

Page 1

Manual
Page 2

TABLE OF CONTENTS
1. Mouse Properties 3
2. Software Properties 3
3. Mouse Specifications 3
3.1 General 3
3.2 Button Properties 4
3.3 DPI Proper ties 4
3.4 Cable and Connectors 4
3.5 Software Properties 4
4. Package Contents 5
5. Skiller SGM1 Overview 5
6. Connecting to the PC 6
7. Weight Tuning System 6
8. Installing the Gaming Software 6
9. Gaming Software 7
9.1 DPI Setting 8
9.2 Lighting Effect 8
9.3 Polling Rate 8
9.4 Mouse Speed 9
9.5 Double-Click Speed 9
9.6 Scroll Speed 9
9.7 Angle Snapping 9
9.8 Game Profiles 9
9.9 Axis Sensitivity 10
9.10 Macro Manager 10
9.11 But ton Assignment 11
9.12 Top View and Side View 11
Page 3
3
Dear Customer,
Thank you for your purchase of this new Sharkoon product. To ensure a long service life and full functionality,
we recommend that you read this manual thoroughly.
SHARKOON Technologies
www.sharkoon.com
1. Mouse Properties
• Gaming mouse with RGB illumination
• Optical PixAr t PMW3336 sensor with 10,800 DPI
• Quickly accessible macro keys
• 4-way scroll wheel
• Weight tuning system
• Onboard memory for game profiles
• Durable Omron switches in left and right mouse buttons
• Gaming software
• 12 programmable buttons
• Textile braided cable
• Gold-plated USB plug
2. Software Properties
• All 12 but tons are freely programmable with functions or macros
• Supports up to six game profiles
• DPI set ting, lighting effect, polling rate, mouse speed (also individually per axis), angle snapping,
double-click and scroll speed
• Macro manager
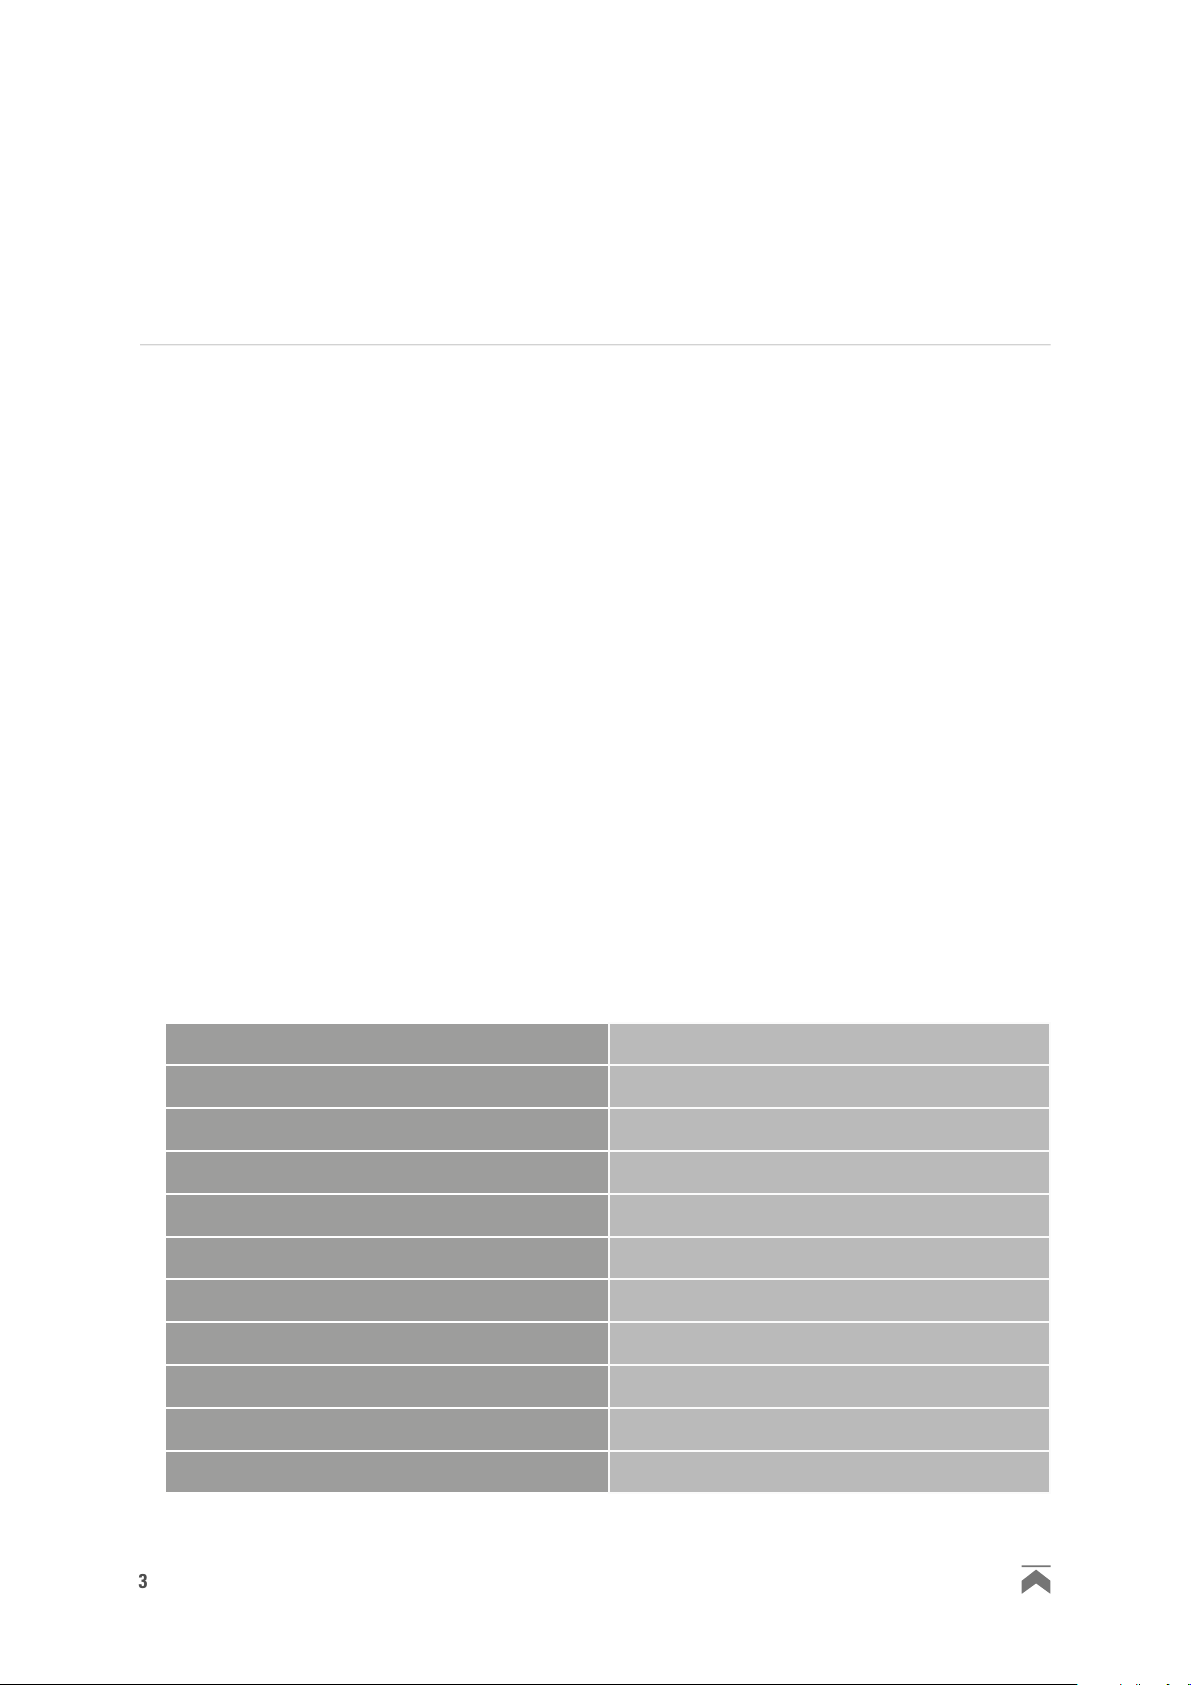
3. Mouse Specifications
3.1. General
Max. DPI/CPI
Sensor
Chip
Illumination
Max. Polling Rate
Lift-Off Distance
Frames Per Second
10,800
Optical
PixArt PMW3336
RGB
1,000 Hz
2 mm
8,000
Inches Per Second
Max. Acceleration
Weight Tuning System
Mouse Feet
SKILLER SGM1
150
30 g
6 x 4 g
5, PTFE
Page 4
4
Weight Without Cable
130 g
Dimensions (L x W x H)
Supported Operating Systems
3.2 Button Properties
Number of Buttons
Programmable Buttons
Durable Omron Switches in Left and Right
Mouse Buttons
4-Way Scroll Wheel
Operating Life Cycles of Buttons
3.3 DPI Properties
DPI Steps*
DPI Switch
DPI Indicator
123 x 82 x 42 mm
Windows 7/8/10
12
12
Min. 10 Million Clicks
10,800; 8,200; 5,200; 3,600; 2,400; 1,600; 800
LED
*DP I levels are i ndividu ally cust omizabl e through t he soft ware
3.4 Cable and Connectors
Connector
Gold-Plated USB Plug
Textile Braided Cable
Cable Length
3.5 Software Properties
Gaming Sof tware
Onboard Memory for Game Profiles
Capacity of Onboard Memory
Number of Profiles
USB
180 cm
16 kB
6
SKILLER SGM1
Page 5

5
4. Package Contents
• Skiller SGM1
• CD with software and manual
• Additional set of mouse feet
• Transport bag
Note:
If you are missing any of the items listed above, please contact our customer service immediately:
support@sharkoon.com (Germany and Europe)
support@sharkoon.com.tw (International)
5. Skiller SGM1 Overview
Left mouse button
Scroll wheel
Right mouse button
DPI switch
Note:
The button functions are factory preset and customized within the gaming sof tware.
Macro keys
DPI indicator
Mouse feet
SKILLER SGM1
Weight tuning system locking mechanism
Weight tuning system tray
6x 4 grams weights
Page 6

6
6. Connecting to the PC
1. Connect the USB plug from the mouse into an available USB port on your PC.
2. The operating system will automatically recognize the Skiller SGM1 mouse and install all needed drivers.
Note:
If your mouse is not recognized, disconnect it and try a different USB port on your PC.
7. Weight Tuning System
The weight tuning system inside the mouse allows seven increment adjustments to the overall weight of the
mouse bet ween 106 g to a maximum 130 g. To adjust the weight tuning system, proceed as follows:
1. Pull back on the locking mechanism of the weight tuning system (8). The tray will unlock and release
slightly on the right side.
2. Remove the tray containing the weights.
3. Remove or add the desired number of weights.
4. Insert and lock the tray into the mouse by pushing it in until it clicks.
8. Installing the Gaming Software
Before installing the included gaming software, ensure no other mouse software is currently installed. If necessary, uninstall existing software from the PC before proceeding with the installation of the gaming software.
1. Insert the CD into your CD/DVD/BD drive.
2. Open the directory of the CD/DVD/BD drive (i.e. D:\).
3. Open the “Gaming Software” folder.
4. Start the “Skiller SGM1 Configuration Setup.exe” application and follow the InstallShield Wizard
instructions.
Alternatively, the latest software version is also available for download on our website www.sharkoon.com.
SKILLER SGM1
Page 7

7
5. Once complete, click “Finish”.
Restart the PC once the installation is complete. The Skiller icon will now appear in the taskbar. The soft ware
is now successfully installed.
9. Gaming Software
Launch the Skiller SGM1 software by double-clicking on the Skiller icon in the taskbar.
DPI Set ting
A
B
Lighting Effect
C
Polling Rate
D
Mouse Speed
Double-Click Speed
E
F
Scroll Speed
Angle Snapping
Game Profiles
Axis Sensitivity
I
Macro Manager
Button Assignment
Top View and Side View
Important: After making changes, you must press “Apply” in order to save all changes.
SKILLER SGM1
Page 8

8
9.1 DPI Setting
A
In this menu, you can set individual DPI values simply by clicking on
the bar. If certain DPI steps are not required, then deactivate it by
clicking the corresponding blue button. The higher the value, the
more sensitive your mouse responds.
The selected DPI level is displayed on the mouse with white LEDs.
The illumination color of the logo and mouse wheel can be set and
adjusted for each DPI step by clicking on the respective square
colored field under the blue bar.
Step 7
Step 6
Step 5
Step 4
Step 3
Step 2
Step 1
9.2 Lighting Effect
B
This menu option controls the LED illumination of the Skiller SGM1.
• Brightness: The illumination brightness adjusts in five in crements from 0 to 100%.
• Pulsating: The adjusted color pulsates. Set the frequency in
five increments from four to eight seconds.
• Color Change: The color of the lighting changes. The frequency
can be set in five increments. Please note, in this mode, DPI
steps are not identified by color.
9.3 Polling Rate
C
The polling rate is the query rate between PC and mouse. The higher
the Hertz (Hz) value, the shor ter the time between the two queries.
The polling rate allows four level settings:
• 125 Hz, 8 ms
• 250 Hz, 4 ms
• 500 Hz, 2 ms
• 1000 Hz, 1 ms
SKILLER SGM1
Page 9

9
9.4 Mouse Speed
D
There are eleven levels to adjust the mouse speed. The higher the
value, with the same mouse movement, the faster the cursor on the
screen moves.
9.5 Double-Click Speed
E
In this menu, you can set how far two mouse clicks are allowed to be
apart while still being recognized as a double-click. The higher the
value, the faster the clicks must follow each other. The double-click
speed can be adjusted in eleven increments.
9.6 Scroll Speed
F
When scrolling, the mouse wheel moves the image to the selected
number of rows or screen page. The standard set ting is three lines.
At a lower value, scrolling with the mouse wheel must be more
frequent to achieve the same distance. With a higher value, less
frequently.
9.7 Angle Snapping
Angle snapping corrects uneven movements by the mouse into straight movements automatically. This is primarily beneficial in games
and graphics programs. When Angle Snapping is activated, for example, it is easier to stay focused on an object without the cursor
drifting by slight mouse movements.
9.8 Game Profiles
Game Profiles is where all gaming software settings are saved. The
use of multiple game profiles allows the possibility of custom configurations for every game or application, and allows you to quickly
switch bet ween them without having to readjust the configuration
after changing the game. To create a game profile, proceed as follows:
1. Click on “Game Profiles” in the lower left corner.
2. Select a profile or click on “New” to create a new profile. To
rename a new profile, double-click in the name field or right click and select “Edit.”
3. Click the “X” on the top-right corner of the configuration field
to close.
4. Perform the desired configurations using the options explained under section 9. Gaming Software.
5. Click on “Apply” on the bottom right to save the data in the profile.
6. The selected profile is immediately activated. To switch profiles, first click on “Game Profiles” and then
the desired profile. The desired profile is now loaded. Click the “X” on the top-right corner of the confi guration field to close.
SKILLER SGM1
Page 10

10
Within Game Profiles, up to six profiles can be created, edited or deleted. Additional commands are available
by right-clicking on the profile:
• Delete: Delete this profile
• Edit: Allows changes to the name
• Copy: Copies the profile, so it can be used as a basis to create a similar profile
• Load: Load a saved configuration from the hard drive
• Save: Save the configuration to the hard drive
9.9 Axis Sensitivity
I
Here, the axis sensitivity of the horizontal and vertical axis can be
individually adjusted up to ten steps. The higher the value, the more
sensitive your mouse.
9.10 Macro Manager
Record, edit and delete macros through the Macro Manager. After clicking “New,” the software assigns the
macro a name automatically within the “Select Macro” field, double-clicking the macro to rename it. Before
recording a macro, you can assign the delay between keystrokes and number of loops settings.
If the box “Record delay between keystrokes” is checked, the input breaks apply also during the recording of
the macro for that specific macro. Details regarding the times in milliseconds will appear within the “Keystroke Sequence.”
Also in the “Options” field, adjust the number of loops. To do this, check the “Number of Loops” box and
input the specific number of loops desired. Up to 255
loops are possible.
Example: A macro containing the key sequence “F 6,
F2, 478” with three loops; the macro’s output will be
the follow: F6 F2 478 F6 F2 478 F6 F2 478.
After clicking “Start Recording” within “Options,”
any subsequent keyboard inputs will recorded. Click
on “Stop Recording” to end the recording.
After recording a macro, make manually adjustments
within the Keystroke Sequence field. Right-click on a
recorded keystroke to delete it.
Also, right-click to insert left, right, middle mouse
clicks and delays. Delays are initially for 50 milliseconds; adjust this value by double-clicking on the
individual delay. However, 50 milliseconds is the lowest value possible.
Up to 12 macros can be stored within the Macro Manager. The maximum number of keystrokes is 62, plus
mouse commands and delays. Please note, pressing and releasing a key represents t wo commands. Assign
each macro to a mouse button through the “But ton Assignment” menu (see 9.11 Button Assignment).
SKILLER SGM1
Page 11

11
9.11 Button Assignment
Assign every single mouse but ton wit h a function through the But ton
Assignment menu. Select from the following choices: Click, Menu,
Scroll, Forward, Back, Double-Click, DPI Set ting, Scroll Wheel Left/
Right, Multimedia Commands, Basic and Additional Commands plus
Assign Keyboard Key (except FN and Windows keys) . In addition, it
is possible to assign macros or deactivate a mouse button.
Note:
The Top View screen allows you to assign the first seven but tons.
With the buttons eight through twelve, switch to Side View (see
9.12 Top View and Side View).
Macros can be programmed to run once, endless
loop or endless loop while the button is pressed (see
9.10 Macro Manager).
Example: A macro is assigned with a “1, 2, 3” sequence.
The following settings and outputs are possible:
• Setting: Macro runs once after pressing the
button.
Output: 123
• Setting: Macro runs endless loop until any but ton is pressed.
Output: 12312 31231231231231
The output stops when the selected macro but ton or any other button is pressed.
• Setting: Macro runs endless loop until button is released.
Output: 12312 312312312312.
The output stops once the pressed macro key is released.
Note:
Please note, with the latter two options the macro does not run to an end but rather stops by button stroke.
9.12 Top View und Side View
By pressing “Side View” the view of the mouse will rotate. This allows the macro buttons to be visible. Likewise, switching the view allows button assignment of the macro buttons (see 9.11 Button Assignment). Press
“Top View” to restore the original view.
SKILLER SGM1
Page 12

12
Legal Disclaimer:
For potential loss of data, especially due to inappropriate handling, SHARKOON assumes no liability. All named products and descriptions are trademarks and/or registered trademarks of the respective manufacturers
and are accepted as protected. As a continuing policy of product improvement at SHARKOON, the design
and specifications are subject to change without prior notice. National product specifications may vary. The
legal rights of the enclosed software belong to the respective owner. Please observe the license terms of
the manufacturer before using the software. All rights reserved especially (also in extracts) for translation,
reprinting, reproduction by copying or other technical means. Infringements will lead to compensation. All
rights reserved especially in case of assignation of patent or utility patent. Means of delivery and technical
modifications reserved.
Disposal of your old product :
Your product is designed and manufactured with high quality materials and components, which can be recycled and reused.
When this crossed-out wheeled bin symbol is attached to a product, it means the product is covered
by the European Directive 2002/96/EC. Please be informed about the local separate collection sys tem for electrical and electronic products. Please act according to your local rules and do not dispo se of your old products with your normal household waste. The correct disposal of your old product
will help prevent potential negative consequences to the environment and human health.
SHARKOON Technologies GmbH
Siemensstraße 38
35440 Linden
Germany
info@sharkoon.com
www.sharkoon.com
SKILLER SGM1
 Loading...