

Page 1
Manual
Page 2

TABLE OF CONTENTS
1. Mouse Properties 3
2. Software Properties 3
3. Mouse Specifications 3
3.1 General 3
3.2 Button Properties 4
3.3 DPI Proper ties 4
3.4 Software Properties 4
3.5 Cable and Connectors 4
4. Package Contents 5
5. SHARK ZONE M52 Overview 5
6. Connecting to the PC 6
7. Installing the Gaming Software 6
8. Gaming Software 7
8.1 Load, Reset, Save 7
8.2. Color Setting 8
8.3. Macro Manager 9
8.4. DPI Setting 10
8.5. But ton Assignment 11
Page 3
3
Dear Customer,
Thank you for your purchase of this new Sharkoon product. To ensure a long service life and full functionality,
we recommend that you read this manual thoroughly.
SHARKOON Technologies
www.sharkoon.com
1. Mouse Properties
• Avago ADNS-9800 laser sensor for outstanding precision
• True DPI sensitivity ranging from 100 to 8,200
• RGB LED on mouse bottom
• White LED SHARK ZONE logo
• Comfortable, soft rubber coating for a perfect grip
• Eight programmable buttons to meet all your user needs
• Omron switches in both primary mouse buttons
• Outstanding gliding performance
• User-friendly gaming software
• Four adjustable DPI steps
• Full complement of command options
• 128 kB onboard memor y
2. Software Properties
• All 8 buttons are freely programmable with functions or macros
• Any number of game profiles can be stored on the PC and a game profile within the onboard memory
• Free configuration of all but tons, light ing effect s, DPI selection, polling rate, mouse sensitivity (also individu ally by axis), mouse acceleration
• Macro manager
• All settings are transferred in real time
3. Mouse Specifications
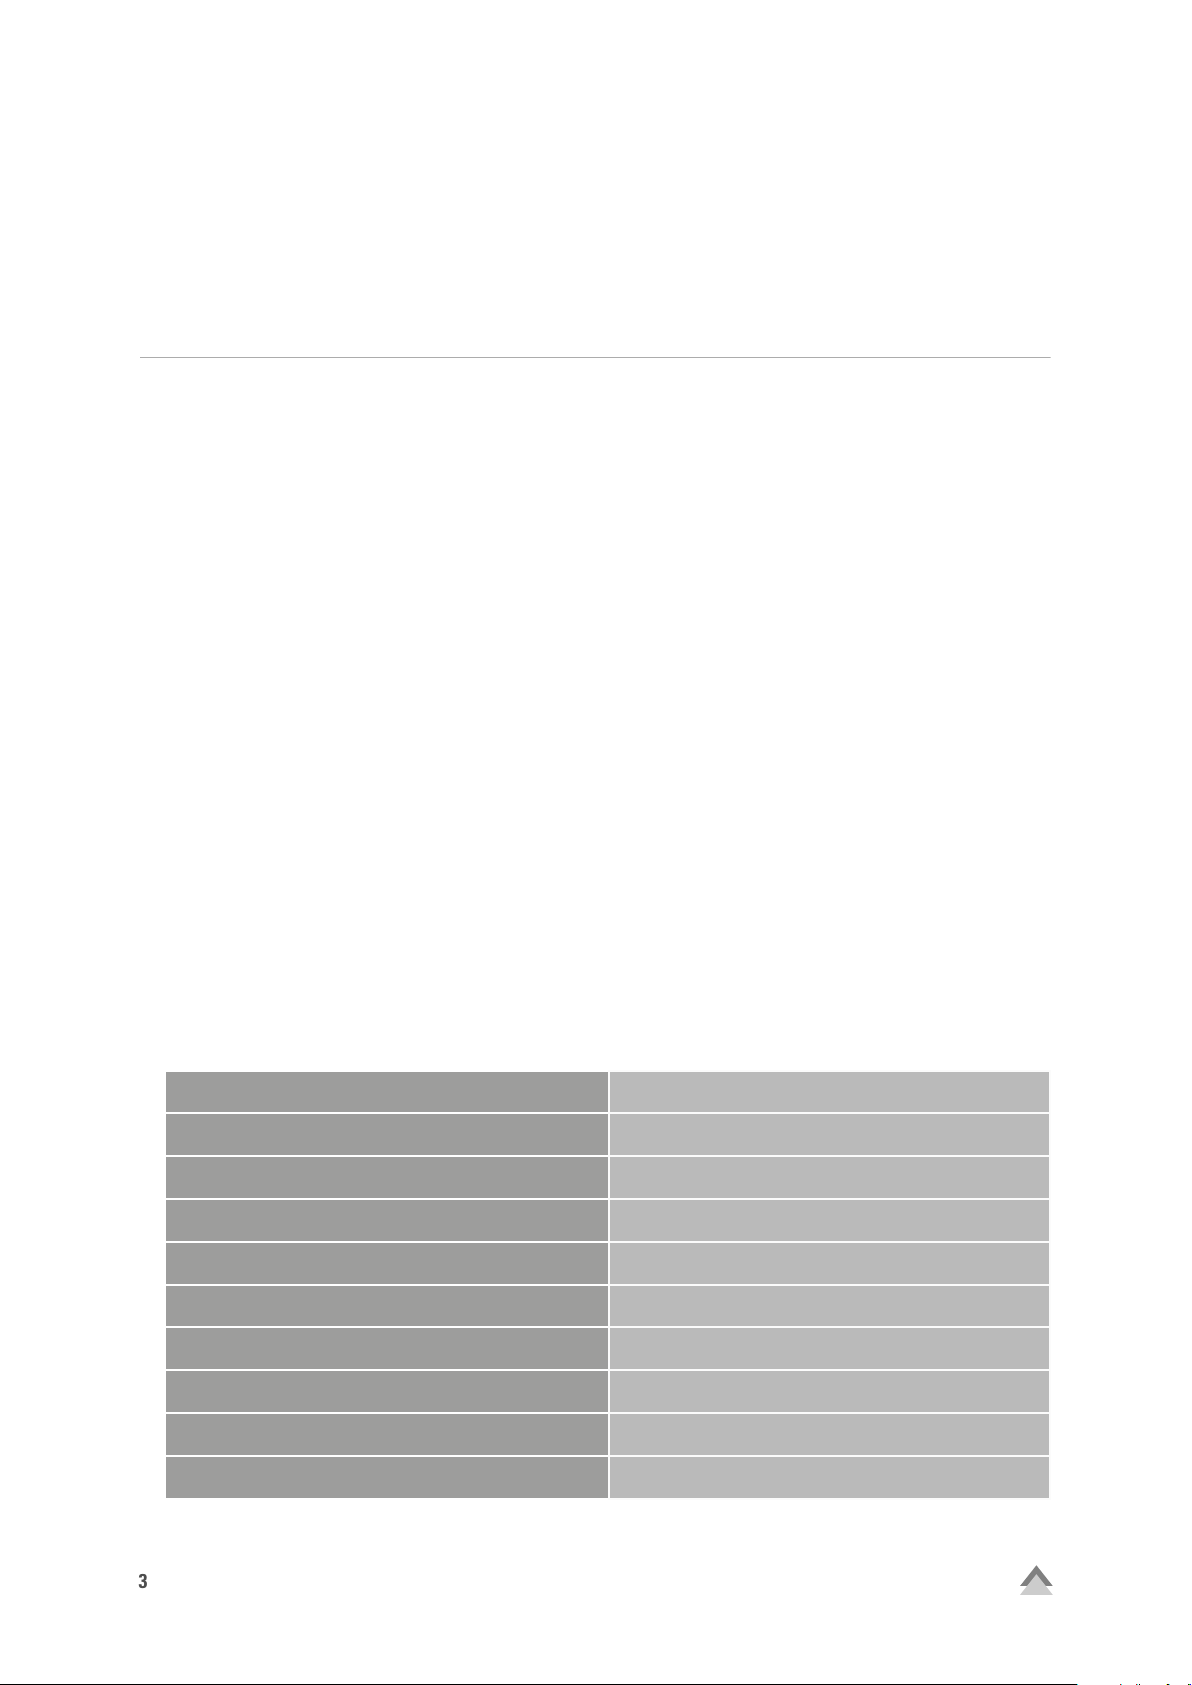
3.1. General
Max. DPI/CPI
Sensor
Chip
Illumination
Max. Polling Rate
Lift-Off Distance
Frames Per Second
8,200
Laser
Avago ADNS-9800
RGB
1,000 Hz
1 - 5 mm
12,000
Inches Per Second
Max. Acceleration
Mouse Feet
SHARK ZONE M52
150
30 g
2, PTFE
Page 4
4
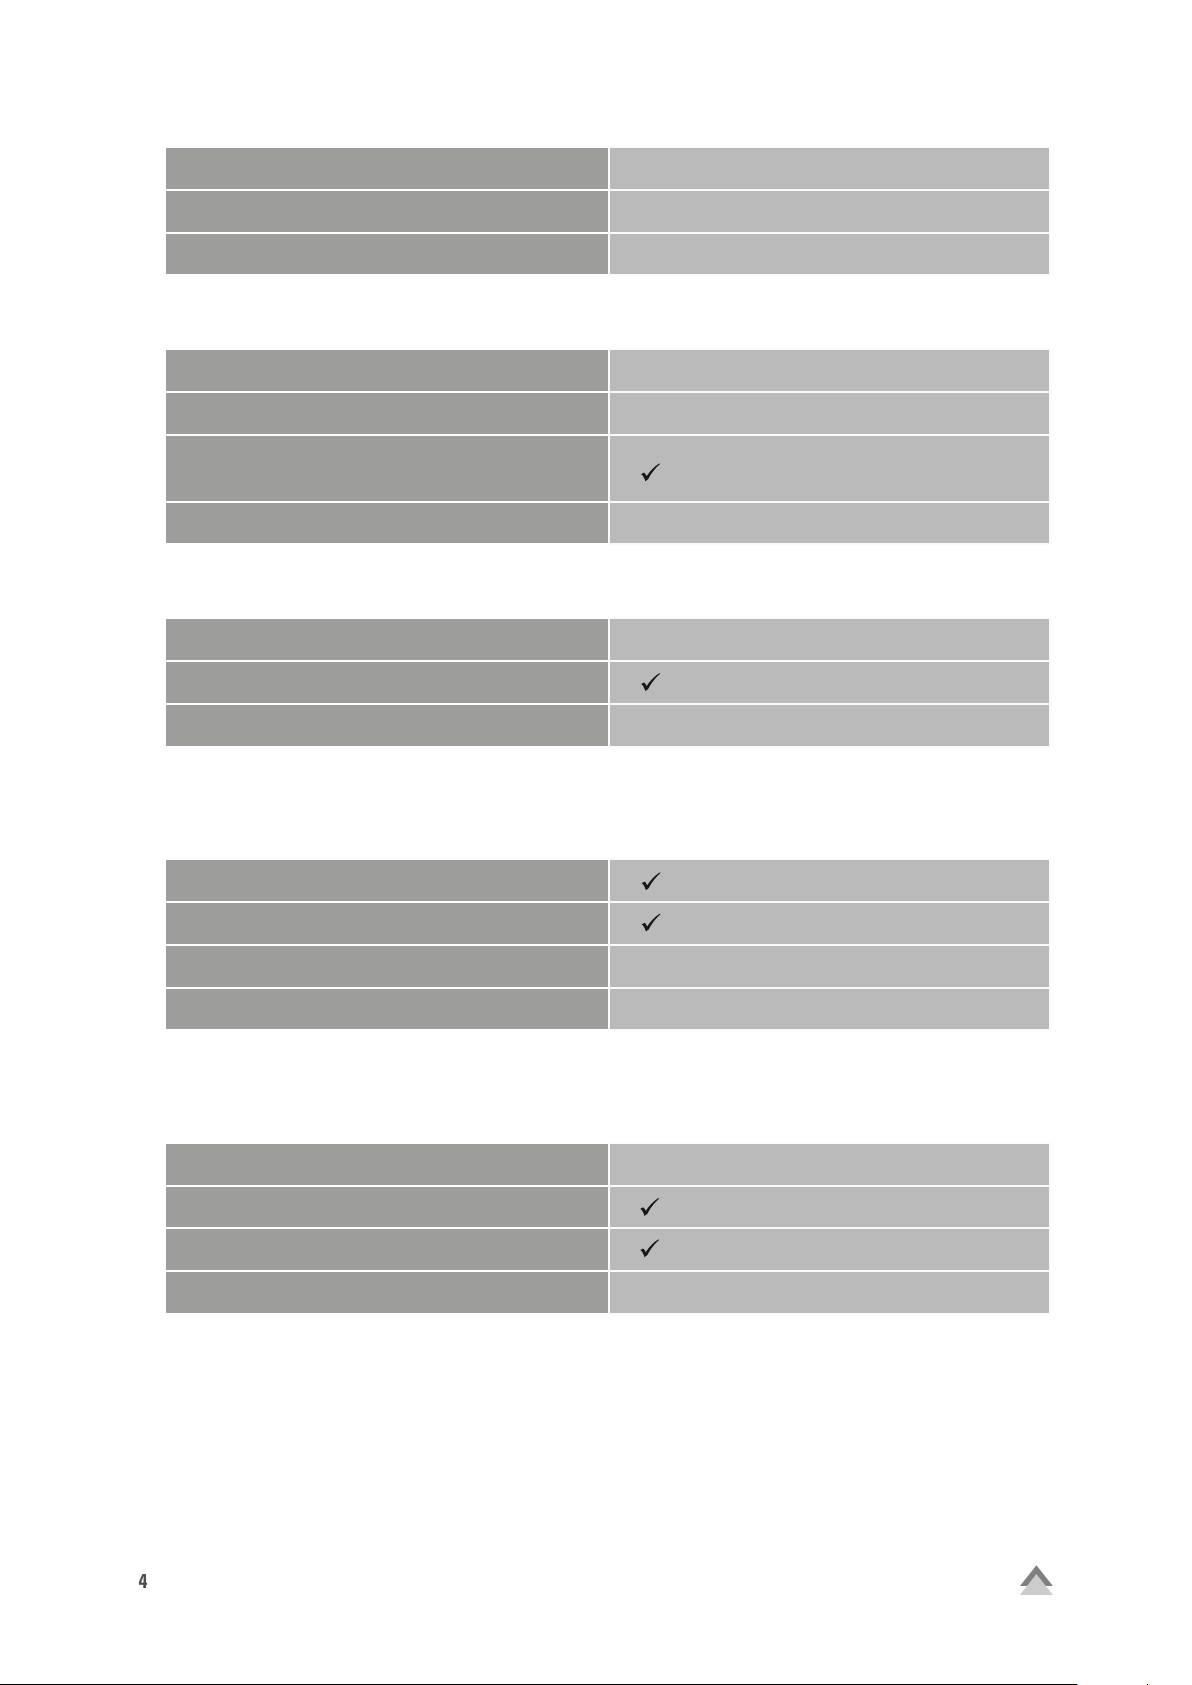
Weight without Cable
97 g
Dimensions (L x W x H)
Supported Operating Systems
3.2 Button Properties
Number of Buttons
Programmable Buttons
Durable Omron Switches in Lef t and Right
Mouse Buttons
Operating Life Cycles of Buttons
3.3 DPI Properties
DPI Steps*
DPI Switch
DPI Indicator
*DP I steps are i ndividu ally cust omizabl e through t he soft ware
124.5 x 66.5 x 38.7 mm
Windows 7/8/10
8
8
Min. 10 Million Clicks
8,200; 3,200; 1,600; 800*
LED
3.4 Software Properties
Gaming Sof tware
Onboard Memory for Game Profiles
Capacity of Onboard Memory
Number of Profiles
**A n unlimi ted number o f game profi les can be sav ed on the PC an d then, if n eeded, can be l oaded int o the onboar d memory o f the mous e
128 kB
Unlimited**
3.5 Cable and Connectors
Connector
USB
Gold-Plated USB Plug
Textile Braided Cable
Cable Length
180 cm
SHARK ZONE M52
Page 5

5
4. Package Contents
• SHARK ZONE M52
• CD with software and manual
• Additional set of mouse feet
• Transport bag
Note:
If you are missing any of the items listed above, please contact our customer service immediately:
support@sharkoon.com (Europe)
support@sharkoon.com.tw (International)
5. SHARK ZONE M52 Overview
Left mouse button
Scroll whell
Right mouse button
DPI switch
Note:
The button functions are factory preset and customized within the gaming software.
DPI indicator
Thumb button 1
Thumb button 2
SHARK ZONE M52
Page 6

6
6. Connecting to the PC
1. Connect the USB plug from the mouse into an available USB port on your PC.
2. The operating system will automatically recognize the SHARK ZONE M52 mouse and install all needed
drivers.
Note:
If your mouse is not recognized, disconnect it and try a different USB port on your PC.
7. Installing the Gaming Software
Before installing the included gaming software, ensure no other mouse software is currently installed. If necessary, uninstall existing software from the PC before proceeding with the installation of the gaming software.
1. Insert the CD into your CD/DVD/BD drive.
2. Open the directory of the CD/DVD/BD drive (i.e. D:\).
3. Open the “Gaming Software” folder.
4. Start the “SHARK ZONE M52 Configuration Setup.exe“ application and follow the Installation Wizard
instructions.
Alternatively, the latest software version is also available for download on our website www.sharkoon.com.
5. Once complete, click "Finish".
Once the installation is complete, the SHARK ZONE M52 symbol will appear on the desktop. The sof tware is
now successfully installed.
SHARK ZONE M52
Page 7

7
8. Gaming Software
Load, Reset, Save
A
B
Color Setting
C
Macro Manager
D
DPI Set ting
Button Assignment
E
Note:
All gaming software settings are transferred in real time to the SHARK ZONE M52.
8.1 Load, Reset, Save
A
The "Load," "Reset" and "Save" buttons allow game profiles to be managed from any other gaming sof tware
menu.
The "Load" button opens a previously saved game profile. Game profiles include all settings changed in the
gaming sof tware as well as saved key settings in up to five different configurations.
"Reset" returns all current settings within the gaming soft ware back to factory default. Stored game profiles
are not af fected.
With the "Save" command, modified settings within a game profile for the M52 can be saved for later use.
An unlimited amount of game profiles can be stored on your PC. To do this, select a folder on your PC to the
location where you want to store the game profile and then give it a name. In addition, the latest game profile
is saved within the onboard memory of the SHARK ZONE M52.
SHARK ZONE M52
Page 8

8
8.2 Color Setting
B
Within the "Color Setting" menu, the illumination on the bottom of the mouse can be switched on/off via the
"Illumination On" or "Illumination Off" button.
Adjust the brightness via the "Lighting Effect" field within three increments from 100%, 50% or 25% .
The illumination can either be permanent or pulsating, depending if the "Pulsating" field is activated or not. The
interval setting in which the illumination pulsates is adjusted by nine steps by means of a slider.
Also in this menu, the lighting color can be changed to one of the 32 different color variations.
SHARK ZONE M52
Page 9

9
8.3 Macro Manager C
Through the Macro Manager, record, modif y and delete up to 15 macros, each with 160 button commands including delays. By clicking the "New" button, a new macro is created with the default name "New Macro" and consecutive numbering in the adjacent drop-down list. Change the name of the currently selected macro by clicking on
the "Rename" button. The "Delete" button will remove it permanently.
If the box "Record Delay Between Keystrokes" is checked, the input breaks apply also during the recording of the
macro for that specific macro. By activating the "Set All Items Delay Time to" field, individual delays of at least 10
ms can be set. If no delay is desired, simple check the "Record No Delay" field.
Also in this field, adjust the number of loops. To do this, check the "Number of Loops" box and input the specific
number of loops desired. Maximum of 255 are possible.
Example: A macro containing the key sequence "F6, F2, 478" with three loops; the macro’s output will be the following: F6 F2 478 F6 F2 478 F6 F2 478.
With the "Move Up" and "Move Down" buttons, a selected and previously recorded key command within the
macros can be moved around from its order in this respective direction. The "Delete" button removes a single
previously recorded key command. Under "More Options" other key sequences within the macro can be added,
copied, cropped or deleted. This function can also be accessed by right-clicking on the desired key command
within the macro.
Click "Start Recording" to record a macro. Each subsequent key command is now recorded. Pressing and releasing
a key is assessed as two commands. Pressing a key is marked with a downward arrow symbol before the entry, an
upward pointing symbol when releasing the key. Click on "Stop Recording" to end the recording.
Note:
If you leave the gaming software during the recording of a macro, the macro will continue to record in the background, resulting in the keyboard not responding to any keystrokes in other programs or windows.
Assign each macro to a mouse button through the "Button Assignment" menu (see 8.5 But ton Assignment).
SHARK ZONE M52
Page 10

10
8.4 DPI Setting
D
Set DPI steps, sensitivit y, mouse acceleration and polling rate in this menu.
Four DPI steps are already preset and are activated by clicking on their respective button or over the DPI switch directly
on the mouse. For each of the four selectable DPI steps, the
SHARK ZONE logo on the top of the mouse illuminates brighter, regardless of the actual height of the DPI value.
Gradually adjust the four DPI steps via the
slider bar step-by-step within the ranges
of 100 to 8,200 DPI and save. To do this,
select a level and adjust the sensitivity to
the desired value using the slider. The gaming software and the DPI switch then accepts the adjusted levels.
Adjust the hor tizonal and ver tical sensitivity of the mouse for each level by activating the "Enable Axis Sensitivity" option. After activating the option, a second slider appears below the sensitivity bar. The upper slider
controls the horizontal sensitivity; the lower slider controls the vertical. The set values are displayed within
the fields for the DPI steps in the following order: The top number represents the horizontal DPI value; the
bottom number represents the vertical DPI value. These do not
differ from each other when the "Enable Axis Sensitivity" option
is not activated.
With the "Enable Acceleration" selection field, the mouse acceleration is activated or deactivated. When the
mouse acceleration is activated, the mouse pointer moves a greater distance on the screen based on how fast
the mouse is moved.
SHARK ZONE M52
Page 11

11
The polling rate can be set here. It specifies the query data
between PC and mouse. The higher the Hertz (Hz) value, the
shorter the time between the t wo queries. The polling rate
allows four level settings:
• 125 Hz, 8 ms
• 250 Hz, 4 ms
• 500 Hz, 2 ms
• 1,000 Hz, 1 ms
E
8.5 Button Assignment
Within the "Button Assignment" menu, all eight SHARK ZONE M52 mouse buttons in up to five different configurations can be programmed and then bundled together and saved in a game profile.
First select a configuration that you want to edit. Afterwards you then have the possibility to assign keys
different functions for the respective configuration. Available options are Click, Menu, Middle Button, Double-Click, Forward, Back, Macro, Advanced Commands, Basic Commands, Additional Commands, Multimedia
Commands as well as deactivate a key. Please note, at least one button must be set with the "Click" function.
In the "Advanced Commands" submenu, a key can be assigned to either increase or decrease the DPI value
with one click. It is here that the four preset DPI steps are used (see 8.4 DPI Setting). In addition, another DPI
selection can be set. With the "Configuration +" or respectively the "Configuration –" functions, the next or
previous of the five possible configurations can be cycled through. Here the mouse can also be assigned any
keyboard key (except Fn, Print and Windows key) as well as the "X-Shot" function. With help from the " X-Shot"
function, a single click from the assigned key emulates up to 255 left clicks. Also, a delay between each X-Shot
can be set of up to 255 ms.
Under "Basic Commands" and "Additional Commands," keys can be assigned Windows functions, such as "Cut"
or "Copy," for example. Under "Multimedia Commands," functions for controlling multimedia programs are
found.
SHARK ZONE M52
Page 12

12
Legal Disclaimer:
For potential loss of data, especially due to inappropriate handling, SHARKOON assumes no liability. All named
products and descriptions are trademarks and/or registered trademarks of the respective manufacturers and
are accepted as protected. As a continuing policy of product improvement at SHARKOON, the design and specifications are subject to change without prior notice. National product specifications may vary. The legal rights
of the enclosed sof tware belong to the respective owner. Please observe the license terms of the manufacturer
before using the software. All rights reserved especially (also in extracts) for translation, reprinting, reproduction by copying or other technical means. Infringements will lead to compensation. All rights reserved especially
in case of assignation of patent or utility patent. Means of delivery and technical modifications reserved.
Disposal of your old product:
Your product is designed and manufactured with high quality materials and components, which can be recycled and reused.
When this crossed-out wheeled bin symbol is attached to a product, it means the product is covered by the European Directive 2012/19/EU.
Please be informed about the local separate collection system for electrical and electronic pro-
ducts. Please act according to your local rules and do not dispose of your old products with your
normal household waste. The correct disposal of your old product will help prevent potential negative consequences to the environment and human health.
SHARKOON Technologies GmbH
Siemensstraße 38
35440 Linden
Germany
© SHARKOON Technologies 2016
info@sharkoon.com
www.sharkoon.com
SHARK ZONE M52
 Loading...