

Page 1
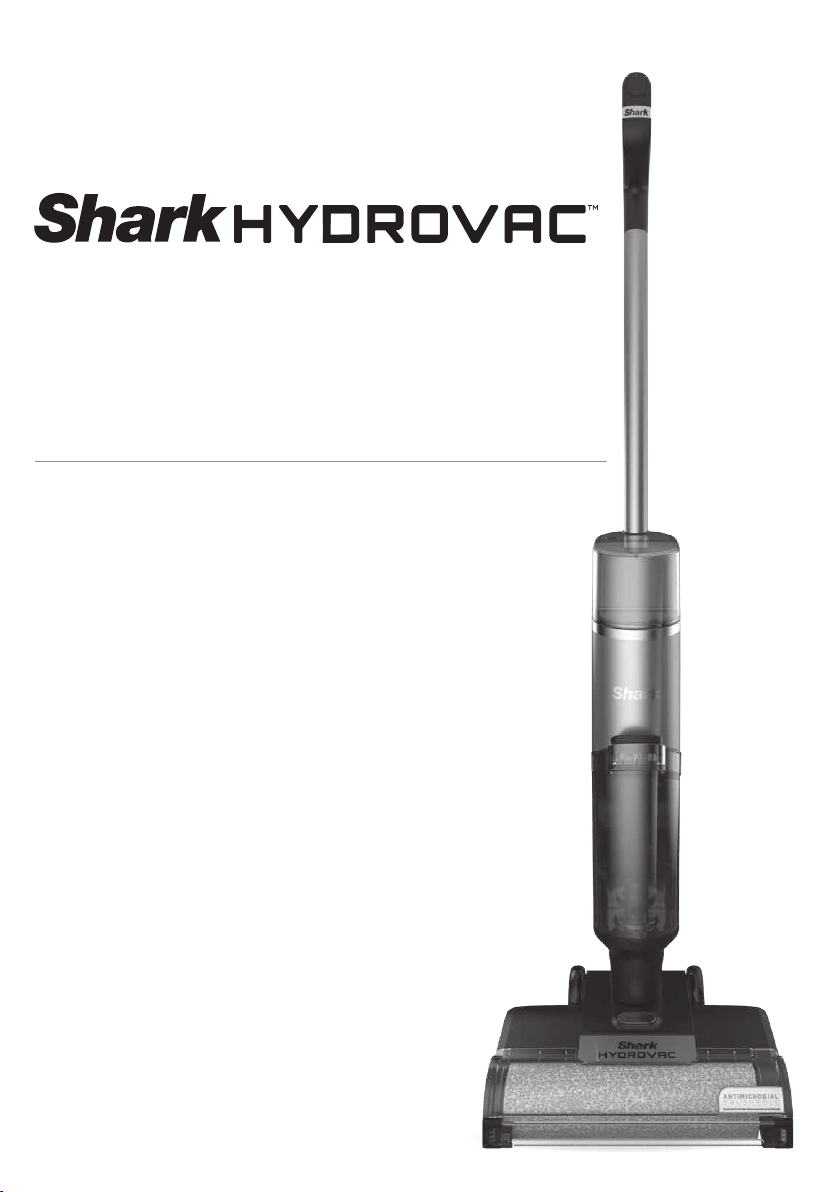
Cordless 3-in-1 Cleaner
WD210ANZ
OWNER’S GUIDE
Page 2
IMPORTANT SAFETY INSTRUCTIONS
FOR HOUSEHOLD USE ONLY READ ALL INSTRUCTIONS BEFORE USING THIS 3-IN-1 CLEANER
WARNING
To reduce the risk of fire, electric shock, injury, or property damage:
1. To reduce the risk of shock and
unintended operation, turn o power
before servicing.
2. This 3-in-1 Cleaner consists of a
motorised nozzle, main body, pole, and
handle. These components contain
electrical connections, electrical wiring,
and moving parts that potentially present
risk to the user.
3. Before each use, carefully inspect
all parts for any damage. If a part is
damaged, discontinue use.
4. Use only identical replacement parts.
5. Use only as described in this manual.
DO NOT use the 3-in-1 Cleaner for any
purpose other than those described in
this manual.
6. DO NOT immerse or spray water on the
body of the 3-in-1 Cleaner. To clean the
surface, wipe with a dry cloth.
7. Keep the 3-in-1 Cleaner and the dock’s
cord out of reach of children. Do not
allow the appliance to be used by
children. Do not allow to be used as a toy.
Close supervision is necessary when used
near children.
8. DO NOT handle plug or 3-in-1 Cleaner
with wet hands.
9. DO NOT use without the dirty water tank,
Clean Solution Tank, filter, brushroll, and
brushroll cover in place.
10. Only use Shark® branded filters and
accessories.
11. DO NOT put any objects into nozzle
openings. DO NOT use with any opening
blocked; keep free of dust, lint, hair, and
anything that may reduce airflow.
12. DO NOT use if nozzle airflow is restricted.
If the air paths or the motorised floor
nozzle become blocked, turn the 3-in-1
Cleaner o. Remove all obstructions
before you turn on the unit again.
13. Keep nozzle and all 3-in-1 Cleaner
openings away from hair, face, fingers,
uncovered feet, or loose clothing.
14. DO NOT use if 3-in-1 Cleaner is not
working as it should, or has been
dropped, damaged, left outdoors, or
dropped into water.
15. Use extra care when cleaning on stairs.
16. DO NOT leave the 3-in-1 Cleaner
unattended while powered on.
17. When using on carpet or flooring, always
keep the 3-in-1 Cleaner moving over
the carpet surface or flooring to avoid
damaging the carpet fibers or flooring.
18. DO NOT place 3-in-1 Cleaner on unstable
surfaces such as chairs or tables.
19. DO NOT use to pick up:
a) Large objects
b) Hard or sharp objects (nails, screws,
or c oins)
c) Large quantities of dust (e.g., drywall
dust).
d) Smoking or burning objects (hot
coals, cigarette butts, or matches)
e) Flammable or combustible materials
(lighter fluid, petroleum, or kerosene)
f) Toxic materials (chlorine bleach,
ammonia, or drain cleaner)
20. DO NOT use in the following areas:
a) Poorly lit areas
b) Outdoor areas
c) Spaces that are enclosed and may
contain explosive or toxic fumes
or vapors (lighter fluid, petroleum,
kerosene, paint, paint thinners, or
flammable dust)
21. Turn o the 3-in-1 Cleaner before any
adjustment, cleaning, maintenance or
troubleshooting.
22. During cleaning or routine maintenance,
DO NOT cut anything other than hair,
fibers, or string wrapped around the
brushroll
23. Allow all filters to air dry completely
before replacing in the 3-in-1 Cleaner
to prevent liquid from being drawn into
electric parts.
24. DO NOT modify or attempt to repair the
3-in-1 Cleaner or the battery yourself.
25. Use only Shark brand cleaning fluids
intended for use with this appliance to
prevent internal component damage.
BAT T E RY PACK
26. The battery is the power source for the
3-in-1 Cleaner. Carefully read and follow
all charging instructions.
27. To prevent unintentional starting, ensure
the 3-in-1 Cleaner is powered o before
picking up or carrying the 3-in-1 Cleaner.
DO NOT carry the appliance with your
finger on the power switch.
28. Use only Shark charger XDOCKWD200.
Use of an incorrect charger may result in
no charging, and/or unsafe conditions.
29. The battery pack is non-serviceable. Call
consumer services with any questions and
concerns.
30. Under abusive conditions, liquid may
be ejected from the battery. Avoid
contact with this liquid, as it may cause
irritation or burns. If contact occurs, flush
with water. If liquid contacts eyes, seek
medical help.
31. Battery should not be stored at
temperatures below 3° C or above 40° C
to maintain long term battery life.
32. DO NOT charge battery at temperatures
below 5° C or above 40° C.
33. Store the appliance indoors. DO NOT
use or store it below 3° C. Ensure the
appliance is at room temperature before
operating.
34. DO NOT expose the battery to fire or
temperatures above 130° C as it may
cause explosion.
SAVE THESE INSTRUCTIONS
AU 02 8801 7666 | NZ 0800 112 660sharkclean.com.au | sharkclean.co.nz
Page 3
ASSEMBLY
LI -ION BAT TERY
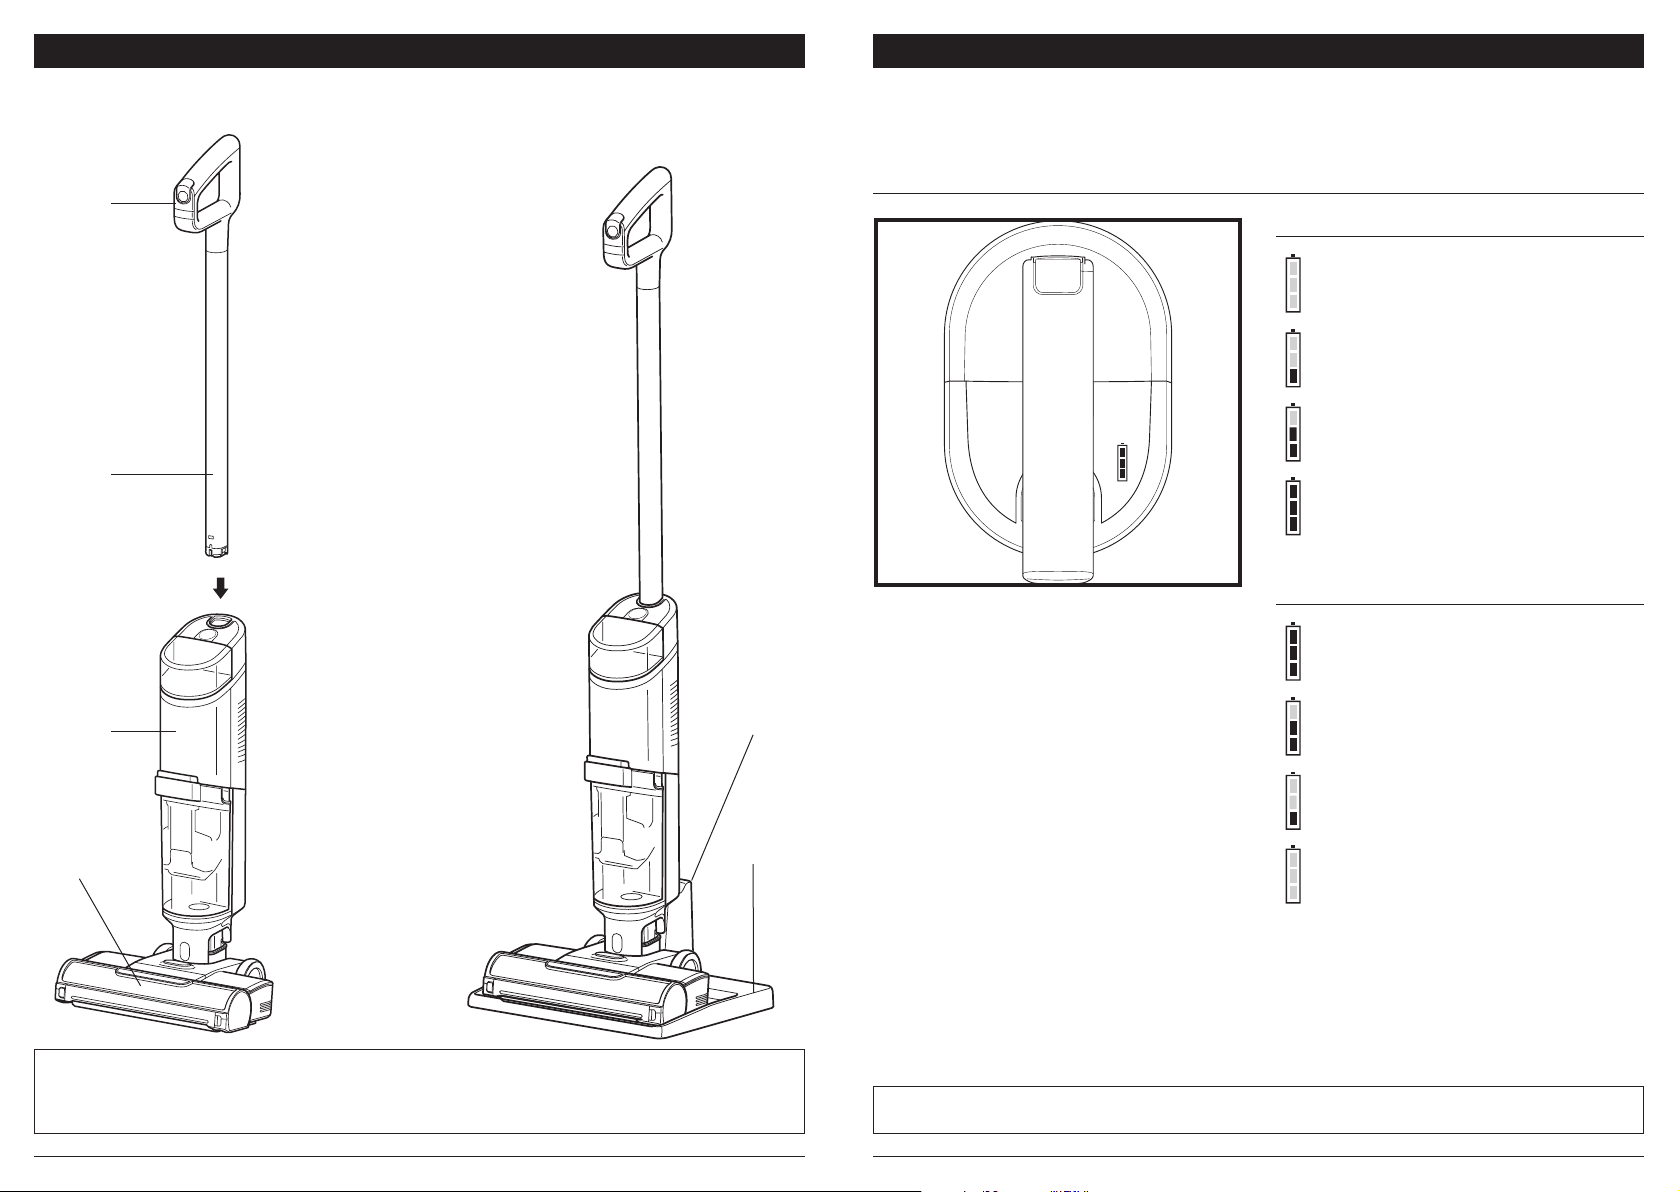
1. Align the Pole with the opening in the
Main Body and insert firmly until it clicks
into place.
Handle
Pole
(Click)
2. Place the Dock on the floor near a wall
outlet and plug in the cord. Wind the
remaining cord around the Cord Wrap
on the back of the dock.
Prior to first use, charge the battery completely. A full charge takes approximately 4 hours.
LED BATTERY POWER AND CHARGING INDICATOR
Charging
Low Charge
Mid Charge
Nearly Full
Full Charge
Note: Full Charge takes approximately 4 hours.
In Use
Full Charge
Main Body
Nozzle
NOTE: When assembling your HydroVac, there may be a little water in or around the water tanks. This is because we test all
our HydroVacs before you buy them to ensure the highest quality.
NOTE: To remove the handle, press the release button located on the back of the unit with a thin tool while pulling up on the
handle.
Cord Wrap
Dock
Mid Charge
Nearly Empty (Pulsing)
No Charge
NOTE: The Shark® battery, like all lithium-ion batteries, will naturally decrease in capacity over time from the 100% capacity of
a new battery.
AU 02 8801 7666 | NZ 0800 112 660sharkclean.com.au | sharkclean.co.nz
Page 4
USING YOUR 3-IN-1 CLEANER
USING YOUR 3-IN-1 CLEANER
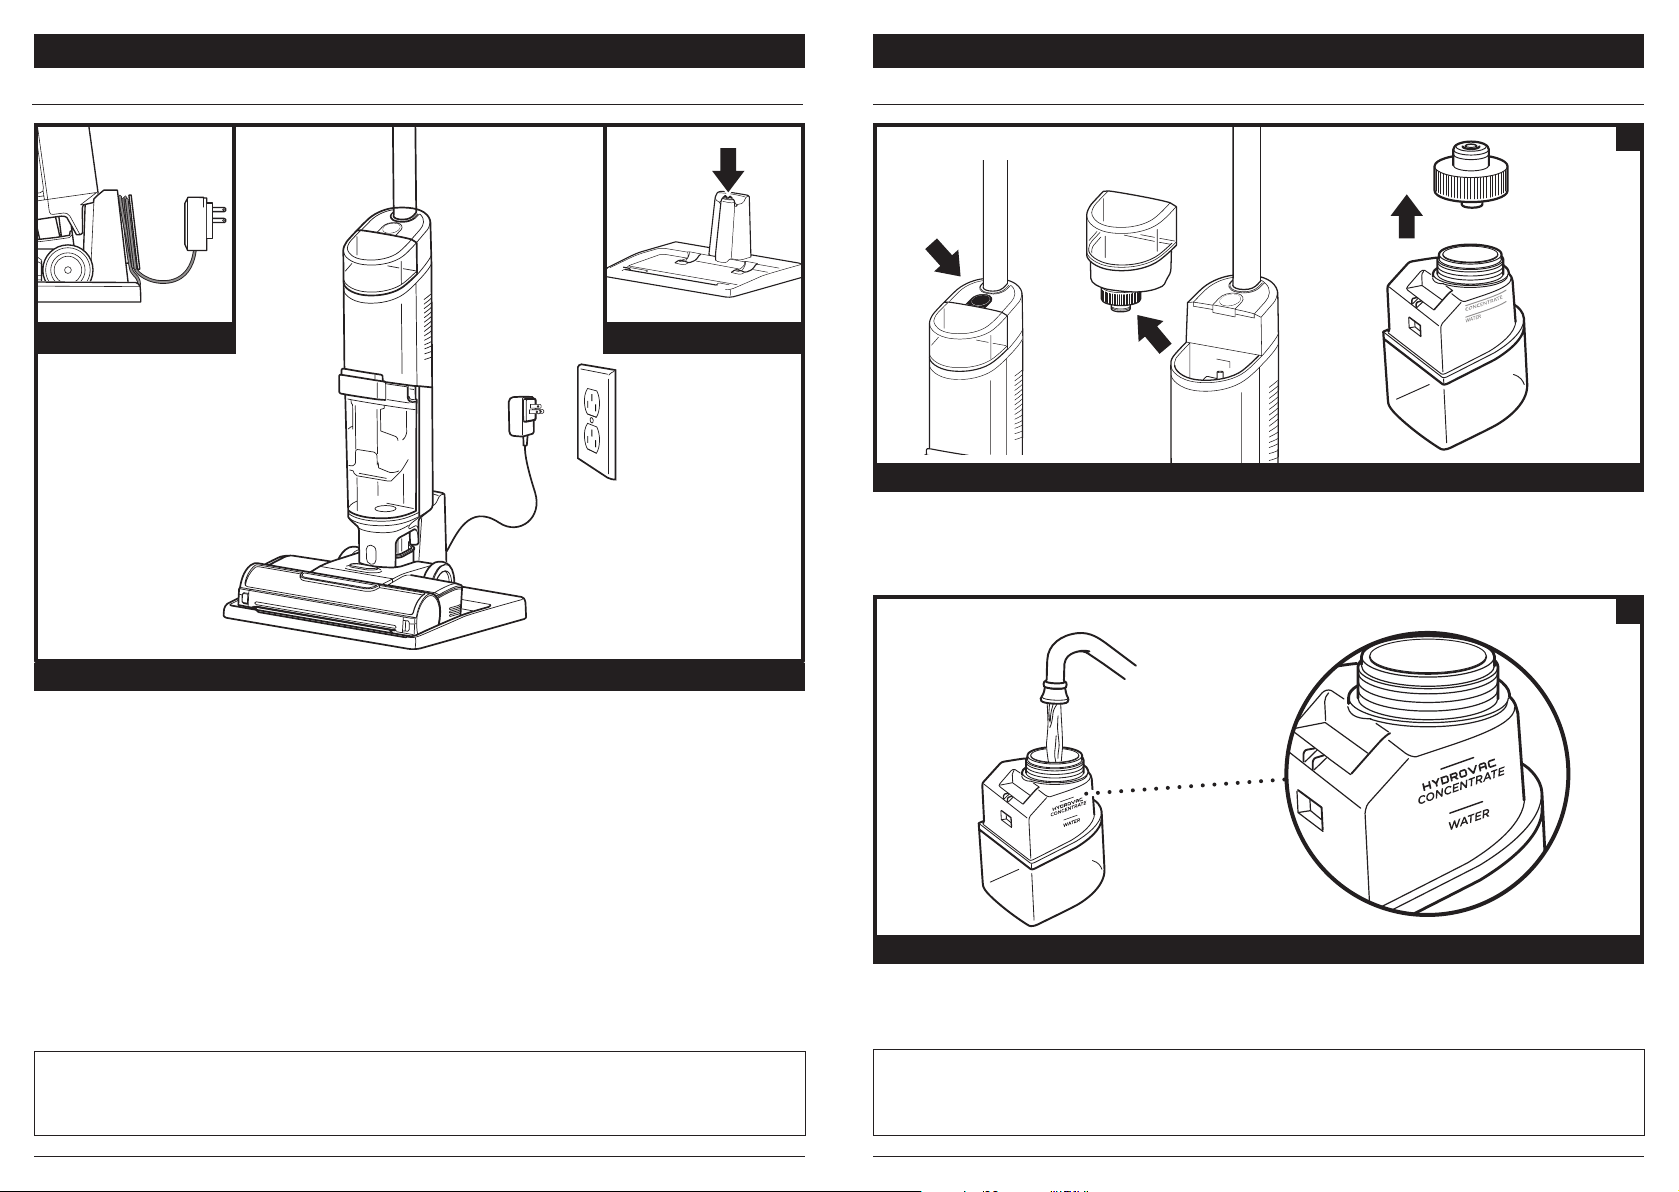
CHARGING ON THE DOCK
CORD WRAP CONTACTS
FILLING THE CLEAN SOLUTION TANK
1
REMOVE THE CLEAN SOLUTION TANK
Press the release button and lift o the Clean Solution Tank.
2
DOCK CHARGING
Charge the unit by placing it on the dock. Make sure the contacts on the body are aligned with the contacts
on the charging dock.
The Battery Icon on the main body will illuminate when charging begins.
When charging is complete and you need to use the unit again, lif t it o the dock.
NOTE: When docked properly, the charging lights on the Main Body will blink, indicating that charging has begun. When
charging is complete, all three indicator lights will turn o.
NOTE: The main unit comes with a partial charge. For maximum runtime, charge fully before first use (approximately 4
hours). Leaving the unit charging will not damage battery life.
FILL THE CLEAN SOLUTION TANK
Unscrew the cap and add water to the tank , up to the WATER line. Next, add Shark HydroVac™ Multi-Surface
Concentrate, filling to the HYDROVAC CONCENTRATE line. Replace the cap and reinsert the tank until it clicks
into place. The top of the tank should be flush with the top of the body.
NOTE: Only use Shark HydroVac Multi-Surface Concentrate and water with this product.
NOTE: Be sure to not overfill the Clean Solution Tank with more HydroVac Multi Surface Concentrate than instructed, as this
may clause streaking.
NOTE: Without sucient water supply in the clean solution tank, HydroVac will not run.
AU 02 8801 7666 | NZ 0800 112 660sharkclean.com.au | sharkclean.co.nz
Page 5
USING YOUR 3-IN-1 CLEANER
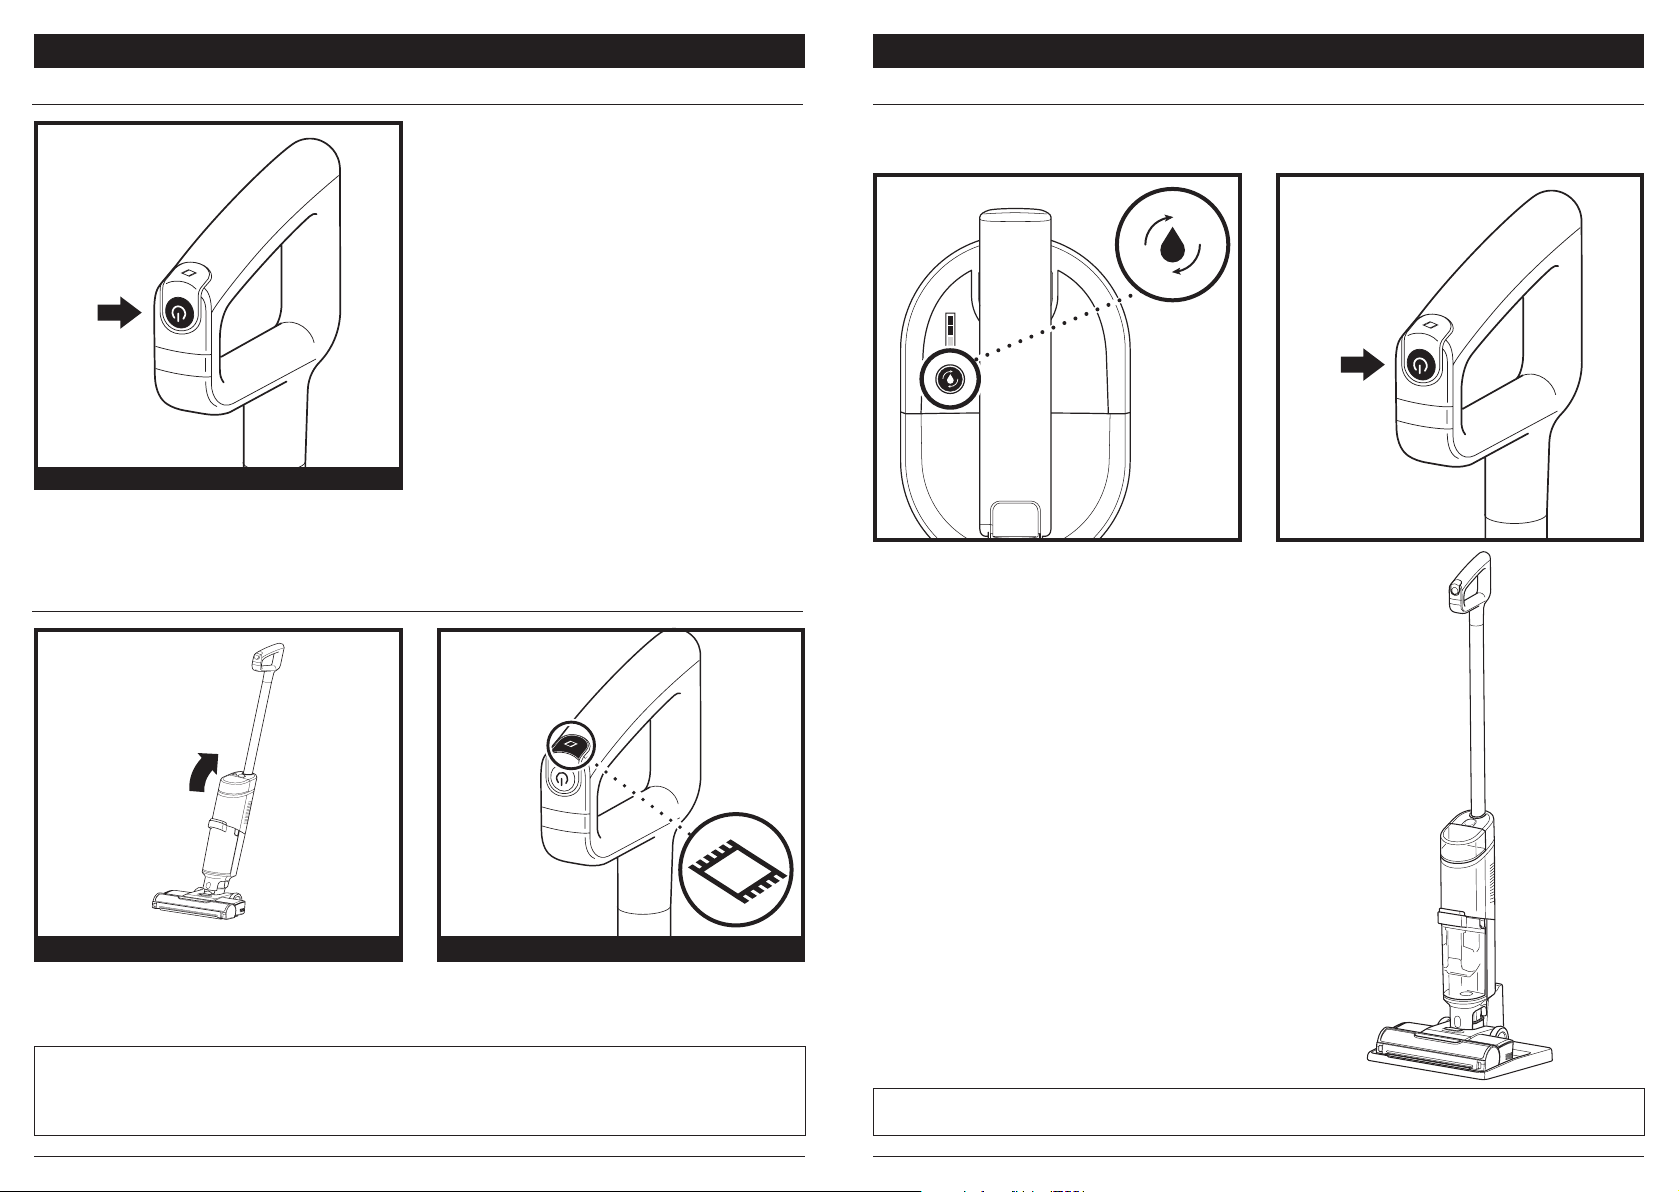
CONTROLS SELF-CLEAN CYCLE
POWER
Press and release the Power button on the handle
to turn on power. To turn o power, press the
button again .
CLEANING MODES
MAINTAINING YOUR 3-IN-1 CLEANER
The self-clean cycle automatically cleans the system and the brushroll.
Recommended after every use
1. Place the unit on the charging dock.
2. Empty the Dirty Water Tank and make sure the
clean solution tank is at least half full.
3. Press the Power Button to start the self-clean
cycle. The icon will pulse for the full 2-minute
duration of the cycle.
4. DO NOT remove the unit from the dock during
the self-clean cycle. The icon will turn o when the
cycle is complete.
5. Empty the dirty water tank.
See LED Glossary for more information on indicator
lights during self-clean cycle.
HARD FLOOR MODE
Use Hard Floor mode for powerful cleaning on bare
floors. To activate Hard Floor mode, turn on the unit
and tilt the handle back.
NOTE: To prevent leakage, DO NOT place the main body on the floor. The nozzle should always be kept flat on the floor.
NOTE: If you encounter a dicult stain, use Area Rug Mode for improved stain cleaning.
NOTE: If you encounter a stubborn odour on your floor or area rug, continue to clean in Area Rug mode until the odour is gone.
NOTE: If your floors are cloudy, streaky, or spotty after cleaning, it may be due to accumulated soap or grease residue. The
floor may require several cleanings with the Hydrovac.
To clean area rugs, press the Area Rug icon on top of
the handle. The Area Rug light on the main body will
illuminate. To turn o Area Rug mode (and to switch
back to Hard Floor Mode), press the button again.
AREA RUG MODE
NOTE: Make sure the clean solution tank is at least half full and that the dirty water tank is empty before running the self-
clean cycle.
AU 02 8801 7666 | NZ 0800 112 660sharkclean.com.au | sharkclean.co.nz
Page 6
MAINTAINING YOUR 3-IN-1 CLEANER MAINTAINING YOUR 3-IN-1 CLEANER
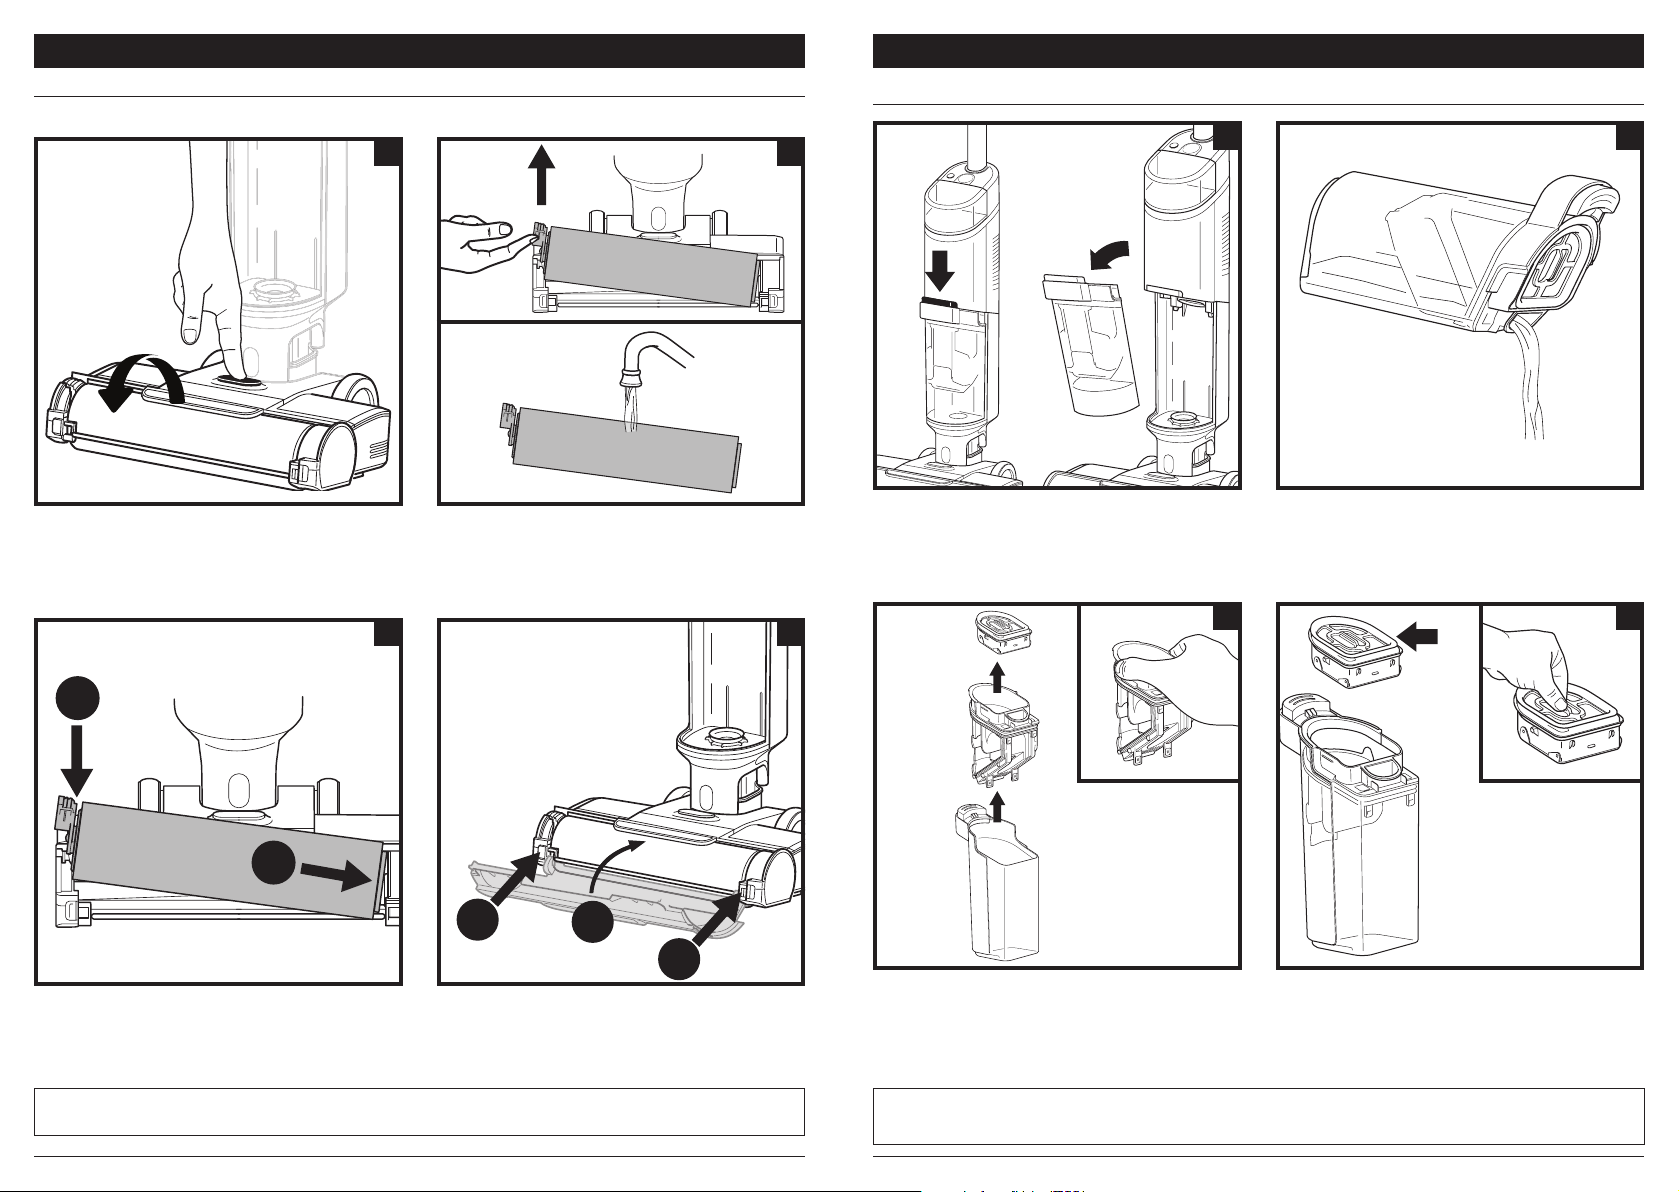
MANUALLY CLEANING THE BRUSHROLL
You can clean the brushroll by hand as an alternative to the self-clean cycle, and to remove debris or hair
wrapped around the brushroll.
1
CLEANING THE DIRTY WATER TANK
1 2
2
1. To access the brushroll, press the button on the top
of the nozzle and lift o the brushroll cover.
2
1
3. Reinsert the brushroll by lining up the grooves on the
end of the brushroll with the helix on the inner right side
of the nozzle, then press down on the left side of the
brushroll. When properly installed, the brushroll tab will
be flush with the left side of the nozzle
on the lef t side of the nozzle. Wipe away any debris
stuck on the back wall.
Wash thoroughly with warm water. Allow the
brushroll to air-dr y completely in a well-ventilated
area for at least 24 hours.
3
1
2
1
4. To reinstall the brushroll cover, inser t the tabs on the
cover into the slots on the nozzle. Press down on the
cover until it clicks into place.
1. To remove the dirty water tank, press the release
button and pull out the tank.2. Remove the brushroll by pulling up on the pull tab
4
3. To dispose of solid debris, lift out the Solids
Separator. Grasp the recessed areas on the sides of
the separator and lift it out. Empty the solid debris
into the rubbish bin. If any liquid waste remains in
the tank, pour it down a drain. To clean, rinse the
separator and the tank with water.
2. To dispose of liquid waste only, pour it out though
the Easy Pour spout on the back of the dirty water
tank.
3 4
Pull
from he re
4. Clean the filter housing and the foam filter after
every use. Pull out the foam filter and hand-wash
with warm water and soap.
Allow the foam filter to air-dry completely in a wellventilated area for 24 hours before reinstalling back
into the unit.
NOTE: Do not place brushroll in washing machine or dishwasher. Replace the brushroll after 6 months.
NOTE: Replace the filter every 6 Months.
NOTE: Do not place dirty water tank in washing machine or dishwasher.
AU 02 8801 7666 | NZ 0800 112 660sharkclean.com.au | sharkclean.co.nz
Page 7
MAINTAINING YOUR 3-IN-1 CLEANER MAINTAINING YOUR 3-IN-1 CLEANER
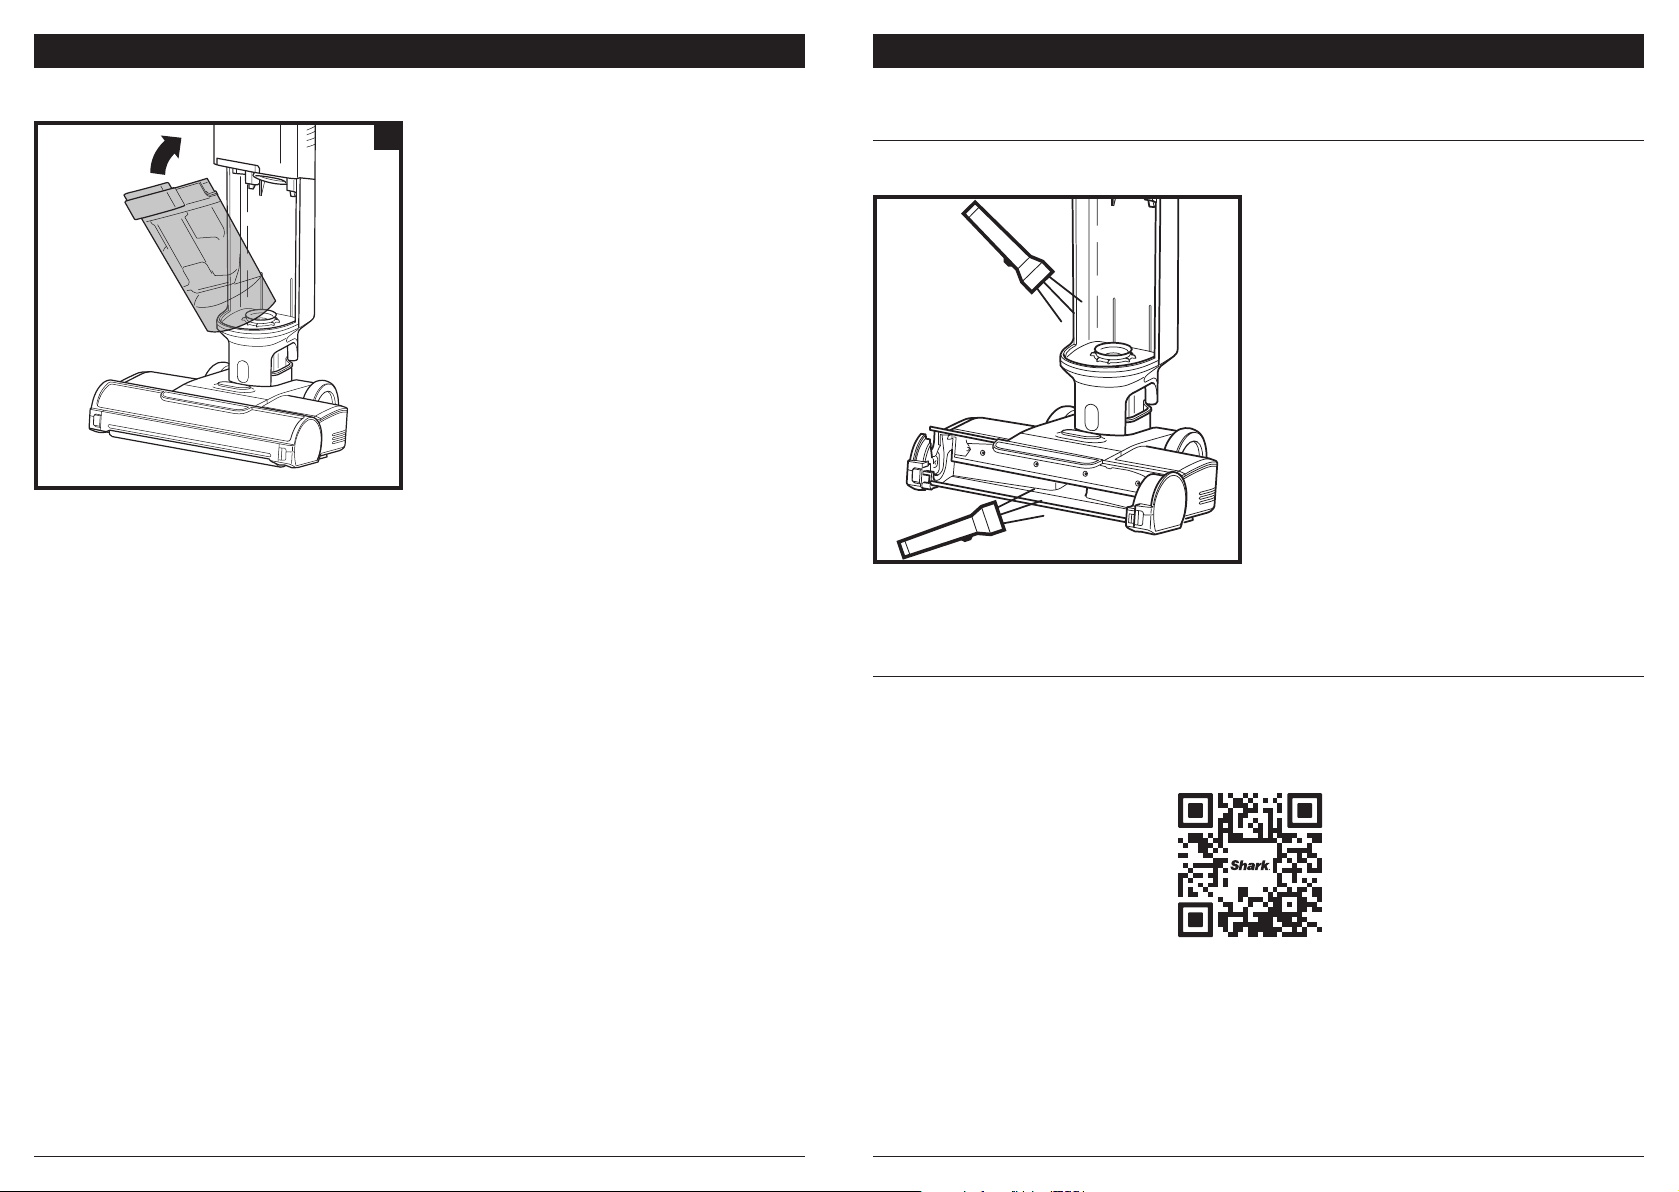
5. After cleaning the dirty water tank and the solids
separator, allow them to air-dry in a well-ventilated
area for at least 24 hours. To reinstall the tank, insert
the bottom into the opening in the main body, then
tilt the tank back until it clicks into place.
5
If you run over a hard or sharp object or notice a noise change while using your unit, check for blockages or
objects caught in the brushroll, nozzle chamber, or inlet hose.
CHECKING FOR BLOCKAGES
1. Turn o the power.
2. Remove the brushroll cover, brushroll, and dirty
water tank.
3. Check the openings and remove all debris.
4. When finished, reinstall the brushroll and the cover.
ORDERING REFILLS AND PARTS
Replace the filter and brushroll every 6 months.
Only use Shark HydroVac Concentrates, or water with the Shark HydroVac.
To order brushrolls, filters, Shark HydroVac Multi-Surface Concentrate, please visit AU sharkclean.com. au |
NZ sharkclean.co.nz or scan the QR code below.
AU 02 8801 7666 | NZ 0800 112 660sharkclean.com.au | sharkclean.co.nz
Page 8
LED GLOSSARY LED GLOSSARY
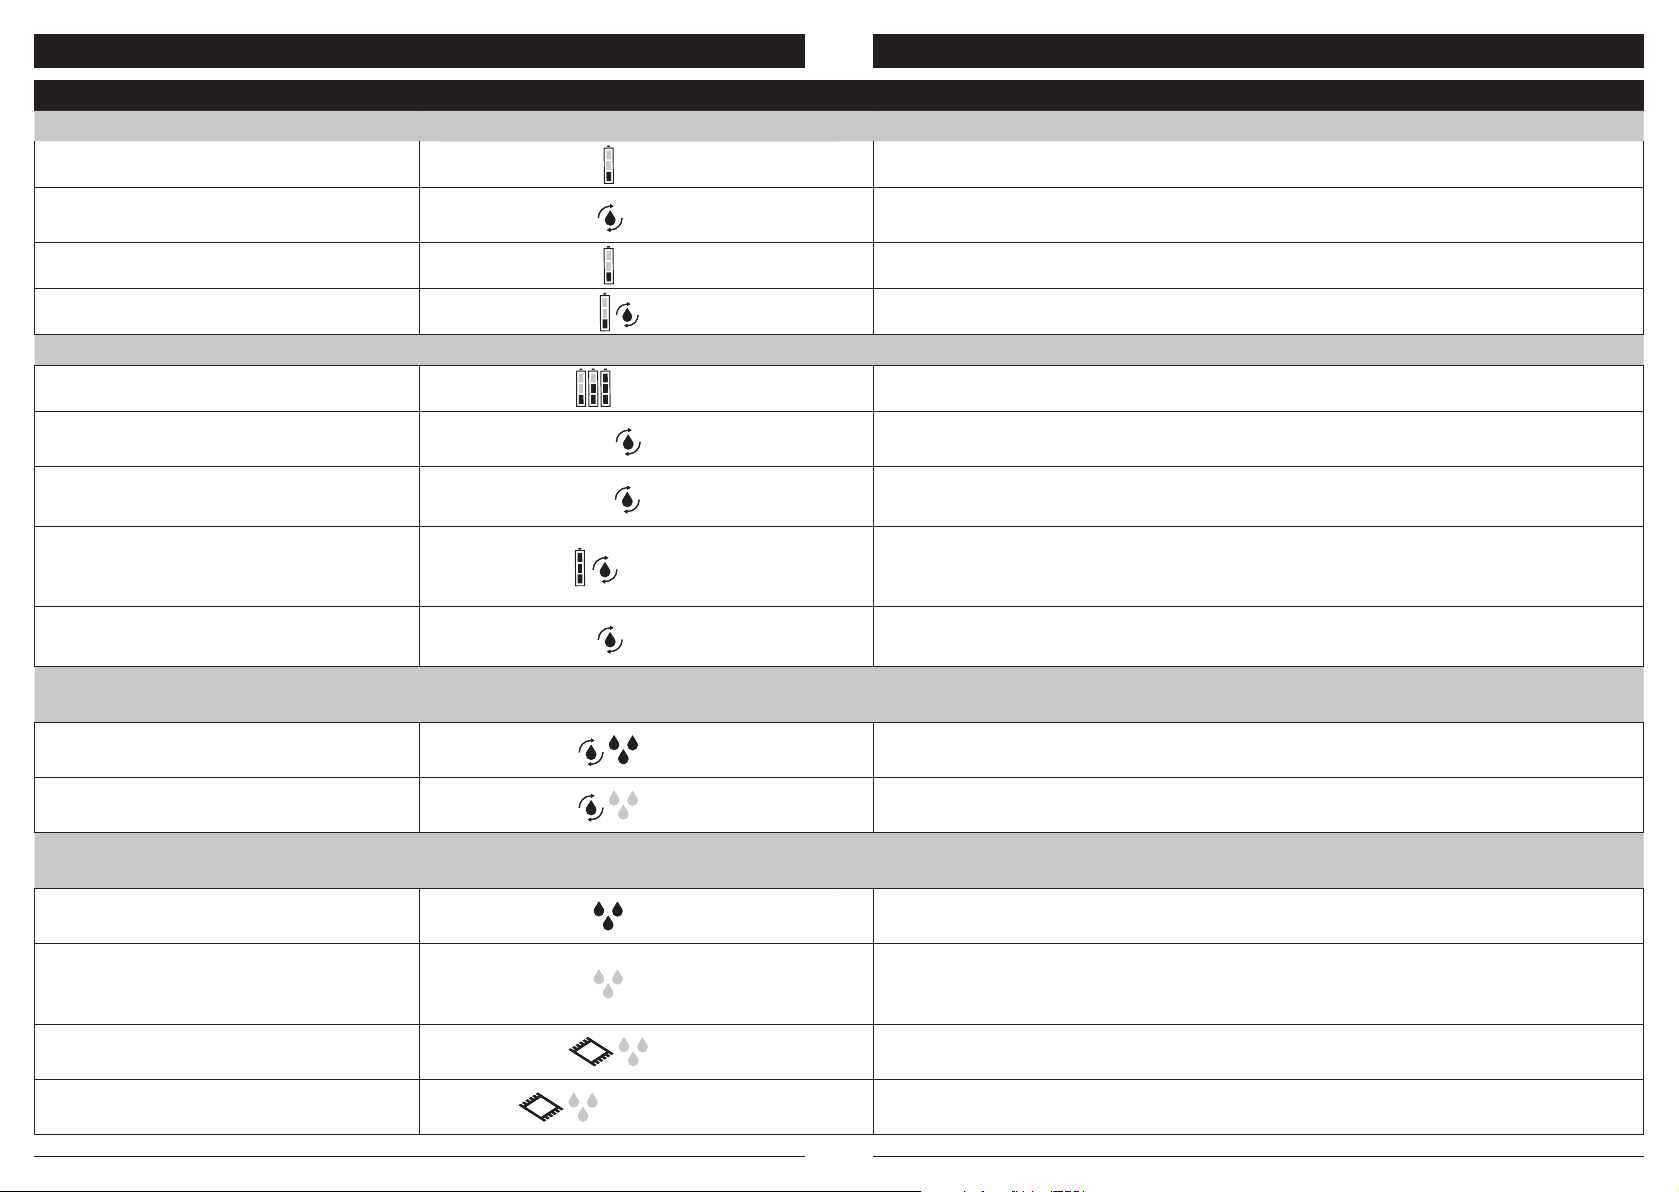
Brushroll cover has been removed. Attach brushroll cover. Press the power button to
DETAILS
Battery low. Note - you will not be able to run a Self-clean cycle.
Place unit on dock while Self-clean icon is pulsing. Press Power button to run Self-
clean cycle.
Battery is close to running out.
Insucient battery life needed to run Self-Clean Cycle after use.
Unit is charging
There is sucient battery life to run a Self-clean cycle
Press Power button to run a Self-clean cycle
There is not sucient battery life to run Self-clean cycle
Wait until Self-clean turns on to run a Self-clean cycle
Unit is charging. There is not sucient battery life to run a Self-clean cycle
Wait until Self-clean icon turns on to run a Self-clean cycle
Self-clean cycle is running. Self-clean icon will turn o when cycle is complete.
Battery icons will turn on and unit will begin charging
Clean solution tank is empty. Fill Clean solution tank and press Power button to
resume Self-clean cycle.
Dirty water tank is full. Empty Dirty water tank and press the Power button to
resume Self-clean cycle
Clean solution tank is empty. Fill clean solution tank, press Power button to resume
cleaning
Dirty water tank is full. Empty dirty water tank. Press Power button, resume
cleaning. *If this is a false error, remove the solids separator and clean completely.
Allow part to dry for 24 hours or dry manually.
Brushroll cover has been removed. Attach brushroll cover. Press Power button to
resume cleaning.
Brushroll is jammed. Remove brushroll cover and brushroll. Remove any object that
may be causing the brushroll to jam. Press Power button resume cleaning.
SCENARIO VISUAL
VISUAL DETAILS
UNIT IS IN USE
Single battery icon is on. Solid.
Self-clean icon is pulsing.
Single battery icon is pulsing.
Self-clean icon has turned o.
Solid. Battery low. Note - you will not be able to run a self-clean cycle.
Pulsing
Pulsing
Pulsing
Pulsing
O
O
UNIT IS PLACED ON THE DOCK
Battery icons are pulsing.
Self-clean icon is on.
Self-clean icon is o.
Pulsing
Pulsing
On
On
O
O
Power button is pressed to activate selfclean cycle. Battery icons and self-clean
Flash ×3
Flash ×3
icon flash three times.
Power button is pressed to activate self-
Pulsing
clean cycle. Self-clean icon is pulsing.
Pulsing
SELF-CLEAN CYCLE IS IN PROCESS;
SELF-CLEAN CYCLE PAUSES
Self-clean icon is flashing.
Flashing
Blue water droplet icon is flashing.
Flashing
Self-clean icon is flashing.
Flashing
Red water droplet icon is flashing.
Flashing
UNIT IS IN USE;
CLEANING FUNCTIONS TURN OFF
Blue water droplet icon is flashing.
Red water droplet icon is flashing.
Flashing
Flashing
Flashing
Flashing
Red water droplet icon is flashing.
Flashing
Red area rug icon is flashing.
Red water droplet icon is flashing.
Red area rug icon is flashing.
Flashing
Flashing out of sync
Flashing out of sync
Place unit on dock while self-clean icon is pulsing. Press the power button to run
self-clean cycle.
Battery is close to running out.
Insucient battery life to run self-clean cycle after use.
Unit is charging.
There is sucient battery life to run a self-clean cycle.
Press the power button to run a self-clean cycle.
There is not sucient battery life to run self-clean cycle.
Wait until self-clean icon turns on to run a self-clean cycle.
Unit is charging. There is not sucient battery life to run a self-clean cycle.
Wait until self-clean icon turns on to run a self-clean cycle.
Self-clean cycle is running. Self-clean icon will turn o when cycle is complete.
Battery icons will turn on and unit will begin charging.
Clean solution tank is empty. Fill clean solution tank and press the power button to
resume self-clean cycle.
Dirty water tank is full. Empty dirty water tank and press the power button to
resume self-clean cycle.
Clean solution tank is empty. Fill clean solution tank, press the power button to
resume cleaning.
Dirty water tank is full. Empty dirty water tank. Press the power button, resume
cleaning. *If this is a false error, remove the solids separator and clean completely.
Allow part to dry for 24 hours or dry manually.
resume cleaning.
Brushroll is jammed. Remove brushroll cover and brushroll. Remove any object that
may be causing the brushroll to jam. Press the power button resume cleaning.
AU 02 8801 7666 | NZ 0800 112 660sharkclean.com.au | sharkclean.co.nz
Page 9
TWO (2) YEAR LIMITED REPLACEMENT WARRANTY
The warranty commences on the date of purchase and expires at the end of the two-year period. In the
unlikely event of a defect due to faulty materials or workmanship within the guarantee period we will
replace the defective/faulty part with a new product, free of charge, or if the unit is deemed defective/
faulty we replace the unit with an equivalent or upgraded model, at our discretion.
For warranty claims, you will need to submit a proof of purchase in the form of a valid receipt that displays
date and place of purchase.
Your warranty is subject to the following conditions
• DO NOT operate the appliance with a damaged plug or cord, or if the unit has been dropped, damaged
or dropped in water.
• To avoid the risk of electric shock, do not disassemble or attempt to repair the appliance on your own. If
the supply cord is damaged, it must be replaced by a qualified electrician to avoid a hazard. Incorrect reassembly or repair can cause a risk of electric shock or injury to persons when the appliance is used.
• The item has not been misused, abused, neglected, altered, modified or repaired by anyone.
• The item has been subjected to fair wear and tear.
• The item has not been used for trade, professional or hire purposes.
• The item has not sustained damage through foreign objects, substances or accident
Customer costs within warranty
The customer is responsible for any inwards freight charge to return a product for warranty if requested,
and outward freight charge for warranty parts and or replacement unit.
Who is covered?
This warranty applies only to the original purchaser, who bought the product from an authorised retailer
and may not be transferred. Proof of purchase is required.
What is not covered?
• Filters and brush rolls
• Accessories supplied with the item.
• Components that are subject to natural wear and tear caused by normal use in accordance with
operating instructions.
• Unauthorised/improper maintenance/handling or overload is excluded from this warranty.
• Accidental damage
• Damage as a result of use not in accordance with the rating plate
• Removal of blockages. If a blockage does occur please refer to the trouble shooting guide within your
Shark Operating manual
• Use of par ts and accessories that are not genuine Shark components
NOTES
AU 02 8801 7666 | NZ 0800 112 660sharkclean.com.au | sharkclean.co.nz
Page 10
NOTES
REGISTER YOUR PURCHASE
sharkclean.com.au/support-registration
sharkclean.co.nz/support-registration
RECORD THIS INFORMATION
Model Number: �����������������������������
Date Code: ���������������������������������
Date of Purchase: ���������������������������
(Keep receipt)
Store of Purchase: ���������������������������
TIP: You can find the model and serial numbers on
the QR code label on the bottom of the back of the
3-in-1 Cleaner.
TECHNICAL SPECIFICATIONS
Voltage: 21.6V
BATTERY RE MOVAL AND DISPOSAL
This product uses a lithium-ion rechargeable and recyclable battery. When the battery no longer holds a
charge, it should be removed from the unit and recycled. DO NOT incinerate or compost the battery.
When your lithium-ion battery needs to be replaced, dispose of it or recycle it in accordance with local
ordinances or regulations. In some areas, it is illegal to place spent lithium-ion batteries in the rubbish bin or in
a municipal solid waste stream. Return spent battery to an autorised recycling center or to retailer for recycling.
Contact your local recycling center for information on where to drop o the spentbattery.
AU 02 8801 7666 | NZ 0800 112 660sharkclean.com.au | sharkclean.co.nz
Page 11
Caution: Any changes or modifications to this unit not expressly approved by the party
responsible for compliance could void the user’s authority to operate the equipment.
All testing on carpet (e.g. per ASTM-F608) shall be conducted in Area Rug mode.
PLEASE READ CAREFULLY AND KEEP FOR FUTURE REFERENCE.
This Owner’s Guide is designed to help you get a complete understanding of your new
Shark HydroVac™ Cordless 3-in-1 Cleaner.
SharkNinja Operating LLC
ANZ: Erskine Park, NSW, 2759
https://sharkclean.com.au/
https://sharkclean.co.nz/
Illustrations may dier from actual product. We are constantly striving to improve our products,
therefore the specifications contained herein are subject to change without notice.
This product may be covered by one or more U.S. patents. See sharkninja.com/patents for more
information.
© 2024 SharkNinja Operating LLC. SHARK is a registered trademark of SharkNinja Operating LLC. SHARK HYDROVAC is
a trademark of SharkNinja Operating LLC. RBRC is a trademark of Rechargeable Battery Recycling Corporation.
WD210ANZ�IB�MP�Mv6
 Loading...