

Page 1

SHARK Vantime
SHARK Vantime - V01
Page 2

2
CONTENT
• Anatomy of the helmet ............................................... 3
• A helmet in your size .................................................. 4
• Chin strap .................................................................. 5
• Advice for use ............................................................ 6
• Visor ......................................................................7 - 8
• Sun visor ............................................................. 9 - 10
• Textile parts .......................................................11 - 12
• Easy Fit .................................................................... 13
• SHARKTOOTH ............................................................ 13
• Ventilation ................................................................ 14
• Warranty .................................................................. 15
• Legal informations ................................................... 16
Thank you for choosing a Vantime helmet.
The Vantimeis a top-quality helmet that is
ideal for use in urban and extra urban areas.
For the Vantime, SHARK has invested all of
its designing experience in safe headgear for
riding two-wheeled motorised vehicles.
The helmet complies with international
standards but does not purport to guarantee
total protection in all circumstances.
Make sure you carefully read all of the
following recommendations before using the
helmet. Just because you are wearing a hel-
met does not mean you should neglect driving
carefully.
Standard: This Vantime helmet has been
approved and conforms to the
ECE R 22/05 standard. It therefore meets
the requirements imposed on all the countries
that recognise this standard in their territory.
Warning: for French trafc, the Highway
Code requires safety reectors (supplied se-
parately in a packet) to be tted in accordance
with the enclosed plan. In the United States
and Canada, specic regulations require that
helmets that only have ECE approval cannot
be used in these territories unless they have
acquired additional DOT FMVSS 218 approval.
Page 3
3
1
2
3
6
8
7
4
5
5
7
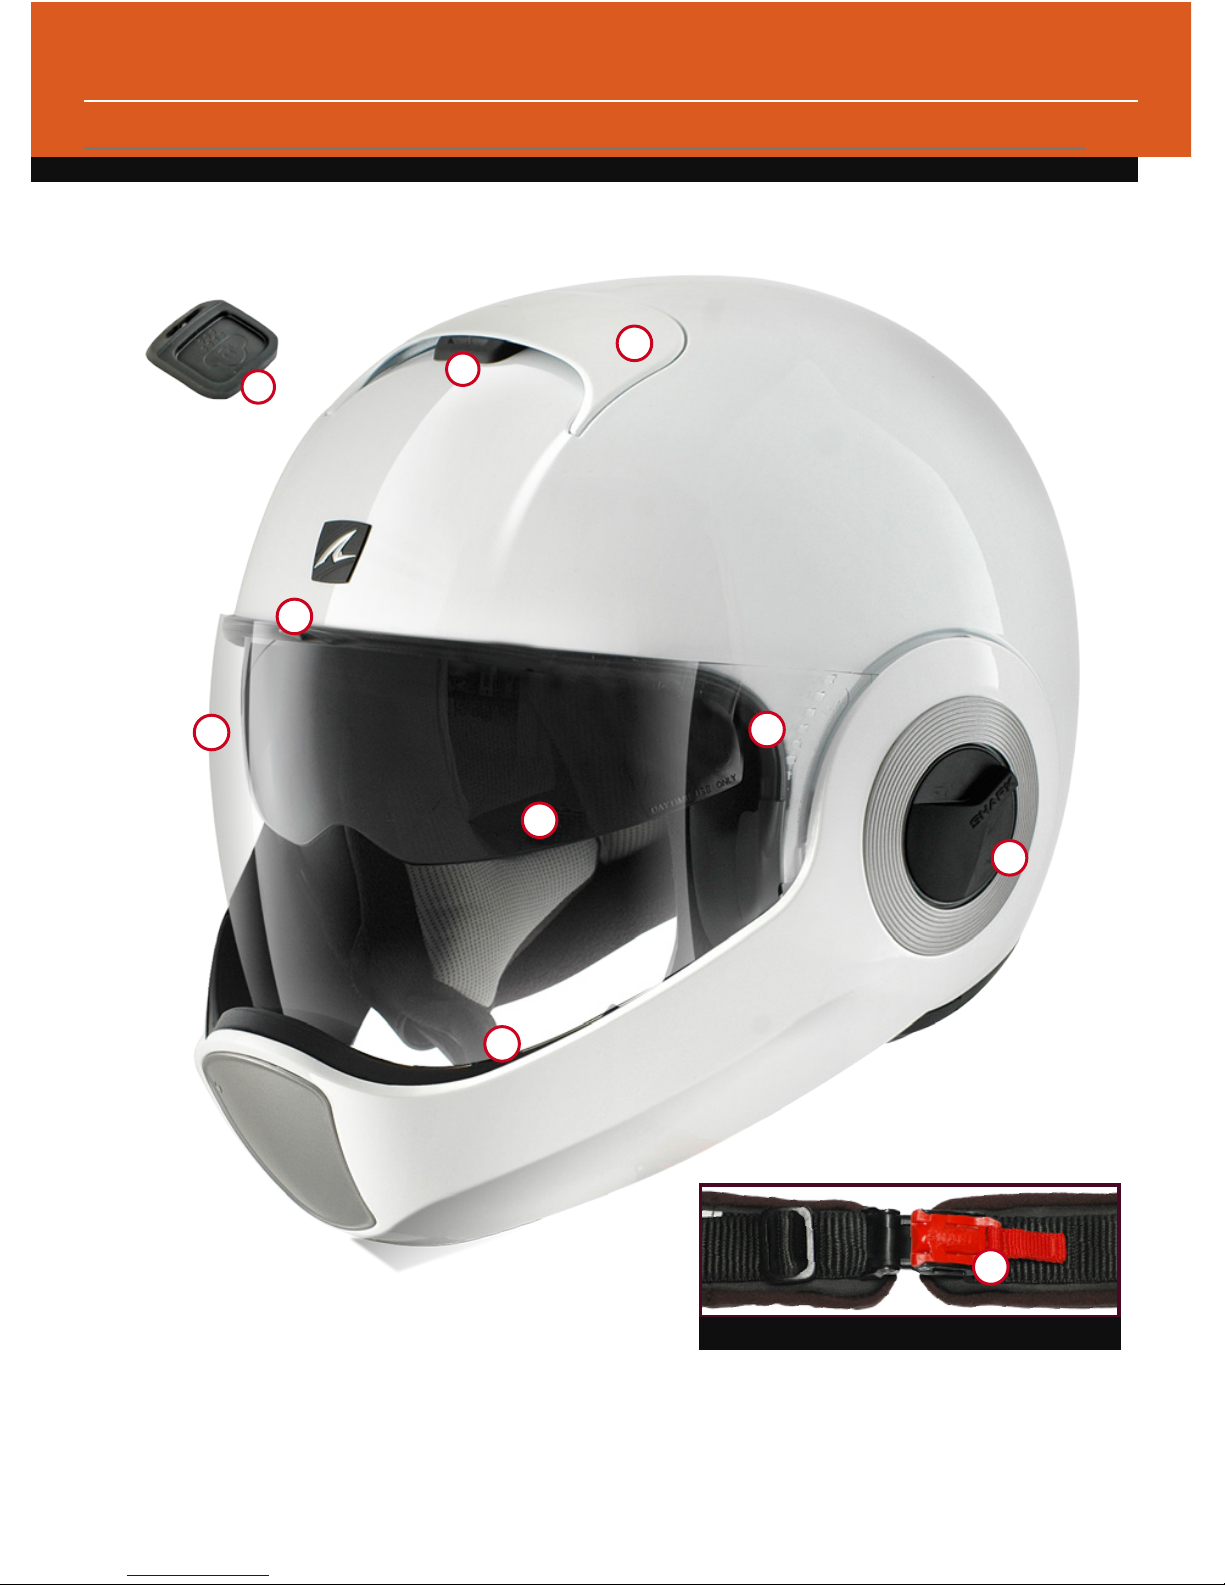
ANATOMY OF THE HELMET
1) Visor VZ140 long trip
2) Sun Visor
3) Ergonomic sun visor command
4) Top ventilation
5) Cork top ventilation
6) Central visor grip
7) Chinstrap buckle
8) Visor seal
7 - “Precise Lock“ buckle
Page 4
4
XS 53/54
S 55/56
M 57/58
L 59/60
XL 61
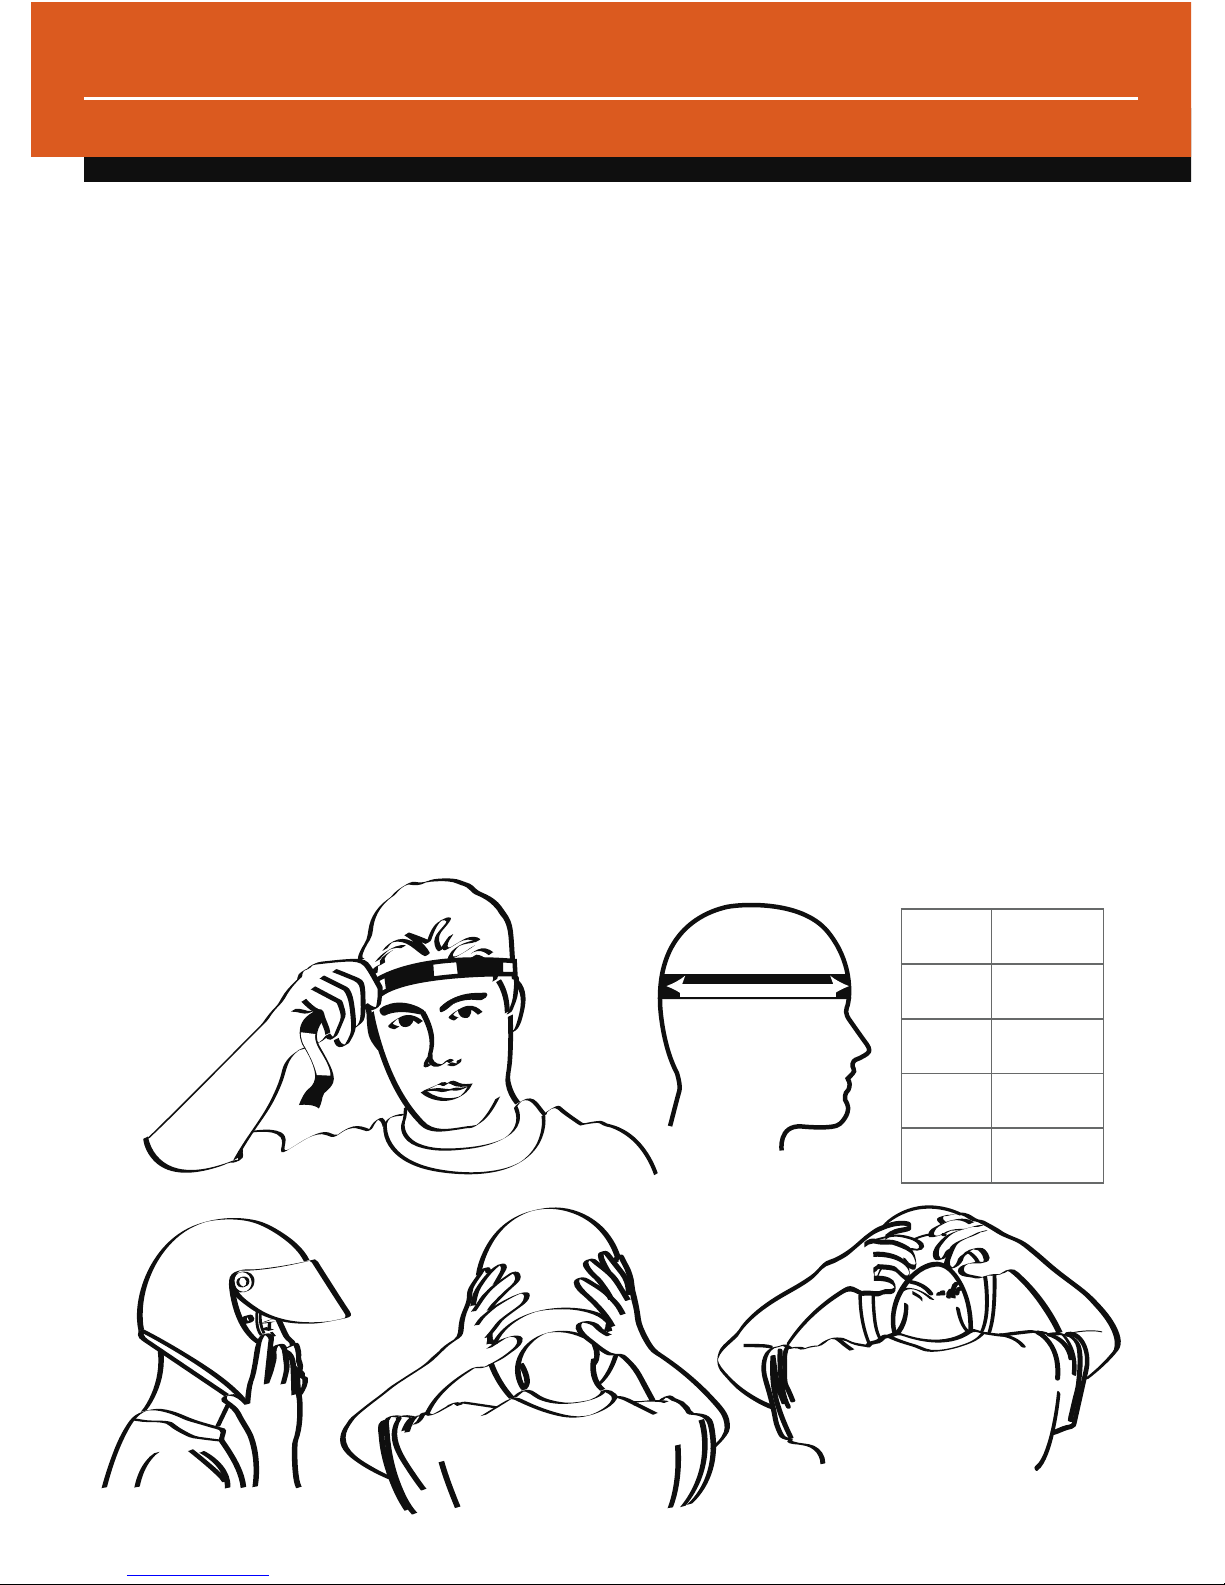
A HELMET IN YOUR SIZE
For a helmet to provide effective protection
while remaining comfortable, it has to be perfectly suited to its user.
Choosing the correct size is essential.
Measure the circumference of your head
with a tape measure, positioning it about 2
cm above your eyebrows: this is where your
head is the largest. Once you have taken this
measurement, compare it to the table of sizes.
Try the size of SHARK Vantime helmet closest
to the measurement obtained, starting with the
size smaller than your head measurement. If
you feel that the contact is too hard, try the
size larger.
Your head should be held quite rmly but you
should feel no discomfort.
Tests for size must be carried out with the
chin strap tightened (please refer to the section on page 5 for instructions on tightening the
chin strap). Check that you have good vertical
and horizontal visibility.
Check that your head can carry out all of
these movements without any particular discomfort.
• Check that when the chin strap is tightened, the helmet cannot be removed from your
head when you try to move it forward by force.
If the helmet comes off or nearly comes off, it
is too big or else the chin strap is not correctly
tightened. Keep trying on helmets until you nd
the ideal size.
WARNING: do not lend your helmet, even for
a short journey, if its size is not perfectly suitable. For each use of your helmet, it is absolutely necessary to make sure that the helmet
is well positioned on your head, and that the
chin strap is properly adjusted, following the
instructions of this manual (p. 5).
Page 5
5
A
B C
D E F
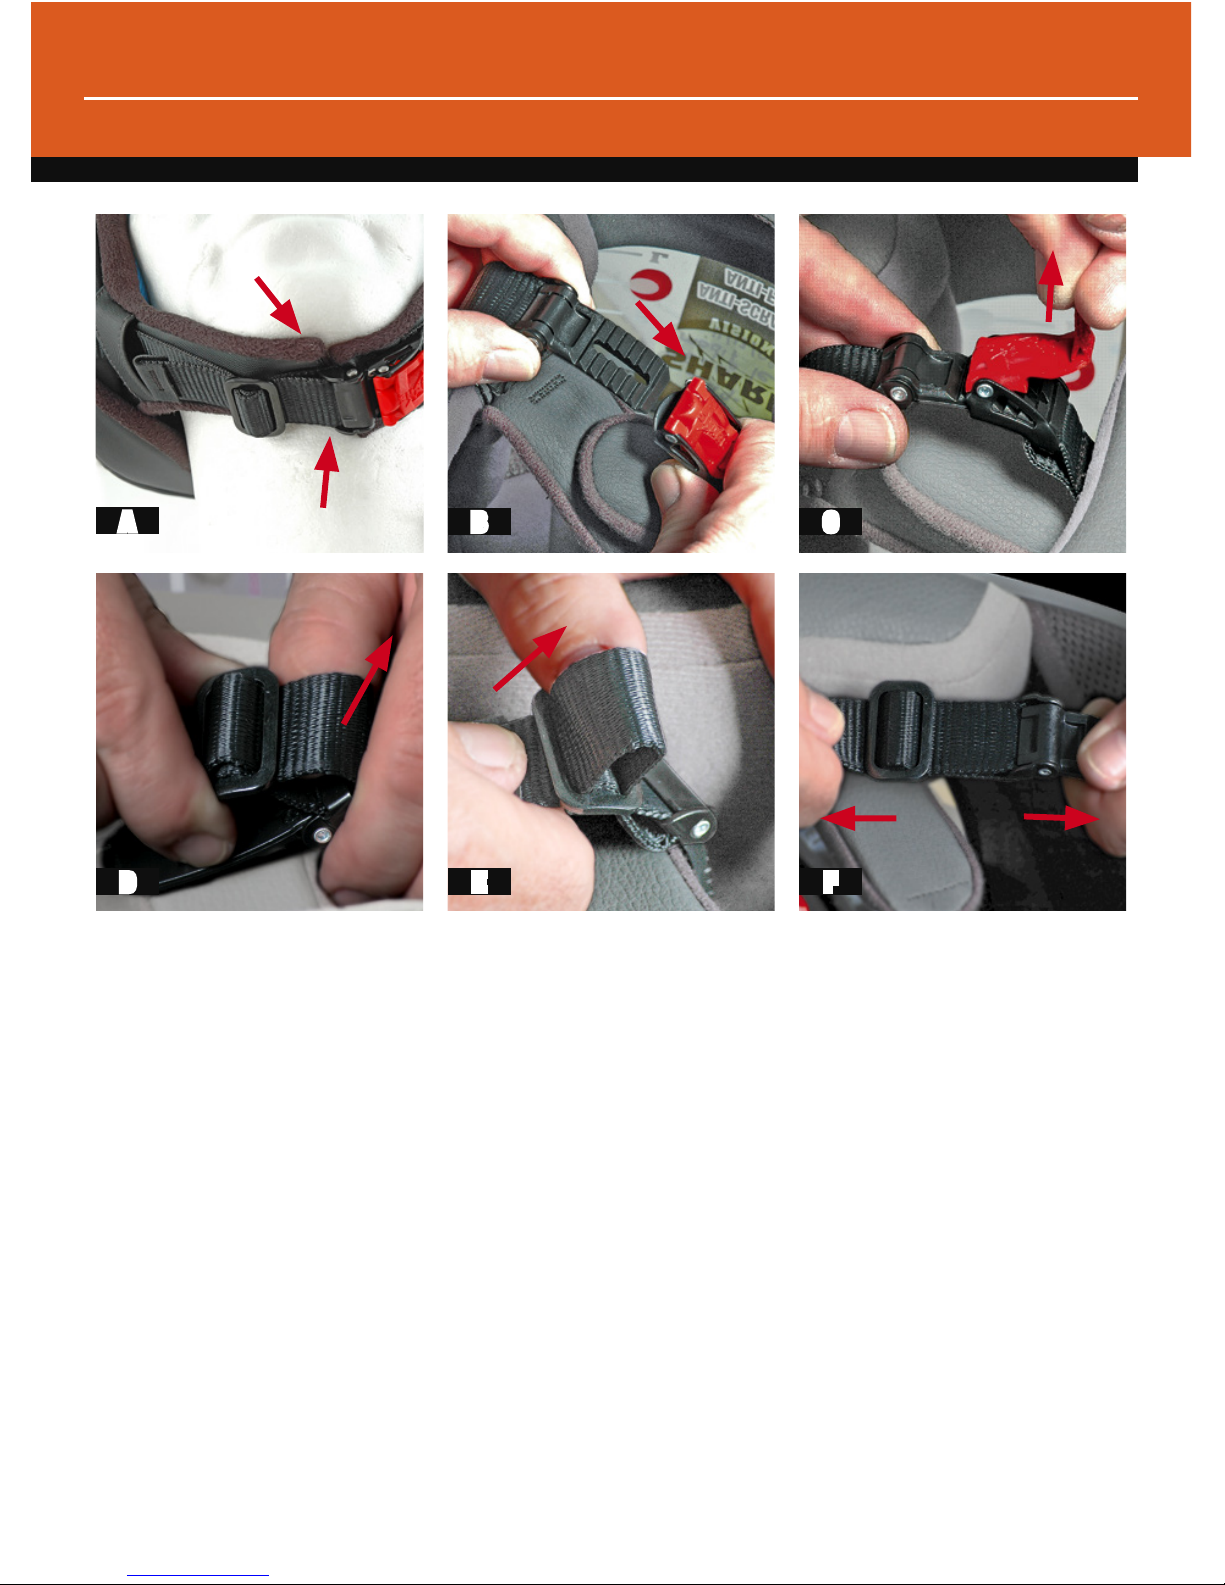
CHIN STRAP MICROMETRIC BUCKLE
Vantime helmet is equipped with a chin strap
micrometric buckle.
“Precise Lock“ ratchet system allows you to
make adjustments through the length of the
toothed portion.
However, it is necessary, when your purchase,
to adapt the length of the chin strap to your
morphology.
Put on your Vantime helmet (p.6) and lock the
holding system.
When the strap is set to medium position,
chinstrap should be correctly stretched below
your chin (A) to ensure a secure hold without
inecting you pain or discomfort.
If needed, adjust the strap length with the
buckle (D, E, F).
Even if the notched strap allows you to im
-
prove the setting to each use, it is necessary to
check frequently that the strap length is correct.
To lock the chin strap, you just have to slide
the strap into the appropriate space of the
buckle until the tightened get sufcient (B).
To release the chin strap, pull on the fabric
grip (C) and remove the strap of the buckle.
Warning: never ride with the chin strap loose or
insufciently tightened. Even though the inte-
rior padding gives you the impression of being
held, your helmet risks coming off in a fall.
Never apply lubricating or acid products or
grease or solvents to the chin strap buckle
parts.
Page 6

6
A
C
B
D
ADVICE FOR USE
Reversed fitting.
Put on the helmet.
Open the visor. Hold the helmet by
the chin guard keeping the chin strap out of
the helmet in your hands to enhance the head
access. Position it upright on your neck (A).
Bring the chin guard back to the front to put
on the helmet. In the same motion, keep the
two parts of the chin strap out of the helmet so
as, it remains well-positioned (B).
End up by positioning correctly the helmet on
your head (C).
Put on correctly the chin strap protections
and lock it. Check that the tightened is suf-
cient. If necessary, set it up (p.5).
Reversed withdrawal.
Remove the helmet.
Detach the chin strap. Move slightly aside
the two parts of the chin strap and hold them
such as for the drawing-in.
To remove the helmet, raise it at the
upright position on your neck in a rear rotary
movement (D).
Page 7

7
A B
VZ140 «long trip» visor of your SHARK Vantime helmet is injected into a polycarbonate
material specically developed for its excellent
optical quality and high performance shock
resistance. With a thickness of 2.2mm, it offers
a good strength.
It was developed from a complete aerodynamic simulation and is specically recommended for long journeys at high speed: the
long trip makes it possible to have a good eld
of vision at slow speed such as faster.
VZ140 screen is optical class 2. It has three
technical areas that allow a greater demisting
surface and a better visibility:
One come with air diffusers for a larger
demisting area
Two shaped air outlets to force the extraction
of hot and humid air, by «Venturi effect».
Bafes channeling air ow away from the
plates, thus reducing the noise associated with
the aeroacoustics.
With its curved prole, this screen provides
protection against wash air even at high speed.
The outer surface of the screen has a treat-
ment with high resistance to scratches.
Opening of the visor.
Pull up the visor using the central visor grip (A).
Closure of the visor.
To close it, the visor has to be handling with
the same central visor grip. Lower the visor
until you hear a click which indicates that it is
well-positioned in its lowest location (B).
Maintenance
For protection and improve its life, the outer
surface of your visor SHARK Vantime is anti-
scratch treated. When cleaning the screen, use
lukewarm water (below 40 degrees) and a soft
cloth (100% cotton and lint) to wipe the screen.
Neutral soap as “savon de Marseille” can help
you clean up.
Caution: Never use any kind washing windows
(with alcohol or other solvent type), these pro-
ducts can damage the screen treatment.
VISOR
Page 8

8
A
C
B
D
QRVS SYSTEM
QRVS System
Dismantling.
Claim screen in the upper position (A).
Exerting a traction on the side of the
visor (B).
Repeat the operation on the other side.
This screen has a system of easy disassem-
bly without tools, allowing you to clean it easily.
Assembly.
Place the screen face to the helmet.
Screen the hooks in the side anges (C).
Squeeze homogeneous on both sides (D).
Page 9

9
B
A
Sun visor.
SHARK Vantime is equipped with a sun visor
with an integrated external control.
This ergonomic command allows to operate
the visor from the outside with ease and whatever the type of gloves worn, offering you
a fast and full protection security. The R&D
department has developed a mechanism
for obtaining a progressive movement of the
control. The sun visor has a 380 UV protection
to lter out 100% of UVA and UVB.
Warning: This sun visor can be used only
in bright glare and when you’re not riding
in an area in which you risk having a sudden
change in visibility (ex tunnel). In all cases
where visibility is reduced, the beginning or
end of the day, night, rain or fog, the sun visor
must be set high to not to degrade your vision.
The visor is operated by the elastomer button
located on the left side of the helmet (A-B).
Maintenance.
For protection and improve its life, the outer
surface of your sun visor SHARK Vantime is
anti-scratch treated. When cleaning the screen,
use lukewarm water (below 40 degrees) and
a soft cloth (100% cotton and lint) to wipe the
screen. Neutral soap as “savon de Marseille”
can help you clean up.
Warning: If your visor and/or sun shield no
longer provides you with clear visibility, you
must immediately replace it. Never ride if your
sun shield is scratched, dirty, foggy or with
your vision obscured in any way. Always ride
with perfect visibility. Never ride with the sun
shield as eye protection. You must always ride
with the visor in the lowered position.
SUN VISOR
Page 10

10
A
B
C
D
E
SUN VISOR
Removal.
Remove or open the visor.
Move the sun visor in the lowered position (A).
Pull the sun visor down gently (B).
Unclip the sun visor sideways, on one side
then the other (C)
Assembly.
Move the sun visor button grip in the lowered
position ((D)
Clip sideways sun visor on one side then the
other (E).
Page 11

11
TEXTILES
TEXTILE PARTS
Type
The textile and foam parts providing comfort
to the SHARK Vantime make it easy for you
to appreciate the performance of your helmet
to the best.
The parts in contact with the skin are made
in a fabric that is guaranteed to feel pleasant,
to absorb perspiration well and to resist wear
satisfactorily. We treat surfaces to limit the risk
of mould and bacteria.
Always in one concerns of hygiene, the
outer seal are treated against bacteria, what
allows avoiding their proliferation when we put
the helmet.
Treatment
Warning: although they are selected for their
quality of resistance and satisfactory wear,
all the interior padding is subject to normal
wear depending on use and care and mainte-
nance, the length of use and also the degree
of acidity of your perspiration.
If you note any wear, we advise you to replace
the interior padding in order to keep your
helmet perfectly clean and comfortable.
Your SHARK supplier can propose you with
replacement parts and also offer you cheek
pads of different thicknesses and densities,
should the standard selection not correspond
to the contours of your face.
Maintenance
The interior textile parts are washable;
it is important to follow the instructions below
scrupulously to avoid damaging them.
The cheek pads and head section must
be hand washed in warm, soapy water (about
30°). Do not use aggressive detergents
but either a product for delicate materials
in low dilution or household soap.
It is essential to dry textile and foam parts
completely before using them. They must
be dried at room temperature. Never iron
textile parts.
For parts with a leather appearance or textiles
attached to safety elements, use a slightly
damp sponge or cloth and household soap
and rinse with clean water. Avoid allowing
too much water to come into contact with
polystyrene parts.
It is essential to ensure that all interior parts
are perfectly dry before using the helmet.
Page 12

12
A
D
B
E
C
F
Dismantling
Inside textile parts can be fully dismantled. Turn
over the helmet, open the chin strap buckle.
Unclip cheek Velcro, and release chin strap
from its loops (A).
Unclip Velcro from both ends of the neck pad
and release the rear plastic part (B).
Remove the front plastic support from Its loca-
tion. To end it, remove the cap.
REPLACE
Insert the front plastic part of the cap in its
location (D). Put back the rear plastic part and
clip back Velcro (E).
Slide in the chin straps into its loops (F). Put back
cheek Velcro. Check that cap is well positioned.
TEXTILES
Page 13

13
EASY FIT
Your SHARK Vantime have been designed
to provide additional comfort for eyeglasses
wearers with the SHARK EASY FIT.
SHARKTOOTH
Your helmet SHARK Vantime is designed to
be equipped with audio system SHARKTOOTH.
You will nd a specic location designed for
battery at the rear of the helmet, behind the
neck pad (A) and a space for the microphone
to the front of the helmet. Concerning the hea
-
dphones, a cavity has been devise in the cheek
Velcro.
Battery is easily rechargeable thanks to its
access from the outside without dismantling
neck pad.
SHARKTOOTH® system offers the possibility
to communicate easily by Bluetooth
For urban, Touring or road riders who want
to communicate while they are driving. SHAR
-
TOOTH® Bluetooth hands-free bike kit for mobile phones and Smartphones is a must-have
accessory.
It provides a bike to bike intercom system
with another SHARKTOOTH® (500m). It can
be easily connected with most of the mobile
phones and Smartphones. It switches on by the
voice, there is an automatic volume control and
it enables riders to reduce background noise. It
is waterproof. You can receive audio informa
-
tion from motorbike Bluetooth® GPS navigator
and music streaming thanks to Stereo Blue
-
tooth® A2DP.
To access this function, connect the
SHARKTOOTH® to an appropriate Bluetooth®
device.
EASY FIT - SHARKTOOTH
Page 14

14
A
C
B
D
VENTILATION
Ventilation
To maximize comfort including ventilation
of SHARK Vantime, R&D has produced
a new concept combining creating
air channels in the damping elements
and insertion of broadcasterst in the cap
thermo compressed. The air ow is optimal
cooling and allows a real skull.
Air enters through the upper front ventilation (A),
circulates and cools the head through the diffusers integrated in internal damping elements.
The quality and design of textile comfort
participate in the dissemination of good air.
The position of the upper ventilation is determined to maximize the effectiveness of its air
intake. Depending on your machine, the fairing
can reduce the effectiveness of the ventilation.
Function plug
Ventilation is open for the summer when the
cap is removed.
To remove the cap of the helmet, take a coin
or other object having the same thickness.
Drag the object into the slot provided for this
purpose plug and pull the plug. B).
Once removed, it ts on a ring or a key chain (C).
For the winter, just put the cap specially designed for this purpose (D) easy and convenient.
It provides a perfect seal, there is no water
leakage or air.
Page 15

15
WARRANTY
5 years Warranty
You have recently purchased a SHARK helmet for your
safety and pleasure. It has been designed with the grea
-
test care to satisfy your every requirement. For your safety, and that of your passenger, you must respect all the
rules of prudence when using your two-wheeled vehicle.
The SHARK 5-YEAR warranty guarantees the initial pur
-
chaser that any possible manufacturing fault or material
defect will be covered by the SHARK warranty.
Limitations
If during the warranty period (5 years as from the date
of purchase), a problem covered by the warranty were
to arise, SHARK, through the intermediary of its sales
network, undertakes to repair or replace any defective
components, up to a maximum limit which is the pur
-
chase value of the helmet. Any labour costs are normally
paid by the SHARK network, but are submitted for appro
-
val prior to the work being carried out.
If the repair requires components to be dispatched
incurring transportation costs, the SHARK network shall
cover these costs up to a limit which is the cost of trans
-
port by the national postal service at the normal rate.
Exclusions
This warranty only covers problems related to mate
-
rials or manufacturing. SHARK cannot be held liable with
regard to the product in the following cases :
Any damage following
1) a fall or accident
2) a technical modication made by the user or a third
party (glue, adhesives, paint, screws, etc.)
3) use of or contact with: harmful chemical products
(including methylated spirits on the visor treatments), or
an intense heat source
4) incorrect use: abnormal conditions (e.g. underwater),
lack of maintenance or care
5) ageing due to normal wear of the inner fabrics or
foams, the appearance of the external parts, or the visor
(scratches, marks, etc.)
6) abnormal and prolonged exposure to ultra- violet
light, in particular for the decorative colours. In addition,
SHARK cannot consider subjective considerations rela
-
ted to use of the helmet as defects covered by the warranty: problems with comfort, size, noise or whistling,
aerodynamics, etc.
SHARK cannot be held liable for the temporary non-
availability of the helmet while it is being
enhanced to satisfy the needs of its owner. In all cases,
the maximum warranty period is 5 years. Replacement
of a component during this period does not prolong this
period.
Procedure
When the helmet is sold go to our website www.sharkhelmets.com in order to activate your warranty. All war
-
ranty claims must be made to the SHARK dealer that
sold the helmet.
For a warranty claim to be considered, the purchaser
must notify the dealer of the problem that has arisen,
and return the helmet that is the subject of the claim,
together with the warranty card lled out when the hel
-
met was purchased. This warranty does not affect in any
way the statutory rights of the purchaser as stipulated by
directive 1999/44CE.
The effects of this specic and limited warranty shall
come to an end after a period of 5 years as from the
date of purchase. After this period, if you continue to use
a helmet regularly, we recommend that to benet from
optimum protection and comfort you should replace your
helmet. This is because certain external factors - gene
-
ral wear, certain impacts - could be prejudicial to the
safety characteristics of this essential piece of protective
equipment.
Limit
SHARK reserves the right to carry out work within the
terms of the warranty using replacement parts from the
most recent version compatible with the model concer
-
ned, and is unable to guarantee perfect harmonisation of
the paint or decorative elements associated with specic
production runs and/or limited editions. In addition, the
natural deterioration of colours over a period of time can
cause mismatching in the adaptation of colours of spare
parts.
If SHARK is unable to carry out the repair for technical
reasons or because a component is not available, SHARK
undertakes to make the customer an advantageous of
-
fer, taking account of the age of the helmet, consisting
in either an identical new helmet or an equivalent model
manufactured at the time of the repair, if the original
model is no longer available
Page 16

16
SHARK - ZAC de la Valentine
110, route de la Valentine
13396 MARSEILLE
Cedex 11 FRANCE
Tél. : +33 (0)4 91 18 23 23
Fax : +33 (0)4 91 35 29 23
contact@shark-helmets.com
www.shark-helmets.com
Legal informations: this helmet was specically designed for
motorcycle use. It is not to be subjected to any technical modication. In order to offer an adequate level of protection, this helmet has
to be properly adjusted and securely tted. Any helmet which has
been subjected to a severe impact must be replaced.
Caution: Do not apply any paint, stickers, petrol or any other
solvent to this helmet. Only the visors SHARK VZ140 approved and
registered under No. E11 050416 must be used with this helmet.
This visor is made of injected polycarbonate.To keep the good
optical quality of the visor and the coatings do not use any
solvent, petrol, abrasive paste or similar products for cleaning.
We advise to use a soft rag with cool water and mild soap. Visors
printed “DAYTIME USE ONLY” must not be used at night or in poor
visibility conditions.
“This user’s manual and its images can not be considered as
contractual. SHARK reserves the right to improve the quality of
production. The images contained in this document are SHARK’s
exclusive property. Any reproduction is forbidden”.
LEGAL INFORMATIONS
 Loading...