

Page 1
Copyright © EURO-PRO OPERATING LLC 2008
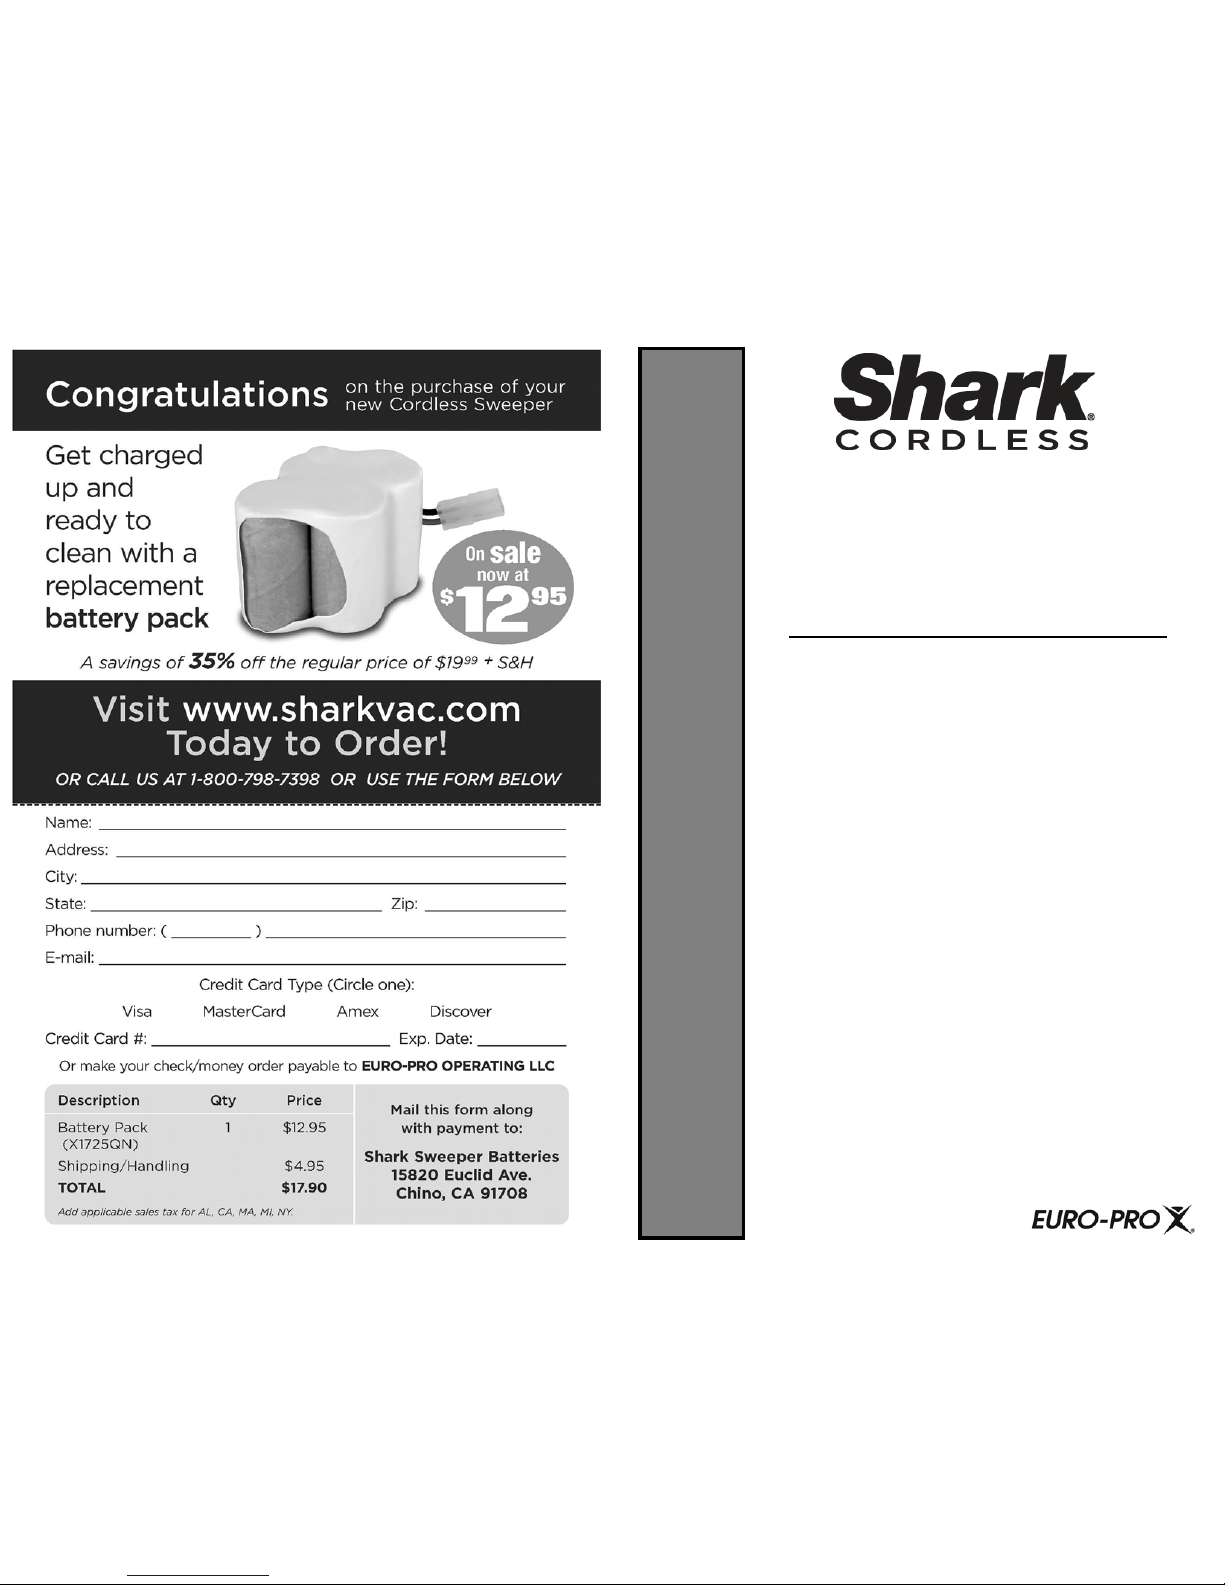
Cordless Sweeper
Barredora inalámbrica
Model/Modelo: V1935Q
4.8 Volt/ Voltios DC/CC
IMPORTANT
IMPORTANT
To Maximize the life of your NiCd batteries:
1. Charge for a minimum of 20 hours before initial use.
Failure to do so will reduce the product’s battery life
significantly.
2. Do not store unit with the charging adapter attached
and plugged in.
3. Only recharge when the batteries are fully discharged
(or as close to fully discharged as possible).
4. Do not store in areas of high temperature or humidity.
5. After 3 months of non-use, the product should be fully
discharged and then recharged to maximize battery
power.
6. Use only the charger supplied with the product. If other
chargers are used, the batteries can fail causing damage to
the battery, product, or personal property.
NiCd batteries have a long useful life but at s ome time they
will need to be replaced. To purchase replacement batteries,
call 1 (800) 798-7398.
NOTE:1. The on/off switch must be in the “off” position in
order to charge the unit. If the charging indicator
does not light, depress the on/off switch once.
2. If the product has never been used or has been
stored for an extended period of time without use – it
will take several complete charge and discharge
cycles to realize the full operational time of your
product.
EURO-PRO Operating LLC
Boston, MA, 02465
Tel.: 1 (800) 798-7398
Page 2
FOR HOUSEHOLD USE ONLY
1. Do not charge this unit outdoors.
2. Do not use outdoors or on wet surfaces.
3. Do not allow to be used as a toy. Close attention is necessary when used by or
near children.
4. Use only as described in this manual. Use only manufacturer’s recommended
attachments.
5. Do not use with damaged cord or plug. Do not use cordless sweeper if it has been
dropped, damaged, left outdoors, or dropped in water. Return it to EURO-PRO
Operating LLC for examination, repair or adjustment.
6. Do not abuse the charger cord. Never carry the charger or base by the cord or
yank to disconnect from an outlet; instead grasp the charger and pull to disconnect.
7. Keep charger cord away from heated surfaces.
8. This product includes rechargeable nickel cadmium batteries. Batteries must be
recycled or disposed of properly. Do not incinerate batteries or expose to high
temperatures, as they may explode.
9. Do not handle plug or appliance with wet hands.
10. Do not put any object into openings. Do not use with any opening blocked; keep
free of dust, lint, hair and anything that may reduce air flow.
11. Keep hair, loose clothing, fingers, and all parts of body away from openings and
moving parts.
12. Do not pick up anything that is burning or smoking, such as cigarettes, matches, or
hot ashes.
13. Do not attempt to change accessories while unit is running.
14. Use extra care when cleaning on stairs.
15. Do not use to pick up flammable or combustible liquids such as gasoline or use in
areas where they may be present.
16. Read and follow all label, operational and marking instructions.
17. Do not use charger with an extension cord. Plug charger directly into an electrical
outlet. Use charger only in a standard (120V., 60Hz) electrical outlet.
18. Do not use the cordless sweeper without dust container in place.
19. Store the cordless sweeper indoors. Store after use to prevent accidents.
20. Leaks from battery cells can occur under extreme conditions. If the liquid, which is
20-35% solution of potassium hydroxide, gets on the skin - wash immediately with
soap and water or neutralize with a mild acid such as lemon juice or vinegar. If the
liquid gets into the eyes, flush them immediately with clean water for a minimum of
10 minutes and seek medical attention.
21. Use only on dry, indoor surfaces.
22. Do not use for any purpose other than described in this user’s guide.
23. Do not attempt to use the charger with any other product or attempt to charge this
product with another charger. Use only charger model
KA12D075015023U
supplied with this appliance.
24. The appliance must be disconnected from the supply when removing the battery.
IMPORTANT SAFEGUARDS
When using an electrical appliance, basic safety precautions should always be observed,
including the following
WARNING: To reduce the risk of fire, electrical shock, or injury:
SAVE THESE INSTRUCTIONS
READ ALL INSTRUCTIONS BEFORE USING YOUR CORDLESS SWEEPER.
1
Rev. 08/08
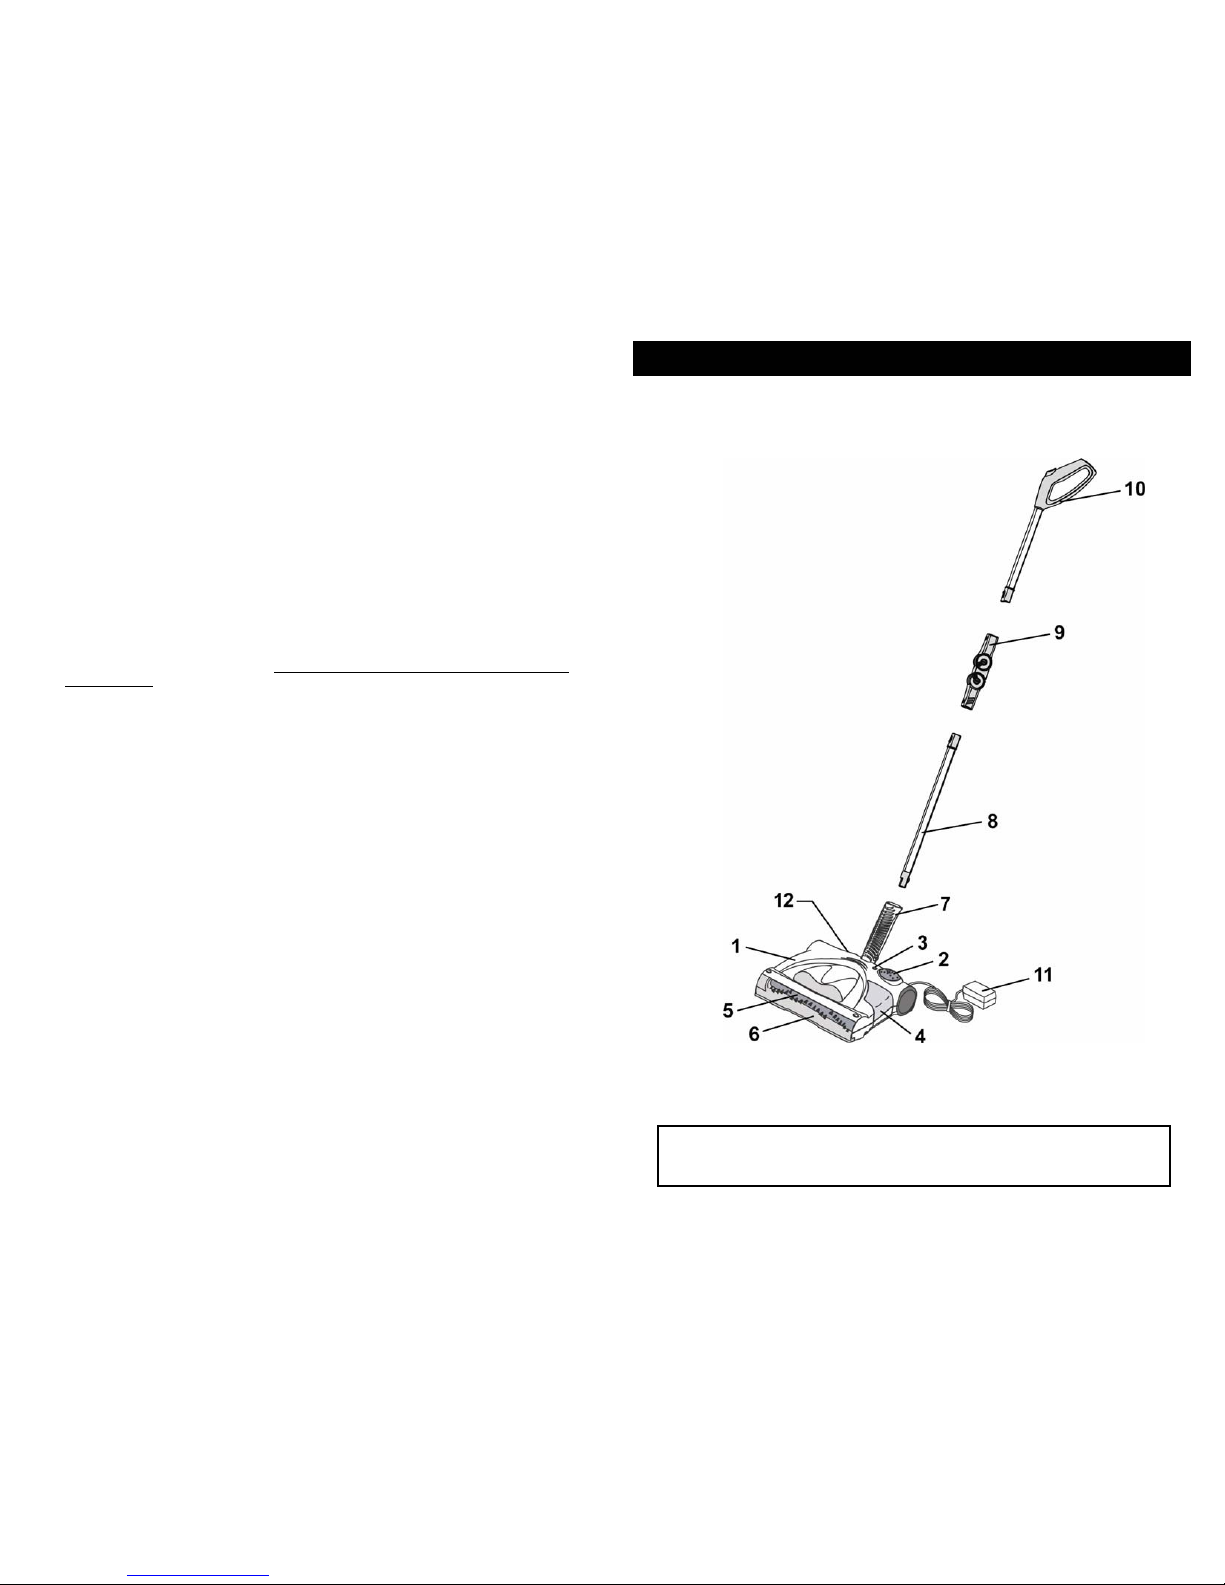
1. Sweeper Power Head
2. On/Off Switch
3. Charging Light Indicator
4. Dust Cup (Container)
5. Rotating Brush
6. Transparent Brush Cover
7. Lower Handle
8. Lower Handle Extension Tube
9. Folding Pivot
10. Upper Handle
11. Charging Adapter
12. Charging Jack
NOTE: Cordless Sweeper Model V1935Q is shipped with the batteries
uncharged. Charging of the unit for 20 hours prior to first usei s
required. Use replacement battery #X1725QN only.
*Illustrations may differ from actual product.
2
PARTS AND COMPONENTS
Page 3

3
Assembling your Cordless Sweeper
1. Insert the lower handle onto the power head. Fasten it with the captive nut and bolt
provided. (Fig. 1) The captive nut and bolt are found secured to the end where the
lower handle will be inserted.
Before you start:
Your Cordless Sweeper will require very little assembly. You should remove it from the
carton and familiarize yourself with all the components listed per the exploded view
drawing (pg.2). This will help you in the assembly and operation of your cordless
sweeper.
NOTE: The charging adapter may be shipped inside the dust cup.
Fig. 2
CAUTION: ALWAYS USE ADAPTOR SUPPLIED (ONLY) WITH
SWEEPER.
2. Assemble the handle by inserting the lower handle extension tube
into the lower handle. Push until you hear it snap into place. Next,
push the plastic folding pivot onto the lower handle extension
tube until you hear it snap into place. Finally, insert the upper
handle into the forward folding until you hear it snap into
place. (Fig. 2)
3. Place the handle into the upward storage position.
4. Plug the charging adapter into the sweeper power
head charging jack. Plug the charging adapter cord
into a standard electrical outlet (120V., 60Hz.) The
green charging indicator light should illuminate.
If the charging indicator does not illuminate,
depress the on/off switch once to reset the unit.
Fig. 1
Captive
Nut
Lower Handle
Bolt
OPERATING INSTRUCTIONS
How to Operate Your Cordless Sweeper
CAUTION: Any electronic or electrical appliance should not be stored
in or exposed to areas of high heat or humidity. Do not
store your cordless sweeper close to stoves, radiators,
furnaces or in a bathroom or bathing area.
NOTE: Before using, please ensure that the cordless sweeper has been initially
charged for 20 hours.
Your cordless sweeper will only operate properly when the batteries are fully charged.
Your sweeper will operate for varying lengths of time on a full charge. This will depend
upon the type of surface being cleaned. (Longer operating time on bare floors vs
carpets.)
1. Push the on/off switch to operate the unit. To turn “Off”, press switch again. (Fig. 3)
"On/Off“
switch
Fig. 3
2. To fold the handle, press on the handle release button while bending the handle
forward. The folding pivot will click into the bent position. (Fig. 4)
3. To straighten the handle, simply lift the upper handle. The folding pivot will click
into the straightened position. (Fig. 5)
Fig. 5
Fig. 4
4
Handle
Release
Button
OPERATING INSTRUCTIONS
Page 4
Cleaning the Dust Container
For best performance, empty the dust container after each use.
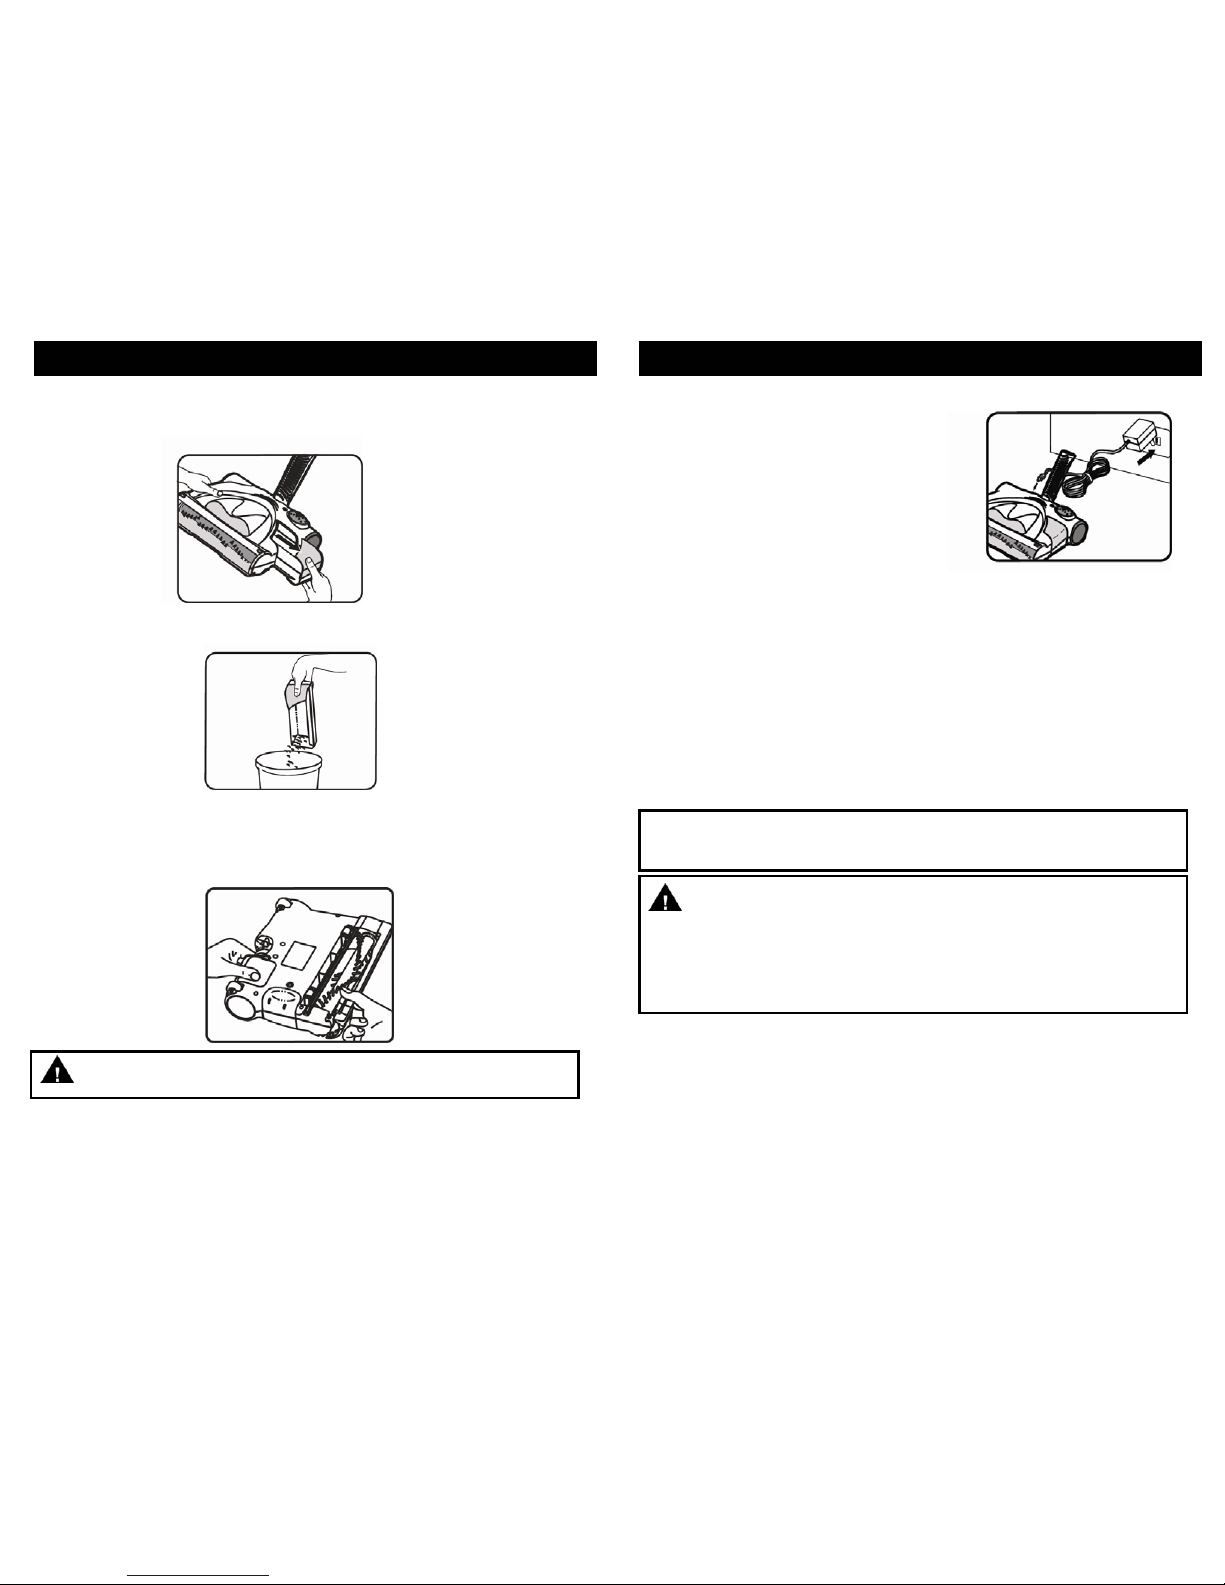
1. Pull the dust container straight out from the side. (Fig. 6)
CAUTION: Do not accidentally turn unit “On” while cleaning.
Do not clean while unit is charging.
Fig. 8
Fig. 6
Fig. 7
5
2. Empty dust container contents. (Fig. 7) If desired, rinse with water to clean the dust
container - but dry thoroughly before replacing on the sweeper.
3. Replace dust container on cordless sweeper.
4. Periodically remove the transparent brush cover on the front of the cordless
sweeper and remove any build up of lint, hair or fiber on the rotating brush. To
remove the cover - grip the cover from the bottom, pull out and downward until the
cover unlocks from the side slots and tabs located on the top of the sweeper. (Fig. 8)
OPERATING INSTRUCTIONS
1. Connect the charger plug to the charging jack
or hole on the back of the sweeper. Plug the
charging adapter into the wall outlet.
(120V., 60Hz.) Use only charger
KA12D075015023U. (Fig. 9)
2. This cordless sweeper is powered by Ni-Cd
batteries. Before first use, they must be
charged for a minimum of 20 hours.
IMPORTANT: After initial charging, your new
cordless sweeper should not be left connected
to the charging adapter for a period in excess of
24 hours. A normal charge cycle is approximately 20 hours. Themanufacturer
recommends that when charging the cordless sweeper, the unit be allowed to
charge for approximately 20 hours and then be disconnected from the charging
adapter. The charging adapter should be unplugged from the wall receptacle and
stored in a convenient place until next use.
3. When recharging the unit, the on/off switch must be in the “Off" position.
4. The charging light indicator on the top of the sweeper will illuminate to indicate that
the sweeper is charging.
5. To recharge, repeat step #1 above. Charging times will vary depending upon the
amount of usage between charging cycles.
NOTE: If you place the sweeper to recharge and the charging indicator light does
NOT illuminate, then press the on/off button once to turn the sweeper “Off”. The
charging indicator light should now light up.
NOTE: Peak performance may only be realized after the unit has been charged
and discharged two (2) or three (3) times.
Charging the Cordless Sweeper
IMPORTANT: To maintain peak performance of your cordless sweeper, it is
recommended that the unit be fully discharged, then
completely re-charged at least once a month.
Fig. 9
6
CAUTION: Use only with the battery pack supplied with the unit.
Do not attempt to remove the battery pack from the unit to
charge it.
Never attempt to throw the battery pack or unit into a fire or
incinerate it.
Do not attempt to remove or damage the battery casing.
Battery must be recycled or disposed of properly at the end of
its service life.
OPERATING INSTRUCTIONS
Page 5

Battery Removal & Disposal
NOTE: If uncertain as to how to remove your battery pack, we suggest you take
your sweeper to a reputable small appliance service technician to have this
service performed.
This sweeper is equipped with Ni-Cd batteries and you need to dispose of them
properly. When the batteries are no longer good for use, they must be removed from
the sweeper for disposal. Do not remove the batteries for any reason other than
disposal of them. The batteries must be recycled or disposed of in accordance with
local regulations. Please consult your Yellow Pages or local recycling center for more
information.
WARNING: You must never use ordinary batteries for replacement as
these may leak and cause damage. Use only battery pack
X1725QN provided for replacement.
7
OPERATING INSTRUCTIONS
To Maximize the Life of Your NiCd Batteries
1. Charge for a minimum of 20 hours before initial use. Failure to do so will reduce the
product’s battery life significantly.
2. Do not store the unit with the charging adaptor attached and plugged in.
3. Only recharge when the batteries are fully discharged (or as close to fully discharged
as possible).
4. Do not store in areas of high temperature or humidity.
5. After three (3) months of storage, the product should be fully discharged and then
recharged to maximize battery power.
6. Use only the charger supplied with the product. If other chargers are used, the
batteries can fail causing damage to the battery, product or personal property. NiCd
batteries have a long useful life but at some time they will need to be replaced. To
purchase replacement batteries call Customer service at 1 (800) 798-7398.
NOTE:
1. The on/off switch must be in the “Off” position in order to charge the unit. If
the charging indicator does not light, depress the on/off switch once.
2. If the product has never been used or has been stored for an extended period
of time without use – it will take several complete charge and discharge cycles
to realize the full operational time of your product.
8
OPERATING INSTRUCTIONS
Removal of Battery Pack
1. Turn unit over so that the base is facing upwards. Be careful not to turn the unit
“On”. (Fig. 10)
2. Push in locking tab and lift off battery compartment cover. (Fig. 11)
3. Lift out battery pack, disconnect battery connector and set the battery aside.
4. Connect battery connector and insert the new battery pack into unit. Replace the
battery compartment cover making certain that the locking tab snaps in place.
Fig. 10 Fig. 11
CAUTION: This appliance contains Ni-Cd batteries. The batteries must
be recycled or disposed of in accordance with local
regulations. Please consult your Yellow Pages or local
recycling center for more information.
Locking Tab
Page 6

TROUBLESHOOTING GUIDE
PROBLEM POSSIBLE REASON POSSIBLE SOLUTION
SWEEPER WILL NOT
OPERATE
1. Batteries discharged.
2. No power in electrical
outlet supplying charging
adapter.
3. Unit needs servicing.
1. Charge unit.
2. Check fuse or breaker.
Replace fuse/reset breaker.
3. Call Customer Service at
1 (800) 798-7398.
SWEEPER WILL NOT
PICK-UP
1. Dust container is full.
2. Unit needs recharging.
1. Empty dust container.
2. Charge unit.
DUST ESCAPING
FROM SWEEPER
1. Dust container is full. 1. Empty dust container.
ROTATING BRUSH
WILL NOT PICK UP
1. Unit clogged.
2. Dust container is full.
1. Check for excessive material
on brush or in bottom of
sweeper. Remove ob struction
from brushes and/or sweeper .
2. Empty and clean dust
container.
SWEEPER WILL NOT
CHARGE
1. Electrical outlet not
working.
2. Charging adapter not
working.
3. Batteries no longer
functioning.
4. Unit left in “On” position.
1. Check to ensure outlet is
working properly. (Easily
checked by plugging in
another appliance.
2. Replace charging adapter.
3. See battery disposal
instructions.
4. Press switch to “Off”.
To improve the performance and life of your unit, we recommend you do the following:
1. Once a month clean the unit with a dry cloth, including the chamber which the
dust container fits into. Remove any hair, fiber or other materials that may have
built up in the chamber, on the rotating brush.
2. Don’t use abrasive materials to clean the sweeper. Do not immerse the unit in
water.
3. Do not pick up liquids or use on wet floors.
4. Do not use on concrete, tar or similar rough surfaces .
5. Don’t pick up pieces of string or fabrics with the sweeper.
6. Do not clean tasseled or frayed carpets with the sweeper.
7. Any other servicing should be done by an authorized representative. Please call
customer service at: 1(800) 798-7398.
Care and Maintenance
9
Model
V1935Q
Printed in China
10
ONE (1) YEAR LIMITED WARRANTY
EURO-PRO Operating LLC warrants this product to be free from defects in material and
workmanship for a period of one (1) year from the date of the original purchase, when utilized for
normal household use, subject to the following conditions, exclusions and exceptions.
If your appliance fails to operate properly while in use under normal household conditions within the
warranty period, return the complete appliance and accessories, freight prepaid. For Customer
Service support, call 1(800) 798-7398.
If the appliance is found to be defective in material or workmanship, EURO-PRO Operating LLC
will repair or replace it free of charge. Proof of purchase date and $ 7.95 to cover the cost of return
shipping and handling must be included. *
Non-durable parts including, without limitation, dust cups and brushes which normally require
replacement are specifically excluded from warranty.
The liability of EURO-PRO Operating LLC is limited solely to the cost of the repair or replacement
of the unit at our option. This warranty does not cover normal wear of parts and does not apply to
any unit that has been tampered with or used for commercial purposes. This limited warranty does
not cover damage caused by misuse, abuse, negligent handling or damage due to faulty packaging
or mishandling in transit. This warranty does not cover damage or defects caused by or resulting
from damages from shipping or repairs, service or alterations to the product or any of its parts,
which have been performed by a repair person not authorized by EURO-PRO Operating LLC.
This warranty is extended to the original purchaser of the unit and excludes all other legal and/or
conventional warranties. The responsibility of EURO-PRO Operating LLC if any, is limited to the
specific obligations expressly assumed by it under the terms of the limited warranty. In no event is
EURO-PRO Operating LLC liable for incidental or consequential damages of any nature
whatsoever. Some states/provinces do not permit the exclusion or limitation of incidental or
consequential damages, so the above may not apply to you
.
This warranty gives you specific legal rights, and you may also have other rights which vary from
state to state or province to province.
*Important: Carefully pack item to avoid damage in shipping. Be sure to include proof of
purchase date and to attach tag to item before packing with your name, complete address
and phone number with a note giving purchase information, model number and what you
believe is the problem with item. We recommend you insure the package (as damage in
shipping is not covered by your warranty). Mark the outside of your package “ATTENTION
CUSTOMER SERVICE”. We are constantly striving to improve our products, therefore the
specifications contained herein are subject to change without notice .
OWNERSHIP REGISTRATION CARD
Please fill out and mail the product registration card within ten (10) days of purchase. The
registration will enable us to contact you in the unlikely event of a product safety notification. By
returning this card you acknowledge to have read and understood the instructions for use, and
warnings set forth in the accompanying instructions.
RETURN TO: EURO-PRO Operating LLC, 4400 Bois Franc, St Laurent, Qc, H4S 1A7
_______________________________________________________________________
Appliance model
______________________________________________________________________________
Date purchased Name of store
______________________________________________________________________________
Owner’s name
_____________________________________________________________________________
Address City State Zip Code
V1935Q
Page 7

PARA USO DOMÉSTICO SOLAMENTE
ADVERTENCIA: Para reducir el riesgo de incendio, descarga eléctrica o
daños personales:
1. No recargue esta unidad en el exterior.
2. No la utilice en el exterior o en superficies húmedas.
3. No permita que se utilice como un juguete. Debe tener mucho cuidado al ser utilizada por o
cerca de niños.
4. Utilícela solamente como se indica en este manual. Use únicamente los accesorios
recomendados por el fabricante accesorios.
5. No usar si el cable o el enchufe están dañados. No utilice la barredora inalámbrica si se ha
caído, dañado, dejado en el exterior o tirado al agua. Retórnela a EURO-PRO Operating LLC
para su examen, reparación o ajuste.
6. No maltrate el cable del cargador. Nunca levante el cargador o la base por el cable, o tire del
cable para desconectarlo del tomacorriente; agárrelo por el cargador y tire para desconectarlo.
7. Mantenga el cargador alejado de superficies calientes.
8. Este producto incluye baterías recargables de níquel cadmio. Las baterías deben descartarse
o reciclarse de forma apropiada. No arroje las baterías al fuego o las exponga a altas
temperaturas ya que pueden explotar.
9. No toque el enchufe o el artefacto con las manos húmedas.
10. No introduzca ningún objeto en las ranuras. No la use con ninguna abertura tapada;
manténgalas libres de polvo, pelusa, pelos y cualquier otra cosa que pudiera reducir el flujo de
aire.
11. Mantenga el cabello, la ropa suelta, los dedos y toda parte del cuerpo alejados de las
aberturas y de las partes móviles.
12. No recoja nada que se estéquemando o echando humo, como cigarrillos, fósforos, o cenizas
calientes.
13. No intente cambiar ningún accesorio mientras la unidad estáfuncionando.
14. Tenga especial cuidado al limpiar escaleras.
15. No la use para recoger líquidos inflamables o combustibles como gasolina ni la use en áreas
donde puedan estar presentes.
16. Lea y siga todas las indicaciones de las etiquetas y de operación.
17. No utilice el cargador con un cable de extensión. Enchufe el cargador directamente en un
tomacorriente. Use el cargador únicamente en un tomacorriente común (120V, 60Hz).
18. No use la barredora inalámbrica sin el recipi en te c ol e ctor de ti err a inst a l ado.
19. Guarde la barredora inalámbrica dentro de su casa. Guárdela luego de usarla para evitar
accidentes.
20. Bajo condiciones extremas, las baterías pueden presentar pérdidas. Si el líquido, que es una
solución de 20-35% hidróxido de potasio, entra en contacto con la piel, lávese inmediatamente
con agua y jabón o neutralícelo con un ácido suave como jugo de limón o vinagre. Si el
líquido le entra en los ojos, enjuaguuelos inmediatamente con agua limpia durante 10 minutos
como mínimo y vea un doctor.
21. Uzéela solamente en superficies secas, en interiores.
22. No la utilice con ningún propósito que no esté descrito en este manual del usuario.
23. No intente usar el cargador con ningún otro producto o intente recargar este producto con otro
cargador. Use únicamente el cargador modelo KA12D075015023U suministrado con
este artefacto.
24. Este artefacto debe desenchufarse del tomacorriente antes de quitarle la batería.
MEDIDAS IMPORTANTES DE SEGURIDAD
LEA TODAS LAS INSTRUCCIONES ANTES DE USAR SU BARREDORA
INALÁMBRICA.
Al usar aparatos eléctricos, siempre debe seguir precauciones básicas de seguridad,
incluyendo las siguientes:
CONSERVE ESTAS INSTRUCCIONES
LEA TODAS LAS INSTRUCCIONES ANTES DE USAR SU BARREDORA
INALÁMBRICA
11
Rev. 08/08
1. Cabezal eléctrico de la barredora
2. Llave de encendido
3. Luz indicadora de carga
4. Recipiente para tierra
5. Cepillo giratorio
6. Cubierta Transparente del Cepillo
7. Mango inferior
8. Tubo de extensión del mango inferior
9. Pivote de plegado
10. Mango superior
11. Cargador
12. Enchufe de carga
NOTA: La barredora inalámbrica Modelo V1935Q viene con la batería
descargada. Necesita cargar la unidad por 20 horas antes de
usarla por primera vez. Use la batería de repuesto # X1725QN
únicamente.
* El dibujo puede no ser igual al producto real.
12
PARTES Y COMPONENTES
Page 8

13
Armado de su Barredora Inalámbrica
1. Inserte el mango inferior en el cabezal eléctrico. Ajústelo con la tuerca insertada y el
perno suministrado. (Fig. 1) El perno y la tuerca de retención vienen colocados en el
extremo donde hay que insertar el mango inferior.
Antes de comenzar:
Su barredora inalámbrica requiere muy poco armado. Deberá sacarla de la caja y
familiarizarse con todos los componentes listados en el diagrama descriptivo. (Pág. 12)
Esto le ayudará en el armado y operación de su barredora inalámbrica.
NOTA: El cargador puede estar empacado dentro del recipiente para la tierra.
Fig. 2
CUIDADO: SIEMPRE USE (ÚNICAMENTE) EL CARGADOR
SUMINISTRADO CON LA BARREDORA.
2. Arme el mango insertando el tubo de extensión del mango
inferior dentro del mango inferior. Empujuelo hasta que se trabe
en su lugar. Luego, coloque el pivote plástico de plegado sobre
el tubo de extensión del mango inferior y empujuelo hasta que
se trabe en su lugar. Finalmente, inserte el mango superior
dentro de la bisagra de plegado hasta que se trabe
en su lugar. (Fig. 2)
3. Coloque el mango en la posición vertical de almacenamiento.
4. Conecte el cargador al enchufe de carga del cabezal
eléctrico de la barredora. Enchufe el cargador
en un tomacorriente común (120V, 60Hz).
La luz verde indicadora de carga se encenderá.
Si la luz indicadora de carga no se enciende,
presione una vez el botón de encendido.
Fig. 1
Tuerca
Insertada
Mango inferior
Perno
INSTRUCCIONES DE USO
Cómo Usar su Barredora inalámbrica
CUIDADO: No debe guardarse ni colocarse ningún artefacto eléctrico o
electrónico en zonas con mucho calor o humedad. NO
guarde su barredora inalámbrica cerca de cocinas,
radiadores, calefactores o en un baño o lugares para bañarse.
NOTA: Antes de usarla, asegúrese de que la barredora inalámbrica haya sido
cargada inicialmente durante 20 horas.
Su barredora inalámbrica funcionará correctamente sólo cuando la batería esté
completamente cargada. Su barredora funcionará durante un tiempo variable con una
carga completa. Esto dependerá del tipo de superficie que limpie. (Durará más en
pisos lisos que en alfombras).
1. Presione el botón de encendido para hacer funcio nar la unidad. Para apagarla,
presione nuevamente el botón. (Fig. 3)
Interruptor "On/Off"
(Encendido/Apagado)
Fig. 3
2. Para plegar el mango, presione el botón de liberación del mango mientras
empuja el mango hacia delante. El pivote de plegado se trabará en la posición
plegada. (Fig. 4)
3. Para enderezar el mango, simplemente levante el mango superior. El pivote de
plegado se trabará en la posición desplegada. (Fig. 5)
Fig. 5
Fig. 4
14
Botón para
destrabar
el mango
INSTRUCCIONES DE USO
Page 9

Limpieza del Recipiente de la Tierra
1. Tire del recipiente para la tierra hacia fuera desde el costado. (Fig. 6)
Para obtener el mejor rendimiento, limpie el recipiente para la tierra luego de cada uso.
CUIDADO: No encienda la unidad accidentalmente mientras la limpia. No
limpie la unidad mientras se esté cargando.
Fig. 8
Fig. 6
Fig. 7
15
2. Vacíe el contenido del recipiente para la tierra. (Fig. 7) Si lo desea, puede
enjuagarlo con agua, pero debe secarlo completamente antes de colocarlo
nuevamente en la barredora.
3. Vuelva a colocar el recipiente para la tierra en la barredora.
4. De vez en cuando, quite la cubierta transparente del cepillo del frente de la
barredora y saque la acumulación de pelusa, pelos o fibras del cepillo giratorio.
Para quitar la cubierta, agárrela por debajo, tire hacia fuera y hacia abajo hasta que
se desenganche de las ranuras laterales y de las pestañas de la parte superior.
(Fig. 8)
INSTRUCCIONES DE USO
1. Conecte el enchufe del cargador en el conector
o agujero en la parte posterior de la barredora.
Enchufe el cargador en un tomacorriente.
(120V., 60Hz.) Use únicamente el cargador
KA12D075015023U. (Fig. 9)
2. Esta barredora inalámbrica contiene baterías
de Ni-Cd. Antes de usarla por primera vez, debe
cargarse durante 20 horas como mínimo.
IMPORTANTE: Luego de la carga inicial, su nueva
barredora inalámbrica no debe quedar conectada al
cargador por más de 24 horas. El ciclo normal de
carga es de aproximadamente 20 horas. El fabricante recomienda que al cargar la
barredora inalámbrica, la deje cargando durante 20 horas y luego la desconecte
del cargador. El cargador debe desenchufarse del tomacorriente y guardarse en
un lugar apropiado hasta su nuevo uso.
3. Al cargar la unidad, el botón de encendido debe estar en la posición "Off"
(Apagado).
4. La luz indicadora de carga en la parte superior de la barredora se encenderá para
indicar que la misma se está cargando.
5. Para recargar, repita el paso #1 anterior. Los tiempos de carga variarán
dependiendo del uso entre los ciclos de carga.
NOTA: Si cuando conecta la unidad para que se recargue NO enciende la luz
indicadora de recarga, presione el botón de encendido (On/Off) una vez para
apagar la unidad. Ahora debe prenderse la luz indicadora de carga.
NOTA: Se alcanzará el rendimiento máximo únicamente luego de haber cargado
y descargado la unidad dos (2) o tres (3) veces.
Recarga de la Barredora Inalámbrica
IMPORTANTE: Para mantener el máximo rendimiento de su barredora
inalámbrica, se recomienda descargar completamente la
unidad, luego recargarla completamente por lo menos una
vez por mes.
Fig. 9
16
CUIDADO: Use únicamente la batería suministrada con la unidad.
No intente remover la batería de la unidad para recargarla.
Nunca arroje la batería o la unidad al fuego.
No intente remover o dañar la cubierta de la batería.
La batería debe ser reciclada o desechada apropiadamente al
final de su vida útil.
INSTRUCCIONES DE USO
Page 10

Para maximizar la vida útil de sus baterías de NiCd:
1. Cárguelas por un mínimo de 20 horas antes de usarlas por primera vez. El no
hacer esto reducirá considerablemente la vida útil de las baterías.
2. No guarde la unidad con el cargador conectado y enchufado.
3. Cárguelas únicamente cuando las baterías estén completamente descarg adas (o lo
más cerca posible a completamente descargadas).
4. No las guarde en áreas de alta temperatura o humedad.
5. Luego de guardarlo por tres (3) meses, deberá descargar completamente el
producto y luego recargarlo para maximizar el poder de las baterías.
6. Use únicamente el cargador suministrado con el prod ucto. Si utiliza otros
cargadores, las baterías pueden llegar a fallar causando daños a las baterías, el
producto o la propiedad privada. Las baterías de NiCd tienen una larga vida útil
pero deberá reemplazarlas en cierto momento. Para comprar baterías de
reemplazo, la llamada 1 (800) 798-7398.
NOTA:
1. El botón de encendido deberá estar en la posición ‘Off’ (apagado) para cargar
la unidad. Si la luz indicadora de carga no se enciende, presione una vez el
botón de encendido.
2. Si nunca ha usado el producto, o estuvo guardado por mucho tiempo sin
usarse, requerirá varios ciclos completos de carga y descarga para obtener el
tiempo total de funcionamiento de su producto.
INSTRUCCIONES DE USO
Extracción y Descarte de la Batería
NOTA: Si no está seguro de cómo extraer la bate ría, le sugerimos que lleve su
barredora a un técnico calificado en reparación de artefactos pequeños para
que lo haga por usted.
Esta barredora está equipada con una batería de Ni-Cd y necesita descartarla
correctamente. Cuando la batería no funcione más, debe ser extraída de la barredora
para ser descartada. No extraiga la batería por ningún otro motivo que no sea su
descarte. La batería debe ser reciclada o descartada de acuerdo con las normas
locales. Consulte sus Páginas Amarillas o centro de reciclado local por mayor
información.
ADVERTENCIA:Nunca use baterías comunes como reemplazo ya que
pueden perder y causar daños. Use únicamente la batería
X1725QN como repuesto.
17
Extracción de la Batería
1. De vuelta la unidad de modo que la base quede mirando hacia arriba. Tenga
cuidado de no encender accidentalmente la unidad. (Fig. 10)
2. Presione la traba y levante la tapa del compartimiento de la batería. (Fig. 11)
3. Levante las baterías, desenchufe su conector y déjelas a un lado.
4. Enchufe el conector de las baterías nuevas y colóquelas dentro de la unid ad.
Vuelva a colocar la tapa del compartimiento de la batería verificando que haya
quedado trabada en su lugar.
Fig. 10 Fig. 11
CUIDADO: Este artefacto contiene baterías de Ni-Cd. La batería debe
ser reciclada o descartada de acuerdo con las normas
locales. Consulte sus Páginas Amarillas o centro de
reciclado local por mayor información.
18
Traba
INSTRUCCIONES DE USO
Page 11

Cuidado y Mantenimiento
Para mantener el rendimiento y la vida útil de su unidad, le recomendamos lo siguiente:
1. Limpie la unidad con un trapo seco una vez por mes, incluyendo el compartimiento
donde se coloca el recipiente para la tierra. Quite los pelos, fibras y cualquier otro
material que se haya acumulado en el compartimiento o en el cepillo giratorio.
2. No utilice materiales abrasivos para limpiar la barredora. No sumerja la unidad en
agua.
3. No la use para recoger líquidos o sobre pisos mojados.
4. No la use en concreto, alquitrán o superficies ásperas similares.
5. No recoja trozos de soga o tela con la barredora.
6. No limpie alfombras adornadas con borlas o deshilacha das con la barredora.
7. Cualquier otro mantenimiento debe ser realizado por un representa nte técnico
autorizado. Llame al Servicio al Cliente al 1 (800) 798-7398.
19
INSTRUCCIONES DE USO
1.Verifique que el tomacorriente
funcione correctamente.
(Verifíquelo fácilmente
enchufando otro artefacto).
2.Reemplace el cargador.
3.Vea cómo desechar la batería.
4.Apague la unidad.
1.El tomacorriente donde
enchufa el cargador no
funciona.
2.El cargador no funciona.
3.La batería no funciona
más.
4.Ha dejado la unida d
encendida.
BARREDORA
NO SE
RECARGA
1.Verifique que no haya material
acumulado en el cepillo o
debajo de la barredora. Quite
las obstrucciones del cepillo y/o
de la barredora.
2.Vacíe y limpie el recipiente
para la tierra.
1.Unidad tapada.
2.Recipiente para la tierra
está lleno.
CEPILLO
GIRATORIO
NO RECOGE
1.Vacíe el recipiente para la
tierra.
1.Recipiente para la tierra
está lleno.
SALE TIERRA
DE LA
BARREDORA
1.Vacíe el recipiente para la
tierra.
2.Recargue la unidad.
1.Recipiente para la tierra
está lleno.
2.La unidad necesita una
recarga.
LA
BARREDORA
NO RECOGE
1.Recargue la unidad.
2.Verifique el fusible o la llave
general. Reemplace el
fusible/encienda la llave
general.
3.Llame al Servicio al Cliente a l 1
(800) 798-7398.
1.Batería descargada.
2.El tomacorriente donde
enchufa el cargador no
funciona.
3.La unidad necesita ser
reparada.
BARREDORA
NO FUNCIONA
POSIBLE SOLUCIÓNPOSIBLE CAUSAPROBLEMA
GUÍA DE SOLUCIÓN DE PROBLEMAS
Modelo
V1935Q
Impreso en China
20
GARANTÍA LIMITADA DE UN (1) AÑO
EURO-PRO Operating LLC garantiza este producto contra defectos de materiales y mano de obra
por un término de un (1) año a partir de la fecha de compra original, siempre que sea utilizado para
uso doméstico normal, sujeto a las siguientes condiciones, exclusiones y excepciones.
Si su artefacto no funciona correctamente al utilizarlo bajo condiciones domésticas normales dentro
del período de garantía, devuelva el artefacto completo y los accesorios, pagando el envío. Por
servicio al cliente, llame al 1 (800) 798-7398.
Si el artefacto presenta un defecto de materiales o mano de obra, EURO-PRO Operating LLC lo
reparará o remplazará sin cargo. El envío debe incluir un comprobante de la fecha de compra y $
7,95 para cubrir los gastos de envío. *
Los insumos tales como, sin limitación, filtros y cepillos los que normalmente necesitan ser
reemplazados son explícitamente excluidos de la garantía.
La responsabilidad de EURO-PRO Operating LLC se limita únicamente al costo de reparación o
reemplazo de la unidad, a nuestro criterio. Esta garantía no cubre el desgaste normal de las partes
y no cubre ninguna unidad que haya sido alterada o utilizada con fines comerciales. Esta garantía
limitada no cubre daños ocasionados por uso inadecuado, abuso, negligencia o daños causados
por embalaje inapropiado o maltrato durante el transporte. Esta garantía no cubre daños o
defectos causados o resultantes durante el transporte para su reparación o alteraciones del
producto o cualquiera de sus partes, realizadas por una persona no autorizada por EURO-PRO
Operating LLC.
Esta garantía es válida para el comprador original del producto y excluye cualquier otra garantía
legal y/o convencional. La responsabilidad de EURO-PRO Operating LLC, de existir, se limita a
las obligaciones específicas asumidas expresamente bajo los t érminos de esta garantía limitada.
Bajo ninguna circunstancia EURO-PRO Operating LLC será responsable por daños incidentales
o indirectos de ninguna clase. Algunos estados/provincias no permiten la exclusión o limitación de
daños consiguientes o incidentales, por lo tanto lo anterior puede no ser válido para usted
.
Esta garantía le otorga derechos legales específicos, y usted puede también tener otros derechos
los que varían de estado a estado o de provincia a provincia.
*Importante: Embale el producto cuidadosamente para evitar da ños durante el transporte.
Asegúrese de incluir un comprobante de la fecha de compra y de colocarle una etiqueta al
producto con su nombre, dirección completa y número de teléfono, una nota
proporcionando información de la compra, número de modelo y una descripción del
problema. Le recomendamos asegurar el paquete (puesto que la garantía no cubre daños
de envío). Escriba en el exterior del paquete “ATTENTION CUSTOMER SERVICE”. Nosotros
nos esforzamos constantemente en mejorar nuestros productos, por lo tanto las
especificaciones aquí indicadas pueden cambiar sin previo aviso.
TARJETA DE REGISTRO DEL CLIENTE
Complete y envíe la tarjeta de registro del producto dentro de los diez (10) días posteriores a la
compra. El registro nos permitirá contactarnos con usted en caso de existir alguna notificación de
seguridad con respecto al producto. Retornando esta tarjeta usted reconoce haber leído y
entendido las instrucciones de uso y advertencias incluidas en estas instrucciones.
ENVIAR A: EURO-PRO Operating LLC, 4400 Bois Franc, St Laurent, Qc, H4S 1A7
_______________________________________________________________________
Modelo del Artefacto
______________________________________________________________________________
Fecha de compra Nombre del Negocio
______________________________________________________________________________
Nombre del Dueño
______________________________________________________________________________
Dirección Ciudad Estado Código Postal
V1935Q
 Loading...