

Page 1
OWNER’S MANUAL
Model UV610
7.2 Volt DC
For information or assistance:
IMPORTANT SAFEGUARDS
When using an electrical appliance, basic safety precautions should always be observed,
including the following
READ ALL INSTRUCTIONS BEFORE USING YOUR CORDLESS SWEEPER.
WARNING: To reduce the risk of fire, electrical shock, or injury:
1. Do not charge this unit outdoors.
2. Do not use outdoors or on wet surfaces.
3. Do not allow to be used as a toy. Close attention is necessary when used by or near
children.
4. Use only as described in this manual. Use only manufacturer’s recommended
attachments.
5. Do not use with damaged cord or plug. Do not use cordless sweeper if it has
been dropped, damaged, left outdoors, or dropped in water. Return it to EURO-PRO
Corporation for examination, repair or adjustment.
6. Do not abuse the charger cord. Never carry the charger or base by the cord or yank to
disconnect from an outlet; instead grasp the charger and pull to disconnect.
7. Keep charger cord away from heated surfaces.
8. This product includes rechargeable nickel cadmium batteries. Batteries must be
recycled or disposed of properly. Do not incinerate batteries or expose to high
temperatures, as they may explode.
9. Do not handle plug or appliance with wet hands.
10. Do not put any object into openings. Do not use with any opening blocked; keep free of
dust, lint, hair and anything that may reduce air flow.
11. Keep hair, loose clothing, fingers, and all parts of body away from openings and
moving parts.
12. Do not pick up anything that is burning or smoking, such as cigarettes, matches, or hot
ashes.
13. Do not attempt to change accessories while unit is running.
14. Use extra care when cleaning on stairs.
15. Do not use to pick up flammable or combustible liquids such as gasoline or use in
areas where they may be present.
16. Read and follow all label, operational and marking instructions.
17. Do not use charger with an extension cord. Plug charger directly into an electrical
outlet. Use charger only in a standard (120V~, 60Hz) electrical outlet.
18. Keep end of rotating brush, hose, wands and other openings away from your face and
body.
19. Do not use the cordless sweeper without dust container in place.
20. Store the cordless sweeper indoors. Store after use to prevent accidents.
21. Leaks from battery cells can occur under extreme conditions. If the liquid, which is 2035% solution of potassium hydroxide, gets on the skin - wash immediately with soap
and water or neutralize with a mild acid such as lemon juice or vinegar. If the liquid
gets into the eyes, flush them immediately with clean water for a minimum of 10
minutes and seek medical attention.
22. Use only on dry, indoor surfaces.
23. Do not use for any purpose other than described in this user's guide.
24. Do not attempt to use the charger with any other product or attempt to charge this
product with another charger. Use only the charger model TechWorld AD-0920-UL
supplied with this appliance.
25. The battery is to be recycled or disposed of safely.
26. The appliance must be disconnected from the supply when removing the battery
USA: EURO-PRO Corporation Canada: EURO-PRO Corporation
178 West Service Rd. 4400 Bois Franc
Champlain, NY 12919 St. Laurent, QC H4S 1A7
Tel: 1 866 98SHARK (1 866 987-4275)
www.sharkvac.com
SAVE THESE INSTRUCTIONS
FOR HOUSEHOLD USE ONLY
1
Rev. 08/02H
Page 2
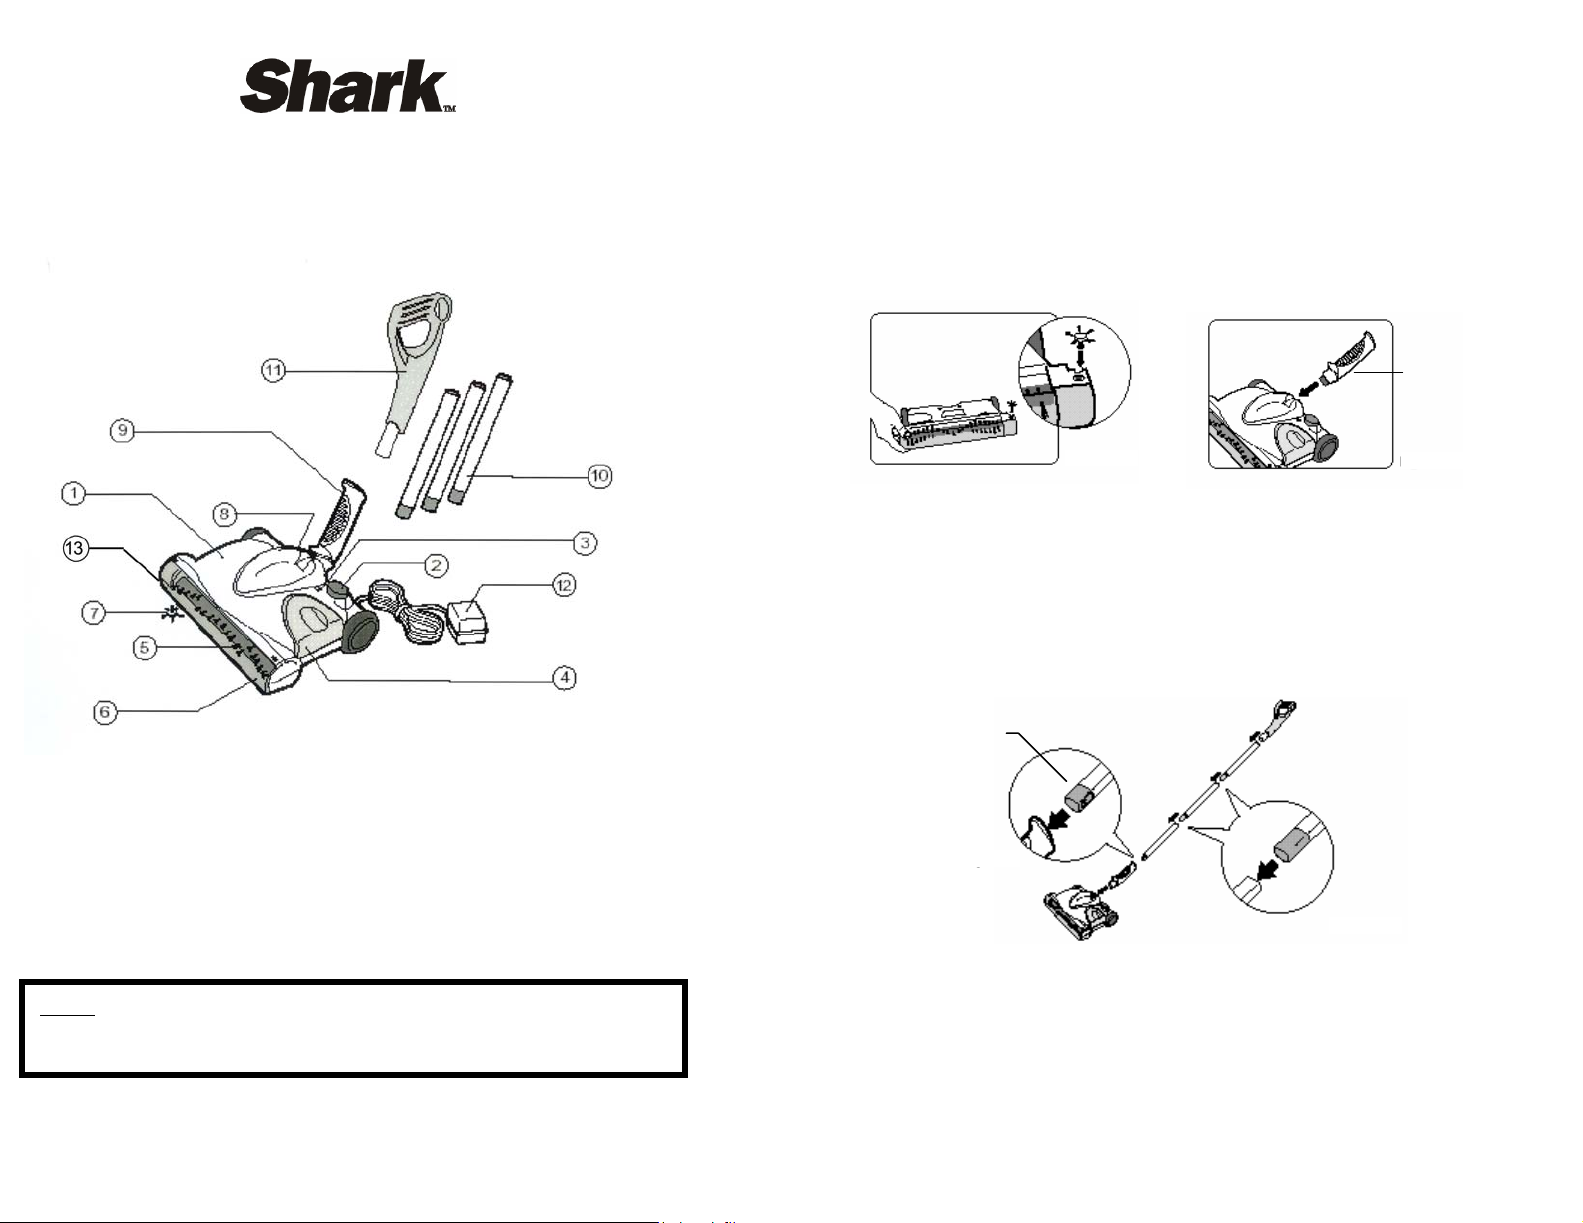
ASSEMBLING YOUR CORDLESS SWEEPER
Before you start:
CORDLESS SWEEPER
1. Sweeper Power Head
2. On / Off Switch
3. Charging Light Indicator
4. Dust Cup (Container)
5. Rotating Brush
6. Transparent Brush Cover
7. Edging Tool
Model UV610
7.2 Volt DC
8. Charging Jack
9. Lower Handle
10. Metal Extension Handles
11. Upper Handle
12. Charging Adapter
(TechWorld AD-0920-UL
rated output DC 9V, 200mA.)
13. Gear Box
Your Cordless Sweeper will require very little assembly. You should remove it
from the carton and familiarize yourself with all the components listed per the
exploded view drawing (pg.2) This will help you in the assembly and operation of
your cordless sweeper.
1. Insert the Edging Tool into the "square" hole under the bottom of the sweeper power
head. Gently but firmly push until the edging tool locks into place.(See fig. 1)
Lower Handle
Fig. 1
2. Insert the lower handle - small end - into the sweeper power head. Push until firmly
in place.(Fig. 2)
3. Assemble the metal extension handles by pushing the plastic insert into the mating
metal tube. Push until only small portion of insert is visible or you cannot press any
farther into the tubing. Push the handle assembly into the upper handle.(Fig. 3)
NOTE: One metal extension tube has a different plastic insert. This tube should
be on the bottom of the handle.
Insert the handle assembly into the lower handle so that the “tab’ on the plastic
insert snaps into the open slot on the lower handle. (Fig. 3a)
Insert into Lower
Handle.
Fig. 3a
Fig.4a
Fig. 3
Fig. 2
NOTE: Cordless Sweeper Model UV610 is shipped with the
batteries uncharged. Charging of the unit for 16-20
hours prior to first use is required.
2
4. Place the handle into the upward storage position.
5. Plug the charging adapter into the sweeper power head charging jack. Plug
the charging adapter cord into a standard electrical outlet (120V~,60Hz.)
3
Page 3

HOW TO OPERATE YOUR CORDLESS SWEEPER
1. Before using, please ensure that the cordless sweeper has been initially
charged for 16-20 hours
Your cordless sweeper will only operate properly when the batteries are fully
charged. When fully charged your sweeper will operate for 35-45 minutes dependent upon the type of use (example - carpets or bare floors).
2. Push the On/Off switch to operate the unit. To turn off , press switch again.(Fig.4)
NOTE: Do not operate the sweeper without the dust container in place.
CLEANING THE DUST CONTAINER
To achieve the best performance, empty the dust container after each use.
1. Pull the dust container straight out from the side. (Fig. 6)
“On/Off” switch
Fig. 4
CAUTION: Any electronic or electrical appliance
should not be stored in or exposed to
areas of high heat or humidity. Do not store
your cordless sweeper close to stoves,
radiators, furnaces or in a bathroom or bathing
area.
3. To release the handle to a comfortable position, apply pressure to the top of
the sweeper head with your foot while pulling back on the handle.(Fig. 5)
Fig. 7
2. Empty dust container contents. (Fig. 7) If desired- you may rinse with water to
clean the dust container - but dry thoroughly before replacing on the sweeper.
Fig. 8
3. Replace dust container on cordless sweeper.
4. Periodically remove the transparent brush cover on the front of the cordless
sweeper and remove any build up of lint, hair or fiber on the rotating brush. To
remove the cover - grip the cover from the bottom, pull out and upward until
the cover unlocks from the side slots and tabs located on the top of the
sweeper. (Fig. 8)
Fig. 6
Fig. 7
Fig. 8
Fig. 5
CAUTION: Do not accidentally turn unit on while cleaning. Do not
clean while unit is charging.
4
5
Page 4

CHARGING THE CORDLESS SWEEPER Changing the Rotating Brush & Gear Box
1. Connect the charger plug to the charging jack or hole on the back of the
sweeper. Plug the the charging adapter into the wall outlet. (120V~,60Hz.) Use only
TechWorld Charger AD-0920-UL, rated output DC 9V,200mA. (Fig. 9)
2. This cordless sweeper is powered by Ni-Cd batteries. Before first use,
they must be charged for a minimum of 16 hours.
3. Once the batteries are fully charged, the cordless sweeper will run for
approximately 35 to 45 minutes before recharging is required.
4. When recharging the unit, the “On/Off” switch must be in the “OFF” position.
5. To recharge, repeat step #1 above. Charging times will vary depending upon
the amount of usage between charging cycles.
6. The charging light indicator on the top of the sweeper will illuminate
to indicate that the sweeper is properly charging.
Fig. 9
NOTE: Peak performance may only be realized after the unit
has been charged and discharged two (2) or three (3)
times.
IMPORTANT: To maintain peak performance of your cordless
sweeper, it is recommended that the unit be fully
discharged, then completely re-charged at least
once a month.
WARNING: Use caution when changing the rotating brush and gear box
so that the unit does not turn ON when pressing down on the
sweeper power head.
1. Remove the extension tube handle from the sweeper power head.
2. Turn sweeper power head upside down being careful Not to accidentally turn the
unit ON.
3. Remove the transparent brush cover. (Fig. 10) (Refer to page 5 for detailed
instructions.)
4. Push in on the locking tab of the gear box and lift gear box to remove. (Fig. 11 &
Fig. 12)
5. Lift the brush bar end cap up from the slot. (Fig. 13)
6. Pull the brush bar out from the bushing and slip off the belt to remove the
brush bar. (Fig. 14)
7. Insert the new brush bar by first inserting the brush bar into the bushing on the
end opposite the driver belt. (Fig. 14)
8. Slip the belt over the brush bar cap.
9. Insert the brush bar into the slot. (Fig. 13)
10.Insert the gear box tabs into the tab slots and push down until it clicks into place.
Lift
Fig. 12
Fig. 10
Gear box
Gear box
tabs
Locking
Fig. 11
tab
CAUTION
• Use only with the battery pack supplied with the unit.
• Do not attempt to remove the battery pack from the unit to charge it.
• Never attempt to throw the battery pack or unit into a fire or incinerate
it.
• Do not attempt to remove or damage the battery casing.
• Battery must be recycled or disposed of properly at the end of it's
service life.
6
Fig. 13 Fig. 14
7
Page 5

Battery Removal & Disposal Care and Maintenance
To improve the performance and life of your unit, we recommend you
do the following:
1. Once a month clean the unit with a dry cloth, including the chamber which
Page 6

UV610
ONE (1) YEAR LIMITED WARRANTY
EURO-PRO CORPORATION warrants this product to be free from defects in
material and workmanship for a period of one (1) year from the date of the
original purchase, when utilized for normal household use, subject to the
following conditions, exclusions and exceptions.
If your appliance fails to operate properly while in use under normal household
conditions within the warranty period, return the complete appliance and
accessories, freight prepaid to:
In US: EURO-PRO Corporation, 178 West Service Rd., Champlain, N.Y. 12919
In Canada: EURO-PRO Corporation, 4400 Bois Franc, St. Laurent, QC, H4S 1A7
If the appliance is found by EURO-PRO to be defective in material or
workmanship, EURO-PRO will repair or replace it free of charge. Proof of
purchase date and $ 11.95 to cover the cost of return shipping and handling
must be included. *
Non-durable parts including, without limitation, dust cups, filters and brushes
which normally require replacement are specifically excluded from warranty.
The liability of EURO-PRO Corporation is limited solely to the cost of the repair
or replacement of the unit at our option. This warranty does not cover normal
wear of parts and does not apply to any unit that has been tampered with or used
for commercial purposes. This limited warranty does not cover damage caused
by misuse, abuse, negligent handling or damage due to faulty packaging or
mishandling in transit. This warranty does not cover damage or defects caused
by or resulting from damages from shipping or repairs, service or alterations to
the product or any of its parts, which have been performed by a repair person not
authorized by EURO-PRO.
This warranty is extended to the original purchaser of the unit and excludes all
other legal and/or conventional warranties. The responsibility of EURO-PRO
Corporation if any, is limited to the specific obligations expressly assumed by it
under the terms of the limited warranty. In no event is EURO-PRO Corporation
liable for incidental or consequential damages of any nature whatsoever. Some
states do not permit the exclusion or limitation of incidental or consequential
damages, so the above may not apply to you.
This warranty gives you specific legal rights, and you may also have other rights
which vary from province to province.
*
 Loading...