

Page 1
®
UV540CCO
INSTRUCTIONS
sharkclean.com
1-800-798-7398
Page 2
2
TOLL FREE: 1-800-798-7398
WARNING:
TO REDUCE THE RISK OF FIRE, ELECTRIC
SHOCK OR INJURY:
GENERAL ELECTRICAL SAFETY:
1. Unplug from electrical outlet when not in use
and before servicing.
2. DO NOT use vacuum with a damaged cord
or plug. If appliance is not working as it
should, has been dropped, damaged, left
outdoors, or dropped into water, return it to
SharkNinja Operating LLC for examination,
repair, or adjustment.
3. DO NOT pull or carry vacuum by the cord.
4. DO NOT unplug by pulling on cord; to
unplug, grasp the plug, not the cord.
5. DO NOT handle plug or appliance with wet
hands.
6. DO NOT run the vacuum over the power
cord.
7. DO NOT use the cord as a handle.
8. DO NOT close a door on the cord.
9. DO NOT pull cord around sharp corners.
The use of an extension cord is not
recommended.
10. DO NOT leave appliance when plugged in.
11. Keep cord away from heated surfaces.
12. Turn off all controls before plugging or
unplugging vacuum cleaner.
13. Always turn off this appliance before
connecting or disconnecting motorized
nozzle.
14. Store your appliance with the power cord
secured around the two cord holders-as
shown in the storage instructions.
IMPORTANT SAFETY INSTRUCTIONS
For Household Use Only
WHEN USING AN ELECTRICAL
APPLIANCE, BASIC SAFETY
PRECAUTIONS SHOULD ALWAYS
BE OBSERVED, INCLUDING THE
FOLLOWING:
READ ALL INSTRUCTIONS BEFORE
USING YOUR SHARK NAVIGATOR
™
LIFT-AWAY™ PROFESSIONAL.
POLARIZED PLUG:
To reduce the risk of electric shock, this
appliance has a polarized plug (one blade
is wider than the other). As a safety feature,
this plug will fit into a polarized outlet only
one way. If the plug does not fit fully into
the outlet, reverse the plug. If it still does
not fit, contact a qualified electrician. DO
NOT force into outlet or try to modify
to fit.
WARNING:
To reduce the
risk of electric shock or injury, do not
use outdoors or on wet surfaces.
Page 3

3
sharkclean.com
HOSE ATTACHMENTS:
1. DO NOT use if air flow is restricted; if the air
paths, the hose, or the accessories become
blocked, turn the vacuum cleaner off.
Remove all obstructions before you turn on
the unit again.
2. Keep the end of the hose and accessory
openings away from face and body.
3. Keep cleaning tools and hose suction
openings away from hair, face, fingers,
uncovered feet, or loose clothing.
4. Only use manufacturer’s recommended
attachments.
GENERAL USE:
1. Use only as described in this manual.
2. DO NOT put any objects into openings. DO
NOT use with any opening blocked; keep
free of dust, lint, hair, and anything that may
reduce air flow.
3. Keep your work area well lit.
4. Keep the vacuum moving over the carpet
surface at all times to avoid damaging the
carpet fibers.
5. DO NOT place vacuum on unstable
surfaces such as chairs or tables.
6. DO NOT allow young children to operate the
vacuum or use as a toy. Close supervision is
necessary when used near children.
7. DO NOT use vacuum cleaner if it has
been dropped, damaged, left outdoors, or
submerged in water. Return to SharkNinja
Operating LLC for examination, repair, or
adjustment.
8. DO NOT use without dust cup and/or filters
in place.
DUST CUP/FILTERS/ACCESSORIES:
Before turning on the vacuum:
1. Make sure that all filters are thoroughly dry
after routine cleaning.
2. Make sure that dust cup and all filters are in
place after routine maintenance.
3. Make sure accessories are free of
blockages.
4. Only use filters and accessories provided by
SharkNinja Operating LLC. [Failure to do so
will void the warranty.]
GENERAL CLEANING:
1. DO NOT pick up large-sized objects.
2. DO NOT pick up hard or sharp objects such
as glass, nails, screws or coins that could
damage the vacuum cleaner.
3. DO NOT pick up smoking or burning objects
such as hot coals, cigarette butts, fireplace
ash, or matches.
4. DO NOT use to pick up drywall dust.
5. DO NOT pick up flammable or combustible
materials such as lighter fluid, gasoline, or
kerosene or use vacuum in areas where
they may be present.
6. DO NOT pick up toxic solutions such as
chlorine bleach, ammonia, or drain cleaner.
7. DO NOT use in an enclosed space where
vapors are present from paint, paint thinner,
moth-proofing substances, flammable dust
or other explosive or toxic materials.
8. DO NOT vacuum up any liquids.
9. DO NOT immerse vacuum cleaner in water
or other liquids.
10. DO NOT use outdoors or on wet surfaces;
use only on dry surfaces.
11. Use extra care when cleaning on stairs.
SAVE THESE
INSTRUCTIONS
Page 4

4
1-800-798-7398
This manual covers model number:
UV540CCO
TECHNICAL SPECIFICATIONS
Voltage: 120V., 60Hz
Watts: 1200W
Amps: 10A
Page 5

5
sharkclean.com
English
English
Getting Started 6
Mode 1: Upright Vac 8
Mode 2: Portable Lift-Away 10
Above-Floor Cleaning 11
Storage 12
Maintenance 13
Emptying the Dust Cup 13
Cleaning the Pre-Motor Filters 13
Cleaning the Post-Motor HEPA Filter 14
Cleaning the Pet Power Brush 14
Cleaning the Motorized Floor Brush 14
Checking for Blockages 15
Troubleshooting Guide 16
Ordering Parts 17
Warranty & Product Registration 34
Contents
Thank you for
purchasing
the Shark
Navigator™
Lift-Away
™
Professional
Page 6
6
TOLL FREE: 1-800-798-7398
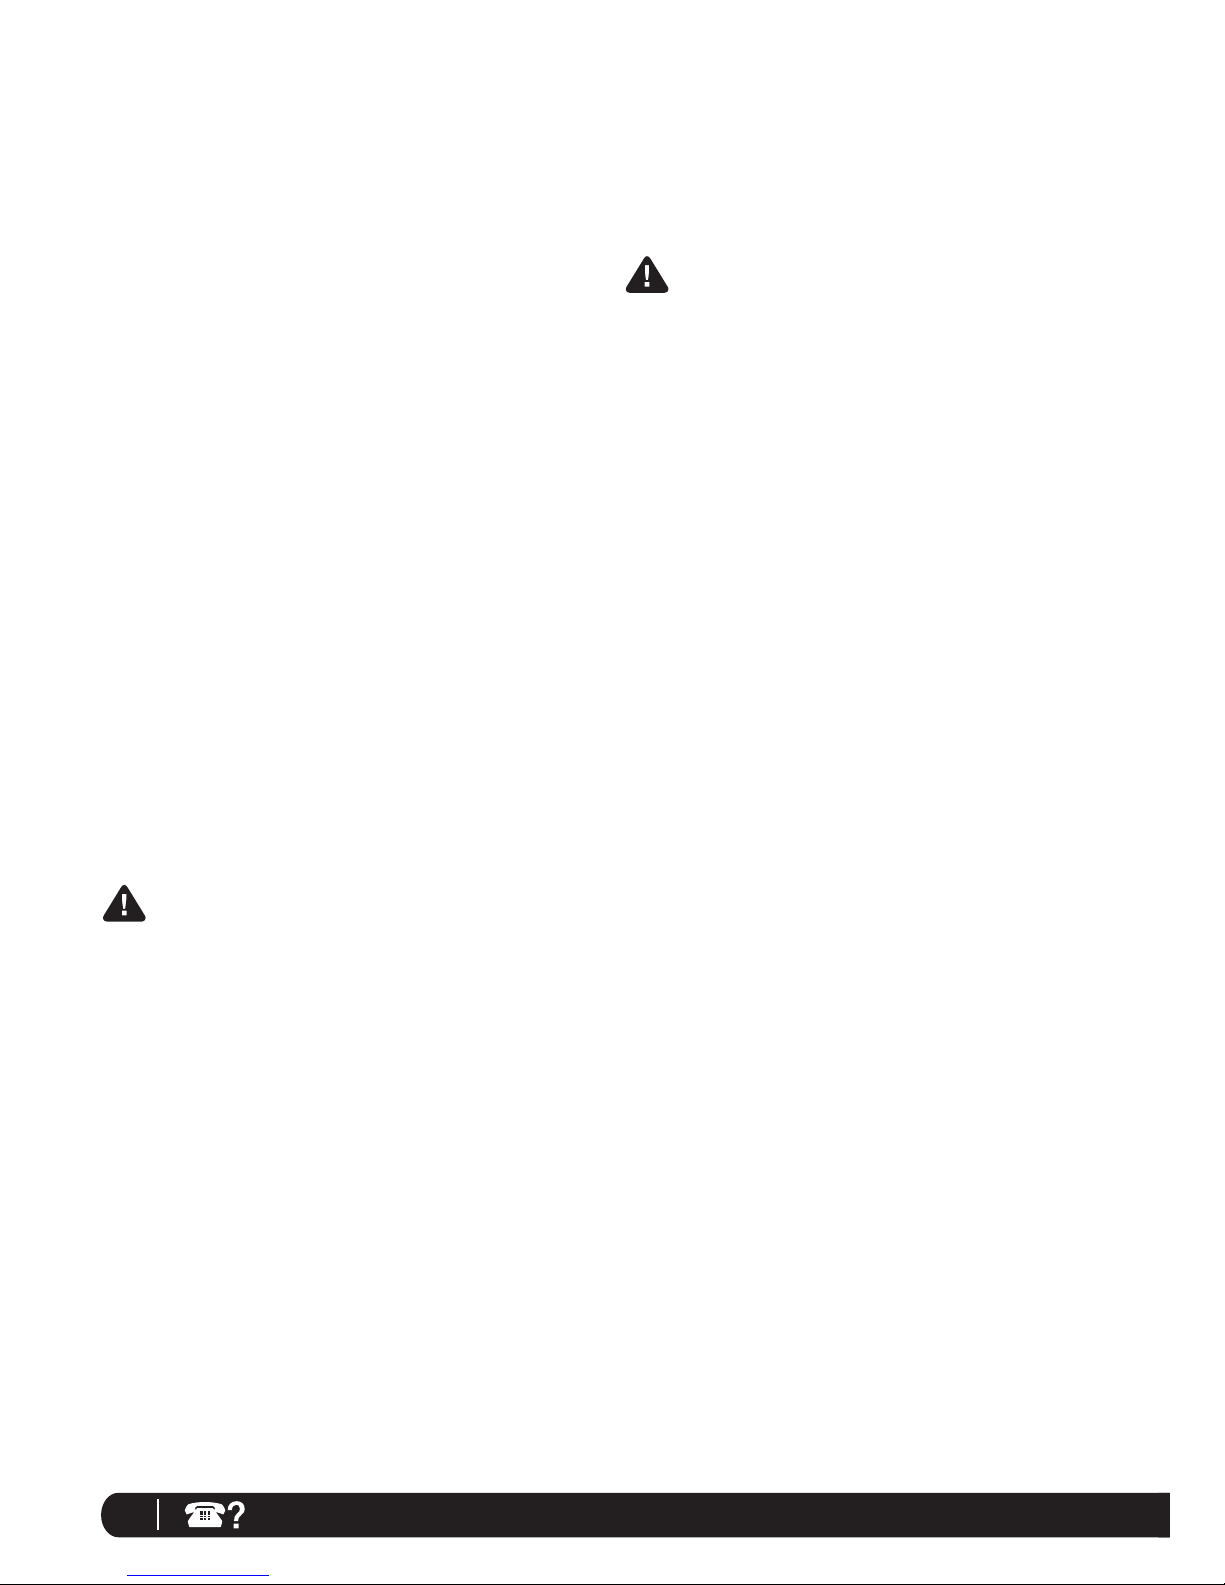
FIRST THINGS FIRST, YOU NEED TO KNOW WHAT’S
IN THE BOX YOU JUST OPENED:
a Handle with Stretch Hose
b Accessory Holder
c Extension Wand
d Portable Lift-Away
™
e Motorized Floor Brush
f Dusting Brush
g Crevice Tool
h Pet Power Brush
i Extension Wand
f
h
ACCESSORIES:
CREVICE TOOL
Reach deep into narrow spaces and clean between
cushions, under radiators and baseboards and in
hard-to-reach crevices and corners. (Fig. 1)
DUSTING BRUSH
Dust shelves, lamp shades, window blinds, books, furniture
and other upholstered household items. (Fig. 2)
PET POWER BRUSH
This unique tool was engineered for fast and easy removal
of pet hair and ground in dirt from carpeted stairs and
upholstery. (Fig. 3)
ACCESSORY HOLDER
Designed to hold the crevice tool and dusting brush. For
quick access to tools when vacuuming and cleaning around
the house. (Fig. 4)
EXTENSION WAND
Reach even further and attach the crevice tool, the dusting
brush or the pet power brush for cleaning all around the
house. (Fig. 5)
Fig. 1
Fig. 4
Fig. 2
Fig. 3
a
e
c
d
b
g
Getting Started
Fig. 5
i
Page 7
7
sharkclean.com
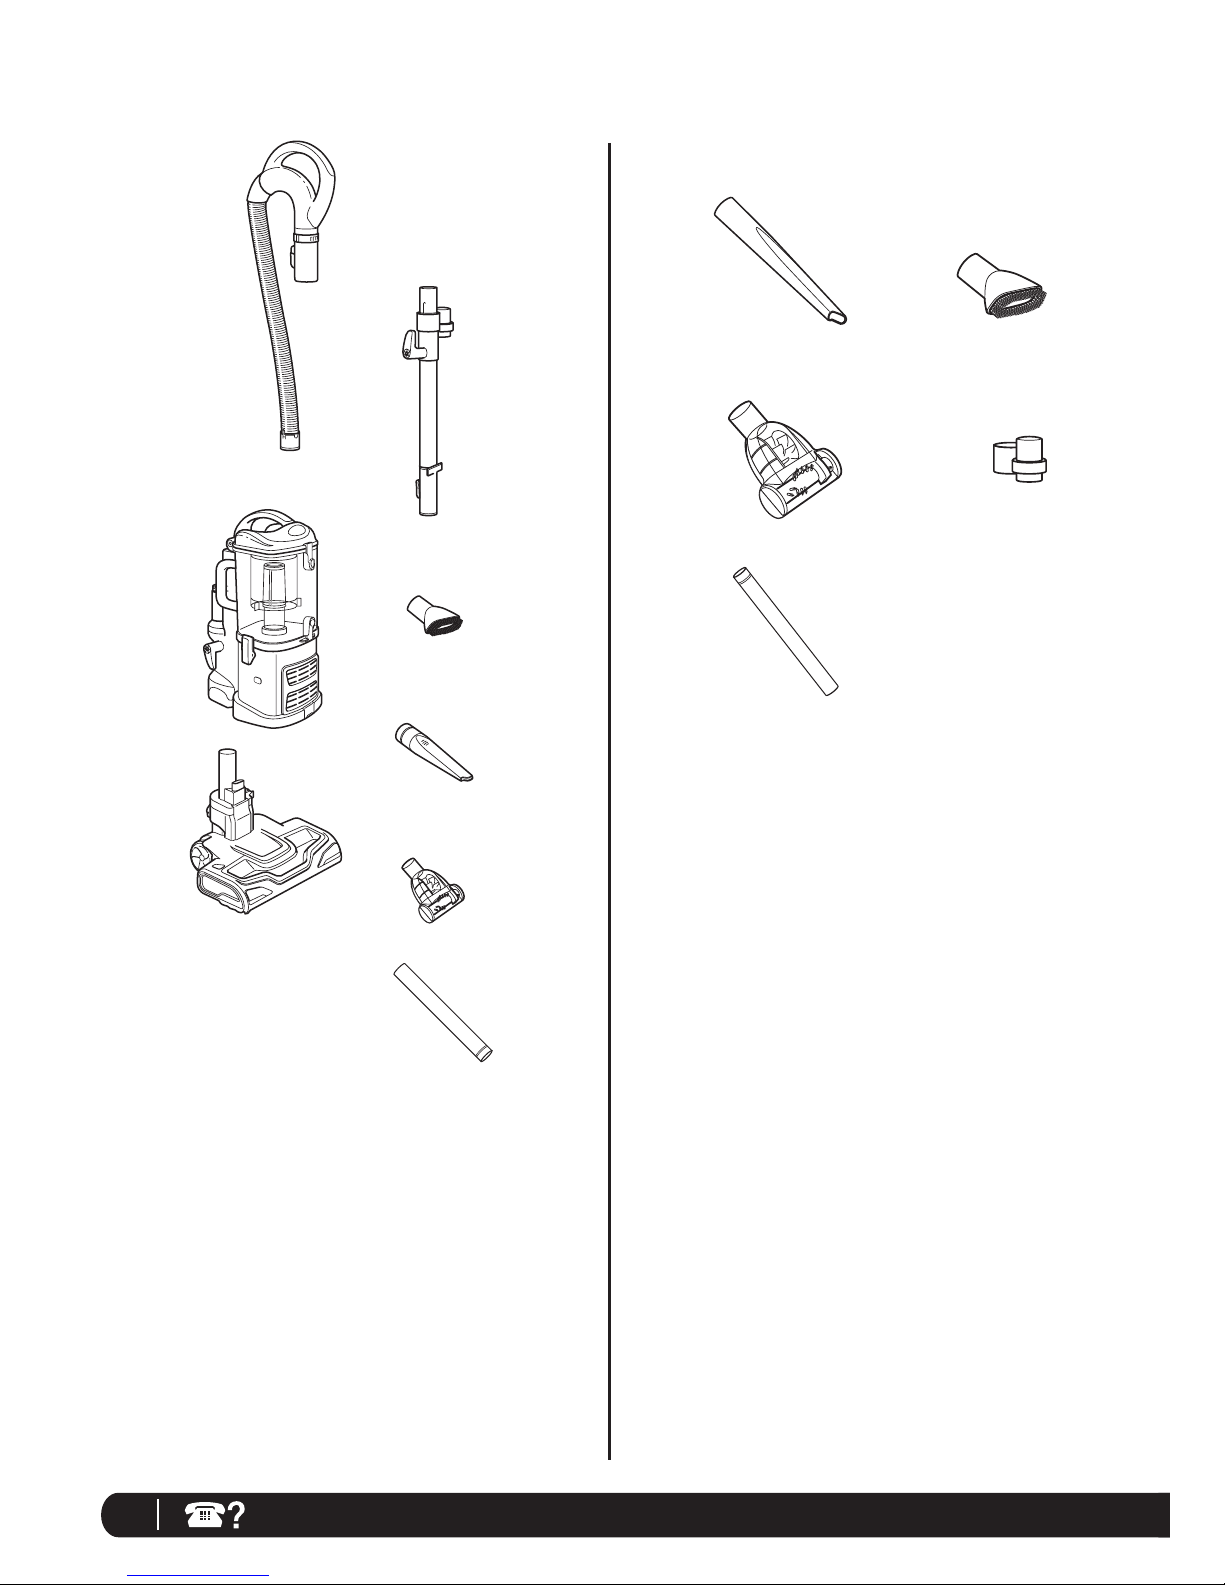
Your new Shark Navigator™ Lift-Away™ Professional vacuum cleaner can easily be configured into different cleaning
modes to meet all your cleaning needs: upright vacuum and portable Lift-Away - both with constant suction power.
MODES:
1 UPRIGHT VAC
Upright vacuuming - floors and carpets. (Fig. 6)
Fig. 6
Fig. 7
2 PORTABLE L I F T-AWAY
®
Take the Lift-Away® with you around the house to clean
hard to reach places. (Fig. 7)
Page 8
8
1-800-798-7398
To reduce the risk of electric shock, unplug the unit before assembling, adding or removing attachments or
converting modes.
WARNING: The On/Off switch is on the top of the Lift-Away™ canister. Always ensure the power is OFF
(“O” position) before plugging and unplugging.
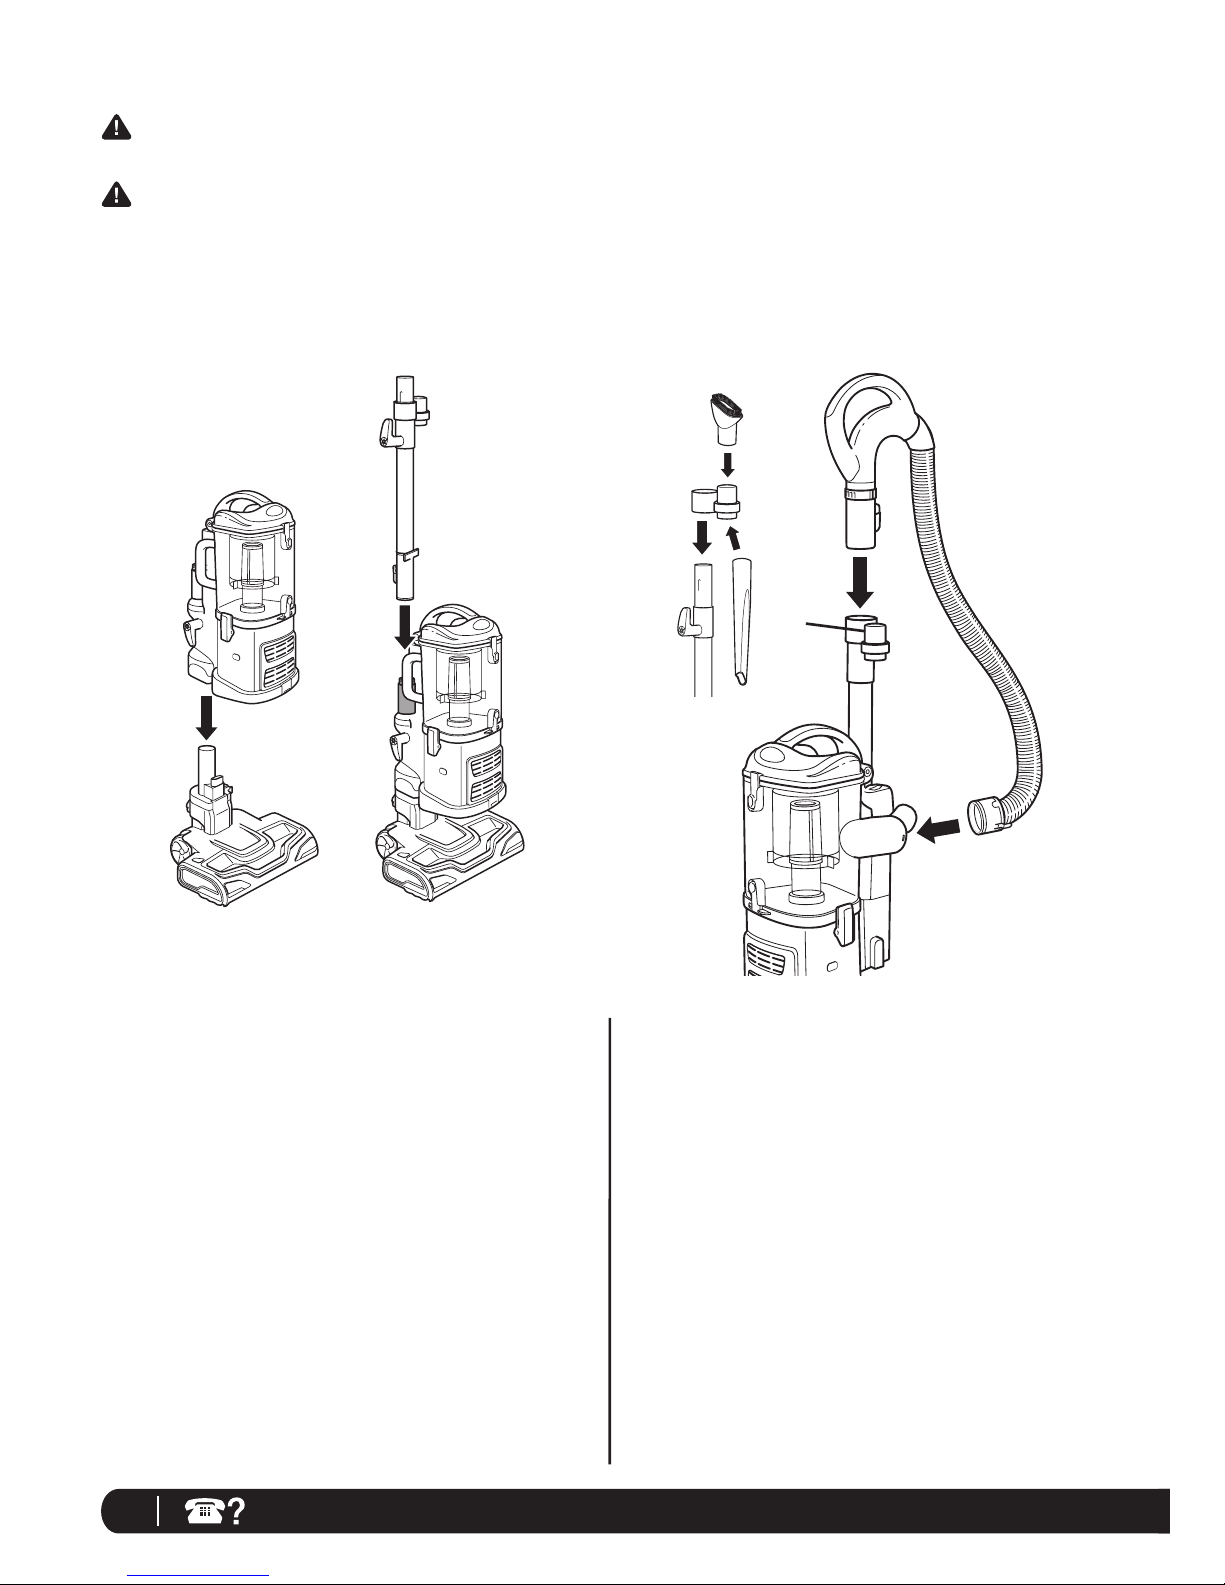
TO ASSEMBLE:
1 Place the floor nozzle on a level surface.
2 Align the tube of the floor nozzle with the tube on the
Lift-Away canister and lower until you hear the two pieces
click into place. (Fig. 8)
When attaching the motorized floor brush, ensure that
the latching mechanism is fully locked in place to ensure
electrical connection has been made.
3 Attach the end of the extension wand to the tube on the
back of the Lift-Away canister until it clicks into place.
(Fig. 9)
4 Slide the accessory holder (a) positioned opposite the
upper cord wrap, over the extension wand. Align the tab
with the groove and push down. (Fig. 10)
5 Push the handle (b) onto the top of the extension wand
until you hear it click into place. (Fig. 10)
6 Insert the end of the stretch hose (c) into the connector on
the back of the Lift-Away canister. (Fig. 10)
7 Store the dusting brush (d) and the crevice tool (e) on the
mounts of the accessory holder. (Fig. 10)
Fig. 8 Fig. 9
Fi g. 10
Mode 1: Upright Vac
c
a
d
e
b
Page 9

9
sharkclean.com
English
English
TO USE:
1 Rotate the cord release to quickly release the power cord.
2 Secure the power cord in the cord hook.
= Brush Roll ON
= Bare Floor
= OFF
3 Press the On/Off switch (a) to the “I” position to vacuum
bare floors (straight suction only) or to the “II” position to
engage the motorized floor brush (for vacuuming carpets
and rugs). (Fig. 11)
IMPORTANT: The motorized brush indicator light (b)
will illuminate green when motorized floor brush is on, or
red if there is a blockage or jam. (Fig. 11) This feature is
designed to protect your Lifetime Belt that powers your
motorized floor brush. See Checking for Blockages on
page15.
4 Gently press the floor nozzle down with your foot while you
grasp the handle and tilt it back towards you. (Fig. 12)
NOTE: The rotating brush on the motorized floor brush will
not spin unless the nozzle is flat against the floor and the
handle is tilted back.
5 It may become necessary at times to adjust the
suction release (c) on the handle. (Fig.11) If the
vacuum seems difficult to push or pull or if it is
lifting up area rugs, adjust the suction release
by rotating the collar 90° counterclockwise to open
the valve. Rotate the collar clockwise to close the
valve when you need high suction and for vacuuming
floors.
6 Empty dust cup after vacuuming and periodically during
use when it appears full. (See “Maintenance” section for
instructions.)
7 When you are finished vacuuming, turn the vacuum off.
Fig . 12
Release suction
for easier push
and pull on high
pile carpets and
area rugs.
b
Suction
Release Collar
c
a
Fi g . 11
Page 10
10
1-800-798-7398
You can carry your vacuum cleaner
in both modes by the carry handle
located on top of the dust cup.
Fig . 15
Fig. 14
Fig. 13
Mode 2: Portable Lift-Away
™
b
a
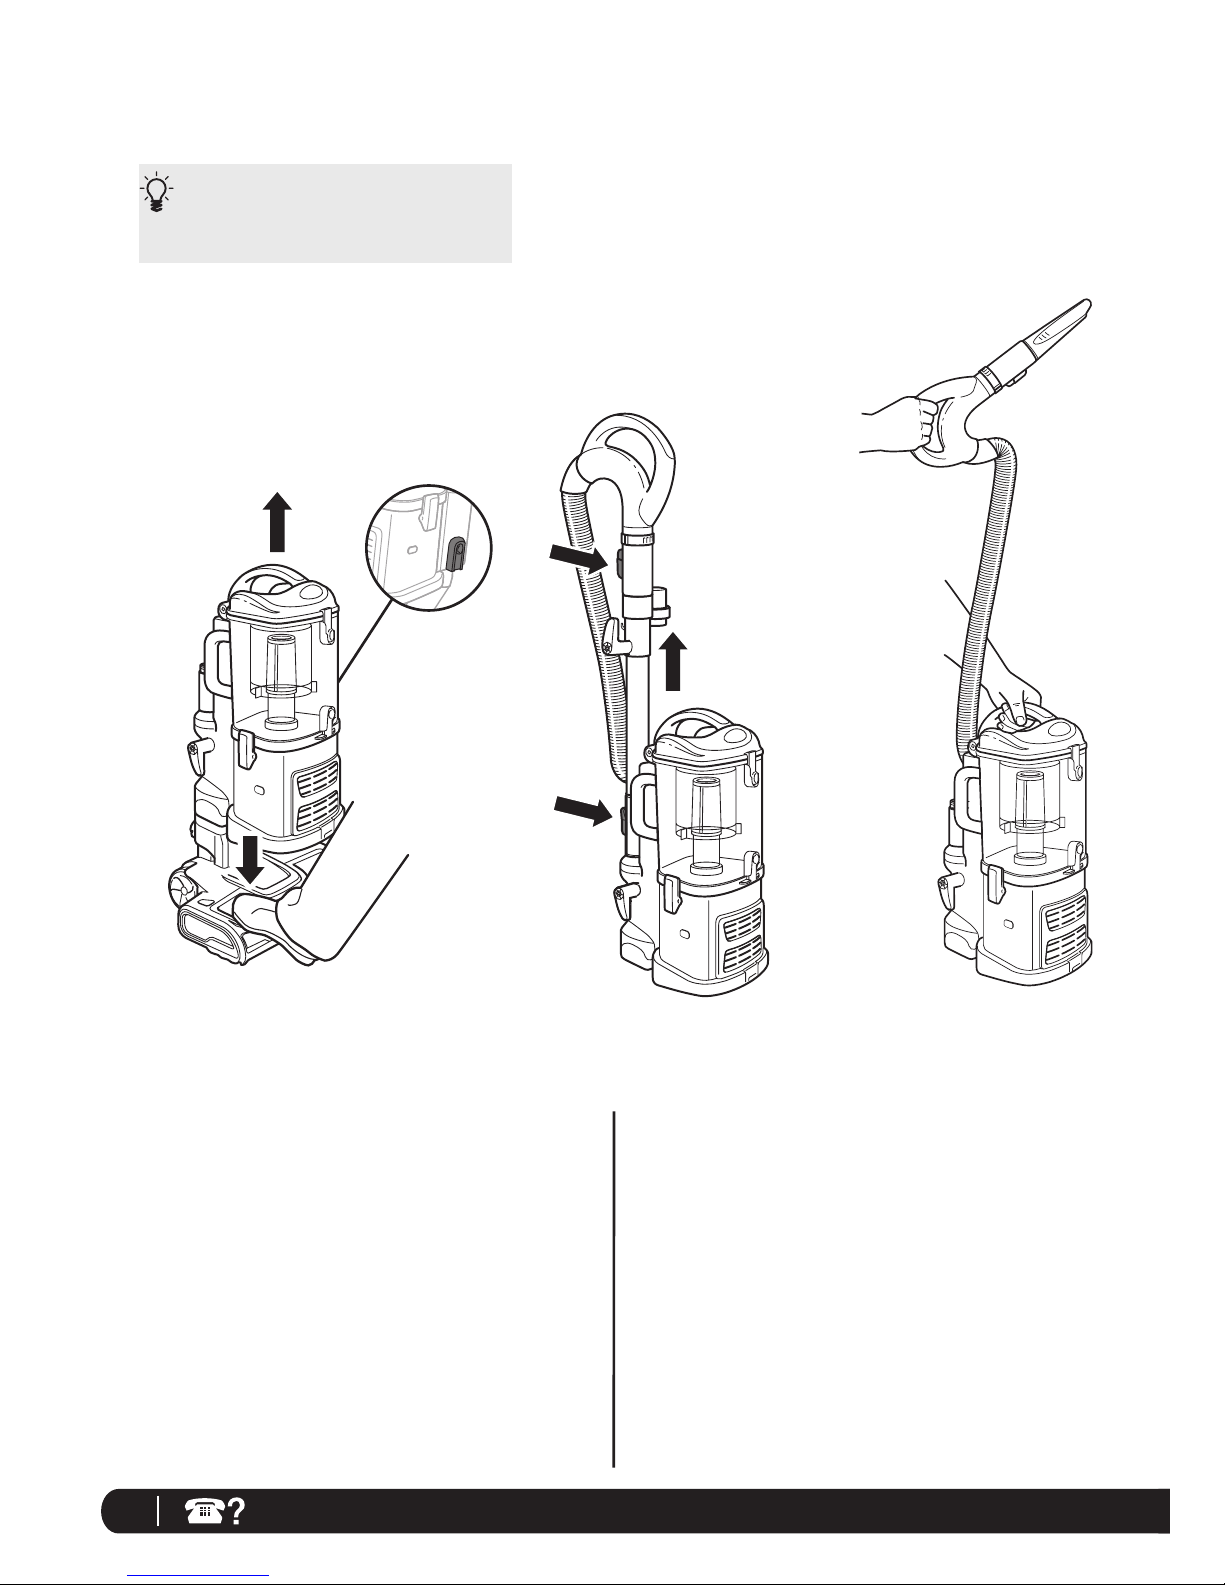
PORTABLE LIF T- AWAY
1 Separate the portable Lif t-Away canister from the floor
nozzle by pressing the red release button (a) on the side
of the canister. Gently hold the nozzle to the floor with
your foot and pull the canister up. (Fig. 13)
2 Press the handle release button (a) and pull the handle up
or press the extension wand release button (b) and pull the
extension wand up. (Fig. 14)
3 Attach desired accessory onto the end of either the
extension wand or the handle.
4 Press the On/Off switch to the “I” position to turn the
vacuum on for above-floor cleaning and hold the handle in
one hand while you carry the portable Lift-Away around
the house with the other hand. (Fig. 15)
Page 11
11
sharkclean.com
English
English
Fi g. 16
Suction
Release Collar
Above-Floor Cleaning
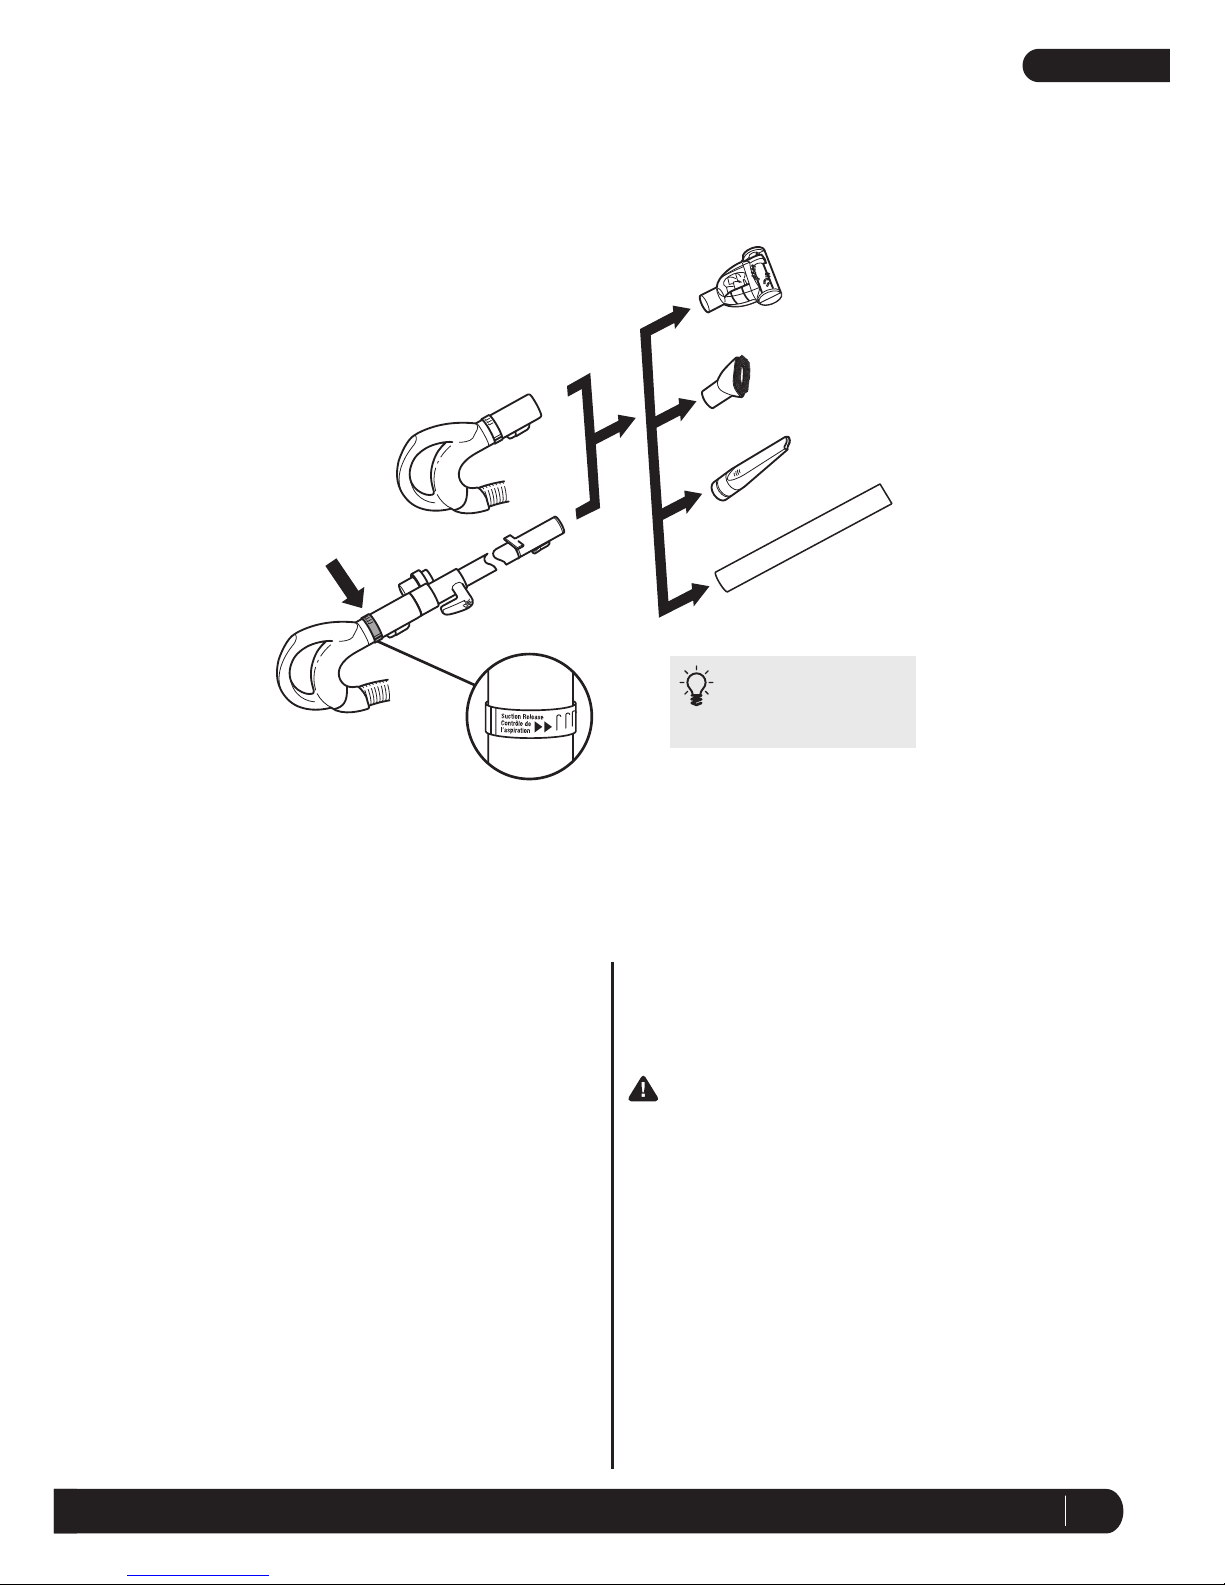
CLEAN ABOVE THE FLOOR IN UPRIGHT VAC OR PORTABLE
LIFT-AWAY™ MODE
1 Press the handle release button and pull the handle up
or press the extension wand release button and pull the
extension wand up.
2 Attach desired accessory onto the end of either the
extension wand or the handle. (Fig. 16)
3 Adjust the amount of suction with the suction
release on the handle. Open the valve (a) by rotating
the collar 90˚ counterclockwise for low suction
when doing light jobs such as drapes or fine
surfaces. Close the valve (a) by rotating the collar
clockwise 90˚ for high suction and when using the
hand held pet power brush. (Fig. 16)
4 Press the On/Off switch to the “I” position to turn the
vacuum on for above-floor cleaning.
IMPORTANT: Ensure vacuum is in upright position. Do
not use position “II” when cleaning above the floor in the
upright vac mode as this will engage the motorized floor
brush. The rotating brush may damage your floor if run for
a prolonged period of time in one area.
Release suction when
dusting delicate objects,
furniture or draperies.
Page 12

12
1-800-798-7398
Fig. 17
Quick
Cord Release
Lower Cord
Storage Clip
Storage and Maintenance
STORE YOUR VACUUM SAFELY
1 Convert your vacuum back to upright vac mode.
2 Rotate the upper quick cord release to its upright position
and coil the power cord loosely around the two clips. Clip
the plug onto the cord to secure. (Fig. 17)
3 Store the dusting brush and the crevice tool on the mounts
on the accessory holder.
4 Store your vacuum cleaner safely in a cool dry area where
it will not be a hazard, will not get damaged and will not
cause damage to anyone or anything.
NOTE: Empty dust cup after cleaning and prior to storing.
(See “Maintenance” section for instructions.)
To reduce the risk of electric shock, unplug the unit before
performing any cleaning, maintenance, or troubleshooting
checks.
Reassemble all parts securely before operating vacuum.
DO NOT operate the vacuum without the filters and dust
cup in place.
DO NOT operate the vacuum with WET filters.
IMPORTANT: Make sure all filters are completely dry
before inserting back into vacuum.
WARNING: Never insert sharp objects into any opening to
clear an obstruction.
IMPORTANT: Damages caused while clearing or
attempting to clear blockages are not covered under your
product’s limited warranty.
Page 13

13
sharkclean.com
English
English
IMPORTANT: Loss of suction may
occur if foam filters are not cleaned
every 3 months. Rinse and allow to
air dry completely. Also, tap loose dirt
off filter between washes as needed.
Foam filters may appear dirty after
use - this is normal.
Fig. 18 Fi g. 19
COMPONENT
MAINTENANCE SCHEDULE
Rinse and air dry every 3 months under normal use.
Empty each time you vacuum.
Pre-Motor Foam Filter
Dust Cup
Rinse and air dry every 3 months under normal use.
Pre-Motor Felt Filter
Clean once every 2 years or as needed.
Post-Motor HEPA Filter
1
2
3
4
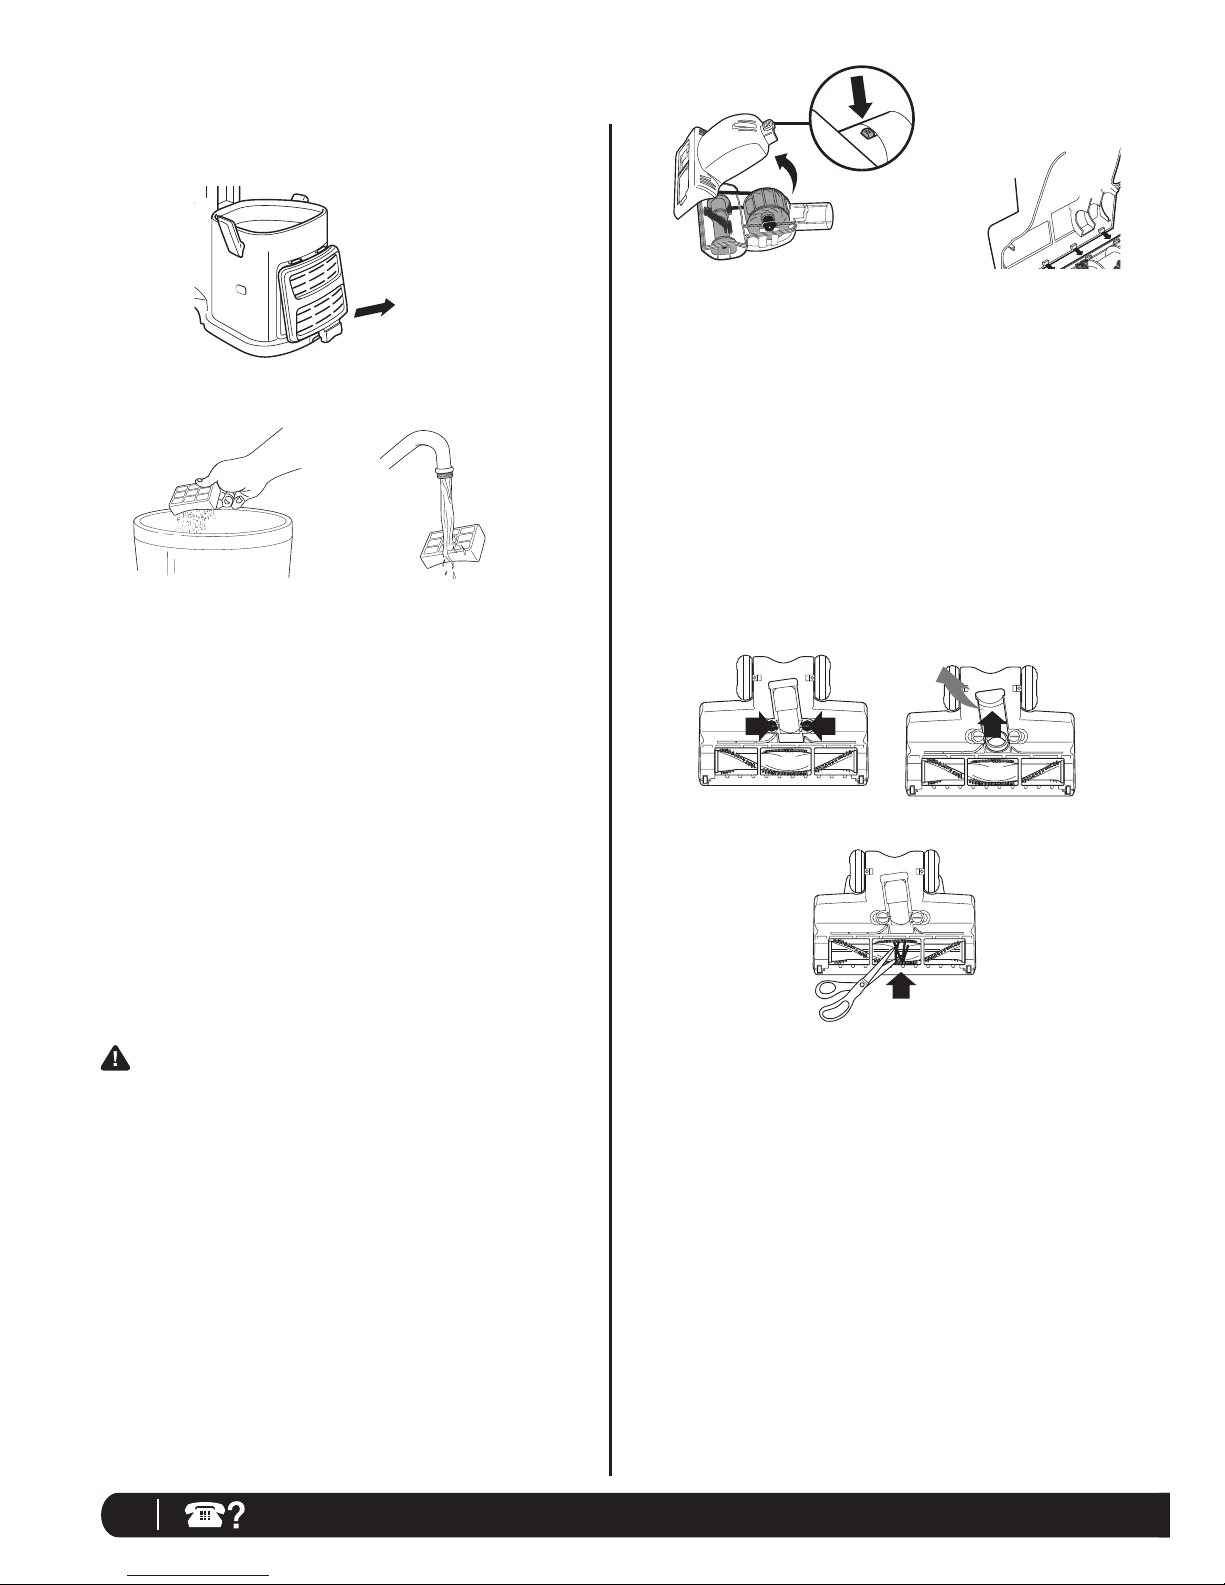
CLEANING THE PRE-MOTOR FILTERS
1 Remove the dust cup.
2 Pull the 2 filters out from the top of the motor base.
(Fig. 21)
3 Rinse the filters thoroughly in lukewarm water until the
water runs clear.
DO NOT put the filter in the washing machine or
dishwasher.
NOTE: The material in the filter will discolor over time. This
is NORMAL and will not affect the performance of the filter.
4 Squeeze out excess water and let air-dry for at least 24
hours before replacing. Do not use a hair dryer or other
heating methods to dry.
5 Place the felt filter in first, then the foam filter.
6 Replace the dust cup.
EMPTYING THE DUST CUP
The dust cup needs to be emptied each time you vacuum and
periodically during cleaning, when the dust cup appears full.
1 Undo the latches on the sides of the dust cup by lifting
them up and outwards to remove the dust cup from the
motor base. (Fig. 18)
2 Hold the dust cup over a trash receptacle and press the
bottom door release button. (Fig. 19) Tap gently to empty
contents. Press the door shut again until it clicks.
3 If needed, turn the dust cup upside down over the trash
receptacle and press the top door release button.
(Fig. 20) Tap gently to remove contents.
Use a dry cloth or paper towel to remove debris stuck to the
screen filter inside the dust cup. Press the door shut again
until it clicks.
4 Replace the dust cup on top of the motor base. Hook the
two latches onto the tabs on the sides of the dust cup and
push down to lock.
Screen
Filter
Fig. 20
Fig. 21
Pre-Motor
Foam Filter
Felt Filter
Post Motor
HEPA Filter
Maintenance
Page 14

14
1-800-798-7398
CLEANING THE PET POWER BRUSH
1 Slide the locking latch (a) forward and gently tilt brush
housing upward to remove. (Fig. 25)
2 Carefully remove any blockage or debris and cut away
any build-up of hair or string wrapped around the rotating
bristle brush with scissor.
3 To reassemble, insert the tabs on the front edge of the
bottom cover into the matching holes in the top half and tilt
it back down until it clicks into place. (Fig. 26)
Fig. 23
Fig. 22
Fig. 24
CLEANING THE POST-MOTOR HEPA FILTER
1 Remove the filter cover from the front of the vacuum by
pulling up on the tab and pulling the cover away from the
vacuum. (Fig. 22)
2 Take out the HEPA filter by pulling it straight out.
3 Turn the filter over so that the dirty side is on the bottom
and vigorously tap it clean against a garbage can to remove
any dust. (Fig. 23)
4 Wash the filter under the tap using lukewarm water with the
dirty side face down until the water runs clear. (Fig. 24)
DO NOT put the filter in the washing machine or
dishwasher.
NOTE: The material in the filter will discolor over time. This
is NORMAL and will not affect the performance of the filter.
5 Allow the filter to air dry for 24 hours. Do not use a hair
dryer or other heating methods to dry.
6 Once the HEPA filter is dry, replace it back into the vacuum.
7 Replace the cover by inserting the two tabs into the holes at
the top and then swinging the cover down until it clicks into
place.
Fig. 26
Fig. 25
CLEANING THE MOTORIZED FLOOR BRUSH
When your motorized floor brush needs cleaning or locks onto
an object, it automatically shuts down to prevent damage to
your lifetime belt. The indicator light will illuminate red warning
you to turn off the vacuum and clear blockage immediately.
The light will reset itself once blockage has been cleared and
power has been cycled on/off or vacuum has been locked in the
upright position.
1 Detach the motorized floor brush from the portable
Lift-Away™ canister.
2 Squeeze tabs together and pull up to expose the airway.
(Fig. 27, Fig. 28)
3 Remove any string, carpet fibers or hair that may be
wrapped around the brushroll. (Fig. 29)
Maintenance - cont’d
Fig. 27
a
Fig. 29
Fig. 28
Page 15

15
sharkclean.com
English
English
CHECKING FOR BLOCKAGES
Blockages may cause your vacuum to overheat and shut down.
To prevent this from happening, check potential blockage
areas after heavy use or if you detect a loss of suction or poor
cleaning performance.
1 Dust Cup
Dust cup may be full. Empty dust cup.
2 Pre-Motor and Post-Motor Filters
• Pre-motor filters require washing every 3 months for
optimum performance.
The post-motor HEPA filter needs to be washed every
2 years.
• Ensure that all the filters are clean.
3 Accessories
• Check intake openings:
- Extension Wands
- Dusting Brush
- Crevice Tool
- Pet Power Brush
4 Hose and Connections to Vacuum
• Detach the stretch hose from the back of the portable
Lift-Away™ canister by squeezing the tabs together
and pulling up. (Fig. 30) Straighten out the hose and
look inside for blockages.
• Remove the dust cup and extension wand and separate
the portable Lift-Away canister from the motorized
floor brush. Look in all 4 openings for any blockages.
(Fig. 31)
Make sure you are working in a well-lit
area and use a flashlight to help
search for blockages.
Fig. 31
Fig. 30
Page 16

16
1-800-798-7398
PROBLEM POSSIBLE REASONS AND SOLUTIONS
Vacuum is not
picking up dirt.
Check filters to see if they need cleaning. Follow instructions for rinsing
and drying the filters before re-inserting back into the vacuum. (See
“Maintenance” sections for instructions.)
Dust cup may be full; empty dust cup.
Check hose and hose connections for blockages; clear blockages if required.
If dust cup is empty, and attachment inlets are clear, check for other
blockages. (See “Checking for Blockages” for instructions.)
Vacuum lifts scatter rugs
(lightweight, movable rugs).
Take care when vacuuming scatter-type rugs or rugs with delicately sewn
edges. Open the suction release on the handle to decrease suction power.
Move the On/Off switch to “I - Bare Floors” position to disengage the
brush roll.
Airflow is restricted. No
suction or light suction.
Check filters to see if they need cleaning. Follow instructions for rinsing and
drying the filters before re-inserting back into the vacuum.
Dust cup may be full; empty dust cup.
Check hose, hose connections, nozzles and accessories for blockages; clear
blockages if required.
Close the suction release on the handle to increase suction power.
If dust cup is empty, and attachment inlets are clear, check for other
blockages.
Brush roll does not spin.
Immediately turn off and unplug vacuum, disconnect the nozzle and remove
blockage before reconnecting and turning vacuum back on.
Pull the handle toward you and release the floor nozzle to disengage the
auto-off feature.
Move the On/Off switch to the “II - Brush Roll On” position.
Vacuum turns off
on its own.
This vacuum cleaner is equipped with a motor protective thermostat. If for
some reason your vacuum overheats, the thermostat will automatically turn
the unit off. Should this occur, perform the following steps to restart the
motor thermostat:
1. Move the On/Off switch to the “O” (Off) position.
2. Unplug the vacuum.
3. Empty the dust cup and clean filters.
4. Check for blockages in hose, accessories and inlet openings.
5. Allow the unit to cool for a minimum of 45 minutes.
6. Plug in the vacuum.
7. Turn the On/Off switch to the “I” (On) position to restart the vacuum.
Note: If vacuum still does not start, contact Customer Service at:
1-800-798-7398.
Troubleshooting Guide
Page 17

17
sharkclean.com
English
English
PART PART NO.
1 Pre-Motor Filter Set XFF350
2 HEPA Filter XHF350
3 Dusting Brush 349FJV540
4 Crevice Tool 350FJV540
5 Pet Power Brush 351FJV540
6 Extension Wand 352FJV540
5
3
1
2
6
Ordering Parts
To purchase replacement parts, please visit our website sharkaccessories.com
or contact customer service: 1-800-798-7398.
4
Page 18

18
1-800-798-7398
AVERTISSEMENT :
POUR RÉDUIRE LE RISQUE D’INCENDIE,
D’ÉLECTROCUTION ET DE BLESSURES :
INSTRUCTIONS DE SÉCURITÉ
ÉLECTRIQUE GÉNÉRALES :
1. Débranchez l’aspirateur de la prise de courant
lorsqu’il n’est pas utilisé et avant tout entretien.
2. N’UTILISEZ PAS l’aspirateur si sa fiche ou son
cordon sont endommagés. Si l’appareil ne
fonctionne pas comme il se doit, a été échappé,
endommagé, laissé à l’extérieur ou échappé dans
l’eau, veuillez le retourner à SharkNinja Operating
LLC pour une vérification, pour un réglage ou
pour une réparation.
3. NE DÉPLACEZ PAS l’appareil en tirant sur son
cordon d’alimentation.
4. NE DÉBRANCHEZ PAS l’appareil en tirant sur
le cordon d’alimentation; pour le débrancher,
agrippez la fiche et non le cordon.
5. NE MANIPULEZ PAS la fiche ou l’appareil avec
des mains humides.
6. NE PASSEZ PAS l’aspirateur sur le cordon
d’alimentation.
7. N’UTILISEZ PAS le cordon comme une poignée.
8. NE FERMEZ PAS une porte sur le cordon.
9. NE TIREZ PAS le cordon en le faisant passer
sur des rebords coupants. Nous déconseillons
l’utilisation d’une rallonge électrique.
10. NE LAISSEZ PAS l’appareil branché sans
surveillance.
11. Tenez le cordon loin des surfaces chaudes.
12. Éteignez toutes les commandes avant de
brancher ou de débrancher l’aspirateur.
13. Veuillez toujours mettre cet appareil hors tension
avant de brancher ou de débrancher l’accessoire
motorisé.
14. Lors du rangement de l’appareil, enroulez
fermement le cordon d’alimentation autour des
deux crochets à cordon – comme illustré dans
les instructions de rangement.
LORSQUE VOUS UTILISEZ UN APPAREIL
ÉLECTRIQUE, DES MESURES DE
SÉCURITÉ ÉLÉMENTAIRES DEVRAIENT
TOUJOURS ÊTRE RESPECTÉES, Y
COMPRIS LES MESURES SUIVANTES:
LISEZ TOUTES LES INSTRUCTIONS
AVANT D’UTILISER VOTRE ASPIRATEUR
NAVIGATORMC LIFT-AWAYMC
PROFESSIONAL DE SHARKMD.
FICHE POLARISÉE :
Afin de réduire les risques d’électrocution, cet
appareil a été muni d’une fiche polarisée (une
broche est plus large que l’autre). Par mesure
de sécurité, cette fiche ne peut être insérée
que d’un seul côté dans une prise polarisée.
Si la fiche ne s’insère pas complètement
dans la prise de courant, inversez-la. Si cela
ne fonctionne toujours pas, contactez un
électricien compétent.
NE forcez PAS et ne modifiez pas la fiche
pour la brancher dans une prise murale.
AVERTISSEMENT:
Pour réduire le risque d’électrocution,
n’utilisez pas l’appareil à l’extérieur ou sur
des surfaces mouillées.
MESURES DE SÉCURITÉ IMPORTANTES
Pour usage domestique seulement
Page 19

Français
19
sharkclean.com
ACCESSOIRES POUR TUYAU SOUPLE :
1. N’UTILISEZ PAS l’appareil si le débit d’air est
restreint; si les conduits d’air, le tuyau souple
ou les accessoires sont obstrués, éteignez
l’aspirateur. Retirez toutes les obstructions avant
de remettre l’appareil en marche.
2. Gardez l’extrémité du tuyau souple et les orifices
d’aspiration des accessoires éloignés de votre
visage et de votre corps.
3. Gardez les accessoires de nettoyage et les
orifices d’aspiration éloignés de vos cheveux, de
votre visage, de vos doigts, de vos pieds nus et
de vêtements amples.
4. N’utilisez que les accessoires recommandés par
le fabricant.
UTILISATION GÉNÉRALE :
1. Utiliser l’appareil seulement de la façon décrite
dans ce guide.
2. N’INSÉREZ PAS d’objets dans les ouvertures.
N’utilisez PAS l’appareil si des ouvertures sont
obstruées; assurez-vous que les ouvertures sont
libres de poussière, peluches, cheveux et d’objets
pouvant réduire le débit d’air.
3. Assurez-vous que votre espace de travail est bien
éclairé.
4. L’aspirateur doit toujours être en mouvement sur
le tapis afin d’éviter d’endommager les fibres.
5. NE PLACEZ PAS l’aspirateur sur des surfaces
instables telles que des chaises et des tables.
6. NE PERMETTEZ PAS aux jeunes enfants d’utiliser
l’appareil ou de s’en servir comme jouet. Une
surveillance étroite est nécessaire lorsque
l’appareil est utilisé par un enfant ou à proximité
d’un enfant.
7. N’UTILISEZ PAS l’aspirateur s’il a été échappé,
endommagé, utilisé à l’extérieur ou immergé dans
l’eau. Retournez l’appareil à SharkNinja Operating
LLC pour vérification, réparation ou réglage.
8. N’utilisez PAS l’appareil si le récipient à poussière
et (ou) les filtres ne sont pas en place.
RÉCIPIENT À POUSSIÈRE / FILTRES /
ACCESSOIRES :
Avant de mettre l’aspirateur en marche :
1. Assurez-vous que les filtres sont complètement
secs après le nettoyage de routine.
2. Après avoir effectué l’entretien de routine,
assurez-vous que le récipient à poussière et tous
les filtres sont bien en place.
3. Assurez-vous que les accessoires sont libres de
toute obstruction.
4. Utilisez seulement les filtres et accessoires fournis
par SharkNinja Operating LLC. [À défaut de quoi,
la garantie sera annulée.]
NETTOYAGE GÉNÉRAL :
1. NE RAMASSEZ PAS de gros objets.
2. N’ASPIREZ PAS des objets durs ou pointus
comme du verre, des clous, des vis ou de la
monnaie, lesquels pourraient endommager
l’aspirateur.
3. N’ASPIREZ PAS d’objets fumants ou brûlants
comme des charbons chauds, des cendres
chaudes, des bouts de cigarettes ou des
allumettes.
4. N’UTILISEZ PAS l’aspirateur pour ramasser de la
poussière de cloison sèche.
5. N’ASPIREZ PAS de liquides inflammables ou
combustibles tels que de l’essence à briquets, du
carburant, du kérosène; n’utilisez pas l’aspirateur
dans des endroits où ces produits peuvent être
présents.
6. N’UTILISEZ PAS l’aspirateur pour aspirer des
solutions toxiques telles que de l’eau de javel, de
l’ammoniac ou du nettoyeur à drains.
7. N’UTILISEZ PAS l’appareil dans des endroits clos
où il y a des vapeurs provenant de la peinture,
des diluants à peinture, des substances antimites,
de la poussière inflammable ou tout autre
matériau explosif ou toxique.
8. N’ASPIREZ aucun liquide.
9. N’IMMERGEZ PAS l’appareil dans l’eau ou dans
un autre liquide.
10. N’UTILISEZ PAS l’appareil à l’extérieur ou sur des
surfaces mouillées; utilisez l’appareil uniquement
sur des surfaces sèches.
11. Soyez particulièrement prudent en nettoyant les
escaliers.
VEUILLEZ CONSERVER
CES INSTRUCTIONS
Page 20

20
1-800-798-7398
Ce manuel concerne le modèle :
UV540CCO
CARACTÉRISTIQUES TECHNIQUES
Voltage : 120 V., 60 Hz
Watts : 1 200 W
Amps : 10 A
Page 21

Français
21
sharkclean.com
À faire au début 22
Mode 1 : Aspirateur vertical 24
Mode 2 : Aspirateur portatif Lift-Away
26
Nettoyage sur surface élevée 27
Rangement 28
Entretien 29
Vidange du récipient à poussière 29
Nettoyage des filtres avant moteur 29
Nettoyage du filtre HEPA après moteur 30
Nettoyage de la brosse turbo animaux 30
Nettoyage de la buse à plancher motorisée 30
Détection des obstructions 31
Guide de dépannage 32
Commande de pièces 33
Garantie et enregistrement du produit 35
Table des matières
Merci d’avoir
acheté l’aspirateur
Navigator
MC
Lift-AwayMC
Professional de
SharkMD.
Page 22

22
1-800-798-7398
TOUT D’ABORD, VOUS DEVEZ VOUS FAMILIARISER
AVEC LE CONTENU DE CET EMBALLAGE
:
a Poignée avec tuyau extensible
b Support pour accessoires
c Tube rallonge
d Aspirateur portatif Lift-Away
MC
e Buse à plancher motorisée
f Brosse à épousseter
g Suceur plat
h Brosse turbo animaux
i Tube rallonge
f
h
ACCESSOIRES :
SUCEUR PLAT
Pour le nettoyage en profondeur des espaces étroits et entre
les coussins, sous les radiateurs et les plinthes, ainsi que
dans les fentes et les recoins difficiles d’accès. (Fig. 1)
BROSSE À ÉPOUSSETER
Pour épousseter les tablettes, les abat-jours, les stores, les
livres, le mobilier et les meubles rembourrés. (Fig. 2)
BROSSE TURBO ANIMAUX
Cet accessoire unique est conçu pour l’élimination rapide
et facile des poils d’animaux de compagnie et des saletés
incrustées dans les tapis et le mobilier rembourré. (Fig. 3)
SUPPORT POUR ACCESSOIRES
Conçu pour tenir le suceur plat et la brosse à épousseter.
Permet l’accès rapide aux accessoires lors du passage de
l’aspirateur et du nettoyage de votre résidence. (Fig. 4)
TUBE RALLONGE
Pour accroître la portée de l’aspirateur et fixer le suceur
plat, la brosse à épousseter et la brosse motorisée afin de
nettoyer toutes les pièces de votre résidence. (Fig. 5)
Fig. 1
Fig. 4
Fig. 2
Fig. 3
a
e
c
d
b
g
À faire au début
Fig. 5
i
Page 23

Français
23
sharkclean.com
Votre nouvel aspirateur NavigatorMD Lift-AwayMC Professional de SharkMD peut facilement être configuré en différents
modes de nettoyage pour satisfaire tous vos besoins : aspirateur vertical et portatif Lift- AwayMD – ces modes offrant
une puissance d’aspiration constante.
MODES:
1 ASPIRATEUR VERTICAL
Aspirateur vertical pour le nettoyage des planchers et des
tapis. (Fig. 6)
Fig. 6
Fig. 7
2 ASPIRATEUR PORTATIF Lift-Away
MC
Transportez l’aspirateur Lift-AwayMC partout dans votre
résidence pour nettoyer les endroits difficiles d’accès.
(Fig. 7)
Page 24

24
1-800-798-7398
ASSEMBLAGE :
1 Déposez la buse à plancher sur une surface de
niveau.
2 Alignez le tube de la buse à plancher avec le tube du corps
de l’aspirateur Lift-AwayMC en les enfonçant l’un dans
l’autre jusqu’à ce que les deux pièces s’enclenchent.
(Fig. 8)
Lorsque vous fixez la buse à plancher motorisée, assurez-
vous que le mécanisme de verrouillage est bien enclenché
pour garantir la connexion électrique.
3 Fixez l’extrémité du tube rallonge au tube à l’arrière du
corps de l’aspirateur Lif t-AwayMC jusqu’à ce qu’il soit bien
enclenché. (Fig. 9)
4 Faites glisser le support pour accessoires (a), situé à
l’opposé de l’enrouleur pour cordon supérieur, par-dessus
le tube rallonge. Alignez l’onglet avec la rainure et
enfoncez-le. (Fig. 10)
5 Enfoncez la poignée (b) sur la partie supérieure du tube
rallonge jusqu’à ce qu’il s’enclenche (vous entendrez un
«clic »). (Fig. 10)
6 Insérez l’extrémité du tuyau extensible (c) dans le raccord à
l’arrière du corps de l’aspirateur Lift-AwayMC. (Fig. 10)
7 Rangez la brosse à épousseter (d) et le suceur plat (e)
dans les logements du support pour accessoires.
(Fig. 10)
Fig. 8
Fig. 9
Fi g. 10
Afin de réduire les risques d’électrocution, débranchez l’appareil avant l’assemblage, l’ajout ou le retrait des accessoires et avant
le passage d’un mode de nettoyage à l’autre.
AVERTISSEMENT : L’interrupteur d’alimentation est situé sur le corps de l’aspirateur Lift-AwayMC. Vérifiez toujours que
l’aspirateur est éteint (interrupteur à la position O, « OFF ») avant de le brancher et de le débrancher.
Mode 1 : Aspirateur vertical
c
a
d
e
b
Page 25

Français
25
sharkclean.com
MODE D’EMPLOI :
1 Tournez le porte-cordon pour dérouler rapidement le
cordon d’alimentation.
2 Fixez le cordon d’alimentation dans le crochet prévu à
cette fin.
= Brosse rotative
activé « ON »
= Planchers nus
= Arrêt « OFF »
3 Faites glisser l’interrupteur d’alimentation
(« ON/OFF ») (a) à la position « I » pour passer
l’aspirateur sur des planchers nus (succion droite)
ou à la position « II » pour activer la buse à plancher
motorisée (pour le nettoyage des tapis et des carpettes).
(Fig. 11)
IMPORTANT : Le voyant lumineux de la buse à plancher
motorisée (b) sera vert lorsque la brosse rotative est
activée; le voyant devient rouge lorsque l’appareil détecte
une obstruction ou un blocage. (Fig. 11) Cette fonction
est conçue pour protéger la courroie permanente qui
actionne la buse à plancher motorisée. Consultez la section
Détection des obstructions à la page 31.
4 Tenez la poignée et inclinez-la vers vous en appuyant
doucement sur la buse à plancher avec votre pied.
(Fig. 12)
REMARQUE : Pour que la brosse rotative de la buse à
plancher motorisée tourne, la buse doit être déposée à plat
sur le plancher et le manche doit être incliné vers l’arrière.
5 À cause de la succion très puissante de cet
aspirateur, il est parfois nécessaire d’ajuster
la bague de réglage de la succion située sur le
manche. (Fig. 11) S’il est difficile de pousser
ou de tirer l’aspirateur ou si la succion soulève
les carpettes, réglez la bague de réglage de
la succion en la faisant tourner de 90° dans le
sens contraire des aiguilles d’une montre afin
d’ouvrir la soupape. Faites tourner la bague de
réglage de la succion dans le sens des aiguilles
d’une montre afin de fermer la soupape pour
augmenter la puissance d’aspiration et nettoyer
les planchers.
6 Videz le récipient à poussière après avoir passé
l’aspirateur et pendant le nettoyage si le récipient
semble plein. (Consultez la section « Entretien » pour
obtenir des instructions.)
7 Lorsque vous avez terminé, éteignez l’aspirateur.
Fig . 12
Réduction de
la puissance
d’aspiration
pour faciliter les
mouvements de
va-et-vient sur les
carpettes et les
tapis à poil long.
b
a
Bague de réglage
de la succion
c
Fi g . 11
Page 26

26
1-800-798-7398
Lors de l’utilisation de ces deux modes,
vous pouvez porter l’aspirateur en le
tenant par la poignée de transport située sur le
récipient à poussière.
Fig . 15Fig. 14Fig. 13
Mode 2 : Aspirateur portatif Lift-Away
MC
ASPIRATEUR PORTATIF LIF T-AWAYMC
1 Séparez le corps de l’aspirateur portatif Lift-AwayMC de la
buse à plancher en enfonçant le bouton de dégagement
rouge (a) sur le côté de l’appareil. Maintenez la buse sur
le plancher avec votre pied et tirez le corps de l’aspirateur
vers le haut. (Fig. 13)
2 Enfoncez le bouton de dégagement de la poignée (a) et
tirez la poignée vers le haut ou enfoncez le bouton de
dégagement du tube rallonge (b) et tirez celui-ci vers le
haut. (Fig. 14)
3 Fixez l’accessoire désiré à l’extrémité de la poignée ou du
tube rallonge.
4 Faites glisser l’interrupteur d’alimentation (« ON/OFF ») à
la position « I » pour nettoyer des surfaces élevées et tenez
la poignée d’une main tout en transportant l’aspirateur
portatif Lif t-AwayMC de l’autre main pour vous déplacer
dans toutes les pièces. (Fig. 15)
b
a
Page 27

Français
27
sharkclean.com
Fi g. 16
Nettoyage sur surface élevée
NETTOYAGE DES SURFACES ÉLEVÉES AVEC LE MODE «
ASPIRATEUR VERTICAL » OU « ASPIRATEUR PORTATIF »
LIFT-AWAY
MC
1 Enfoncez le bouton de dégagement de la poignée et tirez la
poignée vers le haut ou enfoncez le bouton de dégagement
du tube rallonge et tirez celui-ci vers le haut.
2 Fixez l’accessoire désiré à l’extrémité de la poignée ou du
tube rallonge. (Fig. 16)
3 La succion de votre aspirateur est très puissante.
Réglez la puissance d’aspiration en modifiant la
position de la bague de réglage de la succion située
sur la poignée. Ouvrez la soupape (a) en faisant
tourner la bague de 90° dans le sens contraire des
aiguilles d’une montre afin de réduire la puissance
d’aspiration lors du nettoyage léger de surfaces
délicates et des draperies. Fermez la soupape (b)
en faisant tourner la bague de 90° dans le sens
des aiguilles d’une montre afin d’augmenter la
puissance d’aspiration et lors de l’utilisation de la
brosse motorisée portative. (Fig. 16)
4 Faites glisser l’interrupteur d’alimentation (« ON/OFF ») à la
position « I » pour nettoyer des surfaces élevées.
IMPORTANT : Assurez-vous que l’aspirateur est en
position verticale. Ne mettez pas l’interrupteur à la position
« II » lorsque vous nettoyez des surfaces élevées en mode
d’aspirateur vertical, car cela activera la buse à plancher
motorisée. La brosse rotative peut endommager les
planchers si elle tourne en position immobile pendant une
période prolongée.
Bague de réglage
de la succion
Réduisez la succion pour
épousseter des objets,
des draperies et des meubles
délicats.
Page 28

28
1-800-798-7398
Fig. 17
Porte-cordon à
déroulement rapide
Crochet inférieur pour le
rangement du cordon
Rangement et entretien
RANGEZ VOTRE ASPIRATEUR DE MANIÈRE SÉCURITAIRE
1 Configurez l’aspirateur en mode « aspirateur vertical ».
2 Faites tourner le porte-cordon à dégagement rapide
supérieur vers le haut et enroulez le cordon lâchement
autour des deux crochets. Engagez le crochet de la fiche
sur le cordon pour la fixer solidement. (Fig. 17)
3 Rangez la brosse à épousseter et le suceur plat dans les
logements du support pour accessoires.
4 Rangez votre aspirateur de façon sécuritaire dans un
endroit frais et sec, où l’appareil ne constitue pas un
danger, ne sera pas endommagé, ne causera aucun
dommage et ne posera aucun risque pour autrui.
REMARQUE : Videz le récipient à poussière après le
nettoyage et avant de ranger l’aspirateur. (Consultez la
section « Entretien » pour obtenir des instructions.)
Afin de réduire les risques d’électrocution, débranchez
l’appareil avant de le nettoyer, de réaliser son entretien ou
de faire les vérifications de dépannage.
Réassemblez toutes les pièces en vous assurant qu’elles
sont bien fixées avant d’utiliser l’aspirateur.
N’UTILISEZ PAS l’aspirateur si le récipient à poussière et
les filtres ne sont pas en place.
N’UTILISEZ PAS l’aspirateur lorsque les filtres sont
HUMIDES.
IMPORTANT : Assurez-vous que tous les filtres sont secs
avant de les réinstaller dans l’aspirateur.
AVERTISSEMENT : N’insérez jamais d’objet pointu dans
les orifices pour débloquer ceux-ci.
IMPORTANT : Les dommages causés par l’élimination de
blocage ne sont pas couverts par la garantie limitée du
produit.
Page 29

Français
29
sharkclean.com
IMPORTANT : La perte de puissance
d’aspiration peut survenir si les filtres de
mousse ne sont pas nettoyés tous les 3mois.
Rincer, laisser sécher complètement à l’air libre.
De plus, tapez doucement les filtres pour déloger
les saletés non adhérentes entre les nettoyages.
Les filtres de mousse peuvent sembler sales après
l’utilisation – ceci est normal.
Fig. 18 Fi g. 19
NETTOYAGE DES FILTRES AVANT MOTEUR
1 Retirez le récipient à poussière.
2 Retirez les deux filtres situés sur le bloc-moteur. (Fig. 21)
3 Rincez les filtres abondamment à l’eau tiède, jusqu’à ce que
l’eau soit claire.
NE LAVEZ PAS les filtres à la machine à laver ou au lave-
vaisselle.
REMARQUE : Le matériau des filtres se délave au fil du
temps. Cela est NORMAL et ne nuit pas au rendement des
filtres.
4 Tordez les filtres pour en extraire tout excès d’eau. N’utilisez
pas un séchoir à cheveux ou un autre élément chauffant
pour sécher les filtres.
5 Insérez d’abord le filtre de feutre, puis le filtre de mousse.
6 Réinstallez le récipient à poussière.
VIDANGE DU RÉCIPIENT À POUSSIÈRE
Il faut vider le récipient à poussière chaque fois que vous utilisez
l’aspirateur et à l’occasion pendant le nettoyage, lorsque le
récipient semble plein.
1 Dégagez les clenches latérales du récipient à poussière en
les soulevant vers l’extérieur afin d’enlever le récipient du
bloc-moteur. (Fig. 18)
2 Tenez le récipient à poussière au-dessus de la poubelle,
puis enfoncez le bouton de verrouillage du panneau
inférieur. (Fig. 19) Tapez doucement le récipient pour le
vider. Fermez le panneau en appuyant sur celui-ci jusqu’à
ce qu’il s’enclenche.
3 Au besoin, tenez le récipient à poussière à l’envers au-
dessus de la poubelle et enfoncez le bouton supérieur de
dégagement du panneau. (Fig. 20) Tapez doucement le
récipient pour le vider.
Utilisez une serviette en papier ou un linge sec pour
déloger les débris collés au filtre-tamis dans le récipient
à poussière. Fermez le panneau en appuyant sur celui-ci
jusqu’à ce qu’il s’enclenche.
4 Remettez le récipient à poussière sur le bloc-moteur.
Engagez les deux clenches dans les onglets latéraux du
récipient à poussière et poussez celui-ci vers le bas pour le
verrouiller en place.
Filtretamis
Fig. 20
Fig. 21
Filtres avant moteur
Filtre de mousse
Filtre de feutre
Entretien
COMPOSANT
CALENDRIER D’ENTRETIEN
Rincer et sécher à l’air libre tous les 3 mois dans des conditions
d’utilisation normales.
Vider lors de chaque utilisation.
Filtre de mousse avant-moteur
Récipient à poussière
Rincer et sécher à l’air libre tous les 3 mois dans des conditions
d’utilisation normales.
Filtre de feutre avant-moteur
Nettoyer tous les 2 ans ou lorsque nécessaire.
Filtre HEPA après-moteur
1
2
3
4
Filtre après moteur
Filtre HEPA
Page 30
30
1-800-798-7398
NETTOYAGE DE BROSSE TURBO ANIMAUX
1 Faites glisser le loquet de verrouillage (a) vers l’avant et
faites basculer le couvercle inférieur vers le haut pour
l’enlever. (Fig. 25)
2 Enlevez soigneusement les débris ou obstructions et coupez
toute accumulation de cheveux ou de fils enroulés autour
des soies de la brosse rotative avec des ciseaux.
3 Pour réassembler, insérez les onglets situés dans le
coin supérieur du couvercle inférieur dans les orifices
correspondants situés sur la partie supérieure et inclinez-le
jusqu’à ce qu’il s’enclenche en place. (Fig. 26)
Fig. 23
Fig. 22
Fig. 24
NETTOYAGE DU FILTRE HEPA APRÈS MOTEUR
1 Pour enlever le couvercle des filtres situé à l’avant de
l’aspirateur, tirez l’onglet du couvercle vers le haut, puis
tirez sur celui-ci pour le dégager de l’appareil. (Fig. 22)
2 Pour retirer le filtre HEPA, tirez sur celui-ci.
3 Retournez le filtre afin que le côté sale soit orienté vers le
bas, puis tapez-le vigoureusement au-dessus de la poubelle
pour déloger toute la poussière. (Fig. 23)
4 Nettoyez le filtre en le passant à l’eau tiède, côté sale vers
le bas, jusqu’à ce que l’eau soit claire. (Fig. 24)
NE LAVEZ PAS les filtres à la machine à laver ou au lave-
vaisselle.
REMARQUE : Le matériau des filtres se délave au fil du
temps. Cela est NORMAL et ne nuit pas au rendement des
filtres.
5 Laissez le filtre sécher à l’air libre pendant 24heures.
N’utilisez pas un séchoir à cheveux ou un autre élément
chauffant pour sécher les filtres.
6 Une fois le filtre HEPA sec, réinstallez-le dans l’aspirateur.
7 Réinstallez le couvercle en insérant les deux onglets dans
les orifices supérieurs, puis poussez le couvercle vers le
bas jusqu’à ce qu’il s’enclenche.
Fig. 26
Fig. 25
NETTOYAGE DE LA BUSE À PLANCHER MOTORISÉE
Lorsque votre brosse à plancher motorisée nécessite un
nettoyage ou si elle demeure coincée sur un objet, elle
s’éteindra automatiquement afin de prévenir tout dommage à
votre courroie à vie. Le témoin lumineux deviendra rouge pour
vous avertir d’éteindre l’aspirateur et de dégager immédiatement
l’obstruction. La lumière se réinitialisera d’elle-même lorsque
l’obstruction aura été dégagée et que l’alimentation aura été
mise en marche et éteinte ou que l’aspirateur aura été verrouillé
en position verticale.
1 Enlevez la brosse à plancher motorisée du traîneau.
2 Pincer les languettes et tirer jusqu’à exposer les voies
aériennes. (Fig. 27, Fig. 28)
3 Enlevez les fils, les fibres de tapis ou les cheveux qui peuvent
être enroulés autour de la brosse motorisée. (Fig. 29)
Entretien – suite
Fig. 27
Fig. 29
Fig. 28
a
Page 31

Français
31
sharkclean.com
DÉTECTION DES OBSTRUCTIONS
Les obstructions peuvent causer la surchauffe et l’arrêt
automatique de l’aspirateur. Pour éviter ces situations, veuillez
inspecter les parties susceptibles d’être obstruées après une
utilisation intensive, si vous détectez une perte de puissance
d’aspiration ou si l’appareil ne fonctionne pas comme il se doit.
1 Récipient à poussière
Il est possible que le récipient à poussière soit plein. Videz
le récipient à poussière.
2 Filtres avant et après moteur
• Les filtres avant moteur doivent être nettoyés tous les 3
mois pour un rendement optimal.
Le filtre HEPA après-moteur doit être nettoyé tous les
2 ans.
• Assurez-vous que les filtres sont propres.
3 Accessoires
• Vérifiez les entrées d’air :
- Tube rallonge
- Brosse à épousseter
- Suceur plat
- Brosse turbo animaux
4 Tuyau souple et raccords de l’aspirateur
• Détachez le tuyau extensible à l’arrière de l’aspirateur
portatif Lif t-AwayMC en pressant les onglets ensemble
et en tirant le tuyau vers le haut. (Fig. 30) Redressez le
tuyau souple et inspectez l’intérieur pour détecter toute
obstruction.
• Retirez le récipient à poussière et le tube rallonge, puis
séparez l’aspirateur portatif Lift-AwayMC de la buse
à plancher motorisée. Vérifiez les quatre orifices pour
détecter toute obstruction. (Fig. 31)
Fig. 31Fig. 30
Assurez-vous que votre espace de
travail est bien éclairé et utilisez une
lampe de poche pour détecter les
obstructions.
Page 32

32
1-800-798-7398
PROBLÈME CAUSES ET SOLUTIONS POSSIBLES
L’aspirateur n’aspire pas
les saletés.
Inspectez les filtres pour vérifier s’il faut les nettoyer. Nettoyez et séchez
les filtres en respectant les instructions avant de réinsérer ceux-ci dans
l’aspirateur. (Consultez la section « Entretien » pour obtenir des instructions.)
Le récipient à poussière est peut-être plein; videz-le.
Inspectez le tuyau souple et ses raccords pour détecter la présence
d’obstructions et dégagez tout objet coincé.
Si le récipient à poussière est vide et que les orifices des accessoires ne sont
pas obstrués, inspectez l’aspirateur pour détecter toute autre obstruction.
(Consultez la section « Détection des obstructions » pour obtenir des
instructions.)
L’aspirateur soulève les
carpettes (tapis légers et
amovibles).
La succion est puissante. Faites attention lorsque vous passez l’aspirateur
sur les carpettes de fantaisie et les tapis à bordure cousue fragile. Ouvrez le
loquet de déblocage sur la poignée pour réduire la puissance d’aspiration.
Faites glisser l’interrupteur d’alimentation à la position de marche
« I – Planchers nus » pour désactiver la brosse rotative.
Le débit d’air est restreint.
Succion faible ou
inexistante.
Inspectez les filtres pour vérifier s’il faut les nettoyer. Nettoyez et séchez
les filtres en respectant les instructions avant de réinsérer ceux-ci dans
l’aspirateur.
Le récipient à poussière est peut-être plein; videz-le.
Inspectez le tuyau souple et ses raccords, les suceurs et autres accessoires
pour détecter toute obstruction; dégagez les obstructions au besoin.
Fermez le loquet de déblocage de la succion sur la poignée pour augmenter
la puissance d’aspiration.
Si le récipient à poussière est vide et que les orifices des accessoires ne sont
pas obstrués, inspectez l’aspirateur pour détecter toute autre obstruction.
La brosse rotative ne
tourne pas.
Éteignez immédiatement l’aspirateur et débranchez-le. Retirez la brosse
et enlevez toute obstruction avant de remettre la brosse et de redémarrer
l’aspirateur.
Tirez la poignée vers vous et relâchez la buse à plancher pour désactiver le
mode d’arrêt automatique.
Faites glisser l’interrupteur d’alimentation à la position « II – brosse rotative
activée ».
L’aspirateur s’éteint
automatiquement.
Cet aspirateur est doté d’un thermostat de protection du moteur. Si, pour
une raison quelconque, l’appareil surchauffe, le dispositif de protection
l’éteindra automatiquement. Lorsque cela se produit, suivez les étapes cidessous pour redémarrer l’aspirateur :
1. Faites glisser l’interrupteur d’alimentation à la position d’arrêt « O (Off) ».
2. Débranchez l’aspirateur.
3. Videz le récipient à poussière et nettoyez les filtres.
4. Vérifiez si le boyau, les accessoires et les entrées d’air sont obstrués.
5. Laissez l’aspirateur refroidir pendant au moins 45 minutes.
6. Branchez l’aspirateur.
7. Pour mettre en marche l’aspirateur, faites glisser l’interrupteur
d’alimentation à la position de marche « I » (« ON »).
Remarque : Si l’aspirateur ne se met pas en marche, contactez le Service à
la clientèle en composant le numéro suivant : 1-800-798-7398.
Guide de dépannage
Page 33

Français
33
sharkclean.com
PIÈCE NUMÉRO DE PIÈCE
1 Ensemble de filtres avant moteur XFF350
2 Filtre HEPA XHF350
3 Brosse à épousseter 349FJV540
4 Suceur plat 350FJV540
5 Brosse turbo animaux 351FJV540
6 Tube rallonge 352FJV540
5
3
1
2
6
Commande de pièces
Pour acheter des pièces de rechange, veuillez visiter notre site Web
sharkaccessories.com ou contacter le Service à la clientèle : 1-800-798-7398.
4
Page 34

34
1-800-798-7398
Product Registration
Please visit registeryourshark.com or call 1-800-798-7398 to register your new Shark® product within ten (10) days of purchase.
You will be asked to provide the store name, date of purchase and model number along with your name and address.
The registration will enable us to contact you in the unlikely event of a product safety notification. By registering you acknowledge to
have read and understood the instructions for use, and warnings set forth in the accompanying instructions.
FIVE-YEAR (5) LIMITED WARRANTY
SharkNinja Operating LLC warrants this product to be free from material defects and workmanship for a period of
five (5) years from the date of purchase when utilized for normal household use, subject to the following conditions,
exclusions and exceptions.
The liability of SharkNinja Operating LLC is limited solely to the cost of the repair or replacement of the unit at
our option. This Limited Warranty does not cover normal wear of parts and does not apply to any unit that has been
tampered with or used for commercial purposes. This Limited Warranty does not cover damage caused by misuse,
abuse, negligent handling or damage due to faulty packaging or mishandling in transit. This Limited Warranty does not
cover damage or defects caused by or resulting from damages from shipping or repairs, service or alteration to the
product or any of its parts, which have been performed by a repair person not authorized by SharkNinja Operating
LLC.
If your appliance fails to operate properly while in use under normal household conditions within the warranty period,
you may return the complete appliance and accessories with proof of purchase and date, freight prepaid. For customer
service support, call 1-800-798-7398 or visit our website at sharkclean.com/warranty.
If the appliance is found by SharkNinja Operating LLC to be defective, in SharkNinja Operating LLC’s sole
discretion, we will repair or replace it free of charge. Proof of purchase date and a check made payable to SharkNinja
Operating LLC in the amount of $19.95 to cover the cost of return shipping and handling must be included.*
Non-durable parts including, without limitation, filters, brushes and electrical parts which normally require replacement
are specifically excluded from warranty.
This Limited Warranty is extended to the original purchaser of the unit and excludes all other legal, implied and/or
conventional warranties. The responsibility of SharkNinja Operating LLC if any, is limited to the specific obligations
expressly assumed by it under the terms of this Limited Warranty. In no event is SharkNinja Operating LLC liable for
incidental or consequential damages to anyone of any nature whatsoever. Some states do not permit the exclusion or
limitation of incidental or consequential damages, so the above may not apply to you.
This Limited Warranty gives you specific legal rights, and you may also have other rights which vary from state to state or
province to province.
*IMPORTANT: Carefully pack item to avoid damage in shipping. Be sure to include proof of purchase date
and to attach a tag to item before packing including your name, complete address and phone number with
a note giving purchase information, model number and what you believe is the problem with the item. We
recommend you insure the package (as damage in shipping is not covered by your warranty). Mark the
outside of your package “ATTENTION CUSTOMER SERVICE.”
Page 35

Français
35
sharkclean.com
Enregistrement du produit
Veuillez visiter registeryourshark.com ou composer le 1-800-798-7398 pour enregistrer votre nouveau produit SharkMD dans
les dix (10) jours suivant l’achat. Vous devrez fournir le nom du magasin, la date d’achat, le numéro de modèle, ainsi que votre nom et
adresse.
L’enregistrement nous permettra de vous contacter en cas d’avis sur la sécurité du produit. En enregistrant votre produit, vous
reconnaissez avoir lu et compris les instructions d’utilisation et les consignes de sécurité énoncées dans ce document.
GARANTIE LIMITÉE DE CINQ (5) ANS
SharkNinja Operating LLC garantit ce produit contre toute défectuosité matérielle ou de main-d’œuvre pour une
période de cinq (5) ans à compter de la date d’achat, dans le cadre d’une utilisation domestique normale, en vertu des
conditions, exclusions et exceptions suivantes.
La responsabilité SharkNinja Operating LLC se limite au coût des réparations ou du remplacement de l’appareil,
à sa discrétion. Cette garantie limitée ne couvre pas l’usure normale des pièces et ne s’applique pas aux appareils
ayant été altérés ou utilisés à des fins commerciales. Cette garantie limitée ne couvre pas les dommages causés par
une mauvaise utilisation, l’usage abusif, la négligence lors de la manipulation, un emballage inadéquat ou la mauvaise
manipulation en transit. Cette garantie limitée ne couvre pas les dommages ou défauts causés par ou résultant du
transport, des réparations, ou de l’entretien ni de l’altération du produit ou de ses pièces, effectué par un réparateur non
autorisé par SharkNinja Operating LLC.
Si votre appareil cesse de fonctionner correctement dans le cadre d’un usage domestique normal, et ce, pendant la
période de garantie, vous pouvez retourner l’appareil en entier et ses accessoires, avec une preuve de la date d’achat,
port payé. Pour le Soutien à la clientèle, appelez le 1-800-798-7398 ou visitez notre site Web : sharkclean.com/
warranty.
Si SharkNinja Operating LLC constate que l’appareil est défectueux, à la seule discrétion de SharkNinja Operating
LLC, nous le réparerons ou le remplacerons sans frais. Vous devez inclure une preuve de la date d’achat ainsi qu’un
chèque de 19,95 $ au nom de SharkNinja Operating LLC pour couvrir les frais d’expédition et de manutention du
retour du produit.*
Les pièces non durables, y compris, sans s’y limiter, les filtres, brosses et composants électriques exigeant normalement
d’être remplacés, sont exclus de la garantie.
Cette garantie couvre l’acheteur initial du produit et exclut toute autre garantie légale, implicite ou conventionnelle.
Le cas échéant, la responsabilité de SharkNinja Operating LLC se limite aux obligations spécifiques expressément
énoncées au titre de cette garantie limitée. En aucun cas SharkNinja Operating LLC ne peut être tenue responsable
d’incidents ou de dommages indirects à quiconque et de toute nature que ce soit. Certains états et certaines provinces
n’autorisent pas l’exclusion ou la limitation de dommages accessoires ou indirects; dans ce cas, cette disposition ne
s’appliquerait pas.
Cette garantie limitée vous confère des droits juridiques précis pouvant varier d’un état ou d’une province à l’autre.
*IMPORTANT : Emballez soigneusement l’appareil pour éviter tout dommage lors du transport. Veillez
à inclure la preuve de la date d’achat et de fixer une étiquette à l’appareil portant votre nom, adresse
complète et numéro de téléphone, ainsi qu’une note précisant les détails de l’achat, le modèle et le
problème associé à l’appareil. Nous vous recommandons d’assurer votre colis (puisque les dommages lors
du transport ne sont pas couverts par la garantie). Indiquez sur l’extérieur de votre colis «ATTENTION :
SERVICE À LA CLIENTÈLE ».
Page 36

SharkNinja Operating LLC
Needham, MA USA 02494
Ville St. Laurent, Québec Canada H4 S 1A7
1-800-798-7398
sharkclean.com
Copyright © SharkNinja Operating L LC 2017
Droit d’auteur © SharkNinja Operating LLC , 2017
Shark is a registered trademark of SharkNinja Operating LLC.
Lift-Away and Navigator are trademarks of SharkNinja Operating LLC.
Shark est une marque déposée de SharkNinja Operating LLC.
Lift-Away et Navigator sont des marques déposées de SharkNinja Operating LLC.
For SharkNinja U.S. Patent information visit sharkninja.com/USPatents.
Pour des renseignements sur les brevets de SharkNinja aux É.-U., veuillez visiter
sharkninja.com/USPatents.
Illustrations may differ from actual product. We are constantly striving to improve
our products, therefore the specifications contained herein are subject to change
without notice.
Les illustrations peuvent différer du produit réel. Nous essayons constamment
d’améliorer nos produits, donc les clauses contenues dans ce document peuvent
changer sans préavis.
Printed in China / Imprimé en Chine
UV540CCO_26_IB_E_F_170410_1
 Loading...