

Page 1
Commercially Rated Upright Vacuum
Aspiradora Vertical de Uso Comercial
Aspirateur Vertical Professionnel
OWNER’S MANUAL
MANUAL DEL USUARIO
GUIDE D’UTILISATION
Model/Modelo/Modèle: UV210CN
120V., 60Hz., 12 Amps
COPYRIGHT© EURO-PRO OPERATING LLC 2006
USA: EURO-PRO Operating LLC Canada: EURO-PRO Operating LLC
94 Main Mill Street, Door 16 4400 Bois Franc
Plattsburgh, NY 12901 St. Laurent, QC H4S 1A7
Tel: 1 (800) 798-7398
www.sharkcompany.com
Page 2

Page 3

Modèle
UV210CN
GARANTIE LIMITÉE DE TROIS (3) ANS
EURO-PRO Operating LLC garantit ce produit contre toute défectuosité matérielle ou de maind’œuvre pour une période de trois (3) ans à compter de la date d’achat. Cette garantie ne couvre
que l’usage domestique normal.
Si votre appareil cesse de fonctionner correctement dans le cadre d’un usage domestique normal
pendant la période de garantie, retournez-le avec ses accessoires, retour pré-affranchi, à:
É.-U. : EURO-PRO Operating LLC, 94 Main Mill Street, Plattsburgh, NY 12901
Canada : EURO-PRO Operating LLC, 4400, Bois Franc, St-Laurent QC H4S 1A7
Si EURO-PRO Operating LLC constate que l’appareil comporte une défectuositématérielle ou de
main-d’œuvre, elle le réparera ou le remplacera sans frais de votre part. Une preuve d’achat
indiquant la date d’achat et un montant de 14,95 $ pour les frais de port et de manutention de
l’envoi de retour doivent être inclus.*
Les pièces non durables, y compris, sans s’ y limiter, les filtres, courroies de transmission, brosses
rotatives, ampoules et composants électriques exigeant normalement d’être remplacés sont
exclues de la garantie.
La responsabilité de EURO-PRO Operating LLC ne se limite qu’au coût des pièces de rechange
ou de l’appareil, à notre discrétion. Cette garantie ne couvre pas l’usure normale des pièces et ne
couvre pas les appareils altérés. Cette garantie limitée exclut les dommages causés par le
mésusage, l’abus, la manipulation négligente ainsi que par une manutention en transit ou un
emballage inadéquats. Cette garantie ne couvre pas les défectuosités ou dommages découlant
directement ou indirectement du transport, des réparations, des altérations ou de l’entretien
apportés au produit ou à ses pièces par un réparateur non autorisé par EURO-PRO Operating
LLC.
Cette garantie couvre l’acheteur initial du produit et exclut toute autre garantie juridique ou
conventionnelle. Le cas échéant, EURO-PRO Operating LLC n’est tenue qu’aux obligations
spécifiques assumées par elle de façon expresse en vertu des conditions de cette garantie limitée.
En aucun cas EURO-PRO Operating LLC ne sera-t-elle tenue responsable de dommages
indirects de quelque nature que ce soit. Certains états ou provinces n’autorisent pas l’exclusion ou
la limitation des dommages indirects. Ainsi, la disposition ci-devant pourrait ne pas s’appliquer à
vous. Cette garantie vous confère des droits juridiques précis pouvant varier d’un état ou d’une
province à l’autre.
*Important: Emballez soigneusement l’appareil afin d’éviter tout dommage durant le
transport. Avant d’emballer l’appareil, assurez-vous d’y apposer une étiquette portant vos
nom, adresse complète et numéro de téléphone ainsi qu’une note précisant les détails de
l’achat, le modèle et le problème éprouvé par l’appareil. Nous vous recommandons
d’assurer votre colis (les dommages survenus durant le transport ne sont pas couverts par
la garantie). Indiquez «AUX SOINS DU SERVICE À LA CLIENTÈLE» sur l’emballage extérieur.
Comme nous nous efforçons en tout temps d’améliorer nos produits, les spécifications
décrites dans ce guide sont sujettes à changement sans préavis.
---------------------------------------------------------------------------------------------------------------
FICHE D’ENREGISTREMENT DU PROPRIÉTAIRE
CONSOMMATEURS CANADIENS SEULEMENT
Veuillez remplir cette fiche d’enregistrement et la poster dans les dix (10) jours suivant l’achat.
L’enregistrement nous permettra de communiquer avec vous en cas d’avis sur la sécurité du
produit. En nous retournant cette fiche, vous convenez avoir lu et compris les consignes
d’utilisation et les avertissements qui les accompagnent.
Canada : EURO-PRO Operating LLC, 4400 Bois Franc, St Laurent (Québec) H4S 1A7
Modèle UV210CN
___________________________________________________________________________
Modèle de l’appareil
___________________________________________________________________________
Date d’achat Nom du détaillant
___________________________________________________________________________
Nom du propriétaire
___________________________________________________________________________
Adresse Ville Prov. Code postal
Imprimé en Chine
48
IMPORTANT SAFETY INSTRUCTIONS
When using your Upright Vacuum, basic safety precautions should always be
observed, including the following:
Read all instructions before using this vacuum.
WARNING: To reduce the risk of fire, electrical
shock, or injury:
1. Do NOT leave vacuum cleaner unattended
when it is plugged in. Unplug from outlet
when not in use and before removing filters.
2. To reduce the risk of electric shock – do
NOT use outdoors or on wet surfaces.
3. Do NOT allow children to use as a toy.
Close attention is necessary when used by
or near children.
4. Use only as described in this manual. Use
only manufacturer’s recommended
attachments.
5. Do NOT use with damaged cord or plug.
Do NOT use vacuum cleaner if it has been
dropped, damaged, left outdoors, or
dropped into water. Return appliance to
EURO-PRO Operating LLC for
examination, repair or adjustment.
6. Do NOT pull or carry by cord. Do NOT use
cord as a handle, close a door on cord,
or pull cord around sharp edges or corners.
Do NOT run appliance over cord. Keep cord
away from heated surfaces.
7. Do NOT unplug by pulling on cord. To
unplug, grasp the plug, not the cord.
8. Do NOT handle plug or vacuum cleaner
with wet hands.
9. Do NOT use the vacuum cleaner to pick up
large objects or objects that are likely to
damage the vacuum cleaner.
10. Keep hair, loose clothing, fingers, feet and
all parts of body away from openings,
rotating agitator and other moving parts. Do
NOT operate cleaner in bare feet or when
wearing open toe shoes.
11. Do NOT pick up hot coals, cigarette butts,
matches or any hot, smoking, or burning
objects.
12. Do NOT pick up hard or sharp objects such
as glass, nails, screws, coins, etc.
13. Do NOT use without all filters in place.
Use ONLY filters and accessories
provided by EURO-PRO Operating LLC.
Failure to do so will void the warranty.
14. Turn off all controls before plugging or
unplugging vacuum cleaner into electrical
outlet.
15. Use extra care when vacuuming on
stairs.
16. Do NOT pick up flammable or
combustible materials (lighter fluid,
gasoline, kerosene, etc.) or use in the
presence of explosive liquids or vapor.
17. Do NOT pick up toxic material (chlorine
bleach, ammonia, drain cleaner, etc.).
18. Do NOT use in an enclosed space filled
with vapors given off by oil based paints,
paint thinner, moth proofing substances,
flammable dust, or other explosive or
toxic vapors.
19. Use only on dry, indoor surfaces.
20. Do NOT use for any purpose other than
described in this user’s guide.
21. The use of an extension cord is not
recommended.
22. Do NOT put any objects into openings.
Do NOT use with any opening blocked.
Keep free of dust, lint, hair and anything
else that may reduce air flow.
23. Store your appliance indoors in a cool,
dry area.
24. Keep your work area well lit.
25. Do NOT immerse the vacuum into water
or other liquids.
26. Keep end of hose, wands and other
openings away from your face and body.
27. To avoid damaging the carpet, keep the
vacuum cleaner head moving at all times.
28. Connect to a properly grounded outlet
only. See grounding instructions.
SAVE THESE INSTRUCTIONS
For Household or Commercial Use Only
GROUNDING INSTRUCTIONS
This appliance must be grounded. If it should malfunction or breakdown, grounding provides a
path of least resistance for electric current to reduce the risk of electric shock. This appliance is
equipped with a cord having an equipment-grounding conductor and grounding plug. The plug
must be inserted into an appropriate outlet that is properly installed and grounded in accordance
with all local codes and ordinances.
WARNING: Improper connection of the equipment-grounding conductor can
result in a risk of electric shock. Check with a qualified electrician or service person
if you are in doubt as to whether the outlet is properly grounded. Do not modify the
plug provided with the appliance - if it will not fit the outlet, have a proper outlet
installed by a qualified electrician.
This appliance is for use on a nominal 120-volt circuit, and has a grounding
attachment plug that looks like the plug illustrated at right. Make sure that the
appliance is connected to an outlet having the same configuration as the
plug. No adaptor should be used with this appliance.
1 Rev. 12/06
Page 4
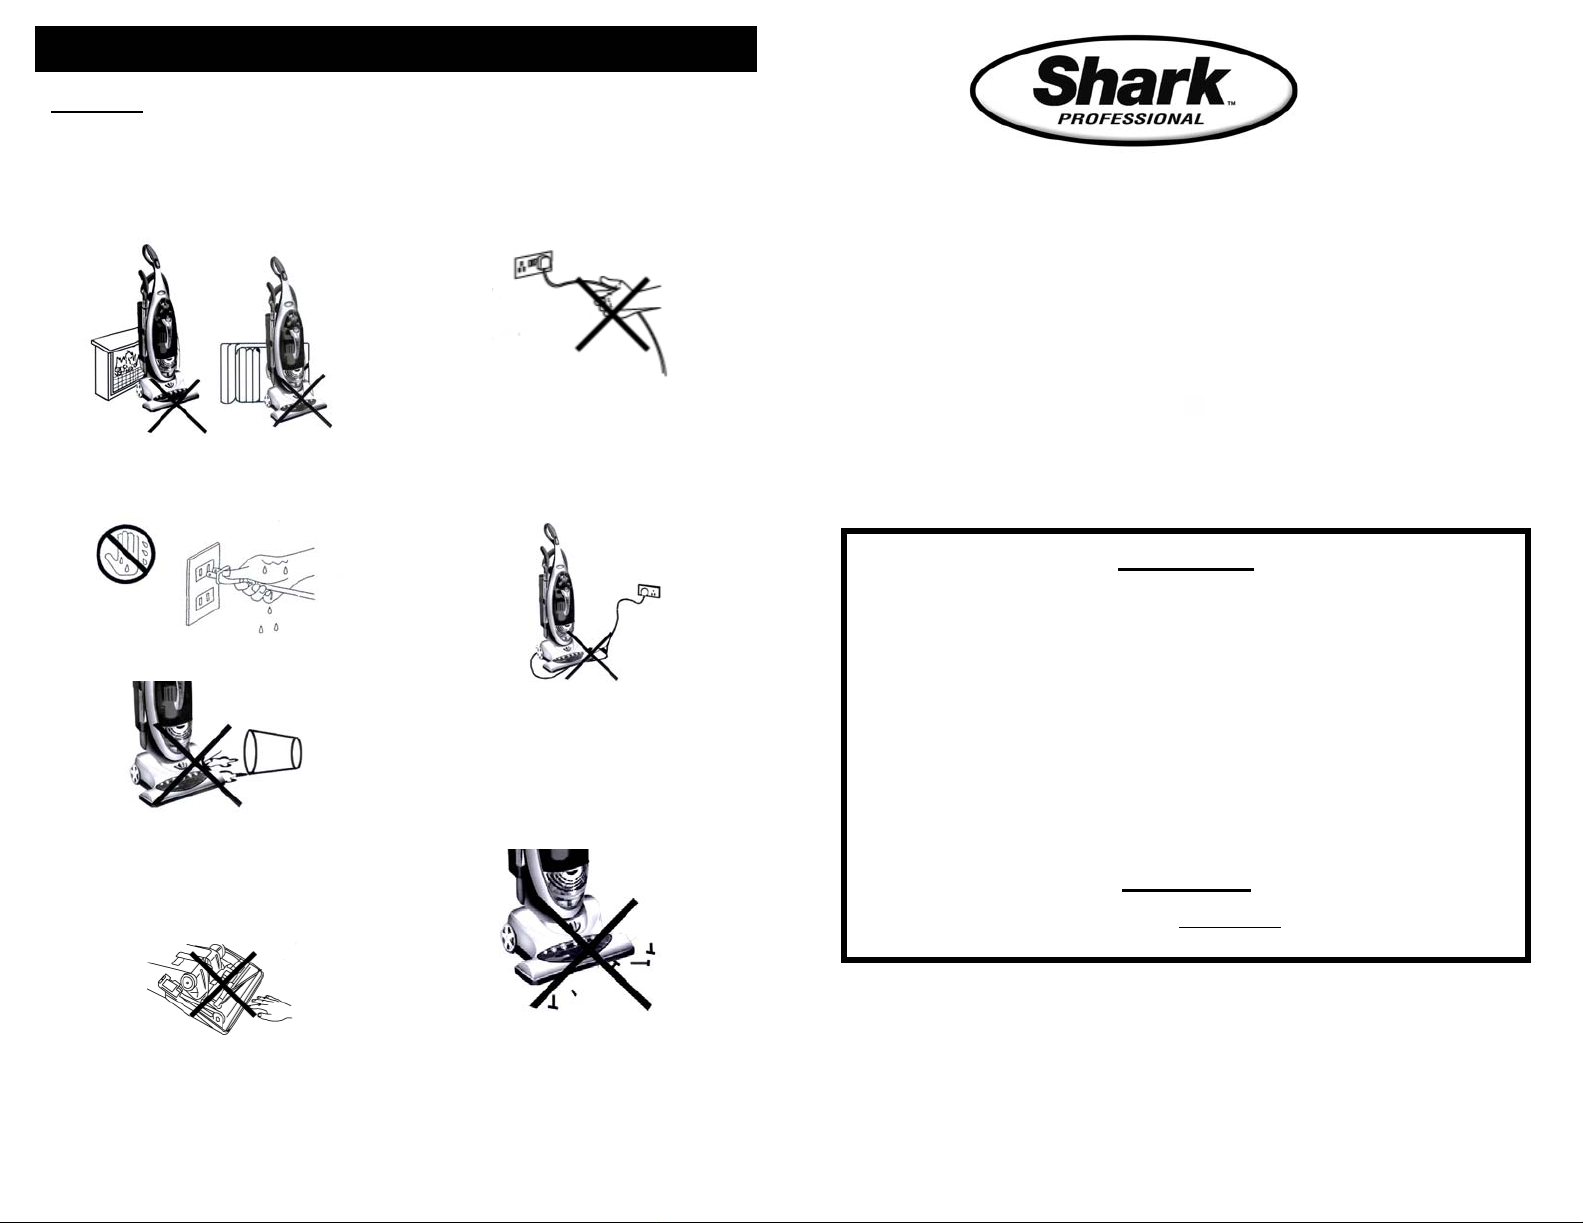
PRECAUTIONARY MEASURES
Important
1. Do not operate the vacuum
2. Before inserting the power plug
3. Do not vacuum any liquids.
4. Keep hair, loose clothing, fingers,
: If the suction opening in the unit, the hose or the telescopic tube become
blocked, switch off the vacuum cleaner and remove the blocking
substance before you start the unit again.
cleaner too close to heaters,
or radiators.
into the wall outlet, make sure that
your hands are dry.
feet and all parts of body away from
openings, rotating agitator and other
moving parts.
5. When pulling out the power plug
from the wall outlet, pull the plug
not the power cord.
6. Do not pick up anything that is
burning or smoking such as
cigarettes, matches or hot ashes.
7. Do not run appliance over power
cord.
8. Do not use without dust cup
filter or filters in place.
9. Before you start vacuuming,
make sure to remove large or
sharp objects that might damage
the vacuum.
Aspirateur vertical professionnel
POUR COMMANDER DES FILTRES DE RECHANGE OU
DES COURROIES
Modèle UV210CN
Appelez : 1 (866) 826-6941
Du lundi au vendredi, de 8h30 à 17h00 heure normale de l’Est
visitez notre site Web : www.sharkcompany.com
SOUTIEN TECHNIQUE
Modèle UV210CN
Du lundi au vendredi, de 8h30 à 17h00 heure normale de l’Est
Appelez: 1 (866) 826-6941
Remarque:
Les filtres pré-moteur, secondaire et d’échappement sont lavables. Veuillez
toutefois les remplacer tous les trois (3) mois afin d’assurer un rendement optimal
à votre aspirateur.
Le filtre HEPA est lavable.
selon l’usage, pour assurer un rendement optimal à votre aspirateur.
recommandons de le nettoyer une fois par mois ou lorsque la succion semble
réduite. Pour laver votre filtre HEPA, tenez la cartouche du filtre par sa bride et
rincez-la sous le robinet jusqu’à ce que la poussière visible soit éliminée. Le filtre
HEPA pourrait subir une certaine décoloration. Ceci est normal et n’affectera en
rien sa performance. Lorsque vous avez terminé, secouez pour éliminer tout
excédent d’eau. NE LAVEZ PAS au lave-vaisselle.
Après leur nettoyage, il est important que vous laissiez tous les filtres sécher
COMPLÈTEMENT avant de les réutiliser. Le temps de séchage à l’air
recommandé est de 24 heures. NE PAS SÉCHER À LA SÉCHEUSE.
Veuillez toutefois le remplacer tous les trois (3) à six (6) mois,
Important:
Assurez-vous que TOUS les filtres sont entièrement secs avant de les remettre
dans l’aspirateur.
ou
Nous vous
2
47
Page 5
RÉSOLUTION DE PROBLÈMES
Cet appareil a fait l’objet d’une inspection complète et était en parfait état de
fonctionnement à sa sortie d’usine. Si un problème mineur survient, il pourra
généralement être réglé facilement une fois sa cause identifiée. Cette liste vous est
offerte afin de vous faciliter la tâche.
PROBLÈM E CAUSE PRO BABLE R ÉSOLUTION POSSIBLE
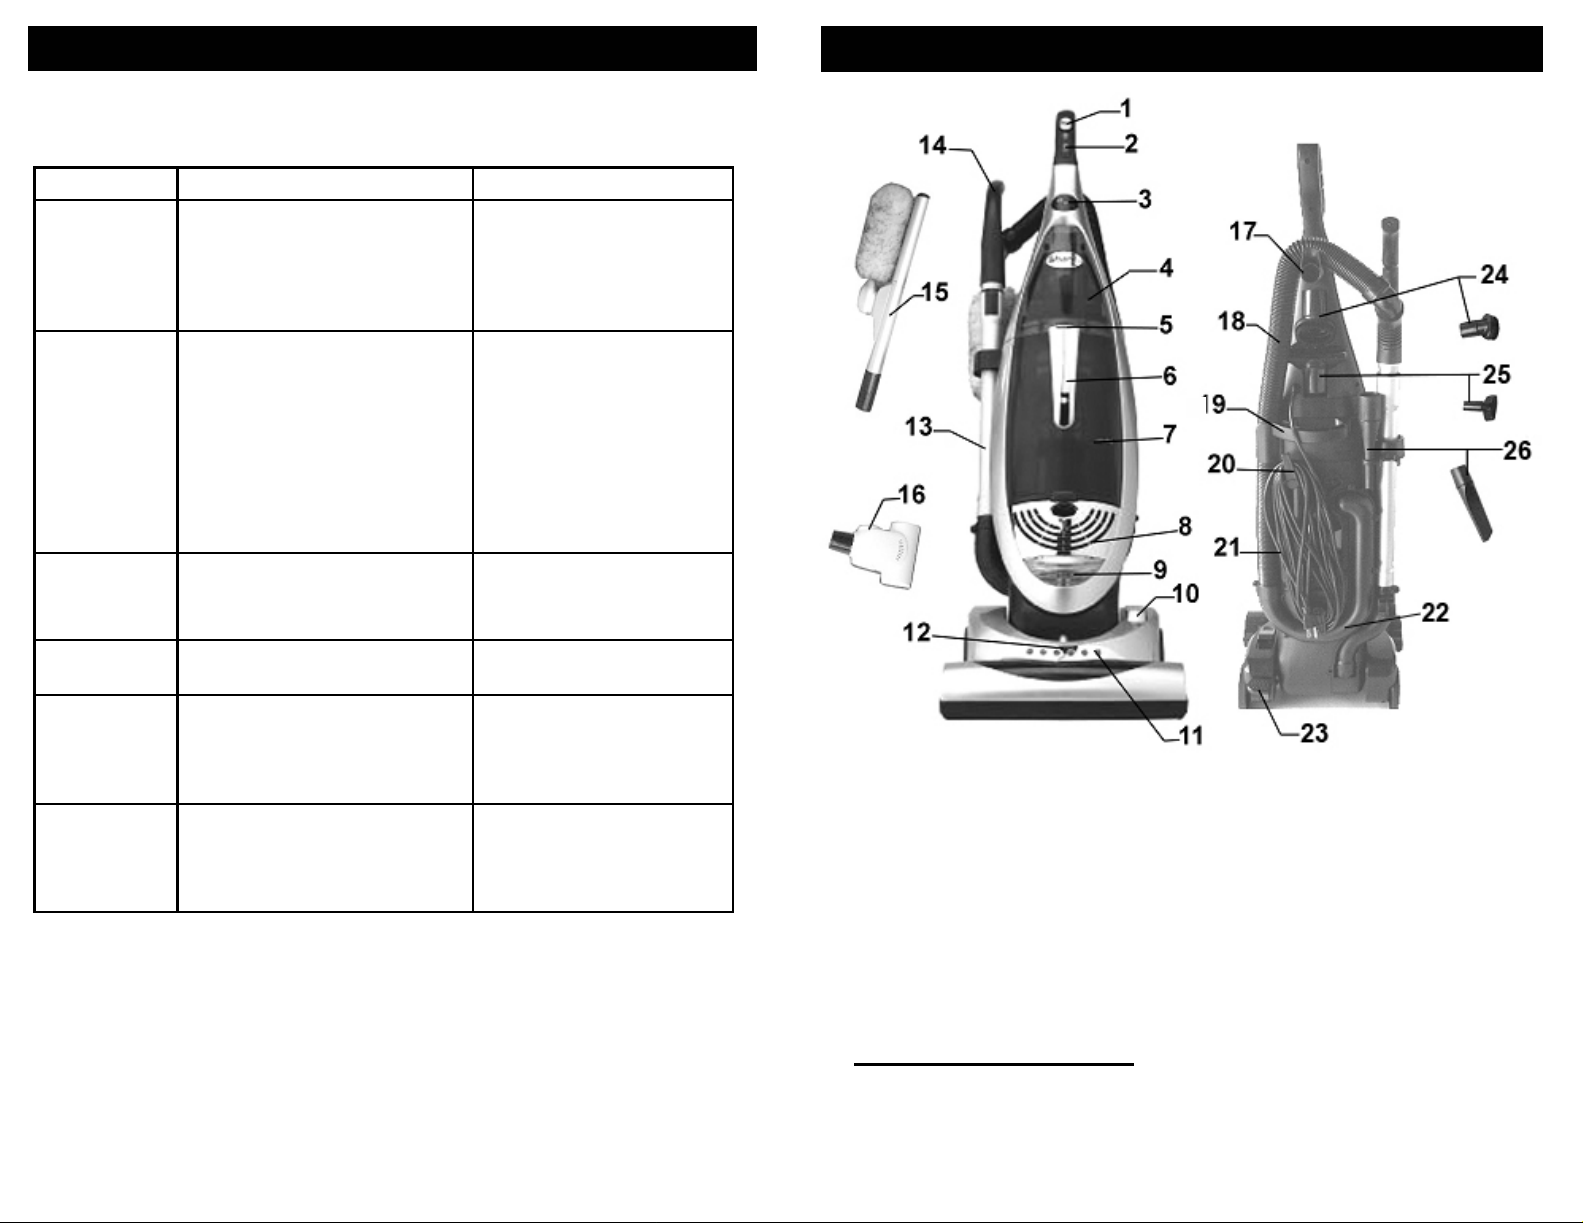
GETTING TO KNOW YOUR UPRIGHT VACUUM
L’aspirateur ne
fonctionne pas
L’aspirateur
n’aspire pas
L’aspirateur
aspire les tapis
mobiles ou tire
trop fo rt
Le batteur ne
tourne pas
L’électrobross
e ne tourne pas
ou tourne
len t e me nt
Le débit d’air
diminue avec
un accesso ire
Le son change
1. Mauvais branchement à la prise
murale.
2. La prise murale n’est pas alimentée.
3. Le bouton d’alimentation n’est pas à
la position allumée.
4. Le thermostat s’est déclenché.
1. Coupelle pleine ou obstruée.
2. Mauvais réglage de la hauteur des
poils.
3. Bec ou entrée de poussière obstrué.
4. Boyau obstrué.
5. Courroie(s) cassée(s).
6. Bo y a u ma l in s é ré .
7. Filtres sales.
8. L e filtre H EPA d o it être n e tto yé o u
rem p lacé .
9. Le filtre à débris doit être nettoyé.
10. L’aspirateur peur s’obstruer d’une
accumulation de débris.
1. Mauvais réglage de la hauteur des
1. Courroie(s) cassée(s).
poils.
2. Cou rr o ie(s) m al ins ta llée (s ).
1. La brosse rotative, la turbine ou le
coude sont obstrués.
2. La courroie est cassée.
3. Le boyau est obstrué.
4. Le filtre HEPA ou l’écran à débris est
obstrué.
1. L’accessoire réduit le débit d’air.
2. Des détritus d’un nouveau tapis
obstruent la voie d’accès de l’air.
1. Branchez bien l’appareil.
2. Ré in itia lis e z le d isjo n c te u r o u
remp lacez le fusible.
3. Mettez le bouton à la position
allumée.
4. Ré in itia lis e z le th e rmo s ta t d u
moteur
1. Nettoyez la coupelle
2. Ajustez le réglage.
3. Retirez toute obstruction.
4. Retirez toute obstruction.
5. Remplacez les courroies.
6. Insérez bien le boyau.
7. Nettoyez ou remplacez les
filtres .
8. Nettoyez ou remplacez le filtre
HEPA ou le cadre du filtre.
9. Nettoyez l’écran à débris.
10. Débloquez l’aspirateur
1. Ajustez le réglage.
Rem placez les courroies.
1.
2.
Vérifiez le changement de
courroie
1. Retirez toute obstruction.
2. Appelez le 1 800 798-7398.
3. Retirez toute obstruction.
4. N e tto y ez le filtre H EPA ou
l’éc ra n à d é b ris .
1. Vérifiez les accessoires.
2. Retirez toute obstruction.
1. Quiet / Normal Mode Selector
2. On/Off Switch
3. Intelli-Sense Filter Monitor
4. Turbo Brush Storage
Compartment
5. Dust Cup Release Button
6. Dust Cup Handle
7. Dust Cup
8. Exhaust Filter Cover
9. Light
10.Carpet-to-Floor Selector
11.LED Lights
12.Carpet Height Adjustor
13. Telescopic Tube
14. Flexible Hose Handle
15. Self-Cleaning Duster
16. Turbo Brush
17. Hose Holder
18. Flexible Hose
19. Vacuum Handle
20. Quick Release Power
Cord Holder
21. Power Cord
22. Intake Trap Door
23. Handle Release
24. Dusting Brush
25. Upholstery Brush
Technical Specifications
26. Crevice Tool
Voltage: 120V., 60Hz.
Power: 12 Amps
Note: Illustrations may differ from actual unit.
46
3
Page 6
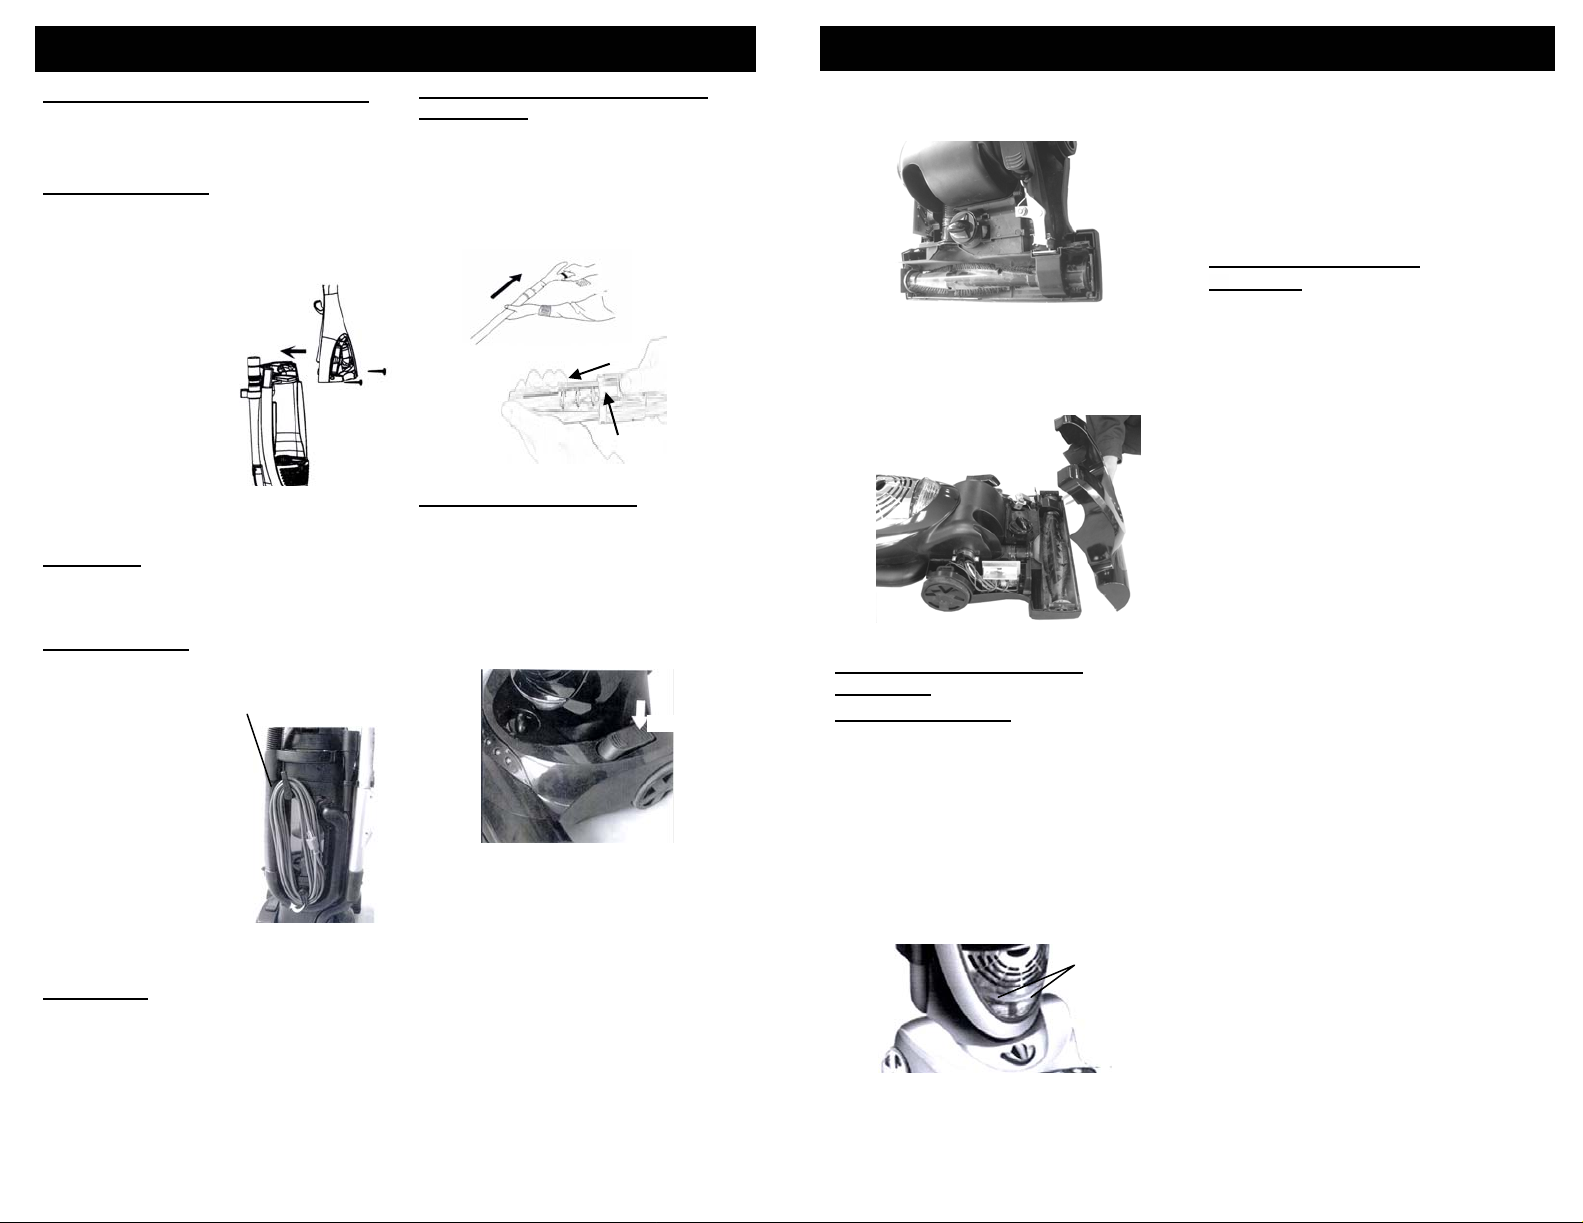
OPERATING INSTRUCTIONS
CONSIGNES D’UTILISATION
Assembling Your Vacuum Cleaner
Note: Do not plug the power cord
into an electrical outlet until the
vacuum is fully assembled.
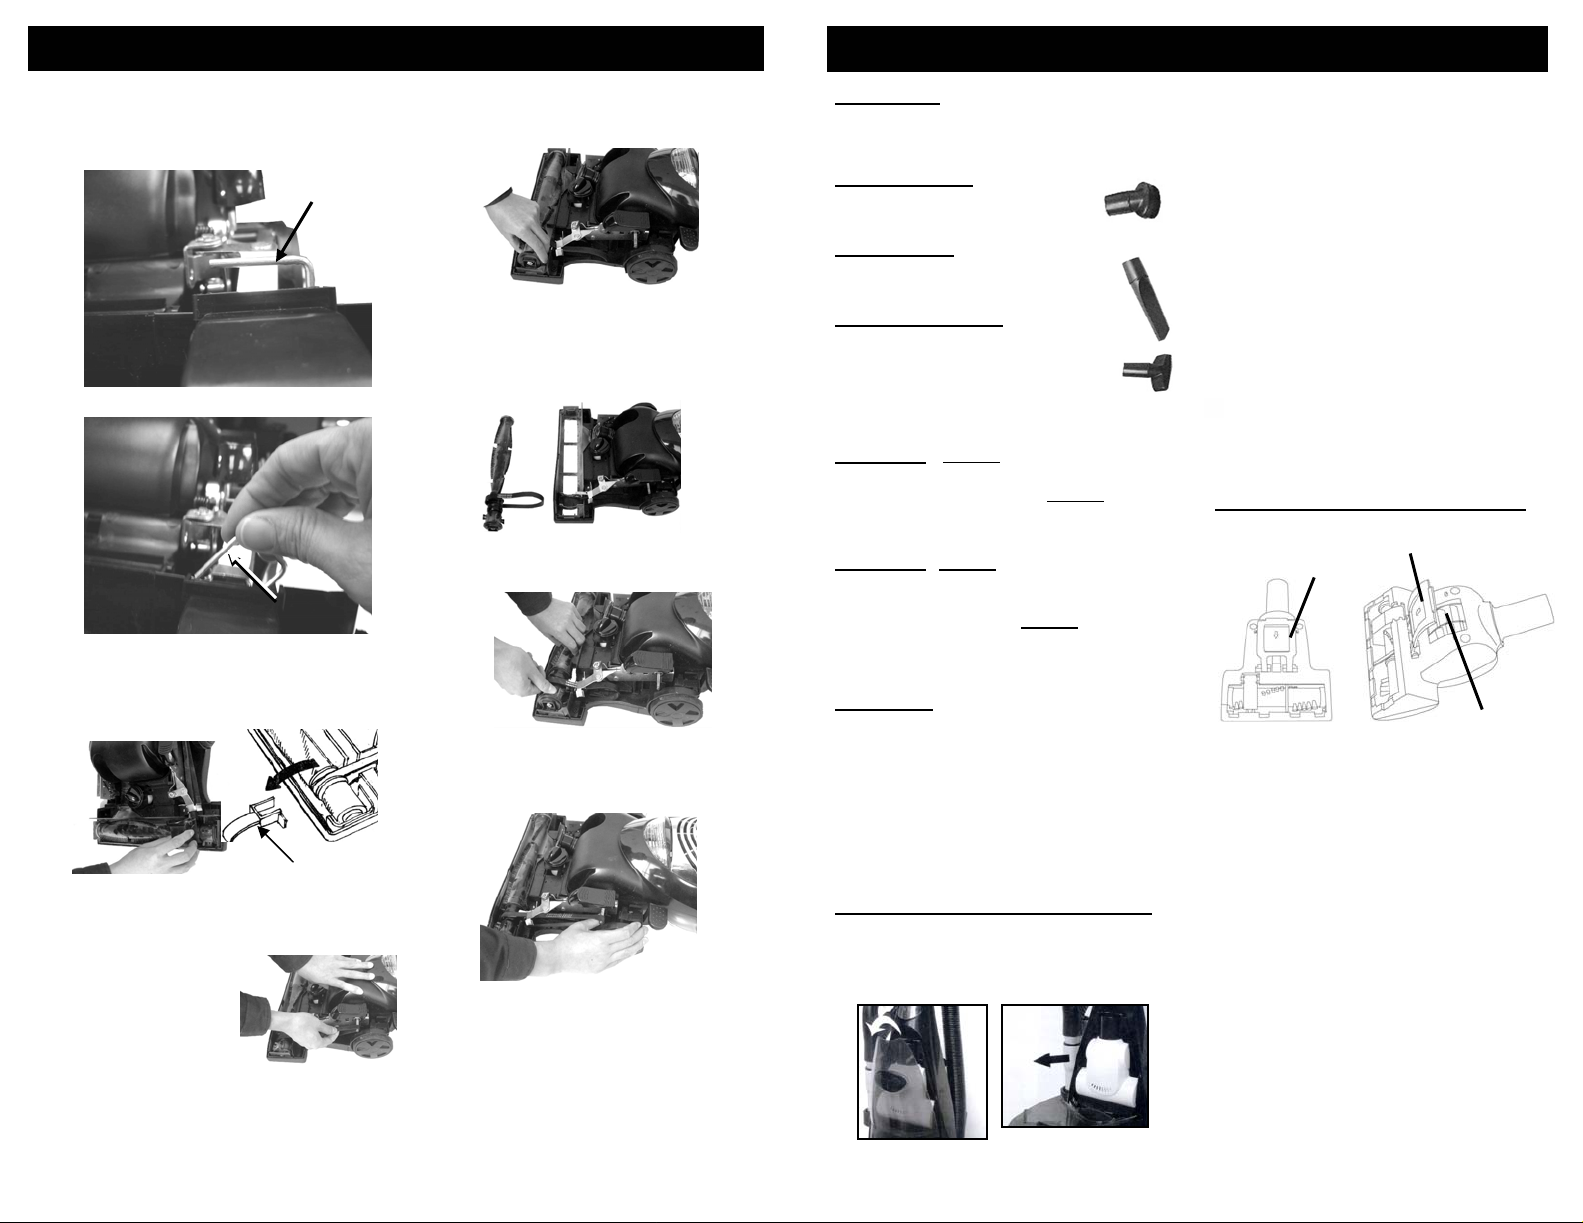
Handle Assembly
1. Carefully unpack all components,
set aside packaging.
2. Lift vacuum body to upright position.
3. Remove the screws (2) that come
attached to the body.
4. Open the turbo brush
storage door.
From the front of
the vacuum, align
the handle with
groove and slide
onto vacuum. If
necessary, use
thumb and finger
pressure to slide
Fig. 1
handle into position.
5. Once handle is in place, secure the
handle with the screws (2). (Fig. 1)
CAUTION:
Do not over tighten. Over
tightening could strip the screw holes.
Do not operate the vacuum without
the handle screws in place.
Cord Assembly
1. Make sure that the quick release
cord holder is in the upright
position.
2. Remove the wire
Quick Release
tie from the
power cord.
3. Wrap the cord into
place by wrapping
it in a clockwise
direction around
the quick release
cord holder and the
lower cord holder.
(Fig. 2)
4. Turn the quick release
Fig. 2
cord holder to the left or right to
unwrap the power cord. (Fig. 2)
WARNING: Do not plug in if the
On/Off switch is in the "On"
position.
Attaching the Telescopic Tube
to the Hose
To attach the flexible hose to the
telescopic tube:
1. Push the telescopic tube into the
hose. (Fig. 3)
2. Push forward on the plastic button
and pull the inner tube outward to
extend for a longer reach. (Fig. 4)
Fig. 3
Fig. 4
Plastic
Button
Using the Attachments
1. Place vacuum in its upright position.
Make sure that the vacuum cleaner
is NOT plugged into the electrical
outlet when adding or removing
accessories.
2. Press carpet-to-floor selector to the
“Floor” selection to stop agitator from
rotating. (Fig. 5 )
Floor
Fig. 5
3. Remove the hose handle from the
side of the unit and push the desired
attachment firmly onto the end of the
hose handle.
4. If additional length is required, attach
the flexible hose handle to the
telescopic tube and then attach the
desired accessory to the other end.
15. Replacez le couvercle de la courroie,
suivi de la pince de retenue.
(Fig. 49)
Fig. 49
16. Vérifiez que la courroie est centrée
sur la brosse du batteur et que le
batteur tourne librement.
17. Replacez le couvercle de
l’électrobrosse sur sa
base et remettez
les vis. (Fig. 50)
Fig. 50
Changement de l’ampoule
Électrique
AVERTISSEMENT: Afin de réduire les
risques d’électrocution, le cordon
d’alimentation doit être débranché avant
de procéder à l’entretien ou au
dépannage.
1. Éteignez l’appareil et débranchez-
le.
2. Insérez la tête d’un tournevis à tête
plate dans une des deux fentes sur le
dessus de la lentille du phare et tirez
doucement vers le bas. (Fig.51)
3. Retirez la lentille.
Fentes
de la lentille
Fig. 51
4. Retirez l’ampoule en la tirant
doucement.
5. Replacez la nouvelle ampoule en la
poussant vers l’intérieur.
6. Pour remplacer la lentille du phare,
insérez les onglets inférieurs de la
lentille dans les fentes de retenue et
faites claquer le dessus pour la fixer.
Thermostat du Moteur
Important: Cet appareil est équipé
d’un thermostat de protection du moteur.
Si, pour une raison quelconque,
l’aspirateur devait surchauffer, le
thermostat l’éteindra automatiquement.
Si ceci devait arriver :
• Appuyez une fois sur le bouton
On/Off.
• Débranchez la fiche de
l’alimentation.
• Vérifiez la source de la surchauffe
(ex.: boyau ou filtre obstrués).
• Si le boyau ou le filtre sont obstrués,
retirez toute obstruction du boyau et
remplacez le filtre.
• Attendez au moins 45 minutes
avant de réutiliser l’aspirateur.
• Une fois l’appareil refroidi pendant
45 minutes, branchez-le et appuyez
sur le bouton On/Off. L’aspirateur
devrait redémarrer.
• Si l’aspirateur ne démarre toujours
pas, contactez le service à la
clientèle au 1 (866) 826-6941.
4
45
Page 7
CONSIGNES D’UTILISATION
OPERATING INSTRUCTIONS
6. Retirez la pince de retenue du
couvercle de la courroie.
(Fig. 40, Fig. 41)
Pince de
retenue
Fig. 40
Pince de retenue
Fig. 41
7. Retirez le couvercle de la courroie
du côté droit afin de couvrir la
courroie et le batteur. (Fig. 42
et 43)
Fig. 43
Fig. 42
Couvercle de
la courroie
8. Retirez doucement tout détritus
pouvant se trouver dans la zone de la
courroie.
9. Retirez la
courroie de
l’arbre
d’entraînement
du moteur.
(Fig. 44)
Fig. 44
10. Retirez la brosse du batteur.
(Fig. 45)
Fig. 45
11. Retirez la courroie usée ou cassée
de la transmission du moteur.
12. Placez la nouvelle courroie
pardessus la brosse du batteur.
(Fig. 46)
Fig. 46
13. Replacez la brosse du batteur dans
la buse motorisée. (Fig. 47)
Fig. 47
14. Enroulez la nouvelle courroie pardessus l’arbre d’entraînement du
moteur. (Fig. 48)
Fig. 48
WARNING: To reduce the risk of electric
shock, the power cord must be
disconnected before attaching or removing
accessories.
Dusting Brush
The dusting brush is used for
the furniture
Crevice Tool
For radiators, crevices, corners,
baseboards and between cushions.
Upholstery Brush
The upholstery brush is used
for the furniture. The unique
surface makes it an excellent
tool for removing unwanted pet hair.
Note: This tool is not a grooming tool and
should not be used on animals.
CAUTION: Do not use upholstery brush
on delicate or woven fabrics that may
snag on upholstery brush. Do not
on wooden floors as this accessory might
cause mild scratching.
use it
CAUTION: Do not pull the vacuum
cleaner around the room by the hose as it
could tip over and cause damage. When
using the attachments, Do not
over
extend the hose length when reaching.
Trying to reach beyond the hose reach
could cause the vacuum to tip over.
WARNING: Avoid tipping the vacuum or
setting it on furniture, fringed area rugs or
carpeted stairs while you are using the
hose with the attachments. When the
vacuum is turned on, the agitator will
continue to rotate until you put the carpetto-floor selector to the “Floor” position.
Avoid leaving the vacuum in one place for
an extended period of time, particularly
on thick carpet.
Using the Air Driven Turbo Brush
Your Turbo Brush is located din the front of
your vacuum in its storage compartment.
1. Pull down turbo brush storage
compartment door. (Fig. 6)
2. Remove the air driven turbo brush
from the front of the unit. (Fig. 7)
3. Connect the turbo brush to hose
handle or to the telescopic tube.
The efficiency of your air driven turbo
brush depends on the bristle brush
rotating at high speed. Strong air suction
is needed to accomplish this. In order to
ensure that maximum air suction is
maintained, please read the following
instructions:
1. Empty the Dust Cup frequently during
use.
2. Always “TapClean” the HEPA dust
cup filter each time the dust cup is
emptied.
3. Ensure that the rotating bristle brush
is kept free of hair and string.
4. Inspect the turbine regularly to ensure
that the air passage is free of dirt and
debris.
Cleaning Air Driven Turbo Brush
Tilt
Locking
Latch
Fig. 8
1.Pull locking latch upwards then tilt the
door housing of the brush upwards.
(Fig. 8) The door housing is hinged
and will tilt up approximately 45° only.
(Fig. 9)
2.Inspect turbine wheel and air passage
for debris and/or blockage. Remove
debris if present.
3.Inspect the rotating brush for built-up
hair or string. If present, remove by
carefully cutting with scissors. Avoid
damaging or cutting bristles.
4.Once clean, press the door cover of
the turbo brush until it clicks to lock.
Upwards
Turbine
Wheel
Fig. 9
44
Fig. 6
Hand Held Air Driven
Turbo Brush
Fig. 7
5
Page 8
OPERATING INSTRUCTIONS
CONSIGNES D’UTILISATION
Using The Unit with Duster
The duster is powered by 2 AAA
batteries (packaged separately).
Before using your duster for the first time,
insert batteries as per illustration on
battery door. (Fig. 10) When replacing
batteries, ALWAYS use AAA batteries.
Battery life is dependant on usage.
Do not
use rechargeable batteries.
To Insert or Change Batteries
1. To open the battery door pull button
upwards and lift door. (Fig. 10)
2. Insert batteries making sure the ‘+’
and ‘-’ ends are in the correct
position. (Fig. 10)
3. To remove the batteries, open the
battery door and slide the batteries
out by tipping duster downward.
(Fig. 10)
Duster
Fig. 10
Intake Tube
+
Battery Door
On/Off
Switch
-
-
Important: Always use new batteries
when replacing. Never mix new
batteries together with old ones. Never
use rechargeable batteries.
To Operate Duster
The duster is designed to suction up
dust as it is rotating, making dusting a
cleaner chore.
1. To use the duster slide the duster
intake tube firmly onto the end of
the hose handle or telescopic tube
of the vacuum. (Fig. 11)
Fig. 11
2. Make sure duster head is pointing
downwards and vent holes are aligned
with duster before using on furniture or
other flat surfaces. The telescopic tube
makes it possible to reach high out of
the way places.
Hose
Handle
Extension
Tube
3. Depress on/off power switch located
on duster handle. Releasing power
switch will stop motor.
4. For constant turning motion of duster
depress on/off switch on the duster
and push forward, switch will lock into
the “On” position.
5. To turn off constant motion, slide
switch back to “Off” position.
: Do not exert pressure on duster,
Note
this causes the motor to stop. A light
dusting motion is all that is needed.
Occasionally the duster will require
cleaning. To do this:
1. Remove duster from housing.
2. Insert crevice tool into the unit. Vacuum
duster and intake tube to remove
excess dust.
Carpet Height Adjustment
This upright vacuum can be used on
multiple types of carpeting, bare floors or
upholstery with attachments. To select a
pile height setting:
1. Turn vacuum cleaner "Off".
2. Select a pile height setting by turning
the carpet height adjustment knob to
the desired setting. (Fig. 12)
Carpet Height
Adjustment Knob
Fig. 12
Suggested Pile Height Setting:
You may need to raise the height of the
vacuum to make some jobs easier, such
as scatter rugs and longer pile carpets.
Suggested settings are:
HIGH: shag carpet, long pile,
plush scatter rugs, tools
MED: medium to long pile
LOW: short to medium pile,
bare floors
FLOOR: very low pile, bare
floors
Place unit in "HIGH" setting and set
carpet-to-floor selector to “Floor” position
when using attachments to prevent
possible floor damage.
ATTENTION: Special care is required
when vacuuming certain types of carpet
or floor covering. Always check the carpet
or floor covering manufacturer's
recommended cleaning instructions
before vacuuming.
6
Déblocage de l’entrée d’air Derrière
la Barre de Brosse
Il y a une entrée d’air derrière la barre de
brosse, sous l’appareil. Il peut s’y
accumuler des débris qui réduisent la
puissance d’aspiration. Pour débloquer
cette entrée:
1. Débranchez l’appareil et mettez
l’aspirateur sur le côté.
2. Vérifiez s’il y a un bouchon derrière la
barre de brosse. (Fig. 35)
Entrée d’air
Fig. 35
3. Procédez au déblocage par cette
entrée. N’insérez jamais d’objet pointu
dans l’ouverture.
4. Branchez l’appareil et passez
l’aspirateur.
Déblocage de la Poignée du Tuyau
Si le pouvoir aspirant est toujours
diminué, vérifiez que la poignée n’est pas
obstruée.
1. Débranchez l’appareil et retirez la
poignée du tuyau pour vérifier si elle
est obstruée.
Fig. 36
2. Débloquez l’ouverture de la poignée
du tuyau. (Fig. 36) N’insérez jamais
d’objet pointu dans l’ouverture.
3. Vérifiez si le tube de rallonge est
débloqué en le mettant sous la lumière
et en repérant tout débris pouvant
l’obstruer.
4. Branchez l’appareil et passez
l’aspirateur.
Déblocage
Changement et Nettoyage de la
Courroie
AVERTISSEMENT : Afin de réduire les
risques d’électrocution, le cordon
d’alimentation doit être débranché avant de
procéder à l’entretien ou au dépannage.
La courroie d’entraînement du bec
souffleur doit être remplacée
occasionnellement. La fréquence varie
selon l’utilisation de votre aspirateur.
1. Éteignez l’appareil et débranchez-le de
l’alimentation électrique.
2. Relâchez la poignée en appuyant sur la
pédale de relâche et tirez sur la
poignée jusqu’à ce qu’elle quitte sa
position verticale et qu’elle repose à
plat sur le plancher. Retournez ensuite
l’aspirateur.
3. À l’aide d’un tournevis Philips nº 2,
retirez les six (6) vis de la plaque
inférieure. (Fig. 37)
Fig. 37
4. L’appareil toujours à plat,
retournez-le. Mettez le
sélecteur tapisplancher à la position
«On». (Fig. 38)
5. Retirez ensuite
l’électrobrosse à
partir de l’arrière.
(Fig. 39)
43
Fig. 38
Fig. 39
Page 9

MODE D’EMPLOI
OPERATING INSTRUCTIONS
Déblocage
De temps à autres, l’aspirateur peut
s’obstruer d’une accumulation de débris. Il
doit alors être nettoyé. Afin de réduire les
risques d’électrocution, le cordon
d’alimentation doit être débranché avant
de d’éliminer un débris ou avant de
procéder à l’entretien ou au dépannage.
Important: Les dommages causés par
l’élimination de blocage ne sont pas
couverts par la garantie limitée du produit.
ATTENTION: Faites attention aux objets
coupants pendant le déblocage.
Important: Replacez bien les pièces de
l’aspirateur avant de l’utiliser à nouveau.
Nettoyage de la Conduite d’air de la
Coupelle
1. Débranchez l’aspirateur.
2. Vérifiez si la coupelle est pleine. Si oui,
retirez-la et videz-la.
3. Vérifiez si la conduite d’air derrière la
coupelle est obstruée. (Fig. 31)
4. Branchez l’appareil et passez
l’aspirateur.
Conduite d’air
de la coupelle
Fig. 31
Nettoyage du Tuyau Court
Si le pouvoir aspirant est réduit, vérifiez
que le tuyau court n’est pas obstrué.
1 Débranchez l’aspirateur.
2. Retirez le couvercle du tuyau court.
(Fig. 32)
Fig. 32
Couvercle du
tuyau court
3. Regardez à l’intérieur du tuyau court
afin de voir s’il est obstrué. Le cas
échéant, retirez les obstructions.
N’insérez jamais d’objet pointu dans
l’ouverture pour nettoyer le tuyau.
(Fig. 33).
Fig. 33
4. Replacez le couvercle du tuyau court.
Branchez l’appareil et passez
l’aspirateur.
Nettoyage de la conduite d'air de la
coupelle
1. Débranchez l'aspirateur.
2. Vérifiez si la coupelle est pleine. Si
oui, retirez-la et videz-la.
3. Vérifiez si la conduite d'air derrière la
coupelle est obstruée. (Fig. 34)
Conduite d'air
de la coupelle
Fig. 34
4. Procédez au déblocage par cette
conduite et replacez la coupelle.
N’insérez jamais d’objet pointu dans
l’ouverture.
5. Branchez l’appareil et passez
l'aspirateur.
42
How to Start
The upright vacuum can be used on
multiple types of carpeting, bare floors or
upholstery with attachments. When using
the attachment tools such as the crevice
tool, the upholstery brush, duster or turbo
brush, place the handle of the vacuum in
the upright position.
1. Turn the quick release cord holder
to either side 180° to release the
power cord.
2. Plug the power cord into the electrical
outlet.
3. Depress on the handle release pedal
to release the
handle.
If a flat position
is required,
depress the
handle release
pedal a second
time.
4. Push the On/Off
switch to the "On"
position to turn
the vacuum on and select “Quiet” or
“Normal” mode.
5. When using the attachments, the
vacuum must be in the upright
position. (Fig. 13)
6. Ensure that agitator is locked by
pressing the carpet-to-floor selector to
the “Floor” position when using
attachments. (Fig. 14)
7. When using on carpets, set the
carpet-to-floor selector to the “Carpet”
position to engage the agitator.
(Fig. 15)
Fig. 14
Agitator Lock
Floors and Attachments
Store or Use
Attachments
Carpet-to-Floor
Selector
Use
Clean under
furniture
Handle release
Fig. 13
Fig. 15
Agitator Unlock
Carpets
Quiet/Normal Mode Selector
This unit is equipped with a quiet/normal
mode selector on the handle of the
vacuum. (Fig. 16)
Use the “Normal“ mode
when vacuuming
carpets, floors or
using the turbo
brush. Use the
“Quiet” model
when using the
Normal Mode - Up
Quiet Mode – Down
attachments to
vacuum
curtains,
drapes,
upholstery, etc.
Intelli-Sense Filter Monitor
When the Intelli-Sense
Filter Monitor
TM
lights
up, it means that the
dust cup is full or the
HEPA filter needs
cleaning or there is a
clog in the hose or
the telescopic tube.
You must empty the
dust from the dust
cup and clean the
HEPA dust cup
filter and debris screen and check
the unit for any clogs. (Fig. 17)
Intelli-Sense Filter
Fig. 17
MonitorTM
Removing & Emptying Dust Cup
WARNING: To reduce the risk of
electric shock, the power cord must be
disconnected before removing the dust
cup, HEPA filter,changing the filters or
performing maintenance/trouble shooting
checks.
The “Dust Cup” must always be emptied
when the dirt level is "FULL“, and the
intelli-sense filter monitor on the handle
goes on. To remove the dust cup from
the vacuum:
1. Press the dust
cup release
button and
pull the dust
cup out from
the vacuum.
(Fig. 18)
2. To empty the dust
cup, hold it by the
handle over a
garbage can and
press on the trap
door release
button to empty.
7
(Fig.19)
Dust Cup
Release
Button
Trap Door
Release
Button
Fig. 18
Fig. 19
Fig. 16
TM
Page 10

OPERATING INSTRUCTIONS
CONSIGNES D’UTILISATION
Cleaning the Dust Cup
The dust cup can be
washed in lukewarm
water. Do not use
strong detergents.
Ensure that the dust
cup is fully dry before
putting back into the
vacuum cleaner.
(Fig. 20) Do not
wash in dishwasher.
Fig. 20
Cleaning the HEPA Dust Cup Filter
IMPORTANT, Please Note: The Rinseable
“TapClean” HEPA Dust Cup Filter will stop
most of the tiniest dust particles and
airborne allergens from re-entering the air
you breathe. In fact it stops 99.97% of all
particles as small as 0.3 microns - many
times smaller than a human hair!!! Because
of this incredible filtration performance, the
HEPA Dust Cup Filter will quickly
accumulate many fine dust particles inside
the white filter folds that are difficult to see
but which will eventually block or reduce
your suction power - if not cleaned properly.
Clean the HEPA Filter after each use as
described in this section.
1.To remove the HEPA
filter, lift the filter retaining
tabs on either side of
the HEPA filter.
2.Remove the HEPA
Rinseable "Tap Clean"
filter from the
dust cup. (Fig. 21)
3.Clean the HEPA
filter after every
use with the
built in pleat
cleaner that is on
the HEPA filter
cartridge. Turn the knob on top of the
HEPA filter cartridge to clean the pleats
of the HEPA filter. (Fig. 22)
4. Then vigorously
"TapClean“ the
HEPA dust cup
filter on a hard
surface to remove
any residual
dust that might
still be on the
HEPA filter. (Fig. 23)
Retaining Tabs
Fig. 21
Pleat
Cleaner
Knob
Fig. 22
Fig. 23
5. You can wash
the HEPA filter
by running it under
the tap allowing the
water to run on the
dirty side at least
once a month or when
suction is decreased.
(Fig. 24)
Fig. 24
Important: NEVER use the pleat cleaner
knob on the HEPA filter if the HEPA filter is
wet or you will damage the filter.
Note: We recommend washing it once a
month or when suction appears reduced.
Always allow 24 hours for drying before
replacing into the vacuum. The HEPA dust
cup filter should, however, be replaced
every three (3) to six (6) months to ensure
peak performance of your vacuum.
Please Note: The white material in the
HEPA filter will discolor over time - This is
NORMAL and will NOT affect the
performance of the filter.
WARNING: Always empty the dust cup
and clean the HEPA dust cup filter and
debris screen before each use and during
prolonged usage. Never over fill the dust
cup - remove dirt and clean the HEPA dust
cup filter each time the dust cup is emptied
during prolonged usage or risk motor
damage.
Cleaning the Debris Screen
To remove the debris screen:
1. Open the trap door and
empty any dirt that is
in the dust cup. Hold the
debris screen and turn
it counter clockwise to
unlock. (Fig. 25)
2. Rinse the debris screen
in lukewarm water by
running it under the tap
to remove any dust
that is adhering to the
screen. (Fig. 26)
Do not
place in dishwasher.
3. Make sure that the debris
screen is completely dry
before replacing into the dust cup.
Note: The debris screen must be cleaned
after every use.
Fig. 25
Fig. 26
Nettoyage du Filtre Secondaire
1. Sous le filtre HEPA se trouve un
filtre secondaire. Il doit être
nettoyé en même temps
que le filtre HEPA. (Fig. 27)
Retirez le filtre HEPA et
tirez sur le filtre secondaire
pour le sortir.
Fig. 27
2. Rincez à l’eau courante tiède.
Laissez toujours le filtre secondaire
sécher à l’air pendant 24 heures
avant de le replacer. N’utilisez
jamais l’aspirateur sans tous ses
filtres et l’écran à débris.
Remarque: Ce filtre est lavable, mais il
est recommandé de le remplacer tous
les trois (3) mois.
Changement et Nettoyage du
Filtre d’échappement
AVERTISSEMENT: Afin de réduire les
risques d’électrocution, le cordon
d’alimentation doit être débranché avant de
retirer la coupelle ou le filtre HEPA, de
changer le filtre et de procéder à l’entretien
ou au dépannage.
Le filtre d’échappement est situé à l’avant
de l’aspirateur. Veuillez prendre note que ce
filtre peut être lavé en le rinçant à l’eau
tiède. Laissez toujours au filtre
d’échappement le temps de sécher à l’air
durant 24 heures avant de le replacer dans
l’aspirateur. N’utilisez pas de séchoir à
cheveux pour le sécher. Séchez à l’air
seulement. Pour retirer le filtre
d’échappement:
1. Retirez la coupelle à poussière de
l’appareil. Insérez le pouce dans la fente
du filtre d’échappement. Enfoncez le
pouce et retirez la plaque. (Fig. 28)
2. Faites glisser le cadre du filtre
d’échappement. (Fig . 29)
3. Nettoyez le filtre d’échappement en le
rinçant à l’eau tiède.
4. Après un séchage à l’air de 24 heures,
replacez-le dans l’aspirateur et remettez
la plaque frontale.
Changement et Nettoyage du Filtre
Pré-Moteur
AVERTISSEMENT: Afin de réduire
les risques d’électrocution, le cordon
d’alimentation doit être
débranché avant de retirer la coupelle à
poussière, le filtre HEPA, ainsi qu’avant
de changer les filtres ou d’effectuer
l’entretien ou le dépannage.
Le filtre pré-moteur est situé sous la
coupelle à poussière. Vérifiez
fréquemment le filtre pré-moteur et
nettoyez-le au besoin. Pour retirer le
filtre pré-moteur:
1. Retirez la coupelle à poussièr e.
2. Retirez le filtre pré-moteur en le
soulevant. (Fig. 30)
3. Rincez le filtre à l’eau tiède et
laissez sécher à l’air durant 24
heures avant de le replacer dans
l’aspirateur. Ne rincez pas le filtre à
la laveuse. N’utilisez pas de séchoir
à cheveux pour le sécher. Séchez à
l’air seulement. N’utilisez jamais
l’aspirateur sans TOUS ses filtres.
4. Lorsque le filtre est sec, replacez-le
dans l’aspirateur.
Remarque
obstrué devrait être nettoyé
entièrement à l’eau froide. Un détergent
doux peut être utilisé au besoin.
: Un filtre très souillé ou
Filtre
pré-moteur
Fig. 30
Fig. 28
8
Fig. 29
41
Page 11

CONSIGNES D’UTILISATION
OPERATING INSTRUCTIONS
Nettoyage de la Coupelle
La coupelle peut être lavée à
l’eau tiède. N’utilisez pas de
détergent fort. Assurez-vous
que la coupelle est entièrement
sèche avant de la remettre dans
l’aspirateur. (Fig. 20) Ne lavez
pas au lave-vaisselle.
Fig. 20
Nettoyage du Filtre de Coupelle
à Poussière HEPA
AVERTISSEMENT IMPORT ANT: Le
filtre de coupelle à poussière HEPA
rinçable et «secouable» empêchera la plus
petite particule de poussière et les
allergènes en suspension de revenir dans
l’air que vous respirez. En fait, il retient
99,97 % des particules,qui sont aussi
petites que 0,3 micromètre – beaucoup
plus petites qu’un cheveu! Étant donné ce
pouvoir filtrant incroyable, le filtre HEPA
accumule rapidement les fines particules
de poussière à l’intérieur de son pli de filtre
blanc. Ces particules sont difficiles à voir
mais elles obstrueront ou réduiront
éventuellement le pouvoir de succion si le
filtre n’est pas nettoyé correctement.
Nettoyez le filtre HEPA après chaque
utilisation, tel que décrit dans cette section.
1. Pour retirer le filtre
HEPA, débloquez
la plaque du
contenant de la
coupelle en soulevant
les onglets de retenue
situés de chaque
côté du filtre HEPA.
2. Retirer le de filtre
HEPA
«secouable»
de la coupelle à
poussière. (Fig. 21)
3. Nettoyez le filtre
HEPA après chaque utilisation à l’aide
du nettoyant à plis situé sur la cartouche
du filtre. Tournez le bouton situé sur le
dessus de la cartouche du filtre HEPA
pour nettoyer ses plis. (Fig. 22)
4. Secouez ensuite
vigoureusement le
filtre de coupelle à
poussière sur une
surface dure afin de
retirer tout résidu de
poussière qui pourrait
s’y trouver. (Fig. 23)
Onglets de retenue
Fig. 21
Bouton
nettoyeur
de plis
Fig. 22
Fig. 23
40
5. Vous pouvez laver le
filtre HEPA en laissant
l’eau du robinet
couler sur le côté
souillé au moins une fois
par mois ou lorsque
la succion diminue. (Fig . 24)
Fig. 24
Important: N’utilisez pas le bouton de
nettoyage des plis du filtre HEPA si le
filtre est mouillé.
Remarque: Nous vous recommandons
de le nettoyer une fois par mois ou
lorsque la succion semble réduite.
Laissez-le toujours sécher durant 24
heures avant de le replacer dans
l’aspirateur. Le filtre à coupelle HEPA doit
être remplacé tous les trois (3) à six (6)
mois pour assurer un rendement optimal
à votre aspirateur.
Remarque: Le matériel blanc du filtre
HEPA subira une décoloration avec le
temps. Cela est NORMAL et
N’AFFECTERA EN RIEN sa performance.
AVERTISSEMENT: Videz toujours la
coupelle et nettoyez toujours le filtre
HEPA et le filtre à débris avant chaque
utilisation et pendant l’usage prolongé. Ne
faites jamais déborder la coupelle. Retirez
la saleté et nettoyez le filtre HEPA chaque
fois que la coupelle est vidée durant un
usage prolongé, sans quoi vous
encourrez le risque d’endommager le
moteur.
Nettoyage de l’écran à Débris
Pour retirer l’écran à débris:
1. Ouvrez la trappe et
retirez toute poussière
de la coupelle. Tenez
l’écran à débris et
faites-le tourner dans
le sens horaire
pour le débloquer.
(Fig. 25)
2. Rincez l’écran à débris
à l’eau tiède en
le passant sous
le robinet pour en
retirer toute
poussière. (Fig. 26)
Ne le lavez pas
au lave-vaisselle.
3. Assurez-vous que l’écran à débris
est entièrement sec avant de le
remettre dans la coupelle à
poussière.
Fig. 25
Fig. 26
Cleaning the Secondary Filter
1. Beneath the HEPA filter is a secondary
filter that should be
cleaned each time
the HEPA filter is
cleaned. (Fig. 27)
Remove the HEPA
Fig. 27
filter and then lift out the
secondary filter.
2. Clean under the running water. Always
allow the secondary filter to air dry for
24 hours before replacing. Never run
the vacuum without all the filters and
debris screen in place.
Note: This is a washable filter, but we
recommend replacing it every three (3)
months.
Changing & Cleaning the Exhaust
Filter
WARNING: To reduce the risk of electric
shock, the power cord must be
disconnected before removing the dust cup,
HEPA filter,changing the filters or
performing maintenance/trouble shooting
checks.
The exhaust filter is located in the front of
the vacuum. Please note that this filter is a
washable filter and can be cleaned by
rinsing under lukewarm water. Always allow
the exhaust filter to air dry for 24 hours
before replacing in the vacuum. Do not use
a hair dryer to dry it. Air dry only. To remove
the exhaust filter:
1. Insert a thumb into the slot on the
exhaust filter. Press down and pull the
cover outwards. (Fig. 28)
2. Slide out the exhaust filter frame.
(Fig. 29)
3. Clean the exhaust filter by rinsing
under lukewarm water.
4. After air drying for 24 hours, replace
in the vacuum and replace front cover.
Fig. 28
Fig. 29
Changing & Cleaning the Pre-Motor
Filter
WARNING: To reduce the risk of electric
shock, the power cord must be
disconnected before removing the dust
cup, HEPA filter, changing the filters or
performing maintenance/trouble shooting
checks.
The pre-motor filter is located underneath
the dust cup. Check the pre-motor filter
frequently and clean when dirty. To
remove the pre-motor filter:
1. Remove the dust cup.
2. Lift the pre-motor filter out. (Fig. 30)
3. Rinse in lukewarm water and let the
filter air dry for 24 hours before reinstalling into the vacuum. Do not use
a washing machine to rinse the filter.
Do not use a hair dryer to dry it. Air dry
only. Never operate the vacuum
without ALL the filters in place.
4. When the filter is dry, replace into
the vacuum.
Note: A severely soiled or clogged filter
should be thoroughly washed with fresh
tepid water. A mild detergent can be used
if required.
Pre-motor
filter
9
Fig. 30
Page 12

OPERATING INSTRUCTIONS
Clearing Blockages
Occasionally the vacuum may become
blocked by a build up of debris which will
require cleaning. To reduce the risk of
electric shock, the power cord must be
disconnected before clearing a blockage
or performing maintenance/trouble
shooting checks.
Important: Damages caused while
clearing or attempting to clear blockages
are not covered under your product’s
limited warranty.
CAUTION: Beware of sharp objects
when clearing blockages.
Important: Replace parts of the vacuum
securely before continuing to use.
Clearing the Intake Hose
Check the intake hose for blockages if
suction is reduced.
1. Unplug the vacuum.
2. Lift the intake trap door on the rear of
the unit. (Fig. 31)
Intake Trap
Door
Fig. 31
3. While holding the intake door open,
clear the build up. Never insert sharp
objects into opening to clean.
4. Close door, plug in unit to continue
vacuuming.
Clearing the Short Hose
Check the short hose for blockages if
suction is reduced.
1. Unplug the vacuum.
2. Remove the short hose cover. (Fig. 32)
Fig. 32
Short Hose
Cover
3. Look inside the short hose to see if
there is any build up. If there is, clear
the build up. Never insert sharp
objects into opening to clean. (Fig. 33)
Fig. 33
4. Replace the short hose cover, and
plug in the unit to continue vacuuming.
Clearing the Dust Cup Air Duct
1. Unplug the vacuum.
2. Check fullness of the dust cup, if full,
remove and empty the dust cup.
3. Check the air duct behind the dust cup
for any blockage. (Fig. 34)
Dust Cup
Air Duct
Fig. 34
4. Clear the blockage from the air duct
and replace dust cup. Never insert
sharp objects into an opening to clear.
5. Plug in unit and resume vacuuming.
CONSIGNES D’UTILISATION
Pour Commencer
À l’aide des accessoires, l’aspirateur
debout peut être utilisé sur divers types de
tapis, sur les planchers nus ou sur les
meubles. Lorsque vous utilisez des
accessoires tels que le suceur plat, la
brosse à meubles, le plumeau ou
l’électrobrosse, mettez la poignée de
l’aspirateur en position verticale.
1. Tournez le porte-cordon à relâche
rapide de 180° d’un côté ou de l’autre
afin de libérer le cordon d’alimentation.
2. Branchez le cordon d’alimentation dans
la prise électrique.
3. Appuyez sur la pédale de relâche de la
poignée pour
libérer la poignée.
Si une position à
plat est nécessaire,
appuyez à nouveau
sur la pédale de
relâche de la
poignée.
4. Enfoncez le bouton
On/Off à la position
«On» pour mettre l’aspirateur en
marche. Sélectionnez le mode
«Silencieux» ou «Normal».
5. Lorsque vous utilisez des accessoires,
maintenez l’aspirateur en position
verticale. (Fig. 13)
6. Assurez-vous que le batteur est bloqué
en mettant le sélecteur tapis-plancher à
la position «plancher» («Floor»)
lorsque vous utilisez des accessoires.
(Fig. 14)
7. Réglez le sélecteur tapis-plancher à la
position «Tapis» («Carpet») lorsque
vous utilisez le batteur. (Fig. 15)
Sélecteur tapis-plancher
Fig. 14
Batteur bloqué
Planchers et accessoires
Sélecteur de Mode Silencieux/Normal
Cet appareil est doté d’un sélecteur de mode
silencieux/normal, situé sur sa poignée.
(Fig. 16)
Ranger ou utiliser
Accessoires
Nettoyez sous
Relâche de la poignée
Fig. 15
Batteur débloqué
Tapis
Utilisez
les meubles
Fig. 13
Mettez-le en mode «Normal» lorsque vous
nettoyez les tapis,
planchers ou lorsque vous
utilisez l’électrobrosse.
Mettez-le en mode
«Silencieux» lorsque
vous utilisez les
accessoires pour
nettoyer les rideaux,
les tapisseries, les meubles, etc.
Dispositif de Surveillance du
Filtre Intelli-Sense
Lorsque le témoin du
dispositif de surveillance
du filtre Intelli-Sense
Mode normal– Haut
Mode silencieux – Bas
MC
Dispositif de
surveillance du filtre
Intelli-Sense
MC
Fig. 16
MC
est élevé, la coupelle
est pleine ou le filtre
HEPA doit être nettoyé
ou il y a une
obstruction dans le
tuyau ou le tube
télescopique. Vous
devez vider la coupelle
à poussière et nettoyer
Fig. 17
le filtre HEPA et l’écran à débris.
Vérifiez que l’appareil n’est pas obstrué.
(Fig . 17)
Retrait et Vidange de la Coupelle
AVERTISSEMENT: Afin de réduire
les risques d’électrocution, le cordon
d’alimentation doit être débranché avant
de retirer la coupelle ou le filtre HEPA,
de changer le filtre et de procéder à
l’entretien ou au dépannage.
La «coupelle à poussière» doit toujours
être vidée le niveau de poussière
indique «PLEIN» («FULL») et que le
dispositif de surveillance Intelli-Sense
de la poignée s’allume. Pour retirer la
coupelle de l’aspirateur:
1. Appuyez sur le bouton de relâche
de la coupelle et
retirez-la de
l’aspirateur.
(Fig. 18)
2. Pour vider la
coupelle,
tenez-la par sa
poignée
au-dessus d’une
poubelle et
appuyez sur le
bouton de relâche
pour la vider.
(Fig.19)
Bouton de
relâche
de la
coupelle
Fig. 18
Bouton
de relâche
de la trappe
Fig. 19
10
39
Page 13

CONSIGNES D’UTILISATION
Utilisation du Plumeau
Le plumeau est alimenté par 2 piles AAA
(emballées séparément). Avant d’utiliser
votre plumeau pour la première fois, insérez
les piles tel qu’illustré sur la trappe des
piles. (Fig. 10) Lorsque vous remplacez les
piles, utilisez TOUJOURS des piles AAA. La
durée des piles dépend de l’utilisation.
N’utilisez pas
Insertion ou Remplacement des Piles
1. Pour ouvrir la trappe des piles, tirez le
bouton vers vous et levez la trappe.
(Fig. 10)
2. Insérez les piles en vous assurant que
les extrémités ’+’ et ’-’ sont à la bonne
position. (Fig. 10)
3. Afin de retirer les piles, ouvrez la
trappe et faites glisser les piles en
inclinant le plumeau vers le bas.
(Fig. 10)
Plumeau
Importante: Utilisez toujours des
nouvelles piles en remplacement. Ne
mélangez pas les nouvelles piles avec les
anciennes. N’utilisez jamais de piles
rechargeables.
Utilisation du Plumeau
Le plumeau est conçu pour aspirer la
poussière et tournant, rendant
l’époussetage plus efficace.
1. Pour utiliser le plumeau, insérez-le
fermement dans à l’extrémité de la
poignée du boyau ou au tube
télescopique. (Fig. 11)
2. Assurez-vous que le plumeau pointe
vers le bas et que les trappes de
ventilation sont alignées au plumeau
avant de l’utiliser sur les meubles ou
autres surfaces planes. Le tube
télescopique permet d’atteindre des
emplacements éloignés.
de piles rechargeables.
Tube d’entrée
Fig. 10
+
Trappe de la pile
Bouton
d’alimentation
On/Off
-
-
Poignée
du boyau
Tube
de rallonge
Fig. 11
38
3. Appuyez sur le bouton d’alimentation
situé sur la poignée du plumeau.
Relâchez le bouton d’alimentation pour
arrêter le moteur.
4. Pour un mouvement de rotation constant
du plumeau, relâchez le bouton
d’alimentation du plumeau et poussez-le
vers l’avant, le verrouillant sur «On».
5. Pour arrêter le mouvement constant,
glissez le bouton à la position «Off».
Remarque: N’appliquez pas de force sur le
plumeau: le moteur s’arrêtera. Seul un léger
mouvement d’époussetage est nécessaire.
Le plumeau doit être nettoyé à l’occasion.
Pour ce faire:
1. Retirez le plumeau du boîtier.
2. Insérez le suceur plat dans l’appareil.
Nettoyez le plumeau et le tube d’entrée
pour éliminer la poussière.
Sélecteur de Hauteur de Tapis
À l’aide des accessoires, l’aspirateur debout
peut être utilisé sur divers types de tapis,
sur les planchers nus ou sur les meubles.
Pour la hauteur des poils:
1. Éteignez l’aspirateur («Off»).
2. Sélectionnez un réglage de hauteur
de poils en tournant le sélecteur au
réglage désiré. (Fig. 12)
Bouton de réglage
de hauteur de tapis
Fig. 12
Réglage de hauteur des poils suggéré:
Vous devrez peut-être élever la hauteur de
l’aspirateur afin de vous faciliter la tâche,
comme sur les carpettes et les tapis à poil
long. Les réglages suggérés sont:
LONGS: tapis peluche, tapis à
MOYEN: poils moyens à longs
COURT: poils courts à moyens,
planchers nus
PLANCHER : poils très courts,
planchers nus
poils longs, accessoires
Afin d’éviter d’endommager le plancher,
placez l’appareil à «LONG» et réglez le
sélecteur tapis-à-plancher à la position
«Plancher» lorsque vous utilisez les
accessoires.
ATTENTION: Une attention particulière
est nécessaire lorsque vous nettoyez
certains types de tapis ou de couvreplancher. Vérifiez toujours les instructions
de nettoyage du fabricant du tapis ou du
couvre-plancher avant de nettoyer.
OPERATING INSTRUCTIONS
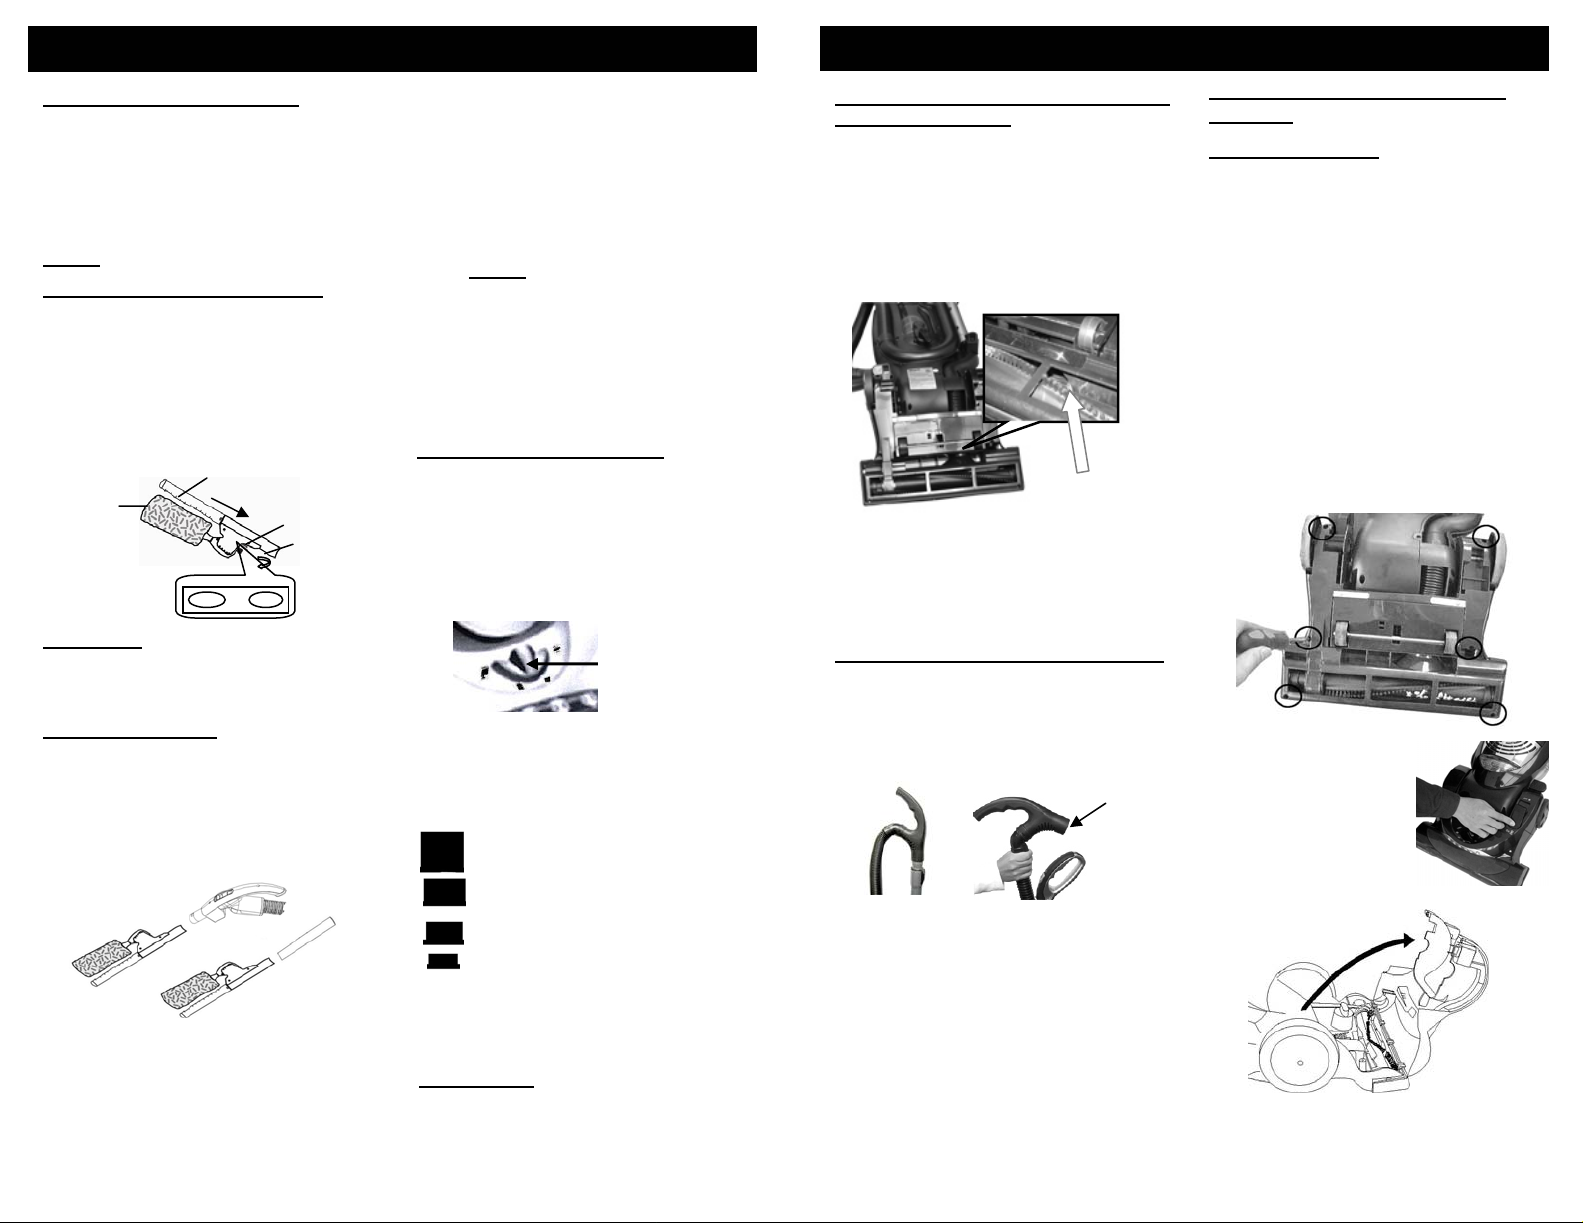
Clearing the Intake Opening Behind
the Agitator
There is an intake opening behind the
agitator underneath the unit where debris
may collect, reducing suction. To clear
this opening:
1. Unplug the unit and lay the vacuum
on its side.
Intake
Opening
Fig. 35
2. Check to see if there is a clog just
behind the agitator. (Fig. 35)
3. Clear the blockage from this opening.
Never insert sharp objects into
opening to clean.
4. Plug unit in, to continue vacuuming.
Clearing the Hose Handle
If the suction is still reduced, check the
hose handle for blockages.
1. Unplug the unit and remove hose
handle to check for any blockage.
(Fig. 36)
Clear
Blockage
Fig. 36
2. Clear the blockage from the opening,
of the hose handle. Never insert sharp
objects into an opening to clear.
3. Verify that extension tube is clear by
holding it up to the light to see if there
is any debris blocking the extension
tube.
4. Plug in unit and resume vacuuming.
Cleaning & Changing the Belt
WARNING: To reduce the risk of electric
shock, the power cord must be
disconnected before performing
maintenance/trouble shooting checks.
Occasionally the power nozzle drive belt
will require changing, the frequency will
depend upon the amount of use your
vacuum sees.
1. Turn the vacuum "Off" and unplug from
power supply.
2. Release the handle by pressing on the
handle release pedal twice and pull
back on the handle until it releases from
its upright position and lies flat on the
floor. Then turn the vacuum over.
3. With a Phillips #2 screw driver remove
the six (6) screws on the bottom plate.
(Fig. 37)
Fig. 37
4. With the unit still lying down,
turn it around. Place the
carpet-to-floor selector
to the “On” position.
(Fig. 38)
5. Then remove
the power head
cover starting
from the back. (Fig. 39)
Fig. 39
11
Fig. 38
Page 14

OPERATING INSTRUCTIONS
CONSIGNES D’UTILISATION
6. Remove the locking clip that holds
down the belt cover.
(Fig. 40, Fig. 41)
Locking Clip
Fig. 40
Locking Clip
Fig. 41
7. Remove the belt cover on the right
side, covering the belt and agitator.
(Fig. 42, Fig. 43)
Fig. 43
Fig. 42
Belt cover
8. Carefully remove any residue that may
exist in the belt area.
9. Remove the belt from the motor shaft.
(Fig. 44)
Fig. 44
10.Remove the agitator brush. (Fig. 45)
Fig. 45
11.Remove the worn or broken belt from
the motor drive shaft.
12.Place the new belt over the agitator
brush. (Fig. 46)
Fig. 46
13.Replace the agitator brush back into
the power nozzle. (Fig. 47)
Fig. 47
14. Loop the new belt over the motor
drive shaft. (Fig. 48)
Fig. 48
15. Replace the belt cover and then the
locking clip. (Fig. 49) Make sure that
the belt is over the bottom part of the
locking clip.
Fig. 49
12
AVERTISSEMENT: Afin de réduire les
risques d’électrocution, le cordon
d’alimentation doit être débranché avant
poser ou de retirer des accessoires.
Brosse à Épousseter
La brosse à épousseter s’utilise
sur les meubles.
Suceur Plat
Pour radiateurs, fissures, coins,
plinthes et entre les coussins.
Brosse à Meubles
La brosse à meuble est utilisée sur les
meubles. Sa surface unique en fait
un excellent outil pour éliminer les poils
d’animaux.
Remarque: Cet outil n’est pas un appareil
de toilettage et ne doit pas être utilisé sur
les animaux.
MISE EN GARDE: N’utilisez pas la
brosse à meubles sur les tissus délicats ou
laineux qui pourraient s’y coller. Ne
l’utilisez pas sur les planchers de bois:
cet accessoire pourrait égratigner la
surface.
MISE EN GARDE: NE DÉPLACEZ PAS
l’aspirateur à travers la pièce en tirant sur
son boyau, sans quoi il pourrait tomber et
causer des dommages. Lorsque vous
utilisez les accessoires, N’ÉTIREZ PAS
TROP le boyau en travaillant. Si vous
tentiez d’atteindre un endroit au-delà de la
portée du boyau, l’aspirateur pourrait
tomber.
AVERTISSEMENT: Évitez de pencher
l’aspirateur ou de le mettre sur les
meubles, les tapis frangés ou les escaliers
de tapis lorsque vous utilisez le boyau
avec des accessoires. Lorsque l’aspirateur
est en marche, le batteur continue à
tourner tant que le sélecteur tapis-àplancher est à la position « Plancher ».
Évitez de laisser l’aspirateur à un endroit
fixe pour une période prolongée,
particulièrement sur un tapis épais.
Utilisation de l’électrobrosse
Votre électrobrosse est située à l’avant de
l’aspirateur, dans son compartiment de
rangement.
Fig. 7
Fig. 6
Électrobrosse
pneumatique manuelle
1. Tirez la porte du compartiment de
l’électrobrosse vers le bas. (Fig. 6)
2. Retirez l’électrobrosse pneumatique
de l’avant de l’appareil. (Fig. 7)
3. Branchez l’électrobrosse à la poignée
du boyau ou au tube télescopique.
L’efficacité de votre électrobrosse
pneumatique dépend de la bonne vitesse
de rotation des soies. Afin d’obtenir ce
résultat, une grande force de succion d’air
est nécessaire. Afin d’assurer une succion
d’air maximale constante, veuillez lire les
instructions suivantes:
1. Videz la coupelle à poussière
fréquemment en cours d’utilisation.
2. «Secouez» toujours le filtre de la
coupelle HEPA, chaque fois que la
coupelle est vidée.
3. Assurez-vous que les soies de la
brosse rotative sont libres de cheveux
et de fils.
4. Vérifiez régulièrement que le passage
d’air de la turbine est libre de
poussière et de débris.
Nettoyage de l’électrobrosse
Pneumatique
Levier
de blocage
1. Tirez le verrou vers le haut et inclinez
l’habitacle de la brosse vers le haut.
(Fig. 8) L’habitacle à charnière
s’inclinera d’environ 45° seulement.
(Fig. 9)
2. Vérifiez que le volant de la turbine et
le passage d’air ne sont pas obstrués.
Retirez les débris, le cas échéant.
3. Vérifiez que la brosse rotative ne
contient pas d’accumulation de
cheveux ou de fils. Le cas échéant,
retirez-les prudemment à l’aide de
ciseaux. Évitez d’endommager ou de
couper les soies.
4. Une fois propre, appuyez sur la plaque
de la porte de l’électrobrosse jusqu’à
ce qu’elle se verrouille.
37
Inclinez
vers le haut
Fig. 8
Roue de turbine
Fig. 9
Page 15

CONSIGNES D’UTILISATION
OPERATING INSTRUCTIONS
Assemblage de Votre Aspirateur
Remarque: Ne branchez pas le
cordon d’alimentation à la prise
électrique tant que l’aspirateur n’est
pas complètement assemblé.
Assemblage de la Poignée
1. Déballez délicatement tous les
composants. Réservez l’emballage.
2. Mettez l’aspirateur en position
verticale.
3. Retirez les vis (2)
attachées à l’appareil.
4. Ouvrez la porte du
compartiment de
l’électrobrosse.
À partir de l’avant
de l’aspirateur,
alignez la poignée
Fig. 1
avec la rainure et
faites-la glisser sur l’aspirateur.
Au besoin, servez-vous du pouce
et de l’index pour faire glisser la
poignée à sa place.
5. Une fois la poignée à sa place,
fixez-la à l’aide des vis (2). (Fig. 1)
MISE EN GARDE:
Ne serrez pas
trop. Trop serrer pourrait rayer les
trous de vis. N’utilisez pas
l’aspirateur sans que toutes les vis
de sa poignée soient en place.
Assemblage du Cordon
1. Assurez-vous que le porte-
cordon à relâche rapide est en
position verticale.
2. Retirez le lien
Relâche rapide
armé du cordon
d’alimentation.
3. Enroulez le corde en
l’enroulant dans le
sens horaire autour
du porte-cordon
à relâche rapide et du
portecordon
inférieur. (Fig. 2)
4. Tournez le porte-
Fig. 2
cordon à relâche rapide vers la
gauche ou vers la droite pour
dérouler le cordon d’alimentation.
(Fig. 2)
AVERTISSEMENT: Ne branchez
pas l’appareil si le bouton
d’alimentation est à «ON».
Pose du Tube Télescopique a u
Boyau
Afin d’attacher le tube télescopique au
boyau:
1. Poussez le tube télescopique dans
le boyau. (Fig. 3)
2. Poussez sur le bouton de plastique
et tirez le tube interne vers
l’extérieur à la longueur désirée.
(Fig. 4)
Fig. 3
Fig. 4
En plastique
Utilisation des Accessoires
1. Mettez l’aspirateur en position
verticale. Assurez-vous que
l’aspirateur N’EST PAS branché dans
la prise électrique lorsque vous
ajoutez ou retirez des accessoires.
2. Mettez le sélecteur tapis-plancher à la
position «plancher» («Floor») pour
empêcher le batteur de tourner.
(Fig. 5)
Plancher
Fig. 5
3. Retirez la poignée du boyau du côté
de l’appareil et insérez fermement
l’accessoire désiré à son extrémité.
4. Si vous avez besoin de plus de
longueur, attachez la poignée du
boyau flexible au tube télescopique et
attachez l’accessoire désiré à l’autre
extrémité.
16. Check to make sure that the belt is
centered on the agitator brush and
that the agitator turns freely.
17. Replace the power head
cover over the power
head base and replace
the screws. (Fig. 50)
Fig. 50
Changing the Headlight Bulb
WARNING: To reduce the risk of
electric shock, the power cord must
be disconnected before performing
maintenance/trouble shooting checks.
1. Turn unit “Off” and unplug from
wall outlet.
2. With a flathead screw driver, insert
into one of the two slots on top of
the head light lens and gently pull
down. (Fig. 51)
3. Lift out the head light lens.
Lens Slots
Fig. 51
4. Remove the light bulb by pulling it
out carefully.
5. Replace the new bulb by pushing it
in.
6. To replace the head light lens, insert
bottom tabs of lens into holding slots
and snap top back into place to
secure.
Motor Thermostat
Important: This unit is equipped with a
motor protective thermostat. If for some
reason the vacuum cleaner should
overheat, the thermostat will
automatically turn the unit off. Should
this occur:
• Push the On/Off button once.
• Disconnect the plug from the power
source.
• Check the source of overheating
problem. (i.e. clogged hose or filter)
• If clogged hose or filter is found,
unclog the hose and replace the
filters.
• Wait at least 45 minutes before
attempting to reuse the vacuum.
• After unit has cooled do wn for 45
minutes, plug in the cleaner and push
the On/Off button. The vacuum should
start again.
• If the vacuum still does not start,
contact customer service at
1 (800) 798-7398.
36
13
Page 16

PROBLEM SOLVING
This appliance was inspected thoroughly and was in good operating condition when it
was shipped from the factory. If a minor problem occurs, it usually can be solved quite
easily when the cause is found. Therefore, this checklist is provided for your
convenience.
PROBLEM POSSIBLE CAUSE POSSIBLE SOLUTION
FAMILIARISEZ-VOUS AVEC VOTRE ASPIRATEUR
VERTICAL
Cleaner Won’t
Run
Cleaner Won't
Pick Up
Cleaner Picks
Up Moveable
Rugs Or
Pushes Too
Hard
Agitator Does
Not Turn
Air Driven
Turbo Brush
Does Not
Rotate Or
Rotates
Slowly
Air Flow
Restricted
With
Attachment
Use Sound
Changes
1. Not properly plugged into
wall ou tlet.
2. No electricity in wall outlet.
3. On/Off switch not turned
on.
4. Motor thermostat tripped.
1. Full or clogged dust cup.
2. Wrong pile height setting.
3. Clogged nozzle or dust
inlet po rt.
4. Clogged hose.
5. Broken belt(s).
6. Hose no t ins e rted fully.
7. Dirty filters.
8. HEPA filter needs
cleaning or replacing.
9. Debris screen needs
cleaning.
10. Clog somewhere in unit.
1. Wrong pile height setting. 1. Adjust setting.
1. Broken belt(s).
2. Belt(s) installed
incorre c tly.
1. Rotating brush, turbine or
elbow obstructed.
2. Belt broken.
3. Hose obstructed.
4. HEPA filter or d ebris
screen clogged.
1. Attachment use restricts
air flow.
2. New carpet debris
clogging air path.
1. Plug in firmly.
2. Reset circuit breaker or replace
fuse.
3. Push on/off switch to on
4. Reset motor thermostat.
1. Clean d ust cup.
2. Adjust se tting .
3. Remove obstruction.
4. Remove obstruction.
5. Replace belt(s).
6. Push hose in securely.
7. Clean / change filters
8. Clean or repla ce HEPA Filter or
filter frame.
9. Clean debris screen.
10. Clear blockage.
1. Replace belt(s).
2. Check belt changing.
1. Clear obstructions.
2. Call 1-800-798-7398.
3. Clear obstruction.
4. Clean HEPA filter or debris
screen.
1. Check attachment.
2. Remove obstruction.
1. Sélecteur de mode silencieux/normal
2. Bouton d’alimentation On/Off
3. Dispositif de surveillance du filtre
Intelli-Sense
4. Compartiment de rangement
de l’électrobrosse
5. Bouton de relâche de la coupelle
6. Poignée de la coupelle à poussière
7. Coupelle à poussière
8. Plaque du filtre d’échappement
9. Phare
10. Sélecteur tapis-plancher
11. Témoins à DEL
12. Sélecteur de hauteur de tapis
13. Tube télescopique
14. Poignée du boyau souple
15. Plumeau autonettoyant
16. Électrobrosse
17. Porte-tuyau
18. Boyau souple
19. Poignée de l’aspirateur
20. Porte-cordon à relâche rapide
21. Cordon d’alimentation
22. Trappe d’admission
23. Relâche de la poignée
24. Brosse à épousseter
25. Brosse à meubles
26. Suceur plat
Spécifications techniques
Tension : 120 V, 60 Hz
Intensité : 12 A
Avertissement : Les illustrations peuvent différer de l’appareil lui-même.
14
35
Page 17

MESURES DE PRÉCAUTION
Important
1. N’ap prochez pas l’aspirateur
2. Avant d’insérer la fiche
3. N’aspirez aucun liquide.
4. Tenez toutes les parties du
: Si la trappe de succion, le boyau ou le tube télesco pique se bloquent,
éteignez l’aspirateur et retirez l’obstacle avant de redémarrer l’appareil.
trop près des éléments chauffants
ou des radiateurs.
d’alimentation dans la prise
murale, assurez-vous que vos
mains sont sèches.
corps, les doigts, les cheveux et
les vêtements lâches éloignés
des ouvertures, du batteur rotatif
et des autres pièces mobiles.
5. Lorsqu e vous retirez le cordon
d’alimentation de la prise murale,
tirez sur la fiche et non pas sur le
cordon.
6. Ne ramassez a ucun objet fumant
ou brûlant tel que les cigarettes,
allumettes ou cendres chaudes.
7. Évitez de faire passer l’aspirateur
sur le cordon d’alimentation.
8. N’utilisez pas l’aspirateur sans
sa coupelle ou sans ses filtres.
9. Avant de netto yer, assurez-vous
de retirer tout gros objet ou tout
objet coupant pouvant
endommager l’aspirateur.
Commercially Rated Upright Vacuum
TO ORDER REPLACEMENT FILTERS OR BELTS
for Model UV210CN
Call: 1 (800) 798-7398
Monday to Friday 8:30 A.M. - 5:00 P.M. Eastern Standard Time
or
visit our website: www.sharkcompany.com
FOR TECHNICAL SUPPORT
for Model UV210CN
Call: 1 (800) 798-7398
Monday to Friday 8:30 A.M. - 5:00 P.M. Eastern Standard Time
Please Note:
Secondary Filter, Pre-Motor and Exhaust Filters are washable. They
should however be replaced every three (3) months to ensure peak
performance of your vacuum.
The HEPA Filter may be washed.
(3) to six (6) months, depending on amount of use, to ensure peak performance of
your vacuum.
We recommend washing it once a month or when suction
appears to be reduced. To wash your HEPA Filter, hold filter cartridge by
frame flange and rinse under a tap until all observable dirt has been
removed. Some discoloration of the HEPA filter material may occur, this is
normal and will not affect the filter's performance. When finished, shake off
excess water. Do NOT wash in dishwasher.
It is important that when you wash the HEPA filter or any of the other filter,
you allow them to air dry COMPLETELY before using again. We
recommend 24 hours to air dry. DO NOT DRY IN DRYER.
It should, however, be replaced every three
34
Important:
Make sure that ALL the filters are completely dry before inserting back in
the vacuum.
15
Page 18

Model
UV210CN
THREE (3) YEAR LIMITED WARRANTY
EURO-PRO Operating LLC warrants this product to be free from defects in material and
workmanship for a period of three (3) years from the date of the original purchase. This warranty
applies only to normal domestic household use.
Should your appliance fail to operate properly while in use under normal commercial or household
conditions within the warranty period, return the complete appliance and accessories, freight
prepaid to:
U.S.:
Canada:
If the appliance is found to be defective in material or workmanship,
EURO-PRO Operating LLC, 94 Main Mill Street, Plattsburgh, N.Y., 12901
EURO-PRO Operating LLC, 4400 Bois Franc, St. Laurent, Quebec, H4S 1A7
EURO-PRO Operating LLC
will repair or replace it free of charge. Proof of purchase date and $14.95 to cover the cost of
return shipping and handling must be included. *
Non-durable parts including, without limitation, filters, drive belts, rotating brushes, bulbs and
electrical parts which normally require replacement are specifically excluded from warranty.
The liability of
EURO-PRO Operating LLC is limited solely to the cost of the repair or replacement
of the unit at our option. This warranty does not cover normal wear of parts and does not apply to
any unit that has been tampered with. This limited warranty does not cover damage caused by
misuse, abuse, negligent handling or damage due to faulty packaging or mishandling in transit.
This warranty does not cover damage or defects caused by or resulting from damages from
shipping or repairs, service or alterations to the product or any of its parts, which have been
performed by a repair person not authorized by
EURO-PRO Operating LLC.
This warranty is extended to the original purchaser of the unit and excludes all other legal and/or
conventional warranties. The responsibility of
specific obligations expressly assumed by it under the terms of the limited warranty.
EURO-PRO Operating LLC if any, is limited to the
In no event is
EURO-PRO Operating LLC liable for incidental or consequential damages of any nature
whatsoever. Some states do not permit the exclusion or limitation of incidental or consequential
damages, so the above may not apply to you.
This warranty gives you specific legal rights, and you may also have other rights which vary from
state to state or province to province.
*Important: Carefully pack item to avoid damage in shipping. Be sure to include proof of
purchase date and to attach tag to item before packing with your name, complete address
and phone number with a note gi ving purchase information, mod el number and w hat you
believe is the problem with item. We recommend you insure the package (as damage in
shipping is not covered by your warranty). Mark the outside of your package “ATTENTION
CUSTOMER SERVICE”. We are constantl y striving to improve our products, therefore the
specifications contain ed her ein are subject to change w ithout noti c e.
------------------------------------------------------------------------------------- -------------
OWNERSHIP REGISTRATION CARD
FOR CANADIAN CONSUMERS ONLY
Please fill out and mail the product registration card within ten (10) days of purchase. The registration will enable
us to contact you in the unlikely event of a product safety notification. By returning this card you acknowledge to
have read and understood the instructions for use, and warnings set forth in the accompanying instructions
Canada:
______________________________________________________________________
EURO-PRO Operating LLC, 4400 Bois Franc, St. Laurent, Québec H4S 1A7
Model UV210CN
Appliance model
______________________________________________________________________
Date purchased Name of store
______________________________________________________________________
Owner' s name
______________________________________________________________________
Address City Prov. Postal Code
Printed in China
16
.
CONSIGNES DE SÉCURITÉ IMPORTANTES
Lors de l’utilisation de votre Aspirateur vertical, des précautions élémentaires doivent
être observées, dont les suivantes :
Avant d’utiliser votre aspirate ur, lisez toutes le s
directives.
MISE EN GARDE : Afin de réduire les risques
d’incendie, d’électrocution et de blessure :
1. Ne laissez pas l’aspirateur branché sans
surveillance. Débranchez lorsque vo us ne l’utilisez
pas et avant de retirer les filtres.
2. Afin d’éviter tout risque d’électrocution, NE
L’UTILISEZ PASà l’extérieur ou sur des surfaces
mouillées.
3. Cet appareil N’EST PAS un jouet. Une surveillance
étroite est nécessaire lorsqu e utilisé par de s enfants
ou à proximité.
4. N’utilisez cet appareil que de la façon décrite dans
ce guide. N’utilisez que les accessoires
recommandés par le fabricant.
5. N’UTILISEZ PAS l’appareil si sa fiche ou son
cordon sont endommagés. N’utilisez pas
l’aspirateur s’il a été échappé, endommagé, utilisé à
l’extérieur ou immergé. Retournez l’appareil à
EURO-PRO Operating LLC pour vérification,
réparation ou réglage.
6. Ne déplacez pas l’aspirateur en tirant sur son
cordon d’alimentation. N’utilisez pas le cordon
comme une poignée, ne fermez pas de porte sur le
cordon, et ne tirez pas sur le cordon à proximité de
rebords ou de coins coupants. Ne passez pas
l’aspirateur sur le cordon. Éloignez le cordon de
toute surface chauffée.
7. Ne débranchez pas l’appareil en tirant sur le
cordon d’alimentation. Pour débrancher, agrippez la
fiche, et non le cordon.
8. Ne manipulez pas la fiche ou l’aspirateur les
mains mouillées.
9. N’UTILISEZ PAS l’aspirateur pour ramasser de
gros objets ou des objets pouvant l’endommager.
10. Tenez toutes les parties du corps, les doigts, les
cheveux et les vêtements lâches éloignés des
ouvertures, du batteur rotatif et des autres pièces
mobiles. N’utilisez pas l’aspirateur nus pieds ou
avec des sandales.
11. Ne ramassez pas de combustible chaud, de mégot
de cigarette, d’allumette ni tout autre objet chaud,
fumant ou brûlant.
12. Ne ramassez pas d’objets durs ou coupants
tels le verre, les clous, vis, pièces de monnaie, etc.
13. N’utilisez pas l’aspirateur sans ses f iltres.
Utilisez UNIQUEMENT les filtres et accessoires
fournis par EURO-PRO Operating LLC. Sans
quoi vous annulerez votre garantie.
14. Éteignez toutes les commandes avant de
brancher ou de débrancher l’appareil.
15. Soyez particulièrement prudent en nettoyant les
escaliers.
16. Ne ramassez pas de produit inflammable ou
combustible (huile à briquet, essence, kérosène,
etc.) et n’utilisez pas l’appareil en présence de
vapeur ou de liquide explosifs.
17. Ne ramassez pas de produit toxique (eau de
javel, ammoniaque, dégorgeoir, etc.).
18. N’utilisez pas dans un endroit fermé rempli de
vapeurs de peinture à l’huile, de diluant, d’apprêt
antimite, de poussière inflammable ou autre
vapeur explosive ou toxique.
19. N’utilisez l’aspirateur qu’à l’intérieur, sur des
surfaces sèches.
20. N’UTILISEZ PAS cet appareil pour un usage autre
que ceux décrits dans ce guide.
21. L’utilisation d’une rallonge n’est pas
recommandée.
22. Ne mettez aucun objet dans les ouvertures.
N’utilisez pas
obstruée. Assurez-vous que les ouvertures sont
libres de poussière, peluche, cheveux et de tout
ce qui pourrait réduire le débit d’air.
23. Rangez l’appareil à l’intérieur dans un endroit frais
et sec.
24. Assurez-vous que votre espace de travail est bien
éclairé.
25. N’immergez pas l’aspirateur.
26. Gardez votre visage et votre corps à l’abri de
l’extrémité du boyau, des tubes et autres
ouvertures.
27. Afin d’éviter d’endommager les tapis, gardez
constamment la tête de l’aspirateur en
mouvement.
28. Ne branchez que sur une prise correctement mise
à la terre. Consultez les instructions de mise à la
terre.
l’appareil si une ouverture est
CONSERVEZ CES INSTRUCTIONS
Usage domestique ou professionnel seulement
INSTRUCTIONS DE MISE À LA TERRE
Cet appareil doit être mis à la terre. Dans le cas d’un mauvais fonctionnement ou d’un
bris, la mise à la terre réduit le risque d’électrocution en permettant au courant électrique
d’emprunter le chemin offrant le moins de résistance. Cet appareil est doté d’un cordon
d’alimentation avec équipement conducteur de mise à la terre et fiche bipolaire avec
terre. La prise doit être branchée dans une prise adéquate, installée
et mise à la terre selon la réglementation locale.
AVERTISSEMENT : Une connexion inadéquate du conducteur de mise à la terre
peut causer des chocs électriques. Consultez un électricien qualifié ou un représentant
du service si vous n’êtes pas certain de la mise à la terre de l’appareil. Ne modifiez pas
la fiche fournie avec l’appareil. Si elle ne convient pas à la prise, faites installer une prise
appropriée par un électricien qualifié.
Cet appareil convient à un courant nominal 120 volts. Il est doté d’une fiche mise à la
terre semblable à celle illustrée à droite. Assurez-vous que l’appareil est branché à une
prise dont la configuration convient à la fiche. N’utilisez aucun adaptateur avec cet
appareil.
33
Prise mise
à la terre
La lame de mise
à la terre est la
plus longue des
trois
V. 12/06
Page 19

Modelo
UV210CN
GARANTÍA LIMITADA DE TRES (3) AÑOS
EURO-PRO Operating LLC garantiza este producto contra defectos de materiales y mano de obra por un
término de tres (3) años a partir de la fecha de compra original. Esta garantía es válida únicamente para uso
doméstico normal.
Si su artefacto no funciona correctamente al utilizarlo bajo condiciones comerciales o domésticas normales
dentro del período de garantía, devuelva el artefacto completo ylos accesorios, pagando el envío, a:
EE.UU.: EURO-PRO Operating LLC, 94 Main Mill Street, Plattsburgh, N.Y., 12901
Canadá: EURO-PRO Operating LLC, 4400 Bois Franc, St. Laurent, Quebec H4S 1A7
Si el artefacto presenta un defecto de materiales o mano de obra, EURO-PRO Operating LLC lo reparará o
remplazará sin cargo. El envío debe incluir un comprobante de la fecha de compra y $14,95 para cubrir los
gastos de envío. *
Los insumos tales como, sin limitación, filtros, correas, cepillos giratorios, lámparas y partes eléctricas que
normalmente necesitan ser reemplazados son explícitamente excluidos de la garantía.
La responsabilidad d e EURO-PRO Operating LLC se limita únicamente al costo de reparación o reemplazo de
la unidad, a nuestro criterio. Esta garantía no cubre el desgaste normal de las partes y no cubre ninguna unidad
que haya sido alterada. Esta garantía limitada no cubre daños ocasionados por uso inadecuado, abuso,
negligencia o daños causados por embalaje inapropiado o maltratodurante el transporte. Esta garantía no cubre
daños o defectos causados o resultantes durante el transporte para su reparación o alteraciones del producto o
cualquiera de sus partes, realizadas por una persona no autorizada por EURO-PRO Operating LLC.
Esta garantía es válida para el comprador original del producto y excluye cualquier otra garantía legal y/o
convencional. La responsabilidad de EURO-PRO Operating LLC, de existir, se limita a las obligaciones
específicas asumidas expresamente bajo los términos de esta garantía limitada. Bajo ninguna circunstancia
EURO-PRO Operating LLC será responsable por da ños incidentales o indirectos de ninguna clase. Algunos
estados no permiten la exclusión o limitación de daños consiguientes o incidentales, por lo tanto lo anterior
puede no ser válido para usted.
Esta garantía le otorga derechos legales específicos, y usted puede también tener otros derechos los que varían
de estado a estado o de provincia a provincia.
*Importante: Embale el producto cuidadosamente para evitar daños durante el transporte. Asegúrese de
incluir un comprobante de la fecha de compra y de colocarle una etiqueta al producto con su nombre,
dirección completa y número de teléfono, una nota proporcionando información de la compra, número
de modelo y una descripción del problema. Le recomendamos asegurar el paquete (puesto que la
garantía no cubre daños de envío). Escriba en el exterior del paquete “ATTENTION CUSTOMER
SERVICE”. Nosotros nos esforzamos constantemente en mejorar nuestros productos, por lo tanto las
especificaciones aquí indicadas pueden cambiar sin previo aviso.
--------------------------------------------- ---------------------------------------------- --------------------------------
TARJETA DE REGISTRO DEL CLIENTE
SÓLO PARA CONSUMIDORES CANADIENSES
Complete y envíe la tarjeta de registro del producto dentro de los diez (10) días posteriores a la
compra. El registro nos permitirá contactarnos con usted en caso de existir alguna notificación de
seguridad con respecto al producto. Retornando esta tarjeta usted reconoce haber leído y
entendido las instrucciones de uso y advertencias incluidas en estas instrucciones.
: EURO-PRO Operating LLC, 4400 Bois Franc, St. Laurent, Québec H4S 1A7
Canadá
Modelo UV210CN
_____________________________________________________________________________
Modelo del Artefacto
_____________________________________________________________________________
Fecha de compra Nombre del Negocio
_____________________________________________________________________________
Nombre del Usuario
_____________________________________________________________________________
Dirección Ciudad Provincia Código Postal
Impreso en China
32
INSTRUCCIONES IMPORTANTES DE SEGURIDAD
Al usar su Aspiradora Vertical, siempre debe seguir precauciones básicas de
seguridad, incluyendo las siguientes:
Lea completamente las instrucciones antes de
utilizarla.
ADVERTENCIA: Para reducir el riesgo de
incendio, descarga eléctrica o daños personales:
1. No deje la aspiradora desatendida cuando
esté enchufada. Desenchúfela del
tomacorriente cuando no la utilice y antes
de quitar los filtros.
2. Para reducir el riesgo de descargas eléctricas
– NO la utilice al exterior o sobre superficies
mojadas.
3. No permita que los niños la utilicen como un
juguete. Debe tener mucho cuidado al ser
utilizada por o cerca de niños.
4. Utilícela solamente como se indica en este
manual. Use únicamente los accesorios
recomendados por el fabricante.
5. No la use si el cable o el enchufe están
dañados. No utilice la aspiradora si se ha
caído, dañado, dejado en el exterior o tirado al
agua. Retórnela a EURO-PRO OperatingLLC
para que sea examinada, reparada o
ajustada.
6. No la jale o transporte del cable. No utilice el
cable como manija, no lo apriete con una
puerta, o tire del cable a través de esquinas o
bordes filosos. No pase el artefacto por
encima del cable de alimentación. Mantenga
el cable alejado de superficies calientes.
7. No la desenchufe tirando del cable. Para
desenchufarla, tire del enchufe, no del cable.
8. No toque el enchufe o la aspiradora con las
manos húmedas.
9. No use la aspiradora para levantar objetos
muy grandes u objetos que podrían dañarla.
10. Mantenga el cabello, la ropa suelta, los dedos
y toda parte del cuerpo alejados de las
aberturas y de las partes móviles. No use la
aspiradora cuando esté descalzo o con
zapatos abiertos.
11. No levante carbón caliente, colillas de
cigarrillos, fósforos ni ningún objeto caliente,
echando humo o quemándose.
12. No levante objetos duros o filosos como
vidrios, clavos, tornillos, monedas, etc.
13. No la utilice sin todos los filtros colocados
en su lugar. Use únicamente filtros y
accesorios proporcionados por
Operating LLC
. El no hacerlo invalidarála
EURO-PRO
garantía.
14. Apague todos los controles antes de enchufar
o desenchufar la aspiradora.
15. Tenga especial cuidado al aspirar escaleras.
16. No levante materiales inflamables o
combustibles (líquido para encendedor,
gasolina, kerosén, etc.) o la utilice en
presencia de líquidos o vapores explosivos.
17. No levante materiales tóxicos (lavandina,
amoníaco, destapa cañerías, etc.).
18. No la utilice en ambientes cerrados llenos
de vapores emanados de pinturas al aceite,
diluyente de pintura, substancias an tip olilla,
polvo inflamable u otros vapores explosivos o
tóxicos.
19. Úsela solamente en superficies secas, en
interiores.
20. No la utilice con ningún propósito que no esté
descrito en este manual del usuario.
21. No se recomienda el uso de un cable de
extensión.
22. No introduzca ningún objeto en las ranuras.
No la use con alguna abertura obstruida.
Manténgala sin tierra, pelusa, cabellos o
cualquier otra cosa que pueda reducir la
circulación de aire.
23. Siempre guarde su artefacto en el interior en
un lugar frío y seco.
24. Mantenga el área de trabajo bien iluminada.
25. No sumerja la aspiradora en agua o ningún
otro líquido.
26. Mantenga el extremo de la manguera, tubos y
otras aberturas alejados de su cara y de su
cuerpo.
27. Para evitar daños a la alfombra, mantenga
el cabezal de la aspiradora en movimiento
todo el tiempo.
28. Conéctelo únicamente a un tomacorriente
con conexión a tierra. Vea las instrucciones
de conexión a tierra.
CONSERVE ESTAS INSTRUCCIONES
Para uso Doméstico o Comercial Únicamente
INSTRUCCIONES DE LA CONEXIÓN A TIERRA
Este artefacto debe ser conectado a tierra. Si deja de funcionar o se descompone, la conexión
a tierra proporciona un camino de menor resistencia para la corriente eléctrica reduciendo el
riesgo de descargas. Este artefacto viene con un cable de alimentación que tiene un conductor
y pata del enchufe de tierra. El enchufe debe conectarse a un tomacorriente apropiado que
esté instalado y conectado a tierra de acuerdo con las normas y reglamentaciones locales.
ADVERTENCIA: La conexión inadecuada del cable de tierra puede causar riesgo de
descarga eléctrica. Consulte con un electricista calificado o representante técnico si tiene
dudas acerca de la conexión a tierra del artefacto. No modifique el enchufe suministrado con el
artefacto – si no entra en el tomacorriente, haga que un electricista calificado le instale el
tomacorriente adecuado.
Este artefacto debe usarse en un circuito de 120 voltios nominales y tiene un enchufe con
conexión a tierra como el que se muestra en la figura de la derecha. Asegúrese de conectar el
artefacto a un tomacorriente con la misma configuración que el enchufe. No debe usar ningún
adaptador con este artefacto.
17 Rev. 12/06
TOMACORRIENTE CON
CONEXIÓN A TIERRA
LA PATA DE TIERRA ES LA
MÁS LARGA DE LAS TRES
PATAS
Page 20

MEDIDAS DE PRECAUCIÓN
Importante: Si la abertura de succión o la manguera o el tubo telescópico de la
unidad SE TAPAN, apague la aspiradora y destápelos antes de
encender nuevamente la unidad.
1. No use la aspiradora cerca de
calefactores o radiadores.
2. Antes de enchufar el cable en un
tomacorriente, asegúrese de tener las
manos secas.
3. No aspire ningún líquido.
4. Mantenga el cabello, la ropa suelta,
los dedos y toda parte del cuerpo
alejados de las aberturas y de las
partes móviles.
5. Al desenchufar el cable del
tomacorriente, tire del enchufe,
no del cable.
6. No recoja nada que se esté
quemando o echando humo,
como cigarrillos, fósforos, o
cenizas calientes.
7. No pase el artefacto por encima del
cable de alimentación.
8. No la use sin el recipiente para
la tierra o los filtros instalados
en su lugar.
9. Antes de empezar a usar la
aspiradora, asegúrese de quitar
los objetos grandes o filosos que
podrían dañar la aspiradora.
Aspiradora Vertical de Uso Comercial
PARA ORDENAR FILTROS O CORREAS DE REPUESTO
para Modelo UV210CN
Llame al: 1 (800) 798-7398
de Lunes a Viernes de 8:30 AM hasta 5:00 PM Eastern Standard Time
o
visite nuestro sitio de Internet: www.sharkcompany.com
PARA SOPORTE TÉCNICO
para Modelo UV210CN
Llame al: 1 (800) 798-7398
de Lunes a Viernes de 8:30 AM hasta 5:00 PM Eastern Standard Time
Observaciones:
El filtro del Motor, Secundario y de Salida son lavables. Sin embargo,
deben ser reemplazados cada tres (3) meses para asegurar el óptimo
rendimiento de su aspiradora.
El filtro HEPA puede lavarse. Sin embargo, deben ser reemplazados cada
tres (3) a seis (6) meses, dependiendo del uso, para asegurar el óptimo
rendimiento de su aspiradora. Le recomendamos lavarlo una vez por mes
o cuando note una reducción en la succión. Para lavar su filtro HEPA,
sostenga el cartucho del filtro por el bastidor y enjuáguelo debajo de la
canilla hasta quitarle toda la tierra. El material del filtro HEPA puede perder
el color, esto es normal y no afectará el rendimiento del filtro. Al terminar,
sacuda el exceso de agua. NO lo lave en el lavavajillas.
Es muy importante que al lavar el filtro HEPA, o cualquier otro filtro, los
deje secar COMPLETAMENTE antes de volverlos a usar. Le
recomendamos dejarlos secar por 24 horas. NO LOS SEQUE EN LA
SECADORA.
18
Importante:
Asegúrese de que TODOS los filtros estén completamente secos antes
de volverlos a instalar en la aspiradora.
31
Page 21

RESOLUCIÓN DE PROBLEMAS
Este artefacto fue inspeccionado detenidamente y funcionaba correctamente al salir
de la fábrica. Si se presenta algún problema menor, puede solucionarse fácilmente
encontrando su causa. Por lo tanto, le proporcionamos esta lista de control para su
conveniencia.
PROBLEM A POSIBLE C AU S A POSIBLE SOLUCIÓN
1. Enchúfela firmemente.
2. Recom poner la llave térmica
o cambiar el fusible.
3. Presione el botón de
encendido una vez.
4. Recomponer el termostato
del motor.
1. Limpie el recipiente de la
tierra.
2. Ajuste la altura.
3. Quite la obstrucción.
4. Quite la obstrucción.
5. Re e m p lac e la (s) co rrea (s ).
6. Inserte completamente la
manguera.
7. Limpie / cambie los filtros.
8. Limpie o reemplace el filtro
HEPA o el bastidor del filtro.
9. Limpie la re jilla de
escombros.
10. Limpie la obstrucción
1. Re -e mplace la (s ) correa(s).
2. Verifique el reemplazo de la
correa.
1. Limpie las obstrucciones.
2. Llame al 1-800-798-7398.
3. Limpie las obstrucciones.
4. Limpie los filtros HEPA o de
residuos.
1. Verifique el accesorio.
2. Quite la obstrucción.
Aspiradora no
funciona
Aspiradora no
absorbe
Levanta las
alfombrillas o
no se desliza
fácilm e n t e
El cepillo no
gira
El cepillo no
gira o gira muy
despacio
No circula el
aire al usar
accesorios.
Cambia el
sonido
1. No está enchufada correctamente en
el tomacorriente.
2. El tomacorriente no funciona.
3. El botón de encendido no está en
encendido.
4. Termo stato de l motor a ctivado .
1. Recipiente de la tierra lleno o
tapado.
2. Ajuste de altura inadecuado.
3. Mango o entrada de la tierra
tapados.
4. Manguera tapada.
5. Correa(s) rota(s).
6. Manguera no insertada
completamente.
7. Filtros sucios.
8. Filtro HEPA debe ser limpiado o
reemplazado.
9. La rejilla de escombros necesita
limpie z a.
10. Aspiradora se puede tapón con
acumulaciones.
1. Ajuste de altura inadecuado. 1. Ajuste la altura.
1. Correa(s) rota(s).
2. Correa(s) mal instalada(s).
1. Turbina o codo del cepillo giratorio
obstruido.
2. Correa rota.
3. Manguera tapada.
4. Filtro HEPA o de residuos tapado.
1. E l uso del accesorio restringe la
circulación de aire.
2. Restos de alfombra obstruyen la
circulación de aire.
COMPONENTES DE SU ASPIRADORA VERTICAL
1. Selector de Modo Silencioso/Normal
2. Llave de Encendido
3. Intelli-Sense Filter MonitorTM
4. Compartimiento para Guardar el
Cepillo Giratorio
5. Botón para Destrabar el Recipiente
de la Tierra
6. Mango del Recipiente para la Tierra
7. Recipiente para la Tierra
8. Tapa del Filtro de Salida
9. Luz
10.Selector de Piso-Alfombra
11. Luces LED
12.Ajuste de Altura de la Alfombra
Especificaciones Técnicas
Voltaje: 120V., 60Hz.
Potencia: 12 Amperes
Nota: El dibujo puede no ser igual al producto real.
13.Tubo Telescópico
14.Mango de la Manguera Flexible
15.Plumero Auto Limpiarte
16.Cepillo Giratorio
17.Soporte para la Manguera
18.Manguera Flexible
19.Mango de la Aspiradora
20.Gancho para el Cable de
Alimentación
21.Cable de Alimentación
22.Tapa de la Entrada
23. Botón de Liberación del Mango
24.Cepillo Limpiador
25.Cabezal para Tapizados
26.Cabezal Esquinero
30
19
Page 22

INSTRUCCIONES DE USO
INSTRUCCIONES DE USO
Armado de su Aspiradora
Nota: No enchufe el cable en un
tomacorriente hasta que la aspiradora
esté completamente armada.
Armado del Mango
1. Desempaque cuidadosamente todos
los componentes y separe el
material de empaque.
2. Levante el cuerpo de la aspiradora
hasta pararla.
3. Quite los tornillos (2) que
vienen colocados en el
cuerpo.
4. Abra la puerta del
compartimiento para
guardar el cepillo
giratorio. Desde la
parte de adelante
de la aspiradora,
alinee el mango con
Fig. 1
la ranura y deslícelo
dentro de la aspiradora. De ser
necesario, haga presión con los
dedos para deslizar el mango en su
lugar.
5. Una vez que está en su lugar, fíjelo
con los tornillos (2). (Fig. 1)
ADVERTENCIA: No lo ajuste de más.
Podría falsear los tornillos. NO use la
aspiradora sin los tornillos del mango
en su lugar.
Cable de Alimentación
1. Asegúrese de que el gancho del
cable esté para arriba.
2. Quite el precinto que ata el cable
de alimentación.
3. Enrolle el cable
Gancho Superior
en su lugar en
sentido horario
entre el gancho
superior y el gancho
inferior. (Fig. 2).
4. Gire el gancho
superior hacia la
derecha o la izquierda
para desenrollar el
cable. (Fig. 2)
Fig. 2
ADVERTENCIA: No la enchufe si la
llave de encendido está en la posición
“ON”.
Colocación del Tubo
Telescópico en la Manguera
Para colocar la manguera flexible en
el tubo telescópico:
1. Empuje el tubo telescópico dentro
de la manguera. (Fig. 3)
2. Presione el botón plástico hacia
adelante y extienda el tubo interior
hacia afuera para aumentar el
alcance. (Fig. 4)
Fig. 3
Fig. 4
Botón de Plástico
Accesorios
1.Coloque la aspiradora en posición
vertical. Verifique que la aspiradora no
esté enchufada al colocar o quitar
accesorios.
2.Coloque el selector de alfombra-piso
en la posición de “Piso” para que el
cepillo deje de girar. (Fig. 5)
Piso
Fig. 5
3.Saque el mango de la manguera del
costado de la unidad y coloque el
accesorio deseado firmemente en el
extremo de la manguera.
4.Si necesita más longitud, coloque el
mango de la manguera flexible en el
tubo telescópico y luego coloque el
accesorio deseado en el otro extremo.
16. Verifique que la correa esté
centrada en el cepillo giratorio y
que el cepillo pueda girar
libremente.
17. Vuelva a colocar la tapa del cabezal
motorizado sobre la base y vuelva a
colocar los tornillos. (Fig. 50)
Fig. 50
Reemplazo de la Luz Frontal
ADVERTENCIA: Para evitar el
riesgo de una descarga eléctrica,
desenchufe la unidad antes de
efectuar mantenimiento o localización
de fallas.
1. Apague la unidad y desenchúfela
del tomacorriente.
2. Inserte un destornillador plano en
una de las ranuras en la parte
superior de la lente de la luz y
presione hacia abajo con cuidado.
(Fig. 51)
3. Remueva la lente de la luz frontal.
Ranuras
Fig. 51
4. Quite la lamparilla jalándola
cuidadosamente.
5. Coloque la lamparilla nueva
presionándola hacia adentro.
6. Vuelva a colocar la lente de la luz
frontal, inserte las lengüetas
inferiores de la lente en las ranuras
de montaje y empuje la parte
superior en su lugar para que se
trabe.
Termostato del Motor
Importante: Esta unidad está equipada
con un termostato de protección del
motor. Si la aspiradora se sobrecalienta
por cualquier motivo, el termostato la
apagará automáticamente. Si esto
sucede:
• Presione una vez el botón de
encendido.
• Desconecte el cable del
tomacorriente.
• Verifique la fuente del
sobrecalentamiento. (Por ejemplo
manguera o filtro tapados)
• Si encuentra la manguera o el filtro
tapados, destape la manguera y
reemplace el filtro.
• Espere 45 minutos antes de usar
nuevamente la aspiradora.
• Una vez que la unidad se haya
enfriado, enchúfela y presione el
botón de encendido. La aspiradora
deberá encenderse nuevamente.
• Si la aspiradora todavía no funciona,
llame al servicio al cliente al
1 (800) 798-7398.
20
29
Page 23

INSTRUCCIONES DE USO
INSTRUCCIONES DE USO
6. Quite la clavija de traba
que sostiene la cubierta
de la correa.
(Fig. 40, Fig. 41)
Gancho de Traba
Fig. 40
Gancho de Traba
Fig. 41
7. Quite la cubierta de la correa del
lado derecho, que está tapando la
correa y el cepillo giratorio. (Fig. 42
y Fig. 43)
Fig. 43
Fig. 42
Cubierta de
la correa
8. Quite cuidadosamente todo residuo
que pudiera haber quedado en el área
de la correa.
9. Quite la correa del eje del motor.
(Fig. 44)
10. Quite el cepillo giratorio. (Fig. 45)
Fig. 45
11. Quite la correa rota o gastada del eje
del motor.
12. Coloque la nueva correa sobre el
cepillo giratorio. (Fig. 46)
Fig. 46
13. Vuelva a colocar el cepillo giratorio
en el cabezal. (Fig. 47)
Fig. 47
14. Pase la nueva correa alrededor del
eje del motor. (Fig. 48)
Fig. 48
15. Vuelva a colocar la cubierta de la
correa y la clavija de traba. (Fig. 49)
ADVERTENCIA: Para reducir el riesgo
de descarga eléctrica, debe desenchufar el
cable de alimentación antes de colocar o
sacar los accesorios.
Cepillo Limpiador
El cabezal de limpieza se usa en
los muebles.
Cabezal Esquinero
Para radiadores, ranuras, esquinas,
zócalos y entre almohadones.
Cabezal para Tapizados
El cabezal para tapizados se usa
en los muebles. Su superficie
especial es ideal para remover
pelos de mascotas.
Nota: Este no es un accesorio para
cepillar y no debe usarse en animales.
ADVERTENCIA: No use el cabezal
para tapizados en telas delicadas o
tejidos que podrían engancharse en el
cepillo. No lo use en pisos de madera ya
que podría causar pequeñas ralladuras.
ADVERTENCIA: No arrastre la
aspiradora de un lugar a otro de la
manguera ya que podría caerse y causar
algún daño. Al usar los accesorios, no
estire la manguera para llegar más lejos.
El hacerlo podría causar que la
aspiradora se caiga.
ADVERTENCIA: Evite voltear la
aspiradora o apoyarla en los muebles,
alfombras con flecos o escaleras
alfombradas mientras utiliza la manguera
con los accesorios. Al encender la
aspiradora, el cepillo seguirá girando
hasta que coloque el selector de
alfombra-piso en la posición “Piso”. Evite
dejar la aspiradora por mucho tiempo en
el mismo lugar, especialmente en
alfombras altas.
Uso del Cepillo Impulsado a Aire
El cepillo giratorio está ubicado en el frente
de la aspiradora, dentro del
compartimiento para guardarlo.
1. Abra la puerta del compartimiento para
guardar el cepillo giratorio. (Fig. 6)
2. Saque el cepillo impulsado a aire del
frente de la unidad. (Fig. 7)
3. Coloque el cepillo giratorio en el
mango de la manguera o en el tubo
telescópico.
La eficiencia de su cepillo impulsado a
aire se basa en el cepillo rotando a alta
velocidad. Para lograrlo se necesita una
poderosa succión de aire. Para asegurar
que se mantenga la máxima succión de
aire, lea las siguientes instrucciones:
1. Vacíe frecuentemente el recipiente de
la tierra.
2. Lave el filtro HEPA cada vez que vacíe
el recipiente de la tierra.
3. Asegúrese que el cepillo giratorio esté
libre de cabellos e hilos.
4. Inspeccione a menudo la turbina para
asegurarse de que el conducto del aire
esté libre de tierra y deshechos.
Limpieza del Cepillo Impulsado a Aire
Mover hacia
Palanca de
Traba
Fig. 8
1. Tire de la palanca de traba hacia
arriba luego levante la cubierta
superior hacia arriba. (Fig. 8) La
cubierta tiene una bisagra y se
levantará solo unos 45°
aproximadamente. (Fig. 9)
2. Revise que la turbina y el conducto
del aire no tengan deshechos o estén
bloqueados. Quite cualquier
deshecho que encuentre.
3. Revise que el cepillo giratorio no
haya acumulado cabellos o hilos. Si
existen, quítelos cortándolos
cuidadosamente con una tijera. No
dañe o corte las cerdas del cepillo.
4. Una vez que esté limpio, vuelva a
cerrar la cubierta del cepillo giratorio
hasta que se trabe en su lugar.
Arriba
Rueda de
la Turbina
Fig. 9
Fig. 44
28
Fig. 49
Fig. 6
Fig. 7
Cepillo Manual
Impulsado a Aire
21
Page 24

INSTRUCCIONES DE USO
INSTRUCCIONES DE USO
Uso de la Unidad con el Plume ro
El plumero se alimenta con 2 pilas AAA
(embaladas separadamente). Antes de
usar su plumero por primera vez, coloque
las pilas como se indica en la tapa de las
baterías. (Fig. 10) Cuando reemplace las
pilas, use SIEMPRE pilas AAA. La vida de
las pilas depende de uso. No use baterías
recargables.
Para Colocar o Cambiar las Pilas
1.Para abrir el compartimiento de las pilas,
jale el botón hacia arriba y levante la
tapa. (Fig. 10)
2.Coloque las pilas verificando que los
extremos ‘+’ y ‘-‘ estén en la posición
correcta. (Fig. 10)
3.Para quitar las pilas, abra el
compartimiento de las pilas y deslice las
pilas hacia afuera inclinando el plumero
hacia abajo. (Fig. 10)
Tubo de Entrada de Aire
+
Compartimiento
de las Pilas
Llave de
Encendido
-
-
Plumero
Fig. 10
Importante: Use siempre pilas nuevas al
reemplazarlas. Nunca mezcle pilas viejas
con nuevas. Nunca use pilas recargables.
Para Usar el Plumero
El plumero está diseñado para succionar la
tierra a medida que rota, facilitando la
limpieza.
1.Para usar el plumero, deslice el tubo de
entrada de aire del plumero firmemente
sobre el extremo
del mango de la
manguera o del
tubo
telescópico
de la
aspiradora. (Fig. 11)
2. Asegúrese de que la cabeza del plumero
apunte hacia abajo y que los orificios de
ventilación estén alineados con el
plumero antes de usarlo en los muebles u
otras superficies planas. El tubo
telescópico le permite llegar a lugares
más difíciles.
3.Presione el botón de encendido ubicado
en el mango del plumero. El motor se
detendrá al soltar el botón.
Mango de la Manguera
Tubo de
Extensión
Fig. 11
4. Para obtener la rotación continua del
plumero, presione el botón de
encendido y empújelo hacia delante,
esto lo trabará en la posición de
encendido.
5. Para detenerlo, deslícelo hacia la
posición de apagado (Off).
Nota: No haga presión sobre el plumero,
esto detendrá el motor. Todo lo que
necesita es un movimiento suave para
pasar el plumero.
Tendrá que limpiar el plumero de vez en
cuando. Para hacerlo:
1. Quite el plumero de la cubierta.
2. Coloque el cabezal esquinero en la
unidad. Use la aspiradora para limpiar
el plumero y el exceso de tierra del
tubo de entrada.
Ajuste de Altura de la Alfombra
Esta aspiradora vertical puede usarse en
varios tipos de alfombra, pisos o tapizados
con los accesorios. Para seleccionar una
altura en particular:
1. Apague la aspiradora.
2. Seleccione la altura adecuada rotando
la perilla del selector de altura alfombra
a la altura deseada. (Fig. 12)
Perilla de Ajuste de
Altura de la Alfombra
Fig. 12
Las alturas sugeridas son:
Podría ser necesario elevar la altura de la
aspiradora para facilitar el trabajo en
algunos casos, como en tapetes o
alfombras muy gruesas. Sugerencia:
ALTO: Alfombras de pelo largo,
alfombras altas, tapetes de
felpa
MED: Alfombras medianas y altas
BAJO: Alfombras cortas y
medianas, pisos
PISO: Alfombras muy bajas, pisos
Al usar los accesorios, coloque el selector
en “ALTO” y el selector de alfombra-piso en
“Piso” para evitar dañar el piso.
Atención: Necesita tener cuidado especial
al aspirar ciertos tipos de alfombras o
revestimientos de piso. Siempre consulte
las recomendaciones de limpieza del
fabricante de la alfombra o del
revestimiento antes de aspirar.
22
Limpieza de la Entrada de Aire
detrás de la Zona de Cepillo
Hay una abertura en la entrada de aire
detrás de la zona de cepillo en la parte de
abajo de la unidad en la que se pueden
acumular desperdicios, reduciendo la
succión. Para limpiar esta abertura:
1. Desenchufe la unidad y apóyela sobre
un costado.
2. Revise si hay una obstrucción detrás
de la zona del cepillo. (Fig. 35)
Entrada de
Aire
Fig. 35
3. Limpie la obstrucción de la entrada de
aire. Nunca introduzca objetos filosos
dentro de la abertura para limpiarla.
4. Enchufe la unidad para continuar
aspirando.
Limpieza del Mango de la
Manguera
Si continúa notando una reducción en la
succión, revise si el mango de la
manguera está tapado.
1. Desenchufe la unidad y quite el mango
de la manguera para ver si tiene una
obstrucción. (Fig. 36)
Limpiar la
Obstrucción
Fig. 36
2. Limpie la obstrucción de la abertura,
en el mango de la manguera. Nunca
introduzca objetos filosos dentro de la
abertura para limpiarla.
3. Revise el tubo de extensión para
verificar que no éste obstruido
apuntándolo hacia una luz y mirando
en su interior.
4. Enchufe la unidad y continúe
aspirando.
Limpieza y Reemplazo de la
Correa
ADVERTENCIA: Para evitar el riesgo de
una descarga eléctrica, desenchufe la
unidad antes de efectuar mantenimiento o
localización de fallas. De vez en cuando,
la correa del cabezal motorizado puede
necesitar ser reemplazada, la frecuencia
dependerá del uso que se le dé a la
aspiradora.
1. Apague y desenchufe la aspiradora.
2. Destrabe el mango pisando el pedal
de liberación dos veces y tirando hacia
atrás del mango hasta que se
desenganche de su posición vertical y
quede horizontal en el piso. Luego de
vuelta la aspiradora.
3. Con un destornillador Phillips #2,
saque los seis (6) tornillos de la placa
inferior. (Fig. 37)
Fig. 37
4. De vuelta la unidad.
Coloque el selector de
alfombra-piso en la
posición “ON”.
(Fig. 38)
5. Saque la tapa del
cabezal motorizado
empezando desde
atrás. (Fig. 39)
Fig. 39
27
Fig. 38
Page 25

INSTRUCCIONES DE USO
INSTRUCCIONES DE USO
Limpieza de Obstrucciones
De vez en cuando, la aspiradora se puede
tapar con acumulaciones de desechos los
cuales deberán limpiarse. Para evitar el
riesgo de una descarga eléctrica,
desenchufe la unidad antes de limpiar una
obstrucción o de efectuar mantenimiento
o localización de fallas.
Importante
: Los daños ocasionados al
limpiar o al intentar limpiar las
obstrucciones no están cubiertos por la
garantía limitada de este producto.
ADVERTENCIA: Tenga cuidado con los
objetos filosos al limpiar las
obstrucciones.
Importante
: Vuelva a colocar bien todas
las partes de la aspiradora antes de
continuar usándola.
Limpieza del Conducto de Aire del
Recipiente para la Tierra
1. Desenchufe la aspiradora.
2. Revise si el recipiente para la tierra
está lleno, si lo está, quítelo y vacíelo.
3. Revise que el conducto de aire detrás
del recipiente para la tierra no esté
obstruido. (Fig. 31)
4. Enchufe la unidad para continuar
aspirando.
Conducto de Aire
del Recipiente
para la Tierra
Fig. 31
Limpieza de la Manguera Corta
Si nota una reducción en la succión,
revise que la manguera corta no esté
obstruida.
1. Desenchufe la aspiradora.
2. Quite la cubierta de la manguera corta.
(Fig. 32)
Fig. 32
Cubierta de la
Manguera Corta
3. Mire dentro de la manguera corta para
ver si existe acumulación de residuos.
Si la hay, límpiela. Nunca introduzca
objetos filosos dentro de la abertura
para limpiarla. (Fig. 33)
Fig. 33
4. Vuelva a colocar la cubierta de la
manguera corta, enchufe la unidad y
continúe aspirando.
Limpieza del Conducto de Aire del
Recipiente para la Tierra
1. Desenchufe la aspiradora.
2. Revise si el recipiente para la tierra
está lleno, si lo está, quítelo y vacíelo.
3. Revise que el conducto de aire detrás
del recipiente para la tierra no esté
obstruido. (Fig. 34)
Conducto de
Aire del Recipiente
para la Tierra
Fig. 34
4. Quite la obstrucción del conducto de
aire y vuelva a colocar el recipiente
para la tierra. Nunca introduzca
objetos filosos dentro de la abertura
para limpiarla.
5. Enchufe la unidad y continúe
aspirando.
26
Para Comenzar
La aspiradora vertical puede usarse en
varios tipos de alfombra, pisos o
tapizados con los accesorios. Al usar los
accesorios, tal como la boquilla
rinconera, cepillo para tapizados, el
plumero o el cepillo giratorio, coloque el
mango de la aspiradora en posición
vertical.
1.Gire el gancho superior del cable 180º
para cualquier lado para desenganchar
el cable.
2.Enchufe el cable de alimentación en el
tomacorriente.
3.Presione el pedal para destrabar el
mango.
Si necesita ponerlo
en posición
horizontal,
presione el pedal
una vez más.
4. Encienda la unidad
con el botón de
encendido y
seleccione el modo
“Silencioso” o “Normal”.
5. Al usar los accesorios, el mango debe
estar en posición vertical. (Fig. 13)
6.Verifique que el cepillo giratorio esté
detenido colocando el selector de
alfombra-piso en la posición “Piso” al
usar los accesorios. (Fig. 14)
7. Al usarla sobre alfombras, coloque el
selector de alfombra-piso en la
posición “Alfombra” para activar el
celillo giratorio. (Fig. 15)
Selector de Piso-Alfombra
Fig. 14
Cepillo Giratorio
Trabado
Pisos y Accesorios
Para Guardarla o
usar Accesorios
Para Limpiar Debajo
de los Muebles
Pedal de Liberación
del Mango
Fig. 15
Cepillo Giratorio
Destrabado
Alfombras
Uso Normal
Fig. 13
Selector de Modo Silencioso/
Normal
Esta unidad está equipada con un selector
de modo silencioso/normal
en el mango de la aspiradora.
(Fig. 16) Use el modo
“normal” al aspirar alfombras,
pisos o al usar el cepillo
giratorio. Use el modo
Modo Normal - Arriba
Modo Silencioso - Abajo
“silencioso” al usar los
accesorios para aspirar
cortinas, tapizados, etc.
Fig. 16
Intelli-Sense Filter MonitorTM
Cuando se enciende la
luz del Intelli-Sense
Filter MonitorTM significa
que se ha llenado el
recipiente de la tierra
o que el filtro HEPA
debe limpiarse o la
manguera o el tubo
telescopio están
tapados. Debe
vaciar la tierra del
recipiente de la tierra y
limpiar el filtro HEPA y el
residuos y revisar que la unidad no este
tapada. (Fig. 17)
Intelli-Sense Filter
MonitorTM
Para Quitar y Vaciar el Recipiente
de la Tierra
ADVERTENCIA: Para evitar el riesgo
de una descarga eléctrica, desenchufe la
unidad antes de quitar el recipiente de la
tierra, el filtro HEPA, cambiar los filtros o
al efectuar mantenimiento o localización
de fallas.
Siempre debe limpiar el recipiente de la
tierra cuando esté lleno y se encienda el
monitor Intelli-Sense del filtro. Para quitar
el recipiente de la tierra de la aspiradora:
1. Presione el
botón para abrir
el recipiente de
la tierra y sáquelo
de la aspiradora.
(Fig. 18)
2. Para vaciarlo,
sosténgalo desde
el mango sobre
un tacho de basura
y presione el botón
para abrir la base
del recipiente y
vaciarlo. (Fig. 19)
23
Botón para
Destrabar el
Recipiente
de la Tierra
Fig. 18
Botón para
Abrir
la Base
Fig. 19
Fig. 17
Page 26

INSTRUCCIONES DE USO
INSTRUCCIONES DE USO
Limpieza del Recipiente de la Tierra
El recipiente de la tierra puede
lavarse con agua tibia. No use
detergentes fuertes. Asegúrese
de que el recipiente de la tierra
esté completamente seco antes
de colocarlo nuevamente en la
aspiradora. (Fig. 20) NO lo lave
en el lavavajillas.
Limpieza del Filtro HEPA del
Fig. 20
Recipiente de la Tierra
Importante, Observación: El filtro
enjuagable HEPA “TapClean” del recipiente
de la tierra detendrá la mayoría de las
partículas más finas de tierra y alérgenos
suspendidos en el aire para que no vuelvan
al aire que respira. De hecho, detiene el
99.97% de todas las partículas tan pequeñas
como 0,3 micrones - ¡¡¡muchas veces más
pequeñas que un cabello!!! Debido a esta
increíble capacidad de filtración, el Filtro
HEPA del recipiente de tierra acumulará
rápidamente muchas partículas pequeñas de
tierra dentro de los dobleces que son difíciles
de ver pero que eventualmente bloquearán o
reducirán la potencia de succión si no se
lo limpia correctamente.
Limpie el Filtro HEPA luego
de cada uso como se
describe en esta sección.
1. Para sacar el filtro HEPA,
levantando las lengüetas
de traba del filtro en
ambos lados del
filtro HEPA.
2. Quite el filtro
enjuagable HEPA
“TapClean” del
recipiente de la
tierra. (Fig. 21)
3. Limpie el filtro HEPA
luego de cada uso
con el limpiador de
pliegos incorporado
en el cartucho de
filtro HEPA. Gire la
perilla de la parte
superior del cartucho
de filtro HEPA para limpiar
los pliegos del filtro. (Fig. 22)
4. Luego golpee (TapClean) vigorosamente
el filtro HEPA contra una superficie dura
para remover toda la tierra residual que
pudiera quedar en él. (Fig. 23)
Lengüetas de Traba
Fig. 21
Perilla para
Fig. 22
Limpiar los
Pliegos
Fig. 23
5.Puede lavar el filtro
HEPA enjuagándolo
debajo del agua por lo
menos una vez al mes
o cuando disminuya
el poder de succión.
(Fig. 24)
Fig. 24
Importante: No use la perilla para limpiar
los pliegues del filtro HEPA si el filtro está
húmedo.
Nota: Le recomendamos lavarlo una vez
por mes o cuando note una reducción en
la succión. Siempre déjelo secar durante
24 horas antes de volver a colocarlo en la
aspiradora. Sin embargo, debe ser
reemplazado cada tres (3) o seis (6)
meses para asegurar el óptimo
rendimiento de su aspiradora.
Observaciones: El material blanco del
filtro HEPA se descolorará con el tiempo –
Esto es NORMAL y NO afectará el
rendimiento del filtro.
ADVERTENCIA
: Siempre vacíe el
recipiente de la tierra y limpie el filtro
HEPA y el filtro de deshechos luego de
cada uso y durante usos prolongados.
Nunca permita que el recipiente de la
tierra se llene demasiado – quite la tierra
y limpie el filtro HEPA cada vez que vacíe
el recipiente de la tierra durante usos
prolongados o puede dañarse el motor.
Limpieza del Filtro de
Residuos
Para sacar el filtro de
residuos:
1. Abra la base del recipiente
de la tierra y saque toda la
tierra del recipiente.
Agarre el filtro de
desechos y gírelo en
sentido contra horario para
destrabarlo. (Fig. 25)
2. Enjuague el filtro de
desechos en agua tibia
para remover la tierra que
esté adherida en él.
(Fig. 26) NO
lavavajillas.
3. Augúrese de que el
soporte del filtro de
desechos esté
completamente seco antes
de volver a colocarlo en el
recipiente de la tierra.
24
lo lave en el
Fig. 25
Fig. 26
Limpieza del Filtro Secundario
1. Hay un filtro secundario debajo del
filtro HEPA que
debe limpiarse
cada vez que se
limpie el filtro HEPA.
(Fig. 27)
Fig. 27
Saque el filtro HEPA y
luego saque el filtro secundario.
2. Límpielo debajo del agua. Siempre
deje que se seque al aire durante 24
horas antes de volver a colocarlo.
Nunca use la aspiradora sin todos los
filtros colocados.
Nota: Este filtro es lavable, pero le
recomendamos cambiarlo cada tres (3)
meses.
Reemplazo y Limpieza del Filtro
de Salida
ADVERTENCIA: Para evitar el riesgo
de una descarga eléctrica, desenchufe la
unidad antes de quitar el recipiente de la
tierra, el filtro HEPA, cambiar los filtros o
al efectuar mantenimiento o localización
de fallas.
El filtro de salida está ubicado en la parte
de adelante de la aspiradora. Este filtro
es lavable y puede limpiarse
enjuagándolo con agua tibia. Siempre
deje que se seque al aire durante 24
horas antes de volverlo a colocar en la
aspiradora. No lo seque con un secador
de cabello. Deje que se seque al aire.
Para sacar el filtro de salida:
1. Inserte un pulgar dentro de la ranura
del filtro de salida. Presione hacia
abajo y tire de la cubierta hacia
arriba. (Fig. 28)
2. Saque el bastidor del filtro de salida.
(Fig. 29)
3. Limpie el filtro de salida
enjuagándolo en agua tibia.
4. Luego de dejarlo secar al aire por 24
horas, vuelva a colocarlo en la
aspiradora y coloque la cubierta.
Fig. 28
Fig. 29
Reemplazo y Limpieza del Filtro del
Motor
ADVERTENCIA: Para evitar el riesgo
de una descarga eléctrica, desenchufe la
unidad antes de quitar el recipiente de la
tierra, el filtro HEPA, cambiar los filtros o
al efectuar mantenimiento o localización
de fallas.
El filtro del motor se encuentra debajo
del recipiente de la tierra. Revíselo a
menudo y límpielo cuando esté sucio.
Para quitar el filtro del motor:
1. Quite el recipiente para la tierra.
2. Levante el filtro del motor: (Fig. 30)
3. Enjuáguelo en agua tibia y déjelo
secar al aire por 24 horas antes de
volverlo a colocar en la aspiradora.
No lo coloque en una lavadora. No lo
seque con un secador de cabello.
Deje que se seque al aire. Nunca use
la aspiradora sin TODOS los filtros
colocados.
4. Una vez que se haya secado,
colóquelo en la aspiradora.
Nota: Si el filtro está muy sucio o tapado
deberá limpiarlo muy bien con agua tibia.
Puede usar un detergente liviano si es
necesario.
Fig. 30
25
Filtro del
Motor
 Loading...