

Page 1
SKWAL
OWNER’S MANUAL - MANUEL D’UTILISATION - BENUTZERHANDBUCH - LIBRETTO ISTRUZIONI
MANUAL DE UTILIZADOR - MANUAL DEL USUARIO
WARNING
Carefully read, understand and follow the instructions
provided in this manual, and keep it in a safe place for future
reference. If you have any doubt whatsoever regarding the use
or care of your helmet, please see your retailer for assistance or
advice. Failure to follow the warnings and instructions provided
herein can result in the failure of the helmet to protect you in an
accident, resulting in a head injury or death.
ATTENTION
Veuillez lire avec attention, comprendre et suivre les
instructions fournies dans ce manuel, et veuillez le garder
en lieu sûr pour vous en servir ultérieurement. En cas de
doute concernant l’utilisation ou l’entretien du casque, veuillez
demander l’aide ou l’avis de votre revendeur. Tout non respect
des précautions et recommandations fournies dans ce manuel
peut entraîner une défaillance dans l’efficacité du casque à vous
protéger en cas d’accident, provoquant une blessure grâve ou
la mort.
WARNUNG
Lesen Sie diese Anleitung aufmerksam durch und bewahren
Sie sie sorgfältig auf. Bei Fragen zur Verwendung oder
Pflege Ihres Helms wenden Sie sich an Ihren Einzelhändler.
Falls Sie die Warnungen und Hinweise dieser Anleitung nicht
befolgen, kann das die Schutzwirkung des Helms im Falle eines
Unfalls beeinträchtigen, was zu einer schweren oder tödlichen
Kopfverletzung führen kann.
ATTENZIONE
Leggere con attenzione, capire e seguire le istruzioni
fornite in questo libretto e conservarlo in luogo sicuro per
potersene servire ulteriormente. In caso di dubbio riguardo
l’utilizzo o la manutenzione del casco, chiedere l’aiuto o l’avviso
del proprio rivenditore. Il non rispetto delle precauzioni e
raccomandazioni fornite in questo libretto può provocare
una mancanza dell’efficacità del casco a proteggere in caso
d’incidente, provocando una ferita grave o la morte.
ATENCIÓN
Lea atentamente, siga las instrucciones de este manual y
guárdelo en lugar seguro para futuras referencias. Si tuviera
cualquier duda sobre la utilización o cuidado de su casco por
favor diríjase a su establecimiento habitual. No seguir los avisos
y consejos de utilización presentes en este manuscrito podría
disminuir la protección para la cual este casco esta diseñado,
pudiendo causar traumatismos craneales o incluso la muerte en
caso de accidente.
Skwal - V1a - 17112014
1
Page 2
CONTENTS ANATOMY OF THE HELMET
• Anatomy of the helmets ..........................................................3
• A helmet in your size ....................................................................4-5
• Chin strap ....................................................................................6-7
• Visor .............................................................................................. 8
• Auto seal ......................................................................................... 9
• The sun shield ............................................................................... 10
• Textile parts ..............................................................................11-12
• Cleaning ........................................................................................13
• Nose mask / chin cover ............................................................14-15
• Easy Fit. ........................................................................................ 14
• LED ............................................................................................... 15
• Ventilations .................................................................................... 16
• 5 year guarantee ........................................................................... 17
• Legally required information .......................................................... 20
Thank you for purchasing this SHARK SKWAL
helmet.
We are certain that you will be completely sa-
tised with this helmet.
Meeting the most rigorous international safety
standards, however this helmet cannot protect
the user in every circumstance, it is so recommended to drive carefully.
Your helmet has been designed for a motorcy-
cle use only and not for any other purpose.
This SHARK SKWAL helmet is approved and
WARNING! The United-States have a specic regulation, the helmets ECE approved
only cannot be used in these territories without
the complementary DOT FMVSS 218 approval.
WARNING! For French trafc, the Highway
Code requires safety reectors (supplied
separately in a packet) to be tted in accordance
with the enclosed plan.
WARNING! According to the version, your
helmet is equipped with a LED system that
you can switch off.
meets the ECE R 22/05 standards, so it meets the
demands imposed in every country recognizing
this regulation on its own territory.
2
WARNING! Check if the national or local legislation in power in your country does not
limit the use of LED on public highway.
Page 3

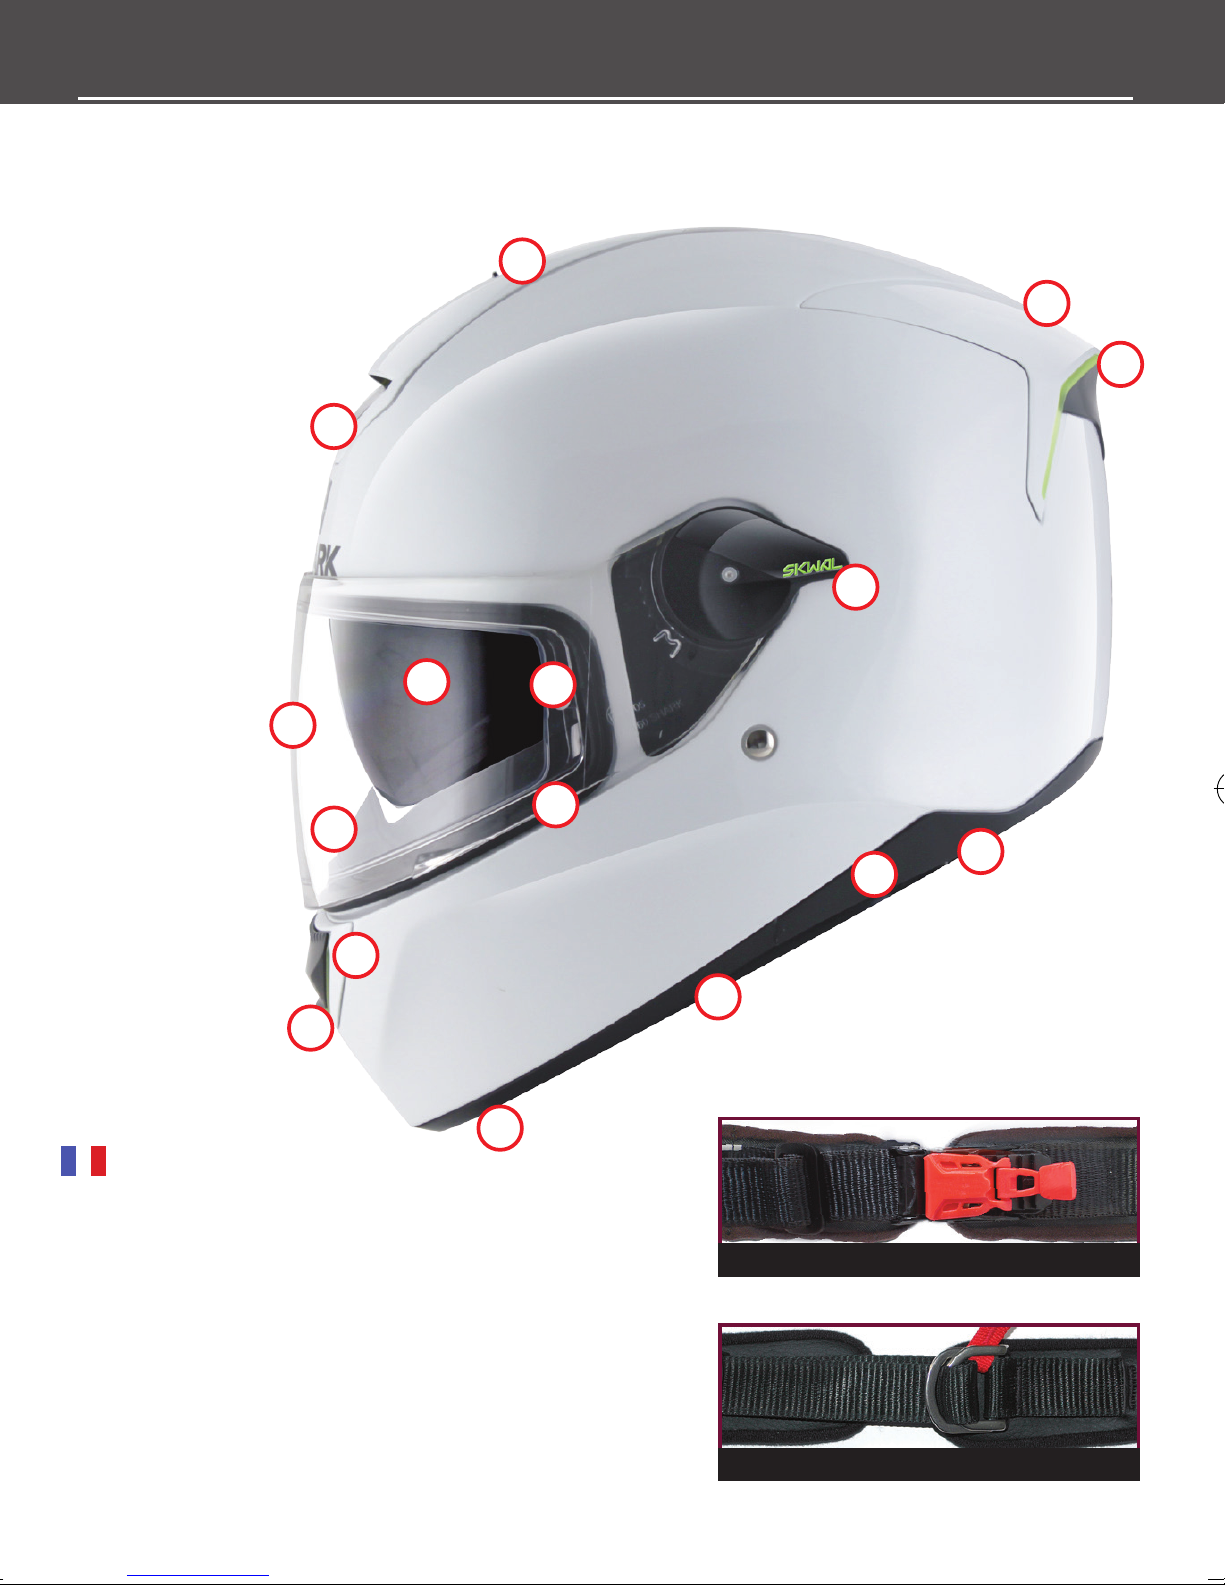
10
4
6
10
3
2
1
8
5
10
1) Visor
2) Sun shield
3) Sun shield mechanism handle
4) Upper ventilation
5) Lower ventilation
6) Venturi exhaust
7) Precise Lock” chin strap buckle
8) Anti-fog mask (optional equipment)
9) Chin cover(optional equipment)
10) LED
14
13
9
11) LED switch
(optional equipment)
12) Base seal
13) Visor seal
14) Easy fit
11
12
7
7 - “Precise Lock“ chinstrap buckle
7 - Double-D ring chinstrap buckle
3
Page 4

A HELMET IN YOUR SIZE
WARNING! No helmet can protect
the wearer from all foreseeable
high or low speed impacts. However, for
maximum protection, the helmet must be
of proper t and the chin strap must be
securely fastened as described in this
manual. Failure to have a proper t and
to securely fasten the chin strap is dange
rous, as the helmet could come off in an
accident, resulting in severe head injury
or death.
-
CHOOSE YOUR SIZE
Each helmet is designed to corres-
pond to a head measurement (from for
shapes, this size reference can only be
considered as a guide. For maximum protection, it is necessary to check that the
helmet is well suited for the shape of your
head. When trying a brand new helmet,
make sure that your head is pushed into
the helmet as far as possible, with the
front part just above your eyebrows, and
with the chin strap securely fastened as
described on the next page.
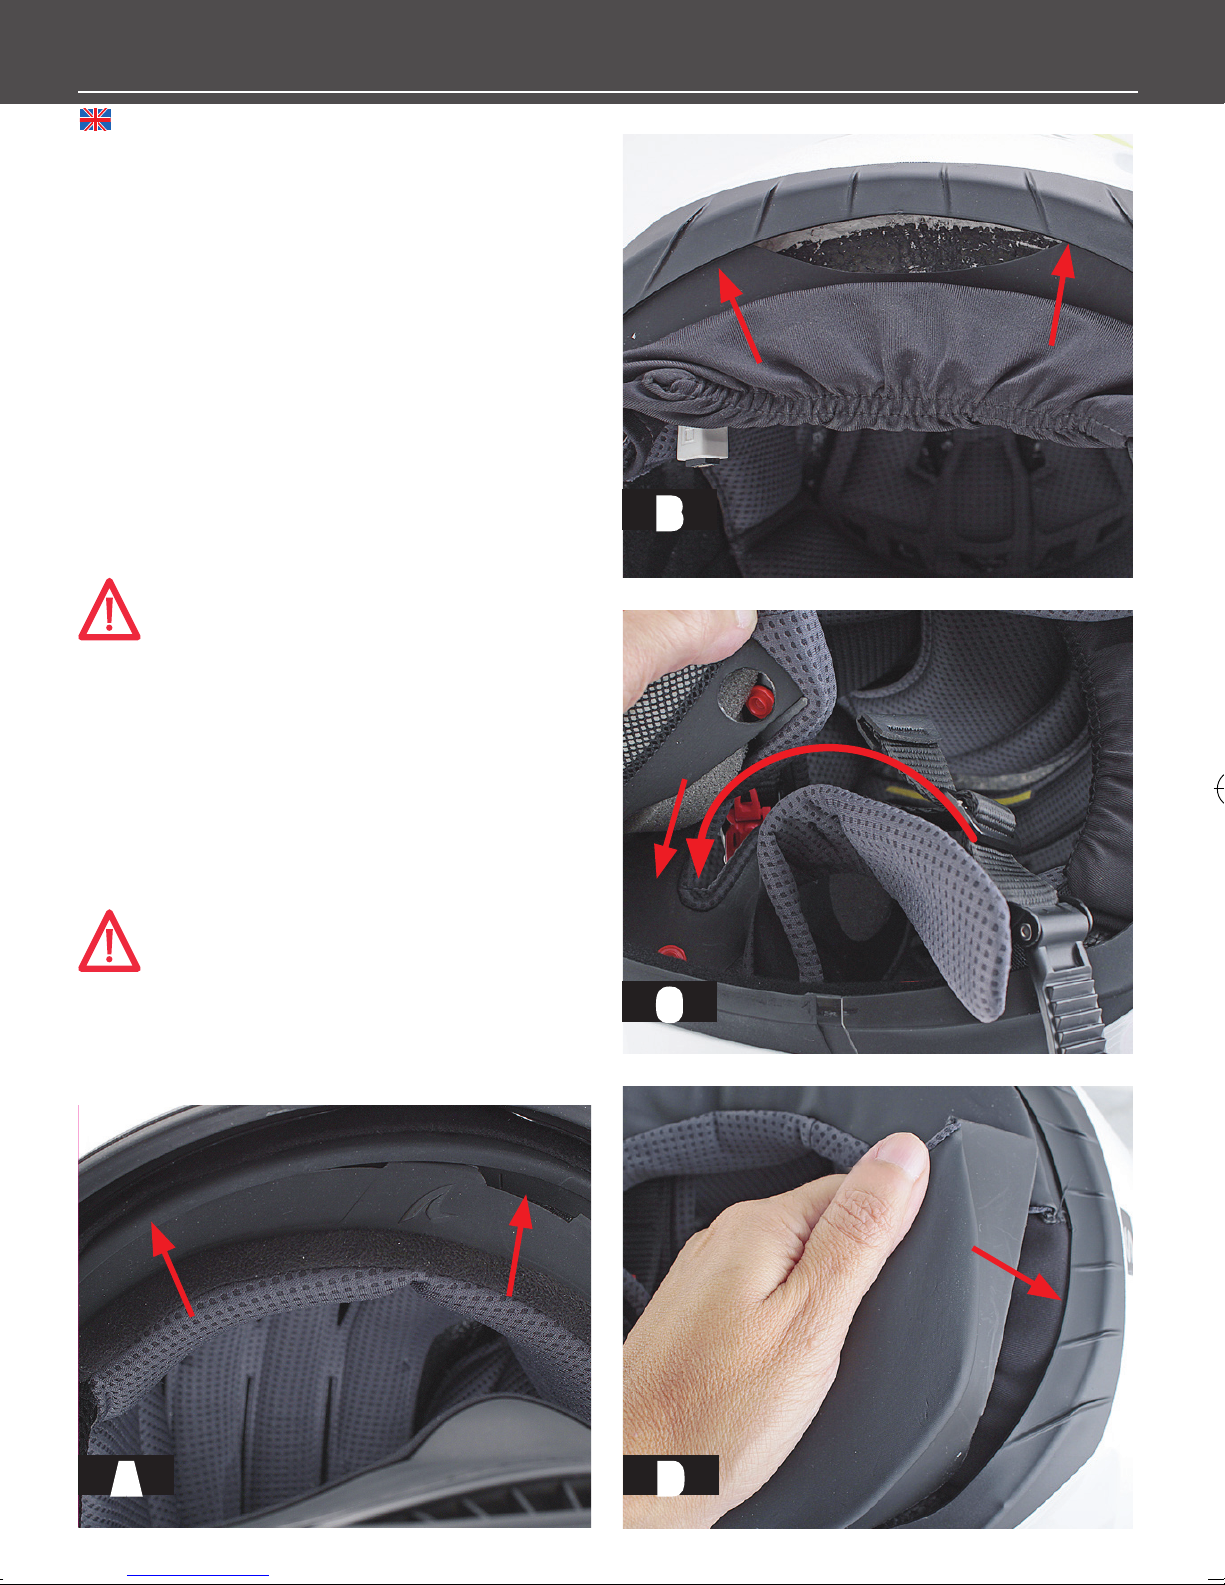
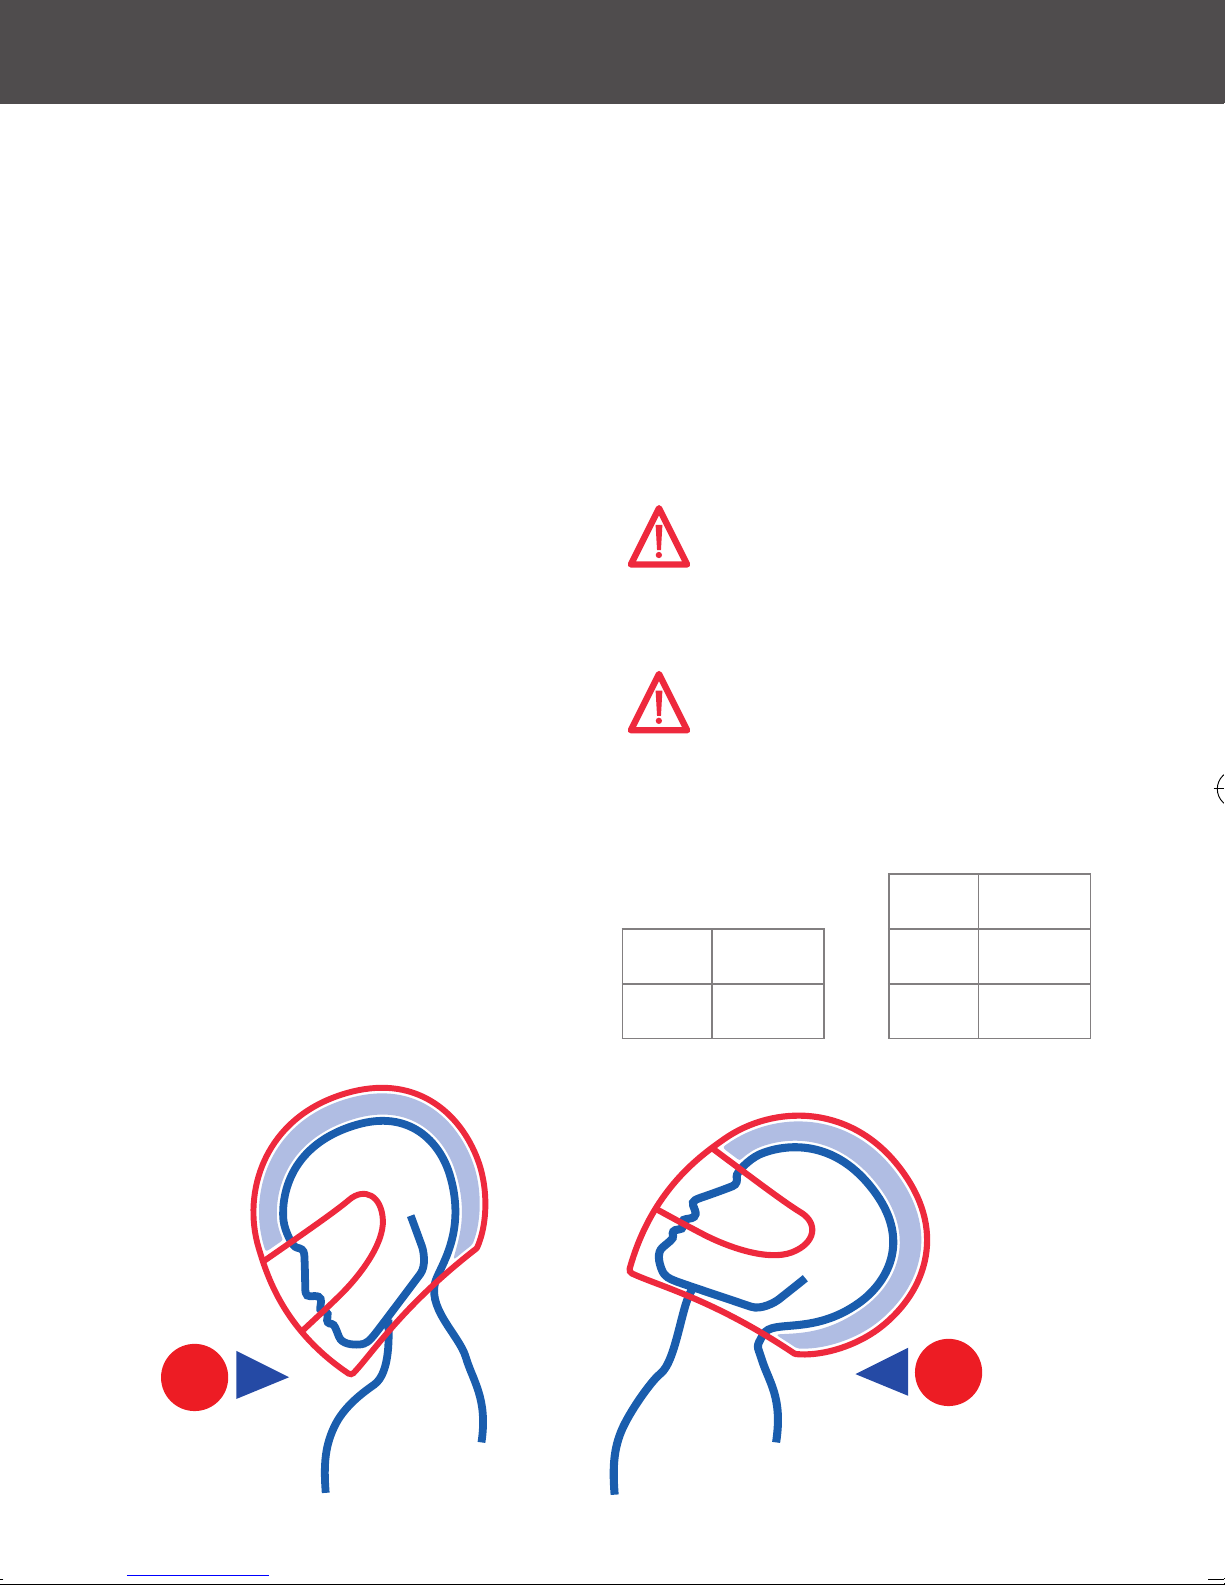
1. The helmet should feel very snug all
around your head and fairly tight on the
cheek pads. If not, it is too big for you;
select a smaller size.
See gure A.
XS up to XL). To measure your head size,
wrap a tape measure horizontally around
your head at a height of approximately
one inch (2.5cm) above your eyebrows.
If your head measurement falls between
two sizes, rst try on the smaller helmet.
However, because of different head
2. With the chin strap properly fastened
(see instructions), be sure that the helmet
cannot be moved excessively from side to
side or up and down.
You should feel the skin of your head and
face being pulled as you move the helmet.
If not, the helmet is too big for you; select
4
B
Page 5
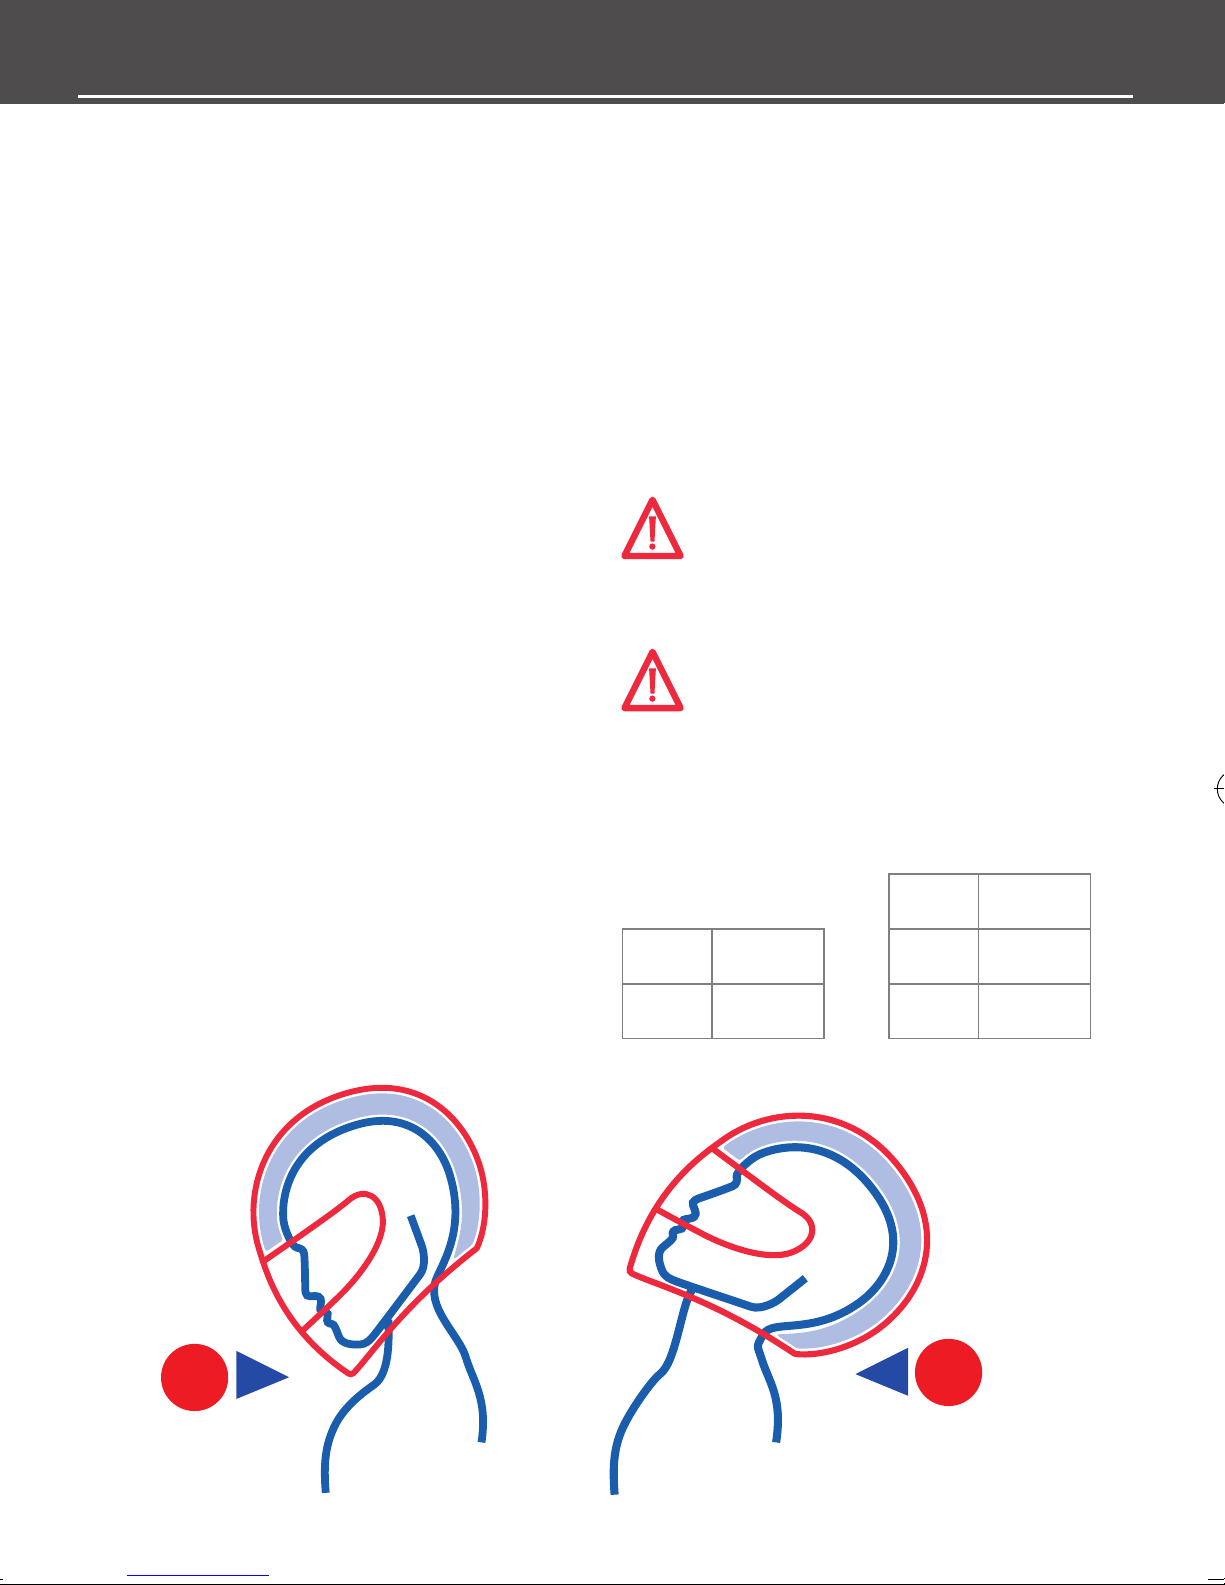
A HELMET IN YOUR SIZE
a smaller size. See gure B.
3. Grasp the back of the helmet at the
base and attempt to pull the helmet
off your head. Next, push the helmet
upwards from beneath the chin
guard. You should push and pull with
relatively signicant force. If the helmet
starts to come off, the helmet is too big
for you; select a smaller size.
4. Bend your head forward as far as possible. The chin guard must not touch your
chest. See gure C.
5. Bend your head backwards as far as
possible. The helmet shell must not touch
your back. See gure D.
Never wrap your hair inside the
assistance.
Each of these tests must be repeated
throughout the life of the helmet, as the
comfort padding may wear or change
over time. If, during the life of your helmet,
your helmet does not maintain the correct
t, you must replace the helmet.
WARNING! Never lend your helmet
to others without insuring a proper
t in accordance with these instructions.
WARNING! If you cannot obtain
a proper t in accordance with
these instructions, DO NOT USE THE
helmet, or place anything in or on your
hair inside the helmet. Never insert
padding to modify the position of the
helmet on the head.
If you have any questions about properly
sizing your helmet, see your retailer for
C
HELMET. Select a different helmet size or
model.
Sizing (cm)
XS 53/54
S 55/56
M 57/58
L 59/60
XL 61
D
5
Page 6
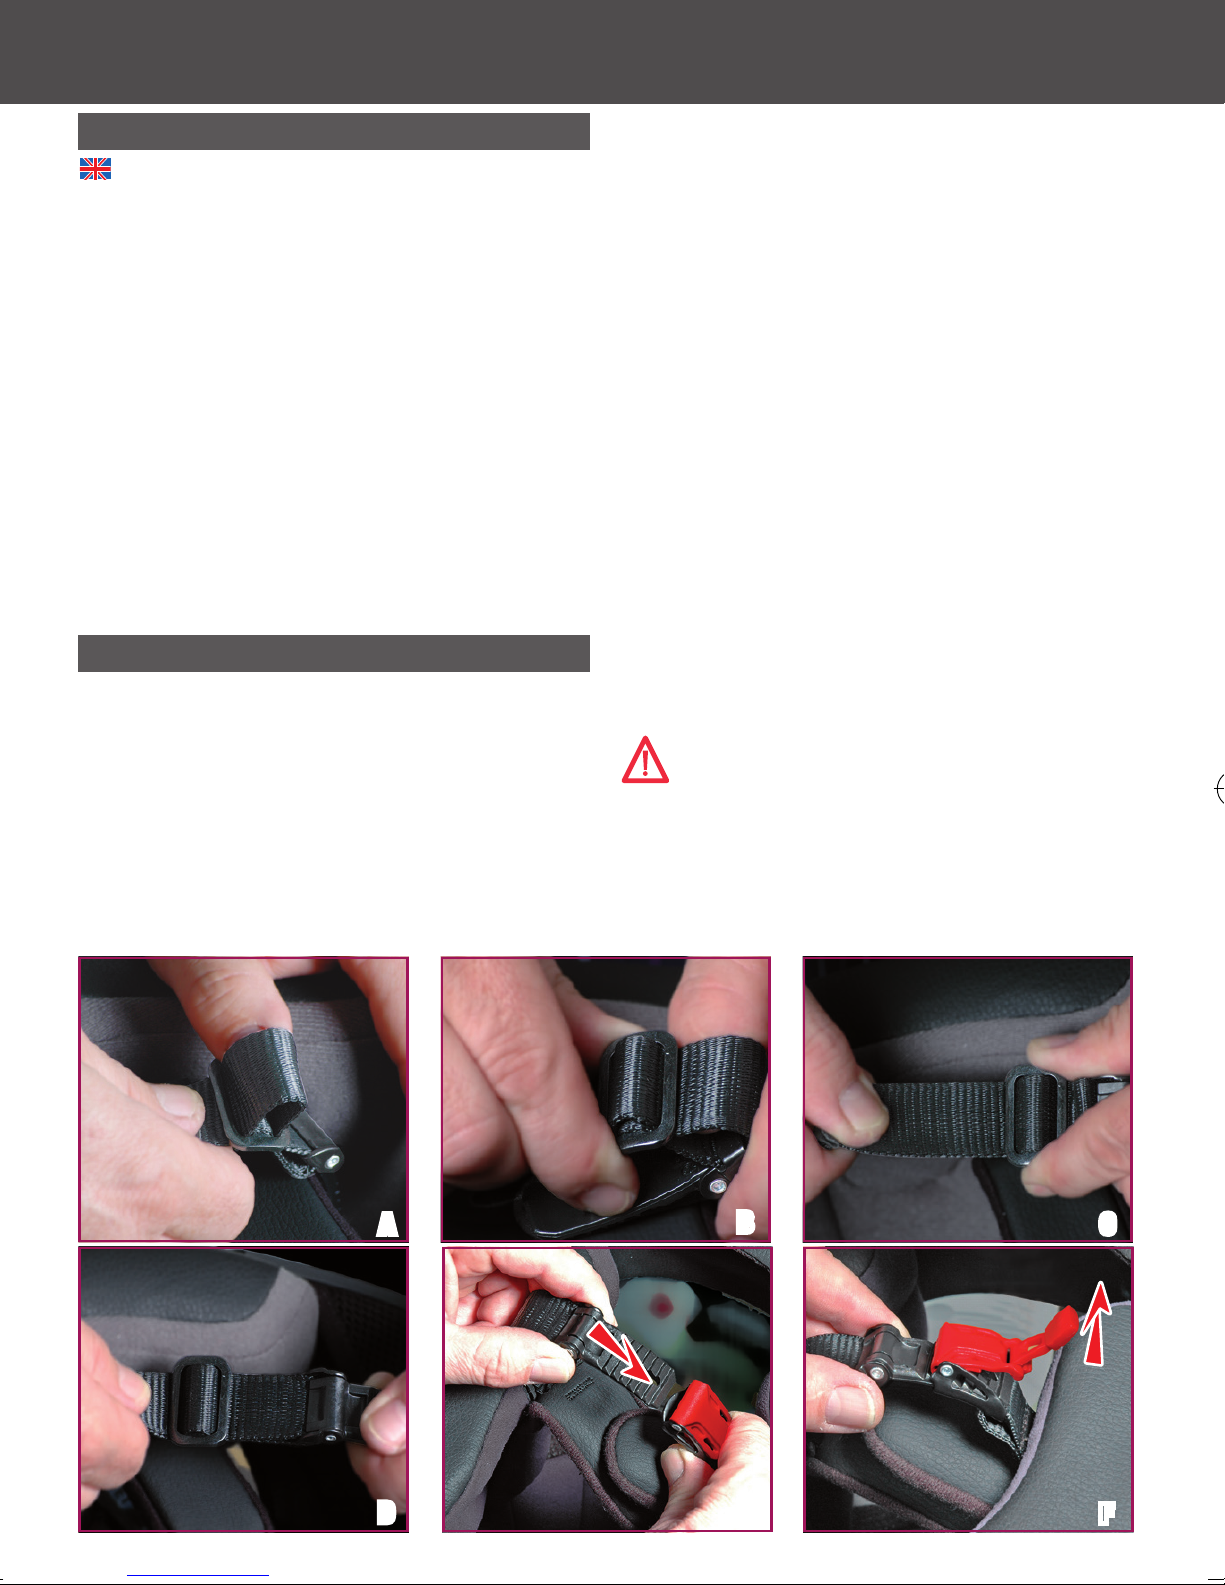
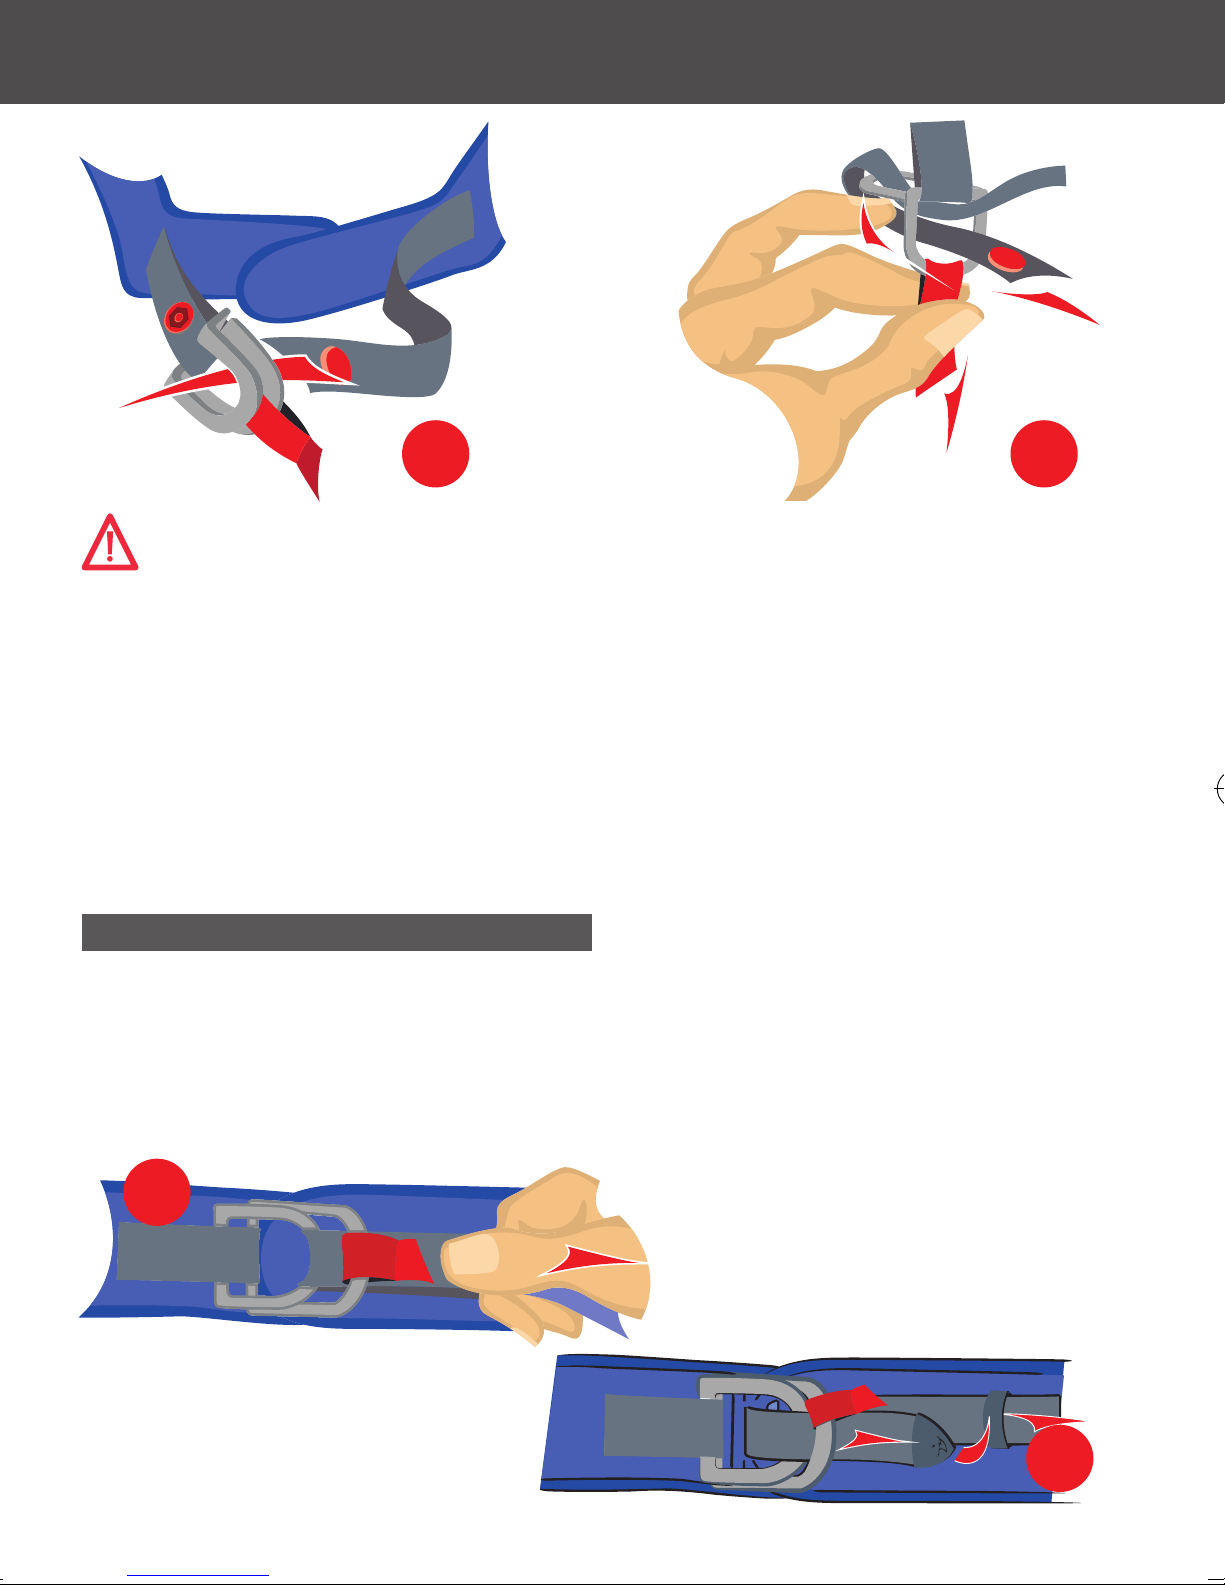
CHIN STRAP
CHIN STRAP
Depending on the various versions and the
country concerned, your SHARK SKWAL helmet
is equipped with a chin strap with a “Precise
Lock” rapid buckle with a snap lock or one with a
double-D ring. Proper use of the chin strap is critical for proper performance of the helmet. Never
alter your chin strap in any way. For example, never
cut it or add holes, or apply buttons, studs or other
items to your chin strap. During the life of your
helmet, be sure that the chin strap never suffers
any type of abrasion or cut, and that its total length
does not change. If it does, replace your helmet.
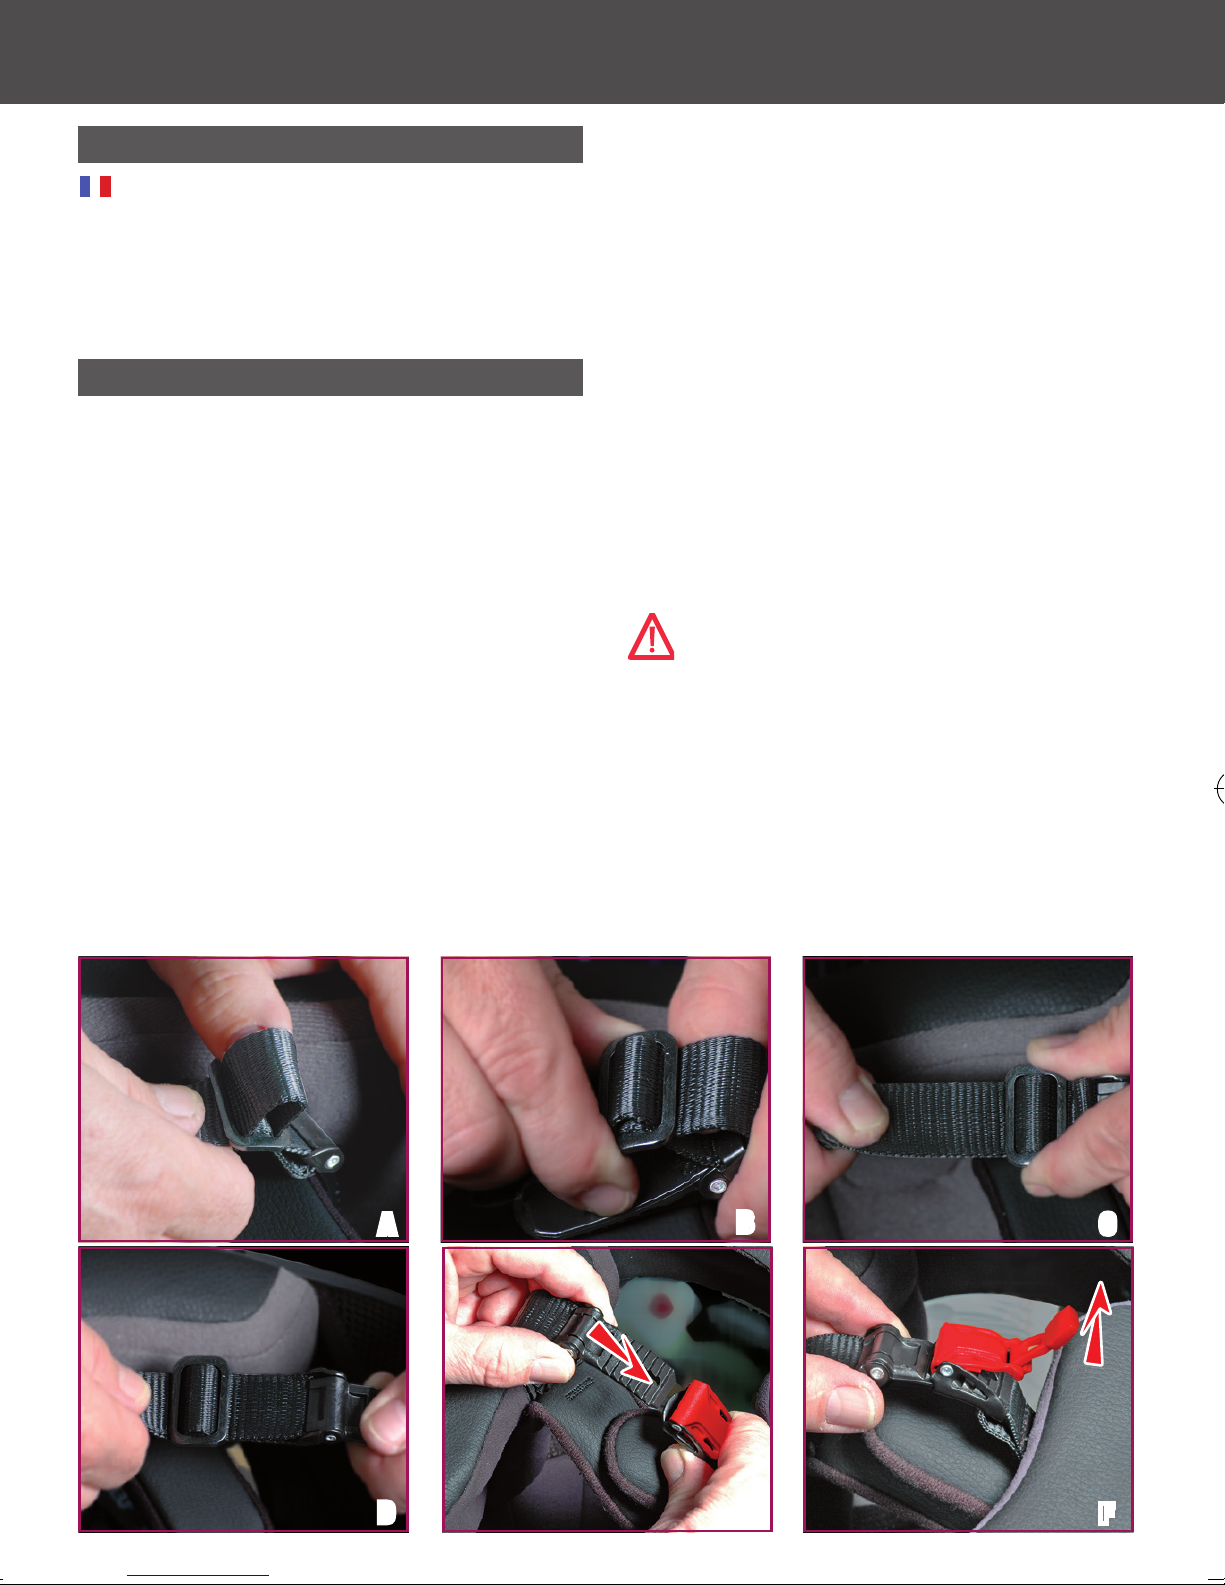
PRECISE LOCK
The “Precise Lock” snap lock system gives you
precise and accurate adjustment because of the
considerable length of its notched section.
Choose your SHARK SKWAL helmet and attach
the holding system. When the “Precise Lock” is
adjusted to the medium position, the chin strap
must be correctly tensioned under the chin to
hold the helmet firmly without causing you any
discomfort or pain.
To fasten the chin strap, all you have to do is to
thread the tongue into its place on the buckle until
tension is perfect (Fig. E). The tongue connects and
is automatically blocked.
To release the chin strap, you have to pull on the
lever (Fig. F) and remove the tongue from the buckle. Although the notched tongue enables you to
change the adjustment precisely on each use, it is
important to check frequently that the adjustment
of the strap length is correct.
WARNING! Never ride with the chin strap loose
or insufficiently tightened. Even though the
However, it is essential on purchase to adapt the
length of the chin strap to your measurements.
Adjust the length of the strap using the adjusting
buckle (Figs. A, B, C and D).
A
interior padding gives you the impression of being
held, your helmet risks coming off in a fall.
Never apply lubricating or acid products or grease or
solvents to the chin strap buckle parts.
B
C
D
6
E
F
Page 7
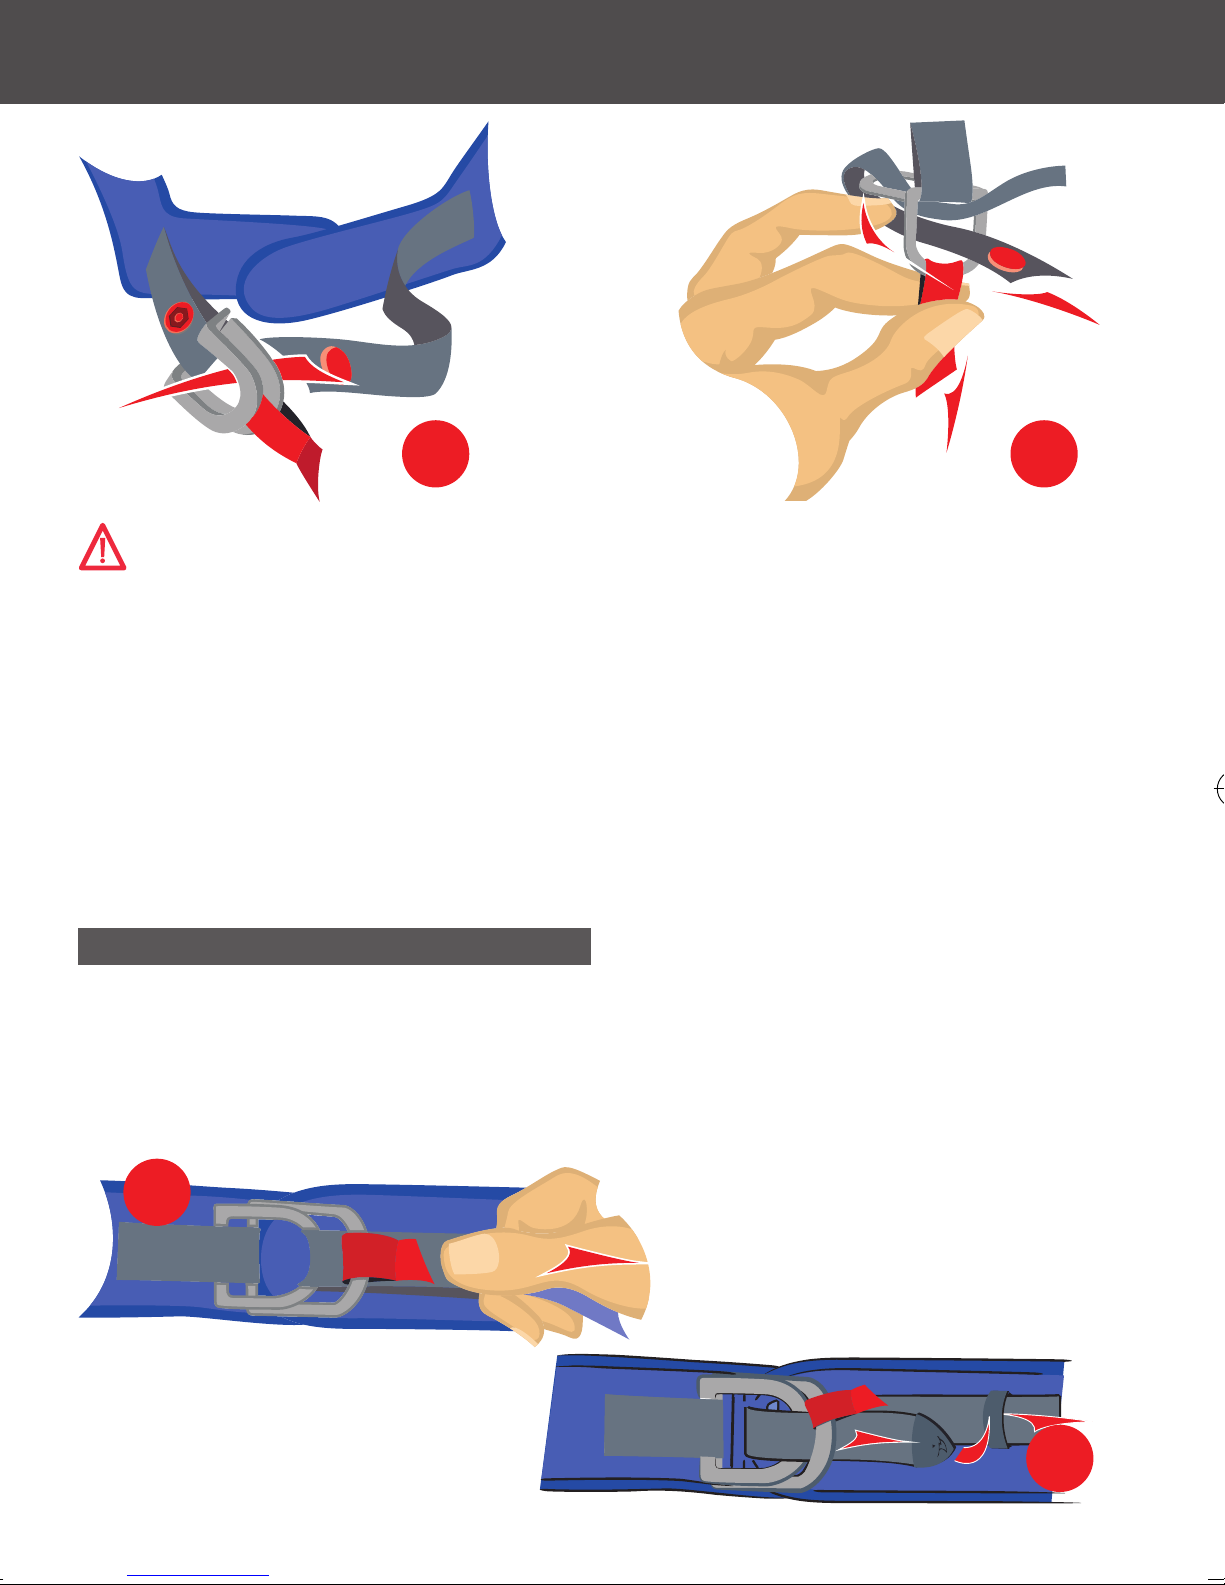
CHIN STRAP
A
WARNING! Never use the strap loop to
secure your helmet to your head. In order to
be properly fastened, you must thread the strap
through the double-D-rings. Failure to properly
use the double-D-rings will cause your helmet
to become dislodged during an accident, leaving
your head completely unprotected and resulting
in severe head injury or death. Try to pull down
on the chin strap with your ngers. If the strap
loosens in any way, you have not properly tightened
DOUBLE-D RING
A - Slide the long part of the chin strap through
the two D rings, positioning the comfort pad correctly
between the chin strap and your neck.
B - Then bring the end of the chin strap
back through the lower of the two D rings
B
the chin strap with the double-D rings.
Repeat the steps above. Never ride with the chin strap
loose, improperly fastened or improperly positioned.
Even though the comfort padding gives you the
impression that the helmet is securely held in place,
it will come off in an accident, leaving your head
completely unprotected.
If you have any doubt concerning the fastening
system of your helmet, do not use the helmet. Contact
your dealer for assistance.
as shown in the diagram.
C - Pull the strap until you feel resistance from
the strap and it is held in place under your chin
without being too tight, so that you have no
difficulty in breathing.
D - Slide the free end of the chin strap into the
C
plastic strap loop on the comfort padding, in order
to prevent the strap from uttering in the wind.
D
7
Page 8
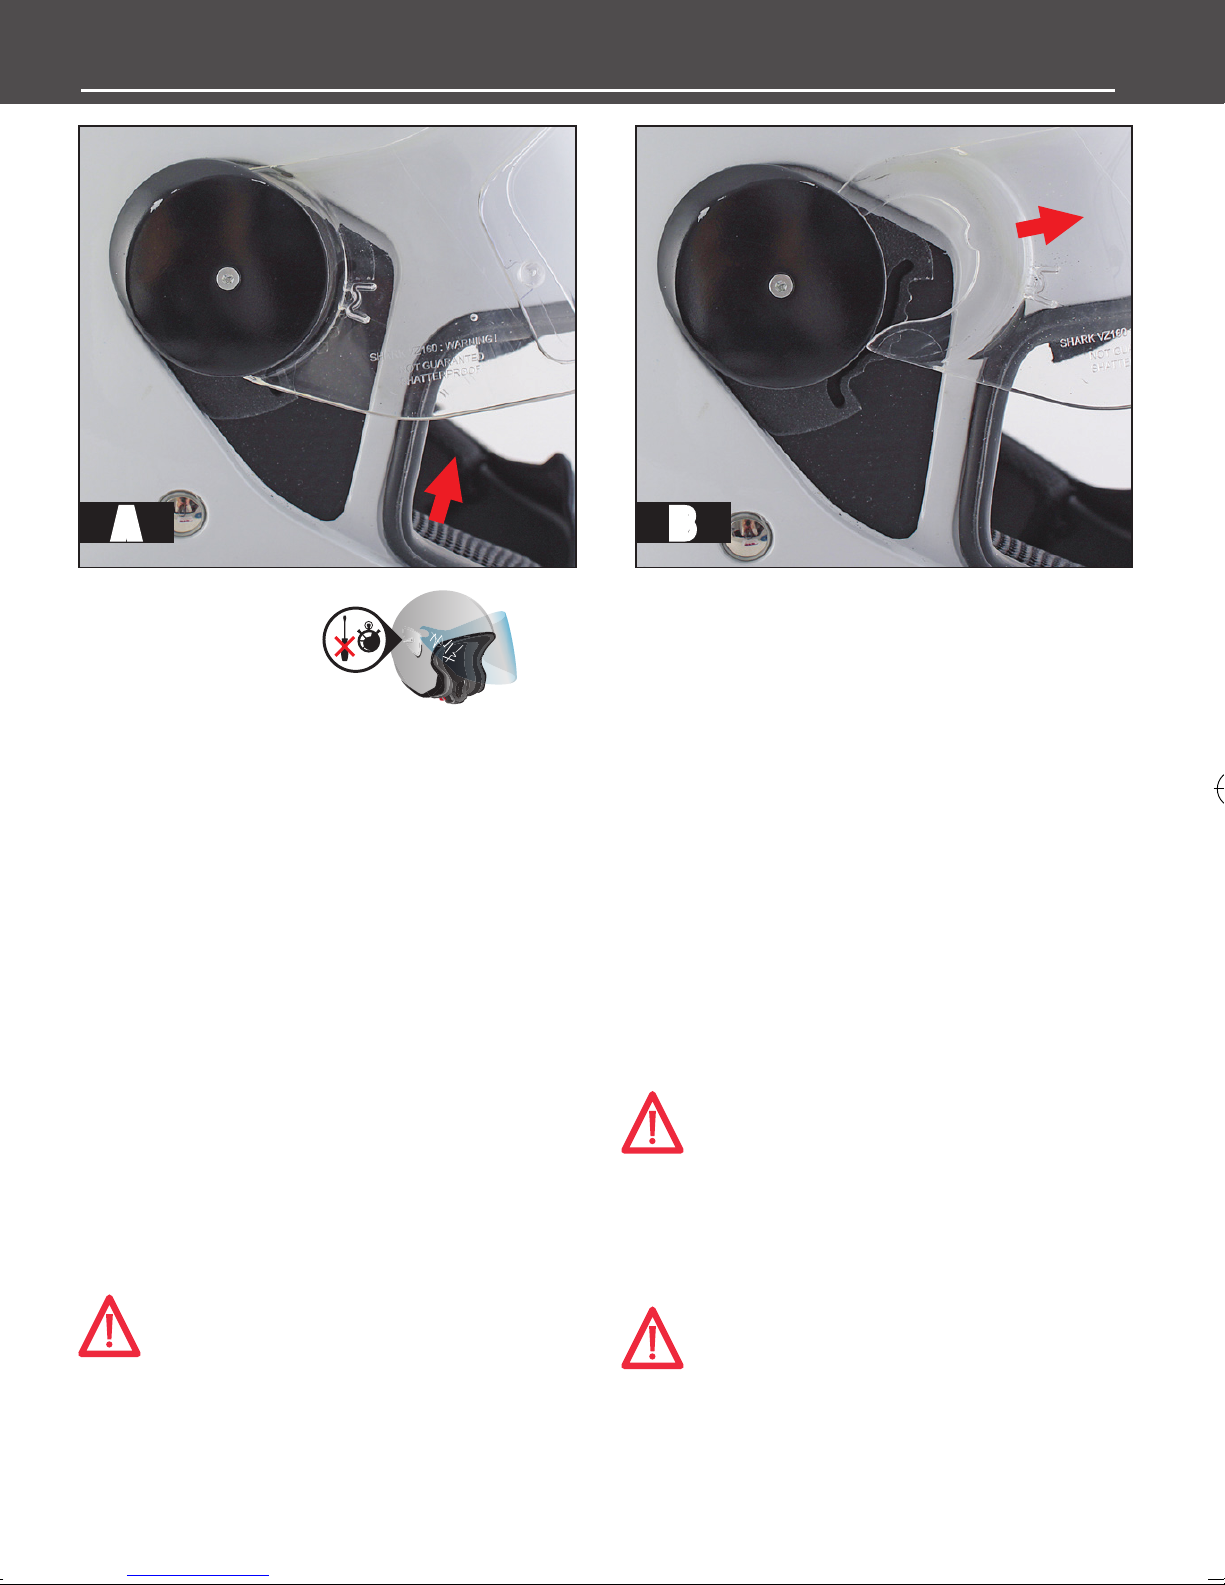
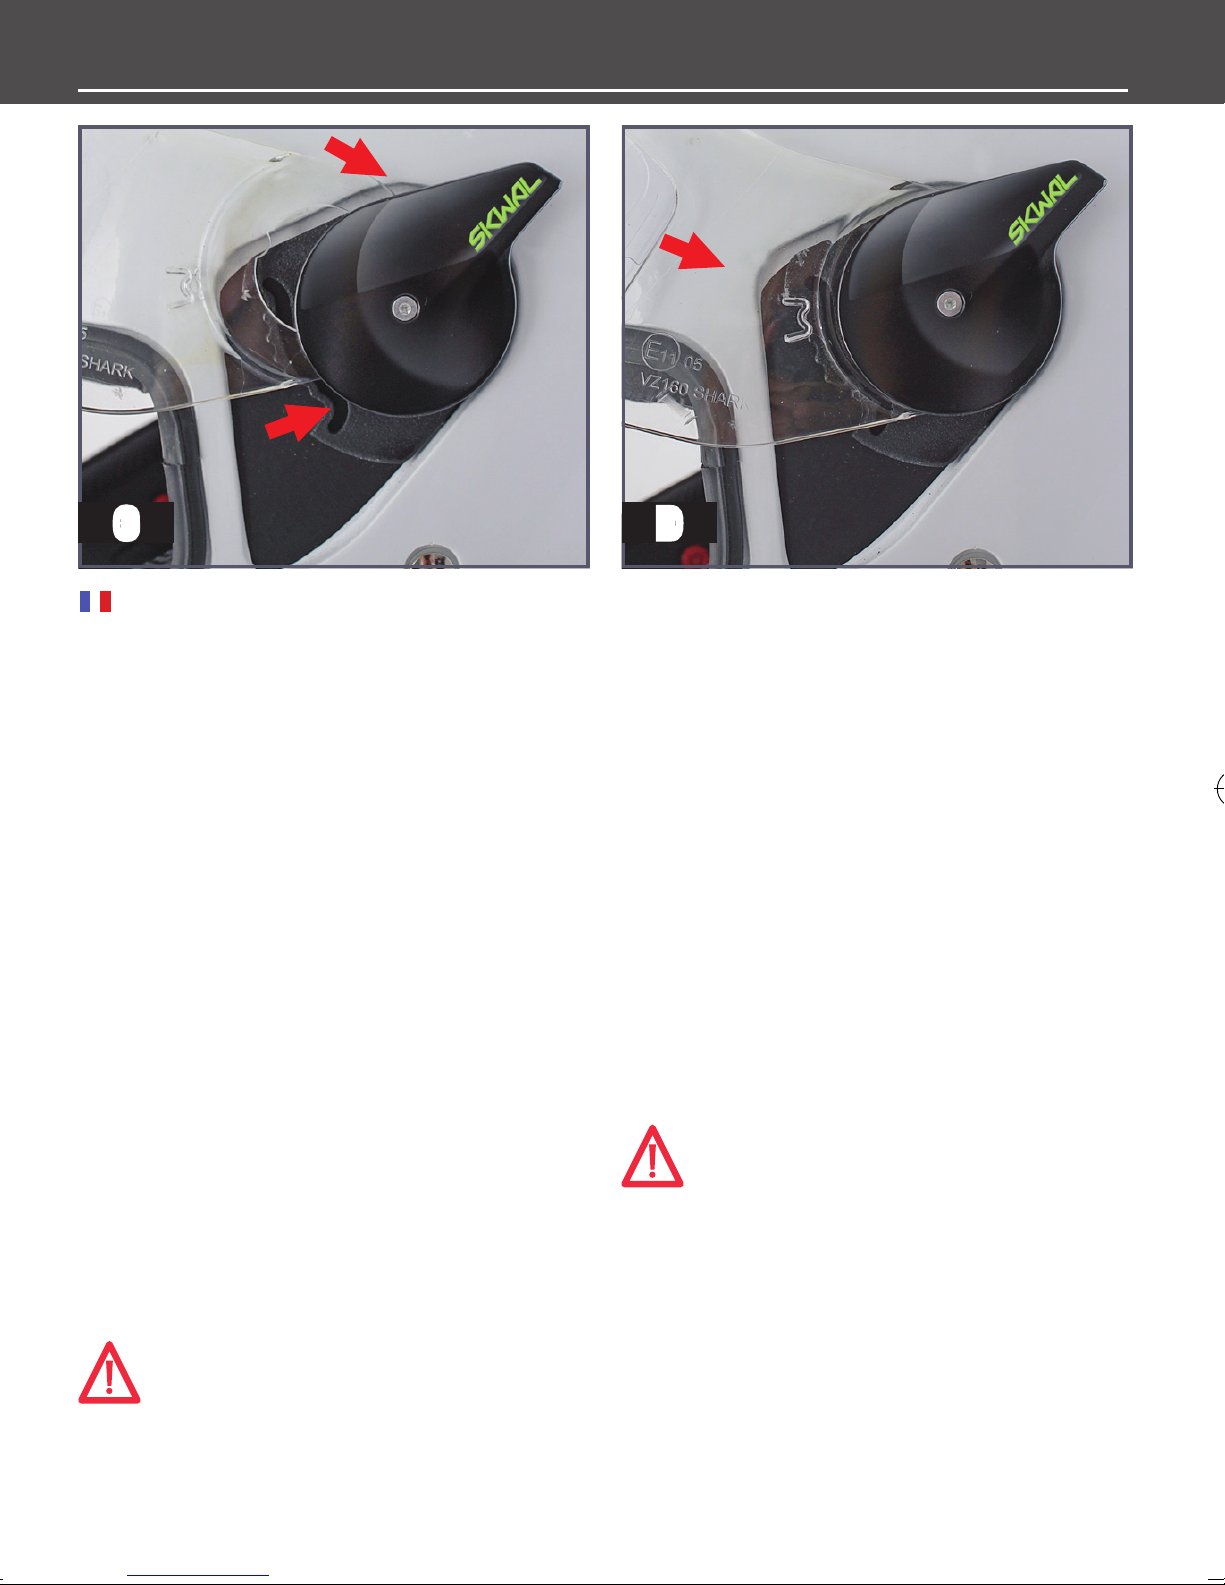
VISOR
A B
Contact your retailer for any assistance or advice. Do not
QRVS System
Dismantling.
Raise visor in the upper position (A).
Exerting a traction on the side of the
visor (B).
Repeat the operation on the other side.
This visor has a system of easy disassembly
without tools, allowing you to clean it easily.
Assembly.
Place the visor face to the helmet.
Place the visor hooks in the side anges (C).
Exerting a homogeneous pression on both
sides (D).
ride with an open visor and do not try to open or adjust the
visor while riding. The visor could suddenly and without
warning become detached from the helmet, leaving your
eyes and face unprotected. In addition, your head could
be pulled to the side, causing you to lose control of your
motorcycle. These events could cause you to lose control
of your motorcycle, resulting in an accident, personal
injury or death.
WARNING! Tinted or dark visors should never be
used at night or under poor visibility conditions
as they reduce your ability to see. Never ride with
a fogged visor.
WARNING! If you are not sure that you properly
replaced the visor, do not use the helmet. The visor
could suddenly and without warning become detached
from the helmet while riding, causing you to lose control
of your motorcycle, resulting in an accident, personal
injury, or death.
8
WARNING! If your visor no longer provides you
with clear visibility after a period of service, you
must immediately replace it. Never ride if your visor is
scratched, dirty, foggy or with your vision obscured in any
way. Always ride with perfect visibility.
Page 9

C D
AUTO SEAL - SUN VISOR
AUTO SEAL
Your helmet SKWAL has a patented system
SHARK “AUTOSEAL”. This system ensures a
perfect sealing of the visor by clinging the visor
on the seal, by spring effect backward the visor
when it is in lower position.
SUN VISOR.
SHARK SKWAL is equipped with a sun visor
with an integrated external control.
This ergonomic command allows to ope-
rate the visor from the outside with ease and
whatever the type of gloves worn, offering you
a fast and full protection security. The R&D
department has developed a mechanism
for obtaining a progressive movement of the
The visor is operated by the button located
on the left side of the helmet (A-B).MAINTE-
NANCE.
For protection and improve its life, the ou-
ter surface of your sun visor SHARK SKWAL is
anti-scratch treated. When cleaning the screen,
use lukewarm water (below 40 degrees) and
a soft cloth (100% cotton and lint) to wipe the
screen. Neutral soap as “savon de Marseille”
can help you clean up.
WARNING! If your visor and/or sun
shield no longer provides you with
control. The sun visor has a 380 UV protection
to lter out 100% of UVA and UVB.
WARNING! This sun visor cannot be used
when the light is strong and you ride in an
area where you may have a sudden change in
visibility (ex tunnel). In all cases where visibility is reduced, the beginning or end of the day,
night, rain or fog, the sun visor must be set
high to not to degrade your vision.
clear visibility, you must immediately replace
it. Never ride if your sun shield is scratched,
dirty, foggy or with your vision obscured in any
way. Always ride with perfect visibility. Never
ride with the sun shield as eye protection. You
must always ride with the visor in the lowered
position.
9
Page 10
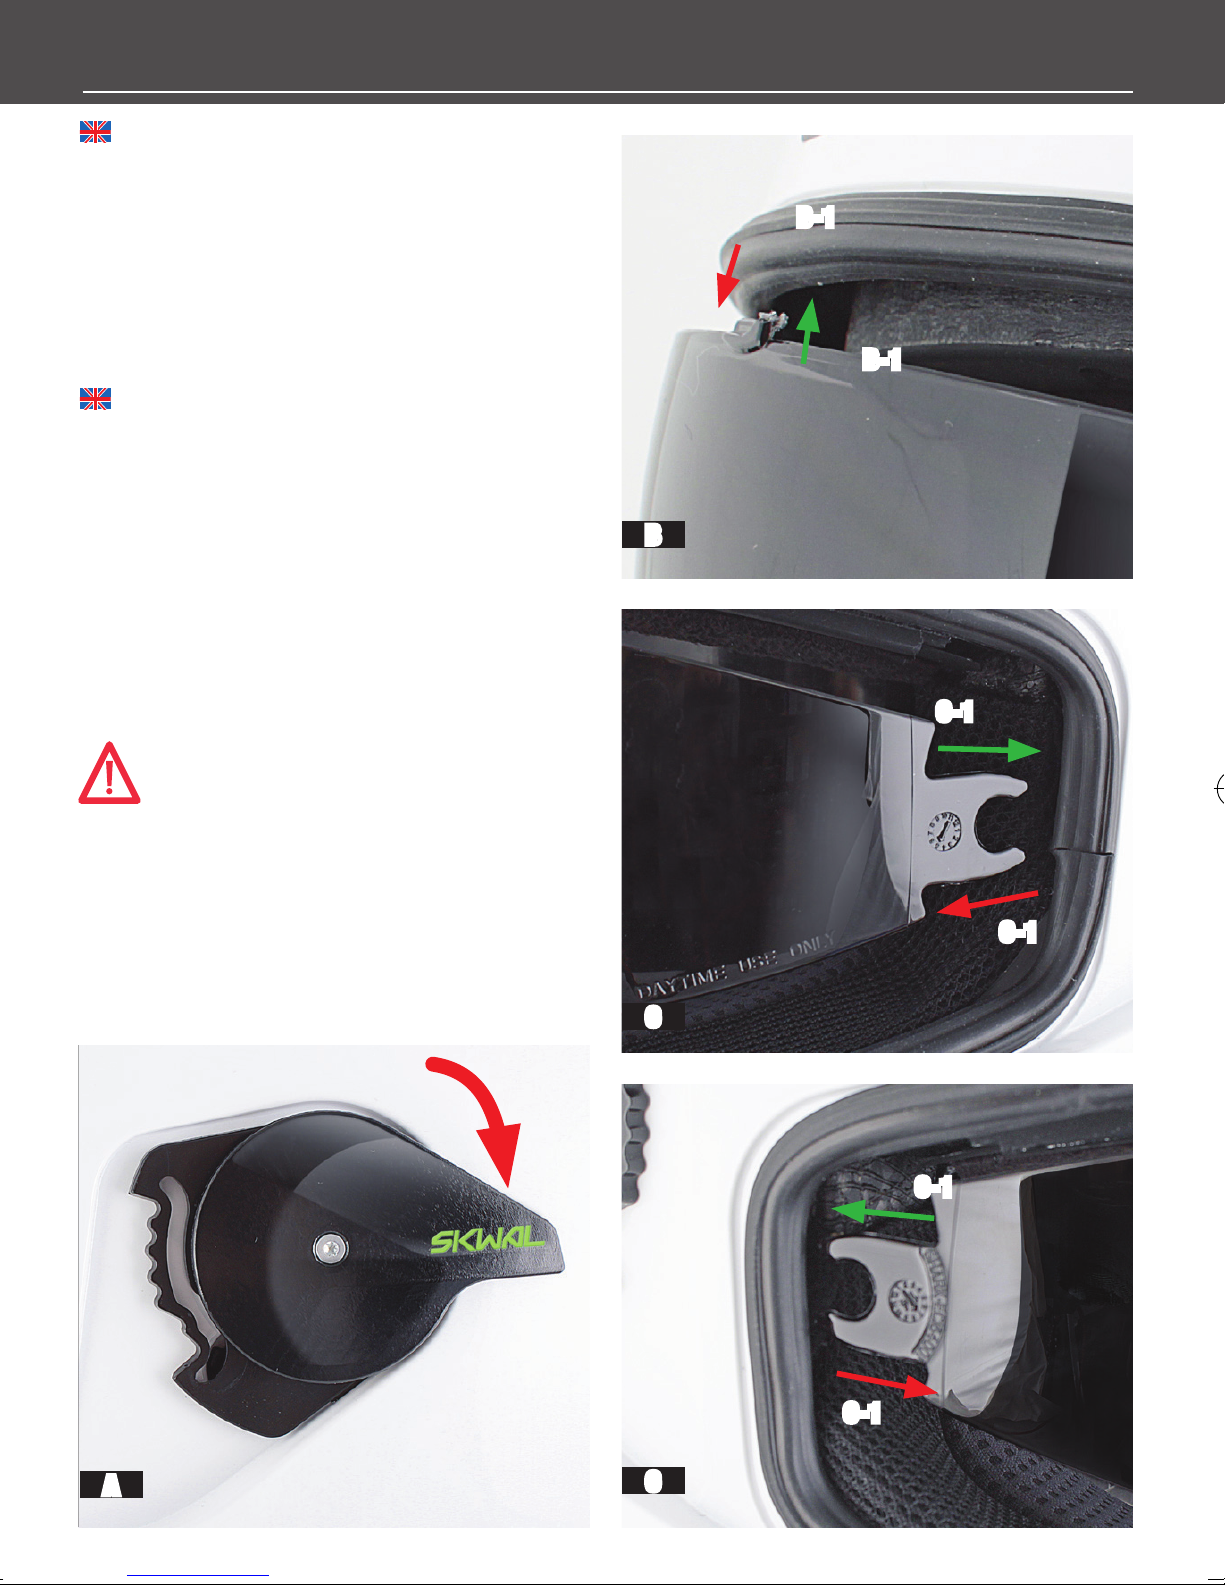
SUN VISOR
REMOVAL (A)
- Move the sun shield to the lower position (A).
- Pull the sun shield delicately downward. (B-1).
- Pull the sun shield forward, one side at a
time, to unclip it from the mounting points in
the helmet (C-1).
REPLACEMENT (B)
- Move the handling button to the low position
(A).
- Push, at one side at a time, the sun shield
forward to clip it onto the mounting points in
the helmet (C-1).
- And then clip the sun shield back on by lifting
it slightly (C-1).
WARNING! If you are not sure that you properly replaced the sun shield, do not use the
B-1
B-1
B
C-1
helmet. The sun shield could suddenly and without
warning become detached from the helmet while ri
ding, causing you to lose control of your motorcycle,
resulting in an accident, personal injury, or death.
Contact your retailer for any assistance or advice.
-
C-1
C
C-1
C-1
A
10
C
Page 11
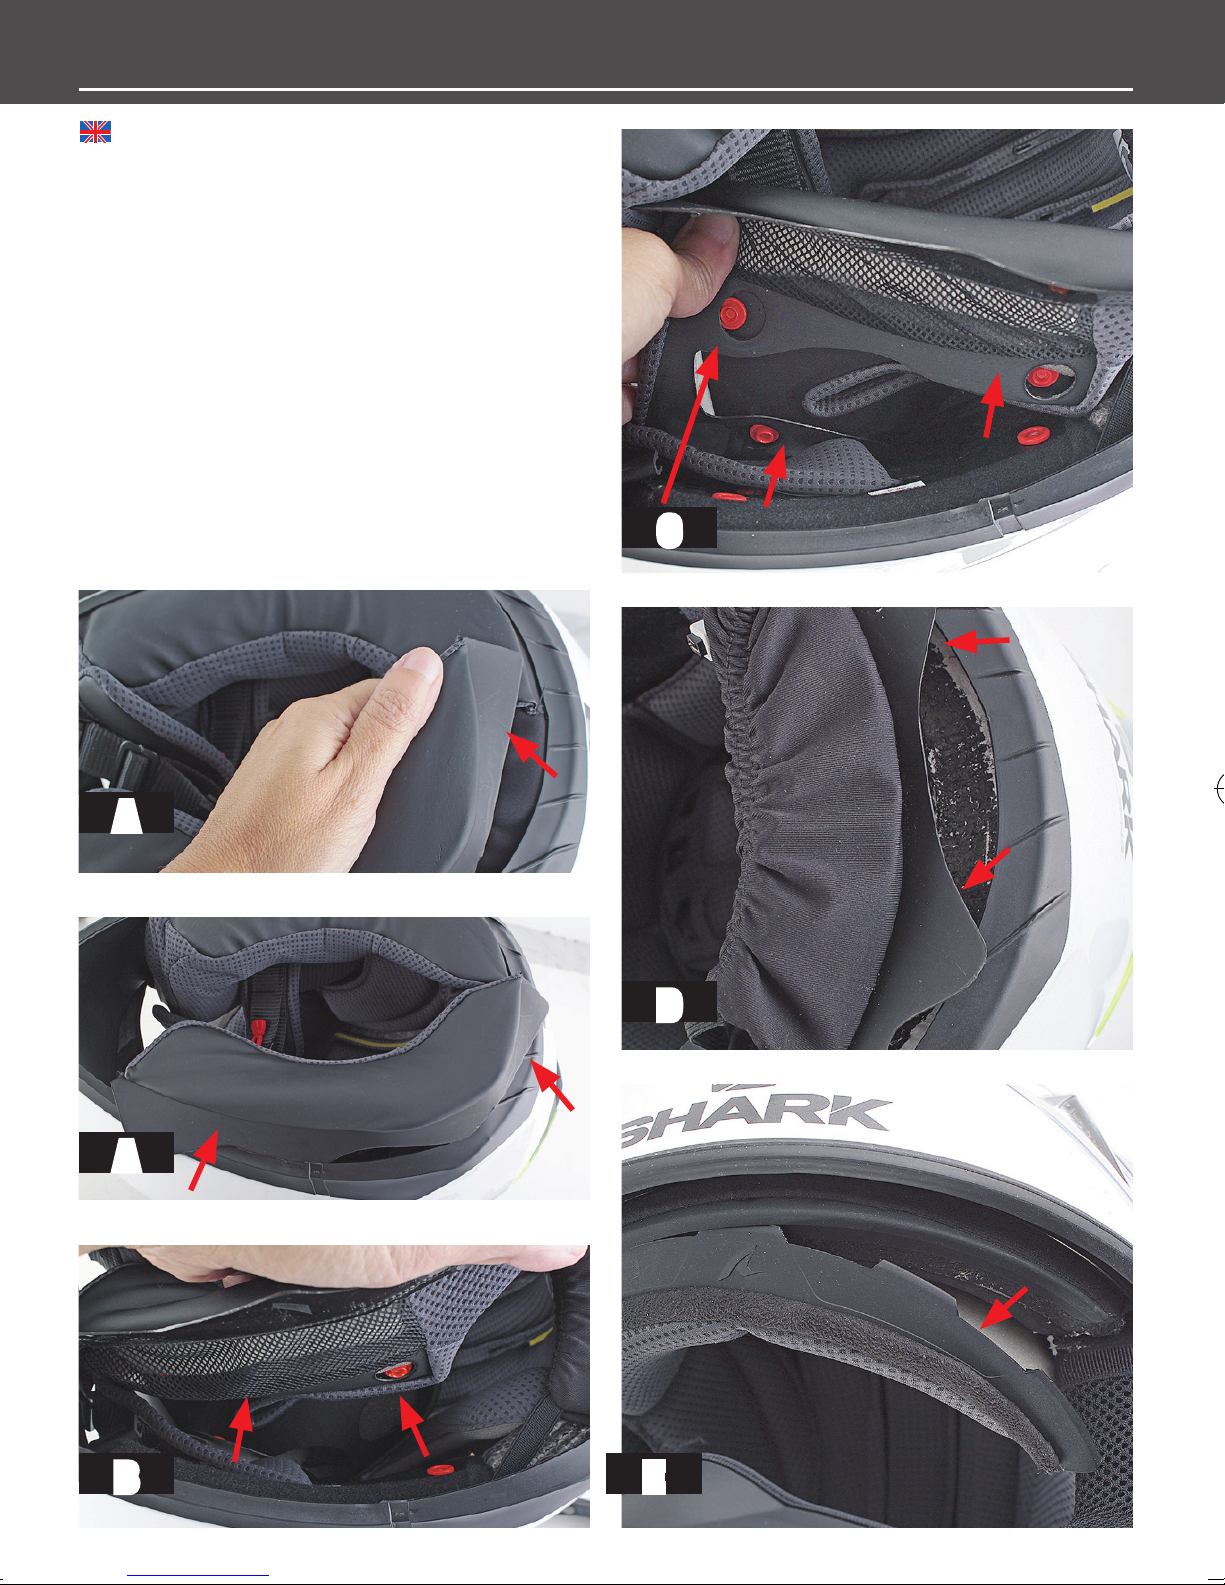
REMOVAL
- Turn your helmet over.
- Separate the two parts of the chin strap.
- Remove the neck pad by holding one of its sides.
Pull out the end and then detach its rear section (Fig.
A).
- Unclip the two cheek pads (Fig. B) and slide them
along the chin straps to extract them.
- Withdraw the rear part of the head section from its
housing in order to remove it (Fig. C -D).
- To complete the operation, unclip the front of the
head section, starting with one side (Fig. E) and re
move the head section.
-
TEXTILE PARTS - REMOVAL
C
A
A
D
B E
11
Page 12
TEXTILE PARTS - REPLACE TEXTILE PARTS - CLEANING
REPLACE
- Start the operation by engaging the plastic part of
the front of the head section in its housing beginning
with one side (Fig. A).
Replace the rear part of the head section within its
housing (B).
- Position the textile part correctly.
- Reposition the cheek pads by passing the chin
straps through the slit in the foam (Fig. C).
- Replace the neck pad, inserting one of its side parts,
then position it correctly in its housing (D).
WARNING!
soever regarding the removal or replace-
ment of the interior padding, DO NOT USE YOUR
HELMET. Contact your retailer for assistance or
advise. NEVER use your helmet with any part of
the interior padding removed. The helmet will not
protect you in an accident.
If you have any doubt what-
WARNING! Damaged interior padding
will compromise the fit of your helmet on
your head and could allow the helmet to come
off your head in an accident, resulting in a head
injury or death.
B
C
A
12
D
Page 13
THE TEXTILES
CLEANING THE INTERIOR
The SKWAL make it easy for you to appre
-
ciate fully the performance of your helmet.
The parts in contact with the skin are made
in a fabric that is guaranteed to feel pleasant,
to absorb perspiration well and to resist wear
satisfactorily. We treat surfaces to limit the
risk of mould and bacteria.
WARNING! Although they are selected
for their quality of resistance and satis-
factory wear, all the interior padding is subject
The interior textile parts are washable; it is im-
portant to follow the instructions below scru-
pulously to avoid damaging them:
The cheek pads and head section must be
hand washed in warm, soapy water (about
30°). Do not use aggressive detergents but
either a product for delicate materials in
low dilution or household soap. It is essential
to dry textile and foam parts completely before
to normal wear depending on use and care
and maintenance, the length of use and also
the degree of acidity of your perspiration. If
you note any wear, we
advise you to replace the interior padding
in order to keep your helmet perfectly clean
and comfortable.
Your SHARK supplier can propose you with
replacement parts and also offer you cheek
pads of different thicknesses and densities,
using them. They must be dried at room tem-
perature. Never iron textile parts. For parts with
a leather appearance or textiles attached to
safety elements, use a slightly damp sponge or
cloth and household soap and rinse with clean
water. Avoid allowing too much water to
come into contact with polystyrene parts.
WARNING! It is essential to ensure that
all interior parts are perfectly dry before
using the helmet. The battery feeding the LED
should the standard selection not correspond
to the contours of your face.
as its electric cable could be damaged by the
moisture of fabrics and corrode.
13
Page 14
CLEANING - ANTI-FOG MASK - EASY FIT CHIN COVER - SHARKTOOTH - LED
NOSE MASK (OPTIONAL EQUIMENT)
Your SKWAL is tted with a removable breath guard.
CHIN COVER
Your SKWAL is tted with a chin cover (ventilation
open).
SHARKTOOTH
Your helmet SHARK SKWAL is designed to be
equipped with audio system SHARKTOOTH.
You will nd a specic location designed for
battery at the rear of the helmet, behind the
neck pad (A) and a space for the microphone
to the front of the helmet. Concerning the
headphones, a cavity has been devise in the
cheek Velcro.
Battery is easily rechargeable thanks to its
access from the outside without dismantling
neck pad.
SHARKTOOTH® system offers the possibility
to communicate easily by Bluetooth
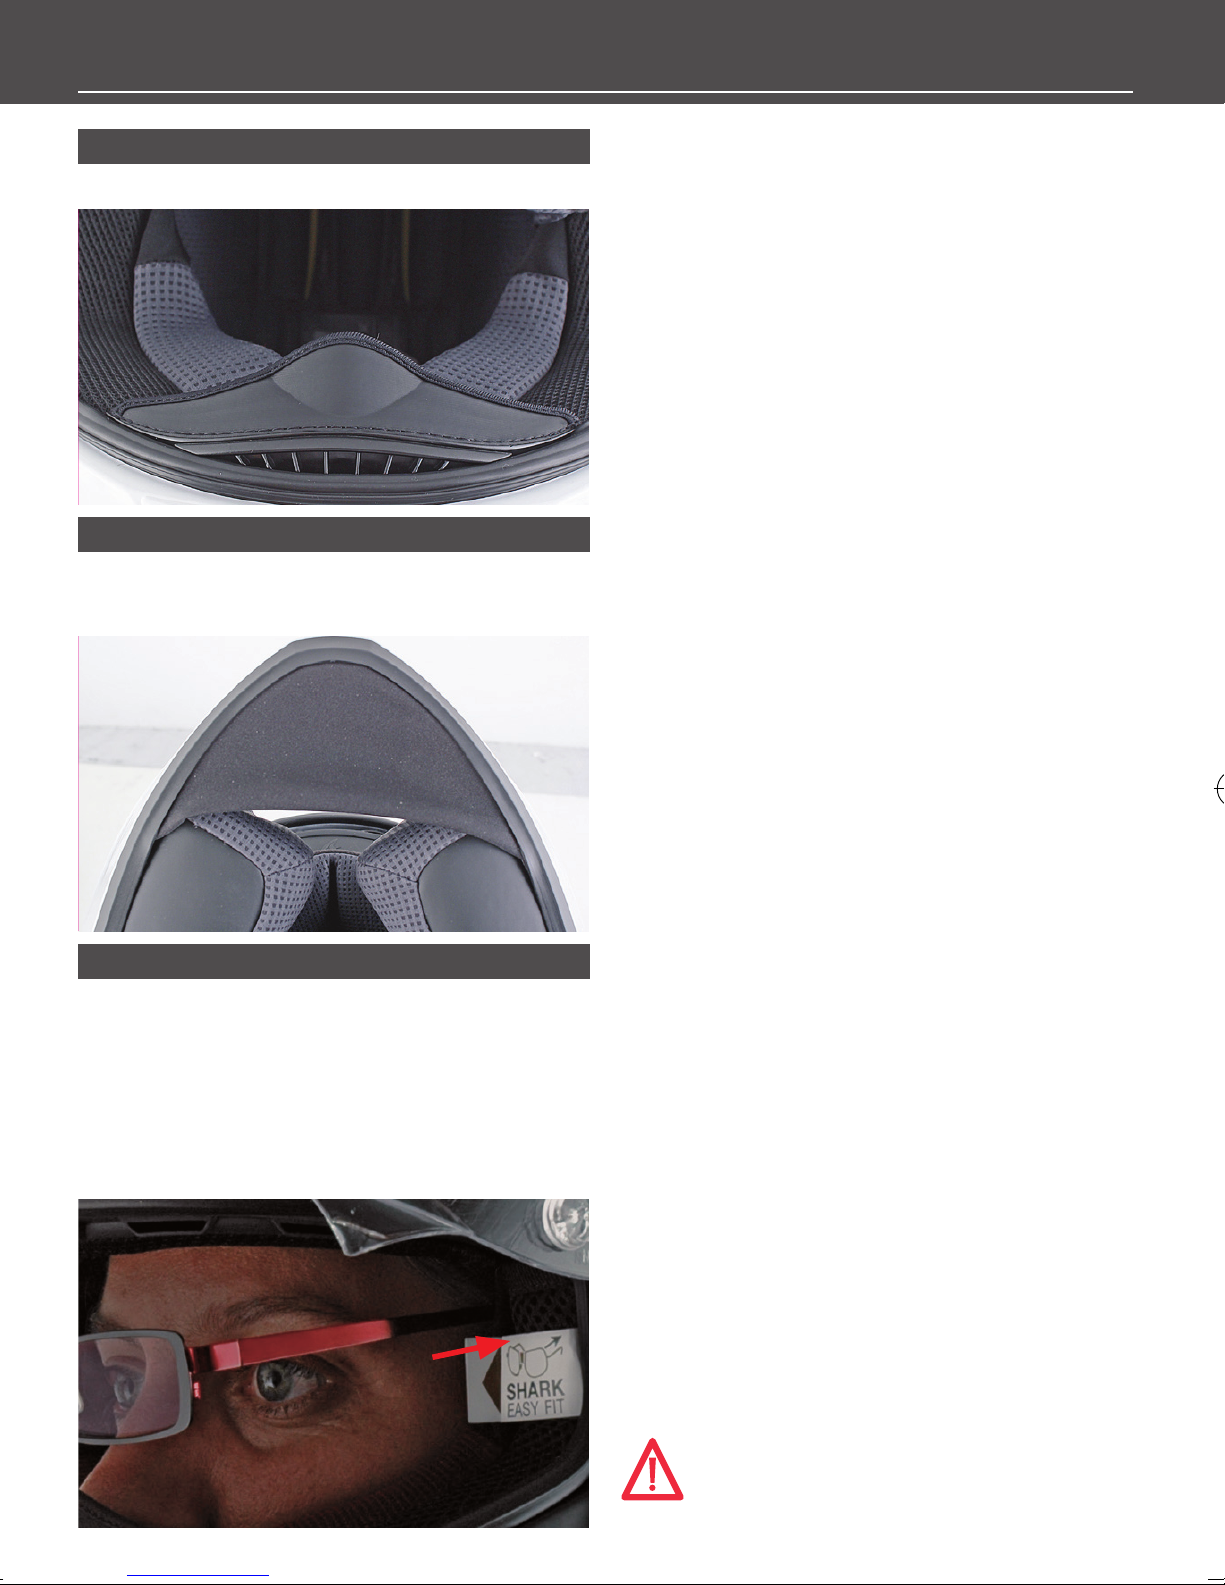
EASY FIT
Your helmet SKWAL has been designed to provide
additional comfort for eyeglasses wearers with the
SHARK EASY FIT.
The 2 cheeks are made with a pocket shape fabric
part to provide the passage to the glasses arms.
For urban, Touring or road riders who want
to communicate while they are driving. SHAR
-
TOOTH® Bluetooth hands-free bike kit for mobile phones and Smartphones is a must-have
accessory.
It provides a bike to bike intercom system
with another SHARKTOOTH® (500m). It can
be easily connected with most of the mobile
phones and Smartphones. It switches on by the
voice, there is an automatic volume control and
it enables riders to reduce background noise. It
is waterproof. You can receive audio informa
-
tion from motorbike Bluetooth® GPS navigator
and music streaming thanks to Stereo Bluetoo
-
th® A2DP.
14
To access this function, connect the
SHARKTOOTH® to an appropriate Bluetooth®
device.
WARNING! SHARK disclaims all liability in case
of adaptation into the SKWAL of a communica-
tion system other than the SHARKTOOTH.
Page 15

LED
Your helmet SHARK SKWAL is equipped with a LED
system (depending of model and version).
To control it, press the button (Fig. A)
First pulse: light (Fig. B)
2nd pulse: twinkling (Fig. B)
3rd: Off (Fig. C)
The service time in xed mode is about 5 hours and
10 hours in twinkling mode.
WARNING! Check if the national or local le-
gislation in power in your country does not
limit the use of LED on public highway.
Charging of the LED system.
To reload your system, to use the cable micro USB
placed in the neck pad and connect it to the provided
cable (Fig. D). This cable can be connected on USB
port fed or a sector adapter.
Time for a battery charged with 100% is approximately of 5:00 hours.
sustainable reuse of material resources.
Household users should contact either the retailer
where they purchased this product, or their local
government office, for details of where and how
they can take this item for environmentally safe
recycling.
Business users should contact their supplier and
check the terms and conditions of the purchase
contract. This product should not be mixed with
other commercial wastes for disposal.
Please contact the local recycling facility for removal of the battery.
A
WARNING! This system not being equipped
with load indicator, be careful to the duration of
the load attentively. The system musn’t be connected
to the charge more than 5 hours.
WARNING! This product has an embedded,
non-replaceable battery, do not attempt to
open the product or remove the battery as this may
cause injury and damage the product.
Correct Disposal of This Product
(Waste Electrical & Electronic Equipment.
Applicable in the European Union and other European countries with separate collection systems)
This marking shown on the product or its literature, indicates that it should not be disposed with
other household wastes at the end of its working
life. To prevent possible harm to the environment
or human health from uncontrolled waste disposal, please separate this from other types of
wastes and recycle it responsibly to promote the
B C
D
15
Page 16
VENTILATIONS
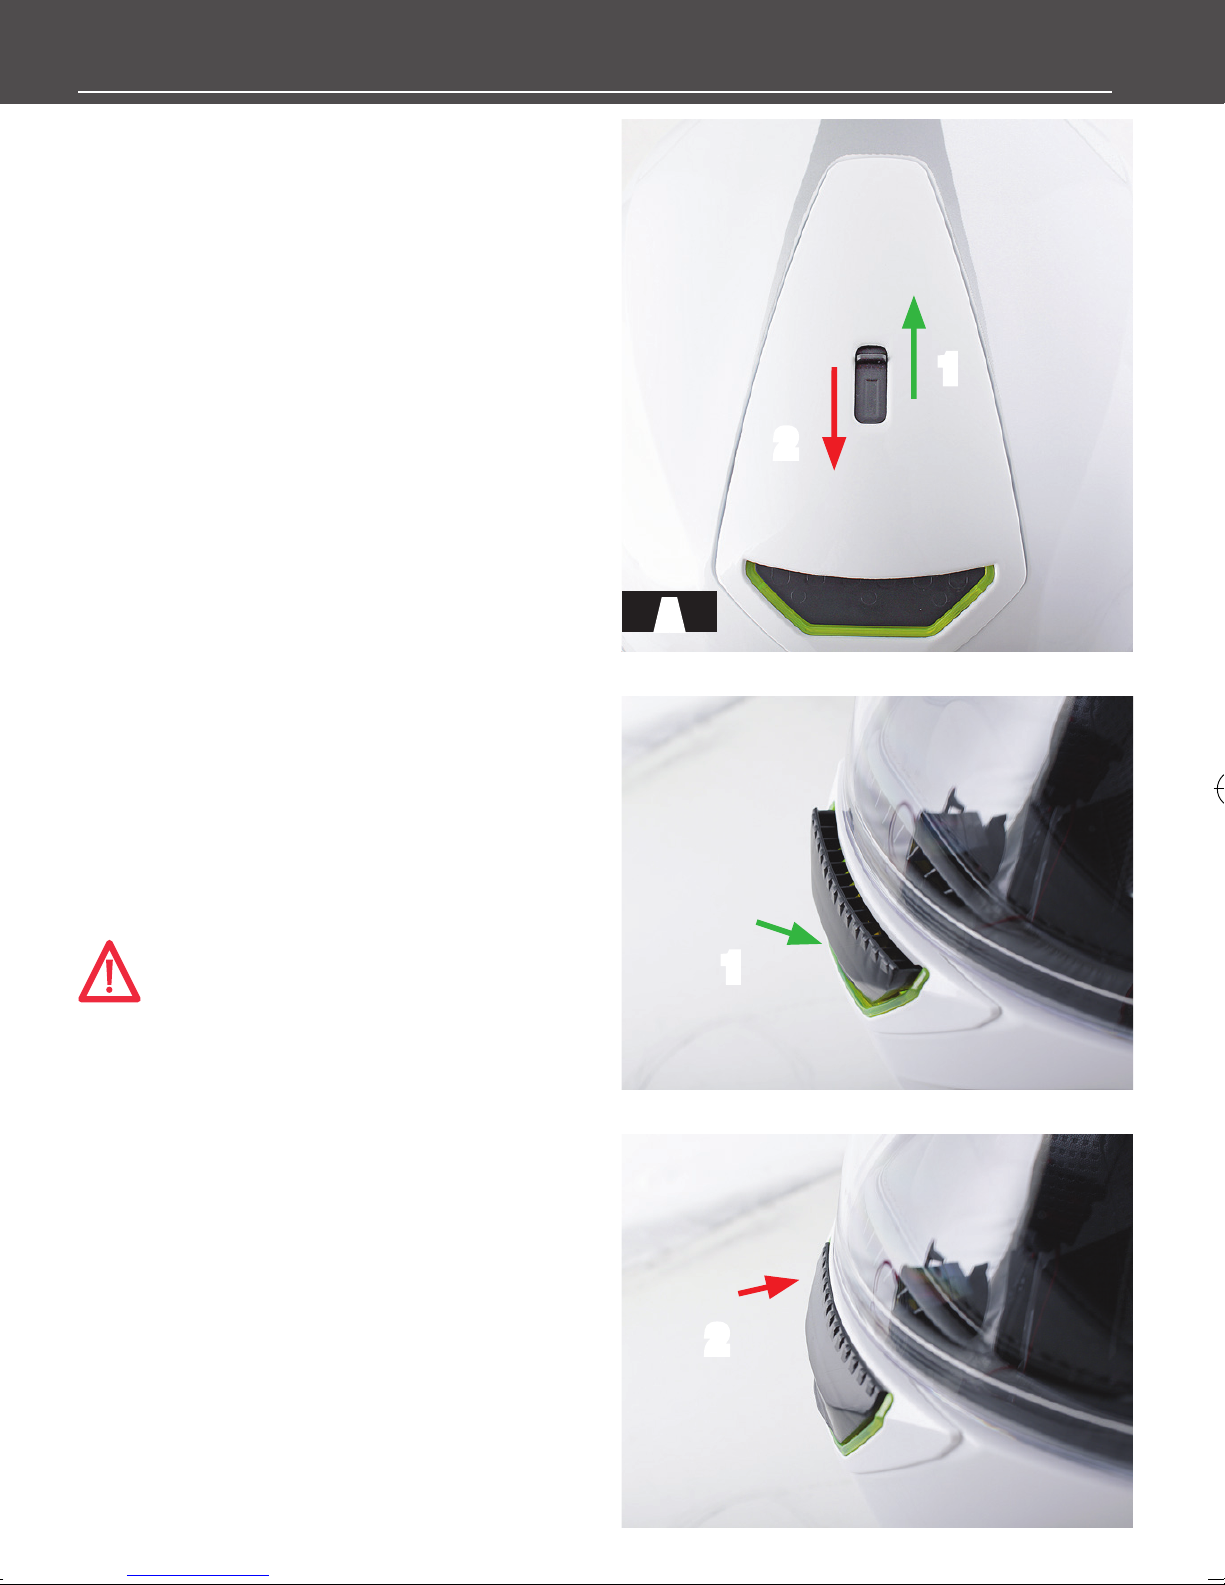
VENTILATION INSIDE THE HELMET.
The upper air intake (Fig. A) allows air to enter onto
the upper part of the head and thus renew the air in
the head section. The channels incorporated in the
internal shock absorbers facilitate the circulation of
air over the surface of the head.
The quality and design of the textile comfort parts
contribute to the proper distribution of air. The position of the upper ventilation system is designed to optimise the effectiveness of its intake of air. Depending
on the type of your motorbike, the fairing may reduce
the effectiveness of this ventilation.
The ventilation is in the open position when the
tongue is pushed backwards (1) and closed when the
tongue is pushed forwards (2).
1
2
A
LOWER VENTILATION.
The principal function of this air intake is to direct a
flow of fresh air over the interior surface of the visor in
order to limit the risk of misting. The fresh air diffused
cuts off contact with the hot air emitted by breathing
or even by the head inside the helmet.
To open (1) or close (2) the lower ventilation, press
the button as indicated.
WARNING! Do not open or close any vents
while operating your motorcycle. You could
lose control of your motorcycle, resulting in an
accident, personal injury or death.
AERODYNAMICS AND ACOUSTICS
The SKWAL has been carefully designed to offer you
the greatest pleasure in use.
The profile of the helmet, its impermeability and the
quality of the materials used enable air noise on the
crown of the head and aerodynamic turbulence to be
filtered as far as possible. In order for the use of your
helmet to be as pleasant as possible, it is important
for turbulence or air eddies created by the fairings not
to impair the aerodynamic qualities of your SKWAL
helmet. The shape of the fairings of your motorcycle
and/or your size should not cause air eddies to reach
the lower part of your helmet.
16
1
2
Page 17

5 YEARS WARRANTY
5 YEARS WARRANTY
You have recently purchased a SHARK helmet for your safety
and pleasure. It has been designed with the greatest care to
satisfy your every requirement. For your safety, and that of
your passenger, you must respect all the rules of prudence
when using your two-wheeled vehicle. The SHARK 5-YEARS
warranty guarantees the initial purchaser that any possible
manufacturing fault or material defect will be covered by the
SHARK warranty.
Limitations
If during the warranty period (5 years as from the date of
purchase), a problem covered by the warranty were to arise,
SHARK, through the intermediary of its sales network, under
takes to repair or replace any defective components, up to a
maximum limit which is the purchase value of the helmet.
Any labour costs are normally paid by the SHARK network,
but are submitted for approval prior to the work being car
ried out. If the repair requires components to be dispatched
incurring transportation costs, the SHARK network shall cover
these costs up to a limit which is the cost of transport by the
national postal service at the normal rate.
Exclusions
This warranty only covers problems related to materials or
manufacturing. SHARK cannot be held liable with regard to
the product in the following cases :
Any damage following
1) a fall or accident
2) a technical modication made by the user or a third party
(glue, adhesives, paint, screws, etc.)
3) use of or contact with: harmful chemical products (inclu
ding methylated spirits on the visor treatments), or an intense
heat source
4) incorrect use: abnormal conditions (e.g. underwater), lack
of maintenance or care
5) ageing due to normal wear of the inner fabrics or foams,
the appearance of the external parts, or the visor (scratches,
marks, etc.)
6) abnormal and prolonged exposure to ultra-violet light, in
particular for the decorative colours. In addition, SHARK can
not consider subjective considerations related to use of the
helmet as defects covered by the warranty : problems with
comfort, size, noise or whistling, aerodynamics, etc.
SHARK cannot be held liable for the temporary non-availa
bility of the helmet while it is being enhanced to satisfy the
needs of its owner. In all cases, the maximum warranty period
is 5 years. Replacement of a component during this period
does not prolong this period.
Procedure
When the helmet is sold go to our website www.sharkhelmets.com in order to activate your warranty.
All warranty claims must be made to the SHARK dealer that
sold the helmet.
For a warranty claim to be considered, the purchaser must
notify the dealer of the problem that has arisen, and return
-
the helmet that is the subject of the claim, together with the
warranty card lled out when the helmet was purchased. This
warranty does not affect in any way the statutory rights of the
purchaser as stipulated by directive 1999/44CE.
-
The effects of this specic and limited warranty shall
come to an end after a period of 5 years as from the
date of purchase. After this period, if you continue to
use a helmet regularly, we recommend that to bene
t from optimum protection and comfort you should
replace your helmet. This is because certain external
factors - general wear, certain impacts - could be prejudicial
to the safety characteristics of this essential piece of protec
tive equipment.
Limit SHARK reserves the right to carry out work within the
terms of the warranty using replacement parts from the most
recent version compatible with the model concerned, and is
-
unable to guarantee perfect harmonisation of the paint or
decorative elements associated with specic production runs
and/or limited editions. In addition, the natural deterioration of
colours over a period of time can cause mismatching in the
adaptation of colours of spare parts.
If SHARK is unable to carry out the repair for technical reasons
or because a component is not available, SHARK undertakes
to make the customer an advantageous offer, taking account
of the age of the helmet, consisting in either an identical new
-
helmet or an equivalent model manufactured at the time of
the repair, if the original model is no longer available.
This warranty is only valid for european continent.
-
-
-
17
Page 18
SOMMAIRE ANATOMIE DU CASQUE
• Anatomie du casque ...............................................................3
• Un casque à votre taille ...................................................... 4-5
• Jugulaire ............................................................................6-7
• Ecran .................................................................................... 8
• Auto seal .................................................................................9
• Pare-soleil ..........................................................................10
• Textiles ..........................................................................11-12
• Nettoyage ........................................................................... 13
• Masque anti-buée/bavette anti-remous ..........................14-15
• Easy Fit ................................................................................. 14
• LEDS.....................................................................................15
• Ventilations ......................................................................... 16
• Garantie 5 ans ....................................................................17
• Mentions légales .................................................................20
Nous vous remercions d’avoir choisi un SHARK
SKWAL.
Nous sommes certains que ce casque vous
donnera entière satisfaction.
Conforme aux normes internationales les plus
sévères, ce casque ne peut toutefois protéger
son utilisateur en toutes circonstances, nous
vous recommandons de rester prudent.
Votre casque a été conçu pour une utilisation
sur un deux-roues motorisé, vous ne devez pas
l’employer pour un autre usage.
Ce casque SHARK SKWAL est homologué et
conforme au règlement ECE R 22/05, ce casque
est donc conforme aux exigences imposées dans
tous les pays reconnaissant cette norme sur leur
territoire.
2
Attention ! Les États-Unis ayant une
réglementation spécifique, les casques uniquement homologués ECE ne doivent pas être
utilisés sur ces territoires sans l’homologation
complémentaire DOT FMVSS 218.
Attention ! pour la circulation en France,
le code de la route exige que les réfléchissants de sécurité (fournis à part dans une pochette) soient apposés conformément au plan
joint.
Attention ! Ce casque est vendu avec un
système de LED que vous pouvez éteindre.
Important : conduisez prudemment et en respectant le code de la route en vigueur. Vérifiez
que la législation de votre pays ne limite pas
l’utilisation de LED.
1) Ecran VZ160
2) Pare-soleil
3) Levier de mécanisme de pare-soleil
4) Ventilation supérieure
5) Ventilation inférieure
6) Venturi
7) Jugulaire
8) Masque anti-buée (selon version)
9) Bavette anti-remous (selon version)
10) LED
11) Commande LED (selon version)
Page 19
10
4
6
10
3
2
1
8
5
10
1) Ecran VZ160
2) Pare-soleil
3) Levier de mécanisme de pare-soleil
4) Ventilation supérieure
5) Ventilation inférieure
6) Venturi
7) Jugulaire
8) Masque anti-buée (selon version)
9) Bavette anti-remous (selon version)
10) LED
11) Commande LED (selon version)
14
13
9
12) Joint d’embase
13) Joint d’écran
14) easy fit
11
12
7
7 - Boucle de jugulaire “Precise Lock”
7 - Boucle de jugulaire double anneaux.
3
Page 20

CHOISIR SA TAILLE CHOISIR SA TAILLE
ATTENTION ! Aucun casque ne peut
protéger entièrement l’utilisateur de
tous les chocs possibles à haute ou basse
vitesse. Toutefois, pour une protection
efficace, le casque doit être à la bonne taille et
la jugulaire doit être correctement serrée
comme indiqué dans le manuel. Il est
dangereux de ne pas utiliser un casque à sa
taille ou de ne pas serrer correctement le
système de fermeture de la jugulaire, car le
casque pourrait se séparer de la tête en cas
d’accident, entrainant des blessures graves
ou mortelles.
CHOISIR SA TAILLE
Chaque casque de XS à XL est conçu
pour une taille de tête donnée. Pour mesurer
votre tour de tête, utiliser un mètre ruban
vérifier que le casque correspond bien à votre
tête. Lorsque que vous choisissez un nouveau
casque, vérifier que votre tête soit bien
enfoncée dans le casque, le haut du champ
de vision étant positionné au dessus des
sourcils. Vérifier également que la jugulaire
soit correctement serrée comme indiqué dans
la page suivante.
1. La tête doit être bien enveloppée par le
casque et les joues doivent apporter un bon
maintien. Si ce n’est pas le cas, le casque
choisi est trop grand, essayer donc une taille
plus petite. Voir la figure A.
2. Avec la jugulaire correctement
en l’enroulant horizontalement à 2,5 cm au
dessus de vos sourcils. Si la mesure se trouve
entre deux tailles, essayez d’abord le casque le
plus petit. Toutefois, en raison des différentes
morphologies de crânes, les références de
taille servent uniquement à vous orienter vers
la taille la mieux adaptée à votre tête. Pour
une protection efficace, il est nécessaire de
serrée (voir page 10), assurez-vous que le
casque ne bouge pas trop de gauche à droite
et de haut en bas. Vous devez sentir votre
peau se tirer au niveau de la tête et du visage
lorsque vous bougez le casque. Si ce n’est pas
le cas, le casque choisi est trop grand, essayer
donc une taille plus petite. Voir la figure B.
4
B
Page 21
3. Avec la jugulaire serrée, attraper l’arrière
Pour toute question concernant le choix de la
du casque par la base et essayer de le retirer
de votre tête dans un mouvement rotationnel.
Ensuite essayer d’enlever le casque en le
saisissant par la base de la mentonnière. Vous
devez faire ces mouvements de manière
suffisamment énergique. Si le casque commence à se déchausser, le casque choisi est
trop grand, essayer donc une taille plus petite.
4. Penchez la tête vers l’avant le plus possible. La base de la mentonnière ne doit pas
toucher la poitrine. Voir la figure C.
5. Penchez la tête à l’arrière le plus loin possible. La base du casque ne doit pas toucher
le dos. Voir la figure D.
N’ayez pas les cheveux enroulés ou attachés
à l’intérieur du casque.
Ne pas mettre quelque chose dans/ou sur
ses cheveux à l’intérieur du casque. Ne rien
bonne taille de casque, demandez conseil à
votre revendeur.
Chacune de ces étapes doit être répétée
pendant toute la durée de vie du casque, car
les mousses de confort peuvent évoluer au fil
du temps. Si, au cours de la durée de vie du
casque, celui-ci ne conserve pas une taille
correcte, il faudra le remplacer.
ATTENTION ! Ne jamais prêter votre
casque sans vous assurer, en suivant
les instructions dans ce manuel, qu’il convient
bien à la personne.
ATTENTION ! Si en suivant ces
instructions vous ne trouvez pas un
casque parfaitement adapté, NE L’UTILISEZ
PAS. Choisissez alors une taille ou un modèle
différent.
Tailles (cm)
M 57/58
ajouter à l’intérieur du casque afin d’ajuster sa
position sur votre tête.
C
XS 53/54
S 55/56
L 59/60
XL 61
D
5
Page 22
JUGULAIRE
JUGULAIRE
Votre casque SKWAL est équipé selon les versions et les pays d’une jugulaire à fermeture rapide
« Precise Lock » à cliquet ou d’une boucle de jugulaire à double anneau.
PRECISE LOCK
Le système « Precise Lock » à cliquet vous permet
un réglage fin et précis grâce à la longueur importante de sa partie dentée.
Toutefois il est indispensable, lors de votre achat,
d’adapter la longueur de la jugulaire à votre morphologie. Ajuster la longueur de sangle à l’aide de
la boucle de réglage (Fig. A, B, C, D). Chausser votre
Pour bloquer la jugulaire, il suffit d’enfiler la languette dans l’emplacement prévu sur la boucle
jusqu’à ce que la tension soit parfaite
(Fig. E). La languette s’enclenche et se bloque automatiquement.
Pour débloquer la jugulaire, il faut tirer sur le levier
(Fig. F) et sortir la languette de la boucle. Bien que
la languette dentée permette d’affiner le réglage à
chaque utilisation, il est important de vérifier fréquemment que le réglage de la longueur de sangle
soit correct.
ATTENTION ! Ne jamais rouler avec la jugulaire non attachée ou insuffisamment tendue,
même si l’habillage intérieur vous procure un
casque SKWAL et attacher le système de rétention.
Lorsque le « Precise Lock» est réglé en position
moyenne, la jugulaire doit être correctement tendue sous le menton pour vous assurer un maintien
ferme du casque, sans causer de gêne ni douleur.
A
sentiment de maintien, le casque risque de se déchausser lors d’une chute.
Ne jamais appliquer de produits lubrifiant ou acide,
ni de graisse ou de solvant sur les éléments de la
boucle de jugulaire.
B
C
D
6
E
F
Page 23
JUGULAIRE
A
ATTENTION ! Ne jamais utiliser le passant
comme seule fermeture de la jugulaire . Afin
d’être correctement serrée, la jugulaire doit passer
selon les instructions dans les boucles double-D. Toute
mauvaise utilisation de la jugulaire peut faire
que votre casque soit expulsé en cas d’accident,
laissant la tête sans aucune protection. Essayez de
tirer sur la jugulaire avec les doigts. Si la sangle se
desserre d’une quelconque façon, vous n’avez pas
BOUCLE DOUBLE-D
1. Faites glisser la partie la plus longue de la jugulaire
dans les deux anneaux, tout en vérifiant que le coussinet de confort est bien positionné entre la sangle et
le cou. Voir la figure A.
2. Formez une boucle avec l’extrémité de la jugulaire
autour de l’anneau extérieur et repassez-la dans
C
B
correctement fermé la jugulaire dans les boucles
double-D. Répétez alors les étapes décrites ci-contre.
Ne jamais rouler avec la jugulaire ouverte, mal fermée
ou mal positionnée. Même si les joues donnent la
sensation que le casque assure un maintien sécure,
il serait éjecté lors d’un accident, laissant la tête sans
aucune protection.
En cas de doute concernant le système de fermeture
du casque, ne pas utiliser le casque. Demandez
conseil à votre revendeur .
l’anneau intérieur. Voir la figure B.
3. Tirez sur l’extrémité de la sangle jusqu’à ce que
la jugulaire soit bien tendue. La jugulaire doit être
positionnée contre le cou, et non sous le menton. Elle
doit être serrée le plus possible sans faire mal ou
gêner la respiration. Voir la figure C.
4. Glisser l’extrémité libre de la sangle dans le passant plastique afin d’éviter tout flottement de la
sangle dans les airs. Voir la figure D.
D
7
Page 24

ÉCRAN
A B
Si vous conduisez à haute vitesse, n’ouvrez pas
QRVS System
DÉMONTAGE.
Mettre l’écran en position haute (A).
Exercer une traction sur la partie latérale de
l’écran (B).
Recommencer de l’autre côté.
Cet écran bénéficie d’un système de démontage facile et sans outils, vous permettant de le
nettoyer très facilement.
MONTAGE.
Placer l’écran face au casque.
Positionner les crochets d’écran dans les
flasques latérales à l’aide des repères (C).
Exercer une pression homogène sur les deux
côtés (D).
l’écran. Il pourrait se détacher et laisser vos yeux et
votre visage sans protection.
De plus, votre tête pourrait être tirée en arrière
ou sur les côtés, ce qui peut vous faire perdre le
contrôle de la moto, causant ainsi un accident, des
blessures corporelles ou la mort.
ATTENTION ! Les écrans teintés ou colorés
ne doivent jamais être utilisés la nuit ou
dans de mauvaises conditions de visibilité car ils
diminuent votre vision. Ne roulez jamais avec un
écran embué.
ATTENTION ! Si vous n’êtes pas sûr d’avoir
bien remonté votre écran, n’utilisez pas le
casque. En roulant l’écran pourrait se détacher du
casque soudainement et sans prévenir, causant
ainsi une perte de contrôle de votre moto, puis
entraînant un accident, une blessure ou la mort.
Nous vous conseillons de contacter votre revendeur
pour toute assistance et conseil.
8
ATTENTION ! si votre écran après un temps
d’utilisation, ne vous garantit pas une excel
lente visibilité, il est absolument nécessaire de le
remplacer. Nous vous conseillons de toujours rouler
avec une visibilité optimale.
-
Page 25
C D
AUTO SEAL - PARE-SOLEIL
AUTO SEAL
Votre casque Skwal dispose d’un système
breveté SHARK «AUTOSEAL» le système
assure une parfaite étanchéité de l’écran sur
les joints en ramenant par un effet ressort
l’écran vers l’arrière lorsque celui-ci est en
position basse.
PARE-SOLEIL
Le SHARK SKWAL est équipé d’un pare-soleil
intégré à commande extérieure.
Cette commande ergonomique permet d’ac
tionner le pare soleil de l’extérieur avec facilité et
quel que soit le type de gants portés : vous bé
néficiez ainsi d’une protection complète rapide et
de plus de sécurité. Le département R&D a déve
loppé une mécanique permettant l’obtention d’un
mouvement progressif de la commande. Le pare
soleil a une protection UV380 permettant de filtrer
-
-
-
Dans tous les cas où la visibilité est réduite, dé
but ou fin de journée, nuit, temps de pluie ou de
brouillard, le pare-soleil doit être en position haute
pour ne pas dégrader votre vision.
Le pare-soleil s’actionne par le bouton élasto
mère situé sur la partie gauche du casque (A-B).
ENTRETIEN
Pour assurer sa protection et améliorer sa du
rée de vie, la surface extérieure du pare-soleil
du SHARK Vantime est traitée anti-rayures. Pour
son entretien et son nettoyage, veuillez suivre les
mêmes conseils préconisés pour l’écran extérieur.
ATTENTION ! si votre écran et/ou pare-
-
-
-
soleil après un temps d’utilisation, ne
vous garantit pas une excellente visibilité, il
est absolument nécessaire de le/les remplacer.
100% des UVA et UVB.
ATTENTION !
utilisé que lorsque la luminosité est forte
et que vous ne circulez pas dans une zone où
vous risquez d’avoir un changement brusque de
visibilité (tunnel par exemple).
ce pare-soleil ne peut être
Nous vous conseillons de toujours rouler avec
une visibilité optimale. N’utilisez jamais le
pare-soleil sans l’écran comme seule protection.
Vous devez toujours rouler avec l’écran en position basse.
9
Page 26

PARE-SOLEIL
Démontage.
Déposer ou ouvrir l’écran.
Amener le pare-soleil en position basse (A).
Ramener délicatement le pare-soleil vers
le bas (B-1).
B-1
Déclipser le pare soleil latéralement, d’un
côté puis de l’autre (C-1).
Montage.
Amener la manette de commande du pare-
soleil en position basse (A).
Clipser latéralement le pare soleil d’un côté
puis de l’autre, et au centre (C-1).
Ramener ensuite le pare-soleil dans sa posi-
tion initiale en le reclipsant délicatement (B-1).
ATTENTION ! Si vous n’êtes pas sûr d’avoir
bien remonté votre pare-soleil, n’utilisez pas
le casque. En roulant le pare-soleil pourrait se déta
cher du casque soudainement et sans prévenir, causant ainsi une perte de contrôle de votre moto, puis
entrainant un accident, une blessure ou la mort. Nous
B-1
B
C-1
C-1
vous conseillons de contacter votre revendeur pour
toute assistance et conseil.
A
10
C
C-1
C-1
C
Page 27

DÉMONTAGE
- Retournez votre casque.
- Séparer les deux parties de la jugulaire.
- Démonter le pare-nuque en saisissant l’une de ses
parties latérales, sortir son extrémité puis dégager la
partie arrière (Fig. A).
- Déclipser les deux joues (Fig. B-C), et faites les glisser le long des sangles de jugulaire pour les sortir.
- Déclipser la partie arrière de la coiffe afin de la sortir de son logement (Fig. D).
- Pour finir, déclipser le support de coiffe avant en
commençant par un côté (Fig. E) et retirez la coiffe.
TEXTILE - DÉMONTAGE
C
A
A
D
B E
11
Page 28

TEXTILE - MISE EN PLACE
MISE EN PLACE
- Débutez l’opération en enfilant la partie plastique
de l’avant de la coiffe dans son logement (Fig. A), en
commençant par l’un des côtés (comme indiqué par
la flèche).
- Positionnez le textile correctement.
- Enfiler la partie arrière de la coiffe (Fig. B).
- Repositionnez les coussinets de joue en faisant
passer la sangle de jugulaire dans la fente des
mousses (Fig. C).
- Remontez le pare-nuque en insérant l’une de ses
parties latérales, puis positionnez-le correctement
dans son logement (D).
ATTENTION ! Si vous avez des doutes sur
B
le démontage ou le remontage de l’intérieur,
n’utilisez pas votre casque. Contactez votre reven
deur pour assistance et conseil. N’utilisez jamais un
casque sans une quelconque pièce composant son
intérieur, il ne vous protègera pas en cas d’accident.
ATTENTION ! Endommager les mousses
intérieures compromet la bonne taille de
votre casque. S’il n’est plus ajusté à votre tête, le
casque peut se déchausser, laissant ainsi votre tête
sans protection et causer des blessures graves,
voire fatales.
-
C
A
12
D
Page 29

LES TEXTILES
Les textiles et mousses de confort du
Skwal vous permettront d’apprécier au mieux
les performances de votre casque.
Les parties en contact avec la peau sont
faites dans un tissu vous garantissant un
contact agréable, une bonne absorption de
la transpiration ainsi qu’une bonne tenue au
vieillissement.
Par un traitement de surface, nous limitons
les risques de moisissures et de bactéries.
ATTENTION ! Bien que sélectionnées
pour leurs qualités de résistance et
de tenue dans le temps, toutes les parties
de l’habillage intérieur sont soumises à une
usure normale en fonction du soin et de l’en
tretien, du temps d’utilisation, mais aussi des
caractéristiques d’acidité de votre transpira
tion.
Si vous constatez un vieillissement, nous
vous conseillons de remplacer vos garnitures
intérieures afin de conserver dans le temps
un casque parfaitement propre et vous assu
-
rant le confort nécessaire.
Votre revendeur SHARK pourra vous propo
-
ENTRETIEN.
Les parties textiles internes sont entièrement lavables, il est important, afin de ne pas
les détériorer, de suivre scrupuleusement les
conseils ci-dessous:
Les coussinets de joues et la coiffe doivent
être lavés soit en machine programme délicat
ou à froid avec un filet de protection, soit à la
main, à l’eau savonneuse et tiède (30° environ). Ne pas utiliser de produits détergents
agressifs, mais soit une lessive pour textile
délicat à dose réduite, soit du savon de
Marseille.
Il est indispensable de faire sécher complètement, avant utilisation les textiles et les
mousses. Ce séchage doit être effectué à
température ambiante. Ne jamais repasser les
éléments textiles.
Pour les parties aspect cuir ou textiles solidaires des éléments de sécurité, utiliser une
éponge ou un chiffon légèrement humide avec
un peu de savon de Marseille, puis rincer à
l’eau claire. Évitez d’utiliser trop d’eau sur
les éléments en polystyrène.
ATTENTION ! Il est indispensable de
bien s’assurer que toutes les parties
ser les pièces de remplacement, et aussi vous
proposer optionnellement des coussinets de
joue d’épaisseurs et de densités différentes
dans le cas ou le choix standard ne corres
pondrait pas à la morphologie de votre visage.
intérieures sont parfaitement sèches avant utilisation du casque. La batterie alimentant les
LED ainsi que son câble d’alimentation pour-
-
raient être endommagés par l’humidité des
tissus et se corroder.
13
Page 30

MASQUE ANTI-BUÉE - BAVETTE - EASY FIT - SHARKTOOTH LED
MASQUE ANTI-BUÉE
Votre Skwal est équipé d’un masque anti-buée
démontable.
BAVETTE ANTI-REMOUS
Votre SKWAL est équipé d’une bavette anti-remous.
SHARKTOOTH
Votre casque SKWAL est SHARKTOOTH®
ready, c’est-à-dire préconçu pour recevoir le
®
SHARKTOOTH
.
Vous trouverez en effet un logement spécialement prévu pour la batterie à l’arrière du
casque, sous le pare nuque ainsi qu’un
espace pour le micro devant le casque. Pour
les écouteurs, une cavité est prévue dans les
joues internes.
La batterie est facilement rechargeable car
accessible de l’extérieur, sans démonter le
pare-nuque.
®
Le système SHARKTOOTH
vous permet
de communiquer par Bluetooth en toute
simplicité.
EASY FIT
Votre casque SKWAL a été conçu pour apporter un
confort supplémentaire aux porteurs de lunettes avec
le SHARK EASY FIT.
Les 2 joues sont réalisées chacune avec une partie
textile en forme de poche permettant de laisser un
passage aisé aux branches de lunettes.
Pour les conducteurs urbains, routiers ou touring qui souhaitent communiquer en roulant,
®
le kit SHARKTOOTH
Bluetooth mains libres
pour téléphones portables et Smartphones
est un “must have” des accessoires.
Il propose un système d’intercommunication
de moto à moto avec un autre SHARKTOO-
®
(500m). Il se connecte rapidement avec
TH
la majorité des téléphones portables et Smartphones. Il s’active par la voix. Il résiste à l’eau.
Connexion audio Bluetooth aux GPS. Musique
par Bluetooth stéréo A2DP. Réduction du
bruit ambiant de fond, contrôle automatique
du volume.
Pour accéder à ces fonctionnalités, vous devez
®
connecter votre SHARKTOOTH
à un système
14
Bluetooth.
ATTENTION! SHARK se dégage de toutes responsabilités en cas d’adaptation dans le SKWALd’un système
de communication autre que le SHARKTOOTH. Votre
Revendeur SHARK est en mesure de vous fournir
toutes les informations techniques concernant le
montage du SHARKTOOTH.
Page 31

LED
Votre casque SHARK SKWAL est équipé d’un système
lumineux de LED (selon modèle et version).
Pour le contrôler, actionner le bouton poussoir situé à
l’arrière gauche du pare-nuque (Fig. A).
ère
1
impulsion : allumer
ème
2
impulsion : clignotant
ème
3
impulsion : Off
La durée d’utilisation en mode fixe est d’environ
5 heures et 10 heures en mode clignotant.
ATTENTION ! Vérifiez que la législation de votre pays
ne limite pas l’utilisation des LED sur la voie publique.
Conduisez prudemment et en respectant le code de
la route en vigueur.
RECHARGE DU SYSTÈME LED
Pour recharger votre système, utiliser le câble micro
USB placé dans le pare-nuque (Fig. B) et le relier au
câble fourni. Ce câble peut être relié sur port USB alimenté ou sur un adaptateur secteur.
Le temps pour une batterie chargée à 100 % est
environ de 5 h.
réutilisation durable des ressources matérielles.
Les particuliers sont invités à contacter le distributeur leur ayant vendu le produit ou à se renseigner auprès de leur mairie pour savoir où et comment ils peuvent se débarrasser de ce produit afin
qu’il soit recyclé en respectant l’environnement.
Les entreprises sont invitées à contacter leurs
fournisseurs et à consulter les conditions de leur
contrat de vente. Ce produit ne doit pas être éliminé avec les autres déchets commerciaux. Veuillez
contacter le centre de recyclage le plus proche
pour collecter la batterie.
A
ATTENTION ! Le système n’étant pas équipé
de témoin de charge, surveillez attentivement la durée de la charge. Il ne faut en aucun cas laisser le
système branché plus de 5 heures.
ATTENTION ! Ce système est alimenté par une batterie non remplaçable. N’essayez pas d’ouvrir le système ou d’enlever la batterie car cela endommagerait
le produit.
Comment éliminer ce produit. (Équipement
électrique et électronique usagé. Applicable
dans les pays de l’Union Européenne et dans les
autres pays européens disposant de systèmes de
collecte sélective).
Ce symbole sur le produit ou sa documentation
indique qu’il ne doit pas être éliminé en fin de vie
avec les autres déchets ménagers. L’élimination
incontrôlée des déchets pouvant porter préjudice
l’environnement ou à la santé humaine, veuillez le
séparer des autres types de déchets et le recycler
de façon responsable. Vous favoriserez ainsi la
B C
D
15
Page 32

VENTILATIONS
VENTILATION DE COIFFE
La prise d’air supérieure (Fig. B) permet une entrée
d’air sur la partie haute de la tête et ainsi de renou
veler l’air de la coiffe. Les canaux intégrés aux éléments amortisseurs internes facilitent la circulation
de l’air sur la surface de la tête.
La qualité et la conception des textiles de confort
participent à la bonne diffusion de l’air. La position
de la ventilation supérieure est déterminée afin
d’optimiser l’efficacité de sa prise d’air. Selon le
type de votre machine, le carénage peut amoindrir
l’efficacité de cette ventilation.
La ventilation est en position ouverte une fois le
bouton poussé vers l’arrière
poussé vers l’avant
VENTILATION DE DÉSEMBUAGE
Cette prise d’air a pour fonction principale de diriger
un flux d’air frais sur la surface intérieure de l’écran
afin de limiter les risques de formation de buée. L’air
frais diffusé coupe le contact de l’air chaud émis par
le souffle ou même la tête à l’intérieur du casque.
Pour ouvrir
appuyer sur le bouton dans le sens indiqué
(1) ou fermer (2) la ventilation inférieure,
(2).
(1), fermée, le bouton
-
1
2
A
ATTENTION ! Ne manipulez pas les ven-
tilations pendant que vous conduisez.
Vous pourriez perdre le contrôle de votre moto,
causant ainsi un accident, des blessures corpo
relles ou la mort.
AÉRODYNAMIQUE ET ACOUSTIQUE
SKWAL a été étudié avec soin afin de vous offrir le
plus grand plaisir d’utilisation.
Le profil du casque, l’étanchéité et la qualité des
matériaux employés permettent de filtrer au mieux
les bruits d’air sur la calotte et les turbulences aé
rodynamiques.
Pour que l’utilisation de votre casque soit la plus
agréable possible, il est important que les tur
bulences ou tourbillons d’air créés par le carénage
et/ou par votre taille n’arrivent pas dans la partie
inférieure et ne perturbent pas les qualités aérody
namiques de votre casque SKWAL.
16
1
-
-
2
-
-
Page 33

GARANTIE 5 ANS
Garantie 5 ans
Vous venez de choisir pour votre sécurité et votre plaisir un
casque SHARK. Il a été conçu avec le plus grand soin pour
vous apporter toute satisfaction. Toutefois pour votre sécurité
et celle de votre passager, vous devez respecter toutes les
règles de prudence lors de l’utilisation de votre deux roues.
La garantie 5 ans SHARK assure à l’acheteur initial que tout
éventuel défaut de fabrication ou vice sur les matériaux sera
pris en compte au titre de la garantie SHARK.
Limitations
Si durant la période de garantie (5 années à partir de la
date d’achat) un problème couvert par la garantie survenait,
SHARK, par l’intermédiaire de son réseau de vente s’engage
à réparer ou à remplacer les éventuels éléments défectueux
dans la limite maximum de la valeur d’achat du casque. Les
éventuels frais d’oeuvre seraient assumés par le réseau
SHARK mais doivent être soumis à un accord précédant
l’opération. Si la réparation nécessite un envoi occasionnant
des frais de transport, la prise en charge par le réseau SHARK
se limite au coût d’un transport par les services de poste na
tional en vitesse normale.
Exclusions
Seuls les problèmes de matières ou de fabrication sont pris
en compte durant cette garantie. La responsabilité de SHARK
sur le produit ne peut en aucun cas être mise en cause dans
les cas suivants :
1) à une chute ou un accident ;
2) à une modification technique apportée
par l’utilisateur ou un tiers (colle, adhésifs, peinture, vis, etc.)
3) à l’emploi ou au contact de produits
chimiques néfastes (entre autre : alcool à
brûler sur les traitements d’écran) ou d’une source de chaleur
importante
4) à une mauvaise utilisation : conditions anormales (aqua
tique par exemple), manque d’entretien ou de soin
5) à un vieillissement dû à l’usure normale des tissus et
mousses internes, de l’aspect des parties externes ou de
l’écran (rayures, griffes, etc.)
6) à l’exposition anormale et prolongée
aux UV en particulier pour les couleurs
des décors.
D’autre part, SHARK ne peut retenir comme défauts couverts
par la garantie toutes les conséquences subjectives dues à
l’utilisation :
problèmes de confort, de taille, de bruits ou
sifflements, d’aérodynamique, etc. SHARK ne peut être tenu
responsable de l’indisponibilité temporaire qu’engendre la
mise à niveau du casque afin de satisfaire son propriétaire.
Dans tous les cas, 5 ans est la période maximum de garantie,
le remplacement d’un quelconque élément durant ce temps
ne prolonge pas cette durée.
Procédures
Lors de la vente rendez-vous sur notre site www.sharkhelmets.com afin d’activer votre garantie.
Toutes les demandes de garantie doivent être
faites auprès du distributeur SHARK ayant
vendu le casque. Pour qu’une demande de garantie soit prise
en compte, l’acquéreur doit notifier auprès de son vendeur
le problème rencontré en retournant le casque, l’objet de
la réclamation et le bon de garantie rempli au moment de
l’acquisition.
Cette garantie n’enlève nullement les droits de l’acheteur
prévus par la directive 1999/44CE.
Cette garantie spécifique et limitée est annulée de tous ses effets
au bout de 5 années à compter de la date d’achat. Après cette
période, dans le cas d’un usage régulier, il est préfé-
rable, pour que vous puissiez bénéficier d’une pro-
tection et d’un confort maximum, de remplacer votre
casque. En effet, certains éléments extérieurs (usure
générale, certains chocs...) pourraient nuire aux ca
ractéristiques de sécurité de cet élément de protection
essentiel.
Limites
SHARK se réserve la possibilité d’effectuer des opérations au
titre de la garantie
avec des pièces de remplacement dans la dernière version
adaptable sur le modèle
concerné et ne peut garantir une parfaite
adaptation des peintures ou décors, lié à des productions
spécifiques et/ou des séries limitées. De plus, l’altération
naturelle des couleurs dans le temps peut également provo
quer une distorsion dans l’adaptation de celles des pièces de
rechange.
Si SHARK n’est pas en mesure d’assurer la réparation
pour une raison technique ou une disponibilité de com
posant, SHARK s’engage à proposer, à des conditions
avantageuses pour le client et en tenant compte de la
vétusté de son casque, soit un casque neuf identique,
soit un modèle équivalent produit au moment de la
demande, si celui-ci n’est plus disponible.
Cette garantie n’est valable que pour le continent européen.
-
-
-
17
Page 34

INHALT ANATOMIE DES HELMS
• Anatomie des Helms ...............................................................3
• Ein Helm in Ihrer Größe.................................................................4-5
• Kinnriemen ...................................................................................6-7
• Visiers .............................................................................................8
• Auto seal ......................................................................................... 9
• Sonnenblende .............................................................................. 10
• Textilien ...................................................................................11-12
• Reinigung .....................................................................................13
• Nasenmaske (Nasendeflektor/Kinndelfektor) ............................14-15
•Easy fit ........................................................................................... 14
•LED ............................................................................................... 15
• Belüftungen ..................................................................................16
• 5-Jahres-Garantie ......................................................................... 17
• Rechtliche Hinweise ...................................................................... 20
Vielen Dank, dass Sie sich für den Skwal
entschieden haben.
Der Skwal ist ein Qualitätshelm, und
als solcher für Stadt- oder Überlandfahrten
bestensgeeignet. Der Skwal profitiert vom reichen
Erfahrungsschatz von SHARK aufdem Gebiet der
Sicherheit. Er ist ausschlielich für den Gebrauch
mit motorisierten
Zweirädern gedacht. Trotz Einhaltung der
internationalen Normen kann der Helm seinen
Träger nicht in allen Situationen zu 100%
schützen.
Bevor Sie den Helm benutzen, sollten Sie
unbedingt die folgenden Empfehlungen studieren.
Fahren Sie auch mit Helm stets vorsichtig.
Norm: Der SHARK-Skwal-Helm ist anerkannt
und mit der Norm ECE R 22/05 konform. Der Helm
entspricht somit den Anforderungen, die in allen
Ländern auferlegt sind, die diese Norm auf ihrem
ACHTUNG! Für den Verkehr in Frankreich
fordert die Straßenverkehrsordnung, dass die
Sicherheitsreflektoren (getrennt in einer Hülle
geliefert) gemäß beigefügtem Plan angebracht
werden.
ACHTUNG! In den Vereinigten Staaten in de-
nen eine besondere Regelung herrscht, dürfen Helme, die nur ECE-anerkannt sind, dort nicht
ohne die zusätzliche Zulassung DOT FMVSS 218
benutzt werden.
ACHTUNG! Je nach Ausführung ist Ihr Helm
mit LED Leuchten ausgerüstet, die sich
ausschalten lassen.
ACHTUNG! Vergewissern Sie sich, ob die in
Ihrem Land geltenden Gesetze den Gebrauch
der LED Leuchten im öffentlichen Straßenverkehr
Gebiet anerkennen.
2
zulassen.
Page 35

10
4
6
10
3
1
8
5
10
1) Visier
2) Sonnenblende
3) Knopf für den Sonnenblendemechanismus
4) Obere Lüftung
5) Untere Lüftung
6) Entlüftung
7) Kinnriemenverschluss « Precise Lock »
8) Nasendeflektor ( optinale(s)
Ausführung/Zubehör)
2
14
13
9
9) Kinndelfektor( optinale(s) Ausführung/
Zubehör)
10) LEDS Schalter (
optinale(s) Ausführung/
Zubehör)
11) Abschlusskantendichtung
12) Visierdichtung
13) Easy fit
11
12
7
7 -Kinnriemenverschluss „Precise Lock“
7 - Kinnriemenverschluss mit Doppelring
3
Page 36

EIN HELM IN IHRER GRÖSSE EIN HELM IN IHRER GRÖSSE
WARNUNG! Kein Helm ist in der Lage,
den Träger bei sämtlichen denkbaren
Kollisionen bei hoher oder geringer
Geschwindigkeit vor jeglichen Verletzungen zu
schützen. Für optimalen Schutz muss der Helm
optimal passen und der Kinnriemen muss
sorgfältig geschlossen sein wie in diesem
Handbuch beschrieben. Mit einem nicht perfekt
passenden Helm oder nicht sorgfältig
geschlossenem Kinnriemen zu fahren ist
gefährlich, da sich der Helm bei einem Unfall
vom Kopf lösen könnte. Dadurch können
schwere Kopfverletzungen bis hin zur
Todesfolge eintreten.
DIE RICHTIGE GRÖSSE
Jede Helmgröße von XS bis XL ist auf
einen bestimmten Kopfumfang ausgelegt.
Messen Sie Ihren Kopfumfang mit einem
Bandmaß waagerecht etwa 2,5 cm über den
jedoch nur einen ungefähren Hinweis. Um
die bestmögliche Schutzwirkung zu erzielen,
prüfen Sie, ob die Passform des Helms optimal
zu Ihrer Kopfform passt. Ziehen Sie einen
neuen Helm bei der Anprobe unbedingt so weit
wie möglich herunter, so dass der obere Rand
des Gesichtsausschnitts unmittelbar über den
Augenbrauen liegt, und schließen Sie den
Kinnriemen sorgfältig wie auf der nächsten
Seite beschrieben.
1. Der Helm muss am ganzen Kopf
straff anliegen und besonders an den
Wangenpolstern recht stramm sitzen. Ist das
nicht der Fall, so ist er Ihnen zu groß. Wählen
Sie in diesem Fall eine kleinere Größe. Siehe
Abbildung A.
2. Bei geschlossenem Kinnriemen darf sich der
Helm weder seitlich noch von oben nach unten
weit gegenüber dem Kopf verschieben lassen.
Augenbrauen. Falls Ihr Kopfumfang zwischen
zwei ganzzahligen Werten liegt, versuchen Sie
zunächst die kleinere Helmgröße. Aufgrund
der von Mensch zu Mensch unterschiedlichen
Kopfformen gibt der Kopfumfang
Beim Versuch, den Helm zu verschieben,
sollten Sie an der Haut einen Widerstand
spüren. Falls nicht, ist der Helm Ihnen zu groß
und Sie müssen eine kleinere Größe wählen.
Siehe Abbildung B.
B
4
Page 37

3. Fassen Sie den Helm hinten am unteren
Rand und versuchen Sie, ihn vom Kopf zu
streifen. Drücken Sie den Helm dann am
Kinnschutz nach oben. Drücken und ziehen Sie
bei diesen Tests mit relativ hoher Kraft. Beginnt
der Helm sich vom Kopf zu lösen, ist er zu groß.
Wählen Sie dann eine kleinere Größe.
4. Beugen Sie den Kopf so weit wie möglich
nach vorn. Der Kinnschutz darf dabei Ihre Brust
nicht berühren. Siehe Abbildung C.
5. Beugen Sie den Kopf so weit wie möglich
nach hinten. Der Helm darf dabei Ihren Rücken
nicht berühren. Siehe Abbildung D.
Wickeln Sie keinesfalls Ihr Haar in den
Helm und tragen Sie unter dem Helm keine
Gegenstände im Haar. Führen Sie auch keine
zusätzlichen Polster ein, um die Position des
Helms auf dem Kopf zu verändern.
Bei Fragen zum korrekten Sitz des Helms
wenden Sie sich an Ihren Fachhändler.
WARNUNG! Leihen Sie anderen niemals
Ihren Helm, ohne zu prüfen, ob er im Sinne
dieser Anleitung korrekt sitzt.
WARNUNG! Falls der Helm im Sinne die-
ser Anleitung in keiner Größe auf Ihrem
Kopf korrekt sitzt, FAHREN SIE NICHT MIT DIESEM HELM. Wählen Sie in diesem Fall einen
anderen Helm.
Jeder von diesen Tests muss regelmäßig
wiederholt werden, weil sich die Polsterung
im Laufe der Zeit abnutzen oder sonstwie
verändern kann. Sobald der Helm nicht mehr
korrekt auf dem Kopf sitzt, müssen Sie ihn
ersetzen.
C
Größe (cm)
XS 53/54
S 55/56
M 57/58
L 59/60
XL 61
D
5
Page 38

KINNRIEMEN
RÜCKHALTEVORRICHTUNG
Ihr SHARK-SKWAL-Helm ist je nach Version und Land
mit einem Kinnriemen mit dem Schnellschnappverschluss
„Precise Lock“ oder einem Kinnriemenverschluss mit
Doppelring ausgestattet.
Das Schnappsystem „Precise Lock“ bietet Ihnen eine
feine und präzise Einstellung dank der ansehnlichen Län
ge seines gezahnten Teils. Es ist jedoch unerlässlich, dass
bei Ihrem Kauf die Länge des Kinnriemens Ihrer Anatomie
angepasst wird. Passen Sie die Länge des Riemens mit
Hilfe der Einstellschnalle an (Abb. A, B, C, D) . Ziehen Sie
Ihren SKWAL-Helm auf und schließen Sie den Kinnriemen.
Wenn der „Precise Lock“ in der mittleren Position einras
tet , muss der Kinnriemen richtig unter dem Kinn gespannt
sein, um einen ungehinderten und schmerzfreien festen
Halt des Helms zu gewährleisten.
Um den Kinnriemen zu schließen, wird einfach die
Lasche in die dafür vorgesehene Stelle im Verschluss
gesteckt, bis die Spannung einwand- frei ist (Abb. E). Die
Lasche klinkt sich ein und blockiert sich automatisch.
Um den Kinnriemen zu öffnen, muss am Hebel gezogen
-
-
werden. Auch wenn die verzahnte Lasche es ermöglicht,
die Einstellung bei jeder Benutzung zu verfeinern, ist es
wichtig, häufig zu überprüfen, ob die Einstellung der Rie
menlasche richtig ist. Je nach Version und Land kann der
SKWAL mit einem Kinnriemenverschluss mit Doppelring
ausgestattet sein . Führen Sie den längeren Teil des Rie
mens durch beide Ringe; dabei sollte das Riemenpolster
zwischen Kinnriemen und Ihrem Hals sitzen. Führen Sie
anschließend das Ende des Kinnriemens durch die beiden
Ringe und ziehen Sie an, bis Sie einen Widerstand des
Riemens und leichten Druck am Hals spüren. Der Druck
darf nicht so groß sein, dass Ihre Atmung behindert wird.
WARNUNG!
oder unzureichend gespannten Kinnriemen fahren. Auch wenn die Innenverkleidung Ihnen ein Gefühl des
Halts vermittelt, kann sich Ihr Helm bei einem Sturz lösen.
Keine Schmiermittel oder säurehaltigen Produkte, Fett
oder Lösungsmittel auf den Elementen des Kinnriemen
Nie mit dem nicht angeschnallten
-
-
-
(Abb. F) und die Lasche aus dem Verschluss genommen
A
verschlusses auftragen.
B
C
D
6
E
F
Page 39

A
B
1. Streifen Sie den Riemen so weit wie
möglich durch beide D-Ringe. Prüfen Sie,
ob die Kinnriemenunterlage glatt zwischen
dem Riemen und Ihrem Hals anliegt. Siehe
Abbildung A.
2. Führen Sie den Riemen gemäß Abbildung
B außen um den äußeren der beiden D-Ringe
und dann durch den inneren hindurch.
3. Ziehen Sie den Kinnriemen stramm. Er
sollte dabei korrekterweise nicht unter dem
Kinn, sondern am Hals anliegen. Schließen
Sie den Kinnriemen so straff wie möglich,
ohne dass es schmerzt oder Probleme mit der
Atmung verursacht. Siehe Abbildung C.
4. Führen Sie das freie Ende des Kinnriemens
in die Halteschlaufe, damit es nicht flattert.
Siehe Abbildung D.
WARNUNG! Schließen Sie den
Kinnriemen niemals allein mit der
Halteschlaufe.
Um den Kinnriemen ordnungsgemäß zu
schließen, ist es unbedingt erforderlich,
ihn durch die beiden D-Ringe zu führen.
Anderenfalls wird sich der Helm bei einem
Unfall vom Kopf lösen, so dass Ihr Kopf völlig
ungeschützt ist. Das kann zu schweren
Kopfverletzungen bis hin zum Tod führen.
Ziehen Sie den Kinnriemen versuchsweise
nach unten. Falls er sich dabei zu lösen beginnt,
ist der Doppel-D-Ring-Verschluss nicht
ordnungsgemäß geschlossen. Wiederholen
Sie in diesem Fall die beschriebene
Vorgehensweise.
Fahren Sie nicht mit diesem Helm, falls
C
Sie nicht sicher sind, ob der Verschluss
korrekt geschlossen ist. Wenden Sie sich in
diesem Fall an Ihren Fachhändler.
D
7
Page 40

VISIERS
A B
QRVS System
ACHTUNG! Verwenden Sie den Helm nicht,
wenn Sie nicht sicher sind, ob sie das
Visier korrekt eingesetzt haben. Das Visier könnte
AUSBAU.
Stellen Sie das Visier in die oberste Position
(A).
Drücken Sie auf die Seitenhalterung des Visiers (B).
Wiederholen Sie dies auf der anderen Seite.
Dieses Visier hat ein System für ein leichtes
Ausbauen ohne Werkzeug, welches ein einfaches Reinigen erlaubt.
EINBAU.
Plazieren Sie das Visier mit der Innenseite zum
Helm.
Positionieren Sie die Haken mithilfe der Markierung in den seitlichen Backen (C).
sich sonst während der Fahrt plötzlich und ohne
Warnung vom Helm lösen, was dazu führen kann,
dass Sie die Kontrolle über das Motorrad verlieren.
Hierdurch können Unfälle und Verletzungen bis
hin zur Todesfolge eintreten. Wenden Sie sich im
Zweifel an Ihren Fachhändler.
ACHTUNG! Fahren Sie nie mit offenem Visier
und versuchen Sie nie, das Visier während
der Fahrt zu öffnen oder einzustellen. Das Visier
könnte sich dabei während der Fahrt plötzlich und
ohne Warnung vom Helm lösen, so dass Augen
und Gesicht ungeschützt wären. Darüber hinaus
Drücken gleichzeitig auf beide Seiten (D).
ACHTUNG! Getönte oder dunkle Visiere
sollten niemals bei Nacht oder geringer Sicht
verwendet werden, weil sie die Sicht noch wei
ter einschränken. Fahren Sie niemals mit einem
beschlagenen Visier.
8
könnte ihr Kopf seitlich weggedrückt werden.
Falls Sie dadurch die Kontrolle über das Motorrad
verlieren, kann es zu einem schweren Unfall und
Verletzungen bis hin zur Todesfolge kommen.
Page 41

AUTO SEAL - SONNENBLENDE
C D
AUTOMATISCHES VERSCHLIESSEN
Ihr Helm SKWAL hat ein patentiertes SHARK
«AUTOSEAL» System. Durch eine Rückfederung stellt dieses System ein perfektes Ver-
schließen durch Klammern des Visiers an den
Verschluss sicher, wenn sich das Visier in der
unteren Position befindet.
SONNENVISIER.
Der SHARK SKWAL ist mit einem integrierten
Sonnenvisier ausgestattet, welches von außen
betätigt wird.
Dieser ergonomische Aspekt erlaubt, dass
Visier leicht von außen zu betätigen, egal wel
che Art von Handschuhen Sie tragen: so profitieren Sie von einem schnellen Schutz und
einer höheren Sicherheit. Die R&D Abteilung
entwickelte einen Mechanismus zum Erhalt
einer progressiven Beweglichkeit des Hebels.
-
In allen Fällen, in welchen das Tageslicht redu
ziert ist, Dämmerung, nachts, bei Regen oder
Nebel, muss das Sonnenvisier geöffnet sein um
Ihre Sicht nicht zu behindern.
Das Visier funktioniert durch einen Hebel wel
cher an der linken Seite des Helmes befestigt
ist. (A - B).
PFLEGE.
Damit die kratzfeste, obere Schicht des
Visiers für Ihren SHARK Vantime möglichst
lange hält, ist es nötig, dass sie es sorgfältig
behandeln. Zum Reinigen des Visiers benutzen
Sie bitte lauwarmes Wasser (nicht über 40°C)
und ein weiches Tuch (100% Baumwolle und
fusselfrei). Eine Neutralseife kann Ihnen beim
-
-
Das Sonnenvisier hat einen UV380-Schutz und
filtert 100% der UVA- und UVB-Strahlen.
ACHTUNG!
benutzt werden, wenn die Lichtverhältnisse
stark wechseln und Sie in einen unerwarteten
Lichtwechsel (durch einen Tunnel) kommen.
Das Sonnenvisier darf nicht
Reinigen helfen.
ACHTUNG!
Glasreinigungsmittel (mit Alkohol oder anderen
Lösungsmitteln), denn diese können die Ober
fläche beschädigen
Benutzen Sie bitte niemals
-
9
Page 42

SONNENBLENDE
DEMONTAGE DER SONNENBLENDE
Bringen Sie die Sonnenblende in die untere Position
-
- Ziehen Sie die Sonnenblende vorsichtig nach unten
(A).
(B-1).
- Ziehen Sie eine Seite der Sonnenblende nach der anderen
nach vorn, um sie von den Befestigungspunkten im Helm
zu lösen
Führen Sie die obigen Schritte zur Demontage in
umgekehrter Reihenfolge aus:
- Stellen Sie den Bedienhebel auf die untere Position
(C-1).
MONTAGE DER SONNENBLENDE
(A).
- Drücken Sie erst die eine, dann die andere Seite der
Sonnenblende nach hinten und führen Sie sie in die
Befestigungspunkte im Inneren des Helms ein
- Rasten Sie die Sonnenblende ein, indem sie sie leicht
nach oben drücken
WARNUNG! Verwenden Sie den Helm
nicht, wenn Sie nicht sicher sind, ob sie
(B-1).
(C-1).
B-1
B-1
B
C-1
die Sonnenblende korrekt montiert haben. Die
Sonnenblende könnte sich sonst während der Fahrt
plötzlich und ohne Warnung vom Helm lösen, was
dazu führen kann, dass Sie die Kontrolle über das
Motorrad verlieren. Hierdurch können Unfälle und
Verletzungen bis hin zur Todesfolge eintreten. Fragen
Sie im Zweifel Ihren Fachhändler.
C-1
C
C-1
A
10
C-1
C
Page 43

LÖSEN DER INNENAUSSTATTUNG
- Drehen Sie Ihren Helm um.
- Öffnen Sie den Kinnriemen.
- Bauen Sie das Nackenpolster aus, indem sie eines
der seitliche Teile greifen. Führen Sie das Endstück
und anschließend den hinteren Teil heraus (Abb. A).
- Lösen Sie die beiden Wangenpolster
(Abb. B) und schieben Sie entlang der Kinnriemen,
um sie herauszunehmen.
- Ziehen Sie das hintere Kopfpolster aus seiner Hal
terung, um es zu herauszunehmen (Bild C – D).
- Lösen Sie schließlich den vorderen Teil des Ober
kopf-Polsters heraus. Beginnen Sie dabei von einer
Seite (Fig. E) und nehmen Sie den Helmüberzug
heraus.
-
-
TEXTILIEN - LOESEN
C
A
A
D
B E
11
Page 44

TEXTILIEN - EINSETZEN TEXTILE - REINIGUNG
EINSETzEN DES INNENRAUMS
- Beginnen Sie den Vorgang mit dem Wiedereinsetzen
des Plastikteils am vorderen Teil des Oberkopf-Polsters
in seine Führungen, beginnend von einer Seite (Abb.
A).;
- Positionieren Sie das Oberkopf-Polster korrekt;
- Befestigen Sie die beiden Druckknöpfe am hinteren
Teil des Polsters (Abb. B).
- Bringen Sie die Wangenpolster wieder in Position, in
dem Sie die Kinnriemen durch die Aussparungen in den
Polstern ziehen (Abb. C).
- Setzen Sie das Nackenpolster wieder ein, beginnend
von einer Seite, und positionieren Sie es korrekt in sei
nem Sitz (Abb. D).
-
B
-
ACHTUNG
tigen den Sitz Ihres Helms. Bei einem Unfall
kann der Helm sich dadurch vom Kopf lösen, was
zu einer schweren oder tödlichen Kopfverletzung
führen kann.
ACHTUNG! Die Styroporkalotte und die
Polsterung sind entscheidend für den kor
rekten Sitz des Helms. Sitzt der Helm nicht
korrekt, kann er sich bei einem Unfall lösen. Ihr
Kopf wäre dann ungeschützt, was zu schweren
Verletzungen bis hin zum Tod führen kann. Falls
Sie nicht sicher sind, ob die Polster korrekt
eingesetzt wurden, FAHREN SIE NICHT MIT DEM
HELM. Wenden Sie sich im Zweifel an Ihren
Fachhändler.
! Beschädigte Polster beeinträch-
-
C
A
12
D
Page 45

DIE TEXTILTEILE
REINIGUNG
Mit den Textilien und Polstern von SKWAL
können Sie die Leistungen Ihres Helms
bestens genießen.
Die Teile, die mit der Haut in Berührung
kommen, bestehen aus Stoff auf der Grun
dlage von 100%-igem-Garn, das Ihnen ein
angenehmes
Tragegefühl, eine gute Schweißaufnahme
sowie eine gute Alterungsbeständigkeit ga
rantiert.
Durch eine Oberflächenbehandlung wird
das Risiko für das Auftreten von Schimmel
und Bakterien eingeschränkt.
ACHTUNG! Auch wenn diese Materialien aufgrund ihrer Widerstandsfähig-
Reinigung des Innenraums: Die inne
ren Stoffteile sind waschbar. Um sie nicht
zu beschädigen, ist es wichtig, genau die
nachstehenden Hinweise zu befolgen: Die
Wangenpolster und das Oberkopf-Polster
müssen mit der Hand mit lauwarmem Sei
fenwasser (ungefähr 30°) gewaschen
werden. Keine aggressiven Reinigungs
mittel verwenden, sondern entweder ein
Feinwaschmittel in geringer Dosis oder
Kernseife.
Die Textilien und Schaumstoffe müssen
unbedingt vor der Benutzung vollkommen ge
-
keit und Alterungsbeständigkeit ausgewählt
wurden, unterliegen alle Teile der Innen
verkleidung normalem Verschleiß, der von
der Pflege und Reinigung, der Dauer der
Benutzung, aber auch von dem Säuregrad
Ihres Schweißes abhängt. Wenn Sie Alterung
serscheinungen fest-stellen, empfehlen wir,
die Einsätze zu wechseln, um den Helm lang
fristig voll-kommen sauber zu halten und den
notwendigen Tragekomfort zu gewährleisten.
Ihr SHARK-Fachhändler kann
Ihnen die Ersatzteile liefern und Ihnen op
tional auch Wangenpolster mit unterschiedlicher Dicke und Dichte anbieten, für den Fall,
trocknet werden. Diese Trocknung muss bei
Raumtemperatur erfolgen. Die Textilelemente
nicht bügeln. Für Stoffteile oder lederartige
Teile, die fest mit den Sicherheitselementen
verbunden sind, verwenden Sie einen leicht
angefeuchteten Schwamm oder ein Tuch mit
etwas Kernseife. Anschließend mit klarem
Wasser abspülen. Vermeiden Sie, dass die
Elemente aus Polystyrol mit zu viel Wasser
in Berührung kommen.
ACHTUNG! Es ist unbedingt notwen-
dig, sich vor der Benutzung des Helms
dass die Standardauswahl nicht der Anatomie
Ihres Gesichts entspricht.
zu vergewissern, dass alle Innenteile vollkom
men trocken sind.
-
13
Page 46

NASENDEFLEKTOR - KINNDELFEKTOR - EASY FIT
NASENDEFLEKTOR
Ihr SKWAL ist mit abnehmbarer Klarsichtmaske.
KINNDELFEKTOR
Ihr SKWAL ist mit Anti Luftwirbel- Kinnschutz ausgestattet.
)
SHARKTOOTH
Ihr SHARK SKWAL Helm ist für den Einsatz des Blu-
tooth®-fähigen SHARKTOOTH® Systems vorbereitet.
Aussparungen in den Helmpolstern bie
ten Platz für die einzelnen SHARKTOOTH®
Komponenten: im Nackenpolster für den
Akku, im Kinnteil für das Mikrofon und in
den Wangenpolstern für die Kopfhörer.
Der van außen zugängliche Akku kann
leicht aufgeladen werden, ohne dass auch nur
ein Helmpolster entfernt werden muss.
Für Motorradfahrer, die auch während
der Fahrt kommunizieren möchten, ist
-
EASY FIT
Ihr Helm SKWAL wurde designt, um Brillenträgern
einen zusätzlichen Komfort mit SHARK EASY FIT zu
bieten. Die beiden Wangenpolster wurden aus einem
eingeschobenen, komfortablen Schaumstoff gemacht, den man entfernen kann, um einen
Kanal für die Brillenbügel zu schaffen. Diese
Taschen enthalten (oder auch nicht) einen speziellen
Schaumstoff.
die SHARKTOOTH® Freisprechanlage
ein unentbehrliches Zubehör. Sie ist mit den
meisten Mobiltelefonen und Smartphones kom
patibel und ermöglicht die Kommunikation
mit anderen Motorradfahrern mit SHARKTOOTH® System auf eine Entfernung
von bis zu 500 Metern.
Das SHARKTOOTH® System ist wasserdi
cht, es bietet modernste Technologien wie
Gesprächsannahme per Sprachbefehl, automatische Lautstärkenanpassung und Störgeräuschunterdrückung, und es gibt bei Bedarf
die akustischen Informationen eines Bluetooth®-fähigen Navigationsgerätes sowie
-
-
14
die Stereo-Musik eines A2DP-fähigen
Players wider.
ACHTUNG! SHARK lehnt jede Verantwortung ab, sofern ein anderes Kommunika-
tionssystem als SHARKTOOTH verwendet wurde.
Page 47

LED
Ihr Helm SHARK Skwal wird gegebenenfalls mit ei-
nem hellen LED-System ausgestattet.
Um sie zu kontrollieren, drücken Sie die Taste (Abb. A)
Erster Impuls: Licht
2. Impuls: blinkend
3. Aus
Bei Dauerlicht reicht die Batteriekapazität für fünf
Stunden, bei Blinklicht für zehn Stunden.
Achtung! Vergewissern Sie sich, ob die in Ihrem Land
geltenden Gesetze den Gebrauch der LED Leuchten
im öffentlichen Straßenverkehr zulassen.
ACHTUNG! Vergewissern Sie sich, ob die in
Ihrem Land geltenden Gesetze den Gebrauch
der LED Leuchten im öffentlichen Straßenverkehr
zulassen.
LADEN DES LED SYSTEMS
Um das LED System wieder aufzuladen, verbinden Sie
den Micro USB Anschluss im Nackenpolster des Helms
mittels des mitgelieferten Kabels mit einem USB Port
oder mit einem Sector Adapter. Es dauert etwa fünf
Stunden, bis die Batterie vollständig geladen ist.
in Verbindung zu setzen, der das Produkt verkauft
hat, oder sich bei Ihrem Ordnungsamt zu erkun
digen, wo und wie sie dieses Produkt entsorgen
können, damit es aus Umweltschutzgründen recycelt werden kann.
Unternehmen werden gebeten, sich mit ihren Lieferanten in Verbindung zu setzen oder die Bedingungen ihres Verkaufsvertrags nachzulesen. Dieses
Produkt darf nicht mit anderen Handelsabfällen
entsorgt werden.
Wenden Sie sich bitte an ein Recyclingcenter in
Ihrer Nähe, um die Batterie zu entfernen.
-
A
ACHTUNG! Das LED System ist nicht mit einer
Ladeanzeige ausgerüstet. Sie müssen deshalb
die Ladedauer im Auge behalten, die fünf Stunden
nicht überschreiten soll.
ACHTUNG! Dieses Gerät ist mit einer inte-
grierten Batterie ausgerüstet, die nicht ersetzt
werden kann. Der Versuch, das Gerät zu öffnen und
die Batterie zu tauschen, kann zu Verletzungen und
zur Beschädigung des Geräts führen.
Richtige Entsorgung dieses Gerätes (Elektro-
und Elektronik-Altgeräte. Gültig für die Europäische Union und für andere europäische Länder mit Mülltrennung)
Dieses Symbol auf dem Gerät oder auf seiner Dokumentation bedeutet, dass das Gerät an seinem Lebensende nicht mit dem Hausabfall entsorgt werden darf. Da die nicht kontrollierte Entsorgung von
Abfällen der Umwelt oder der menschlichen Gesundheit schaden kann, trennen Sie das Gerät bitte von
den anderen Abfallarten und führen Sie es einem
Recycling zu. Damit fördern Sie die nachhaltige
Wiederverwendung der materiellen Ressourcen.
Privatleute werden gebeten, sich mit dem Händler
B C
D
15
Page 48

BELÜFTUNGEN
Der obere Lufteinlass (Abb. A) ermöglicht eine Luftzufuhr im oberen Kopfbereich und somit die Erneuerung
der Luft im Helminnern. Die in die stoßdämpfenden
Elemente integrierten Kanäle erleichtern die Luftumwälzung auf der Oberfläche des Kopfes. Die
Qualität und die Gestaltung der Tragekomforttextilien
tragen zur richtigen Luftverteilung bei. Die Position
der oberen Lüftung ist so festgelegt, dass der Luftein-
lass optimiert wird. Je nach dem Typ Ihres Fahrzeugs,
kann die Verkleidung die Wirksamkeit dieser Lüftung
verringern. Die Lüftung ist in offener Position (1), sobald die Lasche nach hinten geschoben wird um sie
zu schließen wird die Lasche nach vorne geschoben
(2).
ANTIBESCHLAGSBELÜFTUNG
Die Hauptfunktion dieses Lufteinlasses ist es, einen
frischen Luftstrom auf die Innenfläche des Visiers zu
leiten, um ein Beschlagen weitestgehend zu verhindern. Die verbreitete Frischluft verhindert den Kontakt
mit der durch den Atem ausgestoßene Warmluft oder
auch mit dem Kopf im Innenraum des Helms.
Um die untere Belüftung zu öffnen (1) oder zu
schließen(2), Bild oben gezeigt drücken.
1
2
A
ACHTUNG! Do not open or close any vents
while operating your motorcycle. You could
lose control of your motorcycle, resulting in an
accident, personal injury or death.
AERODYNAMIK UND AKUSTIK
SKWAL wurde mit Sorgfalt entwickelt, um Ihnen die
größte Fahrfreude. Das Profil des Helms, die Dichtigkeit und die Qualität der verwendeten Materialien ermöglichen es, die Luftgeräusche auf der Helm-schale
und die aerodynamischen Turbulenzen bestens zu
filtern. Damit die Benutzung Ihres Helms so angenehm wie möglich ist, ist es wichtig, dass die Luftturbulenzen oder Luftwirbel, die durch die Verkleidung
erzeugt werden, nicht die aerodynamischen Qualitäten Ihres SKWAL-Helmes beeinträchtigen. Die Luftwirbel dürfen nicht durch die Form der Verkleidung
Ihres Motorrads und durch Ihre Größe in den unteren
Teil des Helms gelangen.
16
1
2
Page 49

5 JAHRES-GARANTIE
5 Jahres-Garantie
Sie haben für Ihre Sicherheit und Ihr Freizeitvergnügen
einen SHARK-Helm gekauft. Dieser ist mit größter Sorgfalt
hergestellt worden, um Ihren Ansprüchen gerecht zu werden. Für Ihre Sicherheit und die Ihres Mitfahrers beachten
Sie stets alle Vorsichtsmaßnahmen beim Fahren mit Ihrem Zweirad.
Die 5-Jahres-Garantie von SHARK sichert jedem Käufer
zu, dass bei einem eventuellen Fabrikationsfehler oder
Materialmangel die Verantwortung in Form dieser Garantie von SHARK übernommen wird.
Umfang
Durch diese Garantie werden die dem Käufer zustehenden
gesetzlichen Gewährleistungs-rechte (Nachbesserung,
Ersatzlieferung, Rücktritt vom Vertrag oder Minderung
des Kaufpreises, Schadensersatz) nicht einge-schränkt.
Wenn während der Garantiezeit (5 Jahre ab Kaufdatum)
ein Problem auftritt, das unter diese Garantie fällt, verpflichtet sich SHARK, über seine SHARK-Partner die fehlerhaften Teile zu reparieren oder zu ersetzen; und zwar in
der maximalen Höhe des Verkaufspreises. Die eventuellen
Bearbeitungskosten werden von den SHARK-Partnern
übernommen.
SHARK behält sich das Recht vor, Arbeiten im Sinne dieser
SHARK-Garantie mit Ersatzteilen durchzuführen, die dem
neuesten Stand des jeweiligen Modells entsprechen. Es
ist nicht möglich, eine perfekte Anpassung der Farben
oder des Dekors zuzusichern, wenn diese an besondere
Herstellungsverfahren und/oder limitierte Serien gebunden sind. Außerdem verändern sich die Farben mit der
Zeit, was eine Anpassung der entsprechenden Ersatzteile
erschweren kann.
Sollte die Reparatur eine Rücksendung notwendig
machen, übernimmt der SHARK-Partner die Frachtkosten
in der Höhe der nationalen Standardtarife.
Wenn SHARK aus technischen Gründen oder mangelnder
Verfügbarkeit von Ersatzteilen nicht in der Lage ist, die
Reparatur kurzfristig zuzusichern oder durchzuführen,
wird SHARK dem Käufer zu vorteilhaften Bedingungen
entweder einen neuen Helm oder (sollte dieser nicht mehr
lieferbar sein) ein in Preis und Optik gleichwertiges Modell zur Verfügung stellen. Sollte ein gleichwertiges Modell nicht lieferbar sein, ist der Käufer zum Rücktritt vom
Vertrag berechtigt.
SHARK ist nicht verpflichtet, einen Ersatzhelm für den
Zeitraum der Bearbeitung eines Garantiefalls unentgeltlich zu stellen.
Nicht von der Garantie erfaßte Mängel/Schäden
Unter diese Garantie fallen ausschließlich Materialmängel
und Fabrikationsfehler.
Die SHARK-Garantie kann in folgenden Fällen nicht in
Anspruch genommen werden :
Schäden als Folge von
1. Sturz oder Unfall
2. technischen Änderungen durch den Benutzer oder
einen Dritten (Klebstoff, Aufkleber, Farbe, Schraube usw.).
3. Benutzung oder Kontakt mit: chemi-schen Produkten
(u.a. Brennspiritus auf dem Visier) oder zu starken Hitzequellen.
4. schlechter Behandlung : ungewöhnliche
Bedingungen (z.B. hohe Feuchtigkeit), fehlende Wartung
und Pflege.
5. Alterung (durch normalen Gebrauch) der inneren Stoffe
und Dämmung, der äußeren Oberfläche oder des Visiers
(Kratzer, Streifen usw.).
6. langem und unnormalen Einwirken von UV-Strahlen,
vor allem bezüglich den Farben des Dekors.
Außerdem fallen Mängel, die durch Gebrauch entstanden
sind, nicht unter diese Garantie. Dazu zählen: Probleme
mit Tragekomfort, Größe, Helmgeräuschen, Aerodynamik
usw.
Ablauf
Beim Kauf des Helmes, besuchen Sie unsere Website
www.shark-helmets.com, um Ihre Garantie zu aktivieren.
Alle Garantieansprüche müssen grundsätzlich bei dem
SHARK-Händler angemeldet werden, der den Helm
verkauft hat. Ausnahmen sind möglich, z.B. bei Umzug
des Käufers. Um Garantieansprüche geltend machen zu
können, muss der Käufer den Grund der Reklamation
dem Händler mitteilen und ihm die Garantiekarte gegen
Quittung übergeben.
Dauer
Diese Garantie wird in allen Punkten nach 5 Jahren ab
Kaufdatum ungültig. Auch das zwischenzeitliche Ersetzen
eines beliebigen Teiles verlängert diese Garantie nicht.
Nach dieser Zeit und einem normalen Gebrauch ist es
ratsam, den Helm zu ersetzen, um stets von einer maxi-
malen Sicherheit und Ausstattung zu profitieren. Durch
fortwährenden Gebrauch und/oder Stöße können äußere
Teile dieses Schutzhelmes in Funktion und Sicherheit
beeinträchtigt werden.
17
Page 50

INDICE IL CASCO
• Anatomia del casco .........................................................3
• Un casco su misura ..........................................................4-50
• Cinturino ............................................................................. 6-7
• Visiera ......................................................................................8
• Auto seal ..................................................................................9
• Parasole .................................................................................10
• Tessuti ............................................................................. 11-12
• Pulizia ....................................................................................13
• Maschera anti-appannamento / Protezione anti-vento ......14-15
• Easy Fit ..................................................................................14
• LED ........................................................................................15
• Ventilazioni ............................................................................16
• Garanzia 5 anni .....................................................................17
• Annotazioni legali ..................................................................20
Grazie di avere scelto un Skwal. Skwal è un
casco di qualità, perfettamente adatto all’uso urbano o extra urbano.
Il casco Skwal sfrutta l’esperienza
globale della SHARK nell’ambito della sicurezza,
è stato ideato per un uso esclusivo sul 2 ruote
motorizzato.
Questo casco è conforme alle norme internazionali, però non è in grado di proteggere l’utente
da qualsiasi evenienza.
Prima dell’uso, siete pregati di seguire atten-
Normativa: Il casco SHARK Skwal è omologato e conforme alla normativa ECE R 22/05
ed è quindi conforme ai requisiti imposti in tutti
i Paesi in cui tale normativa è in vigore.
ATTENZIONE! per quanto riguarda la circo-
lazione in Francia, il codice stradale richiede
l’apposizione dei catarifrangenti di sicurezza
(forniti in una custodia separata), secondo quanto
indicato sul disegno allegato.
ATTENZIONE! Negli Stati Uniti in cui vige
una normativa specifica, non è possibile utilizzare caschi omologati solamente ECE, ma solo
caschi omologati anche DOT FMVSS 218.
ATTENZIONE! A seconda della versione, il
tuo casco è equipaggiato di un sistema LED
tamente le seguenti raccomandazioni. Portare
questo casco non vuol dire dimenticare di essere
prudenti.
2
che può essere spento.
ATTENZIONE! Verifica che la legislazione
nazionale o locale vigente nel tuo Paese non
limiti l’uso di LED sulle strade aperte al traffico.
Page 51

10
4
6
10
3
1
8
5
10
1) Visiera
2) Parasole
3) Pulsante del meccanismo
del parasole
4) Ventilazione superiore
5) Ventilazione inferiore
6) Venturi
7) Gancio del cinturino « Precise Lock »
8) Maschera anti-appannamento (in opzione)
2
14
13
9
9) Protezione anti-vento(in opzione)
10) interruttore di LEDS.
(in opzione)
11) Guarnizione di base
12) Guarnizione della
visiera
13) Easy fit
11
12
7
7 - Cinturino con fibbia “Precise Lock“.
7 - Cinturino con fibbia doppio anelli.
3
Page 52

UN CASCO SU MISURA
ATTENZIONE! Nessun casco può
proteggere completamente l’utilizzatore
da tutti gli urti possibili ad alta o bassa
velocità. Tuttavia, per una protezione
efficace, il casco dev’essere della buona
taglia e il cinturino dev’essere allacciato
correttamente come indicato nel libretto.
È pericoloso utilizzare un casco che non sia della
buona taglia o con il cinturino non allacciato
correttamente, il casco potrebbe separarsi dalla
testa in caso di incidente, causando delle ferite
gravi o mortali.
UN CASCO SU MISURA
Ogni casco, dalla XS alla XL, è concepito
servono solo ad orientare la scelta della talgia
più adatta alla propria testa. Per una protezione
efficace è necessario verificare che il casco
corrisponda bene alla propria testa. Quando si
sceglie un nuovo casco, verificare che la testa
sia ben infilata dentro al casco, la parte alta del
campo visivo dev’essere posizionata sopra le
sopracciglia. Verificare anche che il cinturino sia
correttamente stretto come indicato di seguito.
1. la testa dev’essere ben avviluppata dal
casco e i guanciali devono apportare un buon
mantenimento. Nel caso contrario il casco scelto
è troppo grande, provare dunque una taglia più
piccola. Vedere la figura A.
per una taglia di testa precisa. Per misurare la
propria testa utilizzare un metro da sartoria,
misurare la circonferenza orizzontalmente 2,5
cm sopra le sopracciglia. Se la misura si trova tra
due taglie provare per prima la taglia più piccola.
Tuttavia, per causa delle differenti morfologie di
cranio, i riferimenti delle taglie
2. Con il cinturino correttamente allacciato,
assicurarsi che il casco non si muova troppo da
sinistra a destra e dall’alto al basso. Quando si
muove il casco si deve sentire la pelle tirare a
livello della testa e del viso. Se non è così il casco
scelto è troppo grande, provare una taglia più
piccola. Vedere la figura B.
4
B
Page 53

UN CASCO SU MISURA
3. con il cinturino allacciato, prendere il casco
dalla base posteriore e provare a sfilarlo dalla
testa con un movimento rotativo. Provare poi
a sfilare il casco prendendolo dalla base della
mentoniera. Questi movimenti devono essere
fatti in maniera sufficientemente energica. Se il
casco inizia a scalzarsi, il casco è troppo grande,
provare una taglia più piccola.
4. Inclinare la testa verso l’avanti il più possibile.
La base della mentoniera non deve toccare il
petto. Vedere la figura C.
5. Inclinare la testa verso dietro il più possibile,
la base del casco non deve toccare la schiena.
Vedere la figura D.
ripetute durante tutta la vita del casco, poichè
la gommapiuma del comfort può evolvere col
passare del tempo. Se, nel corso della vita del
casco, quest’ultimo non conserva una taglia
corretta, bisognerà sostituirlo. Non prestare
mai il proprio casco senza essersi assicurati,
seguendo le istruzioni del libretto, che convenga
bene alla persona a cui viene prestato.
ATTENZIONE! Nessun casco può
proteggere completamente l’utilizzatore da tutti gli urti possibili ad alta
o bassa velocità. Tuttavia, per una protezione
efficace, il casco dev’essere della buona taglia e
il cinturino dev’essere allacciato correttamente
come indicato nel libretto. È pericoloso utilizzare
Non avere i capelli intrecciati o allacciati
all’interno del casco. Non mettere niente in
mezzo o sopra i capelli all’interno del casco.
Non aggiungere niente all’interno del casco
per aggiustare la posizione della testa. Per ogni
domanda riguardante la scelta della buona
taglia del casco, chiedere consiglio al proprio
rivenditore. Tutte queste prove devono essere
un casco che non sia della buona taglia o con
il cinturino non allacciato correttamente, il
casco potrebbe separarsi dalla testa in caso di
incidente, causando delle ferite gravi o mortali.
Misura (cm)
XS 53/54
S 55/56
M 57/58
L 59/60
XL 61
C
D
5
Page 54

CINTURINO CINTURINO
Sistema di tenuta
Il casco SHARK SKWAL è provvisto, in base alle
versioni e ai Paesi, di un cinturino a chiusura ra
pida «Precise Lock» con nottolino o di un gancio
del cinturino a doppio anello.
Il sistema «Precise Lock» con nottolino
vi permette di effettuare regolazioni accurate
e precise, grazie alla notevole lunghezza della
parte dentellata. È tuttavia indispensabile, al mo
mento dell’acquisto, adattare la lunghezza del
inturino alla propria morfologia.
Regolare la lunghezza della cinghia agendo sul
gancio di regolazione (Fig. A, B, C, D). Indossare
il casco SKWAL e collegare il sistema di tenuta.
Quando il «Precise Lock» si trova in posizione in
-
termedia, il cinturino deve essere correttamente
sufficiente infilare la linguetta nel punto previsto
sull’anello fino a ottenere una tensione perfetta
(Fig. E). La linguetta s’inserisce e si blocca automaticamente. Per sbloccare il cinturino, tirare
la leva (Fig. F) e rimuovere la linguetta dall’anello. Nonostante la linguetta dentellata consenta
di ottimizzare la regolazione ad ogni utilizzo,
è importante verificare frequentemente la
correttezza della regolazione della lunghezza
della cinghia.
ATTENZIONE! non utilizzare mai il casco
con il cinturino slacciato o non sufficientemente teso. Anche qualora il rivestimento interno vi procuri una sensazione di
mantenimento in posizione, in caso di cadu
-
teso sul mento in modo tale da garantire una te
nuta ottimale del casco in posizione, senza causare problemi o dolori. Per bloccare il cinturino, è
A
ta, il casco potrebbe scalzarsi. Non applicare
mai prodotti lubrificanti o acidi, né grasso
o solvente, sugli elementi del gancio del cinturino.
B
C
D
6
E
F
Page 55

A
B
Fare scivolare la cinghia più lunga del
cinturino dentro i due anelli, verificando che il
cuscinetto del comfort sia ben posizionato tra il
cinturino e il collo. Vedere la figura A.
Formare un cerchio con l’estremità del
cinturino attorno all’anello esterno e ripassarlo
poi nell’anello intern o. Vedere la figura B.
Tirare sull’estremità della cinghia fino a che
il cinturino sia ben teso. Il cinturino dev’essere
posizionato contro il collo e non sotto al mento.
Dev’essere stretto il più possibile senza fare
male o dare fastidio alla respirazione. Vedere
la figura C.
Infilare l’estremità libera del cinturino nel
passante di plastica al fine di evitare che sven-
ATTENZIONE! Non utilizzare mai
il passante di plastica come sola
chiusura del cinturino. Per una chiusura corret-
ta il cinturino deve passare come da istruzioni
nel doppio anello. Un qualsiasi cattivo utilizzo
del cinturino può far si che il casco si sfili
in caso di incidente, lasciando la testa senza
alcuna protezione. Provare a tirare sul cinturi-
no con le dita. Se il cinturino, in un modo o in
un altro si allenta significa che non è sta-
to chiuso correttamente nel doppio anello.
toli in aria. Vedere la figura D.
C
Ripetere in questo caso le operazioni qui
descritte. In caso di dubbio sul siste-
ma di allacciamento non usare il casco.
Chiedere consiglio al proprio rivenditore.
D
7
Page 56

VISIERA
A B
QRVS System
ATTENZIONE! Se non si è sicuri di aver ben
rimontato la visiera, non usare il casco. Durante
SMONTAGGIO.
Sollevare la visiera (A).
Esercitare una trazione sulla parte laterale
della stessa (B).
Eseguire la stessa trazione sull’altro lato (3).
Questa visiera è provvista di un sistema di
smontaggio semplice e che non richiede l’utilizzo
di attrezzi, permettendo di pulirla molto facil
mente.
MONTAGGIO.
1. Posizionare la visiera di fronte al casco.
2. Collocare gli agganci della visiera nelle
flange laterali utilizzando i perni (C).
-
la guida la visiera potrebbe staccarsi improvvisamente
e senza avvertimento dal casco , causando la perdita di
controllo della moto, causando poi un incidente, delle ferite
o la morte. Consigliamo di contattare il proprio rivenditore
per qualsiasi assistenza e consiglio.
ATTENZIONE! Non guidare mai con la visiera
aperta, o provare ad aprire o aggiustare la visiera
guidando. Si potrebbe staccare lasciando gli occhi e il viso
3. Esercitare una pressione omogenea su
entrambi i lati (D).
ATTENZIONE! Le visiere fumè o colorate non
devono mai essere utilizzate le notte o in condizioni
di scarsa visibilità perchè ne diminuiscono la vista. Non
guidare mai con una visiera appannata.
8
senza protezione. Inoltre la testa potrebbe essere tirata
indietro o sui lati, causando così la perdita di controllo della
moto, causando poi un incidente, delle ferite o la morte.
Page 57

AUTO SEAL - VISIERINO PARASOLE
C D
AUTO SEAL
Il casco SHARK SKWAL é dotato di un “AUTO
SEAL” sistema brevettato che assicura una
perfetta tenuta della visiera sulle guarnizioni
effettuando una pressione che permette una
perfetta adesione della visiera al casco quando
questa si trova in posizione abbassata (effetto
molla).
VISIERINO PARASOLE.
Il casco SHARK SKWAL è dotato di un visierino
parasole integrato a comando esterno.
Questo comando ergonomico permette di
azionare il parasole dall’esterno con facilità e
con qualsiasi tipologia di guanto: avrete così una
protezione completa, rapida e in tutta sicurezza.
Il reparto Ricerca&Sviluppo ha messo a punto un
meccanismo che dà la possibilità di muovere il
comando progressivamente. Il visierino parasole
offre una protezione UV380, filtrando al 100% i
essere sollevato per non ostacolare la visuale.
Il visierino parasole è attivabile tramite
il cursore in gomma collocato sulla parte sinistra
del casco (Fig A - B).
MANUTENZIONE.
Per assicurarne la protezione e migliorarne il ciclo
vitale, la superficie esterna del visierino parasole
del casco SHARK SKWAL è sottoposta a un trat
tamento anti-graffio. Per la sua manutenzione e
pulizia vi preghiamo di seguire gli stessi consigli
forniti circa la visiera esterna.
ATTENZIONE!
il visierino parasole, dopo un cer
to periodo di utilizzo, non vi garantiscono
più una visibilità ottimale, è assolutamente
necessario sostituirla/li. Vi consigliamo di
se la vostra visiera e/o
-
-
raggi UVA e UVB.
ATTENZIONE!
utilizzato solo in presenza di luce forte e
quando circolate in zone non a rischio di bruschi
cambi di visibilità (in galleria, ad esempio). In tutti
i casi in cui la visibilità risulta ridotta, alba o tra
monto, notte, pioggia o nebbia, il visierino deve
Questo visierino può essere
circolare sempre in condizioni di visibilità
ottimale. Non utilizzate mai il visierino parasole come unica protezione, senza la visiera
esterna. Dovete sempre circolare con la visiera
esterna abbassata come descritto nella sezione
precedente
9
Page 58

VISIERINO PARASOLE
SMONTAGGIO
-Abbassare il para-sole
-Tirare il para-sole delicatamente verso il basso
(A).
(B-1).
-Sganciare il para-sole lateralmente (C-1).
INSTALLAZIONE
- Effettuare le stesse operazioni in senso inverso :
- Portare la leva di comando del para-sole verso il
basso
- Agganciare il para-sole lateralmente prima da un
lato poi dall’altro
- Reinserire il para-sole rialzandolo leggerente (B-1).
utilizzare il casco. Durante la guida il para-sole
(A).
(C-1).
ATTENZIONE ! Se non si è sicuri di avere
rimontato il para-sole correttamente, non
B-1
B-1
B
C-1
potrebbe staccarsi improvvisamente e senza
avvertimento dal casco, causando la perdita di
controllo della moto, causando poi un incidente,
delle ferite o la morte. Consigliamo di contattare
il suo rivenditore per qualsiasi assistenza e
consiglio.
C-1
C
C-1
A
10
C-1
C
Page 59

RIMOZIONE DELLA PARTE INTERNA
- Capovolgere il casco.
- Separare le due parti del cinturino.
- Smontare il paranuca afferrando una delle relative
parti laterali, estrarne le estremità, quindi sganciare
la parte posteriore (Fig. A).
- Sganciare le due flange (Fig. B-C) e farle scorrere
lungo le cinghie del cinturino in modo tale da estrarle.
- Ricordarsi di iniziare togliendo la parte posteriore
della cuffia dal suo alloggiamento per rimuoverla
completamente (Fig. D).
- Infine, sganciare il supporto della cuffia anteriore,
partendo da un lato (Fig. E), quindi togliere la cuffia.
TESSUTI - RIMOZIONE
C
A
A
D
B E
11
Page 60

TESSUTI - INSTALLAZIONE TESSUTI - PULIZIA
INSTALLAZIONE
- Iniziare infilando la parte plastica anteriore della cuf
fia nel proprio alloggiamento, a partire da uno dei lati
(Fig.A).
- Posizionare correttamente il tessuto;
- Agganciare i parte posteriore della cuffia (Figg. B).
- Riposizionare i cuscinetti delle guance facendo scor
rere la cinghia del cinturino nella scanalatura delle parti
in schiuma (Fig.C).
- Rimontare il paranuca inserendo una delle sue parti
laterali, quindi posizionarlo correttamente nel proprio
alloggiamento (Fig.D).
ATTENZIONE! Il calottino e la cuffia interna sono
fatti per andare perfettamente in testa. In caso
di incidente, un casco che non è della proria taglia
può sfilarsi, lasciando così la testa senza protezione e
causare delle ferite gravi o fatali. Se non si è sicuri che
-
-
B
gli interni siano correttamente montati, non utilizzare il
casco. Contattare il proprio rivenditore per assistenza
e consiglio.
ATTENZIONE! Danneggiare la gommapiuma
interna compromette la buona taglia del casco.
Se non è ben aggiustato alla testa, il casco può scalzar
si, lasciando così la testa senza protezione e causare
delle ferite gravi e anche fatali.
-
C
A
12
D
Page 61

I TESSUTI
Manutenzione.
I confortevoli tessuti e le schiume del casco
SKWAL vi permetteranno di apprezzare al me
-
glio le performance del casco.
Le parti a contatto con la pelle sono realiz
zate in un tessuto che garantisce un contatto
gradevole, un buon assorbimento della tras
pirazione e una buona resistenza all’usura.
Con un trattamento di superficie, riduciamo i
rischi di formazione di muffa e di batteri.
ATTENZIONE! Nonostante selezionati per
le loro qualità di resistenza e di tenuta
nel tempo, tutti i componenti del rivestimento
interno sono sottoposti a una normale usura,
Le parti tessili interne sono interamente lava-
bili; è importante, per non deteriorarle, seguire
scrupolosamente i seguenti consigli:
I guanciali e la cuffia possono essere lava-
ti sia in lavatrice con programma delicati o a
freddo, sia a mano, in acqua tiepida (30° circa)
e sapone. Non usate detergenti aggressivi: solo
prodotti per tessuti delicati in dose contenuta o
sapone di Marsiglia.
È indispensabile far asciugare completa-
mente i tessuti e le schiume prima del loro
in base alla cura e alla manutenzione esegui
ta, al tempo d’uso, ma anche alle caratteristiche d’acidità della propria traspirazione.
Qualora si constati uno stato d’usura, vi
consigliamo di sostituire le guarnizioni interne
in modo tale da conservare nel tempo un
casco perfettamente pulito, che garantisca il
comfort richiesto. Il vostro rivenditore SHARK
potrà fornirvi le parti di ricambio, nonché
proporvi, quale opzione, dei cuscinetti per
le guance con spessori e densità diversi nel
riutilizzo. L’asciugatura deve avvenire a tem-
peratura ambiente. Non stirare mai le compo-
nenti tessili.
Per le parti in similpelle o tessili degli ele-
menti di sicurezza usare una spugna o un
panno leggermente inumiditi e poco sapo-
ne di Marsiglia; risciacquare poi con cura. È
sconsigliato l’uso abbondante di acqua sugli
elementi in polistirene..
È indispensabile assicurarsi che tutte le
caso in cui la selezione standard non soddisfi
la morfologia del vostro viso.
componenti interne siano perfettamente as-
ciutte prima di utilizzare il casco.
13
Page 62

PULIZIA - MASCHERA ANTI-APPANNAMENTO - EASY FIT LED
MASCHERA ANTI-APPANNAMENTO
Il vostro casco SKWAL è munito di una maschera antiappannamento.
PROTEZIONE ANTI-VENTO
Il vostro casco SKWAL è munito di una mentoniera
antivento.
SHARKTOOTH
I vostri caschi SHARK SKWAL e SHARK Vantime sono SHARKTOOTH Ready, ovvero predisposti per ricevere lo SHARKTOOTH.
Troverete infatti un vano appositemente previsto per la batteria sul retro del casco, sotto
il paranuca, così come uno spazio per il microfono sul davanti. Per le cuffie sono invece
previste delle cavità interne ai guanciali.
La batteria è facilmente ricaricabile poiché
accessibile direttamente dall’esterno, senza
dover smontare il paranuca.
Il sistema SHARKTOOTH vi permette di comunicare via Bluetooth in tutta semplicità.
Per tutti i motociclisti urbani, stradali o Touring che desiderano comunicare circolando, il
EASY FIT
Il vostro casco SKWAL è stato concepito in modo
da apportare un confort supplementare ai portatori
d’occhiali, grazie allo SHARK EASY FIT.
I 2 guanciali sono stati realizzati ciascuno conun cuscinetto estraibile, che consente un passaggio facilitato alle stanghette degli occhiali.
kit SHARKTOOTH Bluetooth mani libere per
telefoni cellulari e Smartphones è un “must
have” tra gli accessori.
SHARKTOOTH Bluetooth mani libere propone un sistema di intercomunicazione da moto
a moto con un altro SHARKTOOTH (500m). si
connette rapidamente con la maggior parte dei
telefoni cellulari e Smartphones. Si attiva con
comando vocale, è resistente all’acqua, presenta un collegamento audio Bluetooth ai GPS.
C’è la possibilità di ascoltare la musica con
A2DP tramite Bluetooth. Altri comandi sono la
riduzione del rumore di sottofondo e il controllo
automatico del volume.
Per accedere a queste funzioni dovete connettere il vostro SHARKTOOTH a un dispositivo
14
Bluetooth appropriato.
ATTENZIONE! SHARK declina ogni responsabi-
lità in caso di uso nel SKWALdi un sistema di
comunicazione differente dallo SHARKTOOTH. Il vostro rivenditore SHARK puo darvi tutte le informazioni
ed i consigli tecnici.
Page 63

LED
Il tuo casco SHARK SKWAL è equipaggiato con un
sistema LED (a seconda del modello e della versione).
Per controllarne il funzionamento premete il bottone
(Fig. A).
Primo impulso: luce (Fig. B).
2 ° impulso: lampeggiante (Fig. B).
3 °: Off (Fig. C).
La durata a luce fissa è di circa 5 ore, 10 ore con luce
intermittente.
ATTENZIONE! Verifica che la legislazione
nazionale o locale vigente nel tuo Paese non
limiti l’uso di LED sulle strade aperte al traffico
RICARICA DEL SISTEMA LED.
Per ricaricare il tuo sistema LED utilizza il cavo micro USB inserito nel collarino e connettilo al cavo di
alimentazione in dotazione (Fig. D). Questo cavo può
essere a sua volta connesso a una presa USB alimentata o a un adattatore da rete.
Il tempo per una batteria incaricata di 100% ha luogo
approssimativamente di 5 ore.
rettamente, puntando a un riutilizzo sostenibile
delle risorse.
L’utilizzatore finale può contattare il suo rivendi
tore di fiducia o l’amministrazione pubblica del
luogo in cui vive per sapere come comportarsi per
rispettare le norme sullo smaltimento dei rifiuti in
sicurezza. I rivenditori possono contattare il pro
prio fornitore e verificare le regole e le condizioni
di vendita previste dal contratto. Questo prodotto
non va smaltito assieme ad altri rifiuti dell’attività
commerciale. Siete pregati di contattare le stazio
ni ecologiche locali per la rimozione della batteria.
-
-
-
A
ATTENZIONE! Il sistema LED non è dotato di
un avvisatore di carica. Fate molta attenzione alla durata della stessa, il sistema non deve
essere lasciato connesso per la ricarica oltre le
5 ore.
ATTENZIONE! Il prodotto è dotato di una
batteria ricaricabile, non sostituibile
dall’utente. Non tentate di aprire il suo alloggiamento per rimuovere la batteria, questa operazione potrebbe causarvi una lesione o danneggiare il prodotto stesso.
Corretto smaltimento del prodotto (Rifiuti
elettrici & equipaggiamenti elettronici. Nella
Unione Europea e in altri Paesi europei è obbliga
toria la raccolta differenziata)
Questa indicazione applicata sul prodotto o nel
libretto di istruzioni indica che non deve essere
smaltito assieme ad altri rifiuti domestici alla
fine della sua vita utile. Per evitare possibili danni
all’ambiente o alla salute dovuti a uno smaltimen
to non corretto, vi preghiamo di separare questo
prodotto da altri tipi di rifiuti e di riciclarlo cor
B C
-
-
D
-
15
Page 64

AERAZIONI GARANZIA DI 5 ANNI
VENTILAZIONE SUPERIORE
La presa d’aria superiore (Fig. A) consente un ingresso dell’aria sulla parte superiore della testa, nonché i
l rinnovo dell’aria della cuffia. I canali integrati agli
elementi smorzatori interni semplificano la circolazione dell’aria sulla superficie della testa.
La qualità e la concezione dei tessuti di comfort
aiutano a garantire una corretta diffusione dell’aria.
La posizione della ventilazione superiore viene determinata in modo tale da ottimizzare l’efficacia della
relativa presa d’aria. In base al tipo di veicolo, la carenatura potrebbe ridurre l’efficacia della ventilazione.
La ventilazione commuta in posizione aperta premendo la linguetta verso la parte posteriore (1), mentre per
la posizione chiusa premerla la linguetta in avanti (2).
VENTILAZIONE DI DISAPPANNAMENTO
Scopo primario di questa presa d’aria è quello
di indirizzare un flusso d’aria fresca verso la superficie interna della visiera, in modo tale da ridurre i
rischi di formazione di condensa. La diffusione d’aria
fresca interrompe il contatto dell’aria calda emessa
respirando o dalla testa stessa all’interno del casco.
Per aprire (1) o chiudere (2) la ventilazione inferiore,
spingere il bottone come indicato nell’immagine.
2
A
1
WARNING! Do not open or close any vents
while operating your motorcycle. You could
lose control of your motorcycle, resulting in an
accident, personal injury or death.
AERODINAMICA E ACUSTICA
SKWAL è stato studiato con cura affinché gli utenti ne
siano completamente soddisfatti. Il profilo del casco,
la tenuta e la qualità dei materiali utilizzati permettono di filtrare al meglio i rumori dell’aria sulla calotta,
nonché le turbolenze aerodinamiche.
Affinché l’uso del casco sia quanto più gradevole possibile, è importante che le turbolenze od i vortici d’aria
creati dalla carenatura non influenzino negativamente
le qualità aerodinamiche del casco SKWAL. In virtù
della forma della carenatura della moto e/o della vostra taglia, i rumori generati dall’aria si percepiscono
nella parte inferiore del casco.
16
1
2
Page 65

GARANZIA DI 5 ANNI
Garanzia di 5 anni
Avete appena scelto per la vostra sicurezza e il vostro piacere un casco SHARK. È stato progettato con la massima cura
per garantirvi una soddisfazione totale. Tuttavia, per la vostra
sicurezza e quella del passeggero, dovete rispettare tutte le
regole di prudenza mentre utilizzate il vostro veicolo.
La garanzia di 5 anni di SHARK assicura all’acquirente che
ogni difetto di fabbrica sui materiali sarà preso in considera
zione ai sensi della garanzia di SHARK.
Limitazioni
Se durante il periodo di garanzia di 5 anni (5 anni a partire
dalla data di acquisto) si verificasse un problema coperto dal
la garanzia stessa, SHARK, attraverso l’intermediazione del
suo dealer, si impegna a riparare o a sostituire gli eventuali
elementi difettosi entro il limite massimo del valore d’acquisto
del casco. Gli eventuali costi di manodopera saranno a carico
del dealer dietro accordo preventivo. Se la riparazione neces
sita di una spedizione che comporti dei costi di trasporto, la
responsabilità del dealer SHARK si limita ai costi di trasporto
dei servizi di posta nazionale a velocità normale.
In ogni caso, 5 anni è il periodo massimo di garanzia e la
sostituzione di un qualsiasi elemento durante questo periodo
non ne prolunga la durata.
Procedura
In seguito all’acquisto visitate il nostro sito www.sharkhelmets.com per attivare la garanzia.
-
Tutte le richieste di garanzia devono essere fatte al rivenditore
SHARK presso il quale si è acquistato il casco. Affinché una
richiesta di garanzia sia presa in considerazione, l’acquirente
deve notificare presso il proprio rivenditore il problema ris
contrato riportando indietro il casco, specificando l’oggetto
di reclamo e mostrando il tagliando di garanzia compilato al
momento dell’acquisto.
Questa garanzia non tiene conto dei diritti dell’acquirente pre
-
visti dalla direttiva 1999/44CE.
Questa garanzia specifica e limitata è annullata in tutti i suoi
effetti una volta trascorsi 5 anni dalla data dell’acquisto. Dopo
-
-
Esclusioni
Soltanto i problemi legati ai materiali e/o alla fabbricazione
sono tenuti in considerazione durante l’arco di tempo coperto
dalla garanzia. La responsabilità di SHARK sul prodotto non
può in nessun modo essere contestata nei casi seguenti:
1) caduta accidentale
2) modifica tecnica apportata dall’utente o da terzi (colle, ade
sivi, vernici, viti, etc.)
3) utilizzo o contatto di prodotti chimici inadatti (alcool, etc.)
4) cattivo utilizzo: condizioni anomale (utilizzo in acqua, per
esempio), mancanza di manutenzione e/o cura
5) invecchiamento dovuto alla normale usura dei tessuti e
delle schiume interne, dell’aspetto delle parti esterne o della
visiera (graffi, segni, ecc.)
6) esposizione anomala e prolungata ai raggi UV, in particolare
per i decori e i colori
Inoltre SHARK non può ritenere come danni coperti dalla
garanzia tutte le conseguenze dovute all’utilizzo personale :
problemi di comfort, di taglia di rumore o fischi, d’aerodina
mica ecc.
SHARK non può ritenersi responsabile della non disponibilità
temporanea del casco, dovuta ai tempi di riparazione e tras
porto de casco in garanzia.
questo periodo, nel caso di un utilizzo regolare, è preferibile,
perché possiate avere una protezione e un comfort ottimali,
sostituire il vostro casco. Infatti alcuni agenti esterni (usura
generale, alcuni urti, etc.) potrebbero nuocere alle caratteris
tiche di sicurezza di questo elemento di protezione essenziale.
-
Limiti
SHARK si riserva la possibilità di effettuare delle operazioni in garanzia con dei pezzi di ricambio dell’ultima versione
adattabile al modello preso in questione e non può garantire
una perfetta combinazione dei colori o dei decori, legata a
delle produzioni specifiche e/o serie limitate. Inoltre, l’alte
razione naturale dei colori delle componenti nel tempo può
comunque provocare una dissonanza una volta sostituite dai
pezzi di ricambio.
Se SHARK non può garantire la riparazione per ragioni
tecniche o per mancanza di un componente, si impegna a
proporvi, a condizioni vantaggiose per il cliente e tenendo
conto dell’anno di produzione del casco, sia un casco nuo
vo identico, sia un modello equivalente prodotto al momento
della richiesta, se il casco iin questione non è più disponibile.
-
-
-
17
Page 66

CONTENIDO ANATOMÍA DEL CASCO
• Anatomía del casco ................................................................ 3
• Un casco a su medida .................................................................4-5
• Cincha ..........................................................................................6-7
• Pantalla ........................................................................................... 8
• Auto seal ......................................................................................... 9
•Parasol ........................................................................................... 10
• Textiles ....................................................................................11-12
• Limpieza .......................................................................................13
• Máscara antivaho / barbillera .......................................................14
• Easy Fit .........................................................................................14
• LED ............................................................................................... 15
• Ventilaciones ................................................................................ 16
• Garantía 5 años ............................................................................ 17
• Menciones legales ........................................................................20
Muchas gracias por haber elegido un SKWAL.
SKWAL es un casco de calidad, perfectamente
adaptado para uso urbano y no urbano. El
SKWAL contiene toda la experiencia de SHARK
en el campo de la seguridad, ha sido diseñado
exclusivamente para ser utilizado en vehículos
motorizados de dos ruedas.
De acuerdo con las normas internacionales,
este casco no puede proteger a su usuario en
todas las circunstancias. Antes de utilizarlo no
olvide leer todas las recomendaciones que se
exponen más adelante. Llevar puesto este casco
no debe hacerle olvidar la necesidad de ser pru-
Este casco está conforme con las exigencias
impuestas en todos los países que reconocen
esta norma en su territorio.
¡ATTENZIONE! para la circulación en Fran-
cia, el código de la circulación exige que los
reflectores de seguridad (incluidos aparte en una
bolsita), se coloquen respetando el plano adjunto.
¡ATTENZIONE! En los Estados Unidos
países que poseen una reglamentación
específica, no deben utilizarse los cascos homologados únicamente ECE sin la homologación
complementaria DOT FMVSS 218.
¡ATTENZIONE! Según el modelo, su casco
está equipado con un sistema LED que se
puede apagar.
dente.
Norma: Este casco SHARK SKWAL está homo-
logado y conforme con la norma ECE R 22/05.
2
¡ATTENZIONE! Para la circulación y el
uso de las LED, verifica que este casco está
conforme con las exigencias del código de la
circulación de su país.
Page 67

10
4
6
10
3
1
8
5
10
1) Pantalla
2) Parasol
3) Botón de mecanismo del
parasol
4) Ventilación superior
5) Ventilación inferior
6) Ventilación
7) Correa de cierre
8) Máscara antivaho
9) Barbillera
2
14
13
9
10) Interruptor de LED
11) Junta de la base
12) Junta de la pantalla
13) Easy fit
11
12
7
7 - Correa de cierre rápido “Precise Lock„
7 - Correa de cierre doble anillo.
3
Page 68

¡ATENCION! Ningún casco puede
Para su máxima protección, es necesario
proteger a su portador de cualquier
impacto bien a alta o baja velocidad. Asi
mismo, para su máxima protección, su
casco debe de estar bien ajustado y la
correa de seguridad bien cerrada como se
describe en este manual. Sería peligroso
si el casco no estuviera bien ajustado a
su talla o la correa bien cerrada, el casco
podría sacarse en caso de accidente, re
sultando en graves heridas en la cabeza
o incluso la muerte.
ElEgir su talla
E Cada casco está diseñado para corres-
ponder a una talla (desde Xs hasta Xl). Para
averiguar su talla, utilice una cinta métrica
flexible y rodee su cabeza con ella de for
-
ma horizontal unos dos centímetros y medio
que el casco se adapte bien a la forma de
su cabeza. Cuando nos probamos un casco
nuevo, hay que asegurarse de que la cabeza
entra dentro del casco lo más profundamente
posible, con la parte frontal justo por encima
de sus cejas, y con la correa de seguridad
bien ceñida como describiremos en la si
-
guiente pagina.
1. El casco debe de sentarle bien ajustado
todo alrededor de su cabeza y ceñido en las
mejillas. Si no es así, el casco es demasiado
grande para usted; seleccione una talla más
pequeña. Ver figura a.
2. Con la correa de seguridad propiamente
ajustada, asegúrese de que el casco no se
mueve excesivamente de lado a lado o de ar
-
sobre sus cejas. Si la medida estuviera entre
dos tallas, pruébese primero la más pequeña.
No obstante, debido a las diferentes formas
de cada cabeza, la talla es una mera referen
-
cia y debe de ser considerada como un guía.
riba abajo. Usted debe de sentir como la piel
de su cabeza y cara quedan tirantes cuando
el casco se mueve. Si no es así, el casco es
demasiado grande para usted; seleccione
una talla más pequeña. Ver figura b.
4
B
Page 69

UN CASCO A SU MEDIDA
3. Agarre el casco de su parte trasera e intente sacárselo de la cabeza. Siguientemente
empuje el casco hacia arriba por la parte de
lantera. Esta operación debe de hacerse con
una fuerza significativa. Si el casco comienza
a salirse, este es demasiado grande para us
ted; seleccione una talla más pequeña.
4. Incline su cabeza hacia adelante todo lo
posible. La parte delantera del casco no debe
de tocar su pecho. Vea figura c.
5. Incline su cabeza hacia atrás todo lo po
sible. El casco no debe de tocar su espalda.
Si usted tiene alguna duda sobre como ave
riguar la talla de su casco, pida consejo en
su establecimiento más cercano. Cada una de
estas pruebas debe de repetirse a lo largo de
la vida del casco, debido a que el almohadilla
do interior puede desgastarse y así perder sus
cualidades con el tiempo. Si durante la vida
del casco, este no mantiene el ajuste apropia
do, usted debe de cambiarlo. Nunca preste su
casco a otros sin haber asegurado que este
se ajusta a las características de esta persona
en acorde con estas instrucciones.
¡ATENCION! Si usted no consigue obtener un ajuste apropiado de acuerdo
con estas instrucciones, NO UTILICE EL
Vea figura d.
Nunca recoja su pelo en el interior del casco
o introduzca cualquier objeto entre su cabeza
y el casco. No añada ningún tipo de almoha
dillado para modificar la posición del casco
sobre su cabeza.
CASCO. Seleccione un casco, talla o mo
delo diferente.
MEDIDA (cm)
M 57/58
XS 53/54
S 55/56
L 59/60
XL 61
-
C
D
5
Page 70

CORREA DE CIERRE CORREA DE CIERRE
Sistema de retención
Su casco SHARK SKWAL está equipado, según las versiones y los países, con una correa
de cierre rápido «Precise Lock» dentado o con
El sistema «Precise Lock» dentado le permite
un reglaje fino y preciso, gracias a la longitud importante longitud de su parte dentada.
Sin embargo, es indispensable, al efectuar su
compra, adaptar la longitud de la correa a su
morfología.
Ajuste la longitud de la correa con ayuda de la
hebilla metálica. Colóquese su casco SKWAL y
fije el sistema de retención. Cuando el «Precise
Lock» esté ajustado a su posición mediana, la
correa debe estar correctamente tensa debajo
del mentón para asegurarle una sujeción firme
del casco, sin causarle molestias o dolores.
Para bloquear la correa, basta con introducir
la lengüeta en el emplazamiento previsto en la
de la palanca (Fig. B) y sacar la lengüeta de
la hebilla. Aunque la lengüeta dentada permite
afinar el reglaje en cada utilización, es importante verificar frecuentemente que el reglaje
de la longitud de la correa sea correcto. Según
la versión y los países, el SKWAL puede estar
equipado con una hebilla de yugular de doble
anilla. Pase la parte más larga de la correa por
las dos anillas, colocando la almohadilla de
confort entre la correa y el cuello. Introduzca el
extremo de la correa entre las dos anillas y tire
de él hasta notar una resistencia de la correa y
una sujeción a nivel de la garganta, sin exceso,
a fin de evitar molestias al respirar.
¡ATENCION! no circular nunca con la
correa sin cerrar o insuficientemente
tensa. Incluso si el revestimiento interior le
procura una sensación de sujeción, su casco
puede salirse en caso de caída. No aplicar
nunca un producto lubricante o ácido, ni grasa
hebilla, hasta que la tensión sea correcta (Fig.
A). La lengüeta se fija y se bloquea automáticamente. Para desbloquear la correa, tirar
A
o disolvente en los elementos de la hebilla de
la correa.
B
C
D
6
E
F
Page 71

A
B
1. Deslice la parte más larga de la correa por el interior de los dos anillos, mientras
confirma que el almohadillado está bien situado entre la correa y su cuello (A).
2. Pase el extremo de la misma por el exterior
del anillo D exterior e inmediatamente después
por el dentro del anillo D interior (B).
3. Tire de la correa hasta que esta se ciña bien.
La correa de seguridad debe de estar posicionada contra su cuello, no bajo su barbilla, y
debe de estar todo lo ceñida posible sin causar
dolor o interferir con su respiración (C).
4. Deslice el final de la correa dentro de la
hebilla plástica que se encuentra en el almohadillado para así evitar que esta se sacuda
con el viento (D).
¡ATENCION! Nunca utilice la hebilla
plástica para asegurar el casco a su
cabeza. Para que este bien seguro, usted debe
de entrelazar la correa por entre los anillos
doble-D. Fallo a realizar bien esta operación
causara que su casco se salga de su cabeza
en caso de accidente, dejando su cabeza completamente desprotegida y resultando en heridas graves en su cabeza o incluso la muerte.
Tire de la correa de seguridad con sus dedos.
La correa de destensa de cualquier manera, usted no ha ceñido bien la correa entre
los anillos doble-D. Repita los pasos arriba
descritos.
C
Si usted tuviera alguna duda sobre el sistema de cierre de su casco, no utilice el casco.
Contacte a su establecimiento habitual
y pida consejo.
D
7
Page 72

PANTALLA
A B
QRVS System
Desmontaje - Montaje
Para desmontar la pantalla, sacarla de
su alojamiento ejerciendo una fuerza hacia
delante (A). Para volver a montarla, posicionar las extremidades de la pantalla en el
alojamiento de rotación y retirar la pantalla
hacia atrás (B).
ATENCION! Si no tiene la completa seguridad
de haber montado bien la pantalla, no utilice el
casco. La pantalla podría desinstalarse de repente y sin
ningún aviso mientras conduce, causando una pérdida de
ATENCION! No conduzca con la pantalla abierta
o intente abrirla o ajustarla mientras conduce.
La pantalla podría desinstalarse de repente y sin aviso,
dejando sus ojos y cara desprotegidos. Su cabeza podría
también ser forzada hacia un lado, causando así una
pérdida de control sobre su motocicleta, resultando en un
accidente, lesión corporal e incluso la muerte.
ATENCION! Si su pantalla no le permite una
visibilidad clara después de un periodo de
control sobre su motocicleta, resultando en un accidente,
lesión corporal o incluso la muerte. Contacte con su
establecimiento habitual y pida consejo.
ATENCION! Pantallas oscuras o de color no deben
de utilizarse por la noche o bajo condiciones de
visibilidad escasa. Nunca conduzca con una pantalla
empañada de vaho.
8
servicio, esta debe de ser reemplazarla inmediatamente.
Nunca conduzca con una pantalla rayada, sucia, con vaho
o que le dificulte la visión en cualquier forma. Siempre
conduzca con una visibilidad perfecta.
Page 73

C D
AUTO SEAL
AUTO SEAL
Su casco SKWAL tiene un sistema patentado
SHARK «AUTOSEAL» Este sistema garantiza
una perfecta estanqueidad en la pantalla por
la fuerza del resorte en la pantalla cuando se
posiciona en la parte inferior.
PARASOL
El casco SHARK SKWAL está equipado con un pa
rasol con control externo integrado.
El botón ergonómico situado en la parte exterior
central del casco, permite abrir o cerrar el para
sol con cualquier tipo de guantes, ofreciendo así
la máxima protección y seguridad de la manera
más rápida. El departamento de I+D ha creado
un mecanismo con el cual se obtiene un control
progresivo y muy cómodo del parasol. El parasol
proteja con una protección de 380 UV la cual filtra
el 100% de los rayos UVA y UVB.
ATENCION!
cuando la luz solar es muy intensa y us-
El visor solar no puede utilizarse
-
-
El parasol se acciona empujando el botón hacia
arriba y se esconde tirando hacia abajo.
El parasol se acciona utilizando el botón elastó
mero situado en la parte izquierda del casco (A-B).
MANTENIMIENTO
Para asegurar su protección y mejorar su vida útil,
la superficie exterior del parasol del
SHARK Vantime está tratado anti-rayas.
Para su mantenimiento y su limpieza, seguir los
mismos consejos recomendados para la pantalla
exterior.
ATENCION!
la pantalla y/o el parasol no le garantizan
una excelente visión, es absolutamente necesario
si después de un cierto tiempo,
-
ted conduce en un área donde puede haber un
cambio brusco de luz (por ejemplo, un túnel). En
todos los casos donde hay baja visibilidad, como
en el comienzo o el final del día, lluvia o niebla, el
parasol suele estar en su posición elevada, para
así no degradar la visibilidad del conductor.
remplazarlos. Aconsejamos circular siempre con
una óptima visibilidad. No utilice jamás el para
sol como única protección sin la pantalla exterior.
Siempre debe conducir con la pantalla cerrada.
-
9
Page 74

EL PARASOL
EXTRACCION DE LA PANTALLA SOLAR
-Abra la pantalla solar
-Tire de ella de forma delicada hacia abajo (B-1).
-Tire de nuevo hacia el exterior, un lado de cada vez,
para así desencajarla de los puntos de montura en
el casco
REMPLAZAMIENTO DE LA PANTALLA SOLAR
Repita las instrucciones anteriores en orden inversa:
-Mueva el mecanismo de la pantalla solar a la posición de abierto
-Presione la pantalla solar, un lado de cada vez para
encajarla en los puntos de anclaje del casco
Luego empuje la pantalla solar hacia arriba para
introducirla de nuevo en su emplazamiento
(C-1).
(A).
¡ATENCION! Si no tiene la seguridad de
haber reemplazado bien la pantalla solar,
(A).
(C-1).-
(B-1).
B-1
B-1
B
C-1
no utilice el casco. La pantalla solar podría de
repente y sin aviso soltarse del casco mientras
que conduce, causando una pérdida de control
de su motocicleta, resultando en un accidente,
lesión corporal, o incluso la muerte. Contacte con
su establecimiento habitual y pida consejo.
C-1
C
C-1
A
10
C-1
C
Page 75

DeSMontaje DeL interior
- De la vuelta al casco.
- Separe las dos partes de la correa.
- Desmonte la almohadilla de la nuca asiéndola por
una de sus partes laterales. sacar su extremo y libe
rar la parte trasera (Fig. A).
- Separar los clips de las almohadillas de los pómu
los (Fig. B) y deslizarlas a lo largo de las correas para
sacarlas.
Retire la parte trasera del bonete interior para quitar
lo de su sitio (Fig. C-D).
- Para terminar, separe los clips del soporte de la
cofia delantera, comenzando por un lado (Fig. E) y
retirar la cofia.
-
-
-
LOS TEXTILES - DESMONTAJE
C
A
A
D
B E
11
Page 76

LOS TEXTILES - MONTAJE LOS TEXTILES - LIMPIEZA
Montaje DeL interior
- Comience la operación colocando de nuevo las al
mohadillas de los pómulos pasando la correa por la
ranura de las almohadillas (Fig. A).
- Introduzca la parte de plástico delantera de la cofia
en su alojamiento, comenzando por uno de los lados
(Fig. B).
- Coloque el textil correctamente.
- Introduzca la parte trasera del la cofia (Fig. C).
- Monte la almohadilla de la nuca introduciendo una
de sus partes laterales y colóquela correctamente en
su alojamiento(D).
¡ATENCION: Un casco con el almohadilladlo
interior dañado puede comprometer el ajuste
del casco sobre su cabeza, pudiendo así permitir
que en caso de accidente usted pierda su casco,
-
B
resultando en lesión craneal o la muerte.
¡ATENCION! La protección de polestireno
y el almohadillado interior son partes
críticas para un buen ajuste del casco sobre su
cabeza. Si usted tiene alguna duda sobre cómo ha
manipulado o reemplazado el almohadillado, NO
UTILICE SU CASCO. Póngase en contacto con su
establecimiento habitual y pida consejo.
C
A
12
D
Page 77

LOS TEXTILES
Mantenimiento.
Los textiles y espumas de confort del
SKWAL le permitirán apreciar lo mejor po
-
sible las prestaciones de su casco.
Las partes en contacto con la piel están rea
lizadas en un tejido que le garantiza un agradable contacto y una buena absorción de la
transpiración, así como una buena resistencia
al envejecimiento.
Gracias a un tratamiento de supercie, limi
tamos los riesgos de mohos y de bacterias.
¡ATENCION! aunque están selecciona-
das por sus cualidades de resistencia
y de conservación con el tiempo, todas las
Las partes textiles internas son lavables. A
fin de no deteriorarlas, es importante seguir
escrupulosamente los siguientes consejos:
Las almohadillas de las mejillas y la cofia
deben lavarse a mano, con agua jabonosa
templada (30° aproximadamente). No utilizar
productos detergentes agresivos. Utilizar, bien
un detergente para tejido delicado y a dosis re-
ducidas, o un jabón de Marsella. Es indispen-
sable dejar de secar completamente los tejidos
partes del revestimiento interior están so
metidas a un desgaste normal en función del
cuidado, del mantenimiento y del tiempo de
utilización, pero igualmente de las caracterís
ticas de acidez de su transpiración.
Si constata un envejecimiento, le aconse
jamos reemplazar las guarniciones interiores,
a fin de conservar durante tiempo un casco
perfectamente limpio que le asegurará el
confort necesario.
Su concesionario SHARK podrá suminis
trarle las piezas de reemplazo y proponerle
opcionalmente almohadillas de grosores y
densidades diferentes, en caso de que la
elección estándar no corresponda a la mor
-
y espumas antes de su utilización. El secado
debe efectuarse a temperatura ambiente. No
planchar nunca los elementos textiles. Para
las partes con aspecto de cuero o para los te-
jidos solidarios de los elementos de seguridad,
utilizar una esponja o un trapo ligeramente
húmedo con un poco de jabón de Marsella y
aclarar con agua. Evite utilizar demasiada agua
en contacto con los elementos de poliestireno.
Es indispensable asegurarse de que todas las
partes interiores estén perfectamente secas
fología de su cara.
antes de utilizar el casco.
13
Page 78

MÁSCARA ANTI-VAHO - MÁSCARA - EASY FIT - SHARKTOOTH LED
MÁSCARA ANTIVAHO
El casco SKWAL dispone de un visor antivaho desmontables.
BARBILLERA
El casco SKWAL dispone una protección contra remolinos desmontables.
SHARKTOOTH
Su casco SHARK SKWAL es “SHARKTOOTH®
ready”, es decir que puede ser equipado del
sistema de audio SHARKTOOTH®.
Encontrará un lugar especialmente previsto
para la batería en la parte trasera del casco,
bajo el cubre nuca así que un espacio para el
micro delante del casco.
Por los auriculares, un lugar esta previsto en
las almohadillas internas.
La batería esta fácilmente recargable porque
es fácil acceder por el exterior, sin desmontar
el cubre nuca.
El sistema SHARKTOOTH® permite comu
-
nicar con Bluetooth muy fácilmente. Por los
EASY FIT
Su casco SKWAL ha sido diseñado para proporcionar
una comodidad adicional para personas que lleven
gafas con el SHARK EASY FIT.
Las 2 mejilleras están hechas con espuma de comodidad insertada que se pueden ser quitar para proporcionar el paso de las patillas de las gafas.
conductores urbanos, touring o en rutas que
quieren comunicar cuando conducen, el kit
SHARKTOOTH Bluetooth manos libres por
móviles y Smartphone es un « must have » de
los accesorios.
Propone un sistema de comunicación de
moto a moto con un otro SHARKTOOTH®
(500m). Se conecta rápido con la mayoridad de
los móviles y Smartphone. Se activa con la voz.
Resiste al agua. Conexión audio Bluetooth con
GPS. Música por Bluetooth estéreo A2DP. Re
ducción del ruido ambiente, control automático
del volumen.
Para acceder a estas funcionalidades, hay que
conectar su SHARKTOOTH® con un sistema
14
Bluetooth.
¡ATENCION! SHARK queda liberado de to-
das las responsabilidades en el caso de la
adaptación en el SKWAL de un sistema de comunicación que no sea el Sharktooth.
Page 79

LED (OPCIONAL)
Su casco SHARK Skwal está opcionalmente equipado
con un sistema de LED brillante.
Para controlarlos, pulse el botón (fig. A)
En primer pulso: luz
secundo pulso: intermitente
Tercero: Off
El tiempo de utilización del sistema LED de manera
continua es de aproximadamente 5h y de 10h parpadeando.
¡ATENCION! Para la circulación y el uso
de las LED, verifica que este casco está
conforme con las exigencias del código de la circulación de su país.
RECARGA DEL SISTEMA LED
Para recargar su sistema LED, utiliza el cable micro
USB situado en el cubre nuca y conéctalo al cable
suministrado.
Este cable se puede conectar a un puerto USB alimentado o a un adaptador de alimentación.
El tiempo necesario para una batería cargada al 100
% es aproximadamente de 5 horas.
la reutilización sostenible de los recursos materiales.
Las personas pueden ponerse en contacto con
el establecimiento donde adquirió el producto o
ponerse en contacto con su municipio para saber dónde y cómo pueden deshacerse de este
producto para que se recicle y respetar el medio
ambiente.
Las empresas se pongan en contacto con su proveedor y consultar las condiciones de su contrato
de venta. Este producto no debe desecharse con
la basura comercial.
A
¡ATENCION! El sistema que no se equipa de
testigo de carga, supervisan atentamente la
duración de la carga. No es necesario nunca dejar
el sistema conectado más de 5 horas.
¡ATENCION! Este producto contiene una ba-
tería no reemplazable. No abra el producto
o retire la batería, ya que puede dañar el producto.
Por favor, póngase en contacto con el centro de
reciclaje más cercana para recoger la batería.
Eliminación de este producto: (Equipos eléc-
tricos y electrónicos usados. Aplicable en la
Unión Europea y otros países europeos con sistemas de recogida selectiva de residuos) Este símbolo en el producto o en la documentación indica
que no debe desecharse con la basura doméstica.
El vertido incontrolado de residuos que pueden
dañar el medio ambiente o la salud humana, por
favor separe este producto de otros tipos de residuos y el reciclado responsable. Usted promover
B C
D
15
Page 80

VENTILACIONES GARANTÍA 5 AÑOS
VENTILACIÓN DE LA COFIA INTERIOR
La toma de aire superior (Fig. A) permite una entrada de
aire dirigida a la parte superior de la cabeza, renovando
así el aire de la cofia. Los canales integrados en los ele
mentos amortiguadores internos facilitan la circulación
del aire por la superficie de la cabeza. La calidad y el
diseño de los textiles de confort participan en la buena
difusión del aire. La posición de la ventilación superior
está determinada para optimizar la eficacia de su toma
de aire. Según el tipo de su máquina, el carenaje pue
de disminuir la eficacia de esta ventilación. Empujando
hacia atrás la lengüeta, la ventilación está en posición
abierta
está en posición cerrada
VENTILACIÓN ANTIVAHO
La función principal de esta ventilación es dirigir un flujo
de aire fresco hacia la superficie interior de la pantalla,
a fin de limitar lo riesgos de formación de vaho. El aire
fresco difundido impide el contacto del aire caliente
emitido por el aliento o incluso por la cabeza en el inte
(1) con la lengüeta hacia adelante, la ventilación
(2).
-
-
-
1
2
A
rior del casco. Para abrir (1) o cerrar (2) la ventilación
inferior pulsar el botón en el sentido arriba indicado.
WARNING! Do not open or close any vents
while operating your motorcycle. You could
lose control of your motorcycle, resulting in an acci
dent, personal injury or death.
AERODINAMICA Y ACOSTICA
SKWAL ha sido diseñado cuidadosamente para ofre
cerle el mayor confort en su utilización. El perfil del
casco, la estanqueidad y la calidad de los materiales
empleados, permiten filtrar lo mejor posible los ruidos
de aire en la calota y las turbulencias aerodinámicas.
Para que la utilización de su casco sea lo más agra
dable posible, es importante que las turbulencias
o torbellinos de aire creados por el carenaje no
-
-
-
1
2
perturben las cualidades aerodinámicas de su casco
SKWAL. Es importante que, debido a la forma del care
naje de su moto y a su estatura, los remolinos de aire no
lleguen a la parte inferior del casco.
16
-
Page 81

Garantía 5 AÑOS
Usted ha adquirido recientemente un casco SHARK para su
seguridad y comodidad. Este casco ha sido diseñado y fa
bricado con el mayor esmero a fin de satisfacer todas sus
necesidades. Para su seguridad y la de su pasajero, debe res
petar todas las reglas habituales de seguridad cuando use su
vehículo de dos ruedas. La garantía SHARK 5 AÑOS garantiza
al comprador inicial que cualquier posible fallo de fabricación
o defecto de material va a ser cubierto por la garantía SHARK.
Limitations
Si durante el periodo de garantía (5 años a partir de la fecha
de compra), surgiera un problema que cubriera la garantía,
SHARK, a través de los agentes de su red de ventas, se
compromete a reparar o reemplazar cualquier componente
defectuoso, hasta un límite máximo que es el valor de compra
del casco. Cualquier gasto por mano de obra necesaria será
pagado por la red SHARK habitualmente, pero estará sujeto a
aprobación previa antes de llevar a cabo la reparación. Si la
reparación requiere el envío de componentes que conlleven
gastos de transporte o envío, SHARK cubrirá estos gastos
hasta un límite que será el coste del transporte del servicio
postal nacional en su tarifa normal (no urgente). Los mismos
límites serán de aplicación caso de ser requerido el envío del
casco a un servicio técnico SHARK autorizado, tanto de ida
como de devolución.
Exclusiones
Esta garantía sólo cubre problemas relacionados con los materiales empleados o el proceso de fabricación del producto.
SHARK no es responsable de daños o defectos en sus pro
ductos en los siguientes casos : Cualquier daño causado por
1) Una caída o accidente, tanto durante su uso conducien
do el vehículo como por golpes o arañazos sufridos por el
casco cuando sea transportado, depositado o guardado por
el usuario.
2) Una alteración o modificación del casco hecha por el usua
rio o un tercero (Incorporación, modificación o eliminación de
elementos originales del casco, o aplicación o añadido al mis
mo de pegamento, adhesivos, pinturas o barnices, accesorios
no autorizados, tornillos, etc.).
3) Uso de o contacto con : Productos químicos o de limpieza
nocivos (incluso alcoholes sobre los tratamientos superfi
ciales de la pantalla), o una fuente de calor intenso.
4) Uso incorrecto : condiciones anormales ( Ej. Bajo el agua,
deportes náuticos ), falta de mantenimiento o de cuidados.
5) Envejecimiento debido al uso normal de los tejidos o almo
hadillas interiores, la apariencia de las partes externas o la
pantalla ( arañazos, marcas, etc. ).
6) Exposición anormal y prolongada a luz ultravioleta, en
particular en las decoraciones coloreadas. Además, SHARK
no puede tener en cuenta consideraciones subjetivas rela
cionadas con el uso del casco como defectos incluidos en
garantía : Problemas con el confort, la talla, ruidos o silbidos,
aerodinámica, etc. SHARK no se puede hacer responsable de
los perjuicios causados por la no disponibilidad temporal del
casco mientras está siendo revisado o reparado para satis
facer las necesidades de su dueño. En todos los casos, el
periodo máximo de garantía es de 5 años. El reemplazo de
un componente durante este periodo no prolonga el mismo.
-
Procedimiento
-
Cuando el casco se adquiere visite nuestro sitio web
www.shark-helmets.com para activar su garantía. Todas las
reclamaciones de garantía deben hacerse a través del distri
buidor de SHARK donde se adquirió el casco. Caso de haber
desaparecido, se harán a través del distribuidor nacional
correspondiente. Para que una reclamación de garantía sea
considerada, el comprador debe notificar al distribuidor el
problema que ha surgido, y entregarle el casco que es objeto
de la reclamación, junto con original o fotocopia de la hoja
de garantía cumplimentada en el momento de la compra del
casco. Esta garantía no afecta ni altera de ninguna manera los
derechos legales del comprador según lo estipulado en el re
glamento 1999/44CE. Los efectos de esta garantía específica
y limitada expirarán después de un periodo de 5 años a partir
de la fecha de compra. Después de este periodo, si continúa
usando el casco regularmente, le recomendamos que para
beneficiarse de una protección y un confort óptimos, debería
cambiar su casco por uno nuevo. Esto es así porque ciertos
factores externos - desgaste general por el uso, ciertos im
-
pactos- podrían ser perjudiciales para las características de
esta pieza esencial del equipo de protección, y que por tanto
tiene una vida limitada.
Reservas
SHARK se reserva el derecho de llevar a cabo trabajos dentro
-
del periodo de garantía utilizando piezas de repuesto de
las versiones más recientes compatibles con el modelo en
cuestión, y no puede garantizar la perfecta armonía de la
-
pintura o elementos decorativos asociados con elementos
de producción específica o ediciones limitadas. Además, el
deterioro natural de los colores después de un periodo de
-
tiempo puede causar diferencias en la adecuación de los
colores de los recambios. Si SHARK no puede llevar a cabo
la reparación procedente por razones técnicas o porque la
pieza no está disponible, SHARK se compromete a ofrecerle
al cliente una oferta especial, teniendo en cuenta los años y el
uso que tiene el casco, y consistiendo ésta bien en un nuevo
casco idéntico o bien en un modelo equivalente fabricado en
la fecha de la reparación, en caso de que el modelo original
ya no esté disponible.
-
-
-
17
Page 82

18
Page 83

19
Page 84

LEGAL INFORMATION: this helmet was specically
designed for motorcycle use. It is not to be subjected to any
technical modication. In order to offer an adequate level of
protection, this helmet has to be properly adjusted and securely tted. Any helmet which has been subjected to a severe
impact must be replaced.
CAUTION: Do not apply any paint, stickers, petrol or any
other solvent to this helmet. Only the visors, which have been
approved N°E11-050529 and marketed under SHARK’s reference VZ160 can be used with this helmet. This visor is made
of injected polycarbonate.To keep the good optical quality
of the visor and the coatings do not use any solvent, petrol,
abrasive paste or similar products for cleaning. We advise to
use a soft rag with cool water and mild soap. Visors printed
“DAYTIME USE ONLY” must not be used at night or in poor
visibility conditions.
MENTIONS LÉGALES : ce casque a été conçu pour une
utilisation moto. Aucune modication technique ne doit lui être
apportée. Pour assurer une protection sufsante, ce casque
doit être bien ajusté, correctement et solidement attaché. Tout
casque qui a été soumis à un choc est à remplacer.
ATTENTION : n’appliquez sur ce casque ni autocollant, ni
peinture, ni essence, ni aucun autre solvant. Seuls les écrans
homologués sous le N°E11-050529 commercialisé sous la référence SHARK VZ160 doivent être utilisés avec ce casque. Cet
écran est en polycarbonate injecté. Pour maintenir la bonne
qualité optique et éviter les problèmes d’abrasion, ne pas utiliser de produits à base d’alcool, de solvant, d’essence, de pâte
abrasive ou autres produits similaires pour son nettoyage. Il
est conseillé de tremper l’écran dans de l’eau tiède savonneuse (savon de Marseille) et d’utiliser seulement ensuite un
chiffon doux pour son nettoyage. Les écrans portant la mention
“DAYTIME USE ONLY” (Utiliser seulement le jour) ne se prêtent
pas à une utilisation de nuit ou dans des conditions de mauvaise visibilité.
RECHTLICHE HINWEISE : Dieser Helm wurde speziell für
den Gebrauch durch Motorradfahrer entwickelt. Dieser Helm
unterliegt keiner technischen Änderung. Um ein Mindestmaß
an Sicher-heit zu gewährleisten, muss dieser Helm entsprechend eingestellt und dann getragen werden. Jeder Helm
muss nach jeder stärkeren Kraftaufnahme (Unfall) unbedingt
ersetzt werden.
ACHTUNG: Verwenden Sie keinerlei Fremdlacke, Aufkleber,
Benzine oder irgendgeartete Lösungs-/Reinigungsmittel
auf diesem Helm. Es dürfen ausschließlich solche Visiere
für diesen Helm verwendet werden, die das Stanzzeichen
E11-050529 und die SHARK Teile Nr. SHARK VZ160 aufweisen.
Das Visier muss sorgfältig behandelt werden. Jeder Stoss und
jeder Abrieb sind zu vermeiden.
Zum Abbau und Wiedereinbau richten Sie sich bitte genau
nach der anliegenden Gebrauchsanweisung. Dieses Visier ist
aus Polycarbonat. Um die gute optische Qualität des Visiers
und der Beschichtungen zu erhalten, benutzen Sie weder Lösungsmittel, Benzin, Polierpaste noch ähnliche Produkte zum
Reinigen. Wir empfehlen ein weiches Tuch mit kaltem Wasser
und mildem Reinigungsmittel. Visiere mit der Aufschrift “DAYTIME USE ONLY” dürfen nachts oder bei schlechter Sicht nicht
benutzt werden.
ANNOTAZIONI LEGALI: Questo casco è stato specicatamente
progettato per uso motociclistico. Non deve essere in alcun modo modicato. Al ne di offrire un adeguato livello di protezione questo casco
deve essere regolato in modo sicuro e correttamente calzato. Tutti i
caschi che hanno subito un forte impatto devono essere sostituiti.
ATTENZIONE: non utilizzare vernice, adesivi, benzina o
altri solventi su questo casco. La visiera deve essere maneggiata con cura. Solo le visiere, che sono state omologate n°E11-050529 e commercializzate con il marchio
SHARK VZ160 possono essere utilizzate su questo casco.
La visiera è fabbricata in policarbonato iniettato. Per
non compromettere la qualità e le condizioni di visibilità
garantite dalla visiera e dai suoi strati, si prega di non un usare
nessun solvente, benzina o pasta abrasiva durante il processo
di pulizia. Consigliamo l’uso di un panno bagnato con acqua
fredda e sapone neutro. Le visiere che portano la dicitura
“DAYTIME USE ONLY” non devono assolutamente essere utilizzate durante le ore notturne o in condizioni di scarsa visibilità.
MENCIONES LEGALES: este casco está especícamente
diseñado para su uso en motocicletas. No debe sufrir ningún
tipo de manipulación o modicación. Para ofrecer la máxima protección, el casco debe estar correctamente colocado,
ajustado y cerrado. Todo casco que haya sufrido un golpe de
importancia debe ser sustituido.
ATENCIÓN: No aplicar pinturas, adhesivos, gasolinas ni disol-
ventes sobre el casco. Sólo pueden montarse en este casco
las pantallas homologadas N°E11-050529 y comercializadas
bajo la marca SHARK VZ160. Esta pantalla está fabricada en
policarbonato inyectado. Para conservar su excelente calidad
óptica y evitar los problemas por abrasión, no utilizar en su
limpieza productos a base de alcohol, disolventes o gasolina,
ni pulimentos abrasivos o similares. Se recomienda sumergir
la pantalla en agua tibia con jabón (Jabón de Marsella) y a
continuación usar un paño suave para su secado y limpieza.
Las pantallas con la inscripción “DAYTIME USE ONLY” no son
adecuadas para uso nocturno o en condiciones de baja visibilidad, por su gran absorción de la luz.
SHARK - ZAC de la Valentine - 110, route de la Valentine
13396 MARSEILLE Cedex 11 - FRANCE
Tél. : +33 (0)4 91 18 23 23 - Fax : +33 (0)4 91 35 29 23
contact@shark-helmets.com
www.shark-helmets.com
20
 Loading...