

Shark S4701 Series Owner's Manual

S4701 Series
OWNER’S GUIDE

1 1-800-798-7398
WHEN USING YOUR SHARK® 2-IN-1
BLAST & SCRUB STEAM POCKET® MOP,
BASIC SAFETY PRECAUTIONS SHOULD
ALWAYS BE FOLLOWED, INCLUDING THE
FOLLOWING:
READ ALL INSTRUCTIONS BEFORE USING
YOUR SHARK 2-IN-1 BLAST & SCRUB
STEAM POCKET MOP.
WARNING: DANGER OF SCALDING.
The steam emitted from the Steam Mop
is very hot and may cause scalding.
Please use caution when using the
Steam Mop.
WARNING: KEEP STEAM MOP AWAY
FROM CHILDREN.
POLARIZED PLUG:
This Steam Mop has a polarized plug (one
blade is wider than the other). As a safety
feature, this plug will fit into a polarized outlet
only one way. If the plug does not fit fully
into the outlet, reverse the plug. If it still does
not fit, contact a qualified electrician. Do not
attempt to defeat this safety feature.
IMPORTANT SAFETY INSTRUCTIONS
For Household Use Only
WARNING:
TO REDUCE THE RISK OF FIRE, ELECTRIC
SHOCK OR INJURY:
1. CAUTION: When in use, never turn the
Steam Mop over or on its side. Never direct
steam toward people, pets, or plants.
2. Always unplug and allow the Steam Mop to cool
before attaching or removing accessories.
3. Use the Steam Mop only for its intended use.
4. DO NOT use for space-heating purposes.
5. DO NOT use outdoors.
6. DO NOT leave the Steam Mop unattended
when plugged in. Always unplug the power cord
from the electrical outlet when not in use and
beforeservicing.
7. DO NOT allow the Steam Mop to be used by
children. Close attention is necessary when
used near children, pets, or plants.
8. Use only as described in this manual.
9. Use only manufacturer’s recommended
accessories.
10. DO NOT use with damaged cord or plug. If
Steam Mop is not working as it should or has
been dropped, damaged, left outdoors, or
dropped into water, return it to EURO-PRO
Operating LLC for examination and repair.
Incorrect re-assembly or repair can cause a risk
of electrical shock or injury to persons when the
Steam Mop is used.
11. To protect against a risk of electric shock, DO
NOT immerse the Steam Mop in water or any
other liquids.

2www.sharkclean.com
12. DO NOT handle plug or Steam Mop with wet
hands or operate the Steam Mop without
wearing shoes.
13. DO NOT pull or carry by cord, use cord as
a handle, close a door on cord, or pull cord
around sharp edges or corners. Do not run
Steam Mop over cord. Keep cord away from
heated surfaces.
14. DO NOT unplug by pulling on power cord. To
unplug, grasp the plug not the power cord.
Do not use extension cords or outlets with
inadequate current-carrying capacity.
15. DO NOT put any objects into the the Steam
Nozzle openings. Discontinue use if the steam
nozzle is blocked.
16. DO NOT put hands or feet under the Steam
Mop—it gets very hot.
17. When mopping, use ONLY on flat, horizontal
surfaces. Do not use on walls, counters,
orwindows.
18. DO NOT use on leather, wax-polished furniture,
synthetic fabrics, velvet, or other delicate,
steam-sensitive materials.
19. DO NOT use on electronics, such as televisions,
video game consoles, and cable boxes.
20. DO NOT add cleaning solutions, vinegar,
scented perfumes, oils, or any other chemicals
to the water used in the Steam Mop as this
may damage it or make it unsafe for use. If you
live in a hard-water area, we recommend using
distilled water in your Steam Mop.
21. Never leave any wet Cleaning Pad in one
spot while using or storing for any period of
time, as this may damage your surfaces.
22. Carefully remove all Cleaning Pads after you have
unpluged and allowed the
Steam Mop
to cool.
23. When cleaning the exterior of the Steam Mop,
unplug the power cord from the electrical outlet
and clean with a dry or damp cloth. Do not pour
water or use alcohol, benzene, or paint thinner on
the
Steam Mop
.
24. Extreme caution should be exercised when
using the Steam Mop to clean stairs.
25. Keep your work area well lit.
26. Store Steam Mop indoors in a cool, dry place.
27. To avoid circuit overload, do not operate another
appliance on the same socket (circuit) as the
Steam Mop.
29. To avoid scalding injuries, always unplug and
allow the Steam Mop to cool before removing or
changing Mop Heads, Accessories, or Cleaning
Pads.
WARNING: Your Steam Mop is
designed to clean hard-floor surfaces that will
withstand high heat. Do not use on unsealed
wood or unglazed ceramic floors. On surfaces
that have been treated with wax and on some
no-wax floors, the sheen may be removed
by the heat and steam action. It is always
recommended to test an isolated area of the
surface to be cleaned before proceeding. We
also recommend that you check the use and
care instructions from the floor manufacturer.
SAVE THESE
INSTRUCTIONS

3 1-800-798-7398
Thank you for purchasing the Shark® 2-in-1 Blast & Scrub Steam Pocket® Mop.
This Owner’s Guide is designed to help you get a complete understanding of your new Steam Mop. Please read it
carefully and keep for future reference.
For a list of what is included with this model, refer to inside flap of box.
If you should have a question about your Shark® 2-in-1 Blast & Scrub Steam Pocket® Mop, please call Shark
Customer Service at 1-800-798-7398.
REGISTER YOUR PURCHASE:
www.sharkclean.com
1-800-798-7398
RECORD THIS INFORMATION:
Model Number: ____________________________________
Date of Purchase (Keep receipt): _________________________
TECHNICAL SPECIFICATIONS:
Voltage: 120 V., 60 Hz
Watts: 1200W
Water Capacity: 410 ml (13 oz.)

4www.sharkclean.com
Contents
Getting Started ............................................................................................... 5
Assembling Your Steam Mop .......................................................................... 7
Using Your Steam Mop ................................................................................... 8
Using Your Handheld Steamer ........................................................................10
Using the Precision Clean Pocket Accessory ..............................................12
Using the Total Clean Pocket Accessory.....................................................12
Using the Scrub Blast Accessory ...............................................................13
Using the EZ Reach Bending Duster Accessory .......................................... 13
Using the Flat Scrubber Accessory ............................................................14
Using the Steam Duster Accessory ............................................................14
Caring for Your Steam Mop ............................................................................15
Ordering Optional Accessories .......................................................................17
Troubleshooting Guide ...................................................................................19
Frequently Asked Questions .......................................................................... 21
Warranty ...................................................................................................... 22
Thank you for
purchasing the
Shark
®
2-in-1
Blast & Scrub
Steam Pocket
®
Mop.
5 1-800-798-7398
Getting Started
When assembling your Steam Mop there may be a little water in or around the water tank. This is because we test all
our Steam Mops before you buy them, so you get a quality Shark® 2-in-1 Blast & Scrub Steam Pocket® Mop.
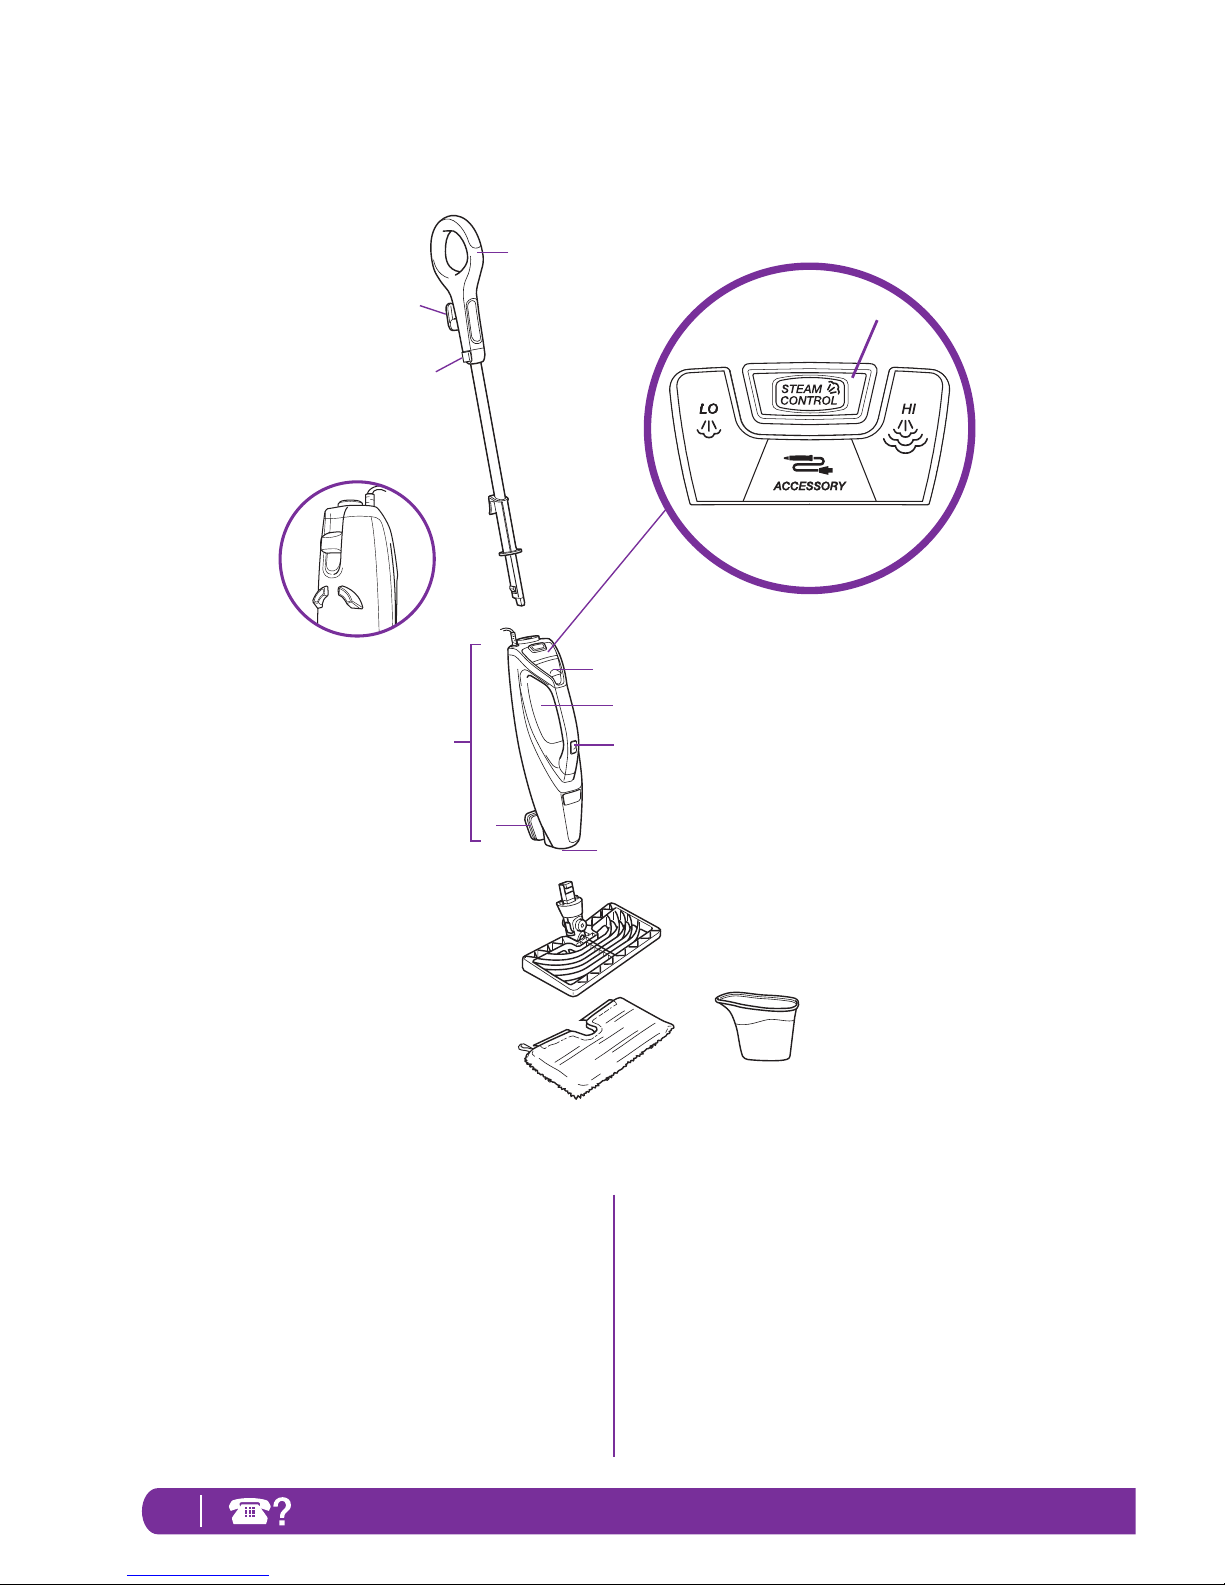
a Mop Handle
b Quick-Release Swivel Cord Wrap
c Cord Management Clip
d Engage Scrubber/Release Head
e Steam Control Button
f Water Tank Lid
g Water Tank
h Mop Body
i Steam Control Button for Above-Floor Mode
j Stain Scrubber
k Steam Nozzle
l Rectangle Mop Head
m Pocket Pad for Rectangle Mop Head
n Filling Flask
a
f
g
h
j
i
d
c
b
l
k
m n
e
6www.sharkclean.com
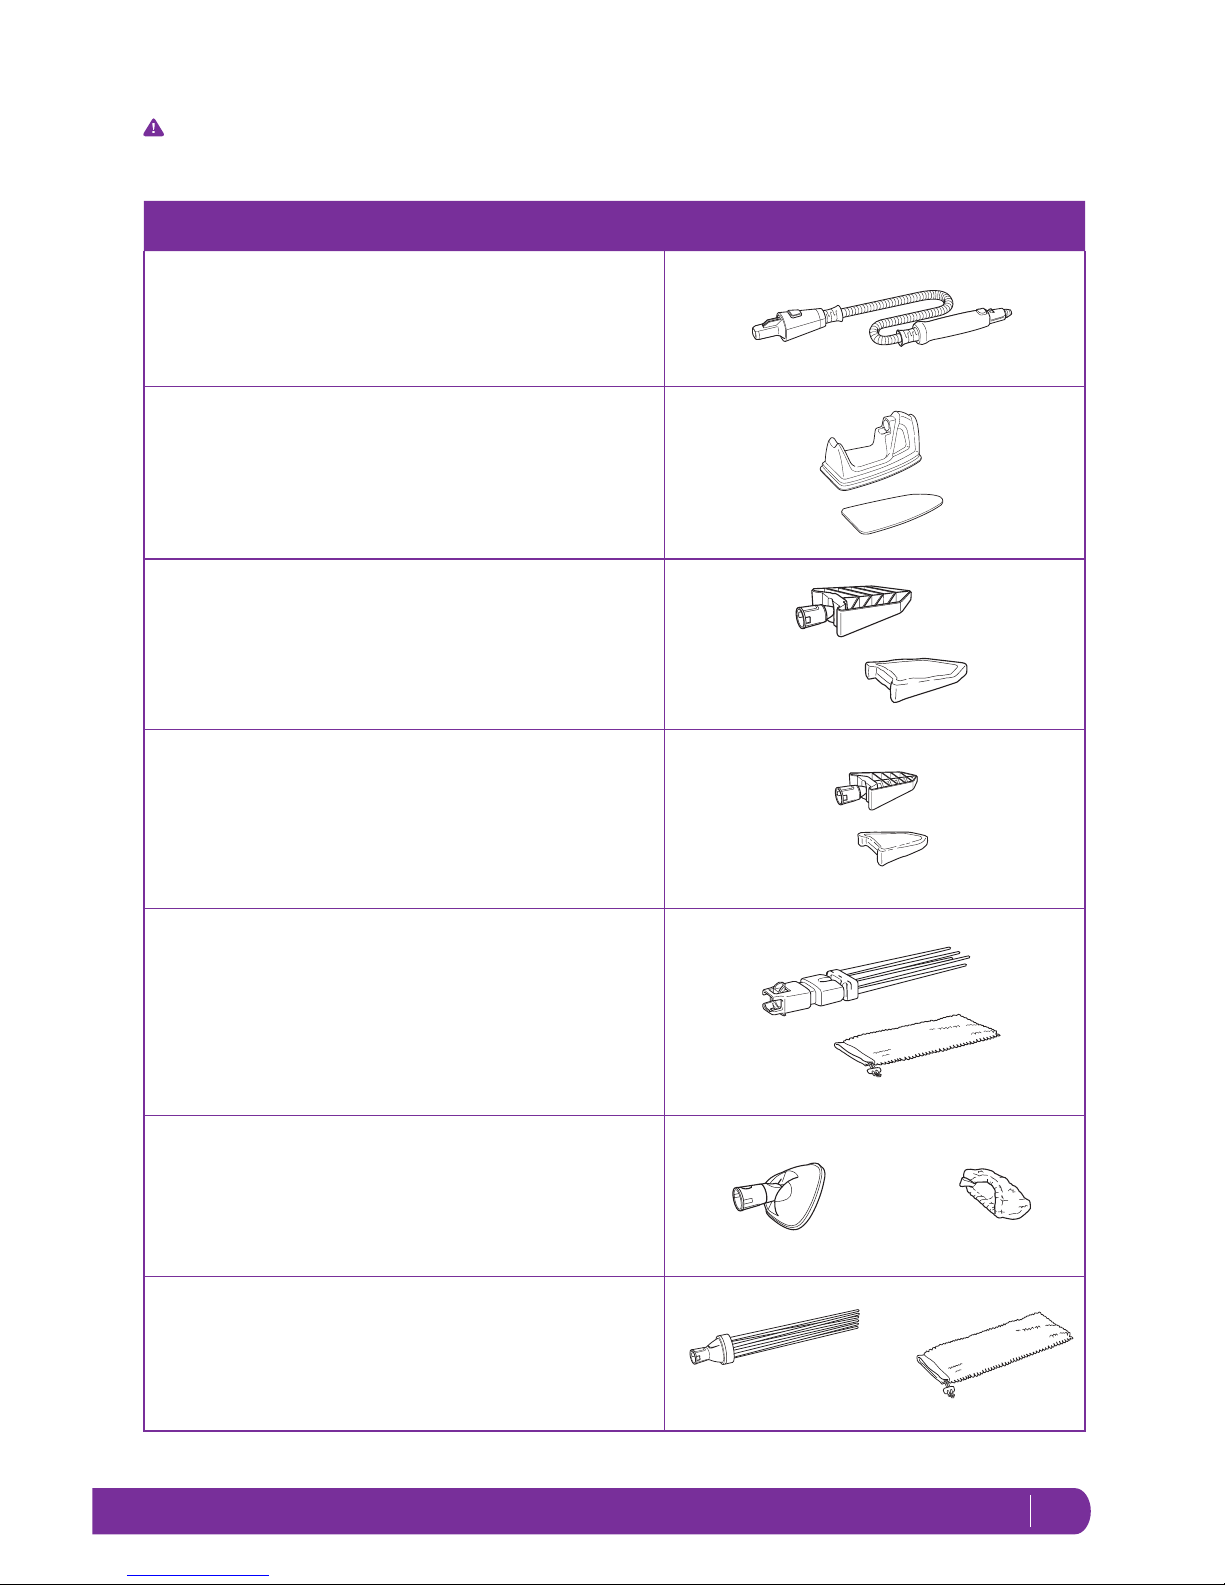
HANDHELD ACCESSORIES
ACCESSORY HOSE
The Shark® 2-in-1 Blast & Scrub Steam Pocket® Mop comes
with an assortment of accessories that easily attach to the
Accessory Hose for optimal range and mobility.
SCRUB BLAST ACCESSORY & PAD
Ideal for large, flat surfaces.
Do not use without the Scrub Blast Pad attached.
TOTAL CLEAN POCKET ACCESSORY & PAD
Ideal for flat surfaces, corners, and edges.
Do not use without a Total Clean Pocket Pad attached.
PRECISION CLEAN POCKET ACCESSORY & PAD
Ideal for small uneven surfaces, corners, and edges.
Do not use without a Precision Clean Pocket Pad attached.
EZ REACH BENDING STEAM DUSTER & PAD
Ideal for cleaning and dusting a variety of surfaces, like large
areas, especially hard-to-reach places, and crevices.
Do not use without the EZ Reach Bending Steam Duster
Padattached.
FLAT SCRUBBER ACCESSORY & PAD
Ideal for dusting a variety of surfaces, especially hard-toreach ones.
Do not use without the Flat Scrubber Pad attached.
STEAM DUSTER ACCESSORY & PAD
Ideal for cleaning and dusting a variety of surfaces, like large
areas, hard-to-reach places, and crevices.
Do not use without the Steam Duster Padattached.
For a full list of what is included with your Steam Mop, please refer to the inside flap of your box.
CAUTION:
Test in a small inconspicuous area and contact your surface manufacturer/installer for
specific information on your surface.
7 1-800-798-7398
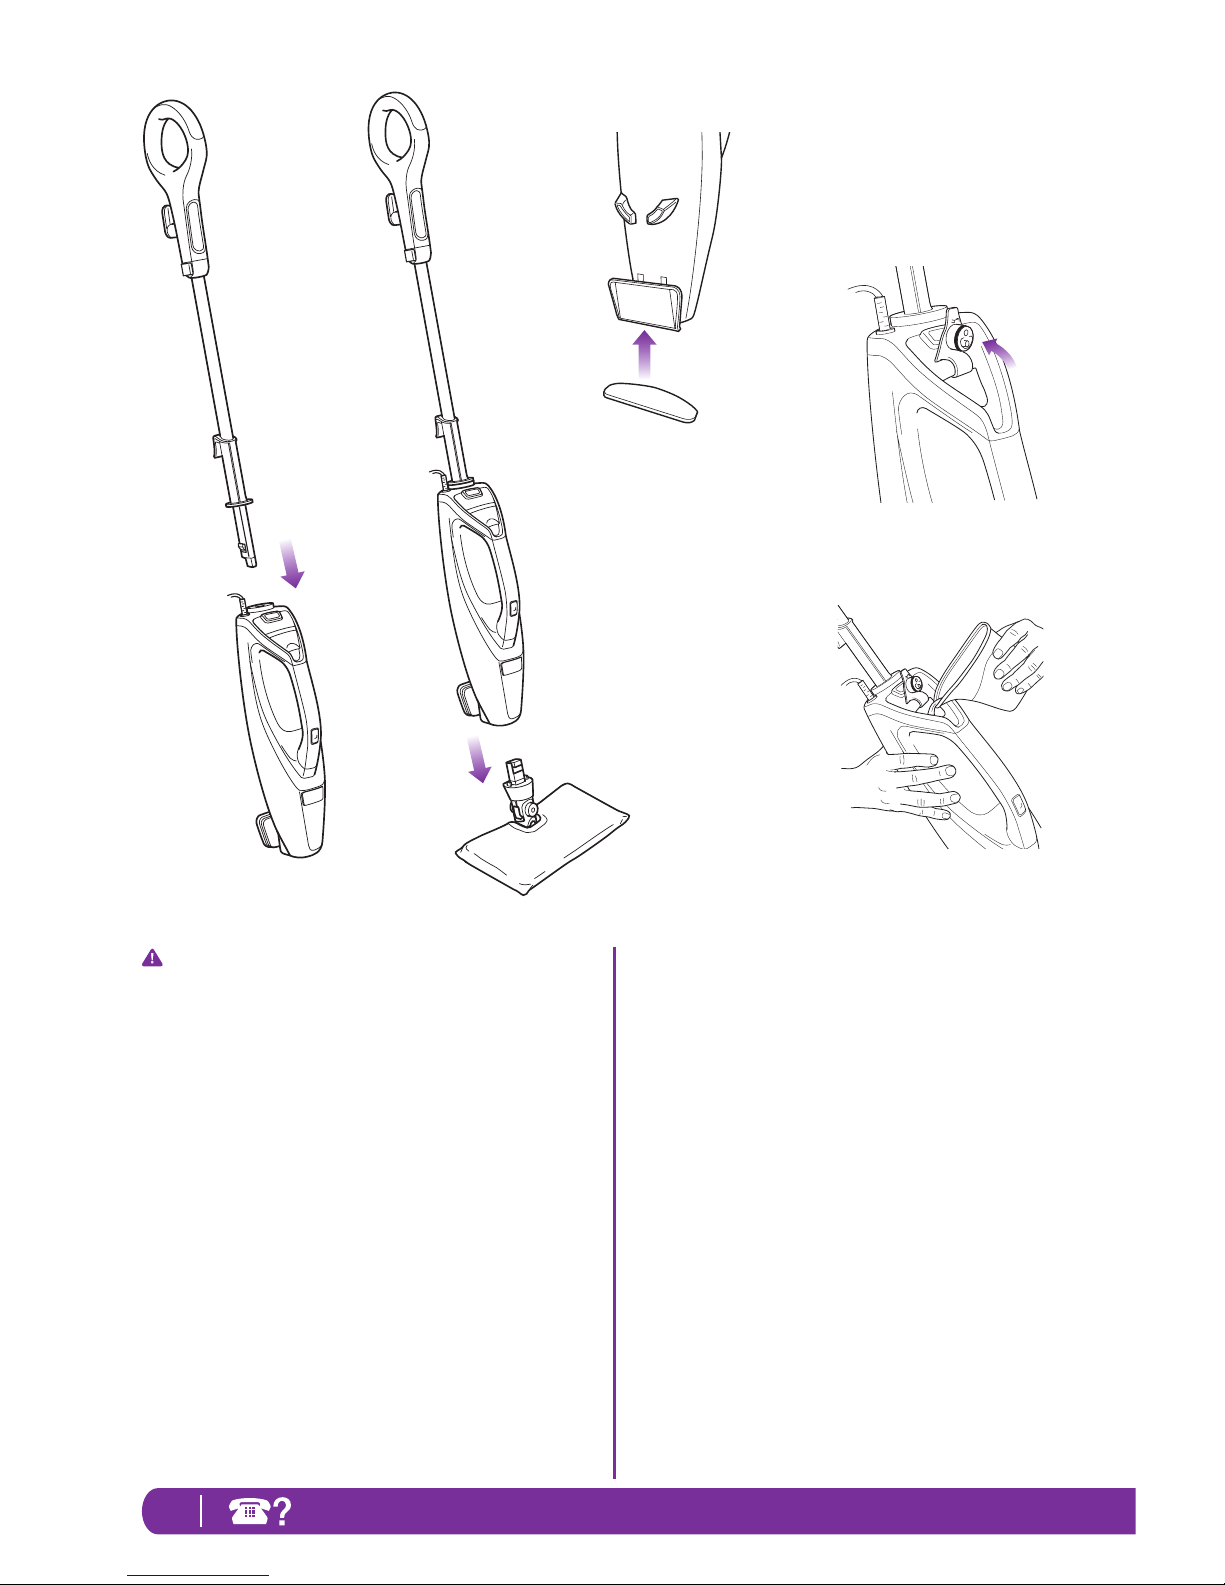
Assembling Your Steam Mop
fig. 1
fig. 2
WARNING: Always make sure the Steam Mop
is UNPLUGGED from the wall when not in use.
Never fill the Steam Mop, attach the Mop Head,
or change or remove the Pocket Pad when the
Steam Mop is plugged into the wall. Unplug from
the wall and allow to cool before you fill the
Steam Mop, attach or remove the Mop Head, or
change or remove the Cleaning Pad. To prolong
the life of your Steam Mop, we recommend using
distilled water. Make sure you add only water
to the tank. Chemicals or cleaning solutions
(including vinegar) may damage the Steam Mop
and could be unsafe for you and your family.
STEAM MOP ASSEMBLY
1 Insert the Mop Handle into the Mop Body. (fig. 1) Push
the Mop Handle in until you hear it click into place.
2 Select the Rectangle Mop Head and Pocket Pad. If
the Pocket Pad is not already attached, fit one side
of the Pocket Pad onto the Mop Head first, then,
using the loop, pull the Pocket Pad over the Mop
Head. Attach the hook-and-loop fasteners on the top
of the Pocket Pad to secure it in place.
3 Insert the Mop Head into the Mop Body. Push until
you hear it click into place (fig. 2).
4 Attach the Scrubbing Pad to the hook-and-loop
surface of the Stain Scrubber (fig. 3).
5 Pull up on the Water Tank Cap to open (fig. 4).
6 Use the Filling Flask to pour water into the Water
Tank (fig. 5). Do not overfill. Press the Water Tank
Cap firmly to close it.
NOTE: Steps 2–6 also apply to the Triangle Mop Head.
NOTE: The Triangle Mop Head may not be included
with your product. See box for specific product details.
fig. 4
fig. 5
fig. 3
 Loading...