

Shark Roadster UV208 Owner's Manual
BAGLESS UPRIGHT VACUUM
ASPIRATEUR VERTICAL SANS SAC
OWNER’S MANUAL
GUIDE DU PROPRIÉTAIRE
Model/ Modèle UV208
120V., 60Hz., 12 Amps
USA: EURO-PRO Operating LLC Canada: EURO-PRO Operating LLC
94 Main Mill Street, Door 16 4400 Bois Franc
Plattsburgh, NY 12901 St. Laurent, QC H4S 1A7
Tel.: 1 (800) 798-7398
www.sharkvac.com

Imprimé en Chine
Modèle UV208
27
Modèle UV208
GARANTIE LIMITÉE DE UN (1) AN
EURO-PRO Operating LLC garantit ce produit contre toute défectuosité matérielle ou de main
d’œuvre pour une période de un (1) an à compter de la date d’achat, dans le cadre d’une
utilisation domestique normale.
Si votre appareil manque de fonctionner correctement dans le cadre d’un usage domestique
normal, et ce, pendant la période de garantie, retournez l’appareil au complet et ses accessoires,
port payé, à:
Aux É.-U. : EURO-PRO Operating LLC, 94 Main Mill Street, Door 16, Plattsburgh, NY 12901
Au Canada: EURO-PRO Operating LLC, 4400 Bois Franc, St-Laurent (QC) H4S 1A7
Si EURO-PRO Operating LLC constate que l’appareil comporte une défectuosité matérielle ou de
main d’œuvre, EURO-PRO Operating LLC le réparera ou le remplacera sans frais de votre part.
Une preuve d’achat indiquant la date d’achat et un montant de 16,95 $ pour la manutention et
l’envoi de retour doivent être inclus.*
Les pièces non durables, y compris, sans s’y limiter, les filtres, les courroies d’entraînement,
brosses rotatives, ampoules et composants électriques exigeant normalement d’être remplacés
sont exclus de la garantie.
La responsabilité de EURO-PRO Operating LLC ne se limite qu’au coût des pièces de rechange
ou de l’appareil, à notre unique discrétion. Cette garantie ne couvre pas l’usure normale des
pièces et ne s’applique pas aux appareils qui ont été manipulés ou utilisés à des fins
commerciales. Cette garantie limitée exclut les dommages causés par un mauvais usage, une
manipulation négligente ainsi que les dommages causés par un emballage inadéquat ou une
mauvaise manutention en transit. Cette garantie ne couvre pas les dommages ou défectuosités
causés par ou découlant de l’envoi, des réparations ou des modifications apportés au produit ou à
ses pièces et ayant été effectués par un réparateur non autorisé par EURO-PRO Operating LLC.
Cette garantie est proposée à l’acheteur d’origine du produit et exclut toute autre garantie juridique
et(ou) conventionnelle. La responsabilité de EURO-PRO Operating LLC, si responsabilité il y a,
ne se rapporte qu’aux obligations spécifiques assumées de façon expresse par EURO-PRO
Operating LLC en vertu des modalités de cette garantie limitée. En aucun cas EURO-PRO
Operating LLC ne sera-t-elle responsable des dommages accessoires ou consécutifs de quelque
nature que ce soit. Certains États/certaines provinces ne permettent pas que des exclusions ou
limites soient imposées aux dommages accessoires ou consécutifs. Ainsi, la disposition ci-dessus
pourrait ne pas s’appliquer à vous.
Cette garantie vous confère des droits juridiques précis qui pourraient varier d’un état ou d’une
province à l’autre.
*Important: Emballez soigneusement l’appareil pour éviter tout dommage en transit. Avant
d’emballer l’appareil, assurez-vous d’y fixer une étiquette portant votre nom, votre adresse
complète et votre numéro de téléphone et précisant les détails de l’achat, le numéro de
modèle et le problème survenu. Nous vous recommandons en outre d’assurer le colis (les
dommages survenus en transit ne sont pas couverts par la garantie). Indiquez, sur
l’emballage extérieur, « AUX SOINS DU SERVICE À LA CLIENTÈLE». Comme nous nous
efforçons en tout temps d’améliorer nos produits, les spécifications décrites dans ce guide
sont sujettes à changement sans préavis.
------------------------------------------------------------------------------------------------------------------------------------------
FICHE D’ENREGISTREMENT DU PROPRIÉTAIRE
CONSOMMATEURS CANADIENS SEULEMENT
S’il vous plaît, remplir et poster cette carte d’enregistrement du produit en dedans des dix (10) jours
suivants l’achat. L’enregistrement nous permettra de communiquer avec vous en cas peu probable
d’une notification de sécurité du produit. En renvoyant cette carte, vous reconnaissez avoir lu et bien
comprendre les instructions d’usage et les avertissements qui accompagnent les instructions.
Au Canada: EURO-PRO Operating LLC, 4400, Bois Franc, St-Laurent (QC) H4S 1A7
______________________________________________________________________
Modèle
______________________________________________________________________
Date de l’achat Nom du magasin
______________________________________________________________________
Nom du propriétaire
______________________________________________________________________
Adresse Cité Province Code postal
IMPORTANT SAFETY INSTRUCTIONS
When using your SHARK Roadster Upright Vacuum, basic safety precautions
should always be observed, including the following:
WARNING: To reduce the risk of fire,
electrical shock, or injury:
1. Do NOT leave vacuum cleaner
unattended when it is plugged in. Unplug
from outlet when not in use and before
removing filters.
2. To reduce the risk of electric shock – do
NOT use outdoors or on wet surfaces.
3. Do NOT allow children to use as a toy.
Close attention is necessary when used
by or near children.
4. Use only as described in this manual. Use
only manufacturer’s recommended
attachments.
5. Do NOT use with damaged cord or plug.
Do NOT use vacuum cleaner if it has been
dropped, damaged, left outdoors, or
dropped into water. Return appliance to
EURO-PRO Operating LLC for
examination, repair or adjustment.
6. Do NOT pull or carry by cord. Do NOT use
cord as a handle, close a door on cord,
or pull cord around sharp edges or
corners. Do NOT run appliance over cord.
Keep cord away from heated surfaces.
7. Do NOT unplug by pulling on cord. To
unplug, grasp the plug, not the cord.
8. Do NOT handle plug or vacuum cleaner
with wet hands.
9. Do NOT use the vacuum cleaner to pick
up large objects or objects that are likely
to damage the vacuum cleaner.
10. Keep hair, loose clothing, fingers, feet and
all parts of body away from openings,
rotating agitator and other moving parts.
Do NOT operate cleaner in bare feet or
when wearing open toe shoes.
11. Do NOT pick up hot coals, cigarette butts,
matches or any hot, smoking, or burning
objects.
12. Do NOT pick up hard or sharp objects
such as glass, nails, screws, coins, etc.
13. Do NOT use without filters in place.
Use ONLY filters and accessories
provided by EURO-PRO. Failure to do
so will void the warranty.
14. Turn off all controls before plugging or
unplugging vacuum cleaner into
electrical outlet.
15. Use extra care when vacuuming on
stairs.
16. Do NOT pick up flammable or
combustible materials (lighter fluid,
gasoline, kerosene, etc.) or use in the
presence of explosive liquids or vapor.
17. Do NOT pick up toxic material (chlorine
bleach, ammonia, drain cleaner, etc.).
18. Do NOT use in an enclosed space
filled with vapors given off by oil based
paints, paint thinner, moth proofing
substances, flammable dust, or other
explosive or toxic vapors.
19. Use only on dry, indoor surfaces.
20. Do NOT use for any purpose other
than described in this user’s guide.
21. The use of an extension cord is not
recommended.
22. Do NOT put any objects into openings.
Do NOT use with any opening blocked.
Keep free of dust, lint, hair and
anything else that may reduce air flow.
23. Store your appliance indoors in a cool,
dry area.
24. Keep your work area well lit.
25. Do NOT immerse the vacuum into
water or other liquids.
26. Keep end of hose, wands and other
openings away from your face and
body.
27. To avoid damaging the carpet, keep
the vacuum cleaner head moving at all
times.
SAVE THESE INSTRUCTIONS
For Household Use Only
WARNING: To reduce the risk of electric shock, this appliance has a
polarized plug (one blade is wider than the other). This plug will fit in a
polarized outlet only one way. If the plug does not fit fully in the outlet,
reverse the plug. If it still does not fit, contact a qualified electrician to install
the proper outlet. Do NOT modify the plug in any way.
Rev. 06/05
1

ASPIRATEUR VERTICAL SANS SAC
COMMANDE DE FILTRES ET DE COURROIES DE
RECHANGE
pour le modèle UV208
PRECAUTIONARY MEASURES
Important: If the suction opening in the unit, the hose or the extension tube become
blocked, switch off the vacuum cleaner and remove the blocking
substance before you start the unit again.
1. Do not operate the vacuum
cleaner to close too heaters,
or radiators.
5. When pulling out the power plug
from the wall outlet, pull the plug
not the power cord.
Composez le: 1 (800) 798-7398
du lundi au vendredi de 8 h 30 à 17 h 00 heure normale de l’Est
ou
visitez notre site web au: www.sharkvac.com
6. Do not pick up anything that is
burning or smoking such as
cigarettes, matches or hot ashes.
2. Before inserting the power plug
into the wall outlet, make sure that
your hands are dry.
7. Do not run appliance over power
cord.
POUR LE SOUTIEN TECHNIQUE
au modèle UV208
Composez le: 1 (800) 798-7398
du lundi au vendredi de 8 h 30 à 17 h 00 heure normale de l’Est
3. Do not vacuum any liquids.
Remarque:
L'anneau de filtre, les filtres pré-moteur, secondaire et d’échappement sont
lavables. Veuillez toutefois les remplacer tous les trois (3) mois afin
d’assurer un rendement optimal à votre aspirateur.
Le filtre HEPA est lavable.
Veuillez toutefois le remplacer tous les trois (3) à six
(6) mois, selon l’usage, pour assurer un rendement optimal à votre aspirateur.
Nous vous recommandons de le nettoyer une fois par mois ou lorsque la
succion semble réduite. Pour laver votre filtre HEPA, tenez la cartouche du
filtre par sa bride et rincez-la sous le robinet jusqu’à ce que la poussière
visible soit éliminée. Le filtre HEPA pourrait subir une certaine
décoloration. Ceci est normal et n’affectera en rien sa performance.
Lorsque vous avez terminé, secouez pour éliminer tout excédent d’eau.
NE LAVEZ PAS au lave-vaisselle.
Après leur nettoyage, il est important que vous laissiez les filtres HEPA, de
débris et pré-moteur sécher COMPLÈTEMENT avant de les réutiliser. Le
temps de séchage à l’air recommandé est de 24 heures. NE PAS
SÉCHER À LA SÉCHEUSE.
Important:
Assurez-vous que TOUS les filtres sont entièrement secs avant de les
remettre dans l’aspirateur.
8. Do not use without dust cup
filter or filters in place.
9. Before you start vacuuming,
make sure to remove large or
sharp objects that might
damage the vacuum.
4. Keep hair, loose clothing, fingers,
feet and all parts of body away from
openings, rotating agitator and other
moving parts.
25 2
GETTING TO KNOW YOUR BAGLESS CYCLONIC
UPRIGHT
DÉPANNAGE
Cet appareil a été inspecté soigneusement en usine et était en bon état de marche lors
de son envoi. Si un problème mineur survient, il est souvent facile de le résoudre en
découvrant d’abord sa cause. La grille ci-dessous pourra vous aider à cet égard.
18*
PROBLÈME RAISON POSSIBLE SOLUTION POSSIBLE
L’aspirateur
ne se met pas
en marche
1. Mal branché dans la prise
murale.
2. Pas d’alimentation en
électricité à la prise.
3. Commutateur marche/arrêt
en position d’arrêt.
4. Thermostat du moteur
enclenché.
5. Fusible sauté/disjoncteur
enclenché.
1. Branchez-le fermement.
2. Vérifiez le fusible ou disjoncteur.
3. Mettez le commutateur en position
de marche.
4. Réinitialisez le thermostat.
5. Réinitialisez le disjoncteur ou
remplacez le fusible.
L’aspirateur
n’aspire pas
1. Coupelle pleine ou obstruée.
2. Mauvais réglage d’épaisseur
de tapis.
3. Bec ou port d’entrée de la
poussière bloqué.
4. Boyau bloqué.
5. Courroie brisée.
6. Boyau mal enfoncé.
7. Filtres souillés.
8. Le filtre HEPA doit être
nettoyé or remplacé.
9. Le cadre de filtre HEPA doit
être nettoyé.
1. Nettoyez la coupelle
2. Ajustez le réglage
3. Retirez l’obstruction.
4. Retirez l’obstruction.
5. Remplacez la courroie
6. Enfoncez bien le boyau.
7. Nettoyez/changez les filtres.
8. Nettoyez or remplacez le filtre
HEPA.
9. Nettoyez le cadre de filtre HEPA.
L'aspirateur
aspire les
carpettes ou
pousse trop
fort
1. Mauvais réglage d’épaisseur
de tapis.
1. Ajustez le réglage
L’agitateur ne
tourne pas
1. Courroie brisée.
2. Courroie mal installée.
1. Remplacez la courroie
2. Lisez la section sur le changement
de la courroie et le nettoyage de
l’agitateur
La brosse
turbo activée
à l’air ne
tourne pas ou
tourne
lentement
1. Obstruction à la brosse, à la
turbine ou au coude.
2. Courroie brisée.
3. Boyau obstrué.
4. Filtre HEPA obstrué.
1. Retirez les obstructions
2. Appelez le 1 (800) 798-7398.
3. Nettoyez l’obstruction.
4. Nettoyez le filtre HEPA
Débit d’air
obstrué avec
usage
d’accessoires
– le bruit
change
1. L’accessoire restreint le débit
d’air.
2. Les débris d’un nouveau
tapis bloquent la voie d’air.
1. Vérifiez l’accessoire
2. Retirez l’obstruction.
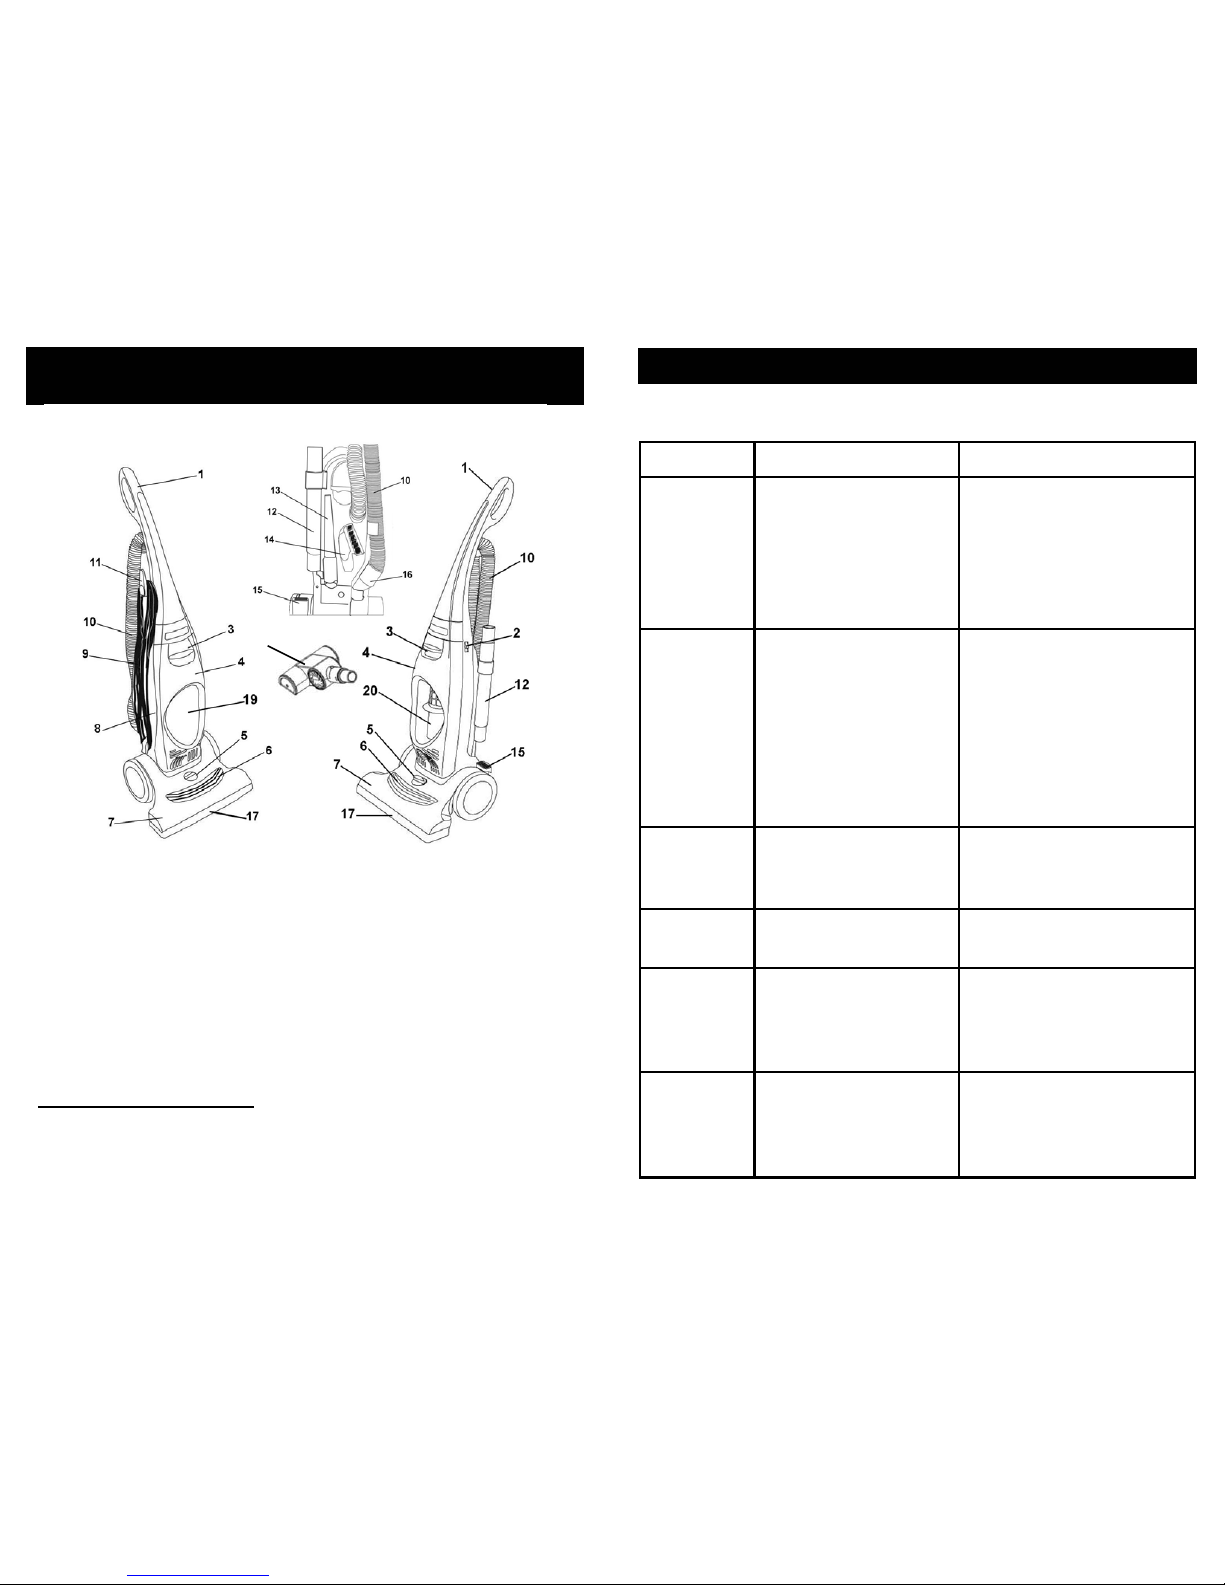
11. Quick Release Power Cord Holder
12. Extension Tubes (X2)
13. Crevice Tool
14. Upholstery Brush
15. Handle Release
16. Hose Connector
17. Furniture Guard
18. Air Driven Turbo Brush (*Optional)
19. Dust Cup (Not shown)
20. HEPA Filter Frame
1. Upper Handle
2. On/Off Switch
3. Front Cover Release
4. Front Cover
5. Carpet Height Adjustment Knob
6. Head Light
7. Motorized Power Head
8. Main Body
9. Power Cord
10.Flexible Hose
Technical Specifications
Voltage: 120V., 60Hz.
Power: 12 Amps
Note: Illustrations may differ from actual unit.
3 24
4. Retirez les ampoules en les enlevant
soigneusement.
5. Mettez en place les ampoules neuves
en les insérant.
6. Remettez en place la lentille et les deux
vis qui tiennent la lentille en place.
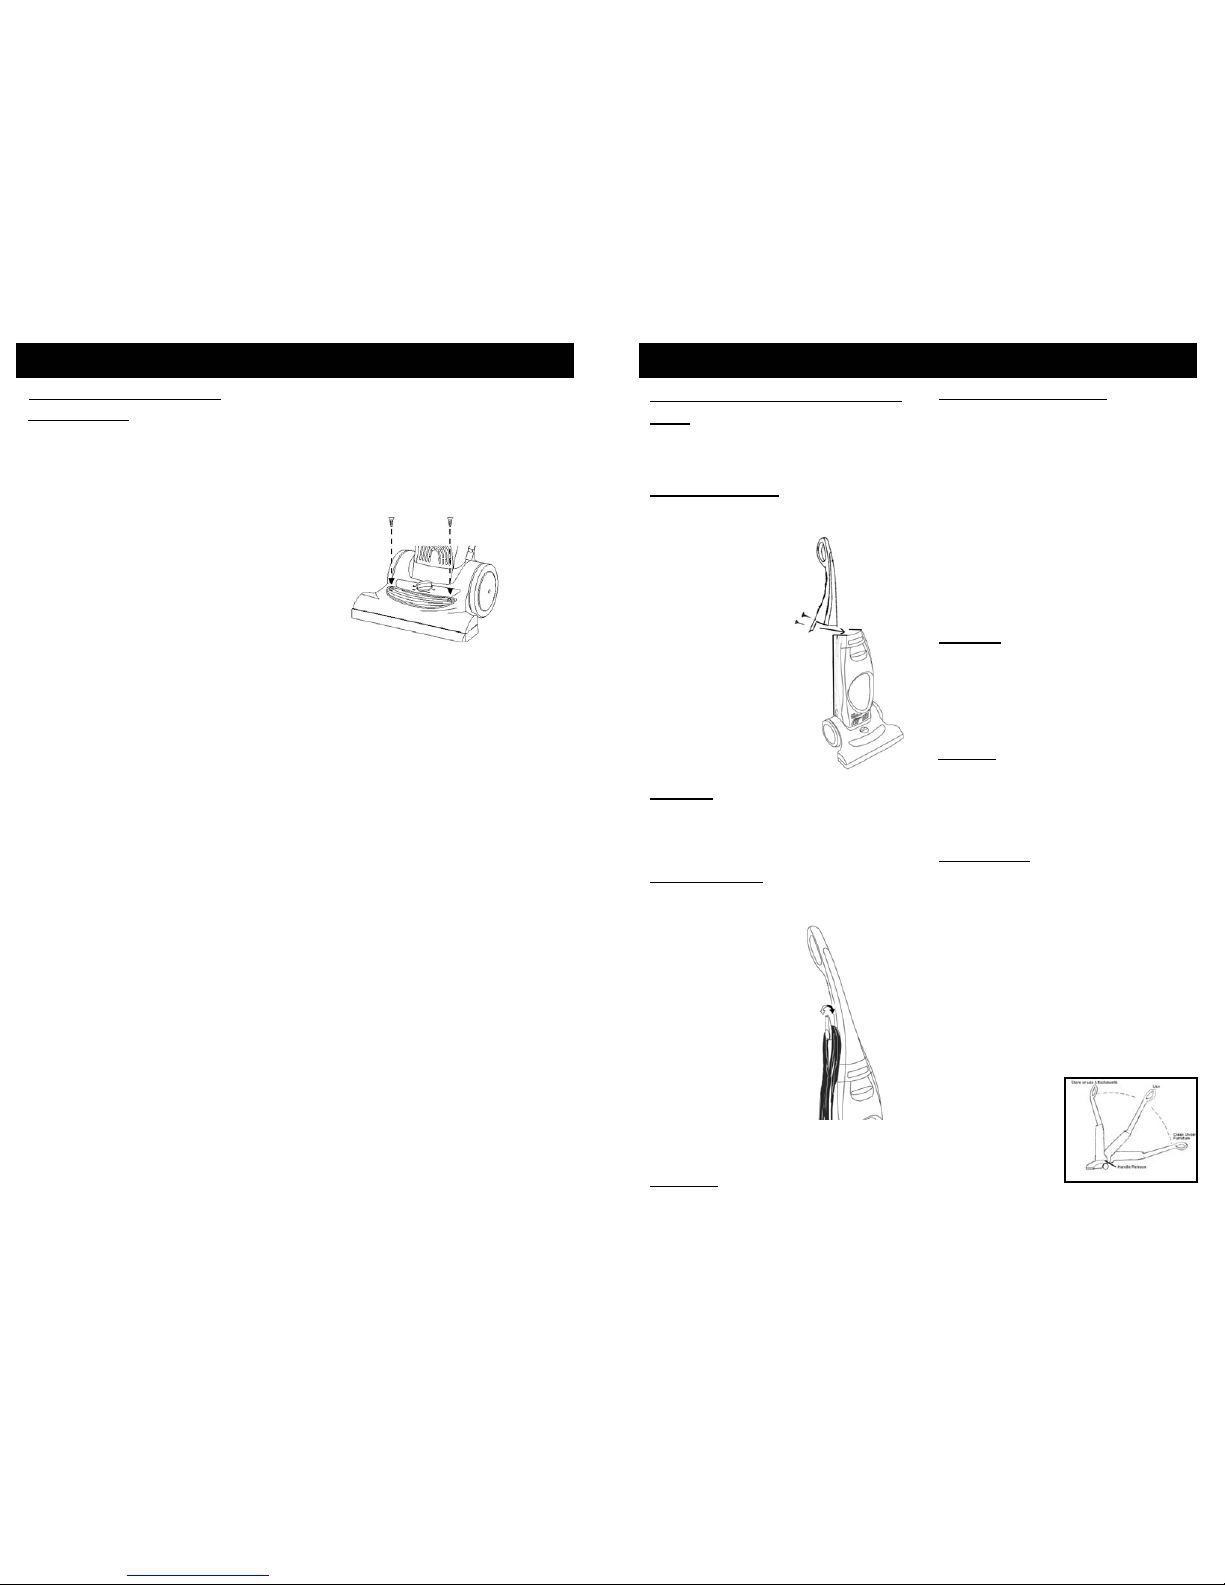
Handle Assembly
1. Carefully unpack all components,
set aside packaging.
2. Lift vacuum body to
upright position.
3. Remove the screws (2)
that come attached
to the body.
4. From the rear of
the vacuum, align
the handle with
groove and slide
onto vacuum. If
necessary, use
thumb and finger
pressure to slide
handle into position.
5. Once handle is in place,
secure the handle with
the screws (2). (Fig. 1)
Caution: Do not over tighten. Over
tightening could strip the screw holes.
Do not operate the vacuum without
the handle screws in place.
How to Start
The upright vacuum can be used on
multiple types of carpeting, bare floors or
upholstery with attachments. When using
the attachment tools such as the crevice
tool and the upholstery brush, place the
handle of the vacuum in the upright
position.
1. Turn the quick release cord holder
to either side 180° to release the
power cord.
2. Plug the power cord into the electrical
outlet.
3. Depress on the handle release pedal
to release the handle.
4. Push the On/Off button to the "On"
position to turn
the vacuum on.
5. When using
the attachments,
the vacuum
must be in the
upright
position. (Fig. 3)
Cord Assembly
1. Make sure that the quick release
cord holder is in the upright
position.
2. Remove the wire
tie from the
power cord.
3. Wrap the cord into
place by wrapping
it in a clockwise
direction around
the quick release
cord holder and
the lower cord
holder. (Fig. 2)
4. Turn the quick
release cord holder
to the left or to the
right to unwrap the power cord.
(Fig. 2)
Warning: Do not plug in if the power
On/Off button is in the
"On" position.
Caution: Do NOT pull the vacuum
cleaner around the room by the hose as it
could tip over and cause damage. When
using the attachments, do NOT over
extend the hose length when reaching.
Trying to reach beyond the hose reach
could cause the vacuum to tip over.
Fig. 1
Fig. 2
Fig. 3
OPERATING INSTRUCTIONS
Assembling Your Vacuum Cleaner
Note: Do not plug the power cord
into an electrical outlet until
the vacuum is fully
assembled.
4
Using the Attachments
1. Place vacuum in its upright position.
Make sure that the vacuum cleaner
is NOT plugged into the electrical
outlet when adding or removing
accessories.
2. Turn the carpet adjustment knob
to the highest position.
3. Remove the hose connector from
the rear of the unit and push in the
desired attachment firmly onto the
end of the hose.
4. If additional length is required, attach
one or both of the extension tubes to
the end of the hose and then attach
the crevice tool or upholstery brush to
the end of the extension tube.
Warning: Avoid tipping the vacuum or
setting it on furniture, fringed area rugs or
carpeted stairs while you are using the
hose with the attachments. When the
vacuum is turned on, the beater brush will
continue to rotate. Avoid leaving the
vacuum in one place for an extended
period of time, particularly on thick carpet.
Changement de l’ampoule
DIRECTIVES D’UTILISATION
1. Arrêtez l’appareil et débranchez-le.
2. Avec un tournevis Philips #2, retirez les
deux (2) sur la lentille du phare avant
(Fig. 25).
3. Levez la lentille du phare avant.
Avertissement: Pour réduire le risque
de choc électrique, débranchez le cordon
d’alimentation avant de retirer la coupelle
à poussière, le filtre HEPA,avant de
changer les filtres ou d’effectuer toute
vérification d’entretien ou de dépannage.
Fig. 25
23
 Loading...