

Page 1
NV800ANZMN
Series
INSTRUCTIONS
AUST: 1800 890 840
NZ: 0800 002 999
Page 2
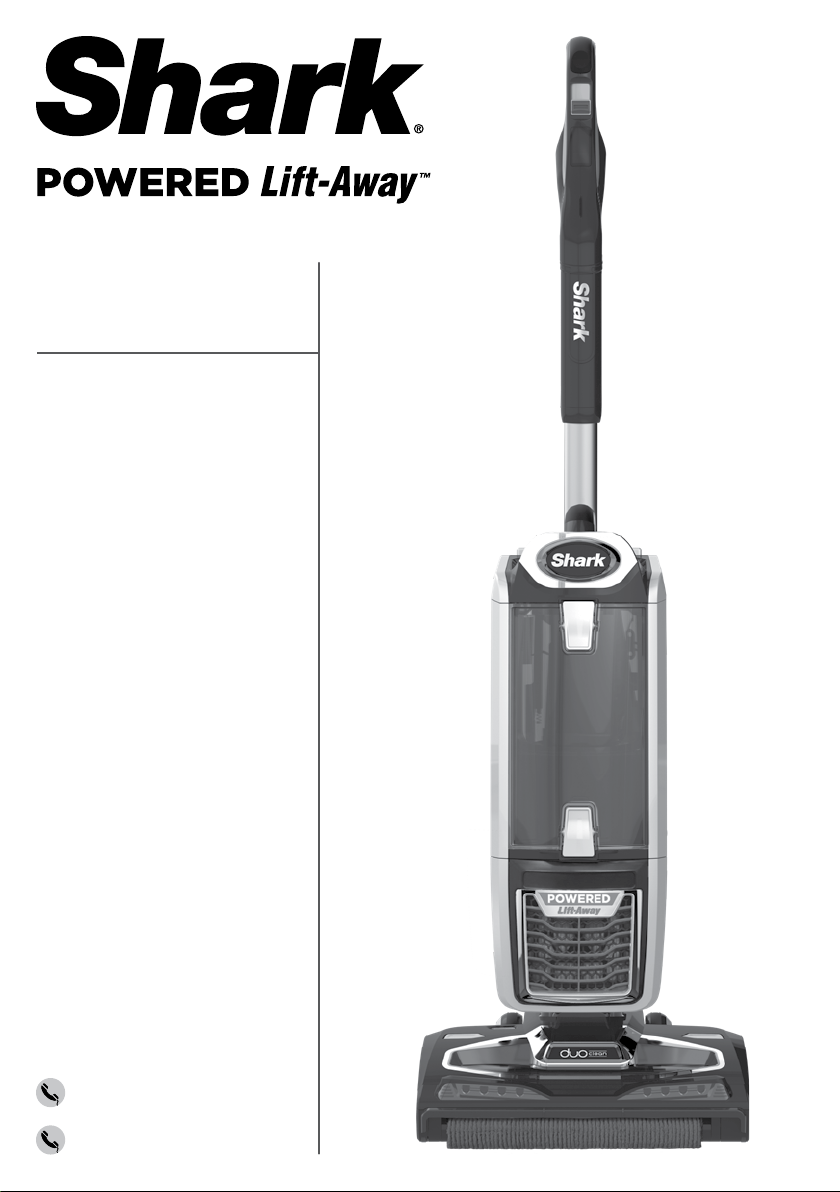
THANK YOU
for purchasing the Shark® Powered Lift-Away™ DuoClean
™
TIP: You can find the
model number on the
rating label located on
the back of your unit.
TIP: You can locate the
date code on one of the
prongs of the power
cordplug.
RECORD THIS INFORMATION
Model Number: ��������������������������������������
Date Code: �����������������������������������������
Date of Purchase (Keep receipt): �����������������������
Store of Purchase: �����������������������������������
TECHNICAL SPECIFICATIONS
Voltage: 220-240V~, 50-60Hz
Watts: 850W
Power Nozzle: 80W
GMA-501823-EA
1 AUST: 1800 099 385
PLEASE READ CAREFULLY AND KEEP FOR FUTURE
REFERENCE.
This Owner’s Guide is designed to help you get a complete
understanding of your new Shark Powered Lift-Away
DuoClean.
If you have any questions, please call the customer service
line at AUST: AUST: 1800 099 385 or NZ 0800 112 660.
Page 3

CONTENTS
Important Safety Instructions . . . . . . . . . . . . . . . . . . . . . . . . . . . 3
Getting to Know Your Shark® Powered
Lift-Away™ DuoClean™ . . . . . . . . . . . . . . . . . . . . . . . . . . . . . . . . . . 5
Assembling Your Vacuum . . . . . . . . . . . . . . . . . . . . . . . . . . . . . . 7
Using Your Vacuum in Upright Mode . . . . . . . . . . . . . . . . . . . . 9
What Does the Brushroll Indicator Light Mean? � � � � � � � � � � � � � 9
Using Your Vacuum in Above-Floor Mode . . . . . . . . . . . . . . . . 11
The Benefits of Suction Control � � � � � � � � � � � � � � � � � � � � � � � � � � � 11
Using Your Vacuum in Powered Lift-Away™ Mode . . . . . . . . . 13
Powered Lift-Away Cleaning � � � � � � � � � � � � � � � � � � � � � � � � � � � � � � 13
Lift-Away Cleaning � � � � � � � � � � � � � � � � � � � � � � � � � � � � � � � � � � � � � � �14
Compatible Accessories . . . . . . . . . . . . . . . . . . . . . . . . . . . . . . . 15
Maintenance . . . . . . . . . . . . . . . . . . . . . . . . . . . . . . . . . . . . . . . . . 17
Emptying the Dust Cup � � � � � � � � � � � � � � � � � � � � � � � � � � � � � � � � � � � 17
Cleaning the Filters � � � � � � � � � � � � � � � � � � � � � � � � � � � � � � � � � � � � � � �18
Cleaning the Brushroll � � � � � � � � � � � � � � � � � � � � � � � � � � � � � � � � � � � �19
Cleaning the Soft Roller � � � � � � � � � � � � � � � � � � � � � � � � � � � � � � � � � � 20
Checking the Nozzle for Blockages � � � � � � � � � � � � � � � � � � � � � � � 20
Troubleshooting Guide . . . . . . . . . . . . . . . . . . . . . . . . . . . . . . . . 21
Warranty . . . . . . . . . . . . . . . . . . . . . . . . . . . . . . . . . . . . . . . . . . . . 22
2NZ: 0800 112 660
Page 4
IMPORTANT SAFETY INSTRUCTIONS
FOR HOUSEHOLD USE ONLY
WARNING
This appliance is not intended for use by persons (including children) with
reduced physical, sensory or mental capabilities, or lack of experience and
knowledge, unless they have been given supervision or instruction concerning
use of the appliance by a person responsible for their safety. Children should be
supervised to ensure that they do not play with the appliance.
CAUTION: THE MOTORIZED
FLOOR NOZZLE, WAND, AND
HANDLE CONTAIN ELECTRICAL
CONNECTIONS:
• These are not serviceable parts.
• Do not use to suck up water.
• Do not immerse in water for cleaning.
•
The handle/wand should be checked
regularly and must not be used if damaged.
1
Inspect supply cord and plug for any
damage before use. If the supply cord
is damaged, it must be replaced by the
manufacturer, its service agent or similarly
qualified persons in order to avoid a
hazard. DO NOT use vacuum cleaner with
a damaged with a damaged cord or plug.
Turn off all controls before plugging in or
unplugging the vacuum cleaner. Store
your vacuum cleaner with the supply cord
secured around the two cord hooks.
2 DO NOT use outdoors or on wet surfaces.
Use only on dry surfaces.
3 The plug must be removed from
the socket-outlet before cleaning or
maintaining the appliance.
4 If vacuum cleaner is not working as it
should, or has been dropped, damaged,
left outdoors, or dropped into water, return
it to the manufacturer for examination,
repair, or adjustment.
5 DO NOT pull or carry vacuum cleaner by
the cord or use the cord as a handle.
6 DO NOT unplug by pulling on cord. Grasp
the plug, not the cord.
7 DO NOT handle plug or vacuum cleaner
with wet hands.
8 DO NOT run the vacuum cleaner over the
power cord, close a door on the cord or
pull the cord around sharp corners.
9 The use of an extension cord is NOT
recommended.
10 DO NOT leave vacuum cleaner unattended
when plugged in.
11 Keep cord away from heated surfaces.
12 Always turn off this appliance before
connecting or disconnecting motorized
nozzle.
GENERAL USE
13 Hair removal tool has a sharp edge. Take
care when using and keep tool away from
children.
14 Use only as described in this manual.
15 Keep your work area well lit.
16 Keep the vacuum cleaner moving over
the carpet surface at all times to avoid
damaging the carpet fibers.
17 DO NOT place vacuum cleaner on unstable
surfaces such as chairs or tables.
18 DO NOT put any objects into openings. DO
NOT use with any opening blocked; keep
free of dust, lint, hair, and anything that
may reduce airflow.
3 AUST: 1800 099 385
Page 5

SAVE THESE INSTRUCTIONS
PLEASE READ CAREFULLY BEFORE USE
19 DO NOT allow the appliance to be used
by children. Close supervision is necessary
when used near children. This is not a toy.
20 DO NOT use without brushroll, Soft Roller,
dust cup, and all filters in place.
21 DO NOT use if airflow is restricted; if the air
paths or the motorized floor nozzle become
blocked, turn the vacuum cleaner off and
unplug from electrical outlet. Remove
all obstructions before you turn on the
unitagain.
22 Keep nozzle away from hair, face, fingers,
uncovered feet, or loose clothing.
23 Only use manufacturer’s recommended
attachments.
DUST CUP/FILTERS/ACCESSORIES
Before turning on the vacuum:
24 Make sure that all filters are thoroughly dry
after routine cleaning.
25 Make sure brushroll, Soft Roller, dust cup,
and all filters are in place after routine
maintenance.
26 Make sure accessories are free of
blockages and keep openings away from
face and body.
27 Only use Shark
accessories (failure to do so will void
thewarranty).
®
-brand filters and
GENERAL CLEANING
28 DO NOT vacuum up hard or sharp objects
such as glass, nails, screws, or coins that
could damage the vacuum cleaner.
29 DO NOT vacuum up drywall dust,
fireplace ash, or embers. DO NOT use
as an attachment to power tools for dust
collection.
30 DO NOT vacuum up smoking or burning
objects such as hot coals, cigarette butts,
or matches.
31 DO NOT vacuum up flammable or
combustible materials (e.g., lighter fluid,
gasoline, or kerosene) or use vacuum in
areas where they may be present.
DO NOT
32
chlorine bleach, ammonia, or drain cleaner).
33 DO NOT use in an enclosed space
where vapors are present from paint,
paint thinner, moth-proofing substances,
flammable dust, or other explosive or toxic
materials.
34 DO NOT vacuum up any liquids.
35 DO NOT immerse vacuum cleaner in water
or other liquids.
36 Use extra care when cleaning on stairs.
vacuum
up toxic solutions (e.g.,
4NZ: 0800 112 660
Page 6

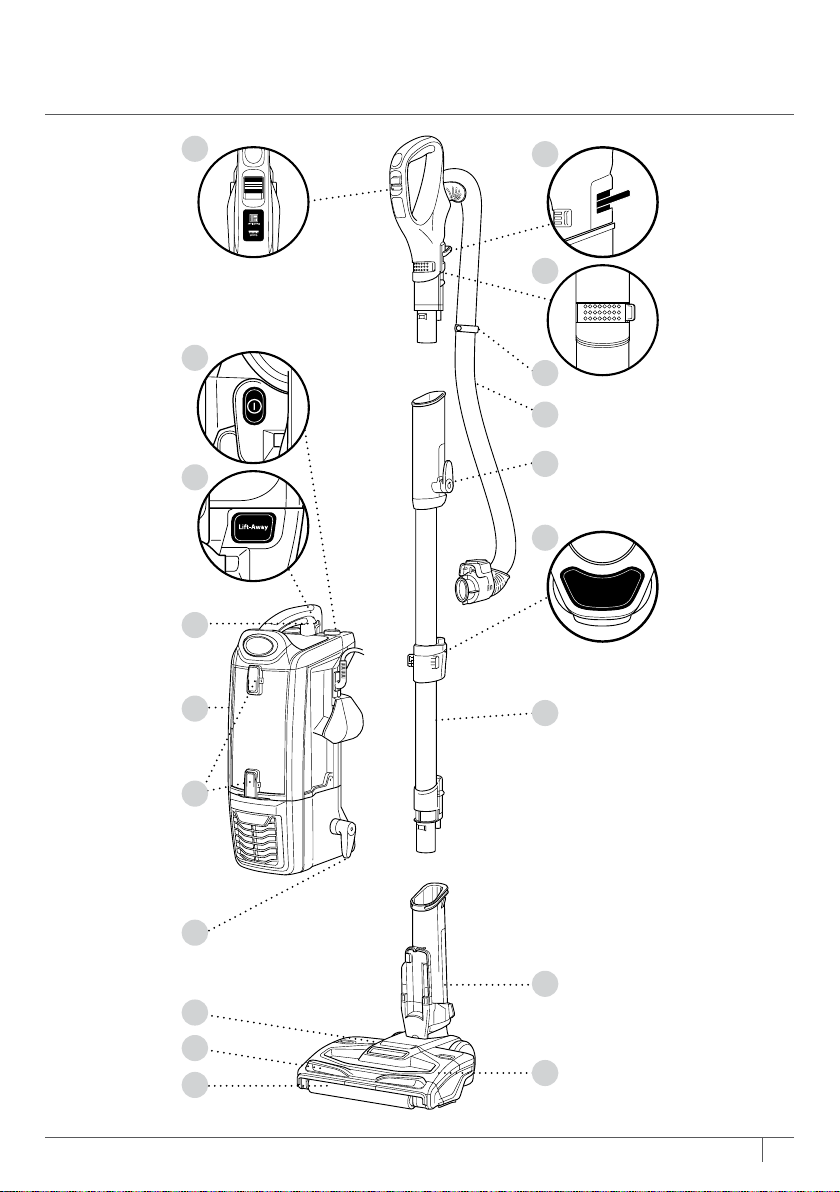
GETTING TO KNOW YOUR SHARK®
POWERED LIFT-AWAY™ DUOCLEAN
WELCOME!
Congratulations on
your purchase. Use this
instruction manual to
learn about your new
vacuum’s great features.
From assembly to use
to maintenance, you will
find it all in here.
MAIN UNIT
A Surface Selector
B Handle Release Button
C Suction Control Slide
D Power Switch
E Hose Clip
F Hose
G Upper Cord Hook
H Lift-Away Button
I Wand Release Button
J Dust-Cup Release Latch
K Lift-Away Pod
L Wand
M Dust-Cup Empty Buttons
N Lower Cord Hook
O Motorized Floor Nozzle
P Brushroll Indicator Light
Q Headlights
R Brushroll Garage
S Soft Roller
™
5 AUST: 1800 099 385
Page 7
Wand Release
A
B
C
D
E
F
H
G
I
J
K
L
M
N
O
P
Q
S
R
6NZ: 0800 112 660
Page 8

ASSEMBLING
YOUR VACUUM
TIP: Push hose clip
into back of wand for
convenience.
TIP: For quick cord
access, rotate upper hook
down and remove cord.
STEP 1 STEP 2
TIP:
Use cord clip located
on the side of wand to
hold cord in place while
vacuuming.
7 AUST: 1800 099 385
1 Place motorized floor
nozzle on floor and insert
wand.
2 Insert handle into wand.
Page 9

STEP 3 STEP 4 STEP 5
3 Place pod onto wand and
slide down to connect.
4 Connect hose into back of
pod until you hear a click.
5 Place included accessories
their accessory posts.
8NZ: 0800 112 660
Page 10

USING YOUR VACUUM
IN UPRIGHT MODE
WARNING: DO
NOT use to vacuum
up drywall dust,
fireplace ash, or
embers. DO NOT use
as an attachment to
power tools for dust
collection.
WHAT DOES THE
BRUSHROLL INDICATOR
LIGHT MEAN?
Solid Green
The brushrolls are on and
working as they should.
Solid Red
There is a jam in the brushroll
and/or soft roller area. Turn
your vacuum off and remove
any blockages.
Flashing Red*
The motorized floor nozzle
is overheating. Turn your
vacuum off and wait for it to
cool down.
No Light
The brushrolls are off because
the vacuum is off.
* See Troubleshooting section for further
instructions.
STEP 1
1 Plug power cord into outlet. Place foot on floor nozzle
andtilt handle back.
9 AUST: 1800 099 385
Page 11

STEP 2 STEP 3
Suction
Control
MAX MIN
2 The Powered Lift-Away DuoClean™ has a
2-speed Slider Switch on the handle. Move
the Slider Switch to appropriate speed
setting. The soft roller spins in both settings
to pick up extra dust and debris.
Hard Floor
The brushrolls spin slowly to pick up fine
dust and large debris on hard floors.
Carpet
The brushrolls spin faster to pick up debris
on and below the surface of your carpets.
3 Press power button to turn vacuum on to
start cleaning. Please note the brushrolls
will not spin unless the wand is reclined.
10NZ: 0800 112 660
Page 12

USING YOUR VACUUM
Wand Release
IN ABOVE-FLOOR MODE
THE BENEFITS OF
SUCTION CONTROL
Suction Control is a way for
you to adjust suction power
when you are using different
tools or vacuuming different
surfaces. For example, if you
are feeling resistance while
vacuuming thick carpet or
upholstery, slide Suction
Control toward MIN to help
reduce your push/pull effort.
STEP 1
OR
11 AUST: 1800 099 385
1 Press the Handle Release
button when you need to
clean within short reach.
OR
Press the Wand Release
button when you need to
clean with a longer reach.
Page 13

STEP 2
OR
STEP 3
Suction
Control
MAX MIN
2 Insert desired tool directly onto wand
orhandle.
3 The Suction Control slide, located at the
base of the top handle, offers variable
suction based on your needs. Slide toward
MIN to minimize suction, and slide toward
MAX to maximize suction.
12NZ: 0800 112 660
Page 14

USING YOUR VACUUM IN
POWERED LIFT-AWAY™ MODE
WARNING: Ensure solid
footing when using
in Lift-Away mode.
Using when you don’t have
stable footing may result in
personal injury.
WHAT IS POWERED
LIFT-AWAY?
Our Powered Lift-Away
feature allows you to remove
the pod from the nozzle while
maintaining the same power
you have in upright mode.
This is great for cleaning
stairs, under furniture, and in
other tight spaces.
13 AUST: 1800 099 385
POWERED LIFT-AWAY CLEANING
1 Press Lift-Away button to lift pod off floor nozzle. You are
now ready to clean those hard-to-reach places.
Page 15

2 For a convenient way to clean stairs, insert
handle into motorized floor nozzle.
LI FT-AWAY
™
CLEANING
1 Attach desired accessory directly into
handle. You can also attach the accessory
to the wand for extended reach.
14NZ: 0800 112 660
Page 16

COMPATIBLE
ACCESSORIES
There are a variety of
accessories that are compatible
with this vacuumseries.
The top flap of your box shows
the select accessories that are
included with your model.
To purchase additional
accessories, go to
sharkclean.com.au or
sharkclean.co.nz
A Pet Hair Power Brush
Designed to remove pet hair and ground-in dirt from
carpeted stairs and upholstery.
B Articulating Upholstery Tool
Remove pet hair and dust from curtains and other delicate
fabrics and upholstery.
C Duster Crevice
Two cleaning tools in one—the crevice tool gives you
extended cleaning reach for small spaces, while the soft
dusting brush cleans a multitude of surfaces.
15 AUST: 1800 099 385
Page 17

A
B
C
16NZ: 0800 112 660
Page 18

MAINTENANCE
To keep your vacuum’s
suction power optimal, follow
these instructions. Make
sure unit is off and cord is
unplugged.
WARNING: To reduce
the risk of shock and
unintended operation,
turn power o and
unplug unit before
servicing.
Hand wash with
water only to prevent
damage from
cleaning chemicals.
Allow ALL filters
to dry completely
before replacing
in the vacuum to
prevent liquid from
being drawn into
electricparts.
IMPORTANT: Do not use
soap when cleaning the
HEPA filter.
STEP 1 STEP 2
RECOMMENDED
FILTER CLEANING
SCHEDULE:
Pre-Motor Filter Kit
(Foam & Felt)
XFF680
Clean every 3 months.
Post-Motor Filter
(HEPA)
XHF680
Clean once a year.
17 AUST: 1800 890 840
EMPTYING THE DUST CUP
1 Pull up on dust-cup
release latch and lift dust
cup off pod.
2 Hold dust cup over a trash
bin and press the bottom
dust-cup empty latch.
Page 19

STEP 3
Filter Access
3 Press top dust-cup empty
latch to access dust
screen and remove builtup debris asrequired.
FOAM FILTER
FILTER FRAME
FELT FILTER
CLEANING THE FILTERS
1 Pre-Motor
(foam and felt):
With the dust cup
removed, take out the
foam and felt filters, and
rinse with water. Tap loose
dirt off filters between
washes asneeded.
HEPA
2 Post-Motor (HEPA):
To access the HEPA filter,
reach under the grill,
press the button, and pull
the grill away from the
vacuum. Remove and
rinse the HEPA filter.
18NZ: 0800 002 999
Page 20

MAINTENANCE
WARNING: To reduce
the risk of shock and
unintended operation,
turn power o and
unplug unit before
servicing.
TIP: You can also check
for blockages in the hose
and tubes. Just remove
floor nozzle, dust cup and
hose and shine a flashlight
in the openings.
19 AUST: 1800 890 840
CLEANING THE BRUSHROLL
1 Press down on the two buttons on the floor nozzle to pop
up the brushroll garage lid.
2 Lift the brushroll out by the tab on the left side. To remove
any string, hair or debris that may be wrapped around
the brushroll, use the onboard hair removal tool. The tool
is located in a compartment on the nozzle, above the
brushroll.
3 To reinstall the brushroll, return it to the brushroll garage.
Press down on the brushroll garage lid until you hear it click
into place.
Page 21

SOFT ROLLER
1 Slide the Soft Roller access button up to
remove the Soft Roller.
2 Use the onboard hair removal tool to
remove any string, carpet fibers or hair that
may be wrapped around the Soft Roller.
The tool is located in a compartment on the
nozzle, above the brushroll. You can also
tap loose debris off the Soft Roller, or wipe it
clean with a dry towel. If you see any fibers
or hair buildup in the teeth behind the Soft
Roller, take a dry towel and wipe it away.
3
Wash the Soft Roller as needed. Use only
water, and let air-dry completely for at least
24 hours.
4 Reinsert the Soft Roller by sliding it into the
front of the nozzle until it clicks into place.
CHECKING THE NOZZLE FOR BLOCKAGES
1 Tilt neck of nozzle back to straighten the
airway. To clear a blockage, insert a long
object such as a wooden spoon into the
nozzle connector.
20NZ: 0800 002 999
Page 22

TROUBLESHOOTING
GUIDE
WARNING: To reduce the risk of shock and unintended operation, turn
power o and unplug unit before servicing.
Vacuum is not picking up debris. No suction or light suction.
(Refer to Maintenance section for more information.)
• Check filters to see if they need cleaning. Follow instructions for rinsing and drying the filters
before re-inserting in the vacuum.
• Dust cup may be full; empty dust cup.
• Check hose, hose connections, nozzle, and accessories for blockages; clear blockages if required.
• Remove any string, carpet fibers, or hair that may be wrapped around the brushrolls.
Vacuum lifts area rugs.
• Turn off unit to disengage the brushrolls. Move switch to Hard Floor setting to turn on the slow
brushrolls, which is optimal for bare floors and area rugs.
• Suction is powerful. Take care when vacuuming area rugs or rugs with delicately sewn edges.
• To minimize suction, refer to Suction Control section for more information on how to use.
Brushroll/soft roller does not spin.
• If Brushroll Indicator Light on the floor nozzle turns red, the brushroll and/or soft roller have
stopped spinning. Immediately turn off and unplug vacuum. Disconnect the nozzle and
remove blockage, then reconnect and turn vacuum back on.
• If Brushroll Indicator light repeatedly turns red while vacuuming carpet, try moving Suction
Control slide to MIN.
• With the power on, recline the handle, which will automatically turn on the brushrolls.
Vacuum turns o on its own or Brushroll Indicator Light flashes red.
• This vacuum is equipped with a motor-protective thermostat. If your vacuum overheats, the
thermostat will automatically turn the suction motor off. Perform the following steps to restart
thethermostat:
1. Turn vacuum off and unplug it.
2. Empty dust cup and clean filters (see Maintenance section).
3. Check for blockages in hose, accessories, and inlet openings.
4. Allow unit to cool for a minimum of 45 minutes.
5. Plug in vacuum and turn it on.
• If hose is not fully connected to the pod, it can cause a poor electrical connection and the
hose can come loose, turning the vacuum off.
1. Turn vacuum off and unplug it.
2. Empty dust cup and clean filters.
3. Check for blockages in hose, accessories, and inlet openings.
4. Remove cord from cord hook so hose latch can be seen and engaged.
5. Ensure you hear an audible click at all connection points:
a. Where hose meets back of pod (may require additional force; pull on hose to ensure
latch is fully engaged)
b. Where wand plugs into floor nozzle
c. Where handle plugs into wand
6. Plug in vacuum and turn it on.
Note: If vacuum still does not start, contact Customer Service at AUST: 1800 099 385 or
NZ 0800 112 660.
21 AUST: 1800 099 385
Page 23

FIVE (5) YEAR LIMITED
REPLACEMENT WARRANTY
If your product becomes defective due to faulty material or workmanship within a period of 5 years from the
date of purchase, we warrant to do the following:
• For New Zealand Consumers: We will replace the product with a new product, free of charge, or repair the
product at our cost, at our discretion.
• For Australian Consumers: Our goods come with guarantees that cannot be excluded under the Australian
Consumer Law. You are entitled to a replacement or refund for a major failure and for compensation for any
other reasonably foreseeable loss or damage. You are also entitled to have the goods repaired or replaced if
the goods fail to be of acceptable quality and the failure does not amount to a major failure.
Your warranty is subject to the following conditions:
• DO NOT operate the appliance with a damaged plug or cord, or if the unit has been dropped, damaged or
dropped in water. To avoid the risk of electric shock, do not disassemble or attempt to repair the appliance
on your own. If the supply cord is damaged, it must be replaced by a qualified electrician in order to avoid
a hazard. Incorrect re-assembly or repair can cause a risk of electric shock or injury to persons when the
appliance is used.
• The item has not been misused, abused, neglected, altered, modified or repaired by anyone.
• The item has been subjected to fair wear and tear.
• The item has not been used for trade, professional or hire purposes.
• The item has not sustained damage through foreign objects, substances or accident.
Your warranty does not cover;
• Components that are subject to natural wear and tear caused by normal use in accordance with operating
instructions.
• Unauthorised/improper maintenance/handling or overload is excluded from this warranty.
• For guarantee claims, you will need to submit a proof of purchase in the form of a valid receipt that displays
date and place of purchase.
This warranty does not replace but is in addition to your statutory rights.
This warranty does not apply to accessories supplied with the item.
This warranty applies only to the original purchaser and may not be transferred.
Replacement items will be covered by the limited warranty for the balance of the warranty period from the date
of the original purchase.
Please note:
Only the defective product or parts returned to place of purchase will be replaced under this warranty.
Proudly distributed by
Mann&Noble Pty Ltd
No.1 Southridge Unit Estate
2 Southridge Street
Eastern Creek NSW, Australia, 2766
AUS 1800 099 385
NZ 0800 112 660
www.sharkclean.com.au
22NZ: 0800 112 660
Page 24

GMA-501823-EA
Proudly distributed by:
Mann&Noble Pty Ltd
No.1 Southridge Unit Estate
2 Southridge Street
Eastern Creek NSW, Australia, 2766
AUS 1800 099 385
NZ 0800 112 660
www.sharkclean.com.au
Illustrations may differ from actual product. We are constantly striving to improve
our products, therefore the specifications contained herein are subject to change
withoutnotice.
Shark is a registe red trad emarks of SharkNinja Operating LLC.
DuoClean and L ift-Away are trademarks of SharkNinja Op eratin g LLC.
© 2016 SharkNinja Operating LLC
NV800ANZ�IB�REV�Mv1
PRINTED IN CHINA
 Loading...