

Shark NV450 Series, NV480 Series Owner's Manual
OWNER’S GUIDE
NV450 SERIES
™

READ ALL INSTRUCTIONS BEFORE USE
Thank you for purchasing the Shark® Rotator Upright Vacuum Cleaner.
This Owner’s Guide is designed to help you get a complete understanding of
your new vacuum cleaner. Please read it carefully and keep for future reference.
RECORD THIS INFORMATION:
THANK YOU!
This appliance complies with the European directives for electromagnetic compatibility (EMC) 2004/108/EC and its revisions, as well as Low Voltage Directive (LVD)
2006/95/EC and its revisions.
This marking indicates that this product should not be disposed with other household wastes throughout the EU. To prevent possible harm to the
environment or human health from uncontrolled waste disposal, recycle it responsibly to promote the sustainable reuse of material sources. To return
your used device, please use the return and collection systems or contact the retailer where this product was purchased. They can take this product for
environmental safe recycling.
Model Number: ���������������������������������������������
Date of Purchase (Keep receipt):
����������������������������������������������������������
TECHNICAL SPECIFICATIONS:
Voltage: 220-240V., 50/60Hz
Watts: 700W
Power Nozzle 80W
For a list of what is included with this model, refer to inside flap of box.
RECOMMENDED FILTER CLEANING SCHEDULE:
See the MAINTENANCE section for filter cleaning instructions
Foam filter: XFF450 Every month
Felt Filter: XFF450 Every month
HEPA Filter: XHF450 Every 12 months
IMPORTANT SAFEGUARDS
When using an electrical appliance, basic safety precautions should
always be observed, including the following:
WARNING
TO REDUCE THE RISK OF FIRE, ELECTRIC SHOCK OR INJURY:
1 DO NOT use outdoors or on wet surfaces.
2 Unplug from electrical outlet when not in use and before cleaning or
servicing.
3 DO NOT use vacuum cleaner with a damaged cord or plug or if the unit has
been dropped, damaged, left outdoors, or dropped into water. If the cord
is damaged, it must be repalced by the manufacturer, its service agent or
similarly qualified persons in order to avoid a hazard. To avoid the risk of
electric shock, do not disassemble or attempt to repair the appliance on your
own. Incorrect re-assembly or repair can cause a risk of electrical shock or
injury to persons when the appliance is used.
4 DO NOT pull or carry vacuum cleaner by the cord or use the cord as a handle.
5 DO NOT unplug by pulling on cord; to unplug, grasp the plug, not the cord.
6 DO NOT handle plug or vacuum cleaner with wet hands.
7 DO NOT run the vacuum cleaner over the power cord, close a door on the
cord or pull cord around sharp corners.
8 The use of an extension cord is not recommended.
9 DO NOT leave vacuum cleaner when plugged in.
10 Keep cord away from heated surfaces.
11 Turn off all controls before plugging or unplugging the vacuum cleaner.
12 Always turn off the vacuum cleaner before connecting or disconnecting
Power nozzle.
CAUTION: Power nozzle contains electrical connections
and the Power nozzle is not a serviceable part
13 Store your vacuum cleaner with the power cord secured around the two cord
holders - as shown in the storage instructions.
GENERAL USE
14 Use only as described in this manual.
15 DO NOT put any objects into openings. DO NOT use with any opening
blocked; keep free of dust, lint, hair, and anything that may reduce air flow.
16 Keep your work area well lit.
17 Keep the vacuum cleaner moving over the carpet surface at all times to
avoid damaging the carpet fibers.
18 DO NOT place vacuum cleaner on unstable surfaces such as chairs or tables.
19 DO NOT use without dust cup and/or filters in place.
20 This appliance is not intended for use by persons (including children) with
reduced physical, sensory or mental capabilities, or lack of experience and
knowledge.
21 Children should be supervised to ensure that they do not play with the
appliance.
HOSE ATTACHMENTS
22 DO NOT use if air flow is restricted; if the air paths, the hose, or the
accessories become blocked, turn the vacuum cleaner off. Remove all
obstructions before you turn on the unit again.
23 Keep the end of the hose and accessory openings away from face and body.
24 Keep cleaning tools and hose suction openings away from hair, face, fingers,
uncovered feet, or loose clothing.
25 Only use manufacturer’s recommended attachments.
DUST CUP/FILTERS/ACCESSORIES
Before turning on the vacuum:
26 Make sure that all filters are thoroughly dry after routine cleaning.
27 Make sure that dust cup and all filters are in place after routine
maintenance.
28 Make sure accessories are free of blockages.
29 Use only manufacturer’s recommended accessories and replacement parts.
GENERAL CLEANING
30 DO NOT pick up large-sized objects.
31 DO NOT pick up hard or sharp objects such as glass, nails, screws or coins
that could damage the vacuum cleaner.
32 DO NOT pick up smoking or burning objects such as hot coals, cigarette
butts, or matches.
33 DO NOT pick up flammable or combustible materials such as lighter fluid,
gasoline, or kerosene or use vacuum in areas where they may be present.
34 DO NOT pick up toxic solutions such as chlorine bleach, ammonia, or drain
cleaner.
35 DO NOT use in an enclosed space where vapors are present from paint,
paint thinner, moth-proofing substances, flammable dust or other explosive
or toxic materials.
36 DO NOT vacuum up any liquids.
37 DO NOT immerse vacuum cleaner in water or other liquids.
38 DO NOT use outdoors or on wet surfaces; use only on dry surfaces.
39 Use extra care when cleaning on stairs.
FOR HOUSEHOLD USE ONLY
SAVE THESE INSTRUCTIONS
32
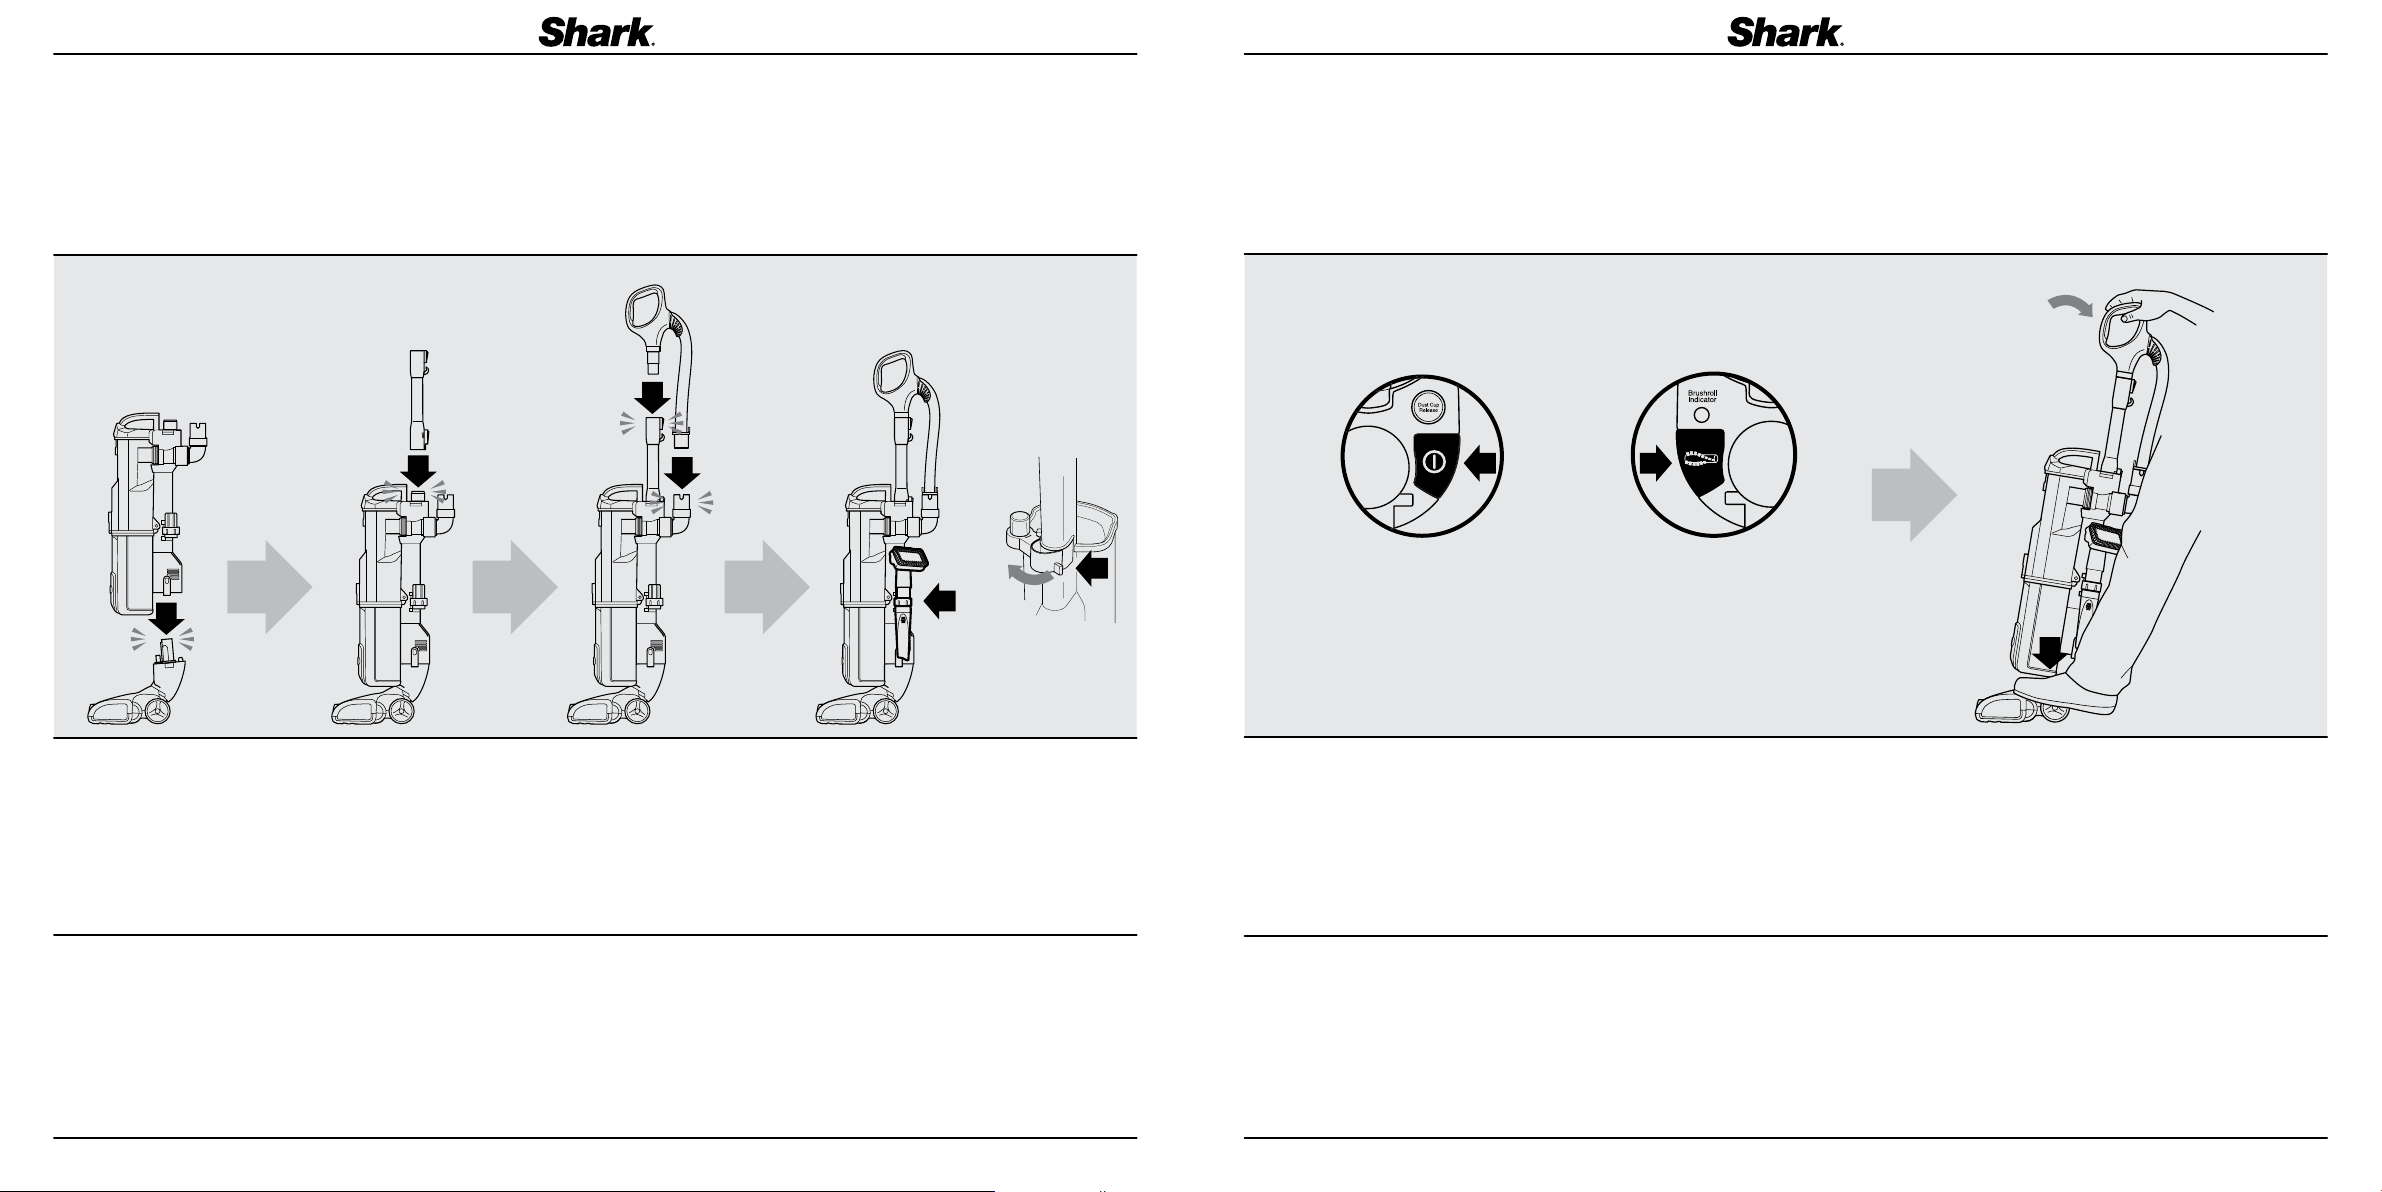
ASSEMBLY
1 Place the vacuum body onto Power nozzle.
2 Insert extension wand into top of the vacuum.
3 Insert handle into the top of the extension wand
(if not already assembled).
4 Insert hose into hose connector.
3
CLICK
5 Insert the crevice tool and multi-tool onto the
accessory holder as shown.
6 The accessory holder is removable.
To remove, first remove the dust cup
(as explained on page 11), then hold and pull
the tab to the lef t and pull out. To replace,
align the pins into the hinge on the vacuum
and clip back into place.
FLOOR
CLEANING
1 Press POWER to clean bare floor surfaces, area
rugs or areas above-floors.
The brushroll will not spin in this mode.
2 Press POWER and BRUSHROLL to clean carpets.
The brushroll indicator lights will illuminate
GREEN. If there is a jam, the indicator light
on floor nozzle will illuminate RED. Refer
to MAINTENANCE (P12) for instructions on
removing blockages.
3 Place your foot gently on the Power nozzle and
tilt the handle back to start cleaning.
Note: The brushroll will only spin once the
vacuum is reclined back.
CLICK
OR
2
POWER + BRUSHROLL
Carpet cleaning
CLICK
2
4
CLICK
6
POWER
Bare floor or wand cleaning
1
5
1
3
4 5
 Loading...