

Page 1
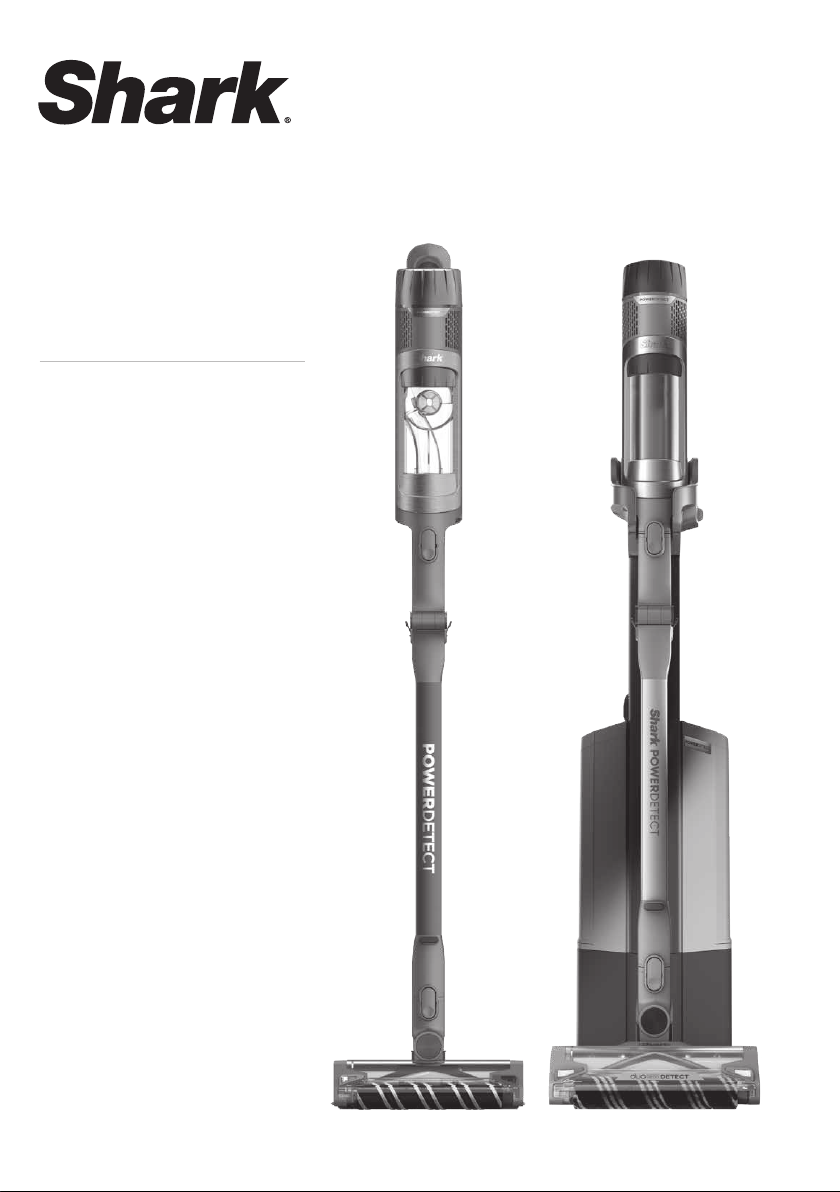
Clean & Empty PowerDetect
Cordless Vacuum
IP1000ANZ Series
IP3000ANZ Series
OWNER’S GUIDE
Page 2
IMPORTANT SAFETY INSTRUCTIONS
FOR HOUSEHOLD USE ONLY • PLEASE READ ALL INSTRUCTIONS
BEFORE USING THIS VACUUM.
To reduce the risk of shock and unintended operation, turn o power
and remove the ION Power Pack battery before servicing.
NOTE: If you have delicate or wool carpets, particularly loop pile, please try the
vacuum on a hidden area first to ensure the spinning brush-rolls do not damage
or unpick carpet fibres.
WARNING
REDUCE THE RISK OF FIRE, ELECTRIC SHOCK, INJURY,
OR PROPERTY DAMAGE:
1. This vacuum consists of a motorised
nozzle, wand, and handheld vacuum. These
components contain electrical connections,
electrical wiring, and moving parts that
potentially present risk to the user.
2. Before each use, carefully inspect all parts
for any damage. If a part is damaged,
discontinue use.
3. Use only identical replacement parts.
4. This vacuum contains no serviceable parts.
5. Use only as described in this manual.
DO NOT use the vacuum for any purpose
other than those described in this manual.
6. With the exception of the filters and dust
cup, DO NOT expose any parts of the
vacuum to water or other liquids.
7 DO NOT allow the appliance to be used by
children. Keep the appliance and its cord
out of reach of children. DO NOT allow to be
used as a toy. Close supervision is necessary
when used near children.
GENERAL USE
8. This appliance can be used by persons
with reduced physical, sensory or mental
capabilities or lack of experience and
knowledge if they have been given
supervision or instruction concerning use of
the appliance in a safe way and understand
the hazards involved. Cleaning and user
maintenance should not be done by
children.
9. Always turn o the vacuum before
connecting or disconnecting any current
carrying hoses, motorised nozzles, chargers,
batteries, or other electrical
or mechanical parts.
10. DO NOT handle plug or vacuum with
wet hands.
11. DO NOT use without dust cup, filters, and
brush-roll in place.
12. Only use Shark branded filters and
accessories. Damage caused by non-Shark
filters and accessories may not be covered
by the guarantee.
13. DO NOT put any objects into nozzle
or accessory openings. DO NOT use
with any opening blocked; keep free
of dust, lint, hair, and anything that
may reduce airflow.
14. DO NOT use if nozzle or accessory
airflow is restricted. If the air paths or
the motorised floor nozzle become
blocked, turn the vacuum o. Remove all
obstructions before you turn on the unit
again.
15. Keep nozzle and all vacuum openings away
from hair, face, fingers, uncovered feet, or
loose clothing.
16. DO NOT use if vacuum is not working as it
should, or has been dropped, damaged, left
outdoors, or dropped into water.
17. Use extra care when cleaning on stairs.
18. DO NOT leave the vacuum unattended
while powered on.
19. When powered on, keep the vacuum
moving over the carpet surface at all times
to avoid damaging the carpet fibres.
20. If you have delicate or wool carpets,
particularly loop pile, please try the
vacuum on a hidden area first to ensure the
spinning brush-rolls DO NOT damage or
unpick carpet fibres.
21. DO NOT use to pick up:
a) Liquids
b) Large objects
c) Hard or sharp objects (glass, nails,
screws, or coins)
d) Large quantities of dust (including
Gyprock, fireplace ash, or embers). DO
NOT use as an attachment to power
tools for dust collection.
e) Smoking or burning objects (hot coals,
cigarette butts, or matches)
f) Flammable or combustible materials
(lighter fluid, petrol, or kerosene)
g) Toxic materials (chlorine bleach,
ammonia, or drain cleaner)
22. DO NOT use in the following areas:
a) Wet or damp surfaces
b) Outdoor areas
c) Spaces that are enclosed and may
contain explosive or toxic fumes or
vapours (lighter fluid, petrol, kerosene,
paint, paint thinners, mothproofing
substances, or flammable dust)
23. Turn o the vacuum before plugging in or
unplugging the charger.
24. Turn o the vacuum before any adjustment,
cleaning, maintenance or troubleshooting.
25. During cleaning or routine maintenance,
DO NOT cut anything other than
hair, fibres, or string wrapped around
the brush-roll.
26. Allow all filters to air-dry completely before
replacing in the vacuum to prevent liquid
from being drawn into electric parts.
27. DO NOT modify or attempt to repair
the vacuum or the battery yourself, except
as indicated in this manual.
DO NOT use the battery or vacuum
if it has been modified or damaged.
Damaged or modified batteries may exhibit
unpredictable behavior resulting in fire,
explosion or risk of injury.
28. Turn o all controls before unplugging.
29. Always turn o this appliance before
connecting or disconnecting motorised
nozzle or hand tool.
30. If the supply cord is damaged, it must be
replaced by the manufacturer, its service
agent or similarly qualified persons in order
to avoid a hazard.
BATTERY PACK
31. The battery is the power source for the
vacuum. Carefully read and follow all
charging instructions.
32. To prevent unintentional starting, ensure
the vacuum is powered o before picking
up or carrying the vacuum. DO NOT carry
the appliance with your finger on the
power switch.
33. For IP3000 Series, use only the
XDCKIP3000ANZ charging dock (One
battery can be charged). For IP1000
and IP3000 Series, use only with
YLJX2I-A260100 charger.
34. Keep the battery away from all metal
objects such as paper clips, coins, keys,
nails, or screws. Shorting the battery
terminals increases the risk of fire or burns.
35. Under abusive conditions, liquid may
be ejected from the battery. Avoid contact
with this liquid, as it may cause irritation
or burns. If contact occurs, flush with
wa te r.
If liquid contacts eyes, seek medical help.
36. Battery should not be stored at
temperatures below 3°C or above 40°C to
maintain long-term battery life.
37. DO NOT charge battery at temperatures
below 5°C or above 40°C. Charging
improperly or at temperatures outside
of the specified range may damage the
battery and increase the risk of fire.
38. Store the appliance indoors.
39. DO NOT expose the battery to fire or
temperatures above 130°C as it may
explode.
40. Use appliances only with specifically
designated battery packs. Use of any other
battery packs may create a risk of injury
and fire.
41. Disconnect the battery pack from the
appliance before making any adjustments,
changing accessories, or storing appliance.
Such preventive safety measures
reduce the risk of starting the appliance
accidentally.
42. Always ensure that the rechargeable
battery is removed from the appliance
before inserting into the battery charging
sleeve.
For IP1000 and IP3000 Series, use only
Shark battery pack XBATR640EU (21.6V
3750mAh 81wh).
ODOUR (IP3000 SERIES ONLY)
43. Observe the following when interacting
with the Odour Neutraliser Technology
cartridge:
a) DO NOT attempt to disassemble Anti-
Odour Technology cartridge.
b) Avoid direct contact with the fragrance
pod in the cartridge
c) DO NOT directly inhale from the Anti-
Odour Technology cartridge.
d) Keep away from children and pets.
e) Keep away from heat, sparks, and open
flame.
DO NOT place in direct sunlight.
FRAGRANCE CARTRIDGE FIRST AID
44. Observe the following when interacting
with the Odour Neutraliser Technology
cartridge:
a) Avoid contact with fabrics and finished
surfaces.
b) Eye contact: Remove contact lenses if
present. Rinse continuously with water or
several minutes.
c) Skin contact: Wash hands thoroughly
after handling. If irritation or rash
develops, seek medical advice/attention.
d) Inhalation: Move person to fresh air
if they are experiencing any respiratory
symptoms. If symptoms persist, seek
medical advice/attention.
d) Ingestion: DO NOT induce vomiting.
Seek medical advice/attention.
sharkclean.co.nzsharkclean.com.au
Page 3
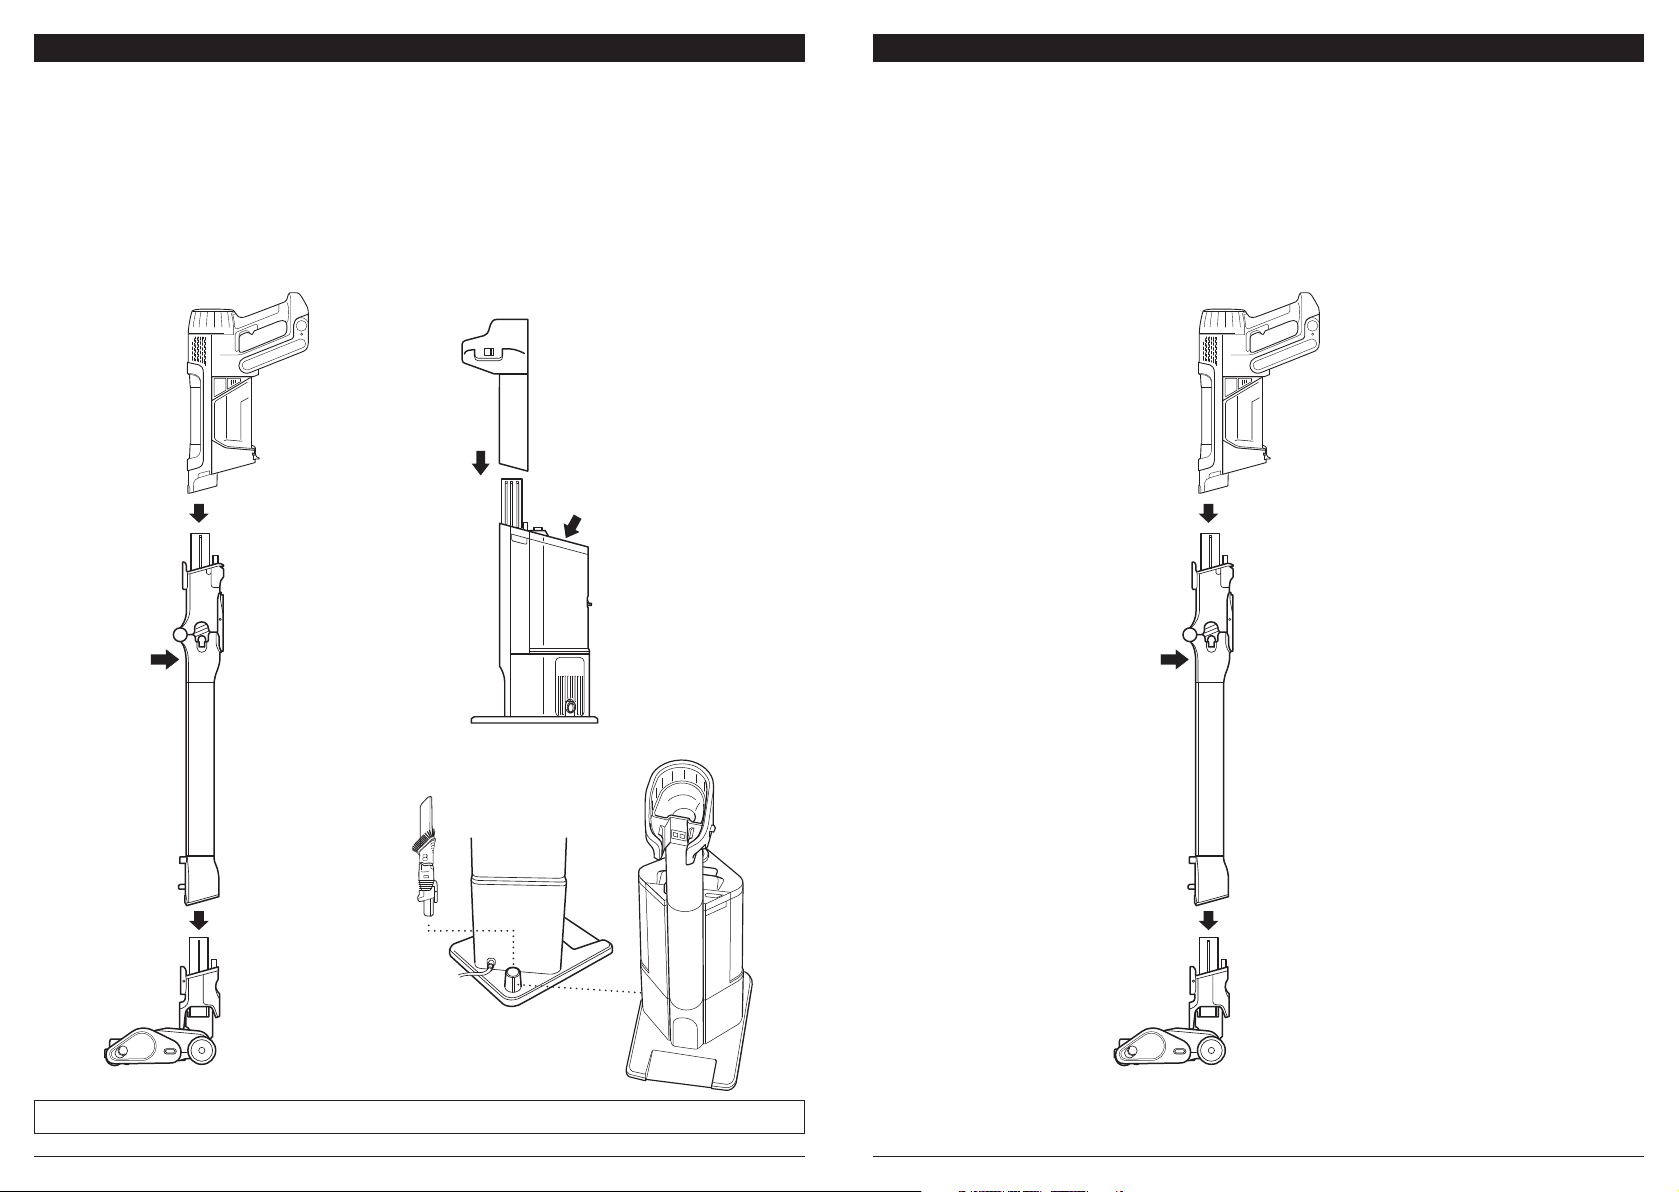
AUTO-EMPTY ASSEMBLY (IP3000 SERIES)
NON-AUTO-EMPTY ASSEMBLY (IP1000 SERIES)
1. Slide the Wand onto the neck of the Floor
Nozzle until it clicks into place.
2. Align the Hand Vacuum nozzle opening
with the top of the wand and slide it on
until it clicks into place.
3. Make sure the Dock Base is facing upright.
Slide the Charging Post into the slot on
front of dock until it clicks.
Handheld
Vacuum
Flex Wa nd
2.
(Click)
4. Place the dock on the floor near a wall
outlet. Plug the Power Cord into the outlet.
5. Store the crevice tool using Accessory
Storage on the dock.
6. Refer to pages 8 and 9 for Odour
Neutraliser Installation and Replacement
instructions.
For proper operation, ensure all components
are completely connected and clicked
into place.
Charging Post
3.
(Click)
Odour Neutraliser Installation
Dock Base
1. Slide the Wand onto the neck of the Floor
Nozzle until it clicks into place.
2. Align the Hand Vacuum nozzle opening
with the top of the wand and slide it on
until it clicks into place.
Handheld
Vacuum
Flex Wa nd
2.
(Click)
For proper operation, ensure all components
are completely connected and clicked
into place.
Accessory
Storage
1.
(Click)
Floor Nozzle
NOTE: Once the charging post is installed, it cannot be removed.
1.
(Click)
Floor Nozzle
sharkclean.co.nzsharkclean.com.au
Page 4
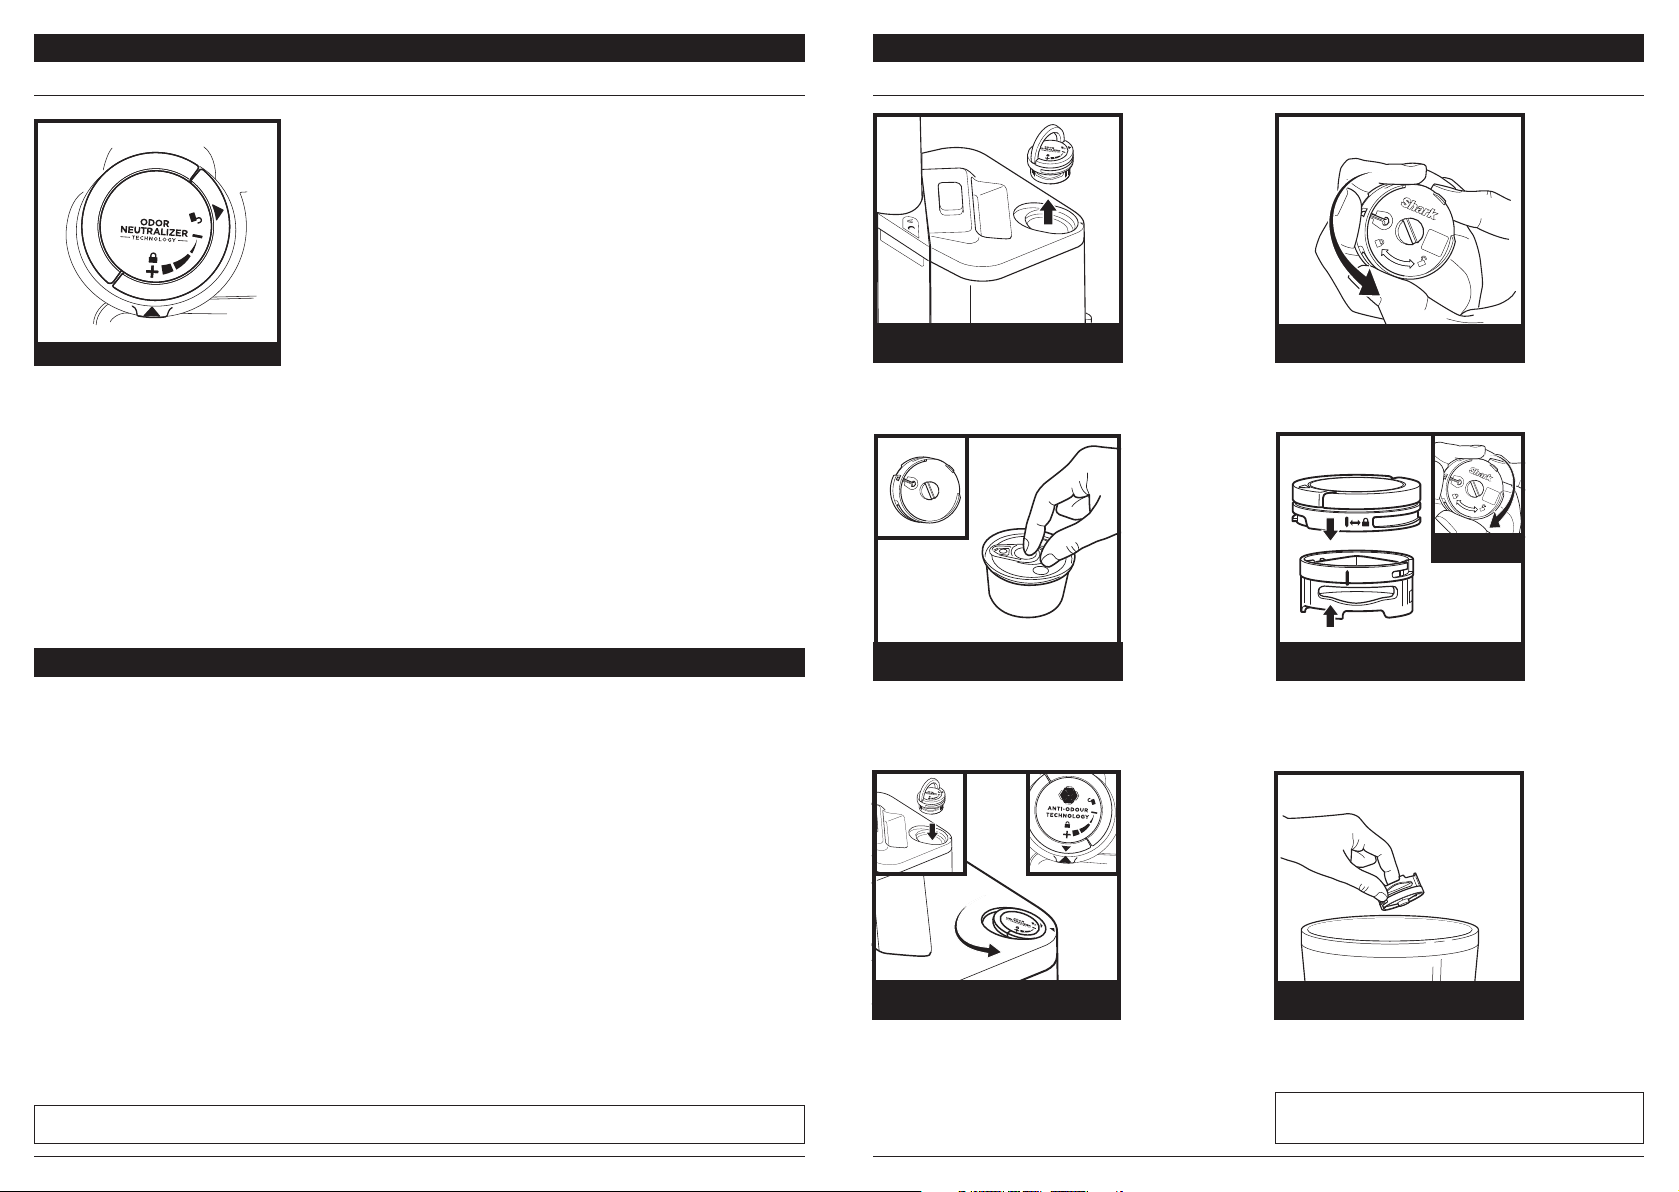
ODOUR NEUTRALISER TECHNOLOGY (IP3000 SERIES)
ADJUSTING THE ODOUR NEUTRALISER TECHNOLOGY INTENSITY
ODOUR NEUTRALISER TECHNOLOGY (IP3000 SERIES)
ODOUR CARTRIDGE REPLACEMENT
ODOUR DIAL
Flip up the dial handle and rotate the odour dial
to adjust odour neutraliser technology intensity
or to unlock the dial for cartridge access.
Insertion/Removal: Rotate the odour dial to align the teal arrows. Remove the dial to
access the odour cartridge for removal or replacement.
Low: Rotate the dial toward the Low position to decrease the intensity to the lowest level
when the vacuum is in use.
High: Rotate the dial toward the High position for the highest intensity level when the
vacuum is in use. This position is the recommended setting for optimal performance.
ODOUR NEUTRALISER TECHNOLOGY TIPS (IP3000 SERIES)
The Odour Neutraliser Technology Dial Must be Installed for Vacuum to Function Properly
• Remove Odour Neutraliser cartridge from dial if you don’t want the benefits of the Odour
Neutraliser Technology.
Maintenance Required
• Clean all filters as recommended under Cleaning Filters.
• Empty the dust cup before storing your vacuum.
• Replace the cartridge as recommended under Odour Cartridge Replacement.
• Visit sharkclean.co.uk to learn more and purchase replacements.
1. REMOVE ODOUR DIAL
FROM THE AUTO-EMPTY DOCK
Flip up the handle and rotate the dial clockwise
until the two arrows are aligned. Pull the handle
to remove the dial from the auto-empty dock.
3.REMOVE NEW CARTRIDGE
FROM CAN
Remove the new Odour Neutraliser cartridge
from the can. To maintain the life of the
cartridge, keep it in the can until you are ready
to install it.
2. REMOVE OLD ODOUR
CARTRIDGE
Rotate the cartridge counterclockwise in
the dial housing and pull out the cartridge to
remove it.
TURN UNTIL
CLICK TO LOCK
4. INSTALL NEW CARTRIDGE
IN DIAL
Align the yellow arrow on the side of the cartridge
with the yellow arrow on the side of the dial
cover, then insert the cartridge into the dial.
Rotate the cartridge clockwise to lock it in place.
Fragrance Strength Over Time
• The intensity of the Odour Neutraliser Technology’s fragrance may diminish over time. It may
also have no noticeable fragrance at all. This is natural and does not indicate the technology
isn’t working. Follow replacement instructions to ensure continued performance.
NOTES: • T he odo ur dial need s to be ins talled for the vacuu m to function p roperly, with or without the odo ur car tridge.
5. INSTALL DIAL IN THE
AUTO-EMPTY DOCK
Align the teal arrow on the dial cover with the
arrow on the auto-empty dock, then reinsert
the dial into the auto-empty dock. Rotate the
dial counterclockwise until it clicks into an
intensity setting to engage. Rotate further to
change the intensity setting.
6. USED CARTRIDGE
DISPOSAL
Dispose of the old cartridge by dropping it
into the bin.
NOTE: O dour cartridges should be replace d every
6 months for opti mal od our ne utral iser technology
performance.
sharkclean.co.nzsharkclean.com.au
Page 5
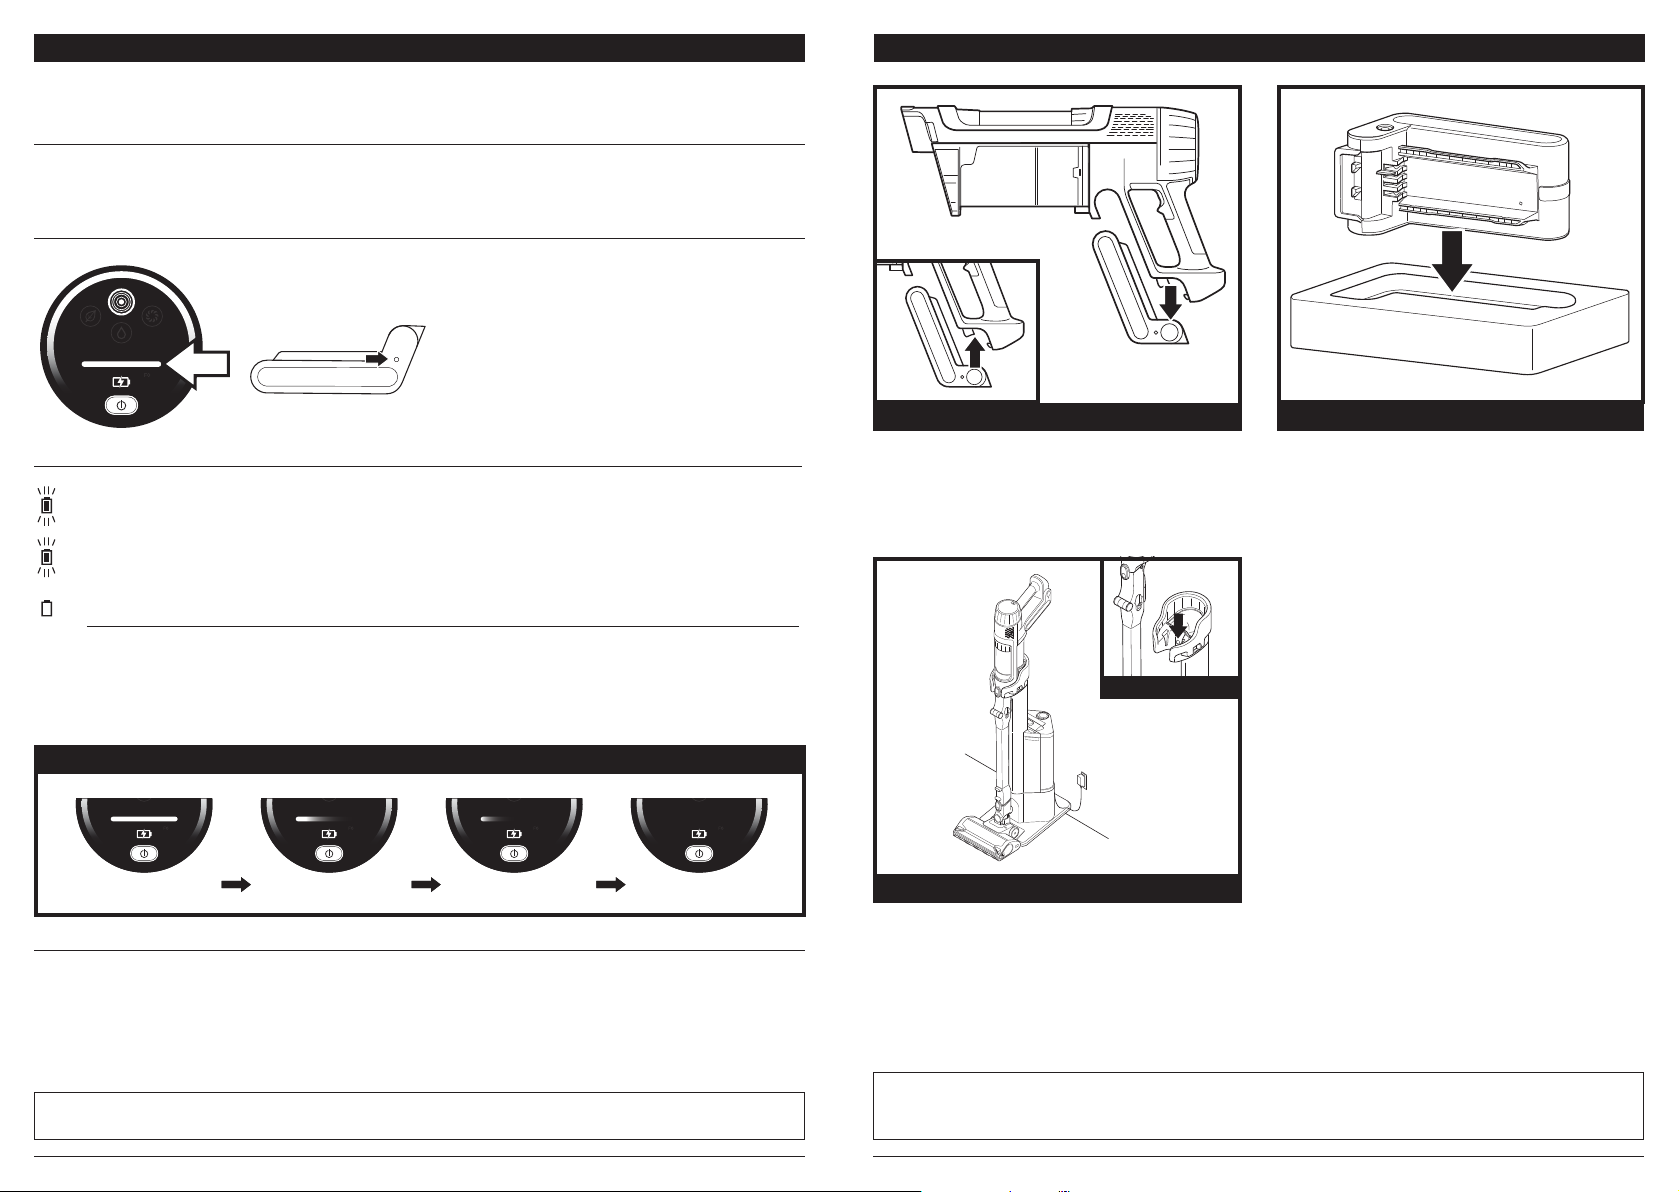
Prior to first use, charge the battery completely. A full charge takes approximately 5 hours.
RUNTIMES PER FULLY CHARGED BATTERY
With a full charge, the unit will have up to a 70-minute runtime. Visit sharkclean.com.au or
sharkclean.co.nz online for more information.
LED BATTERY POWER AND CHARGING INDICATORS
NOTE: Battery consumption will vary depending on the
mode being used:
ECO – Maximum Runtime, saves battery power
DETECT – Optimises suction and power for
maximum cleaning
BOOST – Maximises suction. Uses the most battery power
Charging
LED on the battery pack will pulse yellow when reaching 0-75% charge.
LED on the battery pack will pulse green from 75% - 100% charge.
White LED the battery pack is fully charged.
NOTE: Full charge takes approximately 6 hours.
Additional Notes
1. LEDs turn o once the battery is fully charged.
2. Unit will not power on when charger is connected.
CHARGING YOUR LI-ION BATTERYCHARGING YOUR LI-ION BATTERY
BATTERY REMOVAL
To remove the battery from the vacuum,
press the release button on the battery
and slide out of the handle compartment.
To reinstall, slide the battery back into the
compartment until it clicks into place.
CONTACTS
CHARGING SLEEVE
To charge the battery, remove it from the
vacuum and insert into the charging sleeve.
Once the battery is showing as fully charged
reinsert into the handle compartment on the
vacuum (see charging indicators on previous
pa ge)
BATTERY CHARGING INFORMATION
BATTERY CHARGING INFORMATION
Blinking
Blinking
Full Charge Half Charge Low Charge No Charge
Full Charge Half Charge Low Charge No Charge
RECYCLING THE LI-ION BATTERY
When the Shark Li-ion battery needs to be replaced, dispose of it or recycle it in accordance
with local ordinances or regulations. In some areas, it is illegal to place spent lithium-ion
batteries in the standard rubbish bin. Return spent batteries to an authorised recycling centre
or to the retailer for recycling. Contact your local recycling centre for information on where to
drop o the spentbattery.
NOTE: The Shark battery, like all lithium-ion batteries, will naturally decrease in capacity over time from the 100% capacity of
a new battery.
UPRIGHT DOCK CHARGING IP3000 SERIES
Charge the unit by placing it on the dock. Make
sure the contacts on the wand are aligned
with the contacts on the charging post.
When charging is complete and you need
to use the unit again, lift it o the dock.
NOTE: When the unit i s docke d properly, the chargi ng lights on th e batte ry will blink , indicating that charging has begun .
NOTE: The m ain unit come s with a partial charg e. For maximu m runti me, ch arge f ully be fore fir st use (approximately 5
hours). Leaving th e unit plugge d in will n ot dam age battery life.
sharkclean.co.nzsharkclean.com.au
Page 6
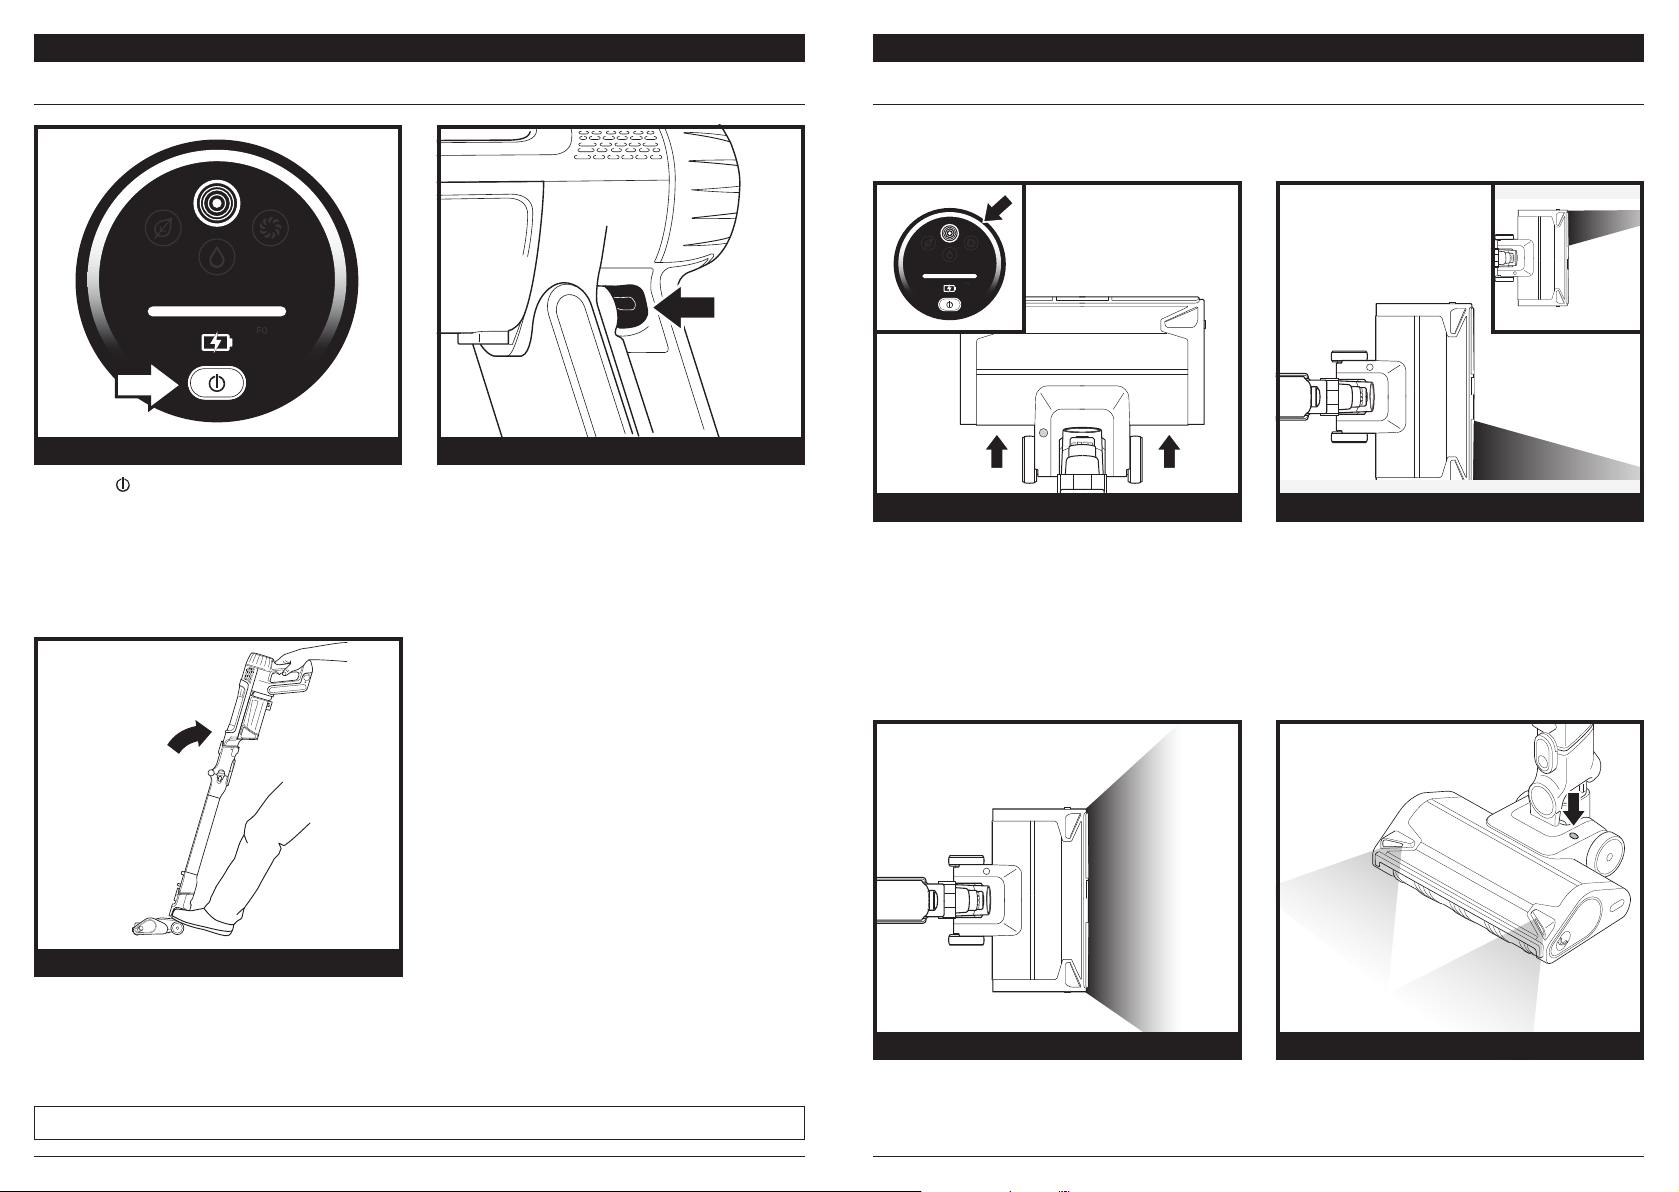
USING YOUR VACUUM
POWER MODE SELECT
Press the button on the UI Screen to
turn on power. To turn o power, press the
button again .
To toggle between ECO, DETECT, and
BOOST modes, press the mode selection
trigger on the handle (shown above).
In DETECT mode, Detect Technology
automatically adjusts vacuum and nozzle
power to maximise cleaning performance
and optimise runtime.
USING YOUR VACUUM
DETECT TECHNOLOGY EXPLAINEDCONTROLS AND CLEANING MODES
NOTE: Detect Technology is ONLY operational in Detect Mode and is activated automatically
when the unit is in use.
CLEAN INDICATOR
Vacuum identifies dirtier areas and
automatically boosts suction power to pull in
hidden dirt.
White LED = No heavy debris detected, low suction
Light Purple LED = Debris is being cleaned, medium
suction
Deep Purple LED = Heav y debris detected, high
suction
Vacuum floor nozzle detects edges and
corners and maximises suction and power
to remove stubborn dirt.
EDGE INDICATOR
UPRIGHT LOCK
To begin cleaning with the floor nozzle,
disengage the lock by stepping on the nozzle
and tilting the hand vac down.
NOTE: For - Best Cleaning on ASTM and IEC Cleaning Tests, Use BoostMode.
FLOOR DETECT
Brushroll and vacuum responds to surface
changes and automatically adjusts to
optimise your clean.
LIGHT DETECT
Senses low-light situations and
automatically illuminates dark areas to help
you spot debris.
sharkclean.co.nzsharkclean.com.au
Page 7
USING YOUR VACUUM
USING YOUR VACUUM
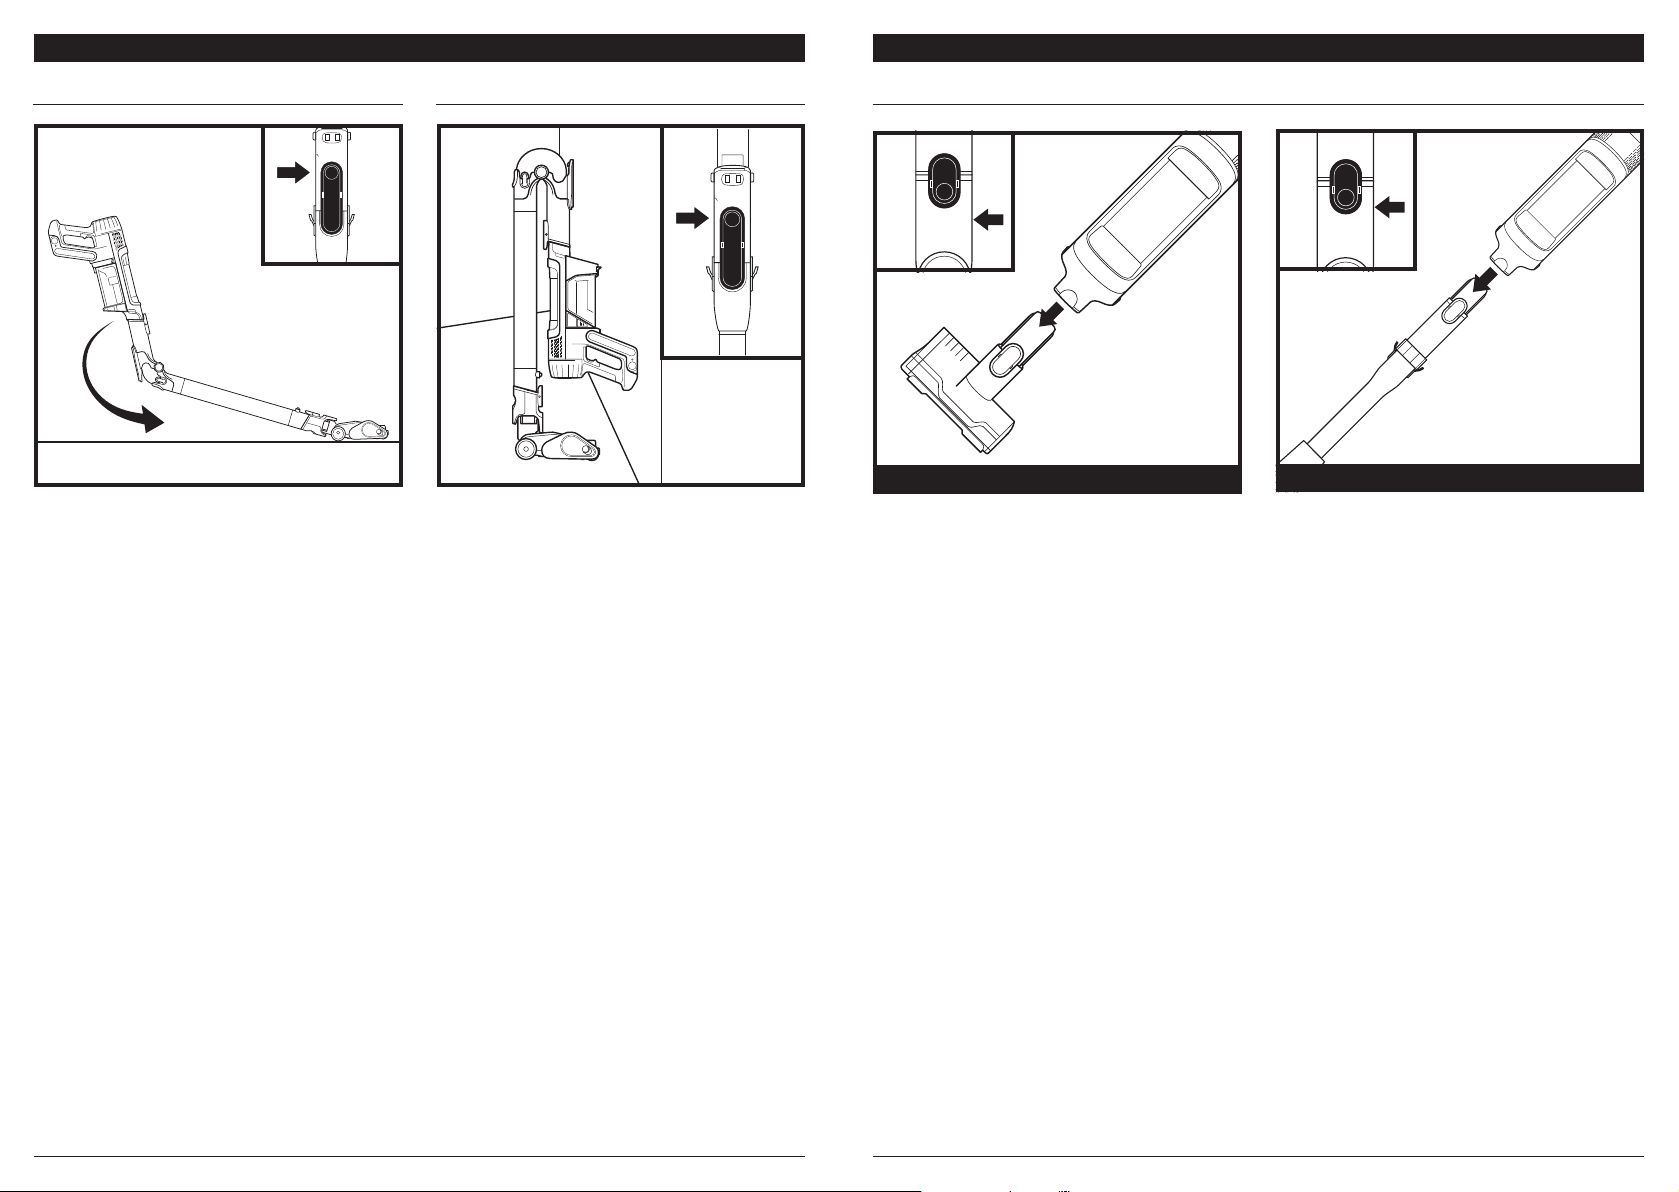
MULTI-FLEX WAND STORAGE
Multi-Flex Wand allows you to flex the wand
to reach under furniture and clean debris in
hard-to-reach areas.
To engage the Multi-Flex Wand feature,
press the unlock button on the back of your
Flex Wand.
For straight wand cleaning, return the wand
to its original angle. You will hear a click
when it is securely back in place.
To put the vacuum into storage mode, press
the Multi-Flex Wand wand unlock button
while folding the handheld vacuum forward
until it is resting against the wand.
To release vacuum from storage mode,
unfold the vacuum until the wand
straightens and clicks securely back in
place.
ABOVE-FLOOR CLEANING
ABOVE-FLOOR WITH HAND VACUUM
Detach the hand vacuum to clean above-floor
areas. Press the front latch release button on
the hand vac where it meets the wand, then lift
o the hand vacuum. To attach an accessory
to the hand vacuum, slide it into the opening
in the nozzle. To remove, press the front latch
release button on the hand vac where it meets
the wand, and slide out the accessory.
ABOVE-FLOOR WITH WAND
To detach the floor nozzle from the wand,
step on the nozzle while pressing the
nozzle release button at the bottom of
the wand. Lift the wand to remove it. To
reattach the wand, align it over the neck
of the floor nozzle, then slide it on until it
clicks into place.
sharkclean.co.nzsharkclean.com.au
Page 8
USING YOUR VACUUM MAINTAINING YOUR VACUUM
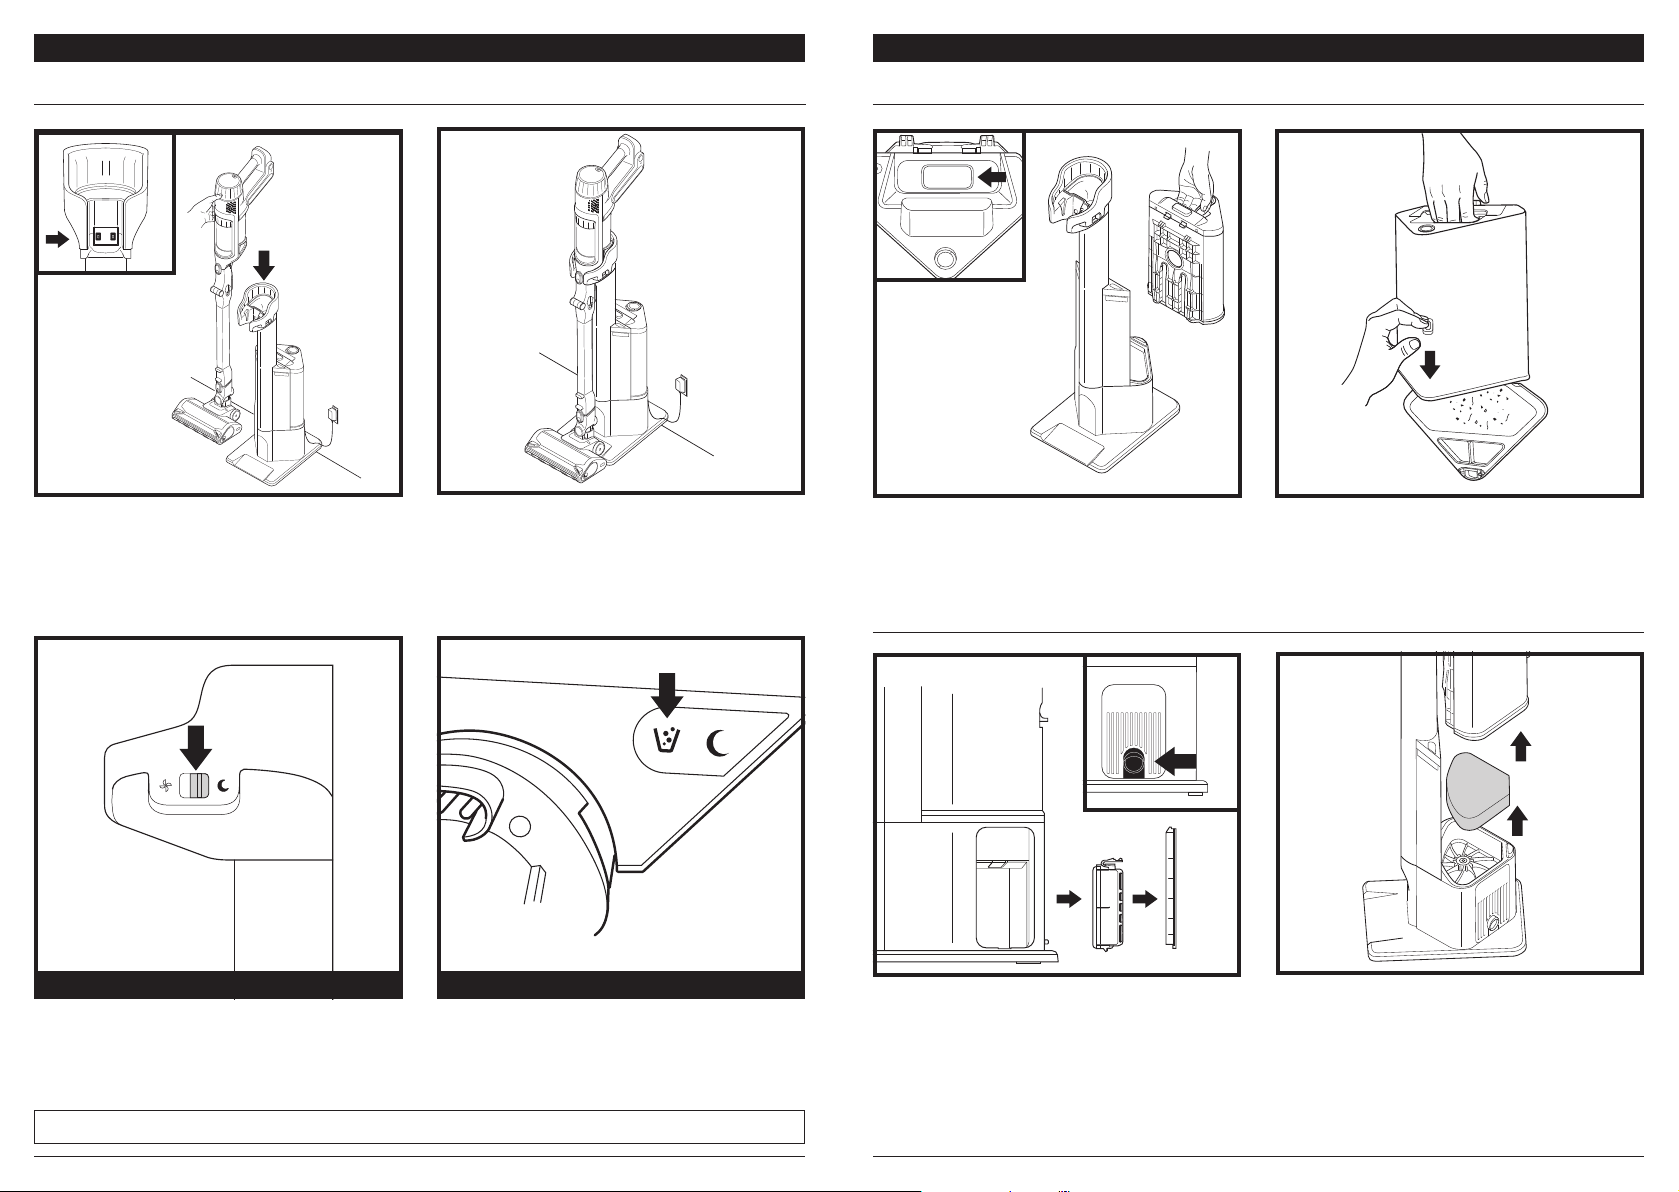
USING THE AUTO-EMPTY DOCK (IP3000 SERIES)
Place the vacuum on the dock in a downward
motion. Once properly attached, the
auto evacuation process will begin. The
evacuation cycle will last for 15 seconds.
Once evacuation is complete, the vacuum
will continue charging until it is removed
from the dock.
EMPTYING THE DOCK DUST BIN (IP3000 SERIES)
The dock dust bin holds up to 45 days’ worth
of dust and debris. Empty the dock dust bin
when the dust bin full indicator light comes on.
To remove the bin, lift it out by the handle.
CLEANING THE AUTO-EMPTY DOCK FILTER
To empty the bin, hold it over the rubbish bin
and press the release button on the side. The
bottom will open to release the debris.
Use Quiet Mode to dock and charge the
vacuum without automatic evacuation.
To activate Quiet mode, press the moon
switch on top of the charging post.
Note: D o not remove the vacuum wh ile the evacuation cycle is tak ing place.
The Dust Bin Full indicator will illuminate
when the dust bin is full of debris and needs
to be emptied. To reset the indicator, remove
the dust bin and empty it.
DUST BIN FULL INDICATORQUIET MODE
To access the filter in the dock, Press the button
at the bottom of the door, then tilt the door
and lift it o. Remove the filter from the dock.
After the filter has been cleaned, reinstall it by
reinserting back into the dock and replacing the
filter door.
Filter, remove the dust bin. Before removing
the Exhaust Foam Filter, remove any fine
debris from the surface using the hand
vacuum. Lift the Exhaust Foam Filter out of
the dock to clean and then reinstall.
sharkclean.co.nzsharkclean.com.au
Page 9
MAINTAINING YOUR VACUUM
MAINTAINING YOUR VACUUM
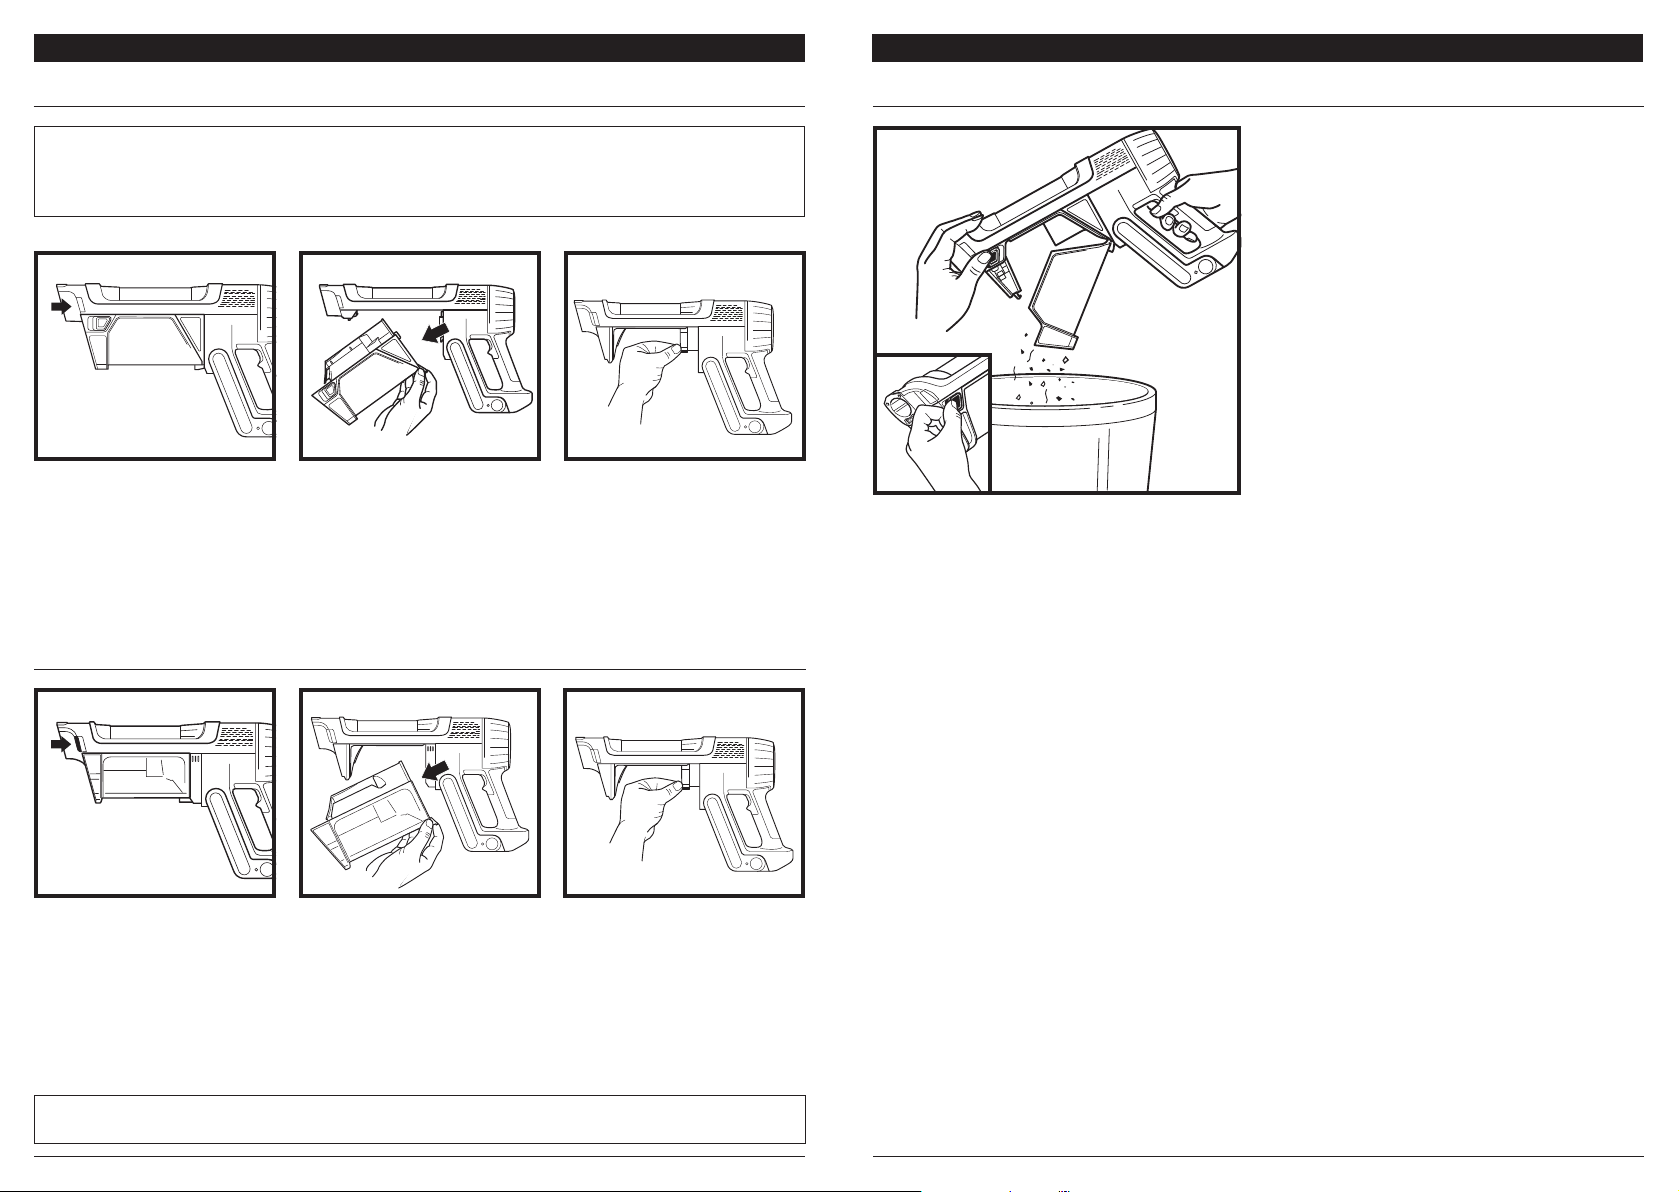
CLEANING THE HEPA FILTER (IP1000 SERIES)
NOTE: Rinse the HEPA filter at least once a month to maintain suction power. More frequent
cleaning may be necessary with heavy use. To clean the filter, rinse it with water only and
allow it to air-dry completely for up to 48 hours before reinstalling. Tap o loose dirt between
washes when needed.
1. To access HEPA filter, first
press the dust cup empty
button to open the dust
cup. Then press the dust
cup release button and
slide the dust cup o the
hand vac.
2. Press the filter release
button and gently pull
the HEPA filter out of the
hand vac.
3. After the filter has been
rinsed and air-dried
completely, slide it back
4. For IP1000 Series only: to
release dust and debris
into the trash, pull the
lever on the bottom of the
dust cup and the bottom
lid will open.
into the hand vacuum.
CLEANING THE HEPA FILTER (IP3000 SERIES)
EMPTYING THE HANDHELD VACUUM DUST CUP (IP1000 SERIES)
To empty the handheld vacuum dust cup,
turn o the power and hold the vacuum
directly over the rubbish bin. Press the
release button and the dust cup lid will drop
open, releasing debris.
1. To access the HEPA filter,
press the Dust Cup Empty
button to open the dust
cup, then press the release
button and slide the dust
cup o the hand vac.
IM P OR TA NT:
DO NOT use soap when cleani ng the filters. Use water only. The vacuu m will not h ave suction if
the post-motor fi lter is not insta lled . Ensure that all filters a re installed before u sing.
2. Press the filter release
button and gently pull
the HEPA filter out of the
hand vac.
3. After the filter has been
rinsed and air-dried
completely, slide it back
into the hand vacuum.
4. For IP3000 Series only:
to release dust and debris
into the trash, pull the
lever on the bottom of the
dust cup and the bottom
lid will open.
sharkclean.co.nzsharkclean.com.au
Page 10
MAINTAINING YOUR VACUUM
MAINTAINING YOUR VACUUM
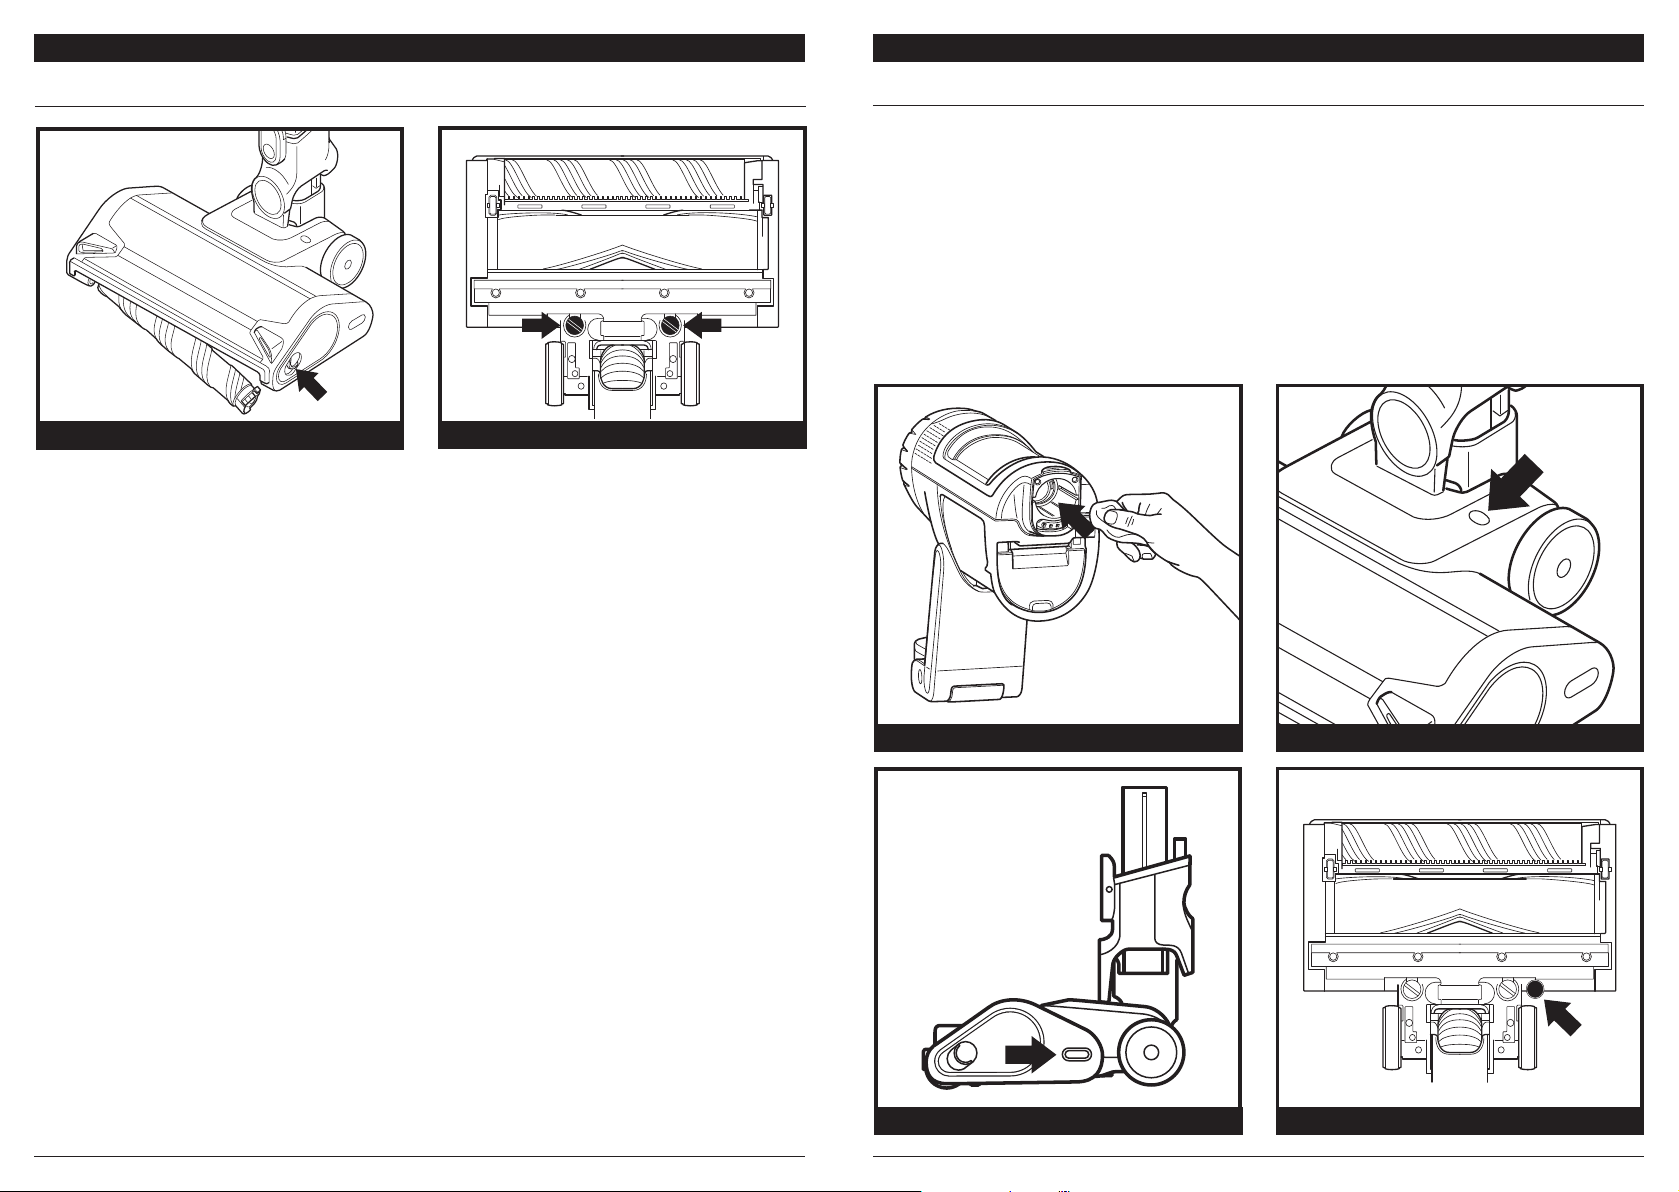
NOZZLE MAINTENANCE
REMOVING SOFT ROLLER REMOVING SQUEEGEE
1. Turn o the vacuum.
2. Press the nozzle release button to detach
the nozzle from the wand.
3. Press the soft roller release button and
slide the soft roller out of the nozzle.
4. Clear any blockages and remove any
debris from the soft roller and floor
nozzle.
5. Tap o loose debris and wipe the soft
roller clean with a dry towel. Hand wash
the soft roller if needed, using only water,
and then let it air dry completely before
reinstalling.
6. When the soft roller is completely dry,
reinstall it into the nozzle by inserting it
into the nozzle until it clicks.
1. Turn o the vacuum.
2. Press the nozzle release button to detach
the nozzle from the wand.
3. Remove rear squeegee by turning screws.
4. Clear our any blockages and debris from
behind the squeegee.
5. Reinstall squeegee and turn screws until
they lock into place.
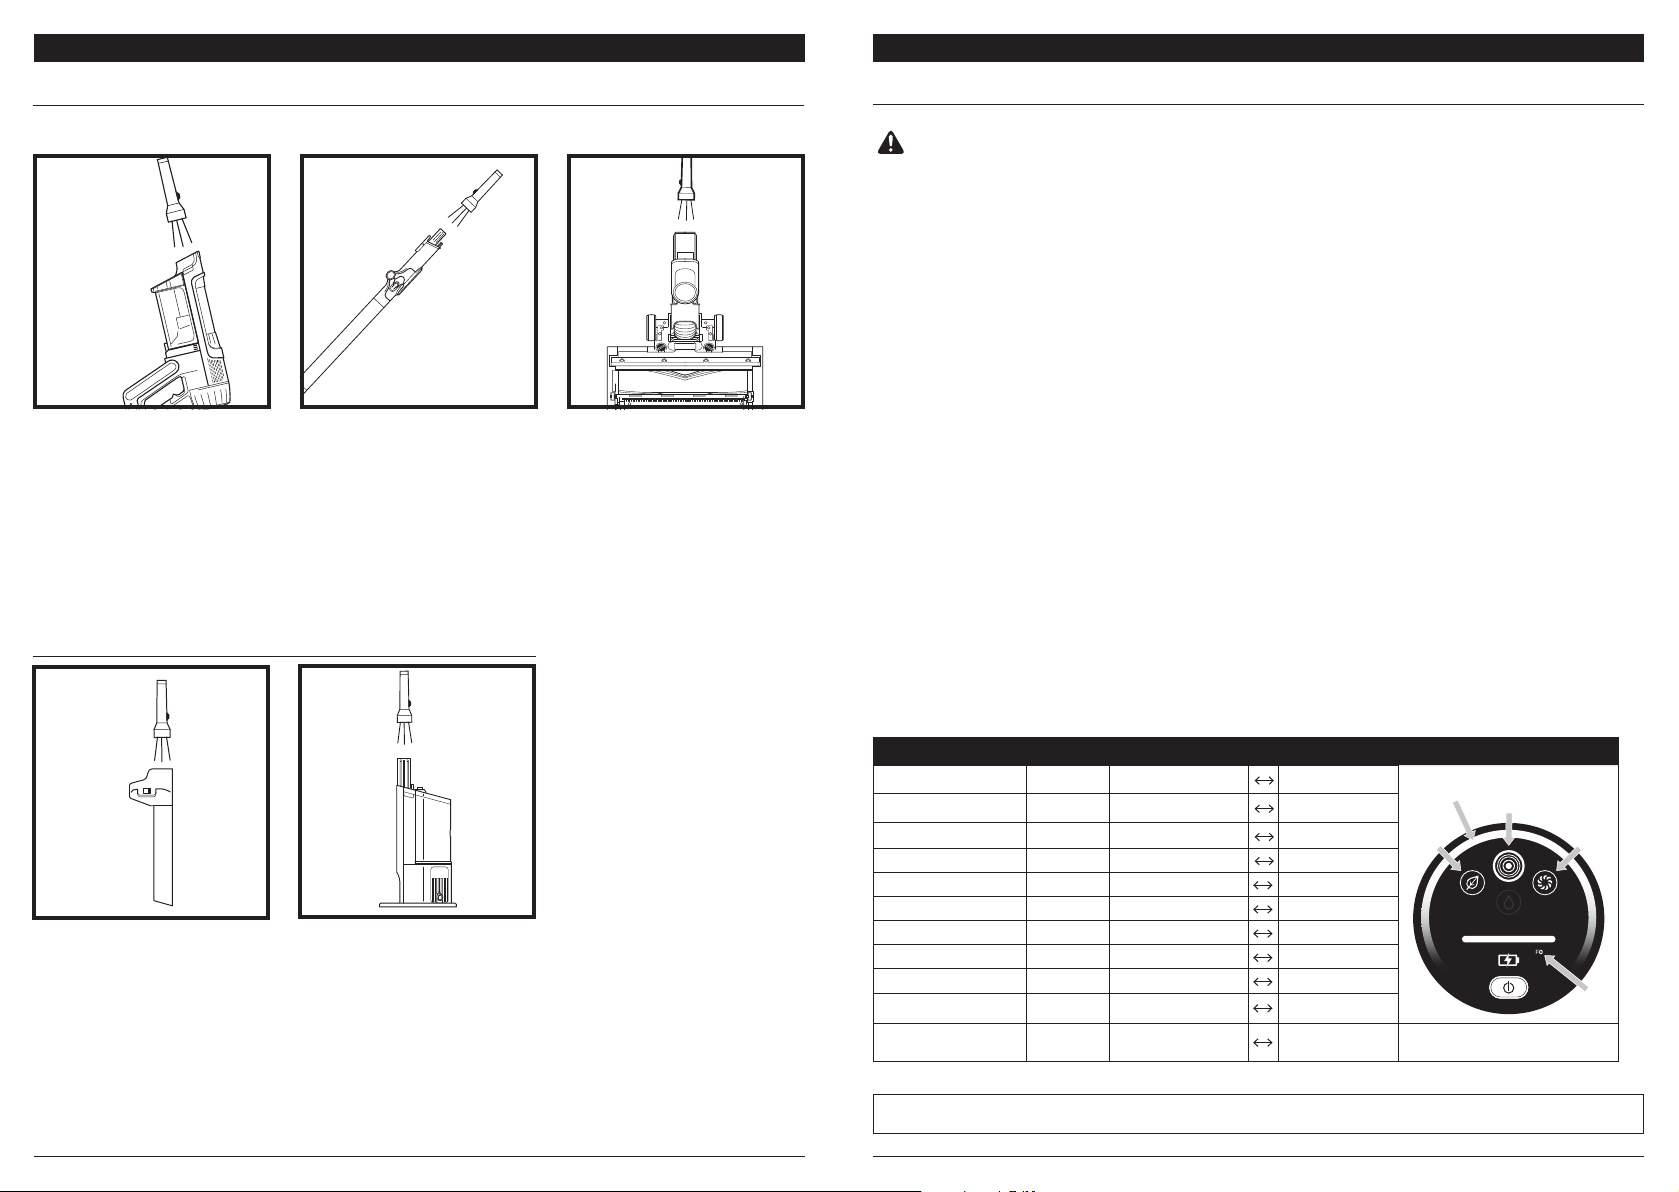
CLEANING THE SENSORS
Make sure to clean the Detect sensors regularly, as hair and other debris may build up and
obstruct them. If the sensors are partially obstructed, Clean Sense Detect mode will not function
as expected.
To clean the sensors:
1. Turn o power and remove the floor nozzle.
2. Locate the Dirt Detect Sensor in the nozzle of the hand vac (Fig. 1), the Light Detect Sensor
on the top of the nozzle (Fig. 2), the Edge Detect sensor on the side of the nozzle (Fig. 3),
and the Floor Detect Sensor (Fig 4) on the bottom of the nozzle.
3. Gently wipe the sensors with a microfibre cloth and remove all hair and debris.
4. Reattach the floor nozzle to the rest of the unit and turn on power. Verify that the unit is
functioning normally.
Fig. 2
DIRTDETECT SENSORS
Fig. 1
LIGHTDETECT SENSOR
Fig. 3 Fig. 4
EDGEDETECT SENSOR FLOORDETECT SENSOR
sharkclean.co.nzsharkclean.com.au
Page 11
MAINTAINING YOUR VACUUM
MAINTAINING YOUR VACUUM
CHECKING FOR BLOCKAGES IN THE VACUUM
If you run over a hard or sharp object or notice a noise change while vacuuming, check for
blockages or objects caught in the brushroll.
Checking for Blockages in the
Hand Vacuum:
1. Turn o the vacuum.
2. Remove the hand vacuum from the
wand.
3. Check all intake openings to the
dust cup and remove any debris
or blockages.
CHECKING FOR BLOCKAGES IN THE
AUTO-EMPTY DOCK (IP3000 SERIES)
Checking for Blockages
in the Charging Post:
1. Unplug the dock.
2. Remove the vacuum from the dock.
3. Press the latch on the back of
the charging post and lift the
post away from the dock.
4. Check the end of the charging
post and top of the dock
for any debris or blockages .
Checking for Blockages in
the Wand :
1. Turn o the vacuum.
2. Detach the hand vacuum and
floor nozzle from the wand.
3. Check both ends of the wand for
blockages and debris.
4. Clear away any debris or
blockages.
Checking for Blockages in the Dock:
1. Unplug the dock .
2. Remove the vacuum from the
dock.
3. Remove the dust bin from the
dock.
4. Check the exit for any debris
or blockages.
Checking for Blockages in the
Floor Nozzle:
1. Turn o the vacuum.
2. Detach the wand from the floor
nozzle.
3. Press the soft roller release
button and slide the brushroll
out of the nozzle.
4. Clear any blockages and release
any debris from the brushroll
and floor nozzle.
5. Slide the soft roller back into the
nozzle, ensuring everything is
lined up and in place.
TROUBLESHOOTING
WARNING: To reduce the risk of shock and unintended operation, turn o
power and remove the battery before servicing.
Vacuum is not picking up debris. No suction or light suction. Third indicator light on hand vacuum is
solid yellow.
(Refer to Checking for Blockages section for more information.)
1. Dust cup may be full; empty dust cup.
2. Check floor nozzle for blockages; clear blockages if required.
3. Remove any string, carpet fibers, or hair that may be wrapped around the brushroll.
4. Check connection between hand vacuum and wand for blockages; clear blockages if required.
5. Check filters to see if they need cleaning. Follow instructions for rinsing and completely air-drying
the filters before reinstalling them.
Vacuum lifts area rugs.
1. Make sure you are not engaging Boost mode. Take care when vacuuming area rugs or rugs with
delicately sewn edges.
2. Turn o the unit to disengage from the carpet, then restart.
The brushroll in the floor nozzle doesn’t spin .
1. Immediately turn o the vacuum . Remove any blockages before turning the vacuum back on. Make sure
the hand vacuum is tilted back far enough for the brushroll to engage while in use.
2. If the floor nozzle has headlights and they are not illuminated, there is a connection issue between the
hand vacuum, wand, and nozzle. Try detaching the parts, then reconnecting them.
Vacuum turns o on its own.
There are several possible reasons for the vacuum turning o on its own, including blockages, battery
issues, and overheating. If vacuum turns o on its own, perform the following steps:
1. Turn on the vacuum and check the battery indicator lights on the hand vacuum. If recharging is needed,
make sure vacuum power is o placing it on the charging dock .
2. Empty dust cup and clean filters (See the Cleaning the Dust Cup and Filter section).
3. Check wand, accessories, and inlet openings and remove any blockages.
4. Allow unit and batter y to cool for at least 45 minutes, until they return to room temperature.
5. Press the On/O switch to restart the vacuum.
Error Message Codes
Malfunction Component Error icons p hase 1 Error icons p hase 2 LED Ico ns
ECO
Icon
Ring
LED
DETECT
Icon
BOOST
Icon
FO
Icon
Nozzle Clog or Stalling Nozzle LED Ring is Flashing Purple No LEDs
Motor Failure During Startup Hand Vacuum ECO, BOOST LEDs on ECO, DETECT LEDs on
Over-Temperature Protection Hand Vacuum ECO, DETECT, BOOST LEDs on BOOST, DETECT LEDs on
Over Current protection Hand Vacuum ECO, DETECT, BOOST LEDs on No LEDs
Short Protection Hand Vacuum ECO, DETECT LEDs on No LEDs
Overspeed Protection Hand Vacuum DETECT LEDs on ECO, BOOST LEDs on
Communication Failure Hand Vacuum ECO, DETECT LEDs on DETECT, BOOST LEDs on
Over-Temperature Protection Nozzle ECO, BOOST LEDs No LEDs
Short Protection Nozzle DETECT, BOOST LEDs on No LEDs
Debris Detection Failure Hand Vacuum F0 LED & LED Ring on No LEDs
Edge Detect Error Nozzle
NOTE: If vacuum still does not op erate proper ly, contact Cus tomer S erv ice on AU: +61 2 8801 7666 | NZ: +6 4 800 112 660
F0 LED on, LED Ring on &
Headlight LEDs on
No LEDs NOTE: Error icons will blink for 0.5 seconds
sharkclean.co.nzsharkclean.com.au
Page 12
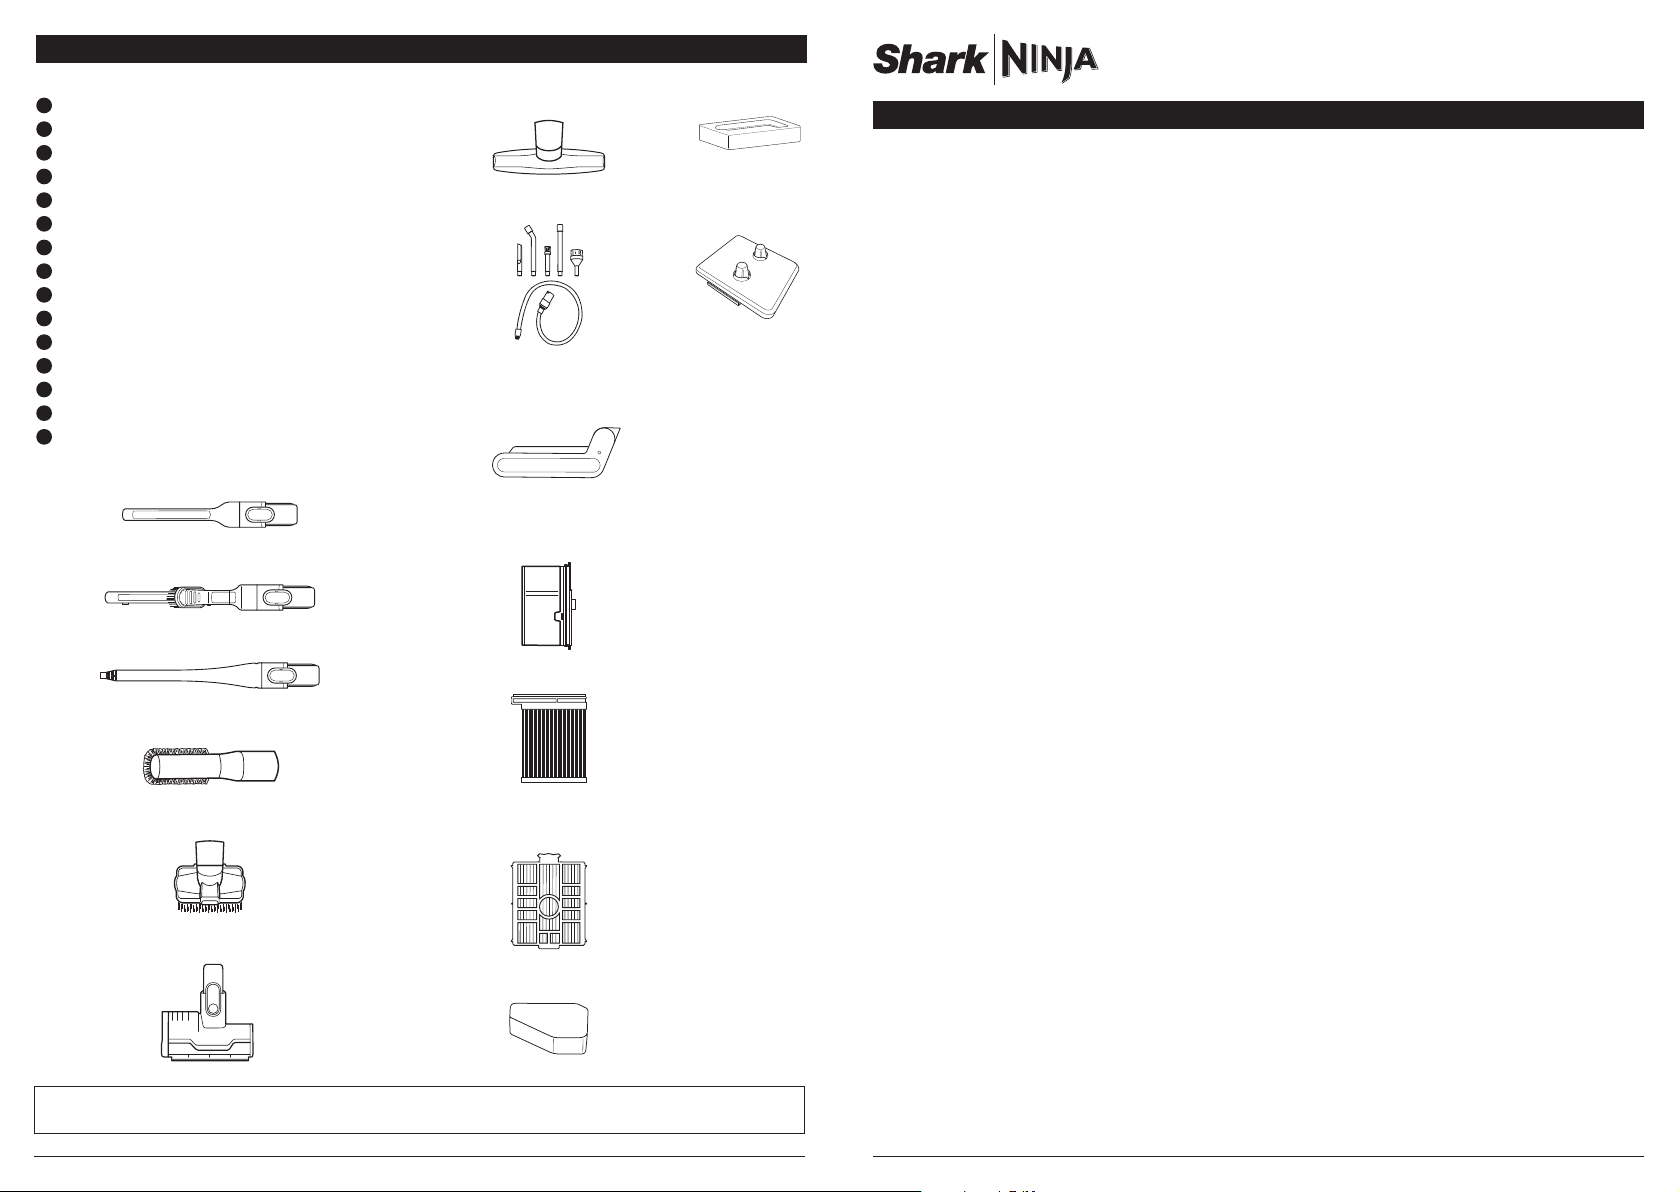
ADDITIONAL ACCESSORIES AVAILABLE
A
Crevice Tool
B
Duster Crevice Tool
C
Flexible Crevice Tool
D
Anti-Allergen Brush
E
Multi-Surface Tool
F
Motorised Hand Tool
G
Wide Upholstery Tool
H
Car Detail Kit
I
Replacement Battery
J
Hand Vacuum Pre-Motor Filter
K
Hand Vacuum Post-Motor Anti-Allergen Filter
L
Auto-Empty Dock Post-Motor Filter
M
Auto-Empty Exhaust Foam Filter
N
Battery Charging Sleeve
O
Accessory Dock
A
B
C
D
G N
H
I
J
K
TWO (2) YEAR LIMITED REPLACEMENT WARRANTY
For guarantee claims, you will need to submit a proof of purchase in the form of a valid receipt
that displays date and place of purchase. This warranty does not replace but is in addition to
your statutory rights.
If your product becomes defective due to faulty material or workmanship within a period of 2
years from the date of purchase, we warrant to do the following:
O
• For New Zealand Consumers: We will replace the defective/faulty part with a new product,
free of charge or if the unit is deemed defective/faulty we replace the unit with an equivalent or
upgraded model, at our discretion.
• For Australian Consumers: Our goods come with guarantees that cannot be excluded under
the Australian Consumer Law. You are entitled to a replacement or refund for a major failure
and for compensation for any other reasonably foreseeable loss or damage. You are also
entitled to have the goods repaired or replaced if the goods fail to be of acceptable quality and
the failure does not amount to a major failure.
Replacement items will be covered by the limited warranty for the balance of the warranty
period from the date of the original purchase. Please note: Your warranty is subject to the
following conditions:
• DO NOT operate the appliance with a damaged plug or cord or if the unit has been dropped,
damaged or dropped in water.
• To avoid the risk of electric shock, do not disassemble or attempt to repair the appliance on
your own. If the supply cord is damaged, it must be replaced by a qualified electrician to avoid
a hazard. Incorrect re-assembly or repair can cause a risk of electric shock or injury to persons
when the appliance is used.
• The item has not been misused, abused, neglected, altered, modified or repaired by anyone.
The item has been subjected to fair wear and tear.
• The item has not been used for trade, professional or hire purposes.
• The item has not sustained damage through foreign objects, substances or accident
What is not covered?
• Accessories supplied with the item.
• Components that are subject to natural wear and tear caused by normal use in accordance with
operating instructions.
• Unauthorised/improper maintenance/handling or overload is excluded from this warranty.
E
L
F
M
NOTE: Not a ll accessori es come with all u nits . Please see th e Quic k Star t Guid e on the p ackaging box for your unit's
configuration. To order additional accessories, visit sharkclean.com.au | sharkclean.co.nz.
sharkclean.co.nzsharkclean.com.au
Page 13
THANK YOU
for purchasing the Shark Power Detect Cordless Vacuum.
REGISTER YOUR PURCHASE
TO BENEFIT FROM YOUR PRODUCT'S EXTENDED
GUARANTEE, SIMPLY REGISTER YOUR PURCHASE
AT:
registeryourshark.com
AU 02 8801 7666
TIP: You can find
the model and serial
numbers on the QR
code label located on
the back of your unit.
TIP: You can locate
the date code on one
of the prongs of the
power cordplug.
NZ 0800 112 660
Scan QR code using mobile device
Please note, products purchased directly from Shark
are automatically registered.
Benefits of registering your product and creating
an account:
• Get easier, faster product support and access to
guarantee information
• Access troubleshooting and product care instructions
• Be among the first to know about exclusive product
promotions
NOTES
Odour Neutraliser
Technology
DANGER
If in direct contact with contents of cartridge:
May cause an allergic reaction to skin.
Wear protective gloves if directly coming
into the contact with the cartridge. Wash
skin thoroughly after handling. Harmful if
swallowed. Avoid breathing in mist or vapours,
intentional misuse and directly inhaling
contents may be dangerous. Avoid release
to the environment. Very toxic to aquatic life
with long lasting eects, ensure cartridge is
disposed of correctly as general waste.
2-(4-tert-butylbenzyl) propionaldehyde
May damage fertility and suspected of
damaging the unborn child. Do not handle
until all safety precautions have been
read and understood. Use personal
protective equipment, such as
protective gloves, as required.
RECORD THIS INFORMATION
Model Number: ������������������������������
Serial Number: �������������������������������
Date Code: ����������������������������������
Date of Purchase (Keep Receipt): ����������������
Store of Purchase: ����������������������������
TECHNICAL SPECIFICATIONS
Voltage: 21.6V
Body Motor Watts: 850W
Nozzle Watts: 120W
PLEASE READ CAREFULLY
AND KEEP FOR FUTURE REFERENCE.
This instruction manual is designed to help you get
a complete understanding of your new Shark Power
Detect Cordless Vacuum.
If you have any questions, please contact Customer
Service at AU 02 8801 7666 | NZ 0800 112 660
AU sharkclean.com.au | NZ sharkclean.co.nz
sharkclean.co.nzsharkclean.com.au
Page 14

NOTES NOTES
sharkclean.co.nzsharkclean.com.au
Page 15

ODOUR NEUTRALISER SPECIFICATIONS
1. Product Name: Odour Neutraliser
Cartridge
2. Manufacturer: Shark Ninja 89 A Street,
Needham, MA 02494
3. Weight: 17.4g / 0.61oz
4. Ingredients: Solid SM composite polymer
C17 + fragrance SE 446676
SHARKNINJA PTY. LTD.
Suite 2, Level 23
45 Clarence St
Sydney NSW 2000
sharkclean.com.au | sharkclean.co.nz
Illustrations may dier from actual product. We are constantly striving to improve our products; therefore the
specifications contained herein are subject to change withoutnotice.
© 2025 SharkNinja Operating LLC. SHARK and MU LTIFLEX are registered trademarks of SharkNinja
Operating LLC. FLOOR DETECT, LIGHT DETECT, and POWERDETECT are
trademarks of SharkNinja Operating LLC.
RBRC is a trademark of Rechargeable Battery Recycling Corporation.
SCF�IP1000-3000ANZ Series�IB�REV�Mv2
@sharkhomeau
@sharkhomenz
 Loading...