

Shark ION P50 Owner's Manual
OWNER'S GUIDE
IC160
Series
CORD-FREE POWERED LIFT-AWAY
®
ION
™
P50

sharkclean.comsharkclean.com
THE DUOCLEAN® FLOOR NOZZLE, WAND,
POD, HANDLE, AND HOSE CONTAIN
ELECTRICAL CONNECTIONS:
1. This vacuum consists of a motorized
nozzle, wand, vacuum pod, handle,
and hose. These compone nts contain
electric al connectio ns, electrical wiring,
and moving pa rts that potentia lly present
risk to the user.
2. Before e ach use, caref ully inspect
all parts for any damage. If a part is
damaged, discontinue use.
3. Use only identical re placement pa rts.
4. T his vacuum contains no serviceable parts .
5. Use o nly as describe d in this manual .
DO NOT use the vacuum for any purpose
other than those described in this manual.
6. With the exception of filters, DO NOT
expose any par ts of the vacuum to water
or other liqu ids.
GENERAL USE
7. Th is vacuum is not intended for use by
anyone with reduced physical, sen sory or
mental ca pabilities, or lack of experience
and knowled ge, unless they h ave been
given supervision or instruction concerning
use of the appliance by a person responsible
for their safety. Children should be
supervi sed to ensure that they DO NOT
play with the vacuu m.
8. Always turn o the vacuum b efore
connecti ng or disconnecting any current
carrying hoses, motorized nozzles,
chargers, batteries, or other electrical or
mechanical parts.
9. DO NOT handle p lug or vacuum with
wet hands.
10. DO NOT use witho ut dust cup, filters, and
brushrolls in place.
11. Only use Shark ® branded filters and
accessorie s. Failure to do so will void
the warranty.
12. DO NOT put any objects into nozzle or
accessory openings. DO NOT use with
any opening b locked; keep free of dust,
lint, hair, and any thing that may reduce
air flow.
13. DO NOT use if nozzle or accessor y airflow
is restricted. If the air paths or the
motorized floor n ozzle become blocked,
turn the vacuum o and remove the
battery. Remove all obstruction s before
you reinser t the battery an d turn on the
unit again.
14. Keep nozzle and all vacuum openings
away from hair, face, fingers, uncovere d
feet, or loose clothing.
15. DO NOT use if vacuum is not working as
it should, o r has been dropped, damaged,
left outdoors, or dropped into water.
16. Use extra care whe n cleaning on st airs.
17. DO NOT leave the vacuum unattended
while powered on.
18. When powered o n, keep the vacuu m
moving over the carpet surface at a ll
times to avoid damaging the carpet fi bers.
19. DO N OT place vacuum on u nstable
surfaces such as chairs or t ables.
20. DO NOT use to pick up:
a) Liquids
b) Large object s
c) Hard or sharp objects (glass, nails,
screws, or coins)
d) Larg e quantities of dus t (including
drywall, fireplace ash , or embers).
DO NOT use as an attachment to
power tools for dust collection .
e) Smoking or b urning objec ts (hot
coals, cigarette butts, or matches)
f) Fla mmable or combustible materials
(lighter fluid, gasoline, or kerosene)
g) Toxic materials (chlorine b leach,
ammonia , or drain clean er)
WARNING
To reduce the risk of fire, electric shock, injury, or property damage:
IMPORTANT SAFETY INSTRUCTIONS
FOR HOUSEHOLD USE ONLY • PLEASE READ CAREFULLY BEFORE USE
If the charger plug does not fit fully into the outlet, reverse the plug. If it still does
not fit, contact a qualified electrician. DO NOT force into outlet or try to modify to fit.
SAVE THESE INSTRUCTIONS
21. DO NOT use in the followin g areas:
a) Poorly lit areas
b) Wet or damp surfaces
c) Outdoor areas
d) Spaces that are enclose d and may
contain explosive or toxic fumes
or vapors (lighter fluid, gasoline,
kerosene, paint, paint thinners,
mothproofing substances , or
flammable dust)
22. Turn o the vacuu m before inserting or
removing the battery, as well as before
plugging in or unplugging the charger.
23. Turn o the vacuum and re move the
battery before any adjustme nt, cleaning ,
maintenan ce, or troublesh ooting. Such
preventative safet y measures reduce the
risk of star ting the applian ce accidentally.
24. During cleaning or routine maintenance,
DO NOT cut anyth ing other than hair,
fibers, o r string wrappe d around the
brushroll.
25. Allow all filter s to air-dry completely
before repla cing in the vacuum to
prevent liquid f rom being drawn into
electric parts.
26. DO NOT modify or at tempt to repair the
vacuum or the b attery yourse lf, except
as indicated in this manual. DO NOT
use the battery or vacuum if it ha s
been modified or damaged. Damaged
or modifie d batteries may exhibit
unpredic table behavio r resulting in fire,
explosion, or risk of injury.
BAT TE RY PACK
27. The battery is the power source for the
vacuum. C arefully read and follow all
charging instructions.
28. To prevent uninte ntional star ting, ensure
the vacuum is p owered o before picking
up or carr ying the vacuum . DO NOT carry
the appliance with your finger on the
power switch .
29. Use only Shark ® chargers YLS0244A or
ZD024S332096US, a nd use only battery
XBAT300. Use of bat teries or batter y
chargers other than those in dicated may
create a risk of fire.
30. Keep the battery away from all metal
objects such as paper clips, coins, keys,
nails, or screws. Shortin g the battery
terminals increases the risk of fire or burns.
31. Under abusive conditions, liquid may be
ejected from the battery. Avoid contact
with this liquid, as it may cause irritation
or burns. If contact occurs, flush with
water. If liquid conta cts eyes, seek
medical help.
32. Battery should not be store d at
temperatures below 37.4°F (3°C) or
above 104°F (40°C ) to maintain long term battery life.
33. DO NOT charge battery at temperatures
below 50° F (10°C) or above 104°F (40°C).
34. Store the appliance indoo rs. DO NOT use
or store it below 37.4°F (3°C). Ensure the
appliance is at room temperatu re before
operating .
35. DO NOT expose the battery to fire or
temperatures above 265°F (130°C) as it
may cause explosion.
36. Follow all charging instructions. DO NOT
charge the battery at temperatures below
50°F ( 10°C) or above 104°F (40°C).
Charging improperly or at temperatures
not in the specified range may damage
the batter y and increase the risk of fire.
sharkclean.comsharkclean.com
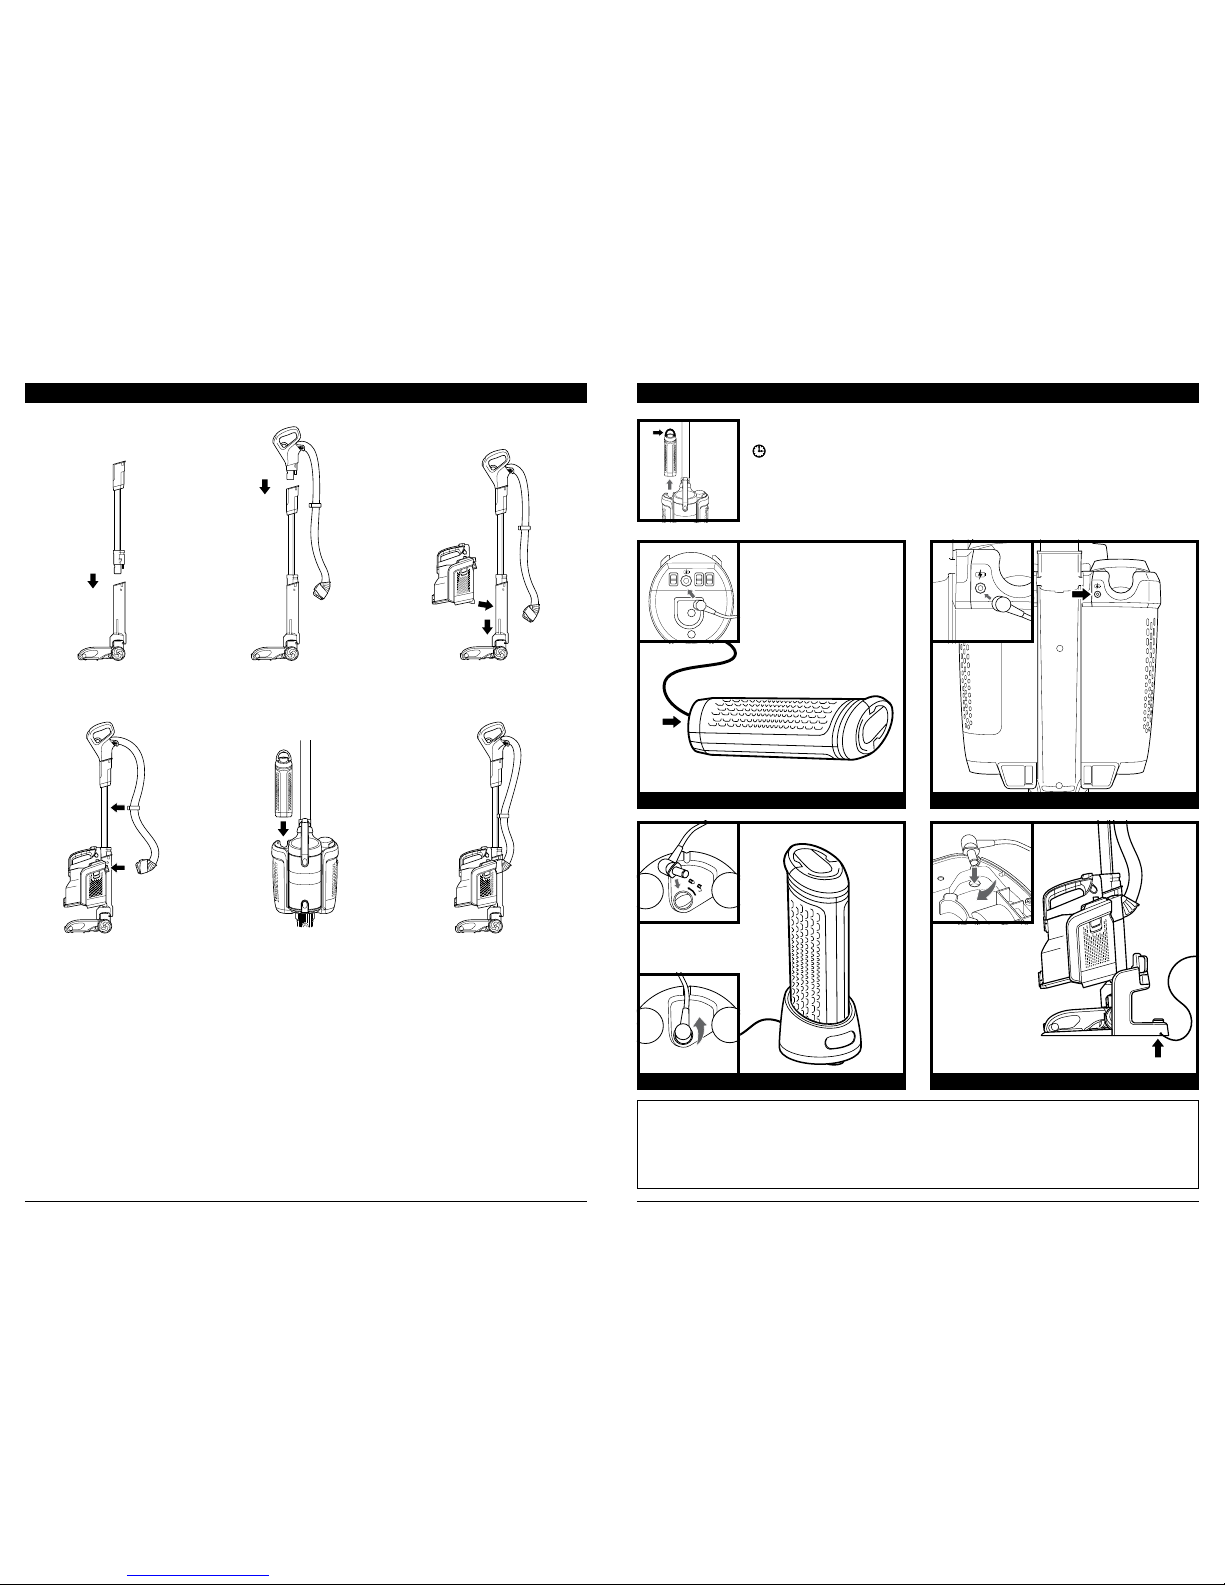
ASSEMBLY
1. Insert wand i nto floor nozzle .
2. Insert handle into wand.
3. Align the bottom of po d onto the rails on th e front of the ne ck of the floor nozzl e.
Slide pod d own the rails unti l it clicks into pla ce.
4. Connect h ose to back of pod , and attach h ose clip onto wand .
5. I nsert cha rged batter y into pod with the ha ndle toward the ba ck.
To ensure prope r insertion , the handle o n battery mus t be down.
IM PORTA NT: For prop er operation , ensure all co nnections a re securely cli cked into place.
(Click)
1
(Click)
2
(Click)
(Click)
4
3
(Click)
(Click)
5
4 WAYS TO CHARGE THE BATTERY
OUT OF VACUUM
IN CHARGING CRADLE
IN VA CUU M
IN CHARG E & GO DOCK
NOTE: Only one charger is provided.
NOTE: Not all charging options are available with all configurations. Please see the enclosed Quick Start Guide for your unit.
Additional charging options can be purchased at sharkaccessories.com.
NOTE: When charging in the floor dock, insert vacuum so that wheels align with the wheel indentations on the base of the dock.
NOTE: When using the cradle or the dock, insert the charger plug into the port and rotate to lock into place. Battery will not
charge unless the charger is locked into place.
To remove the batter y for chargin g, lift the ha ndle on top of the b attery and pu ll up.
The battery must be charged before first use.
A complete charge takes approximately 3.5 hours.
IM PORTA NT: When ch arging, con nect the cha rger to the por t first, then pl ug the
charger i nto wall outlet.

sharkclean.comsharkclean.com
IN USE: LIGHTS ILLUMINATE STEADILY
Full
Charge
Full
Charge
Nearly
Full
Mid
Charge
Mid
Charge
Low
Charge
Low
Charge
Needs
Charge
CHARGING: ONE LIGHT FLASHES
TEMPERATURE ISSUE: FIRST AND THIRD INDICATOR LIGHTS ALTERNATE FLASHING
NOTE: The battery must be charged before first use. A complete charge takes approximately 3.5 hours.
NOTE: After reaching full charge, the indicator light will shut o after 5 minutes.
Charge Indicator
TOP OF BATTERY
CHARGE INDICATOR LIGHTS
If first an d third indica tor lights flash a lternately, the bat tery tempe rature is not
optimal . Leave battery pl ugged in and c harging will re sume when tem perature
returns to opti mal level.
OPERATING THE VACUUM
OPERATING THE VACUUM
SETTINGS
RUNTIMES
Press icon to tu rn power
on or o.
Powe r
Press icon to s elect surf ace
setting:
Carpet
For carpe ts.
Floor
For bare flo ors and
small area rugs.
Press icon to b oost power:
ION BOOST
When in Lif t-Away®
mode, pr ess BOOST
icon to turn on o r o.
The defa ult power setting
on floors a nd carpets is
ION Power mo de. For
an additio nal boost of
suction p ower, press and
hold the BOOST icon.
POWER B UTTON SUR FACE SUCTION LEVEL
NOTE: For d eep carpet clea ning per ASTM F6 08 (embedded d irt in c arpets) , use Carpet setti ng.
NOTE: Sel ect Carpet for stuck-on du st and debris.
IM PORTA NT: Your unit will d efault into ION BOOST mode
when usin g in Lift-Away. ION BOOST mode shorte ns runtime.
MODE AND SETTINGS ION POWE R ION BOOST
UPRIGHT & POWERED LIFT-AWAY®
(CARPET)
Up to 28 minu tes
Up to 18 min utes
UPRIGHT & POWERED LIFT-AWAY
(FLOOR)
Up to 30 minu tes
ABOVE-FLOOR & LIFT-AWAY
(WAND OR HANDLE)
Up to 50 minu tes
NOTE: All accessories can be attached to the wand or the handle.
NOTE: Pod can also remain on floor nozzle when using handle or wand.
POD, HANDLE AND WAND ARE DETACHABLE
Press the Wand Release button u ntil it clicks , then
pull up on wa nd to detach from t he floor nozzle .
DETACH THE WAND
Pull the Ha ndle Relea se trigger to det ach the
handle from the wand.
DETACH THE HAND LE
Press Lift Away bu tton on handl e and lift pod o
floor nozzl e.
DETACH THE POD
TIP: See next page for all the different
ways you can use your vacuum.
 Loading...