

Page 1
Page 2
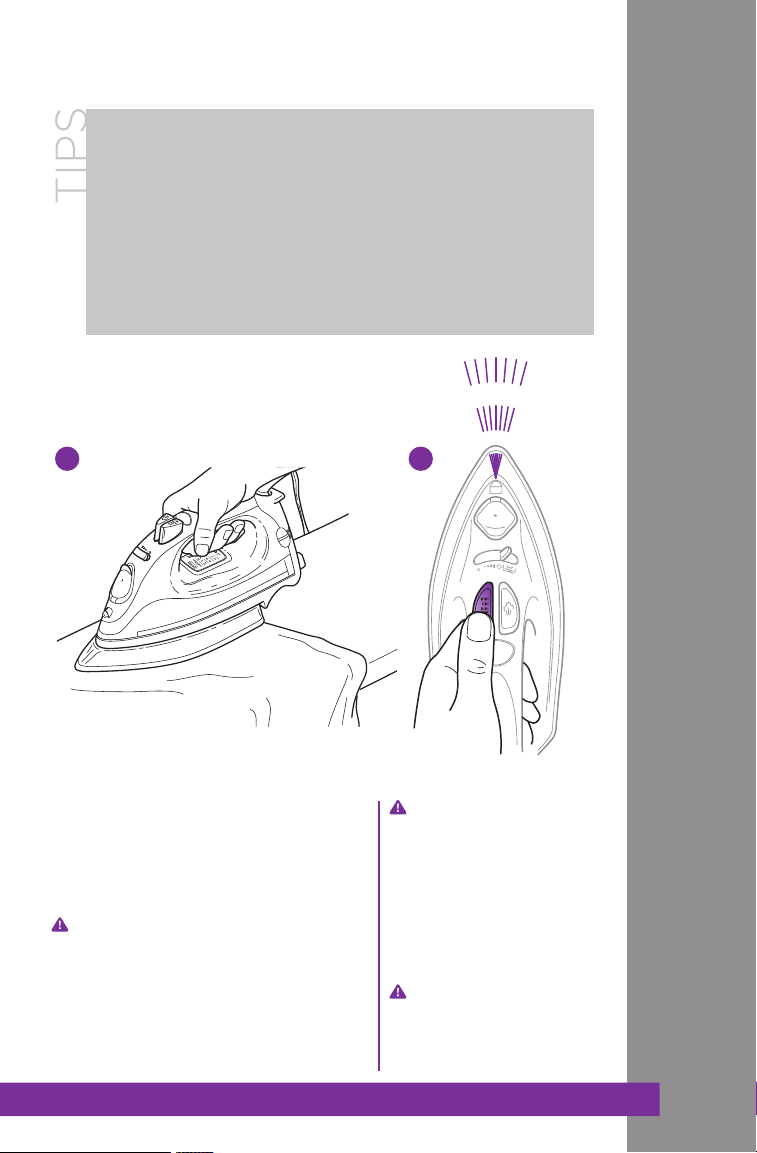
1
TOL L FR EE : 1 -8 00 -798 -739 8
Page 3
Eng lis h
ww w.shar kclean .co m
2
Page 4
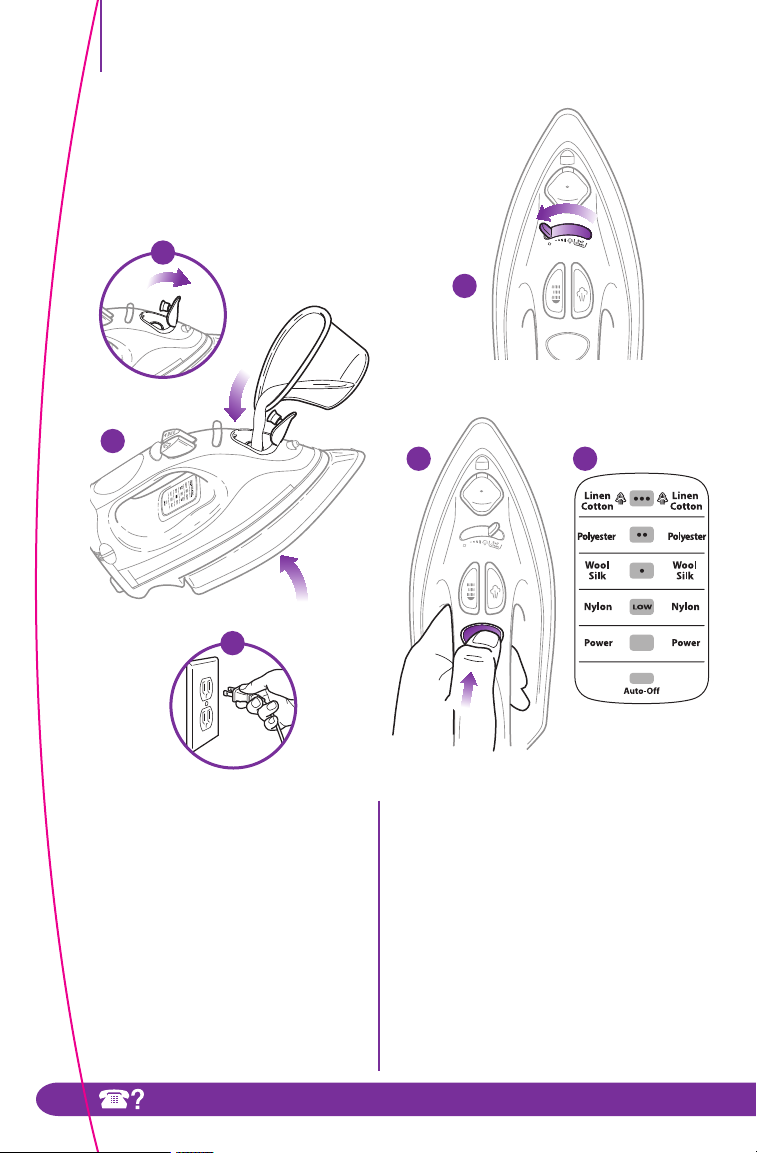
Quick Start
First things first, remove any
labels, stickers or tags that may
be attached to your Shark
Rapido™ Electronic Iron.
®
1
4
2
3
1 Open the water inlet cover
located on the front of the iron.
2 Holding the iron at a slight
angle; fill the tank with the
filling flask without going over
the “MAX” line. Close the water
inlet cover.
3 Plug in the iron.
4 Choose dry or steam ironing
based on the type of fabric you
are going to iron.
For DRY ironing set the steam
control dial to “0”.
5 8
For STEAM ironing set to desired
steam for the type of material to be
ironed.
5 Set the desired fabric/temperature by
pressing the Electronic Temperature
Control on the top of the handle.
6 The temperature indicator light on the
LED Display Panel will flash as the
iron reaches the preset temperature.
7 Allow approximately 2 minutes for the
iron to heat up or cool down to the
new temperature setting. Start ironing!
6
TOL L FR EE : 1 -8 00 -798 -739 8
Page 5
Read all garment care labels before you start
ironing. You can also test the temperature of the
iron on a hem or an inside seam.
Iron similar fabrics together and in sequence of
synthetic fibers acrylic, nylon, silk/wool, polyester
and cotton/linen. This will reduce the need to
adjust the temperature frequently.
7
Quick Start
ATOMIZER SPRAY
8 Use the atomizer spray to get rid of
tough wrinkles. Make sure there is
enough water in the tank. Press the
atomizer spray button to moisten
the fabric.
Before choosing to iron with steam
for the first time, let the iron heat-up,
hold in a horizontal position and hit
the burst of steam button a couple of
times.
When you turn on the
iron for the first time it
might emit an odor for
the first ten minutes. This
is because the materials
used in making the iron
are heating up. The odor
is safe and should not
re-occur after the initial
heating.
To prevent fire, do not
leave iron unattended
while connected.
ww w.shar kclean .co m
Page 6

Thank you for
purchasing the
®
Shark
Rapido™
Electronic Iron
TECHNICAL SPECIFICATIONS
120 Volts, 60 Hz., 1500 Watts
5
TOL L FR EE : 1 -8 00 -798 -739 8
Page 7

Contents
Eng lis h
GETTING STARTED ..................................................................................................................... 7
USING YOUR IRON ..................................................................................................................... 8
USING THE BURST OF STEAM ............................................................................................. 11
ELECTRONIC AUTO-OFF ........................................................................................................ 12
EMPTYING THE IRON
SELF-CLEANING FEATURE
SELECTING THE PROPER TEMPERATURE FOR YOUR FABRIC
STORAGE
TROUBLESHOOTING ................................................................................................................
WARRANTY AND REGISTRATION .......................................................................................
...............................................................................................................12
...................................................................................................13
............................14
......................................................................................................................................14
15
16
ww w.shar kclean .co m
6
Page 8

Getting Started
5 Spray Nozzle
6 Variable Steam/Self-Clean Control
Lever
Select “0” to maximum steaming for
different fabrics.
The self-cleaning feature removes
impurities and scale buildup inside
the soleplate.
7 Atomizer Spray Button
Moistens fabric to remove stubborn
wrinkles.
8 Water Level Window
9 Pivot Cord
Provided for left or right-handed use.
Pivots up and down to prevent
dragging along the fabric. The flexible
cord cover protects the cord from
fraying.
10 Fabric Setting
11 Temperature Indicators
12 Power Light
13 Auto-Off Light
The iron is inactive when the Auto-Off
light is flashing
14 Anti-Drip Function (not shown)
Prevents water spitting when the iron
temperature is too low.
15 Built-In Anti-Calcium Filter
(not shown)
Prevents calcium build-up which
prolongs the life of the iron.
First things first, remove any labels,
stickers or tags that may be attached to
your Shark
®
Rapido™ Electronic Iron.
a
b
FIRST THINGS FIRST, YOU NEED TO
KNOW WHAT’S IN THE BOX YOU JUST
OPENED:
a Shark
b Filling flask
®
Rapido™ Electronic Iron
394
51627
10
12
FEATURES:
1 Stainless Steel Soleplate
Provides maximum glide-ability and
heat retention.
2 Water Inlet Door
Keep closed during use to prevent
any water from spilling while ironing.
3 Steam Burst Button
Removes stubborn wrinkles from
denim, cotton or linen by surge of
steam.
4 Electronic Temperature Control
Select the fabric/temperature setting.
8
11
13
7
TOL L FR EE : 1 -8 00 -798 -739 8
Page 9

Using Your Iron
Eng lis h
5 Spray Nozzle
6 Variable Steam/Self-Clean Control
Lever
Select “0” to maximum steaming for
different fabrics.
The self-cleaning feature removes
impurities and scale buildup inside
the soleplate.
7 Atomizer Spray Button
Moistens fabric to remove stubborn
wrinkles.
8 Water Level Window
9 Pivot Cord
Provided for left or right-handed use.
Pivots up and down to prevent
dragging along the fabric. The flexible
cord cover protects the cord from
fraying.
10 Fabric Setting
11 Temperature Indicators
12 Power Light
13 Auto-Off Light
The iron is inactive when the Auto-Off
light is flashing
14 Anti-Drip Function (not shown)
Prevents water spitting when the iron
temperature is too low.
15 Built-In Anti-Calcium Filter
(not shown)
Prevents calcium build-up which
prolongs the life of the iron.
This iron is for HOUSEHOLD
USE ONLY. Plug it into any
120V AC polarized electrical
outlet to start ironing!
1
2
SETTING THE FABRIC AND
TEMPERATURE INDICATORS:
1 Press the Electronic Temperature
Control to select the desired fabric
setting on the LED display panel. Please
read the garment label for correct
setting. Wait about 1 minute for the iron
to heat up.
2 The temperature indicator will flash on
the LED Display Panel until it reaches
your desired temperature.
ww w.shar kclean .co m
8
Page 10

Using Your Iron
2
4
DRY ironing on a low
temperature is best on
acrylic, nylon, polyester, silk
and wool.
1
2
DRY IRONING
1 Choose any of the fabric settings on
the LED Display Panel according to
your garment label (as described on
page 8).
2 Turn the Steam Control Dial to “0”.
3 Place the iron on its heel, standing up
and on a stable surface while it’s
heating up to the desired temperature.
4 Once the steam flow is cut off, you can
start ironing.
9
TOL L FR EE : 1 -8 00 -798 -739 8
STEAM IRONING
1 Open the water filling inlet cover.
Holding the iron at a slight angle, pour
the water slowly into the inlet. The
soleplate design allows for ordinary
tap water to be used. We recommend
using the mix of 50% tap water and
50% distilled water to reduce the
hardness.
2 Using the filling flask, fill the tank to a
desired level without going over the
“MAX” line on the water tank.
3 When you’re finished, close the inlet
cover before continuing.
4 Plug the cord into a polarized 120V
AC electrical outlet.
Page 11

Using Your Iron
Eng lis h
STEAM ironing on a higher
temperature is best on
cotton and linen.
5 7
6
ANTI-DRIP FEATURE
Steam cannot be produced if the
soleplate is not hot enough. It may
result in water spitting or leaking from
the soleplate. This iron is built with an
anti-drip feature which reduces water
dripping and leaking when ironing at
low temperatures.
5 Set the desired fabric/temperature by
pressing the electronic temperature
control button (as described on page 8)
after reading the garment label.
6 Place the iron on its heel, standing up
on a stable, protected surface to allow
the iron to heat up for approximately 2
minutes or until the temperature
settings on the LED display panel are
lit at the preset temperature.
7 Turn the steam control lever to the
appropriate steam setting.
(See “Ironing Guide” on page 15.)
8 In order to increase the amount of
steam, turn the steam control lever to
the right within the steam band. When
you use extra steam, the iron uses
more water, so you may have to fill the
tank more often.
Before filling the iron with water,
always make sure the cord is not
plugged into the electrical outlet.
Be very careful when filling the iron
with water. Injuries may occur if you or
your family comes in contact with the
hot metal parts, hot water or steam.
Never fill the iron with fabric condi tioner, starches or any other liquid
because these will damage the steam
mechanism. Don’t use contaminated
water either.
DO NOT aim iron at yourself or anyone
else while adjusting steam. Be careful,
burns or serious injury may occur.
ww w.shar kclean .co m
10
Page 12

Using the Burst of Steam Button
2
5
4
Steam burst helps to
remove stubborn wrinkles
and can work both
horizontally and vertically.
1 Make sure the water tank is at least 1/2
filled with water.
2 Select the desired fabric and tempera-
ture setting after reading the garment
label.
3 Place the iron on its heel, standing up
on a stable and protected surface so it
can heat up for approximately 2
minutes.
4 Press the steam burst button while
holding the iron horizontally or
vertically. Give an interval of 3
seconds of each burst. Overuse of
steam burst button may cause water
spitting or weak steam performance.
11
TOL L FR EE : 1 -8 00 -798 -739 8
VERTICAL STEAM
5 The steam burst feature is especially
useful to remove wrinkles from
hanging clothes, delicate garments
and other fabrics. Hold the iron in a
vertical position several inches away
from the articles and press the steam
burst button to prime the pump.
CAUTION: Do not aim iron at yourself
or anyone else while using the steam
burst feature. Be careful, burns or
serious injury may occur.
CAUTION: Never iron or steam
clothes while they are being worn.
If the tank runs dry, always make sure
you unplug the iron from the outlet
before you refill.
Page 13

Electronic Auto-Off Emptying the Iron
Eng lis h
MINUTES
7-9
2
3
4
The Shark
equipped with an electronic auto-off
feature. The electronic auto-off
switches the iron off if it has been
unmoved in any position (sideways,
flat or upright) for approximately 7-9
minutes. The auto-off light will turn red
on the LED display panel when the iron
switches off. To turn the iron back on,
just gently rock the iron back and forth
several times until the “Power ON”
light is re-illuminated. Press the
Electronic Temperature Control to
reset the temperature to the desired
setting. The iron might have to warm
up for a minute if the auto-off feature
was activated for an extended time.
®
Rapido™ Electronic Iron is
1 Always empty the water in the iron
after each use.
2 When you have finished ironing, turn
the variable steam control lever to “0”
and press the electronic temperature
control button until the power light is
lit.
3 Unplug the iron from the electrical
outlet.
4 Turn the iron upside down over the
sink with the tip pointing downward
and allow the water to flow from the
opening. Be cautious when emptying,
don’t touch the hot surfaces, water or
steam because injury may occur.
5 Place the iron upright and allow to
cool before storing.
ww w.shar kclean .co m
12
Page 14

Self-Cleaning
We suggest that you self-clean the
iron at least once every two weeks to
remove scale and calcium. If you know
you have very hard water we
recommend that you self-clean the
iron more often.
1 2 3 4
5 6
1 Set the steam control lever to any
steam position.
2 Fill the water tank up to the “MAX”
level. Do not overfill.
3 Stand the iron on its heel, standing up
on a protected surface and plug into
the electrical outlet.
4 Press the Electronic Temperature
Control button to “•••” setting. Wait
until the iron heats up and the
Temperature Indicator lights up.
5 Hold the iron horizontally over the
sink. Turn the steam control lever all
the way to the right to the
SELF CLEAN position.
6 Move the iron back and forth. Hot
water and steam will now be ejected
9
from the holes in the soleplate. Use
caution when doing this as the water
and the steam are hot enough to
cause burns. The impurities and scale
are washed away.
7 Continue moving the iron back and
forth until all the impurities are
flushed.
8 Empty the water tank as described on
Page 12. Don’t touch the hot surfaces,
water or steam because injury may
occur.
9 Turn the Steam Control Lever to “0”
position when the water tank is empty
10 Place the iron back upright on its heel
to cool down before storing.
13
TOL L FR EE : 1 -8 00 -798 -739 8
Page 15

Selecting the Proper
Temperatures
Storage and Care
Eng lis h
1
3
4
3
2
1
1 Use LOW
other synthetics.
2 Use setting for wool, silks and
blends.
3 Use setting for polyester.
4 Use highest settings for
cottons and linens.
Always read garment labels and
follow the manufacturer’s ironing
instructions.
settings for nylon and
6
1 Always turn the variable steam control
to “0” after you have emptied the
water tank.
2 Allow the iron to cool down.
3 Always store the iron in the upright
position to protect the soleplate.
4 Every two weeks, clean the exterior of
the iron with a damp cloth and wipe
dry.
5 If you use spray starch, wipe the
soleplate with a soft, damp cloth after
every use before unplugging. Please
be careful if the iron is hot when
cleaning the solepate.
6 If the iron hasn’t been used in a few
weeks, hold the iron horizontally and
allow steaming for 2 minutes before
ironing.
ww w.shar kclean .co m
14
Page 16

FABRIC TYPE
LED DISPLAY
PANEL
STEAM
CONTROL
Use this
setting for
synthetic
fibers such
as acrylic,
or nylon
Use this
setting for
silk or wool
Use this
setting for
polyester
Use this
setting for
cotton or
linen
Please note
that the
symbol
above on
the label
of your
garment
means that
THE
ARTICLE
CANNOT BE
IRONED
15
BURST OF
STEAM
SPRAY
TOL L FR EE : 1 -8 00 -798 -739 8
NONO NO YES
YESYES YES YES
Page 17

Trouble Shooting
PROBLEM POSSIBLE REASONS & SOLUTIONS
Iron should be plugged into a 120V AC electric outlet only.
Make sure the plug is securely in the socket.
Iron doesn’t heat.
Temperature setting might be too low.
Try turning to a higher setting.
Eng lis h
An odor is being
emitted from the
new iron or small
particles are
coming out.
Iron doesn’t steam.
Water droplets
coming from
steam vents.
This is normal.
Follow the instructions for first-time use and allow iron to
steam through 2-3 fillings and press the steam burst button
occasionally to eliminate small white particles.
Water tank may be empty or water level is very low. Add
water.
Make sure the fabric/temperature setting and the variable
steam control are correctly set. For maximum steam, set “MAX”
on steam control and the temperature setting should be set on
“•••.”
Steam control dial is set on “0.”
The soleplate is not hot enough and the anti-drip feature
switches off the steam. Always allow the iron to reach the
selected temperature with the variable steam control setting at
“0.” For more steam, turn temperature dial to a higher setting
and the steam control to “MAX.”
If the temperature setting and steam control settings are
correct and there is no steam, gently move the iron left or right
a couple of times. Move the Steam Control Dial from “0” to
“Max” a few times.
Variable Steam Control Dial may be set in “self clean” position.
Align the dial to the "0" to "Max" steam setting.
Iron may not be hot enough. Set temperature to “MAX” position.
Always allow iron sufficient time to heat up before activating the
variable steam control.
Overuse the steam burst. Allow more time between each burst.
ww w.shar kclean .co m
16
Page 18

Notes
17
TOL L FR EE : 1 -8 00 -798 -739 8
Page 19

Eng lis h
GI468N 10 / GI468N 12 / GI468CN 10 / GI468CN 12
ww w.shar kclean .co m
18
Page 20

 Loading...