

Page 1

OWNER’S GUIDE
MANUAL DE INSTRUCCIONES
MODELS | MODELOS
GI408Z 10
GI408Z 12
Copyright © EURO-PRO Operating LLC 2008
www.sharkcompany.com
Page 2
IMPORTANT SAFETY INSTRUCTIONS
When using your iron, basic safety precautions should always be followed, including the
following:
1. Read all instructions carefully.
2. Use iron only for its intended use.
3. To protect against risk of electrical
shock, do not immerse the iron in
water or other liquids.
4. Never yank cord to disconnect from
outlet. Grasp plug and pull to
disconnect.
5. Do not allow cord to touch hot
surfaces. Let iron cool completely
before putting away.
6. Always disconnect iron from electrical
outlet when filling with water,
emptying, or when not in use.
7. Do not operate iron with a damaged
cord, or after the iron has been
dropped or damaged in any manner.
To avoid the risk of electric shock, do
not disassemble the iron. Return the
iron to Euro-Pro Operating LLC for
examination and repair. Incorrect
reassembly can cause the risk of
electric shock when the iron is used.
8. Close supervision is necessary for
any appliance being used by or near
children. Do not leave iron
unattended while connected or on an
ironing board.
9. Burns can occur from touching hot
metal parts, hot water or steam. Use
caution when you turn a steam iron
upside down; there may be hot water
in the reservoir.
10. Never use or rest iron on an unstable
surface.
11. While the iron is hot, never set iron on
an unprotected surface - even if it is
on its heel rest.
12. CAUTION: TO PREVENT ELECTRIC
SHOCK OR OTHER INJURY, before
filling the iron with water, make sure
that the plug is removed from the
outlet.
13. WARNING: Never fill the iron with
fabric conditioner, starches or any
other solution, as these will
damage the steam mechanism. Do
not use contaminated water.
14. CAUTION: TO AVOID FIRE, never
leave iron unattended while it is
plugged in.
15. CAUTION: TO PREVENT ELECTRIC
SHOCK, never use the iron in a
location where it can fall or be pulled
into water or another liquid. If the iron
falls into water or other liquid, unplug it
immediately. DO NOT reach into the
water or liquid.
16. WARNING: Never use scouring pads,
abrasive or chemical cleaners, or
solvents to clean the exterior or
soleplate of your iron. Doing so will
scratch and/or damage the surface.
17. CAUTION: DO NOT aim iron at face,
towards yourself, or anyone else while
using or adjusting steam. Burns or
serious injury may occur.
18. Always store your iron standing
upright, not on the soleplate. If stored
face down, even the smallest amount
of moisture will cause the soleplate to
corrode and stain.
19. This appliance is for household
use only.
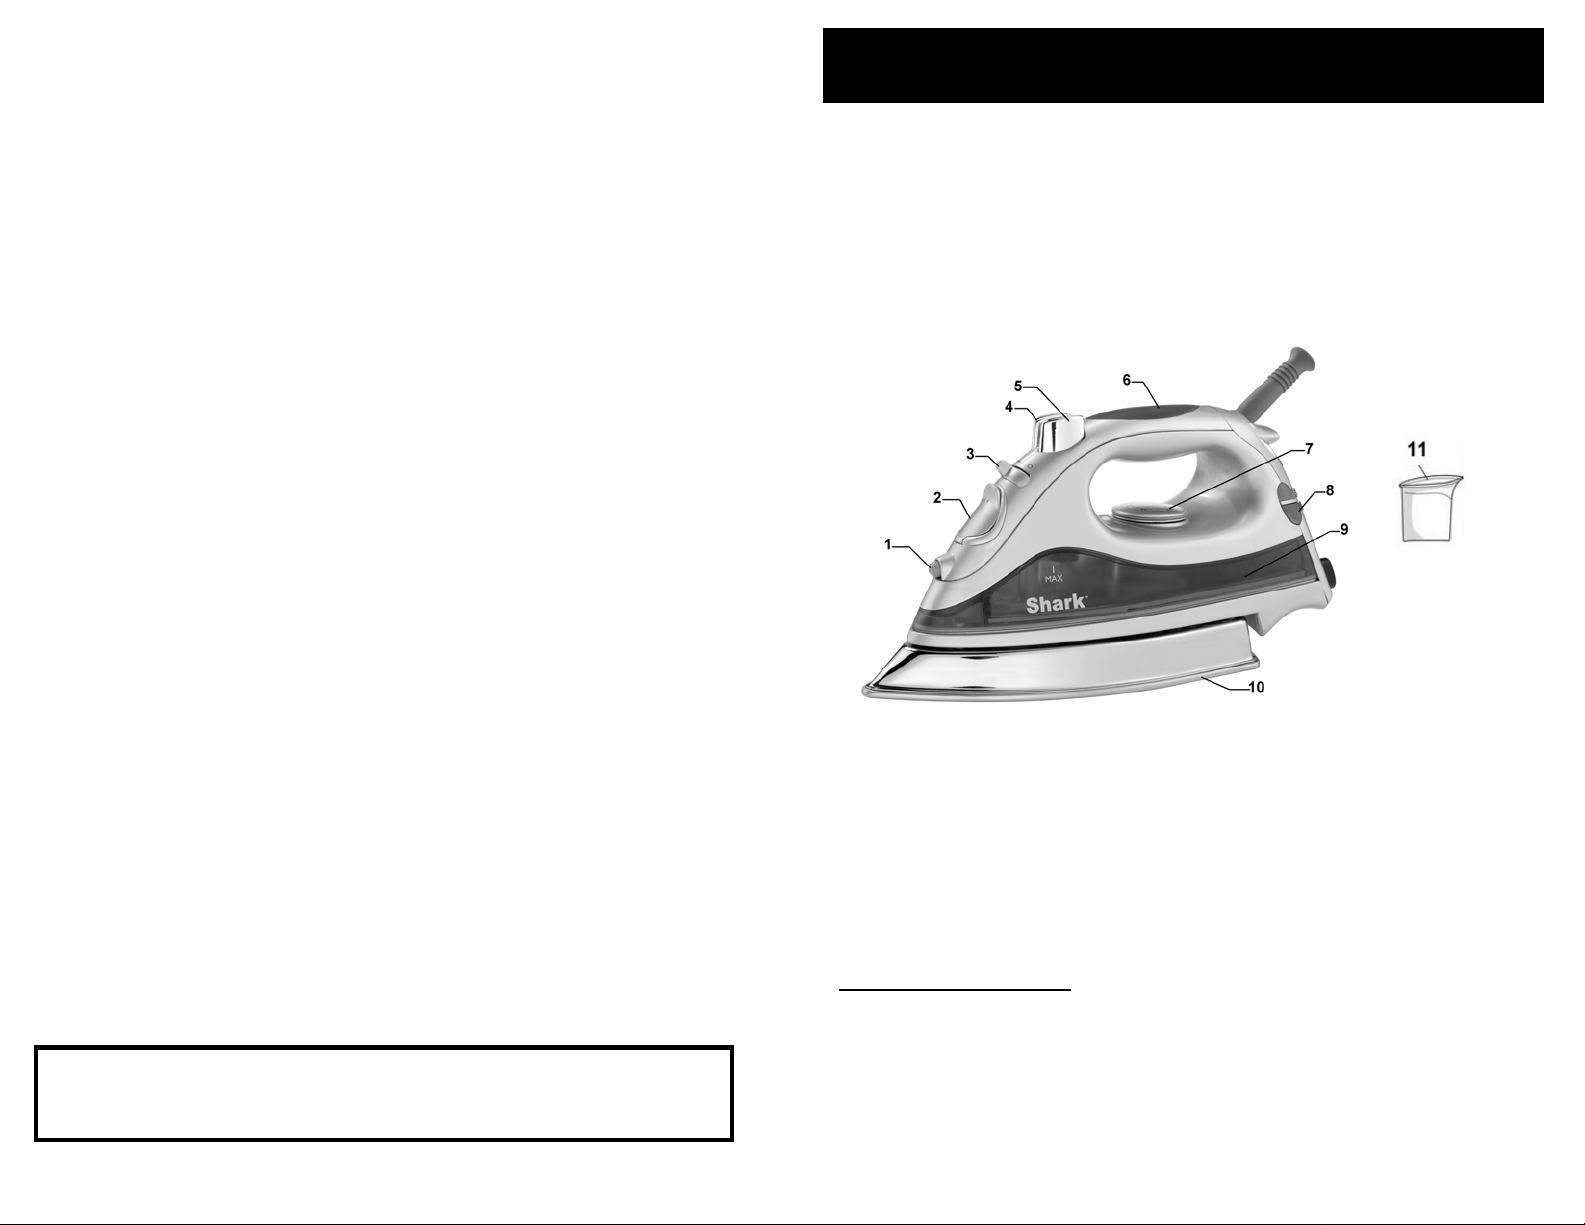
GETTING TO KNOW YOUR
LIGHTWEIGHT PROFESSIONAL IRON
Before using your Shark Lightweight
Professional Iron, remove any labels,
stickers or tags that may be attached to
the body or soleplate of the iron.
When turned on for the first time, your
new iron may emit an odor for up to 10
minutes. This is due to the initial
heating of the materials used in making
the iron.
1. Spray Nozzle
2. Water Fill Inlet
3. Variable Steam Control
4. Burst of Steam Button
5. Atomizer Spray Button
6. Handle
The odor is safe and should not reoccur
after initial heating.
Also, before ironing with steam for the
first time, allow iron to heat, hold in a
horizontal position and hit the burst of
steam button several times. The iron
may emit some small particles from the
steam holes. This is normal and will
clear after pressing the burst of steam
button several times.
7. Temperature Control Dial
8. Temperature Ready Light
9. Water Level Window Filling
10. Stainless Steel Soleplate
11. Filling Flask
SAVE THESE INSTRUCTIONS
For Household Use Only
POLARIZED PLUG: This appliance has a polarized plug (one blade is wider than
the other). As a safety feature, this plug will fit into a polarized outlet on ly one way.
If the plug does not fit fully into the outlet, reverse the plug. If it still does not fit,
contact a qualified electrician. Do not attempt to defeat this safety feature.
1 Rev. 11/08C
Technical Specifications
Voltage: 120V, 60 Hz
Power: 1400 Watts
*Illustrations may differ from actual product
2
Page 3
FEATURES OF YOUR SHARK LIGHTWEIGHT IRON
OPERATING INSTRUCTIONS
3
1
2
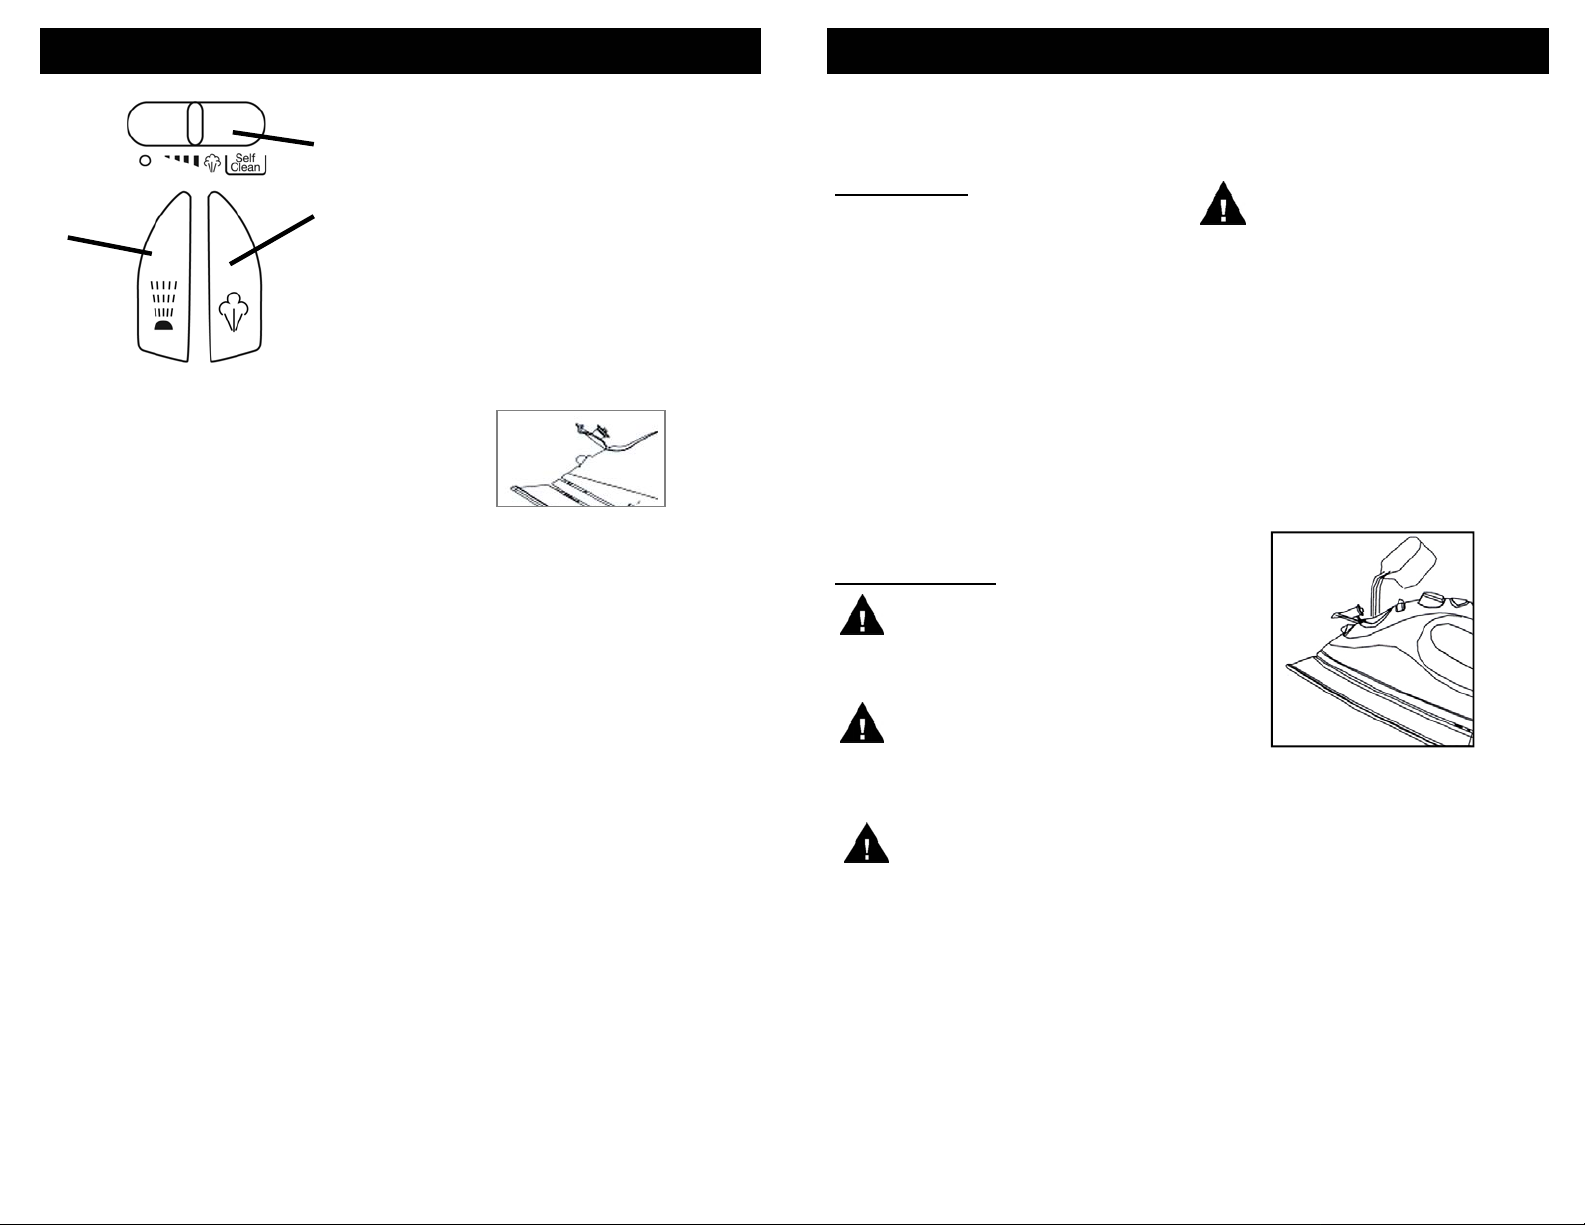
1. BURST OF STEAM BUTTON
Burst of steam provides extra,
sudden bursts of steam which aid in
removing stubborn wrinkles from
fabrics such as denim, cotton
or linen.
2. ATOMIZER SPRAY BUTTON
Pressing this button provides a
defined jet of spray which gently
moistens fabric.
3. VARIABLE STEAM CONTROL
Minimum to maximum steaming for
different materials. Self cleaning
feature flushes internal sole plate
with water.
4. TEMPERATURE CONTROL
DIAL
Turn dial to select temperature.
Main temperature settings are
indicated by the 1, 2 and 3 dots.
(see “Ironing Chart” on page 8)
5. BUILT-IN ANTI-CALCIUM
FILTER
Prevents calcium build-up and
prolongs the life of the iron.
6. STAINLESS STEEL
SOLEPLATE
Provides maximum glide-ability and
heat retention.
7. WATER FILLING INLET
The cover prevents dust and foreign
matter from entering the water tank.
It also stops any water from spilling
during ironing.
8. PIVOT CORD
For left or right handed use. Pivots
up and down; prevents dragging
along the fabric. The flexible cord
protector protects the cord from
fraying.
This appliance is for HOUSEHOLD USE
ONLY and may be plugged into any
120V AC polarized electrical outlet. Do
not use any other type of outlet.
DRY IRONING
For dry ironing, turn the variable steam
control lever to the left to “0”. This will
cut off the steam flow if water is in the
water tank. All marked fabric settings
on the temperature control lever can be
used for dry ironing.
1. Plug the cord into a polarized, 120V
AC electrical outlet. The power “ON”
light will come on, indicating that the
iron is receiving power.
2. Turn the temperature control dial to
the desired fabric/temperature
setting. Turn the variable steam
control to “0”. (See “Ironing Guide”
for a guide to temperature selection.)
3. Place iron on its heel (on a stable,
protected surface) while iron is
warming to desired temperature.
STEAM IRONING
CAUTION: DO NOT aim iron
at face, towards yourself, or
anyone else while using or adjusting
steam. Burns or serious injury may
occur.
WARNING: Before filling the
iron with water, be sure the iron
is not plugged into the electrical
outlet. The iron may be filled with
water while it is hot.
CAUTION: TO PREVENT THE
RISK OF BURNS, use caution
when filling iron with water. Burns
can occur from touching hot metal
parts, hot water, or steam.
NOTE: Because of the soleplate design,
ordinary tap water may be used with this
iron. However, in very hard water
areas, we recommend using distilled or
demineralized water.
WARNING: Never fill the iron
with fabric conditioner,
starches or any other liquid, as these
will damage the steam mechanism.
Do not use contaminated water.
1. Open the water filling inlet cover.
Holding the iron at a slight angle,
pour water slowly into the water
filling inlet. See figure 1. Fill tank to
desired level or to the “MAX” water
level marking using the water filling
flask. (When the iron is upright, the
see-through water tank allows you to
gauge the amount of water.) DO
NOT overfill the tank. When finished
filling the iron with water, close the
water inlet cover before continuing.
Fig. 1
2. Plug the cord into a polarized, 120V
AC electrical outlet.
3. Turn the dial of the temperature
control button to select the desired
fabric and temperature setting. Turn
the variable steam control lever to
the desired steam setting (see
“Ironing Guide” for a guide to
temperature selection).
3
4
Page 4
OPERATING INSTRUCTIONS
OPERATING INSTRUCTIONS
4. Turn the temperature dial to any of
the temperatures within the steam
band and allow the iron to heat for
approximately two (2) minutes before
ironing. Place iron on its heel (on a
stable, protected surface) while the iron
is warming to desired temperature.
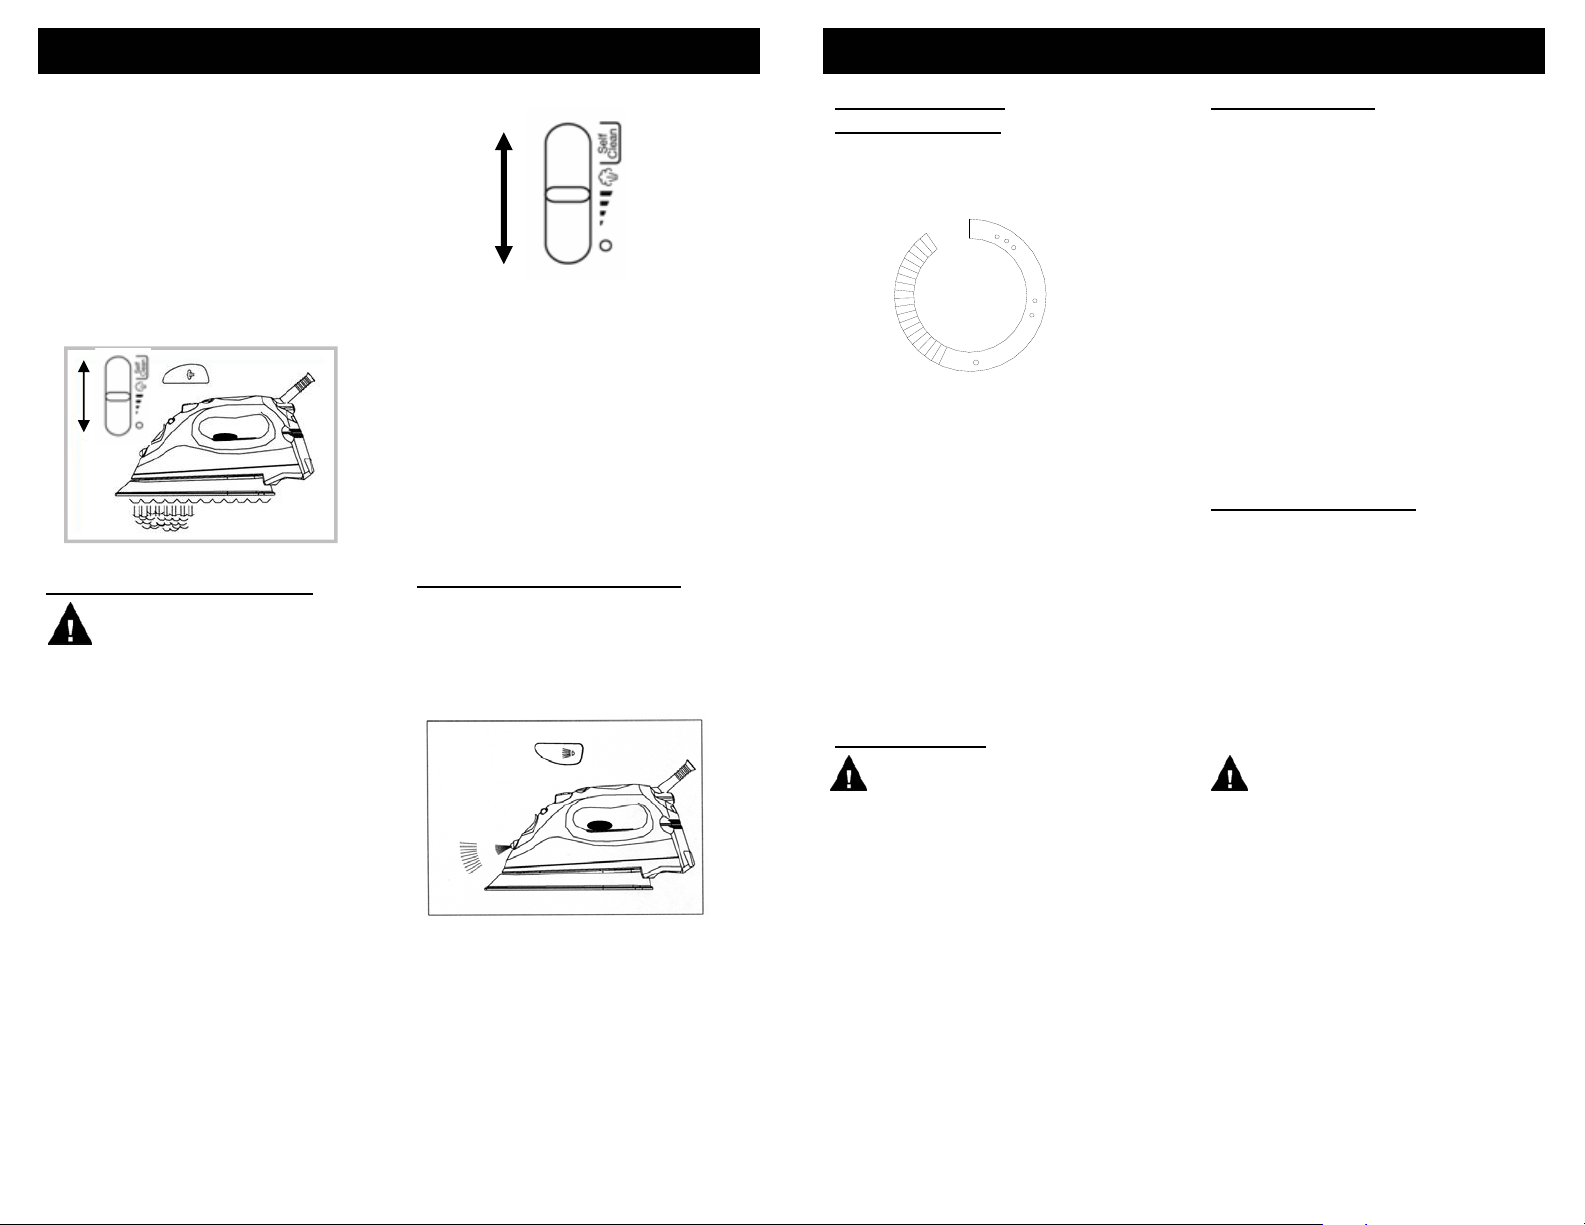
5. Turn the variable steam control lever
to the right to increase the amount of
steam. When using extra steam, the
iron uses more water and it may be
necessary to fill the water tank more
often. (Fig. 2)
Fig. 2
BURST OF STEAM BUTTON
CAUTION: DO NOT aim iron at
face, towards yourself, or
anyone else while using or adjusting
steam. Burns or serious injury may
occur.
The burst of steam feature is useful
when ironing denim, cotton and linens.
It provides quick bursts of steam which
aid in removing stubborn wrinkles.
The burst of steam feature can be used
with Dry or Steam ironing as desired.
1. Make sure the water tank is at least
1/2 filled with water.
2. Select the desired fabric and
temperature setting. Place the iron
on its heel (on a stable, protected
surface) and allow it to heat for
approximately 2 minutes.
3. With the iron in a horizontal position,
press the steam button several times
to prime the pump.
Fig. 3
4. Slide the variable steam control to the
right to increase the amount of steam.
(Fig. 3) When using extra steam, the
iron uses more water and it may be
necessary to fill the tank more often.
See page 4 for refilling the iron with
water.
5. Steam is produced as soon as the iron
is held in the horizontal position.
Steam will stop coming out when the
iron is put on its heel in a vertical
position or by setting the variable
steam control to “0”.
ATOMIZER SPRAY NOZZLE
The atomizer spray nozzle is useful on
fabrics with stubborn wrinkles. Press the
spray button and a jet of water will spray
onto the fabric being ironed. (Fig. 4)
The water spray can be used with dry or
steam ironing as desired.
Fig. 4
SELECTING IRON
TEMPERATURES
Always read garment labels and follow
the manufacturer’s ironing instructions.
Refer to the “Ironing Chart” on page 8 for
temperature recommendations
Use low settings for synthetics.
Use moderate settings for
wool, silks, and blends.
Use high settings for cottons
and linens.
1. Stand iron upright on its heel.
2. Plug the cord into a polarized, 120V
AC electrical outlet.
3. Turn the temperature control dial until
you get to the desired temperature
setting. (Fig. 5)
4. The light on the right side of the
temperature ready light will indicate
when the desired temperature has
been reached.
:
Fig. 5
IRONING HINTS
WARNING: To prevent fire, do
not leave iron unattended while
connected.
• Sort articles to be ironed according
to the type of fabric. This will reduce
the need to adjust the temperature
for different types of garments.
• If you are not sure of the fiber content
of a garment, test fabric by ironing a
small area such as a seam or inside
hem section before ironing a visible
area. Start with a low temperature
setting and gradually increase to find
the best setting.
• When reducing the temperature to
iron sensitive fabrics, allow approx.
two (2) minutes for the iron to cool to
the new temperature setting.
• Fabrics such as velour, wool, linen
and silk are best ironed with an
ironing cloth to prevent shine marks.
AUTO SHUT-OFF
The SHARK Lightweight Professional Iron
has an auto shut-off safety function which
is designed to engage after approximately
7 minutes of non-use. The auto shut-off
indicator light will flash when the auto
shut-off has activated. To reset your iron
and continue ironing follow these steps.
1. Lift the iron.
2. Holding the iron horizontally in front of
you, gently rock the iron back and
forth several times. This motion will
reset the safety switch inside the iron.
DO NOT SHAKE THE IRON.
The red temperature ready light will
illuminate when the auto shut-off system
has been reset. Allow time for the iron to
re-heat. The red temperature indicator
light will go out when the iron is ready for
use.
EMPTYING THE IRON
1. Always empty iron after each use.
2. When finished using the iron, turn
the variable steam control to“0” and
the temperature control dial to "MIN".
3. Unplug the iron from the electrical
outlet.
4. Turn the iron upside down over the
sink with the tip pointing downward
and allow the water to flow from the
opening.
5. Place iron upright and allow to cool
before storing.
CAUTION Use caution
when emptying the iron.
Burns may occur from touching
hot metal surfaces, hot water or
steam.
5
6
Page 5

OPERATING INSTRUCTIONS
IRONING CHART
SELF CLEANING
It is important to “Self Clean” the iron at
least every two weeks to remove scale,
calcium, etc. The harder the water, the
more often the iron should be self
cleaned.
1. Set the variable steam control to any
steam position.
2. Fill the water tank up to the “MAX”
level.
3. Stand the iron on its heel. Plug the
iron into the electrical outlet.
4. Turn the temperature control dial
until you get to the “MAX”
temperature setting and wait until the
iron heats up and temperature ready
light goes out.
5. Turn the variable steam control all
the way to the right to the selfcleaning position and hold the iron
horizontally over the sink. (Fig. 6)
6. Boiling water and steam will now be
ejected from the holes in the
soleplate. Use caution when doing
this as the water and the steam are
hot enough to cause burns. The
impurities and scale are washed
away with it.
7. Move the iron back and forth as this
happens.
8. If there is any water left in the water
tank after the iron stops steaming,
just empty the remaining water in a
sink following the instructions for
emptying the iron.
9. Turn the variable steam control to
the “0” position when the water tank
is empty.
10.Place the iron back upright on its
heel to cool down before storing.
STORAGE
1. Always turn the variable steam
control to “0” after you have emptied
the water tank.
2. Allow the iron to cool down.
3. Always store the iron in the upright
position to protect the soleplate.
4. From time to time, clean the exterior
of the iron with a damp cloth and
wipe dry.
5. If you use spray starch, wipe the
soleplate occasionally with a soft
damp cloth to prevent the build-up of
deposits.
6. If the iron has not been used for a
few weeks, hold the iron horizontally
and allow to steam for 2 minutes
before ironing.
NOTE: Always refer to the garment care tag for ironing instructions. Before starting to
iron delicate fabrics, it is best to first test the temperature of the iron on a hem or an
inside seam.
DIRECTIONS
ON LABEL
P
l
e
a
s
e
n
o
t
e
t
h
a
t
o
n
t
h
e
l
a
b
e
l
m
e
a
n
s
‘
T
H
I
S
A
R
T
I
C
L
E
C
A
N
N
O
T
B
E
I
R
O
N
E
D
!
”
FABRIC
CONTROL
KNOB
STEAM
CONTROL
BURST OF
STEAM
SPRAY
SYNTHETIC
FIBERS, e.g.
acrylic, nylon
polyester
MIN
•
0
SILK
WOOL
COTTON
LINEN
MAX
•• •• •
0
MAXIMUM
STEAM
Fig. 6
CAUTION Use caution
when emptying the iron.
Burns may occur from touching
hot metal surfaces, hot water or
steam.
7
8
Page 6

TROUBLESHOOTING
Models
GI408Z 10
GI408Z 12
PROBLEM POSSIBLE REASONS & SOLUTIONS
• Iron should be plugged into a 120V AC electrical
Iron does not heat
Some odor or small
particles come out of
steam vents of new
iron
Iron does not steam
Water droplets coming
from steam vents
outlet only.
Make sure that the plug is securely in the socket.
• Temperature setting too low.
Turn to higher setting.
• This is normal.
Follow instructions for first use and allow iron to steam
through 2-3 fillings & press the steam burst button
occasionally to eliminate small white particles.
• Water tank may be empty or water level is very low.
Add water.
• Make sure that the fabric/temperature setting and
the variable steam control are correctly set. For
maximum steam, (setting ‘Max’ on steam control),
temperature setting should be set on ‘•••’.
• Variable steam control lever is set on “0”.
Always allow the iron to reach the selected
temperature with the variable steam control setting
at ‘0’. Make sure the temperature setting is set in
the correct steam area, e.g. ‘•’, and the steam control is
not
on ‘0’. For more steam, turn temperature dial to
higher setting, e.g. ‘•••’, and the steam control to ‘Max’.
• If temperature setting and steam control setting are
correct and there is no steam, gently
tap the
soleplate on the ironing board a few times. Move
the variable steam control from ‘0’ to maximum steam
position a few times.
• Iron may not be hot enough. Set temperature to the
‘Max’ position. Always allow iron sufficient time to
heat up before activating the variable steam control.
• Overuse of steam burst. Allow more time between
each burst.
• Iron may have been overfilled. Turn iron off,empty
water and follow instructions for filling.
• Steam performance may be low if iron requires
seasoning. To season, use regular tap water for 1or 2
tanks until steam performance improves.
ONE (1) YEAR LIMITED WARRANTY
EURO-PRO Operating LLC warrants this product to be free from defects in material and
workmanship for a period of one (1) year from the date of the original purchase, when utilized for
normal household use, subject to the following conditions, exclusions and exceptions.
If your appliance fails to operate properly while in use under normal household conditions within
the warranty period, return the complete appliance and accessories, freight prepaid. For Customer
Service support, call 1 (800) 798-7398 or visit our website www.sharkcompany.com.
If the appliance is found to be defective in material or workmanship, EURO-PRO Operating LLC
will repair or replace it free of charge. Proof of purchase date and $14.95 to cover the cost o f
return shipping and handling must be included. *
The liability of EURO-PRO Operating LLC is limited solely to the cost of the repair or replacement
of the unit at our option. This warranty does not cover normal wear of parts and does not apply to
any unit that has been tampered with or used for commercial purposes. This limited warranty does
not cover damage caused by misuse, abuse, negligent handling or damage due to faulty
packaging or mishandling in transit. This warranty does not cover damage or defects caused by
or resulting from damages from shipping or repairs, service or alterations to the product or any of
its parts, which have been performed by a repair person not authorized by EURO-PRO Operating
LLC.
This warranty is extended to the original purchaser of the unit and excludes all other legal and/or
conventional warranties. The responsibility of EURO-PRO Operating LLC if any, is limited to the
specific obligations expressly assumed by it under the terms of the limited warranty. In no event is
EURO-PRO Operating LLC liable for incidental or consequential damages of any nature
whatsoever. Some states do not permit the exclusion or limitation of incidental or consequential
damages, so the above may not apply to you.
This warranty gives you specific legal rights, and you may also have other rights which vary from
state to state, or province to province.
*Important: Carefully pack item to avoid damage in shipping. Be sure to include proof of
purchase date and to attach tag to item before packing with your name, complete address
and phone number with a note giving purchase information, model number and what you
believe is the problem with item. We recommend you insure the package (as damage in
shipping is not covered by your warranty). Mark the outside of your package “ATTENTION
CUSTOMER SERVICE”. We are constantly striving to improve our product s, therefore the
specifications contain ed her ein are subject to change without noti c e.
PRODUCT REGISTRATION CARD
FOR CANADIAN CONSUMERS ONLY
Please complete and return within ten (10) days of purchase. The registration will enable us to
contact you in the event a product defect is discovered. By returning this card you acknowledge
to have read and understood the instructions for use, and warnings set forth in the accompanying
instructions.
RETURN TO:
EURO-PRO Operating LLC, 4400 Bois Franc, St. Laurent, Quebec H4S 1A7
PURCHASER: ……………………………………………………………………………………………
ADDRESS: ……………………………………………………………………………………………….
GI408Z 10
DATE OF PURCHASE: …………………….. MODELS: ………………. SERIAL NO: .………….
NAME AND ADDRESS OF STORE: …………………………………………………………………..
9
Printed in China
GI408Z 12
10
Page 7

INSTRUCCIONES IMPORTANTES DE SEGURIDAD
Al usar aparatos eléctricos, siempre debe seguir precauciones básicas de seguridad,
incluyendo las siguientes:
1. Lea cuidadosamente las instrucciones.
2. Use la plancha únicamente en las
aplicaciones para las que fue diseñada.
3. Para evitar una descarga eléctrica, no
sumerja la plancha en agua o cualquier
otro líquido.
4. Nunca jale del cable para desenchufarla.
Sujete el enchufe y jale para
desenchufarla.
5. No deje que el cable entre en contacto con
superficies calientes. Deje que la plancha
se enfríe antes de guardarla.
6. Siempre desenchufe la plancha del
tomacorriente al llenarla con agua o al
vaciarla, o cuando no se use.
7. No utilice la plancha si el cable o el
enchufe están dañados o luego de que se
haya caído o haya sufrido cualquier tipo de
daño. Para reducir el riesgo de sufrir una
descarga eléctrica no desarme esta
unidad. Retorne la plancha a Euro-Pro
Operating LLC para que sea examinada y
reparada. Si se arma incorrectamente
puede causar una descarga eléctrica al
usarla.
8. Tenga mucho cuidado al utilizar cualquier
aparato eléctrico cerca de niños. No la
deje desatendida mientras esté conectada
o sobre una tabla de planchar.
9. El tocar partes metálicas calientes, agua
caliente o vapor puede causar
quemaduras. Tenga cuidado al dar vuelta
una plancha con vapor ya que puede
haber agua caliente en el recipiente.
10. Nunca use o apoye una plancha sobre
una superficie inestable.
11. Cuando la plancha esté caliente, nunca la
coloque sobre una superficie desprotegida
– aunque esté sobre su base.
12. ATENCIÓN: PARA EVITAR
DESCARGAS ELÉCTRICAS U OTROS
DAÑOS, verifique que la plancha esté
desenchufada antes de llenarla con
agua.
13. ADVERTENCIA: Nunca llene la
plancha con acondicionador para la
ropa, almidones o cualquie r otro
líquido ya que dañarán el mecanismo
vaporizador. No use agua
contaminada.
14. ATENCIÓN: PARA EVITAR
INCENDIOS, nunca deje la plancha
desatendida cuando esté enchufada.
15. ATENCIÓN: PARA EVITAR
DESCARGAS ELÉCTRICAS, nunca
use la plancha en un lugar donde
pueda caerse o ser empujada dentro
del agua o cualquier otro líquido. Si se
cae dentro del agua o cualquier otro
líquido, desenchúfela inmediatam e n te.
NO toque el agua o el líquido.
16. ADVERTENCIA: Nunca use esponjitas
abrasivas, limpiadores químicos o
solventes para limpiar el exterior o la
base de la plancha. El hacerlo dañará o
rallará la superficie.
17. ATENCIÓN: NO apunte la plancha
hacia la cara, hacia su cuerpo o hacia
cualquier otra persona al usarla o al
ajustar el vapor. Podría causar
quemaduras o heridas graves.
18. Guarde siempre su plancha parada, no
apoyada sobre su base. Si la guarda
apoyada sobre la base, una pequeña
cantidad de humedad hará que la base
se oxide y se manche.
19. Este artefacto eléctrico e s para uso
domiciliario solamente.
PARTES DE SU PLANCHA LIGERO PROFESIONAL
Antes de usar su Plancha Ligero
Profesional Shark, quítele todas las
etiquetas que pueda tener sobre el
exterior o en la base.
Al encenderla por primera vez puede
emitir olor por unos 10 minutos. Esto se
debe al calentamiento inicial de los
materiales usados en su fabricación.
El olor es normal y no se producirá
luego del calentamiento inicial.
También, antes de planchar con vapor
por primera vez, deje que la plancha se
caliente, sosténgala en posición
horizontal y presione varias veces el
botón de ráfaga de vapor. Pequeñas
partículas pueden salir expulsadas por
los orificios del vapor. Esto es normal y
dejará de suceder luego de presionar el
botón de ráfaga de vapor varias veces.
CONSERVE ESTAS INSTRUCCIONES
Para Uso Doméstico Solamente
ENCHUFE POLARIZADO: Este artefacto tiene un enchufe polarizado (una de las
patas es más ancha que la otra). Como medida de seguridad, este cable entrará
únicamente en un tomacorriente polarizado. De no ser así, inviértalo, y si aún no
entra, llame a un electricista calificado. No intente alterar este dispositivo de
seguridad.
11
Rev. 11/08C
1. Pico Rociador
2. Entrada del Tanque de Agua
3. Control Variable de Vapor
4. Botón de Ráfaga de Vapor
5. Botón Atomizador
6. Mango
Especificaciones Técnicas
Voltaje: 120V, 60 Hz
Potencia: 1400 Vatios
*El dibujo puede no ser igual al producto real.
7. Perilla de Control de
Temperatura
8. Luz de Temperatura Lista
9. Indicador de Nivel de Agua
10. Base de Acero Inoxidable
11. Frasco de Llenado
12
Page 8

FUNCIONES DE SU PLANCHA LIGERO PROFESIONAL
SHARK
5.FILTRO ANTI-CALCIO
INCORPORADO
3
1
2
1.BOTÓN DE RÁFAGA DE VAPOR
Este botón proporciona ráfagas
adicionales, repentinas de vapor que le
ayudan a remover las arrugas más
rebeldes de telas como jeans, algodón o
lino.
2.BOTÓN ATOMIZADOR
Al presionar este botón se obtiene un
chorro definido del rociador para
humedecer ligeramente la tela.
3.CONTROL VARIABLE DE VAPOR
Desde el mínimo al máximo de vapor
para distintos materiales. La función
autolimpiante rocía la base interna con
.
agua
4.PERILLA DE CONTROL DE
TEMPERATURA
Gire la perilla para seleccionar la
temperatura. Los ajustes principales de
temperatura están indicados por 1, 2 y 3
puntos. (Vea la “Guía de Planchado” en
la página 18.)
Evita la acumulación de calcio y
prolonga la vida útil de la plancha.
6.BASE DE ACERO INOXIDABLE
Proporciona máxima maniobrabilidad
y retención de calor.
7.TANQUE DE AGUA
La tapa evita que entre tierra o
materiales extraños en el tanque de
agua. También evita que el agua se
derrame al planchar.
8.CABLE CON PIVOTE
Para usar con la mano derecha o la
izquierda. Pivota hacia arriba y hacia
abajo, evitando ser arrastrado sobre
la tela. El protector de cable flexible
lo protege contra daños.
INSTRUCCIONES DE USO
Este artefacto es para USO
HOGAREÑO ÚNICAMENTE y debe
enchufarse en un tomacorriente
polarizado de 120V CA. No use ningún
otro tipo de tomacorriente.
PLANCHADO A SECO
Para planchar a seco, gire el control
variable de vapor a la izquierda al “0”.
Esto cerrará el flujo de vapor aunque
haya agua en el tanque. Se pueden
seleccionar todos los tipos de tela de la
Perilla de Control de Temperatura para
planchar a seco.
1. Enchufe el cable en un tomacorriente
polarizado de 120V CA. Se
encenderá la luz de encendido,
indicando que la plancha recibe
corriente.
2. Gire la perilla de control de
temperatura hasta la tela/temperatura
deseada. Gire el control variable de
vapor hasta “0”. (Ver “Guía de
Planchado” para la selección de la
temperatura).
3. Apoye la plancha en posición vertical
(en una superficie estable y
protegida) hasta que se caliente a la
temperatura seleccionada.
PLANCHADO CON VAPOR
ATENCIÓN: NO apunte la
plancha hacia la cara, hacia su
cuerpo o hacia cualquier otra
persona al usarla o al ajustar el
vapor. Podría causar quemaduras o
heridas graves.
ADVERTENCIA: Antes de llenar
la plancha con agua, verifique
que no esté enchufada en el
tomacorriente. Puede ser llenada
mientras está caliente.
ATENCIÓN: PARA EVITAR EL
RIESGO DE QUEMADURAS,
tenga cuidado al llenarla con agua. El
tocar partes metálicas calientes,
agua caliente o vapor puede causar
quemaduras.
NOTA: Se puede usar agua de la
canilla con esta plancha debido al
diseño de su base. Sin embargo, en
áreas de agua muy dura le
recomendamos usar agua destilada o
desmineralizada.
ADVERTENCIA: Nunca llene
la plancha con acondicionador
para la ropa, almidones o cualquier
otro líquido ya que dañarán el
mecanismo vaporizador. No use
agua contaminada.
1. Abra la tapa del tanque d e agua.
Sosteniendo la plancha levemente
inclinada, vierta agua lentamente
dentro de la entrada de agua. Ver
figura 1. Llene el tanque hasta el
nivel deseado o hasta el “MAX”
usando el recipiente para el agua.
(Puede medir la cantidad de agua en
el tanque con la plancha en posición
horizontal). NO llene de más el
tanque. Cuando termine de llenarla,
cierre la tapa del tanque de agua
antes de continuar.
Fig. 1
2. Enchufe el cable en un
tomacorriente polarizado de 120V CA.
3. Gire el control de temperatur a para
escoger el tipo de tela/temperatura
deseados. Gire el control variable de
vapor hasta la posición deseada (vea
"Guía de Planchado" como referencia
para seleccionar la temperatura).
13
14
Page 9

INSTRUCCIONES DE USO
INSTRUCCIONES DE USO
4. Coloque el control de temperatura en
cualquiera de las temperaturas dentro de
la banda de vapor y espere a que la
plancha se caliente por unos dos (2)
minutos antes de usarla. Apoye la
plancha en posición vertical (en una
superficie estable y protegida) hasta que
se caliente a la temperatura
seleccionada.
5. Gire el control variable de vapor hacia la
derecha para aumentar la cantidad de
vapor. Al usar más vapor, la plancha usa
más agua y podría ser necesario
rellenarla más seguido. (Fig. 2)
Fig. 2
BOTÓN DE RÁFAGA DE VAPOR
ATENCIÓN: NO apunte la
plancha hacia la cara, hacia
su cuerpo o hacia cualquier otra
persona al usarla o al ajustar el
vapor. Podría causar quemaduras o
heridas graves.
La ráfaga de vapor es útil al planchar
jeans, algodón y lino. Proporciona
ráfagas rápidas de vapor que ayudan a
remover arrugas rebeldes.
La función de ráfaga de vapor puede
usarse en el planchado con vapor o a
seco.
1. Verifique que el tanque de agua esté
lleno hasta la mitad como mínimo.
2. Seleccione la tela y temperatura
deseadas. Apoye la plancha en
posición vertical (sobre una
superficie estable y protegida) y deje
que se caliente por unos 2 minutos.
3. Con la plancha en posici ón
horizontal, presione el botón del
vapor varias veces para preparar la
bomba.
Fig. 3
4. Gire el botón del vapor variable a la
derecha para aumentar el vapor.
(Fig. 3) Al usar más vapor, la plancha
usa más agua y podría ser necesario
rellenar más seguido el tanque de
agua. Vea la página 14 para rellenar
la plancha con agua.
5. Se genera vapor ni bie n se coloca la
plancha en posición horizontal. El
vapor dejará de salir ni bien se
coloque la plancha en posición vertical
o ajustando el control variable de
vapor a “0”.
PICO ROCIADOR
El rociador es útil en telas con arrugas
rebeldes. Presione el botón atomizador
y obtendrá una ráfaga de agua sobre la
tela que esté planchando. (Fig. 4) El
rociador de agua puede usarse al
planchar con vapor o a seco.
Fig. 4
15
SELECCIÓN DE TEMPERATURA
DE LA PLANCHA
Lea siempre las etiquetas de las
prendas y siga las recomendaciones del
fabricante. Refiérase a la “Guía de
Planchado” de la página 18 por las
temperaturas recomendadas:
Fig. 5
Use bajas temperaturas para
telas sintéticas.
Use temperaturas medias para
lana, seda y telas compuestas.
Use altas temperaturas para
algodón y lino.
1. Apoye la plancha en posició n vertical.
2. Enchufe el cable en un tomacorriente
polarizado de 120V CA.
3. Gire la perilla de control de temperatura
hasta la tela/temperatura deseada.
(Fig. 5)
4. La luz del lado derecho de la luz de
temperatura lista le indicará cuando
haya alcanzado la temperatura
deseada.
CONSEJOS PARA PLANCHAR
ADVERTENCIA: Para evitar
incendios, no deje la plancha
desatendida mientras esté enchufada.
• Agrupe las prendas a planchar de
acuerdo al tipo de tela. Esto reducirá la
necesidad de ajustar la temperatura
para distintos tipos de prendas.
• Si no está seguro del contenido de fibras
de la prenda, pruebe planchando un
área pequeña como un dobladillo o
costura interior antes de planchar un
área visible. Comience con una
temperatura baja y auméntela
gradualmente hasta encontrar el mejor
ajuste.
• Al reducir la temperatura para planchar
telas delicadas, espere unos dos (2)
minutos para que la plancha se enfríe
hasta la nueva temperatura.
• Las telas como velvetón, lana, lino y
seda se planchan mejor con una funda
de planchado para evitar dejar marcas
brillantes.
APAGADO AUTOMÁTICO
La plancha Liviana Profesional SHARK
tiene una función de apagado automático
de seguridad diseñada para activarse
luego de unos 7 minutos de inactividad.
La luz indicadora de apagado automático
comenzará a parpadear cuando se active
esta función. Para reiniciar la plancha y
continuar planchando, siga estos pasos.
1. Levante la plancha.
2. Sosteniendo la plancha en po sición
horizontal, muévala hacia delante y
hacia atrás suavemente varias veces.
Este movimiento reiniciará el
interruptor de seguridad dentro de la
plancha. NO SACUDA LA PLANCHA.
La luz roja de temperatura lista se
encenderá una vez que se haya
reiniciado el sistema de apagado
automático. Espere a que la plancha se
vuelva a calentar. La luz roja de
temperatura se apagará cuando la
plancha esté lista para usar.
VACIADO DE LA PLANCHA
1. Siempre vacíe la plancha después
de usarla.
2. Al terminar de usar la plancha, gire
el control variable de vapor a “0” y la
perilla de control de temperatura a
“MIN”.
3. Desenchufe la plancha.
4. De vuelta la plancha sobre una
pileta con la punta apuntando hacia
abajo y deje que el agua salga por la
apertura.
5. Coloque la plancha derecha y deje
que se enfríe antes de guardarla.
ATENCIÓN. Tenga
cuidado al vaciar la plancha.
El tocar partes metálicas calientes,
agua caliente o vapor puede causar
quemaduras.
16
Page 10

INSTRUCCIONES DE USO
GUÍA DE PLANCHADO
AUTOLIMPIEZA
Es importante limpiar automáticamente
la plancha cada dos semanas para
remover el sarro, calcio, etc. Cuanto
más dura sea el agua, habrá que auto
limpiar la plancha más seguido.
1. Coloque el control variable de vapor
en cualquier posición.
2. Llene el tanque de agua hasta el nivel
“MAX”.
3. Apoye la plancha en posición vertical.
Enchúfela en el tomacorriente.
4. Gire el control de temperatura hasta
llegar al "MAX" y espere hasta que
la plancha se caliente y la luz de
temperatura lista deje de parpadear.
5. Gire el control variable de vapor
completamente hacia la derecha
hasta la posición de auto limpieza
(Self-Cleaning) y sostenga la plancha
horizontalmente sobre una pileta.
(Fig. 6)
6. Saldrá agua hirviendo y vapor por los
orificios de la base. Tenga cuidado al
hacer esto ya que el agua y el vapor
están suficientemente calientes como
para causar quemaduras. Esto
removerá las impurezas y el sarro.
7. Mueva la plancha hacia todos lados
mientras se limpia.
8. Si queda algo de agua en el tanque
cuando la plancha deje de despedir
vapor, viértala en la pileta siguiendo
las instrucciones de vaciado de la
plancha.
9. Gire el control variable de vapor
hasta “0” cuando el tanque de agua
esté vacío.
10. Vuelva a colocar la plancha en
posición vertical para que se enfríe
antes de guardarla.
ALMACENAMIENTO
1. Gire siempre el control de vapor a
"0" luego de vaciar el tanque de
agua.
2. Deje que la plancha se enfríe.
3. Siempre guárdela en posición
vertical para proteger la base.
4. De vez en cuando, limpie el exterior
de la plancha con un trapo húmedo
y séquela.
5. Si usa almidón en aerosol, limpie la
base de vez en cuando con un trapo
húmedo para evitar la acumulación
de depósitos.
6. Si no ha usado la plancha por varias
semanas, sosténgala
horizontalmente y deje que despida
vapor por 2 minutos antes de
planchar.
NOTA: Siempre siga las instrucciones de la etiqueta con respecto al planchado. Antes
de planchar telas delicadas, le recomendamos probar la temperatura de la plancha en
un dobladillo o una costura interna.
INDICACIONES
DE LA
ETIQUETA
T
e
n
g
a
e
n
c
u
e
n
t
a
q
u
e
e
n
l
a
e
t
i
q
u
e
t
a
s
i
g
n
i
f
i
c
a
“
¡
N
O
P
L
A
N
C
H
A
R
E
S
T
A
P
R
E
N
D
A
!
”
TELA
PERILLA DE
CONTROL
CONTROL
DE VAPOR
RÁFAGA
DE VAPOR
ROCIADOR
TELAS
SINTÉTICAS,
como acrílico,
nylon y
poliéster
MIN
•
0
SEDA
LANA
ALGODÓN
LINO
MAX
•• •• •
0
VAPOR
MÁXIMO
Fig. 6
ATENCIÓN. Tenga
cuidado al vaciar la plancha.
El tocar partes metálicas calientes,
agua caliente o vapor puede causar
quemaduras.
17
18
Page 11

DIAGNÓSTICO DE PROBLEMAS
PROBLEMA
La plancha no calienta
La plancha nueva
emite olor o humo por
las ranuras de vapor.
La plancha no genera
vapor
Salen gotas de agua
por las ranuras de
vapor.
POSIBLE CAUSA Y SOLUCIÓN
• Debe enchufarse únicamente a un tomacorriente de
120V CA.
• Verifique que esté enchufada correctamente.
• Ajuste de temperatura muy bajo.
Escoja una temperatura más alta.
• Esto es normal.
Siga las instrucciones para usarla por primera vez y deje
que emita vapor durante 2-3 recargas presionando
ocasionalmente el botón de ráfaga de vapor para eliminar
las partículas pequeñas.
• Tanque de agua vacío o nivel de agua demasiado bajo.
Agregue agua.
• Verifique que el control de tela/temperatura y el control
variable de vapor estén ajustados correctamente. Para el
máximo de vapor (‘Max’ en el control de vapor), el control de
temperatura debe estar en ‘• • •’.
• El control variable de vapor está en “0”.
Siempre deje que la plancha llegue a la temperatura
seleccionada con el control de vapor en “0”. Verifique que el
ajuste de temperatura esté en el área correcta de vapor, por
ejemplo, ‘•’, y que el control de vapor no esté en “0”. Para
obtener más vapor gire el control de temperatura a un ajuste
más alto, por ejemplo ‘• • •’ y el control de vapor en “Max”.
• Si los ajustes de vapor y temperatura son correctos y no hay
vapor, golpee suavemente la base de la plancha varias
veces sobre la tabla de planchar. Mueva el con trol d e va p or
desde “0” hasta “Max” varias veces.
• La plancha no está suficientemente caliente. Ajuste la
temperatura a la posición “Max”. Siempre deje que la
plancha se caliente completamente an tes d e acti var el
control de vapor.
• Uso excesivo de ráfaga de vapor. Espere más tiempo
entre cada ráfaga.
• La plancha puede estar demasiado llena. Apague la
plancha, quítele el agua y siga las instrucciones de llenado.
• El rendimiento de vapor puede ser bajo si la plancha
necesita acondicionamiento. Para acondicionarla, use agua
de la canilla durante 1 o 2 tanques hasta que mejore el
rendimiento del vapor.
Modelos
GI408Z 10
GI408Z 12
EURO-PRO Operating LLC garantiza este producto contra defectos de materiales y mano de
obra por un término de un (1) año a partir de la fecha de compra original, siempre que sea
utilizado para uso doméstico normal, sujeto a las siguientes condiciones, exclusiones y
excepciones.
Si su artefacto no funciona correctamente al utilizarlo bajo condiciones domésticas normales
dentro del período de garantía, devuelva el artefacto completo y los accesorios, con envío
prepagado. Para Servicio al Cliente, llame al 1 (866) 826-6941 o visite nuestro sitio Web
www.sharkcompany.com.
Si el artefacto presenta un defecto de materiales o mano de obra, EURO-PRO Operating LLC lo
reparará o remplazará sin cargo. El envío debe incluir un comprobante de la fecha de compra y
$14,95 para cubrir los gastos de envío. *
La responsabilidad de EURO-PRO Operating LLC se limita únicamente al costo de reparación o
reemplazo de la unidad, a nuestro criterio. Esta garantía no cubre el desgaste normal de las
partes y no cubre ninguna unidad que haya sido alterada o utilizada con fines comerciales. Esta
garantía limitada no cubre daños ocasionados por uso inadecuado, abuso, negligencia o daños
causados por embalaje inapropiado o maltrato durante el transporte. Esta garantía no cubre
daños o defectos causados o resultantes durante el transporte para su reparación o alteraciones
del producto o cualquiera de sus partes, realizadas por una persona no autorizada por EURO-
PRO Operating LLC.
Esta garantía es válida para el comprador original del producto y excluye cualquier otra garantía
legal y/o convencional. La responsabilidad de EURO-PRO Operating LLC, de existir, se limita a
las obligaciones específicas asumidas expresamen te bajo los términos de esta garantía limitada.
Bajo ninguna circunstancia EURO-PRO Operating LLC será responsable por daños incidentales
o indirectos de ninguna clase. Algunos estados no permiten la exclusión o limitación de daños
consiguientes o incidentales, por lo tanto lo anterior puede no ser válido para usted.
Esta garantía le otorga derechos legales específicos, y usted puede también tener otros derechos
los que varían de estado a estado o de provincia a provincia.
*Importante: Embale el producto cuidadosament e para evitar daños durante el transporte.
Asegúrese de incluir un comprobante de la fecha de compra y de colocarle una etiqueta al
producto con su nombre, dirección completa y número de teléfono, una nota
proporcionando información de la compra, número de modelo y una descripción del
problema. Le recomendamos asegurar el paquete (puesto que la garantía no cubre daños
de envío). Escriba en el e xterio r del pa quete “ ATTENTI ON CUST OMER S ERVI CE”. Nos otros
nos esforzamos constantemente en mejorar nuestros productos, por lo tanto las
especificaciones aquí indicadas pueden cambiar sin previo aviso.
GARANTÍA LIMITADA DE UN (1) AÑO
TARJETA DE REGISTRO DEL PRODUCTO
SÓLO PARA CONSUMIDORES CANADIENSES
Por favor, complete y envíe dentro de los diez (10) días de compra. Este registro nos permitirá
ponernos en contacto con usted en el caso de que descubramos un defecto en el producto.
Retornando esta tarjeta usted reconoce haber leído y entendido las instrucciones de uso y
advertencias incluidas en estas instrucciones.
ENVIAR A:
EURO-PRO Operating LLC, 4400 Bois Franc, St. Laurent, Quebec H4S 1A7
19
COMPRADOR: ……………………………………………………………………………………...…………………………
DIRECCIÓN: …………………………………………………………………..……………………………………………….
GI408Z 10
FECHA DE COMPRA: ………………….. MODELOS: ………………. No. de SERIE: .……………………………….
NOMBRE Y DIRECCIÓN DE LA TIENDA: ………………………………………………….……………………………..
Impreso en China
GI408Z 12
20
 Loading...