

Page 1
OWNER’S MANUAL
GUIDE DU PROPRIÉTAIRE
Model/Modèle EP602RF
120 V., 60Hz., 10 Amps
COPYRIGHT© EURO-PRO OPERATING LLC 2008
EURO-PRO Operating LLC
Boston, MA, 02465
Tel.: 1 (800) 798-7398
www.sharkvac.com
Page 2
IMPORTANT SAFETY INSTRUCTIONS
When using your Transformer Vac basic safety precautions should always be
observed, including the following:
1. Read all instructions before using your
Transformer Vac.
2. Use the system only for its intended use.
3. To pr ot ect a g ain st a risk of electric shock,
do not immerse any part of the system in
water or other liquids.
4. Never yank cord to disconnect from outlet;
instead, grasp plug and pull to disconnect.
5. Do not allow cord to touch hot surfaces.
6. Do not run appliance over cord.
7. Do not operate the system with a damaged
cord or plug, or if the appliance or any oth er
part of the system has been dropped or
damaged. To avoid the risk of electric
shock, do not disassemble or attempt to
repair the Transformer Vac. Return the
system to EURO-PRO Operating LLC (see
warranty) for examination and repair.
Incorrect re-assembly or repair can cause a
risk of electrical shock or injury to persons
when the Transformer Vac is used.
8. Close supervision is necessary for any
appliance being used by or near children.
Do not leave the system unattended while
connected.
9. Keep hair, loose clothing, fingers and all
parts of body away from opening and
moving parts.
10. Do not use to pick up flammable or
combustible liquids such as gasoline or use
in areas where they may be present.
11. Do not pick up anything that is burning or
smoking such as cigarettes, matches or hot
ashes.
12. Use extra care when cleaning on stairs.
13. Do not use the vacuum without the HEPA
filter in place.
14. This appliance is intended only for
household use. Follow all user instructions
in this manual.
To reduce the risk of fire, electric shock, or
injury:
• Do not leave the Transformer Vac plugged
in when unattended. Unplug the electrical
cord when not in use and before servicing.
• Do not allow to be used as a toy. Close
attention is necessary when used by or near
children, pets or plants.
• Use only as described in this manual. Use
only manufacturer’s recommended
accessories.
• Do not pull cord, use cord as a handle,
close a door on cord, or pull cord around
sharp edges or corners. Keep cord away
from heated surfaces.
•Use only extension cords UL-rated or cUL
at 15 amperes. Extension cords rated for
less amperage may overheat. Care should
be taken to arrange the cord so that the cord
cannot be pulled or tripped over.
• Turn off all controls as applicable before
unplugging from electrical outlet.
• Do not handle plug or vacuum with wet
hands or operate without shoes.
• Do not put any objects into openings. Do
not use with any opening blocked. Keep free
of dust, lint, hair and anything else that may
reduce air flow.
• Store your appliance indoors in a cool, dry
area.
• Keep your work area well lit.
• Keep end of hose, wands and other
openings away from your face and body.
• Use only on dry surfaces.
• Using improper voltage may result in
damage to the motor and possible injury to
the user. Correct voltage is listed on rating
label.
SAVE THESE INSTRUCTIONS
For Household Use Only
WARNING: To reduce the risk of electric shock, this appliance has a polarized
plug (one blade is wider than the other). This plug will fit in a polarized outlet
only one way. If the plug does not fit fully in the outlet, reverse the plug. If it still
does not fit, contact a qualified electrician to install the proper outlet. Do not
modify the plug in any way.
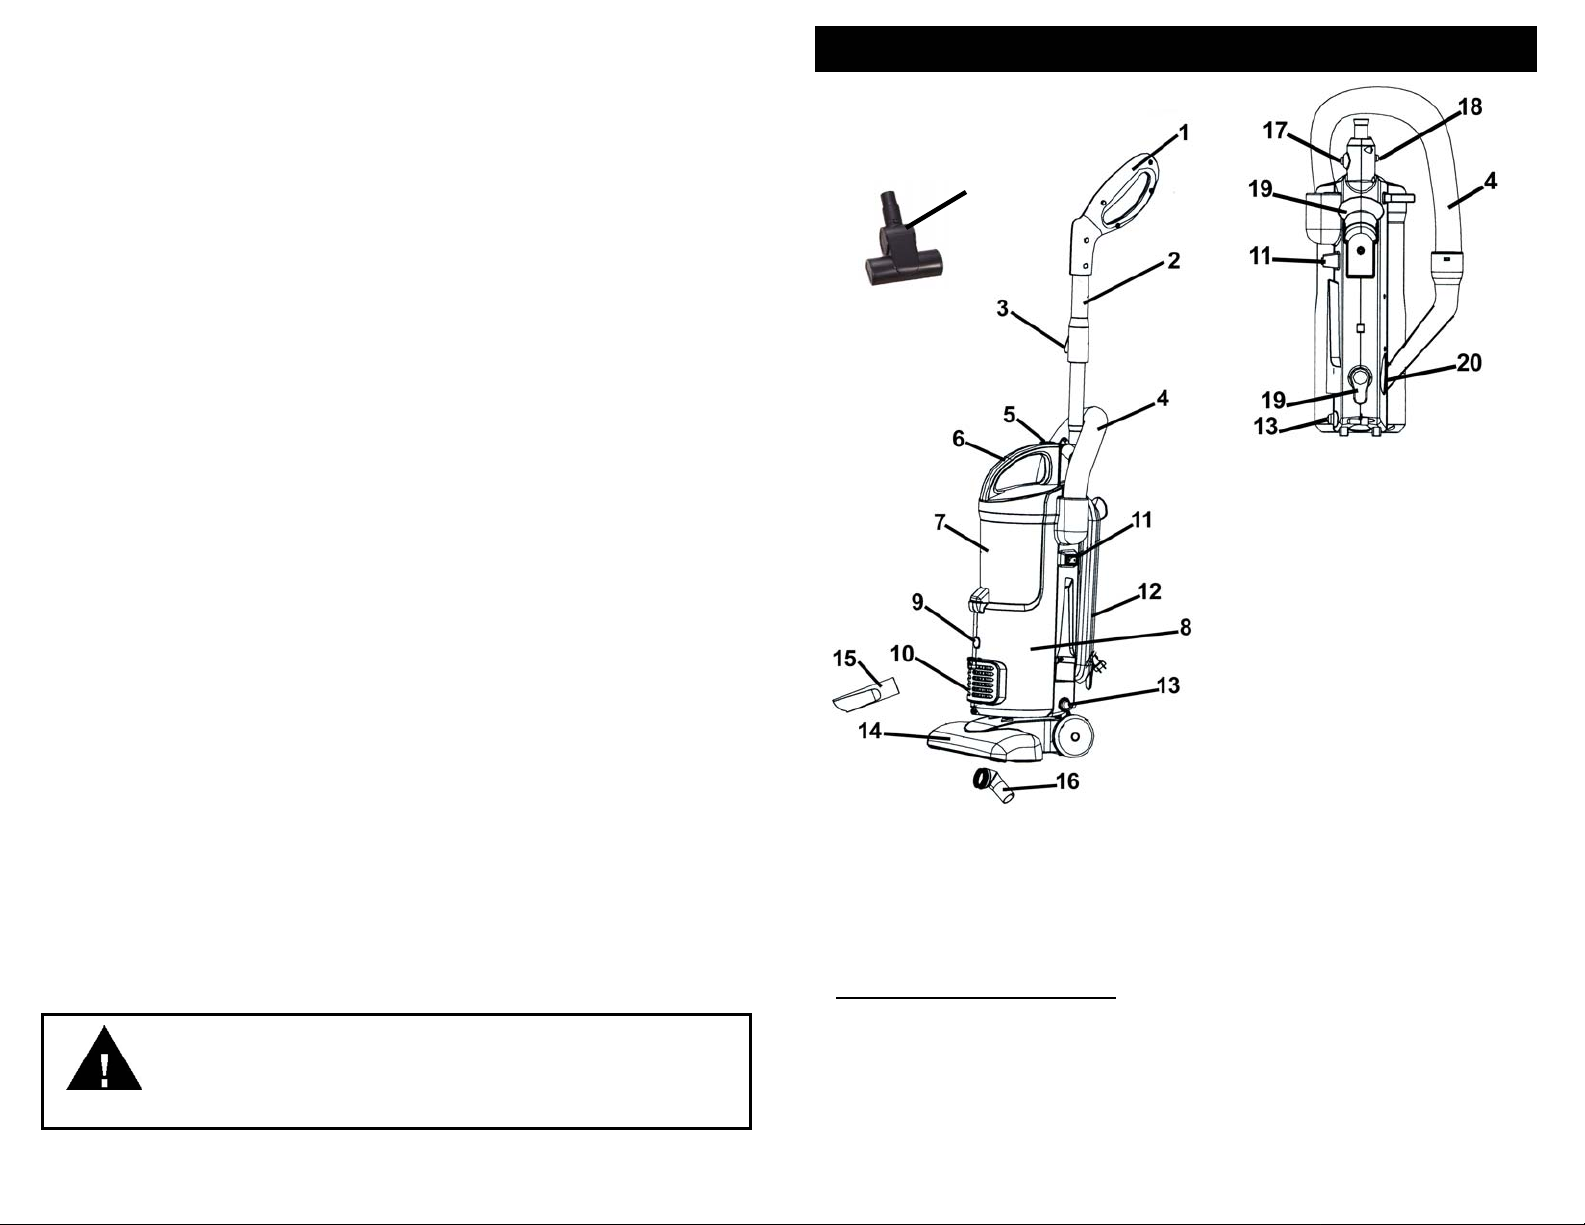
GETTING TO KNOW YOUR TRANSFORMER VAC
22
Technical Specifications
Voltage: 120V., 60Hz.
Power: 10 Amps
Note: Illustrations may differ from actual unit.
1. Hand Grip
2. Telescopic Tube
3. Locking Button
4. Flexible Hose
5. Dust Cup Release Button 1
6. Dust Cup Handle
7. Dust Cup (Container)
8. Main Unit
9. Intelli-Sense
TM
Filter
Monitor
10. Exhaust Filter Cover
11. On/Off Switch
12. Power Cord
13. Floor Brush Release Button
14. Floor Brush
15. Crevice Tool
16. Dusting Brush
17. Telescopic Tube Release
Button
18. Dust Cup Release Button 2
19. Cord Hook Release
20. Hose Connector
21. Shoulder Strap (not shown)
22. Air Driven Turbo Brush
1
Rev. 10/07C
2
Page 3
PRECAUTIONARY MEASURES
OPERATING INSTRUCTIONS
IMPORTANT: If the suction opening in the unit or the hose is BLOCKED, switch off
the vacuum cleaner and remove the blocking substance before you
start the unit again.
1. Do not operate the vacuum cleaner
too close to heaters, radiators or
cigarette butts.
2. Before inserting the power plug into
the wall outlet, make sure that your
hands are dry.
3. Before you start vacuuming, make
sure to remove large or sharp objects
that might damage the dust cup
debris screen.
4. When pulling out the power plug
from the wall outlet, pull the plug not
the power cord.
5. Do not pick up anything that is
burning or smoking such as
cigarettes, matches or hot ashes.
6. Do not use without ALL filters in
place.
WARNING: Always remove the
power plug from the wall outlet
before assembling or removing
accessories.
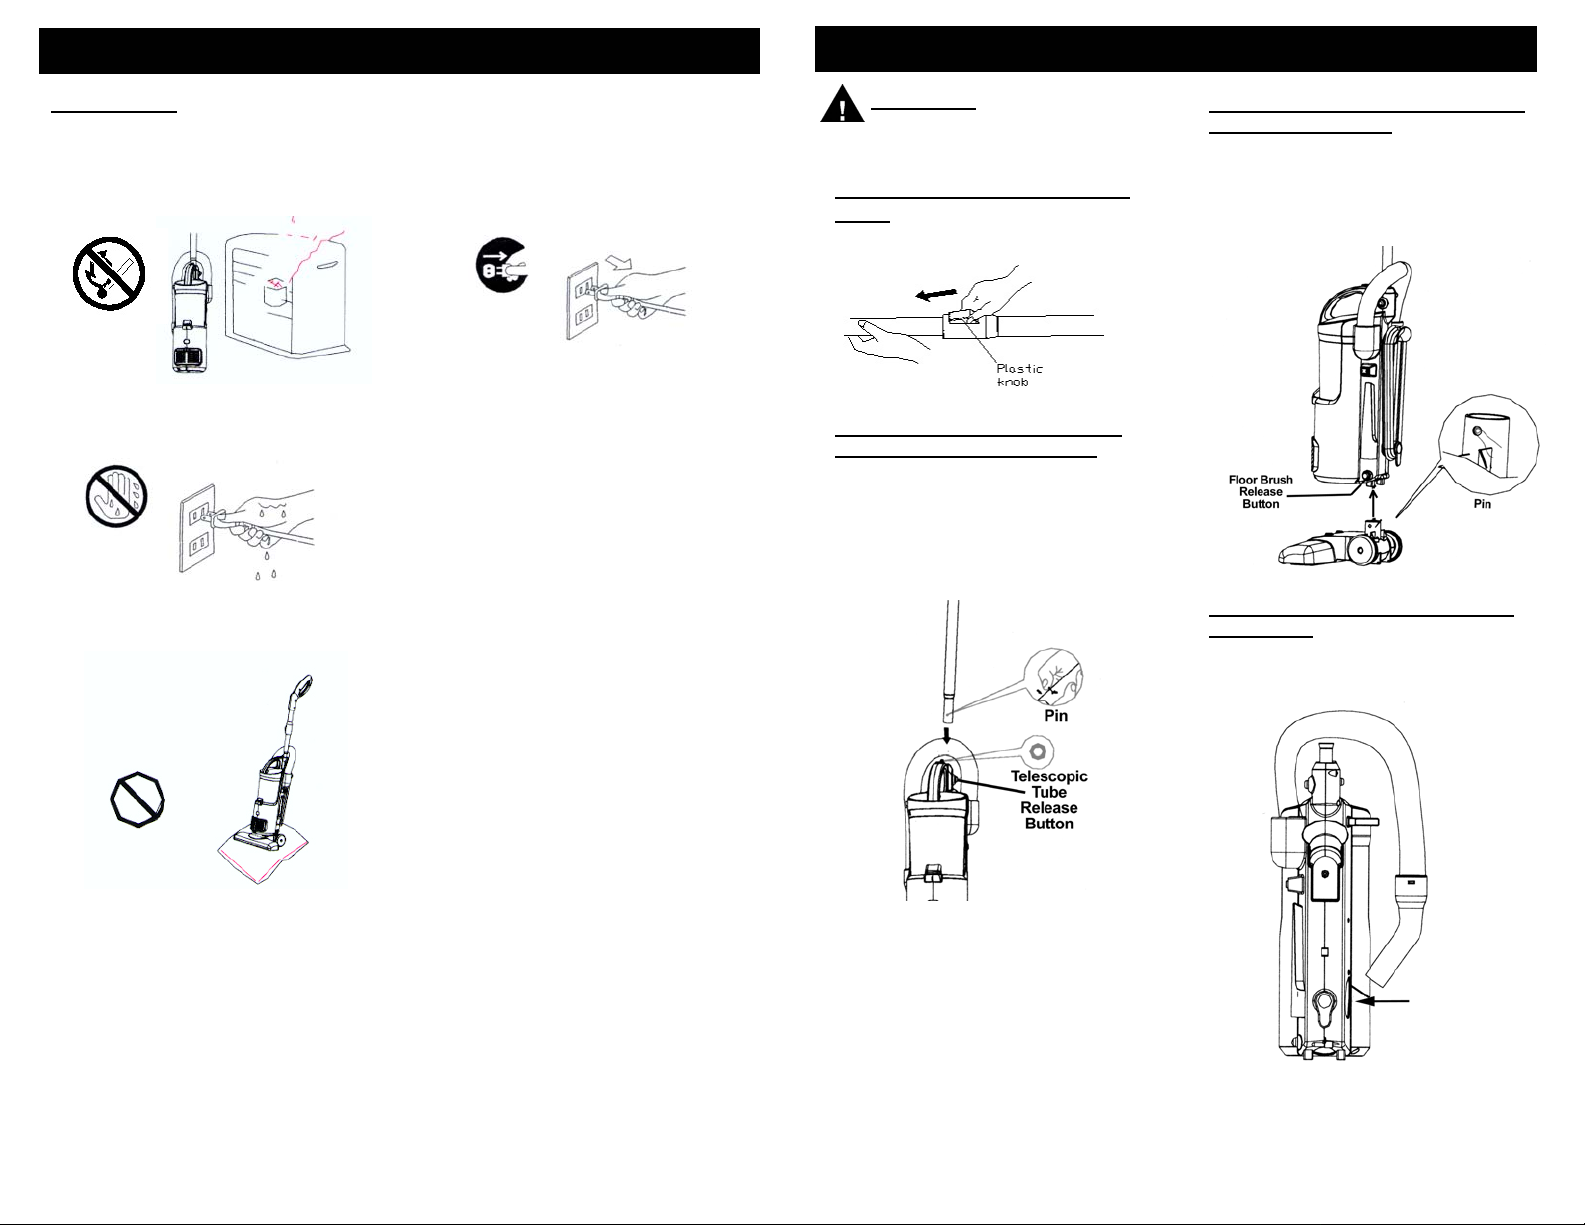
EXTENDING THE TELESCOPIC
TUBE
Push the plastic button and pull out the
smaller tube. See illustration below
.
INSERTING THE TELESCOPIC
TUBE INTO THE MAIN UNIT
• Insert the telescopic tube into the hole
next to the dust cup handle. Make sure
that the slot in the handle fits correctly
into the opening. (Fig. 1)
• To remove the telescopic tube, press
the telescopic tube release button and
pull the tube up.
ATTACHING THE FLOOR BRUSH
TO THE MAIN UNIT
• Insert the floor brush into its location,
in the direction of the arrow.
• To remove the floor brush from the
main unit, press on the floor brush
release button and pull the floor brush
out. (Fig. 2)
Fig. 2
ATTACHING THE HOSE TO THE
MAIN UNIT
• Hold the end of the hose.
Insert the hose into the hose
connector (Fig. 3).
Fig. 1
Fig. 3
3
4
Page 4
OPERATING INSTRUCTIONS
OPERATING INSTRUCTIONS
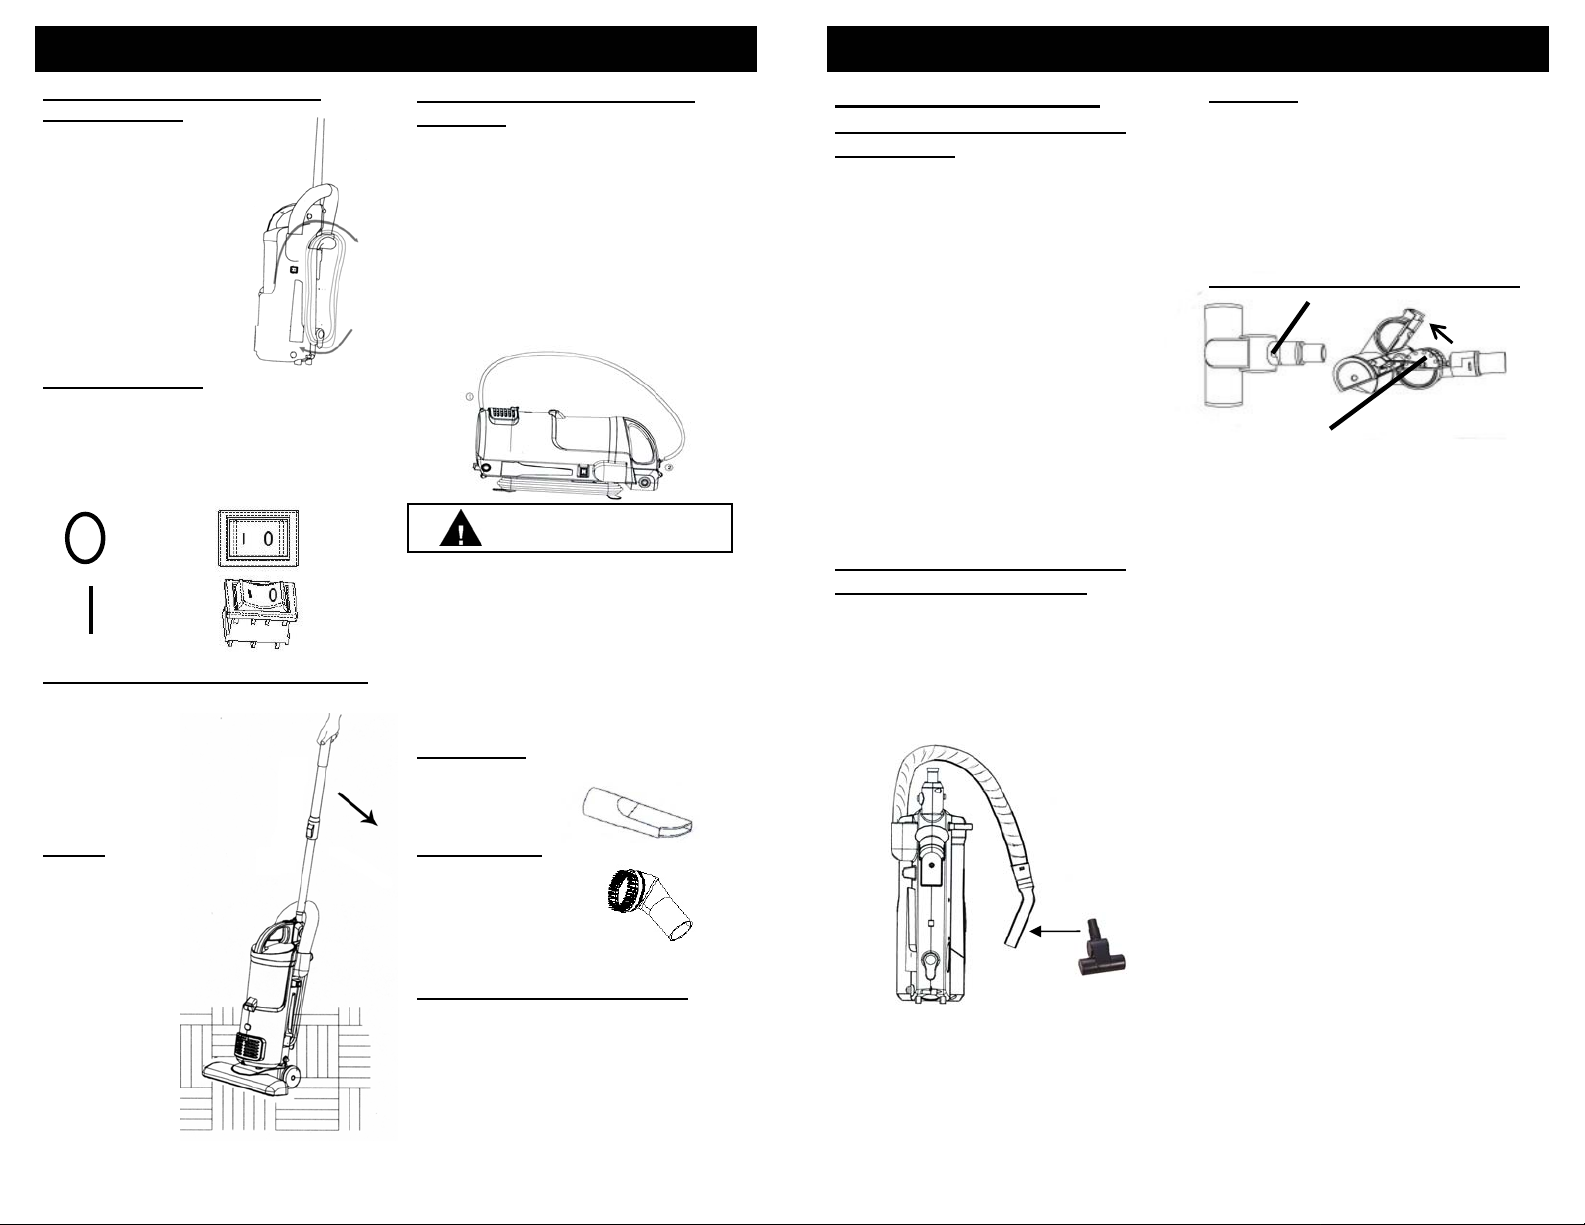
WINDING & UNWINDING THE
POWER CORD
This vacuum cleaner is
equipped with a convenient
cord storage feature. The
power cord winds around
the two cord holders at
the back of the unit. The
bottom one has a quick
cord release feature.
Turn the cord hook to
the left or the right to
remove the power cord.
(Fig. 4)
Fig. 4
ON/OFF SWITCH
• The On/Off switch has two different
positions.
• Push on the "I" side to turn the
vacuum ON.
• Push on the "O" side to turn the
vacuum OFF.
= OFF
= ON
USING THE UNIT AS AN UPRIGHT
• Unwind the power cord
and plug into the
120V outlet.
• Push down on the
locking button to adjust
the height of the
L
o
telescopic handle.
NOTE: When vacuuming
deep pile carpets or
hard to vacuum
carpets, lower the angle
of the telescopic
handle (see
illustration at
right) for
easier
maneuverability.
USING THE UNIT AS A HAND
VACUUM
• Press the telescopic tube release
button to remove the telescopic tube.
( Fig. 1 page 4)
• Press the floor brush release button to
remove the floor brush. (See Fig. 2
page 4)
• Attach the shoulder strap to the
shoulder strap attachment point.
(Fig. 5)
• Attach the crevice tool or the dusting
brush to the end of the hose.
Air Driven Turbo Brush
Using The Unit With Air Driven
Turbo Brush
The efficiency of your air driven turbo
brush depends on the bristle brush rotating
at high speed. Strong air suction is
needed to accomplish this. In order to
ensure that maximum air suction is
maintained, please read the following
instructions:
1.Empty the dust cup frequently.
2. Always shake out the HEPA filter and
Important: In order to ensure that
maximum air suction is maintained,
empty the dust cup frequently and shake
out the HEPA filter and clean the non –
woven pre-filter and debris screen at the
same time. Ensure that the rotating
brush is kept free of hair and string which
may accumulate and decrease brush
performance.
Cleaning Air Driven Turbo Brush
Locking Latch
Tilt
Upwards
clean the non-woven pre-filter and
debris screen when emptying the dust
cup container.
3.Ensure that the rotating brush is kept
free of hair and string which may
accumulate and decrease brush
Fig. 5
performance.
4.Keep the Air Driven Turbo Brush turbine
free of dirt and foreign matter. (See
WARNING
After extended use, the body of the
vacuum cleaner may become hot.
When using the unit with the shoulder
strap, the unit will touch the body of
the user. Therefore, make sure that
the unit body is cool before you use
with the shoulder strap. If during use,
the vacuum gets too warm, allow it to
cool before continuing to use.
illustration for cleaning instructions.)
Attaching the Air Driven Turbo
Brush to the Flexible Hose
To use the air driven turbo brush to
clean upholstery:
1. Remove the flexible hose from the
hose connector. (Fig. 6)
2. Push the air driven turbo brush onto
the end of the flexible hose as far as
it will go.
Crevice Tool
For radiators, crevices, corners,
w
baseboards and
e
r
between cushions.
Dusting Brush
The dusting brush is
used for the furniture,
venetian blinds,
books, lamp shades
From time to time, the turbine of your
turbo brush will require cleaning. To do
this:
1.Remove the turbo brush from the hose
or telescopic extension tube.
2.Slide locking latch forward then tilt the
top housing of the brush upwards. The
top housing is hinged and will tilt up
approximately 45° only. (Fig. 7)
3.There may be some dust, lint, hair, etc
on the turbine wheel. Remove as
much of this as possible.
4.You may also use the unit’s hose with
crevice tool attached and use the
vacuum to remove any additional
debris from the turbine.
5.Ensure that the turbine wheel moves
freely by rotating it with your finger. If
the turbine does not rotate, call
Customer Service for help.
6.Once clean, close the top cover of the
turbo brush and slide the locking latch
toward the rear of the brush to lock.
Turbine
Fig. 7
and shelves.
Intelli-SenseTMFilter Monitor
TM
When the Intelli-Sense
Filter Monitor
Fig. 6
lights up, it means that the dust cup is
full or the HEPA filter or non-woven
pre-filter, debris screen needs
cleaning. You must empty the dust
from the dust cup and clean the HEPA
filter, non-woven pre-filter and debris
screen right away.
5
6
Page 5

OPERATING INSTRUCTIONS
Emptying the Dust Cup Container
and Cleaning / Changing the NonWoven Pre-Filter, HEPA Filter &
Debris Screen
Warning: Always unplug the
unit from electrical outlet before
opening the dust cup (container).
Important: Do NOT use the vacuum
without the HEPA filter in place.
Warning: After each Use - Always
remove the non-woven pre-filter,
HEPA filter and the dust cup cover
with the debris screen, then
vigorously “TapClean” HEPA filter
and clean debris screen and nonwoven pre-filter until no more dust
can be removed.
IMPORTANT
“TapClean” HEPA filter will stop most
microscopic dust particles and airborne
allergens from re-entering the air you
breathe. Because of this incredible
filtration performance, the HEPA filter will
quickly accumulate, inside the white filter
folds, many fine dust particles that are
difficult to see but which will eventually
block or reduce your suction power - if not
cleaned properly.
1. To remove the dust cup container,
first press on the dust cup release
button (1) that is located on the dust
cup handle and at the same time
press on the dust cup release button
(2) that is on the side of the upper
housing. (Fig. 8) Then pull the dust
cup container out.
Dust
Cup
Release
Button 2
, Please Note : The
Dust
Cup
Release
Button 1
Fig. 8
2. To empty the dust
cup container,
press on the trap
door release button
that is on the back
side of the dust cup
container. (Fig. 9)
3. The HEPA filter is
located underneath
the dust cup
container. (Fig. 10)
Remove the non-woven pre-filter.
(Fig. 11) Remove the HEPA filter, hold
the edges and pull it out slowly.
Fig. 11
Fig. 10
4. Hold the HEPA filter
by the edges and vigorously
“TapClean” the HEPA filter
dirty side down on a hard,
flat surface until no more
dust is observed falling out
from between the pleats of
the filter. (Fig. 12) We recommend
washing the HEPA filter once a month
or when suction appears to be
reduced. Let the HEPA filter air dry
completely for 24 hours.
5. Rinse the non-woven pr e-filter and
let air dry completely for 24 hours.
6. Insert the non-woven pre-filter.
7. Reinstall the HEPA filter in the
vacuum.
8. To separate the debris screen from
the dust cup, hold the dust cup in
one hand and turn the dust cup
cover counter clockwise and pull
apart. To clean the debris
screen, we recommend that
you rinse it under
lukewarm running
water to remove the
dirt that accumulates
on it, but always allow 24
hours to air dry before
inserting back into the vacuum.
7
Fig. 9
Non-Woven
Pre-Filter
HEPA
Filter
Fig. 12
Fig. 13
OPERATING INSTRUCTIONS
PLEASE NOTE: The white pleated
filter material in the HEPA filter will
discolor over time -This is NORMAL
and will NOT affect the performance
of the filter. If the HEPA filter
is properly
"TapCleaned”
after each use
and suction
does not return
to 100%, then
we suggest that
the HEPA filter
be “TapCleaned”
vigorously until
no more dust
can be removed,
then rinsed under the faucet and
allowed to air dry for 24 hours before
refitting into the vacuum. (Fig. A)
This should be done once a month
or when suction appears to be
reduced .
CAUTION: The suction hole must
be open, free of any obstructions at
all times. Otherwise, the motor will
overheat and could become
damaged.
Warning: Always empty the dust
cup container and clean the HEPA
filter, non-woven pre-filter and
debris screen before each use
and during prolonged usage.
Never over fill the dust cup container remove dirt and clean the HEPA filter,
non-woven pre-filter and debris screen
when dirt in dust cup is at or below the
"MAX" level during prolonged usage or
risk motor damage.
If you wash the Hepa filter, make sure
that it is completely dry before
inserting back in the vacuum.
Please Note: The HEPA filter is
washable. It should, however, be
replaced every three (3) to six (6) months
to ensure peak performance of your
vacuum.
The non-woven pre-filter, pre-motor and
post motor filters are washable.
Important: Make sure that ALL filters
are completely dry before re-installing
back in the vacuum.
Fig. A
Wash
once a
month or
when
suction
appears
reduced
Warning: Allow 24
hours for drying before
replacing in unit.
Changing & Cleaning the PreMotor Filter
The pre-motor filter is a washable filter.
• Remove the dust cup container and
the HEPA filter to remove the premotor filter. (Fig. 14)
• Rinse the pre-motor filter in lukewarm
water and air dry the filter completely
for 24 hours. Do not use a washing
machine to rinse the filter. Do not use
a hair dryer to dry it. Air dry only.
Never operate the vacuum without the
pre-motor filter in place.
• When the filter is dry, replace into the
unit and replace the HEPA filter and
dust cup container.
• A severely soiled or clogged filter
should be thoroughly washed with
fresh tepid water. A mild detergent
can be used if required.
Pre-Motor
Filter
Fig. 14
Changing & Cleaning the Post
Motor Filter
The post motor filter is a washable filter.
• Remove the filter cover from the front
of the unit and remove the filter.
• Rinse the post
motor filter in
lukewarm water and
air dry the filter
completely for 24 hours.
Do not use a washing
machine to rinse the filter.
Do not use a hair dryer
to dry it. Air dry only.
Never operate the
vacuum without the
post motor filter in place.
• When the filter is dry,
replace into the filter cover and
replace the filter cover to the unit.
• A severely soiled or clogged filter
should be thoroughly washed with
fresh tepid water. A mild detergent
can be used if required. (Fig. 15)
8
Fig. 15
Page 6
OPERATING INSTRUCTIONS
ORDERING REPLACEMENT DUST CUP FILTERS
Motor Thermostat
IMPORTANT: This unit is equipped
with a motor protective thermostat. If for
some reason the vacuum cleaner should
overheat, the thermostat will
automatically turn the unit off. Should
this occur:
• Push the On/Off button once.
• Disconnect the plug from the power
source.
• Check the source of overheating
problem. (i.e. clogged hose or filter)
• If clogged hose or filter is found,
unclog the hose and replace the
filters.
• Wait at least 45 minutes before
attempting to reuse the vacuum.
• After unit has cooled down for
45 minutes, plug in the cleaner
and push the On/Off button. The
vacuum should start again.
• If the vacuum still does not start,
contact customer service at
1 (800) 798-7398.
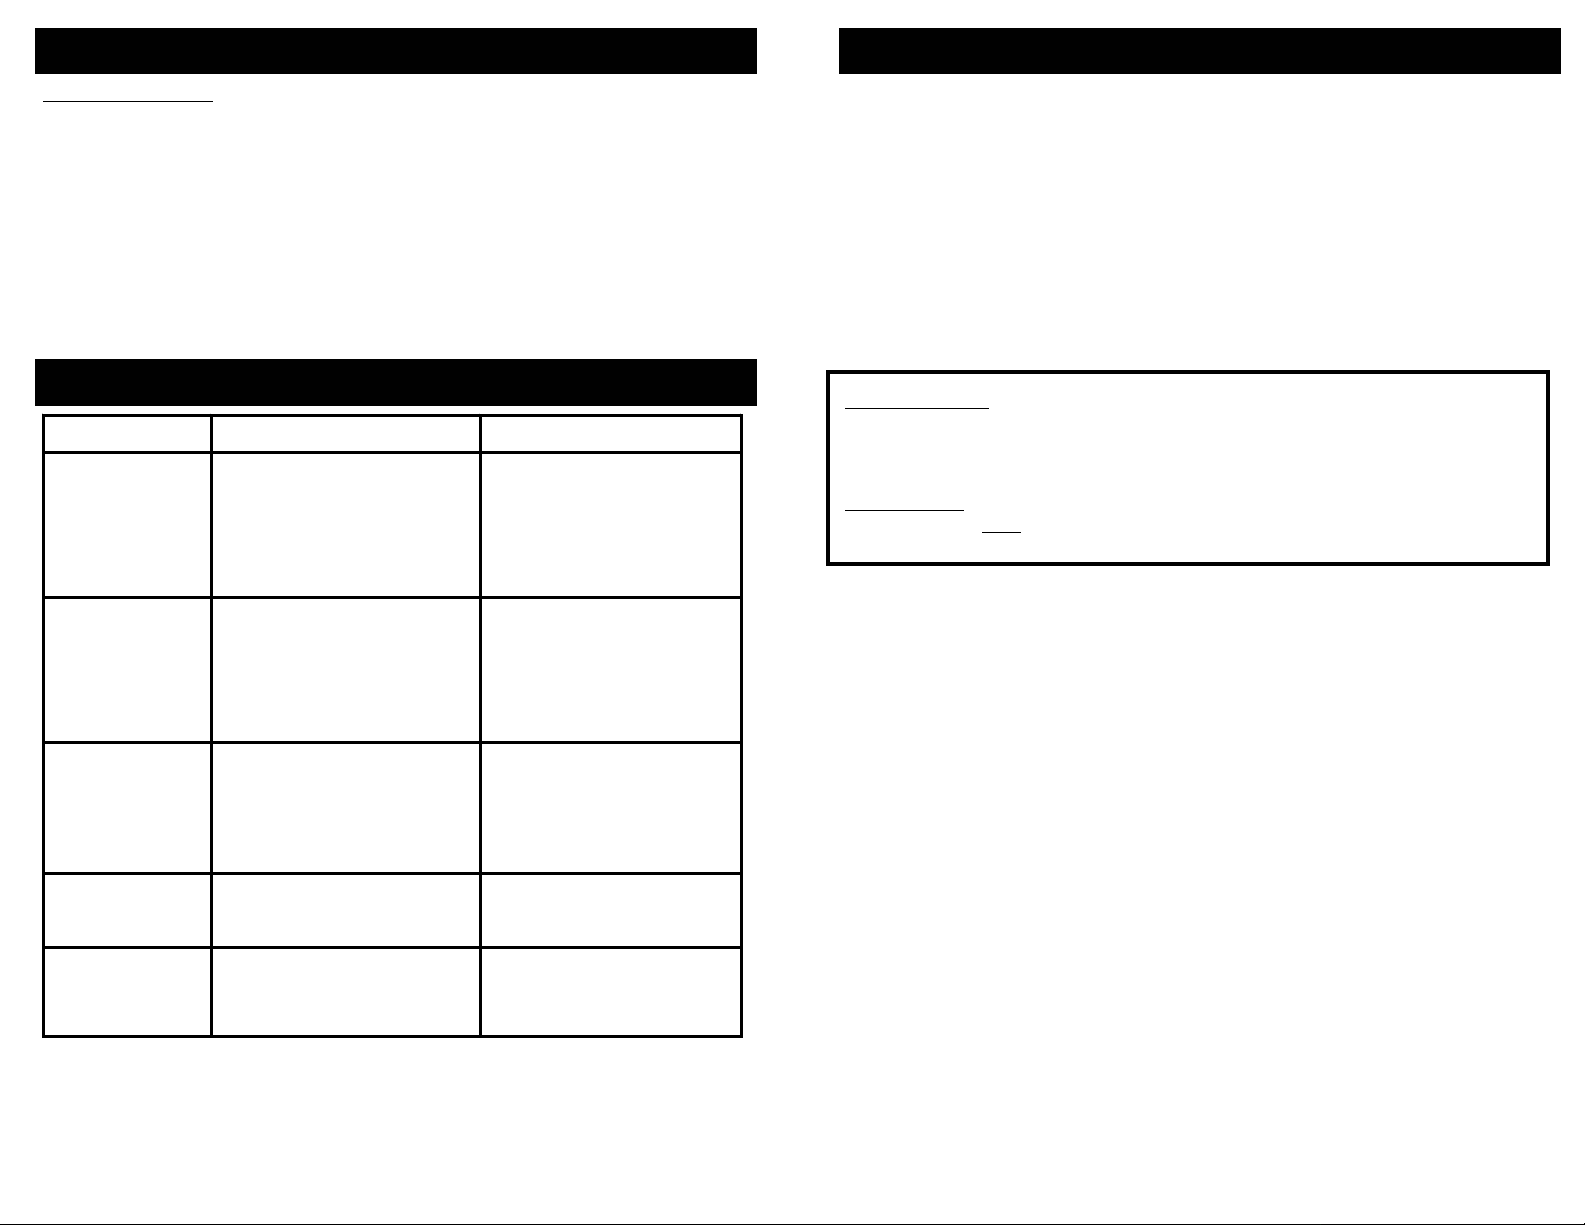
TROUBLE SHOOTING GUIDE
PROBLEM POSSIBLE REASON POSSIBLE SOLUTION
1. Plug unit in firmly.
2. Check fuse or breaker. Replace
fuse/reset breaker.
3. Call 1 (800) 798-7398.
4. Turn the unit off and unplug from
outlet. Allow unit to cool down,
then restart.
1. Empty and clean dust cup.
2. Turn unit off and unplug from
wall outlet. Remove dust cup
filter and check for object(s) in
air duct and remove.
3. Clean or replace HEPA Filter.
4. Clean debris screen.
5. Clean Filters.
VACUUM WILL
NOT OPERATE
VACUUM WILL
NOT PICK-UP OR
SUCTION POWER
IS WEAK
1. Power cord not firmly plugged into
outlet.
2. No power in wall outlet.
3. Needs servicing.
4. Thermostat has tripped.
1. Dust cup is full.
2. Unit clogged.
3. HEPA Filter needs cleaning or
replacing.
4. Debris screen needs cleaning.
5. Filters need cleaning.
TO ORDER REPLACEMENT HEPA FILTERS
Item # XSH602
for Model EP602RF
Call: 1 (800) 798-7398
Monday to Friday 8:30 A.M. - 5:00 P.M. Eastern Standard Time
or
visit our website: www.sharkvac.com
FOR TECHNICAL SUPPORT
for Model EP602RF
Call: 1 (800) 798-7398
Monday to Friday 8:30 A.M. - 5:00 P.M. Eastern Standard Time
Please Note:
The HEPA Filter is washable. It should, however, be replaced every three (3)
to six (6) months to ensure peak performance of your vacuum.
The Pre-Motor, Non-Woven Pre-Filter a nd Post Motor Filters are washable.
Important:
Make sure that ALL filters have been completely air dried for 24 hours before
re-installing back in the vacuum.
TURBO BRUSH
DOES NOT
ROTATE OR
ROTATES
SLOWLY
DUST ESCAPING
FROM VACUUM
VACUUM, HOSE
OR BRUSHES
WILL NOT PICK-UP
1. Dust cup is full.
2. Rotating brush or elbow is
obstructed.
3. Belt is broken.
4. Hose obstructed.
5. Debris screen is clogged.
6. Filters need cleaning.
1. Dust cup is full.
2. Dust cup is not installed correctly.
1. Hose clogged.
2. Dust cup is full.
9
1. Empty dust cup.
2. Clear obstructions.
3. Call 1 (800) 798-7398.
4. Clear obstruction.
5. Clean debris screen.
6. Clean ALL filters.
1. Empty and clean dust cup.
2. Review dust cup instructions.
1. Remove hose and/or brus hes .
Remove obstruction from hose
and /or brush.
2. Empty and clean dust cup.
10
Page 7

Model
EP602RF
ONE (1) YEAR LIMITED WARRANTY
EURO-PRO Operating LLC warrants this product to be free from defects in material and
workmanship for a period of one (1) year from the date of the original purchase, when utilized for
normal household use, subject to the following conditions, exclusions and exceptions.
If your appliance fails to operate properly while in use under normal household conditions within the
warranty period, return the complete appliance and accessories freight prepaid. For Customer
Service support, call 1 (800) 798-7398 or visit our website www.sharkvac.com.
If the appliance is found by EURO-PRO Operating LLC to be defective in material or workmanship,
EURO-PRO Operating LLC will repair or replace it free of charge. Proof of purchase date and $ 9.95
to cover the cost of return shipping and handling must be included. *
Non-durable parts including, without limitation, filters, brushes and electrical parts which normally
require replacement are specifically excluded from warranty.
The liability of EURO-PRO Operating LLC is limited solely to the cost of the repair or replacement of
the unit at our option. This warranty does not cover normal wear of parts and does not apply to any
unit that has been tampered with or used for commercial purposes. This limited warranty does not
cover damage caused by misuse, abuse, negligent handling or damage due to faulty packaging or
mishandling in transit. This warranty does not cover damage or defects caused by or resulting from
damages from shipping or repairs, service or alterations to the product or any of its parts, which have
been performed by a repair person not authorized by EURO-PRO Operating LLC.
This warranty is extended to the original purchaser of the unit and excludes all other legal and/or
conventional warranties. The responsibility of EURO-PRO Operating LLC if any, is limited to the
specific obligations expressly assumed by it under the terms of the limited warranty. In no event is
EURO-PRO Operating LLC liable for incidental or consequential damages of any nature whatsoever.
Some states do not permit the exclusion or limitation of incidental or consequential damages, so the
above may not apply to you.
This warranty gives you specific legal rights, and you may also have other rights which vary from
province to province.
*Important: Carefully pack item to avoid damage in shipping. Be sure to include proof of
purchase date and to attach tag to item before packing with your name, complete address and
phone number with a note giving purchase information, model number and what you believe is
the problem with item. We recommend you insure the package (as damage in shipping is not
covered by your warranty). Mark the outside of your package “ATTENTION CUSTOMER
SERVICE”. We are constantly striving to improve our products, therefore the specifications
contained herein are subj e ct to ch ang e without notice.
OWNERSHIP REGISTRATION CARD
FOR CANADIAN CONSUMERS ONLY
Please fill out and mail the product registration card within ten (10) days of purchase. The registration will enable us
to contact you in the unlikely event of a product safety notification. By returning this card you acknowledge to have
read and understood the instructions for use, and warnings set forth in the accompanying instructions.
RETURN TO:
EURO-PRO Operating LLC, 4400 Bois Franc, St. Laurent, Quebec, H4S 1A7
EP602RF
______________________________________________________________________________
Appliance model
______________________________________________________________________________
Date purchased Name of store
______________________________________________________________________________
Owner’s name
______________________________________________________________________________
Address City Prov. Postal code
Printed in China
11
CONSIGNES DE SÛRETÉ IMPORTANTES
Lors de l’usage de votre aspirateur Transformer Vac, des précautions fondamentales doivent être
observées, y compris les suivantes :
1. Avant d’utiliser votre aspirateur, lisez toutes
les directives.
2. N’utilisez l’appareil qu’aux fins pour
lesquelles il est conçu.
3. Pour éviter le risque de choc électrique,
évitez d’immerger l’appareil ou ses
composantes dans de l’eau ou dans d’autres
liquides.
4. Évitez de débrancher l’appareil en tirant le
cordon. Tirez plutôt la fiche hors de la prise
pour la débrancher.
5. Évitez que le cordon touche des surfaces
chaudes.
6. Évitez de passer l’aspirateur sur le cordon.
7. Évitez d’utiliser l’appareil si le cordon
d’alimentation ou la fiche sont endommagés
ou si l’appareil ou toute composante de
l’appareil a été échappé ou endommagé.
Pour éviter tout risque de choc électrique ,
évitez de démonter ou de tenter de réparer
l’aspirateur. Retournez l’appareil à EURO-
PRO Operating LLC (voir la garantie) pour
examen et réparations). Un réassemblage
ou réparation inadéquats peuvent poser des
risques de chocs électriques ou de blessures
aux personnes utilisant l’aspirateur.
8. Une surveillance étroite est n éces saire lors
de l’usage de tout appareil par des enfants
ou à proximité des enfants. Évitez de laisser
l’appareil sans surveillance s’il est branché.
9. Tenez les cheveux, les vêtements lâches,
les doigts et toutes les parties du corps
éloignés des ouvertures et pièces en
mouvement.
10. Ne pas utiliser l’aspirateur pour aspirer des
liquides inflammables ou combustibles
comme le carburant, et évitez de l’utiliser
dans les endroits où tels liquides sont
présents.
11. Évitez d’aspirer des briquettes de charbon
chaudes, des mégots de cigarette ou tout
objet chaud, fumant ou brûlant.
12. Soyez particulièrement prudent en nettoyant
les escaliers.
13. Ne pas utiliser l’ a spir at eur s an s que son
filtre HEPA soit en place.
14. Cet appareil est conçu pour un usage
domestique seulement. Suivez les directives
figurant dans ce guide.
Pour réduire le risque d’incendie, de choc
électrique ou de blessures :
• Évitez de laisser branché l’aspirateur.
Lorsque celui-ci n’est pas utilisé ou lorsque
vous l’entretenez, débranchez le cordon
d’alimentation.
• Évitez que cet appareil soit utilisé comme un
jouet. Une surveillance étroite est nécessaire
lors de l’usage par des enfants ou à proximité
des enfants, animaux ou plantes.
• N’utilisez cet appareil que de la façon décrite
dans ce manuel. N’utilisez que les
accessoires recommandés par le fabricant.
• Évitez de tirer le cordon, d’utiliser le cordon
comme une poignée, de fermer une porte sur
le cordon, ou de tirer le cordon sur des arêtes
vives ou des coins. Éloignez le cordon de
toute surface chaude.
• N’utilisez que des rallonges homologuées UL
ou cUL de 15 ampères. Les rallonges de
calibre moindre pourraient surchauffer.
Disposez les rallonges de façon à ce que
personne ne puisse les tirer ou y trébucher.
• Éteignez toutes les commandes avant de
débrancher l’appareil.
• Évitez de manipuler la fiche ou l’aspirateur
avec les mains mouillées et évitez d’utiliser
l’appareil sans porter de chaussures.
• Évitez de mettre des objets dans les
ouvertures. Évitez d’utiliser l’aspirateur si les
ouvertures sont bloquées et ne nuisez pas à
la circulation d’air. Assurez-vous que les
ouvertures sont libres de poussière, de
peluches, de cheveux et de tout ce qui peut
réduire le débit d’air
• Rangez l’appareil à l’intérieur dans un endroit
frais et sec.
• Assurez-vous que votre aire de travail est
bien éclairée.
• Tenez le boyau, les tubes et autres
ouvertures à l’écart du visage ou du corps.
• N’utilisez l’aspirat e ur q u e sur d es surfaces
sèches.
• L’usage d’une tension incorrecte peut causer
des dommages au moteur et, possiblement,
des blessures à l’utilisateur. La tension
adéquate est indiquée sur l’étiquette de
régime.
CONSERVEZ CES DIRECTIVES
Pour usage domestique seulement
AVERTISSEMENT: Pour réduire le risque de choc électrique, cet appareil est
doté d’une fiche polarisée (une de ses lames est plus large que l’autre). Cette
fiche ne pourra s’insérer dans une prise polarisée que d’une seule façon. Si la
fiche ne peut pas s’enfoncer dans la prise, adressez-vous à un électricien qui
pourra changer la prise. Ne tentez pas de déjouer le dispositif de sécurité de la
lame de mise à la terre.
12
Rév. 10/07C
Page 8

FAMILIARISEZ-VOUS AVEZ VOTRE ASPIRATEUR
TRANSFORMER VAC
MESURES DE PRÉCAUTION
Important: Si l’orifice de succion ou le boyau de l’aspirateur est BLOQUÉ, arrêtez
l’aspirateur et retirez l’obstruction avant de l’utiliser de nouveau.
22
Spécifications techniques
Tension : 120 V., 60 Hz.
Puissance : 10 amps
1. Poignée
2. Tube télescopique
3. Bouton de verrouillage
4. Boyau sou ple
5. Bouton 1 de rel âche de la
coupelle
6. Poignée de l a coupelle
7. Coupell e à poussière
8. Boîtier principal
9. Surveille-filtre I ntelli-
10. Couvercle du filtre
11. Commutateur marche/arrêt
12. Cordon d’alimentation
13. Bouton de relâche de la
14. Brosse à planchers
15. Suceur plat
16. Brosse à épousseter
17. Bouton de relâche du tube
18. Bouton 2 de relâche de la
19. Relâche du crochet à
20. Raccord du boyau
21. Bandoulière (non illustrée)
22. Brosse turbo actionnée à
MC
Sense
d’échappement
brosse à planchers
télescopique
coupelle
cordon
l’air
1. Ne pas utiliser l’aspirateur près des
chaufferettes, radiateurs ou mégots
de cigarette.
2. Avant d’insérer la fiche dans u ne
prise murale, assurez-vous que vos
mains sont bien sèches.
3. Avant de commencer le nettoyage,
assurez-vous d’enlever tout objet de
grande taille ou pointu risquant
d’endommager l’écran à débris de la
coupelle.
4. Pour débrancher la fiche de la prise
murale, tirez sur la fiche plutôt que
sur le cordon.
5. Évitez d’utiliser l’aspir ateur pour
aspirer toute matière fumante ou
brûlante comme des cigarettes,
allumettes ou cendres chaudes.
6. Ne pas utiliser l’aspirateur sa ns que
TOUS les filtres soit en place.
Remarque: Les illustrations peuvent être
différentes de votre produit.
13
14
Page 9

DIRECTIVES D’USAGE
DIRECTIVES D’USAGE
AVERTISSEMENT: Toujours
débrancher l’aspirateur avant l’assemblage
ou l’enlèvement d’accessoires.
EXTENSION DU TUBE
TÉLESCOPIQUE
Appuyez sur le bouton en plastique et
tirez sur le tube le plus petit. Voir
l’illustration ci-dessous.
INSÉRER LE TUBE
TÉLESCOPIQUE DANS LE
BOÎTIER PRINCIPAL
• Insérez le tube télescopique dans
l’orifice situé près de la poignée de la
coupelle. Assurez-vous que la fente de
la poignée s’insère bien dans l’orifice.
(Fig. 1)
• Pour enlever le tube télescopique,
appuyez sur le bouton de relâche du
tube télescopique et tirez le tube vers
le haut.
Fig. 1
FIXATION DE LA BROSSE À
PLANCHERS AU BOÎTIER
PRINCIPAL
• Insérez le brosse au bon endroit, dans
le sens de la flèche.
• Pour retirer la brosse du boîtier
principal, appuyez sur le bouton de
relâche de la brosse et tirez la brosse
du boîtier. (Fig. 2)
Fig. 2
FIXATION DU BOYAU AU
BOÎTIER PRINCIPAL
• Tenez l’extrémité du boyau.
Insérez le boyau dans le raccord du
boyau. (Fig. 3)
Fig. 3
ENROULAGE ET DÉROULAGE
DU CORDON D’ALIMENTATION
Cet aspirateur est doté d’une
fonction pratique de
rangement du cordon
d’alimentation. Le cordon
s’enroule autour des
deux crochets à cordon à
l’arrière de l’aspirateur.
Le crochet du bas est
doté d’un dispositif de
relâche rapide. Tournez
le crochet vers la gauche
ou la droite pour libérer
le cordon. (Fig. 4)
Fig. 4
COMMUTATEUR MARCHE/ARRÊT
• Le commutateur marche/arrêt est
doté de deux positions.
• Appuyez sur le côté « I » pour
mettre l’aspirateur en marche.
• Appuyez sur le côté « O » pour
éteindre l’aspirateur.
= ARRÊT
= MARCHE
UTILISER L’APPAREIL COMME UN
ASPIRATEUR VERTICAL
• Déroulez le cordon d’alimentation et
branchez-le dans une prise à 120 V.
• Appuyez sur le bouton de
verrouillage pour régler la
hauteur du manche
télescopique.
REMARQUE: En nettoyant
les tapis épais ou difficiles à
nettoyer, abaissez l’angle de
la poignée télescopique
(voir l’illustration à droite)
pour une maniabilité
accrue.
A
b
a
i
s
s
USAGE DE L’APPAREIL COMME
UN ASPIRATEUR À MAIN
• Appuyez sur le bouton de relâche du
tube télescopique pour retirer le tube
télescopique. (voir Fig. 1 page 15)
• Appuyez sur le bouton de relâche de la
brosse à planchers pour retirer la
brosse à planchers. (voir Fig. 2
page 15)
• Fixez la bandoulière au point d’attache.
(Fig. 5)
• Mettez en place le suceur plat ou la
brosse à épousseter à l’extrémité du
boyau.
AVERTISSEMENT
Après un usage prolongé, le boîtier de
l’aspirateur pourrait devenir chaud.
Lors de l’usage de la bandoulière,
l’appareil touche le corps de l’utilisateur.
Ainsi, assurez-vous de n’utiliser
l’aspirateur avec la bandoulière que
lorsque l’appareil est froid. S’il devient
trop chaud, laissez-le refroidir avant de
continuer à l’utiliser.
Suceur plat
Pour radiateurs, fentes,
coins, plinthes
et entre les coussins
Brosse à épousseter
La brosse à épousseter
e
z
convient aux meubles,
stores vénitiens,
livres, abat-jour et tablettes.
Surveille-filtre Intelli-Sense
Le surveille-filtre Intelli-Sense
s’allume pour indiquer que la
coupelle à poussière est pleine ou
que le filtre HEPA, le pré-filtre nontissé ou l’écran à débris doit être
nettoyé. Vous devez alors vider la
poussière de la coupelle et
nettoyer le filtre HEPA, le pré-filtre
non-tissé ou l’écran à débris
immédiatement.
Fig. 5
MC
15
16
Page 10

DIRECTIVES D’USAGE
DIRECTIVES D’USAGE
Brosse turbo actionnée à l’air
Usage de l’appareil avec la brosse
turbo actionnée à l’air
Votre brosse turbo actionnée à l’air est
rendue efficace par la rotation de la
brosse à haute vitesse. À cette fin, une
puissante succion d’air est requise. Pour
assurer le maintien d’une succion
maximum, lisez les directives suivantes:
1. Videz la coupelle fréquemment
pendant l’usage.
2. Nettoyez par tapotement le filtre
HEPA de la coupelle et l’écran à
débris chaque fois que vous videz la
coupelle.
3. Assurez-vous que la brosse rotative
est libre de cheveux ou de fils qui
peuvent réduire son rendement.
4. Inspectez la turbine régulière ment
pour assurer que le passage d’air est
libre de poussière et de débris. Pour
des directives de nettoyage, voir
l’illustration.
Fixation de la brosse turbo
actionnée à l’air au boyau souple
Pour utiliser la brosse turbo actionnée à
l’air pour nettoyer les meubles :
1. Retirez le boyau souple du raccord
du boyau. (Fig. 6)
2. Pressez la brosse turbo actionnée à
l’air dans l’extrémité du boyau
souple aussi profondément que
possible.
Fig. 6
Important: Afin de conserver une
succion maximale, videz fréquemment la
coupelle et « tapotez » le filtre HEPA et
l’écran à débris. Assurez-vous que la
brosse rotative est libre de cheveux et de
fils qui peuvent s’accumuler et réduire le
rendement de la brosse.
Nettoyage de la brosse turbo
actionnée à l’air
Languette
Vers le haut
Fig. 7
Turbine
De temps à autre, vous devrez nettoyer
la turbine de votre brosse turbo.
1. Retirez la brosse turbo du boyau ou
tube de rallonge télescopique.
2. Faites glisser la languette vers l’avant
et inclinez le haut du boîtier de la
brosse vers le haut. Le haut du boîtier
est muni de charnières et s’incline à
environ 45° seulement. (Fig. 7)
3.Inspectez la roue de la turbine et le
passage d’air à l’affût de débris ou de
blocages. Le cas échéant, retirez les
débris.
4. Vous pouvez aussi utiliser le boyau
avec le suceur plat pour retirer tout
débris dans la turbine.
5. En la faisant tourner avec vos doigts,
assurez-vous que la roue de la turbine
tourne librement. Si la turbine ne
tourne pas, appelez le service à la
clientèle pour obtenir de l’aide.
6.Après avoir terminé, fermez le
couvercle de la brosse et faites glisser
la languette vers l’arrière de la brosse
pour la faire verrouiller.
Vider la coupelle à poussière et
nettoyer/changer le filtre HEPA et
l’écran à débris
Avertissement: Toujours
débrancher l’appareil avant
d’ouvrir la coupelle à poussière.
Important: Ne PAS utiliser l’aspirateur
sans que son filtre HEPA soit en place.
Avertissement: Après chaque
usage, toujours enlever le pré-filtre
non tissé, filtre HEPA et le couvercle de
la coupelle avec écran à débris, tapoter
vigoureusement le filtre HEPA et
nettoyer l’écran à débris jusqu’à ce que
toute la poussière en ait été éliminée.
IMPORTANT- Veuillez noter: Le filtre
HEPA « à secouer » empêchera les
particules microscopiques de poussière et
les agents allergènes de pénétrer dans
l'air que vous respirez. A cause de ce
rendement de filtrage incroyable, le filtre
HEPA de la coupelle à poussière
accumule rapidement, dans ses plis
blancs, de nombreuses particules de
poussière difficiles à voir mais qui
obstrueront ou réduiront en bout de
compte la succion de l’aspirateur si vous
manquez de nettoyer le filtre
soigneusement.
1.Pour retirer la coupelle à poussière,
appuyez tout d’abord sur le bouton
de relâche (1) de la coupelle qui se
trouve sur la poignée de la coupelle.
En même temps, appuyez sur le
bouton de relâche (2) de la coupelle
qui se trouve sur la côté du boîtier
principal. (Fig. 8) Retirez ensuite la
coupelle.
Bouton de
relâche de la
coupelle 1
Bouton de
relâche de
la coupelle 2
Fig. 8
2. Pour vider la coupelle,
appuyez sur le bouton de
relâche de la trappe
se trouvant à l’arrière
de la coupelle. ( Fig. 9)
3. Le filtre HEPA se
trouve sous la
coupelle. (Fig 10)
Retirer le pré-filtre
non tissé (Fig. 11) Pour
retirer le filtre HEPA,
tenez ses rebords et sortez-le
lentement.
Pré-Filtre
Non tissé
Fig. 11
Fig. 10
Filtre
HEPA
4.Tenez le filtre HEPA par ses
rebords et tapotez le
vigoureusement (côté
souillé vers le bas) contre
une surface dure et
plane jusqu’à toute la
poussière ait été éliminée
du filtre. (Fig. 12)
Fig. 12
5.Rincer le pré-filtre non tissé et laisser
complètement sécher à l’air p endant
24 heures.
6.Insérer le pré-filtre non tissé.
7.Remettez le filtre HEPA dans
l’aspirateur.
8.Pour séparer l’écran à débris de la
coupelle, tenez la coupelle dans une
main et tournez le couvercle de la
coupelle dans le sens contraire des
aiguilles d’une montre et séparezles. Pour nettoyer l’écran
à débris, nous vous
recommandons de le
rincer à l’eau tempérée
sous le robinet pour
éliminer toute la saleté
qui s’y est accumulée.
Toutefois, laissez
toujours l’écran sécher
à l’air pendant 24 heures
Fig. 13
avant de le remettre dans
l’aspirateur. (Fig. 13)
Fig. 9
17
18
Page 11

DIRECTIVES D’USAGE
DIRECTIVES D’USAGE
REMARQUE: Le matériel blanc du filtre
HEPA se décolorera avec le temps. Ceci
est NORMAL et ne nuira pas au
rendement du filtre. Si le filtre HEPA est
bien nettoyé (en le Tapotant) après
chaque usage mais que la succion ne
revient pas à 100%,
nous vous suggérons
de nettoyer le filtre
HEPA en le tapotant
vigoureusement
jusqu’à ce que vous
ne voyiez plus de
poussière s’échapper
de ses plis. Ensuite,
Avertissement:
pendant 24 heures avant le
remise en place dans
l’aspirateur.
Fig. A
Lavez une
fois par
mois ou
lorsque la
succion
semble
affaiblie
Laissez sécher
rincez-le sous le robinet et laissez-le
sécher pendant 24 heures avant de le
remettre dans l’aspirateur. (Fig. A) Cette
procédure doit être suivie une fois par
mois ou lorsque la succion semble
affaiblie.
MISE EN GARDE: L’orifice de
succion doit être ouvert et libre de
toute obstruction en tout temps. Sinon, le
moteur surchauffera et pourrait
s’endommager.
Avertissement : Toujours vider
la coupelle à poussière et nettoyer le
pré-filtre non tissé filtre HEPA et l’écran à
débris avant chaque usage et pendant
l’usage prolongé.
Ne jamais trop remplir la coupelle. Jetez la
poussière et nettoyez le filtre HEPA et
l’écran à débris lorsque la poussière atteint
le niveau « MAX » de la coupelle ou lors
d’un usage prolongé. Sinon, vous pourriez
endommager le moteur. Si vous lavez le
filtre HEPA, assurez-vous qu’il soit
complètement séché à l’air pendant 24
heures avant de le remettre dans
l’aspirateur.
Remarque: Le filtre HEPA est lavable.
Pour assurer un rendement optimal de votre
aspirateur, il doit toutefois être remplacé à
chaque période de trois (3) à six mois.
Le filtre pré-filtre non tissé, pr é-moteur et
post-moteur sont tous deux lavables.
Important:
filtres sont entièrement secs (laissez-les
sécher à l’air seulement pendant 24 heures)
avant de les réinstaller dans votre
aspirateur
Assurez-vous que TOUS les
Changement et nettoyage du filtre
pré-moteur
Le filtre pré-moteur est lavable.
• Retirez la coupelle et le filtre HEPA
pour pouvoir retirer le filtre pré-moteur.
(Fig. 14)
• Rincez le filtre à l’eau tempérée et
laissez-le sécher complètement
pendant 24 heures. Ne pas rincer le
filtre à la laveuse. Ne pas le sécher
avec un séchoir. Le laisser sécher à
l’air pendant 24 heures. Ne jamais
utiliser l’aspirateur sans que le filtre prémoteur soit en place.
• Une fois que le filtre est sec, remettezle dans l’appareil et remettez en place
le filtre HEPA et la coupelle.
• Un filtre très souillé ou obstrué doit être
lavé à fond à l’eau tiède fraîche. Un
détergent doux peut être utilisé au
besoin.
Fig. 14
Changement et nettoyage du filtre
post-moteur
Le filtre post-moteur est un filtre lavable.
• Retirez le couvercle
du filtre à l’avant de
l’aspirateur et retirez
le filtre.
• Rincez le filtre à l’eau
tempérée et laissez-le
sécher complètement
pendant 24 heures.
• Ne pas rincer le filtre à la
laveuse. Ne pas le sécher
avec un séchoir. Le laisser
sécher à l’air pendant 24 heures.
Ne jamais utiliser l’aspirateur
sans que le filtre post-moteur
soit en place.
• Une fois que le filtre est sec,
remettez-le dans l’appareil et remettez
le couvercle en place.
• Un filtre très souillé ou obstrué doit
être lavé à fond à l’eau tiède fraîche.
Un détergent doux peut être utilisé au
besoin. (Fig. 15)
Fig. 15
Thermostat du moteur
IMPORTANT: Cet appareil est doté
d’un thermostat de protection du
moteur. Si, pour quelque raison, le
moteur venait à surchauffer, le
thermostat arrêtera l’aspirateur. Si
cela se produit :
• Appuyez une seule fois sur le
commutateur mise en marche/arrêt.
• Débranchez l’aspirateur.
• Trouvez la source du problème de
surchauffe (p. ex. boyau ou filtre
obstrué).
• Éliminez l’obstruction dans le boyau
ou remplacez les filtres.
• Attendez au moins 45 minutes avant
de tenter d’utiliser l’aspirateur de
nouveau.
• Une fois que l’aspirateur a refroidi
pendant 45 minutes, rebranchez-le et
appuyez sur le commutateur de mise
en marche/arrêt. L’aspirateur devrait
alors se remettre en marche.
• Si l’aspirateur ne démarre toujours
pas, appelez le service à la clientèle
au 1 (866) 826-6941.
GUIDE DE DÉPANNAGE
PROBLÈM E R AISON P OSS IBLE SOLUTION POSSIB LE
1. Branchez bien l’appareil.
2. Vérifiez le fusible/le disjoncteur.
Remplacez le fusible/enclenchez le
disjoncteur.
3. Appelez le 1 (866) 826-6941.
4. Éteignez l’appareil et débranchez -le.
Laissez-le refroidir et remettez-le en
marche.
1. Videz et nettoyez la coupelle.
2. Éteignez l’appareil et débranchez -le.
Retirez le filtre de la cou pe lle, e t
retirez tout objet obstruant le
passage d’air.
3. Nettoyez ou r e m p lace z le filtre
HEPA..
4. Nettoyez l’écran à débris.
5. Nettoyez les filtres.
1. Videz la coupelle.
2. Éliminez les obstructions.
3. Appelez le 1 (866) 826-6941.
4. Éliminez l’obstruction.
5. Nettoyez l’écran à débris.
6. Nettoyez tous les filtres .
1. Videz et nettoyez la coupelle.
2. Lisez les directives au sujet de la
coupelle.
1. Retirez le boyau et(ou) les brosses.
Retirez toute obstruction dans le
boyau/la brosse.
2. Videz et nettoyez la coupelle.
L’ASPIRATEUR NE
FONCTIONNE PAS
L’ASPIRATEUR
N’ASPIRE PAS OU
SA PUISSANCE DE
SUCCION EST
FAIBLE
LA BROSSE
TURBO NE
TOURNE PAS OU
TOURNE
LENTEMENT
DE LA POUSS IÈRE
S’ÉCHAPPE DE
L’ASPIRATEUR
L’ASPIRATEUR, LE
BOYAU OU LE S
BROSSES
N’ASPIRENT PAS
1. Le cordon n’est pas branché
dans la prise.
2. La prise ne fonctionne pas.
3. Réparations requises.
4. Le thermostat s’est enclenché.
1. La coupelle à poussière est
pleine.
2. L’appareil est bloqué.
3. Le filtre HEPA doit être nettoyé
ou remplacé.
4. L’écran à débris doit être
nettoyé.
5. Les filtres doit être nettoyé
1. La coupelle à poussière est
pleine.
2. La brosse rotative ou le coude
est obstrué.
3. La courroie est brisée.
4. Le boyau est bouché.
5. L’écran à débris est encrassé.
6. Les filtres doivent être nettoyé.
1. La coupelle est pleine.
2. La coupelle est mal installée.
1. Le boyau est obstrué.
2. La coupelle est pleine.
19
20
Page 12

COMMANDE DE FILTRES DE RECHANGE POUR LA
COUPELLE
POUR COMMANDER DES FILTRES HEPA DE RECHANGE
Article XSH602
Pour le modèle EP602RF
Appelez: 1 (866) 826-6941
Du lundi au vendredi, 8 h 30 à 17 h 00 heure normale de l’Est
ou
visitez notre site Web : www.sharkvac.com
SOUTIEN TECHNIQUE
Pour le modèle EP602RF
Appelez: 1 (866) 826-6941
Du lundi au vendredi, 8 h 30 à 17 h 00 heure normale de l’Est
Remarque:
Le filtre HEPA est lavable. Pour assurer un rendement optimal de votre
aspirateur, il doit toutefois être remplacé à chaque période de trois (3) à six
(6)mois.
Le filtre pré-filtre non tissé, pré-moteur et post-moteur sont tous deux
lavables.
Important :
Assurez-vous que TOUS les filtres sont entièrement secs (laissez-les sécher
à l’air seulement pendant 24 heures) avant de les réinstaller dans votre
aspirateur.
Modèle
EP602RF
GARANTIE LIMITÉE DE UN (1) AN
EURO-PRO Operating LLC garantit ce produit contre toute défectuosité matérielle ou de main
d’œuvre pour une période de un (1) an à compter de la date d’achat, dans le cadre d’une utilisation
domestique normale, en vertu des modalités, exclusions et exceptions suivantes.
Si votre appareil manque de fonctionner correctement dans le cadre d’un usage domestique normal,
et ce, pendant la période de garantie, retournez l’appareil au complet et ses accessoires frais de port
prépayé. Veuillez SVP contacter le service à la clientèle au 1 (866) 826-6941 ou visitez-nous au
www.sharkvac.com.
Si EURO-PRO Operating LLC constate que l’appareil comporte une défectuosité matérielle ou de
main d’œuvre, EURO-PRO Operating LLC le réparera ou le remplacera sans frais de votre part. Une
preuve d’achat indiquant la date d’achat et un montant de 9,95 $ pour la manutention et l’envoi de
retour doivent être inclus.* Les pièces non durables, y compris, sans s’y limiter, les filtres, brosses et
composantes électriques exigeant normalement d’être remplacés sont exclus de la garantie.
La responsabilité de EURO-PRO Operating LLC ne se limite qu’au coût des pièces de rechange ou
de l’appareil, à notre unique discrétion. Cette garantie ne couvre pas l’usure normale des pièces et ne
s’applique pas aux appareils qui ont été manipulés ou utilisés à des fins commerciales. Cette
garantie limitée exclut les dommages causés par un mauvais usage, une manipulation négligente
ainsi que les dommages causés par un emballage inadéquat ou une mauvaise manutention en
transit. Cette garantie ne couvre pas les dommages ou défectuosités causés par ou découlant de
l’envoi, des réparations ou des modifications apportés au produit ou à ses pièces et ayant été
effectués par un réparateur non autorisé par EURO-PRO Operating LLC.
Cette garantie est proposée à l’acheteur d’origine du produit et exclut toute autre garantie juridique
et(ou) conventionnelle. La responsabilité de EURO-PRO Operating LLC, si responsabilité il y a, ne
se rapporte qu’aux obligations spécifiques assumées de façon expresse par EURO-PRO Operating
LLC en vertu des modalités de cette garantie limitée. En aucun cas EURO-PRO Operating LLC ne
sera-t-elle responsable des dommages accessoires ou consécutifs de quelque nature que ce soit.
Certains États/certaines provinces ne permettent pas que des exclusions ou limites soient imposées
aux dommages accessoires ou consécutifs. Ainsi, la disposition ci-dessus pourrait ne pas s’appliquer
à vous.
Cette garantie vous confère des droits juridiques précis qui pourraient varier d’un État/d’une province
à l’autre.
*Important : Emballez soigneusement l’app areil pour éviter tout dommage en transit. Avant
d’emballer l’appareil, assurez-vous d’y fixer une étiquette portant votre nom, votre adresse
complète et votre numéro de téléphone et précisant les détails de l’achat, le numéro de
modèle et le problème survenu. Nous vous recommandons en outre d’assurer le colis (les
dommages survenus en transit ne sont pas couverts par la garantie). Indiquez, sur
l’emballage extérieur, « AUX SOINS DU SERVICE À LA CLIENTÈLE ». Comme nous nous
efforçons en tout temps d’améliorer nos produits, les spécifications décrites dans ce guide sont
sujettes à changement sans préavis.
21
FICHE D’ENREGISTREMENT DU PROPRIÉTAIRE
CONSOMMATEURS CANADIENS SEULEMENT
Veuillez remplir cette fiche et la poster dans les dix (10) jours suivant l’achat. L’enregistrement nous
permettra de communiquer avec vous pour tout avis de sécurité au sujet du produit. En nous
retournant cette fiche, vous convenez d’avoir lu et compris les directives d’utilisation et les
avertissements précisés dans les directives.
RETOURNER À: EURO-PRO Operating LLC, 4400, Bois Franc, St-Laurent (Québec) H4S 1A7
EP602RF
______________________________________________________________________________
Modèle de l’appareil
______________________________________________________________________________
Date d’achat Nom du magasin
______________________________________________________________________________
Nom du propriétaire
______________________________________________________________________________
Adresse Ville Prov. Code postal
Imprimé en Chine
22
 Loading...