

Page 1
Operating
Instructions
Stethophon
® 0
4
Page 2

Measurable success by Sewerin equipment
Congratulations. You have chosen a quality instrument manufactured
by Hermann Sewerin GmbH.
Our equipment will provide you with the highest standards of performance, safety and efciency. They correspond with the national and international guide-lines.
Please read and understand the following operating instructions before
using the equipment; they will help you to use the instrument quickly and
competently. If you have any queries we are available to offer advice
and assistance at any time.
Yours
Hermann Sewerin GmbH
Robert-Bosch-Straße 3
33334 Gütersloh, Germany
Tel.: +49 5241 934-0
Fax: +49 5241 934-444
www.sewerin.com
info@sewerin.com
Sewerin USA LLC
2835 Haddoneld Road
Pennsauken, NJ 08110-1108
Phone: +1 215-852-8355
Fax: +1 856-662-7070
www.sewerin.net
sewerin-usa@sewerin.net
SEWERIN SARL
17, rue Ampère – BP 211
67727 Hoerdt Cedex, France
Tél. : +33 3 88 68 15 15
Fax : +33 3 88 68 11 77
www.sewerin.fr
sewerin@sewerin.fr
Sewerin Ltd
Hertfordshire
UK
Phone: +44 1462-634363
www.sewerin.co.uk
info@sewerin.co.uk
SEWERIN IBERIA S.L.
Centro de Negocios Eisenhower
Avenida Sur del Aeropuerto
de Barajas 24, Ed. 5 Of. 2C
28042 Madrid, España
Tel.: +34 91 74807-57
Fax: +34 91 74807-58
www.sewerin.es
info@sewerin.es
Sewerin Sp.z o.o.
ul. Annopol 3
03-236 Warszawa, Polska
Tel.: +48 22 519 01 50
Faks: +48 22 519 01 51
Tel. kom.+48 501 879 444
+48 608 01 37 39
www.sewerin.com
info@sewerin.pl
Page 3
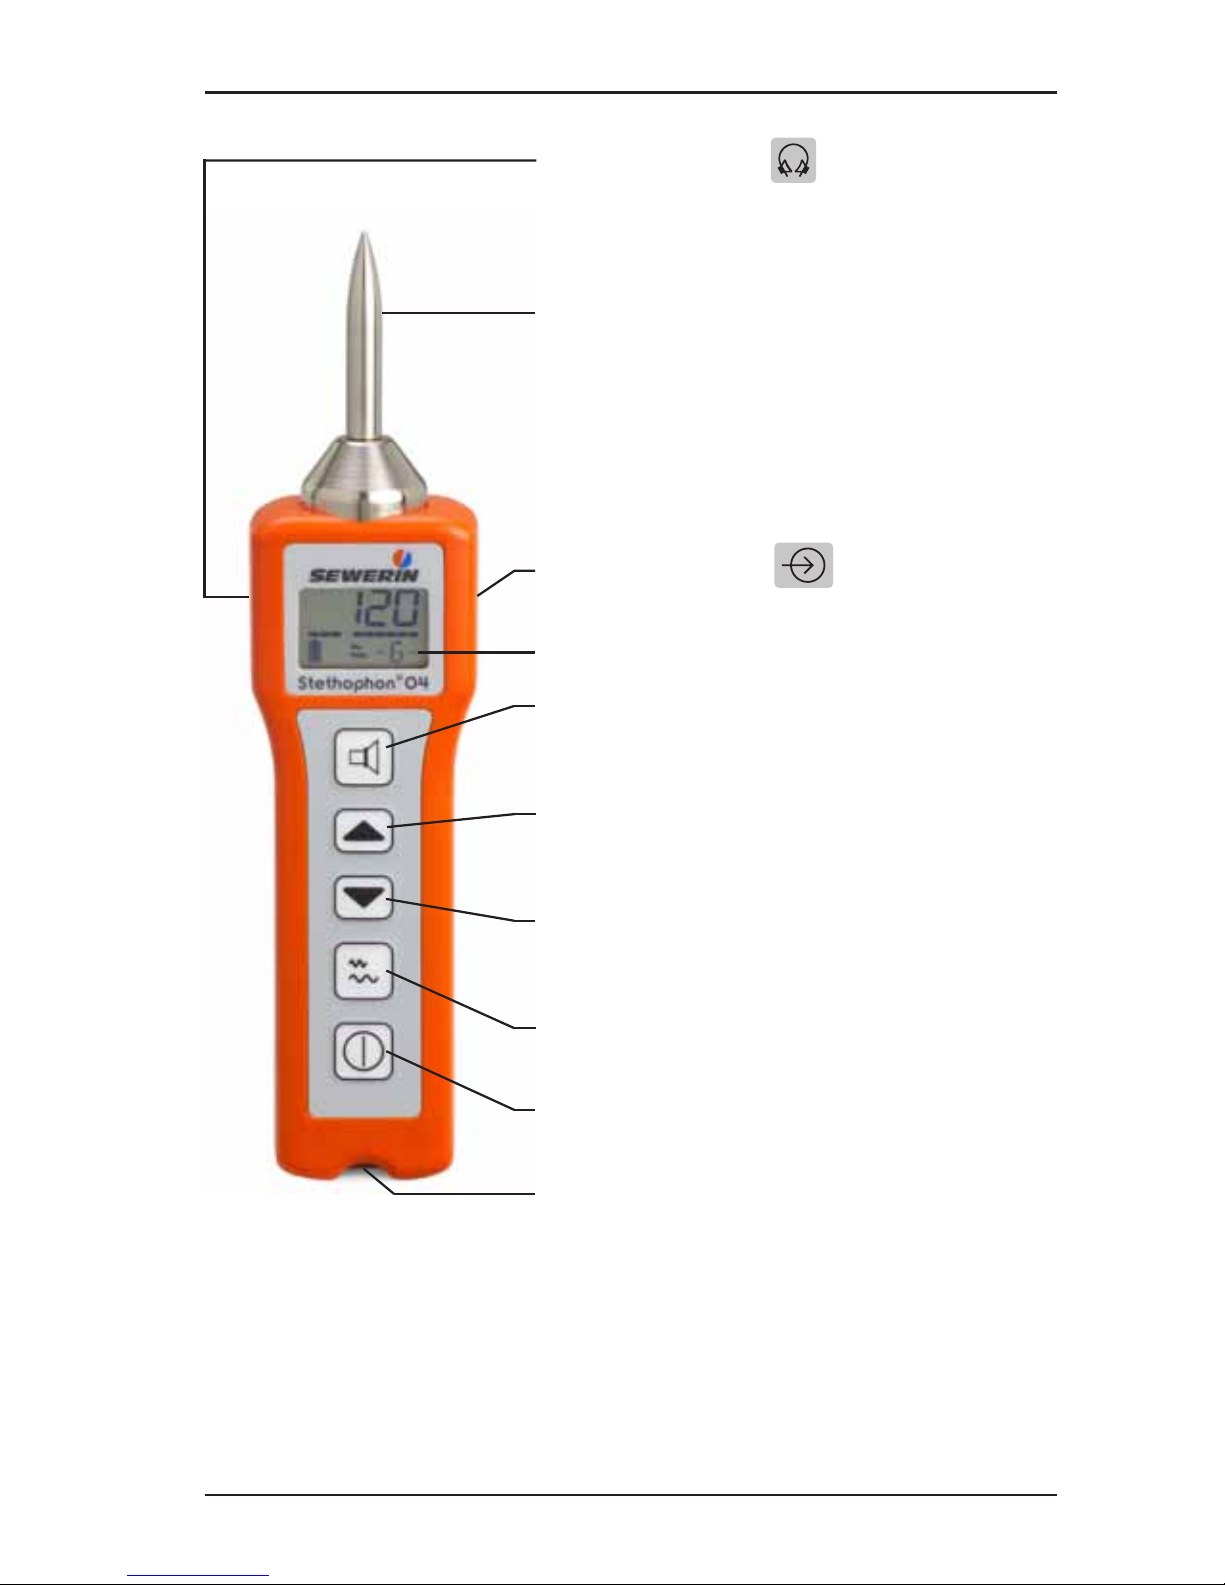
Stethophon 04 illustrated – Device structure
Probe tip
z for recording vibrations
z removable
Headphone socket
Microphone socket
z for connecting an external microphone
Display
Loudspeaker key
z start/stop measurement
z switch off noise
Arrow-up key
z increase volume, lter level, values in normal
settings
Arrow-down key
z reduce volume, lter level, values in normal
settings
Filter key
z change lter level
ON/OFF key
z switch device on/off
Bar
z for attaching carrying strap
Page 4
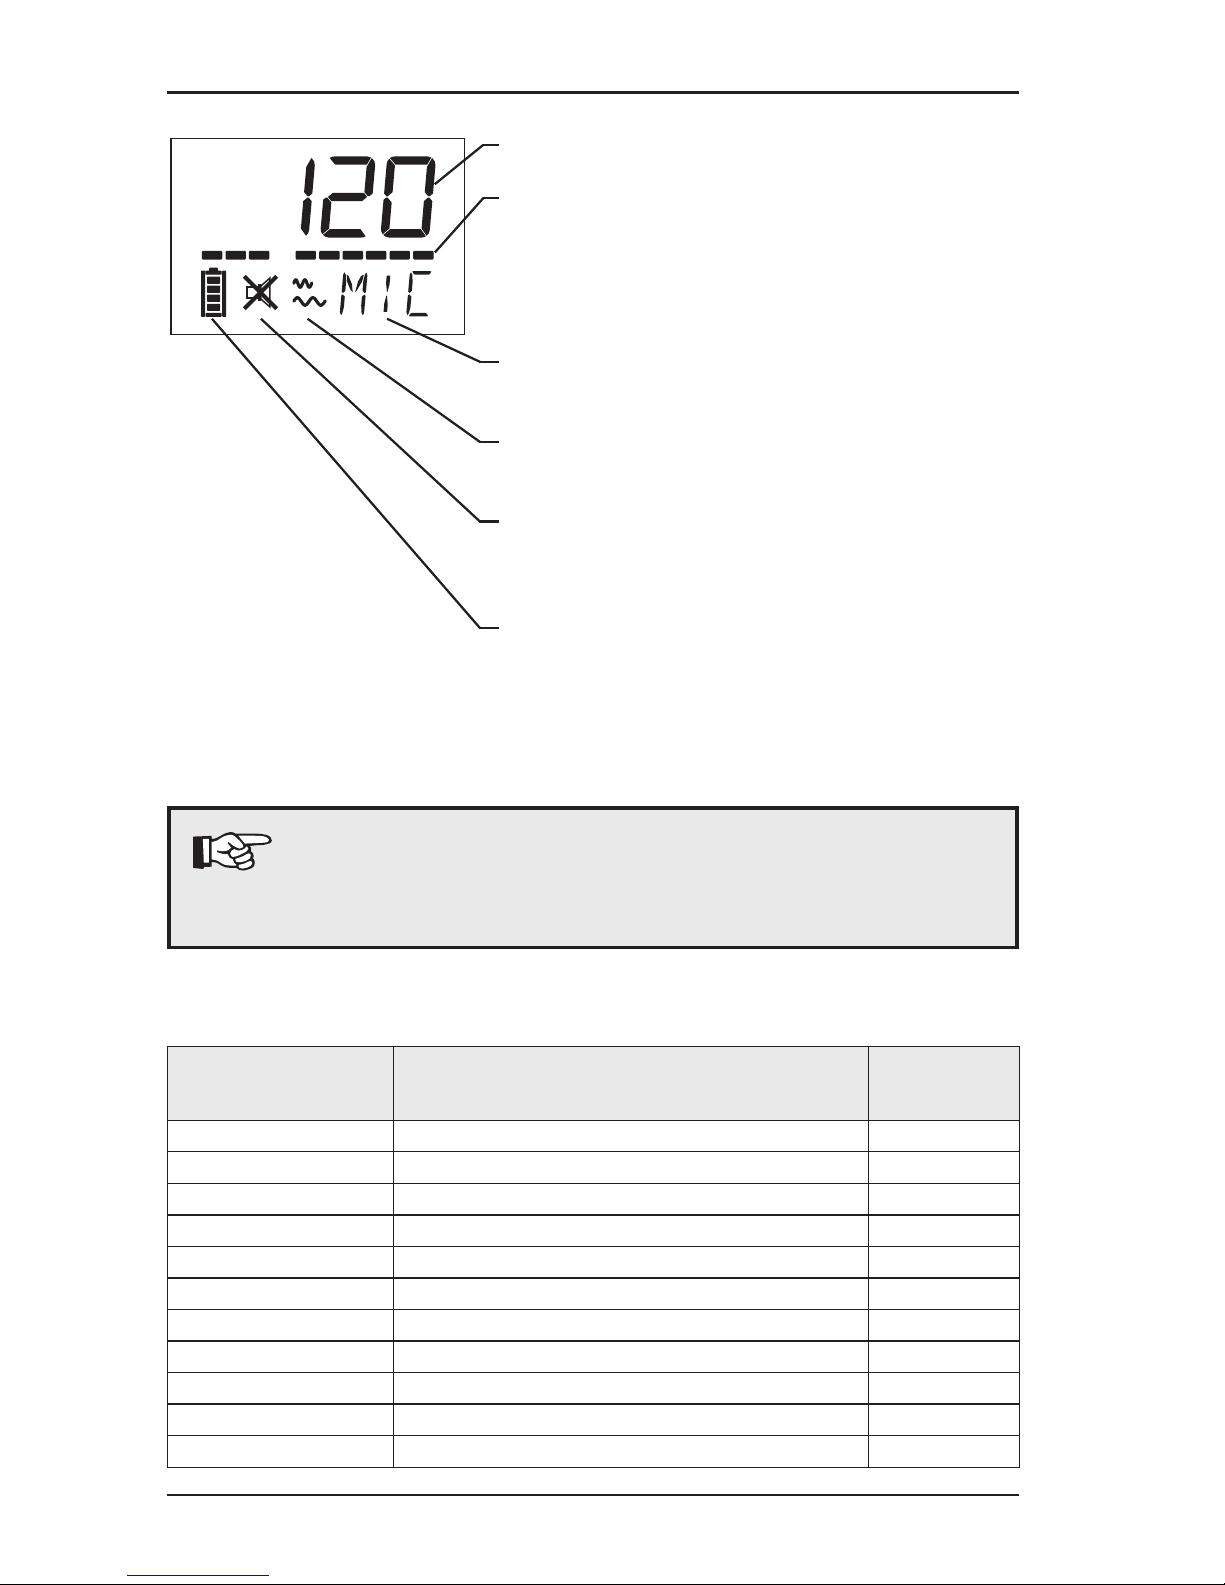
Measured value (current minimum sound level)
Volume, also: frequency range
z missing segment indicates selected volume /
visible segments indicate bandpass frequency
range
Status message, also: menu item /last
measured value /lter level
Filter symbol
z lter level can be changed
Loudspeaker symbol (crossed out)
z ready to measure
z noise switched off
Battery symbol
z current battery capacity; the more segments that
are visible, the higher the remaining capacity
available
Note:
All of the gures (with the exception of zero) in the illustrated displays
are examples. You will generally obtain other values when working with
the device.
Abbreviations:
Status message/
menu item
Abbreviation for See
APF Auto Power Off Section 3.5
BAT Battery Section 3.5
END End Section 5
LDS Loudspeaker Section 5.2
LED Light emitting diode (display illumination) Section 5.2
LOC Lock (lter key) Section 5.2
MIC Microphone (external) Section 4.3.2
PRO Protect (hearing protection threshold value) Section 5.2
RES Reset Section 5.2
SET Setup Section 5.1
VOL Volume (hearing protection) Section 5.2
Display illustration – Description of symbols and abbreviations
Page 5

Operating Instructions
22.07.2013 – V3.XX – 104854 – en
Stethophon® 04
Page 6

Symbol explanation
CAUTION!
This symbol is used to indicate dangers which may
either result in hazards for the operators or in severe
damage – or even destruction – of the product.
Note:
This symbol is used to call attention to information
and tips which may be helpful and which are exceeding the basic operating procedures.
Page 7

I
Contents Page
1 Introduction .............................................................................1
2 General ..................................................................................... 2
2.1 Warranty ....................................................................................2
2.2 Intended use .............................................................................3
2.3 Safety information .....................................................................3
3 Useful information about the device .....................................4
3.1 Models ....................................................................................... 4
3.2 Structure .................................................................................... 4
3.3 Modes of operation ...................................................................5
3.4 Reset ......................................................................................... 5
3.5 Listening to noise .....................................................................6
3.5.1 Adjusting the volume ............................................................. 7
3.5.2 Automatic hearing protection .................................................8
3.5.3 Switching off the noise ...........................................................9
3.6 Automatic shut down ................................................................. 9
3.7 Illumination of display .............................................................. 10
4 Measuring .............................................................................. 11
4.1 How to switch the device on (measuring mode) ..................... 11
4.2 How to measure ...................................................................... 11
4.2.1 What you need to know about the noise picked up ..............13
4.2.2 What you need to know about the measured value
displayed ..............................................................................13
4.3 How to inuence the quality of the measurement result .........14
4.3.1 Changing the lter level .......................................................14
4.3.2 Using an external microphone ............................................17
4.3.3 Extending the probe tip ........................................................18
5 Normal settings .....................................................................19
5.1 How to use the normal settings ............................................... 19
5.2 What values can be adjusted? ................................................21
6 Maintenance and servicing ..................................................23
6.1 Overview .................................................................................23
6.2 Simple function test (troubleshooting) ..................................... 23
6.3 Replacing disposable/rechargeable batteries .........................24
Page 8

II
Contents Page
7 Appendix ................................................................................ 25
7.1 Technical data .........................................................................25
7.2 Accessories ............................................................................. 26
7.3 EC Declaration of Conformity .................................................. 27
7.4 FCC Compliance Statements .................................................. 28
7.5 Advice on disposal ..................................................................29
Page 9

1
1 Introduction
1 Introduction
The Stethophon 04 is an electroacoustic listening device used
to detect leaks.
The device's probe tip records the natural vibrations of the object
of examination. The Stethophon 04 displays a relative measure-
ment according to the internal amplication of the vibrations, and
emits the corresponding noise through the headphones.
Ranges of use:
z Leak detection in the water distribution network
z Inspecting house service connections
z Inspecting and pinpointing damage in compressed air sys-
tems
z Troubleshooting in heating and sanitation facilities in build-
ings
z Bearing inspection on machines
Page 10

2
2 General information
2 General
2.1 Warranty
The following instructions must be complied with in order for any
warranty to be applicable regarding functionality and safe operation of this equipment.
Hermann Sewerin GmbH accepts no liability for any damages
resulting from non-compliance with these instructions. The warranty and liability provisions of the terms of sale and delivery of
Hermann Sewerin GmbH are not affected by the information
given below.
z This product must only be operated after the relevant operating
instructions have been read and understood.
z This product must only be used for its intended purpose.
z This product is designed for use in industrial and commercial
applications.
z Repairs must only be carried out by the manufacturer or by
other suitably trained personnel.
z Changes or modications to this product must not be carried out
without approval from Hermann Sewerin GmbH. The manufacturer cannot be held responsible for damages if unapproved
modications have been made.
z Only replacement parts that have been approved by
Hermann Sewerin GmbH may be used.
z Only the specied battery types may be used.
z The manufacturer reserves the right to make technical modi-
cations in the course of further development.
Generally applicable safety and accident-prevention regulations
must be complied with, in addition to the information provided in
this manual.
Page 11

3
2 General information
2.2 Intended use
The Stethophon 04 is a sensitive measuring device. It may only
be used for listening to sounds.
The device is suitable for both indoor and outdoor use. There are
special accessories available for both applications to optimise
the measurement results and prevent operating errors. Please
contact our sales department for advice.
The manufacturer accepts no responsibility for any damage
or harm caused to persons or property as a result of improper
use.
2.3 Safety information
Risk of personal injury (health risk)
z You could injure yourself or others with the tip of the device
probe. Handle the device carefully therefore when transporting
it and using it to measure.
z The device has an automatic hearing protection function. How-
ever, only set the volume as loud as is necessary to analyse
the noise. Excessive noise can cause permanent damage to
hearing!
Risks to the device
z Do not drop the device. This could damage the internal mi-
crophone.
z Never open the housing (except the battery compartment).
Failure to observe the above instructions will invalidate the
warranty.
z Take extra care when handling the device if you use a probe
tip extension. The mechanical stress on the extended probe
tip can produce forces powerful enough to destroy the internal
microphone.
z Never lean on the device.
z Never use the probe tip as a lever for manual tasks.
Page 12
4
3 Useful information about the device
3 Useful information about the device
3.1 Models
The Stethophon 04 is available with and without a radio mod-
ule.
Stethophon 04 with radio module
Devices featuring a radio module feature an SDR
sticker (SDR = Sewerin Digital Radio).
The device can be used either with the F5 wireless headphones
or with headphones without a radio module (e. g. K3 or S4 head-
phones).
Stethophon 04 without radio module
The device can only be used with headphones without a radio
module (e. g. K3 or S4 headphones).
CAUTION!
Correct recognition of the limit for the automatic
hearing protection function is only guaranteed if
SEWERIN's F5, K3 or S4 headphones are used.
3.2 Structure
Illustrations with
z all parts of the Stethophon 04 labelled and
z an explanation of the symbols/abbreviations on the display
are provided on the inside front cover.
Page 13

5
3 Useful information about the device
3.3 Modes of operation
The device features two modes of operation:
z Measuring > see Section 4
z Normal settings > see Section 5
It is not possible to switch directly to the normal settings from
measuring mode. You must rst switch the device off.
3.4 Reset
All the menu items in the normal settings are set to "0". The lter
level is "5".
Page 14

6
3 Useful information about the device
3.5 Listening to noise
The main purpose of the Stethophon 04 is for listening to noise.
The device is therefore almost always used with headphones.
The minimum sound level shown in the display should conrm
the results heard. These digital measurement values alone may
not provide enough information in certain situations.
Note:
Inexperienced users are advised to practise listening (see below) to allow them to use the device effectively after a short period of training.
Even though listening is more important than reading off the measurement values, these operating instructions focus in particular
on the information shown in the display. This is simply because
the visible changes can be explained in greater detail than the
audible ones.
There is a volume setting for picking up the noise (see Section
3.4.1).
If the noise becomes so loud that it poses a health risk to the user,
the sound will be switched off automatically (see Section 3.4.2).
Practising listening
Practise listening, for example, on an exposed water pipe
with a tap. Learn to distinguish the sound of ows of different
strength.
z First listen to what it sounds like when the water tap is closed
by placing the probe tip on the water pipe and measuring as
explained in Section 4.
z Then listen to the noise when the water tap is open. Take your
measurement at the same spot as before.
z Compare the two noises.
Another readily available practice object is a radiator with adjustable thermostat (difference between closed/open thermostat).
Page 15

7
3 Useful information about the device
3.5.1 Adjusting the volume
The missing segment in the volume display indicates the selected
volume.
z loud
z quiet
Changing the volume
Action What happens?
Hold down Noise gets louder
OR
Hold down Noise gets quieter
Release key Selected volume will be saved
The volume can also be changed during a measurement.
Page 16

8
3 Useful information about the device
3.5.2 Automatic hearing protection
The device features automatic hearing protection. If the noise
picked up exceeds a certain limit, it will be switched off to protect
the user.
CAUTION!
Correct recognition of the limit for the automatic
hearing protection function is only guaranteed if
SEWERIN's F5, K3 or S4 headphones are used.
The limit for activation of automatic hearing protection is set in
the normal settings under PRO. The automatic hearing protection
function can be disabled.
How automatic hearing protection works
z You measure.
z The current minimum sound level of the measurement exceeds
the dened limit.
z The noise is switched off. The loudspeaker symbol will appear
crossed out in the display.
How to continue listening
z Continue without stopping the measurement. Once the mini-
mum sound level falls below the limit in the course of the measurement, the noise will become audible again.
OR
z Stop the measurement. Reduce the volume.
Page 17

9
3 Useful information about the device
3.5.3 Switching off the noise
As soon as you put on the headphones, you will hear continuous
noise. This can be switched off between two measurements to
protect your hearing.
Switching noise off/on
Action What happens? / Why? Information
in display
1.
Press
z Noise will be switched off
z Loudspeaker symbol will
appear
2.
Press
z Noise audible again
z Loudspeaker symbol
hidden
Note:
The loudspeaker key also starts and stops measurements. This means that if you do not wish to
hear noise during a measurement, you will have to
remove the headphones.
3.6 Automatic shut down
The Stethophon 04 switches off automatically
z if there is insufcient battery power.
(BAT will appear briey in the display.)
In some cases this may also happen immediately after switch-
ing the device on! Replace/recharge the batteries (see Section 6.3).
z if the device has not been used for 10 mins (no key pressed)
or there has been no change in the display. (APF will appear
briey in the display.)
The automatic shut down function does not work when a micro-
phone is plugged in.
Page 18

10
3 Useful information about the device
3.7 Illumination of display
The device display automatically illuminates when any key is
pressed (stays lit for 20 s).
Note:
The automatic display illumination function can be
locked (see Section 5.2).
Page 19

11
4 Measuring
4 Measuring
4.1 How to switch the device on (measuring mode)
Switching the device on (measuring mode)
Action What happens? / Why? Information
in display
1.
Press
approx. 2 s
z The device switches on
2. Wait z internal power supply veri-
cation: disposable or re-
chargeable battery
3. z Battery symbol appears
z Device ready to start meas-
uring
4.2 How to measure
The device is switched on (see Section 4.1).
z Establish a radio/electric connection between the headphones
and device.
Wireless headphones
− Press the ON button on the headphones.
The green LED on the headphones will illuminate. The radio
connection will be established automatically.
Headphones without radio module
− Plug the cable of the headphones into the headphone
socket.
z Place the headphones on your head.
CAUTION!
Wearing headphones impairs your perception of
ambient noise. Pay extra attention therefore when
in dangerous surroundings (e. g. trafc).
Page 20

12
4 Measuring
Note:
When using the wireless headphones please ensure
that you do not move too far away from the device
and that you stay within the radio range.
Measuring
Action What happens? / Why? Information
in display
1.
Press
z Device is preparing
for measurement
z Noise switched off
2. Place probe tip on
object of examina-
tion (see note below)
3.
Press
z The measurement
starts
z Current minimum
sound level counts
down
z Noise switches on
4. Wait until the
measurement rests
at a constant value
5.
Press
z Measurement com-
plete
z Measurement result
in example on right:
minimum sound lev-
el = 361
z Noise switched off
Page 21
13
4 Measuring
Please note the following when measuring:
z Ensure that there is rm contact between the device and the
object of examination. However, do not exert any pressure on
the probe tip.
z Always measure until you have a clear impression of the meas-
urement location.
4.2.1 What you need to know about the noise picked up
If the device is switched on, you will hear noise through the head-
phones. If a measurement is not underway (e. g. when carrying the
device around whilst it is switched on) irregular interference noise
will dominate. If the probe tip is placed on an object of examination, a steady ambient noise will immediately become audible. If
you measure close to a leak, the sound of the noise will still
be steady, but it will be much louder and clearer than at an
intact measuring point.
To ensure reliability when analysing noise, you may have to practise listening (see Section 3.3).
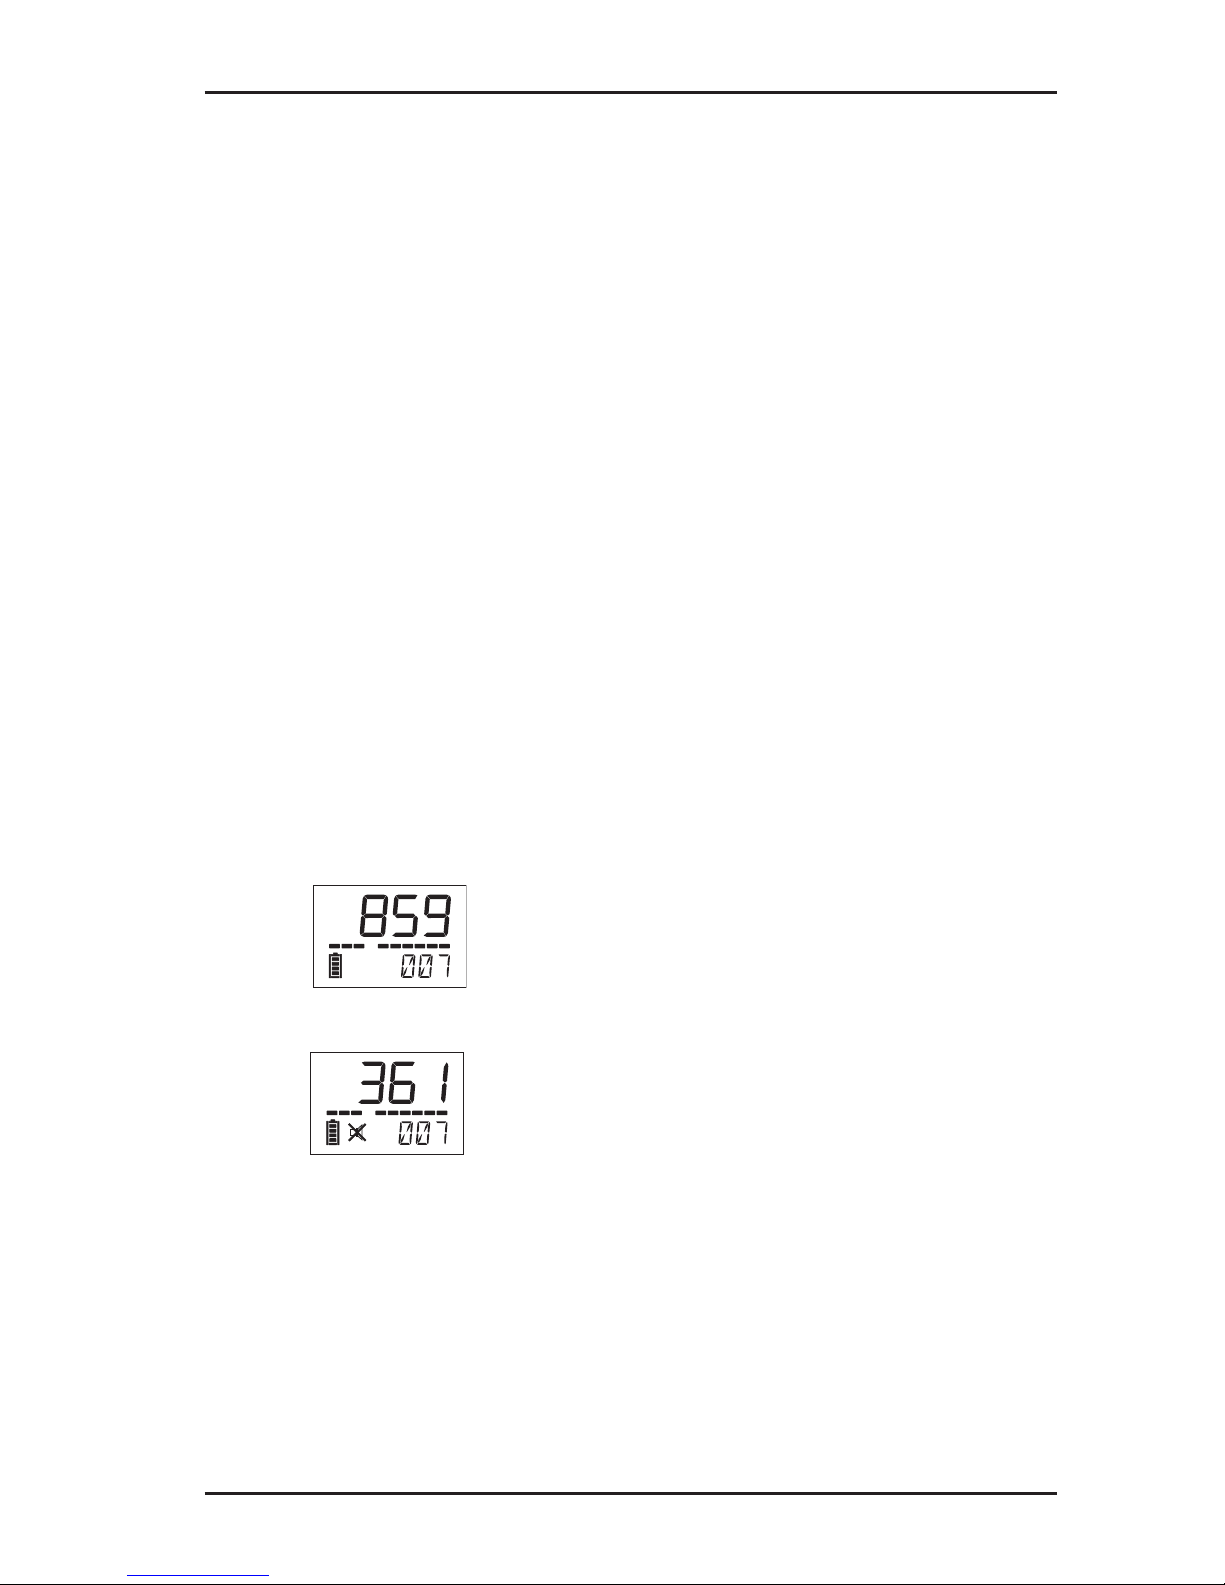
4.2.2 What you need to know about the measured value
displayed
The measured value shown in the display during a measurement (here: 859) indicates the
current minimum value of the noise intensity.
Values above the minimum value will not be
displayed.
When the measurement is complete the device
will show the minimum value over the entire
measurement (here: 361).
The calculated minimum sound level is a relative value, which
only becomes meaningful when it is compared with measured
values from other measuring points.
The current measured value is always shown with the minimum
value of the previous measurement (here: 007) to help you com-
pare two successive measurements.
Page 22

14
4 Measuring
4.3 How to inuence the quality of the measurement result
Various factors can affect the quality of a measurement.
z If possible only measure when the amount and intensity of in-
terference noise (e. g. open water pipes, vibrating machines,
talking) is minimal.
z Check and see if selecting another lter level delivers a
clearer result (see Section 4.3.1).
z Hold the device still during the measurement. Otherwise the
measurement values will be distorted.
If necessary use an external microphone which does not have
to be held steady (see Section 4.3.2) or extend the probe tip
to allow easier access to the object of examination (see Section 4.3.3).
z Never measure just once.
Firstly familiarise yourself with the acoustic environment by
conducting several test measurements.
Repeat the actual measurement at various points around a
suspected leak to obtain an informative series of measure-
ments.
4.3.1 Changing the lter level
The device can be operated with eight different lter levels. The
selected lter level affects individual perception of the noise.
Note:
The lter level cannot be changed if the lter key is
locked (see Section 5.2).
Page 23

15
4 Measuring
Each lter level accentuates certain specic noise elements.
Suitability of lter levels
Filter
level
Frequen-cyNoise Select for
1 low mufed z Large pipe diameters
z Plastic piping
z Floors
.
.
.
.
.
.
z Small pipe diameters
z Metal pipes8 high clear
The lter levels also allow frequency ranges of different widths
to pass.
Width of frequency range in the individual lter levels
Filter
level
Low < Frequency > High
1
2
3
4
5
6
7
8
Note:
The lter level inuences the device's internal calculation of the minimum sound level. It is therefore
important only to compare measurement values that
have been calculated at the same lter level.
Page 24

16
4 Measuring
Changing the lter level
Action What happens? / Why? Information
in display
1.
Press
z Filter symbol appears
z Current lter level ashes
z Instead of the volume the
frequency range is displayed
2.
Press
z Filter level increases
OR
z Filter level decreases
Press
3.
Press
z New lter level is applied
z Filter symbol is hidden
z Volume visible again
The last lter level used is saved when the device is switched off
or when the batteries are replaced.
Page 25

17
4 Measuring
4.3.2 Using an external microphone
The Stethophon 04 can record the structure-borne noise of the
object of examination either using the device's internal or an ex-
ternal microphone.
Using an external microphone is preferable if it makes examina-
tion of the object easier (e. g. setting the microphone up on surfaces). Optional accessories for the device include, for example,
the external EM 30 and EM 35 Piezo microphones.
Points to note when working with an external microphone
z The external microphone can be plugged into the microphone
socket when the device is both switched on and off.
z Once the microphone is connected to the device the status
message MIC will appear in the display.
z The device can only be switched off if the microphone is
rst unplugged from the microphone socket.
z Only lter levels 1-5 are available.
z The device's automatic shut down function is disabled. Re-
member to switch the device off yourself when not in use for a
long period to save the batteries.
Page 26

18
4 Measuring
4.3.3 Extending the probe tip
The probe tip of the Stethophon 04 can be extended if the object
of examination is too far away or awkward to reach.
One or more probe tip extensions can be screwed between the
device and the probe tip.
Always follow the safety advice in Section 2 when working with
an extended probe tip.
When measuring with an extended probe tip:
Do not hold the device by the housing, but
rather by the probe tip close to the housing.
Page 27

19
5 Normal Settings
5 Normal settings
5.1 How to use the normal settings
Opening the normal settings
Action What happens? Information
in display
1. Condition: Device must be switched off
2.
Hold down
whilst pressing
z The device switches
on
z Software version is
displayed briey
3. Wait a moment z First menu item in
normal settings appears
Accessing the menu items and changing values
Action What happens?
Press briey Next menu item appears
Value increases
Values decreases
Page 28

20
5 Normal Settings
Exiting normal settings
Action What happens? Information
in display
Exit
1. Select END from
the menu
2. Set value to 1 z Changed settings will
be saved
OR
Leave value at 0 z Changed settings will
not be saved
3.
Press
z Device switches to
measuring mode
Cancel
1. Select any menu
item, but not END
2.
Hold down
z Device switches off
Page 29

21
5 Normal Settings
5.2 What values can be adjusted?
Menu
item
Adjusted
setting
Signicance/function
LDS Listening 0 Listening functions according to the
power switch principle:
1. Press >
Listening switched on,
loudspeaker symbol hidden
2. Press again >
Listening switched off,
loudspeaker symbol visible
1 Listening functions according to the
principle of the button:
– Listening switched on as long as
is held down
PRO Limit for
activation
of hearing
protection
0 Noise is switched off at average
volume
(good hearing protection)
1 Noise is switched off at high volume
(poor hearing protection)
2 Hearing protection function
switched off (no hearing protection)
VOL Noise when
hearing
protection
activates
0 Noise is switched off
1 Noise gets quieter
LOC Filter key 0 Filter key released > lter level can
be changed
1 Filter key locked > lter level
cannot be changed
Page 30

22
5 Normal Settings
Menu
item
Adjusted
setting
Signicance/function
LED Display
illumination
0 Display illumination switched off
(energy saving mode)
1 Display always lights up when a
key is pressed
RES Reset 0 Menu items are not reset when you
exit normal settings
1 All menu items are reset when you
exit normal settings
END Exit normal
settings
0 Set values are not applied
1 Set values are applied
The set values (except END) are permanently saved until the
next change. They apply both when the device is switched back
on again and following battery replacement.
Page 31

23
6 Maintenance and servicing
6 Maintenance and servicing
6.1 Overview
Maintenance and servicing of the Stethophon 04 comprises the
following points:
Maintenance and servicing
What? How? By whom? How often?
Simple
function test
See
Section 6.2
User If suspected that the
device is not functioning properly
Servicing Wipe
down with
damp cloth
User As required
Replacing
disposable/
rechargeable
batteries
See
Section 6.3
User As required
6.2 Simple function test (troubleshooting)
If you cannot pick up any noise through the headphones, rst
check the following:
z Has the noise been switched off accidentally (loudspeaker
symbol visible)?
z Have the headphones been plugged into the right socket?
Perform the following function test as soon as you suspect that
the device is not working properly:
z Open the normal settings and reset the device (RES = 1, then
END = 1).
z When the device is in measuring mode, apply a vibration to
the probe tip, for example by rubbing it. If in doubt, increase
the volume.
If you do not hear any noise, the device is probably faulty. Send
it to the manufacturer or an authorised company for repair.
Page 32

24
6 Maintenance and servicing
6.3 Replacing disposable/rechargeable batteries
The battery compartment is locked with a quick-release fastener
(1/4 turn). It can be opened using a tool (e. g. coin, screwdriver).
CAUTION!
The polarity of the two disposable/rechargeable
batteries in the battery compartment points in the
same direction.
Page 33

25
7 Appendix
7 Appendix
7.1 Technical data
Protection rating IP54
Power supply 2 AA-size alkaline batteries
or
2 NiMh rechargeable batteries
(each min. 2000 mAh)
Operating time: min. 8 h
Weight: approx. 290 g (0.64 lbs.)
Dimensions: 50 × 228 × 30 mm (W × H × D)
(1.96 × 8.97 × 1.18 in.)
Operating
temperature:
-10 °C – +50 °C
(14 °F – 122 °F)
Storage
temperature:
-25 °C – +70 °C
(-13 °F – 158 °F)
SDR radio module: z Transmitting power: ≤ 10 dBm
z Connection time: typically 10 ms
z Frequency band: 2.408 – 2.476 Ghz
z Marking:
FCC ID WSP-EZ1300102
IC 7994A-EZ1300102
Pressure: 950 – 1100 hPa (13.78 psi. – 15.95 psi.)
Permissible relative
humidity:
15 % – 90 % non-condensing
Page 34

26
7 Appendix
7.2 Accessories
Piezo microphone EM 35
Art. no.: EM35-10100
z particularly for use indoors
z Flexible cable 1.3 m
z Phone jack 3.5 mm
z M6 external thread for attach-
ing adapters
Piezo microphone EM 30
Art. no.: EM30-10400
z particularly for use outdoors
z Tension resistant cable 1.3 m
z Phone jack 6.3 mm
z M10 internal thread for attach-
ing adapters
Other accessories are available for the device. Please contact
our sales department for further information.
Page 35

27
7 Appendix
7.3 EC Declaration of Conformity
Hermann Sewerin GmbH hereby declares that the Stethophon® 04
fulls the requirements of the following guideline:
z 2004/108/EC
The complete declaration of conformity can be found online.
Page 36

28
7 Appendix
7.4 FCC Compliance Statements
The device has been tested and found to comply with the limits
for a Class A digital device, pursuant to part 15 of the FCC Rules.
These limits are designed to provide reasonable protection against
harmful interference when the device is operated in a commercial
environment. The device generates, uses, and can radiate radio
frequency energy and, if not installed and used in accordance with
the instruction manual, may cause harmful interference to radio
communications. Operation of this device in a residential area is
likely to cause harmful interference in which case the user will be
required to correct the interference at his own expense.
Page 37

29
7 Appendix
7.5 Advice on disposal
The European Waste Catalogue (EWC) governs the disposal of
appliances and accessories.
Description of waste Allocated EWC waste code
Device 16 02 13
Disposable battery,
rechargeable battery
16 06 05
End-of-life equipment
Used equipment can be returned to Hermann Sewerin GmbH. We
will arrange for the equipment to be disposed of appropriately by
certied specialist contractors free of charge.
Page 38

Hermann Sewerin GmbH
Robert-Bosch-Straße 3 · 33334 Gütersloh · Germany
Telefon +49 5241 934-0 · Telefax +49 5241 934-444
www.sewerin.com · info@sewerin.com
22.07.2013 a – 104854 – en
 Loading...