


BLUE LASER: SBL0101MP
- User’s Manual

TABLE OF CONTENTS
Safety Information ….…………………………………………………………………….2
Features …………………………………………………………………………………...3
Accessories………………………………………………………………………………..4
Front Panel Description ………………………………………………………………….5
Remote Control …………………………………………………………………………...6
Installation …………………………………………………………………………………8
Unit Removal ……………………………………………………………………………..11
Wire Connection …………………………………………………………………………12
Disc Notes ………………………………………………………………………………..13
Disc Operation …………………………………………………………………………...14
Basic Operations …………………………………………………………………...……15
DVD/VCD/CD/MP3 Function .................................................................................17
Radio Function …………………………………………………………………………..19
Setup ………………………………………………………………………………..……21
Specifications ……………………………………………………………………………24
Trouble Shooting ………………………………………………………………………..25
Warranty ………………………………………………………………………………….26
- 1 -

SAFETY INFORMATION
Please read the manual carefully before operating this unit and keep it for
future reference.
CAUTION: This unit is a class 1 laser product. To prevent direct exposure to the
laser system, do not open the unit. The laser beam may hurt your eyes.
If the unit requires adjustments, contact an authorized service centre.
USE THIS PRODUCT SAFELY
Be sure you fully understand the following safety information:
When driving
Keep the unit at an appropriate sound level. Driving with the sound at a level
preventing you from hearing sounds outside and around the car may cause an
accident.
When cleaning
Do not expose the product to water or excessive moisture. This could cause short
circuit, fire or other severe damage.
When parked
Parking in direct sunlight can result in very high temperature levels inside your car.
Let the interior and unit cool down before switching the unit on.
NOTE:
FUSE REPLACEMENT – WARNING!
ٛ
Do not use and store the player in dusty, hot or humid environment.
Never replace any fuse with one of a higher value than the fuse supplied
with your unit. Using a higher current rated fuse may cause damage to
your unit and/or electrical wiring.
- 2 -

FEATURES
- ISO/DIN
- DVD/VCD/CD/CD-R/CD-RW/MP3 Compatible
- 3.6" Wide-Screen TFT/LCD Display
- High Brightness: 250 cd/m
- Colour, Contrast, Brightness, Tint controls
- Fully Motorized Drop Down Front Panel
- Motorized Viewing Angle Adjustment
- Last Angle Memory
- DVD Slot-in Mechanism
- Digital & Mechanical Anti-Shock with ESP Memory
- Built-In Dolby Digital Decoder
- Last Position DVD Memory
- OSD (On Screen Display)
- NTSC/PAL compatible
- Full Function Remote Control
- AM/FM PLL Synthesizer Tuner with Memory Presets
- RDS Function
- Auto Store Pre-set Scan
- Preset EQ (POP CLASS ROCK USER)
- Bass/Treble/Fader/Balance Controls
- Extending Amplifier Control
- Auto Antenna Control
- Telephone Mute Control
- Brake Reminder System
- Detachable Face
- Hi Power 55W x 4
- 4 RCA Audio Outputs
- 1 RCA Video Output
- 1 Set RCA Audio Video Input
- 1 RCA Rear View Camera Input
NOTE:
This user's manual is only for reference.
Modifying rights are reserved.
Specifications are subject to change without notice.
2
- 3 -
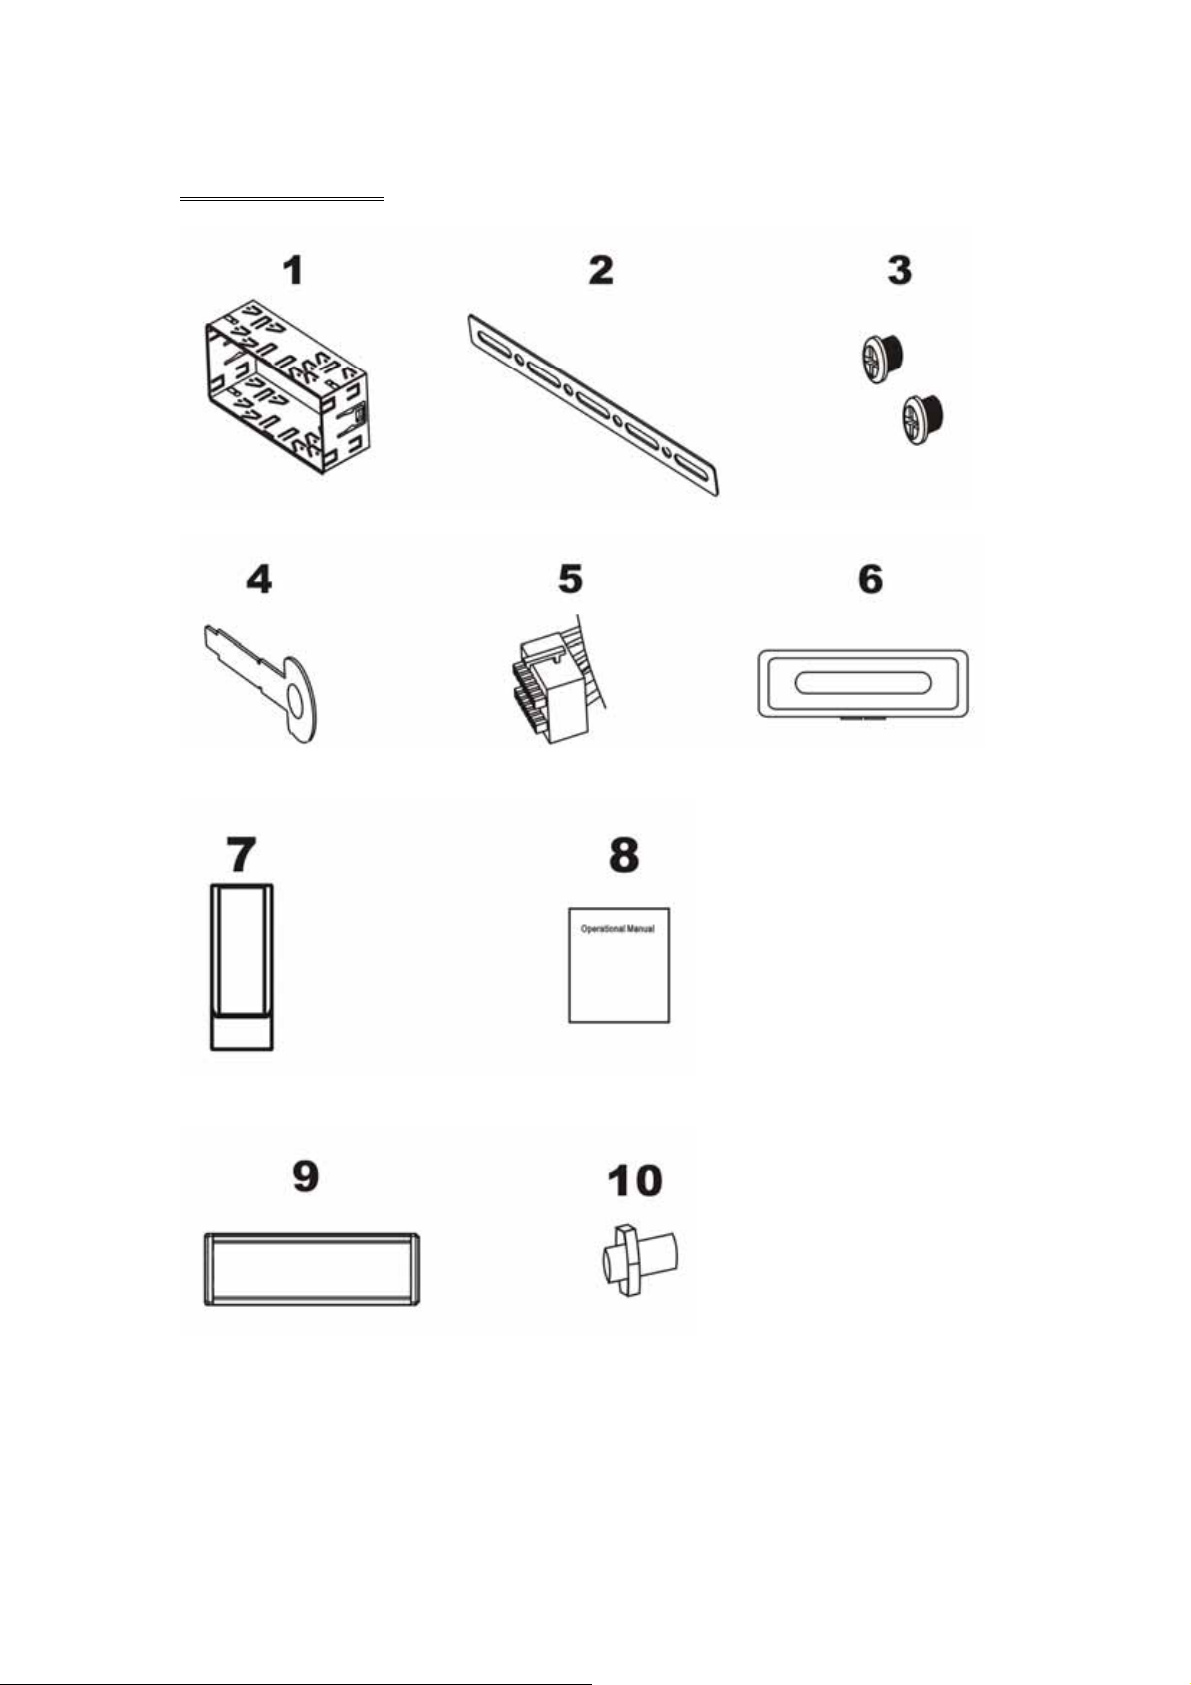
ACCESSORIES
Mounting Sleeve x 1 Backstrap x 1 5X5 Screws x 4
Keys x 2 Main Wire Harness x 1 Faceplate Case x 1
Remote Control x 1 Operational Manual + Warranty x 1
Trim Bezel x 1 Rear Mounting Bolt x 1
- 4 -
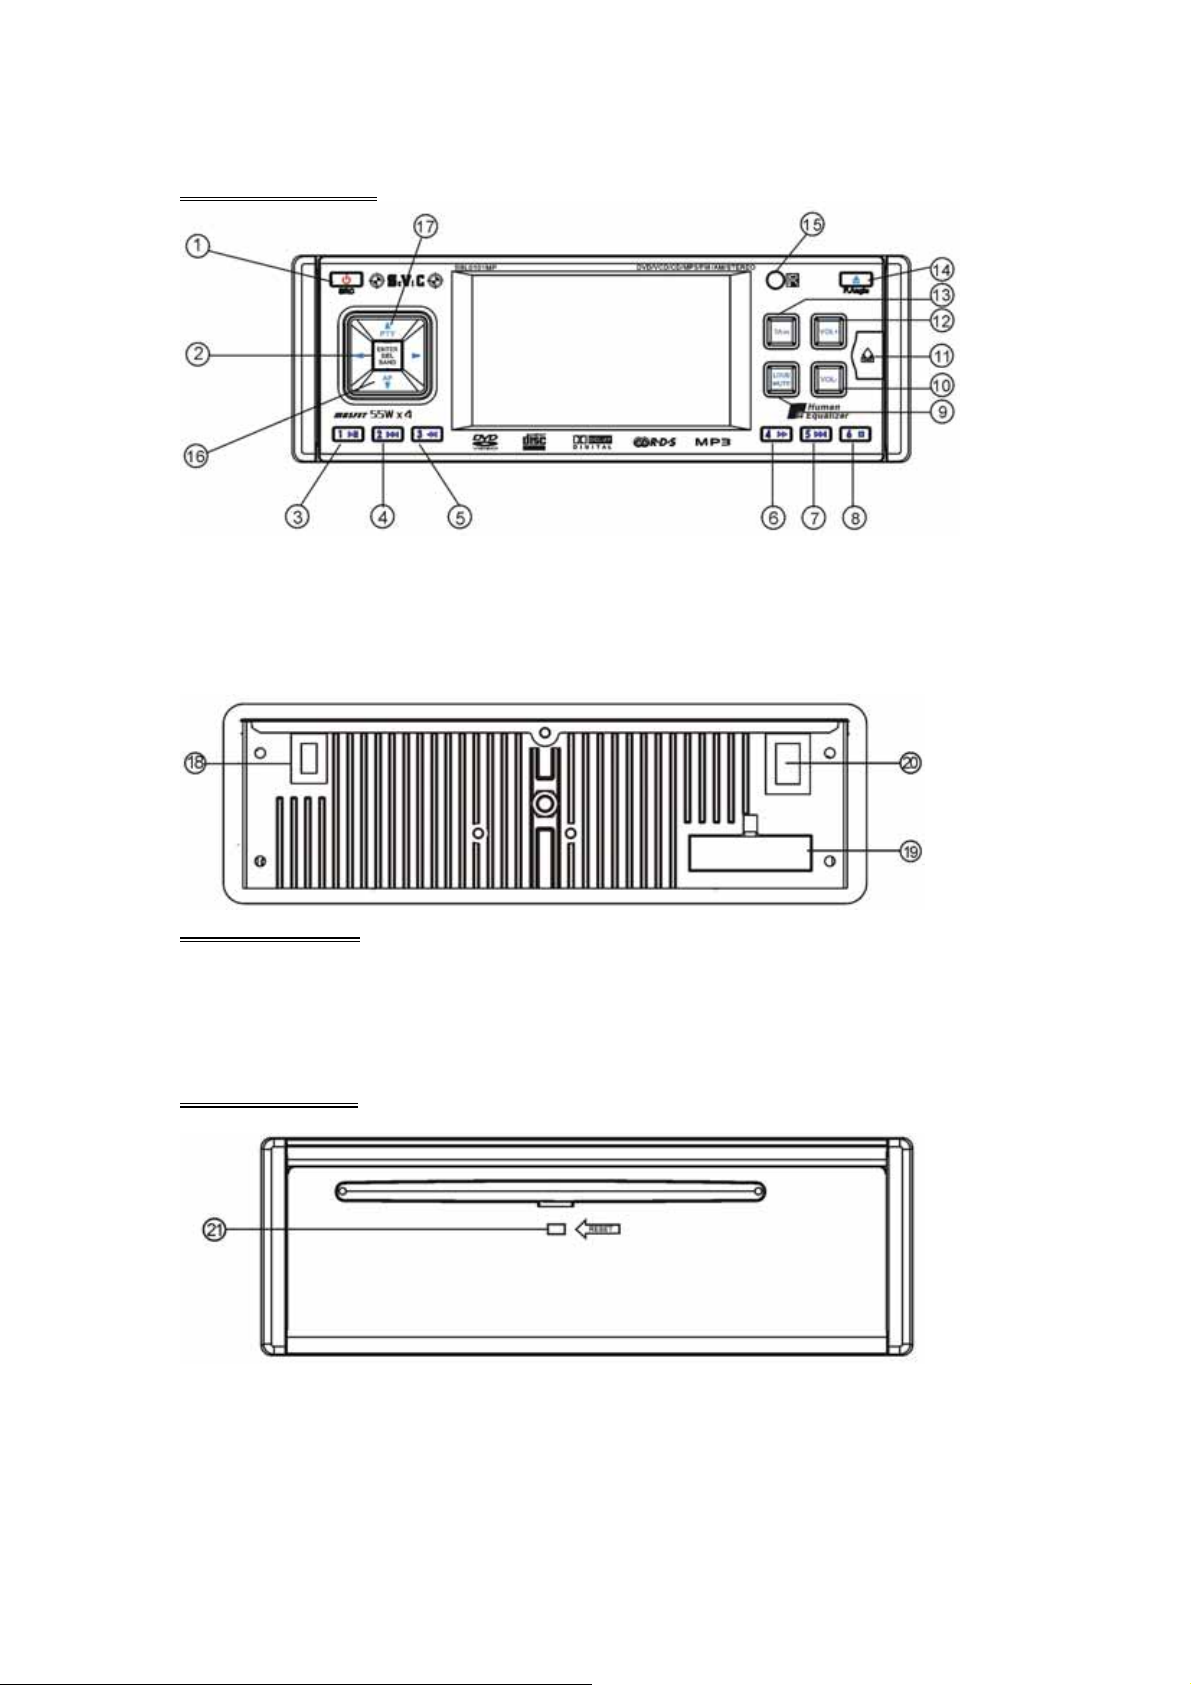
FRONT PANEL
1. POWER / SOURCE 7. NEXT 13. TA Announcement
2. ENTER / SELECT / BAND 8. STOP 14. EJECT / P.ANGLE
3. PLAY / PAUSE 9. LOUD / MUTE 15. REMOTE
4. PREVIOUS 10. VOLUME- 16. AF(Alternative Frequencies)
5. F.REW 11. REL 17. PTY(Program Type)
6. F.FWD 12. VOLUME+
REAR PANEL
18. RADIO ANTENNA INPUT 19. 16PIN SOCKET
20. VIDEO AUDIO OUTPUT & INPUT
BASE PANEL
21. RESET
- 5 -
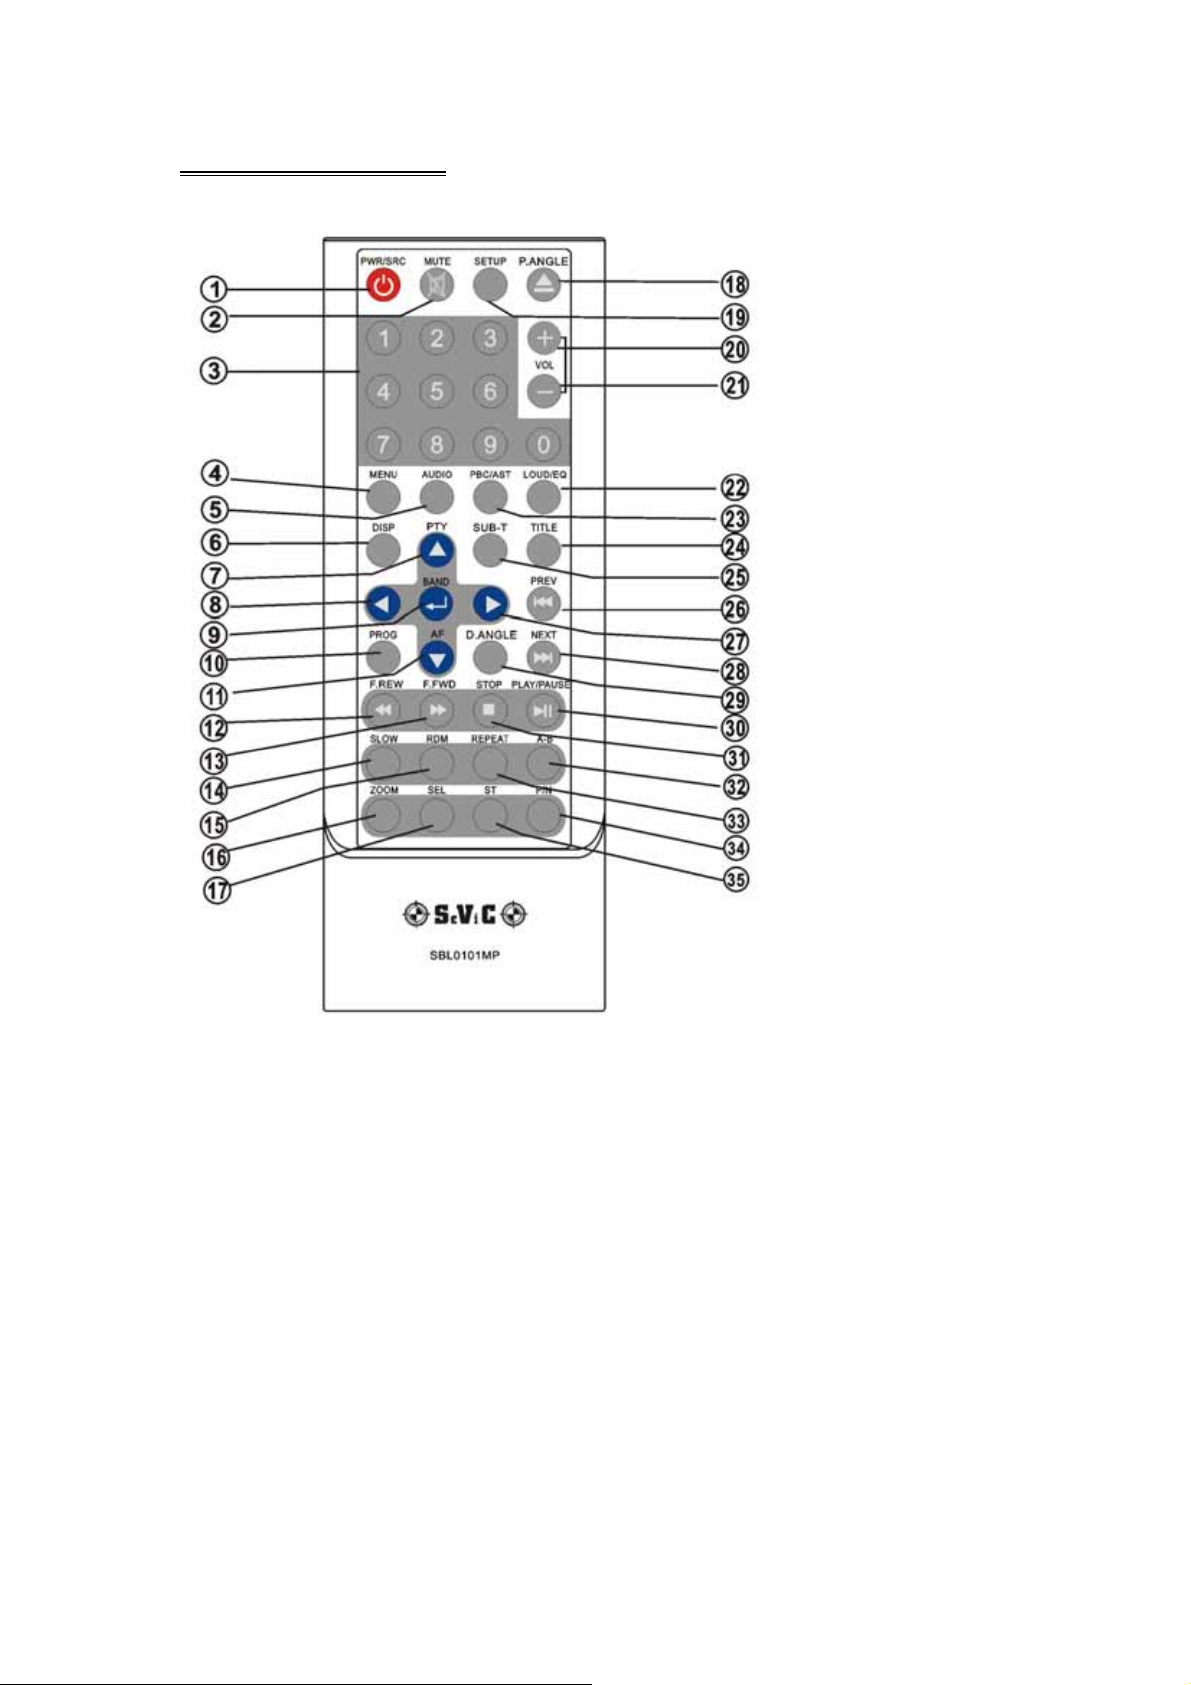
REMOTE CONTROL
1. POWER/SOURCE 13. F.FWD 25. SUBTITLE
2. MUTE 14. SLOW 26. PREVIOUS
3. NUMBER BUTTONS 15. RANDOM 27. RIGHT(Seek up)
4. MENU 16. ZOOM 28. NEXT
5. AUDIO 17. SELECT 29. D.ANGLE
6. DISPLAY 18. EJECT / P.ANGLE 30. PLAY / PAUSE
7. UP(Tune up) / PTY 19. SETUP 31. STOP
8. LEFT(Seek Down) 20. VOLUME+ 32. A-B
9. ENTER / BAND 21. VOLUME- 33. REPEAT
10. PROGRAM 22. LOUD / EQ 34. PAL / NTSC
11. DOWN(Tune Down) / AF 23. PBC / AST 35. STEREO
12. F.REW 24. TITLE
- 6 -
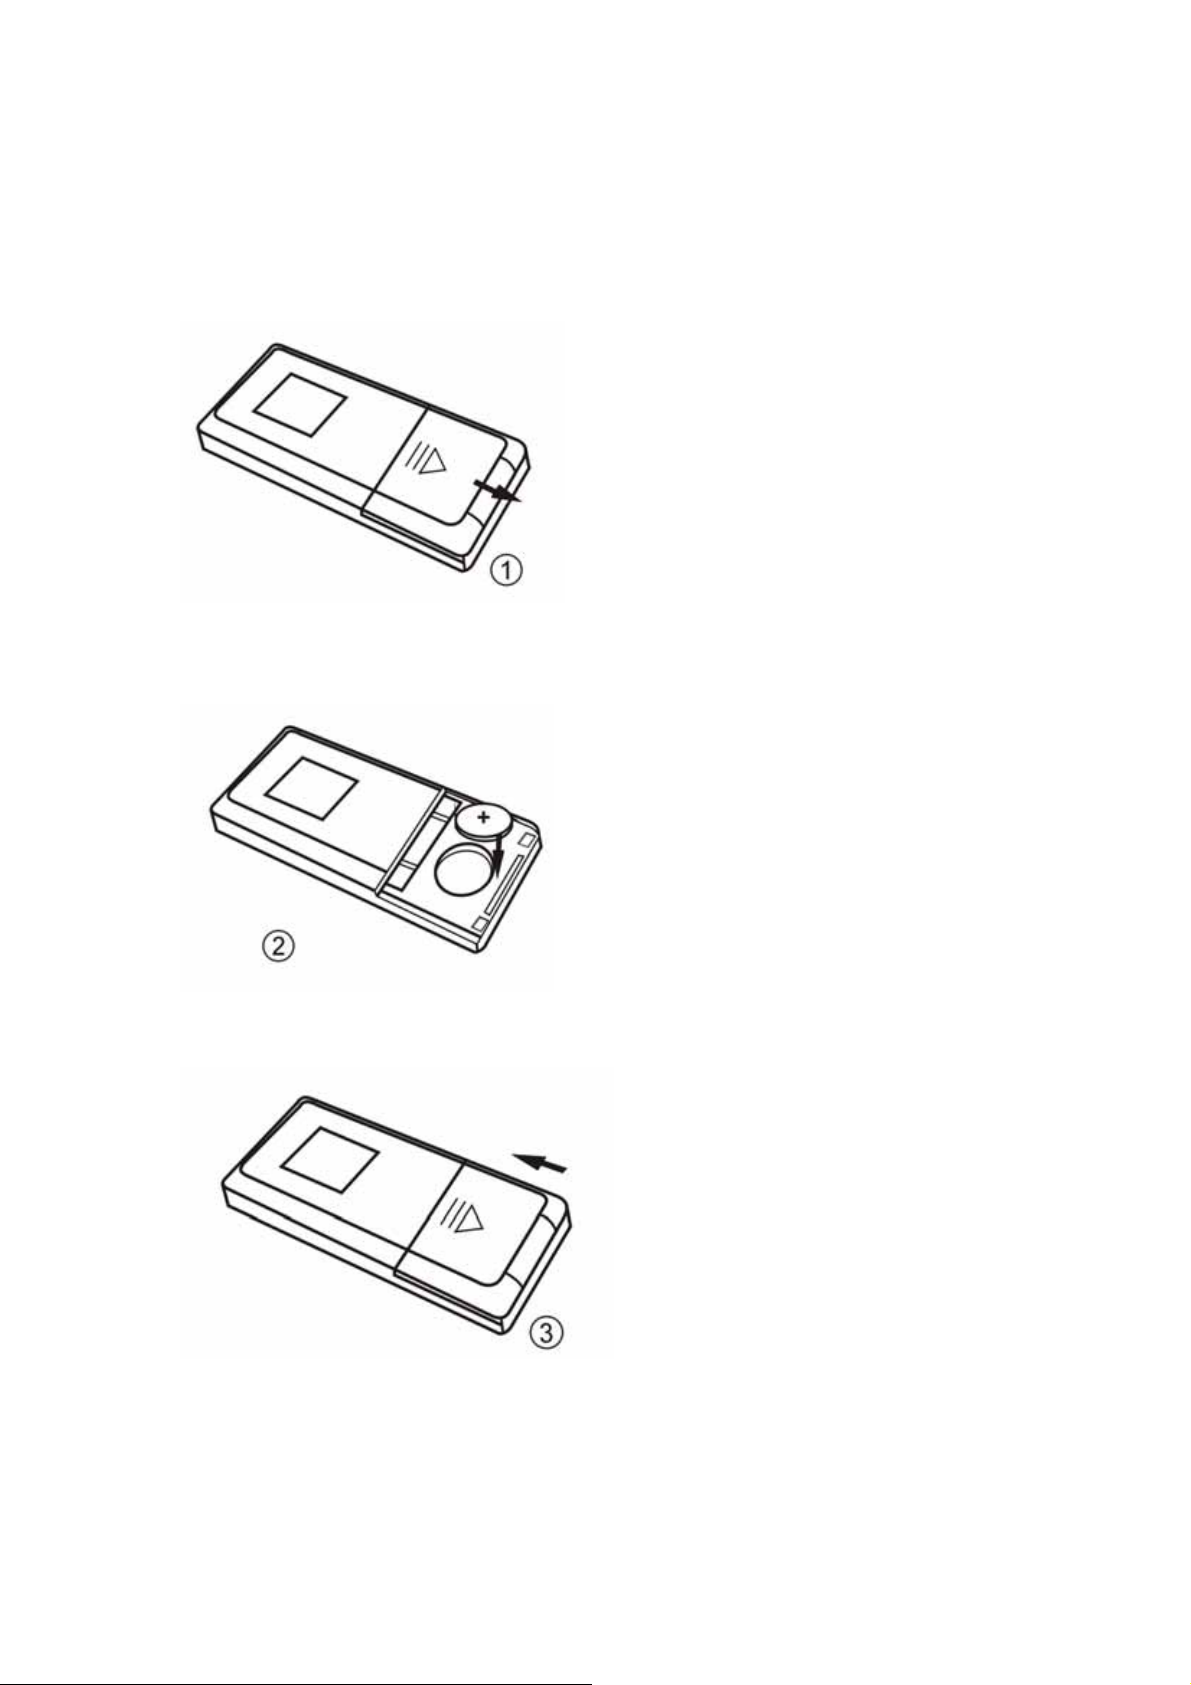
Replacing the batteries
f the remote control has no function or if the operating range is reduced, replace
the old battery with new one.
1. Remove the battery cover. Follow the arrow (1) slide the tab to the right
while pulling the cover away at the same time.
2. Place the new battery in the tray and slide the cover back into place.
3. Make sure the cover is locked into place.
- 7 -
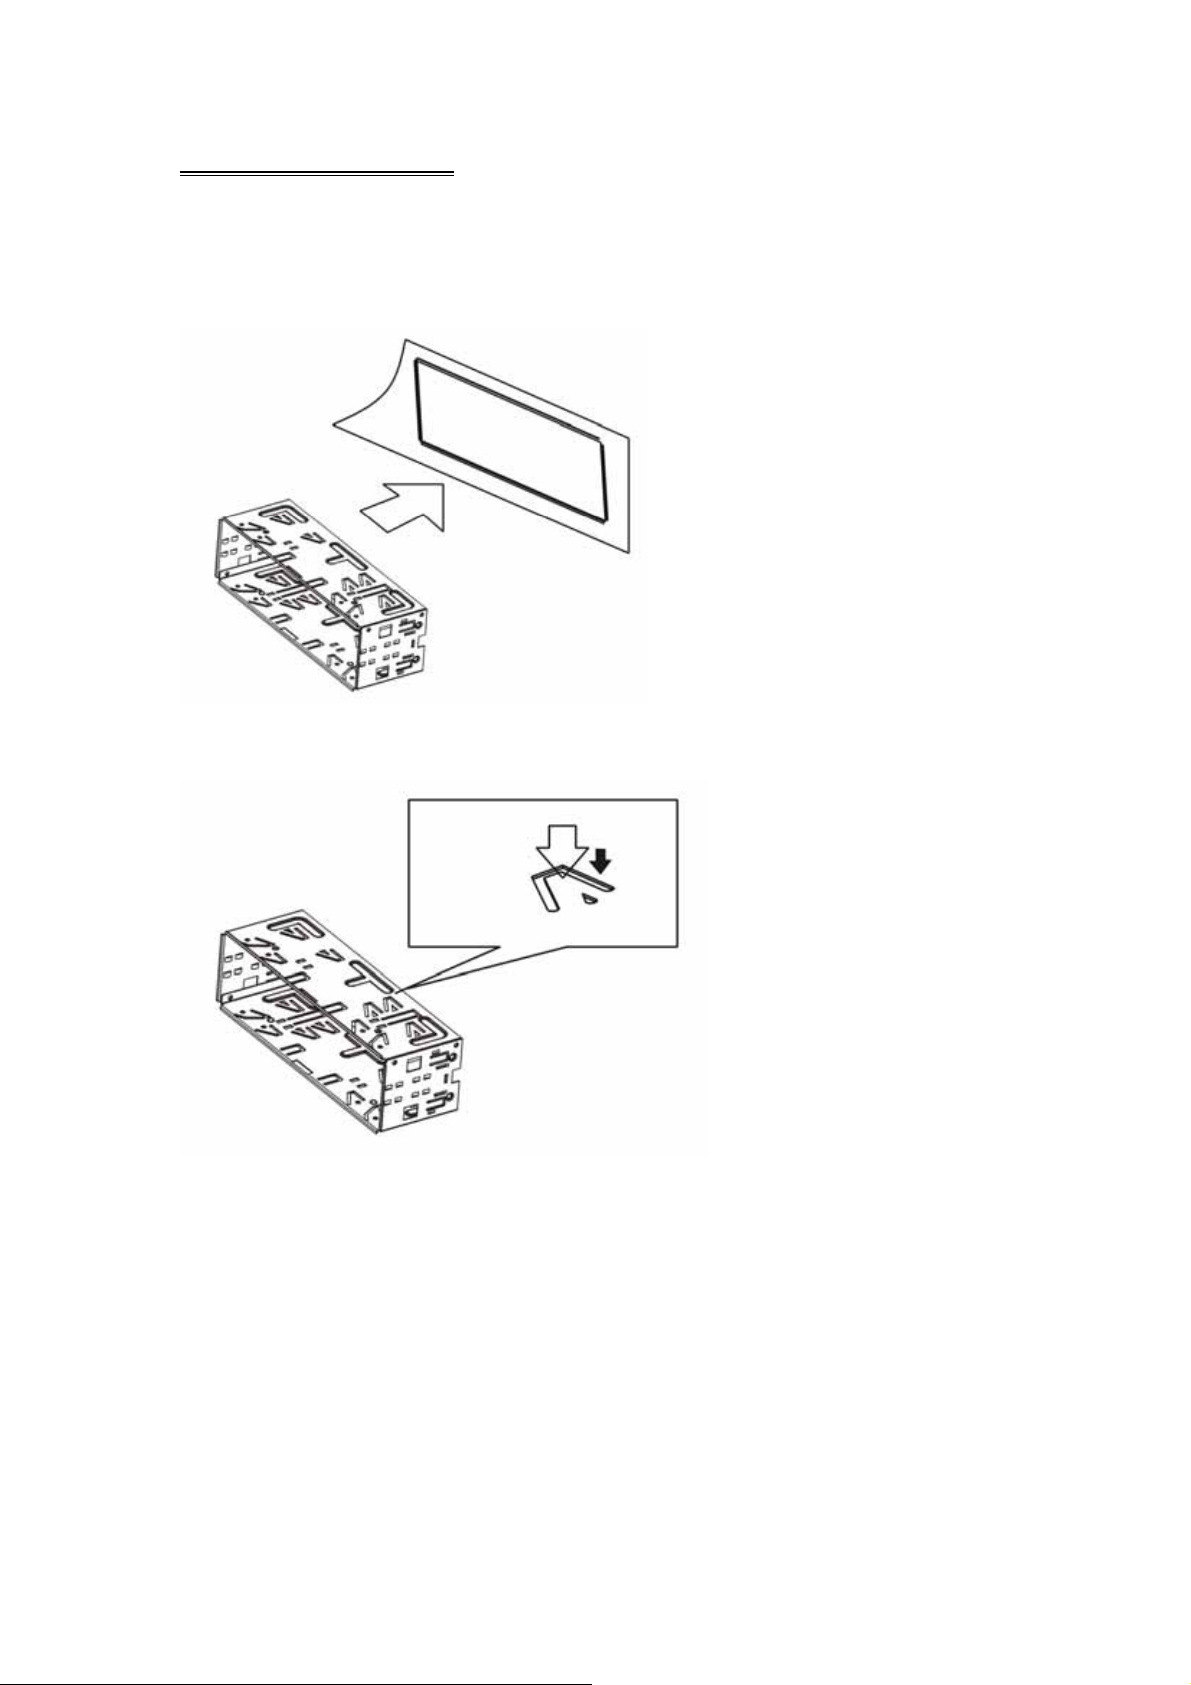
UNIT INSTALLATION
Installation Method 1: Din Front-Mount
Install the Mounting sleeve into the dashboard.
Bend as many claws outward for tight fit, to lock the sleeve into place.
- 8 -
Install the trim bezel to the unit. (Arched surface toward the bottom).
Use the Rear Mounting Bolt to support the unit.
- 9 -

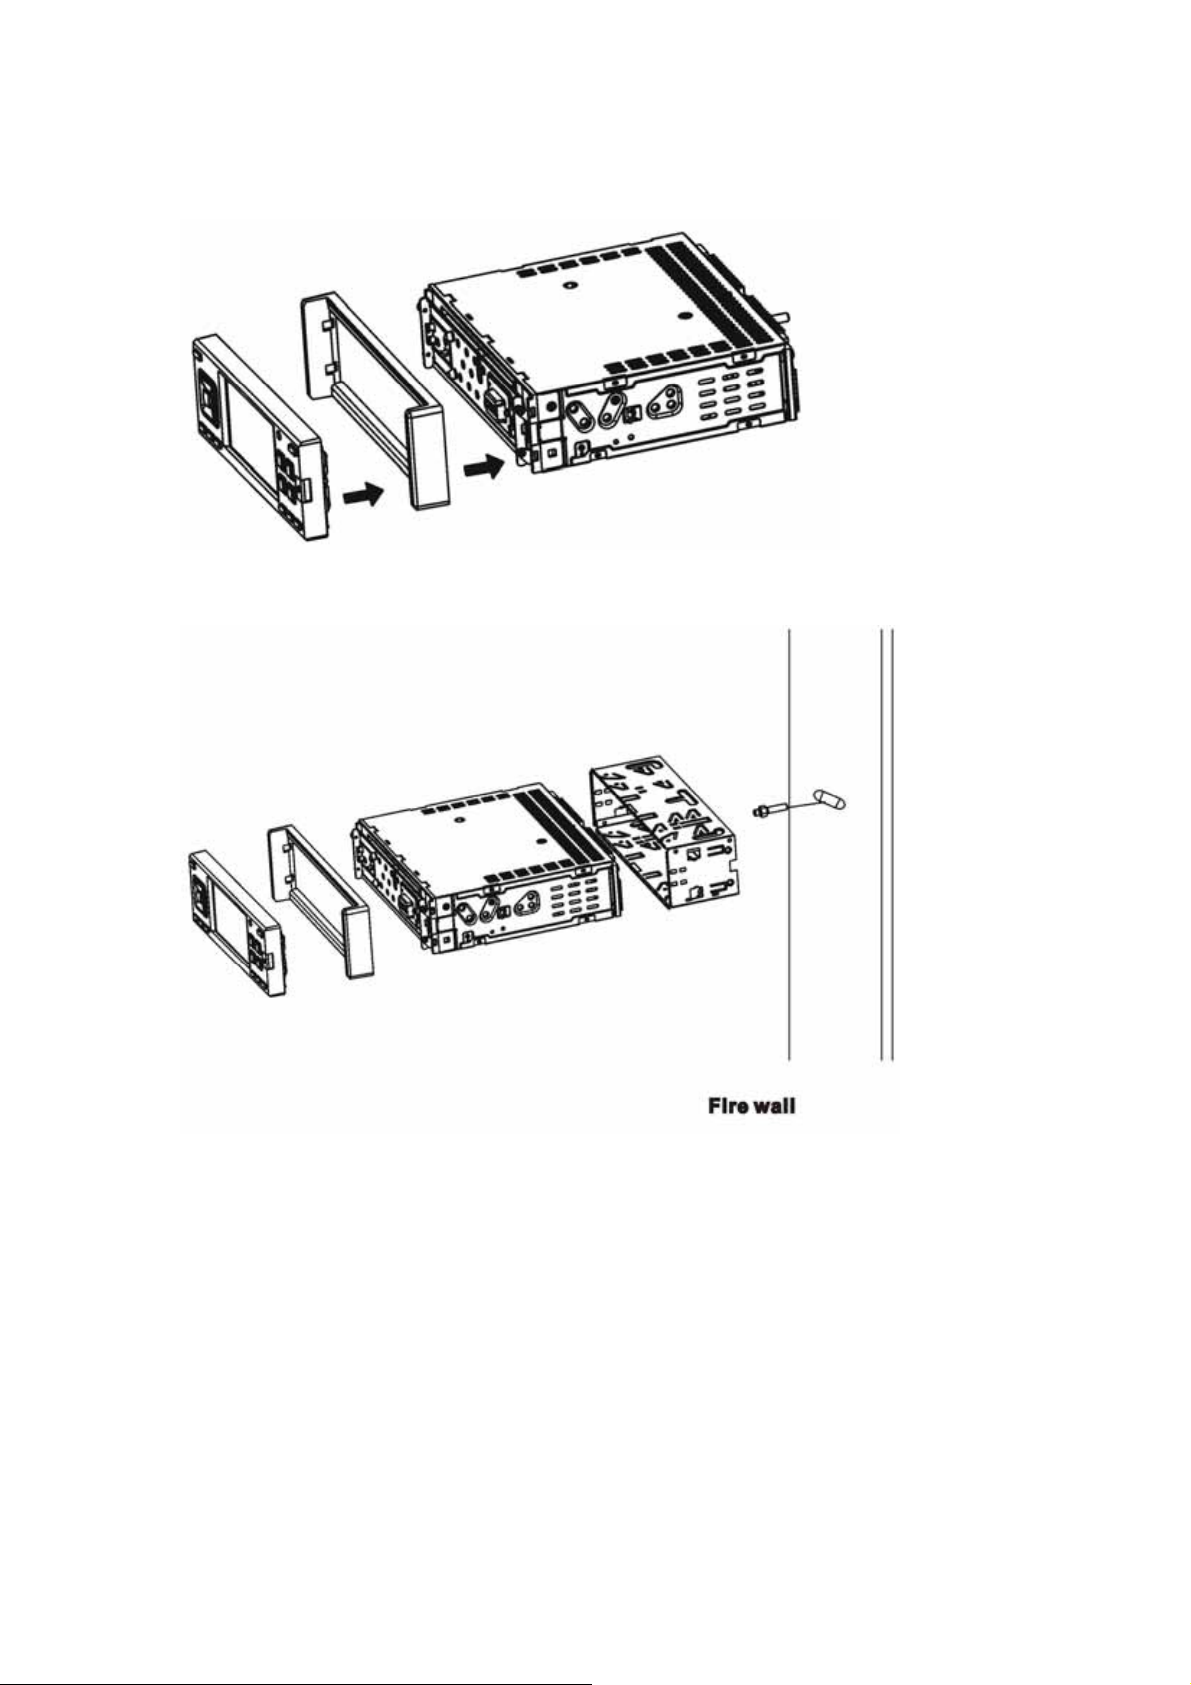
Installation Method 2:
Using the screw holes at the sides of the unit(ISO Mount ).
1. Remove the hooks on both sides.
2. Select a position where the screw holes of the mounting bracket supplied with the
car and the screw holes of the main unit become aligned, tighten the screws on each
side, and re-mount the brackets with the factory hardware in the original location.
NOTE:
1 and 10 are not used for installation method2.
- 10 -
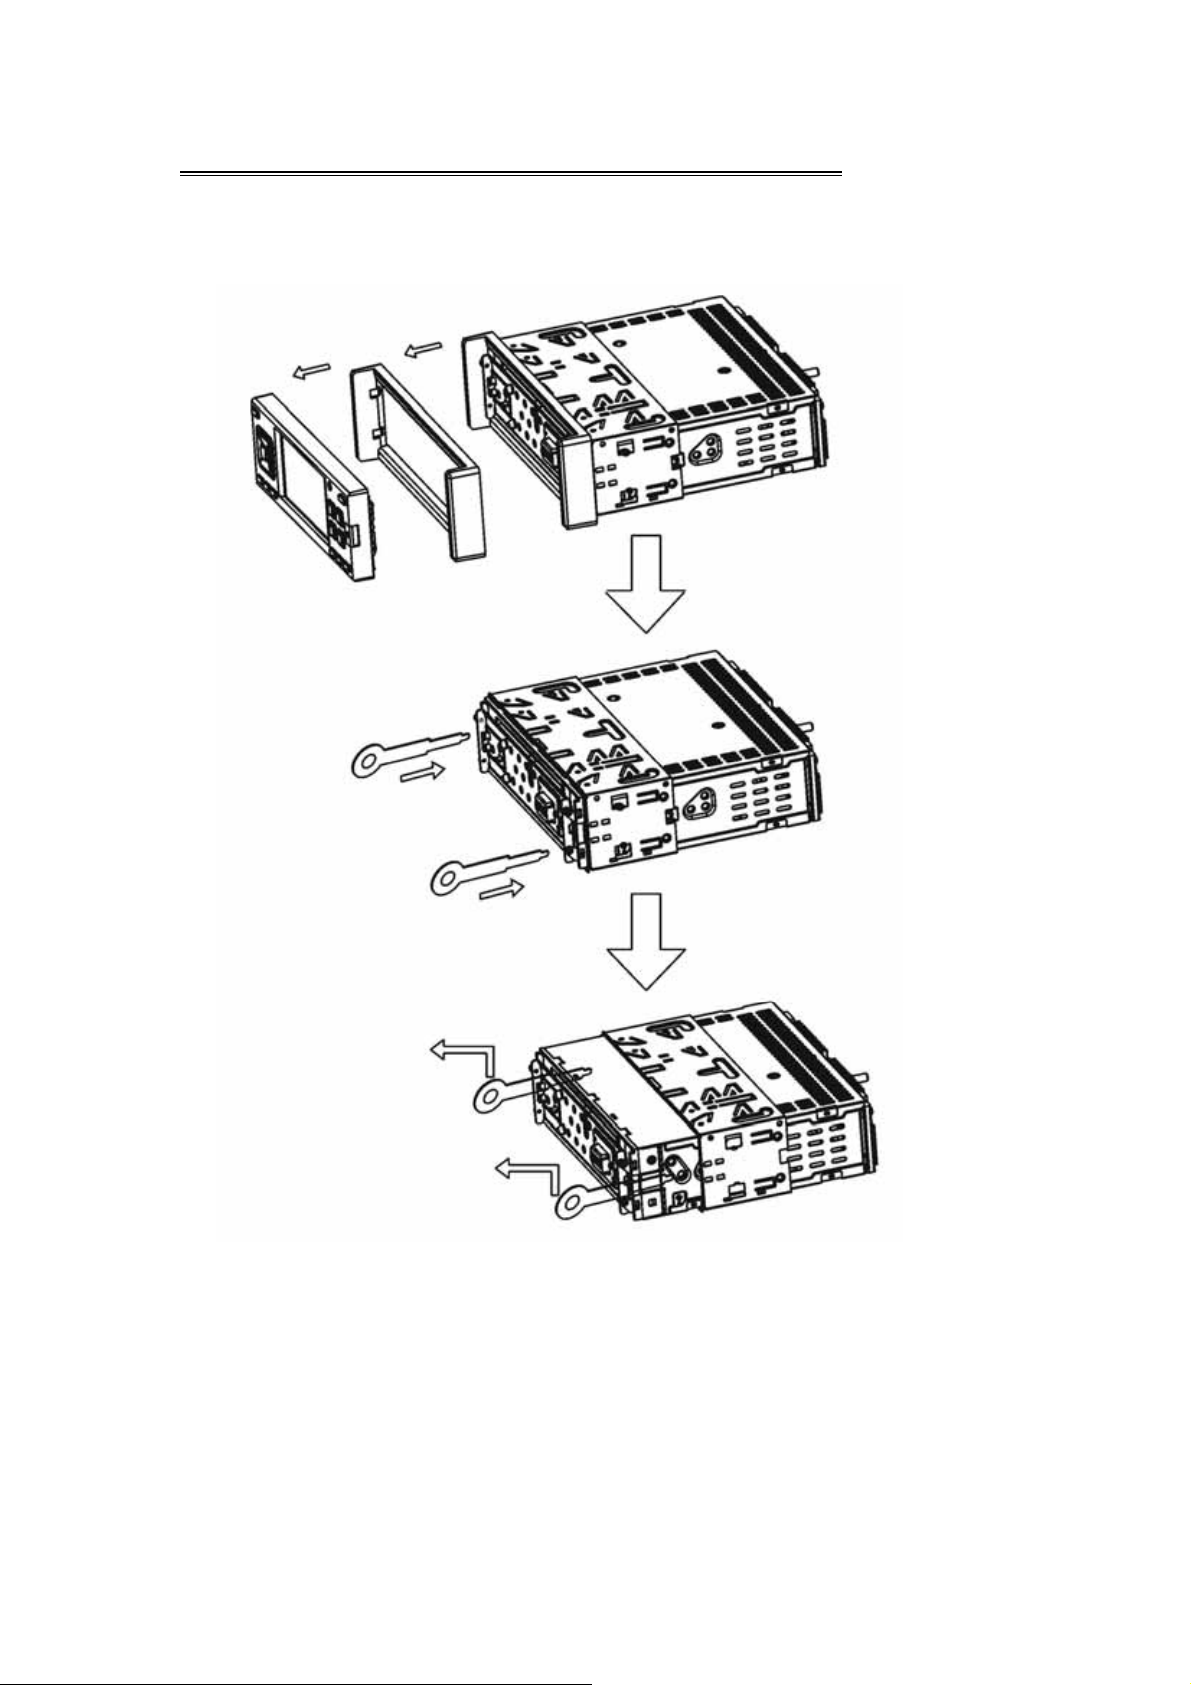
UNIT REMOVAL ( when installed using the sleeve)
1. Detach the front panel.
2. Insert the keys supplied with the unit on both sides ( as illustrated) as this will
release the internal locks so you can slide the unit out.
- 11 -
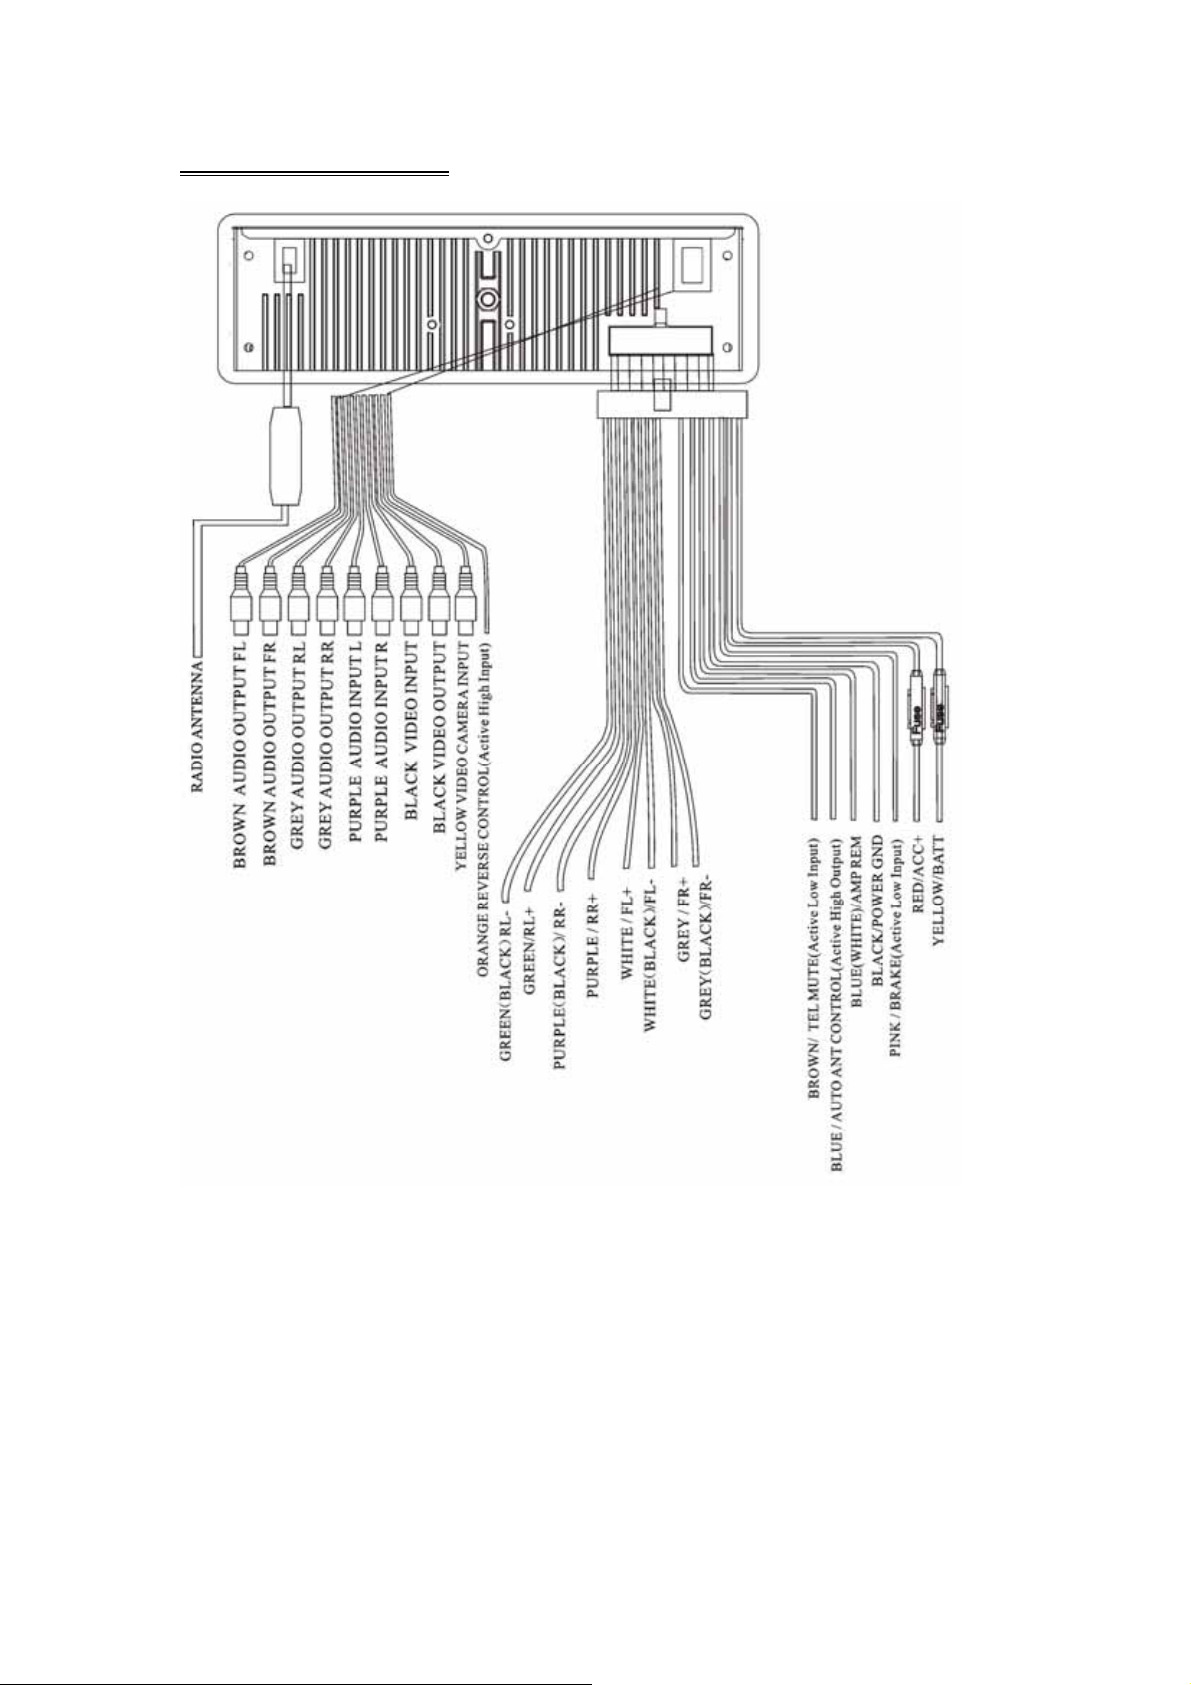
WIRE CONNECTION
- 12 -

DISC NOTES
■ Disc formats supported by this player
Handling and cleaning
• Dirty, dusty, scratched or warped discs may not play properly.
• Do not place stickers or make scratches on discs
• Do not warp discs.
• Store discs in their cases when not in use.
• Do not place discs in the following places:
1. Direct sunlight.
2. Dirty, dusty and damp areas.
3. High temperature places.
4. On the sets or dashboard.
Disc Cleaning
Use a dry soft cloth to wipe the surface. If the disc is quite dirty, use a soft cloth
slightly moist with isopropyl (rubbing) alcohol.
Never use solvent such as benzene, thinner or conventional record cleaners which
may mar the surface of the disc.
Note: A disc may become somewhat scratched to a point which will skip
excessively or not play at all in your player. Have the disc resurfaced
or polished to reduce the issue or replace the disc with a new one.
- 13 -

DISC OPERATION
Repairing New Discs with Rough Spots
A new disc may have rough edges on its inside and outside edges. If a disc with
rough edges is used, the proper setting will not be performed and the player will not
play the disc. Therefore, remove the rough edges in advance by using a ballpoint pen
or pencil. To remove the rough edges, press the side of the pen or pencil against the
inside and outside edges of the disc.
- 14 -

BASIC OPERATIONS
Power:
Press the POWER button to turn the unit ON; Press and hold the button to turn the
unit OFF.
Switching sources:
When the unit in turned ON, press the POWER button to toggle between the different
modes.
Mute:
Press the MUTE/LOUD button to switch off the sound; Press it again or any volume
key to resume to the previous volume level.
Loud:
Press and hold the MUTE/LOUD button to activate the loudness feature.
Volume Control:
Press VOL+ button to increase the sound level and VOL- to decrease the sound level.
EQ:
Press SEL button to enter the sound setup page;
In DVD or any AV mode, Press the SEL button twice to enter the monitor colour setup
menu.
Note: Select ‘Reset’ and press the ‘Left/Right’ direction button to restore the default
settings.
- 15 -

In the radio mode, press the SEL button to enter the tuner setup menu. This tuner
can be switched to work in different countries. Choose the area that works best for
you.
Note: Following areas can be chosen: EUROPE-ASIA -USA-JAPAN-OIRT
SEL:
Press and hold the SEL button to access the preset EQ settings or the user settings
to adjust the audio output to your preference.
If the unit ever needs to be reset, you can do so by removing the face plate to gain
access to the reset button. Press and hold this button to switch back to all the
original factory settings. Keep in mind this will erase all your preset radio stations
ٛ
and any EQ settings you may have made and saved.
Viewing Angle Adjustment:
Press and hold the EJECT button to adjust the angle of the face.
Angle 1- Angle 2- Angle 3- Angle 4- Angle 1
Angle 1 angle 2 angle 3 angle 4
NOTE: you can also make the same adjustments with the remote control. Simply
press and hold the EJECT button to adjust according to your preference.
- 16 -

Restore Default Angle
Turn OFF the unit; then press preset buttons 1-6 and power the unit back ON. The
monitor should display ‘MOTOR ALGN OK”. Press the OPEN button and insert a CD.
The motor and gear drives are now back to their factory positions.
DVD/VCD/CD/MP3 OPERATIONS
Inserting disc
Press EJECT button, the front panel will slide down to
Position 1; then insert a disc into the Disc Loading Slot;
the panel will slide back automatically.
Ejecting a Disc
Press EJECT button, the front panel will slide down to Position 1; then eject
a disc; the panel will slide back automatically after 30 seconds , if no action is taken.
Note: The EJECT button on the remote control will perform the same functions.
Play/Pause
Press the PLAY/PAUSE button to play or pause the disc.
Stop
During movie playback, press the STOP button once; the DVD player memorizes the
location where you stopped (press PLAY button to resume playing from the
memorized location).
If you press the STOP button twice, the playback will start from the beginning of the
disc when you press again on the PLAY button.
F.F WD /F. RE V
Press the F.FWD/F.REV button to select fast forward / reverse search. Press F.FWD/
F.REV on the remote control performs the same operation. Press PLAY/PAUSE to
resume to normal playback.
- 17 -

Previous/Next
Press the Previous/Next button to go to the PREVIOUS/NEXT chapter , track or song.
Setup
Press the SETUP button to enter the setup menu.
Enter
In DVD mode, press the ENTER button to confirm the Setup Menu.
Direction
Press the direction buttons (UP/DOWN/LEFT/RIGHT arrow) to move the cursor to
the selected item
Display
Press the DISPLAY button to display the current playback information on the screen.
Zoom
Press the Zoom button during normal playback to zoom a picture. Press it repeatedly
to switch between the zoom levels.
Repeat
Press the repeat button to repeat the same track, press it twice to repeat all tracks.
When playing a DVD movie, pressing once will repeat the same chapter but pressing
twice will repeat the entire title.
Angle
Press the Angle button during playback to select different viewing angles with
interactive DVD media.
PBC
PBC is available in VCD mode as playback control switch.
Menu
Menu is available in DVD mode as playback control panel.
Audio
When playing a DVD disc, press the Audio button to select one of the available
languages.
Subtitle
For DVD disc, press the Subtitle button to select one of the available languages.
Program
When playing a VCD disc (PCB off) or CD disc, press the Program button to enter
the program status; Press the number buttons to enter the number of the track you
want to play. If you want to exit, press the PROGRAM button again.
Slow
Press the SLOW button to activate the playback in slow motion (DVD mode only.)
- 18 -

P/N
Press the P/N button to select the video output format (PAL/NTSC).
Number Buttons
Press the number buttons to play your favourite track. For example: to play track 8,
press the button 8. To play track 68, press the buttons 6 and 8 etc.
Random
Press the RDM button to shuffle all tracks. Press it again to return to the normal
playback mode from the first track (CD mode only.)
ٛ
RADIO FUNCTION
Band selection
In radio mode, press the BAND button to choose between FM1 / FM2 / FM3 / AM1 /
AM2 / …
ST/MONO Selection:
In the RADIO mode, press the ST button to select MONO or STEREO mode.
AST
In RADIO mode, press the AST button to scan the stored station. Press the
corresponding preset or AST button when your desired station is playing.
Number Buttons:
Press and hold any preset 1-6 to store your favourite radio stations; you can store up
to 18 FM and 12 AM stations.
LOC
In RADIO mode, press the SEL button twice to enter the radio setup page; for LOCAL
item, use the LEFT/RIGHT direction buttons to switch the LOC function on or off.
Direction buttons
In radio mode, press the direction buttons to adjust the frequency forward or
backward step by step. Press the LEFT or RIGT direction button to scan to the next
station. You can also use the UP and DOWN buttons.
- 19 -

RADIO DATA SYSTEM
1. AF
In radio mode, push this button to activate the AF mode. When receiving conditions
become bad, a station with better receiving conditions is automatically tuned into.
When searching an RDS station, the letters "AF" will flicker on the display; when
receiving an RDS station, "AF" will be displayed without flickering on the LCD. If the
reception becomes poor, the same station will be searched automatically for 60
seconds and PI SEARCH will be displayed on the LCD.
In AF mode, during the station search, push the DISP button to display following
information: programme, programme name, type, frequency, time.
2. TA
Press the TA button to activate the Traffic Announcement mode, the letters "TP" will
flicker on the display; when receiving the TP signal, "TA TP" will be displayed without
flickering on the LCD.
If you had a radio station before, the system will automatically switch to radio mode
and broadcast the traffic announcement when the traffic announcement begins in
every mode. If not, the system will automatically search a station in every mode and
when the traffic announcement begins, it will switch to radio mode automatically.
When the power is off, push the SEL button to set up the initialization volume of TP,
no matter how loud the volume is in the other mode, it will broadcast the traffic
announcement in the same sound level; To increase the volume level of the TA, set
press the SEL button until TAVOL is displayed on the LCD, then use the volume
button to adjust the level.
When listening to the traffic announcement, use the volume button to adjust the level,
but if the volume is louder than the TA initialization volume level, it will not be possible
to adjust the volume.
When the signal of the of the Traffic-Program identification (TP) is bad, there will be a
beep sound. The volume setup of the beep sound is the same as the TA initialization
volume.
3. PTY
Press the button the PTY shortly, to activate the PTY mode. It will automatically
search the programme you set up. During the station search the letters "PTY" will
flicker on the display; when the station is found "PTY" will be displayed without
flickering.
In PTY mode, press the AST button to scan and store stations with the 1-6 number
buttons.
Press the button for a couple of seconds to set up the programme, using the volume
button to make your selection and press the enter button to confirm. Following
options are available: NEWS, AFFAIRS, INFO, SPORT, EDUCATE, DRAMA,
CULTURE, SCIENCE, VARIED, POP M, ROCK M, EASY M, LIGHT M, CLASSICS,
OTHER M, WEATHER, FINANCE, CHILDREN, SOCIAL, RELIGION, PHONE IN,
TRAVEL, LEISURE, JAZZ, COUNTRY, NATION M, OLDIES, FOLK M, DOCUMENT,
TEST, ALARM. The default program is NEWS.
- 20 -
SETUP OF PLAYER
Setup Menu
Press Setup button to enter Setup Menu.
Use the UP/DOWN and LEFT/RIGHT arrow buttons to select the items you want to
change. Press the Enter button to confirm the item you have selected.
Press Setup to exit and save the Modifications.
Note: only available in DVD mode.
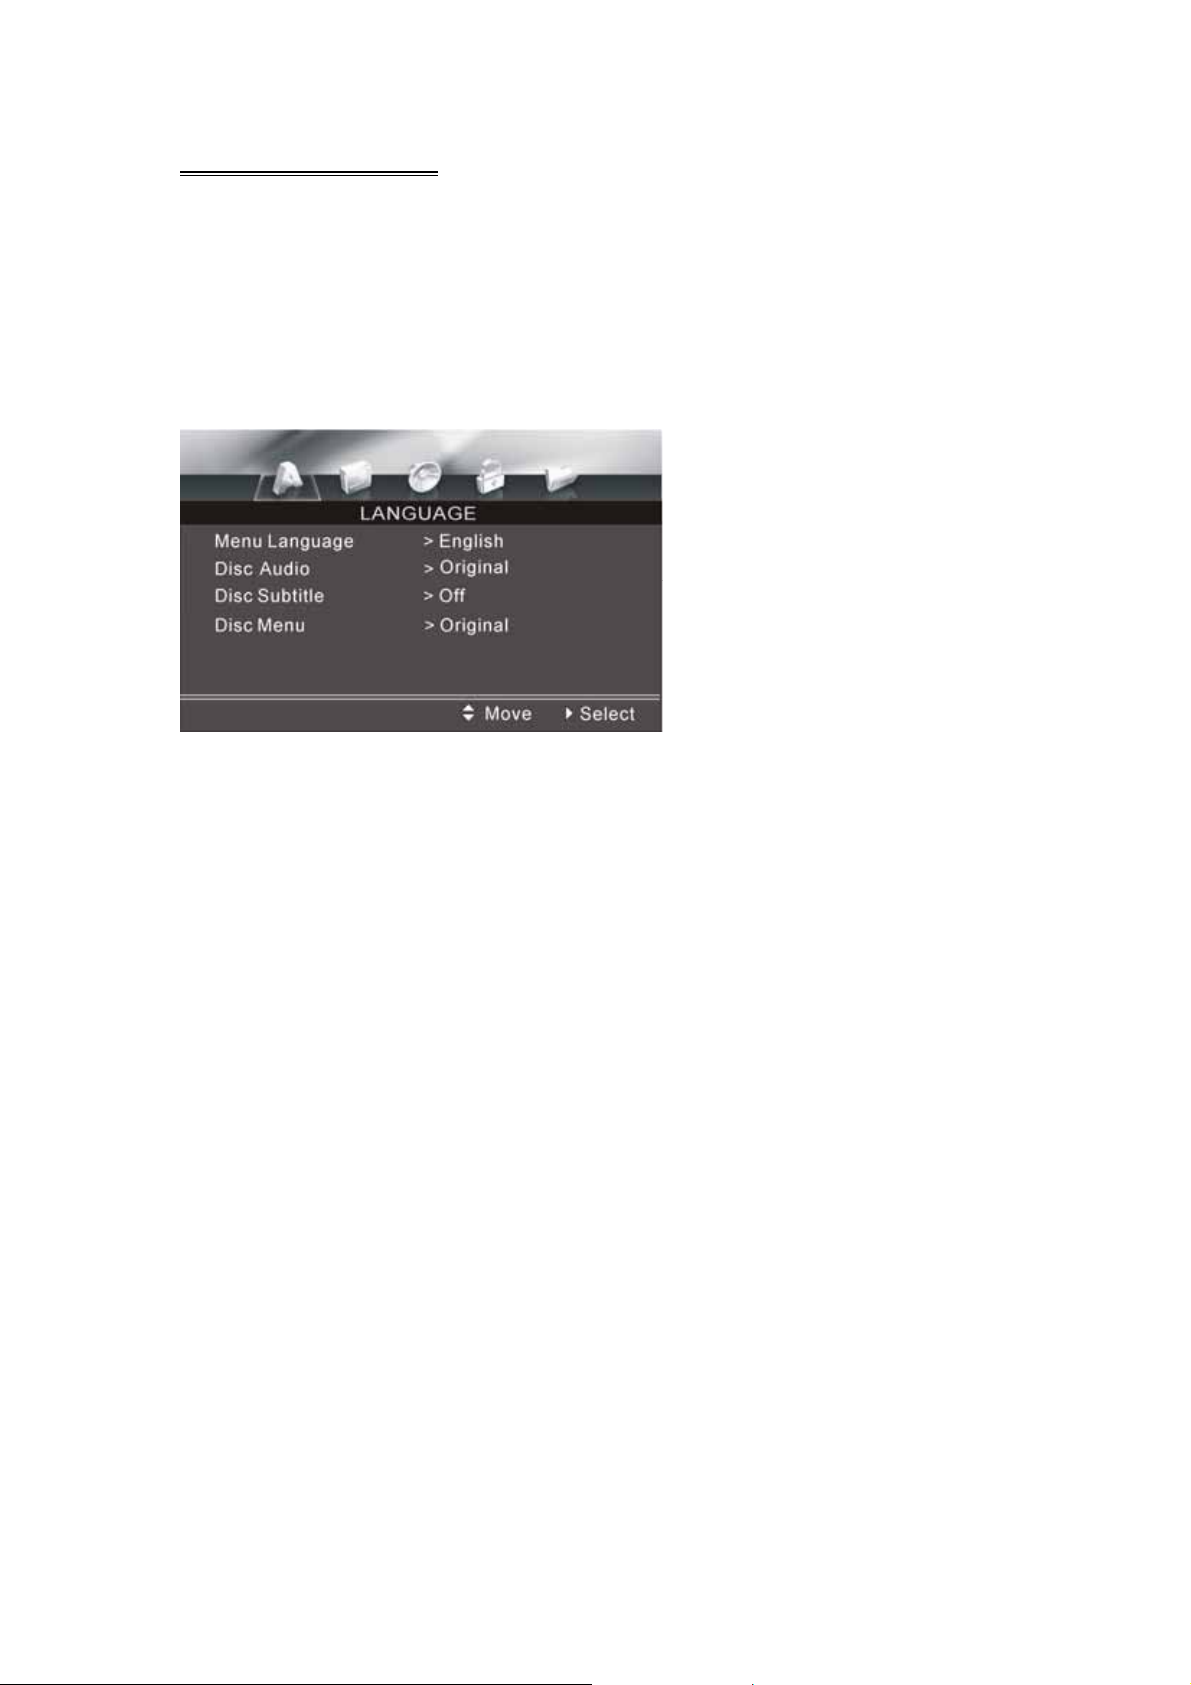
LANGUAGE SETUP
LANGUAGE SETUP MENU
Menu Language
Following options are available for the menu language:
English Deutsch Greek Pycckuu
French Italian Swedish Chinese
Espanol Polska Czech Korean
Magyar Portuguese Dutch Japanese
Disc Audio
Following options are available for the audio language:
Original English Spanish German
Italian Portuguese French Russian
Chinese Other
- 21 -

Disc Subtitle
Press this button to activate / deactivate the subtitle function.
Following options are available for the subtitle language:
Original English Spanish German
Italian Portuguese French Russian
Chinese Other
DISPLAY SETUP
DISPLAY SETUP MENU
TV Aspect: Allows you to select different aspect ratios. You can choose from the
following: 16:9 / 4:3
Display Mode: you can choose between Widescreen (Full Mode) and Letterbox (a
black band will be displayed at the top and at the bottom of the picture.)
TV Output: you can choose the TV format to match your monitor settings. You can
switch between AUTO, NTSC and PAL.
AUDIO SETUP
AUDIO SETUP MENU
Following options are available:
Dolby Digital: (Bitstream PCM).
DTS: (Bitstream PCM).
DRC: Select ON or OFF.
Digital Output: Select ON or OFF.
- 22 -

LOCK SETUP
LOCK SETUP MENU
Following options are available:
Rating: You can select the maximum rating of the disc by entering the password
(default password is: 0000).
Country Code: Select which ever works best for you.
OTHER SETUPS
OTHERS SETUP MENU
Load Default: You can restore all default settings by selecting this option.
Screen Saver: To activate (ON) or deactivate (OFF) the screen saver function.
NOTE: In the OFF position you will only see a blank background during audio
playback in the CD and RADIO modes.
- 23 -

SPECIFICATIONS
GENERAL
Supply Voltage : 14.4V DC (11-16V allowed)
Load Impedance : 4Ω per channel
Max Power Output : 55W x 4
Bass 100Hz : ≥ 10dB
Treble 10KHz : ≥ 10dB
Dimensions (approx.) : 188x183x58mm (d/w/h)
Mounting (approx.) : 350x235x105mm (d/w/h)
Weight (approx.) : 1.8Kg
FM TUNER
Frequency Range : 87.5 – 108 MHz (Europe/Asia)
87.5 – 107.9 MHz (USA)
IF : 10.7 MHz
Usable Sensitivity : ≤ 15dBuV
Stereo Separation : ≥ 26dB (1KHz)
Frequency Response : 100-20000Hz
AM TUNER
Frequency Range : 531 - 1602 KHz (Asia)
522 - 1620 KHz (Europe)
530 - 1710 KHz (USA)
IF : 450 KHz
Usable Sensitivity : ≤ 40dBuV
DVD PLAYER
Signal-to-noise Ratio : ≥ 85dB (1KHz)
Distortion : ≤ 0.5%
Note:
Specifications and design are subject to change without notice.
MPEG Layer-3 audio coding technology licensed from Fraunhofer IIS and Thomson.”
- 24 -

TROUBLE SHOOTING
SYMPTOM CAUSE / SOLUTION
No sound Cancel the mute function.
Adjust the volume.
The memory contents are lost Disconnect the power wire or battery.
Press the reset button.
The disc does not play The disc might be dirty or damaged.
The disc comes out
automatically
The disc can not be inserted Push the disc while pressing the EJECT button.
The function buttons do not
work
Audio skipping The disc might be dirty or damaged.
No picture Open the monitor.
Picture stops (pauses) The disc might be dirty or damaged.
Poor radio reception Antenna may not have the proper length. Be sure
Note: If any problem persists after checking the above list, please consult your
nearest service dealer. Never attempt to dissemble the unit by yourself!
The temperature is outside the range of the
operating temperature.
A disc is loaded in the mechanism.
Press the RESET button.
Press the RESET button.
Choose the video input on the TV to receive the
picture from the unit.
The colour system setup is incorrect.
Adjust to PAL or NTSC according to the TV.
the antenna is fully extended and properly
connected.
If broken replace the antenna with a new one.
The antenna is poorly grounded. Check again the
antenna connection.
- 25 -

WARRANTY TERMS AND CONDITIONS
1) Coverage:
Claims can be validly made only upon presentation of proof of purchase through an invoice or receipt.
2) Application: The present warranty enters into effect on the date of delivery to the user.
3) Period of validity: 2 years warranty for the device - 90 days for the accessories (components of the
product).
4) Validity of warranty:
a) Without prejudice as to the legal guarantee according to article 1641ff of the civil code, the prod ucts
are under warranty if used according to the directions included in the instructions.
b) The warranty is valid only for the first user conditionally to the device being used wisely and under
normal conditions, i.e. suitable for the product.
c) The warranty covers all repairs and/or replacements of components and accessories which are
recognized as being defective by our technical department, without any granting of damages.
d) The performance of the obligations resulting from the warranty does not ent ail an exte nsio n or
renewal of the warranty period, except in case of components which are replaced and which fall und er
the legal guarantee (i.e. in case of exchange or repair under warranty, the period will be neither
extended nor renewed. In this case, the warranty and the period of the first warranty will remain
applicable).
5) Damages not covered: As the device is recognized as being in good working c onditi on and with out
noticeable defect,
THE WARRANTY DOES NOT COVER: transport costs, nor charges relating to an intervention at the
address of the purchaser. Scratches, splinters or marks in the packaging of the device or its accessories
which were not noted at the time of delivery / breakable access ories, except in case of manufacturing
defects recognized by our technical department. Moreover, we wave any liability for general damages
resulting from a defect in the functioning of our devices an d which are not relating to the devices
themselves. This will in no case entitle to any indemnification for damages caused to disks because of a
halt of the device.
6) Exemptions from the warranty are the following :
Interventions due to a faulty installation or connection / a failure in the electrical installation of the
premises or vehicle or of nominal values provided for the supply of the device / a wrong manipulati on or
bad use by the user, insufficient or incorrect maintenance / a fall of or a blow to the device or a n
accessory / a lack of protection of the device and its accessories at the time of the transport by or for
account of the user.
7) The warranty is cancelled:
For devices and accessories having been repaired or altered by persons not authorized by us or whose
manufacturing number was altered or deleted.
8) For repairs:
Please contact your retailer.
9) For any disputes or litigation:
The law courts of Luxembourg are exclusively competent.
10) For all information contact:
SEVIC SYSTEMS Luxembourg S.A.
Zone Industrielle Breedewues
L-1259 Senningerberg
Phone: (+352) 26 34 57 29
Fax: (+352) 26 34 57 27
Email : svc@sevic.com
www.sevic.com
- 26 -
 Loading...