

Page 1

- -1
KITCHEN CENTER 2
SV150210
- User’s Manual
Page 2

- -2
Table of Contents
Important Safety Instruction---------------------------------------------------------------------Characteristic Features ---------------------------------------------------------------------------Disc Information --------------------------------------------------------------------------------------
Front Panel --------------------------------------------------------------------------------------------Rear Panel and Display Panel--------------------------------------------------------------------
Remote Control --------------------------------------------------------------------------------------System Connections --------------------------------------------------------------------------------
Connecting To External AV Signal Source ----------------------------------------------------Connecting To TV Signal Input Source---------------------------------------------------------
Connecting To Antenna ------------------------------------------------------------------------------------ConnectingTothePower Adapter ------------------------------------------------------------------------
ConnectingtoDVB-T Antenna-------------------------------------------------------------------------------
DVD Play Operation ---------------------------------------------------------------------------------DVD Playback Functions -------------------------------------------------------------------------DVD System Setup -----------------------------------------------------------------------------------
DVD Setup ----------------------------------------------------------------------------------------------LCD Setup -----------------------------------------------------------------------------------------------
TV Function -------------------------------------------------------------------------------------------AV Function -------------------------------------------------------------------------------------------Radio Function------------------------------------------------------------------------------------------
DVB-T Setup-------------------------------------------------------------------------------------------Installing the Unit in Kitchen----------------------------------------------------------------------
Troubleshooting -------------------------------------------------------------------------------------Specifications ----------------------------------------------------------------------------------------Warranty -------------------------------------------------------------------------------------------------
3
6
7
8
10
12
15
15
15
16
17
17
18
21
23
23
24
25
28
29
30
38
40
41
42
Page 3

- -3
CAUTION: USE OF ANY CONTROLS, ADJUSTMENTS, OR PROCEDURES
OTHER THAN THOSE SPECIFIED HEREIN MAY RESULT IN HAZARDOUS
RADIATION EXPOSURE
CAUTION
1. The product contains a low-power laser device. In order to ensure the safety of
the laser device, do not remove any cover and attempt to repair the unit. If
service is required, please contact the distributor or its authorized service centre.
2. To reduce the risk of electric shock, do not remove the cover (or back). No userserviceable parts inside. Refer servicing to qualified service personnel. Unplug
the product from the wall outlet before servicing or when it is unused for a long
period of time.
3. The manufacturer should not hold responsibility for the damage caused by any
substitutions and modifications of the product without authorization from the
manufacturer or authorized unit.
WARNING
The apparatus shall not be exposed to dripping or splashing and that no objects filled
with liquids, such as vases, shall be placed on the apparatus.
The lightning flash with arrowhead symbol, within an equilateral triangle, is
intended to alert the user to the presence of un-insulated “dangerous
voltage” within the product’s enclosure that may be of sufficient magnitude
to constitute a risk of electric to persons.
The exclamation point within an equilateral triangle is intended to alert the
user to the presence of important operating and maintenance (servicing)
instructions in the literature accompanying the appliance.
CAUTION: Laser radiation when open. Do not stare into
beam.
Page 4

- -4
Important Safety Instructions
NOTES
1. Read, heed and follow all
instructions to ensure correct
and safe installation and
interconnection of the
apparatus. Keep the
manual for future reference.
2. Do not use this apparatus
near water.
3. Clean only with dry cloth.
4. Do not block any ventilation openings. Maintain well ventilated conditions around
the product. Do not put product on bed, sofa or anything that blocks ventilation.
Install according to the manufacturer’s instructions.
5. Do not install near any heat sources such as radiators, heat registers, stoves or
other apparatus (including amplifiers) that produce heat.
6. The apparatus shall not be exposed to dripping or splashing and that no objects
filled with liquids, such as vases, shall be placed on the apparatus;
7. The mains socket-outlet shall be installed near the apparatus and the mains plug
shall remain readily operable;
8. Protect the power cord from being walked on or pinched particularly at plugs,
convenience receptacles, and the point where they exit from the apparatus.
9. Only use attachments/accessories specified by the manufacturer.
10. Unplug the apparatus during lightning storms or when unused for long periods of
time.
11. Refer all servicing to qualified service personnel. Servicing is required when the
apparatus has been damaged in any way, such as power-supply cord or plug is
damaged, liquid has been spilled or objects have fallen into the apparatus, the
apparatus has been exposed to rain or moisture, does not operate normally, or
has been dropped.
12. The apparatus shall be connected to a mains socket outlet with a protective
ground connection.
Note: Do not touch the colour TFT LCD screen by hand directly.
IMPORTANT FOR LASER PRODUCTS
1. CLASS 1 LASER PRODUCT
2. DANGER: Visible laser radiation when open and
interlock failed or defeated. Avoid direct exposure to
beam.
3. CAUTION: Do not open the top cover. There are no
user serviceable parts inside the unit. Leave all
servicing to qualified service personnel.
Page 5

- -5
FCC Notice
NOTE: This equipment has been tested and found to comply with the limits for a
Class B digital device, pursuant to part 15 of the FCC Rules. These limits are
designed to provide reasonable protection against harmful interference in a residential
installation. This equipment generates uses and can radiate radio frequency energy
and, if not installed and used in accordance with the instructions, may cause harmful
interference to radio communications. However, there is no guarantee that
interference will not occur in a particular installation. If this equipment does cause
harmful interference to radio or television reception, which can be determined by
turning the equipment off and on, the user is encouraged to try to correct the
interference by one or more of the following measures:
--Reorient or relocate the receiving antenna.
--Increase the separation between the equipment and receiver.
--Connect the equipment into an outlet on a circuit different from that to which the
receiver is connected.
--Consult the dealer or an experienced radio/TV technician for help.
Region code information
DVD players and discs are coded by region. If the region number described on the
DVD disc does not correspond to the region number of this product, this product
cannot play the disc. The region code of this unit is 2.
Page 6

- -6
Watch your favourite movies and TV
shows while cooking a meal… or taking
a bath! Kitchen Centre 2 fits neatly
underneath your kitchen cabinet,
shelves in the garage or bathroom.
This versatile unit is also ideal for use in
a boat or any other place where space
is at premium and you need to keep
your counter clutter-free.
All-in-One Entertainment Solution:
- DVD player, 10.2” TFT LCD high-
quality display, DVB-T and analogue TV
receiver, AM/FM radio, clock function
all-in-one
- DVD, CD, CD-R, CD-RW, JPEG,
MPEG4 and MP3 compatible
- Stereo speakers, remote control, AV
input and built-in Dolby Digital decoder
- Ultra slim unit with flip-down swivel
screen that fits almost anywhere
Multiple Mode
DVD
TV
Radio
External Audio & Video Input
Mode
DVB-T
High Quality Property
Video Screen
Supports normal screen (4:3) and wide
screen (16:9) aspect ratios.
AV Input
External Audio, Video input can be
connected to most external AV sources.
Amplifier Function
Built-in 2x5w stereo amplifier with left
and right speakers.
Advanced Playing Function
On-Screen Display
Displays you choices of English, French,
Spanish, German and Italian.
Fast Search Function
Multi-speed, fast forward, fast reverse,
slow play and repeat playback.
Zoom Function
Allows the viewer to enlarge and reduce
the pictures.
Search By Time
Search for a certain time on a disc.
TV Functions
Clear TV signal reception.
Search for TV channels
automatically.
Automatically memorize the
channels.
Radio Functions
ClearAM/FM signal reception.
Search for radio stations
automatically.
Store radio stations easily.
Search for radio stations in high or
low frequency range.
Page 7

- 7 -
Disc Information
Disc Formats Supported By This Player
DISC LOGO DIAMETER
PLAYBACK TIME/
PLAYABLE SIDES
133 mi n (SS-SL )
242 mi n (SS-DL)
266 mi n (DS-SL)
12cm
484 min (DS-DL)
41 min (SS-SL)
75 min (SS-DL)
82 min (DS-SL)
DVD
8cm
150 min (DS-DL)
12cm 74 min
CD
8cm 20 min
JPEG 12cm
MPEG4
MP3
The disc maker specifies the operation of some DVD discs. Please refer to the
instruction manual with the disc.
Care of Discs
Do not touch the playing surface of the
disc.
Do not stick paper or labels on the disc.
Storage of Discs
Do not expose discs to direct sunlight
or excessive temperatures.
Cleaning of Discs
If a disc has fingerprints or dust on it,
lightly wipe the disc with soft cloth from
the centre of the disc outward.
Never use record cleaning sprays, or
any other solvents to clean your discs.
Page 8

- 8 -
Front Panel Drawing
1. POWER Button
Press to enter or exit the STANDBY
mode.
2. Disc Tray
Used to load disc.
3. EJECT Button
Press to open or close the disc tray.
4. (PLAY/PAUSE) Button
Press to start or pause playback under
DVD mode.
5. (STOP) Button
Press to stop playback under DVD
mode.
6. Button
Under DVD mode, press once to go to
beginning of the current track/chapter.
Press twice to go to the previous
track/chapter.
7. Button
Press to go to the next track under DVD
mode.
8. REV SCAN Button
Under radio mode, press once to fine
tune frequency backward. Press for
about 1.5 seconds to search radio
stations backward automatically.
Under DVD mode, press to activate fast
backward playback.
Page 9

- 9 -
Front Panel
9. FWD SCAN Button
Under radio mode, press once to fine
tune frequency forward.
Press for about 1.5 seconds to search
radio stations forward automatically.
Under DVD mode, press to activate fast
forward playback.
10. Remote Sensor
Receives remote control signal for
operation.
11. SOURCE Button
Press to shift among DVD, TV, AV, FM,
AM and DVB-T mode.
12. MUTE Button
Press to turn the speaker output on or
off. The corresponding information will
be displayed on the display panel.
13. SET Button
Press to enter and exit from the alarm
setup menu. Press to memorize the
radio stations under AM/FM status.
14. Display Panel
Displays the time, status, radio
frequency and radio station number.
When adjusting volume, the VOL and
volume level will be displayed on the
display panel for several seconds.
15. ▼/CH- Button
Press to select items in the setup menu.
Press to select the channels or radio
stations backward under TV or radio
mode.
Press to adjust the value downward
when setting the time on the display
panel.
16. ▲/CH+ Button
Press to select items in the setup menu.
Press to select channels or radio
stations forward under TV or radio
mode.
Press to adjust the value upward when
setting the time on the display panel.
17. ◄/VOL- Button
Press to select items in the setup menu.
Press to decrease the volume.
Press to decrease the value in the
picture setup menu.
18. ►/VOL+ Button
Press to select items in the setup menu.
Press to increase the volume.
Press to increase the value in the
picture setup menu. Press to enter the
menu items in the DVB-T setup menu.
19. TIME /OK Button
Press to set the time on the display
panel. In standby status, the time is still
displayed on the panel.
Use the buttons to select the
editing position of hour or minute, and
then use the buttons to adjust the
value of the hour or minute upward and
downward.
Press to confirm selections in setup
menu.
20. TV/LCD SETUP Button
Press once to enter the LCD setup
menu. Then press the button to enter
the TV Setup menu in the TV mode.
21. LCD Screen
Presents high resolution picture.
Page 10

- 10 -
Rear Panel Drawing
1. ANT INPUT Jack
Connected to external antenna to
receive the TV program in TV mode.
2. DVB-T Antenna Jack
3. FM 75ΩCoaxial Antenna Jack
4. AM Antenna Jack
5. Left/Right AUDIO Input Jack
Connection for audio input.
6. VIDEO Input Jack
Connection for video input.
7. Direct Current 12V Input Jack
Display Panel Drawing
1. FM radio status indicator
2. AM radio status indicator
AM time indicator
3. PM time indicator
4. Hour or character indicators
5. Minute or character indicators
6. Character indicators
7. FM frequency unit of MHz
indicator
8. AM frequency unit of KHz
indicator
Page 11

- 11 -
Preparation
Refer to the drawing and remove the
empty battery receptacle.
Put the battery in the receptacle.
Make sure the polarity matches the
marks inside the component.
Insert the receptacle into the remote
control.
Using Of Remote Control
Point the remote control towards the
main unit when operating. The remote
control works best at a distance less
than 7m and at an angle of up to 60°to
the front of the unit. No obstacles may
stand in the way between remote
control and infrared sensor.
The battery normally lasts for about six
months. This depends on how often and
for what operations the remote control is
used.
If the remote control unit fails to work
even when it is operated near the
player, replace the battery.
If the remote control is not used for a
long period of time, please remove the
battery from the compartment, to
prevent damage by leakage.
Page 12

- 12 -
Remote Control
Remote Control Drawing
1. POWER Button
Press to access to or exit the
STANDBY mode.
2. SUBTITLE Button
Press to select a subtitle language or
turn subtitle off when a DVD disc with
multi-subtitles is playing.
3. DVD Button
Press to enter DVD mode.
Page 13

- 13 -
Remote Control
4. TV Button
Press to enter TV mode.
5. AV Button
Press to enter external AV source input
mode.
6. FM/AM Button
Press to enter FM/AM radio mode.
7. DVB-T Button
Press to enter DVB-T mode.
8. OK Button
Press to confirm selections.
9.,, /CH+, /CH- Buttons
Press to select menu items or settings.
Press buttons to adjust value in
the picture setup menu.
Press buttons to select channels
or radio stations forward and backward
in TV or radio mode.
Press to adjust the value of time when
setting time on the display panel.
10. SET Button
Press to enter or exit the Alarm setup
menu. Press to memorize the selected
radio station under AM/FM status.
11. /SEEK – Button
In radio mode, press once to fine tune
frequency backward. Press for about
1.5 seconds to search radio stations
backward automatically.
In DVD mode, press to activate fast
backward playback.
12. /SEEK + Button
In radio mode, press once to fine tune
frequency forward. Press for about 1.5
seconds to search radio stations
forward automatically.
In DVD mode, press to activate fast
forward playback.
13. (PLAY) Button
Press to start playback in DVD mode.
14. (STOP) Button
Press to stop playback in DVD mode.
15. TITLE/EPG Button
Press to display titles if exist on the disc
in DVD mode.
Press to enter the channel schedule in
the DVB-T mode.
16. MENU/FAV Button
Press to access the disc menu in DVD
mode.
In the DVB-T mode, press to enter the
favourite list, then use the
direction buttons to select, then press
the OK button to confirm and start
playback.
17. REPEAT/EXIT Button
Press to repeat a title, chapter or the entire
disc in DVD mode.
Press to return to the previous menu in the
DVB-T setup menu.
18. A-B/TVR Button
In DVD mode, press to play a section of the
disc from point “A” to point “B”.
Press once to select the starting point (A),
press it again to select the end point (B).
Then the selected section will be played
repeatedly. Press this button the third time to
stop A-B repeat. In the DVB-T mode, press to
realize the switch function between TV mode
and radio mode.
Page 14

- 14 -
Remote Control
19. EJECT Button
Press to open or close the disc tray.
20. AUDIO Button
Press to access various audio
languages when the DVD disc contains
multiple audio languages is playing.
21. 0-9 Number Buttons
Select numbers by pressing these
buttons.
22. GOTO Button
Press to select the desired disc starting
Time, Track or Title in DVD mode.
23. +10 Button
Select numbers greater than 9 by
pressing the (+10) button first, and then
additional number buttons are needed.
24. TIME Button
Press to set time on the display panel.
In standby status, the time is still
displayed on the display panel.
Use the buttons to select the
editing position of hour or minute, use
the buttons to adjust the value of
the hour or minute upward and
downward.
25. DVD/DVB Button
Press to enter the DVD system setup
menu in DVD mode.
Or press to enter the DVB-T setup
menu in the DVB-T mode.
26. SLOW Button
Press to activate slow playback in DVD
mode.
27. LCD ON/OFF Button
Press to turn On/Off the LCD screen
display.
28. LCD SETUP Button
Press once to enter the PICTURE
setup menu. Then press the button to
enter the TV SETUP menu in TV mode.
29. NEXT Button
Press to go to next track or chapter in
DVD mode.
30. PREV Button
In DVD mode, press once to go to the
beginning of current track or chapter.
Press twice repeatedly to go to the
previous track or chapter.
31. MUTE Button
Press to turn on/off the speaker’s
output. The corresponding information
will be displayed on the display panel.
32. (PAUSE) Button
Press to pause playback in DVD mode.
33. ZOOM/TTX Button
Press to enter and cycle through zoom
functions, use the direction buttons to
pan around the screen.
Press to display the teletext information
in the DVB-T mode.
34. VOL+/-
Press to increase or decrease the
speaker’s volume level.
35. INFO Button
Press to display detailed playback
information in DVD or DVB-T mode.
Press repeatedly to display additional
information or to turn the information
display Off.
Page 15
- 15 -
System Connections
Do not connect the power cord until all other connections have been made.
Each time you restart the unit, it remembers the last function used.
Please make all the connections before installing the unit.
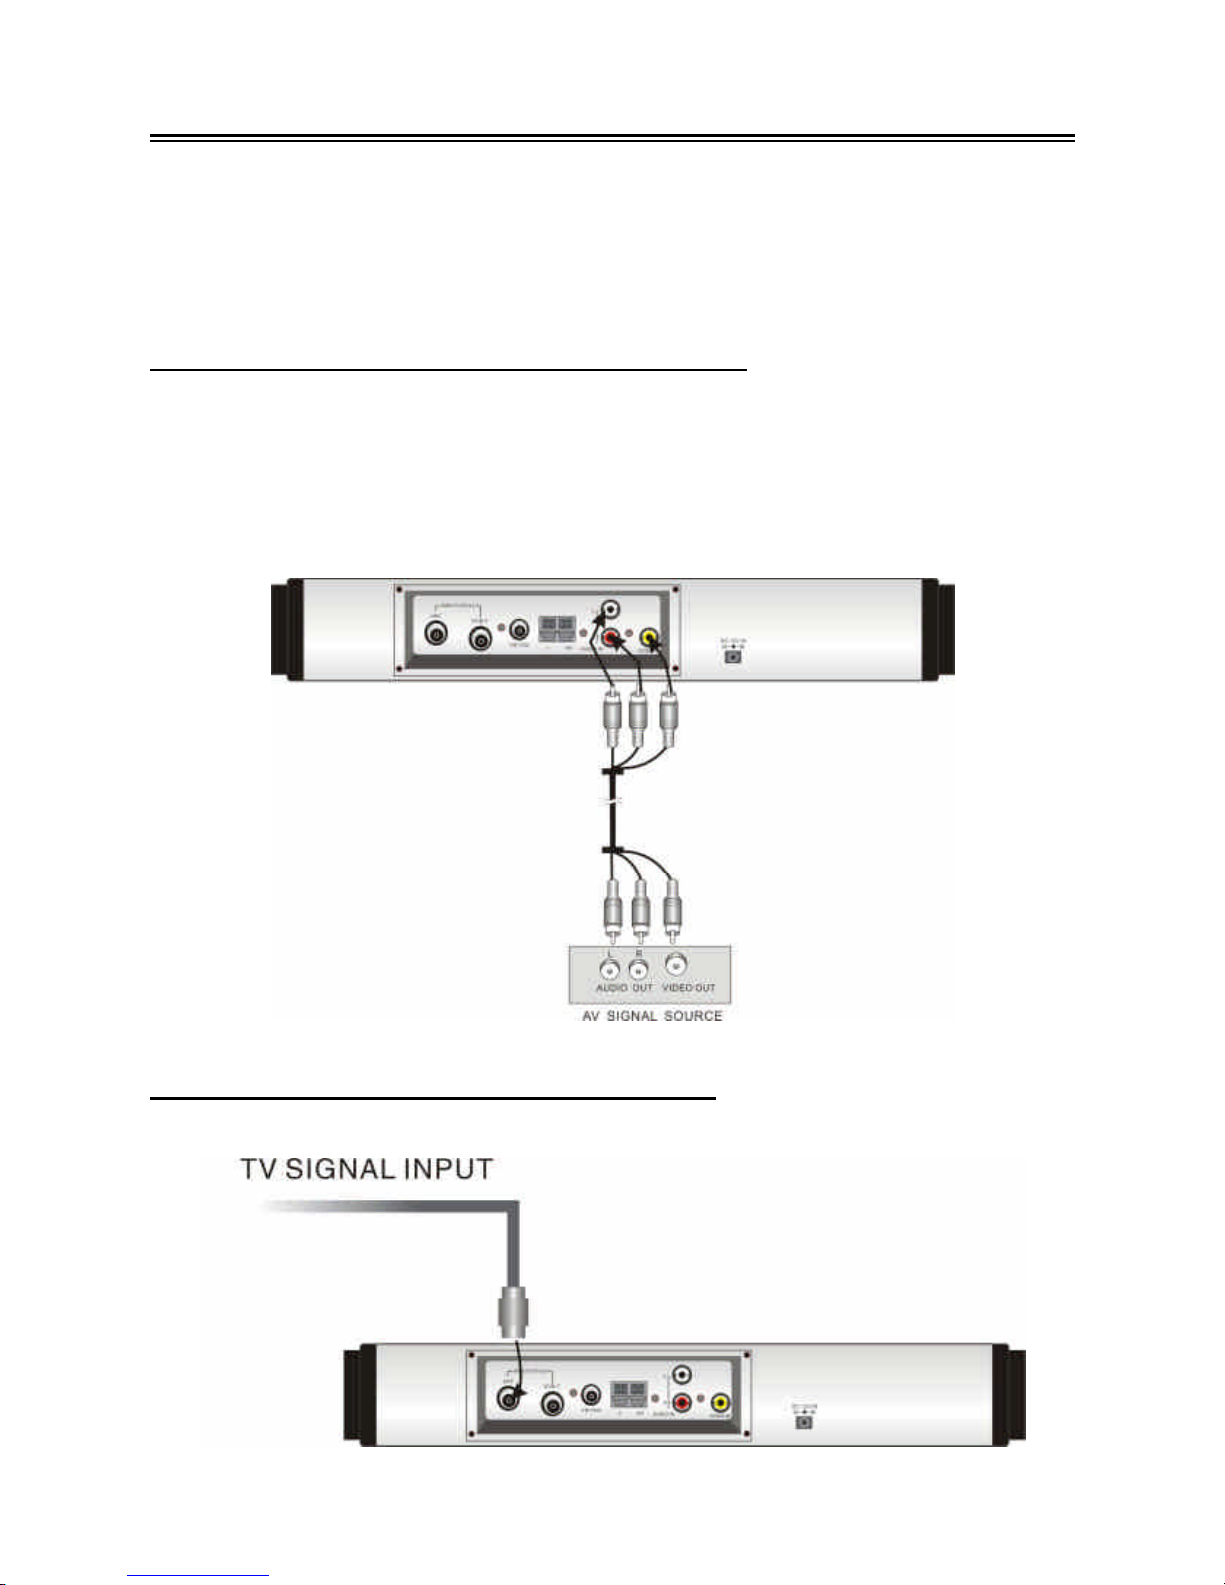
Connecting To External AV Signal Source
Connections should be made as follows:
Connect the L/R audio cables according to the marks on the rear panel of the unit:
Left audio cable is plugged into the upper jack; the right audio cable is plugged into
the lower jack.
Connecting To TV Signal Input Source
Page 16
- 16 -
System Connections
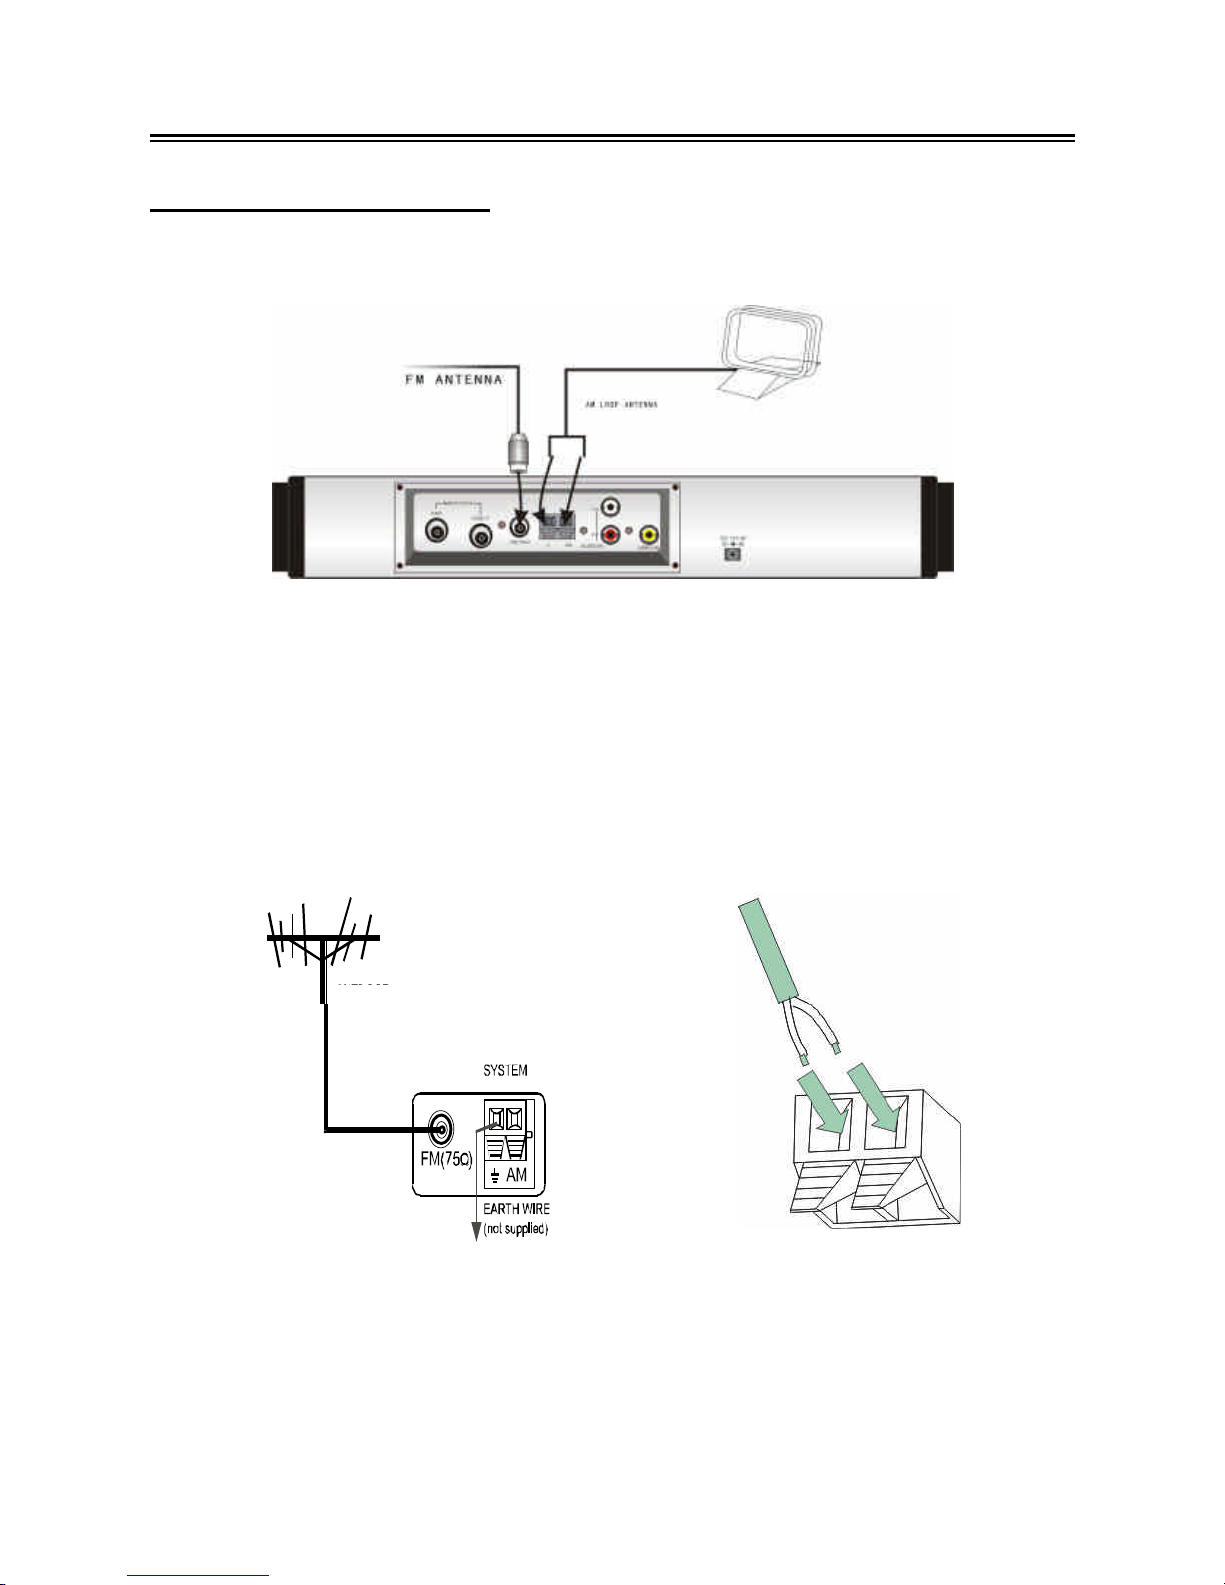
Connecting To Antenna
Connect the supplied AM/FM antennas to listen to the radio.
In order to improve the signal, move AM loop antenna away from system and
other equipment.
Extend FM antenna fully.
Keep the FM antenna as horizontal as possible after connection.
When connecting the supplied AM loop antenna, connect two black cords to AM
and ground jacks as shown below.
If the FM reception is poor, use a 75Ω coaxial cable (not supplied) to connect
system to an outdoor FM antenna as above.
If you connect the system with outdoor FM antenna, you should earth the system
in order to avoid lightning strike.
Do not connect the earth wire to gas pipe to prevent gas explosion.
OUTDOOR
FMANTENNA
Page 17
- 17 -
System Connections
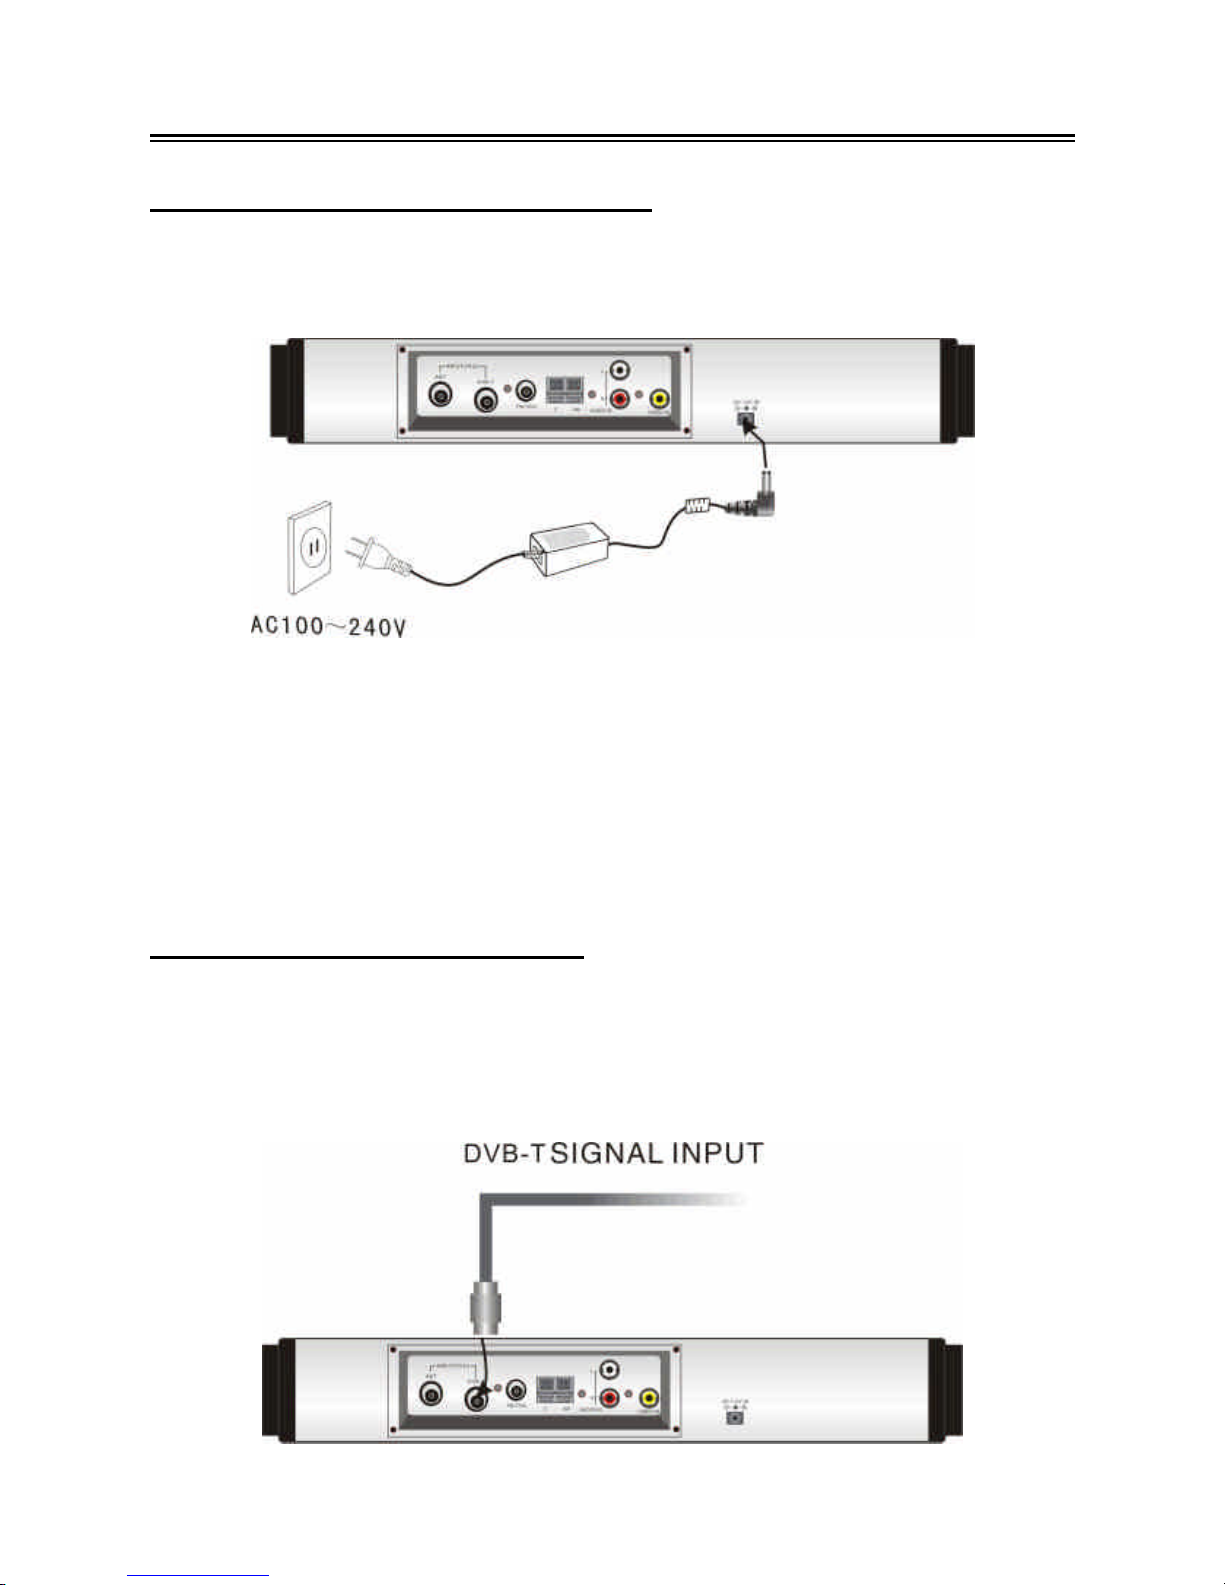
Connecting To the Power Adapter
This unit is powered via the switching power adapter (supplied). See the below figure
for details:
1. Connect the AC adapter to jack marked with “DC 12V IN” on the rear panel of the
unit.
2. Plug the two-prong end of the power cord to the grounded electrical socket.
3. When not using the unit, turn off the power of the unit first, and then unplug the
power supply to prevent malfunctions.
Connecting to DVB-T Antenna
The unit is designed with an antenna input jack. Plug the DVB-T antenna into the
DVB-T jack on the rear panel of the unit to receive TV signal, then press DVB-T
button on the remote control to switch to the DVB /T mode, as shown below:
Page 18

- 18 -
DVD Play Ope
ration
Preparation
1. Install the unit in the kitchen; refer to page 38 for details.
2. After connecting the unit to the AC power, turn on the unit’s power by pressing
the POWER button on the front panel or the remote control.
3. Press the DVD button on the remote control or the SOURCE button on the front
panel to shift to DVD mode.
4. Press the EJECT button on the front panel or the remote control to open the
disc tray.
5. Load the disc with the labelled side facing up.
6. Press the EJECT button again to close the disc tray. The player will automatically
search for the disc and start playback.
DVD disc Playback
Menu
Normally there is a selecting menu for DVD discs. You can press the MENU/FAV
button on the remote control to enter the root menu during DVD disc playback, and
use the direction buttons to highlight an item you would like to select. Press the OK
button to select it.
Title & Chapter
Normally there are several titles in a DVD disc, and several chapters (sections) in a
title. You can select any title or chapter quickly by entering the relevant number.
Audio
DVD discs can contain up to 8 audio bit streams. For Example: English, French,
Spanish, etc.
To select the audio bit stream you prefer press the AUDIO button on the remote
control during playback. The DVD player will play the next audio bit stream every time
you press the AUDIO button in succession.
Note: This function is only available for discs that have several audio bit streams
recorded onto it.
Info
Press the INFO button on the remote control for detailed information on the disc
playing. Press it repeatedly to display as follows: Title Elapsed Title Remain
Chapter Elapsed Chapter Remain Display Off.
Page 19

- 19 -
Subtitle
A DVD disc can be recorded with up to 32 subtitles.
Press the SUBTITLE button on the remote control during playback to select the one
you prefer.
NOTE: This function is only available for DVD discs that are recorded with multisubtitles.
CD disc Playback
The player will play all tracks on a CD disc by default order. You can use the and
(PREV/NEXT skip) buttons, or number buttons to select a certain track.
JPEG disc Playback
JPEG is a common picture format that requires small amounts of storage per image
and has low loss in resolution. Hundreds of pictures can be stored on a disc in this
format. In order to view JPEG photo albums, you can ask your film development
company to make a ”PICTURE CD” when they develop your film.
Normal Playback
Load a JPEG disc in. Use the ,direction button and OK button to select a
submenu with pictures, and then use the , direction button to select the contents.
Many discs have other contents besides pictures.
Picture Rotation
This can be used only when the picture is normally displayed. Once another picture is
selected, rotation will be cancelled automatically.
During playback, use the direction buttons to rotate the picture.
Zoom and Move
The ZOOM button is used to turn on/off the zoom and move functions.
When this function is turned on, use the ,(REV/FWD SCAN) buttons to control
zoom proportion and the screen will display the relevant proportion.
When this function is turned off by pressing the ZOOM button again, the picture will
resumenormal size. Press the MENU buttonto return to menu page.
Some JPEG discs may not support rotation or zooming functions.
Page 20

- 20 -
MPEG4 Playback
Load a MPEG4 disc in the disc tray, the player will search and play disc automatically.
The screen displays the Root Folder. Use the, buttons to select desired folder.
Then you can press any of the buttons below to confirm your selection: OK or
(PLAY) button.
Press the / button to go the previous/next file.
Audio
Press the AUDIO button to select the desired sound effect.
Keep pressing for about 2 seconds to remove display from the screen.
Subtitle
During playback, press the SUBTITLE button to select a subtitle language or to turn
the subtitle off.
This function is only available for the discs recorded with multi-subtitles.
Some MPEG4 discs may not support Subtitle or Audio function.
Info
During playback, press the INFO button for detailed information on the disc. Press it
repeatedly to display as follows: Single Elapsed Single Remain Display Off.
Page 21

- 21 -
Stop
During playback, press the (STOP) button once to stop playback of a disc. Press
the (PLAY) button and the DVD Player will resume playback of the disc from the
point where it was stopped.
Pause
Press the(PAUSE) button on remote control or the (PLAY/PAUSE) on the front
panel to pause playback.
Press this button again or press thePLAY button to resume normal playback.
Resume Playback
Press the STOP button at the point if you wish to stop the playback of a disc. The
DVD Player will memorize the location where playback of the disc was stopped.
Press the PLAY button to resume normal playback. The DVD Player will resume the
playback of the disc from the location where it was stopped. This function will not
operate if the disc is removed from the DVD Player.
Press the STOP button twice (2x). Playback of the disc will stop. When the PLAY
button is pressed again, playback of the disc will start from the beginning of disc.
Zoom
Press the ZOOM/TTX button on the remote control to cycle through the different
zoom settings.
Fast Playback
Press the or button to activate fast forward or rewind playback.
Slow Playback
Press the SLOW button to activate slow playback.
◆ there is no slow playback for CD discs and JPEG discs.
Previous and Next
Press the (PREV) button once to return to the beginning of current playing Chapter
or Track. Press the (PREV) button twice repeatedly and playback will start from the
previous Chapter or Track.
Press the (NEXT) button and playback of the disc will start from the next Chapter
or Track.
Page 22

- 22 -
Search By Time
During DVD disc playback, press the GOTO button on the remote control once, there
will be a menu displayed on the screen. You can set or select items for your
preference. Use the , direction buttons to select items, press the OK button to
enter and use the , direction buttons to select the desired item. Press the
direction button to return. When select the Title or Chapter, use number buttons to
input desired title or chapter number.
Some DVD discs do not support the search function.
Repeat
To repeat a Title, Chapter or Track, press the REPEAT/EXIT button on the remote
control. Continually pressing the REPEAT/EXIT button will display a menu as follows:
Repeat Chapter, Title, All.
You can temporarily select a section of a DVD that you would like to play repeatedly.
You do this by marking the start and the end of the section using the A-B/TVR button.
During playback press the A-B/TVR button on the remote control at the beginning of
the segment (point A) you wish to play repeatedly. Press the A-B/TVR button again to
mark the end of the segment (point B).
The DVD player will automatically return to point A and repeat playback of the
selected segment (A-B). To resume normal playback, press the A-B/TVR button
again.
Page 23
- 23 -
DVD Setup
You can customize the set up menu to your own preference.
Press the “DVD /DVB SETUP” button on the remote control to display the setup
menu. The menu will include “General Setup Page”, “Speaker Setup Page”, “Dolby
Digital Setup”, “Video Setup Page”, and “Preference Page”. Press the, direction
buttons to select a category. All the items in the category will appear on the screen.
Press the “OK” button to enter the category.
Category
When you enter a category all the items under this category will appear, the
highlighted category is the current set up.
Press the right direction button () on the remote control to select another category
(new selection will be highlighted). Press the “OK” button for confirmation.
Press the left direction button () to enter the other setup menu(s).
General Setup
TV Display
Select Normal/PS or Normal/LB when a 4:3 TV is connected.
Select WIDE when using a 16:9 screen on the unit or when a wide screen TV is
connected to the video output.
OSD Lang
There are five different OSD languages for selection. You can choose from English,
French, Spanish, German and Italian.
Screen Saver
When activated, under stop mode, the unit will go into screen saver mode if the same
image remains on the screen for several minutes.
Speaker Setup
Down mix
Select “Lt/Rt” in DOWNMIX, the player will output the audio signal in mixed mono.
Select “Stereo”, then the player will output a stereo signal.
Dolby Digital Setup
Dual Mono
The function is used to select from Stereo, L-Mono, R-Mono and Mix-Mono.
Page 24

- 24 -
Dynamic
Use this item to adjust linear dynamic compression rate to get different signal
compression effects.
Video Setup
Sharpness
Use this setting to adjust the sharpness level.
Brightness
Use this setting to adjust the brightness level.
Contrast
Use this setting to adjust the contrast level.
Preference Page
Audio, Subtitle, Disc Menu
This setting allows you to hear or read the subtitles of a DVD in your choice of
English, Spanish, French, etc. if the disc contains multiple languages.
Default Reset
Use this function to reset all the settings.
Note: For preference setting, the unit must be in the stop mode.
LCD Setup
Under DVD mode, press the LCD SETUP button on the remote control or the TV/LCD
SETUP button on the front panel once, there will be menu displayed on the screen.
Use the ▼,▲ buttons to selec t the item you want to set (Brightness, Cont ra st, and
Colour). Use the ►,◄ buttons to adjust, you can adjust the items bet ween 0 and 20.
Use the ▼,▲ buttons to s elect the Language, press the ►, ◄ buttons to select
English, French or Spanish, etc.Select Reset and press the OK button to resume the
original status.
First use the ▼, ▲ but tons to highlight the PICTURE, and then press the ◄ butt on on
the remote control to exit from the setup menu.
PICTURE
BRIGHTNESS 10
CONTRAST 10
COLOR 10
LANGUAGE ENGLISH
RESET
Page 25

- 25 -
TV Function
Basic Operation
Connect the antenna to the antenna jack on the rear panel. After connecting the
antenna, connect the power supply cord. If the player is in standby mode, press the
POWER button to turn on the power.
Press the TV button on the remote control or the SOURCE button on the front panel
to shift to TV mode.
Press the, buttons to select the desired channel. To go to a channel directly, first
press the number buttons on the remote control for input and then press the OK
button for confirmation. You may also wait for a moment without pressing the OK
button and the unit will go to the selected channel.
Some preferences can be preset:
Picture Parameter Setup
Press the LCD SETUP button on the remote control or the TV/LCD SETUP button on
the front panel once to enter PICTURE setup menu, and screen display as shown:
Use the ▼, ▲ buttons to select the item you want to set (Brightness, Contrast, and
Colour).
Use the ►, ◄ button s to adjust; you can adjust the items between 0 and 20.
Use the ▼, ▲ buttons to selec t the Language, press the ►, ◄ buttons to select
English, French or Spanish, etc.
To restore a setting to the original value, use the ▼, ▲ buttons to select Reset, and
then press the OK button to confirm the change. To exit the setup menu, first use the
▼, ▲b uttons to highlight PICTURE, and then press the ◄ button on the remote
control.
Press the ► but ton on the remote control to enter TV Set up menu.
TV System Setup
When the ► button is pressed, the TV system setup menu will appear:
BRIGHTNESS 10
CONTRAST 10
COLOR 10
LANGUAGE ENGLISH
RESET
EXIT
TV S
SYSTEM PAL B/G
CHANNEL 001
SKIP OFF
SWAP _ _ _
BLUE SCREEN ON
FINE TUNING
AUTO MEMORY
Page 26

- 26 -
TV Function
Use the▼, ▲ buttons to select the item you want to set.
Use the►, ◄ buttons to select the item and enter it.
First use the ▼, ▲ buttons to highlight the TV SETUP, and then press the ► button
on the remote control to exit from the setup menu, and press the ◄ button on the
remote control to return to the PICTURE setup menu.
System
Use the ,direction button to select TV system type.
Channel
Use the , buttons to change the channel.
Skip
When the ► button is pressed to turn the f unc tion ON, it will skip the current chann el
when using ▼, ▲ to select channels.
When the ◄ button is us ed to turn the function OFF, it will play the channels in
sequence when selecting under normal playback status.
Swap
Use the , buttons to select SWAP, press the number buttons on the remote
control to input the channel number, then the channel will be swapped to selected
channel.
Blue Screen
This function is only available when there is no input signal.
Use the► button to turn the function ON, use the ◄ button to turn the function OFF.
Fine Tuning
Use the ▼, ▲ buttons to select Fine Tuning, and then press the ►, ◄ buttons to tune
forward or backward from the current channel.
Auto Memory
Use the▼ , ▲ buttons to select Auto Memory, press the OK or ► button to ent er auto
memory mode:
SEARCHING CH:001
EXIT:◄ 089.75MHz
Page 27

- 27 -
TV Function
The auto memory will take a few minutes. The unit will search channels from the
lowest channel to the highest channel in the standard channel list. When tuning
operations are complete the unit will exit and store the channels by sequence in the
memory.
During tuning, press the ◄ button to exit the auto memory.
Use the ▼, ▲ direction buttons to select the desired channel from those in memory.
Alarm Setup
Press the SET button on the remote control or the front panel to enter ALARM SET
menu, the screen will display as below:
Use the , buttons to select the item you want to set.
Use the,buttons to enter the item and to select.
Press the SET button again to exit from the setup menu.
Alarm
Use the,direction buttons to select ON or OFF. This function allows you to set the
alarm clock time of this unit.
To set the alarm clock time, first press any number button to enter the time input state.
Then use number buttons to input the desired alarm time in sequence of hour, minute.
Press the,direction buttons to switch between am and pm.
You can stop the alarm of the clock in three ways: (1) Press any key on the front
panel for a longer moment. (2) Press OK button on the remote control. (3) Set the
Alarm to OFF in the ALARM SET menu.
If no key is pressed the alarm will stop after three minutes.
ALARM SET
ALARM ON
ALARM _ _: _ _ am
EXIT: SET
Page 28

- 28 -
AV Function
AV Function
The player has an additional AV input so it can function as a monitor for a DVD player,
video cassette player, satellite receiver, video game, etc. When an AV source is
connected, press the AV button on the remote control or the SOURCE button on the
front panel to enter external input AV mode.
Picture Parameter Setup
Press the LCD SETUP button on remote control or the TV/LCD SETUP button on the
front panel once to enter PICTURE setup menu, and the screen will display as shown
below:
Use the ▼, ▲ buttons to select the item you want to set (Brightness, Contrast, and
Colour).
Use the ►, ◄ buttons to adjust the items between 0 and 20.
Use the ▼, ▲ buttons to select the Language, press the ►, ◄ buttons to select
English, French or Spanish, etc.
Select Reset and press the OK button to return to the factory default settings.
First use the ▼ ▲buttons to highlight PICTURE, and then press the ◄ button on the
remote control to exit from the setup menu.
NOTE:
Under AV mode, if there is no signal, the LCD screen will be turned off automatically.
When connected to an AV signal source, make sure the type of the selected AV
signal source is PAL.
BRIGHTNESS 10
CONTRAST 10
COLOR 10
LANGUAGE ENGLISH
RESET
EXIT
Page 29

- 29 -
Radio Function
Radio Function Operation
Press the FM / AM button on the remote control or the SOURCE button on the front
panel to enter FM or AM radio mode. Then press the SEEK+/- button on the remote
control or the /buttons on the front panel for about 1.5 seconds to start searching
forward/backward from the current frequency. Press the SEEK+/- or /buttons
again to stop searching. Radio frequency will be displayed on the display panel. The
frequency range of FM is from 87.5MHz to 108MHz, frequency range of AM is from
531 KHz to 1602 KHz.
Fine Tuning
Press the SEEK+/- button on the remote control or the/buttons on the front panel
once to fine tune the frequency forward/backward under radio mode.
Semi-memorizing radio stations
If you like a radio station and want to store it for later listening press the SET button to
memorize it. “SAVE X X” will be displayed on the display panel; “X X” represents the
default station number.
There are two methods to organize the memorized stations:
Use the , buttons to adjust the channel number for your preference, and
then press the SET button again; the station will be memorized with the coded
station number.
Press the SET button again, the station will be automatically memorized with the
default station number in sequence.
You can store radio stations from 0 to 19, total 20FM or 20AM radio stations. If no
buttons are pressed within 3 seconds of pressing the SET button first time, the
frequency will appear on the display panel again, and the station will not be stored.
Accessing memorized radio stations
First use the number buttons on the remote control to input, then press the OK
button for confirmation to go to the selected radio station directly; Or without
pressing any button and wait a moment, it also goes to the selected radio station.
Press the ,buttons on the remote control or front panel to select the radio
stations forward and backward.
When selecting the stations, the “CH XX” will appear on the display panel, where the
“XX” is the channel number of the stored radio station. After a few seconds, the “CH
XX” disappears and the radio frequency will be displayed once again.
Page 30
- 30 -
DVB-T Setup
Preparation
1. Connect the unit to the power.
2. Press the DVB-T button on the remoter control or the SOURCE button on the
front panel to shift to DVB-T mode.
3. Press the DVD/DVB button on the remote control to enter the DVB-T setup
menu.
4. You can take steps below to go on with the setup:
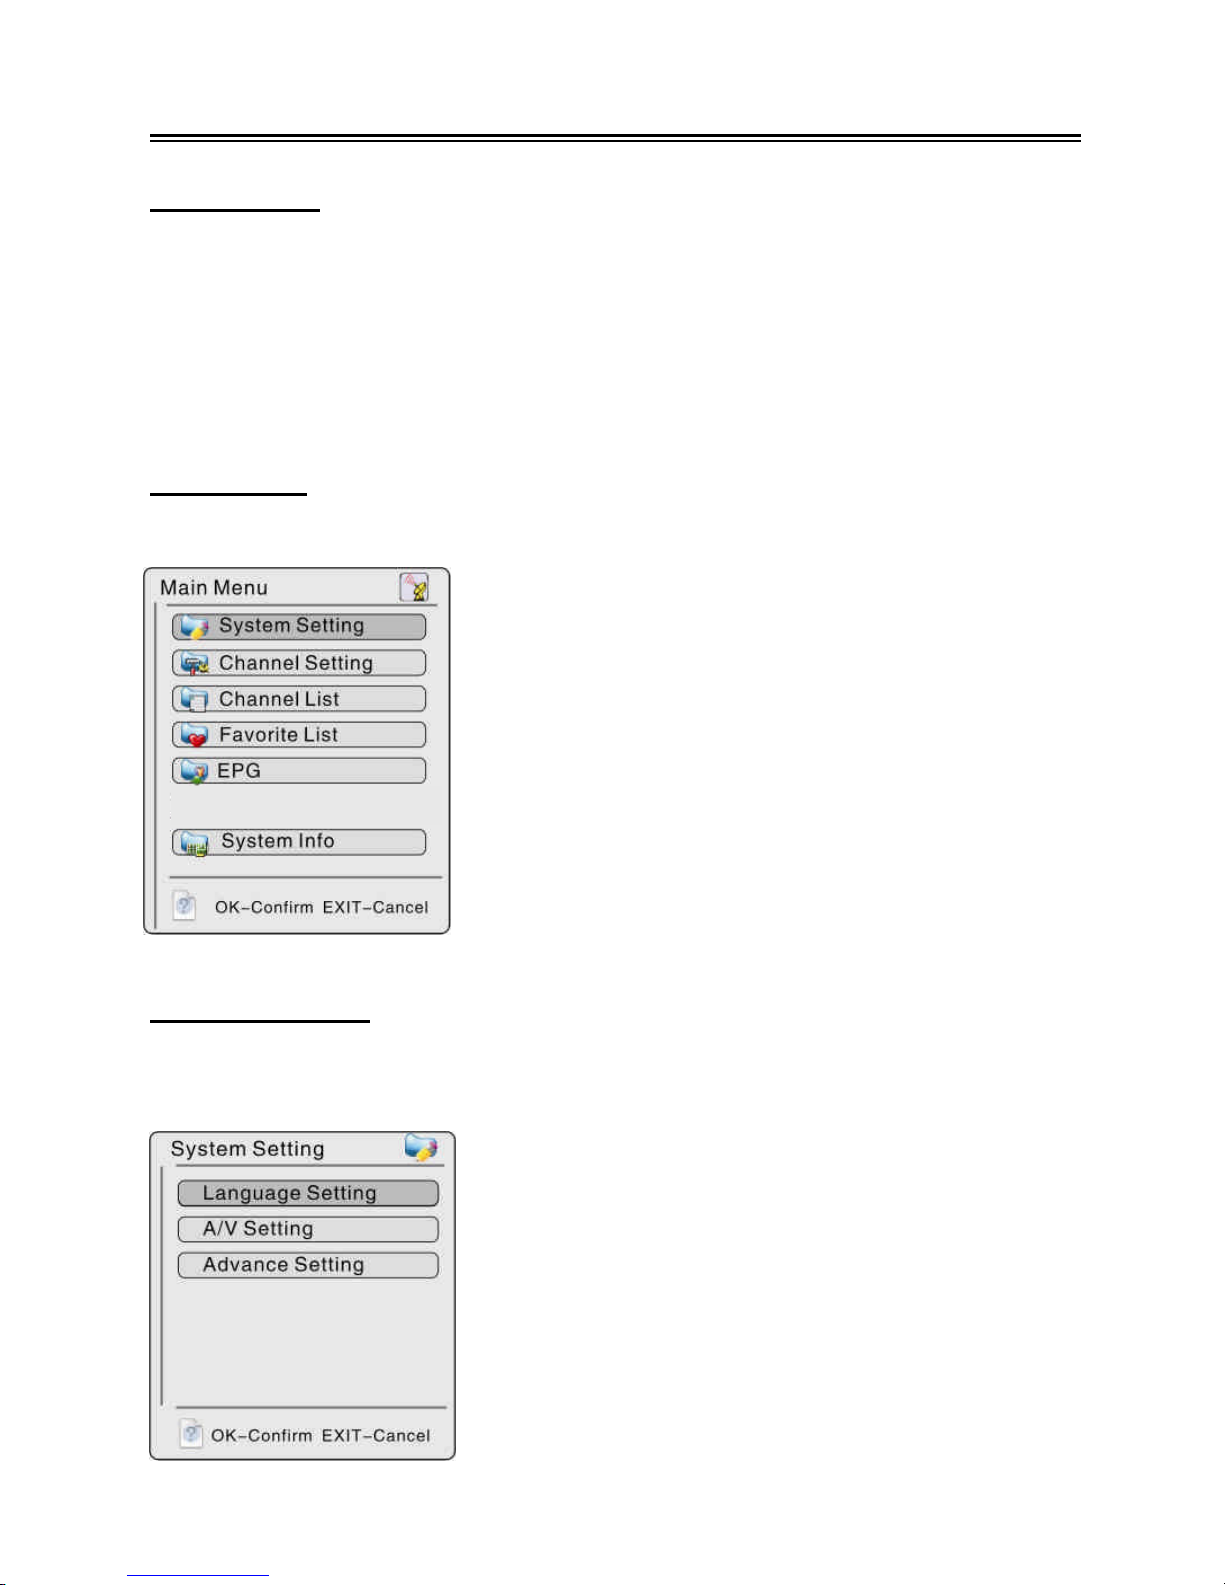
Main Menu
Press the DVD/DVB button, the screen will display as below:
System Setting
Press the direction buttons to select System Setting. Press the OK button to
enter the item, screen will display as below:
In the main menu, press the direction buttons
to select the item you want to set up.
Press the OK button to enter the item. Press the
DVD/DVB or EXIT button to exit menu.
In the menu, press the button to select the item
you want to set up, press the OK button to enter the
item. Press the DVD/DVB or EXIT button to return
to the previous menu.
Page 31
- 31 -
DVB-T Setup
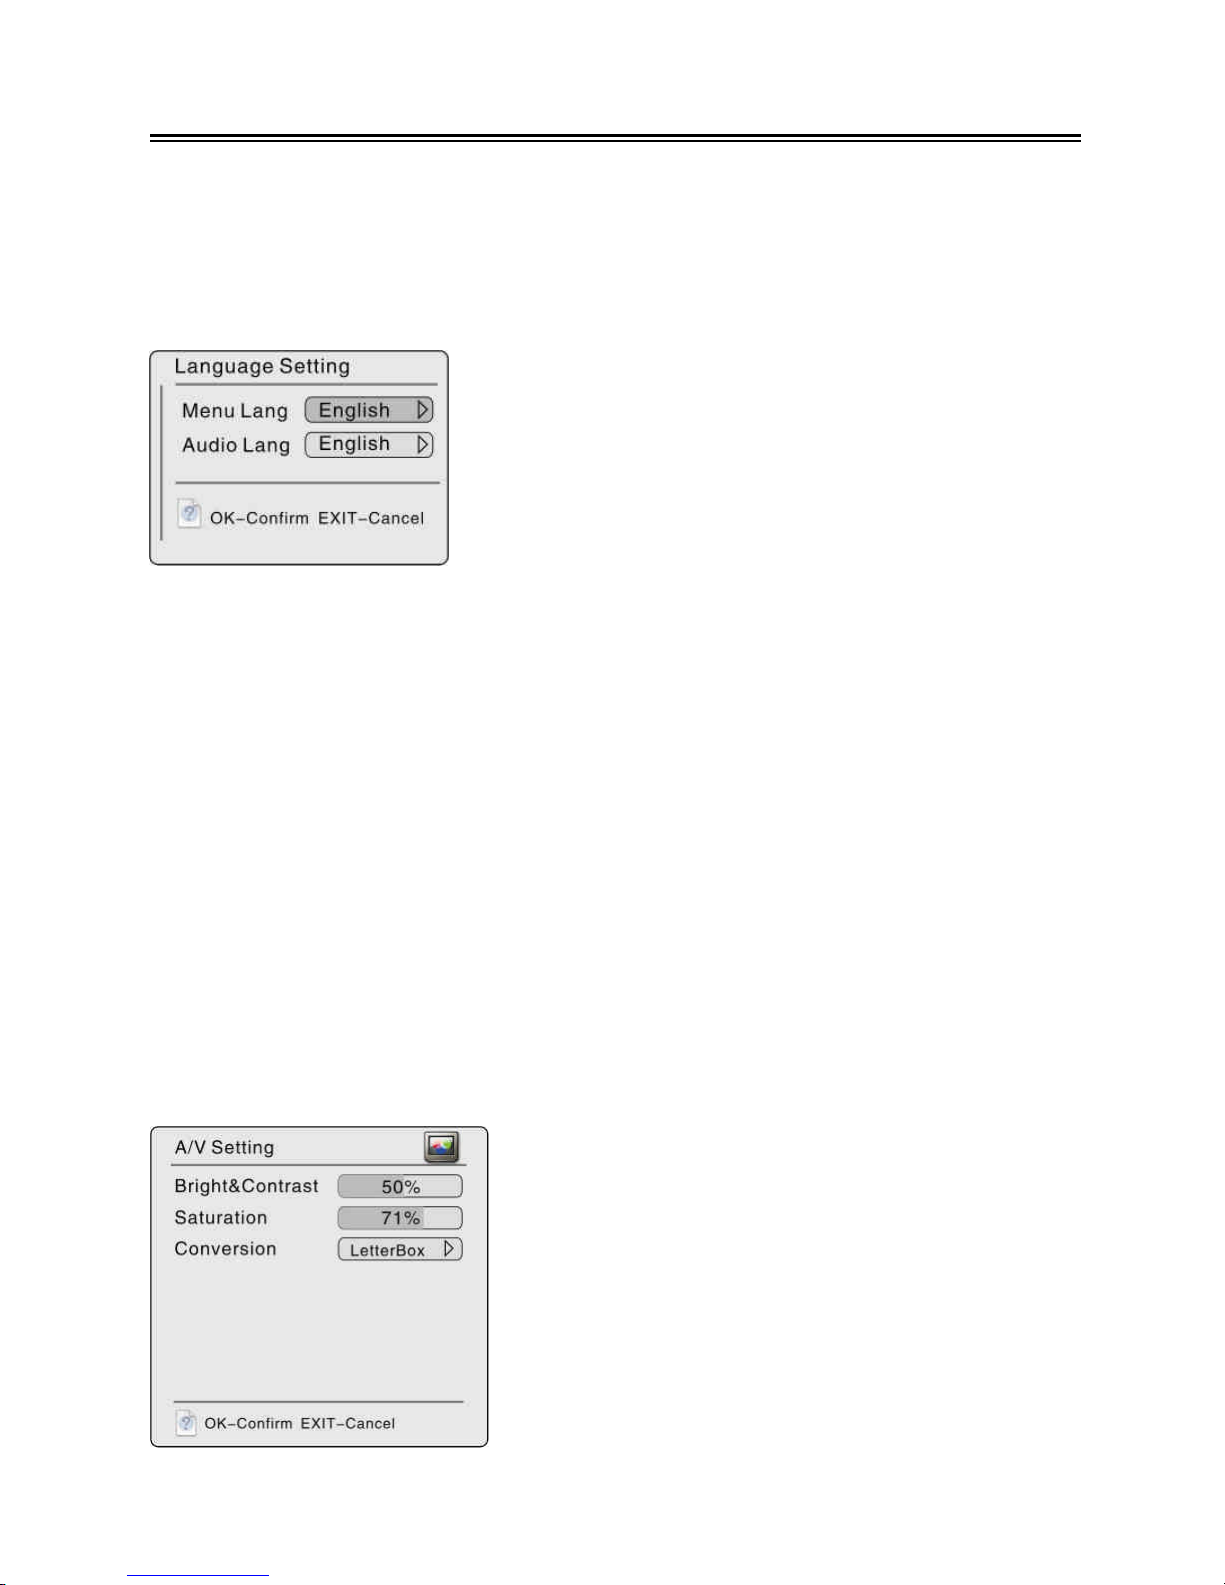
Language Setting
You can set the menu or audio language.
Press the button to select Language Setting, press the OK button to enter the
Language Setting menu, the screen will display as below:
1. Menu Language
Select Menu Lang, press the button to enter the item, then press the button to
select different menu language, press the OK button to confirm selection. During
setting, press the EXIT button to return.
2. Audio Language
Select Audio Lang, press the button to enter the item, then press the button to
select different audio language, press the OK button to confirm selection. During
setting, press the EXIT button to return.
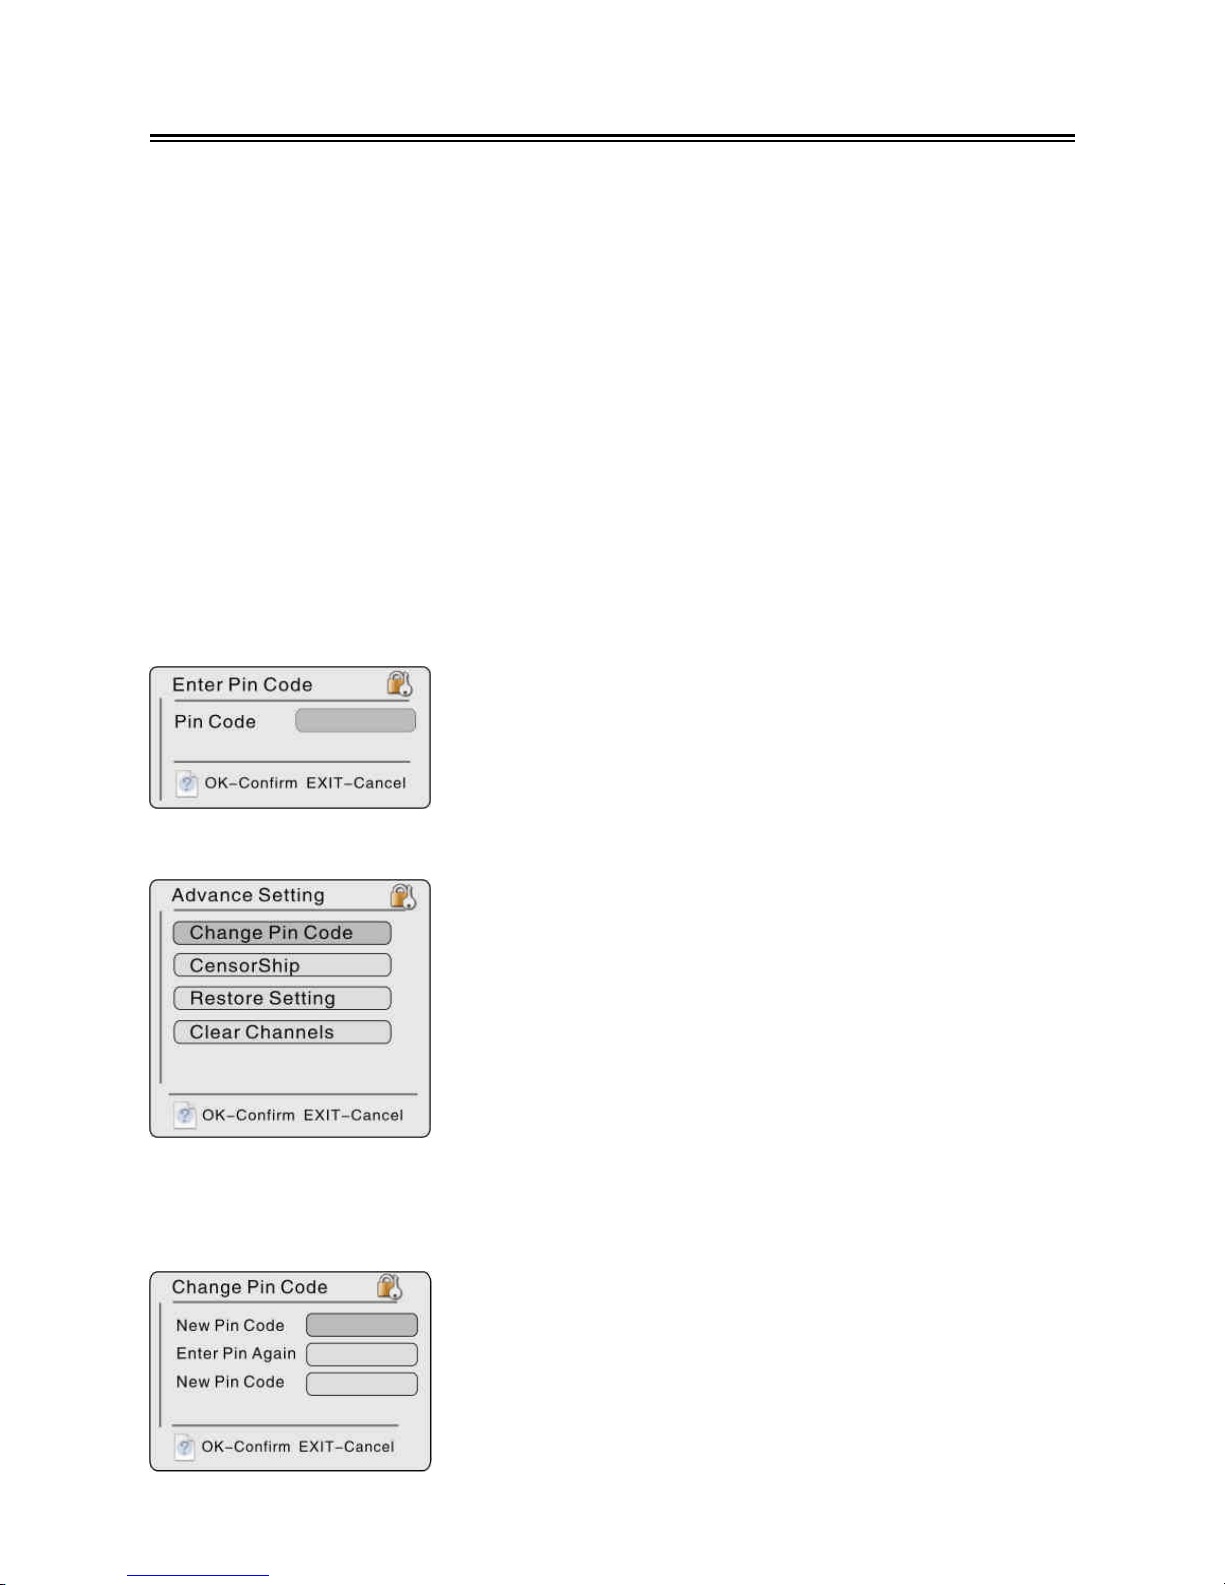
A/V Setting
This item is used to set the audio and video items.
Press the button to select A/V Setting, press the OK button to enter, the screen
will display as below:
In the menu, press the button to select Menu
Lang or Audio Lang. Press the EXIT button to
return.
In the menu, press the button to select
items, press the to adjust or enter. Press
the EXIT button to return.
Page 32
- 32 -
DVB-T Setup
1. Brightness & Contrast
Select the Bright&Contrast, press the button to adjust the value.
2. Saturation
Select the Saturation, press the button to adjust the value.
3. Conversion
Select the Conversion, press the to enter, then press the button to select Auto,
Full Frame, Letterbox or Pan Scan. Press OK button to confirm and return. Press the
or EXIT button to return.
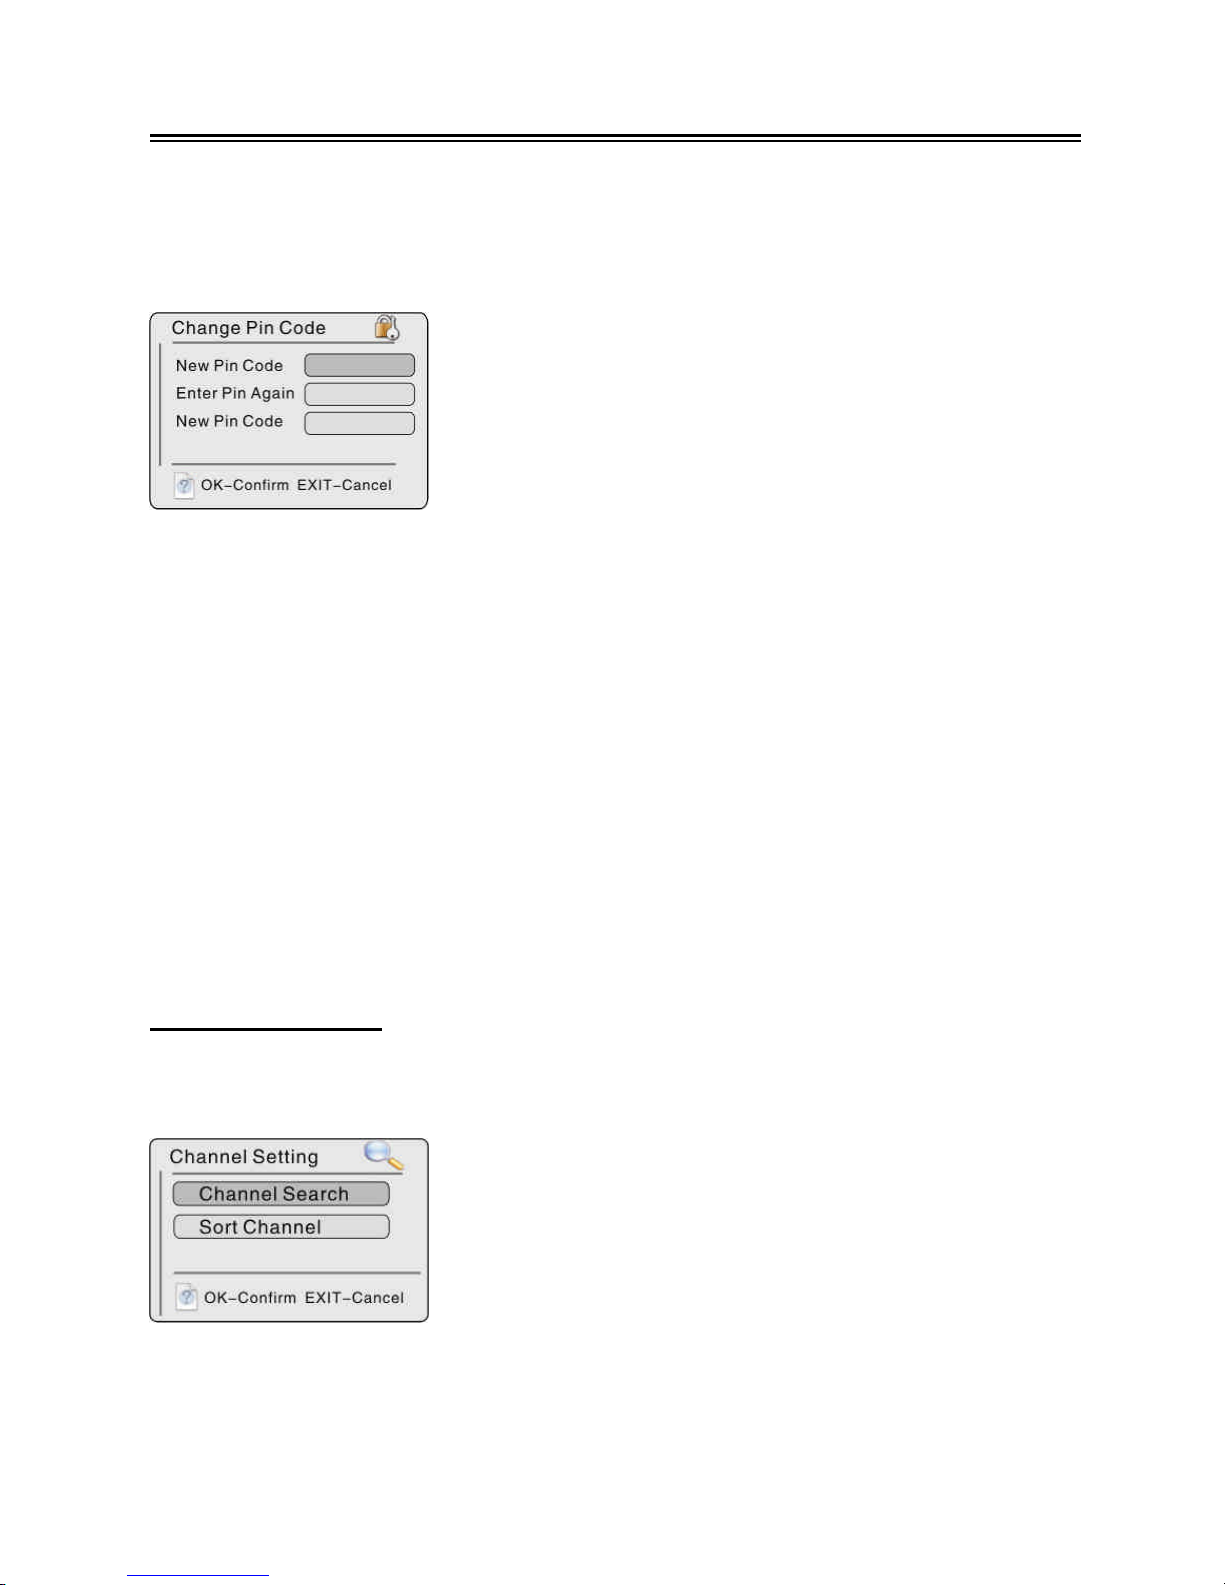
Advance Setting
Press the button to select Advance Setting, press the OK button to enter, the
screen will display as below:
When input the PIN code, press the OK button to enter the menu shown as below:
1. Change Pin Code
In the menu, press the button to select Change Pin Code, press the OK button to
enter the menu shown as below:
In the menu, use the number buttons to input the pin
code, press the OK button to confirm.
The default code is:888888
In the menu, press the
button to select item.
Press OK button to enter. Press the EXIT button to
return.
In the menu, according to the indication to input the
pin code. Press the EXIT button to return.
Page 33
- 33 -
DVB-T Setup
1. Change Pin Code
In the menu, press the button to select Change Pin Code, press the OK button to
enter the menu shown as below:
2. Censorship
Press the button to select Censorship, press the OK button to enter the setup
menu, then press the button to enter, press the button to select items, press
the OK button to confirm the selection,press EXIT button to return.
3. Restore Setting
Press the button to select Restore Setting, then press the OK button to return to
the default status, or press the EXIT button to return.
4. Clear Channels
Press the button to select Clear Channels, then press the OK button to clear all
the channels, or press EXIT button to return.
Channel Setting
Select the Channel Setting, press the OK button to confirm and enter the channel
setting menu, shown as below:
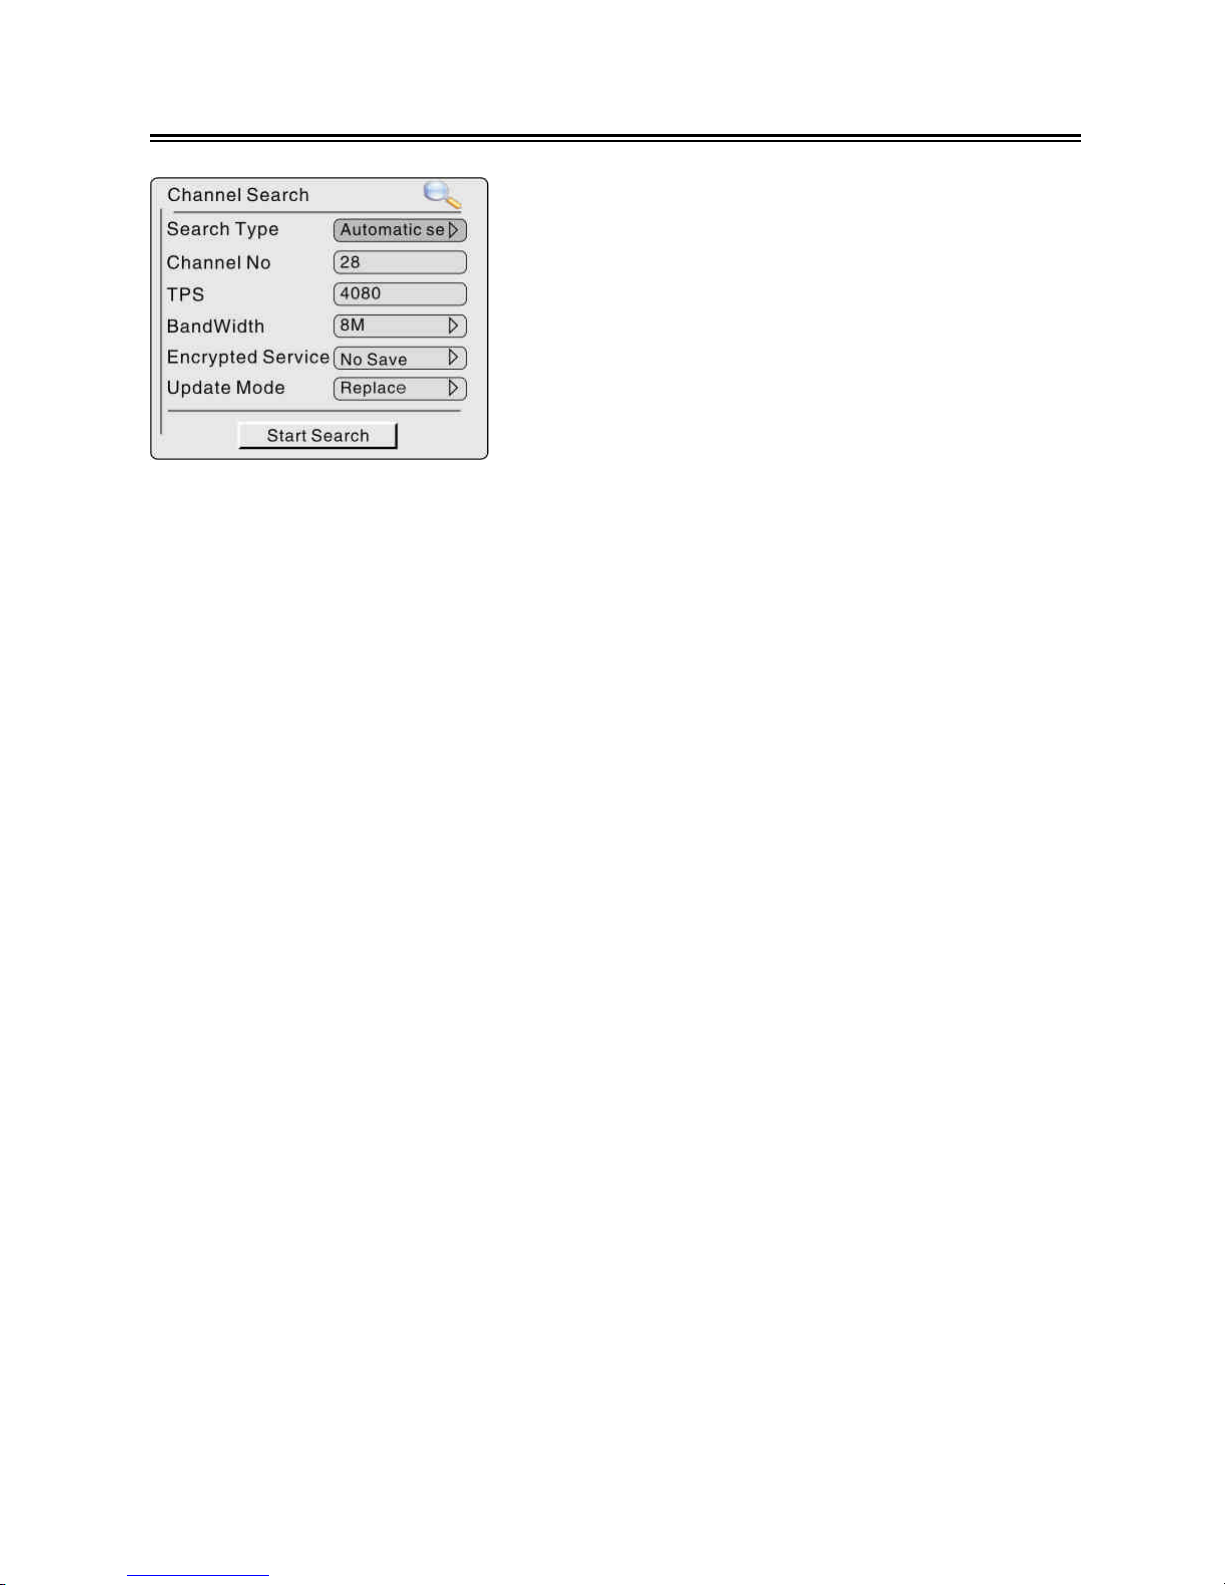
Channel Search
Use the direction buttons to select Channel Search, press the OK button to
confirm, the screen will display as below:
In the menu, according to the indication to input the
pin code. Press the EXIT button to return.
In the channel setting menu, press the direction
buttons to select the item you want to set up, press
the OK button to enter the item. Press the EXIT button
to return tothe previous menu.
Page 34
- 34 -
DVB-T Setup
1. Search Type
Select the Search Type, press the button to enter, then press the direction
buttons to select Auto Search, Manual Search or Scan By NIT, press OK button to
confirm. Press the EXIT or button to return.
2. Channel No.
Select the Channel No, use the number buttons to input the channel number, press
the button to delete the incorrect input. Press the button to enter the character
and number list. In the list, press the direction buttons to select character or number,
press the OK button to confirm input, press the EXIT button to return.
NOTE: this item is not available when the Search Type is Auto Search.
3. TPS
Select the TPS, use the number buttons to input, press the button to delete the
incorrect input. Press the button to enter the character or number list, in the list,
press the direction buttons to select character or number, press the OK button to
confirm input, press the EXIT button to return.
NOTE: this item is not available when the Search Type is Auto Search.
4. Bandwidth
Select the Bandwidth, press the button to enter, then press the direction
buttons to select items, press OK button to confirm, press the EXIT or button to
return.
5. Encrypted Service
Select the Encrypted Service, press the button to enter, and then press the
direction buttons to select Save or No Save, press OK button to confirm, press
the EXIT or button to return.
In the channel search menu, press the
direction buttons to select the item you want
to set up, press the button to enter the item.
Press the EXIT button to return to the previous
menu.
Page 35
- 35 -
DVB-T Setup
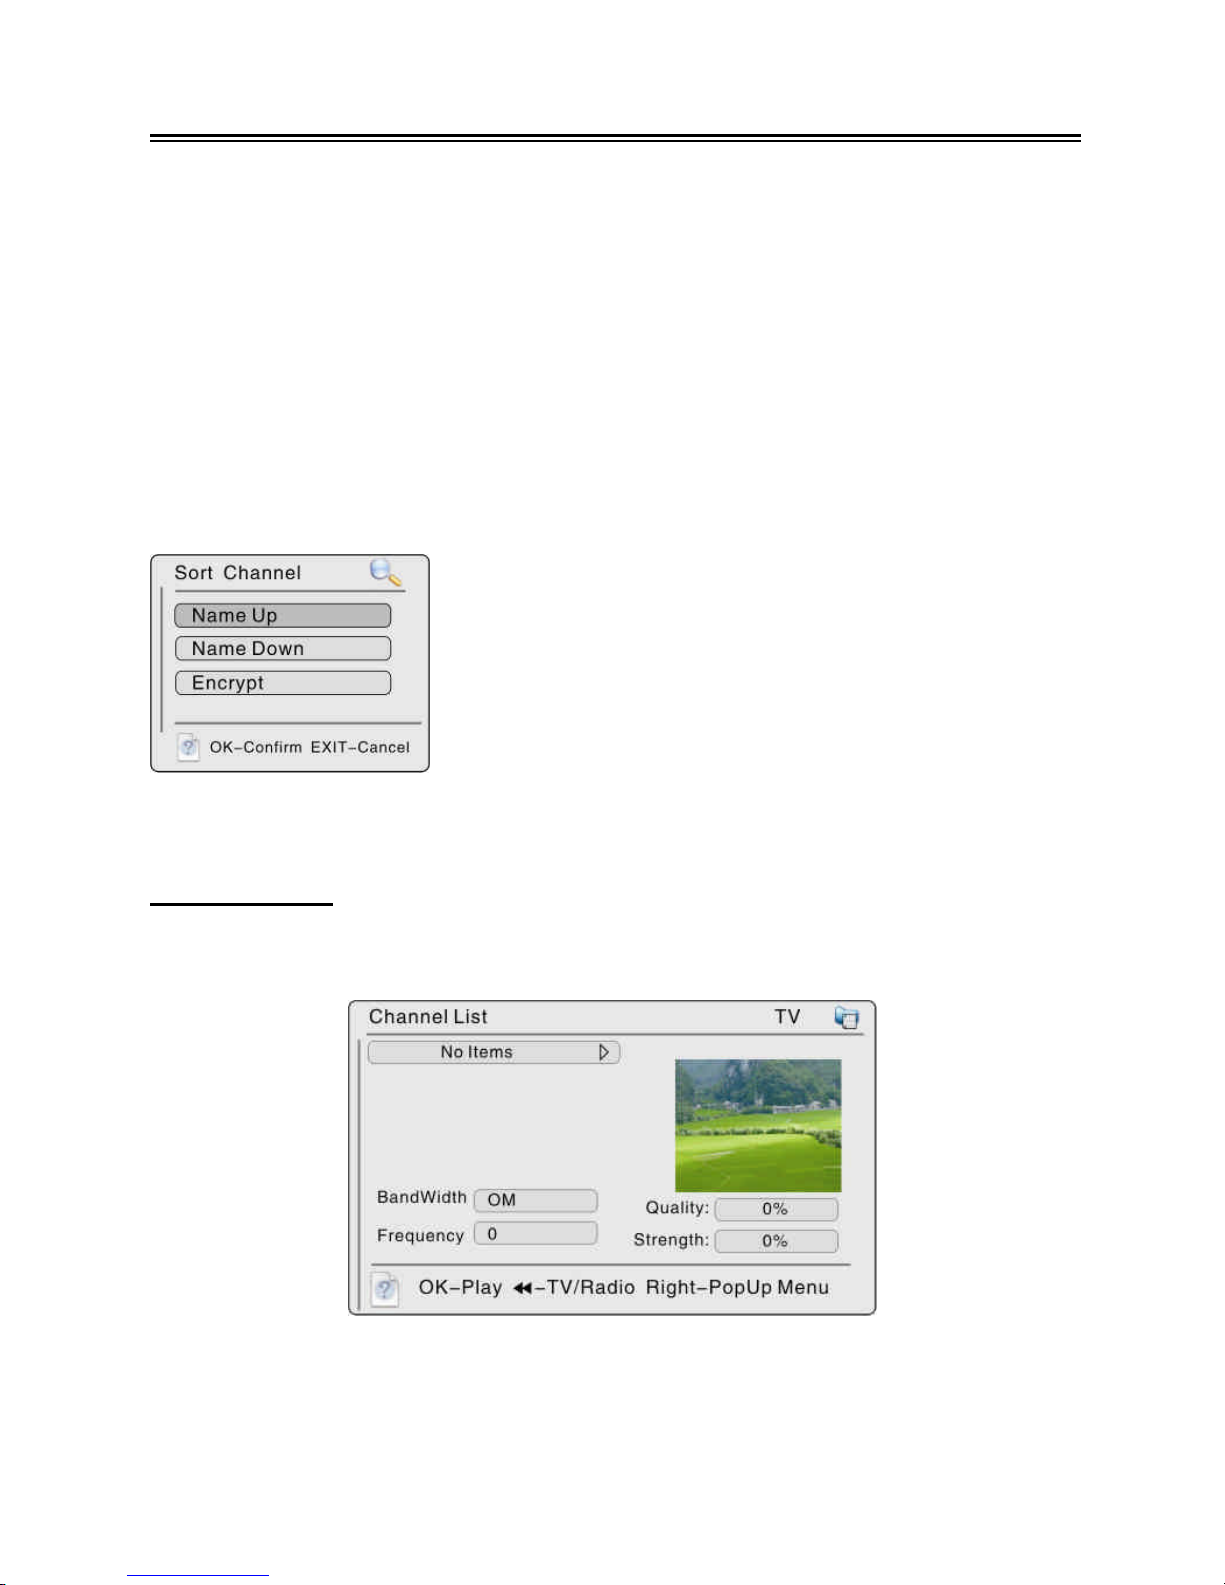
6. Update Mode
Select the Update Mode, press the button to enter, and then press the direction
buttons to select Append or Replace, press OK button to confirm, press the EXIT or
button to return.
After setting these items, use the direction buttons to highlight the Start Search,
and press the OK button to start searching. During searching, press the DVD/DVB
button or EXIT button to stop searching.
Sort Channel
Select Sort Channel, press the OK button to enter, the screen will display as below:
This setting is used to name up ,name down or encrypt the selected channel.
Channel List
Select the Channel List, press the OK button to confirm and enter, the screen will
display as below:
For the first time setting, you should add some programs into the channel list. Press
the OK button to start playback, press the button to select TV or Radio, press
theright direction button to display a menu.
In the menu, press the direction buttons to select
the desired item, press the OK button to confirm.
Press the EXIT button to return to the previous menu.
Page 36
- 36 -
DVB-T Setup
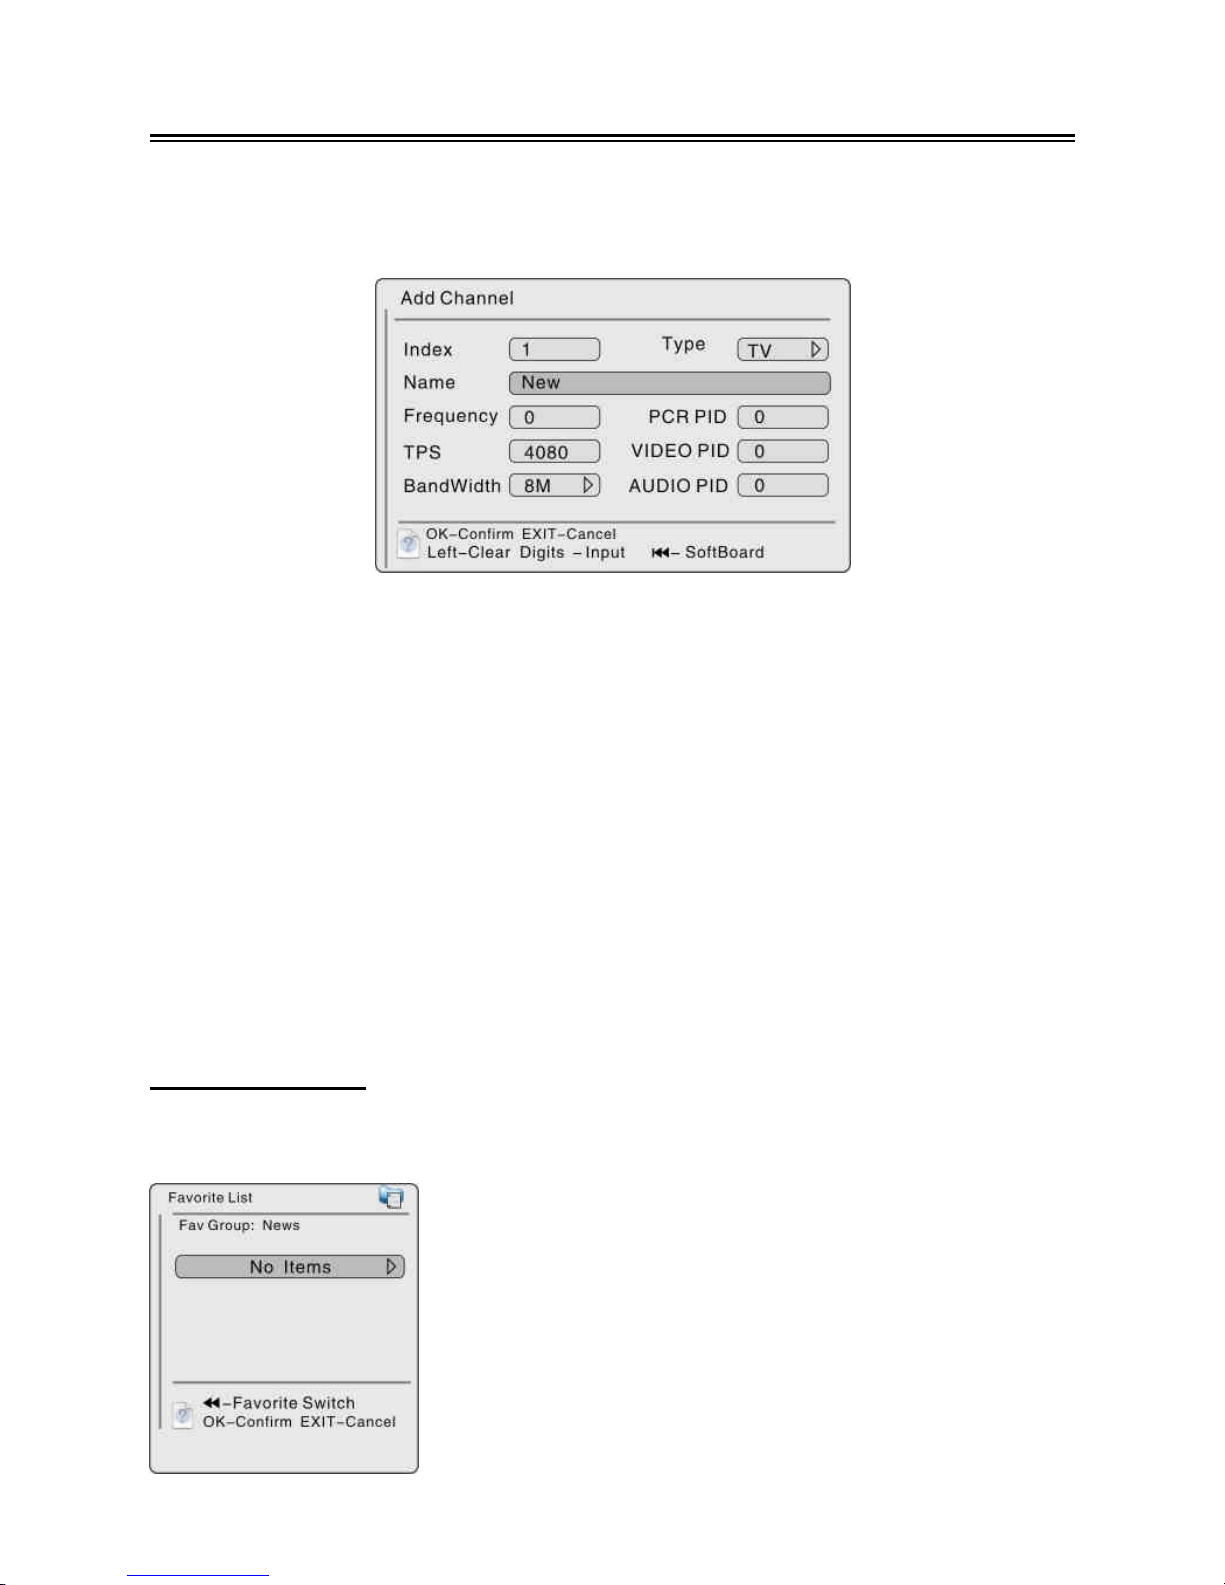
Add Channel
Press the button to enter Add menu, press the OK confirm, the screen will display
as below:
Press the direction buttons to select the desired item, press the button to enter, or
use the number buttons to input, press the button to enter the character and
number list. In the list, press the direction buttons to select character or number, press
the button to delete the incorrect input, press the OK button to confirm input, press
the EXIT button to return.
Repeat the above procedure, you can set many programs. In the channel list, the set
program will be displayed with the name and Index. You can go on with some
operation on the set program. First press the button, then use the button to
select Add, Modify, Delete, Lock/Unlock or Move.
Select Modify to modify the information of the program.
Select Delete to delete the program.
Select Lock/Unlock to lock or unlock the program, you should input the pin code.
Select Move to change the sequence of this channel.
Favourites List
Select the Favourites List, press the OK button to enter, the screen will display as
below:
In the menu, press the button to select different Fav
Group.
Page 37
- 37 -
DVB-T Setup
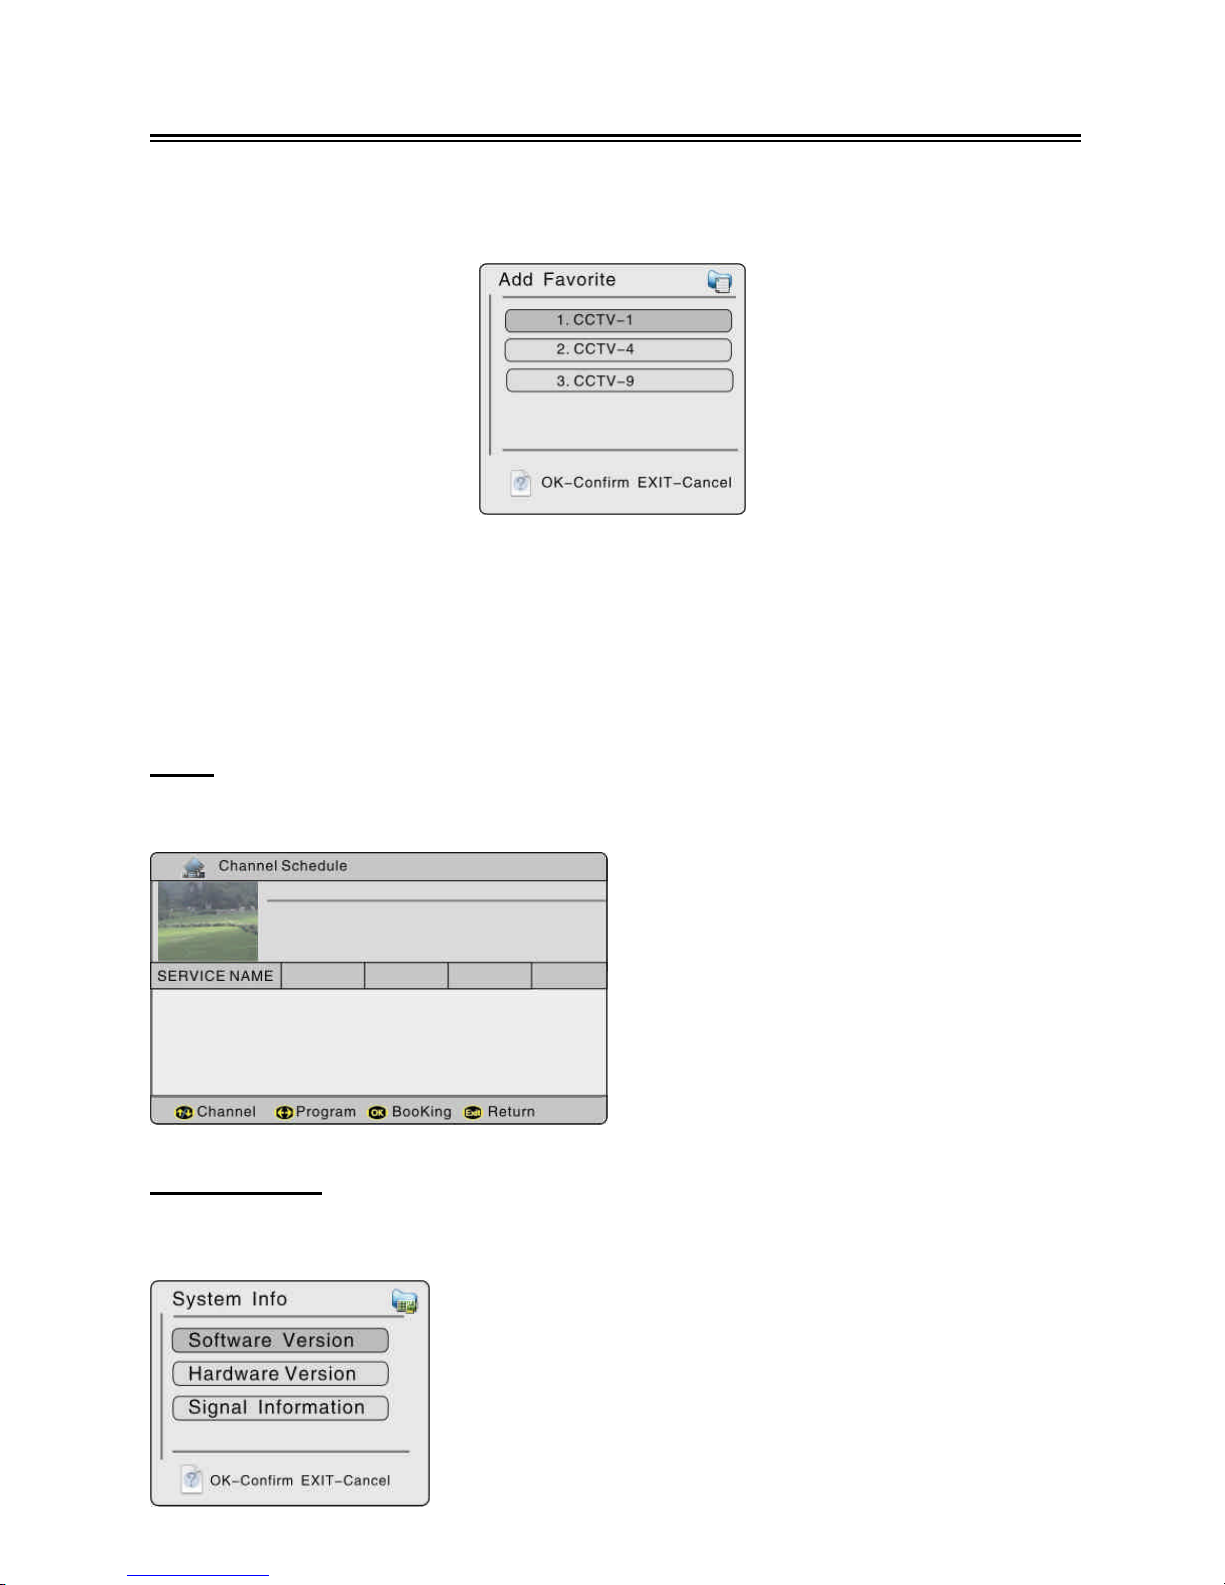
Add Favourite
Press the button to enter, press the OK button, the screen will display as below:
During initial setting, you should set the channel list at first. Then you can select
channels from the channel list, and add the channel into the favourites list. Also you
can delete the channel from the favourites list.
Press the direction button to enter, and then use the direction buttons to select
channels, press the OK button to add, press the EXIT button to return.
EPG
Select EPG, press the OK button to enter, the screen will display as below:
System Info
Select System Info, press the OK button to enter, the screen will display as below:
Use the button to select channel,
press the OK button to booking
channel, and press the EXIT button
to return.
In the menu, press the direction buttons to select
the item, press the OK button to enter. Press the EXIT
button to return to the previous menu.
Page 38
- 38 -
Installing the Unit In Kitchen
NOTE: Before installing the unit in the kitchen, please make all the connections.
Installing the unit under a cabinet
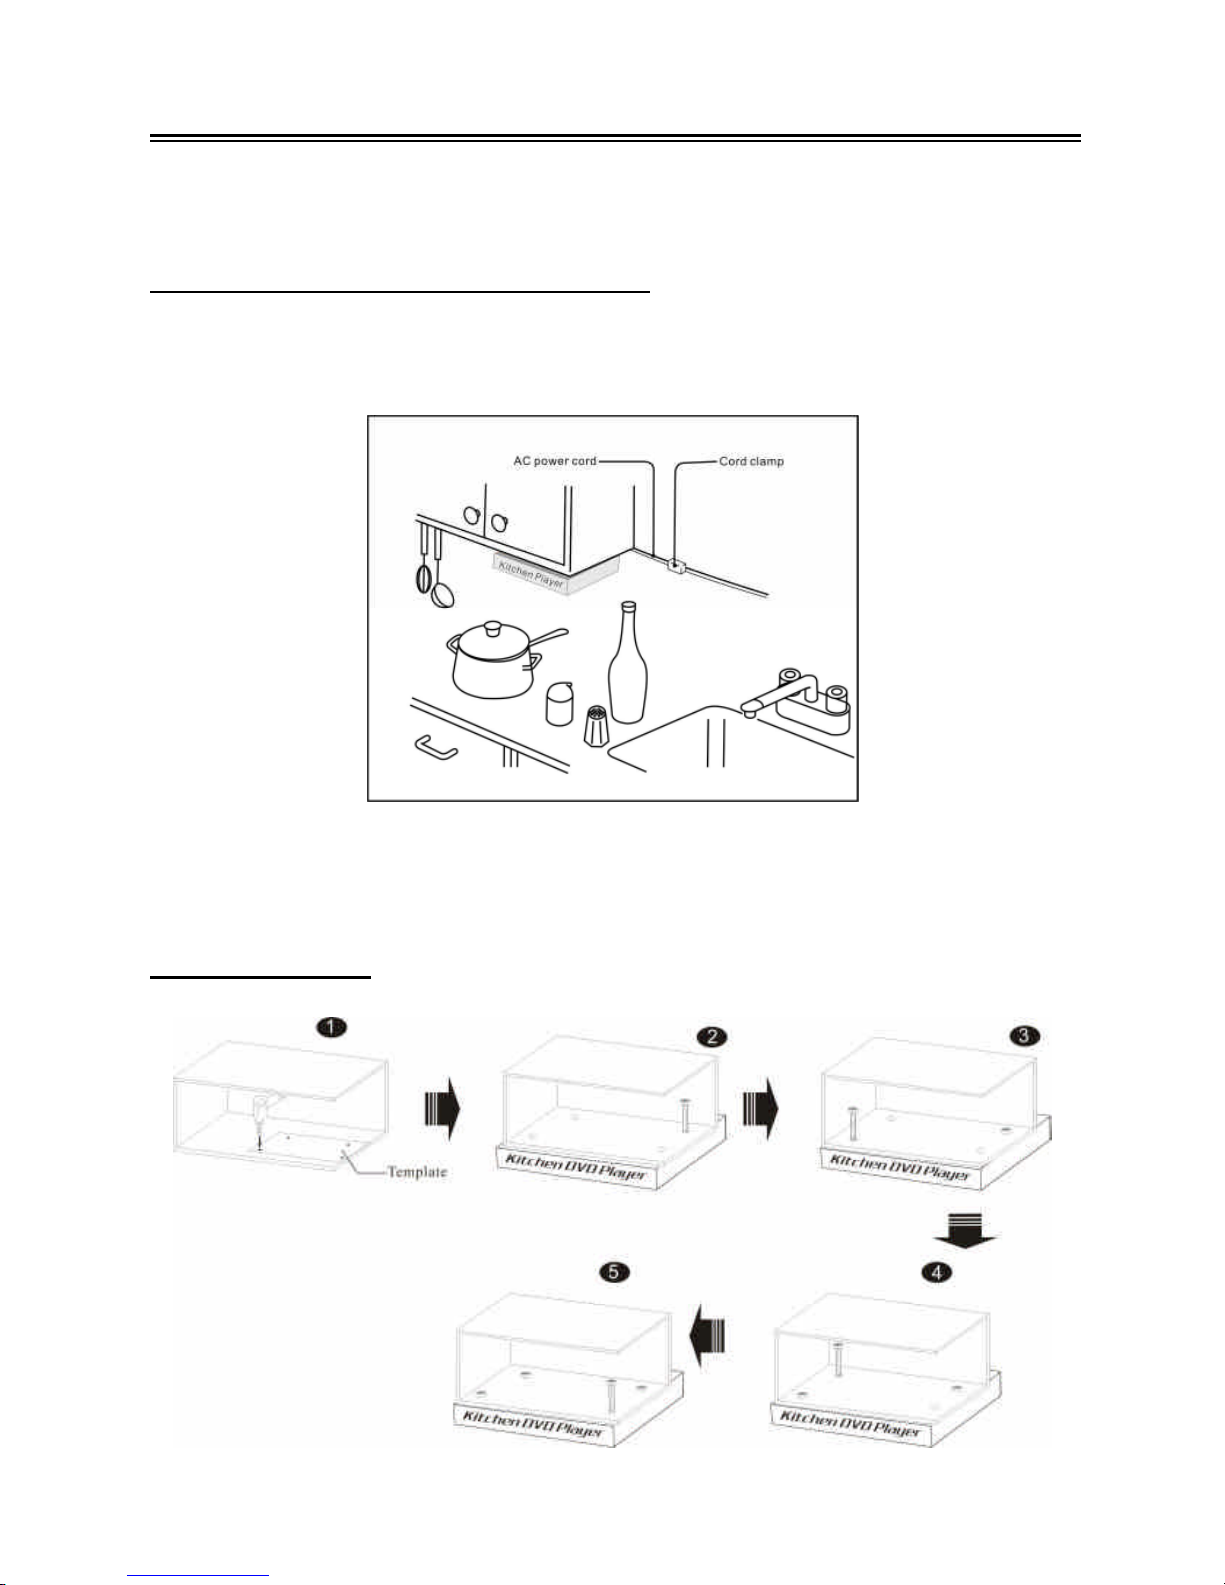
The player unit may be installed in the kitchen with or without the spacer. The
suggested mounting position of the unit is under a wall cabinet. See drawings below:
NOTE: The dimensions of the player: 7.9cmH x 37.2cmW x 28.7cmD
There should be at least 35 mm distance between the unit and the wall.
Installing steps
Page 39

- 39 -
Installing the Unit in Kitchen
1. Mark the position of the 4 holes of screw by using the supplied paper template.
Drill four holes with diameter of 6mm.
2. If the cabinet door overhangs the shelf and obstructs the unit, adjust the unit or
the shelf height for clearance.
3. As shown in the above figures, install the unit with the supplied mounting screws
and spacers step by step. As the thickness of the cabinet is different, the
distance between the cabinet and the DVD player is different for different cabinet.
In general, around 10mm screws are inserted to the holes of the player. Please
do not over-tighten the screws. The spacer is inserted between the DVD player
and the cabinet and this can look like better.
Quick hints:
Since the unit is rather heavy, be careful while doing the installation work.
To reduce risk of fire, do not place any heating or cooking appliance beneath the
unit, especially while the LCD screen is open for viewing.
Mount the unit so that its AC power cord can be plugged directly to a wall outlet.
Do not use a converter or extension cord.
Be sure that the AC power cord has no slack when the player is working,
because the cord acts as an FM wire antenna. If the AC power cord has some
slack, wind it up to the cord hook until the cord has no slack.
The unit has a built-in ferrite bar antenna for AM radio reception. Check the
condition of AM reception before fixing in position.
Install the unit as far as possible from other electrical devices such as:
refrigerators, microwave oven, fluorescent lamp, etc.....
Page 40
- 40 -
Troubleshooting
SYMPTOM CHECK ITEM
The player cannot
play.
Make sure a disc is loaded.
Make sure the disc is loaded with label side up.
Disc should be clean, not dirty or warped.
Player’s region code should be the same as the region
code of the DVD disc.
Make sure water condensation has not occurred. If it
has, remove the disc and keep the player power on
until the moisture evaporates.
There is no sound.
Make sure system connection is correct.
Make sure the player is not under muting mode.
Press the MUTE button to turn on the speaker.
Make sure the volume is adjusted to the lowest.
Adjust the volume upward.
Is your disc dirty or warped? Clean or replace it.
There is no picture
or picture is
unsteady. Position
of the picture is
incorrect.
Make sure the video type of the AV signal source is
PAL.
Make sure system connection is correct.
Is your disc dirty or warped? Clean or replace it.
Cannot continue to
play and plays a
section repeatedly.
Make sure the player is not in A-B repeat status.
Press A-B button to cancel A-B repeat status.
Is your disc dirty or warped? Clean or replace it.
The remote control
does not work.
Make sure there are no obstructions between the
remote control and the player.
Make sure the remote control is pointing at the player.
Make sure batteries are inserted correctly (check
polarity).
Replace weak batteries.
Other Notes: Static or other external interference may cause the player to work
abnormally. If this occurs, unplug the power-supply cord from the outlet and plug it in
again to reset the player. If the problems persist, then please disconnect the power
and consult a qualified technician.
Page 41
- 41 -
Specifications
LCD Screen Size 10.2 inches
Laser Wavelength Wavelength: 780/650nm
Video System PAL
Frequency Response 20Hz~20kHz ±2.5dB
Audio Signal-to-Noise ≥85 dB
Audio Distortion + Noise ≤-70dB (1KHz)
Channel Separation ≥70dB (1KHz)
Dynamic Range ≥80dB (1KHz)
System PLL
AM 531~1602KHzRadio
Frequency
Range
FM 87.5~108MHz
Power AC100V~ 240V, 50/60Hz
Power Consumption ≤30W
Dimensions 7.9cmH x 37.2cmW x 28.7cmD
Weight About 3.1 kg
DESIGNANDSPECIFICATIONSARESUBJECTTO CHANGE WITHOUTNOTICE
MPEG Layer-3 audio coding technology licensed from Fraunhofer IIS and Thomson.”
Manufactured under license from Dolby Laboratories.
“Dolby” and the double-D symbol are trademarks of Dolby
Laboratories.
Confidential unpublished works. ©1992 -1997 Dolby
Laboratories, Inc.
All rights reserved.
Page 42
- 42 -
WARRANTY TERMS AND CONDITIONS
1) Coverage:
Claims can be made only upon presentation of a valid proof of purchase
such as an invoice or receipt.
2) Application:
The present warranty enters into effect on the date of delivery to the user.
3) Period of validity:
2 years warranty for the device - 90 days for the accessories (components
of the product).
4) Validity of warranty:
a) Without prejudice as to the legal guarantee according to article 1641ff of
the civil code, the products are under warranty if used according to the
directions included in the instructions.
b) The warranty is valid only for the first user conditionally to the device being used wisely and
under normal conditions, i.e. suitable for the product.
c) The warranty covers all repairs and/or replacements of components and accessories which are
recognized as being defective by our technical department, without any granting of damages.
d) The performance of the obligations resulting from the warranty does not entail an extension or
renewal of the warranty period, except in case of components which are replaced and which fall
under the legal guarantee (i.e. in case of exchange or repair under warranty, the period will be
neither extended nor renewed. In this case, the warranty and the period of the first warranty will
remain applicable).
5) Damages not covered:
As the device is recognized as being in good working condition and without noticeable defect,
THE WARRANTY DOES NOT COVER:
transport costs, nor charges relating to an intervention at the address of the purchaser. Scratches,
splinters or marks in the packaging of the device or its accessories which were not noted at the
time of delivery / breakable accessories, except in case of manufacturing defects recognized by
our technical department. Moreover, we wave any liability for general damages resulting from a
defect in the functioning of our devices and which are not relating to the devices themselves. This
will in no case entitle to any indemnification for damages caused to disks because of a halt of the
device.
6) Exemptions from the warranty are the following:
Interventions due to a faulty installation or connection / a failure in the electrical installation of the
premises or vehicle or of nominal values provided for the supply of the device / a wrong
manipulation or bad use by the user, insufficient or incorrect maintenance / a fall of or a blow to
the device or an accessory / a lack of protection of the device and its accessories at the time of
the transport by or for account of the user.
7) The warranty is cancelled:
For devices and accessories having been repaired or altered by persons not authorized by us or
whose manufacturing number was altered or deleted.
8) For repairs:
Please contact your retailer.
9) For any disputes or litigation:
The law courts of Luxembourg are exclusively competent.
10) For all information contact:
SEVIC SYSTEMS Luxembourg S.A., Zone Industrielle Breedewues,
L-1259 Senningerberg, G.D. Luxembourg
www.sevic.com
 Loading...