

Page 1

SEUIC
User Manual
AUTOID®Series Mobile Computer
Wearable Ring Product User Manual
Version 2.1
I
Page 2

2015 SEUIC Company. All Copyrights Reserved.
The user manual of AUTOID®wearable ring product is provided by
Jiangsu SEUIC Technology Co., Ltd. The information contained in this
manual is produced in accordance with the current information, subjected
to amendments without prior notice.
No part of this manual may be reproduced, transmitted, distributed,
and stored in any form or by any means, without the prior written
permission of SEUIC company.
Company address:
NO.15 Xinghuo Road,Nanjing New & High Technology Industry Develo
pment Zone,210061,Nanjing City,Jiangsu Province,China
Tel: 400-777-0876
Company official website:www.seuic.com
Product website:www.chinaautoid.net
Mailbox:[email protected]
II
Page 3

Document issue record
Version Issue date description
V2.0 Jul. 20,2017 Complete CE6.0/Android 5.1/IOS English version
V2.1 Sep.27,2017 Complete CE6.0/Android 5.1/IOS English version
III
Page 4

Contents
Chapter 1 Usage notes..................................................................错误!未定义书签。
1.1 Notes of Laser Scanning Engines..................................................................... 1
1.2 Safety notes.....................................................................
1.3 Maintenance notes...........................................................
Chapter 2 Device layout................................................................................................. 3
Chapter 3 Keyboard....................................................................................................... 3
Chapter 4 Quick Start Guide.......................................................................................... 4
4.1 First use............................................................................................................. 4
4.2 Start................................................................................................................... 4
4.3 Power off........................................................................................................... 4
4.4 Reset..................................................................................................................4
Chapter 5 Charging the battery...................................................................................... 5
5.1 Charging time....................................................................................................5
5.2 Charging temperature........................................................................................5
5.3 Battery power supply........................................................................................ 5
5.4 Notes for battery use......................................................................................... 5
5.5 LED indicators.................................................................................................. 6
错误!未定义书签。
错误!未定义书签。
Chapter 6 Introduction to work modes...........................................................................7
6.1 Methods for wearing......................................................................................... 7
6.2 Bluetooth connection........................................................................................ 7
6.3 Scan settings......................................................................................................8
6.4 On-line scan...................................................................................................... 9
6.5 Off-line scan....................................................................................................10
6.4.1 Storage...................................................................................................10
6.4.2 Export....................................................................................................10
Chapter 7 Troubleshooting...........................................................................................11
IV
Page 5

Chapter 1 Usage Note
Your device can only use the battery and charger specified by the
Do not short circuit a charger, otherwise it will cause an electric shock,
Please do not use the charger when the power cord is damaged,
Please do not disassemble or modify the charger, otherwise it will
Seize the charger when pulling the plug, and pulling the power cord
Clean the device, battery and charger with a piece of soft and dry
Please do not use alcohol, thinner, benzene or other solutions to wipe
1.1 Caution for Laser scan engines
Laser radiation; users do not stare into beam.
1.2 Safety notes
company. Any other products may cause the battery leakage,
overheating, burst and fire.
smoke and charger damage.
otherwise it will cause fire and an electric shock.
lead to personal injuries, an electric shock, fire and charger damage.
will damage the cord, causing an electric shock and fire.
cloth.
the device.
1
Page 6

1.3 Maintenance notes
This product is waterproof and dust-proof, but it still should be kept
Keep the scanning exit window clean and avoid the scratch or damage
If this product has not been used for a long time, please make sure to
It will take a long time to fully charge the battery when it is the first
In the event of device failure, please take down the situation and
away from being operated in the environment of extremely high or
low temperature. Please refer to temperature and humidity standards
in the product specifications .
from sharp objects to it.
download the data to the computer storage.
time to work or recover from storage.
information and contact with maintenance staff.
2
Page 7
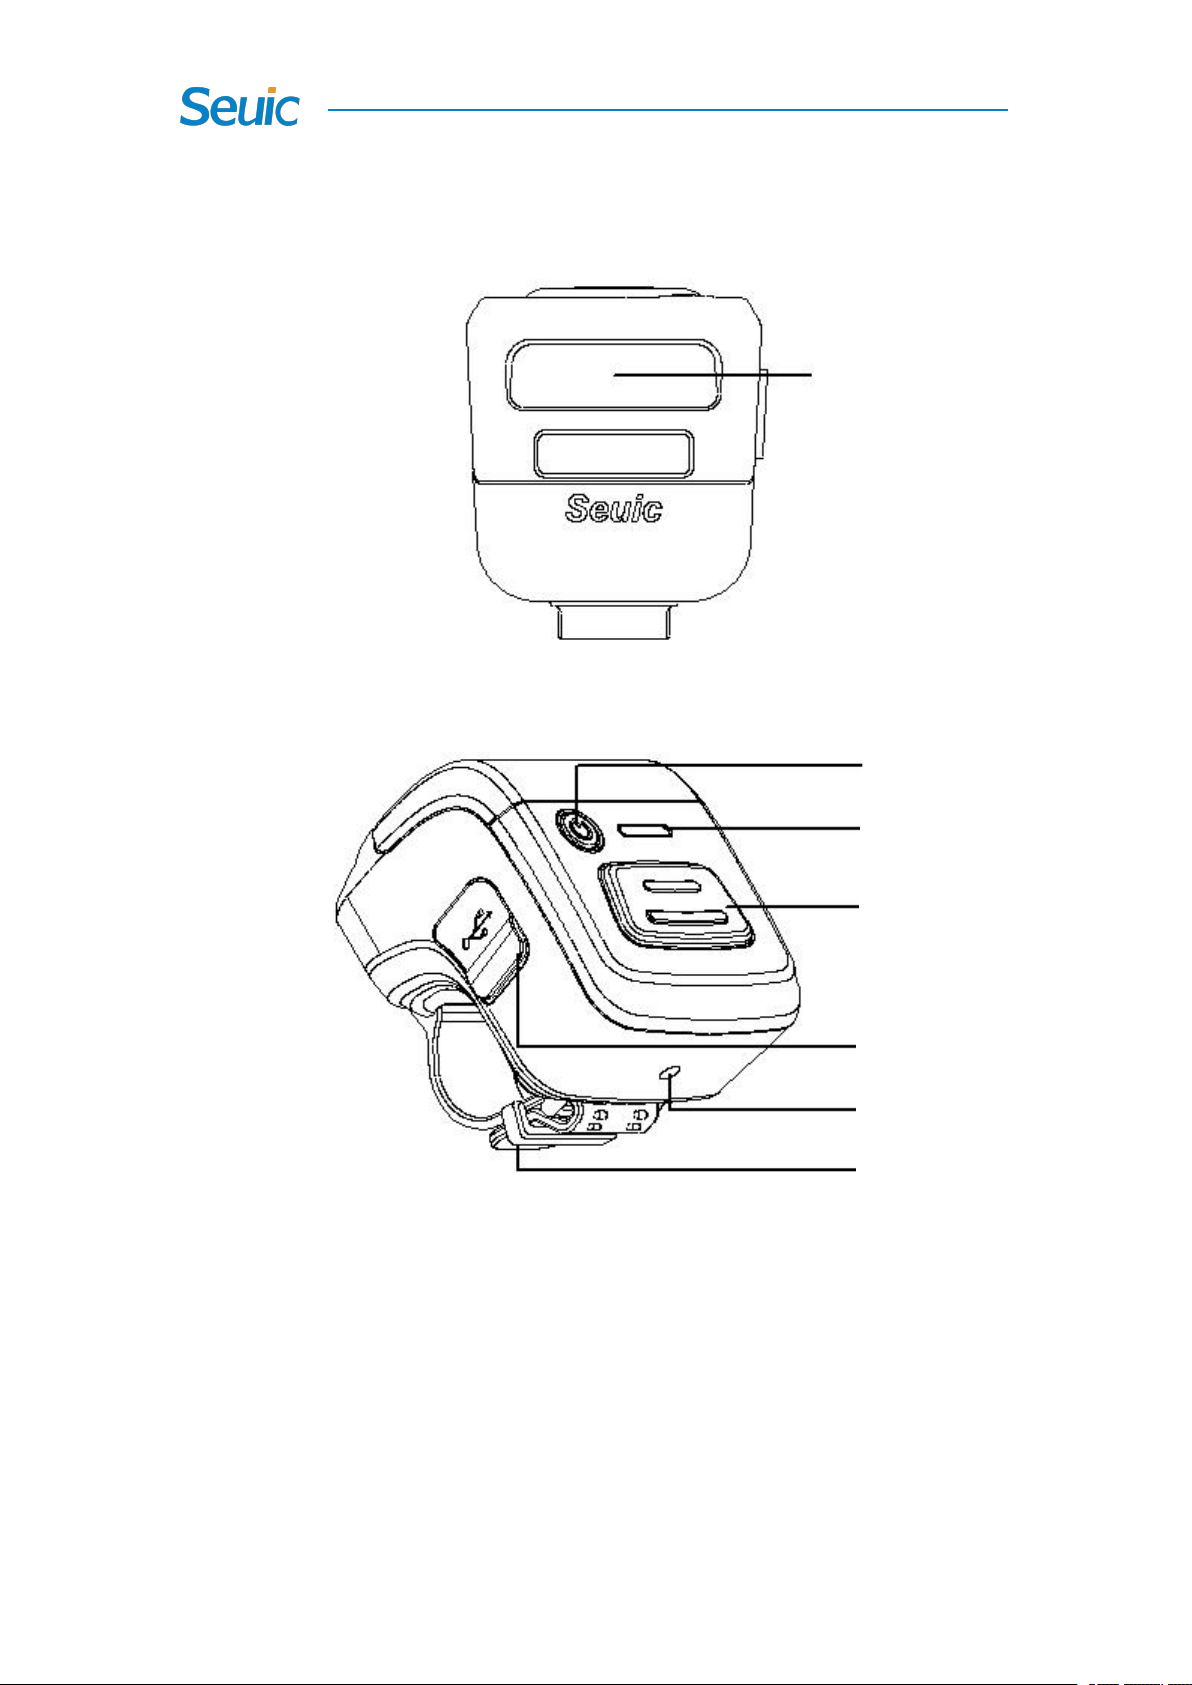
Chapter 2 Device layout
Exit Window
LED Indicator
USB Port
Buzzer
Hand strap
Scan Button
Power Button
Figure 2-1 Bottom View
Figure 2-2 Front View
3
Page 8
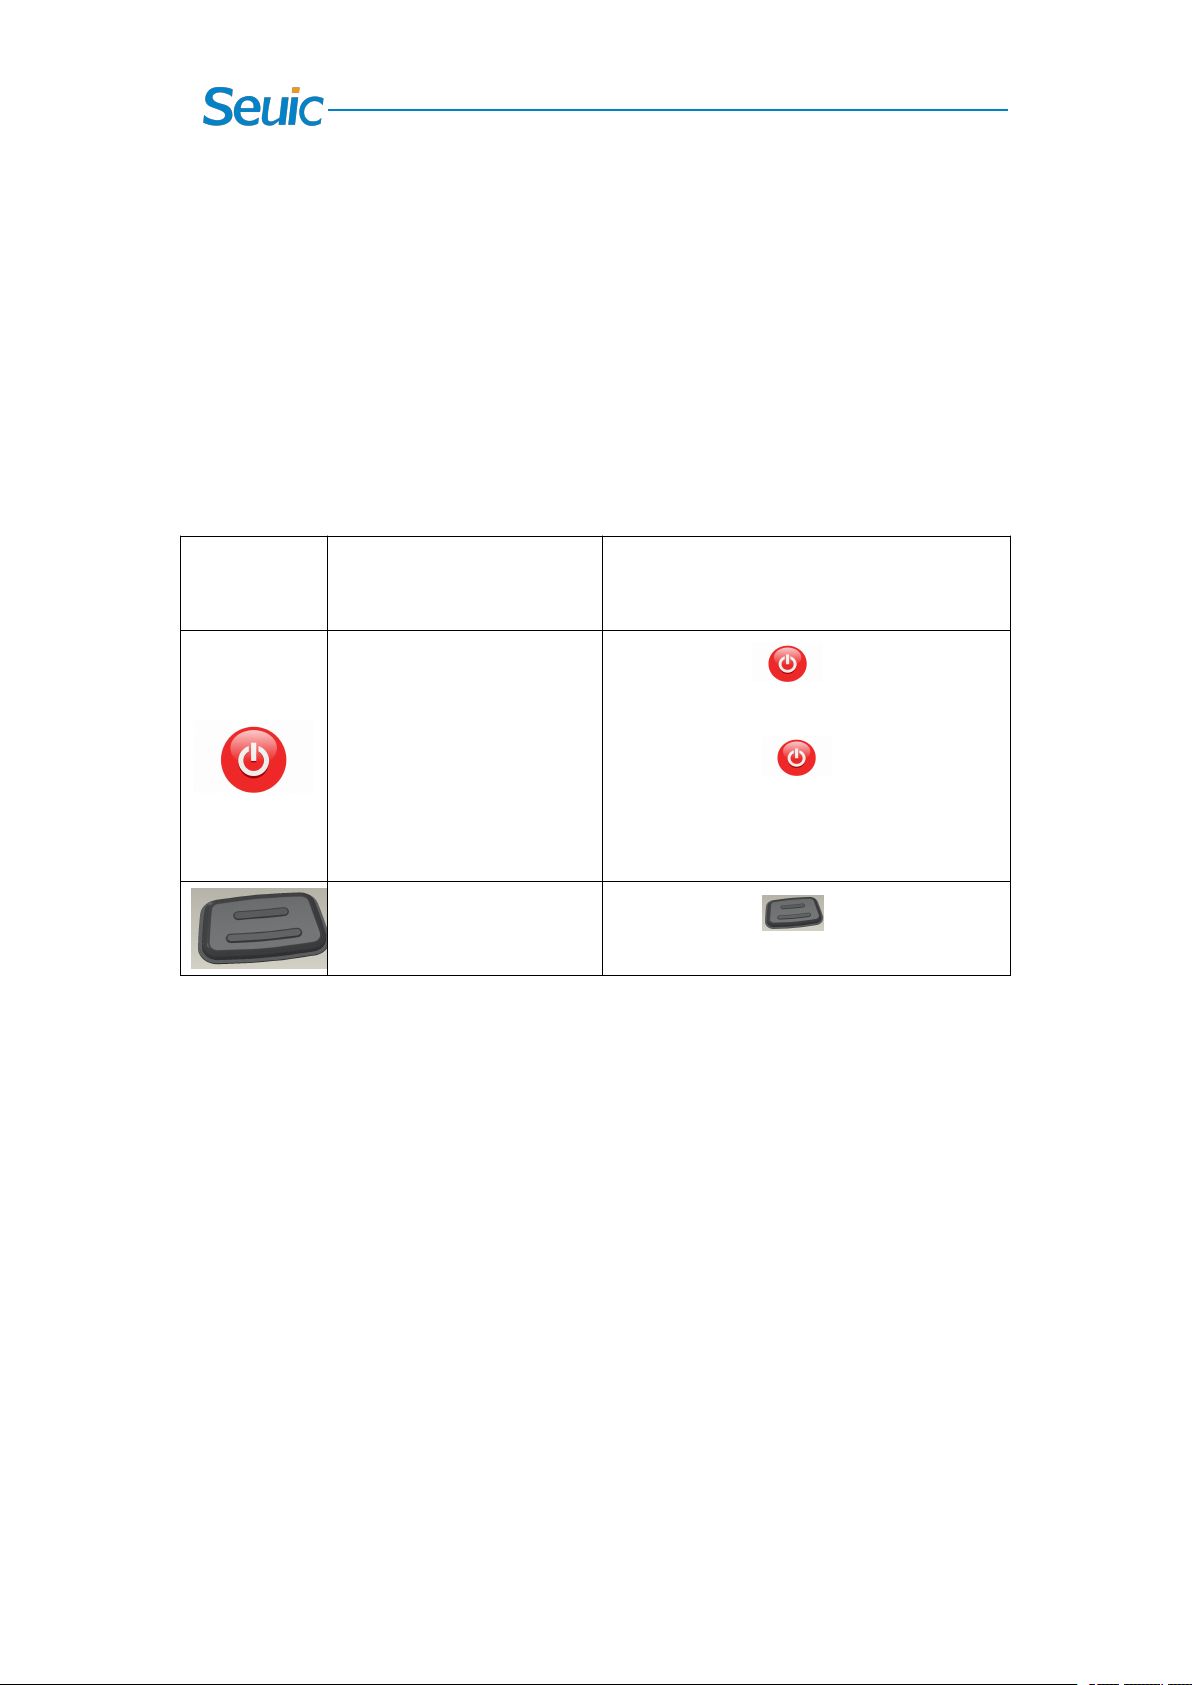
Chapter 3 Keyboard
Key
Function
Function description
Power Button, Power
off Button, Sleep Button
and Wakeup Button
Press and hold for 6s to
restart the device or power off.
Briefly press to switch into
low-power sleep mode and hold and
press for 3s to wake up the device.
Scan Button
Briefly press to initiate data
capture.
There are 2 buttons on the keyboard of AUTOID®wearable ring
device, namely Power button and Scan button.
Key Description:
Table 3-1 Key description
4
Page 9

Chapter 4 Quick Start Guide
After the device stays idle for a period of time, it will automatically
When the device is connected to a mobile computer with Bluetooth
When no connection to any mobile computer, you can scan offline.
Press and hold the Power button for 6s. The LED indicator blinks red,
Hold and press the Power button in the Standby or Sleep state for 6s,
4.1 First Use
go into sleep to save power. Before using the device for the first time,
please press and hold the Power button for 6s to Start. If the device
fails to turn on, please connect it to power source to charge.
enabled via Bluetooth pairing, you can scan online.
Note: See introduction to work modes in Chapter 6 for more information.
4.2 Start
green and blue in turn and the Buzzer beeps once at the same time.
The device vibrates and then goes into Standby mode. In the Standby
mode, briefly press the Scan button to start scanning bar codes.
4.3 Power off
the LED indicator blinks green and red in turn three times before the
device shuts down.
5
Page 10

4.4 Restart
When the device stays idle for 3mins, it will automatically go into
Briefly press the Power button and the device will immediately go
In the Sleep state, the notification indicator will also be turned off to
Press and hold the Power button for 3s in the Sleep mode and the
Sleep mode (If the Bluetooth is connected before the Sleep mode, the
connection will not be disconnected after Sleep mode; if the
Bluetooth is connected after Sleep mode, the device will be waken up;
the time to put the device to sleep can be modified through bar code
scan). In the Sleep mode, the device does not automatically
disconnect the Bluetooth connection.
into the Sleep mode.
lower power consumption (including Bluetooth indicator and low
battery indicator).
device will be waken up after the vibration.
6
Page 11

Chapter 5 Charging the battery
Due to the battery in the factory only with a small amount of
Battery: The battery fully charges about 3.5 hours for the first time
The best operating temperature is room temperature 18~25
0
C.
The battery will not be charged if the temperature lower than-100C or
If the Bluetooth connection and data capture application are enabled,
electricity used for tests, you have to use the charger to charge the
battery before using it for the first time. You can connect the device to
the adapter for charging directly.
5.1 Charging time
through the adapter, and the LED indicator is solid red while charging,
then turns solid green when fully charged.
5.2 Charging temperature
higher than 550C.
5.3 Battery power supply
the battery power will drain quickly. In non-working state, please
disconnect the Bluetooth connection and press the Power button to
7
Page 12

put the device to sleep mode, lowering power consumption.
Note: If you do not use the product for a long time, please charge the
If the battery is completely discharged, the device can’t be turned on
Battery charging time changes with temperature and battery usage.
When the battery power is low, the notification LED flashes red.
The LED indicator indicates the battery and charging status by
Without the insertion of USB, charging adapter and tail plug,
device at least once every two months.
5.4 Notes for battery use
immediately. This is a normal phenomenon. Allow the depleted
device to be charged for a few minutes before turning on the device.
Please charge it at an acceptable temperature range.
When the battery power is critically low, the device will automatically
shut down.
5.5 LED Indicator
flashing different colors:
blinking red indicates that the battery power is low. Please charge the
device as soon as possible;
8
Page 13

With insertion of USB cable, charge adapter and tail plug, solid
red indicates that the battery is charging;
With insertion of USB cable, charge adapter and tail plug, solid
When the LED indicator flashes blue continuously, indicating that the
When a bar code is scanned, the LED indicator flashes green once.
green indicates the battery is fully charged.
Bluetooth has been successfully connected and the device is at
Bluetooth connection status.
When the bar code is not scanned, the indicator is off.
Note: When the device is charging, the LED indicator turns solid red.
Since there is only one LED indicator, the notification LED color of
Bluetooth connection and barcode scan will overlap with the charging
LED color.
9
Page 14

Chapter 6 Introduction to work modes
AUTOID®wearable ring product is designed to be fastened by hand
Bluetooth pairing
After the Bluetooth is connected successfully, the scanner LED
6.1 Methods for wearing
strap. Taking the palm-up as an example, the recommended fixed
position is on the first half joint of the left and right hand forefinger
while the scanner exit window faces downward with the button on the
side of the thumb. Make sure bar code scanning can be facilitated
without the activities of the finger affected.
6.2 Bluetooth connection
1. You can use the traditional Bluetooth pairing, which is to pair the
Bluetooth devices through data capture of Bluetooth search scanner.
2. Use the scanner to scan the specified Bluetooth address bar code for
pairing with the specified device. For example, the wearable ring device
can scan the bar code below to connect the corresponding device. (BT is
followed by a Bluetooth address.)
10
Page 15
indicator blinks blue continuously.
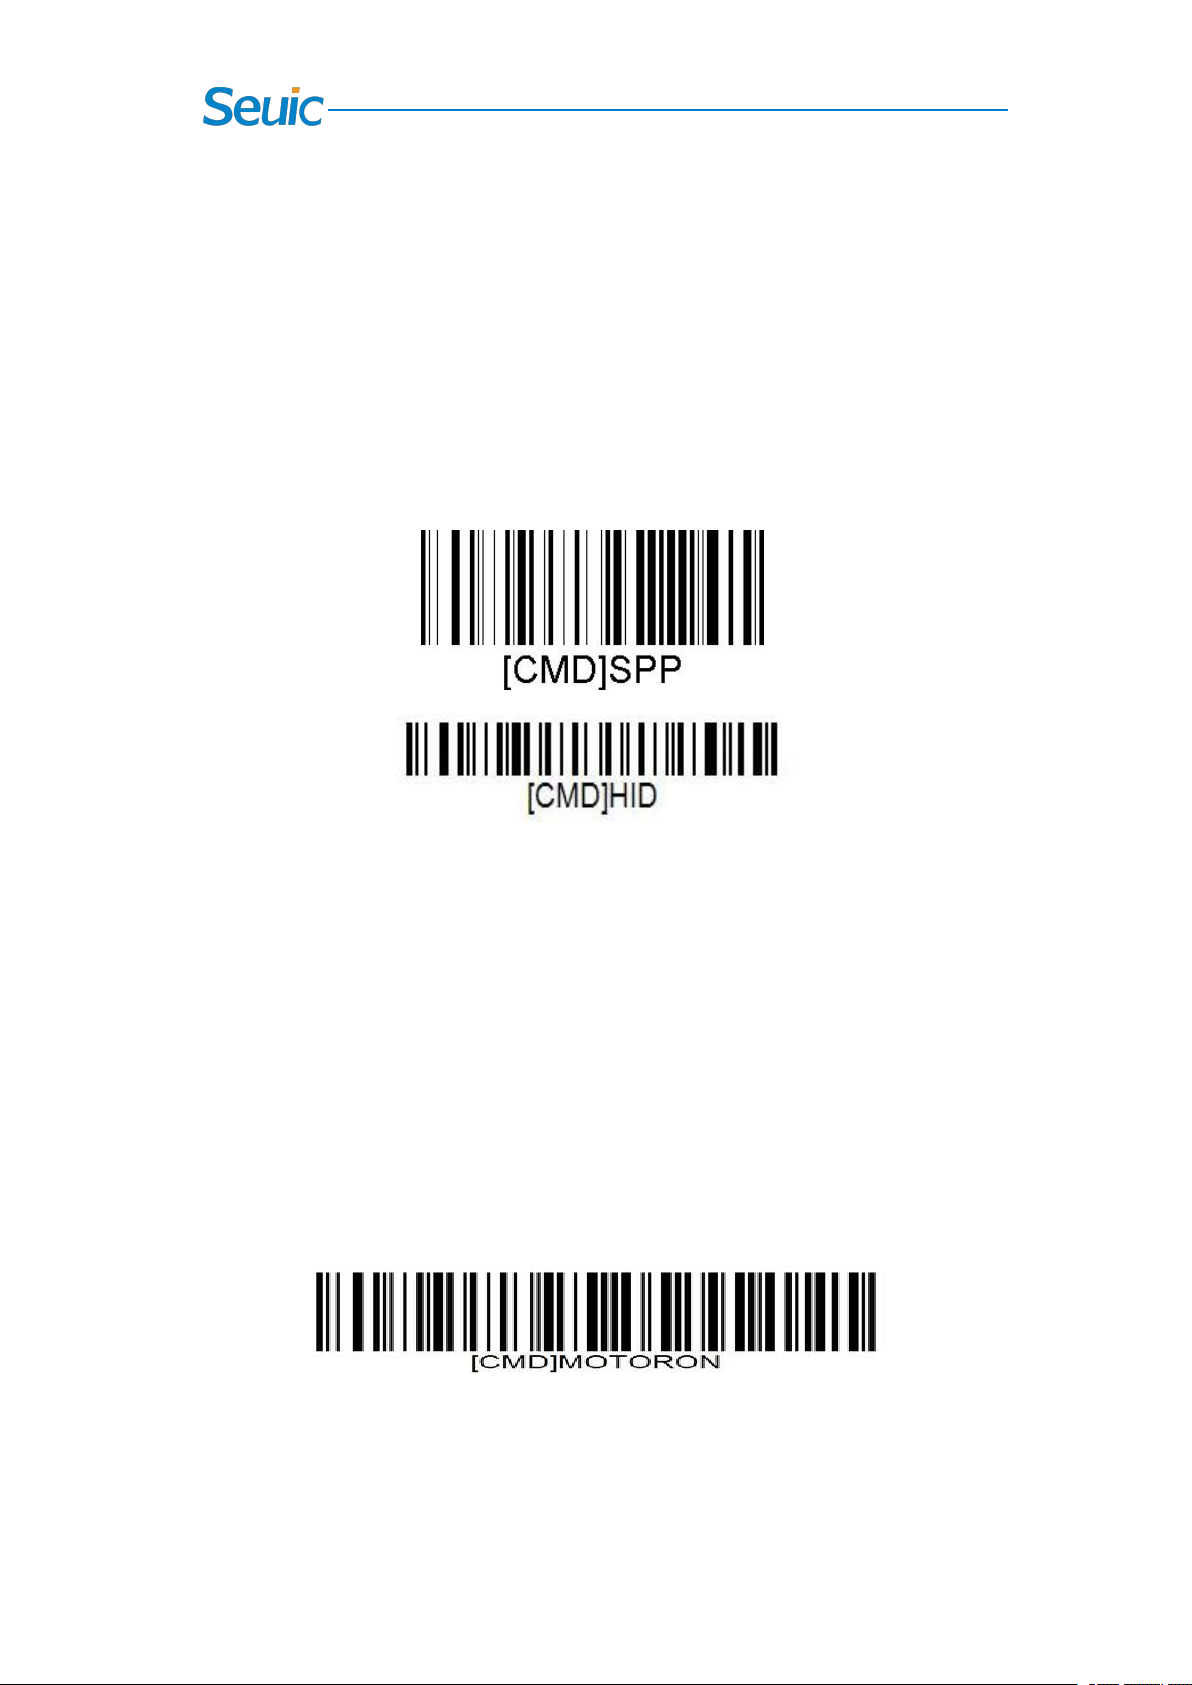
Bluetooth transmission protocol switch (standard HID and SPP):
Scan status (LED indicator: green):
Scan the bar code below to turn on Vibrate:
Scan the bar code below to urn off Vibrate:
Bluetooth protocol switch feature is provided to ensure that different
devices can be successfully connected, because some Android devices
may need to switch the serial protocol and Apple devices only support
HID. The protocol switch bar code is shown as follows:
\
6.3 Scan settings
Scan succeeded: the indicator flashes green once, the buzzer gives off a
beep and the vibrator has a short vibration.
Scan failed: No prompt
11
Page 16
12
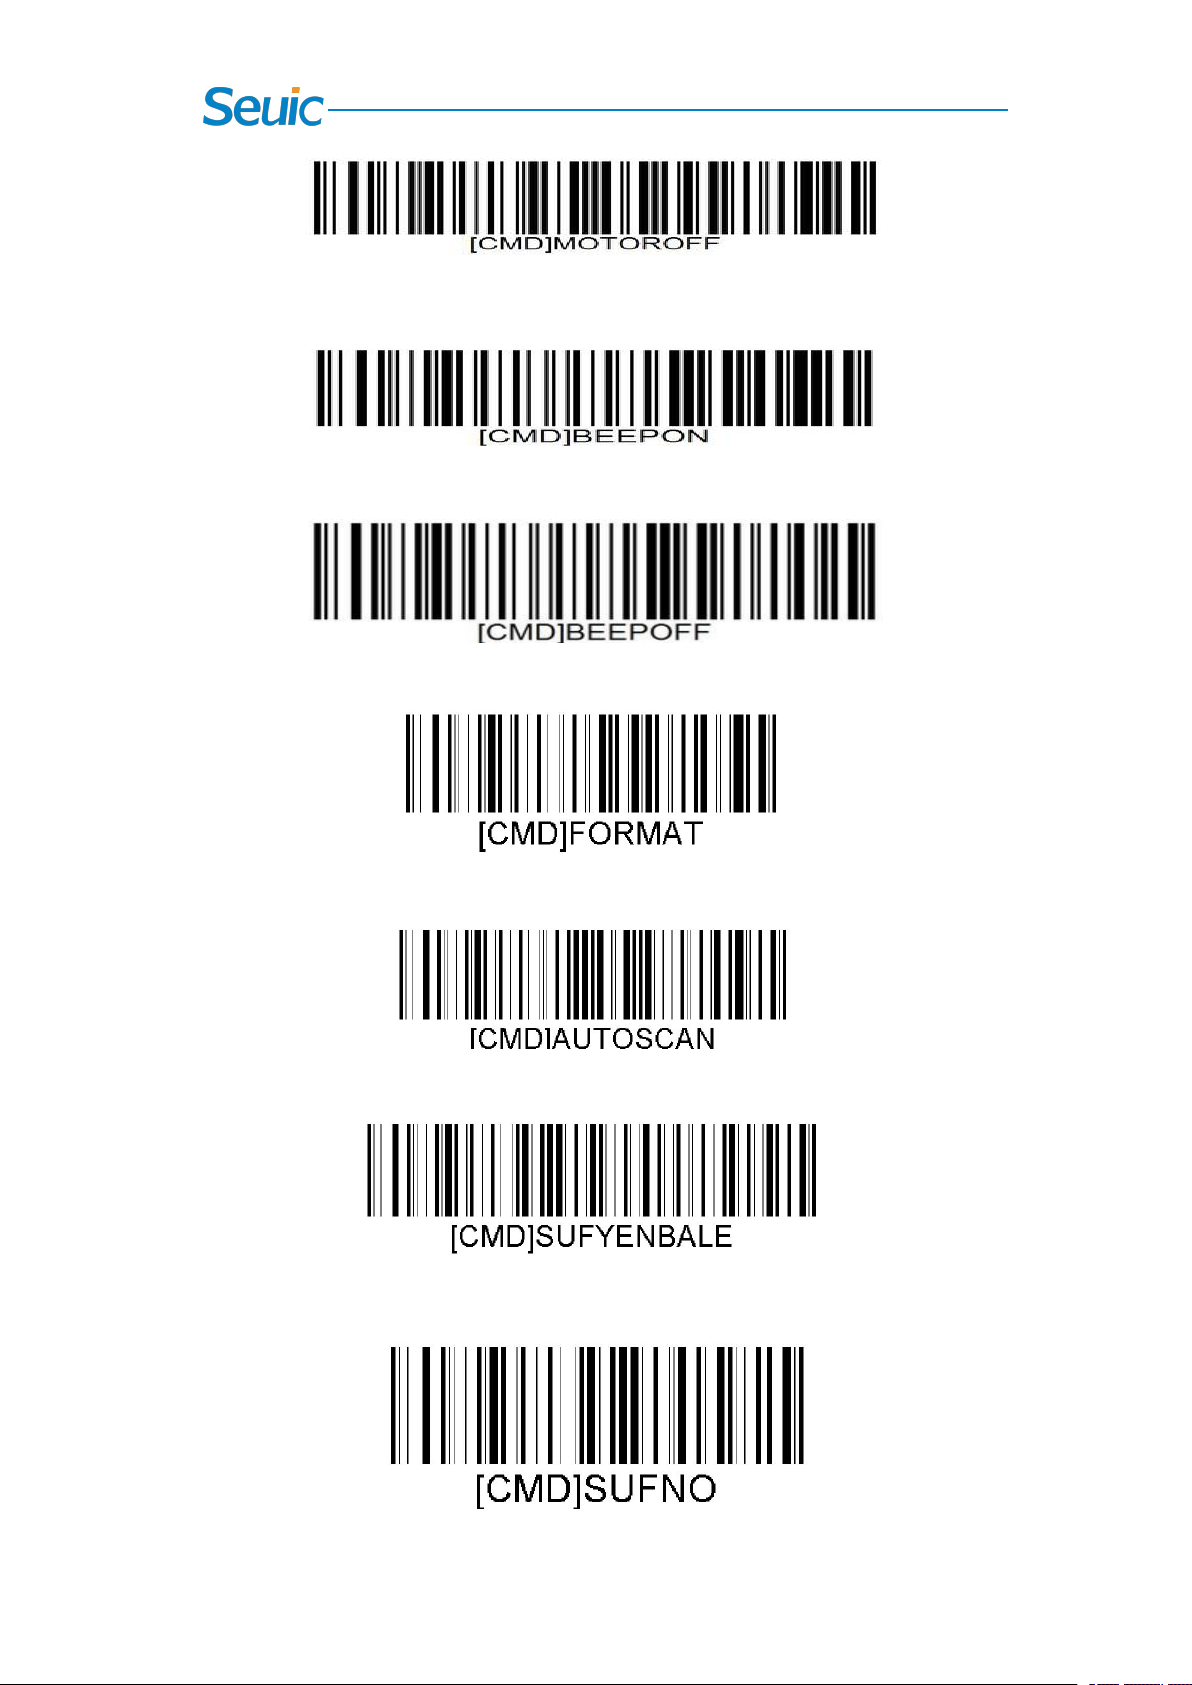
Scan the bar code below to turn on the Buzzer:
Scan the bar code below to turn off the Buzzer:
Scan the bar code below to format the storage space:
Scan the bar code below to turn on/off the Auto Scan:
Suffix: Scan the bar code below to switch carriage return & line feed:
Scan the bar code to turn off the feature of suffix:
Page 17
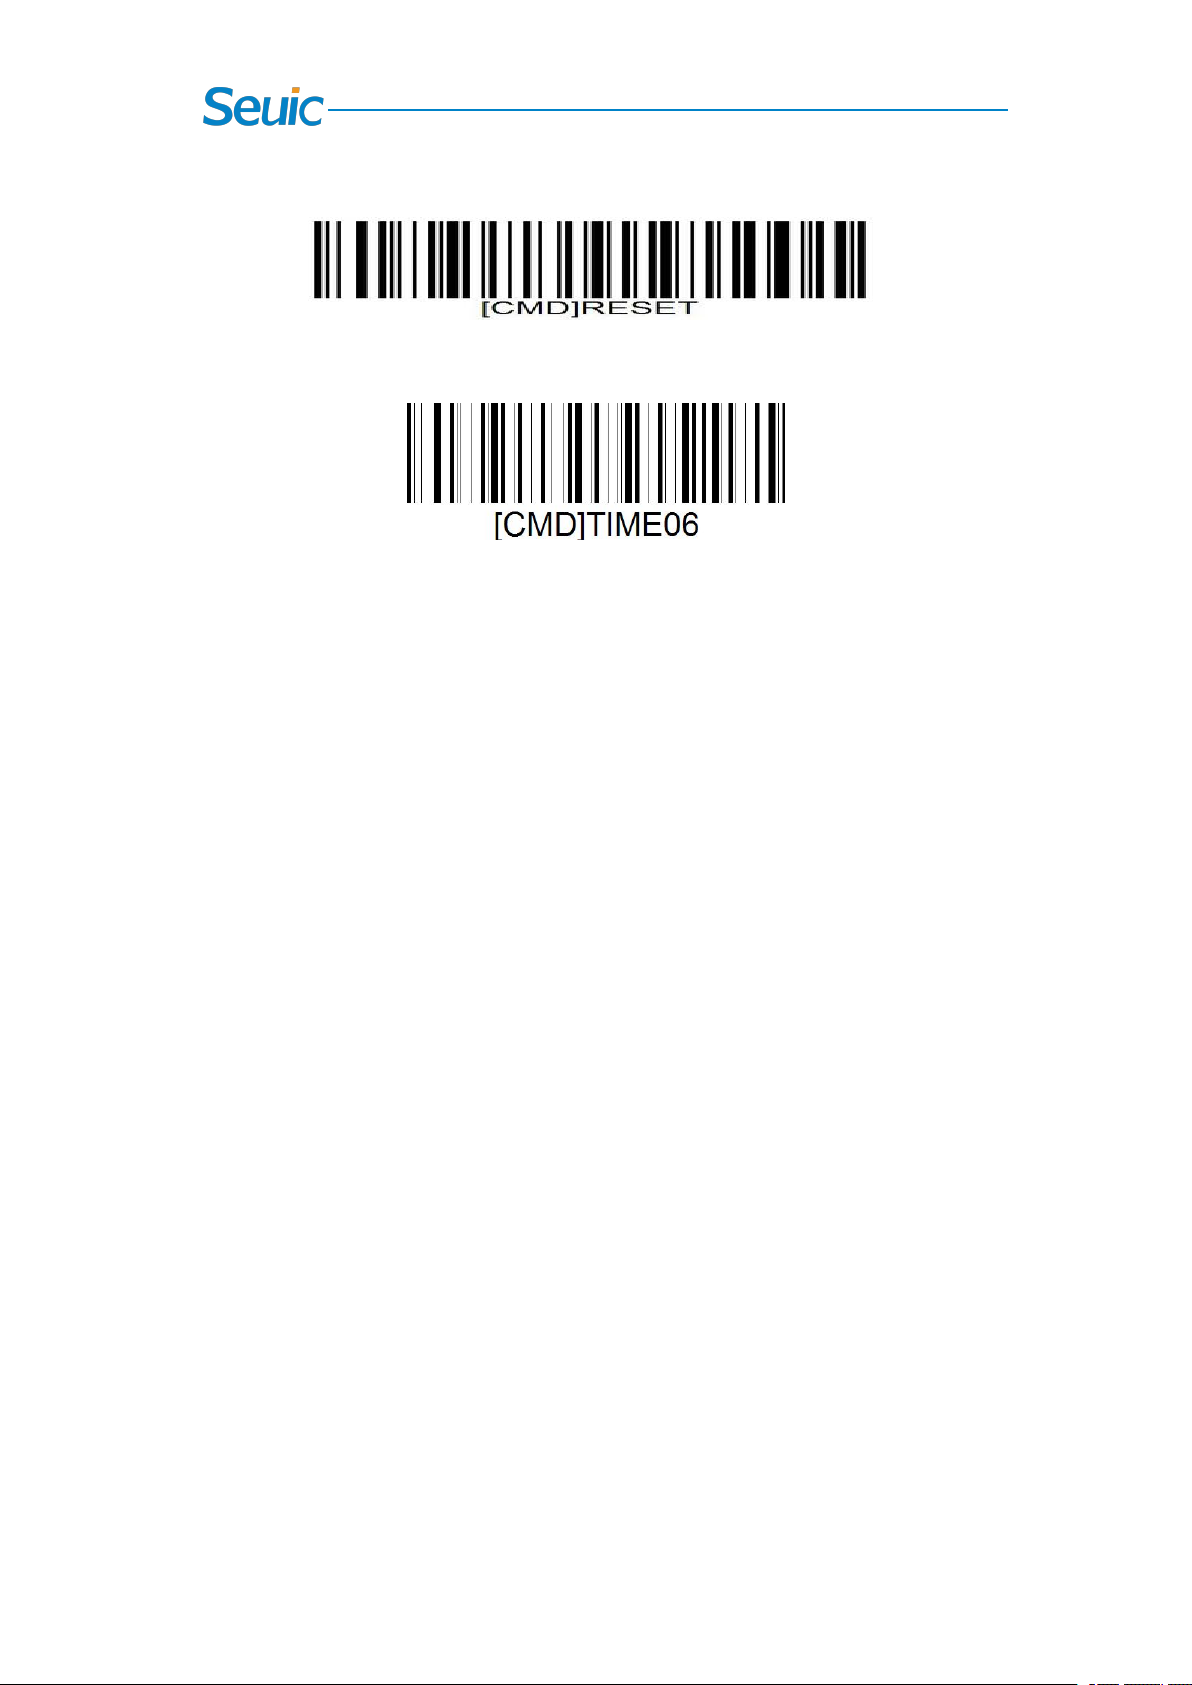
Scan the bar code below to restore factory default settings:
Scan the bar code below to set sleep time
Note: The two digits after TIME are the sleep time, unit: minutes
When HID protocol data capture terminal is connected with the
When SPP protocol data capture terminal is connected with the
When the scanner is not connected to any mobile computer, the bar
6.4 On-line scan
scanner, the bar code information captured by the scanner will be
automatically output at the input cursor of the terminal.
scanner, the bar code information captured by the scanner can be
transmitted to the specified text interface.
6.5 Off-line scan
6.5.1 Storage
code in TXT text is stored in the scanner's built-in storage space.
6.5.2 Export
13
Page 18

In the U disk mode, connect to the computer and copy TXT text to the
computer via USB cable, and then you can open it to view.
14
Page 19
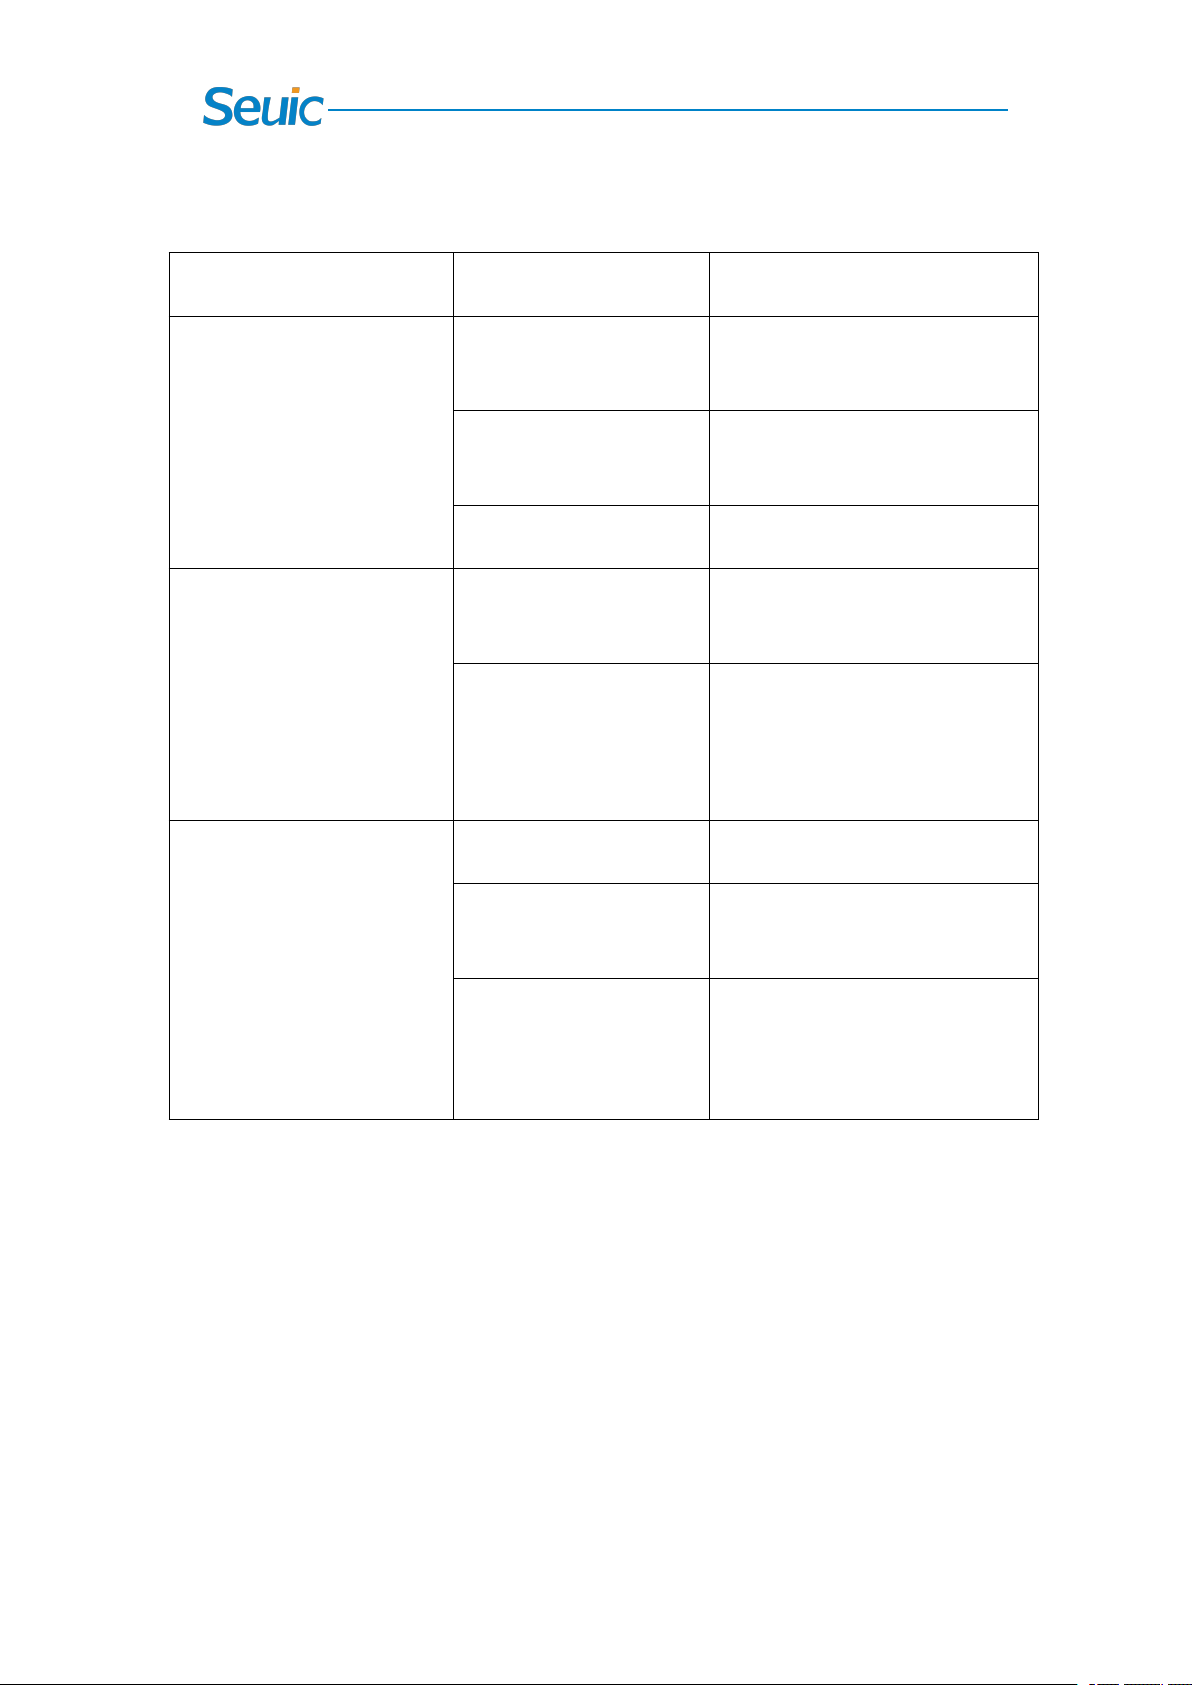
Chapter 7 Troubleshooting
Problem
Cause
Solution
The scanner of the
AUTOID®wearable ring
stops emitting a laser beam
upon pressing the Scan
button.
The device goes into
sleep mode.
Press and hold the Power
button for 3s to wake up the
device.
When the battery is too
low, the device shuts
off.
Charge the device.
System crash
Press and hold the Power
button to reboot.
The AUTOID®wearable
ring can’t be connected to
the mobile computer via
Bluetooth.
The Bluetooth of the
mobile computer is not
turned on.
Turn on the Bluetooth to detect
the the AUTOID®wearable
ring and then pair with it.
Too far from mobile
computers.
Move the AUTOID®wearable
ring closer to mobile
computers, within a range that
it can be detected via
Bluetooth.
The AUTOID®wearable
ring does not decode with
reading bar code.
Unreadable bar code.
Ensure the bar code is not
defaced.
AUTOID
®
wearable
rings not programmed
for this bar code.
Distance between exit
window and bar code is
incorrect.
Place the AUTOID®wearable
ring within proper scanning
range.
15
 Loading...