


User Manual
Micro-Cal™
Model 869
1-800-257-3872 Toll Free
1-978-264-0292 FAX www.setra.com Web Site
Table of Contents
1.0 |
SAFETY INSTRUCTIONS………………………………………….…… |
1 |
2.0 |
INTRODUCTIONS……….…………………………………….………… |
1 |
3.0 |
STANDARD EQUIPMENT……………………………………………… |
2 |
4.0OPERATING FEATURES
4.1Pocket PC…………………………………………………….. 2
4.2Portability…………………………………………………….. 2
5.0CALIBRATION SETUP
5.1Battery Charging…………………………………...……….. 3
5.2Pocket PC Charging…………………………….………….. 3
5.3User Interface Panel………………………………………... 3
5.4Getting Started………………………………………………. 4
5.5Backup/Restore Data……………………………………….. 4
6.0POCKET PC INTERFACE SCREENS
6.1Real Time……….…………………………………...……….. 5
6.2Test…………………..…………………………….………….. 5
6.3Profile………………..………………………………………... 6
6.4Unit Under Test (UUT)….…………………………………... 6
6.5Reference…………………………………………………….. 7
6.6System………………………………………………………... 7
7.0 UNIT UNDER TEST SETUP
7.1 Wiring Setup……….…………………………………...…… 9
8.0 CALIBRATING/TESTING A TRANSDUCER………………………….. 9
9.0POCKET PC TO PC USER INTERFACE……………………………....
9.1Setup…………….…………………………………...……….. 10
9.2Graphic User Interface………………………….………….. 10
9.3Test Results Data………………….………………………... 13
10.0 GLOSSY OF TERMS & SPECIFICATION DERIVATIONS……..… 15

1.0 SAFETY INSTRUCTIONS
Use the calibrator only as specified in the manual, otherwise the protection provided may be impaired.
Do not operate the calibrator in explosive gas, vapor or dust environments.
The calibrator is designed to operate from 24 VDC internal battery source or from the AC adapter that is Included. Additionally, a smart battery charging system is supplied for charging the internal Nickel Metal Hydride (NiMH) battery. Do not use AC adapters or chargers other than those supplied with the unit.
When charging the battery from the included battery charger the AC adapter must be plugged into the 24 VDC port on the left side of the unit to enable charging.
If supply external excitation to the Unit Under Test is a measure mode, do not exceed 30 VDC.
There are no user serviceable parts internally, removing the internal cover will void warranty. Return the unit to the factory for re-certification or repair.
BEST PRACTICES FOR CALIBRATOR OPERATION:
Use the shortest length of tubing from the calibrator to the Unit Under Test, during pressure testing avoid vibration of the tubing.
Avoid movement of the calibrator during operation, avoid locating in a high vibration environment.
Allow the calibrator to warm-up for one (1) hour before use. The calibrator can be turned on during transport.
2.0 INTRODUCTION
DOCUMENTING PROCESS CALIBRATOR:
The Setra Micro-Cal Model 869 is a pressure generating, very low pressure documenting calibrator. The calibrator has been designed and optimized to meet the needs of our customers for a capable system for the calibration, troubleshooting and documentation of very low pressure measuring information.
The design of the Model 869 exploits years of experience in the calibration of Setra transducers, as well as NASA patented and Setra exclusive licensed technology. The Pocket PC user interface provides a familiar “state-of-the-art” application of computer technology and an upgrade path for future developments.
Major Features:
-Pocket PC user interface, capable of storing thousands of Units Under Test (UUT) data files. -Portable, battery powered system, capable of full operation for eight (8) hours.
-Closed loop pressure control which is immune to the effects of ambient pressure perturbations, (doors closing, people moving around).
-Very low internal reference pressure standards, which are matched to the UUT, pressure ranges. -Auto zero pressure “tare” function.
-Ability to source power to the UUT, or external power supply. -Strip chart capability for troubleshooting leak and drift conditions. -Micro-stepping pressure control capable of precise generation and pressure control in the micro inch of water column pressure ranges. -Leak testing
-Volume measurement
Diagram 1
Standard Equipment
1

3.0 STANDARD EQUIPMENT BREAKOUT
THE ITEMS BELOW ARE INCLUDED IN YOUR CALIBRATOR:
Calibrator
AC Power
Adapter Pocket PC Document
and cables
Diagram 2
Battery Charger
Pneumatic Fittings & Tubing
Electronic Test Lead Kit
4.0 OPERATING FEATURES
4.1THE POCKET PC PERFORMS THE FOLLOWING MAJOR FUNCTIONS:
-User interface for setups, display and storage. -External communications
-Communications with internal data acquisition and control microprocessor board. -Monitors battery voltage
-Stores data for UUT, test profiles and test results.
4.2PORTABILITY – CALIBRATOR IS FULLY PORTABLE AND POWERED BY:
-120/240 VDC to 24 VDC power adapter.
-Using the internal 24 VDC battery which has been designed for eight (8) hours of continuous operation after a full charging cycle. The NiHM battery is rated at 24 VDC, 4 Amp hour (AH). See Diagrams 3 and 4.
Battery Charger
User Interface
Panel
Keyboard |
Pocket PC |
Input |
|
120V/ |
On/Off |
Switch |
|
24VDC |
|
Input |
Power |
|
Fuse (4A) |
Diagram 3 |
Current Loop |
Fuse (63mA) |
Serial
Port
Diagram 4
2
5.0CALIBRATION SETUP
5.1BATTERY CHARGING:
The calibrator is assembled, calibrated and tested at the factory.
The battery, as received, will be in a partially charged state. Before operation please be sure to fully charge the battery to get maximum portable use of the device.
TO CHARGE THE BATTERY:
-Connect the AC power adapter to AC supply and the 24 VDC connector to the input labeled 24 VDC on the left side of the calibrator.
-Connect the AC end of the Smart Charger to an AC power source, connect the other end (4 pin circular DIN connector) of the charger to the battery charger input of the calibrator.
-Initial battery charging will take approximately 2-4 hours. If the battery is discharged below 20 VDC charging overnight will be required.
5.2POCKET PC CHARGING
TO CHARGE THE POCKET PC:
-If calibrator is not in use for extended periods of time, Pocket PC should be plugged into HP supplied power cable.
-Pocket PC will only charge from calibrator when battery is charged or A/C adapter is plugged in. The main power switch must be in the ON position.
-Pocket PC must remain charged.
-Should the battery on the Pocket PC become drained to the point that the device resets itself, please see the Pocket PC Backup/Restore information on Page 6 of this manual.
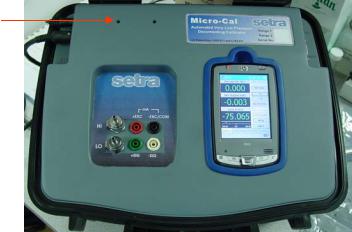
5.3USER INTERFACE PANEL
The user interface panel includes the pressure and electrical connections to the Unit Under Test.
See Diagram 5.
Optional UUT Mounting
8-32 UNF Threaded Inserts (2)
 Power Switch
 Pocket PC
Power Switch
High Pressure Port 
Low Pressure Port 
Diagram 5
3

5.4 GETTING STARTED
-Open calibrator top.
-Turn on calibrator power (power switch on right side of the calibrator). -Once calibrator is powered up, re-zero function begins automatically, Please wait for completion. (User will hear operation of solenoid valves and stepper motor).
-Look for orange light (flashing or solid) on PDA (if light does not come on, see section on battery charging.
-Turn on PDA power (button in upper right-hand corner of the PDA).
-After powering up, tap the icon labeled CALIBRATOR, (tap START MENU icon, programs folder and CALIBRATOR icon).
-Software will start up with Real Time page. Tap VENT button (diagram 6) to leave the calibrator in a ready to “hook-up” state.
Diagram 6
5.5 POCKET PC BACKUP/RESTORE
-Once calibrator is received, install Microsoft® ActiveSync ®. (Disc provided with Pocket PC equipment). -After installation, connect Pocket PC to PC using USB cable provided.
-ActiveSync should start automatically, if not, please follow instructions for usage provided by Microsoft. -ActiveSync will ask which type of partnership to setup. ActiveSync will recognize standard setup and the required actions without automatic synchronization running. If backup/restore and interfacing the database through a PC are the only actions required, select GUEST.
-Once the partnership type has been selected, the ActiveSync main screen should appear. CONNECTED Should be displayed. If not, please refer to the usage instructions provided by Microsoft.
-To backup:
-Select TOOLS menu
-From drop-down menu, choose BACKUP/RESTORE -Select BACKUP tab
-Press BACKUP NOW button
-Wait for status bar to fill and status page to close -To restore:
-Select TOOLS menu
-From drop-down menu, choose BACKUP/RESTORE -Select RESTORE tab
-Press RESTORE button
-A box will pop up requesting which Pocket PC to restore -Press OK button
-Press RESTORE button on confirmation page and wait for status page completion -To restore the file shortcut:
-Use the
MYDEVICE/WINDOWS/STARTMENU/PROGRAMS.
-Press START button -Select PROGRAM from list
-Select from list of available programs
-Select ROOT DIRECTORY by pressing down arrow next to CURRENT DIRECTORY -A list with drop down showing the path, select MYDEVICE.
-Select IFAQ file store directory
-Press and hold stylus to CALIBRATOR file (should be 36B for file size). -A list of options will pop up, select COPY and return to root directory -Start WINDOWS directory
-Select START MENU directory (scroll down using slide bar to right if necessary). -Select PROGRAMS directory
-Scroll to bottom of list (using slide bar on right).
-Press and hold stylus to white area beneath last item in list. 4 -Select PASTE from pop up list
 Loading...