

Page 1
User Manual
WASHING
MACHINE
Model Numbers:
W712F2W
W712F2B
WP1249F2W
Page 2
Contents
01 Welcome
02 Safety Instructions
05 Your Washing Machine
08 Technical Specifi cation
09 Installation
17 Usage
33 Maintenance
39 Clothing Care
43 Troubleshooting
47 Guarantee
49 Index
T: 0800 0124 382T: 0800 0124 382
GUARANTEE NOW
2 YEAR
REGISTER TO
ACTIVATE YOUR
Parts & Labour for 2 years. Go to www.servis.co.uk
for more information
SERVIS.CO.UK 0800 0124382
Page 3
01 02
T: 0800 0124 382 T: 0800 0124 382
WELCOME SAFETY INSTRUCTIONS
To ensure your safety and the safety of others, please read the following safet y
precautions before you operate your Washing Machine.
Your Washing Machine conforms to current safety requirements. Inappropriate use can,
however, lead to personal injury and damage to proper ty. To avoid the risk of accidents and
damage to your Washing Machine, read this user guide carefully before using it for the first
time. It contains important information on the installation, safety, use and maintenance
of your Washing Machine. Retain this user guide for future use and pass it on to any new
owners.
Read this user guide before using or installing your Washing Machine.
WELCOME
Thank you for choosing this Ser vis Washing Machine, which has been designed and
manufactured to give you many years of trouble-free service.
You may already be familiar with using a similar product but please take time to read these
instructions, which have been writ ten to ensure you get the very best from your purchase.
Servis provides you with a guarantee which will protect you should your Washing Machine
develop an electrical or mechanical fault during the guarantee period. To ensure that you get a
prompt and efficient service, please register your Washing Machine immediately.
You will find a warranty card included within the packaging. To register, complete the form, or:
Visit us at www.servis.co.uk
Call us on 0800 0124 382
WARRANTY
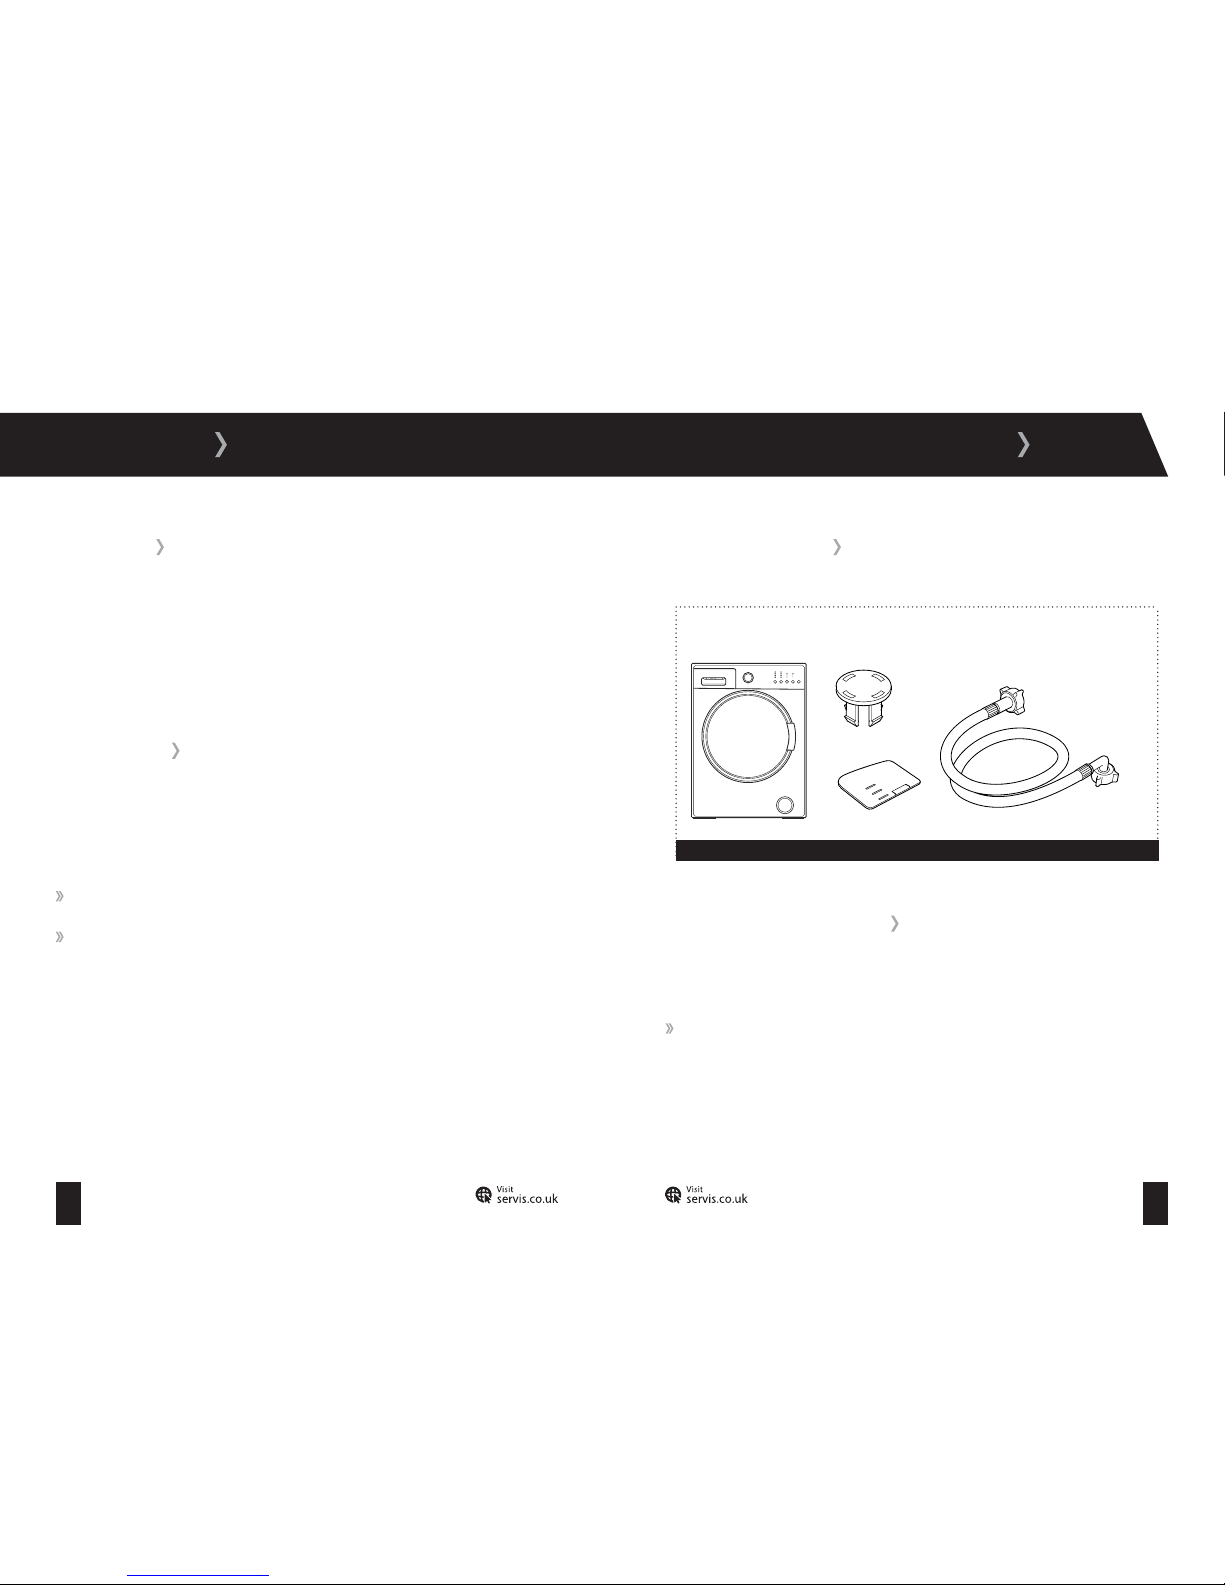
ITEMS INCLUDED
Fill hose
Blanking caps x 4
Fluid detergent level plate
Washing Machine
Figure 1
SAFETY INSTRUCTIONS
Page 4
03 04
T: 0800 0124 382 T: 0800 0124 382
SAFETY INSTRUCTIONS
Your washing machine is for domestic use only and is only intended to wash items which
are specified by the manufacturer to be machine washable on the label, and tex tiles
composed of hand washable wool or wool blend fabrics as well as satin, lace, silk and other
hand-washable garments. Do not use your Washing Machine for any purpose not expressly
specified in this user guide.
Keep children away from your Washing Machine when in use. To avoid risk of injury do not
allow children to play on or near it or to play with its controls.
Before setting up your washing machine, check for any external visible damage. Do not
install or use your Washing Machine if it is damaged.
Before setting up your washing machine, remove the four transit bolts and the rubber
washers from the back of the machine (refer to page 9).
Before connecting your Washing Machine, ensure that the information on the data plate
(voltage and connected load) matches that of the mains electricity supply. If in doubt, consult a
qualified electrician.
Do not connect your Washing Machine to the mains electricity supply using an extension
lead.
A damaged power cord/plug can cause fire or give you an electric shock. When damaged it
must be replaced, this should only be done by qualified personnel.
Never remove the plug from the socket by pulling the cord. Always hold the plug.
Never touch the power cord/plug with wet hands as this could cause a short circuit or
electric shock.
Do not touch your Washing Machine if your hands or feet are wet.
Never open the detergent drawer while the machine is running.
Faulty components must only be replaced by a suitably qualified Service Agent using
genuine spare parts.
Unauthorised repairs could result in unforeseen dangers for the user. Repairs should only be
undertaken by an approved service agent.
In the event of a fault or for cleaning purposes, your Washing Machine is only completely
isolated from the electricity supply when it is unplugged from the mains.
Your Washing Machine must only be connected to your water supply using the supplied new
fill hose. Old hoses must not be reused.
Do not make any alterations to your Washing Machine, unless authorised to do so by Servis.
The packaging of the machine could be hazardous to children. Please refer to the disposal
instructions on the rear cover.
Please ensure that you have removed all of the packaging materials and protective tape
from the outside of your Washing Machine, inside the drum and inside the detergent drawer
before using.
Your Washing Machine is not intended for use by people (including children) with reduced
physical, sensory or mental capabilities, or lack of experience or knowledge, unless they
have been given supervision or instruction concerning the use of your Washing Machine by
a person responsible for their safety. Children should be supervised to ensure they do not
play with your washing machine.
Page 5
05 06
T: 0800 0124 382 T: 0800 0124 382
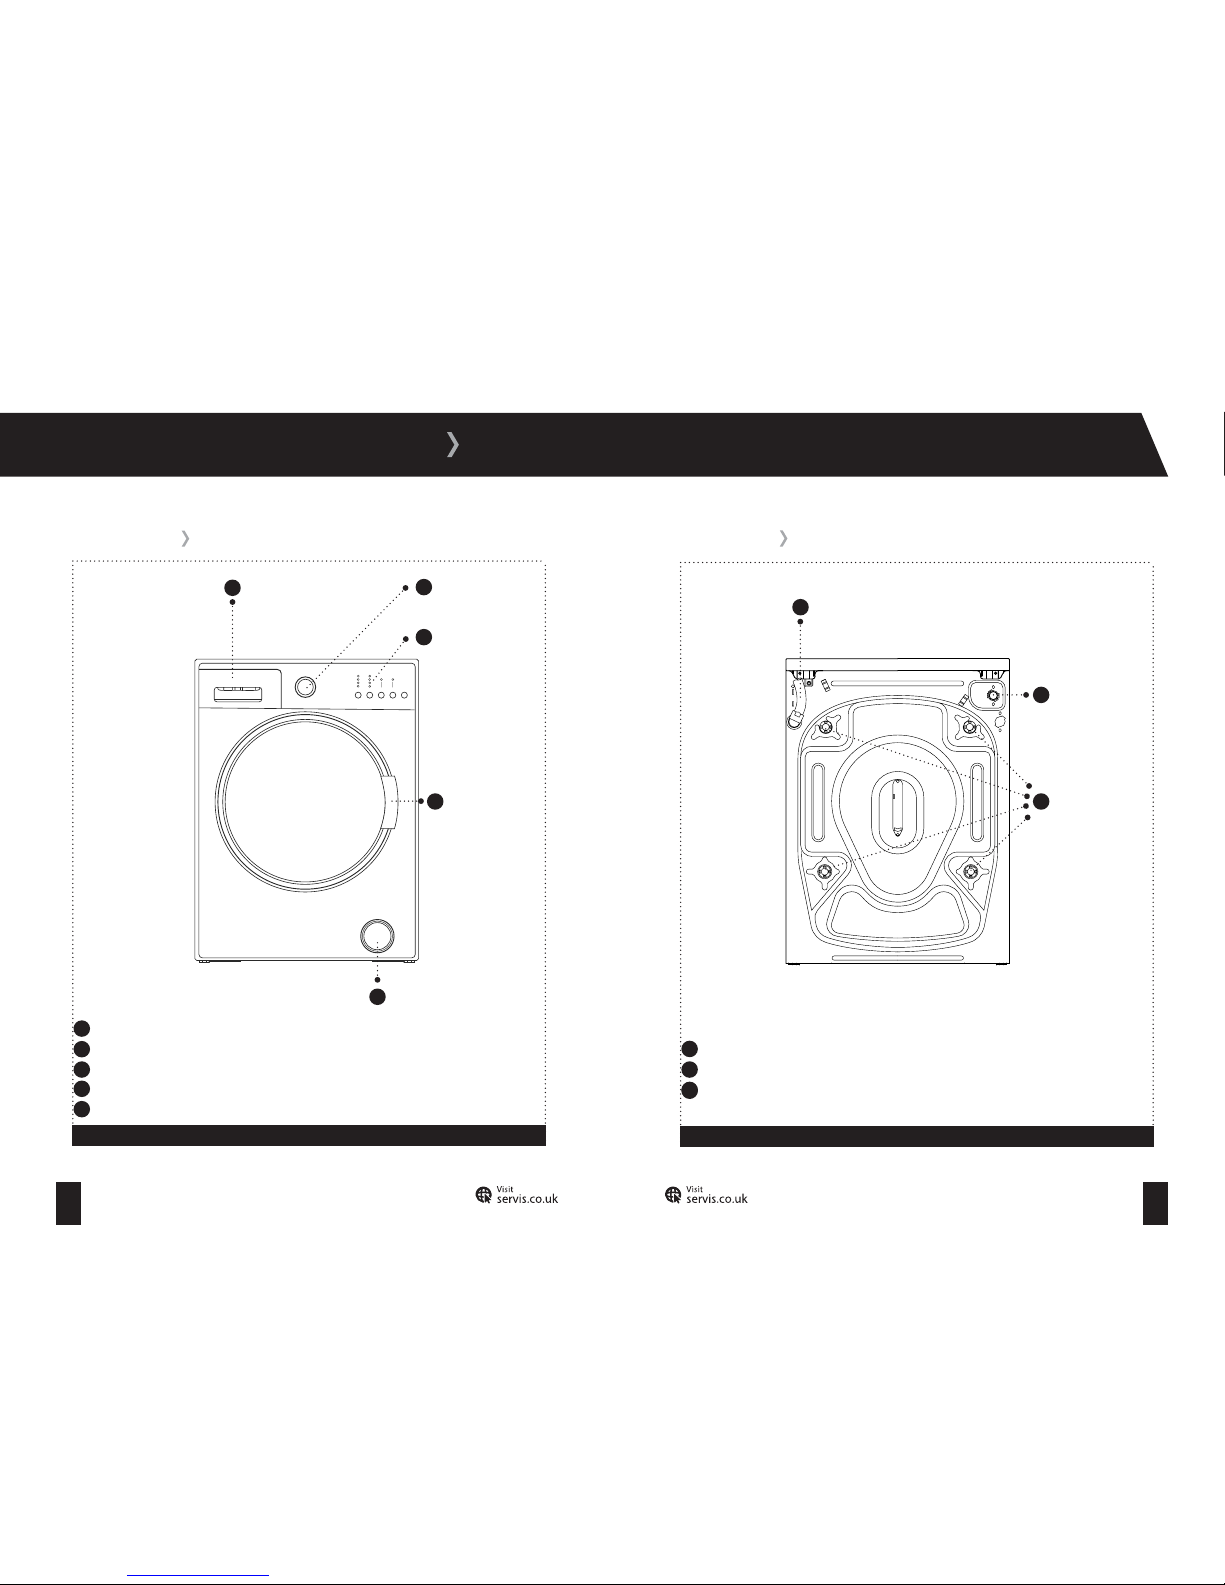
YOUR WASHING MACHINE
1
4
FRONT VIEW REAR VIEW
Detergent drawer
2
Control panel
Door handle
5
Pump filter cover
Drain hose
1
2
Cold water
inlet
Figure 2
Figure 3
1
Detergent drawer; Allows you to insert detergent, fabric conditioner and starch.
2
Programme dial; Allows you to select the programme for your wash.
3
Control panel; Allows you to configure the required settings for your wash.
4
Door handle; Provides you with access to the drum.
5
Pump filter cover; Provides access to the pump filter for maintenance purposes.
1
Drain hose; Provides an outlet for the dirty water from your Washing Machine.
2
Cold water inlet; Connects your Washing Machine to your cold water supply.
2
Transit bolts; Remove before first use of your Washing Machine (refer to page 9).
3
Programme dial
3
Tra nsit bolts
3
Page 6
07 08
T: 0800 0124 382 T: 0800 0124 382
YOUR WASHING MACHINE
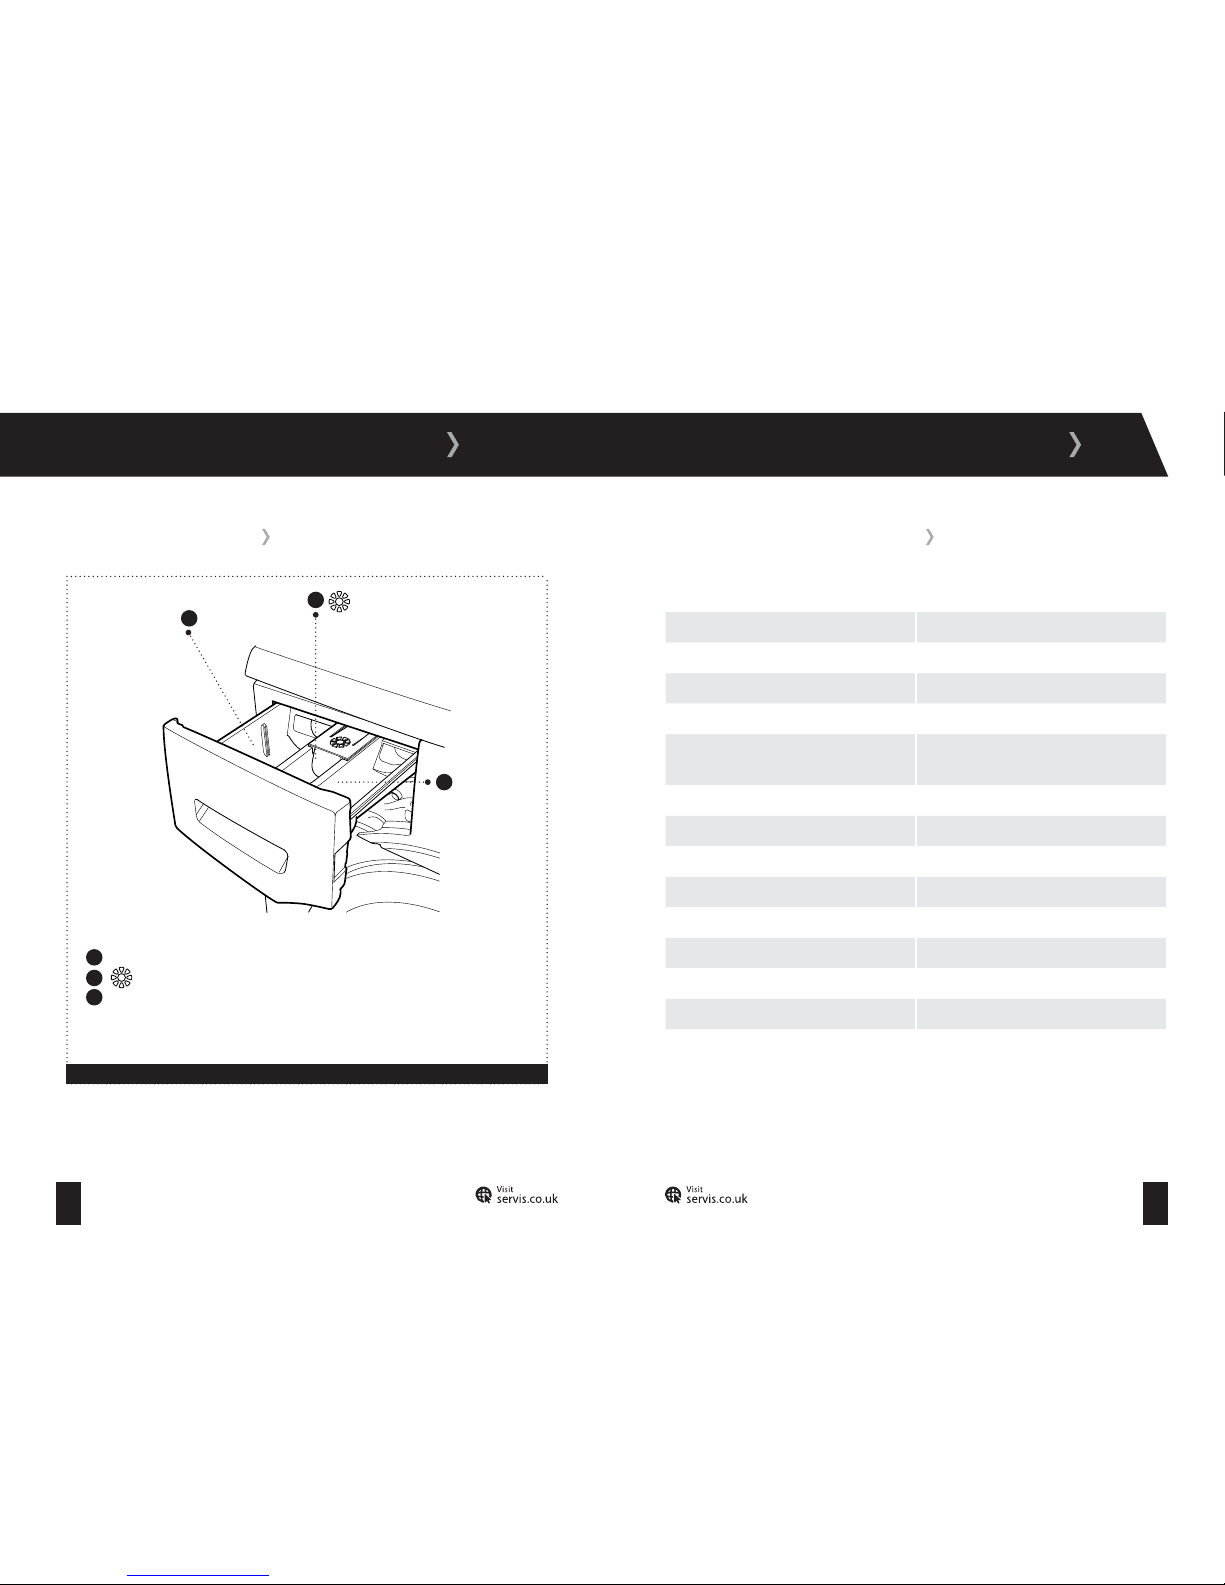
DETERGENT DRAWER
TECHNICAL SPECIFICATION
TECHNICAL SPECIFICATION
Voltage V/Frequency (Hz) 220-240V/50Hz
Electrical Current (A) 10
Power Rating (W) 2100
Water Consumption (l/Cycle) 49
Energy Consumption (Cotton 600 Full Load)
(kWh/Cycle)
1.19
Unpacked Dimensions (H x W x D) (cm) 84.5 x 59.7 x 52.7
Gross Weight (kg) 71.5
Spin Speed (rpm) 1200
Drum Volume (lt) 47
Max Dry Load Capacity (kg) 7
Energy Rating A+
Wash Noise (dB) 58
Spin Noise (dB) 79
Figure 4
1
2
3
Main Wash
Compartment
Compartment
Pre-Wash
Compartment
1
Main Wash Compartment; Add detergent for the main wash.
2
Compartment; For fabric conditioner and liquid starch.
3
Pre-Wash Compartment; Add detergent for the pre-wash.
Page 7
09 10
T: 0800 0124 382 T: 0800 0124 382
INSTALLATION
INSTALLATION REQUIREMENTS
To avoid risk of injury, please take care when moving your Washing Machine. It is heavy and we
recommend that a minimum of two people move your Washing Machine.
To unpack your Washing Machine and manoeuvre it to the installation area, one person should
hold it by the front feet and the other person at the edge of the lid at the rear.
Your Washing Machine measures 84.5 x 59.7 x 52.7cm and will require an installation area with
the space to allow the door to fully open and provide easy access to the plumbing and electrical
connections.
The most suitable installation surface for your Washing Machine is a concrete floor as it is less
prone to vibration during the spin cycle. Soft floor surfaces such as carpets and rugs are not
suitable.
If you have to install your Washing Machine on a wooden floor, we recommend that a waterresistant wooden base at least 30mm thick is installed. The base should span several joists and
be bolted down. Check for the presence of pipes and cables before installing.
If possible, install your Washing Machine in the corner of the room as it is often the most stable
part of the floor.
Do not install your Washing Machine in rooms where temperatures below freezing may occur as
frozen hoses may burst or split.
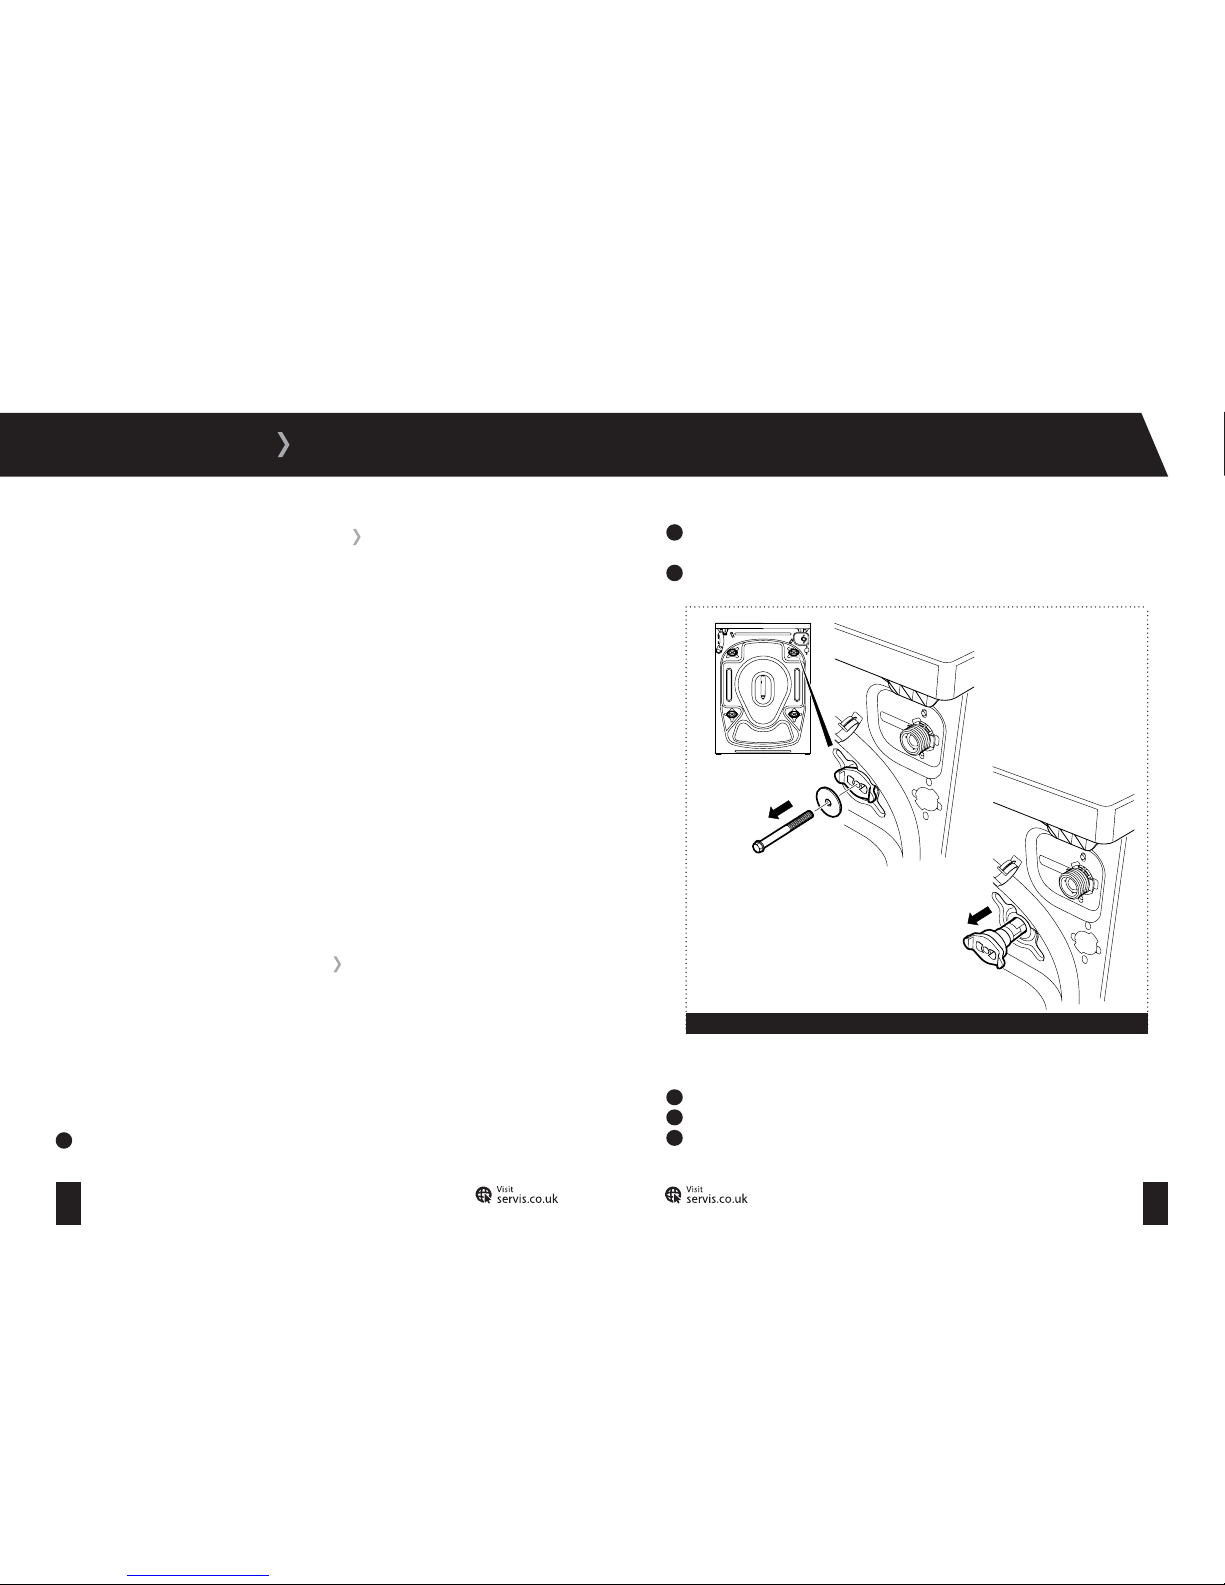
REMOVAL OF TRANSIT BOLTS
The transit bolts are used to protect your Washing Machine from damage during transportation
and must be removed before using your Washing Machine for the first time. Keep the transit
bolts safe and re-fit them if you need to transport your Washing Machine in the future.
The four transit bolts are located on the back of your Washing Machine (fig 5a).
To remove the transit bolts (4 of f):
1
Remove each bolt by turning anti-clockwise with a suitable spanner (fig 5b).
2
Pull out the remaining plastic section of each transit bolt by hand. This will require a
reasonable amount of force (fig 5c).
3
Insert the blanking caps (4 off): Push the cap into the hole until the four connectors click into
place. Check that the cap is flush with the machine.
To re-fit the transit bolts (4 off) for future transportation:
1
Pull and remove the four plastic blanking caps.
2
Insert the plastic sections of the transit bolts into the exposed holes.
3
Insert the bolts into the plastic sections of the transit bolts and tighten with a suitable
spanner until secure.
Figure 5
a:
b:
c:
Page 8
11 12
T: 0800 0124 382 T: 0800 0124 382
INSTALLATION
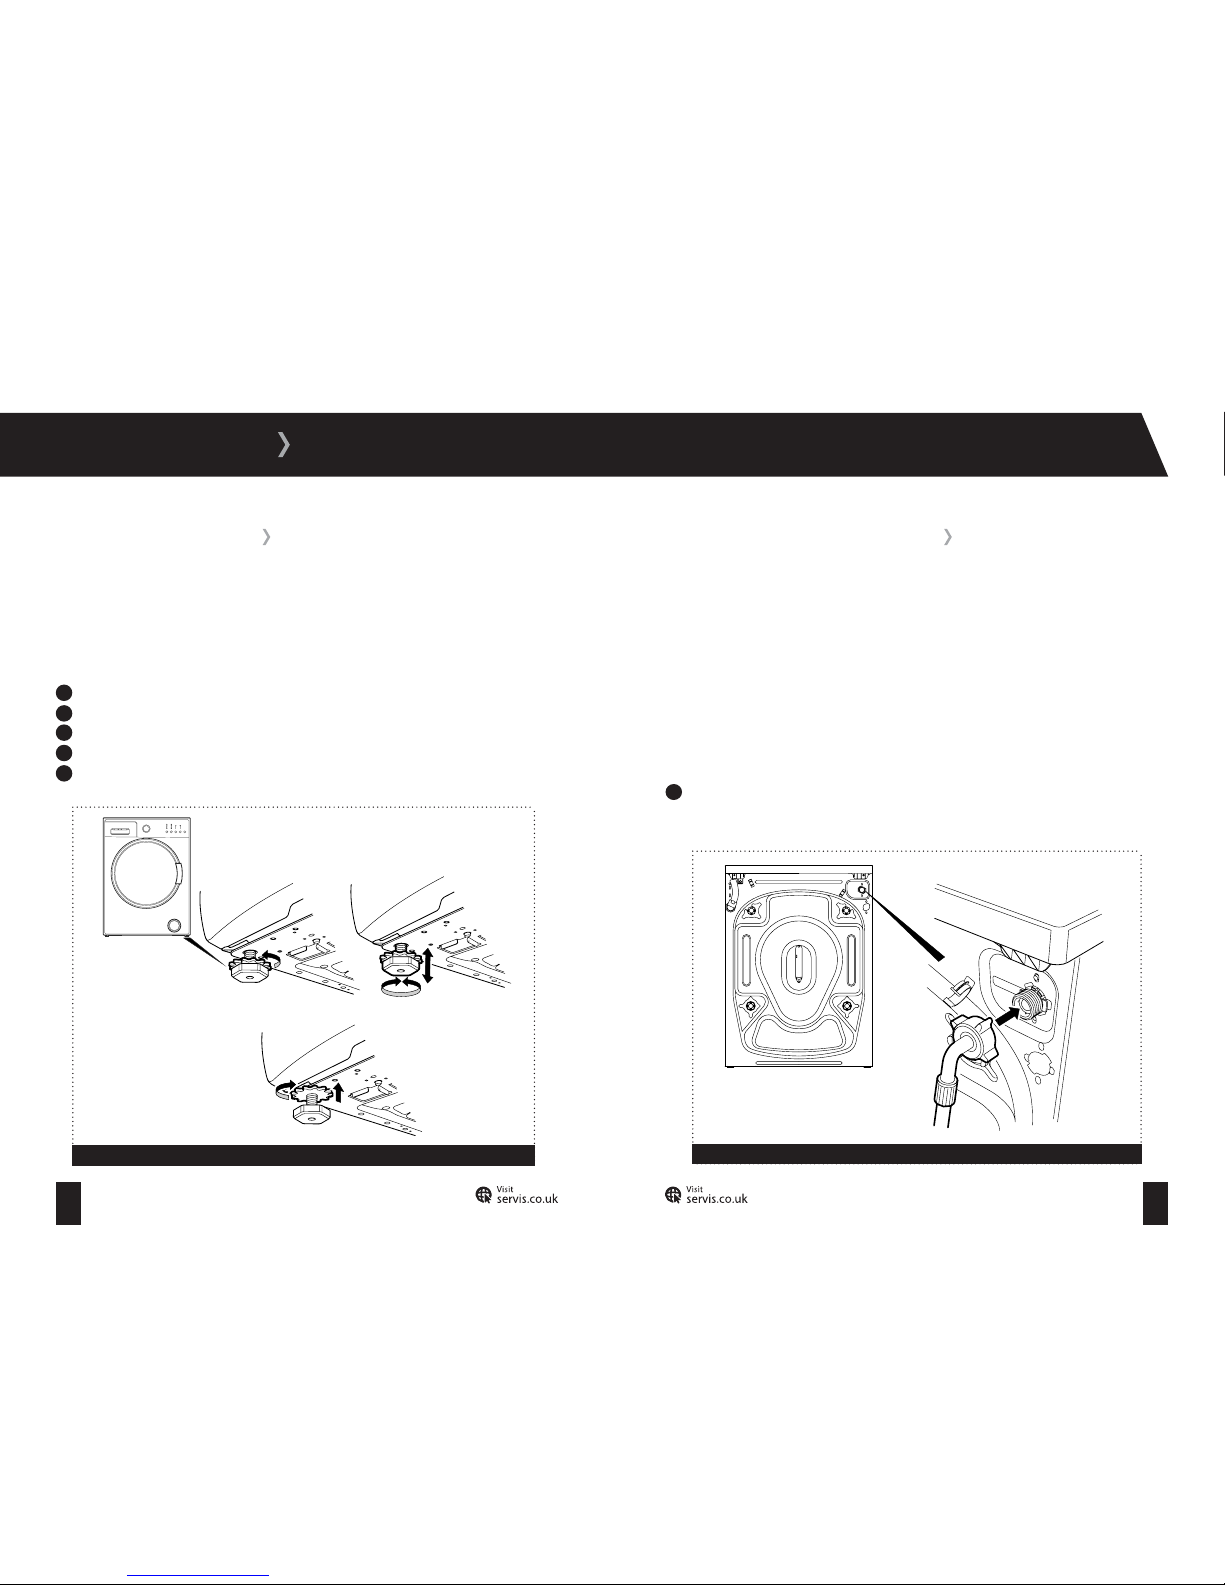
ADJUSTING THE FEET
For safe operation, it is important that your Washing Machine is level and securely positioned on
all four feet. Incorrect installation may cause the Washing Machine to vibrate and increase your
water and electricity consumption.
The four adjustable feet are used to level the Washing Machine. To adjust the feet:
1
Loosen the plastic locking nut by turning anti-clockwise (fig 6a).
2
To increase the height of the machine, turn the feet clockwise (fig 6b).
3
To decrease the height of the machine, turn the feet anti-clockwise (fig 6b).
4
After making adjustments, use a spirit level to check that the machine is level.
5
Once the machine is level, tighten the locking nuts by turning clockwise (fig 6c).
WATER SUPPLY CONNECTION
Your Washing Machine uses an energy ef ficient cold fill system, which means that only the
water required to wash the laundry is heated. As a result, no heat is lost in the pipeline from the
hot water supply.
Connect your Washing Machine to your cold water supply only. If your previous machine had a
hot and cold fill, check that the hot tap on your water supply is closed to avoid leakage. Only use
the fill hose supplied and not one from your old Washing Machine. Only one hose is required
to install your Washing Machine to the cold water supply. The inlet hose provided with your
Washing Machine connects the rear of your machine and the cold water supply.
To connect your Washing Machine to the cold water supply:
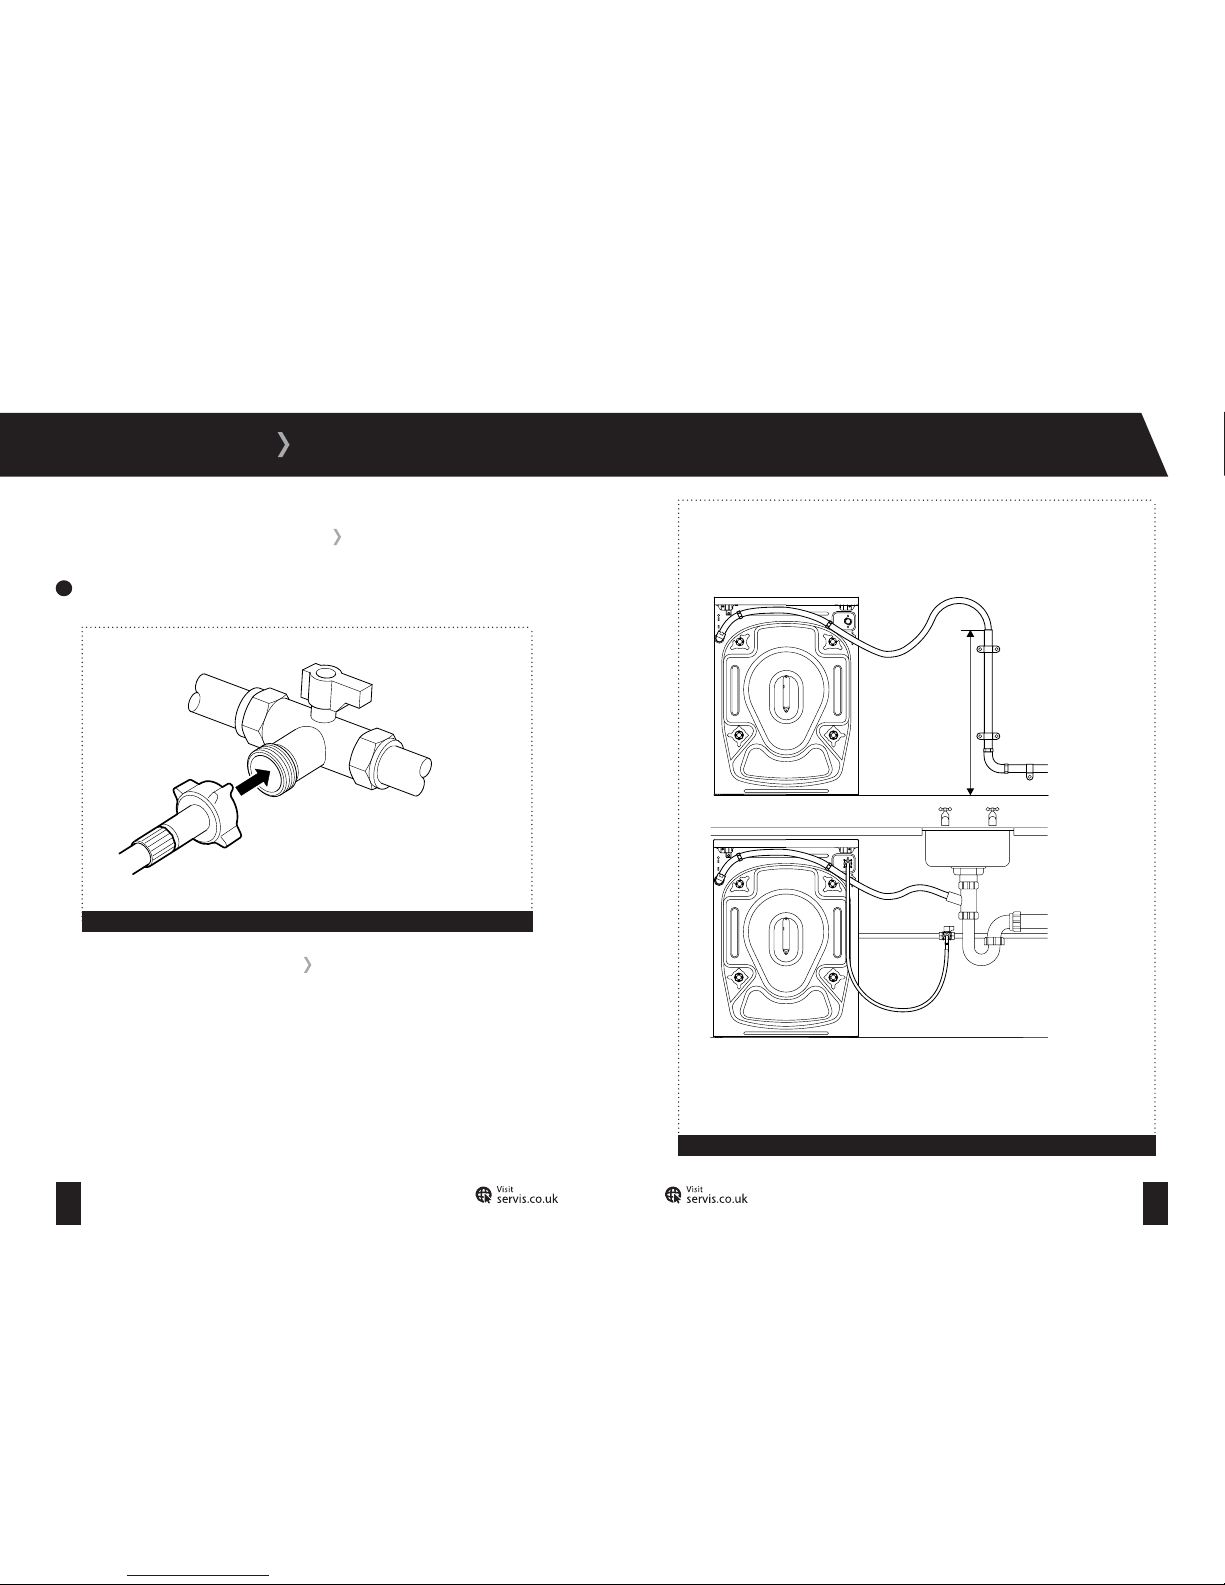
1
Connect the angled end of the fill hose to the cold water inlet on the rear of your Washing
Machine by screwing the threaded connector clockwise (fig 7). Take care not to overtighten
the connection. Hand tight is sufficient.
Figure 6
Figure 7
a:
b:
c:
Page 9
13 14
T: 0800 0124 382 T: 0800 0124 382
INSTALLATION
WATER SUPPLY CONNECTION
2
Screw the straight end of the hose clockwise to a 19mm (3/4’’) cold water tap until hand
tight (fig 8). Take care not to trap or kink the hose.
DRAIN HOSE CONNECTION
Do not connect your Washing Machine to a surface water drain.
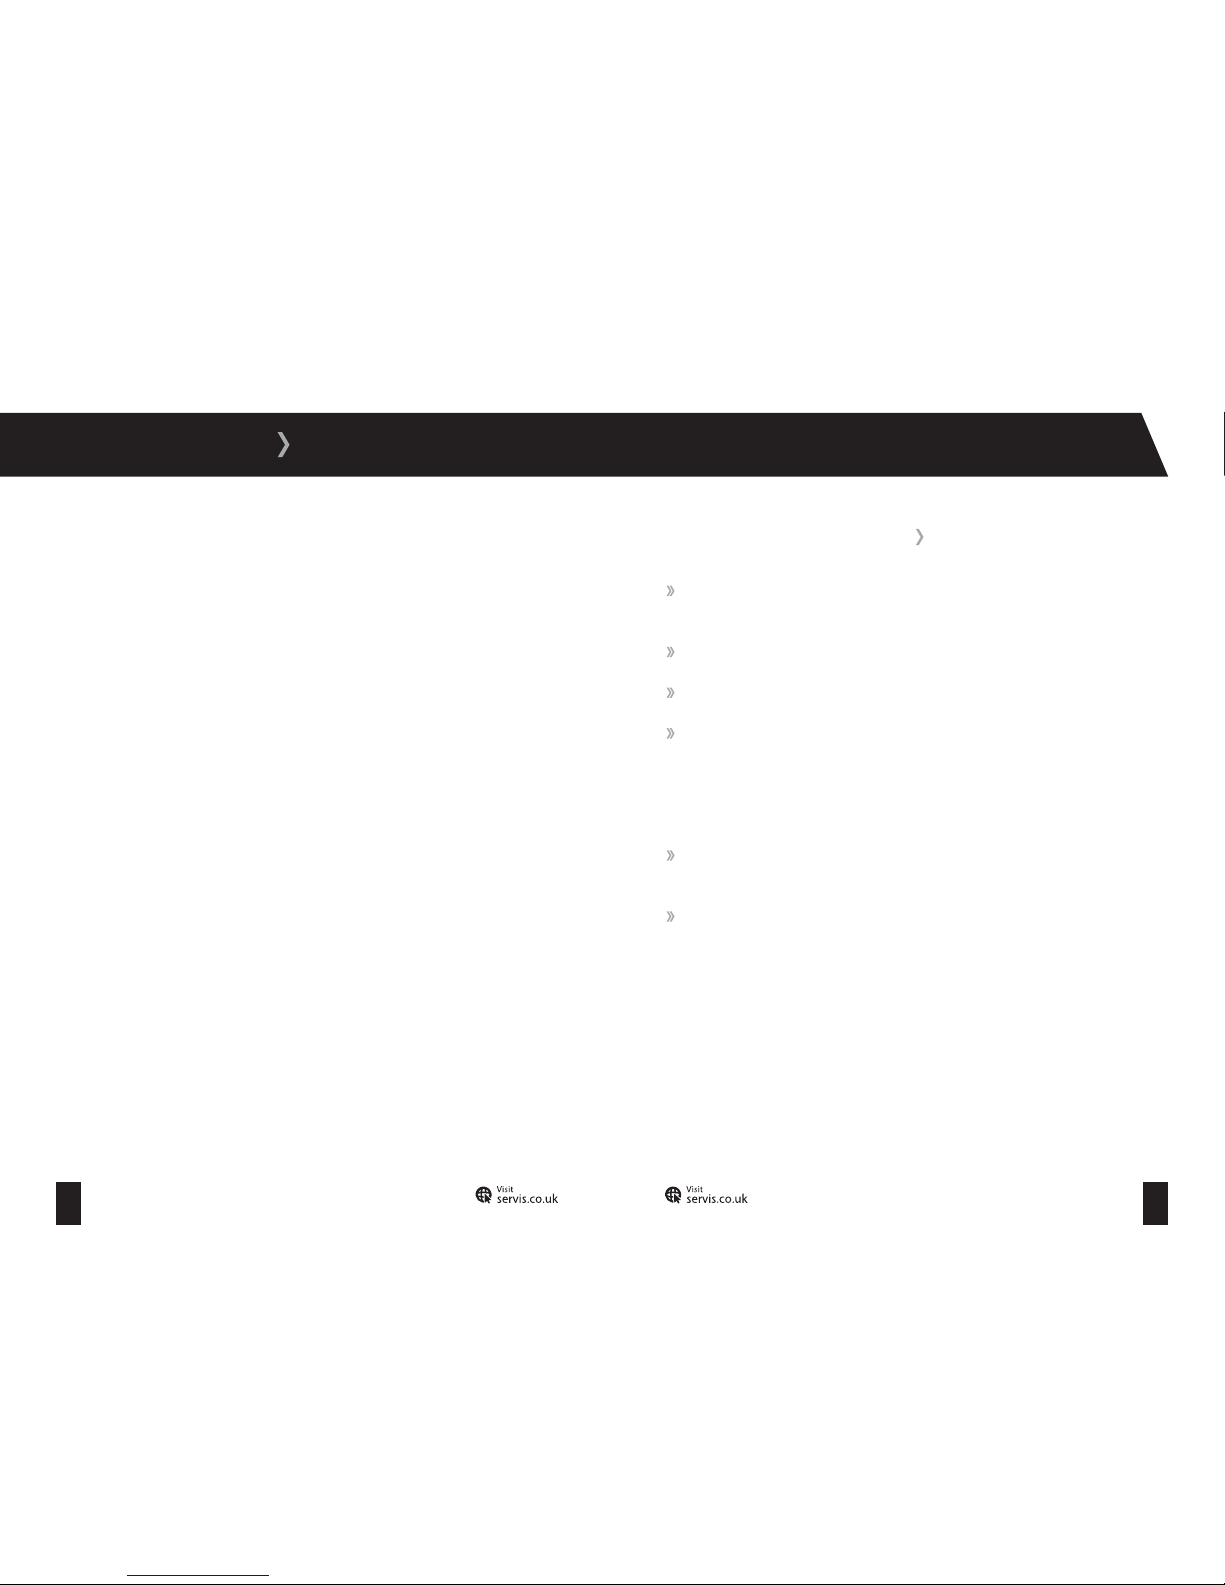
Connect your Washing Machine to your household drainage system (fig 9).
For your Washing Machine to function properly the outlet end of the drain hose must be at a
minimum of 0cm and a maximum of 80cm from the ground.
CAUTION: Check to ensure that the hose is not trapped, kinked, twisted, folded or crushed.
Do not attempt to extend the drain hose by adding extra sections.
Figure 8
Figure 9
a:
b:
Max height 80cm
Min height 0cm
a: The drain hose
can be connected
to a standpipe, as
shown. The hose
must be between
0cm and 80cm
from the ground.
b: The drain hose
can be connected
to a household
sink, as shown.
The hose must be
between 0cm and
80cm from the
ground.
Page 10
15 16
T: 0800 0124 382 T: 0800 0124 382
INSTALLATION
ELECTRICAL CONNECTION
Your Washing Machine requires a 220-240V, 50Hz mains supply. Do not use any other
supply.
Your Washing Machine may be fitted with a moulded plug, which cannot be rewired.
If the fuse cover becomes damaged, you must not use the plug.
If your plug requires changing because it is not suitable for your socket, or it is damaged,
you should consult a qualified electrician.
Fuse:
Replacement fuses should be ASTA-approved to BS1362 and have the correct 10 Amp
rating.
Replacement fuses can be purchased from an electrical supplier.
The cold water pressure for a normal household system ranges from bet ween 0.1 to 1 Mpa. Your
Washing Machine will run at optimum efficiency in this range.
Once you have made all of the connections, carefully turn your cold water supply on and check
for leaks.
Page 11
17 18
T: 0800 0124 382 T: 0800 0124 382
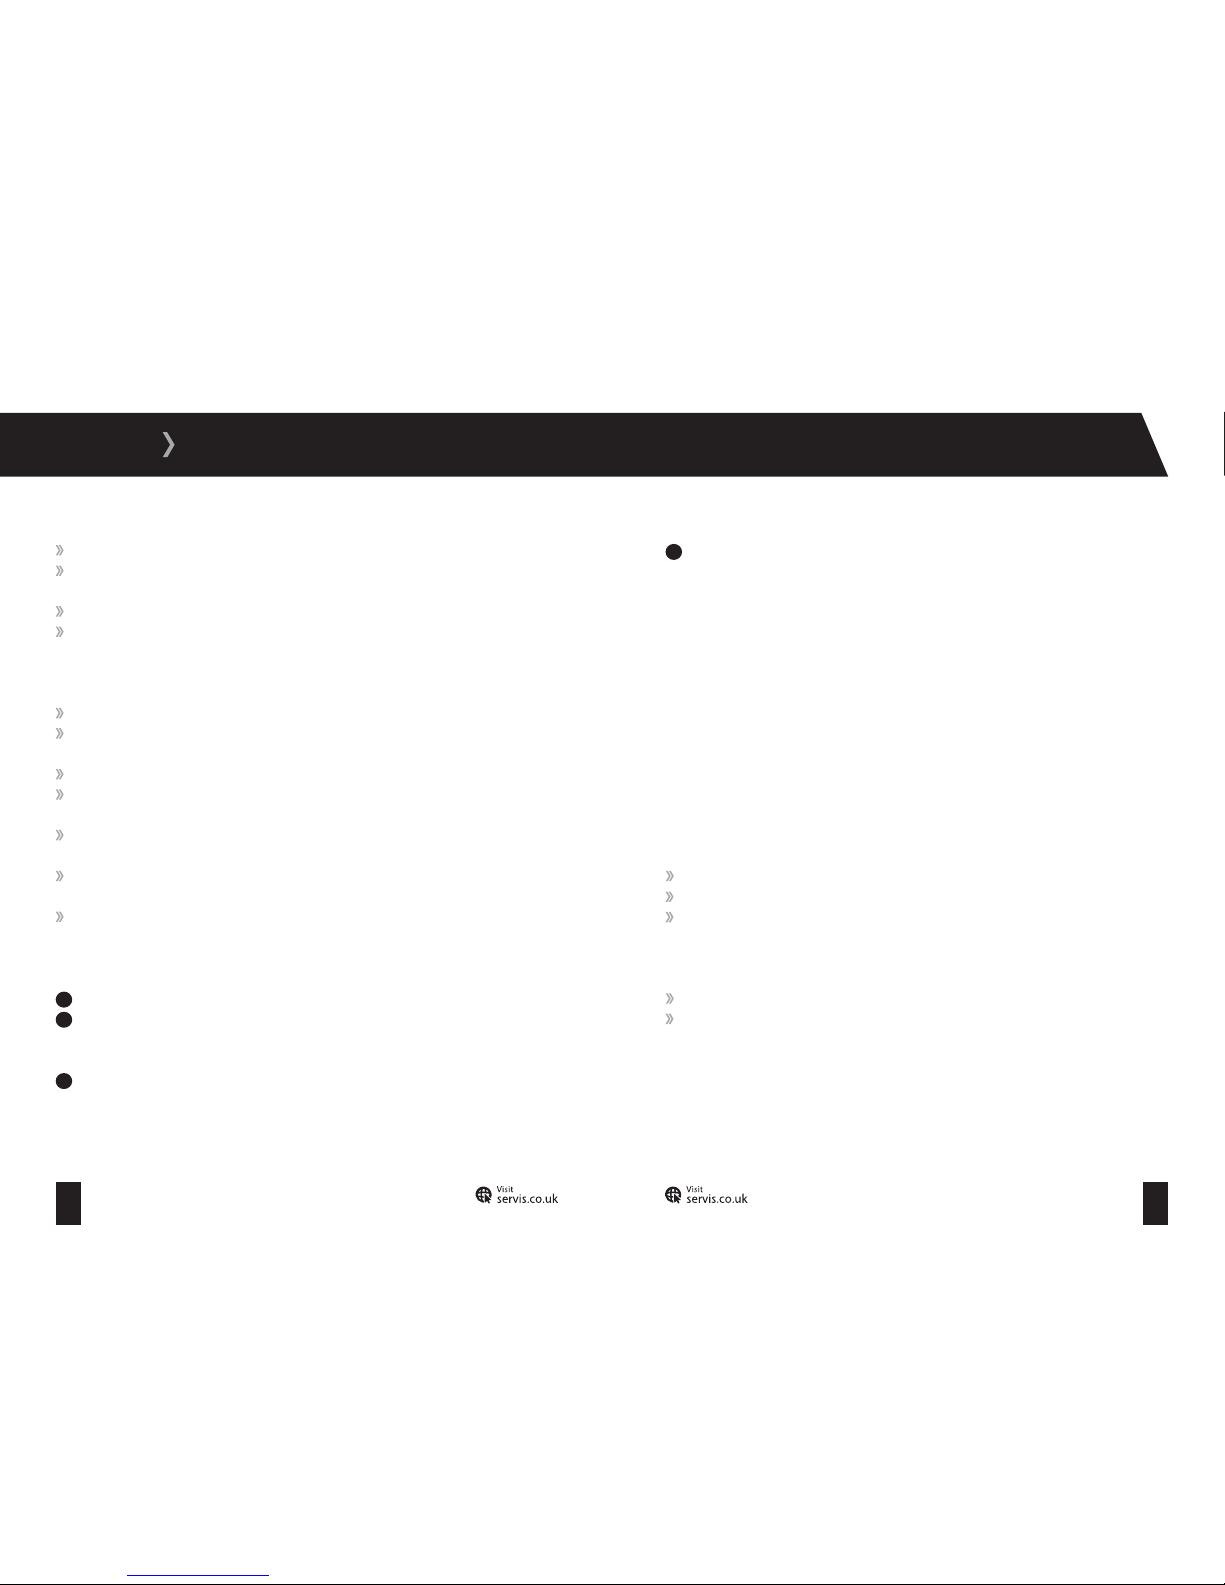
1
Programme Dial; Allows you to select a wash programme
2
Wash Programme Status Indicators (from top: Wash; Rinse; Spin; Finished)/ Delay Time
Selection Indicators (also used to report faults, see page 46)
3
Wash Temperature Indicators
4
Additional Function Indicator
5
Additional Function Indicator
6
Delay Start Selection Button; Select a time delay before the programme runs
7
Spin Speed Adjustment Button/Wash Temperature Adjustment Button
8
Additional Function Button 1; Select auxiliary wash functions*
9
Additional Function Button 2; Select auxiliary wash functions*
10
Programme Start/ Pause Button; Start or Pause the selected programme
* Hold down both Additional Function But tons for 3 seconds to activate child lock
Figure 10
USAGE
CONTROL PANEL OVERVIEW RUNNING YOUR FIRST WASH
Before using your Washing Machine for the first time; check that:
1
The transit bolts have been removed.
2
Your Washing Machine has been correctly connected to your water supply and your water
drainage system.
3
Your Washing Machine has been connected to an appropriate mains power supply and is
switched on at the socket.
Tests were carried out on your Washing Machine at the factory; as a result, water may be left in
the machine. To remove any water we recommend that the first wash is carried out without any
laundry:
1
Open the detergent drawer, pour in half a measuring cup of all-purpose detergent, close
the drawer and select programme 1 ( White cotton at 90
0
C on the programme selection
dial). If using a liquid detergent, refer to page 21 for details on how to insert the fluid level
detergent plate.
2
Close the door until it clicks shut.
3
Press the Start/ Pause button.
Please follow the steps suggested below to get the best results from your washing.
Preparing Your Laundry:
CAUTION:
Please be aware that any foreign objects such as coins or paper clips can cause
damage to your garments and components in your Washing Machine.
Empt y all pockets on items of clothing, brush out any sand and dirt from pockets and cuffs.
WASHING SEQUENCE
1 2 4 5
6 7 839 10
Page 12
19 20
T: 0800 0124 382 T: 0800 0124 382
USAGE
Close zips and fasten any hooks and eyes.
Items such as trousers, t-shir ts, sweat shirts and knit ted garments should be turned inside
out.
Remove any weights from cur tains, or place in a laundry bag.
Any loose wiring in bras and shirt collar stiffeners should be removed or sewn in.
Sorting Your Laundry:
Sort your laundry by colour. Always wash whites and coloureds separately.
Dark tex tiles may contain excess dye and should be washed separately several times
before being included in a mixed load.
Follow the instructions given in the care labels on the clothing.
Do not wash any items in the machine that the manufacturer has specified as non-
washable on the care label.
Badly soiled or stained areas can be pre-treated with liquid detergent or stain removers by
following the manufacturer’s instructions.
If you use a solvent-based cleaning agent to pre-treat a stain, protect any plastic parts such
as buttons. Rinse the cleaning agent off before loading the washing into the machine.
Do not use a solvent-based cleaning agent in your Washing Machine.
Loading the Drum:
1
Pull the door open using the handle.
2
Load your items of clothing into the drum, ensuring they are loosely packed. You will
achieve better wash results if you mix up large and small items. Items of varying size will
help distribute the load more evenly during spinning.
3
Take care not to exceed the maximum load of the drum as this will give poor wash
results and cause creasing. Refer to the table on pages 25 and 26 for information on load
capacities.
4
Gently push the door until it clicks shut. Check that no items of clothing are trapped
between the rubber seal and the door.
Half-Load Detection System:
Your Washing Machine features a half-load detection system. If you put less than half the
maximum load of laundr y into your Washing Machine it will automatically set the half-load
function, regardless of the programme you selected. This means that the selected programme
will take less time to complete and will use less water and energy.
Adding Detergent:
Please take care to add the correct amount of detergent to your Washing Machine.
If too little detergent is added:
Your laundry may not be washed properly and may become grey and stiff over time.
Spots of fat may appear on your laundry.
Limescale may form on the heater elements.
If too much detergent is added:
Excessive foam will be formed resulting in poor wash results.
Water consumption will increase.
You can use any detergent produced for automatic washing machines. The use of dispensing
aids such as balls is recommended, if they are supplied with the detergent.
Tablets are suitable for full loads; however, it may be impractical to reduce them for smaller
loads. Some tablets do not dissolve as quickly as others and may not be suitable for wash cycles
of short duration.
Page 13
21 22
T: 0800 0124 382 T: 0800 0124 382
USAGE
If your clothes are only slightly soiled, do not prewash and put a small amount of detergent,
as specified by the manufacturer, into compartment II of the detergent drawer.
If your clothes are excessively soiled, select a programme with pre-wash and put ¼ of
the detergent to be used into compartment I of the detergent drawer and the rest in
compartment II.
Water Softener:
A water softener can be used to reduce the amount of detergent required in hard water areas.
Follow the guidance on the packaging and dispense as instructed. First add the detergent, then
the water softener.
Fabric Conditioners and Liquid Starch:
Fabric conditioners make garments soft to handle.
Starch stiffens and gives body to items such as bed linen.
To add fabric conditioner or liquid starch, pour the amount as instructed on the packaging into
the
compartment of the detergent drawer, taking care not to exceed the MAX level.
Selecting a Programme:
To select the desired programme, turn the programme dial either clockwise or anti-clockwise
until the marker on the dial points to the chosen programme.
To cancel a programme, refer to the information on page 30.
Spin Speed Selector:
When you select a programme, the maximum spin speed is automatically selected. To adjust
the spin speed, press the spin speed adjustment button until the desired speed is displayed. The
spin speed of your Washing Machine ranges from 400 to 1200 rpm.
Temperature Selector:
When you select a programme, the maximum temperature is automatically selected (note:
900C
is not displayed on the control panel
). To adjust the temperature, press the wash temperature
adjustment button until the desired temperature light is lit.
Delay Programme Start:
Instead of starting the programme immediately you can set the programme to star t
automatically af ter a set period of time (3, 6, 9 or 12 hours). To do so, press the delay start
selection but ton until the desired period of time is displayed, then press any button on the
control panel other than the
Programme Start/ Pause
button.
Figure 11
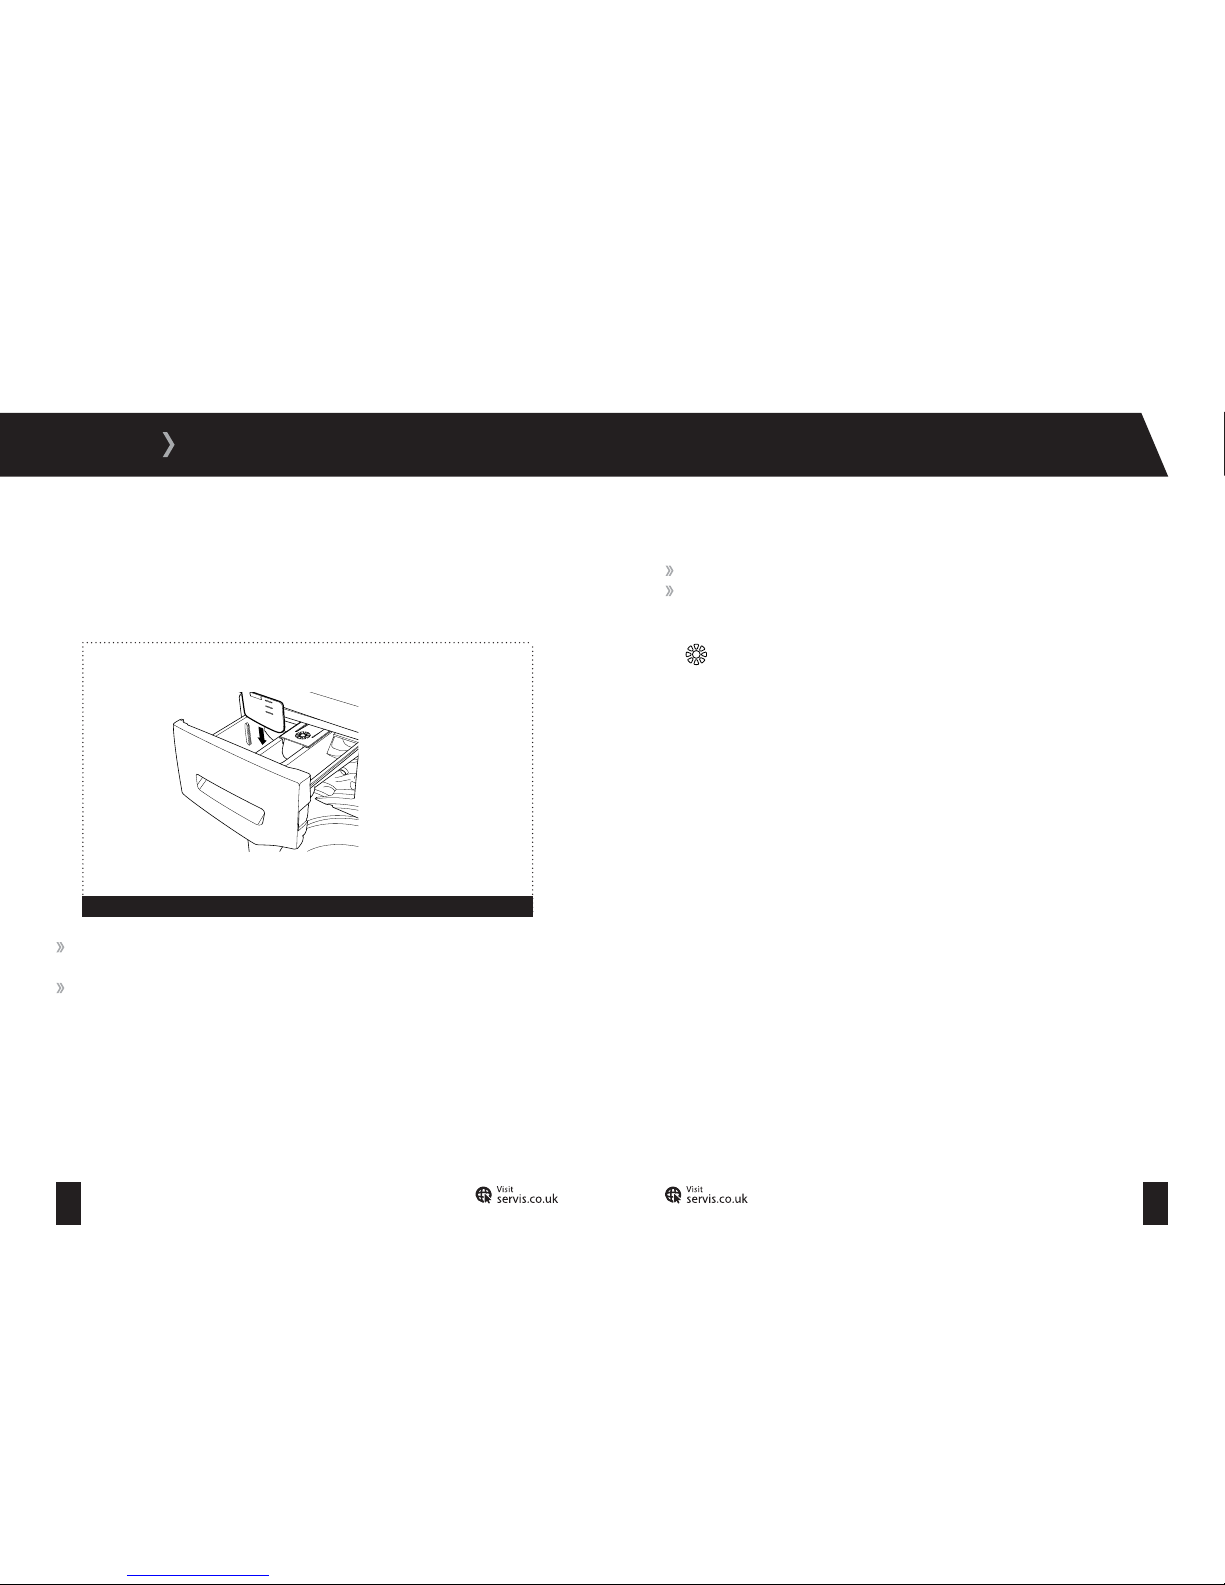
It is possible to use fluid detergents in all programmes without a pre-wash. To do this, slide the
fluid detergent level plate into the guides in compartment II of the detergent drawer (fig 11). Use
the lines on the plate as a guide to fill the drawer to the required level.
The amount of detergent to use will depend on the dirtiness of your clothes and the hardness of
your water supply; guidelines will be on the packaging of your detergent.
Page 14
23 24
T: 0800 0124 382 T: 0800 0124 382
USAGE
Starting a Programme:
To start the selected programme, press the
Programme Start/ Pause
button.
Indicator Lamps:
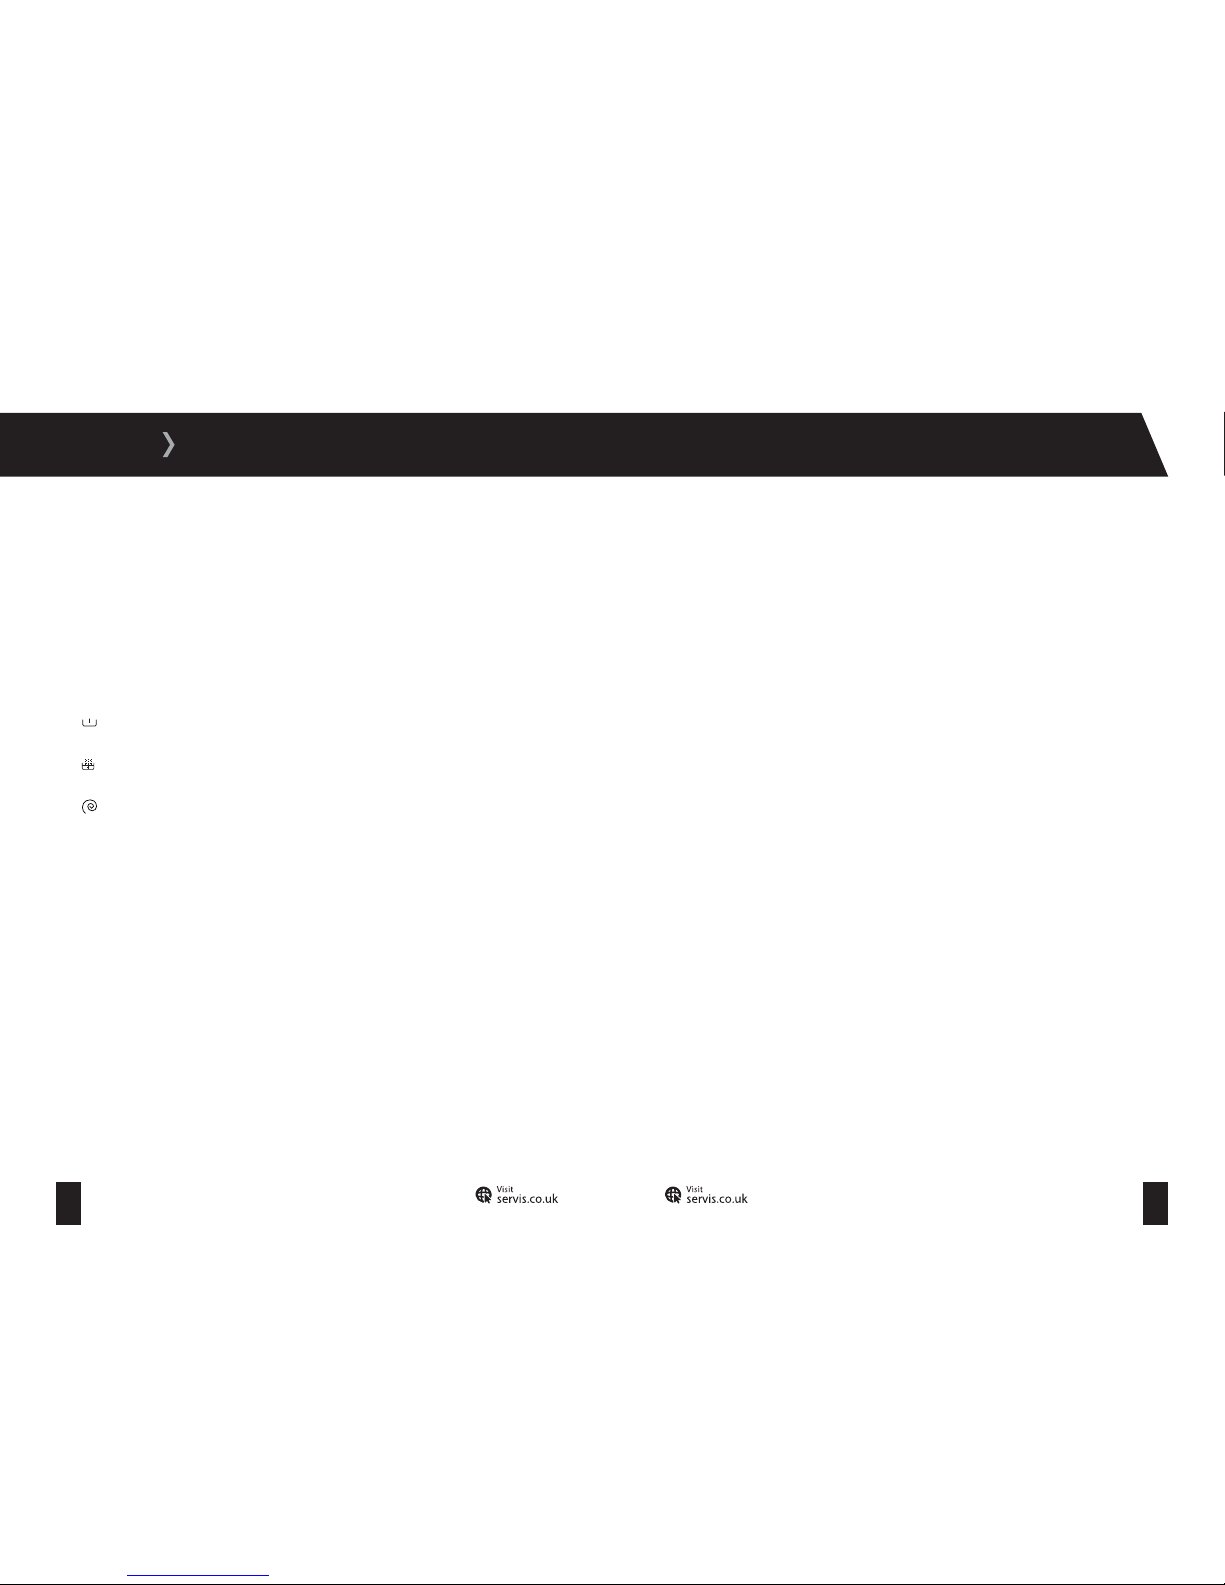
The indicator lamps show the wash stages of the selected programme:
Indicates that a programme with pre-wash has been selected.
Indicates that a rinse programme has been selected.
Indicates that a spin/drain programme has been selected.
To pause the current programme, press the
Programme Start/ Pause
button.
To resume a paused
programme, press the Programme Start /Pause
button
. The programme will resume from its
current point in the cycle.
Programme Summary:
Your Washing Machine is equipped with 15 pre-set programmes. We have summarised some of
the important information, making it as easy as possible for you to select the most appropriate
programme for your laundry.
Day to day washing: Recommended Programmes: 2, 3, 4, 12, 13 and 14
These programmes are ideal for washing lightly soiled cot tons and synthetics as separated
or mixed washes. They of ten run at lower temperatures and can be used with the majority of
detergents.
Programme 15 (Super Rapid 15 Min):
The 15-minute wash is only intended for small loads and quick refreshes of laundry that is only
very slightly dirt y; ideal for the freshening up of a school uniform for example.
Heavily Soiled Washing: Recommended Programmes: 1, 5 and 6
These programmes are ideal for washing heavily soiled cottons and synthetics and are capable
of removing stubborn dirt and stains.
Delicate Washing: Recommended programmes 7 and 10
These programmes are ideal for washing items such as delicate synthetics, wool and silk. Lower
temperatures are used.
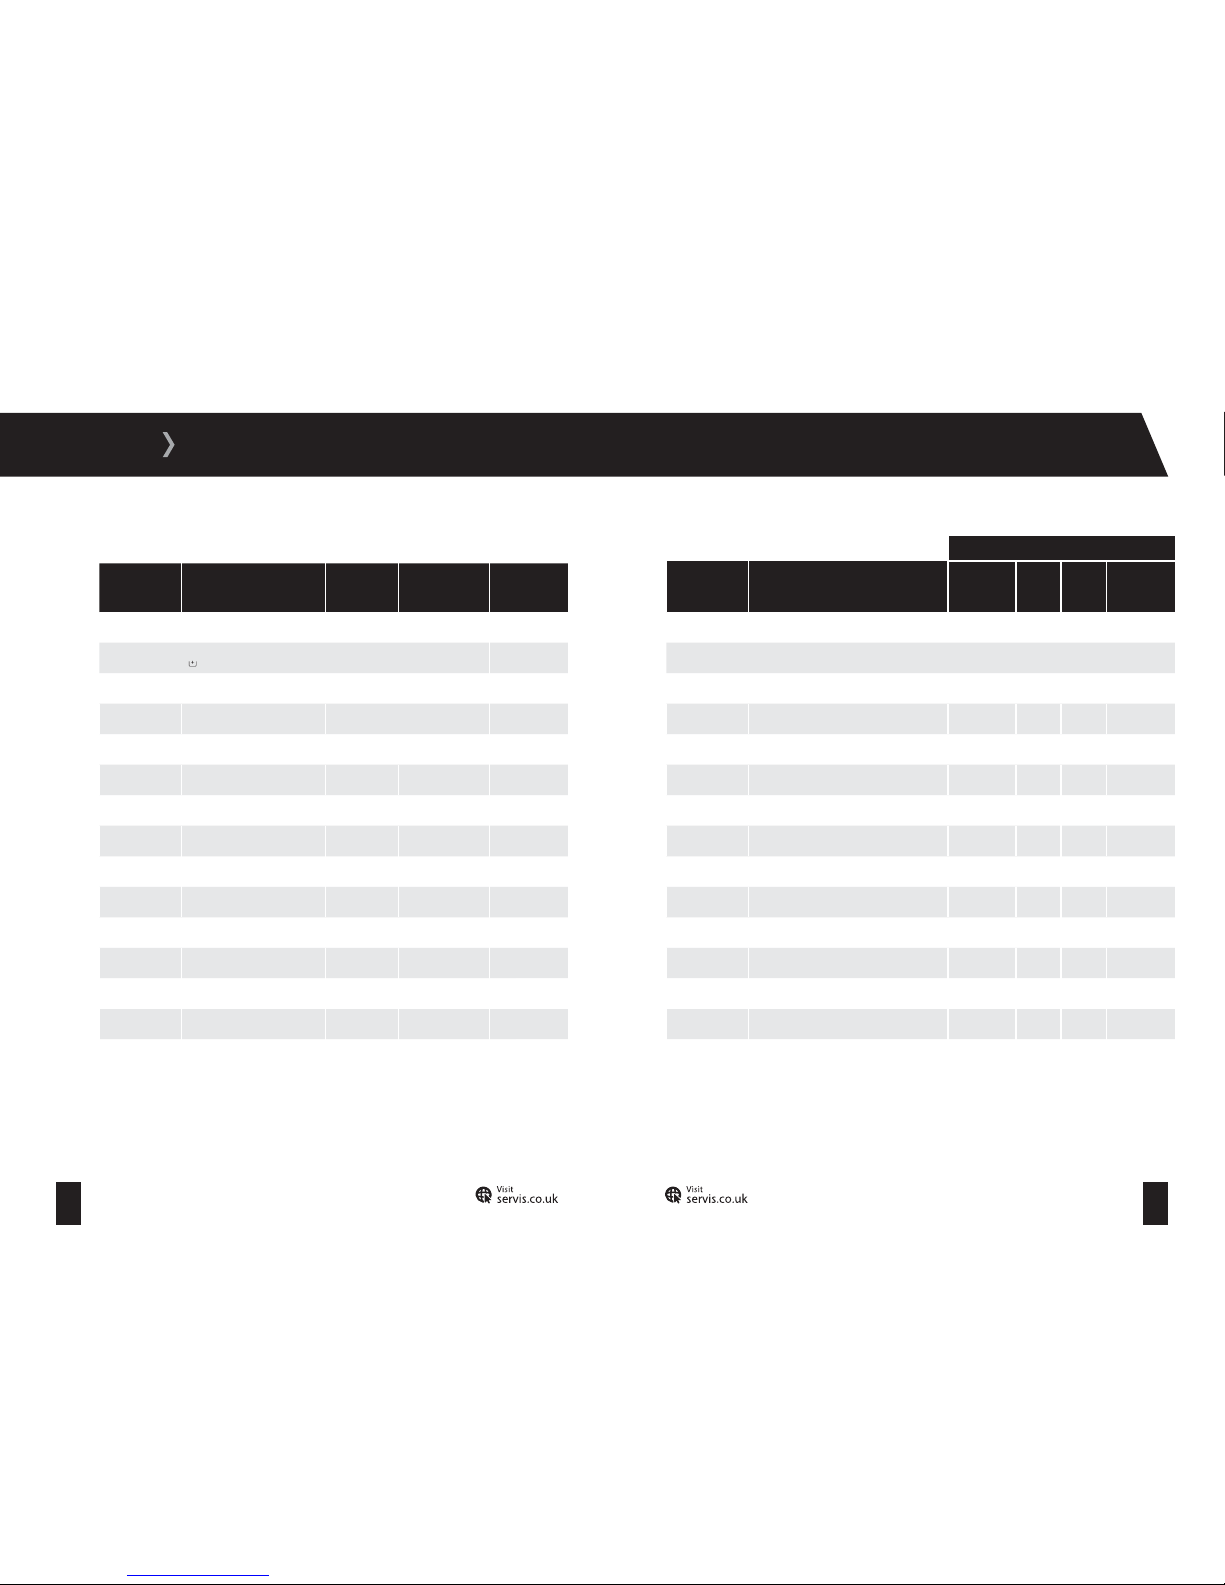
You can find detailed information on all washing programmes in the table on pages 25 and 26.
In addition to the programmes listed in the table, the following options are also available. Turn
the programme dial to the selected option once a previously selected programme has finished:
Rinse (Programme 8):
This option is suitable for all types of laundr y and provides an extra rinse to your laundry after
the washing process has taken place.
Spin (Programme 9):
This is a useful programme to select when extra spinning is required. We do not recommend this
programme for your delicate or woollen laundry.
Page 15
25 26
T: 0800 0124 382 T: 0800 0124 382
Programme Settings and Wash Cycles
Programme NoLaundry Type Pre-Wash Temp Rinse Usable
Detergent
1 Cotton and Linen Textiles 90 Yes 2
2 Cotton and Linen Textiles Yes 60 Yes 1+2
3 Cotton and Linen Textiles 60 Yes 2
4 Cotton and Linen Textiles 40 Yes 2
5 Cotton and Linen Textiles 20 Yes 2
6 Synthetic or Synthetic Mixture 40 Yes 2
7Machine Wash Wool 30Yes2
8Any -Yes-
9Any -Yes-
10 Cotton, Synthetic and Coloureds 30 Yes 2
11 Sp or ts we ar 30 Yes 2
12 Cotton, Synthetic and Coloureds 30 Yes 2
13
13 Cotton, Synthetic and Synthetic-mix 60
Yes
Yes 2
14
14 Cotton, Synthetic and Coloureds 60
Yes
Yes 2
15
15 Cotton, Synthetic and Coloureds 30
Yes
Yes 2
USAGE
Programme NoName Max Dry
Load (kg)
Wash Type
Wash Type
Wash Time
Wash Time
(Min)
(Min)
1 Cotton 900C7Heavy Soiled203
2 Cotton 7 Day to Day 160
3Cotton 60
0
C 7 Day to Day 200
4Cotton 40
0
C 7 Day to Day 190
5Eco 20
0
C3.5Lightly Soiled98
6 Easy Care 3.5 Heavy Soiled 91
7Wool 2.5Delicate55
8Rinse 7Any36
9Spin 7Any15
10 Hand Was h Delicate 2.5 Delic ate 91
11 Sport 3.5 Sportswear 80
12 Mix 3.5 Day to Day 87
13 Shir ts 3.5 D ay to Day 106
14 Daily 60 Min 3.5 Day to Day 60
15 R apid 15 Min 2 L ightly S oiled 15
Programme Modes:
Notes:
Programme 1: You can operate your Washing Machine with no load with this
programme to reduce the level of microor ganisms present in your Washing Machine.
Programme 14:
If the load is less than 2kg, the w ash time is 30 mins.
Programme 15:
Due to the shor t washing time of this programme, we recommend that
less detergent is used than with other programmes. The programme will last longer than
15 minutes if your Washing Machines dete cts an uneven load.
Page 16
27 28
T: 0800 0124 382 T: 0800 0124 382
USAGE
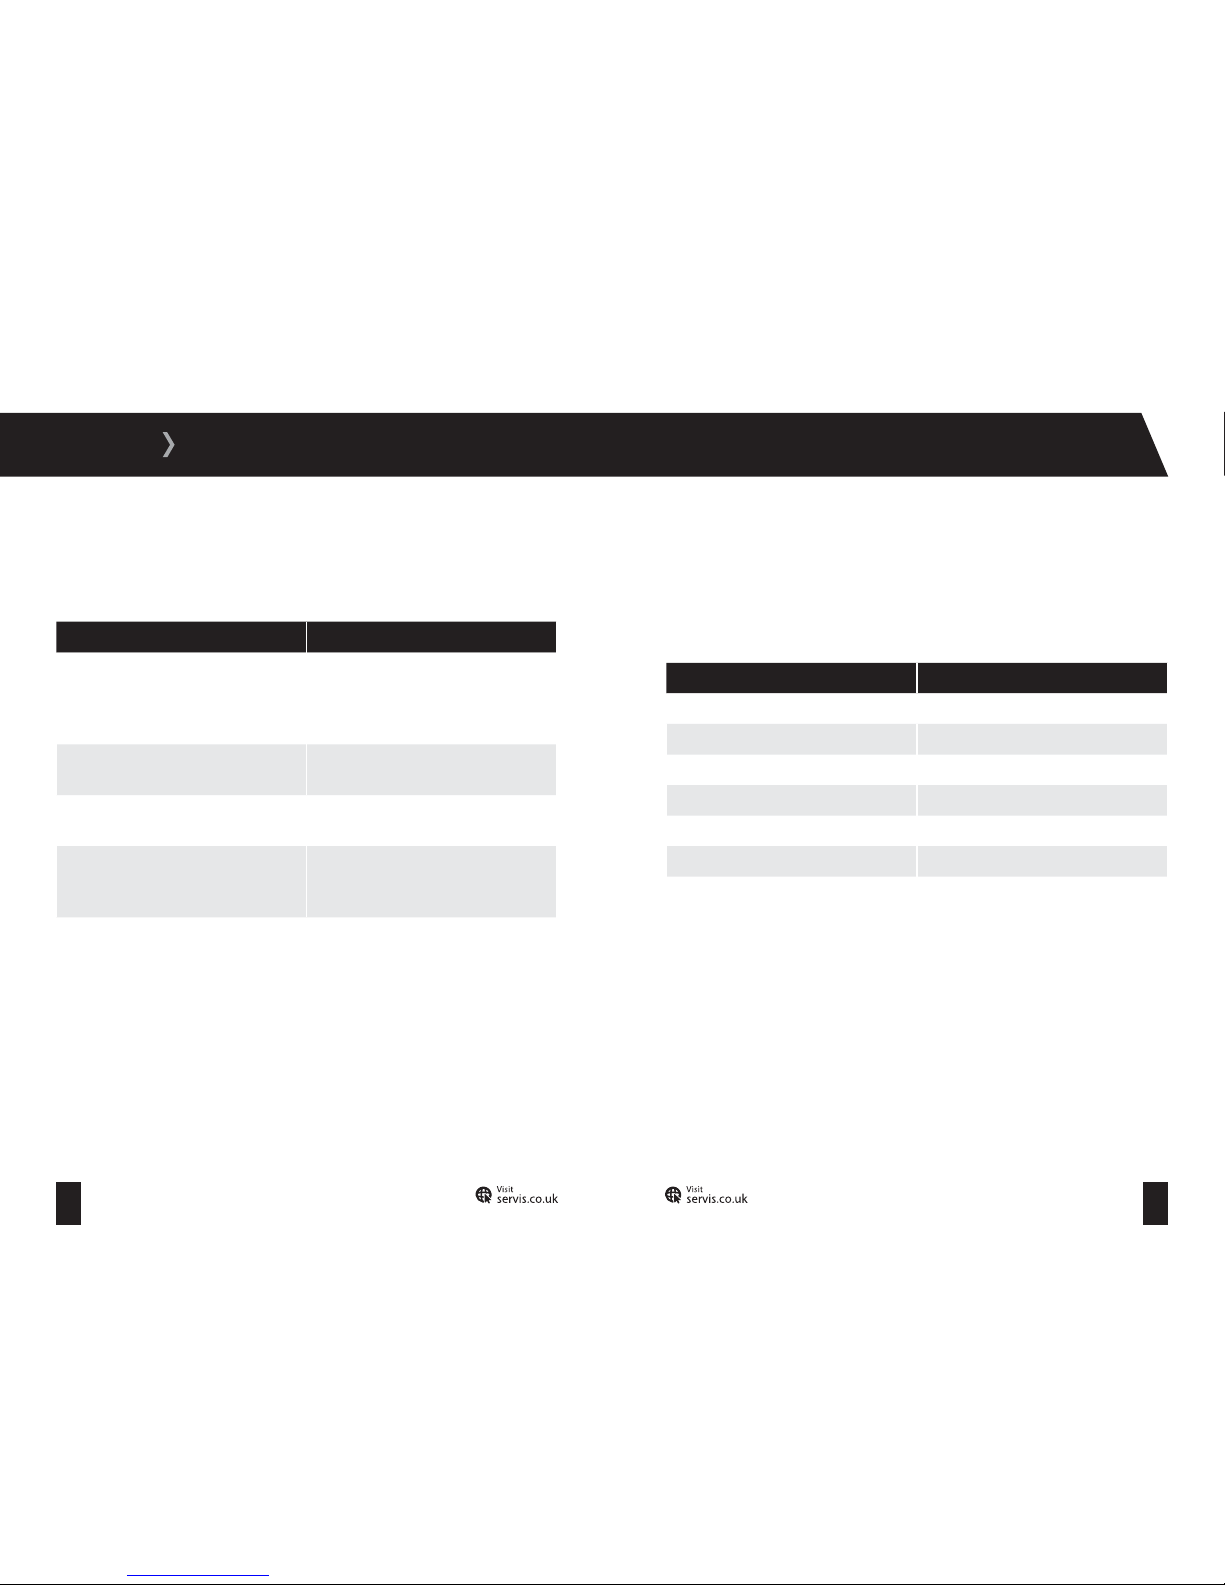
It can often be difficult to know which temperature setting is best. To help with this, we have
provided a table with common temperatures and their typical uses.
Tempe rat ure Typ ical U se
300C This is the lowest wash temperature that
we recommend. By using a detergent that
can work at this temperature, you’ll save on
water and electricity bills.
40
0
C This is the most common wash temperature,
suitable for most everyday items.
50
0
C This is suitable for most polyester/cotton
mixtures and nylon.
60
0
C This higher temperature is recommended for
heavily soiled garments such as baby clothes
or bed linen and towels.
90
0
C
This is the hottest temperature available on
your Washing Machine and is suitable for
white cottons and linen that show dirt.
Note: 90
0
C is not displayed on the
Wash Temperature Indicators on the display panel.
Please be aware that the programme setting provides the default temperature for the selected
programme. You can override this setting by decreasing the temperature should you wish.
Spin Selection:
You can select a Spin Speed to meet the needs of your wash. The table below suggests some
typical selection speeds for common types of clothing. Your Washing Machine will automatically
override a Spin Speed if it is not suitable for the selected programme.
Laundry
rpm
Cottons 1200
Delicate 600
Woollens 600
Shirts 600
Denim 800
Dark Garments 1200
You will be pleased to learn that your Ser vis Washing Machine has an in-built sensor that
prevents your Washing Machine operating with an out-of-balance load; it will make several
attempts to balance the load prior to the spin cycle. If it is not possible for your Washing
Machine to balance the load, your Washing Machine will abort the spin cycle. To reduce the
likelihood of this happening, we recommend that you avoid small wash loads containing items
that could become heavy through water absorption.
Page 17
29 30
T: 0800 0124 382 T: 0800 0124 382
USAGE
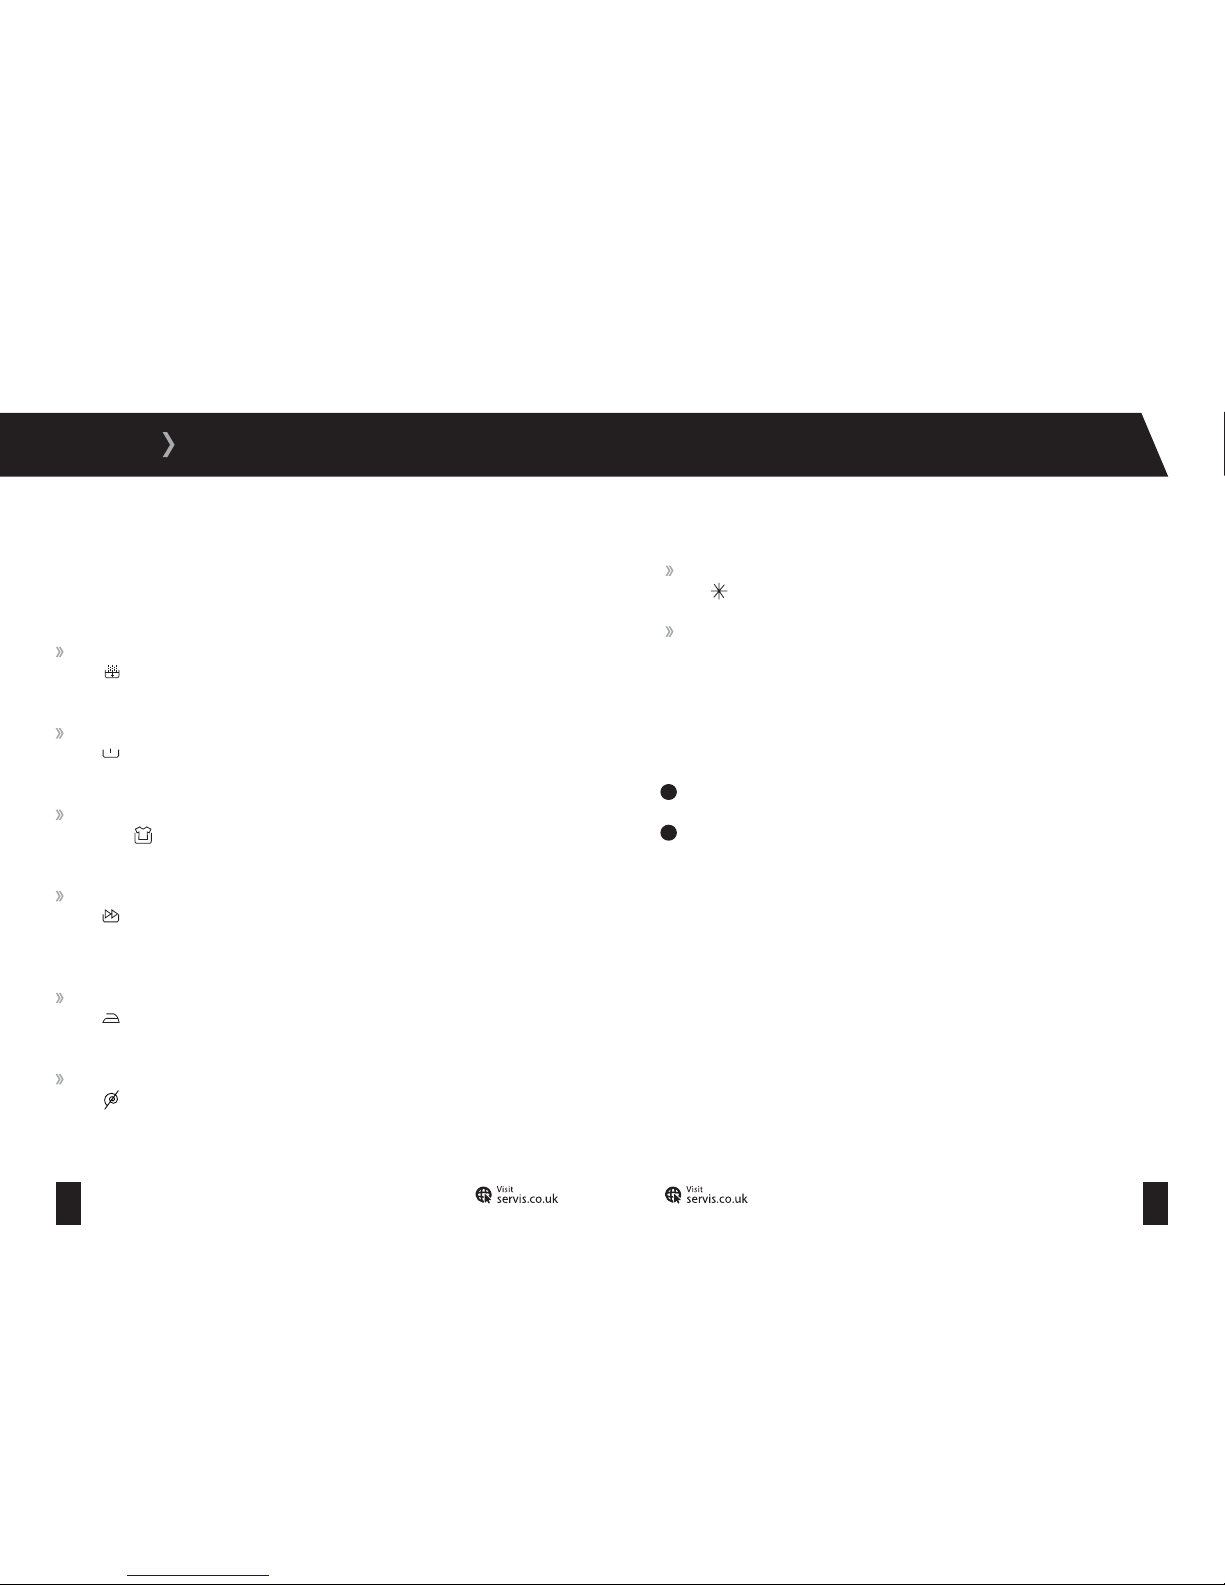
Additional Functions:
To allow you to get the best washing results possible, your Washing Machine offers a selection
of additional functions to complement the selected programme.
Extra Rinse - Select this function by pressing one of the additional function buttons when
the symbol is displayed. Your Washing Machine will carry out one extra rinse in
addition to those made in the selected programme cycle.
Pre-Wash - Select this function by pressing one of the additional function buttons when
the
symbol is displayed. Your Washing Machine will run a pre-wash. When using this
function put detergent in the front compartment of the detergent drawer.
Anti-Allergic - Select this function by pressing one of the additional function buttons
when the
A
symbol is displayed. Your Washing Machine will carry out one extra rinse in
addition to those made in the selected programme cycle.
Rapid Wash - Select this function by pressing one of the additional function buttons when
the
symbol is displayed. Your Washing Machine will wash the laundry in a shorter time
using less water and energy. We recommend that you only use this option if you are
washing less than half the maximum dry load for the selected programme.
Easy Ironing - Select this function by pressing one of the additional function buttons when
the
symbol is displayed. This enables your laundry to be less wrinkled when the wash
is completed.
No Spin - Select this function by pressing one of the additional function buttons when
the
symbol is displayed. This prevents the spin part of the programme from being
performed.
Cancelling a Programme:
To cancel a programme while it is running:
1
Turn the programme dial to the top position. The programme will stop.
2
Turn the programme dial to any programme. Your Washing Machine will discharge any
water left from the cancelled programme.
Programme End:
Your Washing Machine will automatically stop once the selected programme has finished. The
Finished light will illuminate.
Cold Wash - Select this function by pressing one of the additional function buttons when
the
symbol is displayed. Your Washing Machine will wash the laundry in cold water.
Child Lock - Press and hold both additional function buttons for 3 seconds to activate the
child lock. This locks the control panel. Once activated, you can press and hold both
additional function but tons for 3 seconds to release the child lock.
Page 18
31 32
T: 0800 0124 382 T: 0800 0124 382
USAGE
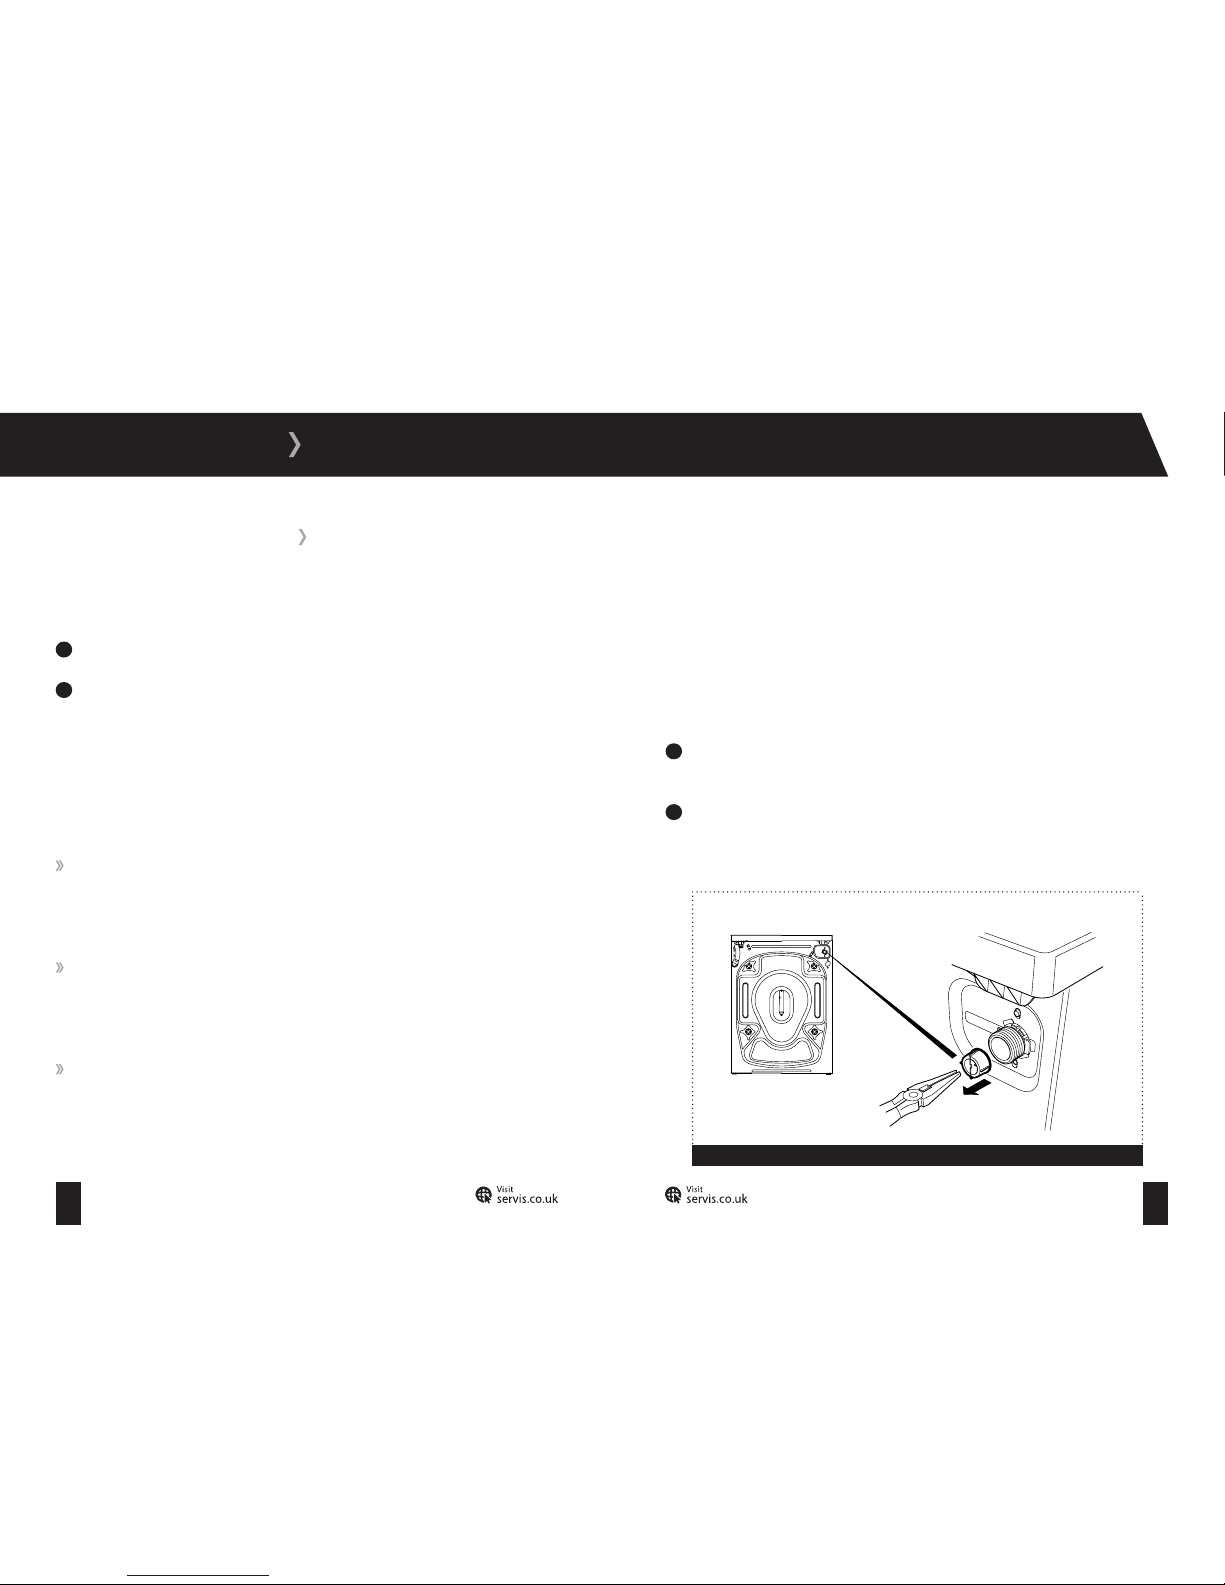
Removing Your Laundry:
1
Turn the programme selection dial to the of f (0) position. Your Washing Machine door lock
will automatically be released approximately 2 minutes af ter the programme has finished.
2
Pull the door handle forwards and open the door fully.
3
Remove your laundry; check that all items have been removed from the drum. A ny items
left in the drum could discolour items in the next wash or become discoloured themselves.
4
Check the drum and door seal for any small articles that may have become dislodged.
5
Leave the door open for a short time to allow the interior of your Washing Machine to dr y.
Check the drum is dr y and empty before closing the door.
Power Supply Failure:
If a power cut should occur while a programme is running, the programme will continue from the
same point once power is restored. This will not cause any harm to your Washing Machine or
laundry.
During a power cut, the door lock mechanism will release after 2 minutes. Do not open the door
if there is water in your machine. If you wish to collect your laundry, drain your Washing Machine
first. Page 36 contains instructions on how to drain your machine.
Page 19
33 34
T: 0800 0124 382 T: 0800 0124 382
MAINTENANCE
From time to time it may be necessary to carry out some routine maintenance of your Washing
Machine to ensure that it operates as intended. Before cleaning your Washing Machine:
1
Turn your mains power supply off and remove the plug from the socket.
2
Turn off the cold water supply.
CAUTION:
Do not use solvents, abrasive cleaners, glass cleaners or all-purpose cleaning
agents to clean your Washing Machine. They may damage the plastic sur faces and other
components with the chemicals they contain.
External Casing:
Use a mild, non-abrasive cleaning agent, or soap and water, to clean the external casing.
Wipe dry with a soft cloth.
The Drum:
Use a suitable stainless steel cleaning agent to clean the drum. Follow the manufacturer’s
advice on the cleaning agent’s packaging.
Extra Cleaning:
Deposits may build up in your machine when washing is mainly carried out at low
temperatures. To prevent these deposits from building up, carry out a hot wash (70oC
or above) once ever y 6 weeks. If you have no reason to wash occasionally at this high
temperature, run a high temperature cottons programme with detergent but no laundr y at
regular inter vals.
Filters:
Water Inlet Filters:
Water inlet filters prevent dirt and foreign materials from entering your machine. It is
recommended that these filters are cleaned when your machine is unable to receive sufficient
water, although your water supply is on and the tap is open.
To clean the water inlet filters:
1
Unscrew the water inlet hose from the Washing Machine by turning the hose anti-
clockwise and gently pulling.
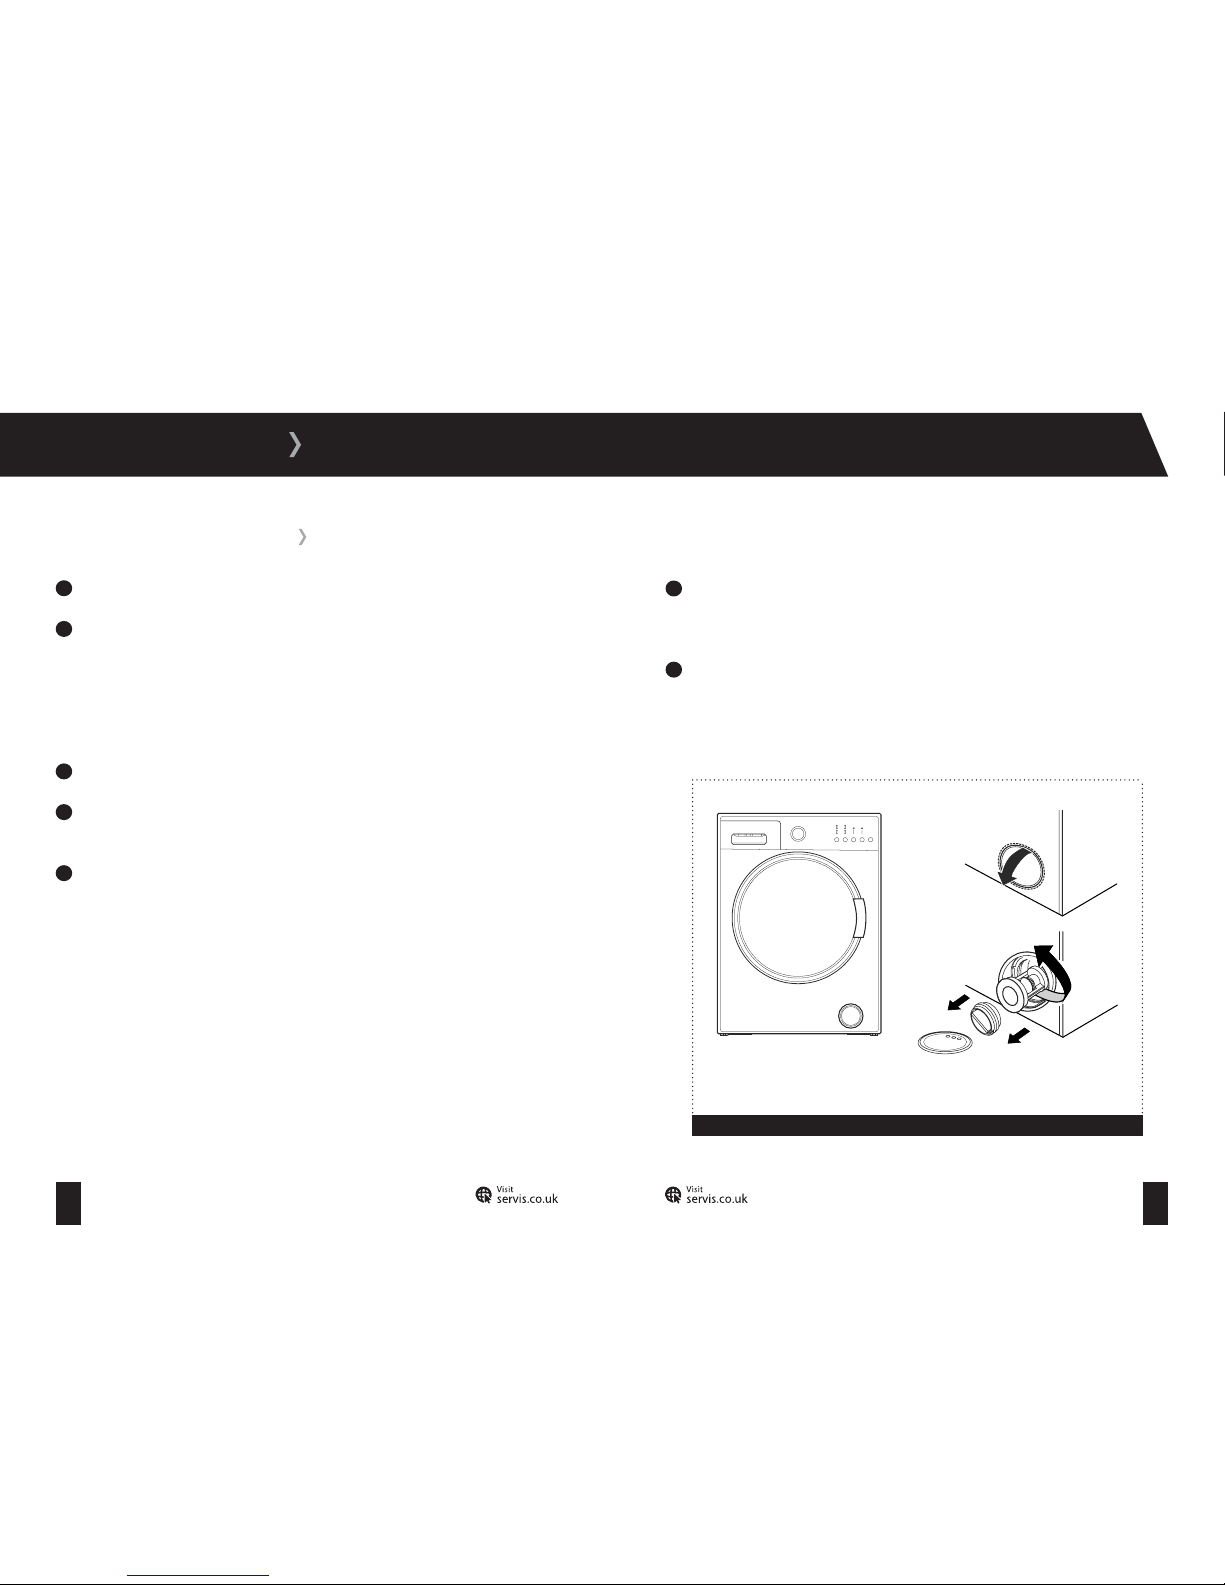
2
To remove the water inlet filter from the water inlet valve, use a pair of long-nosed pliers to
gently pull on the plastic bar in the filter (fig 12).
GENERAL MAINTENANCE
Figure 12
Page 20
35 36
T: 0800 0124 382 T: 0800 0124 382
MAINTENANCE
3
Clean the filter thoroughly with a soft brush, wash with soapy water and rinse thoroughly.
4
Re-insert the filter by gently pushing it back into place.
A second water inlet filter is located in the tap end of the water inlet hose.
To remove the second water inlet filter:
1
Use a pair of long-nosed pliers to gently pull on the plastic bar in the filter.
2
Clean the filter thoroughly with a soft brush and wash with soapy water and rinse
thoroughly.
3
Re-insert the filter by gently pushing it back into place.
Pump Filter:
The pump filter system in your Washing Machine prolongs the life of the pump by preventing lint
from entering your machine. We recommend that you clean the pump filter ever y 2-3 months.
The pump filter is located behind the cover on the front-lower right corner.
CAUTION:
The water in the pump may be hot, wait for it cool before carrying out any
cleaning or maintenance.
Cleaning the Pump Filter:
1
Before opening the filter cover, place a container under the filter cover to collect any water
left in the machine. Pull the top of the cover forwards using the finger groove, until the
pump filter is fully exposed (fig 13a).
2
Loosen the filter by turning anti-clockwise and remove by pulling (fig 13b). Wait for the
water to drain.
GENERAL MAINTENANCE
Figure 13
a:
b:
Page 21
37 38
T: 0800 0124 382 T: 0800 0124 382
MAINTENANCE
3
Remove any foreign materials from the filter with a soft brush.
4
Move the pump by hand to check that it rotates freely.
5
Clean the pump with a sof t brush.
After Cleaning:
1
Re-fit the filter by inserting it and turning clockwise.
2
Close the filter cover.
The use of detergent may cause residual build up in the detergent drawer over time. Remove the
drawer at regular intervals to clean the accumulated residue.
To remove the detergent drawer:
1
Pull the drawer forwards until it is fully extended.
2
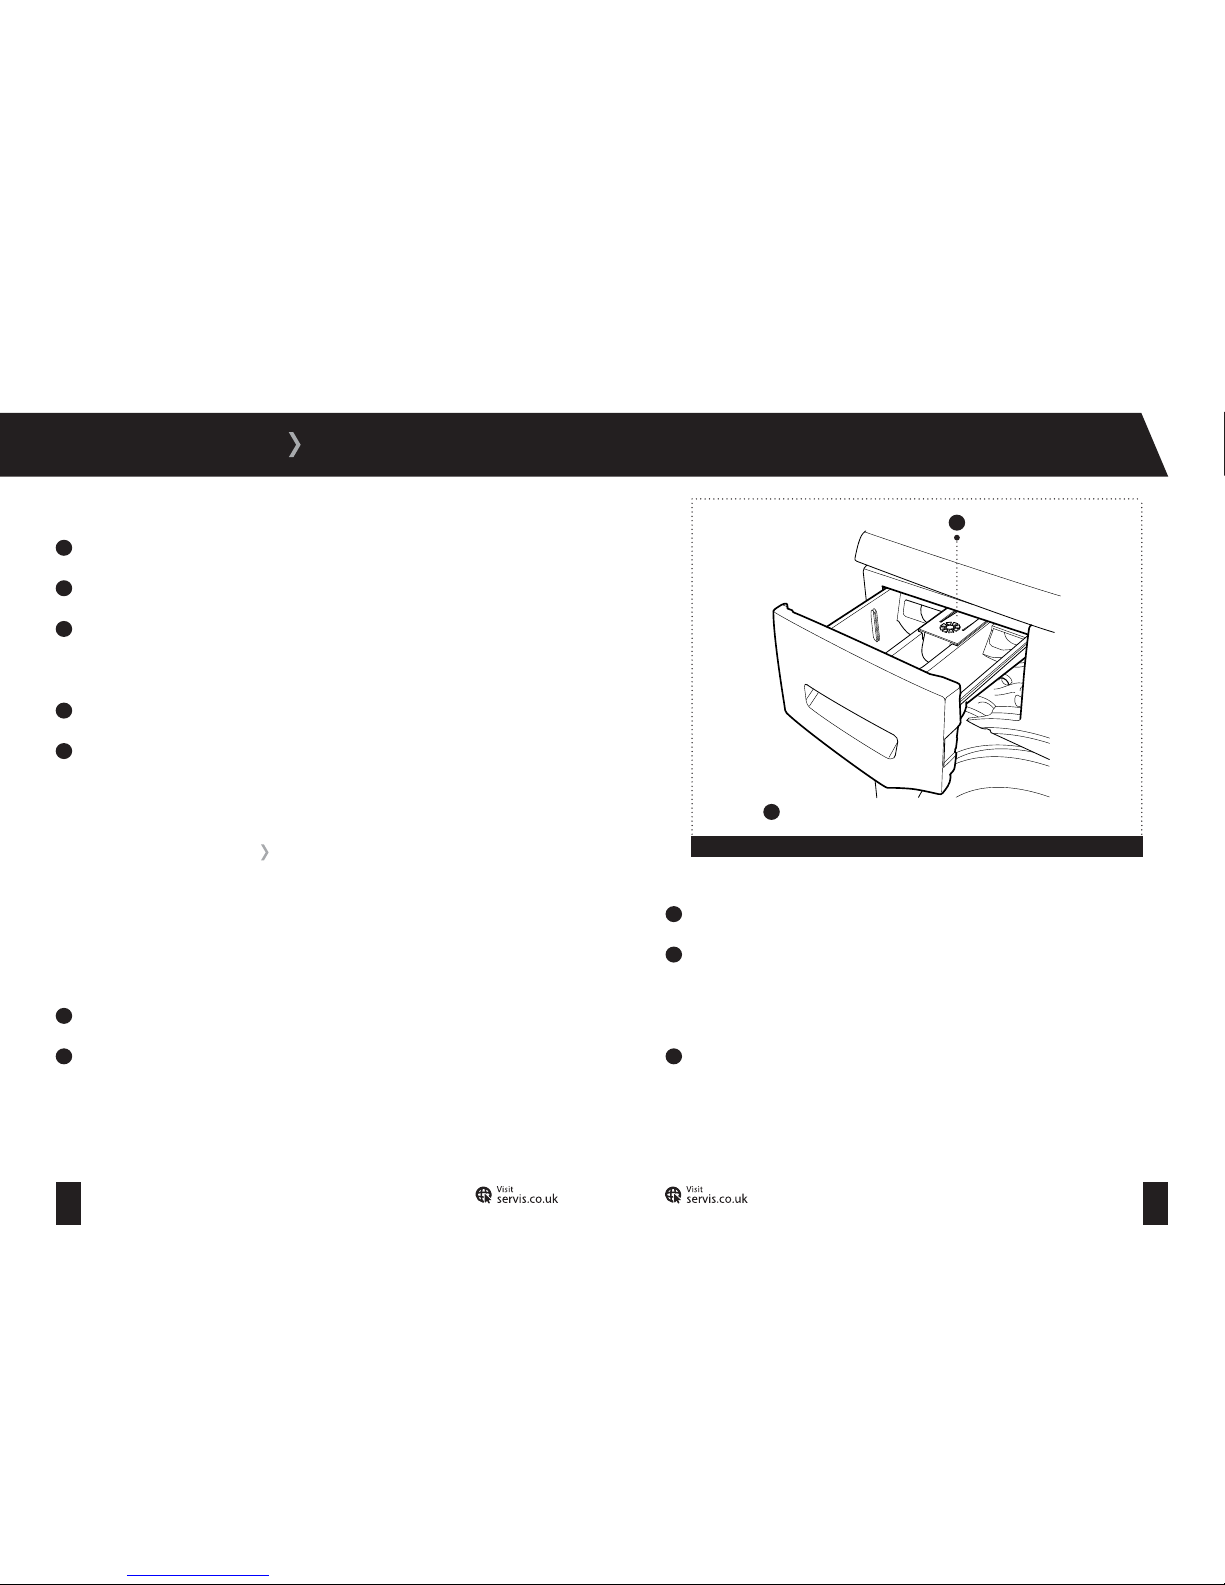
Press down on the siphon lid (fig 14) and pull the drawer from its housing.
3
Clean the drawer with water and a soft brush.
4
If there is any residue in the drawer housing, remove with a soft brush. Take care to prevent
any residue from dropping into the machine.
To replace the drawer:
5
Dry it thoroughly and slide it back into the housing.
DETERGENT DRAWER
Figure 14
1
1
Siphon plug
Page 22
39 40
T: 0800 0124 382 T: 0800 0124 382
The siphon plug is located in the compartment of the detergent drawer. Remove the
detergent drawer fully and pull the plug upwards.
Clean the plug with a soft brush and replace, checking that it is firmly in position.
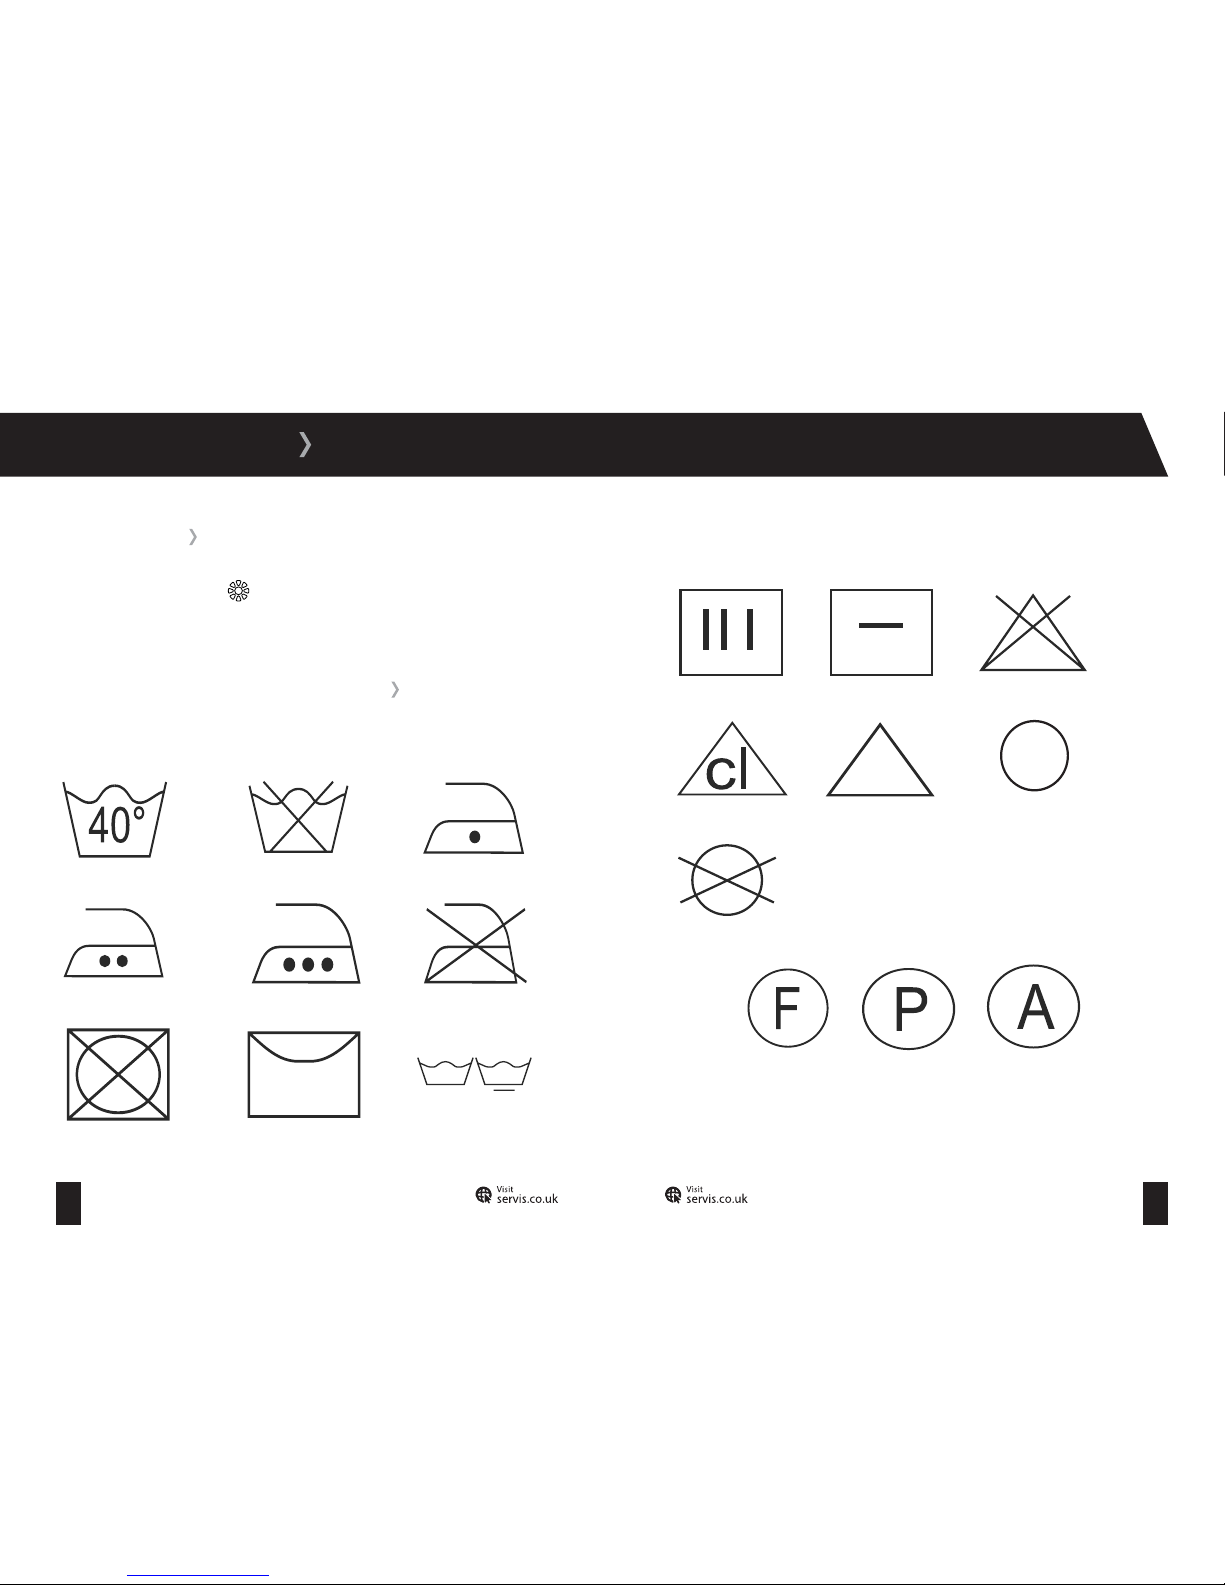
When selecting your washing programme take care to note any instructions displayed on the
international washing signs in your garments and textiles.
Washing Temperature Do Not Wash Lukewarm Iron
Medium Hot Iron Hot Iron Do Not Iron
Do Not Tumble Dry Hang To Dry Normal Washing
CLOTHING CARE
Drip Dry Dry Flat Do Not Bleach
Handy To Bleach Any Bleach Allowed Can Be Dr y Cleaned
No Dry Cleaning
SIPHON PLUG
GENERAL WASHING INSTRUCTIONS
These letters are used to instruct professional cleaners as
to which type of solvent to use. Do not wash garments with
these symbols in your Washing Machine unless the label says
otherwise.
Page 23
41 42
T: 0800 0124 382 T: 0800 0124 382
CLOTHING CARE
If can often be hard to know the best way to treat a stubborn stain. To help with this we’ve
provided you with a few tips on dealing with the most common types before running your wash
cycle.
Alcohol:
Wash the stain in cold water, wipe with glycerine and water and rinse with water mixed with
vinegar.
Shoe Polish:
Scratch out the stain taking care not to damage the material, rub with detergent and rinse.
Tea and Coffee:
Stretch the area containing the stain and pour on hot water.
Chocolate and Cocoa:
Leave your clothes in cold water and rub with soap or detergent, then wash at a high
temperature.
Tom ato Pa ste:
Scrape away the dried pieces, leave in cold water for around 30 minutes and hand wash by
rubbing with detergent.
Egg:
Scrape away the dried pieces, clean the stained area with a cold wet cloth or sponge and rub
with detergent to wash.
Grease and Oil:
Rub the stain with detergent and then wash in lukewarm soapy water.
Mustard:
Apply glycerine to the stained area, rub with detergent and hand wash.
Blood:
Soak your clothes in cold water for around 30 minutes and then hand wash.
Cream, Ice Cream and Milk
Soak your clothes in cold water and rub the stained area with detergent.
Mould:
Clean the stained area as soon as possible and hand wash with detergent.
Ink:
Hold the stained area under cold water and wait until the inky water completely runs off. Rub
the stain with water and diluted lemon juice, wait 5 minutes before beginning the wash cycle.
Fruit:
Stretch the stained area and pour on cold water, apply glycerine and wipe. Wait for 1-2 hours
and rinse after wiping with a few drops of white vinegar.
Grass:
Rub the stained area with detergent before washing.
Oil-Based Paint:
Apply paint thinner to the stained area before it dries, then rub the area with detergent and
wash.
STAIN REMOVAL INFORMATION
Page 24
43 44
T: 0800 0124 382 T: 0800 0124 382
TROUBLESHOOTING
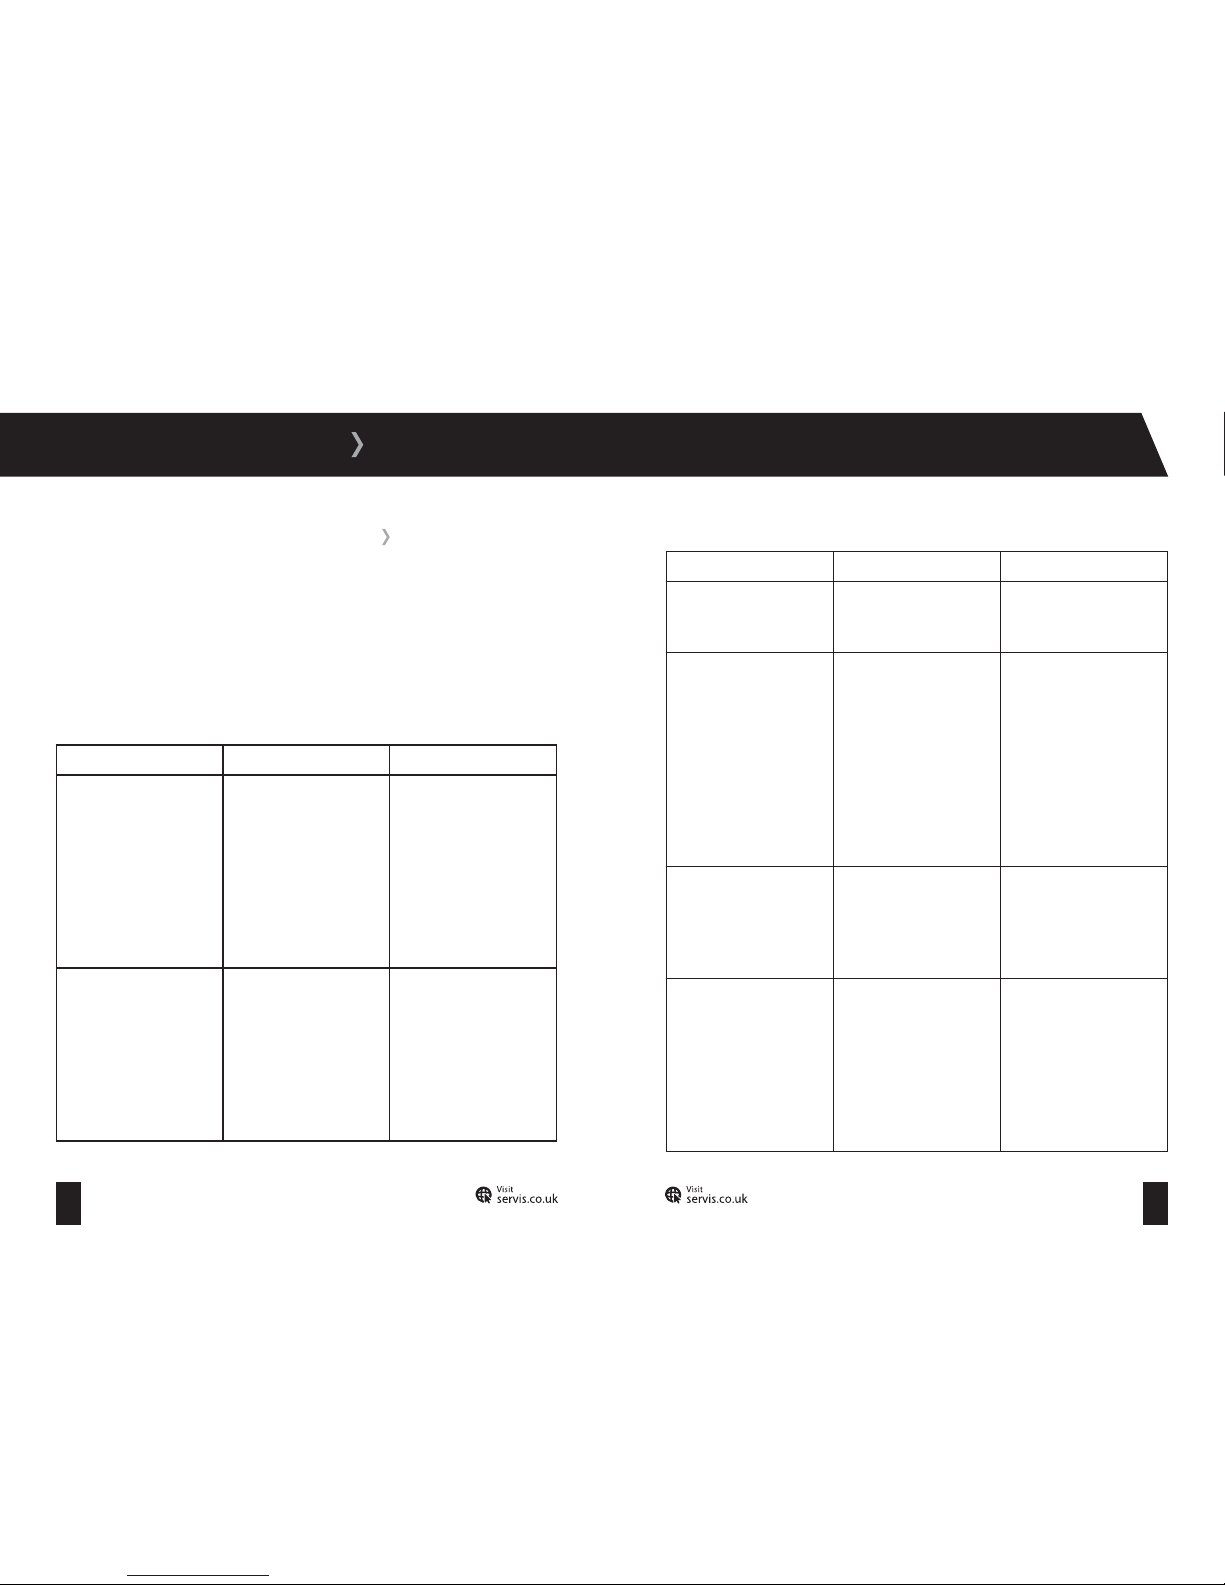
If your Washing Machine is not operating as expected, you may find a simple solution listed in
the table below.
If your Washing Machine is not working and one or more of the indicator lights are flashing, this
means that the automatic error detection system has diagnosed a fault. The table on page 46
will provide you will more information.
If your machine has developed a fault not covered in this manual, please contact the Servis
helpdesk.
Fault Possible Cause Solution
Your Washing Machine does
not operate
It is switched off at the mains
The programme dial is in the
off position
The door is not shut properly
Check that your Washing
Machine is plugged in and
turned on at the mains
Use the programme dial to
select the desired programme
Check that the door ‘clicks’
shut
Your Washing Machine does
not receive water
The cold water supply tap
is off
The water fill hose is bent,
twisted, kinked or trapped
Check that the cold water
supply tap is fully turned on
Check that there are no
bends, twists or kinks and
that the fill hose is not
trapped
Fault Possible Cause Solution
Your Washing Machine does
not receive water
The water inlet filters are
blocked
Clean the water inlet filters.
See page 34 for detailed
instruc tions
Your Washing Machine is not
draining water
The drain hose is bent,
twisted, kinked or trapped
The pump filter is obstructed
Your laundry is too tightly
packed together in the drum
Check the drain hose and
straighten out any kinks,
twists or bends
Clean the pump filter.
See page 36 for detailed
instruc tions
Check that your laundry is
spread out
Your Washing Machine is
vibrating
The feet of your machine are
not correctly adjusted
The transit bolts are not
removed
Adjust the feet. See page 11
for further information
Remove the transit bolts. See
page 9 for fur ther information
There is excessive foam in
the detergent drawer
Too much detergent has been
used
Press the Start/Pause but ton.
To stop the foam, dilute one
tablespoon of softener into
1/2 litre of water and pour
into the detergent drawer.
Press the Start/Pause but ton
after 5-10 mins
TROUBLESHOOTING INFORMATION
Page 25
45 46
T: 0800 0124 382 T: 0800 0124 382
TROUBLESHOOTING
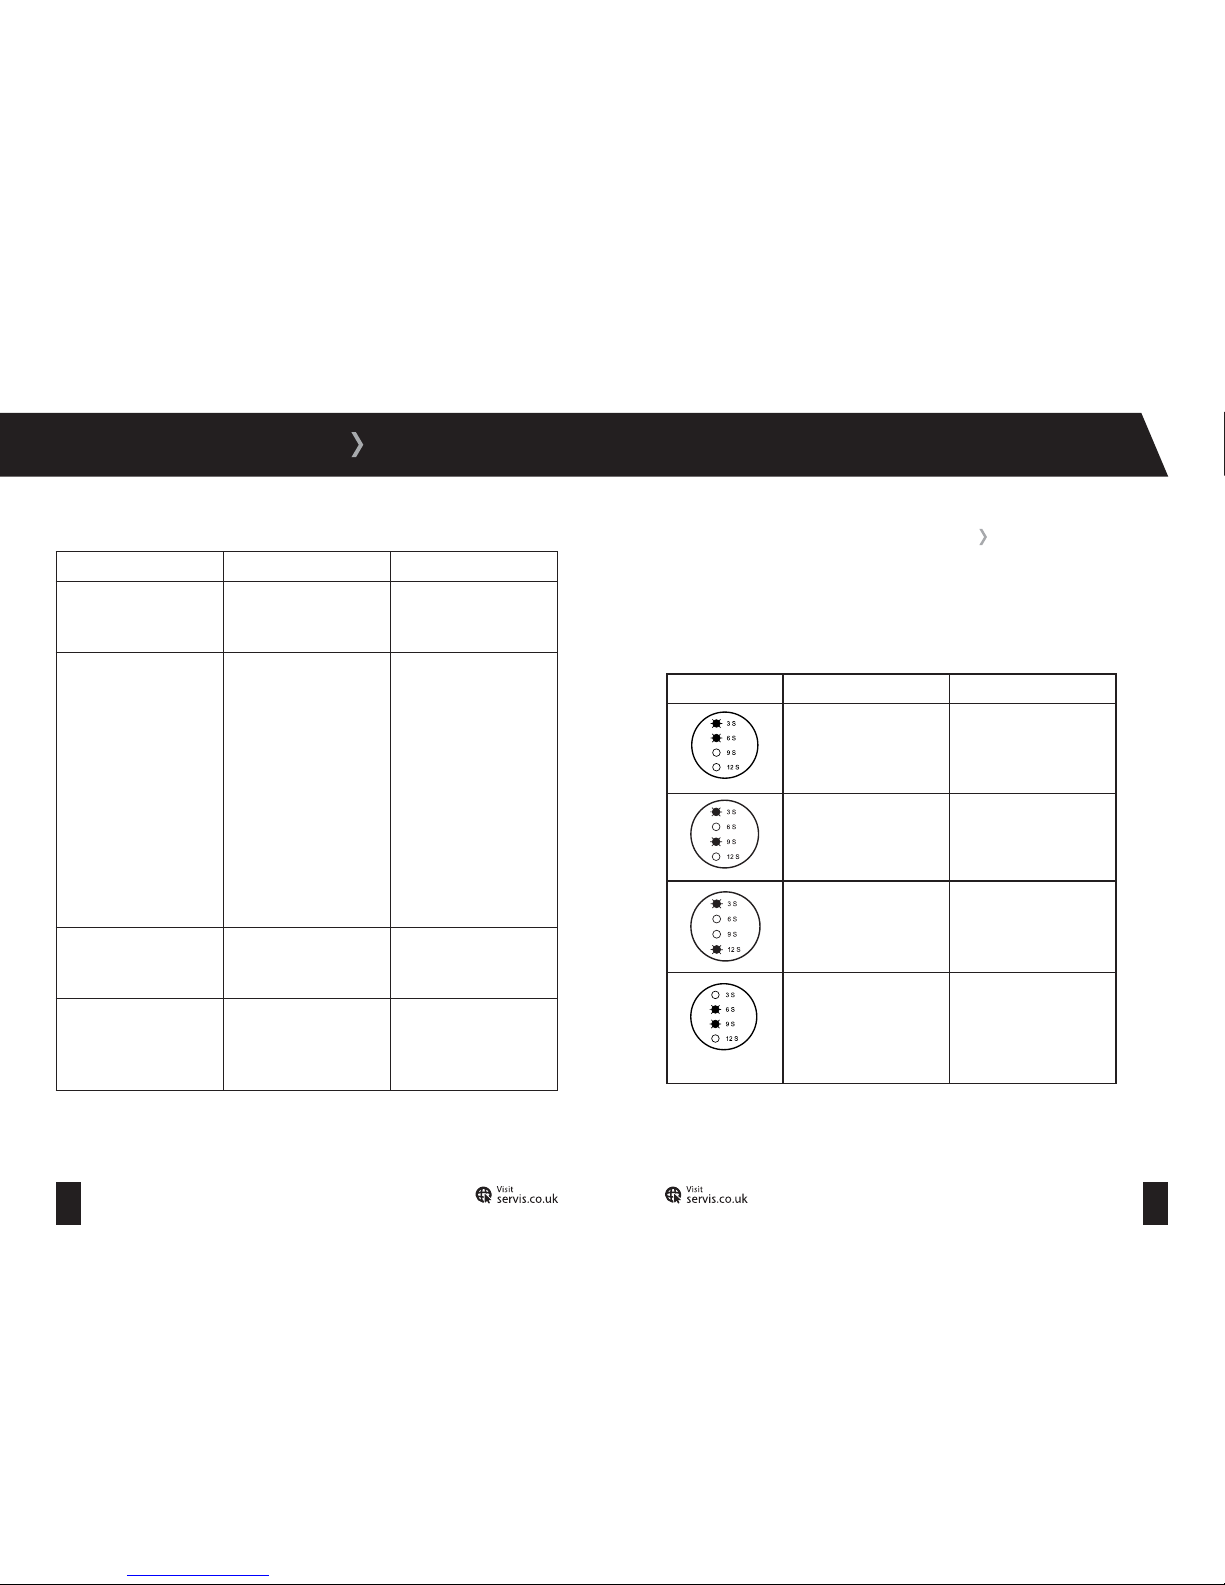
Your Washing Machine is equipped with a built-in fault detection system, indicated by a
combination of flashing wash operation lights. The most common failure codes are shown
below. If your machine displays a code not shown, or if the problem persists af ter you have
taken corrective action, consult the Servis helpdesk.
Error Code Possible Failure Solution
The door is not shut properly Shut the door properly so that
you hear the click
The water level in your
machine may be low, or the
water pressure may be low
Check that the cold water tap
is fully turned on
The pump has failed, or the
pump filter is obstructed
Clean the pump filter (refer to
page 36)
There is an excessive amount
of water in your Washing
Machine
Your Washing Machine
will automatically drain the
water, turn your Washing
Machine off, unplug and
contact the Servis helpdesk
AUTOMATIC DETECTION SYSTEM
Fault Possible Cause Solution
There is excessive foam in
the detergent drawer
The wrong detergent has
been used
Only use detergents produced
for automatic Washing
Machines
The washing result is not as
expected
Your laundry is too dirty
for the programme you’ve
selected
Not enough detergent used
There is too much laundr y in
your Washing Machine
Use the information on pages
25 and 26 to select the most
appropriate programme
Use the amount of detergent
as instructed on the
packaging
Check that the maximum
capacity of your Washing
Machine is not exceeded.
See pages 25 and 26 for
more information
The water from the machine
is drained as soon as it is
filled
The end of the water drain
hose may be too low
Check that the drain hose is
at a suitable height. See page
14 for more information
The spin cycle does not take
place
The in-built sensor has
prevented your Washing
Machine from operating with
an out-of-balance load
Avoid small wash loads
containing items that could
become heav y through water
absorption
Page 26
47 48
T: 0800 0124 382 T: 0800 0124 382
GUARANTEE
All packaging and materials used are environmentally friendly and recyclable. Please dispose
of any packaging in an environmentally friendly manner. Consult your local council for further
details.
To ensure safety when disposing of an old machine, cut of f the main power supply cable and
break the door hinges or lock.
Please refer to the rear cover for disposal instructions.
The Servis guarantee covers the cost of parts/labour/call out charges to repair an appliance
should any covered component fail in its normal functions necessitating a repair or replacement
to resume those functions.
The Servis guarantee
does not
cover:
Accidental damage
Use in a commercial environment
Incorrect or fault y installation
Deliberate damage or neglect
Repairs to cosmetic parts
Damage caused by foreign objects or substances
Claims in respect to routine inspection or maintenance
The Servis guarantee is not transferable.
For your Ser vis guarantee to be valid, you will need to retain your original purchase
receipt and be able to provide it when you make a claim.
The above summar y does not include all of the terms and conditions and exclusions which can
be found on our website w ww.servis.co.uk.
Household contents insurance
Your household insurance may cover you for accidental damage, fire or theft of your product.
Data Protection Act (1988)
Please note that any information provided will be processed by us or our agents in compliance
with the provisions of the Data Protection Act 1988, for the purpose or providing cover and
handling claims, if any, which may necessitate providing such information to third par ties.
DISPOSAL OF YOUR OLD MACHINE
GUARANTEE
KNOW YOUR RIGHTS
Page 27
49 50
T: 0800 0124 382 T: 0800 0124 382
INDEX
F
Fabric conditioner ..........................................21
Feet, adjustment ...........................................11
Filters ............................................................ 34
First wash ......................................................18
Front view ......................................................05
Fuse ................................................................16
G
Garment care labels ......................................39
Guarantee ......................................................47
H
Half load detection system ..........................20
I
Indicator lamps ..............................................23
Installation requirements..............................09
Items included ...............................................02
Liquid starch ..................................................21
Loading the drum ..........................................19
P
Power supply failure .....................................32
Preparing your laundr y ..................................18
Programme end .............................................30
Programme modes ........................................25
Pump filter .....................................................35
R
Rear view ...................................................... 06
Re-fitting of transit bolts ..............................10
Removal of transit bolts................................09
Removing your laundry .................................31
Rinse ..............................................................24
S
Safety instructions ........................................02
Selecting a programme ................................22
Sorting your laundr y ......................................19
Spin ................................................................24
Spin selection ................................................28
Spin speed selector ......................................22
Stain removal information ............................ 41
Starting a programme ...................................23
I
L
A
Adding detergent ..........................................20
Additional functions ......................................29
A djusting the feet...........................................11
C
Cancelling a programme ...............................30
Child lock........................................................30
Cleaning ........................................................ 33
Connection, drain hose ................................. 13
Connection, electrical ...................................16
Connection, water supply .............................12
Control panel .................................................17
D
Detergent .......................................................20
Detergent drawer ..........................................07
Disposal .........................................................47
Drain hose connection ..................................13
E
Electrical connection.....................................16
Error codes.................................................... 46
T
Technical specification .................................08
Temperature selection ..................................27
Transit bolt, re-fitting ....................................10
Transit bolt, removal .....................................09
Troubleshooting ............................................ 43
W
Warranty ........................................................01
Water inlet filter ........................................... 34
Water softener ..............................................21
Water supply connection ..............................13
Page 28
T: 0800 0124 382
E: [email protected]
0000000000
The symbol on the product or on its packaging indicates that this product may not be treated as household waste. Instead it shall be handed over to the applicable collection
point for the recycling of electrical and electronic equipment. By ensuring this product is disposed of correctly, you will help prevent potential negative consequences for
the environment and human health, which could otherwise be caused by inappropriate waste handling of this product. For more detailed information about recycling of this
product, please contact your local city offi ce, your household waste disposal service or the shop where you purchased the product.
 Loading...