

Servis W712F4B, W712F4W Instruction manual
WASHING
MACHINE
Model Number:
W712F4B
W712F4S
W712F4W
User Manual
REGISTER TO
ACTIVATE YOUR
2 YEAR
Contents
01 Welcome
02 Safety Instructions
05 Your Washing Machine
PARTS WARRANTY
SERVIS.CO.UK 0333 577 7232
Your appliance comes with a free one year parts and labour warranty.
Register within 30 days of purchase to receive a free second year
parts warranty.
08 Technical Specifi cation
09 Installation
17 Usage
31 Maintenance
37 Clothing Care
41 Troubleshooting
45 Guarantee
47 Index
T: 0333 577 7232T: 0333 577 7232
WELCOME SAFETY INSTRUCTIONS
WELCOME
Thank you for choosing this Servis Washing Machine, which has been designed and
manufactured to give you many years of trouble-free service.
You may already be familiar with using a similar product but please take time to read these
instructions, which have been written to ensure you get the very best from your purchase.
WARRANTY
Servis provides you with a guarantee which will protect you should your Washing Machine
develop an electrical or mechanical fault during the guarantee period. To ensure that you get a
prompt and efficient service, please register your Washing Machine immediately.
You will find a warranty card included within the packaging. To register, complete the form, or:
Visit us at www.servis.co.uk
Call us on 0333 577 7232
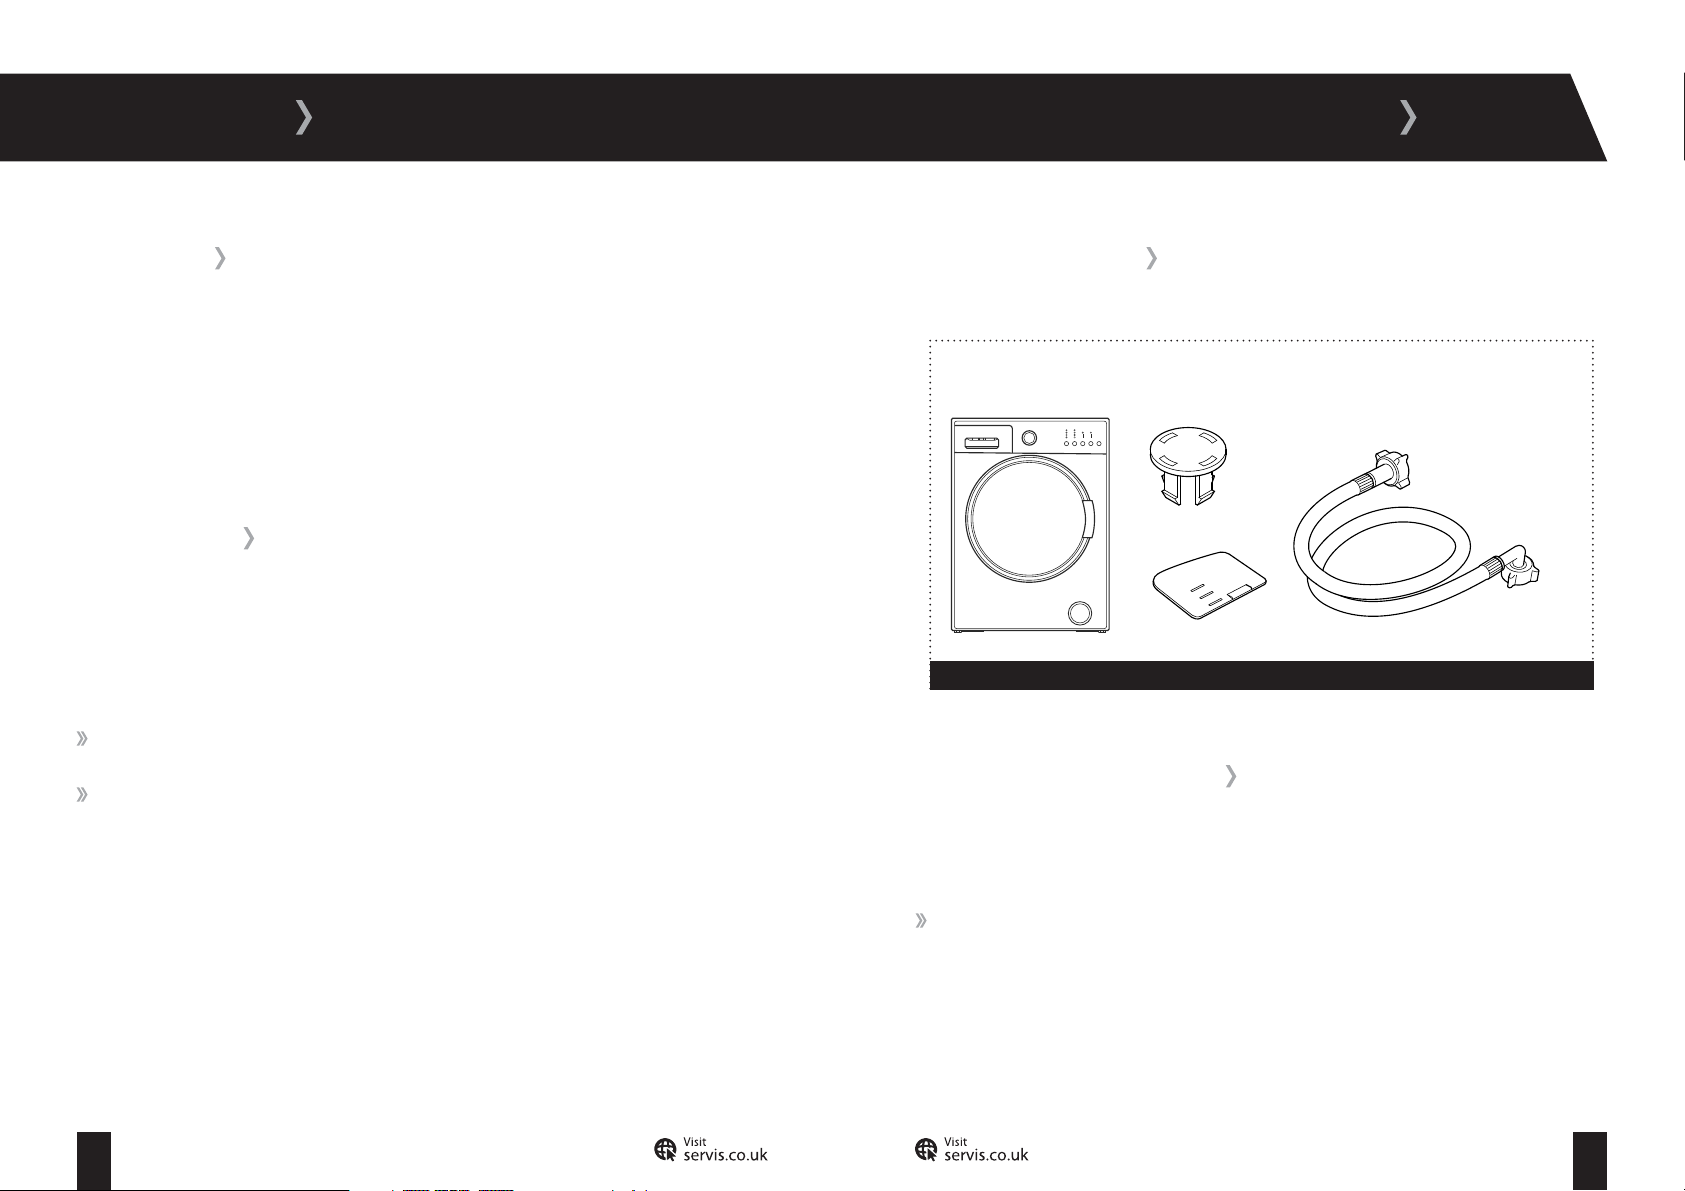
ITEMS INCLUDED
Washing Machine
Blanking caps x 4
Fill hose
Fluid detergent level plate
Figure 1
SAFETY INSTRUCTIONS
To ensure your safety and the safety of others, please read the following safety
precautions before you operate your Washing Machine.
Your Washing Machine conforms to current safety requirements. Inappropriate use can,
however, lead to personal injury and damage to property. To avoid the risk of accidents and
damage to your Washing Machine, read this user guide carefully before using it for the first
time. It contains important information on the installation, safety, use and maintenance
of your Washing Machine. Retain this user guide for future use and pass it on to any new
owners.
Read this user guide before using or installing your Washing Machine.
01 02
T: 0333 577 7232 T: 0333 577 7232
SAFETY INSTRUCTIONS
Your washing machine is for domestic use only and is only intended to wash items which
are specified by the manufacturer to be machine washable on the label, and textiles
composed of hand washable wool or wool blend fabrics as well as satin, lace, silk and other
hand-washable garments. Do not use your Washing Machine for any purpose not expressly
specified in this user guide.
This appliance can be used by children aged from 8 years and above and persons with
reduced physical, sensory or mental capabilities or lack of experience and knowledge if they
have been given supervision or instruction concerning use of the appliance in a safe way and
understand the hazards involved. Children shall not play with the appliance. Cleaning and user
maintenance shall not be made by children without supervision.
Before setting up your washing machine, check for any external visible damage. Do not
install or use your Washing Machine if it is damaged.
Before setting up your washing machine, remove the four transit bolts and the rubber
washers from the back of the machine (refer to page 9).
Before connecting your Washing Machine, ensure that the information on the data plate
(voltage and connected load) matches that of the mains electricity supply. If in doubt, consult a
qualified electrician.
Do not connect your Washing Machine to the mains electricity supply using an extension
lead.
A damaged power cord/plug can cause fire or give you an electric shock. When damaged it
must be replaced, this should only be done by qualified personnel.
Never remove the plug from the socket by pulling the cord. Always hold the plug.
Never touch the power cord/plug with wet hands as this could cause a short circuit or
electric shock.
Do not touch your Washing Machine if your hands or feet are wet.
Never open the detergent drawer while the machine is running.
Faulty components must only be replaced by a suitably qualified Service Agent using
genuine spare parts.
Unauthorised repairs could result in unforeseen dangers for the user. Repairs should only be
undertaken by an approved service agent.
In the event of a fault or for cleaning purposes, your Washing Machine is only completely
isolated from the electricity supply when it is unplugged from the mains.
Your Washing Machine must only be connected to your water supply using the supplied new
fill hose. Old hoses must not be reused.
Do not make any alterations to your Washing Machine, unless authorised to do so by Servis.
The packaging of the machine could be hazardous to children. Please refer to the disposal
instructions on the rear cover.
Please ensure that you have removed all of the packaging materials and protective tape
from the outside of your Washing Machine, inside the drum and inside the detergent drawer
before using.
03 04
T: 0333 577 7232 T: 0333 577 7232
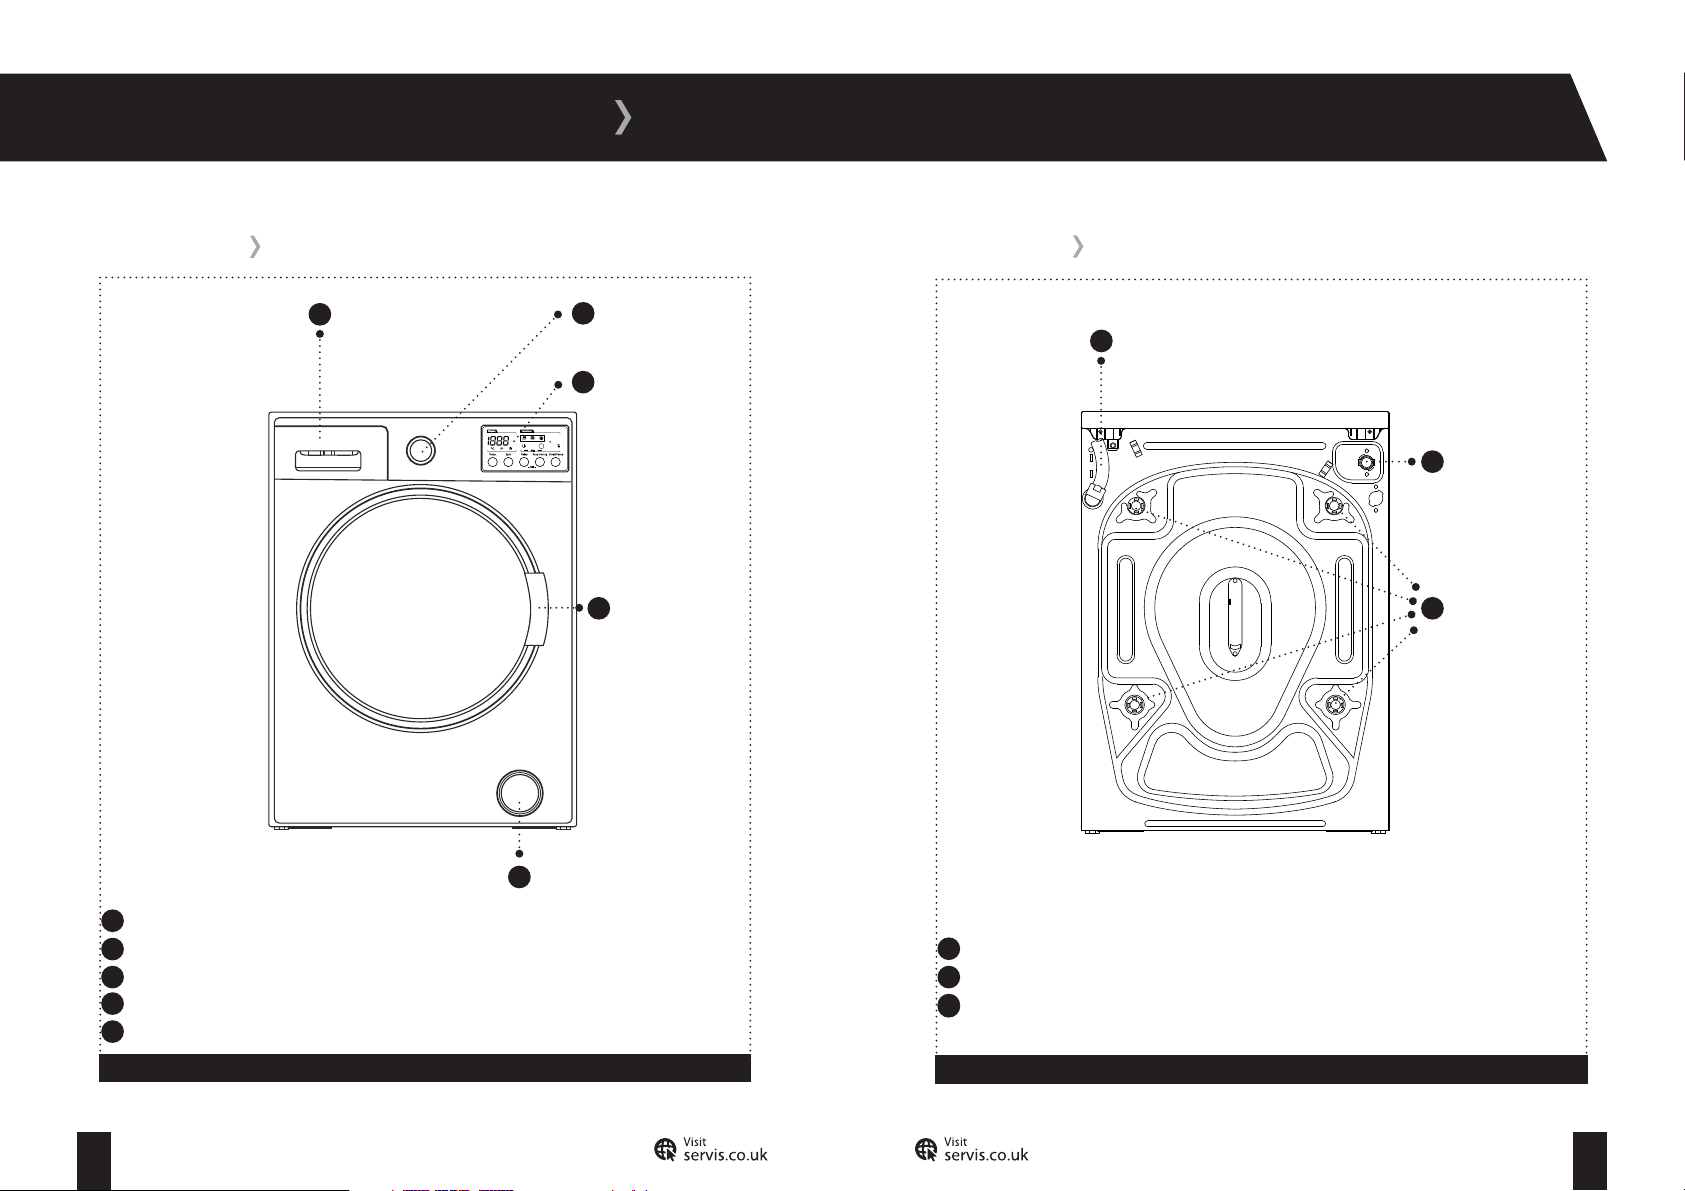
YOUR WASHING MACHINE
FRONT VIEW REAR VIEW
Detergent drawer
1
2
3
4
5
Pump filter cover
Programme dial
Control panel
Door handle
1
Drain hose
2
Cold water
inlet
Transit bol ts
3
Detergent drawer; Allows you to insert detergent, fabric conditioner and starch.
1
Programme dial; Allows you to select the programme for your wash.
2
Control panel; Allows you to configure the required settings for your wash.
3
4
Door handle; Provides you with access to the drum.
5
Pump filter cover; Provides access to the pump filter for maintenance purposes.
Figure 2
05 06
T: 0333 577 7232 T: 0333 577 7232
Drain hose; Provides an outlet for the dirty water from your Washing Machine.
1
Cold water inlet; Connects your Washing Machine to your cold water supply.
2
Transit bolts; Remove before first use of your Washing Machine (refer to page 9).
2
3
Figure 3
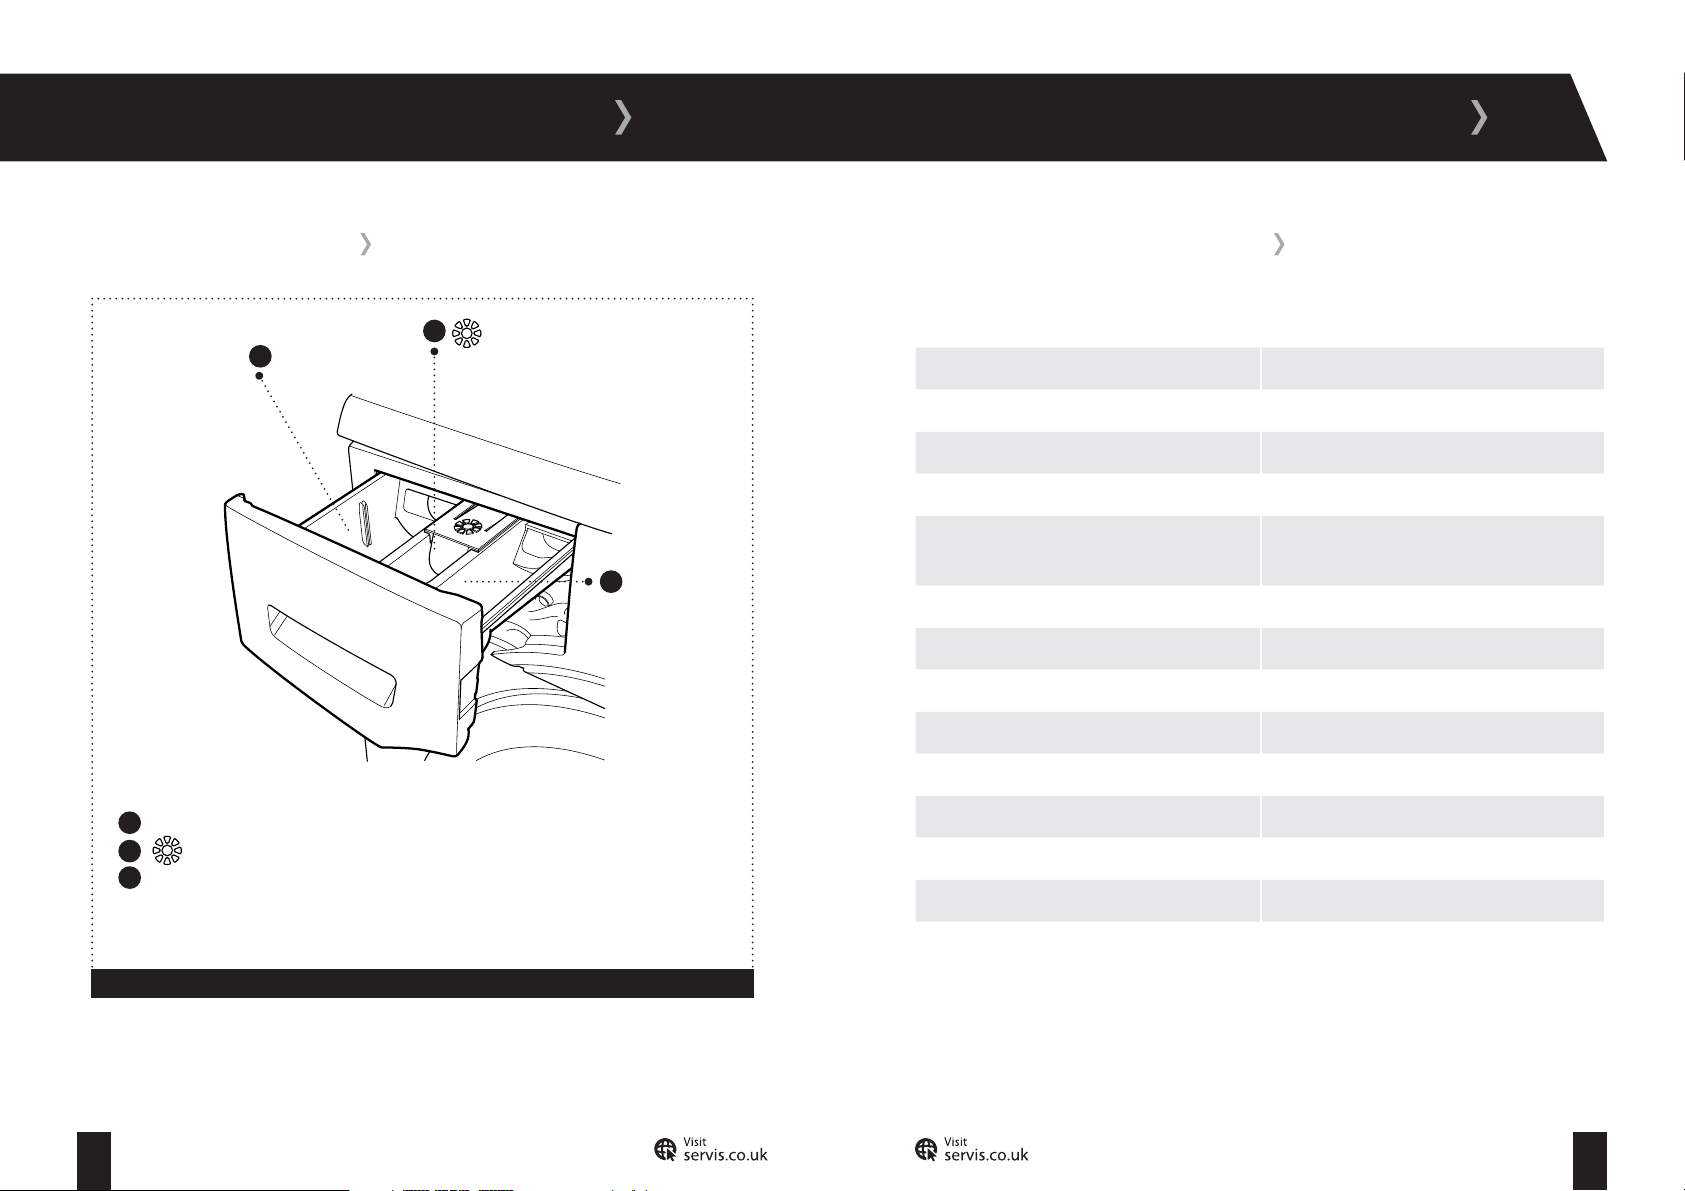
YOUR WASHING MACHINE
TECHNICAL SPECIFICATION
DETERGENT DRAWER
Main Wash
1
Compartment
Main Wash Compartment; Add detergent for the main wash.
1
Compartment; For fabric conditioner and liquid starch.
2
3
Pre-Wash Compartment; Add detergent for the pre-wash.
2
Compartment
Pre-Wash
3
Compartment
TECHNICAL SPECIFICATION
Voltage V/Frequency (Hz) 220-240V/50Hz
Electrical Current (A) 10
Power Rating (W) 2200
Water Consumption (l/Cycle) 50
Energy Consumption (Cotton 400 Partial Load)
(kWh/Cycle)
Unpacked Dimensions (H x W x D) (cm) 84.5 x 59.7 x 52.7
Gross Weight (kg) 71.5
Spin Speed (rpm) 1200
Drum Volume (lt) 49
Max Dry Load Capacity (kg) 7
Energy Rating A+
Wash Noise (dB) 58
Spin Noise (dB) 79
0.74
Figure 4
07 08
T: 0333 577 7232 T: 0333 577 7232
INSTALLATION
INSTALLATION REQUIREMENTS
To avoid risk of injury, please take care when moving your Washing Machine. It is heavy and we
recommend that a minimum of two people move your Washing Machine.
To unpack your Washing Machine and manoeuvre it to the installation area, one person should
hold it by the front feet and the other person at the edge of the lid at the rear.
Your Washing Machine measures 84.5 x 59.7 x 52.7cm and will require an installation area with
the space to allow the door to fully open and provide easy access to the plumbing and electrical
connections.
The most suitable installation surface for your Washing Machine is a concrete floor as it is less
prone to vibration during the spin cycle. Soft floor surfaces such as carpets and rugs are not
suitable.
If you have to install your Washing Machine on a wooden floor, we recommend that a waterresistant wooden base at least 30mm thick is installed. The base should span several joists and
be bolted down. Check for the presence of pipes and cables before installing.
If possible, install your Washing Machine in the corner of the room as it is often the most stable
part of the floor.
Do not install your Washing Machine in rooms where temperatures below freezing may occur as
frozen hoses may burst or split.
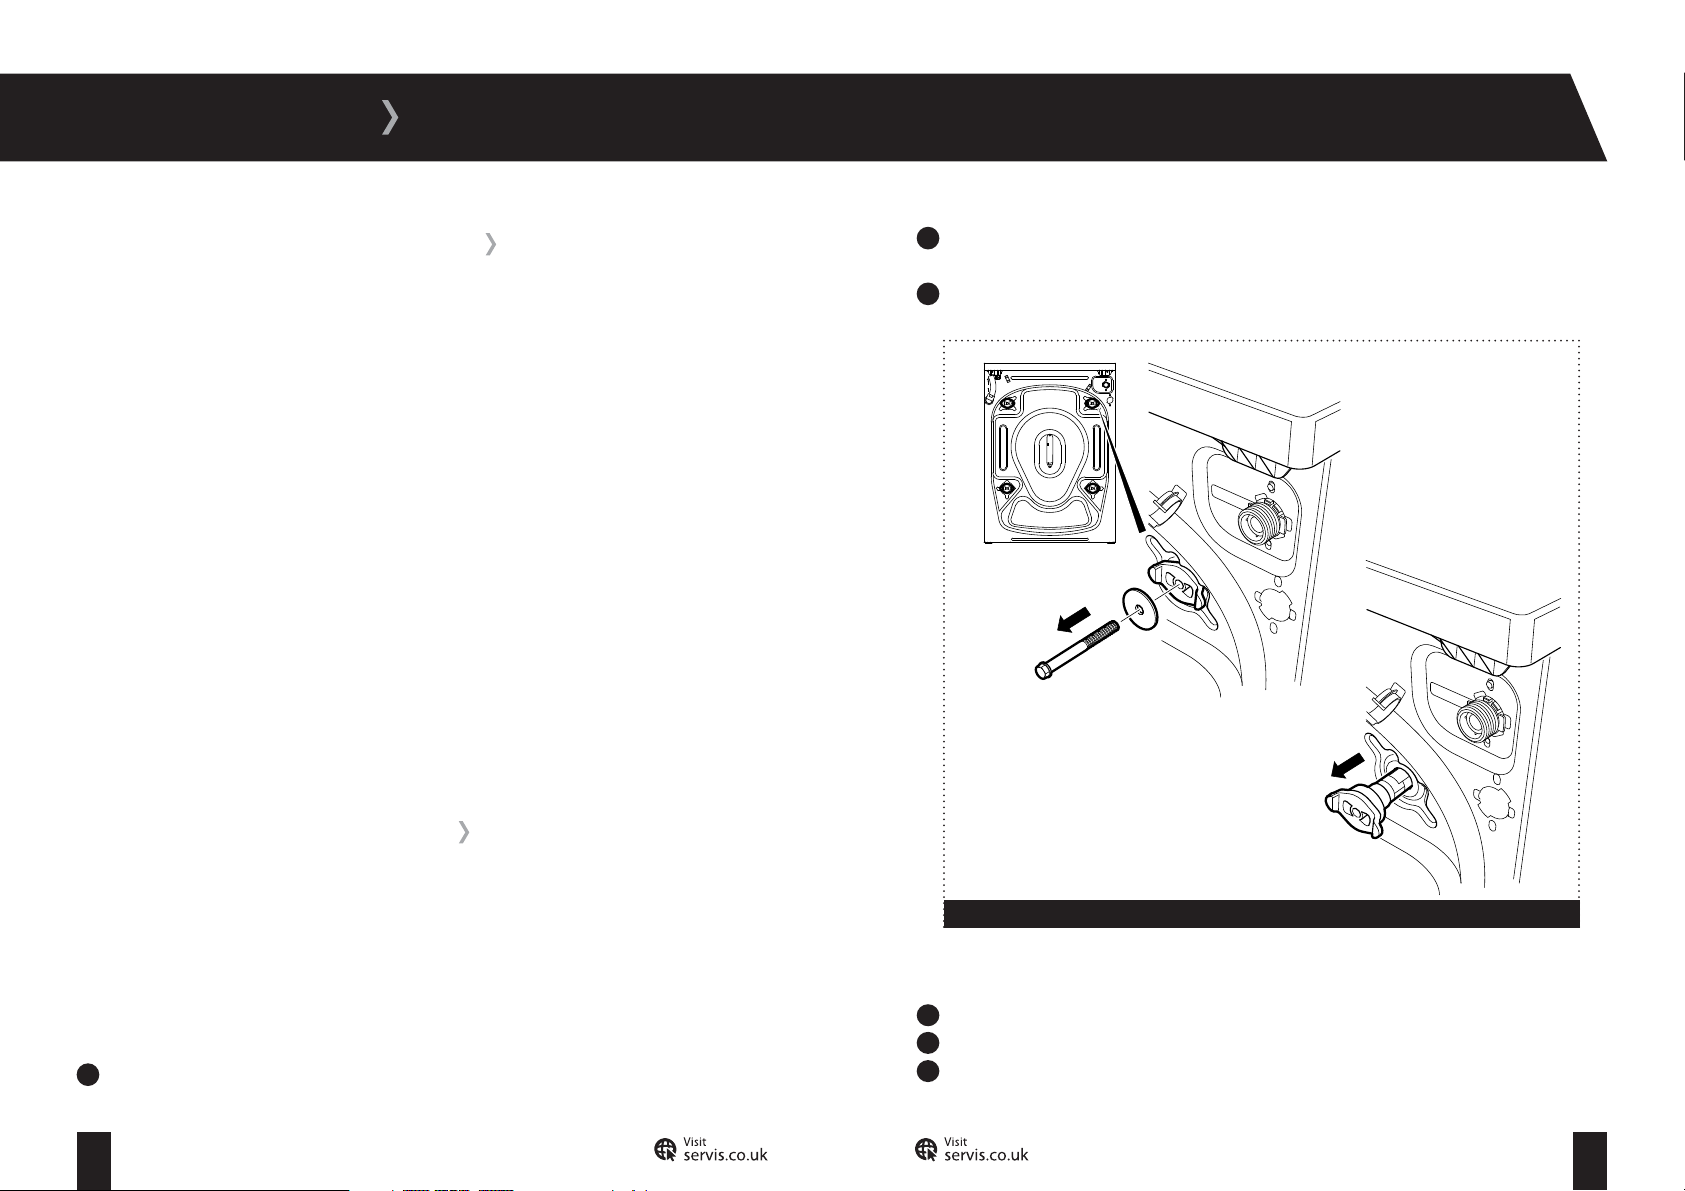
Pull out the remaining plastic section of each transit bolt by hand. This will require a
2
reasonable amount of force (fig 5c).
Insert the blanking caps (4 off): Push the cap into the hole until the four connectors click into
3
place. Check that the cap is flush with the machine.
a:
b:
c:
REMOVAL OF TRANSIT BOLTS
The transit bolts are used to protect your Washing Machine from damage during transportation
and must be removed before using your Washing Machine for the first time. Keep the transit
bolts safe and re-fit them if you need to transport your Washing Machine in the future.
The four transit bolts are located on the back of your Washing Machine (fig 5a).
To remove the transit bolts (4 off):
Remove each bolt by turning anti-clockwise with a suitable spanner (fig 5b).
1
09 10
T: 0333 577 7232 T: 0333 577 7232
Figure 5
To re-fit the transit bolts (4 off) for future transportation:
1
Pull and remove the four plastic blanking caps.
2
Insert the plastic sections of the transit bolts into the exposed holes.
3
Insert the bolts into the plastic sections of the transit bolts and tighten with a suitable
spanner until secure.
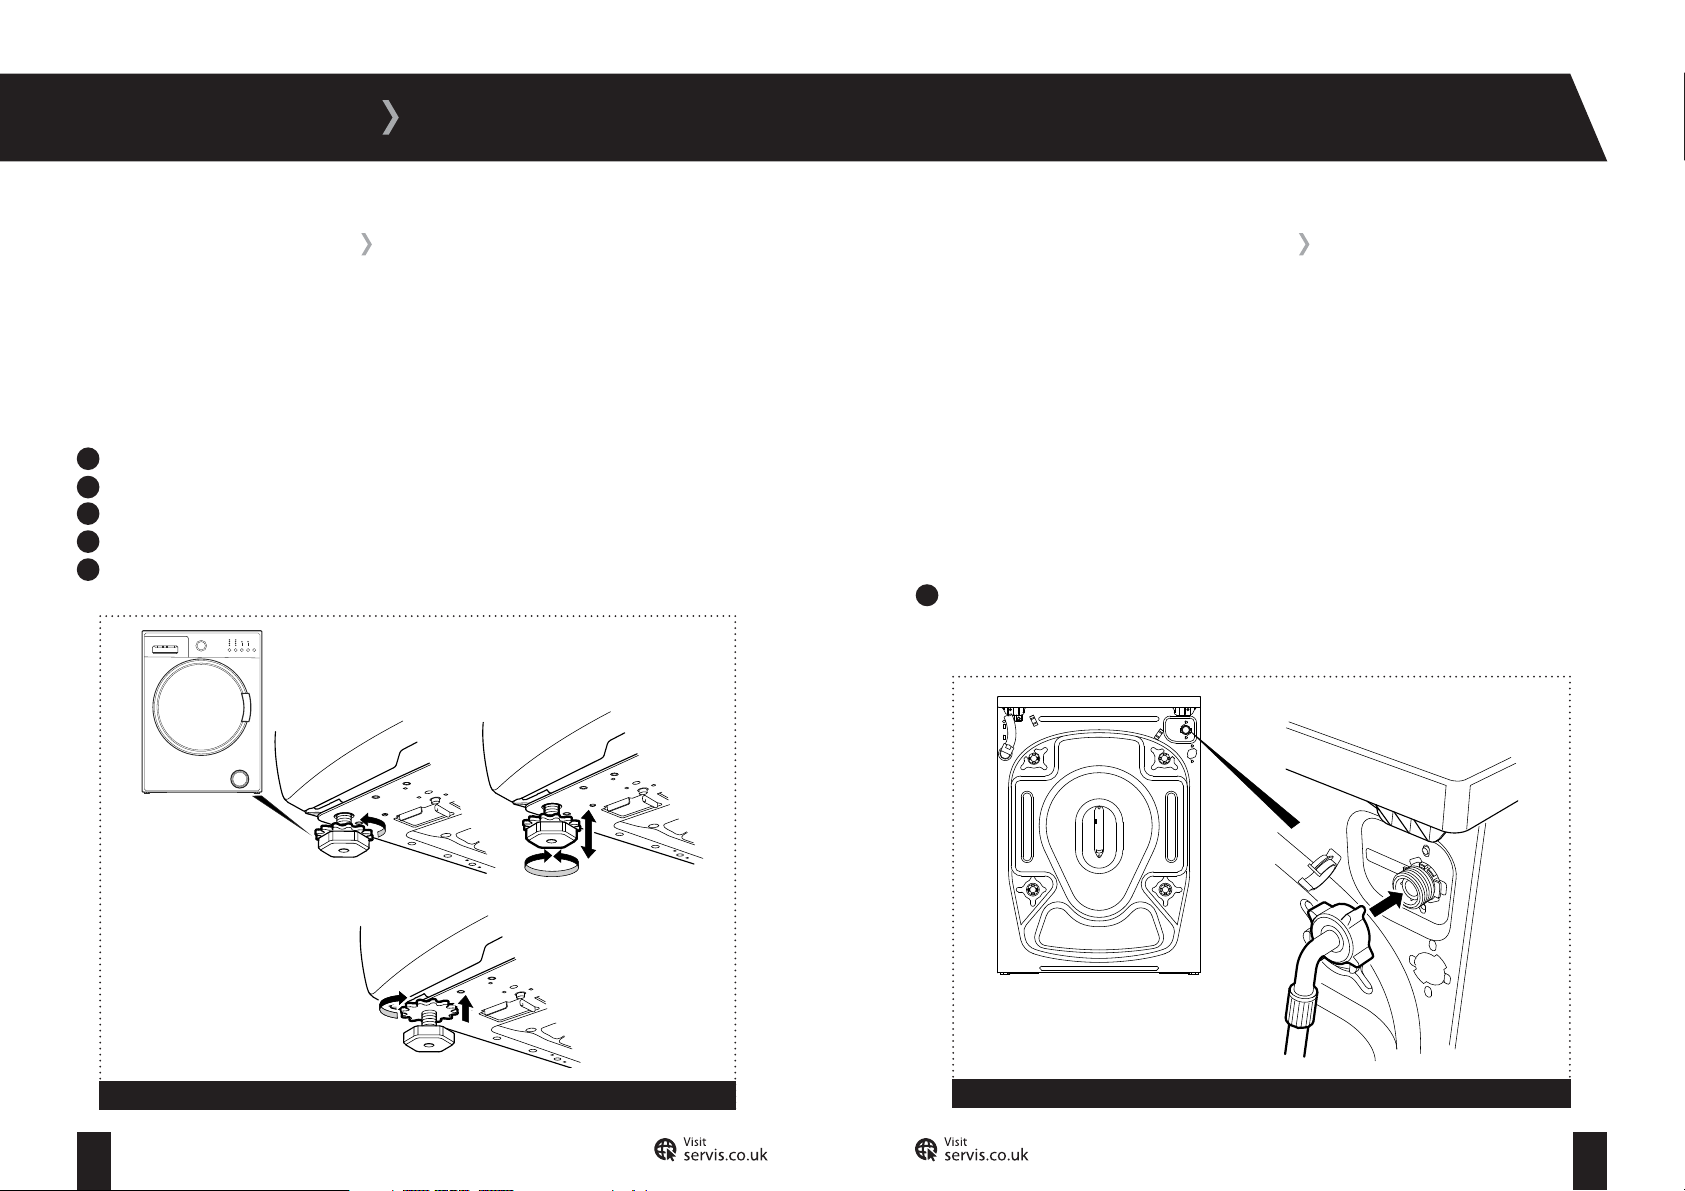
INSTALLATION
ADJUSTING THE FEET
For safe operation, it is important that your Washing Machine is level and securely positioned on
all four feet. Incorrect installation may cause the Washing Machine to vibrate and increase your
water and electricity consumption.
The four adjustable feet are used to level the Washing Machine. To adjust the feet:
Loosen the plastic locking nut by turning anti-clockwise (fig 6a).
1
To increase the height of the machine, turn the feet clockwise (fig 6b).
2
3
To decrease the height of the machine, turn the feet anti-clockwise (fig 6b).
4
After making adjustments, use a spirit level to check that the machine is level.
5
Once the machine is level, tighten the locking nuts by turning clockwise (fig 6c).
a:
b:
WATER SUPPLY CONNECTION
Your Washing Machine uses an energy efficient cold fill system, which means that only the
water required to wash the laundry is heated. As a result, no heat is lost in the pipeline from the
hot water supply.
Connect your Washing Machine to your cold water supply only. If your previous machine had a
hot and cold fill, check that the hot tap on your water supply is closed to avoid leakage. Only use
the fill hose supplied and not one from your old Washing Machine. Only one hose is required
to install your Washing Machine to the cold water supply. The inlet hose provided with your
Washing Machine connects the rear of your machine and the cold water supply.
To connect your Washing Machine to the cold water supply:
1
Connect the angled end of the fill hose to the cold water inlet on the rear of your Washing
Machine by screwing the threaded connector clockwise (fig 7). Take care not to overtighten
the connection. Hand tight is sufficient.
c:
Figure 6
11 12
T: 0333 577 7232 T: 0333 577 7232
Figure 7
INSTALLATION
WATER SUPPLY CONNECTION
2
Screw the straight end of the hose clockwise to a 19mm (3/4’’) cold water tap until hand
tight (fig 8). Take care not to trap or kink the hose.
Figure 8
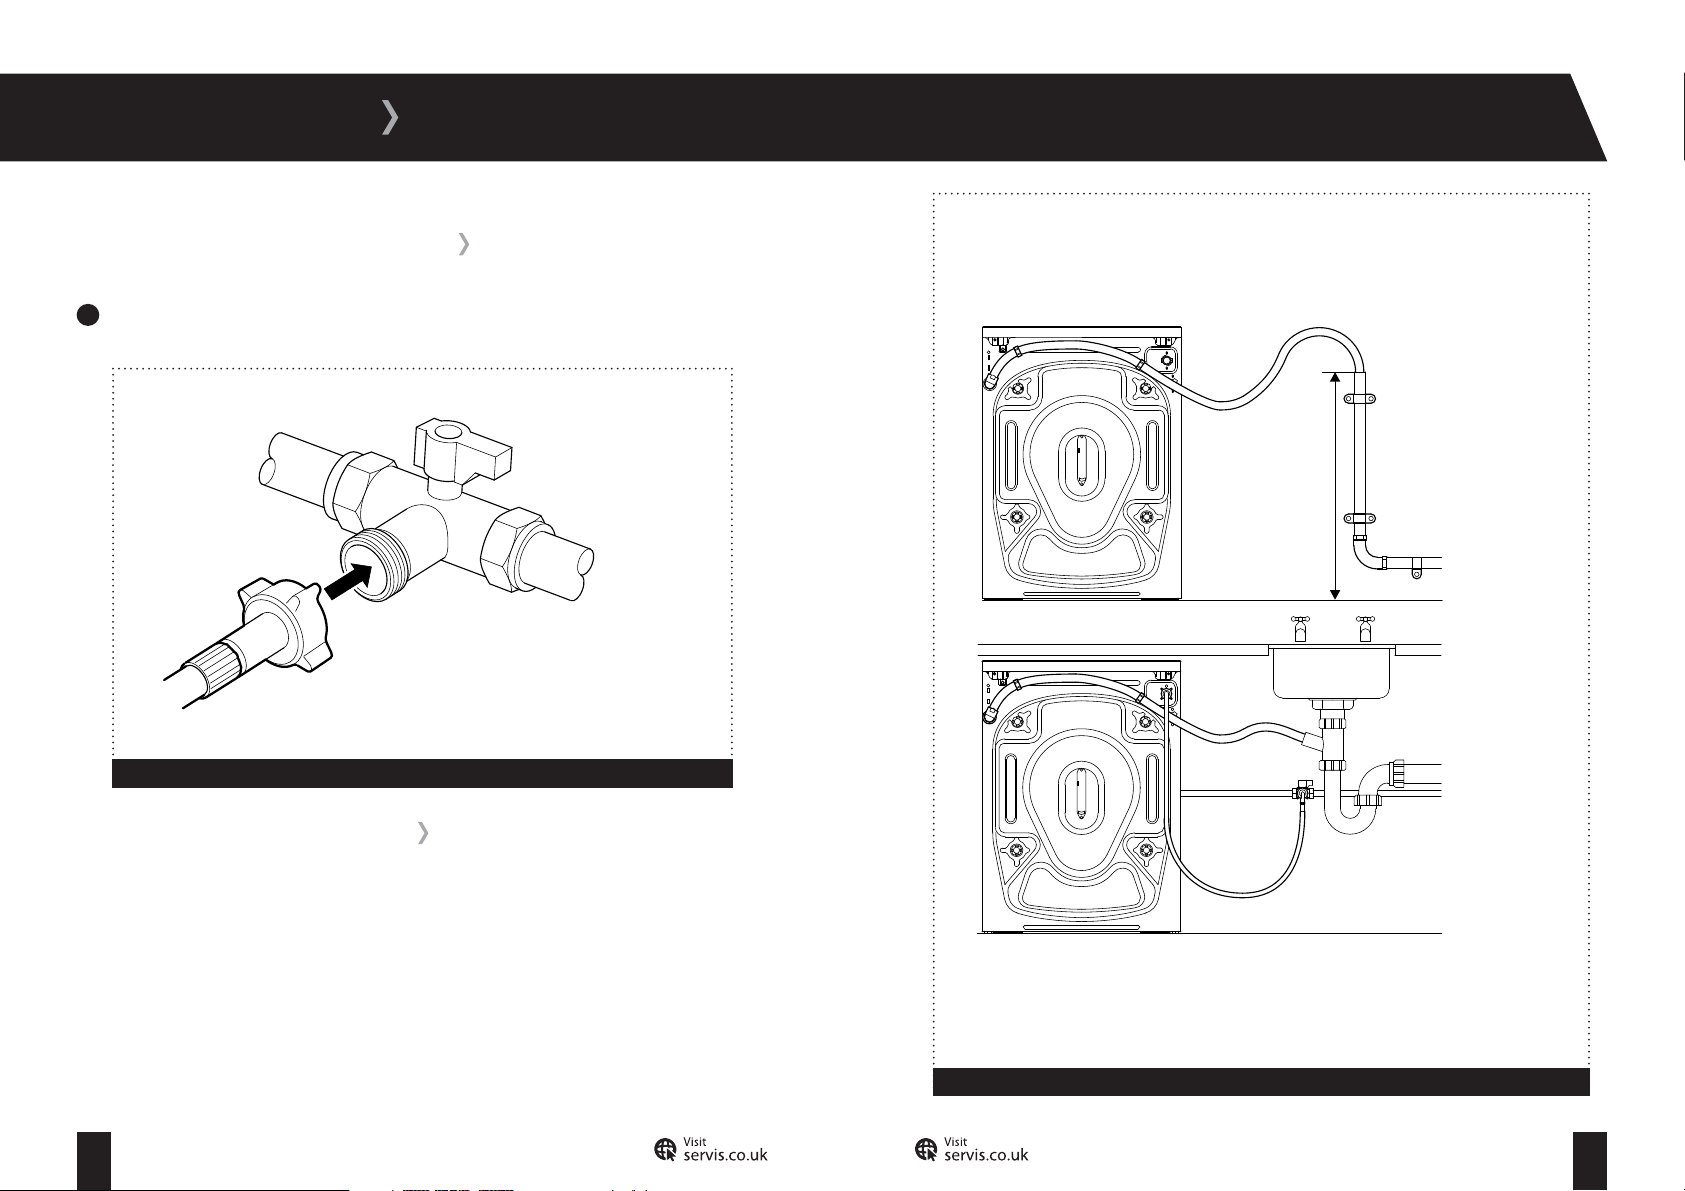
DRAIN HOSE CONNECTION
Do not connect your Washing Machine to a surface water drain.
Connect your Washing Machine to your household drainage system (fig 9).
For your Washing Machine to function properly the outlet end of the drain hose must be at a
minimum of 60cm and a maximum of 100cm from the ground.
a:
a: The drain hose
Max height 80cm
Min height 0cm
b:
can be connected
to a standpipe, as
shown. The hose
must be between
0cm to 80cm
from the ground.
b: The drain hose
can be connected
to a household
sink, as shown.
The hose must be
between 60cm to
100cm from the
ground.
CAUTION: Check to ensure that the hose is not trapped, kinked, twisted, folded or crushed.
Do not attempt to extend the drain hose by adding extra sections.
13 14
T: 0333 577 7232 T: 0333 577 7232
Figure 9
 Loading...