

Page 1
Page 2

Page 3

Contents
1. Welcome .......................................................... 1
Welcome ................................................................................................................ 3
New features ......................................................................................................... 4
Installation ............................................................................................................. 6
2. Getting Started ................................................. 7
Startup Wizard ..................................................................................................... 9
Organizing photos ............................................................................................ 10
Starting from scratch ....................................................................................... 11
Opening an existing file.................................................................................. 12
Saving a file ......................................................................................................... 15
3. Layers, Masks, and Blending ......................... 17
Introduction to layers ...................................................................................... 19
Adjusting opacity/transparency .................................................................. 25
Using masks ........................................................................................................ 27
Using blend modes .......................................................................................... 31
4. Making Image Adjustments ............................ 33
Introduction to image adjustments ........................................................... 35
Overview: Adjusting image colors .............................................................. 36
Using adjustment layers ................................................................................. 38
Retouching tools ............................................................................................... 45
Using PhotoFix ................................................................................................... 46
Page 4

Contents
5. Applying Image Effects .................................. 55
Overview: Applying special effects ............................................................ 57
Using filter layers .............................................................................................. 58
Using the Filter Gallery ................................................................................... 64
Applying 2D layer effects............................................................................... 68
Applying 3D layer effects............................................................................... 70
Warp tool effects ............................................................................................... 73
Merging bracketed photos ........................................................................... 74
6. Manipulating Images ...................................... 79
Making a selection ........................................................................................... 81
Modifying a selection ...................................................................................... 89
Manipulating a selection ............................................................................... 94
Changing image and canvas size ............................................................... 98
Straightening photos .................................................................................... 102
Cropping an image ........................................................................................ 104
Flipping and rotating .................................................................................... 109
Deforming ......................................................................................................... 110
Mesh warping .................................................................................................. 111
Using Cutout Studio ...................................................................................... 113
7. Color and Grayscale .................................... 117
Color modes ..................................................................................................... 119
Choosing colors .............................................................................................. 120
Page 5

Contents
8. Painting, Drawing and Text .......................... 125
Painting and brushes .....................................................................................127
Stamping and spraying pictures ...............................................................129
Erasing.................................................................................................................131
Using patterns ..................................................................................................134
Filling a region .................................................................................................135
Cloning a region ..............................................................................................140
Drawing and editing lines and shapes ....................................................142
Creating and editing text .............................................................................150
9. Print, Export, and Share ............................... 153
Printing ...............................................................................................................155
Exporting to another file format ...............................................................164
Batch processing .............................................................................................167
10. Additional Information ................................... 171
Contacting Serif ...............................................................................................173
Credits .................................................................................................................174
11. Index ............................................................. 177
Page 6

Page 7

1
Welcome
Page 8

2 Welcome
Page 9

Welcome 3
Welcome
Welcome to PhotoPlus X6 from Serif—more than ever, the best value in image
creation and editing software for any home, school, organization, or growing
business. PhotoPlus is the number one choice for working with photographs and
paint-type images, whether for the web, multimedia, or the printed page.
PhotoPlus has the features you’ll need... from importing or creating pictures,
through manipulating colors, making image adjustments, applying filter effects
and so much more, all the way to final export. Built-in support for the most
modern digital cameras makes it easy to open your very own digital photos,
either as JPG or as unprocessed raw images.
PhotoPlus also offers on-computer post-shoot development, using Import Raw,
where you're in full control of your raw image's white balance and exposure, and
perform "blown" highlight recovery. For image adjustments, filter effects
(including stunning artistic effects), or layer cutouts, try PhotoFix, Filter
Gallery, and Cutout Studio, respectively.
PhotoPlus and PhotoPlus Organizer: a powerful combination
PhotoPlus takes care of all your image creation and photo editing needs.
However, if you're looking to take a step back from photo editing and manage
your collection of photos, scanned images, etc. you can use PhotoPlus Organizer.
This is installed automatically with PhotoPlus, and offers a powerful platform for
launching your photos in PhotoPlus. You'll be able to sort, group, rate, and tag
your photos, as well as filter your photos for display by several methods.
Registration
Don’t forget to register your new copy, using the Registration Wizard on the
Help menu. That way, we can keep you informed of new developments and
future upgrades!
Page 10

4 Welcome
New features
• 64-bit Operation for Faster Photo Editing
PhotoPlus X6 is fully optimized for operation on 64-bit computers,
and will automatically install for 64-bit operation accordingly. Open
photos of large image size, especially raw images, in an instant! Benefit
from all-round faster PhotoPlus performance.
• Intelligent Brush-based Selection
Use the Smart Selection Brush Tool to create fast accurate selections
which intelligently grow to objects and edges in your image. Improve
an existing selection by using smart edge refinement to perfect the
selection boundary.
• Improved Raw Image Control
Use Import Raw dialog for faster image loading and convenient inplace photo adjustments: more powerful Lighting and Noise
Reduction adjustments; new Curves, HSL, Lens Distortion, Lens
Vignette, Black and White Film, and Unsharp Mask adjustments are
available. Use masks to selectively control areas subject to adjustment.
The Import Raw dialog also hosts Red-eye, Spot-repair, and Crop tools
for photo retouching.
• Tilt-Shift Effects for Miniature Scenes
The Depth of Field filter hosts the new Tilt-shift effect. Simulate
miniature scenes by targeting an area of focus and controlling the
extent of blurring, e.g. in the photo foreground and background.
• Fill Layers for Creative Color Effects
For ease of use, editable fill layers take a solid or gradient fill (Linear,
Radial, Conical, or Square) without the need to define a selection or
shaped region to fill in advance. With opacity adjustment as well as fill
control you'll be able to create semi-transparent color layers or solidfill backgrounds with ease. For more creativity, try applying blend
modes to fill layers.
• Vector Masks for Versatile Drawn Mask Control
Create vector masks that give you fully editable smooth curves for
masking on standard or adjustment layers.
Page 11

Welcome 5
• Latest Noise Reduction Technology
Remove noise from photos taken in low-light conditions or at high
ISO camera settings with the new Noise Reduction filter. Available via
RAW import or PhotoFix, both luma and chroma noise can be
removed using independent controls.
• Non-destructive Cropping
Enjoy the ability to uncrop any previously cropped images at any time
in the future. Ideal if you want to re-crop your image again or if you
change your mind about the original crop.
• Increased Zoom Range
The PhotoPlus zoom range has been doubled to improve detailed
editing of large images or icon creation.
• Sub-pixel Guides for Vector Drawing
Fine-positioning of guides to the sub-pixel level lets you accurately
position lines, shapes, QuickShapes, and paths.
• Enhanced Export Optimizer
Easier than ever exporting is possible! As well as panning your export
preview by default, you can export as TIF, WDP, or PNG using bit
depths of 48 bit or 64 bit. CMYK or MONO (8 or 16bps) export
options are also available. EXIF/IPTC information can be retained or
discarded on export.
Page 12

6 Welcome
Installation
Minimum:
• Windows-based PC with DVD/CD drive and mouse
• Operating system:
Microsoft Windows® XP* SP2 (32 bit)
Windows® Vista (32 or 64 bit)
Windows® 7 (32 or 64 bit)
Windows® 8 (32 or 64 bit)
• 512MB RAM (1GB RAM for 64-bit operation)
• 821MB free hard disk space (including PhotoPlus Organizer).
• 1024 x 768 monitor resolution
Additional disk resources and memory are required when editing large and/or
complex images.
* Requires Microsoft Windows Imaging Component.
Optional:
• Windows-compatible printer
• Pen (graphics) tablet
• Internet account and connection required for product updates and
accessing online resources
Installation procedure
• Insert your purchased disc into your disc drive.
• If AutoPlay is enabled on the drive, this automatically starts the
Setup Wizard. Follow the on-screen instructions for install.
OR
• If AutoPlay is not enabled (or doesn't start the install
automatically), navigate to your program disc and double-click
autorun.exe.
32 or 64-bit PhotoPlus X6 installs to respective 32 or 64-bit
computers.
Page 13

2
Getting Started
Page 14

8 Getting Started
Page 15
Getting Started 9
Startup Wizard
Once PhotoPlus has been installed, you're ready to start!
• For Windows Vista/7: The Setup routine during install adds a Serif
PhotoPlus X6 entry to the Windows Start menu. Use the Windows
Start button to pop up the Start Menu, click on All Programs and
then click the PhotoPlus icon.
• For Windows 8: The Setup routine during install adds a Serif
PhotoPlus X6 entry to the desktop. Use the Windows Start button to
pop up the desktop, and then click the PhotoPlus icon.
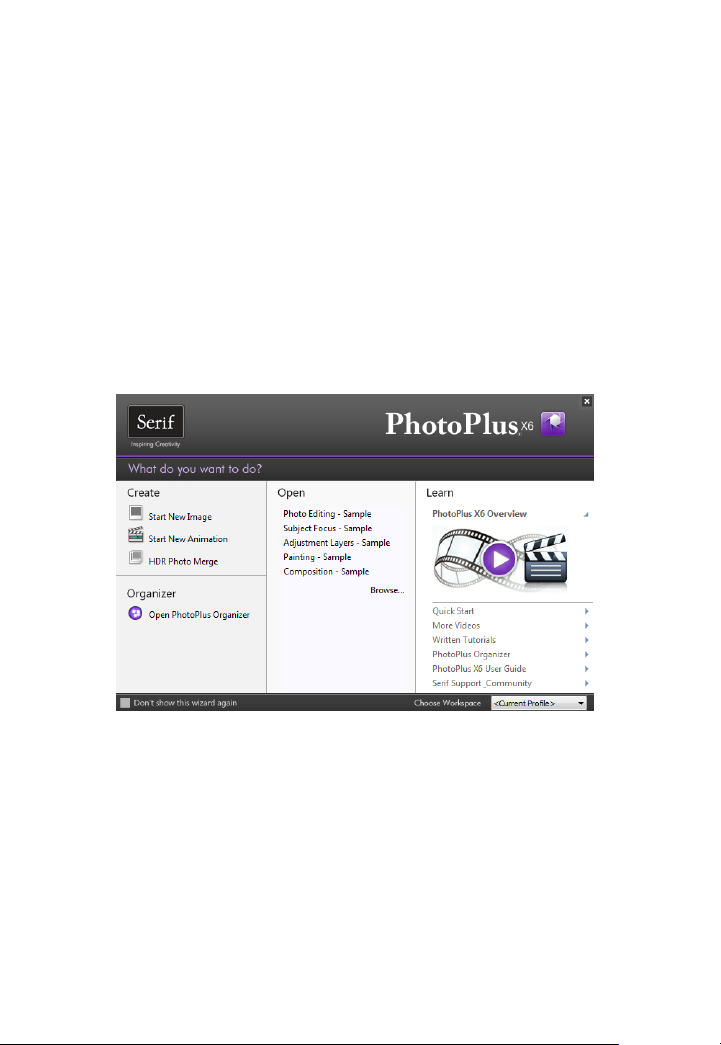
On program launch, the Startup Wizard is displayed which offers different
routes into PhotoPlus:
• Start New Image, to start from scratch.
• Start New Animation, to create an animated GIF.
• HDR Photo Merge, for bracketing photos taken at different exposure
levels.
• Open PhotoPlus Organizer, to manage and filter photos for
PhotoPlus.
• Open, lists recently opened photos and PhotoPlus projects. Hover
over each entry for a quick preview!
• Learn, to access online tutorial resources.
Page 16
10 Getting Started
Use the Choose Workspace drop-down list to choose your workspace
appearance (i.e., Studio tab positions, tab sizes, and show/hide tab status). You
can adopt the default workspace profile <Default Profile>, the last used profile
<Current Profile>, a range of pre-defined profiles, or a custom workspace
profile you've previously saved.
As you click on different profiles from the menu, your workspace will
preview each tab layout in turn.
If you don’t want to use the Startup Wizard again, check the "Don't show this
wizard again" box. However, we suggest you leave it unchecked until you’re
familiar with the equivalent PhotoPlus commands. Switch the wizard back on
again by checking Use Startup Wizard via Preferences. (General menu option)
on the File menu.
Organizing photos
PhotoPlus Organizer is Serif's powerful photo management application which
acts as an essential launch point for your photos. From your collection of photos
you'll be able to perform a range of management and filtering operations.
To launch Organizer:
1. Display PhotoPlus's Startup Wizard.
2. Select Open PhotoPlus Organizer. Organizer is launched as a separate
application.
OR
From the Standard toolbar, select
OR
From the File menu, select Organizer.
Organizer.
Press your F1 key to view PhotoPlus Organizer Help.
PhotoPlus Organizer is a great starting point for editing photos in PhotoPlus.
Click Edit in PhotoPlus on the top toolbar to open, then edit, your chosen
photo in PhotoPlus.
Page 17

Getting Started 11
Starting from scratch
PhotoPlus deals with two basic kinds of image files. We'll differentiate them as
pictures (still images) and animations (moving images). The two types are
closely related, and creating either from scratch in PhotoPlus involves the same
series of steps.
PhotoPlus lets you create an image based on a pre-defined canvas size (e.g., 10 x
8 in). Different canvas size options are available from a range of categories
(International/US Paper, Photo, Video, Web, or Animation). Alternatively, you
can create your own custom canvas sizes, and even store them for future use. For
either preset or custom sizes, the resolution can be set independently of canvas
size.
When you create a new image, you can choose to work in different color modes,
i.e. RGB or Grayscale, in either 8- or 16-bits/channel. Use a Bit Depth of 16 bit
for higher levels of image detail.
To create a new image or animation (using Startup Wizard):
1. The first time you launch PhotoPlus, you'll see the Startup Wizard, with a
menu of choices. Click Start New Image or Start New Animation.
2. In the New Image dialog, you can either:
1. For a preset canvas size, select a suitable Category from the drop-
down list. Categories are named according to how your image or
animation is intended to be used, e.g. pick a Photo category for
photo-sized canvases.
2. Pick a canvas Size from the drop-down list.
OR
• For a custom canvas size, enter your own Width and Height. If
the dimensions are non-standard, the Size drop-down list will be
shown as "Custom." For future use, save the custom size with
Add Size (from the
button) if necessary.
Although you can resize the image canvas size (width x height)
later, it's usually best to allow some extra canvas area at first.
3. (Optional) Add a Resolution for the new image file. Leave the resolution as
it is unless you're sure a different value is required.
Page 18

12 Getting Started
4. (Optional) Select a Color Mode, choosing to operate in RGB or Grayscale
mode.
5. (Optional) Select a Bit Depth of 16 bits per channel for projects which
require higher levels of color detail. Otherwise a bit depth of 8 bits/channel
is used as default.
6. (Optional) Select a background type in the Background drop-down list.
• When painting from scratch, you'll normally choose White.
• You can also choose Background Color, to use the current
background color shown on the Color tab.
• When creating an animation, Transparent is often called for.
7. When you've made your selections, click OK.
To create a new picture or animation (during your session):
1. Click
Wizard (see p. 9) or the New Image dialog (if the Startup Wizard is
disabled).
2. In the New Image dialog, set your canvas size (see p. 11) and then check
Animation to create an animation or leave unchecked for a picture.
3. Click OK. The new image or animation opens in a separate untitled
window.
New on the Standard toolbar. This will open the Startup
Opening an existing file
You can use the Startup Wizard to access files recently viewed in PhotoPlus or
any file on your computer. PhotoPlus opens all the standard formats for print
and web graphics, in addition to its native SPP format, Adobe Photoshop (PSD)
files, and Paint Shop Pro (PSP) files.
Raw files open in an Import Raw dialog, which offers image adjustment on the
"undeveloped" image before opening. See Adjusting raw images in PhotoPlus
Help. Similarly, intermediate HDR images (OpenEXR and Radiance) can be
opened in a dialog at any time for readjusting your HDR merge results (see
p. 74).
Page 19
Getting Started 13
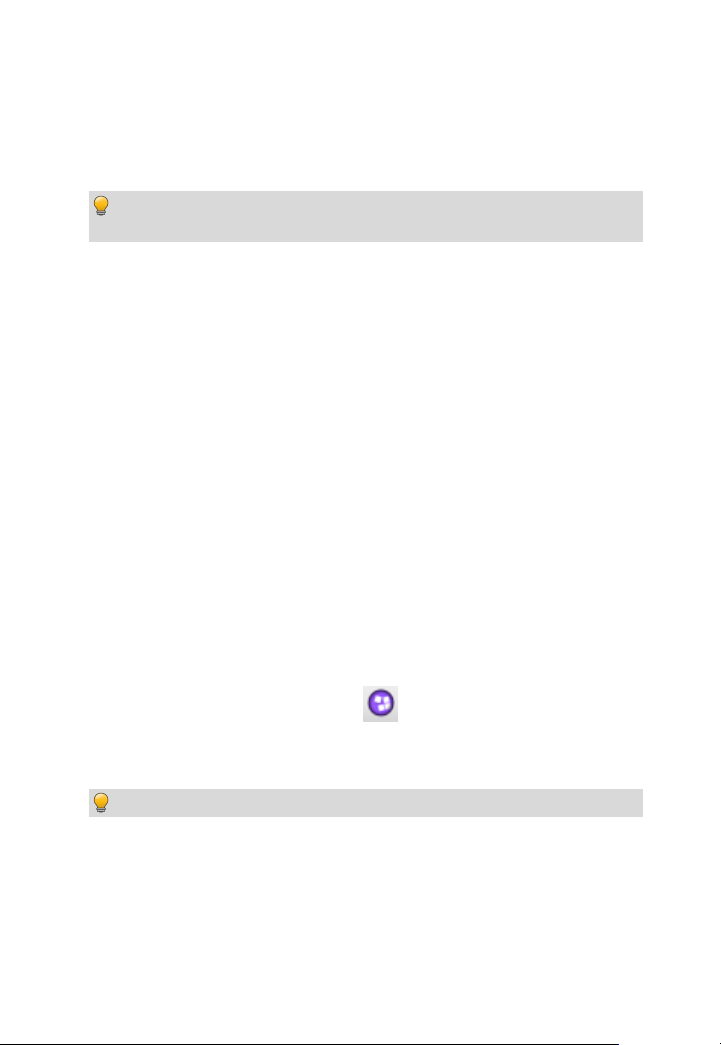
To open a recently opened PhotoPlus Picture or graphic (via Startup Wizard):
1. From the Startup Wizard (at startup time or via File>New from Startup
Wizard.), select your SPP file or graphic file from the Open section. The
most recently opened file will be shown at the top of the list. To see a
thumbnail preview of any file before opening, hover over its name in the
list.
2. Click the file name to open it.
PhotoPlus opens the image as a maximized currently active document; the
document appears in the Documents tab.
Recently viewed files also appear at the bottom of the File menu.
Simply select the file name to open it.
Page 20

14 Getting Started
To open any image file:
1. From the Startup Wizard (at startup time or via File>New from Startup
Wizard.), click Browse.
OR
Click Open on the Standard toolbar.
2. In the Open dialog, select the folder and file name. To open multiple files,
press the Shift or Ctrl key when selecting their names (for adjacent or non-
adjacent files).
3. Click Open to open the desired image as a maximized document.
To open images by drag-and-drop:
• Drag and drop an image file or preview thumbnail into PhotoPlus
from Windows Explorer either:
• into the current workspace (to create a new layer).
OR
• onto the Documents tab (to create a new image window).
Page 21
Getting Started 15
Saving a file
The process of saving differs depending on the type of file you are working on,
the file's current saved state and the file type you want to save.
PhotoPlus lets you work on (and save) one of several file types:
• An open PhotoPlus Picture (.spp) file is project-based and so
preserves 'project' information (e.g., layers, masks, paths) when saving
the file.
• For a currently open image file you can edit and save the image back
to its original format. However, if you've added layers, masks, or paths
to your image you'll be prompted to optionally create an spp file to
preserve 'project' information (otherwise it will be lost). If you choose
not to create an spp file, the additional content is included in the now
flattened image.
• An intermediate HDR image can be saved, which stores the results of
an HDR Photo Merge in an HDR file for future use. See Merging
bracketed photos on p. 74 for more information.
To save your PhotoPlus Picture (.spp):
• Click the
OR
To save under a different path or base name, choose Save As from the
File menu. The window title bar is updated accordingly.
Save button on the Standard toolbar.
If the current window is untitled or non-native, the Save As dialog
opens, and prompts for an SPP file name based on the base name
shown in the title bar.
The procedure for an altered image is slightly more complicated as PhotoPlus
will assist you in deciding if you want to save or lose any added "project
information" added to the original image.
Page 22

16 Getting Started
To save your currently open image:
• If you've altered the background layer only and no layers, paths, or
masks have been added, you can save (without prompt) the altered
image to its current base name (shown in the window title bar) by
choosing one of the above Save options. Changes are included in the
image.
OR
• If you've added layers, paths, or masks to your image, when you click a
Save option you'll be asked if you want to preserve the "project"
information.
• In the dialog, click Yes to save your project information (as an
SPP file).
OR
Click No to save as a flattened image (i.e., without layers).
To revert an image file:
• Click Revert from the File menu. The last saved version of your image
is displayed.
Page 23

3
Layers, Masks, and Blending
Page 24

18 Layers, Masks, and Blending
Page 25
Layers, Masks, and Blending 19
Introduction to layers
If you're accustomed to thinking of pictures as flat illustrations in books, or as
photographic prints, the concept of image layers may take some getting used to.
However, they are one of the most powerful features in PhotoPlus, allowing you
to adjust and manipulate your photos in a variety of ways in a non-destructive
environment.
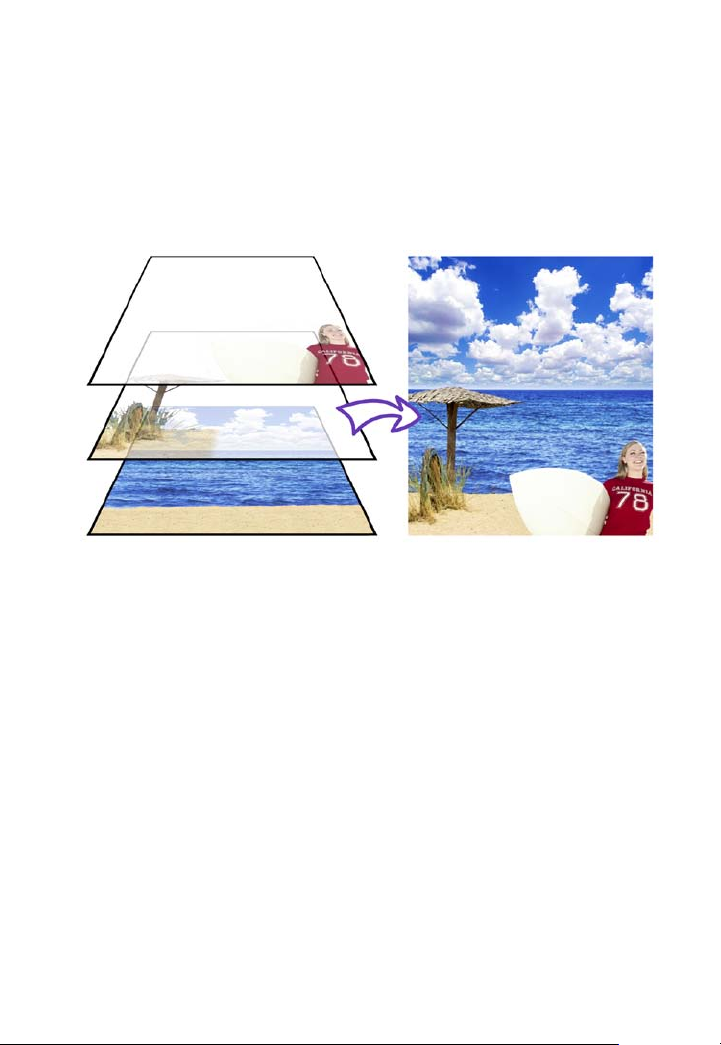
Think of layers as transparent sheets upon which you can add adjustments,
filters, paint colors, and add further images, shapes, and text to build up the
perfect picture.
Page 26
20 Layers, Masks, and Blending
Kinds of layers
In a typical PhotoPlus image—for example, a photograph you've scanned in, a
new picture file you've just created, or a standard bitmap file you've opened—
there is one layer that behaves like a conventional "flat" image. This is called the
Background layer, and you can think of it as having paint overlaid on an
opaque, solid color surface.
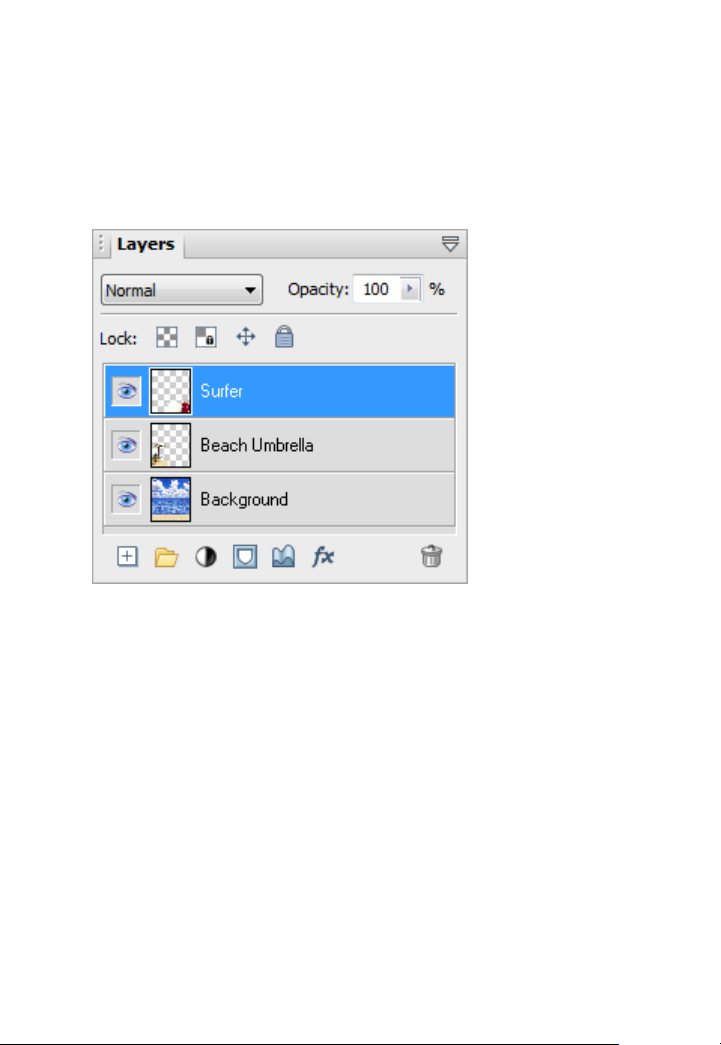
You can create any number of new layers in your image. Each new one appears
on top of the currently active layer, comprising a stack that you can view and
manipulate with the Layers tab.
We call these additional layers standard layers to differentiate them from the
Background layer. Standard layers behave like transparent sheets through which
the underlying layers are visible.
In the example above, the standard layer 'Surfer' is highest in the stack, followed
by 'Beach Umbrella'. The Background layer contains the beach, sea and sky
photo.
Other types of layers also exist in PhotoPlus:
• Shape layers are specifically designed to keep drawn lines and shapes
(including QuickShapes) separate from the other layers so that they
remain editable. (See Drawing and editing lines and shapes; p. 142.)
Page 27

Layers, Masks, and Blending 21
• Text layers work like Shape layers, but are intended exclusively for
text. (See Creating and editing text; p. 150.)
• Fill layers contain an adjustable solid color or gradient fill. (See Fill
Layers; PhotoPlus Help.)
• Adjustment layers apply corrective image adjustments to lower layers.
(See Using adjustment layers; p. 38.)
• Filter layers, are much like standard layers, but you can apply one or
more filter effects to the layer without permanently altering layer
content. You also have full control over effects in the future. (See
Using filter layers; p. 58.)
For now though we're concerned mainly with the Background and standard
layers.
A key distinction is that pixels on the Background layer are always opaque, while
those on standard layers can vary in opacity (or transparency—another way of
expressing the same property). That’s because standard layers have a "master"
Opacity setting that you can change at any time (with on-screen real-time
preview), while the Background layer does not. A couple of examples will show
how this rule is applied in PhotoPlus:
• Suppose you are creating a new image. The New Image dialog
provides three choices for Background: White, Background Color, and
Transparent. If you pick White or Background Color, the Layers tab
shows a single layer in the new image named "Background". If you
pick Transparent, however, the single layer is named "Layer 1"—and in
this case, the image has no Background layer.
• If you cut, delete, or move a selection on the Background layer, the
"hole" that's left exposes the current background color as shown on the
Color tab (illustrated below on the left). The same operations on a
standard layer exposes a transparent hole (illustrated below on the
right).
Page 28

22 Layers, Masks, and Blending
Selections and layers
With few exceptions, you will work on just one layer at any given time—click a
layer on the Layers tab to activate and work on that layer. Tools and commands
generally affect the entire active layer. However, if there's a selection in place,
tools and commands are limited to the pixels inside the selection.
Selections are independent from layers. They don't actually include image
content—they just describe a region with boundaries. Therefore, if your image
has multiple layers and you switch to another layer, the selection stays in place
and follows you to the new active layer.
Operations involving layers
Many standard operations, such as painting, selecting and moving, Clipboard
actions, adjusting colors, applying effects, and so on, are possible on both the
Background layer and standard layers.
Others, such as rearranging the order of layers in the stack, setting up different
color interactions (blend modes and blend ranges) between layers, varying layer
opacity (transparency), applying 2D layer effects and 3D layer effects, using
depth maps, creating animation frames, or masking, only work with standard
layers.
Once an image has more than just a background layer, the layer information can
only be preserved by saving the image in the native PhotoPlus (.spp) format.
Multiple layers are merged when you export an image to a standard "flat" bitmap
format (e.g., .png). It’s best to save your work-in-progress as SPP files, and only
export to a different file format as the final step. (See Saving a file and Exporting
to another file format on p. 15 and 164, respectively.)
Some standard operations can be applied to all layers simultaneously by
checking the Use All Layers option from the context toolbar.
To carry out basic layer operations:
• To select a layer, click on its name in the Layers tab. The selected layer
is now the active layer. Note that each layer’s entry includes a preview
thumbnail, which is visible at all times and is especially useful when
identifying layer contents.
Page 29
Layers, Masks, and Blending 23
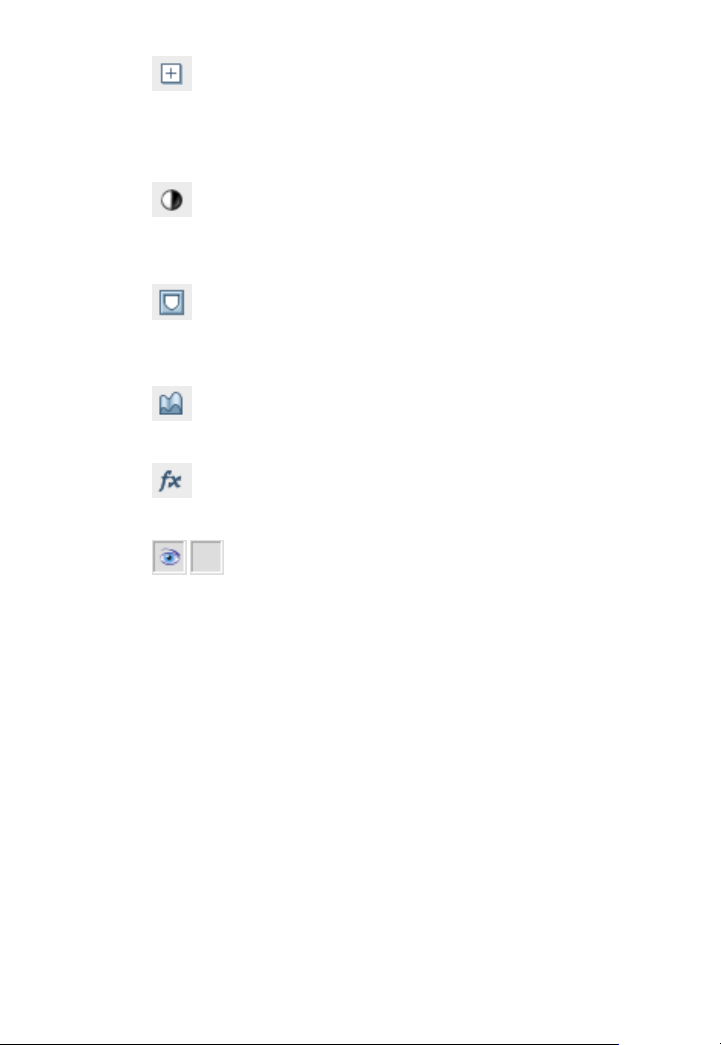
• To create a new standard layer above the active layer, click the
New Layer button on the Layers tab. Dragging a file from Windows
Explorer and dropping it onto the current window also creates a new
layer from the dragged image.
• Click the New Fill or Adjustment Layer button to apply a Fill
Layer or an image adjustment layer. (See Fill Layers in PhotoPlus Help
and Using adjustment layers on p. 38.)
•
The Add Layer Mask button adds a mask to the currently
selected layer. (See Importance of Masks in PhotoPlus Help and Using
masks on p. 27.)
•
The Add Layer Depth Map button creates a depth map for the
selected layer. (See Using depth maps in PhotoPlus Help.)
•
The Add Layer Effects button creates a 2D or 3D effect on the
layer. Right-click to copy/paste, clear or hide effects.
• To make a layer's contents visible or invisible, click the
Hide/Show Layer button next to its name on the Layers tab.
• To convert any shape, text or fill layer to a standard layer, right-click
on the layer name and choose Rasterize from the menu.
• To convert the Background layer to a standard layer (which supports
transparency), right-click "Background" on the Layers tab and choose
Promote to Layer. The layer's name changes from "Background" to
"Layer <number>." To convert a standard layer to a Background layer,
right-click the layer and choose Layer to Background.
• To convert the layer to a non-destructive filter layer, for applying and
managing effect and adjustment filters, right-click and select Convert
to Filter Layer. (See Using filter layers in PhotoPlus Help.)
• To access Layer Properties—including Name, Blend Mode, Opacity,
and Blend Ranges—right-click the layer name and choose Properties.
Page 30

24 Layers, Masks, and Blending
To control layer content:
• To select all layer content use Select>Select All or Ctrl+A. To select
non-transparent regions on a layer, Ctrl-click on a layer thumbnail.
Use Select>Invert or Ctrl+Shift+I to select transparent regions.
•
To move layer content, select one or more layers containing the
content to be moved (from the Layers tab), then drag with the Move
Tool with no selection area present (press Ctrl+D to remove any
selection).
• To align layer content, select one or more layers (as above), then
choose Align from the Layers menu, then select an option from the
submenu.
• To distribute layer content, select one or more layers (as above), then
choose Distribute from the Layers menu, then select an option from
the submenu.
Page 31

Layers, Masks, and Blending 25
Adjusting opacity/transparency
Opacity and transparency describe essentially the same thing. They both
describe the extent to which a particular pixel's color contributes to the overall
color at that point in the image. Fully opaque pixels contribute their full color
value to the image. Fully transparent pixels are invisible: they contribute nothing
to the image. In-between pixels are called semi-transparent.
Fully opaque text
(100% Opacity)
Semi-transparent text
(50% Opacity)
You'll primarily encounter opacity in one of these two contexts:
• As a property of the pixels laid down by individual tools (Paintbrush,
Clone, Eraser, Fill, Smudge, QuickShape, and more).
The map of opacity values for all the pixels on a particular layer is
stored along with the layer and is known as its
• As a property of individual standard layers (in example above). The
layer's opacity setting affects all the pixels on the layer, and is
cumulative with the opacity of individual pixels already there.
Page 32

26 Layers, Masks, and Blending
To set a tool's opacity:
• Select the tool (e.g., Paintbrush Tool) and from the context toolbar
either enter a percentage Opacity value directly or use the slider (click
the option's right arrow button).
To set a layer's opacity:
• Select the layer in the Layers tab and adjust the Opacity setting at the
top of the tab—either enter a percentage Opacity value directly or use
the slider (click the option's right arrow button).
To read the opacity values of pixels on all visible layers:
1. Select the
Color Pickup Tool from the Tools toolbar and move it
around the image.
2. Read the value shown for "O" (Opacity) on the Hintline (e.g., O:60%).
The readout updates constantly, showing the opacity value of each pixel
under the cursor.
For more useful hints and tips about using opacity, see PhotoPlus Help.
Page 33

Layers, Masks, and Blending 27
Using masks
Masking can also be applied to adjustment and effect filters, where you can
isolate regions (e.g., an image background) to which you want a filter to be
applied. (See Using filter layers on p. 58). Similarly, you can use studio-based
filter masking on adjustments by using PhotoFix (see p. 46).
Creating the mask
Before you can use a mask, you have to create it on a particular layer. The mask
can start out as transparent (revealing the whole layer), opaque (hiding the
whole layer), or—if you create it from a selection (opposite)—a bit of both (with
only the selected region hidden or revealed). The mask shows as a mask
thumbnail.
The choice depends on how you want to work with the layer's contents. By
darkening portions of a clear mask, you can selectively fade layer pixels. By
lightening an opaque mask, you selectively reveal layer pixels.
Page 34

28 Layers, Masks, and Blending
To create a mask:
1. Select a layer in the Layers tab. This is the layer where you want to create the
mask, and select specific region(s) if desired.
2. Click the Add Layer Mask button to create a Reveal All mask (or
Reveal Selection if there is one). Instead, Alt-click the button for a Hide All
Mask (or Hide Selection).
OR
Choose Mask>Add Mask from the Layers menu and then one of the
following from the submenu:
• Reveal All for a transparent mask over the whole layer
• Hide All for an opaque mask over the whole layer
• Reveal Selection for an opaque mask with transparent "holes"
over the selected region(s)
• Hide Selection for a transparent mask with opaque "blocks" over
the selected region(s)
On the Layers tab, a mask preview thumbnail appears, confirming that a mask
exists.
Page 35

Layers, Masks, and Blending 29
Editing on the mask
When you create your mask you immediately enter Edit Mask mode, where you
can use the full range of painting tools, selection options, flood fills, gradient
fills, and effects to alter the mask's grayscale values. These manipulations cause
corresponding changes in opacity, which in turn changes the appearance of the
pixels on the layer itself.
The image window's titlebar shows "Mask", indicating that a mask is currently
being edited. The Color tab switches to Grayscale mode when you're editing a
mask, and reverts to the previous setting when you exit Edit Mask mode. This
means anything you paste from the Clipboard onto the mask will automatically
be converted to grayscale.
As long as you are editing the mask, you're only seeing a preview of
changes on the layer.
You can switch out of Edit Mask mode at any time to edit the active layer
directly (or any other part of the image), then switch back to resume work on the
mask.
To edit the active layer:
• Click the layer thumbnail to the left of the Mask thumbnail. The
thumbnail is then bordered in white.
To edit the active layer's mask:
• Click the mask thumbnail.
In Edit Mask mode, you're normally viewing not the mask, but rather the effects
of changes "as if" you were making them on the layer below. Adding a Reveal All
mask can be a bit confusing, because there's initially no evidence the mask is
there at all (i.e. the layer appears exactly the same as it did before you added the
mask)!
Page 36

30 Layers, Masks, and Blending
It's sometimes helpful to switch on the View Mask setting, which hides the layer
and lets you see only the mask, in all its grayscale glory. For example, a Reveal
All mask appears pure white in View Mask mode—the white represents a clear
mask with no effect on the underlying layer pixels' opacity. View Mask can also
be useful in the latter stages of working on a mask, to locate any small regions
that may have escaped your attention.
To view the active layer's mask:
• Alt-click the mask thumbnail, to display the mask in black and white.
Alt-click a second time to view the mask as a tinted overlay.
To stop viewing the mask, click on the layer thumbnail.
White or light portions of the mask reveal layer pixels (make them more
opaque). Black or dark portions hide layer pixels (making them more
transparent).
You can disable the mask to see how the layer looks without the mask's effects.
Note that disabling the mask is not the same as canceling Edit Mask mode—it
only affects your view of the layer, not which plane (i.e. mask or layer) you're
working on.
To disable the active layer's mask:
• Shift-click the mask preview thumbnail. (Shift-click again to enable
masking again.)
When the mask is disabled, a red "X" appears across its
thumbnail.
If you want to fine-tune a mask or layer's position independently of each other
it’s possible to unlink them. You may have noticed a small link button between
the layer and mask thumbnails on the Layers tab, i.e.
A click on this
button will unlink the layer and mask, changing the button to
display a red cross through it ( ). By selecting the layer or mask thumbnail, you
can then drag the layer or mask on the page, respectively. After fine-tuning, click
the button to relink the mask to the layer.
Page 37

Layers, Masks, and Blending 31
Using blend modes
You can think of blend modes as different rules for putting pixels together to
create a resulting color. In PhotoPlus, you'll encounter blend modes on layers or
effects. The colors of an upper layer blend with colors of the lower layer in
different ways according to the upper layer's blend mode.
To set a tool's blend mode:
• Select the tool and use the drop-down list (displays Normal by default)
on the tool's context toolbar.
To set a standard layer's blend mode:
• On the Layers tab, select the layer and choose the mode from the blend
mode's drop-down list.
It's also possible to include or exclude tones or colors to be included
in any blending operation by using blend ranges. For more details,
see Using blend ranges in PhotoPlus Help.
A tool or layer's Opacity setting interacts with its blend mode to
produce varying results. For details, see Adjusting
opacity/transparency on p. 25.
Page 38

32 Layers, Masks, and Blending
Page 39

4
Making Image Adjustments
Page 40

34 Making Image Adjustments
Page 41

Making Image Adjustments 35
Introduction to image adjustments
A major part of photo-editing is making corrections (i.e., adjustments) to your
own near-perfect images. Whether you’ve been snapping with your digital
camera or you've just scanned a photograph, at some point you may need to call
on PhotoPlus’s powerful photo-correction tools to fix some unforeseen
problems.
For photo-correction, several methods can be adopted. You can use a
combination of:
• Image color adjustments: For applying color adjustments to a
selection or layers.
• PhotoFix: For making cumulative corrective adjustments from within
a studio environment.
• Retouch brush-based tools: Red Eye, Smudge, Blur, Sharpen,
Dodge/Burn (for exposure control), Sponge (for saturation control),
Scratch Remover.
If you work with raw images you can make image adjustments on your
unprocessed raw file (before interpolation). Adjustments include white balance,
exposure, highlight recovery, noise reduction, and chromatic aberration
removal. See Adjusting raw images in PhotoPlus Help.
Page 42

36 Making Image Adjustments
Overview: Adjusting image colors
PhotoPlus provides a number of different adjustment filters that you can apply
to a selection or to an active standard layer. Typically, these adjustments are used
to correct deficiencies in the original image.
The adjustment can be applied in one of several ways:
• via the Adjustments tab, as an adjustment layer (non-destructive).
• via PhotoFix, a studio environment for managing and applying
cumulative adjustments (non-destructive).
• via Image>Adjust, on a filter layer (non-destructive).
• via Image>Adjust, on a standard layer (destructive).
Here’s a summary of the available PhotoPlus image adjustments:
• Levels: Displays a histogram plot of lightness values in the image, from
which you can adjust the tonal range by shifting dark, light, and
gamma values.
• Curves: Displays lightness values in the image using a line graph, and
lets you adjust points along the curve to fine-tune the tonal range.
• Brightness/Contrast: Brightness refers to overall lightness or
darkness, while contrast describes the tonal range, or spread between
lightest and darkest values.
• Shadow/Highlight/Midtone: Controls the extent of shadows,
highlights, and contrast within the image.
• Hue/Saturation/Lightness: Hue refers to the color’s tint—what most
of us think of as rainbow or spectrum colors with name associations,
like "blue" or "magenta". Saturation describes the color’s purity—a
totally unsaturated image has only grays. Lightness is what we
intuitively understand as relative darkness or lightness—ranging from
full black at one end to full white at the other.
• Colorize: Lets you recolor an image using Hue, Saturation, and
Lightness.
• Vibrance: Boosts low-saturation colors in your image, while high-
saturation colors are less affected.
Page 43

Making Image Adjustments 37
• Color Balance: Lets you adjust color and tonal balance for general
color correction in the image.
• Replace Color: Tags one or more ranges of the full color spectrum that
require adjustment in the image, then apply variations in hue,
saturation, and/or brightness to just those color regions (not to be
confused with the simpler Replace Color Tool).
• Selective Color: Lets you add or subtract a certain percentage of cyan,
magenta, yellow, and/or black ink for creating effects.
• Channel Mixer: Modifies a color channel using a mix of the current
color channels.
• Gradient Map: Lets you remap grayscale (lightness) information in
the image to a selected gradient. The function replaces pixels of a given
lightness in the original image with the corresponding color value
from the gradient spectrum.
• Lens Filter: Adjusts the color balance for warming or cooling down
your photos. It digitally mimics the placement of a filter on the front of
your camera lens.
• Black and White Film: Used for grayscale conversion with
controllable source channel input.
• Threshold: Creates a monochromatic (black and white) rendering.
You can set the threshold, i.e. the lightness or gray value above which
colors are inverted.
• Equalize: Evenly distributes the lightness levels between existing
bottom (darkest) and top (lightest) values.
• Negative Image: Inverts the colors, giving the effect of a photographic
negative.
• Clarity: Lets you sharpen up your photos using local contrast.
• Posterize: Produces a special effect by reducing the image to a limited
number of colors.
Page 44

38 Making Image Adjustments
Instead of the manual tonal adjustments above, the PhotoPlus Image menu
affords a number of functions you can apply to correct shadow/highlight values
in an image automatically. Adjust>AutoLevels or Adjust>AutoContrast may
do the job in one go; if not, you can use Adjust>Levels. or
Adjust>Shadow/Highlight/Midtone. (See PhotoPlus Help for details.)
Use the Histogram tab to display statistics and image color values,
helping you to evaluate the kinds of image adjustments that may be
needed.
Using adjustment layers
Adjustment layers are recommended for applying image adjustments
experimentally and non-destructively to your image.
The Adjustments tab lists available adjustments in a selectable adjustments list;
after selection, the tab displays a Settings pane for that adjustment (and for any
selected adjustment layer present in the Layers tab).
Page 45

Making Image Adjustments 39
An adjustment layer is created by selecting an adjustment from the Adjustments
tab. As its name suggests, an adjustment layer is considered a layer so it will
appear in the Layers tab on creation.
Unlike the other layer types, adjustment layers don't store content in the form of
bitmap images, text, or shapes. Rather, an adjustment layer applies the
adjustment to content on all layers below it (although you can restrict the effects
of the adjustment by adding to a group or by clipping to the immediate layer
below).
The layer is essentially a container in which only the adjustment's settings and its
layer properties are stored.
You can drag an adjustment layer up or down within the list to determine
exactly which other layers are below and therefore affected by it.
Adjustment layers let you revisit the settings for a given adjustment as often as
needed, while continuing to edit the image in other ways. If you later decide you
don't even need an adjustment, you can simply remove it!
Page 46

40 Making Image Adjustments
The following adjustments are available:
• Levels: Adjust contrast and tonal range by shifting dark, light, and
mid-tone values.
• Curves: Fine-tune lightness (luminance) values in the image or color
channel using a line graph.
• Color Balance: Adjust color and tonal balance for general color
correction in the image.
• Brightness/Contrast: Vary brightness and/or contrast.
• Hue/Saturation/Lightness: Vary hue, saturation, and/or lightness
values.
• Colorize: Vary hue, saturation, and/or lightness to colorize an image.
• Vibrance: Boosts the saturation of low-saturation colors (while
limiting saturation of already saturated colors).
• Selective Color: Add or subtract a certain percentage of cyan,
magenta, yellow, and/or black ink.
• Channel Mixer: Modify a color channel using a mix of the current
color channels.
• Gradient Map: Remap grayscale (lightness) information in the image
to a selected gradient.
• Lens Filter: Apply a color filter to warm up (or cool down) your
image.
• Black & White Film: Convert your color image to black and white
intelligently.
• Threshold Filter: Create a monochromatic (black and white)
representation.
• Posterize: Apply the Posterize effect by limiting the number of
lightness levels.
• Negative Image: Invert each color, replacing it with an "opposite"
value.
For more in-depth details on each adjustment, view the PhotoPlus help, click the
Contents tab, and open the "Making Image Adjustments" book.
Page 47

Making Image Adjustments 41
To create an adjustment layer:
1. From the Adjustments tab, select an adjustment. You can choose a default
adjustment or a named preset by expanding the adjustment entry (click ).
2. In the Layers tab, the new adjustment layer is inserted above the active layer.
The adjustment is applied to all underlying layers.
3. From the Adjustments tab, change the applied adjustment layer's settings to
suit your requirements. For example, for a levels adjustment, you can drag
the histogram pointers to alter levels.
Just like other layer types (Standard, Text,
Shape, Filter, but not Background),
adjustment layers can have a mask applied to
them. By default, a mask thumbnail is shown
on the adjustment layer. Select this to apply a
mask to your adjustment layer. (See Using
masks on p. 27.)
Page 48

42 Making Image Adjustments
To save an adjustment layer as a new preset:
1. Select and then modify an adjustment layer in the Adjustments tab.
2. Click
Add Preset.
3. From the dialog, name your custom adjustment layer, and click OK.
Custom adjustments will appear under the adjustment's type in the tab's
adjustment list.
To modify an adjustment layer:
1. Click the adjustment layer's name in the Layers tab.
2. From the Adjustments tab, modify the applied adjustment layer's settings.
To hide/show an adjustment layer:
•
Click Hide/Show Layer on the Layers tab.
To delete an adjustment layer:
• (via Layers tab)
Select the adjustment layer and click Delete
Layer.
OR
• (via Adjustments tab)
with the adjustment's settings pane
showing, click Delete Layer. This removes the currently selected
adjustment layer, so be careful not to remove additional adjustment
layers in the Layers tab by clicking multiple times.
To reset an adjustment layer:
1. Click the adjustment layer's name in the Layers tab.
2. From the Adjustments tab, select Restore Default Settings.
To access layer properties for an adjustment layer:
• Right-click the layer name and choose Properties..
As with other layers, you can change the adjustment layer’s name, set its opacity,
blend mode, and/or blend ranges.
Page 49

Making Image Adjustments 43
Clipping adjustment layers
Clipping allows you to restrict the scope of an adjustment layer, i.e. the
adjustment influences only the layer immediately below it, rather than all
underlying layers.
To clip an adjustment layer:
• Click
Clip to Layer Below on the selected adjustment layer (in
the Adjustments tab).
OR
Right-click the adjustment in the Layers tab and select the same
option.
You'll see your adjustment layer become indented, indicating that it is clipped to
the layer below. The circled icon indicates a clipped layer.
Page 50

44 Making Image Adjustments
To unclip a selected layer:
• In the Adjustments tab, click
Clip to Layer Below.
One additional benefit of the clipping feature is that you can apply a mask to a
lower layer (thumbnail circled below) so that adjustment layers above that are
"clipped" to that lower layer. This saves you creating a mask per adjustment
layer.
Page 51

Making Image Adjustments 45
Retouching tools
The Tools toolbar includes an assortment of comparatively simple pressuresensitive brush-based tools that come in handy at various stages of photo editing.
Retouching tools work on Background and standard layers, but not on text
layers or shape layers.
On the
color snapshots
"pushing" it in the brush stroke direction
without smearing colors
apparent sharpness
the brush
Retouch Tools flyout:
Red Eye Tool - for correcting the "red eye" phenomenon common in
Smudge Tool - for picking up color from the click point and
Blur Tool - for reducing contrast under the brush, softening edges
Sharpen Tool - for increasing contrast under the brush, enhancing
Dodge Tool - for lightening an area
Burn Tool - for darkening an area
Sponge Tool - for increasing or decreasing the color saturation under
Replace Color Tool - for swapping one color for another
On the
Blemish Removal Tools flyout:
Blemish Remover - for intelligently painting out skin blemishes
Scratch Remover - for filling in small gaps or dropouts in an image
Patch Tool - for painting out selected areas
Page 52

46 Making Image Adjustments
Using PhotoFix
PhotoFix provides an image adjustment environment within PhotoPlus which
simplifies the often complicated process of image correction. The studio
environment offers the following key features:
• Adjustment filters
Apply tonal, color, lens, sharpening, and noise reduction filters.
• Retouching filters
Apply red-eye correction, spot repair, straightening, and cropping.
• Non-destructive operation
All filters are applied without affecting the original picture (by
automatically creating a filter layer), and can be edited at any point in
the future.
• Powerful filter combinations
Create combinations of mixed adjustment filters for savable
workflows.
• Selective masking
Apply filters to selected regions using masks.
• Save and manage favorites
Save filter combinations to a handy Favorites tab.
• Viewing controls
Compare before-and-after previews, with tiled- and split-screen
controls (horizontally and vertically). Use pan and zoom control for
moving around your picture.
Page 53

To launch PhotoFix:
Making Image Adjustments 47
• Click
PhotoFix on the Photo Studio toolbar.
Let's get familiar with the PhotoFix interface showing a non-default Split
horizontal view.
(A) Retouch tools, (B) Main toolbar, (C) Main Workspace,
(D) Histogram, (E) Filters, (F) Favorites.
Page 54

48 Making Image Adjustments
Adjustments overview
Adjustments are made available to the right of the main window from the Filters
section. Here's a quick overview of all the adjustments hosted in PhotoFix, some
tool-based and some available as filters.
Retouch tools:
• Red Eye
Removes the dreaded red eye effect from subject's eyes—commonly
encountered with flash photography.
• Spot Repair
Removes skin blemishes and other flaws.
• Crop
Retains a print-size portion of your image while discarding the
remainder. Great for home printing, then framing.
• Straighten
Re-aligns slightly or wildly crooked photos by resetting the image's
horizon, then applying an auto-crop.
These tools are supported by How To Help instructions within their dialogs.
Page 55

Filter-based:
• Noise Reduction
Use Luma and Chroma adjustments to reduce noise in photos taken in
low light or from cameras with high ISO settings.
• White Balance
"Cool down" or "warm up" your photo by adjusting lighting either by
selecting presets or customizing temperature/tint combinations.
• Lighting
Simple adjustments to a photo's exposure, brightness, contrast,
shadows, and highlights.
• Curves
Correct the tonal range of a photo, i.e. the shadow, midtone, and
highlight regions—and control individual color components.
• HSL
Adjust the Hue, Saturation, and Lightness of your image
independently.
• Black and White Film
Intelligently apply grayscale by varying the gray tones of red, green or
blue colors in your original image. Also apply color tints.
Making Image Adjustments 49
• Chromatic Aberration
Reduces red/cyan or blue/yellow fringing on object edges.
• Lens Distortion
Fixes barrelling and pincushion distortion encountered when
photographing straight-edged objects at close range.
• Lens Vignette
Removes darkening in photo corners.
• Unsharp Mask
Makes your image sharper at image edges—great for improving image
quality after other adjustments have been made.
Some adjustments can also be applied independently from the
Effects menu.
Page 56

50 Making Image Adjustments
To apply an adjustment (from a favorites preset):
1. From the Favorites tab, scroll the tab to review the categorized
adjustments; select a preset or custom thumbnail.
2. Click OK.
When applied, your image layer is automatically converted to a non-destructive
filter layer with a PhotoFix adjustment entry nested under the filter layer entry.
To apply an adjustment (using custom settings):
1. Review the available adjustments in the Filters section, before expanding the
adjustment you want to apply by clicking
Expand filter.
2. Modify the adjustment using sliders, check boxes, graph adjustments, and
drop-down lists (you can also enter absolute values into available input
boxes). The image will be adjusted automatically to reflect the new settings
in the preview window.
You'll notice the adjustment filter is enabled once a setting is changed, i.e.
the Enable/disable filter option becomes grayed out ( ).
3. Click OK. A filter layer is created (as above).
To reset (and disable) a modified adjustment:
• Click
Reset settings in the top-right corner of the adjustment's
pane.
To edit PhotoFix adjustments:
• Double-click the PhotoFix entry on the filter layer. PhotoFix is
launched with the previously set adjustments still applied.
Page 57

Making Image Adjustments 51
Using PhotoFix masks
Masks in PhotoFix adopt the same principles as layer masks (see p. 27). In
PhotoFix however, masking is used to apply adjustment filters to selected
"painted" regions of your image or to protect painted regions from change.
Painting is used exclusively to create PhotoFix masks.
Each new mask comprises the selected mask region, plus a set of adjustments
applied to that mask. You can change the adjustments associated with the mask
at a later date.
In the first example below, the model's hair has been masked by painting,
allowing White Balance to be adjusted in that painted region only. Conversely,
in the second example, the sky has been painted to protect it from masking,
allowing light levels to be adjusted for Tower Bridge's stonework.
To achieve the above, PhotoFix uses two mask modes, namely Mode Select and
Mode Protect. When you begin masking you'll need to decide which mode you
want to use.
Page 58

52 Making Image Adjustments
To apply a mask:
1. Select Create Mask from the main toolbar.
2. In the Mask Brush pane, select the
Add Region tool.
3. Adjust the settings to suit your requirements. For example, adjust Brush
Size to paint larger or more intricate regions.
4. In the Mode drop-down list, choose one of the following options:
• Select: Choose this if you want to apply the filter only to the
regions you paint. This is the default setting.
• Protect: Choose this if you want to apply the filter to all areas,
except for those that you paint.
5. Using the brush cursor, paint the regions to be masked (selected areas are
painted in green; protected areas in red).
6. Click
Accept.
7. Apply your adjustments as described previously, which will make a change
to your masked regions.
Page 59

Making Image Adjustments 53
Adding multiple masks
So far we've looked at an individual mask applied to an image. However,
PhotoFix also supports multiple masks where a different set of adjustments can
be applied to each mask. You can therefore build up a patchwork of masked
regions for absolute and selective control of image adjustments.
To apply additional masks:
1. In PhotoFix, click the down arrow on the Filters heading.
2. From the drop-down list, select New.
3. In the Mask Brush pane, change settings and paint as described previously
in "To apply a mask".
4. Click OK. The new mask, named Mask 1, Mask 2, etc. is applied to your
image.
5. Apply your adjustments as described previously.
6. Repeat the process for further masks.
Once applied, masks are applied cumulatively. The default global mask is applied
to your image first, then Mask 1, then Mask 2, etc., if present. As a result, you
may wish to rearrange the mask order for different results. You can also rename
and delete masks.
To rearrange, rename or delete a mask:
1. From the down arrow on the Filters heading, select Manage.
2. From the dialog, select a mask and use appropriate supporting buttons.
3. Click OK.
Page 60

54 Making Image Adjustments
pick a category to save the filter to. Optionally,
To edit a mask:
1. From the down arrow on the Filters heading,
select your mask name (a check indicates
selection).
2. Modify your adjustments as described
previously.
Saving favorites
If there's a specific filter setting (or combination of
filters) you want to keep for future use it's easy to
save it as a favorite. PhotoFix stores preset and
custom favorites together in the Favorites tab. You
can even create your own categories (e.g.,
MyAdjusts) within the tab for storing your custom
adjustments.
To save a filter(s) as a new favorite:
1. Click
Save Filter on the modified filter's
pane.
2. From the dialog, enter a favorite name and
click to save to a new category.
If you want to further manage your favorites into
user-defined categories, click Manage Favorites on
the Favorites tab's
Tab Menu.
Page 61

5
Applying Image Effects
Page 62

56 Applying Image Effects
Page 63

Applying Image Effects 57
Overview: Applying special effects
Special effects are grouped into different categories, i.e. distort, blur, sharpen,
edge, noise, render, stylistic, and artistic, which offer you a diverse choice of
creative opportunities in PhotoPlus.
Before going ahead and applying your effects, it's a good idea to review Using
filter layers (see p. 58) before deciding on your approach, i.e. whether you work
non-destructively or destructively.
Each effect can be applied in one of several ways:
• on a filter layer, via an Effects dialog or via the Filter Gallery (non-
destructive).
• on a standard layer, via an Effects dialog or via the Filter Gallery
(destructive).
Equally dramatic effects can be applied by using Warp tools on the
Tools toolbar's flyout or 2D/3D layer effects via the Layers tab.
As with image adjustments (see Introduction to image adjustments
on p. 35), you can use filter effects to improve the image, for
example by sharpening, but more often the emphasis here is on the
"creative" possibilities when effects are applied.
Page 64

58 Applying Image Effects
Using filter layers
If you apply a filter effect to a standard or background layer, the layer is
permanently altered. However, if you want the flexibility of being able to edit
your filters at any point in the future (and don't want to destroy the layer
contents) you can convert your standard or background layer to a Filter Layer
(e.g., L_213).
Think of a Filter Layer as a way of keeping layer content independent of any
filters you wish to use, with the flexibility of being able to manipulate a filter
layer in the same way as other layers. Otherwise without filter layers, you would
have to repeatedly undo your operations if you've had a rethink and no longer
want to apply a specific filter.
When applied, filters are created within filter groups, nested individually under
the Filter Layer. When you double-click a filter you display its specific settings.
You can apply a blend mode and opacity to each filter, and additionally filter
masking to the filter group.
For added security, it's good practice to create a duplicate of any
background layer you initially have.
Page 65

Applying Image Effects 59
To convert to a filter layer:
• In the Layers tab, right-click a standard or Background layer and
choose Convert to Filter Layer.
The layer now shows the letter "F" indicating that it is now a filter
layer, and ready to have a filter applied.
To add filters to the filter layer:
1. Select the filter layer.
2. Add an adjustment via the Image menu (see p. 36).
OR
Add an effect via the Effects menu or via the Filter Gallery (see p. 64).
Each filter, as it is applied, is created within a filter group nested under the
selected filter layer. In the example below, the Curves adjustment filter and
Gaussian Blur effect filter is applied to the selected filter layer L_213. They'll
be stored within Filter Group 1.
As a filter layer has all the properties of standard and Background layers, you
may wish to review Introduction to layers (p. 19). Essentially, you can edit,
hide/show, and delete filter layers as for standard layers, as well as apply a blend
mode or opacity level.
To edit filter layer properties:
• In the Layers tab, right-click the filter layer and choose Properties.
Page 66

60 Applying Image Effects
Managing filter groups and specific filters
When you apply a filter to a filter layer it automatically creates a filter
group. This allows you to store and manage a selection of filters more easily—
you'll be able to control multiple filters in bulk by operating at the group level,
e.g. to hide/show, delete, apply blend modes, and opacity to all filters
simultaneously. Most operations can be applied equally to group or specific
filter, except for masking, which can be used on filter groups but not on
individual filters.
To hide/show a filter group/filter:
•
Click the Hide/Show Filter button next to its name on the
Layers tab.
OR
Right-click the filter and select Disable Filter (or Enable Filter).
OR
Right-click the filter group and select Disable Filter Group (or Enable
Filter Group).
To delete a filter group/filter:
• Right-click the filter (or filter group) and select Delete Filter (Group).
To create an empty filter group:
Right-click a filter layer and select Add Filter Group from the flyout menu.
Just as layers can adopt different blend mode and opacity levels the same is true of
filter groups and individual filters. For a refresh on these concepts, see Using blend
modes and Adjusting opacity/transparency on p. 31 and p. 25, respectively.
You can use the Blend Options dialog to make blend mode and opacity changes
with a dynamic preview, updating as you make change.
To apply a blend mode:
1. Right-click the filter group (or filter) and select Blend Options.
2. From the dialog, select an option from the Blend Mode drop-down list.
3. Click OK.
To change opacity:
• From the above dialog, enter an Opacity level.
Page 67

Applying Image Effects 61
Editing filters
The core objective of filter layers is to host filters applied to your image. Once a
filter is applied, it's likely that you may want to edit it at a later date.
To edit a filter:
1. Double-click the filter entry, e.g. Gaussian Blur.
OR
Right-click the filter and select Edit Filter.
2. The filter can then be edited via dialog or Filter Gallery. Adjust the filter and
click OK.
Using filter masks
In an identical way to layer masks (see p. 27) you can apply a mask to a filter
layer. However, masks can additionally be used for selective filter control for
image correction or artistic reasons. These are called filter masks, which limit
the influence of any applied filter(s) to that masked region only. Filter masks are
applied either automatically (from a selection existing before applying a filter) or
manually (after you've applied the filter) to a filter group (but never to an
individual filter).
See Using masks (see p. 27) for more details on masking and
masking controls.
Page 68

62 Applying Image Effects
To create a filter mask (from a selection):
1. Make a selection on which your mask will be based, e.g. a brush selection
around the subject of interest. By default the area outside the selection is
masked (i.e. not affected by the filter), while the selection area retains the
applied filter. If you want to do the opposite, choose Invert from the Select
menu.
2. In the Layers tab, select the filter layer to which you wish to apply a filter.
3. Add an adjustment via the Image menu.
OR
Add an effect via the Effects menu or via the Filter Gallery.
The filter is created within an automatically created filter group, which
applies a mask automatically.
4. (Optional) Fine-tune the filter by double-clicking the filter entry and editing
the settings.
To create a filter mask (by mask painting):
1. With no selections present, in the Layers tab, select the filter layer to which
you wish to apply a filter.
2. Add an adjustment via the Image menu.
OR
Add an effect via the Effects menu or via the Filter Gallery.
Page 69

Applying Image Effects 63
3. Right-click the created filter group and select Add Mask from the flyout
menu and then one of the following from the submenu:
• Reveal All for a transparent mask
• Hide All for an opaque mask.
A mask thumbnail appears to the left of the filter name.
4. Paint or draw on your image using a suitable grayscale value set as your
foreground color. The mask thumbnail updates accordingly.
The mask thumbnail would apply a mask which produces
a vignette effect. As you can also paint with different
grayscale levels you can achieve even more complex
masking effects.
To disable (enable) a mask:
• Right-click the filter group and select Disable Mask (or Enable Mask)
from the flyout menu.
To delete a mask:
• Right-click the filter group and select Delete Mask from the flyout
menu.
Page 70

64 Applying Image Effects
Using the Filter Gallery
The Filter Gallery offers a one-stop studio environment for applying single or
multiple filter effects. The gallery hosts sets of filter thumbnails which are
categorized into different effect categories (e.g., Distort, Blur, Sharpen, Edge,
Artistic, Noise, Render, etc.). Thumbnails are shown in expandable categories.
The Filter Gallery offers the following key features:
• Application of individual or multiple filter effects simultaneously.
• Preview window with zoom and pan support.
• Optional Before and After views arranged as tiles or split-screen, both
horizontally and vertically.
You can apply filters via the Filter Gallery in one of two ways:
• permanently to a standard layer.
OR
on a Filter Layer (see p. 58), allowing you to protect your image layer,
as well as manage your filters at a later date.
To view the Filter Gallery:
• Click
Filter Gallery on the Photo Studio toolbar.
For some effects hosted on the Effects menu, the Filter Gallery will
automatically be launched with the effect already applied.
Page 71

Applying Image Effects 65
To add a filter in the Filter Gallery:
1. Expand your chosen effect category by clicking the Expand button (click
to collapse).
Click on an effect thumbnail to apply it to your image.
The applied filter is shown in a Filters stack in the lower-right corner of the
Filter Gallery. The properties of any selected effect will be displayed in the
expanded area under the effect name—you can alter and experiment with
these at any time. The filter shows on a light background to indicate
selection.
Page 72

66 Applying Image Effects
Use the Undo button to undo recent changes to the filter (or
the Redo button to re-apply the changes).
2. Adjust sliders (or enter input values) until your filter suits your
requirements. Some filters offer check boxes, drop-down lists, and
additional controls (e.g., Advanced settings). The large preview window
updates automatically as you adjust any values.
With the Replace selected option checked (default), adding a new
filter will replace any selected filter in your filter stack.
To add multiple filters:
• Uncheck Replace selected, then add one or more additional effects as
described above.
Any filter can be temporarily disabled, reset, or deleted once applied.
To
disable:
To reset:
To delete:
The effect's properties are expanded by default but can be collapsed to make
more of the Filters stack visible.
To collapse/expand filter properties:
• To collapse, click the
Click
Click
filter's defaults.
Click
expand again, click the
, then click to enable again.
. Any changes to settings are reverted back to the
. The filter is removed from the stack.
button preceding the filter effect name. To
button.
Page 73

Applying Image Effects 67
To replace a filter:
1. Ensure Replace selected is checked.
2. Select the filter you wish to replace by clicking anywhere in the filter's pane.
On selection, the selected filter shows a lighter background, e.g, Gaussian
below.
3. Select a replacement filter from an effect category. Your selected filter is
replaced in the stack with no change made to the existing stack order.
The order in which effects appear in the effect list may produce very different
results. If you’re not happy with the current order, PhotoPlus lets you drag and
drop your effects into any position in the stack. Effects are applied in the same
way that layers are applied, i.e. the most recently added filter always appears at
the bottom of the list and is applied to the picture last (after the other filters
above it).
Filters can be moved around the filter list to change the order in which they are
applied to the photo.
To reorder filters:
• Drag and drop your filter into any position in the stack. A dotted line
indicates the new position in which the entry will be placed on mouse
release.
Page 74

68 Applying Image Effects
Applying 2D layer effects
Layer effects can be applied to the contents of standard layers, text layers, or
shape layers. Standard or "2D" layer effects like shadow, glow, bevel, and emboss
are particularly well adapted to text, while 3D layer effects (covered elsewhere;
p. 70) create the impression of a textured surface.
Unlike image adjustments and Effects menu manipulations, layer effects don’t
directly change image pixels—they work like mathematical "lenses" that
transform how a layer’s bitmap appears. Since the settings are independent, you
can adjust them ad infinitum until you get the result you want!
Here's an example of each effect applied to the letter "A".
Drop Shadow Inner Shadow Outer Glow Inner Glow
Inner Bevel Outer Bevel Emboss Pillow Emboss
Color Fill
Outline
Page 75

Applying Image Effects 69
• Drop Shadow adds a diffused shadow "behind" solid regions on a
layer.
• Inner Shadow adds a diffused shadow inside the edge of an object.
• Outer Glow adds a color border outside the edge of an object.
• Inner Glow adds a color border inside the edge of an object.
• Bevel and Emboss/Inner Bevel adds a rounded-edge effect inside an
object.
• Bevel and Emboss/Outer Bevel adds a rounded-edge effect
(resembling a drop shadow) outside an object.
• Bevel and Emboss/Emboss adds a convex rounded edge and shadow
effect to an object.
• Bevel and Emboss/Pillow Emboss adds a concave rounded edge and
shadow effect to an object.
• Color Fill lets you apply a specific color to a layer.
• Outline applies a border effect to the edge of an object. See Creating
outlines in PhotoPlus Help.
To apply a shadow, glow, bevel, or emboss effect:
1. From the Layers tab, select a layer and click
Add Layer Effects.
2. In the dialog, apply an effect by checking its check box in the list at left. You
can apply multiple effects to the layer.
3. To adjust the properties of a specific effect, select its name and adjust the
dialog controls. Adjust the sliders, drop-down list, or enter specific values to
vary each effect. Options differ from one effect to another.
4. Click OK to apply the effect or Cancel to abandon changes.
Page 76

70 Applying Image Effects
Applying 3D layer effects
3D layer effects are just as easy to apply, but they’re a bit more complex than
their 2D cousins (see p. 68). Actually, there’s an easy way to get started with
them: simply display the Instant Effects tab and preview its gallery thumbnails.
In the tab you’ll see a variety of remarkable 3D surface and texture presets
grouped into wide-ranging "themed" categories (e.g., Glass Text, Abstract,
Wood, Metal). Click any thumbnail to apply it to the active layer. Assuming the
layer has some color on it to start with, you’ll see an instant result!
If hidden, make this tab visible via Window>Studio Tabs.
To apply an Instant Effect to the active layer:
• From the Instant Effects tab, select a category, then click a gallery
thumbnail.
• To make the effect appear smaller or larger in relation to the image,
drag the Scale slider or type a value in the tab.
You can apply an effect from the Instant Effects tab, edit it (using the Layer
Effects dialog) and then save it as a custom preset in a user-defined category
(you'll have to create and select the category first). To save the preset, right-click
in the tab and choose Add Item. From the dialog, you can adjust the Scale of the
effect and have your thumbnail preview stored as a Rectangle or as Text (using
the letter "A"). For either type, the thumbnail will appear in the gallery.
Page 77

Applying Image Effects 71
in the preset, the first thing you’ll notice is that several
great difference; you can click the "+" button
adjustments, along with a choice of gradient
If you want to have complete flexibility when creating 3D effects, you can
click the Add Layer Effects button on the Layers tab.. The dialog is shared for
both 2D and 3D effects—simply check the 3D Effects box and experiment with
the settings (enable other 3D check boxes as appropriate).
For more information about creating 3D filter effects, see PhotoPlus Help.
3D effects overview
Suppose you’ve applied a 3D layer effect preset from
the Instant Effects tab, and then you bring up the
Layer Effects dialog. On inspecting the settings used
boxes may be checked.
• 3D Effects is a master switch for this group,
and its settings of Blur and Depth make a
to unlink them for independent adjustment.
• 3D Pattern Map allows for blend mode,
opacity, depth, displacement and softening
fills. This is checked depending on the type
of instant effect selected.
• 3D Lighting provides a "light source"
without which any depth information in the
effect wouldn’t be visible. The lighting
settings let you illuminate your 3D
landscape and vary its reflective properties.
Page 78

72 Applying Image Effects
To apply 3D Effects:
• Click
Add Layer Effects on the Layers tab and check 3D Effects
in the Layer Effects dialog. Adjust the "master control" sliders here to
vary the overall properties of any individual 3D effects you select.
• Blur specifies the amount of smoothing applied. Larger blur sizes
give the impression of broader, more gradual changes in height.
• Depth specifies how steep the changes in depth appear.
• The
button is normally down, which links the two sliders so
that sharp changes in Depth are smoothed out by the Blur
parameter. To adjust the sliders independently, click the button
so it's up (not blue).
• Check a 3D effect in the 3D Effects list which reflects the 3D effect you
can achieve. Procedures for each are detailed below.
3D Reflection Map
The 3D Reflection Map effect is used to simulate mirrored surfaces by selection
of a pattern (i.e., a bitmap which possesses a shiny surface) which "wraps
around" a selected object. Patterns which simulate various realistic indoor and
outdoor environments can be adopted, with optional use of 3D lighting to
further reflect off object edges. The effect is often used in combination with the
Transparency option.
Page 79

Applying Image Effects 73
Transparency
The uniform transparency of a layer and its objects (with 3D layer effects
applied) can be controlled via the Layers tab with the Opacity option (see rear
heart shape in example below). However, for more sophisticated transparency
control, transparency settings can instead be set within the Layer Effects dialog.
The effect can be used to create more realistic transparency by independently
controlling transparency on reflective (edges) and non-reflective (flat) areas of
the object (see front heart shape below).
Use this effect in conjunction with reflection maps and multiple
directional light sources for ultra-realistic glass effects.
3D Lighting + Layer
Opacity 50%
3D Lighting +
Transparency effect
Warp tool effects
The Warp Tools from the Tools toolbar's Warp Tools flyout work as a
group and act as brush-on effects rather than dialog-based filters. Most of the
tools shift pixels as the brush passes over, while the Unwarp brush undoes the
effects of the other tools. The actual amount of pixel displacement depends on
the direction or amount of brush movement, the brush tip, and the tool's
settings, selectable from the brush context toolbar.
Page 80

74 Applying Image Effects
Merging bracketed photos
High Dynamic Range (HDR) merge, or tone mapping, is used to combine
bracketed photos or scanned images from film, each shot taken at different
exposure levels (typically one each for highlights, midtones, and shadows) and
within seconds apart. Your camera can't capture all exposure levels in a single
shot, so by bringing together multiple photos you can expand your image's
dynamic range which would otherwise be impossible in a single shot.
Typically, scenes of high contrast such as landscapes, sunsets or indoor
environments (with strong lighting) are suited to HDR Merge.
(A)Exposure for Highlights, (B) Midtones,
(C) Shadows, (D) and the Merged output.
Page 81

Applying Image Effects 75
For good results, it's important to bear the following points in mind:
• Many modern cameras offer auto-bracketing which automatically
takes several shots at different exposure levels. A two-EV spacing is
considered to be optimum for most occasions. Alternatively, shoot
with manual exposure set.
• Always shoot the same scene! Your output is based on a composite of
the same scene.
• Take as many shots as is needed to cover your required dynamic
range.
• Use a tripod for optimum camera stability. Also avoid photographing
objects affected by windy conditions (e.g., moving tree branches).
• Ensure Aperture priority is set on your camera (see your camera's
operating manual for more details).
The HDR merge is a two-stage process, firstly to select the source files (JPG or
raw) for merging, and then performing the merge itself after having adjusted
merge settings to optimize the output. The process can be carried out directly on
source files without loading them into your project in advance.
PhotoPlus lets you optionally save the merged HDR image to one of several
formats (namely OpenEXR, HDR and HD Photo), which can be opened at a
later date, saving you from having to align and merge your original images
again.
Page 82

76 Applying Image Effects
To select and merge bracketed photos:
1. From the Startup Wizard, click HDR Photo Merge.
OR
Select HDR Merge from the File menu.
2. From the HDR Source Files dialog, click Add.
3. Browse to, then select multiple files from the chosen folder—use Ctrl-
click or Shift-click for selecting non-adjacent or adjacent images. Click
Open. The files listed show image name and an exposure value
equivalent to your camera's exposure setting (the values are not just
for show—they're crucial for successful HDR merging).
Click the Add button to add more photos or the Remove button to
exclude a selected photo.
For scanned images (from camera film) which won't possess EXIFderived Exposure values, you can click the Edit Exposure button to
add your own exposure values to entries if you've kept a record (or you
could just add +2.0, 0, and -2 then experiment with the results).
4. (Optional) Uncheck Align images if you're sure your source images are
perfectly aligned (perhaps by a third-party application). Otherwise,
PhotoPlus will automatically attempt to align each photo's corresponding
pixel data.
Page 83

Applying Image Effects 77
5. (Optional) Check Infer film response curve to affect a tone curve needed
to accurately process scanned images (from camera film). Otherwise, keep
unchecked for digital camera use.
6. Click OK. The Merge HDR dialog is displayed, showing a preview of your
intermediate HDR image.
Don't worry if your initial results look less than desirable. You're only
half way towards your stunning image but you'll need to modify the
HDR image using a series of adjustments next.
To adjust your intermediate image:
1. From the HDR Merge dialog, an image preview is displayed, along with a
merge file list and merge settings. Optionally, uncheck an image from the
upper-right list to exclude it from the merge.
2. Drag the Compression slider to a new value—use your eye to judge the
best merge results, but also the supporting Histogram to ensure that the
tonal range fits into the visible graph without clipping. The option
compresses or expands the dynamic range by dragging right or left,
respectively.
3. Set a Brightness level to make the image either lighter or darker.
4. Adjust the Black Point slider right to shift the histogram's left-most edge
making all affected pixels in the shadow region turn black.
5. Reduce Local Contrast Radius to alleviate image "flatness" when
compressing the dynamic range (see Compression above).
6. Set the Temperature to give a warmer "reddish" or cooler "blueish" look;
drag to the right or left, respectively.
7. Adjust the Saturation value to reduce or boost the color in your image.
8. Check Output 16-bits per channel if you're looking for the highest level
of detail in your merged output.
9. Click OK.
Page 84

78 Applying Image Effects
10. From the next dialog, you'll be asked if you want to save the intermediate
HDR Image or just continue as an untitled project.
• Click Yes to preserve the HDR image. This saves having to select,
align, and merge images again, but you'll still need to reapply any
adjustments previously made. Select a file location, file format,
name for your file, then click Save. The file format, OpenEXR
(.exr), Radiance (.hdr), or HD Photo (.hdp), can be chosen from
the drop-down list.
OR
• Click No if you don't need to preserve the HDR image (you'll
have to select, align, and merge again). Your merge results will be
the basis for an Untitled project.
If you've created an intermediate HDR image, it can be opened as
for any other file (see p. 12).
Page 85

6
Manipulating Images
Page 86

80 Manipulating Images
Page 87

Manipulating Images 81
want to perform an operation on just a portion
Making a selection
In any photo editing program, the selection
tools and techniques are as significant as any
of the basic brush tools or commands. The
basic principle is simple: quite often you'll
of the image. To do this you must define an
active selection area.
The wide range of selection options in PhotoPlus lets you:
• Define just about any selection shape, using various drawing and
painting techniques.
• Modify the extent or properties of the selection (see p. 89)
• Carry out various manipulations on the selected pixels, including cut,
copy, paste, rotate, adjust colors, apply special effects, etc. (see p. 94)
Selection basics
Although the techniques for using the various selection methods differ, the end
result is always the same: a portion of the active layer has been "roped off" from
the rest of the image. The boundary is visible as a broken line or marquee
around the selected region (see above).
Whenever there's a selection, certain tools and commands operate only on the
pixels inside the selection—as opposed to a condition where nothing is selected,
in which case those functions generally affect the entire active layer.
You may occasionally (especially if the marquee is hidden) find
yourself using a tool or command that seems to have no effect... it's
probably because there's still a selection somewhere, and you're
trying to work outside the selection. In this case, just cancel the
selection.
Page 88

82 Manipulating Images
Available
Tools
To cancel the selection (select nothing):
• From the Select menu, click Deselect.
The opposite of selecting nothing is selecting everything...
To select the entire active layer:
• Choose Select All from the Select menu.
For partial selection of opaque pixels, you can Ctrl-click the layer thumbnail (in
Layers tab).
If your image has multiple layers, and you switch to another layer,
the selection doesn't stay on the previous layer—it follows you to
the new active layer. This makes sense when you realize that the
selection doesn't actually include image content—like an outline
map, it just describes a region with boundaries.
Selection tool options
PhotoPlus offers a very wide range of other selection methods, and a variety of
commands for modifying the extent or properties of the selected pixels—all
available from the Tools toolbar. Note that the selection tools work on
Background and standard layers, but not on text layers or shape layers.
from:
Selection
Tools flyout
Rectangle Selection Tool—drag out a rectangular
selection area of your chosen size (use the Ctrl key to
constrain to a Square area).
Ellipse Selection Tool—drag out an ellipse selection
area (use Ctrl key to constrain to a circle).
QuickShape Selection Tools flyout—provides
different variable shapes, including pie, star, arrow, heart,
spiral, wave, and so on. The shapes can be further
"morphed" into other custom QuickShapes by dragging
node handles around the QuickShape.
Page 89

Manipulating Images 83
Lasso
Tools flyout
directly from
toolbar
from the Select
menu
Freehand Selection Tool—lets you draw a freehand
(irregular) line which is closed automatically to create an
irregularly shaped selection area.
Polygon Selection Tool—lets you draw a series of
straight-line segments (double-click to close the polygon).
Magnetic Selection Tool—lets you trace around an
object edge creating a selection line that snaps to the edge
as you drag.
Magic Wand Tool—lets you select a region based
on the color similarity of adjacent pixels—simply click a
starting pixel then set a Tolerance from the context
toolbar. It works much like the fill tool, but the result is a
selected region rather than a region flooded with a color.
Smart Selection Brush—lets you create your
selection as a series of brush strokes.
Paint to Select mode—lets you use standard painting or
editing tools as selection tools.
Text
Tools flyout
Text Selection Tool—lets you create a selection in
the form of text. Click with the tool to display the Text
cursor. Type your text, format as needed, and click OK.
(See Creating and editing text on p. 150.)
Page 90

84 Manipulating Images
For any selection tool, the context toolbar includes combination buttons (New*,
Add, Subtract, and Intersect*) that determine the effect of each new selection
operation. For example, starting with a square selection (created with the New
button), here's what a second partly overlaid square (shown with a solid line)
might produce with each setting:
New*
=
Add
=
Subtract
=
Intersect*
=
*Not available for Smart Selection Brush
For Rectangle and Ellipse Selection tools, the context toolbar additionally lets
you set a Fixed Size or Fixed Aspect, or number of Rows or Columns (Rectangle
Selection Tool only) in advance of creating your selection—great if you have a
clear idea of the selection area required!
Page 91

Manipulating Images 85
Selecting layer opacity/transparency
New layers are transparent (they have an alpha channel) , but once you've placed
pixels on the layer you'll be able to select between the layer's pixels (i.e., their
opacity) and remaining transparency.
To create a selection from a layer's opacity/transparency:
• For selection of Opacity:
In the Layers tab, Ctrl-click on the layer’s image thumbnail.
• For selection of Transparency:
As above, but additionally select Invert from the Select menu.
Color Range
As an intelligent color selection method, i.e. where selection is based on
"tagging" a specific range of colors or tones in the image, choose Color Range
from the Select menu.
Page 92

86 Manipulating Images
To select a color range:
1. Choose Color Range from the Select menu. The Color Range dialog
opens with a selection preview window.
2. To make an initial selection:
• To tag a particular color or tone group, such as "Reds" or
"Midtones," choose the group’s name from the Select drop-down
list.
OR
Click
image in your workspace. With this method, the Tolerance slider
lets you include a wider or narrower range of colors in the
selection, based on the chosen color.
Once you’ve made an initial selection, you can use the Add Color
and Subtract Color buttons to include/exclude further colors in the selection by
single-click or by dragging across the image to tag/untag a color range.
Alternatively, for initial selection, drag across the image to select ranges.
Color Picker to sample a chosen pixel color from the
With Add/Subtract Color tools initially selected, you can also drag
across a section of the image.
Meanwhile, the dialog provides visual feedback.
1. If Show Selection is checked, the grayscale preview selection window
shows tagged values as brighter, with untagged pixels darker. To customize
what’s displayed in the workspace, choose an option from the Preview list:
"None" shows the original image, "White Matte" shows tagged pixels
through a white background, and so on.
2. Click OK to confirm the selection, or Cancel to abandon changes.
Restore default settings reverts back to original dialog
settings.
Page 93

Manipulating Images 87
Storing selections
You can store selections (i.e., just the marqueed region and per-pixel
selectedness data) as part of either the current image or any open image file, and
load a stored selection at any time. It's often useful to be able to "grab" the same
region of an image at different phases of working on it. And, for repetitive tasks
(preparing web buttons, for example) on different but graphically similar files,
by storing a selection you can reuse it rather than having to recreate it for each
file.
Selections are created and stored exclusively as alpha channels in the Channels
tab; Once stored, they can be retrieved from the tab at any time.
As each alpha channel behaves like a mask (p. 27) you can paint on the alpha
channel at different grayscale levels for different levels of "selectedness". The
White or light portions of the mask reveal layer pixels (make them more
opaque). Black or dark portions hide layer pixels (making them more
transparent).
Page 94

88 Manipulating Images
To store a selection:
1. Make a selection on your image.
2. In the Channels tab, select
channel appears with a default name (rename via double-click if needed).
Create Channel From Selection. The
Use New Channel on the Channels tab to create an empty
channel on which you can design (e.g., paint) in grayscale for
different levels of "selectedness".
To load a selection:
• In the Channels tab, select Create Selection From Channel.
To delete a stored selection:
• In the Channels tab, select
Delete Channel.
Page 95

Manipulating Images 89
Modifying a selection
Once you've used a selection tool to select a region on the active layer, you can
carry out a number of additional steps to fine-tune the selection before you
actually apply an effect or manipulation to the selected pixels.
Transforming the selection
The Selection Deform Tool on the
Tools toolbar's Deform Tools flyout lets you
transform, scale or rotate any already drawn
selection area. With the tool enabled, square
nodes on the mid-points and corners of any
selected area can be dragged (opposite).
Look for the cursor changing between resize
and rotate modes when hovering over a node.
Use in conjunction with the Ctrl key to transform the selection area without
constraint, creating a skewed transform (drag nodes as appropriate). The Alt
key resizes the area about its center, while the Shift key maintains the area’s
aspect ratio. It’s also possible to move the small center of rotation "handle" in the
center of the transform to produce an arc rotational movement rather than
rotating around the area’s center (by default).
Holding down the Shift key whilst rotating will cause a movement
in 15 degree intervals.
Page 96

90 Manipulating Images
Making the selection larger or smaller
If the selection you've made isn't quite the right shape, or doesn't quite include
all the necessary pixels (or perhaps includes a few too many), you can continue
to use the selection tools to add to, or subtract from, the selected region.
To add or subtract to/from the existing selection with a selection tool:
• Select the tool and drag while holding down the Shift or Alt key,
respectively. The newly selected pixels don't have to adjoin the current
selection—it's possible to select two or more separate regions on the
active layer.
Modifying the selection
Once you've made a selection, several modify selection operations can be used in
combination to alter the selection area. Feather, smooth, contract, and expand
operations are possible from a single Modify Selection dialog, along with the
popular Grow, Similar, and Invert available separately. Combining the
operations in a dialog improves efficiency, and lets you preview your modified
selection directly on the image as you make changes. Several preview methods
are possible.
Page 97

Manipulating Images 91
To modify a current selection:
1. From any Selection context toolbar, select Modify Selection.
2. From the Modify Selection dialog, you can enter a specific pixel value for
the type of operation you require.
• Feather: Use to apply feathering to the edge of an existing
selection (but before applying any editing changes). Enter the
width (in pixels) of the transition area. A higher value produces a
wider, more gradual fade-out. See Soft-edged and hard-edged
selections on p. 93.
• Smooth: If the selected region has ragged edges or discontinuous
regions (for example, if you've just used the Magic Wand Tool),
use the option to control the extent of smoothing.
• Contract/Expand: Move the slider left to contract (shrink) the
borders of the selection, or right to extend its borders.
3. Select a preview method from the Preview drop-down list—choose to
preview as an Overlay, in Grayscale, or use different Mattes.
Page 98

92 Manipulating Images
The Modify item on the Select menu (or right-click on selection) provides a
submenu with the above options, along with other intelligent selection options:
• Grow and Similar both expand the selection by seeking out pixels
close (in color terms) to those in the current selection. Grow only adds
pixels adjacent to the current selection, while Similar extends the
selection to any similar pixels in the active layer.
Both options use the tolerance setting entered for the Magic Wand
Tool on the context toolbar. As the tolerance increases, a larger region
is selected. Typically when using these tools, you'll start by selecting a
very small region (the particular color you want to "find" in the rest of
the image).
• Choose Border to create a new selection as a "frame" of a specified
pixel width around the current selection.
• The Invert option selects the portion of the active layer outside the
current selection. Unselected pixels become selected, and vice versa.
Page 99

Manipulating Images 93
Soft-edged and hard-edged selections
Anti-aliasing and feathering are different ways of controlling what happens at
the edges of a selection. Both produce softer edges that result in smoother
blending of elements that are being combined in the image. You can control
either option for the Standard and QuickShape Selection tools, using the Feather
input box (or slider) and Anti-alias check box on the context toolbar.
• Anti-aliasing produces visibly smooth edges by making the selection's
edge pixels semi-transparent. (As a layer option, it's not available on
the Background layer, which doesn't support transparency.)
• If an anti-aliased selection (for example, one pasted from another
image) includes partially opaque white or black edge pixels, you can
use Matting options on the Layers menu to remove these pixels from
the edge region, yielding a smoother blend between the selection and
the image content below. (Fully opaque edge pixels are not affected.)
• Feathering reduces the sharpness of a selection's edges, not by varying
transparency, but by partially selecting edge pixels. If you lay down
paint on a feathered selection, the paint will actually be less intense
around the edges.
• Threshold converts a feathered, soft-edged selection into a hard-edged
selection (use Select>Modify>Threshold). As with feathering, you
won't see an immediate effect on the image, but painting and other
editing operations will work differently inside the selection.
Page 100

94 Manipulating Images
Manipulating a selection
Moving the selection marquee
Sometimes, you need to adjust the
position of the marquee without affecting the
underlying pixels. Any time you're using one
of the selection tools, the cursor over a
selected region changes to the Move Marquee
cursor, which lets you drag the marquee
outline to reposition it.
You’re only moving the selection
outline—not the image content
inside it.
You can also use the keyboard
arrows to "nudge" the selection
marquee.
Once you have selected your chosen pixels, the operations which can be
performed include moving, cutting, copying, duplicating, pasting and deleting.
You use the Move Tool to drag the selection plus its image content. (See
Modifying a selection on p. 89).
 Loading...