

Page 1
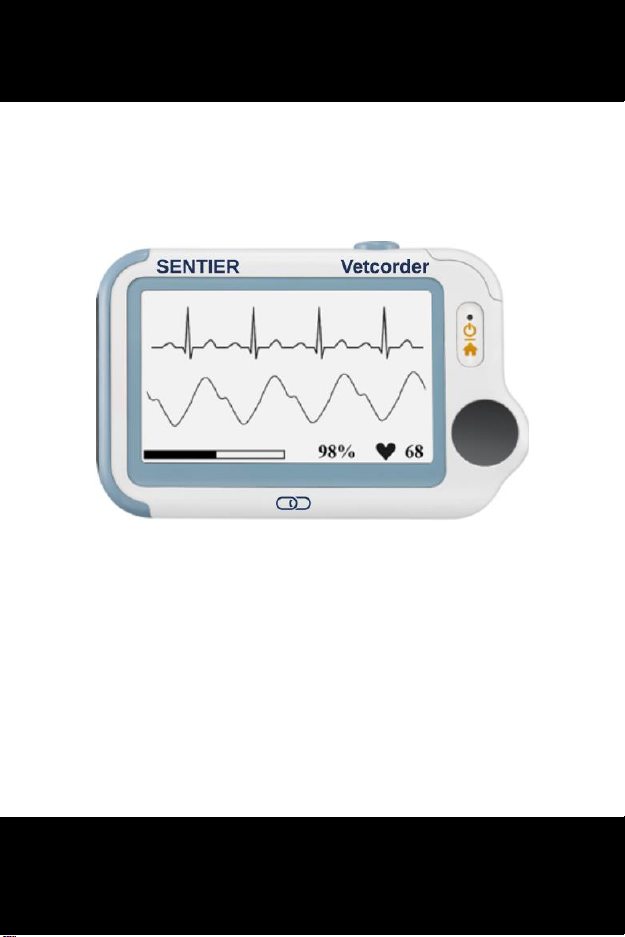
Vetcorder
Version 1
1. The Basics ................................................................................................ 1
2. Intended Use ........................................................................................... 2
3. Getting Started ........................................................................................ 7
4. Using Vetcorder ....................................................................................... 8
5. Settings .................................................................................................. 18
6. Review ................................................................................................... 21
7. Maintenance ......................................................................................... 23
8. Accessories ............................................................................................ 27
9. Specifications ........................................................................................ 28
10. Electromagnetic Compatibility .............................................................. 30
Vital Contact for Every Companion
Owner’s Manual
Page 2

1
1. The Basics
This manual contains the instructions necessary to operate the product
safely and in accordance with its function and intended use. Observance
of this manual is a prerequisite for proper product performance and
correct operation and ensures User and operator safety.
1.1 Safety
Warnings and Cautionary Advices
Before using the device, please ensure that you have read this
manual thoroughly and fully understand corresponding
precautions and risks.
The data and results displayed on the device are for reference only
and cannot be directly used for diagnostic interpretation or
treatment.
Do not use this device with a defibrillator.
Do not use this device during MRI examination.
Do not use the device in a combustible environment (i.e.,
oxygen-enriched environment).
Never submerge the device in water or other liquids. Do not clean
the device with acetone or other volatile solutions.
Do not drop this device or subject it to strong impact.
Do not place this device in pressure vessels or gas sterilization
device.
Do not dismantle the device, as this could cause damage or
malfunctions or impede the operation of the device.
Do not allow the electrodes of the device to come into contact
with other conductive parts (including the ground).
Do not store the device in the following locations: locations in
which the device is exposed to direct sunlight, high temperatures
or levels of moisture, or heavy contamination; locations near to
sources of water or fire; or locations that are subject to strong
electromagnetic influences.
Do not swing the device with the strip, as this could result in injury.
Page 3
2
2. Introduction
2.1 Intended Use
The Vetcorder health monitor is intended to be used for the measuring,
displaying, reviewing and storing of multiple physiological parameters
including ECG, pulse oxygen saturation (SpO2), pulse rate and
temperature. It is not for use on humans.
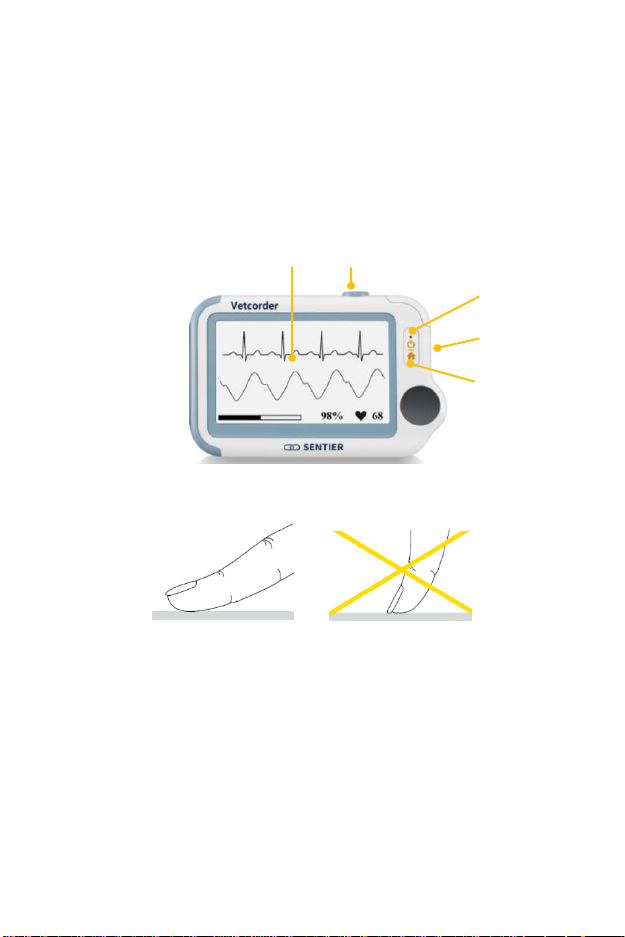
2.2 About Vetcorder
1. Touch Screen
Use the pad of your finger to tap or slip on the touch screen. Do not
use your fingernail or any other object to tap the screen.
2. Infrared temperature sensor
3. LED indicator
Off: the monitor is turned off or working in Standby Mode;
Green: the monitor is turned on, and working normally; or
when the battery is fully charged;
Blue: the battery is being charged;
Red and flash: the battery is low;
4. Multi-functional connector
It connects with external SpO2 cable, ECG cable, or charging cable.
5. Home, Power On/Off
When the monitor is off, press this button to power it on.
4 5 2 1 3
Page 4
3
When the monitor is on, press and hold it for 2 seconds to turn
it off.
During operation, press this button will switch to Main Screen,
or Calendar Screen, or return to upper menu.
6. Speaker
2.3 Main Screen
The Main Screen is shown as below. Slipping your finger from right to
left can switch to the second page, and vice versa.
Press a button in the Main Screen will start a measurement, activate a
function, or open corresponding menu.
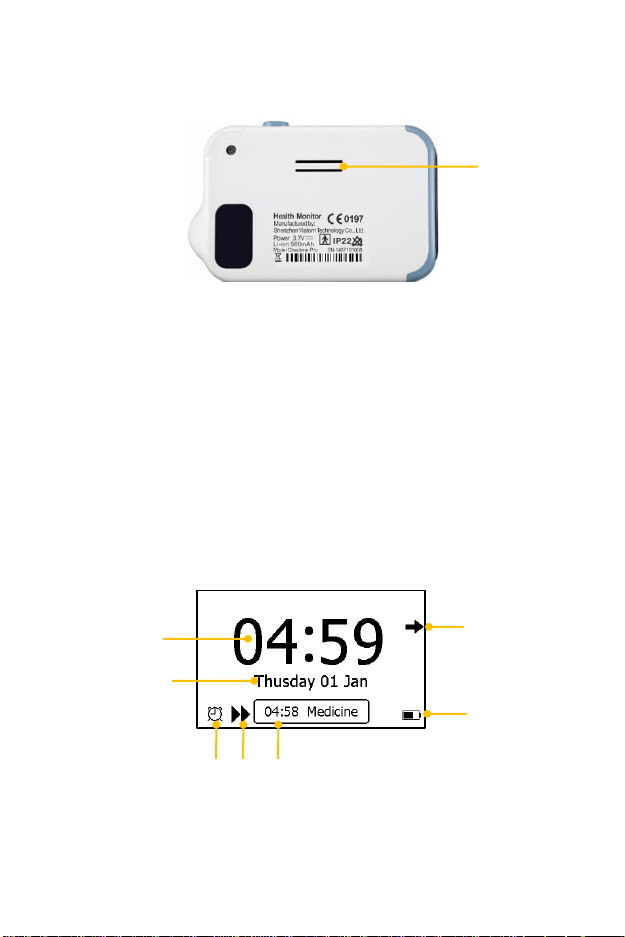
2.4 Calendar Screen / Standby Mode
The device will enter Calendar Screen / Standby Mode when:
No operation is detected for 120 seconds in other screen interface,
the device will automatically switch to the Calendar Screen.
Pressing the Home button in the Main Screen.
1. Current time
2. Current date
When a reminder event happens, this area displays the event name,
6
1
2
3
4
6 7 5
Page 5

4
e.g. “Daily Check”.
You can change the current time and date when the device is powered
on at the first time. Or you can also go to the Setting menu to change it.
Please refer to Section 5.3 for details.
3. This arrow indicates Users to press the Home button to exit the
Calendar Screen / Standby Mode.
4. Battery indicator
Please refer to Section 7.2 for details.
5. If you failed to respond to the previous reminder event, then that
event will be shown in this area.
6. This icon appears when <Quick ECG> is enabled. Please refer to
Section 5.7 for details.
7. This icon appears if you have set reminder event.
When the device enters Calendar Screen, it also begins to work in
Standby Mode, which is an ultra-low power consumption mode. In
Standby Mode, the touch screen operation is invalid.
Page 6
5
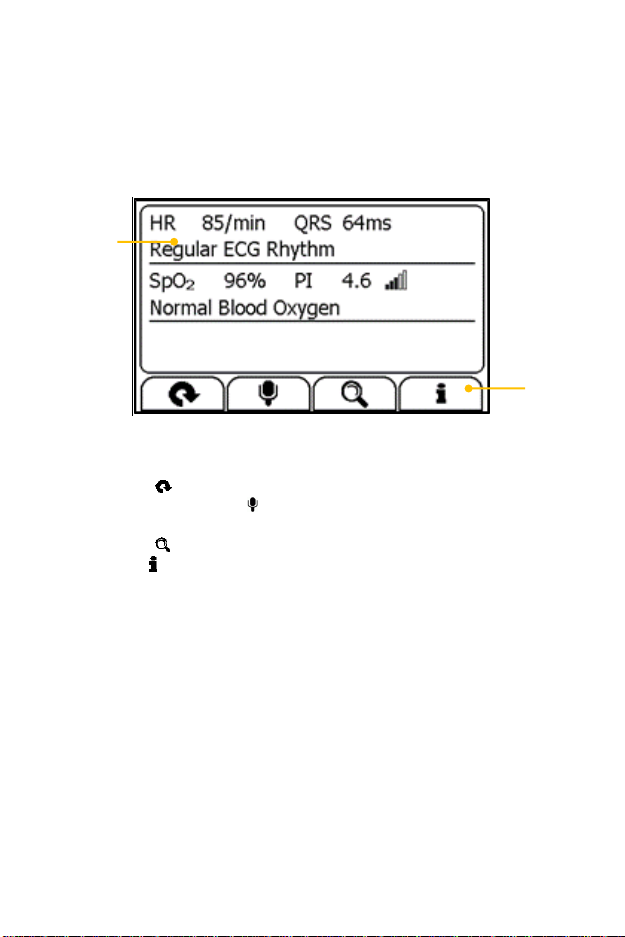
2.5 Result Screen
This device provides powerful measurement functionalities, including
Express Record, Health Check, ECG Record, Oximeter, BP Tracker,
Thermometer, Sleep Monitor and Pedometer. For each measurement, a
Result report will be provided after the measurement is finished. An
example is shown as below.
1. Measured parameters and readings
2. Buttons
Select button to start a measurement again.
Press and hold the button to add voice memo. Voice memo is
only available for Daily Check and ECG Recorder measurements.
Select button to review previous results.
Press button to open the help information.
In the Result Screen, if there is no operation for 2 minutes, the device
will automatically return to Standby Screen.
1
2
Page 7
6
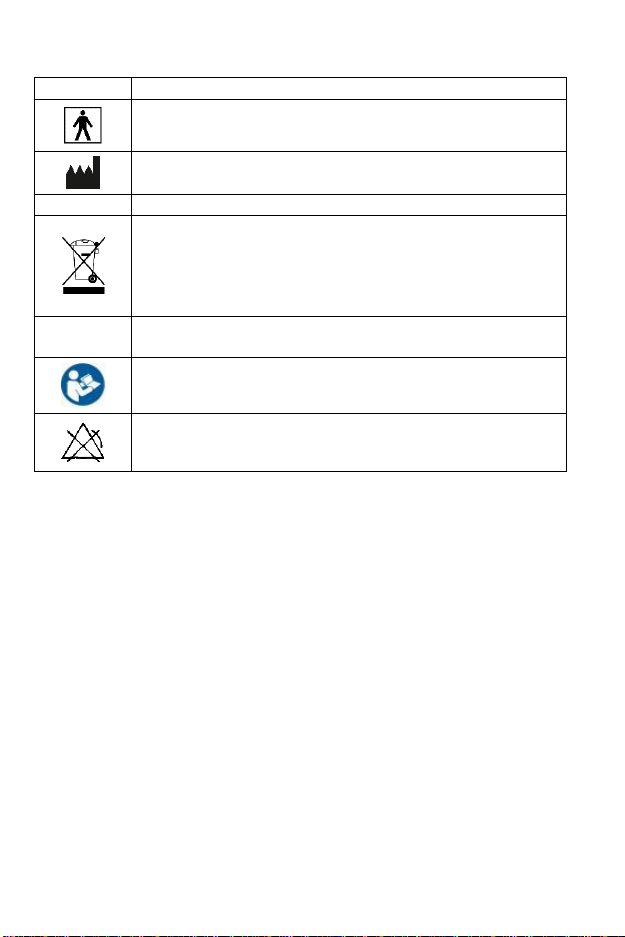
2.6 Symbols
Symbol
Meaning
Application part type BF
Manufacturer
CE0197
In conformity with Directive 93/42/EEC
Symbol for “ENVIRONMENT PROTECTION – Waste
electrical products should not be disposed of with
household waste. Please recycle where facilities exist.
Check with your local authority or retailer for recycling
advice”.
IP22
Against ingress of solid foreign objects ≥12.5mm
diameter, Against dripping(15° tilted)
Follow operating instructions
No alarm system.
Page 8

7
3. Getting Started
3.1 Unpacking
Before unpacking, examine the packing case carefully for signs of
damage. If any damage is detected, contact your distributor or Sentier. If
the packing case is intact, open the package and remove the equipment
and accessories carefully. Check all materials against the packing list and
check for any mechanical damage. Contact us in case of any problem.
Warnings and Cautionary Advices
Save the packing case and packaging material as they can be used
if the device must be reshipped.
Keep the warranty card, which is useful within the period of
warranty.
When disposing of the packaging material, be sure to observe
waste control regulations and keep it out of the reach of children
and animals.
The equipment might be contaminated during storage and
transport. Before use, please verify whether the packages are
intact, especially the packages of single use accessories. In case of
any damage, do not apply it to Pets.
3.2 Power On/Off
Press the Power On/Off button to power on the device. Press and hold
Power On/Off button for 2 seconds to power off the device.
3.3 Initial Settings
The first time when the Vetcorder is powered on, you can set up your
Vetcorder monitor step by step. You can also change the settings in the
<Settings> menu. Please refer to Section 5 for details.
Page 9

8
4. Using Vetcorder
4.1 Prior to Use
Warnings and Cautionary Advices
Use only cables, electrodes, sensors and other accessories
specified in this manual.
The device has no alarms and will not sound if the measurement
reading is too low or too high.
Before using ECG
Proper electrode placement is required to get accurate ECG readings.
Places where leads attach to the body must be prepared correctly to
ensure the best possible contact. Dogs and cats usually have enough
electrolyte material on their skin and hair so that merely moistening lead
sites with 70% isopropyl alcohol is appropriate. This will usually be
sufficient for ECG recording/monitoring for a short time, 30 to 60
minutes, depending upon the relative humidity. For monitoring during
longer periods, an electrode paste should be used. It is best to first wet
the hair at the lead attachment site with alcohol; then place paste on the
moistened hair and skin. It is important that the paste be in direct
contact with skin. For pets with dense undercoat, rub paste with fingers
to assure that it has contacted the skin.
Warnings and Cautionary Advices
When connecting external electrodes, make sure that the
connectors are attached to the Pet, to prevent them from
contacting conductive parts or earth.
If using the ECG for long-term monitoring, periodically inspect the
electrode application site to ensure skin quality. If the skin quality
changes, replace the electrodes or change the application site.
Do not use this device during defibrillation.
Interference from a non-grounded instrument near the Pet and
electro surgery interference can causes problems with the
waveform.
The ST algorithm has been tested for accuracy of the ST segment
data. The significance of the ST segment changes need to be
determined by a clinician.
Page 10

9
Before using Oximeter
Before using Daily Check, Oximeter or Sleep Monitor function, pay
attention to the following points to obtain precise measurements.
The area where the SpO2 sensor is attached must be clean to
ensure proper reading.
Any of the following conditions may cause inaccurate
measurements, including but not limited to:
- Flickering or very bright light;
- Poor blood circulation;
- Low hemoglobin;
- Hypotension, severe vasoconstriction, severe anemia or
hypothermia;
- Injection of intravascular dyes.
The Oximeter may not work if the Pet has poor circulation. Rub the
skin to increase circulation or place the SpO2 sensor in another
location.
The Oximeter measures oxygen saturation of functional
hemoglobin. High levels of dysfunctional hemoglobin (caused by
sickle cell anemia, carbon monoxide, etc.) could affect the accuracy
of the measurements.
Field strengths from fixed transmitters, such as base stations for
radio (cellular/cordless) telephones and land mobile radios,
amateur radio, AM and FM radio broadcast towers, and TV
broadcast towers may affect accuracy.
The pleth waveform displayed on the device is normalized.
Warnings and Cautionary Advices
Limit movement as much as possible when using the Daily Check
or Oximeter, which might result in incorrect reading or analysis.
Do not use the Oximeter on the same paw/leg when using a blood
pressure cuff or monitor.
Do not use the Oximeter outside the specified operating and
storage temperature ranges.
Do not use this device during MRI (magnetic resonance imaging).
Induced current could potentially cause burns. The SpO2 sensor
may affect the MRI image, and the MRI unit may affect the
accuracy of the Oximetry measurements.
Prolonged continuous SpO2 monitoring or sleep monitoring may
increase the risk of undesirable changes in skin characteristics,
Page 11

10
such as irritation, reddening, blistering or burns.
Check the SpO2 sensor application site every 6-8 hours to
determine the positioning of the sensor and the circulation and
skin sensitivity of the Pet. Pet sensitivity varies depending on
medical status or skin condition. For Pets with poor peripheral
blood circulation or sensitive skin, inspect the sensor site more
frequently.
4.2 Daily Check
About Daily Check
Warnings and Cautionary Advices
Before using this function, please read the Section 4.1.
When using Daily Check, please ensure you select the right Pet.
To ensure better tracking of health status, it is strongly suggested
that every Daily Check measurement is made at the same time
period when the body is in the relative same situation. E.g., every
morning or every night.
Daily Check measurement is a function that combines the measuring of
ECG (Electrocardiograph) waveform, HR (heart rate), Pleth waveform,
SpO2 (blood oxygenation) and PI (Pulse Index). It takes a 30 second
recording and provides a summary once completed.
When using the Daily Check function by more than one patient, you can
create individual patient profiles. Before using the Daily Check
measurement or reviewing the data, ensure that the correct patient is
selected. Please refer to Section 5.11 to know how to manage patients
(labeled “Pet management”).
Setting Daily Check Reminder
To better manage your patient’s health status, it is recommended to take
Daily Check measurements at a regular interval. To ensure that you
never forget to take a Daily Check measurement, you can set a Daily
Check reminder. When this Daily Check reminder event is triggered, the
device gives audio alarm prompt, which will last for one minute if you
don’t cancel it manually.
To set the Daily Check reminder event, please refer to Section 4.8.
Page 12
11
Using Daily Check
To start a Daily Check, follow the steps as below.
1. If you have not created a Pet, then please follow the instruction in
Section 5.11 to add your Pet account.
2. Press the Home button to enter the Main Screen.
3. Tap the <Daily Check> icon in the middle of the screen.
4. Choose the Pet profile associated with the animal being checked.
5. Set up the device according to the instruction, keep the device at
the same level as the animal’s heart and keep the animal still.
6. Once the device detects stable waveform, it will automatically start
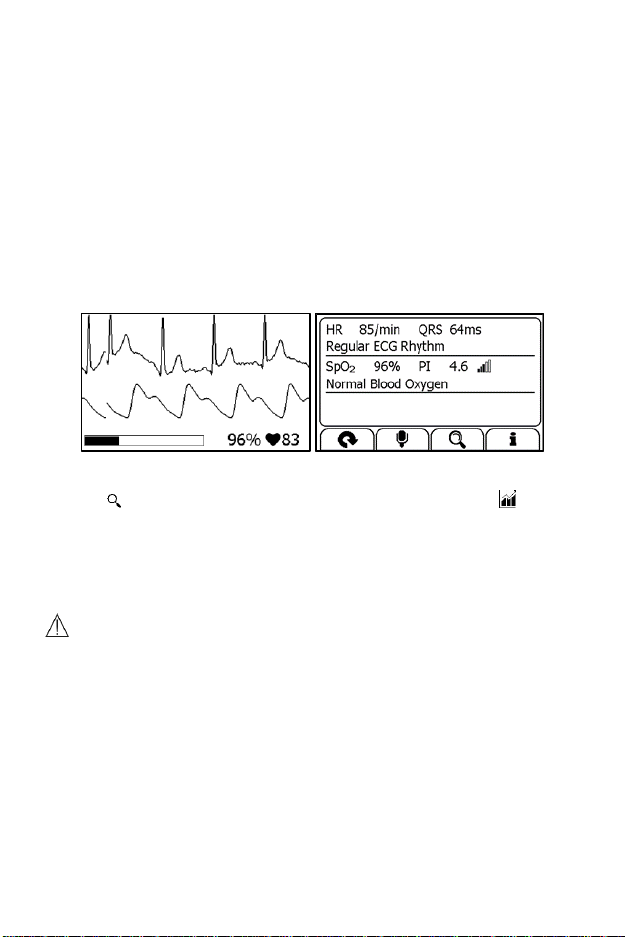
the measurement. The countdown bar moves from left to right.
7. When the bar is fully filled, the device will analyze your data and
then show the measurement result.
Please refer to Section 2.4 to understand the result screen. Daily Check
provides the trending graph of heart rate and SpO2. To view the trend,
tap the button, then select one record, and then tap the button.
For details, please refer to Section 6.1.
4.3 ECG Recorder
About ECG Recorder
Warnings and Cautionary Advices
Before using this function, please read the Section 4.1.
ST segment analysis is performed on selected LEAD.
No matter which method you choose to measure ECG, please keep your
Pet stable and calm during the measurement. Movements may result in
interference and incorrect readings or analysis result.
Measuring
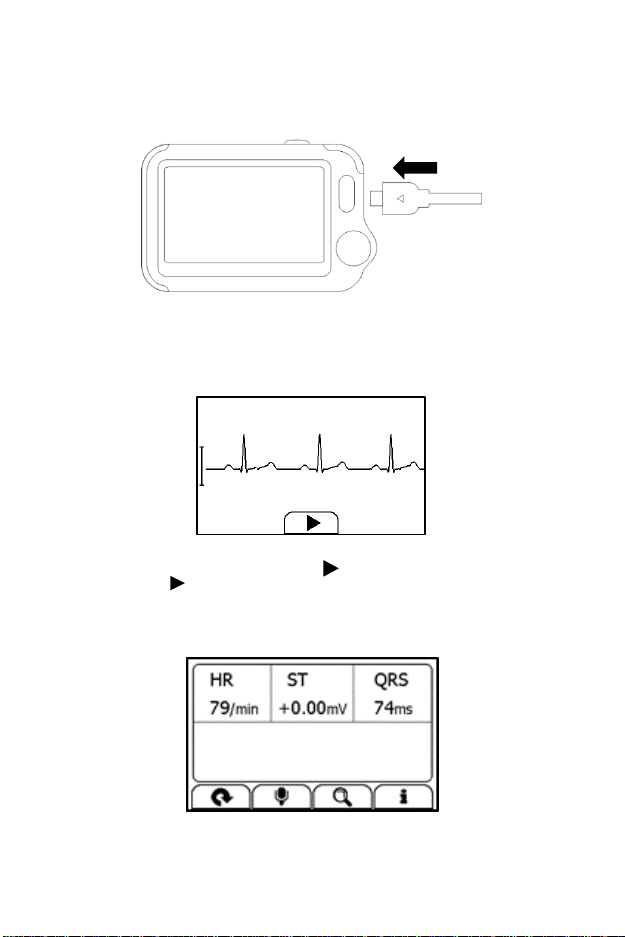
To start an ECG Recorder measurement with cable,
Page 13
12
1. If the device is in Calendar Screen, press the Home button.
2. In the Main Screen, select <ECG Recorder>.
3. Choose method B.
4. Follow the instructions to connect the ECG cable and place the ECG
electrodes.
Keep Pet calm
5. The display will then show your ECG waveform.`
The device will monitor your ECG continuously, however no data
will be saved until you press the button.
6. Press the button to start collecting your ECG data. The
countdown bar moves from left to right.
7. When the bar is filled, the device will analyze your data and then
show the measurement result.
Please refer to Section 2.4 to understand the result screen.
Page 14
13
4.4 Oximeter
About Oximeter
Warnings and Cautionary Advices
Before using this function, please read the Section 4.1.
The Vetcorder Health Monitor measures the amount of oxygen in the
blood, pulse rate and pulse index. The Vetcorder works by shining two
light beams into the small blood vessels or capillaries, reflecting the
amount of oxygen in the blood and displaying the measurement on the
screen. The oxygen saturation (SpO2) is measured and displayed as a
percentage of full capacity. Pulse rate (PR) and pulse index (PI) will also
be measured and displayed.
Measuring
1. Connect the external SpO2 sensor to the multi-functional
connector.
2. Attach the external SpO2 sensor to your Pet.
3. If the device is in Calendar Screen, press the Home button.
4. Tap the <Pulse Oximeter> icon.
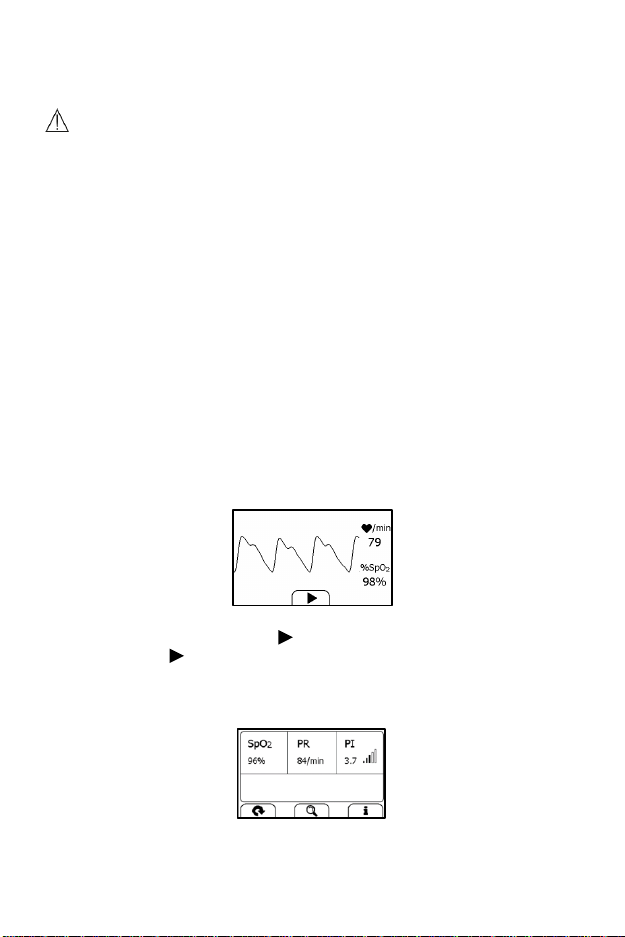
5. The display will then show your PLETH waveform, SpO2 and pulse
rate.
The device will monitor continuously, however no data will be
saved until you press the button.
6. Press the button to start collecting your SpO2 data. The
countdown bar moves from left to right.
7. When the bar is fully filled, the device will analyze your data, and
then show the measurement result.
Please refer to Section 2.4 to understand the result screen.
Page 15

14
4.5 Temperature
About thermometer
Warnings and Cautionary Advices
The thermometer is only designed for the measuring areas on the
body stated in this manual.
Before each use, check that the lens is intact. If it is damaged,
please contact your distributor or Sentier.
The device needs to be in the room where the measurement is
taken for at least 30 minutes before use.
Holding the device in your hand or carrying it in a pocket can cause
the device to warm up, which may result in incorrect readings.
Physical activity, increased perspiration, taking vasoconstrictive
medication and skin irritations can distort the result.
The skin must be free from perspiration and cosmetics.
The temperature varies depending on the part of the body where the
measurement is taken. In a healthy animal, the variance can be between
0.2 °C to 1.0 °C (0.4 °F to 1.8°F) in different parts of the body. This device
uses an infrared thermometer to measure temperature.
Influences on temperature include but not limited to
Individual metabolism
Age
Environmental temperature
Time of day
Activities
Taking Temperature Measurement
To start a temperature measurement,
1. If the device is in Calendar Screen, press the Home button.
2. In the Main Screen, select <Thermometer>.
3. Put the thermometer sensor on your Pet.
4. Press the Home button once; you will hear “Bi-Bi” beep, which
indicates the measurement starts. Then move the thermometer
around the temple for around 3 seconds until you hear a long “Bi”
beep, which indicates the measurement is finished.
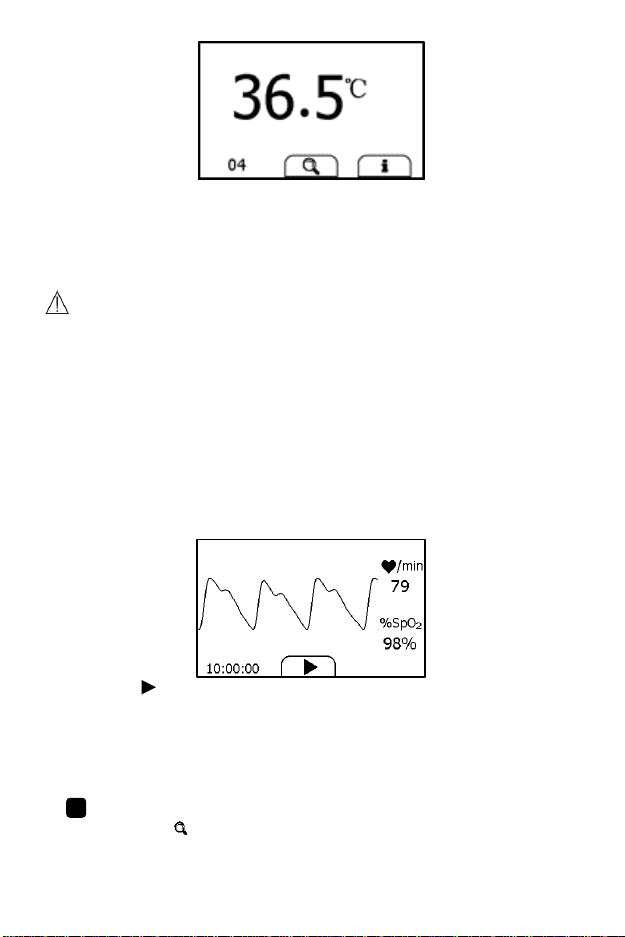
5. The screen should display the measurement result.
Page 16
15
Please refer to Section 2.4 to understand the result screen.
4.6 Sleep Monitor
Vetcorder offers a non-invasive method to monitor sleep status.
Warnings and Cautionary Advices
Before using this function, please read the Section 4.1.
The SpO2 sensor may cause skin sensitivity to the Pet. Changing
another finger if you feel uncomfortable.
Before using as a sleep monitor, please ensure the battery is fully
charged.
To start a sleep monitor measurement:
1. Insert the SpO2 cable into the multi-functional connector.
2. Attach the sensor.
3. Press the Home button to enter the Main Screen. Then Tap the
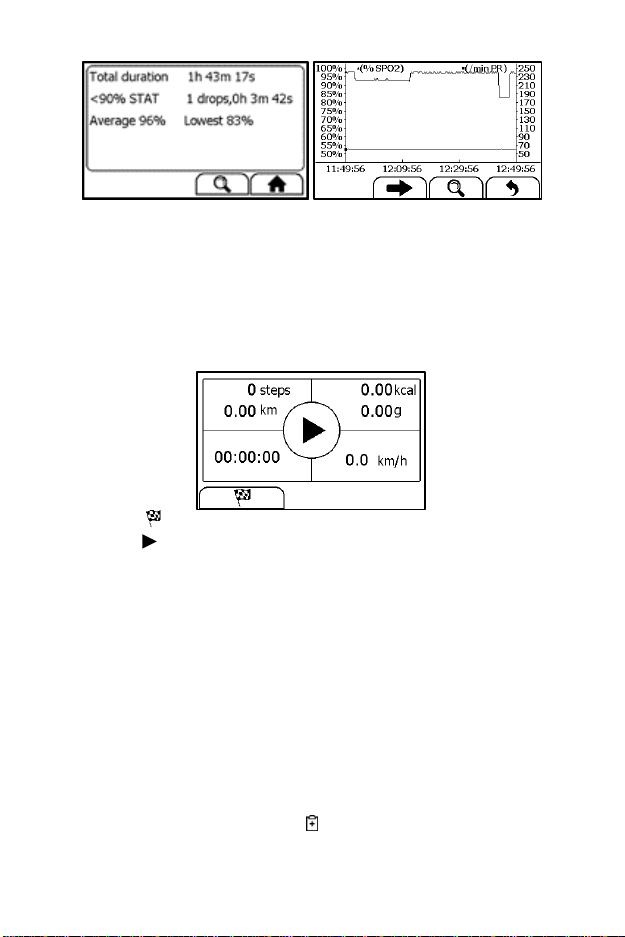
Sleep Monitor icon to enter the screen as below.
4. Tap the button to start the sleep monitoring. During monitoring,
a countdown timer is always displayed at the lower left part.
5. You can press Home button to lock the screen, as shown below. The
device will work in a very low power consumption mode.
6. When the Pet awakens, or when you want to stop monitoring, you
can press the Home button again to unlock the screen, then tap the
icon to stop sleep monitoring.
7. You can tap button to view the SpO2 trending during sleep or tap
Page 17
16
“Close” button and return to the Main Screen.
4.7 Pedometer
To start a Pedometer measurement:
1. If the device is in Calendar Screen, press the Home button.
2. In the Main Screen, select <Pedometer> to enter <Choose Pet>
screen. If you have not created Pet, then please follow the
instruction in Section 5.11 to add your Pet account.
3. Select a Pet to enter the screen as below.
4. Tap the button to set your target, if needed.
5. Tap the button to start calculating steps.
6. Attach the device to the animal.
7. When you finished calculating steps, press the Home button to stop
the pedometer.
8. Press Home button again to exit pedometer function.
4.8 Reminder
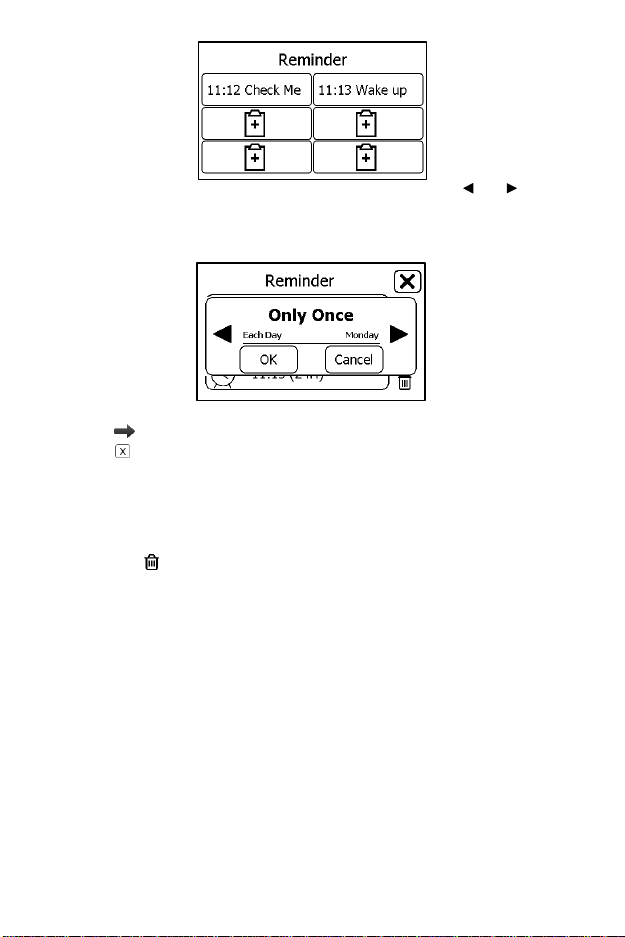
Up to 6 reminder events can be set. You can add, edit and delete
reminder events. To track your health every day, it is suggested to set a
reminder for Daily Check.
To add a reminder:
1. In the Main Screen, tap <Reminder> icon.
2. In the <Reminder> menu, tap icon to add a reminder.
Page 18
17
3. Tap the first row to set the repeat interval. Tap the or button
to change the setting.
4. Tap the second row to set the event. You can define the event by
selecting “Self-define”.
5. Tap the third row, set the time when the reminder is triggered, then
tap .
6. Tap to save this reminder.
To edit or delete a reminder, in the <Reminder> menu, choose the
reminder which you want to edit or delete.
Change the repeat interval, event, and/or time, then save the
change by following the same procedure as adding a reminder.
Tap the button, and then “Yes” to delete a reminder.
Page 19
18
5. Settings
5.1 Opening Settings Menu
To open the Settings menu,
1. Press the Home button to enter the Main Screen.
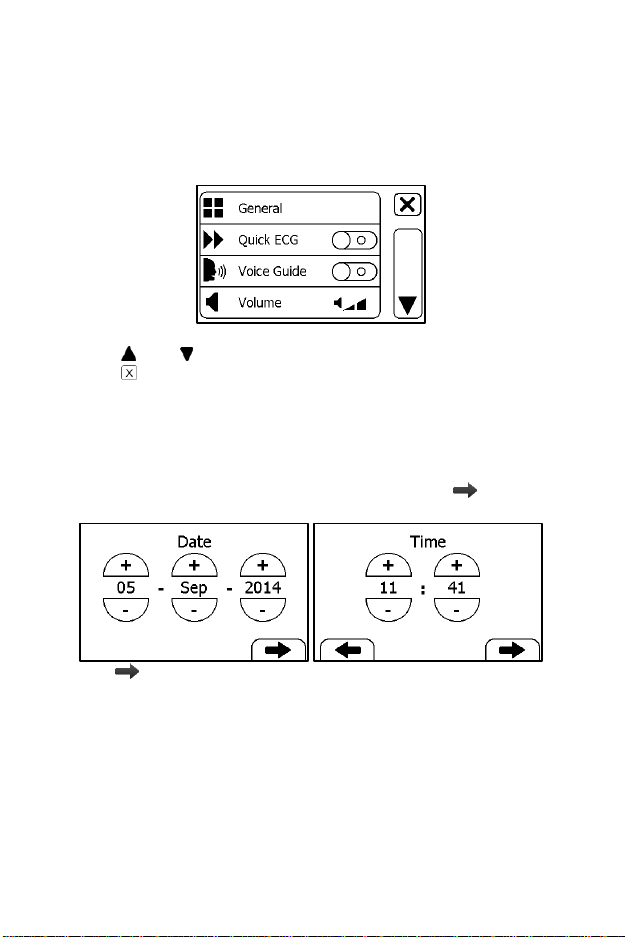
2. Tap the <Settings> icon to open the menu as below.
In the Settings menu, you can
Tap and button to page up or down
Tap to close the Settings menu
5.2 Setting Date & Time
1. In the Settings menu, choose <General>.
2. Choose <Date & Time>.
3. Tap “+” or “-” button to change the date, then tap .
4. Tap “+” or “-” button to change the time.
5. Tap to finish the setting.
5.3 Changing ECG waveform length
To change the length of ECG waveform saved for each ECG Recorder
measurement:
1. In the Settings menu, choose <General>.
2. Tap <ECG Length>, then choose among <30s>, <60s> and <90s>.
3. Tap <OK> to enable the change.
Page 20
19
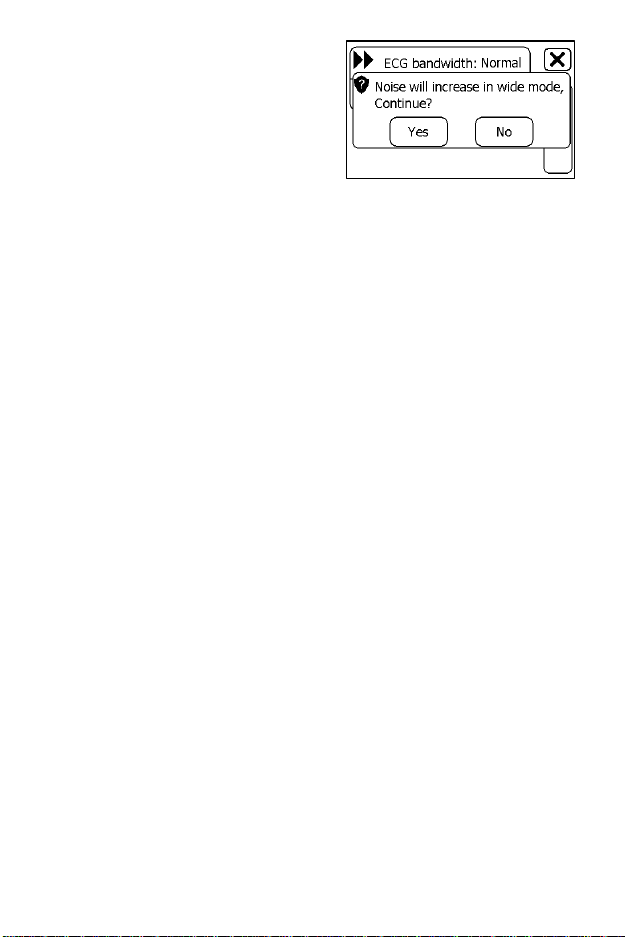
5.4 Setting ECG Bandwidth
1. In the Setting menu, choose
<General>.
2. Tap the <ECG bandwidth> to
change between <Normal> and
<Wide>.
5.5 Erasing Data
1. In the Setting menu, choose <General>.
2. Tap <Erase All Data>, and then <Yes>.
All measurements saved in the device will be deleted.
5.6 Factory Reset
1. In the Setting menu, choose <General>.
2. Choose <Factory Reset> and then tap <Yes>.
All measurements, Pet information and other settings saved in the
device will be deleted, and the device will be restored to the factory
default settings.
5.7 Enabling/Disabling Quick ECG
1. In the Settings menu, choose <General>.
2. Tap <Quick ECG> to enable or disable this function.
5.8 Enabling/Disabling Voice Guide
1. In the Settings menu, choose <General>.
2. Tap <Voice Guide> to enable or disable this function.
5.9 Changing Sound Volume
In the Settings menu, tap the <Volume> area to change volume directly.
“X” means the volume is turned off.
5.10 Changing Temperature Unit
In the Settings menu, tap the <Thermometer> area to change between
Celsius degree (°C) and Fahrenheit degree (°F).
Page 21

20
5.11 Pet Management
To use the Daily Check measurement on a Pet, you must first create an
account for that Pet. If the Daily Check measurement is used for more
than one Pet, then each must have their own account.
To create a Pet account:
1. In the Settings menu, choose <Pet Management>.
2. Tap a “+” button to open the menu below.
3. Tap each button to edit corresponding information.
4. Tap to return the < Pet Management > menu.
To edit the information of a Pet:
1. In the Settings menu, choose <Pet Management>.
2. Choose the Pet that you want to edit.
3. Tap the information that you want to edit, and then modify.
4. Tap <OK> and to return the < Pet Management > menu.
To delete a Pet:
1. In the Settings menu, choose <Pet Management>.
2. Choose the Pet that you want to delete.
3. Tap the button.
4. Choose <Yes> to confirm.
The <Guest> Pet cannot be edited or deleted.
5.12 Identify Software Version
Choose <About> in the <Settings> menu to identify the software version
of your device. Telling the version information when reporting a problem
may help to identify and solve your problem.
5.13 Exporting Recordings
Vetcorder has built-in Bluetooth wireless connectivity, which enables
exporting measured records to mobile phones and pads running iOS or
Android platform. After downloading the Vetcorder Connect app, follow
these instructions to pair and send recordings to your mobile phone:
1. Tap the <Connect> icon, then the device will enter Bluetooth mode,
and the screen will show the Bluetooth icon in the middle of screen.
2. On the mobile app, select your Vetcorder to pair, then navigate to
your recording type to select and download recordings.
Note: Full instructions available at www.sentierconnect.com
Page 22
21
6. Review
To open the <Data Review> menu,
1. If the device is in Calendar Screen, press the Home button.
2. In the Main Screen, tap the <Review> icon.
6.1 Reviewing Daily Check
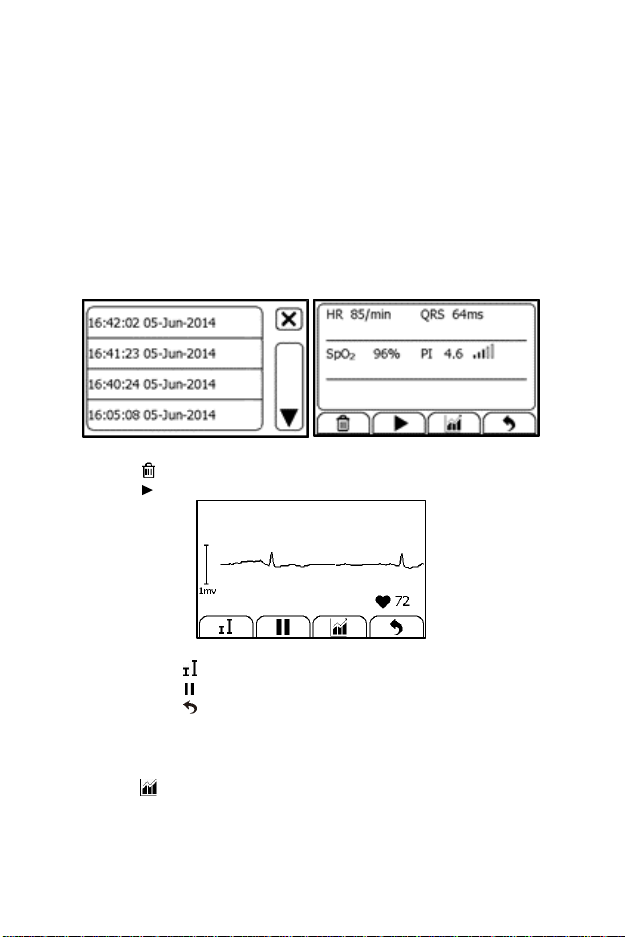
To review Daily Check records,
1. In the <Data Review> menu, select <DailyCheck>.
2. Choose the appropriate Pet to open the list as below, and then
select one record to review more information as below.
In this menu, you can:
Select to delete this measurement
Select to replay the ECG waveform as shown below.
When the ECG waveform is being replayed, you can
Select to change the waveform amplitude.
Select to pause it.
Select to return Daily Check list.
After the ECG waveform is replayed, it will automatically return to
the previous interface. Before that, you will hear the voice memo if
you added the voice memo for this measurement.
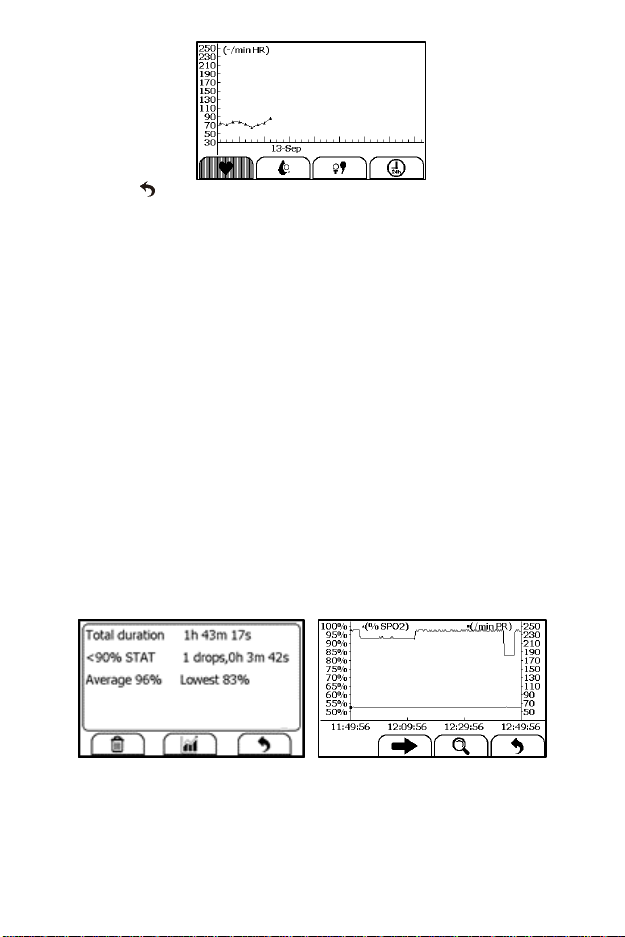
Select to view the trend of heart rate or SpO2.
Page 23
22
Select to return to the Daily Check list.
6.2 Reviewing ECG Recorder
To review ECG Recorder records, in the <Data Review> menu, select
<ECG Recorder>. The operations you can perform are almost the same
with Daily Check. However there is no trending graph.
6.3 Reviewing Oximeter
To review Oximeter records, in the <Data Review> menu, select
<Oximeter>. The operations you can perform are almost the same with
ECG Recorder. However there is no voice memo.
6.4 Reviewing Thermometer
To review Thermometer records, in the <Data Review> menu, select
<Thermometer>. The operations you can perform is almost the same
with ECG Recorder. However there is no voice memo.
6.5 Review Sleep Monitor
To review Sleep Monitor records, in the <Data Review> menu, select
<Sleep Monitor>.
The operations you can perform is the same with Daily Check. However
there is no waveform and audio memo to replay. To better review the
SpO2 trend during sleep, it is suggested to use the Vetcorder Connect
App for iOS or Android phones.
Page 24

23
6.6 Review Pedometer
To review Pedometer records, in the <Data Review> menu, select
<Pedometer>. The operations you can perform are almost the same
with Pedometer Recorder. However there is no voice memo.
7. Maintenance
Warnings and Cautionary Advices
Call Sentier customer service if you think your device needs repairs
Do not perform your own maintenance on the Vetcorder;
performing your own repairs will invalidate the warranty.
7.1 Warranty
The Vetcorder is warranted to be free from defects in materials and
workmanship within the warranty period, which starts upon your date of
purchase:
1-year warranty on the Vetcorder Monitor*
6-month warranty on all Vetcorder Accessories*
*ask your Sentier representative for clarification if needed
7.2 Battery
This monitor is designed to operate on rechargeable Lithium-ion battery.
The battery is charged automatically when the monitor is connected to
AC power or devices that can output electronic power through USB
connector, such as personal computer and mobile battery bank etc.
On-screen battery symbols indicate the battery status as follow:
The battery is fully charged.
The solid portion represents the remained battery energy. If the
solid portion moves from left to right, then it means that the
battery is being charged.
Indicates that the battery is almost depleted and need to be
charged immediately. Otherwise the device will shut down
automatically.
Page 25
24
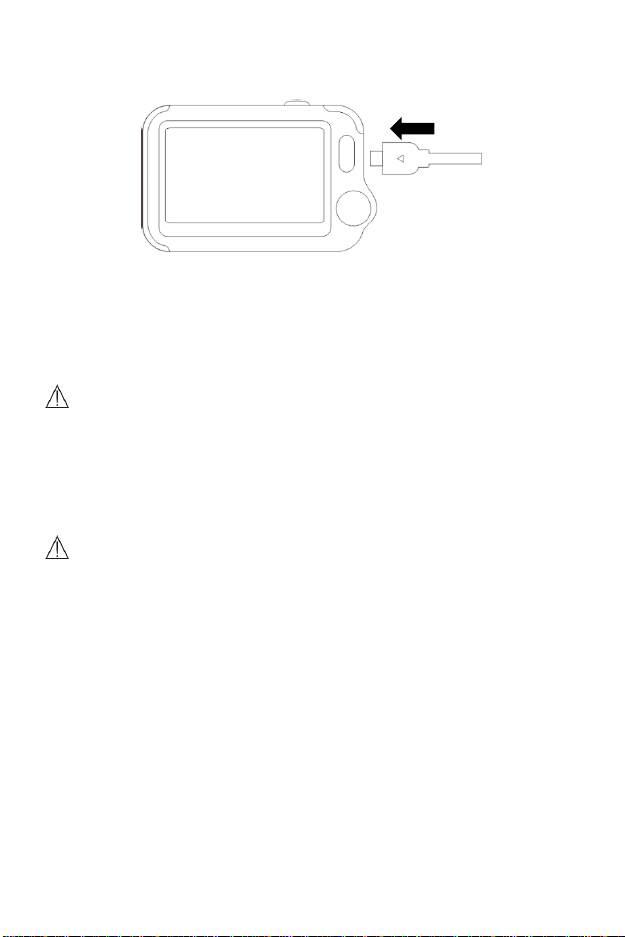
To charge the battery,
1. Connect the smaller end of the USB charging cable to the
multi-functional connector, as shown below.
2. Connect the other end of the USB charging cable to the USB
charging port.
3. Please make sure that the LED is blue, and press the Home button
to enter the Main Screen, if needed.
4. When the LED turns to green, it means the battery is fully charged.
Then you can unplug the USB cable.
Warnings and Cautionary Advices
The device cannot be used for any measurement during charging.
Use charging adapter provided by manufacturer, or USB charging
devices that comply with the standard of IEC 60950.
7.3 Care and Cleaning
Warnings and Cautionary Advices
Call Sentier customer service if you think your device needs repairs
Do not perform your own maintenance on the Vetcorder;
performing your own repairs will invalidate the warranty.
Clean the device weekly, carefully swabbing the device surface with a
soft cloth or cotton swab with rubbing alcohol. Do not pour alcohol
directly on or into the device.
Page 26

25
7.4 Trouble Shooting
Problem
Possible Cause
Solution
The device does not
turn on.
1. The battery may be
low.
2. The device might
be damaged
1. Charge the
battery and try
again.
2. Please contact
with your local
distributor.
Low battery indicator
is blinking
The battery is low.
Charge the battery
and try again.
The ECG waveform
amplitude is small
The lead you chose is
not suitable.
Change another
lead and try again.
ECG waveform drifts
1. The pressure
exerted on the
electrode(s) is not
stable or too much.
2. Leg or body may be
moving.
1. Reattach
electrode(s), hold
the device stably
and gently.
2. Try to keep
animal perfectly
still and test again.
The app cannot find
the device.
The Bluetooth may
not be turned on.
Turn on the
Bluetooth on the
second page of
Main Screen.
“SpO2 cable failed”
after inserting SpO2
cable.
The SpO2 cable might
be damaged.
Please contact with
your local
distributor
“System Error”
occurred.
Software or hardware
failure.
Restart the device
and measure
again. If the error
persists, mark
down the error
number and
contact with your
local distributor.
BP calibration failed.
1. Wrong height.
2. The difference
between two
calibrations is too
large.
1. Reconfirm the
height.
2. Try to keep
perfectly still and
calibrate again.
Page 27

26
No voice during ECG
and SpO2
measurement.
The speaker is muted.
Unmuted the
speaker in the
Settings menu.
Temperature value is
too low.
1. The measurement
area is covered by
hair.
2. The thermometer
sensor is too far away
from the Pet’s skin.
3. The thermometer
sensor is dirty.
1. Remove hair
from the
measurement
area.
2. Keep the sensor
contact with the
Pet’s skin.
3. Clean the sensor
with a soft cloth or
cotton.
Page 28
27
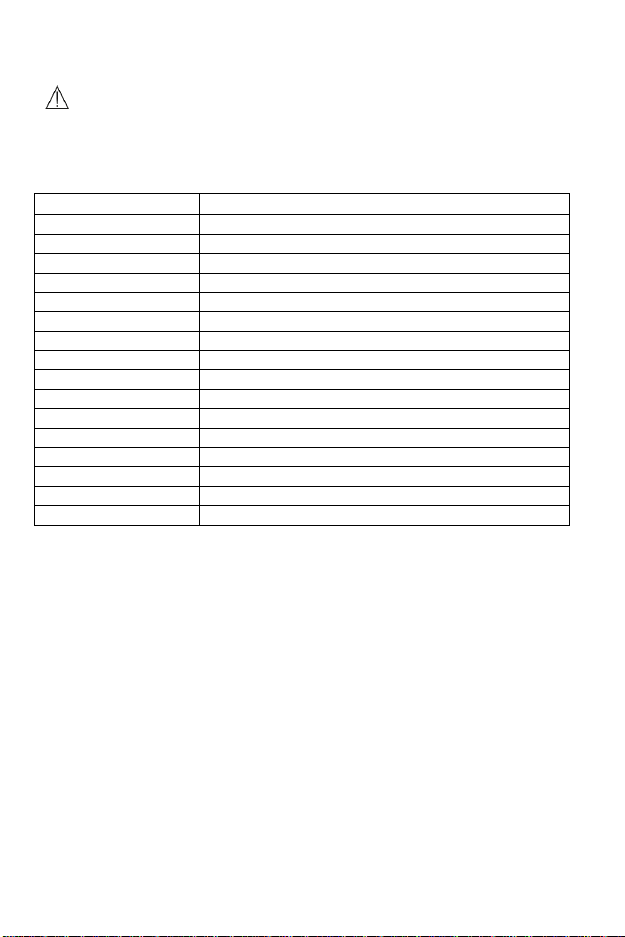
8. Accessories
Warnings and Cautionary Advices
Use accessories specified in this chapter. Using other accessories
may cause damage to the device or not meet the claimed
specifications.
Part Number
Description
600-00210-UV
Vetcorder Veterinary Monitor
540-00193-SV
Small Animal SPO2 Lingual Sensor (2 ft)
540-00193-LV
Large Animal SPO2 Lingual Sensor (2 ft)
560-00192-SV
Small Animal ECG Cable (2 Ft Long)
560-00192-LV
Large Animal ECG Cable (2 Ft Long)
560-00198-SV
Small Animal ECG Clips (electrodes) - 2pcs
560-00198-LV
Large Animal ECG Clips (electrodes) - 2pcs
560-00197-UV
Neck Lanyard
560-00208-UV
Desktop Folding Stand
560-00209-UV
Wristband
560-00157-UV
USB Charging Cable, Micro D
255-00157-UV
Owner’s Manual
Y Adapter Cable
Temperature Adapter Cable
Temperature Probe
Vetcorder Protective Case
Page 29
28
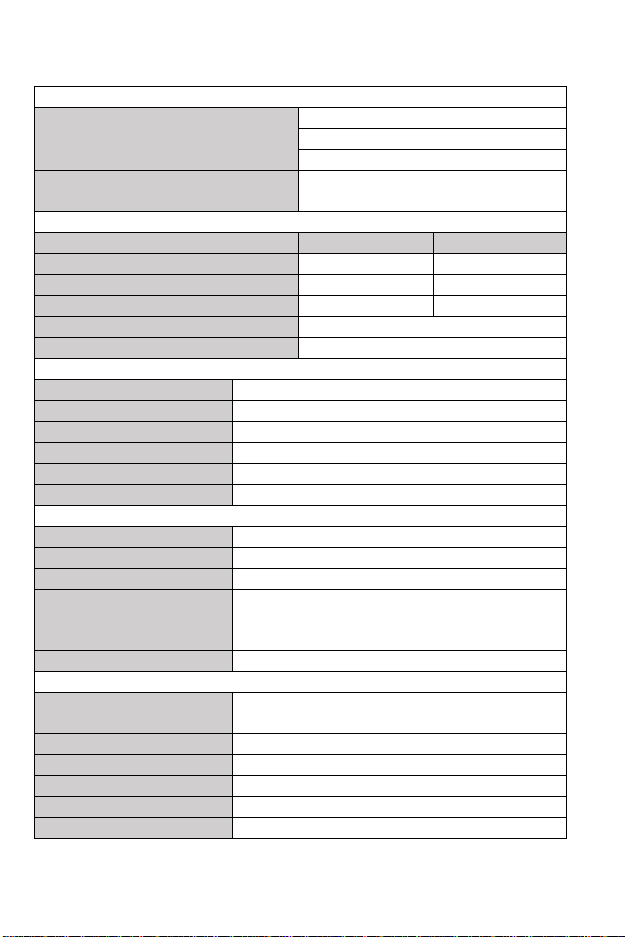
9. Specifications
Classifications
EC Directive
MDD, 93/42/EEC
R&TTE, 1999/5/EC
ROHS 2.0, 2011/65/EU
Degree protection against electrical
shock
Type BF
Environmental
Item
Operating
Storage
Temperature
5 to 45°C
-25 to 70°C
Relative humidity (noncondensing)
10% to 95%
10% to 95%
Barometric
700 to 1060 hPa
700 to 1060 hPa
Degree of dust & water resistance
IP22
Drop test
1.0 m
Physical
Size
88×56×13 mm
Packing size
178*123*75 mm
Weight
Less than 80 g (main unit)
Display
Vetcorder: 2.7” touch screen, HD
Connector
Micro D connector
Wireless connectivity
Built-in Bluetooth dual mode, support 4.0 BLE
Power Supply
Charge adapter input
AC100-240V 50/60Hz
Charge adapter output
DC5V 1.0A
Battery type
Rechargeable lithium-polymer battery 560 mAh
Battery run time
Only daily check: > 1000 times
Continuous sleep monitoring: > 12 hours
Pure standby calendar mode: > 3 months
Charge time
Less than 2 hours to 90%
ECG
Lead type
Integrated ECG electrodes
External ECG cable and electrodes
Lead set
Lead I, lead II
Measurement mode
Episode, continuous
Sampling rate
500 Hz
Sampling accuracy
16 bit
Display Gain
1.25 mm/mV, 2.5 mm/mV, 5 mm/mV
Page 30
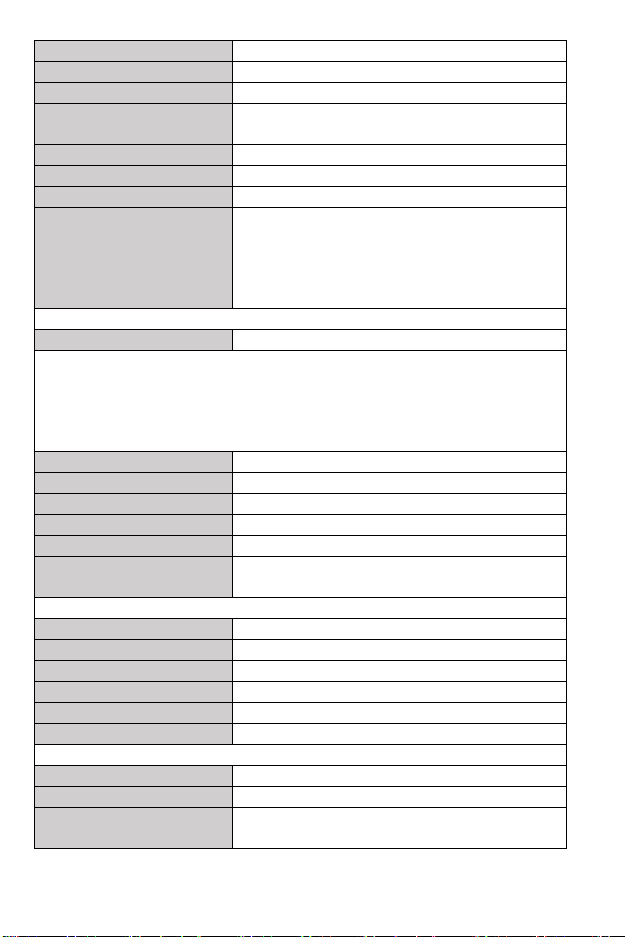
29
10 mm/mV, 20 mm/mV
Sweep speed
25 mm/s
Bandwidth*
0.05 to 40 Hz
Electrode offset potential
tolerance
±300 mV
HR measurement range
30 to 250 bpm
Accuracy
±2 bpm or ±2%, whichever is greater
ST measurement range
-0.5 to +0.5 mV
Measurement summary
Heart rate**, QRS duration, ST segment***, Rhythm
analysis (Regular ECG Rhythm, High Heart Rate,
Low Heart Rate, High QRS Value, High ST Value***,
Low ST Value***, Irregular ECG Rhythm, Unable to
analyze)
SpO2
Standards
Meet standards of ISO 80601-2-61
Measurement accuracy verification: The SpO2 accuracy has been verified in human
experiments by comparing with arterial blood sample reference measured with a
CO-oximeter. Pulse oximeter measurement are statistically distributed and about
two-thirds of the measurements are expected to come within the specified accuracy
range compared to CO-oximeter measurements.
SpO2 range
70% to 100%
SpO2 Accuracy (Arms)
80-100%:±2%, 70-79%:±3%
PR range
30 to 250 bpm
PR accuracy
±2 bpm or ±2%,whichever is greater
PI range
0.5-15
Measurement summary
SpO2, PR, PI, Summary (Normal Blood Oxygen, Low
Blood Oxygen, Unable to analyze)
Thermometer
Technique
Infrared body temperature
Environment temperature
16.0 to 40.0 °C
Measurement site
Temple
Measurement time
3s
Measurement range
34.0 to 42.2 °C (94.0 to 108.0 °F)
Accuracy
±0.2°C or ±0.4°F
Sleep Monitor
Monitoring time
Up to 10 hours
Data storage
Store SpO2 and pulse rate
Measurement summary
Total duration, <90% STAT, Average saturation,
Lowest saturation, Summary(No abnormal detected,
Page 31
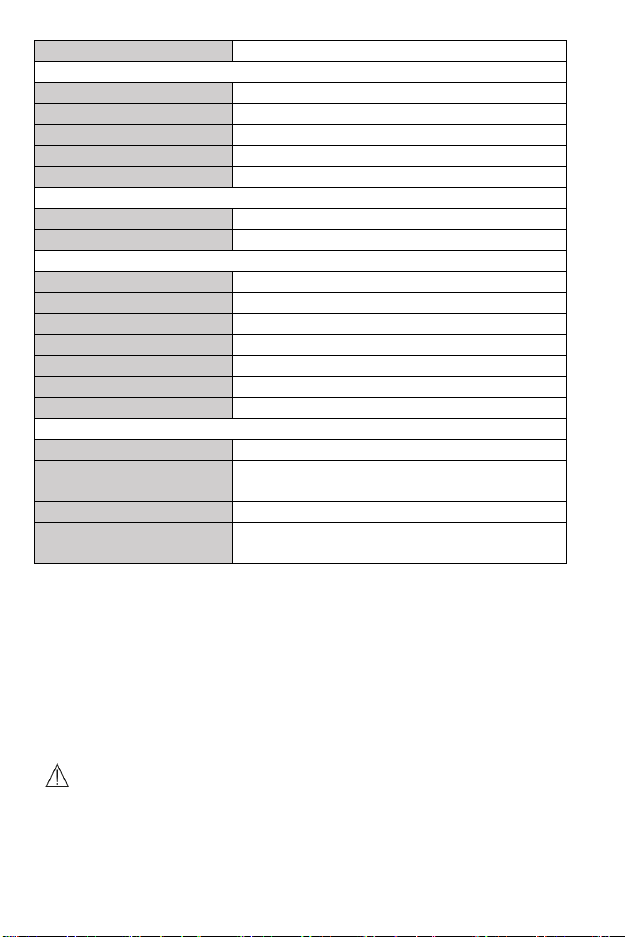
30
blood oxygen drop detected, Unable to analyze)
Pedometer
Range
0 to 99999 steps
Distance
0.00 to 999.99 km
Timer
0 to 1999 minutes
Calories
0.00 to 9999.99 kcal
Fat
0.00 to 199.99 g
Reminder
No. of reminder
6
Reminder event
Wake up, Check me, Medicine, Self-define
Review
Data review
Graphic trend, list trend
Waveform review
Full disclosure waveform
Daily check
100 pcs of records without audio memo
ECG recorder
100 pcs of records without audio memo
Oximeter
100 pcs of records
Thermometer
100 pcs of records
Sleep record review
5 pcs of records, 10 hours each record
Mobile APPS
Operating system
IOS 7.0 or above, Android 4.0 or above
IOS Capability
iPhone 4s and models launched subsequently; iPad 3
and models launched subsequently
Android Capability
Mobile phone or pad with Bluetooth 2.1 or above
Functionality
Data export, data review, waveform replay, trend
review, data sharing
* : External ECG cable, bandwidth mode set to wide
**: Heart rate is calculated based on average of every 5 to 30 QRS complex.
***: Only for measurement with external ECG cable, bandwidth mode set to wide
10. Electromagnetic Compatibility
The device meets the requirements of EN 60601-1-2. All the accessories
also meet the requirements of EN 60601-1-2 when in use with this
device.
Warnings and Cautionary Advices
Using accessories other than those specified in this manual may
result in increased electromagnetic emission or decreased
electromagnetic immunity of the equipment.
Page 32

31
The device or its components should not be used adjacent to or
stacked with other equipment.
The device needs special precautions regarding EMC and needs to
be installed and put into service according to the EMC information
provided below.
Other devices may interfere with this device even though they
meet the requirements of CISPR.
When the inputted signal is below the minimum amplitude
provided in technical specifications, erroneous measurements
could result.
Portable and mobile communication equipment may affect the
performance of this device.
Other devices that have RF transmitter or source may affect this
device (e.g. cell phones, PDAs, and PCs with wireless function).
Guidance and Declaration - Electromagnetic Emissions
The Vetcorder is intended for use in the electromagnetic environment specified below. The customer or the User of the device
should assure that it is used in such an environment.
Emission tests
Compliance
Electromagnetic environment - guidance
RF emissions CISPR 11
Group 1
The device uses RF energy only for i ts internal function.
Therefore, its RF emissions are very low and are not likely to
cause any interference in nearby electronic equipment.
RF emissions CISPR 11
Class B
The device is suitable for use in all establishments, including
domestic establishments and those directly connected to the
public low-voltage power supply network that supplies buildings
used for domestic purposes.
Harmonic emissions IEC61000-3-2
Class A
Voltage F luctuations / Flicker
Emissions IEC 61000-3-3
Complies
Page 33

32
Guidance and Declaration - Electromagnetic Immunity
The Vetcorder is intended for use in the electromagnetic environment specified below. The customer or the User of the Vetcorder
should assure that it is used in such an environment.
Immunity test
IEC60601 test level
Compliance level
Electromagnetic environment -
guidance
Electrostatic discharge
(ESD) IEC 61000-4-2
± 6 kV contact
± 8 kV air
± 6 kV contact
± 8 kV air
Floors should be wood, concrete
or ceramic tile. If floors are
covered with synthetic material,
the relative humidity should be at
least 30 %.
Electrical fast
transient/burst
IEC 61000-4-4
± 2 kV for power
supply lines
± 1 kV for input/output
lines
± 2 kV for power
supply lines
± 1 kV for input/output
lines
Mains power quality should be that
of a typical commercial or hospital
environment.
Surge
IEC 61000-4-5
± 1 kV line(s) to
line(s)
± 2 kV line(s) to
earth
± 1 kV line(s) to
line(s)
± 2 kV line(s) to
earth
Voltage dips, short
Interruptions and Voltage
variations on power
supply input lines
IEC 61000-4-11
<5 % UT
(>95 % dip in UT)
for 0.5 cycle
40 % UT
(60 % dip in UT)
for 5 cycles
70 % UT
(30 % dip in UT)
for 25 cycles
<5 % UT
(>95 % dip in UT)
for 5 s
<5 % UT
(>95 % dip in UT)
for 0.5 cycle
40 % UT
(60 % dip in UT)
for 5 cycles
70 % UT
(30 % dip in UT)
for 25 cycles
<5 % UT
(>95 % dip in UT)
for 5 s
Mains power quality should be that
of a typical commercial or hospital
environment. If the User of our
product requires continued operation
during power mains interruptions, it
is recommended that our product be
powered from an uninterruptible
power supply or a battery.
Power frequency (50/60
HZ) magnetic field IEC
61000-4-8
3 A/m
3 A/m
Power frequency magnetic fields
should be at levels characteristic of a
typical location in a typical
commercial or hospital environment.
Note: UT is the AC mains voltage prior to application of the test level.
Page 34
33
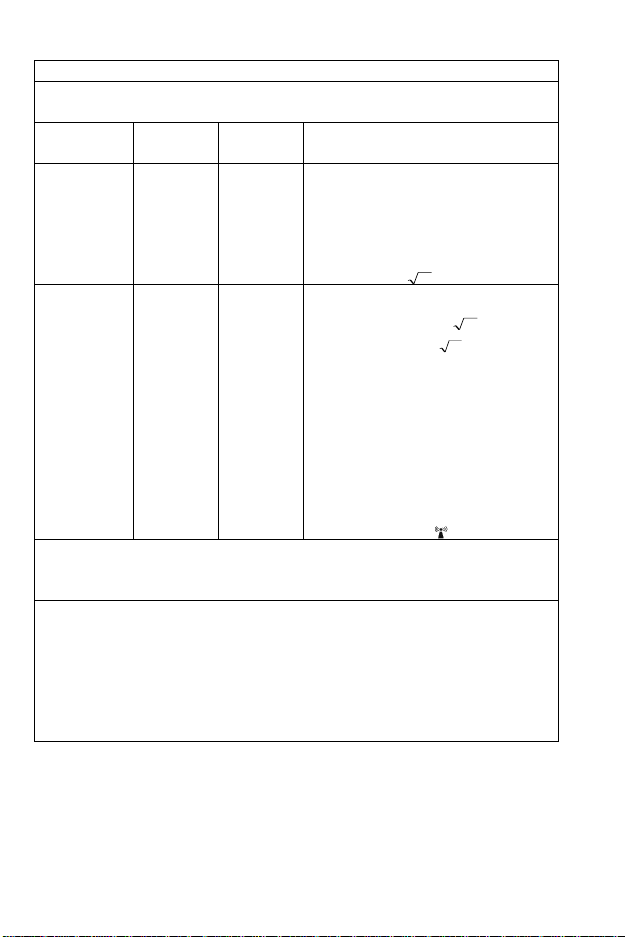
Guidance and Declaration - Electromagnetic Immunity
The Vetcorder is intended for use in the specified electromagnetic environment. The customer or the User o f the Vetcorder
should assure that it is used in such an environment as described below.
Immunity test
IEC60601 test
level
Compliance
level
Electromagnetic environment - guidance
Conduced RF
IEC61000-4-6
3 Vrms 15 0
kHz to
80 MHz
outside ISM
bands
3 Vrms 150
kHz to
80 MHz
outside ISM
bands
Portable and mobile RF communications equipment
should be used no closer to any part of the syste m,
including cables, than the recommended separation
distance calculated from the equat ion appropriate for the
frequency of the transmitter. Recommended separation
distances:
Pd 2.1
Radiated RF
IEC61000-4-3
3 V/m 80 MHz
to
2.5 GHz
3 V/m 80 MHz
to
2.5 GHz
Recommended separation distances:
80 MHz~800 MHz:
Pd 2.1
800MHz-2.5GHz:
Pd 3.2
Where, P is the maximum output power rating o f the
transmitter in watts (W) acc ording to the transmitter
manufacturer and d is the recommended separation
distance in meters (m).
Field strengths from fixed RF transmitters, as determined
by an electromagnetic site survey a, should be less than
the compliance level in each frequency range b.
Interference may occur in the vicinity of equipment
marked with the following symbol:
Note 1: At 80 MHz to 800 MHz, the separation distance for the higher frequency range applies.
Note 2: These guidelines may not apply in all situations. Electromagnetic propagation is affected by absorption and reflection
from structures, objects and people.
a
Field strengths from fixed transmitters, such as base stations for radio (cellular/cordless) telephones and land mobile radios,
amateur radio, AM and FM radio broadcast and TV broadcast cannot be predicted theoretically with accuracy. To assess the
electromagnetic environment due to fixed RF transmitters, an electromagnetic site survey should be considered. If the
measured field strength in the location in which the device is used exceeds the applicable RF compliance level above, the
device should be observed to verify normal operation. If abnormal performance is observed, additional measures may be
necessary, such as re-orienting or relocating the device.
b
Over frequency range 150kHz to 80MHz. For Resp field strength should be less than 1V/m.
Page 35
34
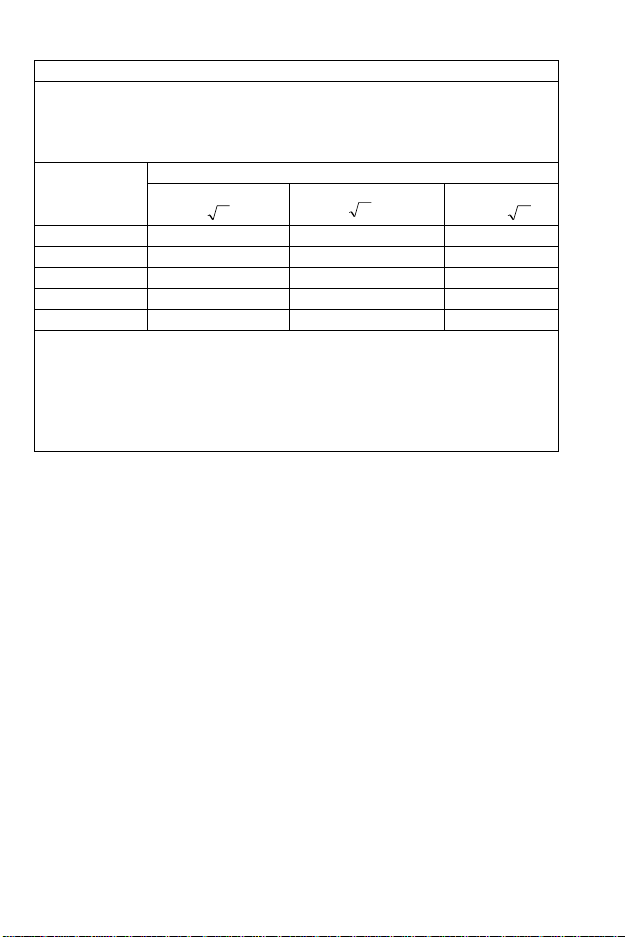
Recommended separation distances between portable and mobile RF communications equipment and the device
The Vetcorder is intended for use in an electromagnetic environment in which radiated RF disturbances are controlled. The
customer or the User of the Health Monitor can help prevent electromagnetic interference by maintaining a minimum dista nce
between portable and mobile RF communications equipment (transmitters) and the monitor as recommended below,
according to the maximum output power of the communications equipment.
Rated max. output
power of transmitter
(W)
Separation distance according to frequency of the transmitter (m)
150 kHz - 80 MHz
Pd 2.1
80 MHz - 800 MHz
Pd 2.1
800 MHz - 2.5 GHz
Pd 3.2
0.01
0.12
0.12
0.23
0.1
0.38
0.38
0.73 1 1.20
1.20
2.30
10
3.80
3.80
7.30
100
12.00
12.00
23.00
For transmitters rated at a maximum output power not listed above, the recommended separation distance d in metres (m)
can be estimated using the equation applicable to the frequency of the transmitter, where P is the maximum output power
rating of the transmitter in watts (W) according to the transmitter manufacturer.
Note 1: At 80 MHz and 800 MHz, the separation distance for the higher frequency range applies.
Note 2: These guidelines may not apply in all situations. Electromagnetic propagation is affected by absorption and refle ction
from structures, objects and people.
Page 36

Sentier LLC (Hereinafter called Sentier) owns the intellectual property
rights to this Sentier product and this manual. This manual may refer to
information protected by copyrights or patents and does not convey any
license under the patent rights of Sentier, nor the rights of others.
Sentier intends to maintain the contents of this manual as confidential
information. Disclosure of the information in this manual in any manner
whatsoever without the written permission of Sentier is strictly
forbidden.
Contents of this manual are subject to changes without prior notice. All
information contained in this manual is believed to be correct. Sentier
shall not be liable for errors contained herein nor for incidental or
consequential damages in connection with the furnishing, performance,
or use of this manual.
© Copyright 2016 Sentier Health Connect. All right reserved.
PN:255-00157-UV Version: A February, 2016
Sentier LLC
21100 W. Capitol Drive #6
Brookfield, WI 53072 USA
Vetcorder
Vital Contact for Every Companion
 Loading...