Sensotec WP9000 User Manual
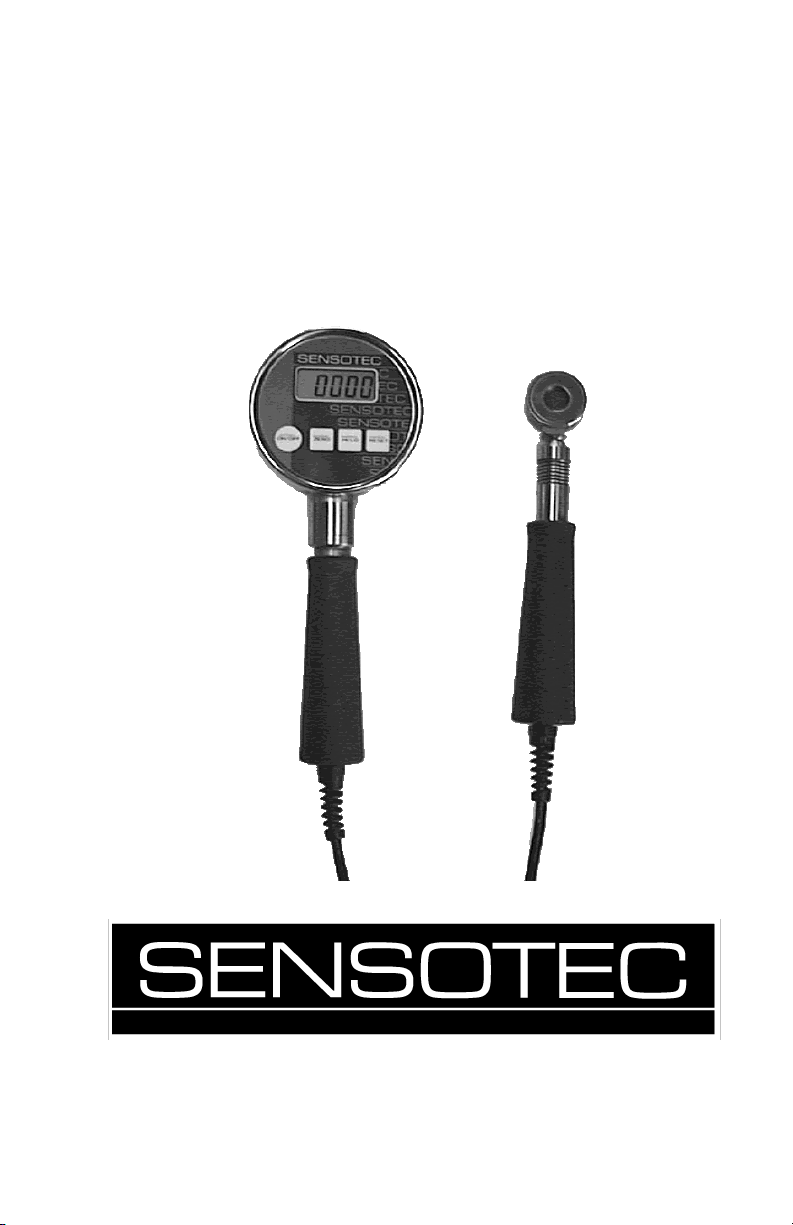
Model WP9000
WeldProbe Force Gage
2080 Arlingate Lane, Columbus, Ohio 43228 USA • (614)850-5000

Sensotec, Inc.
2080 Arlingate Lane
Columbus, Ohio 43228 USA
Copyright © 1999 by Sensotec, Inc. all rights reserved
Telephone: (614)850-5000
FAX: ( 614)850-1111
Toll Free: 1-800-848-6564
E-mail: sales@sensotec.com
WWW: http://www.sensotec.com
Model WP9000 WeldProbe Force Gage
Sensotec Part Number: 008-0548-00
Rev. D: March, 2003
IMPORTANT! IT IS RECOMMENDED THAT YOU READ
THIS DOCUMENT THOROUGHLY BEFORE APPLYING
POWER TO THIS UNIT. THIS DOCUMENT CONTAINS
INFORMATION ON WIRING, CALIBRATION, AND USE
OF FEATURES.
Sensotec continually improves its products, and thus the
information herein is subject to change without notice.
TABLE OF CONTENTS
Chapter 1
INTRODUCTION
1.1 Overview. . . . . . . . . . . . . . . . . . . . . . . . . . . . . . . . 5
1.2 Quick Operation Guide . . . . . . . . . . . . . . . . . . . . . 6
1.3 Instrument Layout. . . . . . . . . . . . . . . . . . . . . . . . . 7
1.3.1 LCD Display . . . . . . . . . . . . . . . . . . . . . . . . . . . . . . . . . . . .7
1.3.2 Low Battery Indicator . . . . . . . . . . . . . . . . . . . . . . . . . . . . . 7
1.3.3 Decimal Point Position . . . . . . . . . . . . . . . . . . . . . . . . . . . . 8
1.3.4 Incremental Display Step . . . . . . . . . . . . . . . . . . . . . . . . . .8
1.3.5 Load Cell . . . . . . . . . . . . . . . . . . . . . . . . . . . . . . . . . . . . . . 8
1.4 Maximum Safe Overload . . . . . . . . . . . . . . . . . . . 9
1.5 Front and Side Views . . . . . . . . . . . . . . . . . . . . . 10
1.6 Dimensions. . . . . . . . . . . . . . . . . . . . . . . . . . . . . 11
1.7 Specifications . . . . . . . . . . . . . . . . . . . . . . . . . . . 12
Chapter 2
OPERATION
2.1 Battery Replacement . . . . . . . . . . . . . . . . . . . . . 13
2.2 Turning the Instrument On and Off. . . . . . . . . . . 14
2.3 Zeroing the Display. . . . . . . . . . . . . . . . . . . . . . . 14
2.4 Restoring the Calibrated Zero . . . . . . . . . . . . . . 15
2.5 Reading the High/Low Values . . . . . . . . . . . . . . 15
2.6 Clearing the High/Low Values . . . . . . . . . . . . . . 16
Chapter 3
FIELD SELECTABLE FEATURES
3.1 Introduction. . . . . . . . . . . . . . . . . . . . . . . . . . . . . 17
3.2 Setup Menu Operation. . . . . . . . . . . . . . . . . . . . 17
3.3 Enable Options (“
3.3.1 Auto-off Feature . . . . . . . . . . . . . . . . . . . . . . . . . . . . . . . .19
3.3.2 Always-On Feature . . . . . . . . . . . . . . . . . . . . . . . . . . . . . .20
3.3.3 [Zero] Button Disable Feature . . . . . . . . . . . . . . . . . . . . . .20
3.3.4 [Hi/Lo] Button Disable Feature . . . . . . . . . . . . . . . . . . . . .20
3.3.5 [Clear] Button Disable Feature . . . . . . . . . . . . . . . . . . . . .20
3.4 Enable Options (“
3.5 Engineering Units (“
3.6 Auto-off time (“
3.7 Update Rate (“
3.8 Internal Software Version (“
((”) Description . . . . . . . . . . . 19
((”) Menu Item . . . . . . . . . . . . 21
81,W
”) Menu Item. . . . . . . . . 22
81,W
$
”) Menu Item . . . . . . . . . . . . 23
$R))
R))
U
”) Menu Item . . . . . . . . . . . . 23
U$
$W(
W(
Y(U
”) Menu Item . . . 24
Y(U
Chapter 4
CALIBRATION
4.1 Calibration Considerations. . . . . . . . . . . . . . . . . 25
4.2 Required Forces . . . . . . . . . . . . . . . . . . . . . . . . 25
4.3 Calibration Procedure . . . . . . . . . . . . . . . . . . . . 27
4.3.1 Enter Forces to be Applied . . . . . . . . . . . . . . . . . . . . . . . .27
4.3.2 Apply Forces . . . . . . . . . . . . . . . . . . . . . . . . . . . . . . . . . . .29
4.4 Rear View of Front Face Panel . . . . . . . . . . . . . 31
4.5 Calibration Error Messages . . . . . . . . . . . . . . . . 32
Chapter 5
TROUBLESHOOTING
5.1 Introduction . . . . . . . . . . . . . . . . . . . . . . . . . . . . 33
5.2 Help Message Codes. . . . . . . . . . . . . . . . . . . . . 33
5.3 Troubleshooting Hints . . . . . . . . . . . . . . . . . . . . 34

Chapter 1
g
y
g
y
INTRODUCTION
1.1 Overview
The WeldProbe is a rugged, hand-held instrument for
accurately calibrating weld electrode force on resistance
welding machines. This device helps ensure compliance
with ISO 9000 or QS 9000 quality requirements by takin
the guesswork out of setup. Measuring accurate force
levels at the electrode tips helps eliminate inaccuracies of
the line-pressure readings, air cylinder friction, and
mechanical wear.
The WeldProbe is designed for long life in the harsh welding environment by using Sensotec’s standard fullywelded load cell construction and NEMA 4 electronics
packaging. The easy-to-use design includes a simple
push-button format and a large LCD display that provides
both continuous and peak (maximum) force values in ke
pad-selectable en
ineering units.
-
High-speed digital electronics sample readings during the
squeeze-weld-hold sequence and capture the peak force
for display. A simple, one-button CLEAR prepares the
instrument for the next reading. Two standard 9-volt alkaline batteries provide 80 hours of continuous use. Batter
life is maximized with a programmable power-off feature.
Model WP9000 WeldProbe Force Gage page 5

1.2 Quick Operation Guide
g
y
1. Depress the [On/Off] button to power up the instrument.
Wait about 5 seconds for the instrument to warm up.
2. If a non-zero value appears on the display, press and
hold the [Zero] button until the display reads “
(this takes about three seconds).
3. Insert probe, initiate welder, and take reading.
4. Press and hold the [Hi/Lo] button until the display reads
+,
“
” to read the maximum (or peak) force value.
+,
5. Press [Clear] to clear the maximum value in preparation for the next readin
6. As shipped from the factor
.
, the instrument will automatically shut itself off if no buttons have been
pressed in four minutes.
”
Note:
The WP9000 is a force calibration device designed
to measure the force between electrodes on resistance
welders. It can withstand passing current through the
force transducer.
It is recommended for the saftey of
the operator and the WP9000 to disable current before operation. Many
repeated current firings may damage
the weld force indicator.
page 6 Introduction
1.3 Instrument Layout
g
y
g
g
g
y
y
y
y
1.3.1 LCD Display
The 4½-digit liquid crystal display (LCD) readout displays
the load applied to the instrument, interacts with the user
when the instrument is being set up or calibrated, and
indicates if there is a problem with the instrument.
When a WP9000 instrument is turned on, it illuminates all
LCD segments. Then, the engineering units the gauge will
be using appears on the display. Most WP9000 instruments are calibrated in pounds (“
has conversion factors for many standard engineerin
units built in. However, if the instrument displays
(special) it has been speciall
neerin
unit at the factory. In that case, the serial number
tag on the top of the instrument will indicate the engineer-
units being used and the capability to select other
in
en
ineering units should not be used.
/E
”) and the instrument
/E6
6
6
63
3&
&/
calibrated to another engi-
/
After the displa
applied to the load cell is shown on the displa
of the engineering units, the force
. If the load
applied to the load cell is above the instrument's ability to
measure, the display will indicate this overrange condition
by showing a "
The display will read "
" on the far left hand side of the display.
" if the instrument is underranged.
1.3.2 Low Battery Indicator
On the left side of the display, just above the minus sign,
is the low battery indicator (in the shape of an arrow).
When the battery voltage is less than 5 volts, the displa
will be blanked and the low battery indicator will illuminate
to indicate that the batteries should be replaced. The low
battery indicator can be seen when the instrument is
turned on and all segments of the display are momentaril
lighted.
Model WP9000 WeldProbe Force Gage page 7

When the low battery indicator is illuminated, change the
y
g
y
g
g
y
g
batteries as soon as possible. The instrument will not
function if the batter
voltage falls below approximately 4
volts.
1.3.3 Decimal Point Position
The decimal point position automatically changes
depending upon:
• the user selected engineering units
• the load range of the instrument
The decimal point position cannot be changed manually.
1.3.4 Incremental Display Step
The incremental display step is the value by which the last
it of the display will change. This value will be either 1,
di
2, or 5 displa
counts. It automatically changes dependin
upon:
• the user selected en
ineering units
• the load range of the instrument
The incremental display step cannot be changed manuall
.
1.3.5 Load Cell
The WP9000 instrument can be ordered with one of two
types of load cells: those with a load sensing button, and
those with a load sensing indentation. The load sensin
button is useful when the WeldProbe is used with projection welders. The load sensing indentation is useful for
most spot welding applications.
page 8 Introduction
1.4 Maximum Safe Overload
Maximum safe overload is the force which the instrument
can experience occasionally without loss of accuracy or
permanent damage.
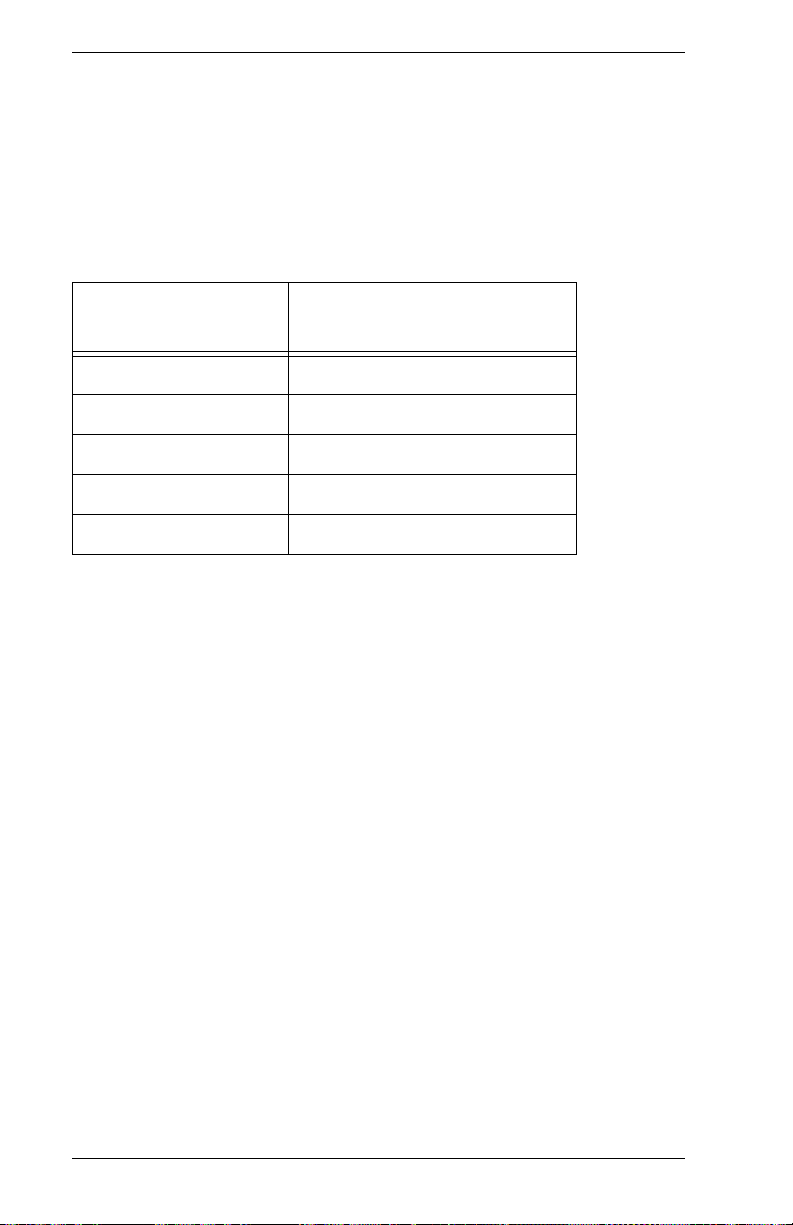
Table 1: Maximum Safe Overload
Force Range (lbs.)
0 - 500 = 500 750
0 - 1000 = 1K 1500
0 - 2000 = 2K 3000
0 - 5000 = 5K 7500
0 - 10000 = 10K 15000
Maximum Safe Overload
(lbs.)
Model WP9000 WeldProbe Force Gage page 9
1.5 Front and Side Views
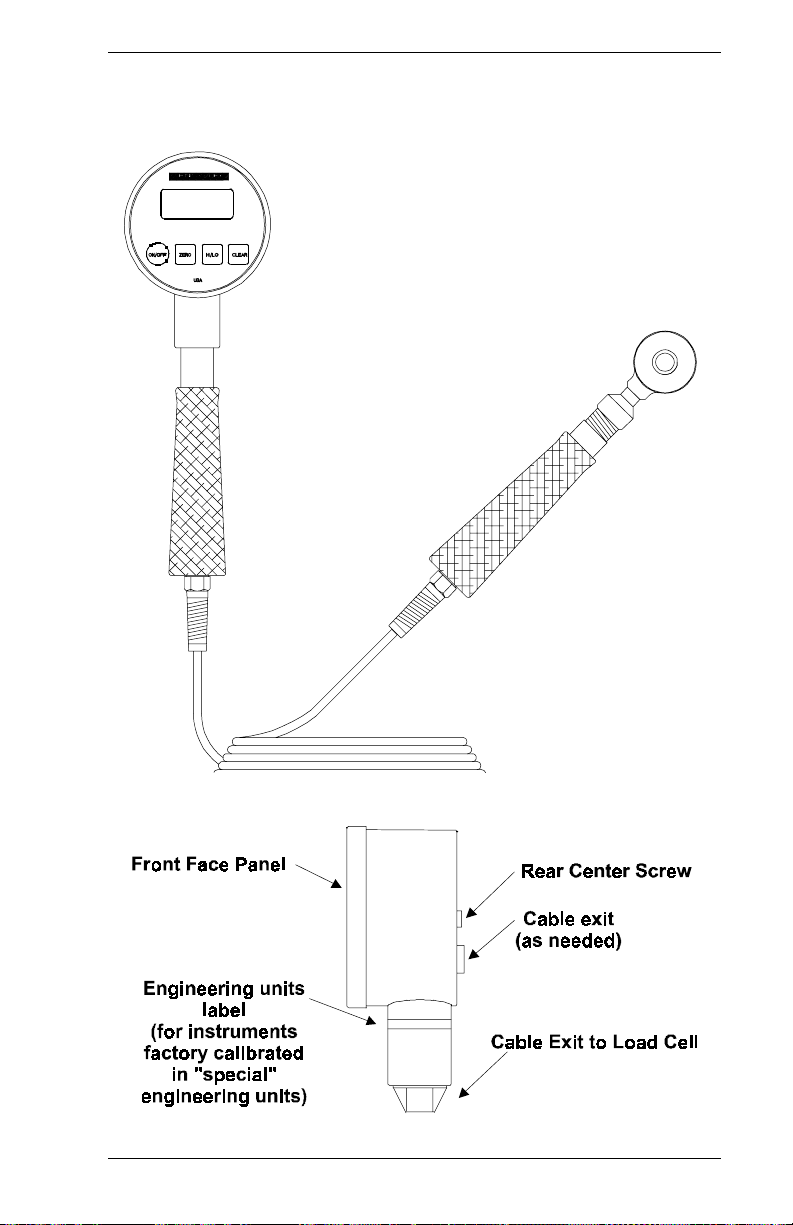
Figure 1-1: Model WP9000 Front View
Figure 1-2: Model WP9000 Display Side View
page 10 Introduction
1.6 Dimensions
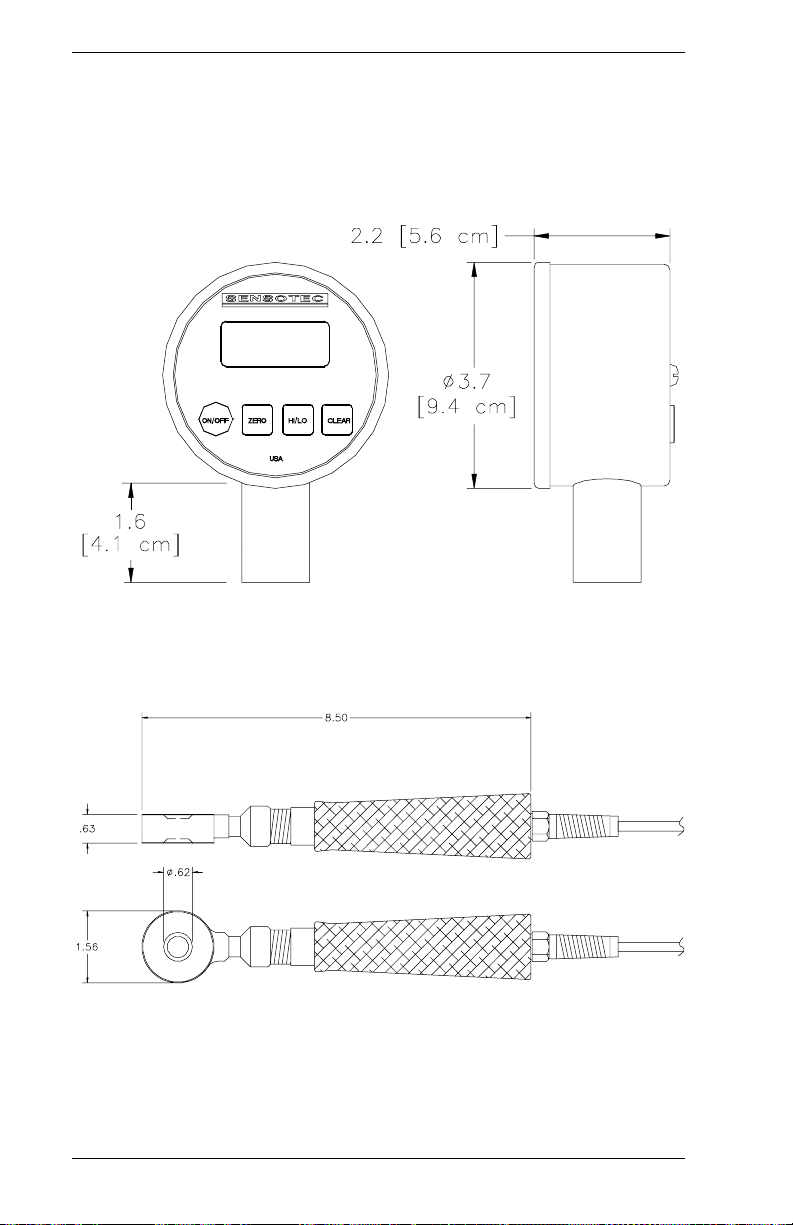
Figure 1-3: Model WP9000 Display Dimensions
Figure 1-4: Model WP9000 Load Cell Dimensions (2000 lbs.
Range with Sensing Indentation)
Model WP9000 WeldProbe Force Gage page 11

1.7 Specifications
g
g
g
g
g
g
g
g
g
g
Sensotec continually improves its products, and thus
these specifications are subject to change without notice.
Display Diameter: 3.7 inches
Accuracy: 0.5%
Operatin
Force Ran
Overload Capability: 150% of full-scale ran
Calibration En
Units:
Built-in En
Conversion:
Samplin
Power Requirements: two 9 Volt alkaline batteries provide
Load Cell Material: BeCu
Housin
Hi
Zero and Span Adjustment:
Front Panel Membrane Tactile feedback, raised buttons
Temperature: 30 to 180 ºF
es 0 to: 1000, 2000, 5000, 10000 lbs.
e
ineering
ineering Unit
Rate: 19.2kHz internal; 24Hz display update
Material: Stainless steel
h and Low Capture: Standard, same update rate as dis-
lbs
lbs, Kg, kN, N, g (field selectable)
approximately 80 hrs continous life
play
Standard
Calibration Data: Stored on non-volatile memory chip
Packa
Weld Current: Survives accidental current dischar
page 12 Introduction
e: All-welded load cell; NEMA 4 rated
display unit
e
 Loading...