

Page 1

Dual Output Pressure Sensor
Model DS
User’s Manual
008-0627-00
Version 1.10
Page 2

Table of Contents
Chapter 1 Introduction
Chapter 2 Command Summary
Chapter 3 Command Format
Chapter 4 System Commands
Chapter 5 Digital Output Commands
Chapter 6 Analog Output Commands
Chapter 7 Electrical Connections
Page 3

1.1 Overview
The Model DS Pressure Sensor combines high performance with the versitility of
both analog and digital outputs. The high accuracy pressure readings are fully
temperature compensated across the entire operating temperature range of the
transducer. In addition the Model DS Pressure Sensor maintains a maximum
update rate of 2500 times a second for both digital and analog outputs.
The Model DS provides a configurable analog ouput of 0 to 5 VDC. In default
operation, the fully temperatrue compensated voltage output is proportional to
the pressure applied to the pressure port. Alternately the analog output may be
configured for independent control by the user through the digital interface.
The Model DS provides a digital output of either a RS-232 full duplex interface or
a RS-485 half duplex interface which allows for multi-unit operation. Each
transducer has an universal address for setup and an user defined address for
multidrop operation. In addtion to pressure readings, all operating parameters of
the transducer are accessible through the digital interface. For example, user
adjustment of span and offset are provided for each output independently
through the digital interface.
1. INTRODUCTION
The following chapters detail the features and operating parameters of Model DS
Pressure Sensor.
1.2 SPECIFICATIONS
Power Requirements: 15 - 28 VDC
50 mA typ.
75 mA peak (during RS-485 operation)
Pressure:
Accuracy:
Digital: ± 0.05% of F.S. typ.
± 0.10% of F.S. max.
Analog: ± 0.10% of F.S. typ.
± 0.20% of F.S. max.
Resolution:
Digital: 0.05% or 5 significant digits
Analog: 1.4 mV steps
Operating Temperature Range: -40 to 180 Degree F
Page 4

Digital output: RS-485 Half Duplex, or RS-232 Full Duplex
Baud Rates: 1200, 2400, 4800, 9600, 19.2K,
38.4K, 57.6K, 115.2K
Data Framing: 1 start bit, 8 data bits, 1 stop bit
Parity: No parity
Addressing; User assigned
1 null address (address not assigned)
Bus operating mode: Response to a designated unit request
(Master/slave)
Pressure Units: Shipped as PSI, field selectable
Update Rate: 2500 updates per second, maximum
Mechanical Shock: TBD
Thermal Shock: TBD
Vibration: TBD
Long term stability: TBD
Media Compatibility: Exposed surfaces are 316L stainless steel
Page 5

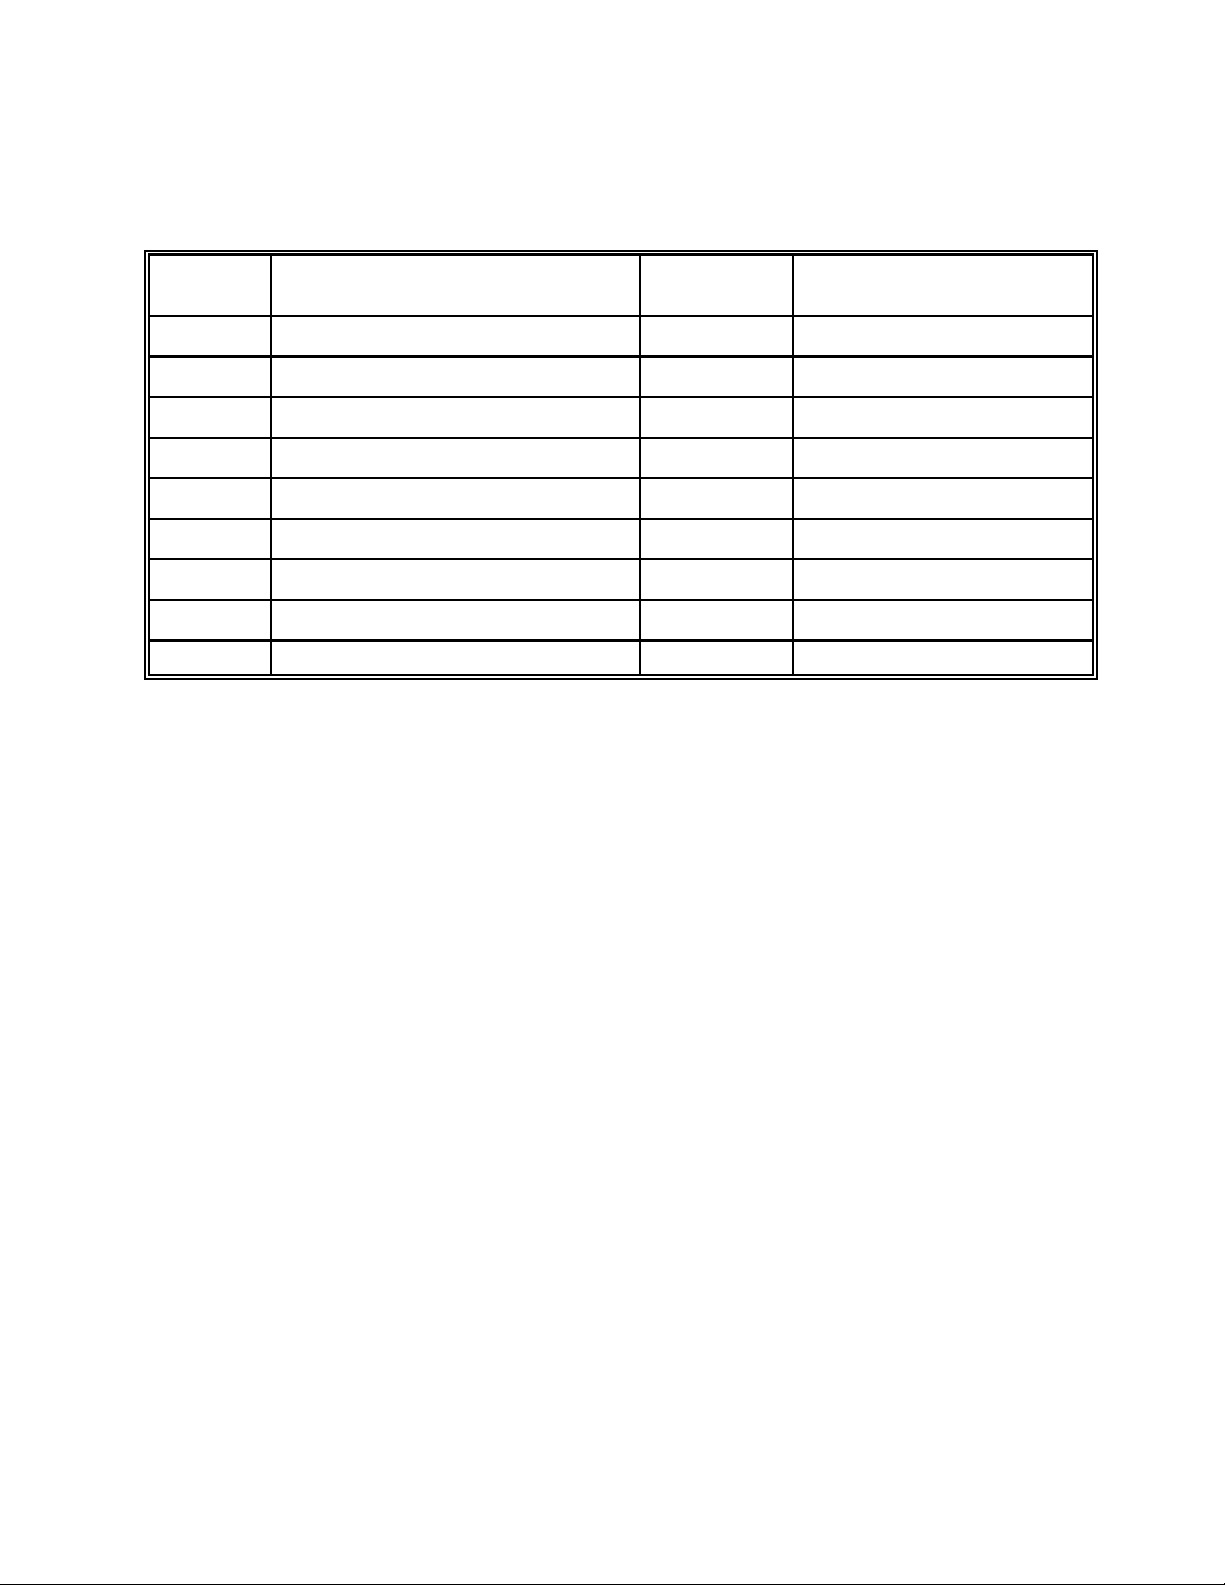
2. Command Summary
2.1 System Commands
Detailed descriptions of each system command is given in alaphabetical order in
Chapter 4.
Command
Code
DC Display Temperature (Centigrade) No sddd<CR>
DP Display User Defined String No xxxxxxxxxxxxxxxx<CR>
DR Display Errors No Err_x<CR>
DT Display Temperature (Fahrenheit) No sddd<CR>
FC Read Calibration Date No dd/dd/dd<CR>
FE Read Serial Number No dddddd<CR>
FR Restore Factory Default Settings Yes OK<CR>
FT Test Data Storage Checksum No OK<CR>
II Set Update Rate Yes OK<CR>
R4 Read Unit Address No dd<CR>
R5 Read Full Scale Range No sd.dddddEsdd<CR>
RM Read Mfg. Part Number No xxxxxxxxxxxx<CR>
RR Read Software Revision No ddd-dddd-dd d.dd<CR>
Description Write Enable
Required
Typical Response
SP Set User Defined String Yes OK<CR>
W1 Write Baud Rate Yes OK<CR>
W4 Write New Address Yes OK<CR>
WE Write Enable No OK<CR>
Typical Response Key: d - decimal digit s - sign indicator: “+” or “-”
x - any valid ASCII character <CR> - Carriage Return
All other characters and punctuation appear as is.
Page 6

2.2 Digital Output Commands
Detailed descriptions of each digital output command is given in alaphabetical order in
Chapter 5.
Command
Code
D0 Display Digital Pressure Reading No sd.dddddEsdd<CR>
DB Display Digital Zero Adjustment No sd.dddddEsdd<CR>
DE Display Eng. Units Conversion Factor No sd.dddddEsdd<CR>
DM Display Digital Span Adjustment No sd.dddddEsdd<CR>
R6 Read Engineering Units Label No xxxx<CR>
SB Set Digital Zero Adjustment Yes OK<CR>
SE Set Eng. Units Conversion Factor Yes OK<CR>
SM Set Digital Span Adjustment Yes OK<CR>
W6 Write Engineering Units Label Yes OK<CR>
Typical Response Key: d - decimal digit s - sign indicator: “+” or “-”
Description Write Enable
Required
x - any valid ASCII character <CR> - Carriage Return
All other characters and punctuation appear as is.
Typical Response
2.3 Analog Output Commands
Page 7
Detailed descriptions of each analog output command is given in alaphabetical order in
Chapter 6.
Command
Code
DA Display Analog Output Voltage No sd.ddd<CR>
RN Read Analog Output Offset No sd.dddddEsdd<CR>
RO Read Analog Output Scaling Factor No sd.dddddEsdd<CR>
SA Set Analog Output No OK<CR>
SS Select Analog Output Source Yes OK<CR>
SV Set Analog Output Default Value Yes OK<CR>
SY Read Analog Output Default Value No sd.dddddEsdd<CR>
WN Write Analog Output Offset Yes OK<CR>
WO Write Analog Output Scaling Factor Yes OK<CR>
Typical Response Key: d - decimal digit s - sign indicator: “+” or “-”
Description Write Enable
Required
x - any valid ASCII character <CR> - Carriage Return
All other characters and punctuation appear as is.
Typical Response
Page 8

3.1 Serial Protocol
The Model DS pressure transducer uses either a half duplex RS-485 or a full
duplex RS-232 hardware interface for serial communications. All serial
communication is in ASCII format using 8 data bits, one start bit, one stop bit and
no parity bits. Baud rates of 1200, 2400, 4800, 9600, 19.2K, 38.4K, 57.6K and
115.2K are available. As shipped from the factory, the baud rate is set to 9600
baud, the default baud rate.
3.2 Command Format
Each command is a string of ASCII characters. The following represents the
general format of the transducer commands:
#aaccxx...xx<cr>
# The pound sign is the start of command character.
3. COMMAND FORMAT
aa This two byte field is the unit address.
cc This two byte field is the command.
xx...xx The data field is an optional field of up to 18 characters.
<cr> The carriage return is the end of command character.
3.2.1 Start of Command
The pound sign, ‘#’, ASCII code 35 decimal, indicates the start of a command.
The transducer continually monitors the serial communication bus, ignoring all
characters until the pound sign is detected. Once the pound sign is detected the
transducer enters receive mode and begins looking for a valid address.
3.2.2 Unit Address
The unit address is a two character field of ASCII alphanumeric characters. The
address may be any combination of numerals or letters and is case sensitive.
Each transducer supports two addresses. The first is an universal address to
which all transducers respond. The address of ‘ff', (ASCII codes 102 decimal,
102 decimal) is reserved as the universal address. This universal address should
not be used when multiple transducers are setup as a RS-485 network. All
Page 9

transducers on the network will respond to this address at the same time
resulting in corrupted responses.
The second address is an unique, user defined address to which only the
specific transducer will respond. The user must define this unique address using
the W4 command. As shipped from the factory, the default value for this address
is ‘00" (ASCII codes 48 decimal, 48 decimal).
After the transducer detects the start of command character and enters receive
mode, it monitors the serial communications port for a valid address. If the
address found is the universal address or the transducer’s unique address, the
transducer will continue to process the serial communications for a command.
If the address found is not the universal address or the transducer’s unique
address, the transducer will exit receive mode and will return to monitor the serial
communication for a start of command character. If characters received after the
start of command character are not ASCII alphanumeric characters, the
transducer also exits receive mode.
3.2.3 Command
A command is comprised of two ASCII alphanumeric characters. Commands are
not case sensitive; either upper or lower case letters may be used. The following
chapters offer a detailed explanation of each command.
3.2.4 Data Field
The data field is an optional field of up to 16 ASCII characters. This field contains
the data for commands which write data to the transducer. Valid characters for
the data field include all alphanumerics, decimal point, plus sign, and minus sign.
3.2.5 End of Command
The carriage return, ASCII code 13 decimal, indicates the end of a command. If
a command requires no additional data, the end of command character follows
the two character command. If a command requires additional data, the end of
command character follows the data field.
The transducer does not process a command until it receives an end of
command character. If the transducer does not receive a end of command
character within approximately 5 seconds after receiving a start of command
character, the command is aborted.
3.3 Command Response
Page 10

The digital transducer transmits only in response to a command which uses its
unique address (or the universal address of ‘ff'). The transducer itself never
initiates a transmission.
There are two basic types of responses. The transducer will transmit an ASCII
string in response to commands which request data. This ASCII string is
terminated by a carriage return. For commands which do not request data, the
transducer acknowledges the command with ‘OK’ followed by a carriage return.
Examples of the typical response for each command are included in the
following chapters.
NOTE: Commands which change the operating parameters of the transducer are
implemented immediately. Changes are written to nonvolatile memory with each
command issued. Nonvolatile memory is guaranteed for 20,000 writes. A
checksum command is available to test the integrity of the nonvolatile memory.
The transducer indicates the following error conditions:
Response Description
Err_NaC Not a Command: The command was not recognized as a
valid command by the transducer.
Err_AcD Access Denied: The required Write Enable command did
not preceed the present command.
Err_NaN Not a Number: The data accompanying the command do not
represent a valid number.
Err_InF Invalid Format: The data accompanying the command do
not represent a valid option for the command.
Err_CsF Checksum Error:This response to the FT command
indicates a checksum error in data storage.
Err_OvR Over Range: This response to the D0 command indicates
the input pressure is approximate 6 % above the full scale
range of the transducer.
Err_UnR Under Range: This response to the D0 command indicates
the input pressure is approximately 3 % below the range of
the transducer.
4. SYSTEM COMMANDS
Page 11

4.1 DC Display Temperature (Centigrade)
DESCRIPTION
The DC command reads the temperature at the transducer’s sensing element.
This value is provided as a diagnostic tool. The accuracy of this value is not
guaranteed but is typically within ±2 degrees Centigrade.
The response to this command is a varible length string representing the
temperature in degrees Centigrade.
EXAMPLE
#00DC
This command, followed by a carriage return, returns the temperature in
Centigrade of the transducer with the address of ‘00'.
Typical responses to this command illustrating the varible length of the response
include:
43
8
-5
-14
4.2 DP Display User Defined String
DESCRIPTION
The DP command displays the character string set by the SP command. This
character string is 16 characters in length. The default value for this character
string is 16 blank spaces (ASCII code 32 decimal).
EXAMPLE
#00DP
This command, followed by a carriage return, reads the character string set by
the SP command from a transducer with the address of ‘00'.
The transducer transmits a response to this command similar to:
Page 12

Part # 456-1003P
For this example the transducer transmits the character string set by the SP
command example below.
4.3 DR Display Errors
DESCRIPTION
At power up the Model DS performs a complete checksum test of all stored data.
During operation the checksum test is repeated periodically. Also during
operation the transducer continually monitors the pressure and temperature
signals for out of range conditions. The DR commands displays the results of
these test.
When an error occurs, the transducer sets the appropiate bit of a status byte to 1
to indicate the presence of an error. Bits set to 0 indicate the absense of an
error. This status byte is available as the last character of the response to this
command.
The following is the bit assignment of this status byte:
bit 0 Temperature over range error
bit 1 Temperature under range error
bit 2 Pressure over range error
bit 3 Pressure under range error
bit 4 1
bit 5 1
bit 6 Checksum error
bit 7 0
(Bit 0 is the least significant bit of the status byte. Note that three of the bits are
constants; this ensures that the status byte is an ASCII printable character.)
Error bits set in the status byte are nonvolatile: bits indicating errors will remain
set after the error condition ceases to exist. Using the DR command to read the
error status will clear all error indications. Removing power from the transducer
will also clear all error indications.
EXAMPLE
Page 13

#00DR
This command, followed by a carriage return, returns the error status of the
transducer with the address of ‘00'.
In response to this command, the transducer transmits the following:
Err_0
In this case, the last character of the response is the ASCII character for zero, 30
hexadecimal. The binary value of this character is 0011 0000 indicating that no
errors have been detected since the last time the error status was read.
As another example, the response to this command could be
Err_4
In this case the last character of the response is the ASCII character for the
numeral 4, 34 hexadecimal. The binary value of this character is 0011 0100. Bit
2 is set to a one indicating a pressure over range error was detected since the
last time the error status was read.
4.4 DT Display Temperature (Fahrenheit)
DESCRIPTION
The DT command reads the temperature at the transducer’s sensing element.
This value is provided as a diagnostic tool. The accuracy of this value is not
guaranteed but is typically within ±4 degrees Fahrenheit.
The response to this command is a varible length string representing the
temperature in degrees Fahrenheit.
EXAMPLE
#00DT
This command, followed by a carriage return, returns the temperature in
Fahrenheit of the transducer with the address of ‘00'.
Typical responses to this command illustrating the varible length of the response
include:
145
Page 14

67
5
-2
-23
4.5 FC Read Calibration Date
DESCRIPTION
The FC command reads the transducer’s date of calibration. This date is set at
the factory and can not be changed by the user.
EXAMPLE
#00FC
This command, followed by a carriage return, requests the date of calibration
from a transducer with the address of ‘00'.
The transducer transmits a response to this command similar to:
06/14/01
The format of the response is month/day/year. For this example, the date of
calibration is June 14, 2001.
4.6 FE Read Serial Number
DESCRIPTION
The FE command reads the transducer’s serial number. The serial number is set
at the factory and can not be changed by the user.
EXAMPLE
#00FE
This command, followed by a carriage return, requests the serial number from a
transducer with the address of ‘00'.
The transducer produces a response to this command similar to:
123456
Page 15

For this example, the transducer’s serial number is ‘123456'.
4.7 FR Restore Factory Default Settings
DESCRIPTION
The FR command restores all factory default settings to the transducer. The
transducer reinitializes all operating parameters with the default settings. All
changes made by the user are lost. This command must be preceded by the WE
command.
EXAMPLE
#00FR
This command , followed by a carriage return, restores all default settings to a
transducer with an address of ‘00'.
In response to this command, the transducer transmits the following:
OK
4.8 FT Test Data Storage Checksum
DESCRIPTION
The FT command performs a checksum test on all stored data within the
transducer. The reponse to this command returns the result of this test.
The transducer performs a checksum test at power up and periodically during
operation. This command allows the user to perform a checksum test on
demand. If this command detects a checksum error, the appropiate bit of the
status byte reported by the DR command is set also.
EXAMPLE
#00FT
This command, followed by a carriage return, instructs the transducer with the
address of ‘00' to perform a checksum test.
In response to this command, the transducer transmits
Page 16

OK
to indicate no checksum errors, or
Err_CsF
to indicate a checksum failure.
4.9 II Set Update Rate
DESCRIPTION
The II command controls the update rate of the transducer. The transducer
calculates primary updates to the digital reading and the analog output voltage at
a maximum rate of 2500 times per second. These primary updates may be
averaged together to implement a simple averaging filter. This command controls
the number of primary updates averaged together to generate the digital reading
and the analog output voltage. As the number of primary updates averaged
increases, the update rate of the digital reading and of the analog output voltage
decreases. The default value for the command is no averaging enabled which
provides the maximum update rate for the transducer.
This command requires a data field of one character. The table below lists the
valid values and the resulting approximate update rates .
Data Field Value Updates / Second
0 (zero) 2500 (averaging disabled)
1 1250
2 625
3 312
4 156
5 78
6 39
7 19
8 9
This command must be preceded by the WE command.
EXAMPLE
Page 17

#00II2
This command, followed by a carriage return, instructs the transducer with the
address of ‘00' to average output results at a rate of 625 updates / second.
In response to this command, the transducer transmits the following:
OK
4.10 R4 Read Unit Address
DESCRIPTION
The R4 command displays the unique two character user defined address
assigned to the transducer by the W4 command.
EXAMPLE
#ffR4
This command, followed by a carriage return, requests the user defined address
of the transducer using the universal address of ‘ff'.
The transducer transmits a response to this command similar to:
33
For this example, the user defined address is 33.
4.11 R5 Read Full Scale Range
DESCRIPTION
The R5 command reads the transducer’s full scale pressure range in units of
PSI. This value is set at the factory and can not be changed by the user. The
response to this command is presented in scientific notation.
EXAMPLE
#00R5
This command, followed by a carriage return, reads the full scale pressure range
of a transducer with the address of ‘00'.
The transducer transmits a response to this command similar to:
Page 18

+1.00000E+02
For this example the full scale pressure range is 100 PSI.
4.12 RM Read Manufacturer’s Part Number
DESCRIPTION
The RM command reads the Sensotec Part Number of the transducer. This
value is set at the factory and can not be changed by the user. The response is
an 11 character ASCII string representing the part number.
EXAMPLE
#00RM
This command, followed by a carriage return, reads the Sensotec part number of
the transducer with the address of ‘00'.
The transducer transmits a response to this command similar to::
060-G769-01
For this example the Sensotec part number is 060-G769-01.
4.13 RR Read Software Revision
DESCRIPTION
The RR command reads the transducer’s software part number and software
revision level.
EXAMPLE
#00RR
This command, followed by a carriage return, requests the software revision level
from a transducer with the address of ‘00'.
The transducer produces a response to this command similar to:
084-1406-03 1.00
The software part number is ‘084-1406-03'. The software revision level is ‘1.00'.
Page 19

4.14 SP Set User Defined String
DESCRIPTION
The SP command writes an user defined ASCII character string to the
transducer. This command requires a data field of up to 16 characters. The user
may use this command to store custom information in the transducer. The
default value for this command is 16 spaces (ASCII code 32 decimal).
Information stored in the transducer with this command is maintained when
power is removed from the transducer. Information stored in the transducer with
this command may be read by the DP command. This command must be
preceded by the WE command.
EXAMPLE
#00SPPart # 456-1003P
This command, followed by a carriage return, writes “Part # 456-1003P” to a
transducer with the address of ‘00'.
In response to this command, the transducer transmits the following:
OK
4.15 W1 Write Baud Rate
DESCRIPTION
The W1 command changes the transducer’s baud rate for serial communication.
This command requires a data field of one numeric value to indicate the new
baud rate. A list of the available baud rates and the corresponding value to be
placed in the data field follows.
Baud Rate Data Field Value
1200 1
2400 2
4800 3
Page 20

9600 4
19.2 K 5
38.4 K 6
57.6 K 7
115.2 K 8
The change to the new baud rate takes place immediately after the transducer
acknowledges the command. This command must be preceded by the WE
command. The default baud rate is 9600.
EXAMPLE
#00W15
This command, followed by a carriage return, changes the baud rate of the
transducer with the address of ‘00' to a baud rate of 19.2K for subsequent serial
communication.
Before changing to the new baud rate, the transducer transmits the following:
OK
4.16 W4 Write New Address
DESCRIPTION
The W4 command writes a user defined address to the transducer. This
command requires a data field of two characters representing the new address.
The address may be any two alphanumeric characters and is case sensitive.
This command must be preceded by the WE command. The default value of this
address is ‘00'.
EXAMPLE
#00W4EE
This command, followed by a carriage return, writes a new user defined address
of ‘EE’ to the transducer addressed with the default address of ‘00'.
In response to this command, the transducer transmits the following:
OK
4.17 WE Write Enable
Page 21

DESCRIPTION
All commands which write data to the transducer or which change the operating
parameters of the transducer must be preceded by the Write Enable command.
The Write Enable command is valid for the next single command only. Each
command which writes data to the transducer must be preceded by a separate
Write Enable command.
EXAMPLE
#00WE
This command, followed by a carriage return, enables a transducer with the
address of ‘00' to process the next command which writes data to the
transducer.
In response to this command, the transducer transmits the following:
OK
5. DIGITAL OUTPUT COMMANDS
5.1 D0 Display Digital Pressure Reading
DESCRIPTION
Page 22

The D0 (D, numeral 0) command displays the most recently computed
temperature compensated pressure reading. The pressure reading is presented
in scientific notation as a string of ASCII characters. If the most recent pressure
reading is out of range or a checksum error has been detected, the transducer
will respond to this command with an error indication. See Section 3.3.
EXAMPLE
#00D0
This command, followed by a carriage return, reads the pressure reading of a
transducer with the address of ‘00’.
The transducer transmits a response to this command similar to:
+6.24250E+01
For this example, the pressure reading is 62.4250.
5.2 DB Display Digital Zero Adjustment
DESCRIPTION
The DB command displays the value of the digital zero adjustment in scientific
notation.
EXAMPLE
#00DB
This command, followed by a carriage return, reads the digital zero adjustment of
a transducer with an address of ‘00'.
The transducer transmits a response to this command similar to:
-2.50000E-01
For this example, the digital zero adjustment is -0.25%, which reduces the digital
zero reading by -0.25%.
5.3 DE Display Engineering Units Conversion Factor
DESCRIPTION
The DE command displays the transducer’s engineering units conversion factor.
Page 23

EXAMPLE
#00DE
This command, followed by a carriage return, reads the engineering units
conversion factor from a transducer with an address of ‘00'.
The transducer transmits a response to this command similar to:
+2.76790E+01
For this example, the engineering units conversion factor is ‘27.679'.
5.4 DM Display Digital Span Adjustment
DESCRIPTION
The DM command displays the value of the digital span adjustment in scientific
notation.
EXAMPLE
#00DM
This command, followed by a carriage return, reads the digital span adjustment
of a transducer with an address of ’00'.
The transducer transmits a response to this command similar to:
+9.98000E+01
For this example, the digital span adjustment is 99.8% of the unadjusted span.
5.5 R6 Read Engineering Units Label
DESCRIPTION
The R6 command reads the four character engineering units label.
EXAMPLE
#00R6
Page 24

This command, followed by a carriage return, reads the engineering units label of
a transducer with the address of ‘00'.
The transducer transmits a response to this command similar to:
PSIG
For this example, the engineering units label is ‘PSIG’, (Pounds per Square Inch
Gage).
5.6 SB Set Digital Zero Adjustment
DESCRIPTION
The SB command is used to adjust the zero of the digital output only. The
command requires a data field of up to 16 characters. Data field values may be
positive or negative and are entered as an integer, a decimal number, or in
scientific notation. This command must be preceded by the WE command.
The units for the SB command is percentage. A data field value of 0.00000 is the
default value for this parameter and represents no zero adjustment.
EXAMPLE
#00SB-0.25
This command, followed by a carriage return, sets the digital zero adjustment of
a transducer with an address of ‘00' to -0.25%. This would result in a 0.25
percent reduction in the zero reading of the transducer.
In response to this command, the transducer transmits the following:
OK
5.7 SE Set Engineering Units Conversion Factor
DESCRIPTION
The SE command is used to set the engineering units conversion factor. This
conversion factor is used in the calculation of the digital output only and
determines the engineering units of the digital output. This command requires a
data field of up to 16 characters. Data field values may be entered as integers,
Page 25

decimal numbers, or scientific notation. Data field values for common conversion
factors are listed below with their corresponding engineering units. This
command must be preceded by the WE command.
NOTE: It is the user’s responsibility to ensure that the engineering units
label written with the W6 command correctly corresponds to the
appropriate engineering units conversion factor.
Engineering Units Data Field Value
CMWC centimeters of water column 70.304
INHG inches of mercury 2.0360
INWC inches of water column 27.679
KPA kilopascal 6.8948
MBAR millibar 68.948
MPA megapascal 0.0068948
PSI pounds per square inch 1.0000
EXAMPLE
#00SE27.679
This command, followed by a carriage return, writes the engineering units
conversion factor of ‘27.679' to a transducer with the address of ‘00'. The
engineering units of the transducer’s digital output will be INWC (inches of water
column) after the transducer acknowledges the command. (The W6 command
should be used to set the engineering units label to ‘INWC’.)
In response to this command, the transducer transmits the following:
OK
5.8 SM Set Digital Span Adjustment
DESCRIPTION
The SM command is used to adjust the span of the digital output only. The
command requires a data field of up to 16 characters. Data field values may be
entered as integers, decimal numbers, or scientific notation. This command must
be preceded by the WE command.
Page 26

The units for the SM command is percentage. A data field value of 100.0 is the
default value for this parameter and represents no span adjustment.
EXAMPLE
#00SM99.80
This command, followed by a carriage return, reduces the digital output span of
a transducer with the address of ‘00' by 0.2 %.
In response to this command, the transducer transmits the following:
OK
5.9 W6 Write Engineering Units Label
DESCRIPTION
The W6 command changes the four character engineering units label associated
with the digital output of the transducer. The command requires a four character
data field to specify the new engineering units label. This command does not
change anything mathematically. The SE command changes the actual
engineering units conversion factor. The label may be read by the R6 command.
This command must be preceded by the WE command.
EXAMPLE
#00W6PSIG
This command, followed by a carriage return, changes the engineering units
label of the transducer with the address of ‘00' to ‘PSIG’'.
In response to this command, the transducer transmits the following:
OK
Page 27

6. ANALOG OUTPUT COMMANDS
6.1 DA Display Analog Output Voltage
DESCRIPTION
The DA command reads the actual voltage present at the transducer’s analog
output pin. This value is provided as a diagnostic tool. The accuracy of this value
is not guaranteed but is typically within ±0.5 percent of the output voltage.
The response to this command is a fixed length string beginning with a plus or
minus sign. The voltage value is presented with three decimal places.
EXAMPLE
#00DA
This command, followed by a carriage return, reads the voltage at the analog
output pin of a transducer with the address of ‘00'.
The transducer transmits a response to this command similar to:
+3.425
For this example, the analog output voltage is approximately +3.425 volts.
6.2 RN Read Voltage Output Offset
DESCRIPTION
The RN command reads the value of the analog voltage output’s offset
adjustment. The response to this command is presented in scientific notation.
The units are percentage.
EXAMPLE
#00RN
This command, followed by a carriage return, reads the voltage output’s offset
adjustment for a transducer with the address of ‘00'.
The transducer transmits a response to this command similar to:
Page 28

+1.00000E-01
For this example, the voltage output zero adjustment is set to +0.1 percent.
6.3 RO Read Voltage Output Scaling Factor
DESCRIPTION
The RO (R, letter O) command reads the value of the analog voltage output
span adjustment. The response to this command is in scientific notation.
EXAMPLE
#00RO
This command, followed by a carriage return, reads the voltage output span
adjustment for a transducer with the address of ‘00'.
The transducer transmits a response to this command similar to:
+9.85000E+01
For this example, the voltage output span adjustment is 98.5 %.
6.4 SA Set Analog Output
DESCRIPTION
The SA command provides the value for the analog output when the transducer
is configured to use the digital interface to control the analog output. (See the SS
command.) This value is in units of percentage of full scale.
This command requires a data field of up to six characters. Data field values may
be entered as integers or decimal numbers and range from 0.00 to 100.00.
NOTE: The analog output scaling factor and offset values set by the WO and
WN commands respectively apply to the value set by this command.
EXAMPLE
#00SA50.0
This command, followed by a carriage return, sets the analog output voltage of a
Page 29

transducer with the address of ‘00' to 50 percent of full scale, i.e. 2.5 Vdc.
In response to this command, the transducer transmits the following:
OK
6.5 SS Select Analog Output Source
DESCRIPTION
The SS command selects the source from which the analog output is generated.
The analog output may be derived from either of two sources. The default source
for the analog output is the sensor at the pressure port of the transducer. The
alternate source is a discrete value provided by the user through the digital
interface.
This command requires a one character data field.Valid values for the data field
are:
Analog Output Source Data Field Value
Pressure Port 0
Digital Interface 1
This command must be preceded by the WE command.
When switching from the pressure port to the digital interface as the source for
the analog output, the initial value for the analog output is set by the SV
command. All subsequent values are provided by the SA command.
EXAMPLE
#00SS1
This command, followed by a carriage return, configures the analog output of a
transducer with the address of ‘00' to use values provided through the digital
interface. The transducer immediately uses the value set by the SV command to
set the analog output voltage.
In response to this command, the transducer transmits the following:
OK
6.6 SV Set Analog Output Default Value
Page 30

DESCRIPTION
The primary use of the SV command is to provide the default value for the
analog output when the transducer is first configured to use the digital interface
to control the analog output. (See the SS command.) It is also the value used at
power up when the transducer’s analog output is controlled by the digital
interface.
The secondary use of the SV command is to provide a default value for the
analog output to indicate a checksum error. When the analog out is under control
of the pressure port and a checksum error is detected, the value set by this
command is used to set the analog output.
This command requires a data field of up to six character. Data field values may
be entered as integers or decimal numbers and range from 0.00 to 100.00. This
value is in units of percentage of full scale. This command must be preceded by
the WE command.
NOTE: The analog output scaling factor and offset values set by the WO and
WN commands respectively apply to the value set by this command.
EXAMPLE
#00SV0.0
This command, followed by a carriage return, sets the default analog output
voltage of a transducer with the address of ‘00' to 0 percent of full scale, i.e. 0.0
Vdc.
In response to this command, the transducer transmits the following:
OK
6.7 SY Display Analog Output Default Value
DESCRIPTION
The SY command reads the default value for the analog output set by the SV
command.
EXAMPLE
#00SY
Page 31

This command, followed by a carriage return, reads the default analog output
value of a transducer with the address of ‘00'.
The transducer transmits a response to this command similar to:
+5.0000E+01
For this example, the default analog output value is 50 %, or 2.5 Vdc.
6.8 WN Write Voltage Output Offset
DESCRIPTION
The WN command is used to adjust the offset of the analog voltage output only.
The command requires a data field indicating the amount of zero offset desired.
The data field represents the percentage of full scale reading by which the zero
offset should be changed and may be entered as integers, decimal numbers, or
scientific notation. This command must be preceded by the WE command.
The zero of the analog voltage output is inversely related to this command’s data
field value. Increasing this value will lower the analog output voltage; decreasing
this value will raise the output voltage. Any zero adjustment of the voltage output
should be made before adjusting the span. The default value for this parameter
is 0.0 and represents no offset adjustment.
EXAMPLE
#00WN-0.2
This command, followed by a carriage return, adjust the offset of the analog
voltage output by -0.2 % of full scale for a transducer with the address of ‘00'. In
effect this inceases the analog output voltage by 0.2 %.
In response to this command, the transducer transmits the following:
OK
6.9 WO Write Voltage Output Scaling Factor
DESCRIPTION
The WO (W, letter O) command is used to adjust the span of the analog voltage
Page 32

output only. The command requires a data field indicating the amount of span
adjustment desired. The data field represents the percentage of full scale
reading by which the span should be changed and may be entered as integers,
decimal numbers, or scientific notation. The command must be preceded by the
WE command.
The span of the analog voltage output is inversely related to this command’s
data field value. Increasing this value will decrease the analog output span;
decreasing this value will increase the analog output span. The default value of
this parameter is 100.0 representing no analog output span adjustment.
EXAMPLE
#00WO98.5
This command, followed by a carriage return, adjusts the span of the analog
output by +1.5 % of full scale for a transducer with the address of ‘00'.
In response to this command, the transducer transmits the following:
OK
Page 33

7. ELECTRICAL CONNECTIONS
Figure 7.1 Electrical Connector Pin Assignments
Figure 7.2 - Typical Transducer Connections, RS-485 Interface
Page 34

Figure 7.3 - Typical Transducer Connections, RS-232 Interface
 Loading...