

Page 1

User Manual
eBee and eBee Ag
Revision 13 / November 2014
Copyright © 2010-2014 senseFly Ltd
Page 2

GENERAL INFORMATION
READ THIS USER MANUAL CAREFULLY BEFORE USING A SENSEFLYLTD PRODUCT.
senseFly Ltd products are intended forprofessional use only.
Applicable Regulations
senseFly Ltd products are subject to Civil Aviation regulations. Regulations may vary depending on the country
where you intend to operate yourproduct.
ANY USEOF SENSEFLYLTDPRODUCTSIN BREACH OFTHE LAW OFTHE COUNTRY WHEREYOUOPERATETHE PRODUCT
IS UNDER YOUR SOLE RESPONSIBILITY.
INFORM YOURSELF BEFORE USING THE PRODUCT. SOME COUNTRIES MAY HAVE LAWS THAT LIMIT THE USE OF UNMANNED AIRCRAFT TO ‘LINE-OF-SIGHT’ OPERATIONS AND/OR PROHIBIT THE USE OF UNMANNED AIRCRAFT AT ALL
OR IN SPECIFIC AREAS.
Privacy
Recording and circulating an image of an individual may constitute an infringement of their image and privacy for
which you can be liable. Ask for authorization before taking pictures of an individual, particularly if you want to keep
your recordings and/or circulate images on the Web or any other medium. Do not circulate degrading images or
ones that could undermine the reputation or dignity of an individual. Check that your use of the cameras on board
senseFly Ltd products comply with the legal provision on privacy in the country where you operate your product.
Limited Warranty
SenseFly Ltd warrants that the product will be free from defects in material and workmanship for a period of twelve
(12) months from the date of delivery. SenseFly Ltd further warrants that the product will perform substantially in
accordance with its specification. During the warranty period senseFly Ltd’s sole liability shall be at senseFly Ltd’s
sole option, either to repair or to replace the defective product with another product or a product with similar specifications, at no charge, or to reimburse the purchase price of the product, or if repair or replacement is not possible,
issue a credit note; provided however, that the defect has been confirmed by senseFly Ltd and that the defective
product is returned to senseFly Ltd in accordance with the support and repair form together with all required flight
logfiles.
Warranty does not apply, without limitation, in case: a) the products are not stored and used according to their
specifications, b) the products are damaged due to carelessness, negligence, or wrong use by the user, and c) for
defects due to normal wear and tear including, but not limited to, deterioration to the airframe after first flight,
normal degradation, misuse, moisture or liquids, proximity or exposure to heat, accidents, excessive strain, abuse,
neglect, misapplication, repairs or modifications made by third party other than senseFly Ltd, damage due to manual
operation, damage due to take-off or landing location with obstacles, damage due to low altitude flight, damage due
to loss of data radio connection, damage due to strong wind, rain or humidity, or other causes for which senseFly Ltd
has no control.
Page 3

THE FOREGOING WARRANTIES ARE IN LIEU OF ALL WARRANTIES, EITHER EXPRESSED OR IMPLIED, INCLUDING WITHOUT LIMITATIONANY IMPLIED WARRANTY OF MERCHANTABILITY OR FITNESS FOR A PARTICULAR PURPOSE, AND OF
ANY OTHER OBLIGATION ON THE PARTOF SENSEFLY LTD.
Limitation of liability
TO THE EXTENT PERMITTED BY APPLICABLE LAW,IN NO EVENT WILL SENSEFLY LTD BE LIABLE FOR ANY LOSS OF REVENUE, LOSS OF PROFIT, LOSS OF DATA, OR INDIRECT, SPECIAL, INCIDENTAL OR CONSEQUENTIAL DAMAGES, EVEN IF
SENSEFLY LTD HAS BEEN NOTIFIED OF THE POSSIBILITY OF SUCH DAMAGES, AND WHETHER THIS LIABILITY ARISES
FROM A CLAIM BASED ON CONTRACT, WARRANTY, TORT OR OTHERWISE, WITH THE EXCEPTION OF GROSS NEGLIGENCE AND DEATH.
YOU SHALL AT ALL TIMES OPERATE THE PRODUCT IN AREAS OR UNDER CIRCUMSTANCES SO AS TO GUARANTY SECURITY AND SAFETY OF PEOPLE, PROPERTY AND ANIMALS.
FCC and iC Compliance statement :
This device complies with part 15 of the FCC Rules and Industry Canada License-exempt RSS standard(s).
Operation is subject to the following two conditions:
1. This device may not cause harmful interference, and
2. This device must accept any interference received, including interference that may cause undesired operation. Changes or modifications not expressly approved by the party responsible for compliance could void
the user’s authority to operate the equipment.
This equipment has been tested and found to comply with the limits for a class B digital device, pursuant to part
15 of the FCC Rules. These limits are designed to provide a reasonable protection against harmful interference in a
residential installation. This equipment generates, uses and can radiate radio frequency energy and, if not installed
and uses in accordance with the instructions, may cause harmful interference to radio communications. However,
there is no guarantee that interference will not occur in a particular installation. If this equipment does cause harmful
interference to radio or television reception, wich can be determined by turning the equipment off and on, the user
is encouraged to try to correct the interference by one or more of the following measures:
1. Reorient or relocate the receiving antenna
2. Increase the separation between the equipment and the receiver
3. Connect the equipment into a an outlet on a circuit different from that to which the receiver is connected
4. Consult the dealer or an experienced radio/TV technician for help.
Page 4

This Class B digital apparatus complies with Canadian ICES-003.
This equipment complies with FCC’s radiation exposure limits set forth for an uncontrolled environment under the
following conditions:
1. This equipment should be installed and operated such that a minimum separation distance of 20cm is
maintained between the radiator (antenna) and user’s/nearby person’sbody at all times.
2. This transmitter must not be co-located or operating in conjunction with any other antenna or transmitter.
Disposal of this product at the end of its life
At the end of this product’s life, please do not dispose of this product in your general household waste.
Instead, in order to prevent possible harm to the environment or human health from uncontrolled waste
disposal, please dispose of this product separately in accordance with your local laws and regulation. For
more information on the separate collection systems for waste electrical and electronic equipment that
are available for consumers, near your home, free of charge, please contact your local municipal authority.
You can also contact senseFly Ltd or the reseller from which you purchased your drone who may provide recycling
services or be part of a recycling scheme.
Copyrights
senseFly Ltd reserves the right to make changes to specifications and product descriptions contained in this document at any time without notice. Please consult www.sensefly.comfor the latest release.
Copyright © 2014 senseFly Ltd. All rights reserved. REPRODUCTION, USE OR DISCLOSURE OF ALL OR IN PARTOF THIS
MANUAL TO THIRD PARTIES WITHOUT THE PRIOR WRITTEN PERMISSION OF SENSEFLY LTDIS STRICTLY PROHIBITED.
Page 5

Address
senseFly Ltd
Route de Gen`eve 38
1033 Cheseaux-Lausanne
Switzerland
Website: http://www.sensefly.com
Technical support
If you have questions about any of your senseFly products:
• Try our Knowledge Base. Youcan find it within my.senseFly (http://my.sensefly.com).
• Send an email to support@sensefly.com.
Page 6

Page 7
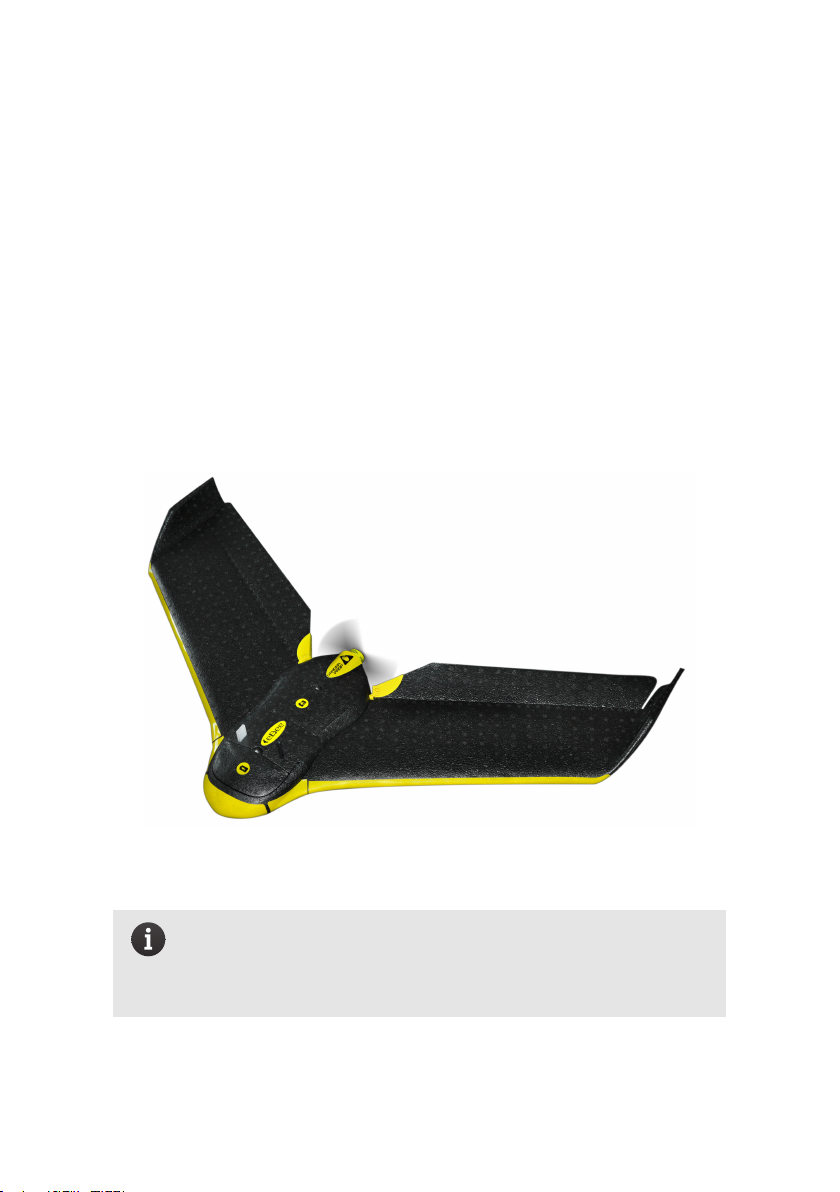
Welcome to your eBee
Congratulations on your purchase of the eBee, a complex and powerful yet intuitive autonomous mapping system. Wetake great care to develop and design the
best possible hardware and software tools for quick, high-quality and easy-to-use
2D and 3D aerial mapping.
Note: This manual refers to the version 2.4 of eMotion andversion 3.2
of Postflight Terra 3D software. Check the software version included
in your package and consult the Release Notes for potential changes
included in more recent versions of the software.
Page 8
Page 9

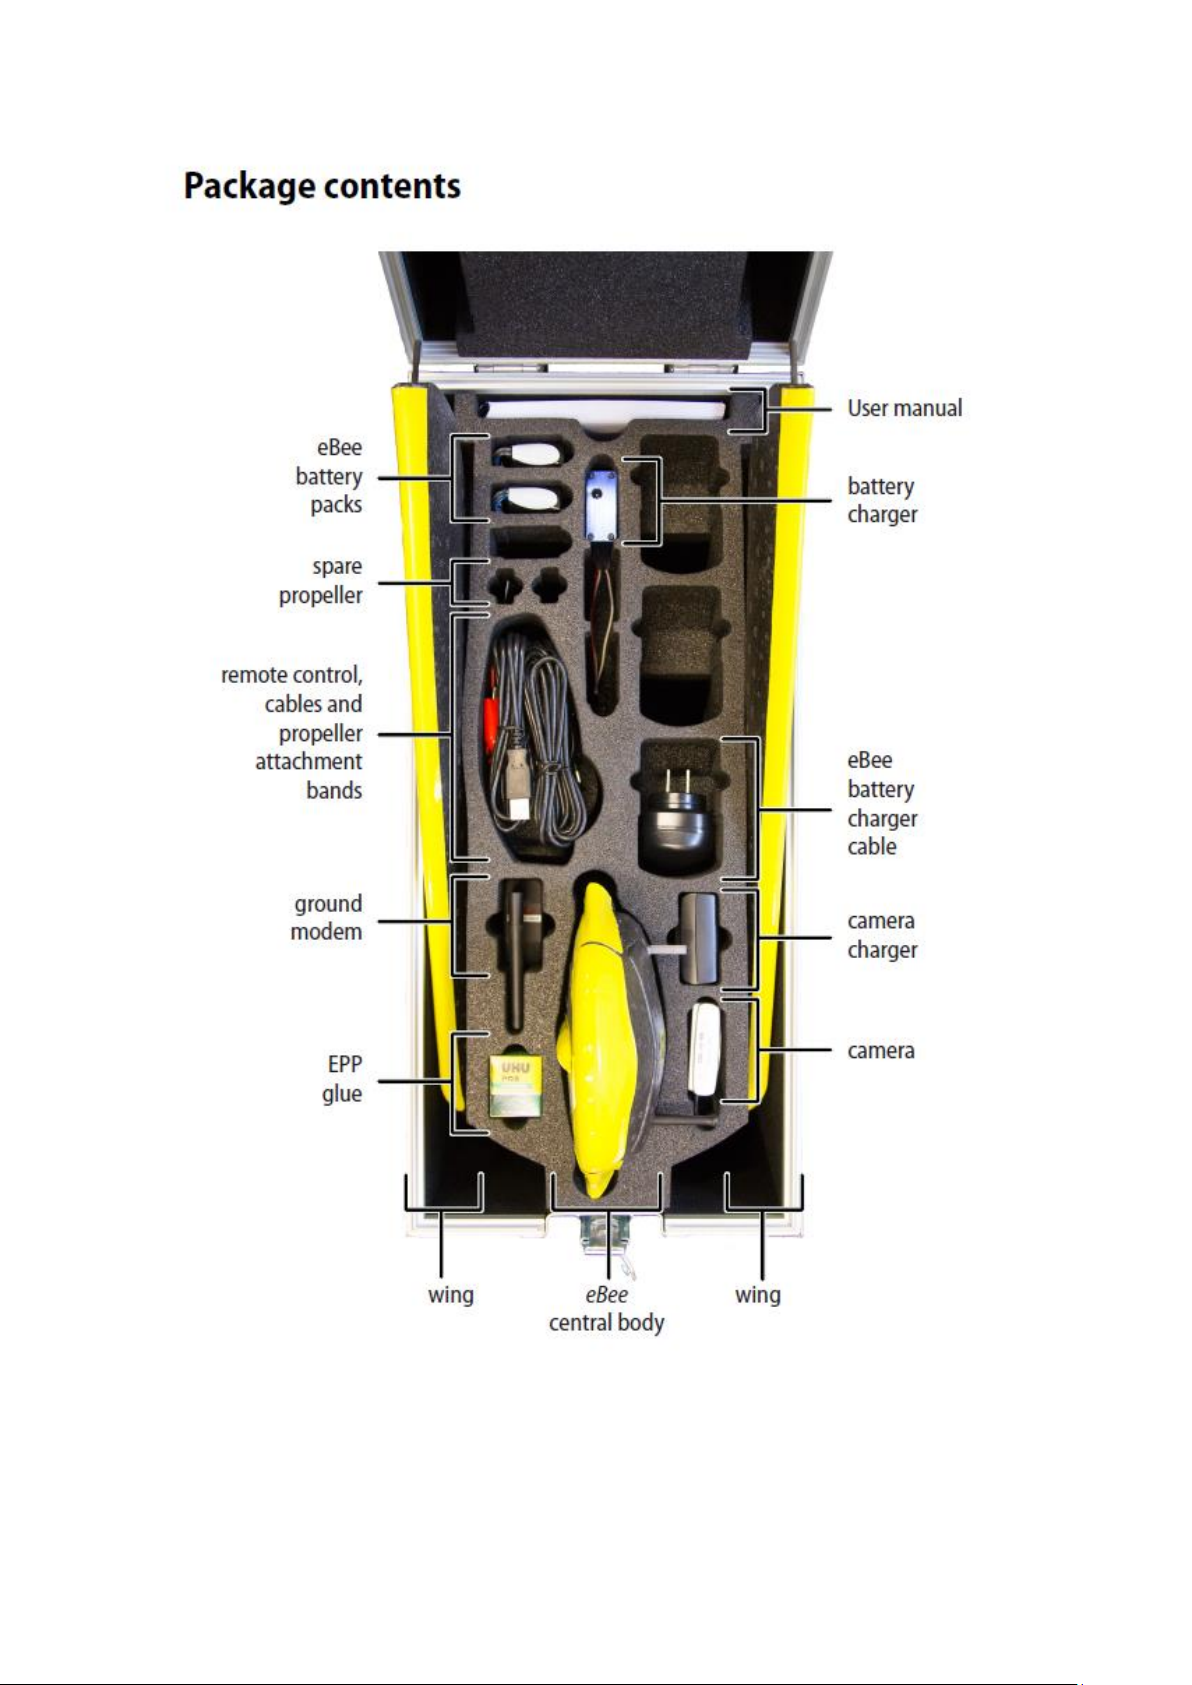
The standard eBee package contains the following items:
• 1x carrying case with foam protection
• 1x eBee central body with built-in autopilot
• 1x pair of detachable wings
• 1x spare propeller
• 10x spare propeller attachment rubber bands
• 2x Lithium-Polymer battery packs
• 1x Lithium-Polymer battery charger (including cables)
• 1x 2.4GHz USB ground modem (FCC ID: 2AC2VGMEBEE) for radio data link (including USB cable)
• 1x 2.4 GHz remote control (including including 3 AA batteries)
• 1x still camera (including memory card, battery and charger)
• 1x USB cable for interfacing with camera and on-board autopilot
• 1x EPP glue
• 1x eBee User Manual
• 1x camera User Manual
Depending on your order, your package may also include other items, such as
additional payloads. Please verify upon delivery that your package is complete.
In case of a missing item, please contact your eBee reseller immediately.
Note: Camera user manuals are also available to download from our
Knowledge Base, part of my.senseFly.
http://my.sensefly.com
Page 10
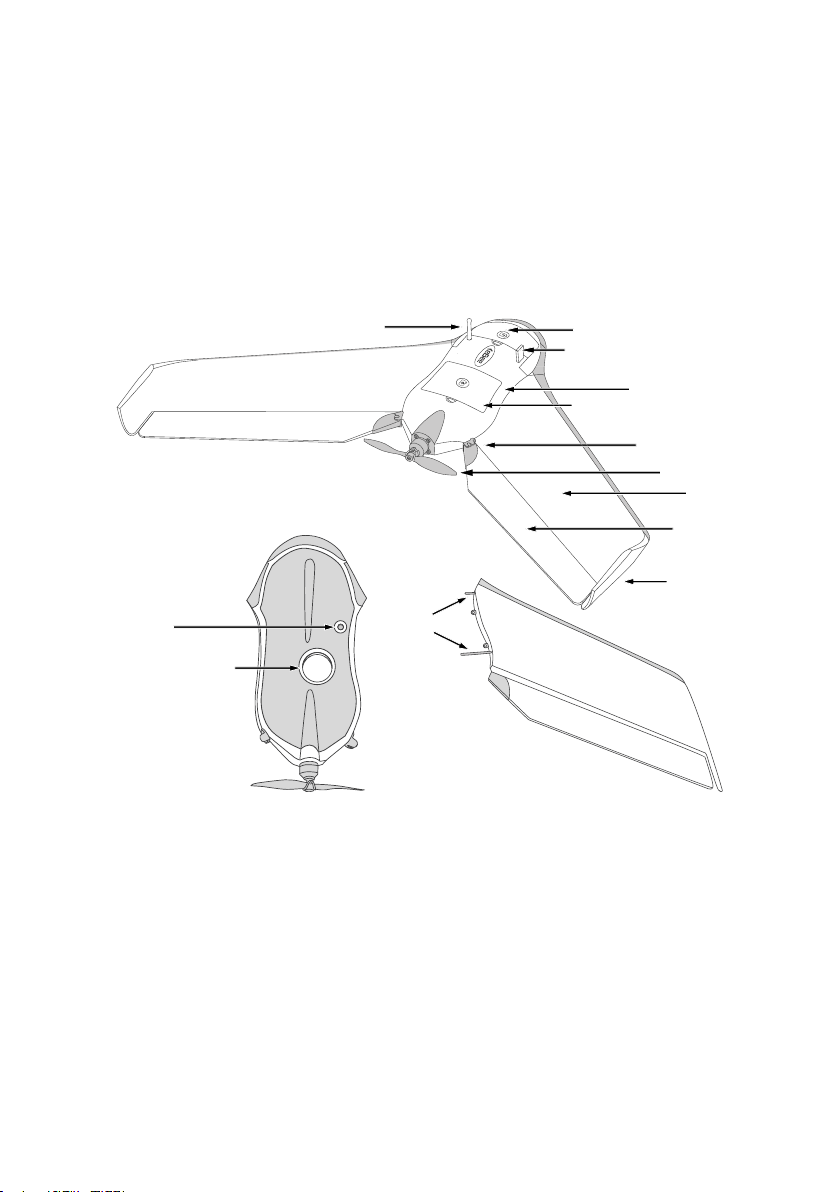
Hardware features
Top face of the eBee
batter
y compartment
aileron
winglet
propeller
rvo connection
mechanism
data link antenna
tot pr
obe, status LED
wing
ra compartment
central body
Bottom face of
the central body
ground
sensor
camera lens hole
Detachable
wing
wing
struts
se
pi
came
The eBee is an autonomous flying drone comprised of the followingcomponents:
• Central body: This is the core of the eBee and includes all the electronics,
actuators and communications hardware on-board the drone.
• Wing: The two wings of the eBee are detachable for storage and replace-
ment. Each wing has two wing strutsand twoclips tohold itin placewithin
the central body.
Page 11

• Winglets: These structures add aerodynamic stability to the drone while it
is in flight.
• Ailerons: Used to control the eBee while in flight.
• Servo connection mechanism: The ailerons are connected to the servo-
motors within the centralbody of the drone through this connection mechanism.
• Propeller: Used to generate thrust while it is in flight.
Caution: When attached to the motor the propeller spins at high
speeds and can be potentially dangerous if itcomes into contact with
exposed skin. Be sure to alwayskeep your hands clear of the propeller
when the battery is attached to the eBee.
• Battery compartment: The eBee is powered by a LiPo (Lithium Polymer)
battery stored within the battery compartment.
Caution: Propercare of your battery is essential. Please read the eBee
Extended User Manual before using your drone for the first time.
• Cameracompartment: The eBee featuresa built-in camera for taking aerial
images stored within the camera compartment.
• Data Link Antenna: Used by the drone to communicate with the eMotion
software through the USB ground modem.
• Pitot probe: This is the sensor used by the eBee to detect airspeed, wind
and altitude. It must be kept clean and clear of obstructions to function
properly.
• Status LED: This coloured LED displays the current state of the eBee. It is
housed underneath the pitot probe and thus illuminates the entire transparent probe in various colours depending on the drone’sstate.
Page 12

• Ground sensor: The ground sensor, composed of a high-speed optical
sensor and lens assembly, is used to detect the proximity of the ground.
Page 13
Software features
The eBee package allows you to download and use eMotion∗and
Postflight Terra3D∗†at no extra cost.
eMotion is the integrated software package that allows you to interact with your
eBee. Its easy-to-use interface allows you to plan a mapping flight intuitivelyfrom
the comfort of your office or directly in the field. Once the drone is launched, you
can use eMotion’swireless connection withyour eBee to track its position, monitor
the progress of your mapping flight and send commands if desired.
Once your eBee returns after an aerial mapping flight it is the turn of Postflight
Terra 3D to process the captured images fully automatically. Postflight Terra 3D is
a full-featured mapping solution: with just a few mouse clicks it can create highquality geo-referenced2D and 3D orthomosaics and digital elevation/surface models (DEM/DSM). While youare still in the field PostflightTerra3D analyses the quality of the capturedimages and generates an easy to understand report, letting you
know immediately if the data you captured meets your mapping requirements.
∗
Software access terms and conditions apply
†
Postflight Terra 3D works with eBee images only
Page 14

Page 15

Contents
I Quick start guide 17
1 Planning and simulating a flight 19
1.1 Installing eMotion, Postflight Terra 3D, and the ground modem
drivers . . . . . . . . . . . . . . . . . . . . . . . . . . . . . . . 19
1.2 The eMotion interface . . . . . . . . . . . . . . . . . . . . . . . 20
1.3 Creating a new flight plan . . . . . . . . . . . . . . . . . . . . . 22
1.4 The mission phase of a flight . . . . . . . . . . . . . . . . . . . . 23
1.5 Simulating your flight . . . . . . . . . . . . . . . . . . . . . . . 25
1.6 Getting ready for a mission . . . . . . . . . . . . . . . . . . . . 26
2 Executing a flight 28
2.1 Weather check . . . . . . . . . . . . . . . . . . . . . . . . . . . 28
2.2 Preparing the eBee for flight . . . . . . . . . . . . . . . . . . . . 29
2.3 The setup phase of a flight . . . . . . . . . . . . . . . . . . . . . 38
2.4 Take-off . . . . . . . . . . . . . . . . . . . . . . . . . . . . . . . 42
2.5 In-flight monitoring and control . . . . . . . . . . . . . . . . . . 45
2.6 Landing . . . . . . . . . . . . . . . . . . . . . . . . . . . . . . . 47
2.7 Potential in-flight errors . . . . . . . . . . . . . . . . . . . . . . 47
3 Processing image data 49
3.1 Importing images and flight data . . . . . . . . . . . . . . . . . 49
3.2 In-field image quality check . . . . . . . . . . . . . . . . . . . . 52
3.3 Creating advanced mapping products . . . . . . . . . . . . . . 54
Page 16

II Specifications 55
1 Software requirements 56
2 Drone specifications 57
Page 17

Part I
Quick start guide
The first part of this document introduces you to the eBee and contains the basic
informationyou will need toplan and execute a simple mapping project. A typical
mapping project can be divided into three main phases:
1. Planning and simulating a flight: Every project begins with careful planning, whether it is a quick flight over a small area or a multi-stage flight in
complex terrain. Section ‘Planning and simulating a flight’ on page 19 describes how to use the Mission Planning featureto quickly generate a flight
plan and to test it using the built-in simulator.
2. Executing a flight: Once planning is complete, it is time for the drone to
perform its flight. In section ‘Executing a flight’ on page 28 you will learn
how to prepare your drone for flight, connect it to eMotion, and to monitor
it in flight while it gathers images. Though the eBee can complete a flight
fully autonomously from take-off to landing, you can also modify its flight
plan at any point during flight.
3. Processing image data: Thelast stepin aproject is converting the images
taken by your eBee into usable products such as precise geo-referenced orthomosaicsor 3D terrain models. section ‘Processingimage data’ on page 49
leads you through the process of transferring images from the drone to a
computer, checking if the image quality suits your needs while still in the
field and producing advanced 2D and 3D maps.
Page 18

Quick start guide
Note: eMotion contains many advanced features, including 3D flight
planning, multi-drone mapping, oblique imagery and many more.
All advanced features are described in the eBee Extended User Manual that can be found directly within the File menu in eMo-
tion. You can also find technical FAQs in our Knowledge Base, part
of my.senseFly¹.
18
Page 19

Planning and simulating a flight
1 Planning and simulating a flight
Goal of this section: This section introduces the eMotion software
used to interface with the eBee. It describes the steps required to
plan, simulate, and save a simple mapping flight. A more detailed
description of eMotion and its advanced functions is presented in the
eBee Extended User Manual.
1.1 Installing eMotion,PostflightTerra3D, and the groundmodem drivers
You can download the latest version of eMotion and Postflight Terra 3D at:
http://my.sensefly.com
We recommend that you download and install Google EarthTMto take full advantage of the features of eMotion. You can find more information at the following
address:
www.google.com/earth/
To install eMotion on Windows, simply execute the provided installers for eMotion
and Postflight Terra 3D and follow the on-screen instructions. The eMotion and
PostflightTerra3D software will be availablein the ‘Start’ menu. Drivers for the USB
groundstation ground modem will automatically be installed along with eMotion.
In case a problem arises after connecting the ground modem to the computer for
the first time you can find the drivers in one of the following directories (depending on your version of Windows):
C:\Program Files\senseFly\eMotion 2\usb driver\
C:\Program Files (x86)\senseFly\eMotion 2\usb driver\
See the eBee Extended User Manual if you have any difficulty with software installation.
19
Page 20
Quick start guide
1.2 The eMotion interface
Thanks to the powerful tools available within eMotion, designinga mapping flight
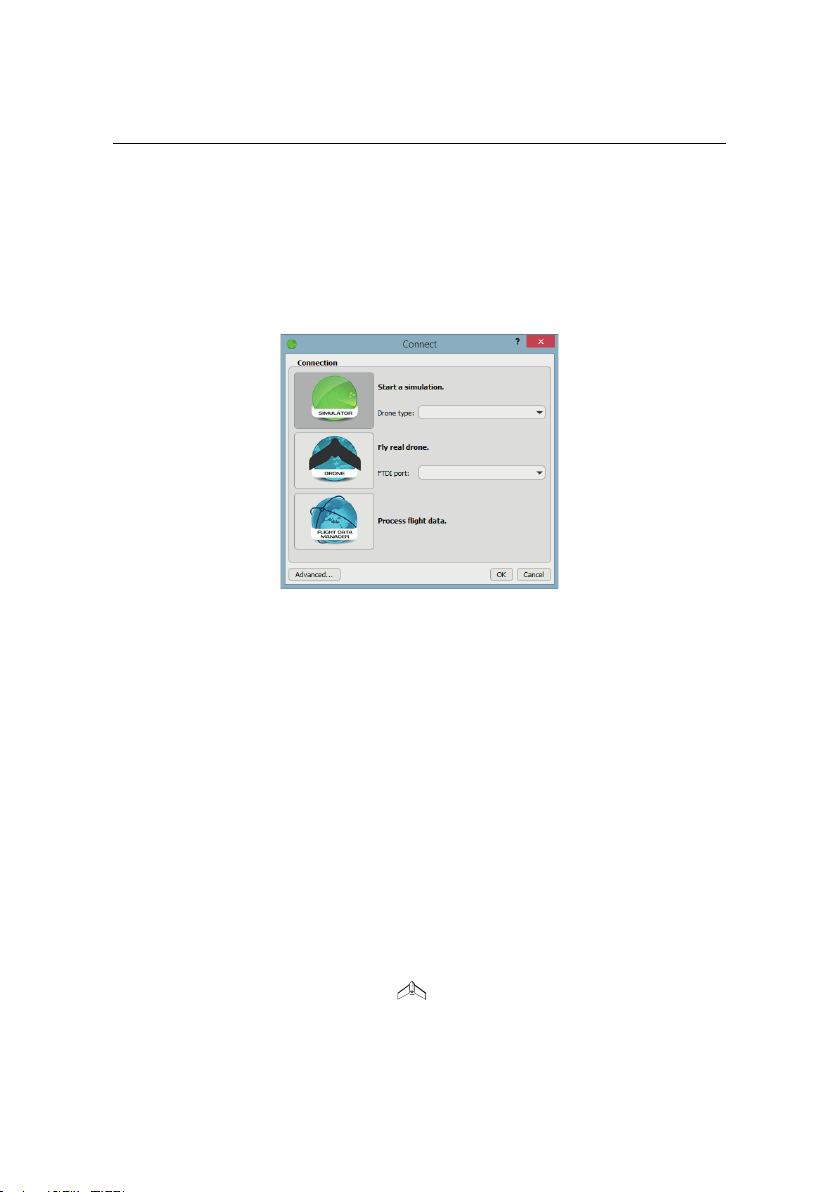
for your eBee is a simple process. To get started, launch eMotion and choose what
you would like to do...
• To run a simulation, select the simulator, choose the drone you want to
simulate and click OK.
• To fly a drone, connect your ground modem to your computer and select
Drone. Ifyou have more than one USB device connected to your PC , choose
the ground modem you want to connect to from the list and click OK. Otherwise, just click OK.
• To process flight data you already created, select the Flight Data Manager
and click OK.
We recommend that you plan flights using a simulated drone. Once connected to
a real or simulated drone you will see the main screen of eMotion.
The main screen of eMotion is split into four sections:
• Map Area: The Map Area of eMotion displays a map with the drone’s cur-
rent position, indicated by the symbol. A small Status Panel floats besidethe symbol, indicating important status information including the eBee’s
20
 Loading...