

Page 1

Tourguide Wireless Transmitter
SR 2020 D
Instruction manual
Page 2

Page 3

Contents
Thank you for choosing Sennheiser!
We have designed this product to give you reliable operation over many years. Over 60 years of
accumulated expertise in the design and manufacture of high-quality electro-acoustic equipment
have made Sennheiser a world-leading company in this field.
Please take a few moments to read these instructions carefully, as we want you to enjoy your new
Sennheiser products quickly and to the fullest.
Contents
Important safety instructions ............................................................................................................2
Delivery includes ....................................................................................................................................4
System components .............................................................................................................................4
Tourguide system overview ................................................................................................................4
Areas of application .........................................................................................................................5
Connection possibilities ..................................................................................................................6
Product overview ...................................................................................................................................7
Indications and displays on the transmitter ..............................................................................8
Putting the SR 2020 D into operation ..............................................................................................9
Preparing the transmitter for use ................................................................................................ 9
Connecting the transmitter to the mains .................................................................................12
Connecting external devices .................. ......................................................................................12
Connecting the headphones ........................................................................................................13
Operating the SR 2020 D ...................................................................................................................14
Switching the transmitter on/off ........................................................................................ .......14
Working with the operating menu .............................................................................................14
Selecting the menus ......................................................................................................................16
Overview of the operating menu ................................................................................................22
Cleaning the SR 2020 D .....................................................................................................................24
If a problem occurs....
Accessories and spare parts ..............................................................................................................25
Specifications .......................................................................................................................................26
Manufacturer Declarations ...............................................................................................................27
Index .......................................................................................................................................................29
.........................................................................................................................24
1
Page 4

Important safety instructions
Important safety instructions
• Read this instruction manual.
• Keep this instruction manual. Always in clude this instruction manual when passing the
device on to third parties.
• Clean only with a dry cloth.
• The configuration of the transmitter must only be carried out by professionally trained
personnel.
• Refer all servicing to qualified service personnel.
Servicing is required if the device has been damaged in any way, liquid has been spilled,
objects have fallen inside, the device has been exposed to rain or moisture, does not
operate properly or has been dropped.
• WARNING: To reduce the risk of fire or electric shock, do not expose the device and the
mains unit to rain or moisture.
• Do not place objects filled with liquids, such as vases or coffee cups, on the device.
• Disconnect the mains connector from the wall socket
– to completely disconnect the device from the mains,
– during lightning storms or when unused for long periods of time.
• Use only the supplied mains unit.
• Ensure that the mains unit is:
– always readily operable and easily accessible,
– properly plugged into the wall socket,
– only operated within the permissible temperature range (see “Specifications” on
page 26).
– not covered or exposed to direct sunlight for longer periods of time in order to prevent
heat accumulation.
2
Page 5

Important safety instructions
Overloading
Do not overload wall outlets and extension cables as this may result in fire and electric shock.
Replacement parts
When replacement parts are required, be sure the service technician has used replacement
parts specified by Sennheiser or those having the same characteristics as the original part.
Unauthorized substitutions may resul t in fire, electric shock, or other hazards.
Danger due to high volumes
This is a professional device. Commercial use is subject to the rules and regulations of the
trade association responsible. Sennheiser, as the manufacturer, is therefore obliged to
expressly point out possible health risks arising from use.
This device is capable of producing sound pressure exceeding 85 dB(A). 85 dB(A) is the sound
pressure corresponding to the maximum permissible volume which is by law (in some
countries) allowed to affect your hearing for the duration of a working day. It is used as a
basis according to the specifications of industrial medicine. Higher volumes or longer
durations can damage your hearing. At higher volumes, the duration must be shortened in
order to prevent hearing damage. The following are sure signs that you have been subjected
to excessive noise for too long a time:
• You can hear ringing or whistling sounds in your ears.
• You have the impression (even for a short time only) that you can no longer hear high
notes.
Intended use of the device
Intended use of the device includes:
y using the device for professional purposes,
y having read these instructions especially the chapter “Important safety instructions” on
page 2,
y using the device within the operating conditions and limitations described in this
instruction manual.
“Improper use” means using the device other than as described in these instructions, or under
operating conditions which differ from those described herein.
3
Page 6

Delivery includes
Delivery includes
1 SR 2020 D transmitter
1NT2 mains unit
1telescopic antenna
1 GA 2 rack adapter, consisting of:
2rack mount “ears”
1blanking plate
1jointing plate
2blanking plugs for closing off unused BNC holes
12 recessed head screws M 3x6
2 recessed head screws M 6x10
4 device feet
1instruction manual
System components
The SR 2020 D transmitter allows the stationary use of the Tourguide 2020D system. The
transmitter can be combined with the following individual components:
• HDE 2020 D stethoset receivers
• EZL 2020-20 L charging case including
instruction manual of the overall system
• L 2021-40 charger (incl. “Conference Control” software)
Tourguide system overview
Together with the SR 2020 D transmitter, the Tourguide 2020 D system offers optimum
digital speech transmission for the following applications:
• simultaneous interpretations and
• stationary guided tours
4
Page 7
Tourguide system overview
t
o
u
r
g
u
i
d
e
t
o
u
r
g
u
i
d
e
to
u
r
g
u
id
e
to
u
r
g
u
id
e
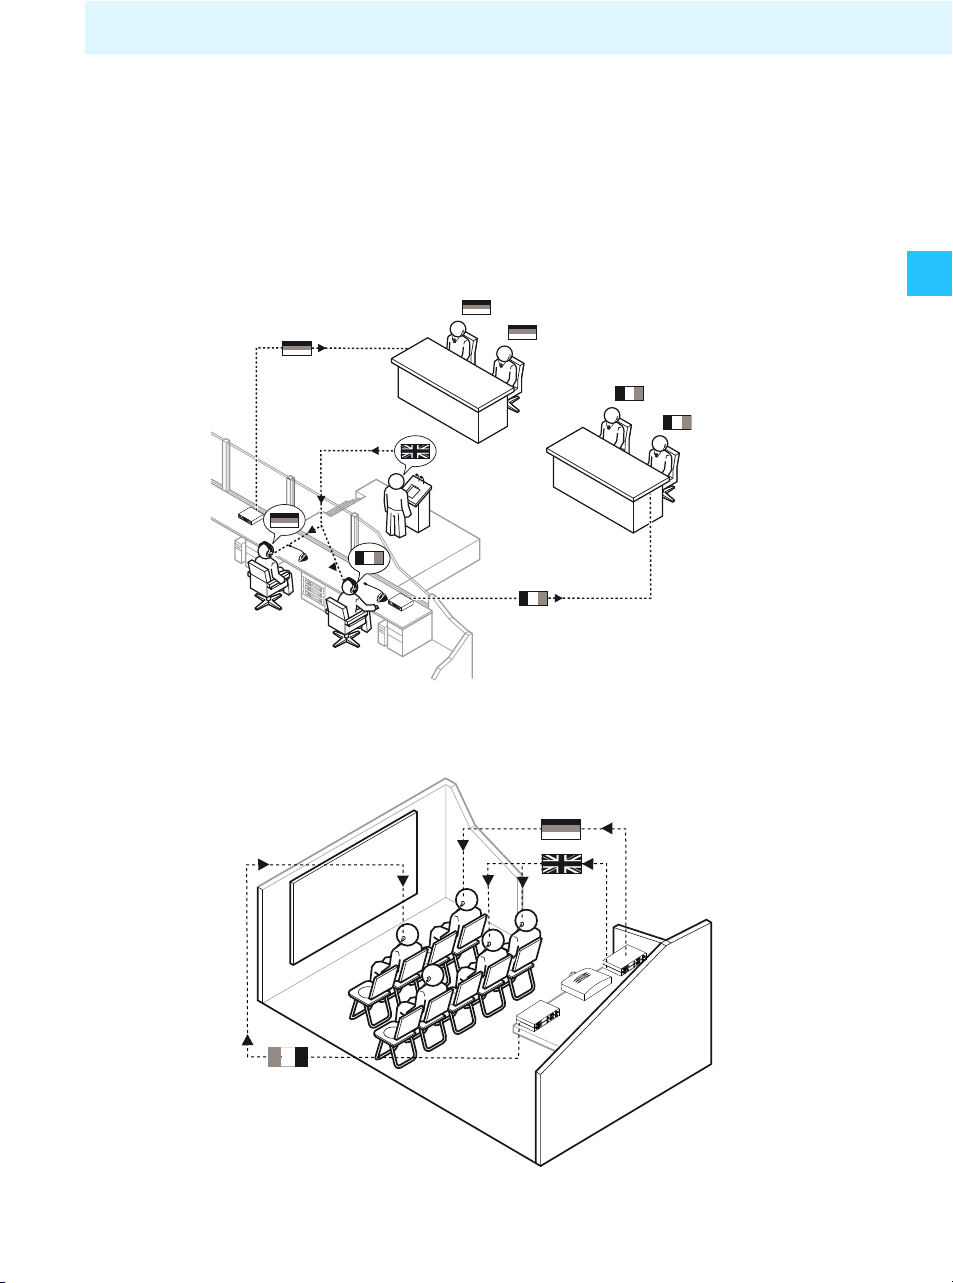
Areas of application
Simultaneous interpretations during conferences (“Conference“ mode)
The main application of the stationary SR 2020 D transmitter is its use for simultaneous
interpretations during conferences.
Eight fixed transmission frequencies allow for interference-free simultaneous interpretations
in up to eight languages (see “Transmitting several languages simultaneously” on page 17).
Stationary guided tours (“Tourguide“ mode)
With a stationary guided tour, both the group and the transmitters are in a fixed location.
5
Page 8

Tourguide system overview
Examples for stationary guided tours are multimedia presenta tions, movie shows as well as
boat and bus tours in several languages.
Six fixed transmission frequencies allow for simultaneous transmission in up to six languages
(see “Transmitting several languages simultaneously” on page 17).
The Tourguide 2020 D system operates in the 863 MHz– 865 MHz frequency band, which is
license-free in Europe (see “Specifications” on page 26).
Connection possibilities
You can connect one of the following phantom-powered Sennheiser condenser microphones
(not included) to the SR 2020 D transmitter:
• ME 34, ME 35, ME 36
In addition, you can connect an audio source to the transmitter:
• Conference/interpretation systems
•MP3 player
•CD /DVD player
6
Page 9
Product overview
B
A
A
B
햴
tourguide
2
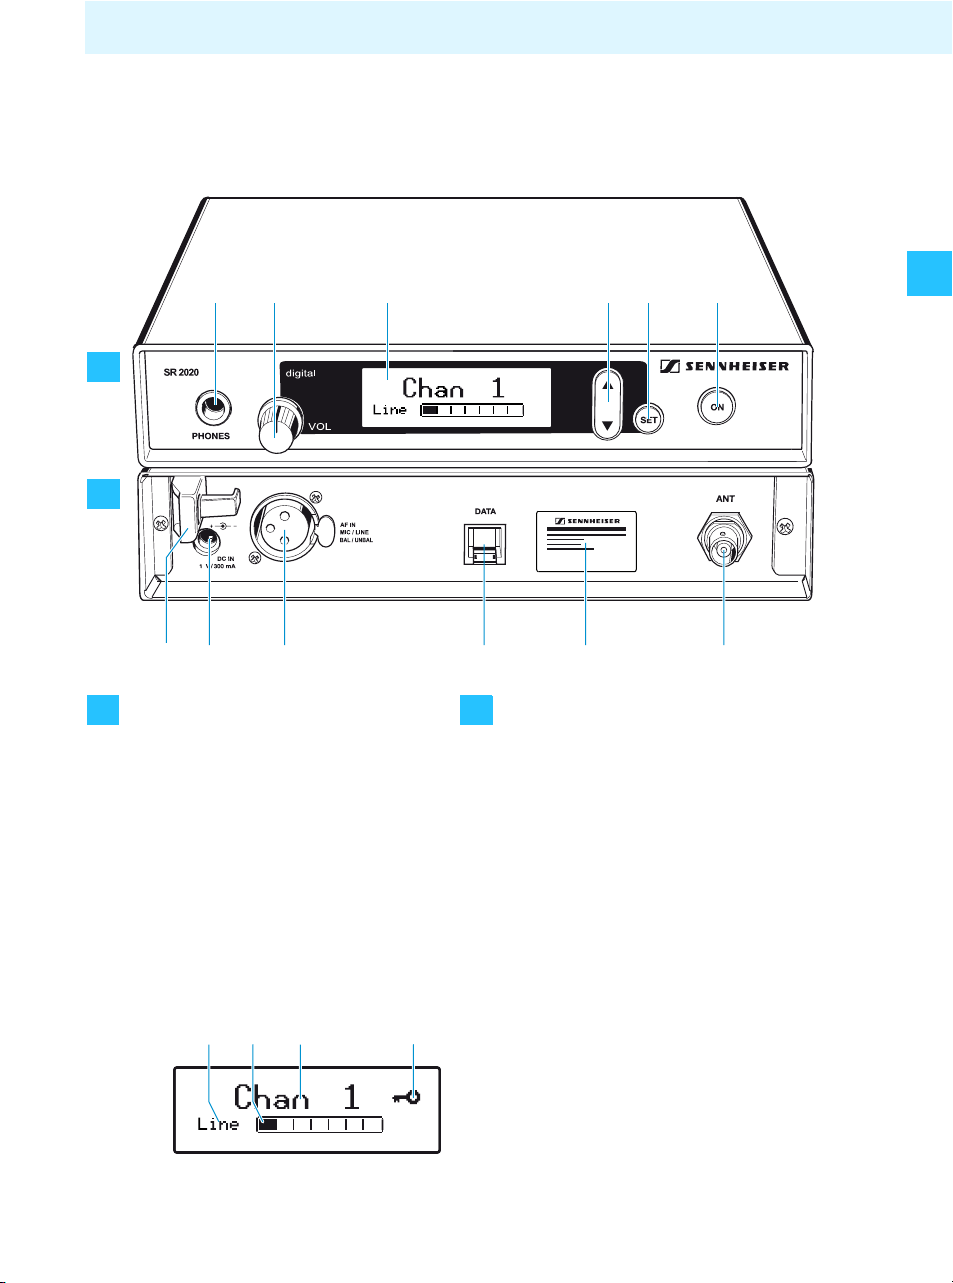
Product overview
Operating controls - front
Headphone output (PHONES),
¼” (6.3 mm) jack socket
Headphone volume control (VOL)
Display, backlit
/ rocker button, backlit
SET button, backlit
ON button, backlit
(serves as the ESC (cancel) key in the
operating menu)
Operating controls - rear
Cable grip for mains cable
Socket for connection of mains unit
(DC IN 12 V/300 mA)
Audio input (AF IN MIC/LINE),
XLR-3F socket
Service interface (DATA)
Type plate
Antenna output (ANT), BNC socket
Indications on the display panel
Display for the selected signal source
(Mic/Line)
Mic/Line level display
Channel display
Lock mode icon
(lock mode is activated)
7
Page 10
Product overview
햴
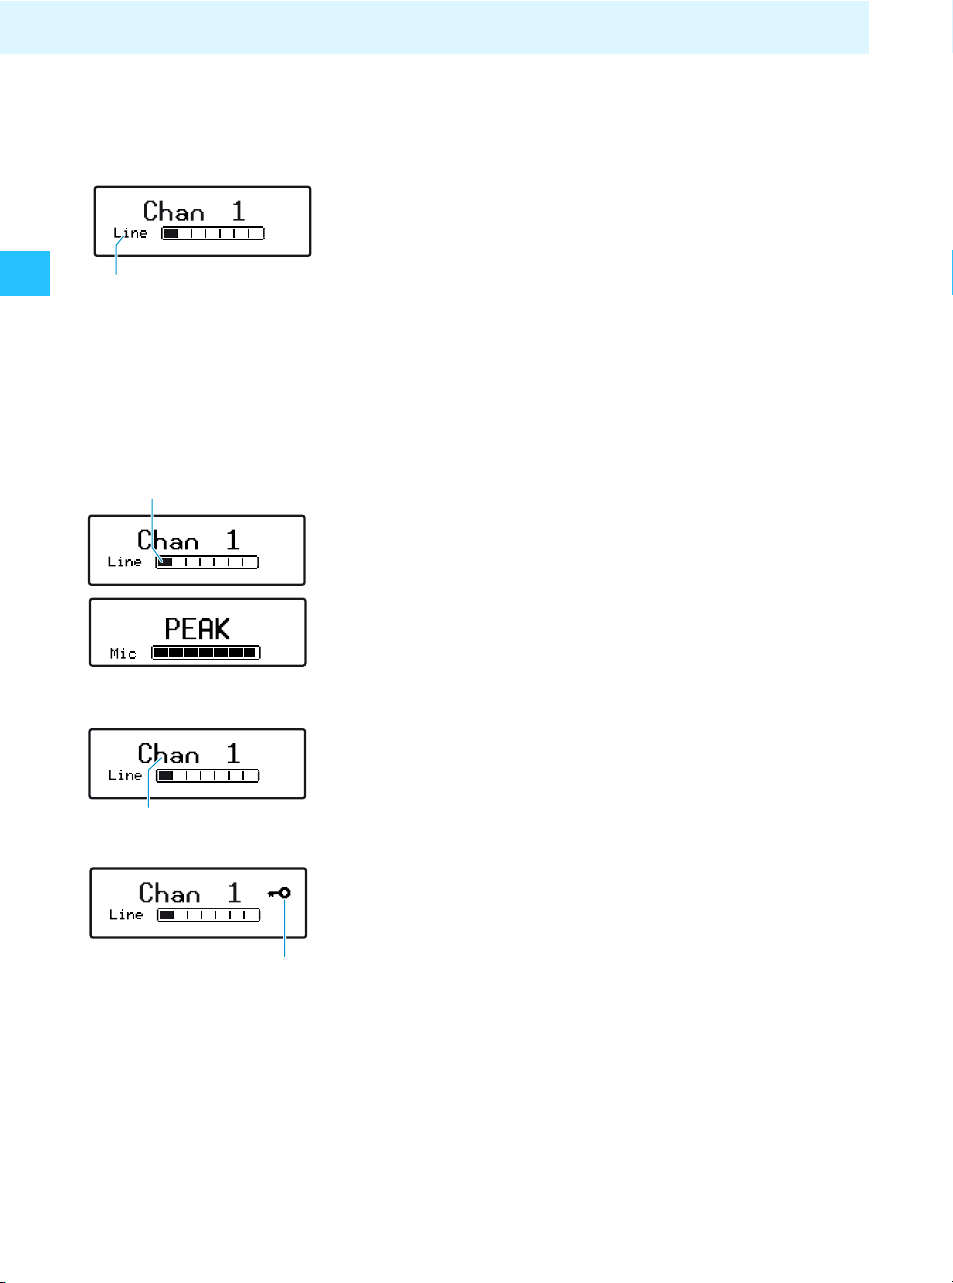
Indications and displays on the transmitter
Display for the selected signal source (Mic/Line)
You can connect either a condenser microphone or an external
audio source to the transmitter.
If you connect a condenser microphone, select “Mic” via the
operating menu. If you connect an external audio source, select
“Line” (see page 19).
“Mic” or “Line” appears on the display .
Note:
If the “Mic” microphone input is selected but no microphone
is connected, “No Mic” appears on the display.
Mic/Line level display
The Mic/Line level display shows the input level.
When the transmitter’s audio input level is excessively high, the
Mic/Line level display shows full deflection.
In addition, the display panel is in backlit in red and the text
“PEAK” flashes in alternation with the channel display (see
page 19).
Channel display
The channel display provides information on the currently
selected channel (see page 17).
Lock mode icon
The lock mode icon appears when the lock mode is activated
(see page 20).
8
Page 11

Putting the SR 2020 D into operation
CAUTION!
Putting the SR 2020 D into operation
Preparing the transmitter for use
You can set up the SR 2020 D transmitter on an even surface or
mount it into a 19“ rack.
Note:
Do not fit the rubber feet when rack mounting the transmitter.
Setting up the transmitter on an even surface
To ensure that the transmitter cannot slip on the surface on
which it is placed, four self-adhesive soft rubber feet are
supplied.
Risk of staining of furniture surfaces!
Some furniture surfaces have been treated with
varnish, polish or synthetics which might cause
stains when they come into contact with other
synthetics. Despite a thorough testing of the
synthetics used by us, we cannot rule out the
possibility of staining.
Do not place the transmitter on delicate
surfaces.
Ensure that the base of the transmitter is clean and free from
grease before mounting the rubber feet.
Fix the rubber feet to the base of the transmitter by peeling
of the safety paper and fitting them as shown in the diagram
on the left.
Connecting the antenna Connect the telescopic antenna to the antenna output at
the rear of the transmitter.
To obtain the best possible radiat ion power:
Align the antenna vertically.
9
Page 12

Putting the SR 2020 D into operation
CAUTION!
Rack-mounting
Risks when rack mounting the transmitter!
When installing the device in a closed or multi-rack
assembly, please consider that, during operation,
the ambient temperature, the mechanical loading
and the electrical potentials will be different from
those of devices which are not mounted into a rack:
The ambient temperature within the rack must
not exceed the temperature limit specified in
the specifications.
When installing the device in a rack, take good
care not to affect the ventilation required for
safe operation. If necessary, provide additional
ventilation.
Make sure the mechanical loading of the rack is
even to avoid a hazardous condition such as a
severely unbalanced rack.
When connecting the device to the mains,
observe the information indicated on the type
plate. Avoid circuit overloading. If necessary,
provide overcurrent protection.
When installing the device in a closed or multi-
rack assembly, please note that intrinsically
harmless leakage currents of the individual
mains units may accumulate, thereby
exceeding the allowable limit value. As a
remedy, ground the rack via an additional
ground connection.
Mounting the antennas
to the front or rear
of the rack
10
For the best possible radiation power, you should align the
antennas vertically. If this is not possible, use one of the optional
antenna mounts (see “Accessories and spare parts” on
page 25):
You mount... Antenna mount
... 1 transmitter AM 2
... 2 transmitters GA 3030 AM
Page 13

Mounting two
SR 2020 D
side by side
Putting the SR 2020 D into operation
When using several transmitters simultaneously, make sure
that, in order to avoid interference, the distance between the
antennas is sufficient. If necessary, use active transmitter combiners (see “Accessories and spare parts” on page 25):
You mount... Active Transmitter Combiner
... 1 transmitter AC 2
... 2 transmitters AC 3200
Place the two transmitters side by side upside-down onto a
flat surface.
Align the jointing plate over the holes in the bottom sides
of the transmitters.
Secure the jointing plate to the transmitters using eight of
the supplied recessed head screws (M 3x6).
Hook the two rack mount “ears” to the front panels of the
transmitters.
Secure the rack mount “ears” to the transmitters using
two of the supplied recessed head screws (M 3x6)
respectively. If you wish to mount the antenna connections
to the front of the rack, use the rack mount “ears” of the
optional GA 3030 AM antenna mount .
Slide the transmitters into the 19” rack.
Secure the rack mount “ears” to the rack.
11
Page 14

Putting the SR 2020 D into operation
2
Mounting only one
SR 2020 D
When mounting only one transmitter into the rack, use the
blanking plate instead of the second transmitter.
Hook the two rack mount “ears” to the front panel of the
transmitter.
Secure the rack mount “ears” to the transmitter using two
of the supplied recessed head screws (M 3x6) respectively.
Secure the blanking plate to one of the rack mount
“ears” using two of the supplied recessed head screws
(M 6x10).
If you are not front mounting the BNC output connector,
insert the two blanking plugs into the holes of the
blanking plate.
Slide the transmitter into the 19” rack.
Secure the rack mount “ears” to the rack.
12
Connecting the transmitter to the mains
Pass the cable through the cable grip .
Connect the cable of the mains unit to the DC IN socket of
the transmitter.
Plug the mains connector into the wall socket.
Connecting external devices
You can connect either a microphone (Mic) or an external audio
source (Line, e.g. CD or MP3 player) to the transmitter.
To do so, use a suitable audio cable with a length of up to 3 m.
Page 15

Putting the SR 2020 D into operation
2
2
CAUTION!
Connecting an external audio source to the transmitter
Connect the line output of the external au dio source to the
XLR-3F socket of the transmitter.
Connecting a condenser microphone
The microphone input of the SR 2020 D transmitter is
exclusively designed for use with condenser microphones.
Suitable microphones are listed on page 6.
Connect the condenser microphone to the XLR-3F socket
of the transmitter.
Connecting the headphones
The Mic/Line level display displays the strength of the input
signal (see page 8). The SR 2020 D transmitter also features a
headphone output for monitoring purposes.
Danger of hearing damage!
Listening at high volume levels for long periods can
lead to permanent hearing defects.
Use the headphone volum e control (VOL) to
set the volume for the connected headphones to
the minimum before putting the headphones on.
To monitor the audio signal via headphones:
Set the headphone volume control to the lowest volume
by turning it to the left as far as possible.
Connect headphones with a ¼” (6.3 mm) stereo jack plug to
the headphone output .
Put the headphones on.
Gradually turn up the volume.
13
Page 16

Operating the SR 2020 D
Operating the SR 2020 D
Switching the transmitter on/off
To switch the transmitter on:
Press the ON button .
The display panel indicates the device name and then
switches to the standard display.
To switch the transmitter off:
Press the ON button until “OFF” appears on the display.
Release the ON button .
The display panel goes off and the transmitter switches off.
Note:
The transmitter can only be switched off when the standard
display is shown on the display panel. When in the operating
menu, the ONbutton serves as the ESC (cancel) key, i.e.
you cancel your entry and return to the standard display.
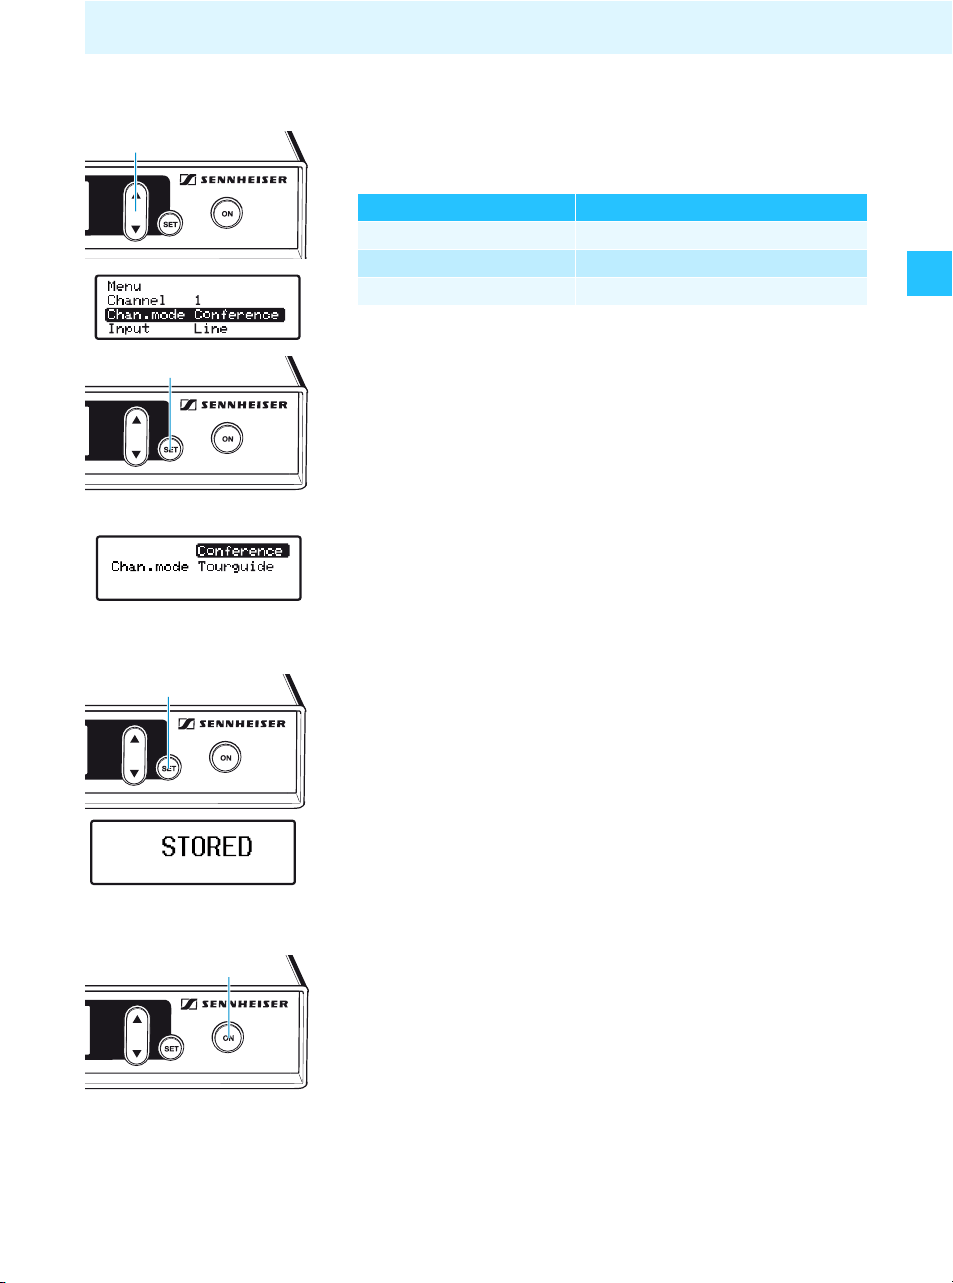
Working with the operating menu
By way of example of the “Chan. mode” menu (Channel mode),
this section describes how to use the operating menu.
For an overview of the operating menu, please see page 22.
Make sure that the lock mode is deactivated (see page 20).
Getting into the operating menu
To get from the standard display into the operating menu:
Press the SET button .
The “Channel” menu is highlighted with a black bar.
14
Page 17
Operating the SR 2020 D
Selecting a menu
Use the / rocker button to select the “Chan. mode”
menu:
Rocker button Display
Press jumps to the previous menu
Press jumps to the next menu
Keep or pressed
cycles continuously
Press the SET button to get into the setting mode of the
“Chan. mode” menu.
The current setting of the menu is displayed.
Adjusting a setting in the setting mode
Use the / rocker button to jump between the settings,
in this example between “Tourguide” and “Conference”.
Storing a setting
Press the SET button to store the selected setting.
“STORED” briefly appears on the display.
Exiting a menu
Press the ON button to return to the operating menu.
15
Page 18

Operating the SR 2020 D
Exiting the operating menu
Use the / rocker button to select the “Exit” menu and
press the SET button .
The standard display is shown on the display panel.
Or:
Press the ON button until the standard display is shown
on the display panel.
Selecting the menus
The transmitter’s operating me nu contains the following menus:
Menu Function of the menu
“Channel” Selecting a channel
(see page 17)
“Frequency” Displaying the frequency of the current
channel (see page 17)
“Chan. mode” Selecting the channel mode
(see page 18)
“Input” Selecting the input signal
(see page 19)
“Sensitiv” Adjusting the input sensitivity
(see page 19)
“Phantom” Displaying the phantom power
(see page 20)
“Contrast” Adjusting the contrast
(see page 20)
“Lock” Activating/deactivating the lock mode
(see page 20)
“Reset” Loading the factory-preset default settings
(see page 21)
“Version” Displaying the current software version
(see page 21)
“Exit” Exiting the operating menu
16
Page 19

Operating the SR 2020 D
Setting a channel (“Channel”)
To set a certain channel, proceed as follows:
1. Make sure that the transmitter and th e receivers are set to
the same channel mode (“Tourguide” or “Conference”),
otherwise no connection can be established (see page 18).
2. Set the SR 2020 D transmi tter to the desired channel (see
next section).
3. Set one of the receivers to the same channel.
4. Automatically set all other receivers to the same channel
using the channel copy function (for information on the
channel copy function, please refer to the instruction manual
of the Tourguide 2020 system).
To set the transmitter to the desired channel:
Select the “Channel” menu.
“Channel” appears on the display and the current channel is
shown.
Press the / rocker button to change the channel.
Press the SET button to store the selected channel.
Transmitting several
languages simultaneously
In order to be able to transmit several languages
simultaneously, you require one SR 2020 D transmitter and one
or several receivers per language:
Set the transmitter and the receivers assigned to certain
language to the same channel.
Do not use this channel for any other language.
Displaying the frequency of the selected channel (“Frequency”)
You can display the frequency of the selected channel. This
function is useful, if you are using other Tourguide systems in
the vicinity which interfere with your transmission (see previous
section).
17
Page 20

Operating the SR 2020 D
Select the “Frequency” menu.
“Frequency” appears on the display and the frequency of the
current channel is shown.
Changing the channel mode (“Chan. mode”)
You can choose between the two channel mod es “Conference”
and “Tourguide”. The two modes have been designed for
different applications and differ from each other in the number
of available channels:
Channel mode Application Number of channels
Conference Simultaneous
interpretations
Tourguide Tourguide systems 6
8
To change the channel mode:
Select the “Chan. mode” menu.
Use the / rocker button to change the channel mode
(“Tourguide“/“Conference”).
Press the SET button to store the selected channel mode.
Display of the channel
18
mode
The selected channel mode appe ars on the standard display as
follows:
Display Channel mode
“Tourguide“
“Conference“
Page 21

Operating the SR 2020 D
Selecting the input signal (“Input”)
You can connect either a condenser microphone or any other
audio source (e.g. CD and MP3 player, see page 6) to the
transmitter.
To select the input signal:
Select the “Input” menu.
Press the SET button to display the current setting (Mic/
Line).
Use the / rocker button to select the desired input
signal:
You connect ... Select
a condenser microphone? Mic
an external audio source? Line
Press the SET button to store the selected input signal.
Adjusting the sensitivity of the Mic/Line input (“Sensitiv”)
If you connect a microphone to the transmitter, the microphone
signal has to be amplified by the transmitter. Other audio
sources can be amplified, if their audio signal is too low.
To adjust the input sensitivity:
Select the “Sensitiv” menu.
Use the / rocker button to change the setting. The
Mic/Line level display should show full deflection during
the loudest passages.
19
Page 22

Operating the SR 2020 D
Press the SET button to store the input sensitivity of the
Mic/Line input.
Displaying the phantom power (“Phantom”)
When you activate the transmitter’s microphone input (see
page 19), the phantom power is automatically available. The
display show the value of the phantom power.
Adjusting the contrast of the display (“Contrast”)
To adjust the contrast of the display to the ambient light:
Select the “Contrast” menu.
“Contrast” appears on the display and the current setting is
shown.
Use the / rocker button to change the setting.
Press the SET button to store the setting.
Activating/deactivating the lock mode (“Lock”)
The lock mode prevents that the transmitter is accidentally
programmed or switched off during operation.
To activate the lock mode:
Select the “Lock” menu.
Select the setting “Lock On”.
Press the SET button .
The lock mode is activated and the lock mode icon appears on
the standard display.
20
Page 23

Operating the SR 2020 D
To deactivate the lock mode:
Press the SET button .
“Lock On” appears on the display.
Select the setting “Lock Off”.
Press the SET button to deactivate the lock mod e .
The lock mode icon disappears from the standard display.
Standard display Lock mode is ...
activated
deactivated
Loading the factory-preset default settings (“Reset”)
Select the “Reset” menu.
“Reset No” appears on the display.
Press the / rocker button until “Reset Yes” appears on
the display.
Press the SET button to reset the device to the fact ory-
preset default settings.
“DONE” appears on the display. The transmitter is reset to
the following factory-preset default settings:
y Channel mode: Tourguide
y Input signal: Line input
y Channel: 1
y Input sensitivities:
– Line input: 0 dB
– Microphone input: 0 dB
y Lock mode: deactivated
Displaying the version number of the software (“Version”)
Note:
This function is for servicing purposes only.
To display the version number:
Select the “Version” menu.
The version number appears on the display.
21
Page 24

Operating the SR 2020 D
Setting modeSelection mode
Phantom power
CHAN 01
SR 2020 D
SET
5 Sec
Chan. mode
Tourguide
/
SET: Stores the setting
Current setting
Chan. mode
Tourguide
Chan. mode
Conference
Setting
the channel mode
SET
STORED
/
SET: Stores the setting
Current setting
Input
Line
Selecting
the input signal
Input
Line
Input
Mic
SET
SET
STORED
/
Mic: 0
to
-36dB
Line: 0
to
-24dB
SET: Stores the setting
STORED
Current setting
Sensitiv
0 dB
Sensitiv
0 dB
Sensitiv
– 36 dB
Setting
the input
sensitivity
Selecting
the channel
Current channel
Channel 1 Channel 6
/ :
1...6/8
SET: Stores the setting
SET
STORED
Channel
1
SET
SET,
ON
SET
SET,
ON
SET
SET,
ON
SET
SET,
ON
ON, SET
Current setting
Frequency
863.124
Frequency
863.124
Displaying
the frequency
SET
EXIT
Overview of the operating menu
Pressing the ON button 쐂 will cancel your entry in all menu modes.
22
Page 25

Operating the SR 2020 D
Selection mode
Sensitiv
Phantom
48 V
Displaying the
phantom power
Contrast
Adjusting
the contrast
Lock
Off
Activating/
deactivating
the lock mode
Reset
No
Loading the
factory-preset
default settings
SW-Version
1.0.0.0
Displaying the
software version
Setting mode
SET
Phantom
48 V
SET,
Current setting
ON
SET
Contrast Contrast
SET,
Current setting
ON
STORED
SET
Lock:
Lock
On
Off
SET,
Current setting
ON
STORED
SET
Reset
No
Current setting
SET
CANCEL
SET
SW-Version
1.0.0.0
SET,
Current setting
ON
/
:
SET: Stores the setting
SET
Lock
On
/
SET: Stores the setting
SET
Reset
Yes
/
SET: Stores the setting
SET
DONE
Exit
23
Page 26

Cleaning the SR 2020 D
CAUTION!
Cleaning the SR 2020 D
Liquids can damage the electronics of the transmitter!
Liquids entering the housing of the device can cause a short-circuit and damage
the electronics.
Keep all liquids away from the device.
Do not use any solvents or cleansing agents.
Before cleaning, disconnect the device from the mains.
Only use a soft and dry cloth to clean the device.
If a problem occurs....
Problem Possible cause Possible remedy
No operation
indication on the
transmitter
Audio signal is
distorted
Occasional drop outs
in the audio signal
No radio waves on the
receiver display
No mains connection Check the mains unit and the connection to
the DC IN socket (see page 12)
Transmitter sensitivity is
adjusted too high
Distance to the transmitter is
too great
Interference of unknown origin Set the transmitter and receiver to a
Interference is being received
from a second transmitter
Antenna is badly positioned Improve the position of the transmitting
No RF signal:
transmitter and receiver are
not on the same channel
No RF signal:
transmission range is
exceeded
Change the sensitivity of the microphone
input or line input (see page 19)
Select the source of the input signal
(see page 19)
Reduce the distance to the transmitter
different channel (see page 17)
Change the transmitters to different
channels (see page 17)
antenna
Mount the antenna to the front of the rack
Set the transmitter and receiver to the same
channel (see page 17)
Reduce the distance between receiver and
transmitter
Improve the position of the transmitting
antenna
If a problem occurs that is not listed in the above table or if the problem cannot be solved with
the proposed solutions, please contact your local Sennheiser agent for assistance.
24
Page 27

Accessories and spare parts
Accessories and spare parts
Only use original Sennheiser accessories and spare parts. Components from other
manufacturers may impair the quality of the devices and/or damage them.
Cat. No. Product name and description
009823 GA 2 rack adapter
087244 NT 2-1-EU mains unit
087245 NT 2-1-UK mains unit
087246 NT 2-1-US mains unit
072817 Telescopic antenna
082875 Device feet (4 pieces)
500543 HDE 2020 D stethoset receiver
500544 HDE 2020 D-US stethoset receiver (US version)
004368 GA 3030-AM antenna mount (2 transmitters)
009912 AM 2 antenna mount for GA 2 rack adapter (1 transmitter)
009822 AC 2 active transmitter combiner for 4 transmitters
502048 AC 3200 active transmitter combiner for 8 transmitters
005060 ME 34 microphone
005063 ME 35 microphone
005065 ME 36 microphone
25
Page 28

Specifications
Specifications
SR 2020 D transmitter
Modulation 2 FSK
RF frequency range 863 – 865 MHz
RF frequency range (US) 926 – 928 MHz
Channels 6 for the Tourguide system,
switchable to 8 for conferences
RF output power 10 mW (ERP)
RF output power (US) max. 50 mV/m (distance 3 m)
AF frequency response 100 Hz–7 kHz
Input voltage range of the audio input Microphone: 1.6 mV
Line: 120 mV
Headphone output ¼’’ (6.3 mm) jack socket
Output power at headphone output max. 100 mW at 32 Ω
Power supply 12 V DC (10.5 V–16 V)
Current consumption at nominal voltage max. 300 mA
Ambient temperature 0°C to 50 °C
Humidity
Dimensions approx. 212 x 145 x 38 mm
Weight approx. 1100 g
≤ 95 %
–100 mV
rms
–2 V
rms
rms
rms
NT 2-1-EU/UK mains unit (Cat. No. 087244/087245)
Nominal input voltage 230V AC
Mains frequency 50 Hz/60 Hz
Max. power consumption 9 W
Nominal output voltage 13V DC
Nominal output current 300 mA
Operating temperature range 0 °C to +40 °C
NT 2-1-US mains unit (Cat. No. 087246)
Nominal input voltage 120V AC
Mains frequency 60 Hz
Max. power consumption 9 W
Nominal output voltage 13V DC
Nominal output current 300 mA
Operating temperature range 0°C to +40°C
26
Page 29

Manufacturer Declaration s
0682
0682
The devices comply with the following European standards:
Radio: ETSI EN 301357-1/-2, Class 1
EMC: ETSI EN 301489-1/-9, EN 55103-1/-2
Safety: EN 60065, EN 61558
Frequency range 863 – 865 MHz, approved in: AT, BA, BE, CH, CY, CZ, DE, DK, EE, ES, FI, FR, GB,
GR, HU, IE, IS, IT, LI, LT, LU, LV, ME, MK, MT, NL, NO, PL, PT, RO, RS, SE, SI, SK, TR, UA.
The SR 2020 D transmitter complies with the following US and Canadian standards:
USA: FCC-Part 15 C FCC ID: DMO SR 2020 D
Canada: RSS-210 Issue 7 IC: 2099 A - SR 2020 D
Manufacturer Declarations
Warranty
Sennheiser GmbH & Co. KG gives a warranty of 24 months on this product.
For the current warranty conditions, please visit our web site at www.sennheiser.com or
contact your Sennheiser partner.
CE Declaration of Conformity
This equipment is in compliance with the essential requirements and other relevant
provisions of Directives 1999/5/EC and 2006/95/EC. The declaration is available on the
internet site at www.sennheiser.com.
Before putting the equipment into operation, please observe the respective country-specific
regulations!
27
Page 30

Manufacturer Declarations
Statements regarding FCC and industry Canada
This device complies with Part 15 of the FCC Rules and with RSS-210 of Industry Canada.
Operation is subject to the following two conditions: (1) this device may not cause harmful
interference, and (2) this device must accept any interference received, including interference
that may cause undesired operation.
This equipment has been tested and found to comply with the limits for a Class B digital
device, pursuant to Part 15 of the FCC Rules. These limits are designed to provide reasonable
protection against harmful interference in a residential installation. This equipment
generates, uses and can radiate radio frequency energy and, if not installed and used in
accordance with the instructions, may cause harmful interference to radio communication s.
However, there is no guarantee that interference will not occur in a particular installation.
If this equipment does cause harmful interference to radio or television reception, which can
be determined by turning the equipment off and on, the user is encouraged to try to correct
the interference by one or more of the following measures:
• Reorient or relocate the receiving antenna.
• Increase the separation between the equipment and receiver.
• Connect the equipment into an outlet on a circuit different from that to which the receiver
is connected.
• Consult the dealer or an experie nced radio/TV technician for help.
This class B digital apparatus complies with the Canadian ICES-003.
Changes or modifications made to this equipment not expressly approved by Sennheiser
electronic Corp. may void the FCC authorization to operate this equipment.
Before putting the device into operation, please observe the respective country-specific
regulations!
28
Page 31

Index
Areas of application
Conferences
Stationary guided tours
Cleaning
Connection
If a problem occurs ....
Indications and displays
Installation
Operating menu
Suitable condenser microphones
24
of antennas
of condenser microphones
of external devices
of headphones
of microphones and external devices
of the telescopic antenna
to the mains
Channel display
Lock mode icon
Mic/Line level display
Signal source
in a rack
on an even surface
Activating/deactivating the lock mode
Adjusting the contrast
Adjusting the input sensitivity
Changing the channel mode
Changing the settings
Displaying the frequency
Displaying the phantom power
Displaying the version number of the software
Exiting the operating menu
Getting into the operating menu
Loading the factory-preset default settings
Overview of the operating menu
Selecting the input signal
Setting a channel
Storing the settings
Working with the operating menu
5
5
10
13
12
13
9
12
24
8
8
8
8
10
9
20
19
18
15
17
20
16
14
22
19
17
15
14
6
Index
6
20
21
21
29
Page 32

Sennheiser electronic GmbH & Co. KG Printed in Germany
Am Labor 1, 30900 Wedemark, Germany Publ. 08/08
www.sennheiser.com 524167/A02
 Loading...