

Page 1

SP230 Operating Instructions
SP230 Operating Instructions
SP230 Operating InstructionsSP230 Operating Instructions
The SP230 is a portable, two channel infrared system with the ability to change
modes of operation from single channel transmission to two channel operation or
stereo with the flip of a switch. Two step installation merely requires the
connection of a microphone, CD player, or similar audio source and 110 VAC.
Once turned on, the SP230 is ready to transmit.
This system is designed to be used on table tops or any flat surface. A carrying
handle has been provided for easy portability from room to room. For better
coverage in large halls, the SP230 can be mounted on a heavy duty microphone
or speaker stand and be raised as high as necessary. A threaded 3/8” insert for
this is located on the base of the unit.
The SP230 can accept both balanced microphone inputs and -10dB high
impedance line inputs. The microphone input passes directly to the microphone
preamp. The line input features a variable line input level control and is
transformer isolated for protection against improperly grounded systems. Both
the microphone and line inputs may be used separately or together with
balancing of levels using the input level control located at the top of the rear
panel.
Specifications
Sub-carrier frequencies 2.3 and 2.8 MHz (switchable or stereo)
Inputs Two XLR balanced mic level
Two ¼” line level
Output Two ¼” line level
Power requirements 110 VAC
Dimensions 10” W x 7” D x 8.5” H
Weight 9 lbs., 8 oz.
Compatible Infrared Receivers
Mono Receivers RI250, RI150
Stereo Receivers HDI302, RI810S, HDI830, RI830S
Optional Accessories
Soft Carrying Case SC110
Charger / carry case HC230
Chargers (receiver dependent) L151-10/NT, L300-10
Page 2
MASTER SWITCH
LEVEL
CONTROLS
110VAC
POWER LED
BARRIER CONNECTIONS
MODULATOR LED
BNC CONNECTORS
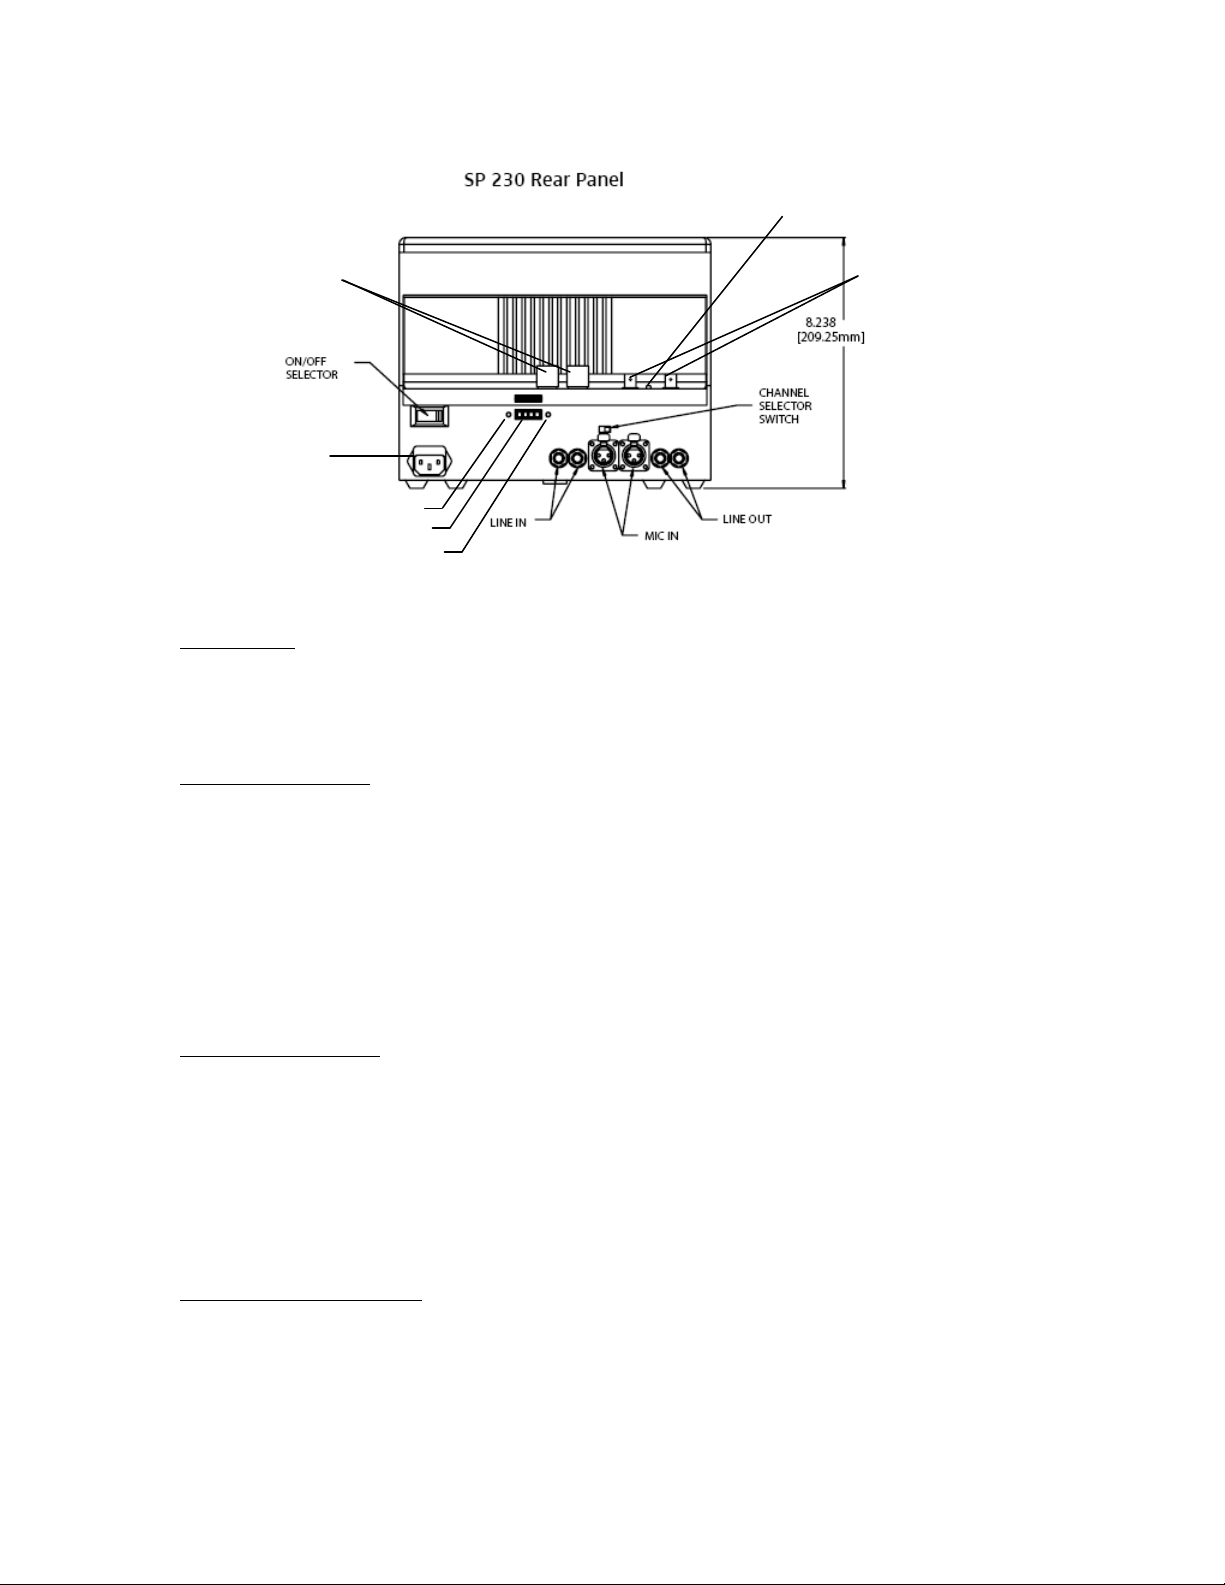
Installation
Using the 110VAC power cord, plug the unit into a standard 110VAC power
outlet. Plug the cable into the socket on the SP230 (see line drawing). Switch
the “Power” selector to the “On” position (see line drawing).
Audio Connection
Plug in the audio input(s) to “Line In Channel 1 and/or 2” via 3 pin XLR for mic
level input or ¼” plug for line level (see above line drawing).
Using the “CH selector” (see line drawing), select Channel 1 (for single channel
audio at 2.3 MHz); Channel 2 (for single channel audio at 2.8 MHz); or, Stereo
(for 2.3 and 2.8 MHz) operation.
To feed recording equipment or house PA system, use the “Line Out”
connections (see line drawing) via ¼” plug(s).
Audio Adjustments
The SP230 comes equipped with internal Automatic Gain Control (AGC) circuitry
which automatically adjusts the audio levels, therefore, set the line level controls
(see line drawing) to the maximum (clockwise) position.
When using a combination of mic level and line level inputs, mixing the audio
input signals can be accomplished using the “Line Level 1 and/or 2” control knobs
to achieve the desired output.
Master / Slave Options
The SP230 can be used as a Master unit, when used alone; or, as a Slave
emitter when used with a separate modulator (e.g., SI1015 rack mount
modulator). Please note: only the modulator accepts the original audio program
directly. When using the SP230 as a master unit, position “Master” switch (see
line drawing) in the Master position.
Page 3

To increase the infrared coverage for larger areas when the SP230 is being
utilized as a Master unit, connect a 50 Ohm Coax cable from the BNC output (see
line drawing) to the BNC input of an emitter (SZI1015, SZI1029, etc.).
To use the SP230 as an emitter only, move the “Master” selector switch (see line
drawing) to the Slave position. By doing this, the modulator is disconnected
allowing use of separate modulator. Then, connect the RF audio signal output of
a modulator to the “In” BNC connector (see line drawing).
System Placement
Place the SP230 on a table, floor stand, or wall mount at the front of the room, in
the center, at eye level (or higher) in a slightly downward fashion facing the
audience. The best possible transmission quality can only be obtained via “line
of sight” with the infrared receivers.
If using the SP230 with an SZI1029 or SZI1015 emitter, position each unit in the
corners of the front of the room diagonally facing the center of the rear of the
room.
 Loading...