

Page 1

infrared TV listening system
Instruction manual
mobile sound booster and
Set 900
Page 2
I
1
2
3
4
5
5
8
6
7
Page 3
II
E
D
0
9
A
B
I
H
G
F
C
Page 4

Page 5

1
Contents
Contents
Safety instructions ................................................................. 2
Delivery includes ..................................................................... 4
Product overview .................................................................... 5
Putting the Set 900 into operation .................................... 6
Setting up the transmitter ............................................... 6
Connecting the transmitter to a sound source ............ 7
Connecting the transmitter to the mains ................... 10
Using the Set 900 ................................................................. 10
Switching the transmitter on/off ................................. 11
Switching the receiver on/off ........................................ 11
Searching for a sound source ......................................... 12
Adjusting the volume ...................................................... 14
Adjusting the balance .................................................... 14
Switching between mono and stereo operation ........ 14
Individually enhancing the speech intelligibility ....... 15
Switching the microphones on/off ............................... 16
Storing and charging the receiver ................................ 17
Charging a rechargeable battery
in the transmitter’s charging compartment .............. 18
Folding up the receiver for transportation ................. 19
What if... ................................................................................. 20
...this indicator lights up? ............................................... 20
...you press this button? ................................................. 21
...you change the position of this control/switch? .... 21
...you hear acoustic signals or warning signals? ........ 22
Cleaning the Set 900 ............................................................ 23
Cleaning the transmitter and the receiver .................. 23
Cleaning the earpads ....................................................... 23
If a problem occurs ... ........................................................... 24
Additional technical information ...................................... 27
Fine adjusting the speech intelligibility ........................ 27
Changing the operating mode ........................................ 28
Accessories and spare parts ............................................... 30
Specifications ........................................................................ 31
Manufacturer declarations ................................................. 33
Index ........................................................................................ 34
Page 6

2
Safety instructions
Safety instructions
y Please read this instruction manual carefully and completely before
using the devices.
y Make this instruction manual easily accessible to all users at all
times. Always include this instruction manual when passing the
devices on to third parties.
y Do not use the devices in situations which require special attention
(e.g. when performing skilled jobs).
y Always keep the devices dry and do not expose them to extreme
temperatures.
y Use the devices with care and set them up in a clean, dust-free
environment.
y Varnish or furniture polish may degrade the feet of the transmitter,
which could stain your furniture. You should therefore place the
transmitter on a non-slip pad to avoid potential staining of
furniture.
y This receiver allows you to set higher volumes than conventional
headphones. This can cause hearing damage in persons with healthy
hearing and especially in children.
y Refer all servicing to qualified service personnel. Servicing is
required if the devices have been damaged in any way, such as
mains cable or plug damage, liquid has been spilled, objects have
fallen inside, the devices have been exposed to rain or moisture, do
not operate properly or have been dropped.
y WARNING: To reduce the risk of fire or electric shock, do not expose
the device and the mains unit to rain or moisture.
y Use only the supplied mains unit.
y Disconnect the mains connector from the wall socket
– to completely disconnect the device from the mains,
– during lightning storms or when unused for long periods of time.
y Ensure that the mains unit is:
– always readily operable and easily accessible,
– properly plugged into the wall socket,
– not covered or exposed to direct sunlight for longer periods of
time in order to prevent heat accumulation,
– only operated within the permissible temperature range (see
“Specifications” on page 31),
– not operated near heat sources.
Page 7
3
Safety instructions
Intended use of the devices
Intended use includes:
y having read this instruction manual, especially the chapter “Safety
instructions”,
y using the devices within the operating conditions and limitations
described in this instruction manual.
“Improper use” means using the devices other than as described in this
instructions, or under operating conditions which differ from those
described herein.
Safety instructions for the Lithium-Ion rechargeable battery
The BA 300 is a Lithium-Ion rechargeable battery. If abused or misused,
this rechargeable battery may be damaged. Please understand that
Sennheiser does not accept liability for damage arising from abuse or
misuse.
WARNING! In extreme cases, the rechargeable battery may even
present a
y heat hazard
y fire hazard
y explosion hazard
y smoke and gas hazard
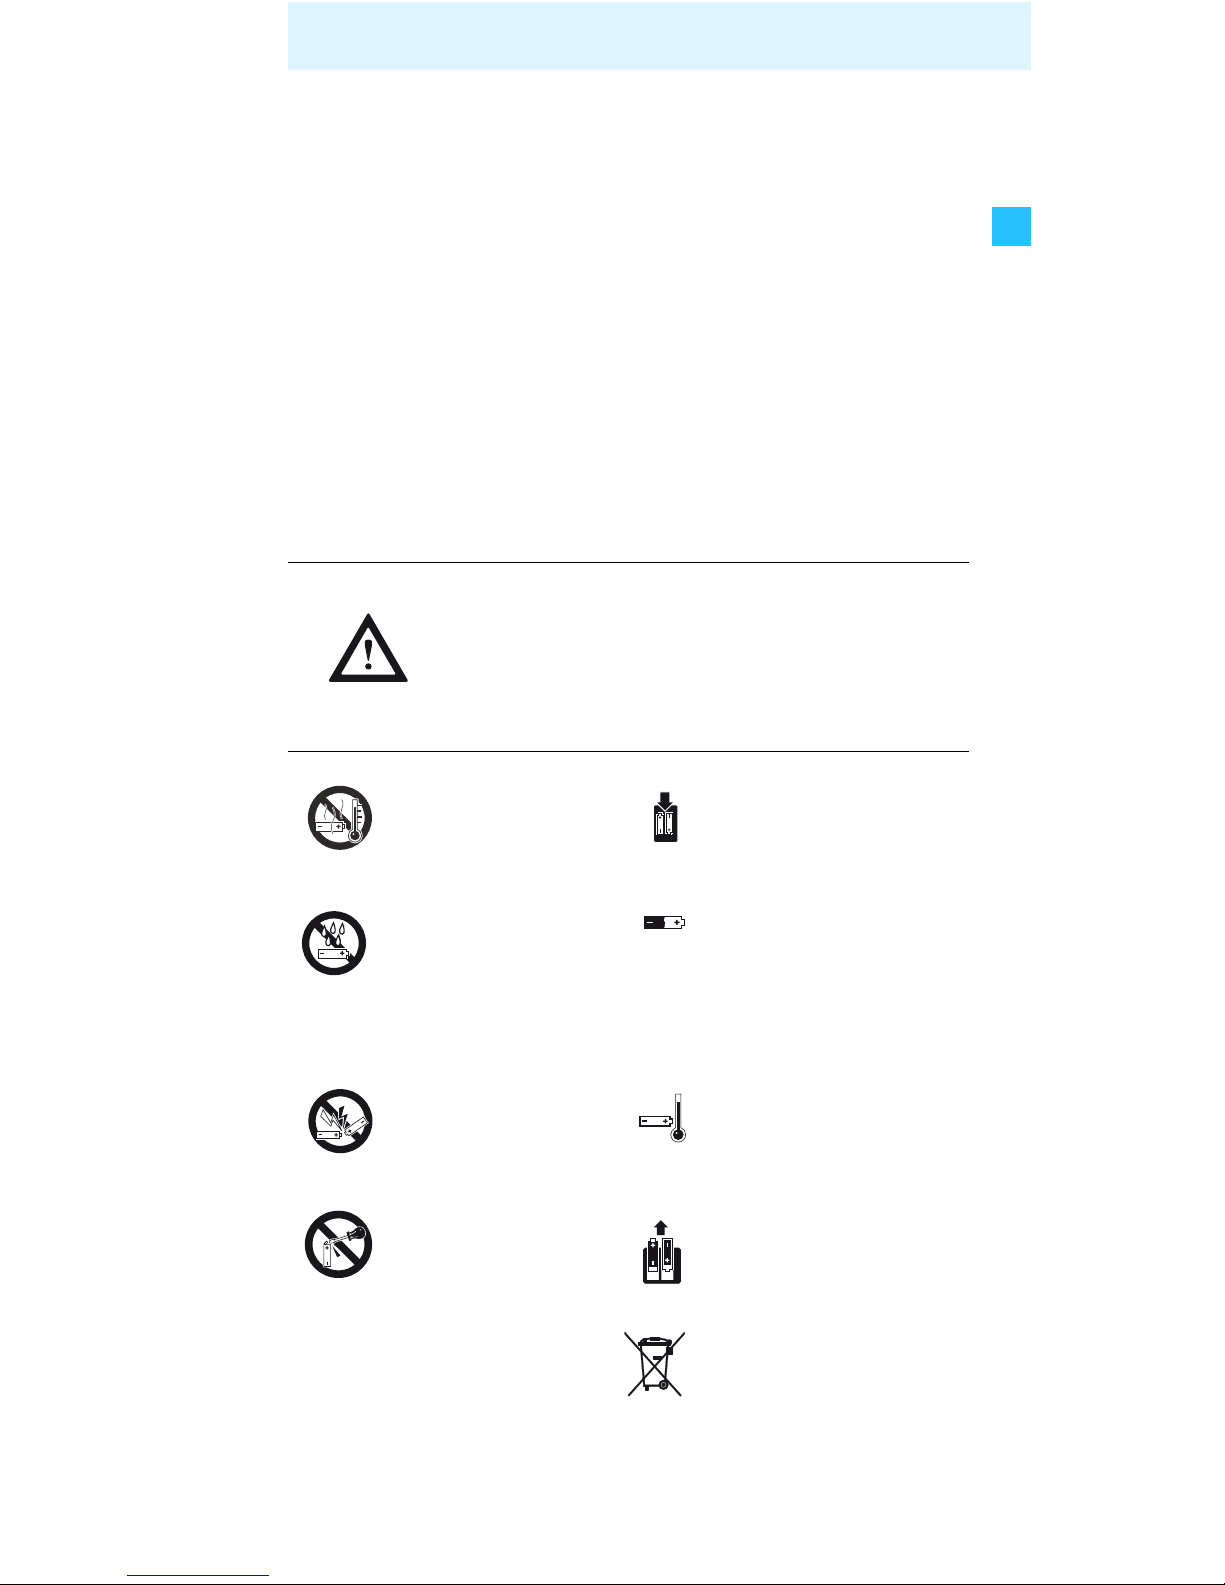
Do not heat above
70°C/158°F, e.g. do
not expose to sunlight
or throw into a fire.
Only charge rechargeable
batteries with the appropriate Sennheiser chargers.
Do not expose to
moisture.
When not using the
rechargeable battery for
extended periods of time,
charge it regularly (every
six months for about one
hour).
Do not short-circuit. Only charge rechargeable
batteries at ambient
temperatures between
10°C and 40°C.
Do not mutilate or
dismantle.
Do not charge the
rechargeable battery if
the device is obviously
defective.
!
Store the devices/
rechargeable batteries
in a cool and dry place
at room temperature.
Return defective devices
or devices with defective
rechargeable batteries to
your specialist dealer.
Page 8

4
Delivery includes
Delivery includes
Delivery of the Set 900 system includes:
1 RI 900 receiver
with BA 300 Lithium-Ion rechargeable battery
1 TI 900 transmitter
with integrated charging compart-ments
1 NT 13 mains unit
with 3 country adapters (EU, UK, US)
1 connection cable
with two 3.5 mm stereo jack plugs
for connection to a headphone socket
3 audio adapters:
1 adapter 3.5 mm to ¼“ (6.3 mm) jack plug
1 adapter for RCA socket
1 SCART adapter for SCART socket
2 pairs of spare earpads
1 transport case for receiver
1 hand strap for transport case
1 instruction manual
Page 9

5
Product overview
Product overview
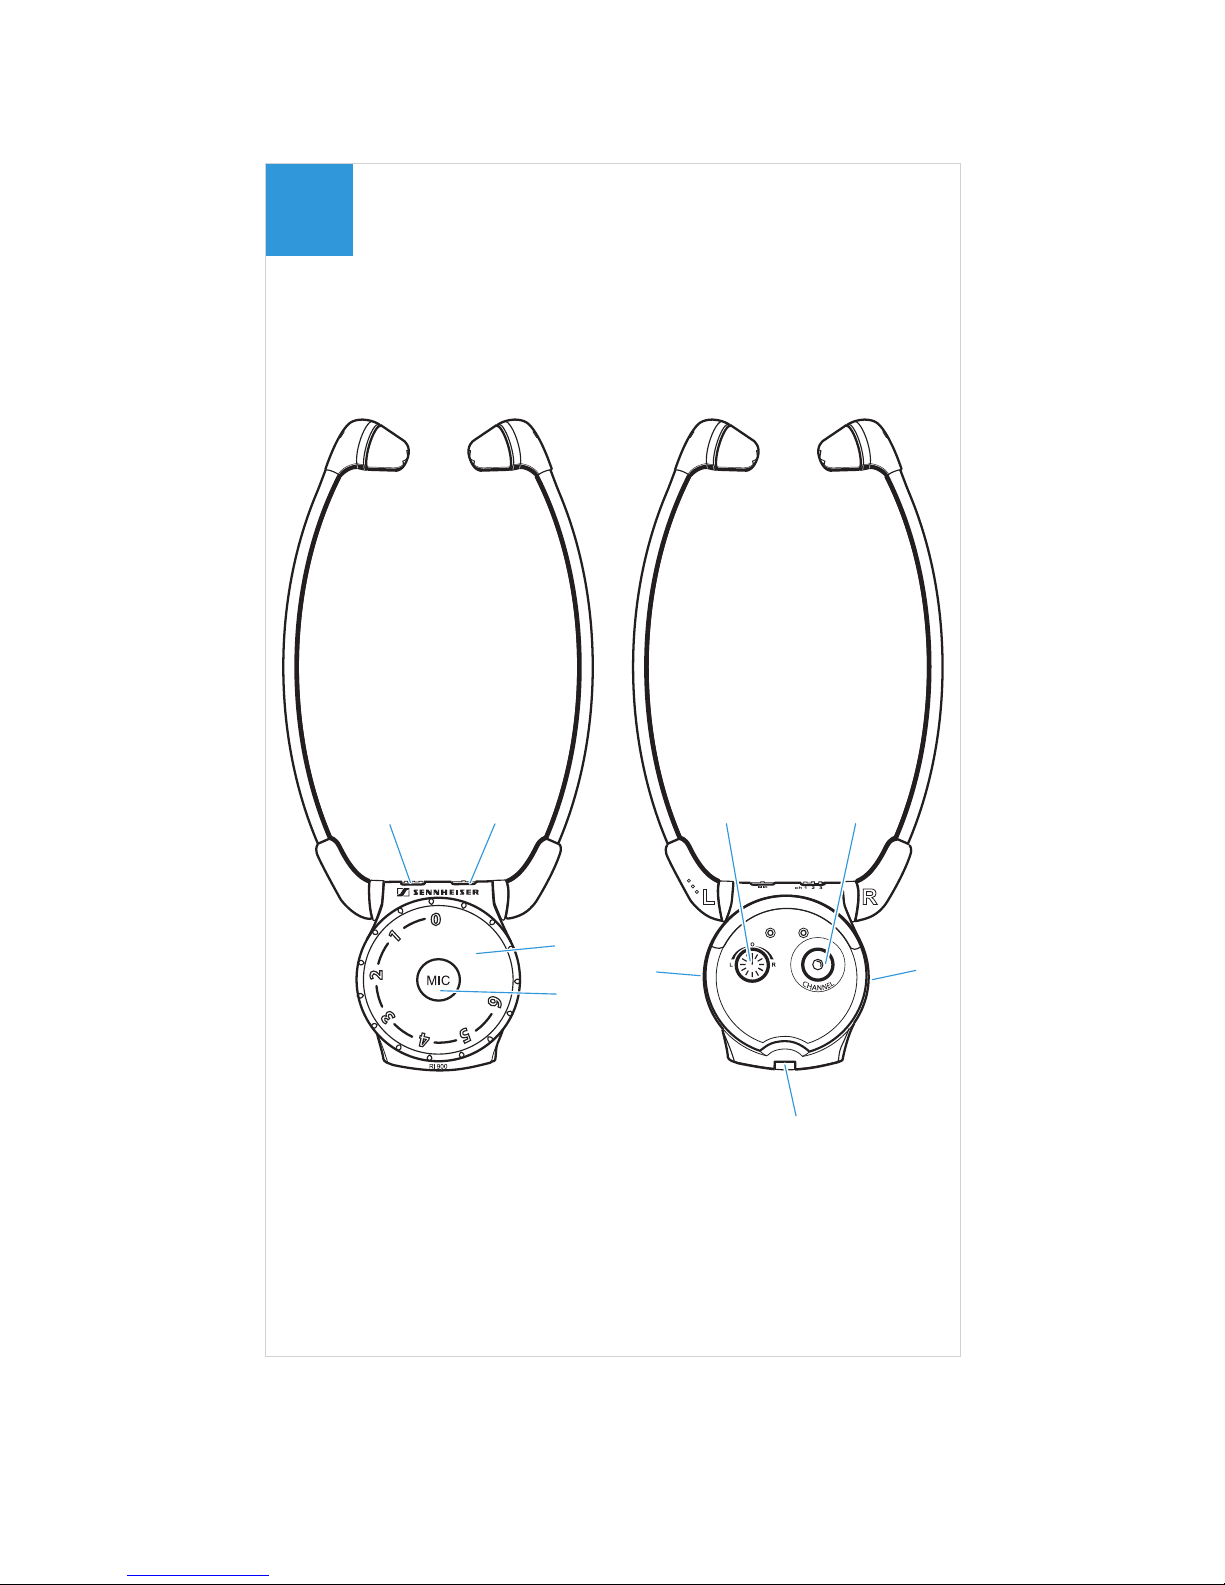
Receiver
(see inside cover)
1 Channel indicator
2 Microphone indicator
3 Volume control
4 Microphone button
5 Microphone openings
(at the sides)
6 Balance control
7 Channel search button
8 Battery compartment
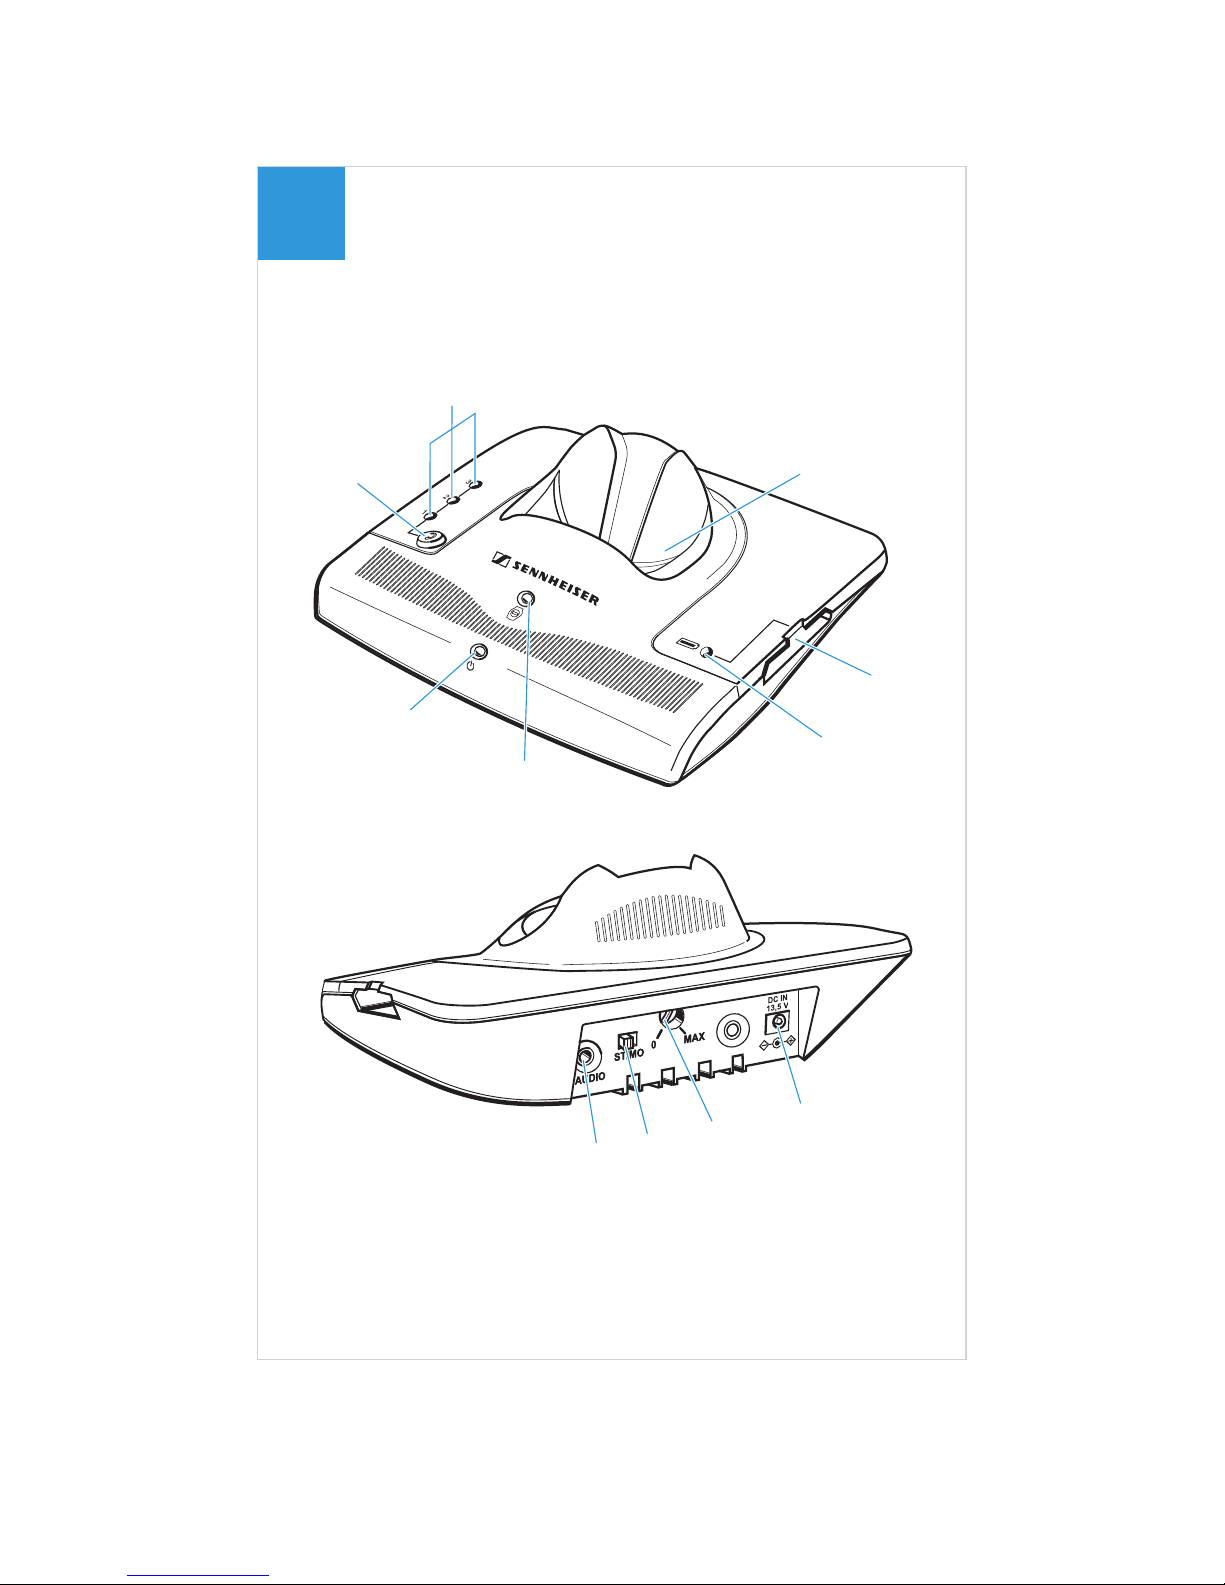
Transmitter
(see inside cover)
9 Charging compartment for receiver
0 Charging compartment for optional spare
rechargeable battery
A Charging indicator for optional spare rechargeable
battery
B Charging indicator for receiver’s rechargeable
battery
C Operation indicator
D “Speech intelligibility” button
E Indicator for the selected speech intelligibility
F Socket (marked blue) for connection of sound source or
external microphone
G Mono/stereo slide switch
H Treble adjustment control
I DC socket (marked yellow) for connection of mains unit
I
II
Page 10
6
Putting the Set 900 into operation
Putting the Set 900 into operation
Setting up the transmitter
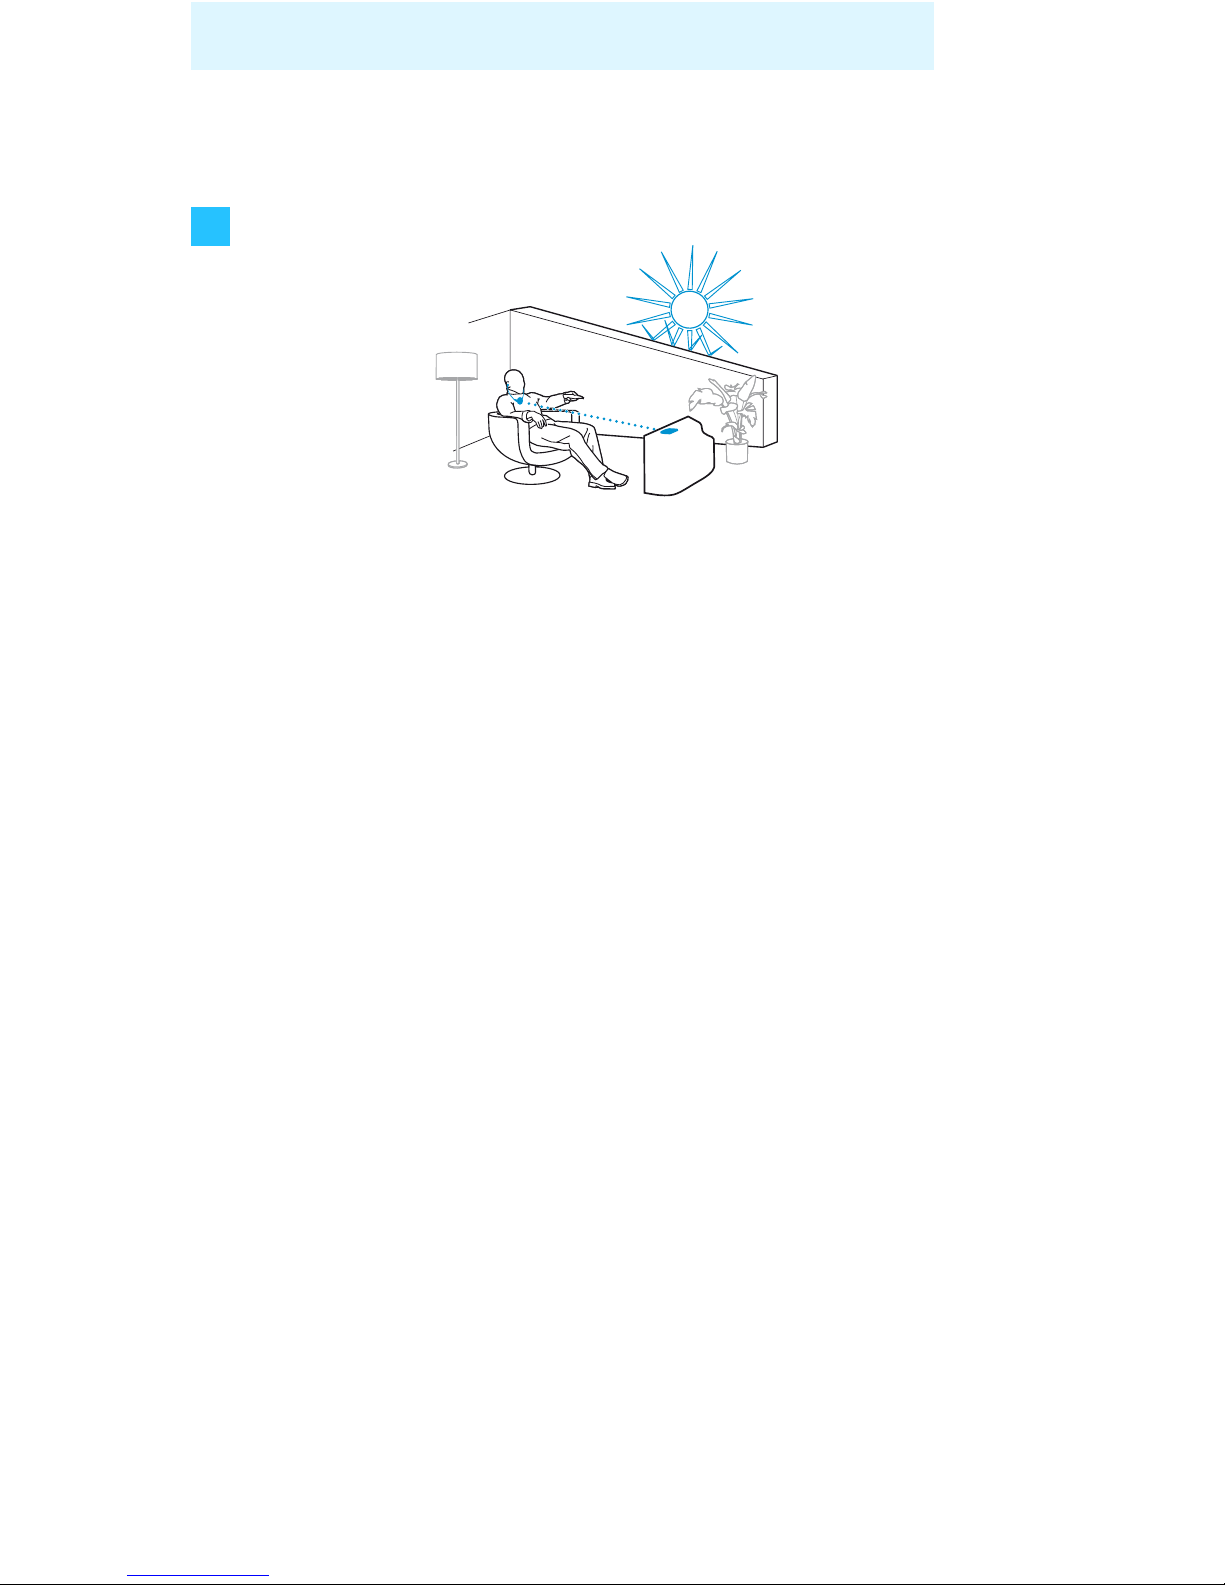
왘 Place the transmitter so that:
– there are no obstacles in the light path between trans-
mitter and receiver and
– transmitter and receiver are not exposed to direct
sunlight. Direct sunlight may interfere with the
reception and may damage the transmitter.
If you are using a plasma TV screen:
Plasma TV screens radiate an infra-red signal that can
adversely affect the transmission quality.
왘 Make sure that the transmitter is placed as far as
possible from your plasma TV screen.
왘 If necessary, use a standard extension cable (3.5 mm
stereo jack plug) to reduce the distance between transmitter and receiver. This extension cable is available from
your Sennheiser dealer.
Note:
One transmitter can be used to transmit to several
receivers on the same frequency.
Page 11
7
Putting the Set 900 into operation
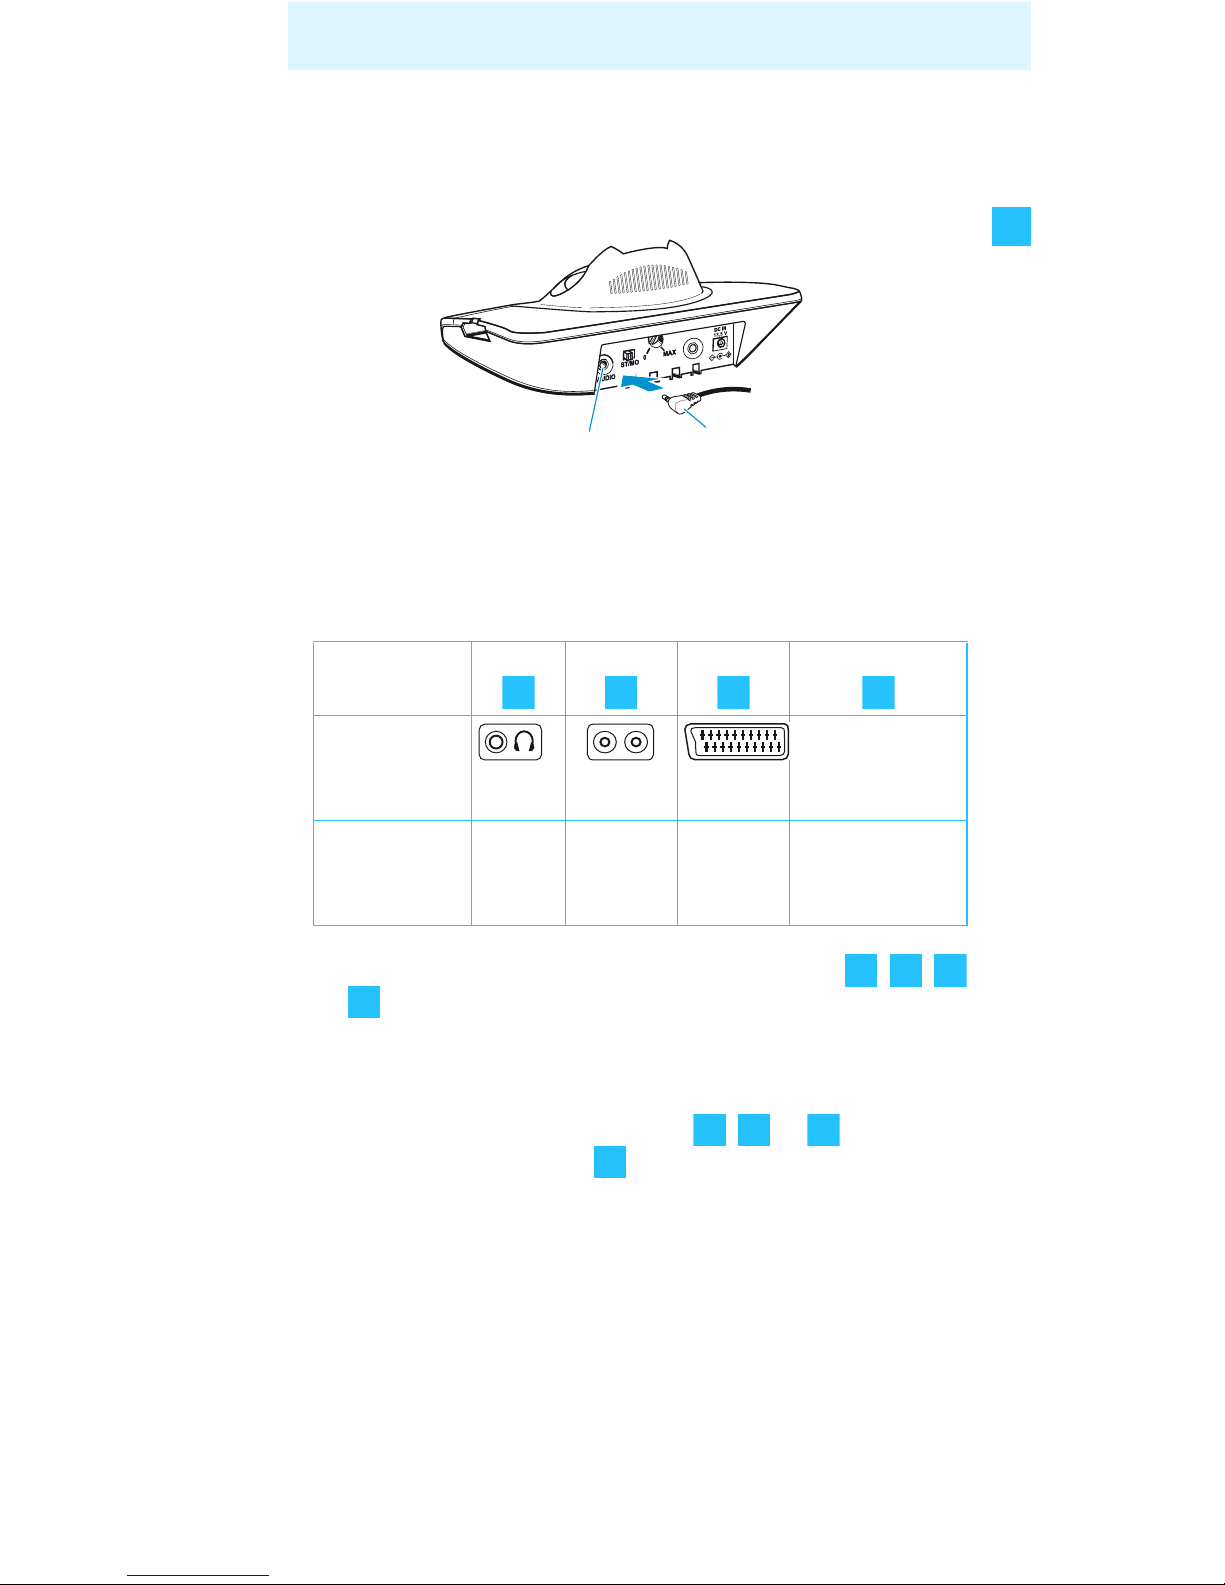
Connecting the transmitter to a sound source
왘 Switch your sound source (e.g. TV) off before connecting
the transmitter.
왘 Plug one end of the connection cable L into the blue
socket F on the transmitter.
왘 Check the connection possibilities of your sound source
(e.g. TV).
왘 Select one of the four connection possibilities , ,
or and follow the instructions in the corresponding
chapter.
Note:
If there are several connections ( , or ) available,
select the SCART socket .
Connection
possibility
Socket on
sound
source
–
Name of
connection
possibility
Headphone
socket
RCA
socket
SCART
socket
MKE 800 TV-N
external
microphone*
*
The MKE 800 TV-N microphone is available as an
accessory (see page 30).
F
L
ABC
D
LR
ABC
D
ABC
C
Page 12
8
Putting the Set 900 into operation
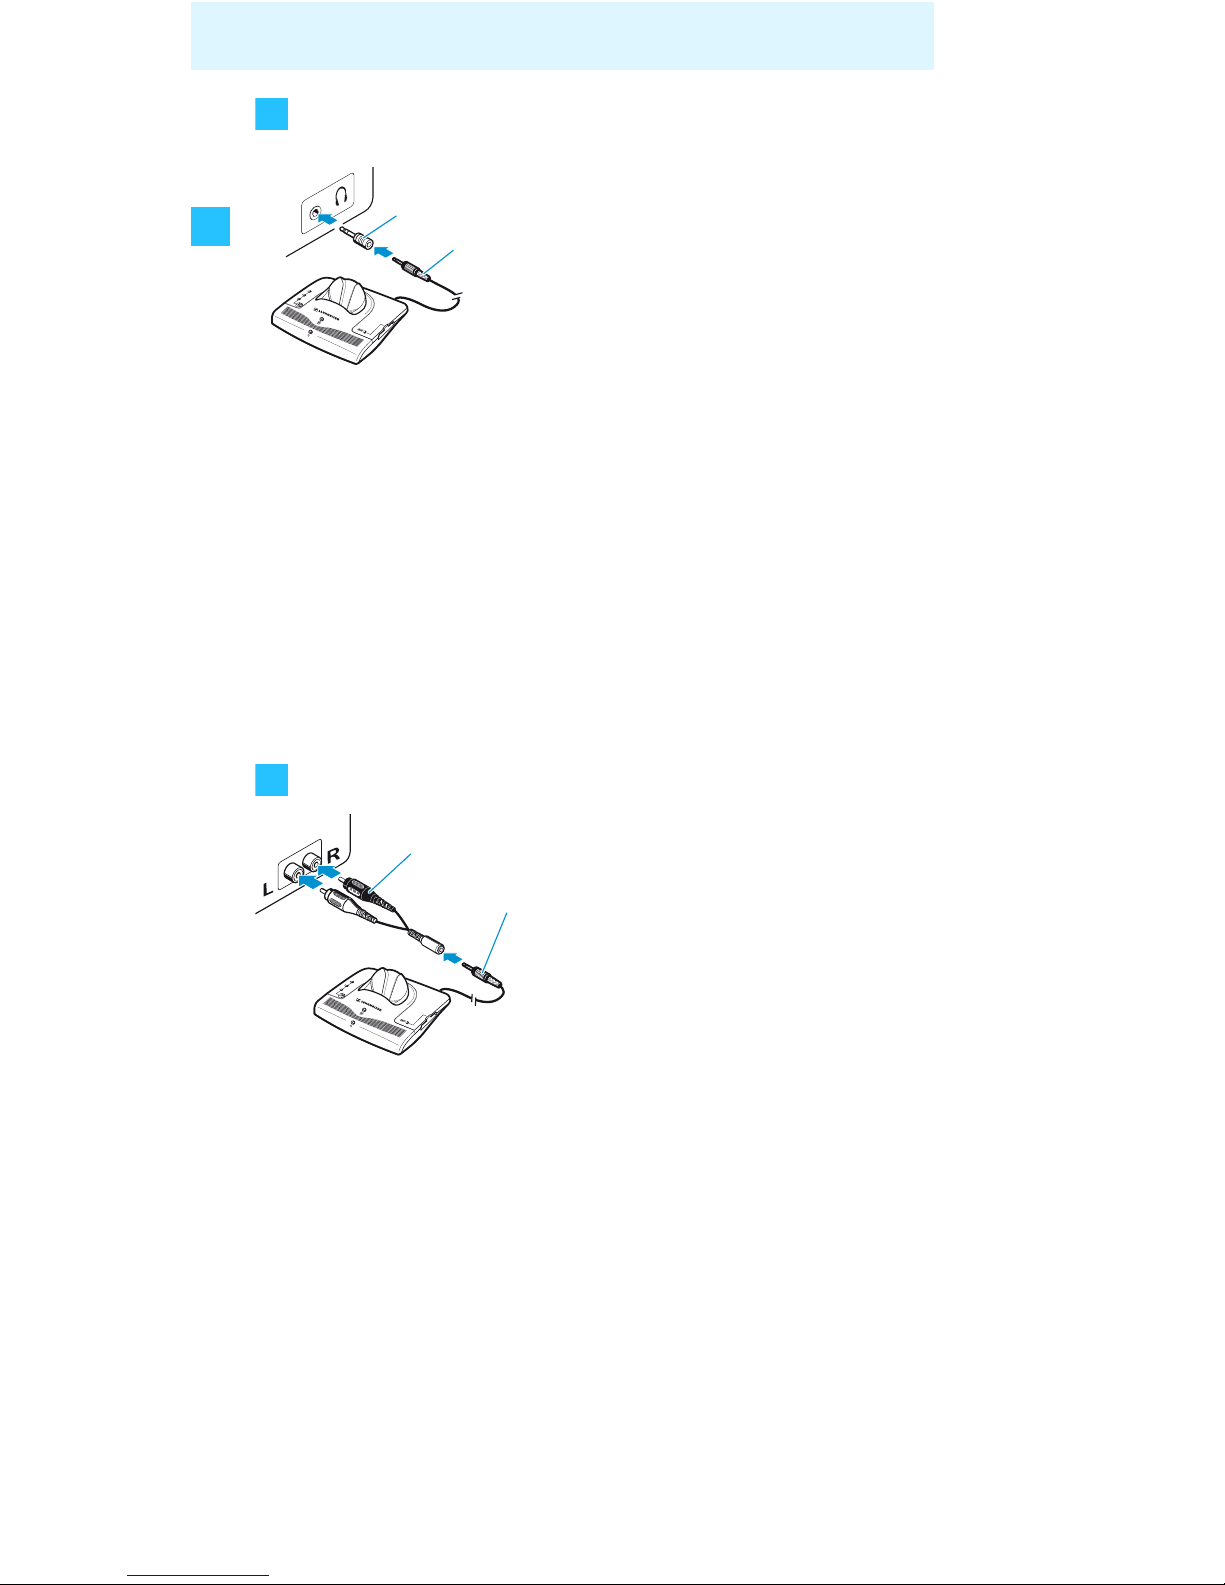
Connecting the transmitter to a headphone socket
왘 Adjust the volume of the headphone socket on your
sound source to a medium level.
This improves the quality of cordless sound transmission.
For detailed information, please refer to the instruction
manual of your sound source (e.g. TV).
Note:
With most TVs, the headphone socket is located at the
front or sides.
Connecting the transmitter to an RCA socket
Note:
With most TVs, the RCA socket is located at the rear.
왘 Plug the other end of the connec-
tion cable L into the headphone
socket on your sound source.
Is the plug on the connection cable
too small for the headphone socket?
왘 Plug the adapter to ¼“ (6.3 mm)
jack socket M onto the connection
cable.
왘 Plug the adapter for RCA
socket N onto the connection
cable L.
왘 Connect the red connector of
the adapter to the red RCA
socket R of your sound source.
왘 Connect the white connector of
the adapter N to the white or
black RCA socket L of your
sound source.
A
L
M
B
N
L
Page 13

9
Putting the Set 900 into operation
Connecting the transmitter to a SCART socket
Note:
If your TV has several SCART sockets, use the socket
SCART output.
Using the MKE 800 TV-N external microphone
Your sound source doesn’t have any of the connections
mentioned above? You can then use the MKE 800 TV-N
microphone (see “Accessories and spare parts” on
page 30).
왘 Directly connect the microphone to the blue socket F on
the transmitter.
왘 Position the microphone in front of the loudspeaker of
your sound source.
Note:
You can change the sound by varying the position of the
microphone in front of the loudspeaker.
왘 Plug the SCART adapter O onto
the connection cable L.
왘 Connect the SCART adapter O
to the SCART socket on your TV.
C
O
L
D
Page 14
10
Using the Set 900
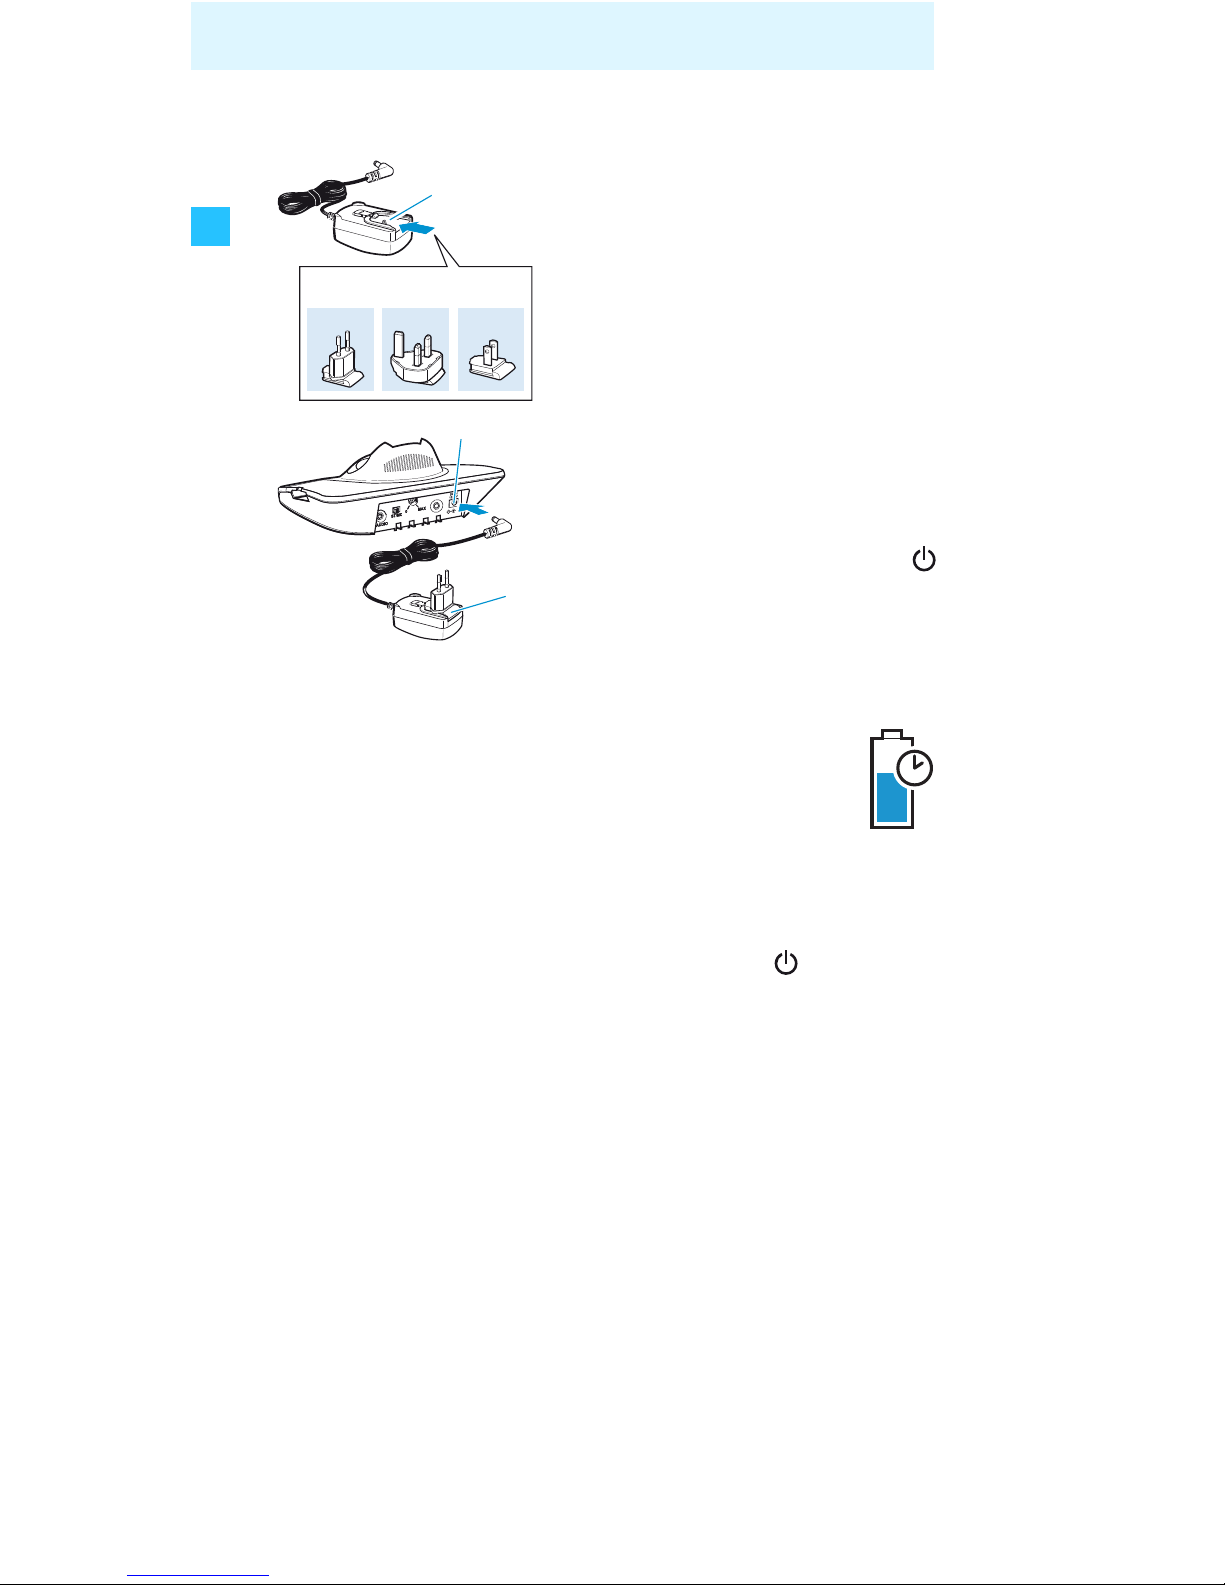
Connecting the transmitter to the mains
– If there is no audio signal from the sound source
for about 3 minutes, the transmitter automatically
switches off. The operation indicator C goes off.
Using the Set 900
To switch the Set 900 system on, proceed as follows:
1. Switch your sound source (e.g. TV) on. The transmitter
automatically switches on (see next chapter).
2. Put the stethoset receiver on. The receiver automatically
switches on (see page 12).
3. Adjust the desired volume (see page 14).
4. When using the receiver without the transmitter on the
move, search for your sound source (see page 12).
왘 Select the suitable country
adapter Q for your wall
socket.
왘 Plug the suitable country
adapter onto the mains
unit P.
왘 Connect the yellow connector
of the mains unit to the yellow
socket I on the transmitter.
왘 Plug the mains unit P into a
wall socket.
The operation indicator C
on the transmitter lights up
green.
Notes:
– When connecting the transmitter to the mains
for the first time, charge the rechargeable
battery for 3 hours as described in the chapter
“Storing and charging the receiver” on
page 17.
P
Q
EU
UK
US
I
P
3h
Page 15
11
Using the Set 900
Switching the transmitter on/off
To switch the transmitter on:
왘 Switch your sound source on.
The transmitter automatically switches on. The operation indicator C lights up green.
The transmitter doesn’t switch on?
왘 Read the chapter “If a problem occurs ...” on page 24.
To switch the transmitter off:
왘 Switch your sound source off.
The transmitter automatically switches off after
3 minutes. The operation indicator C goes off.
To disconnect the transmitter from the mains:
왘 Pull out the mains connector from the wall socket.
Note:
When not using the transmitter for extended periods of
time (e.g. when you are on holiday), pull out the mains
connector from the wall socket. In this case, however, the
receiver’s rechargeable battery will not be recharged.
Switching the receiver on/off
Hearing damage due to high volumes!
This receiver allows you to set higher
volumes than conventional headphones.
This can cause hearing damage in persons
with healthy hearing and especially in
children.
왘 Before putting the receiver on, set the
volume on the receiver to a low value.
왘 Do not continuously expose yourself to
high volumes.
CAUTION!
Page 16
12
Using the Set 900
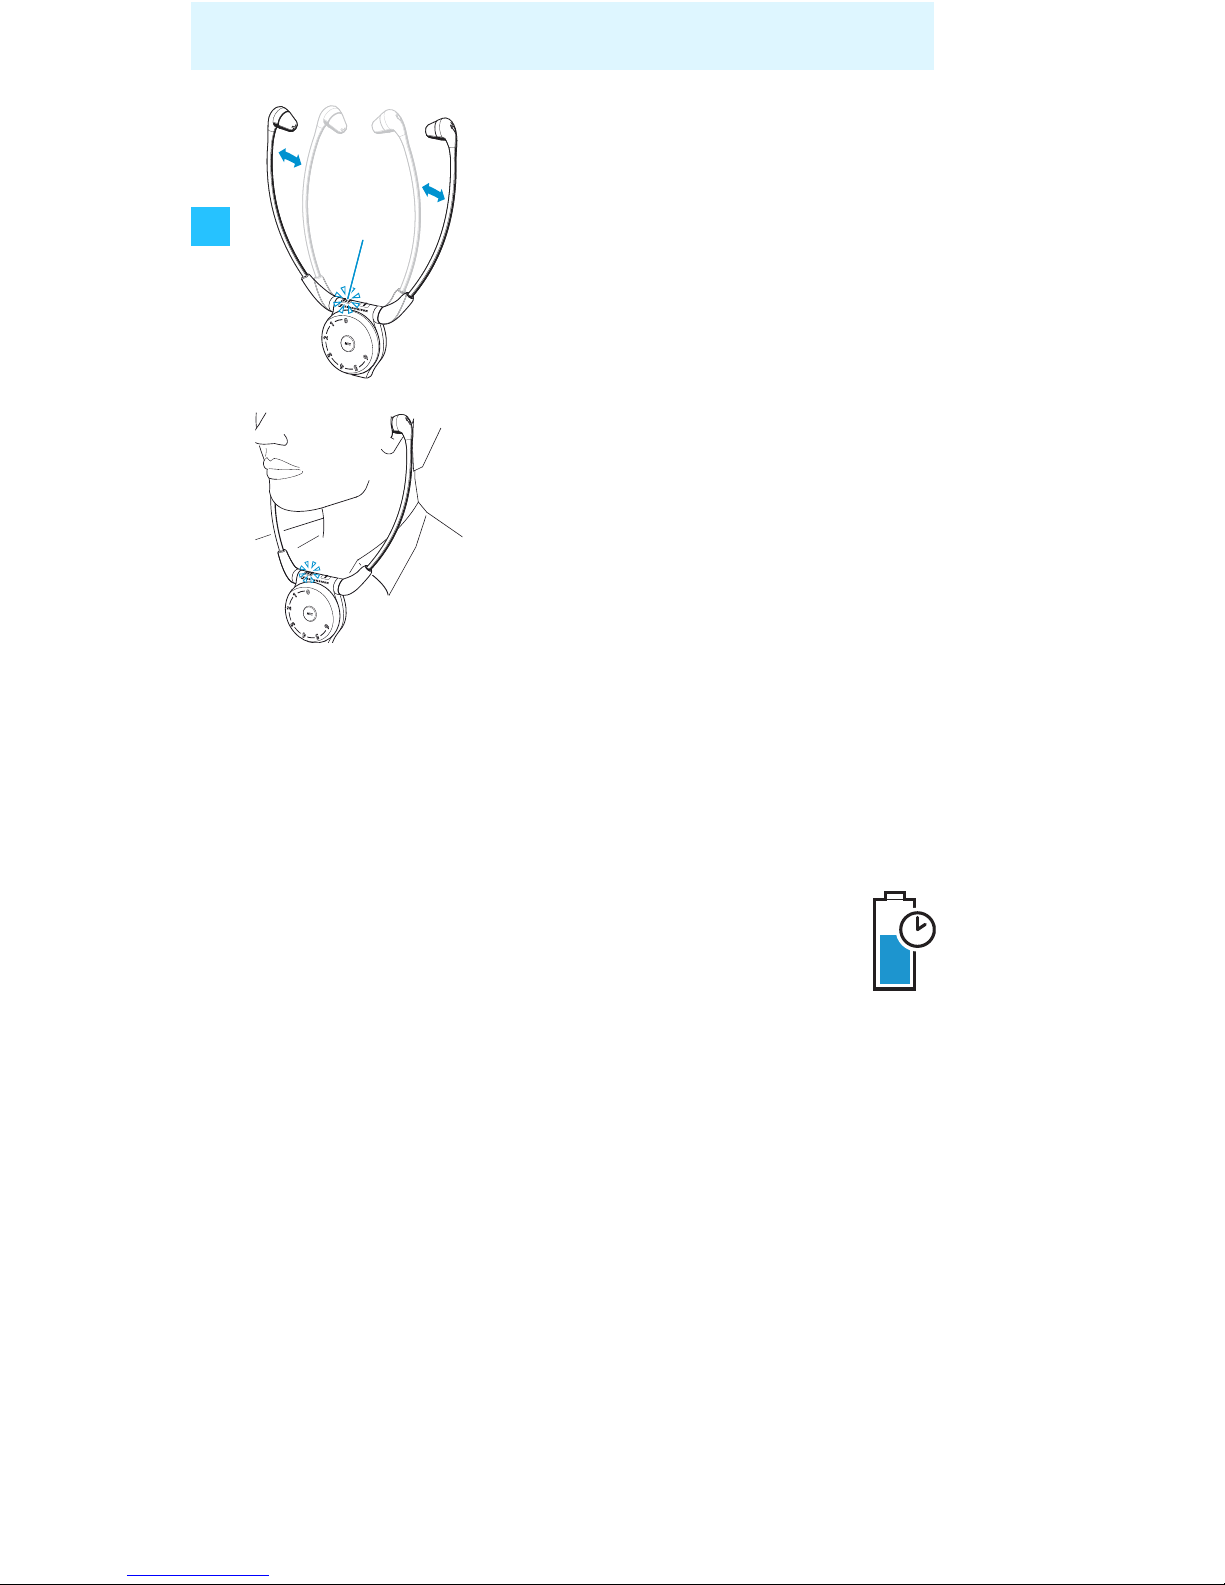
Switching the receiver off
왘 Take the receiver off.
The receiver automatically switches off after 30 seconds.
The channel indicator goes off.
Searching for a sound source
You can use the receiver either at home with the transmitter or on the move in appropriately equipped rooms
(e.g. in a theater).
Switching the receiver on
The receiver automatically switches on
when you pull the earbows apart. The
channel indicator lights up.
Putting the receiver on
왘 Put the receiver on the correct way
round, with the Sennheiser logo
facing away from your body.
The earpads adapt to the ear form
and thus increase the wearing
comfort.
Notes:
– For how to store and charge the receiver, see
page 17.
– If you are not within the range of the trans-
mitter, the receiver automatically switches off
after 3 minutes.
1
3h
Page 17
13
Using the Set 900
왘 If you still haven’t found your sound source, press the
channel search button
7 once more.
Notes:
– The channel indicator goes off after 30 seconds so
that the light won’t disturb you in a dark room.
– When using the receiver without the transmitter on
the move (e.g. in a theater), please note that different
information can be transmitted on the channels. Ask
an employee of the venue which information is transmitted on which channel.
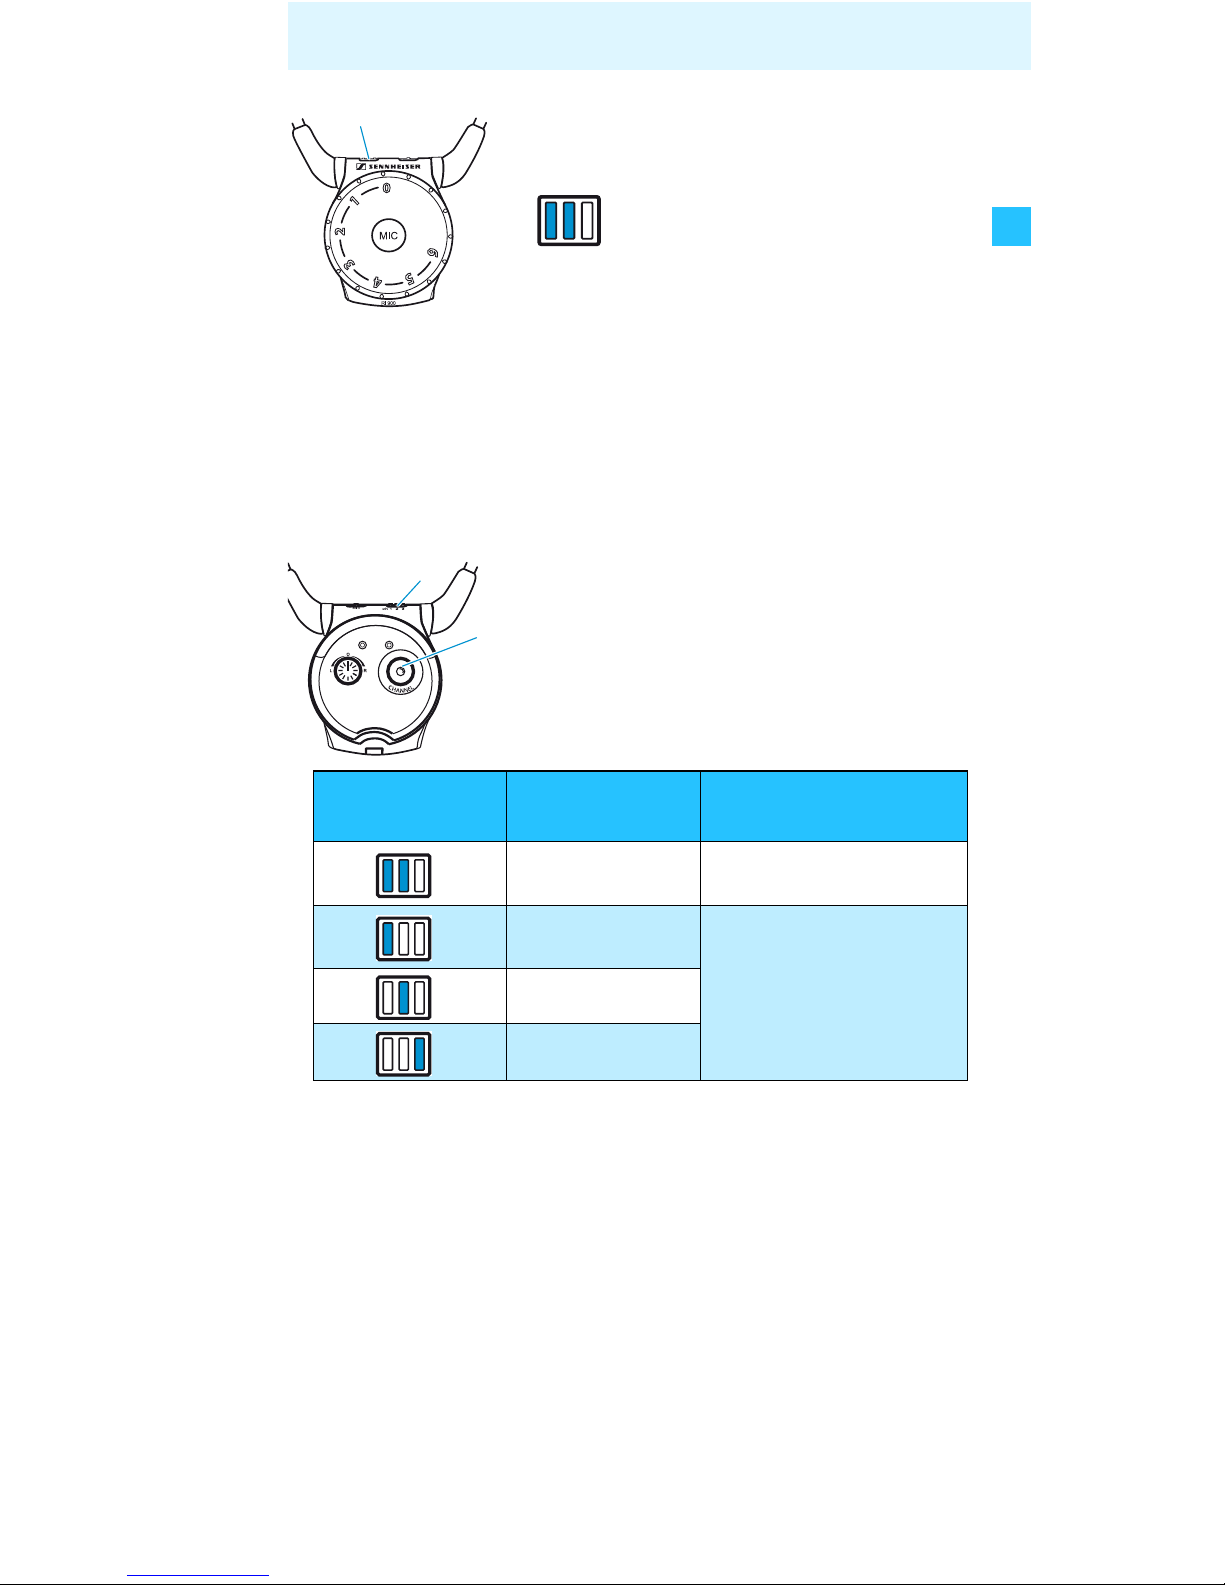
왘 Put the receiver on.
The channel indicator on the
receiver lights up:
For an overview of the channel indicator indications, see table below.
Do you hear the desired sound
source?
Yes:
The receiver has already found the
sound source.
No:
왘 Briefly press the channel search
button 7.
The sound source is searched for. On
the receiver, the channel indicator
can light up as follows:
Channel
indicator
Frequency You hear
the sound in
2.3+2.8 MHz stereo
2.3 MHz
mono
2.8 MHz
95 kHz
1
7
1
Page 18
14
Using the Set 900
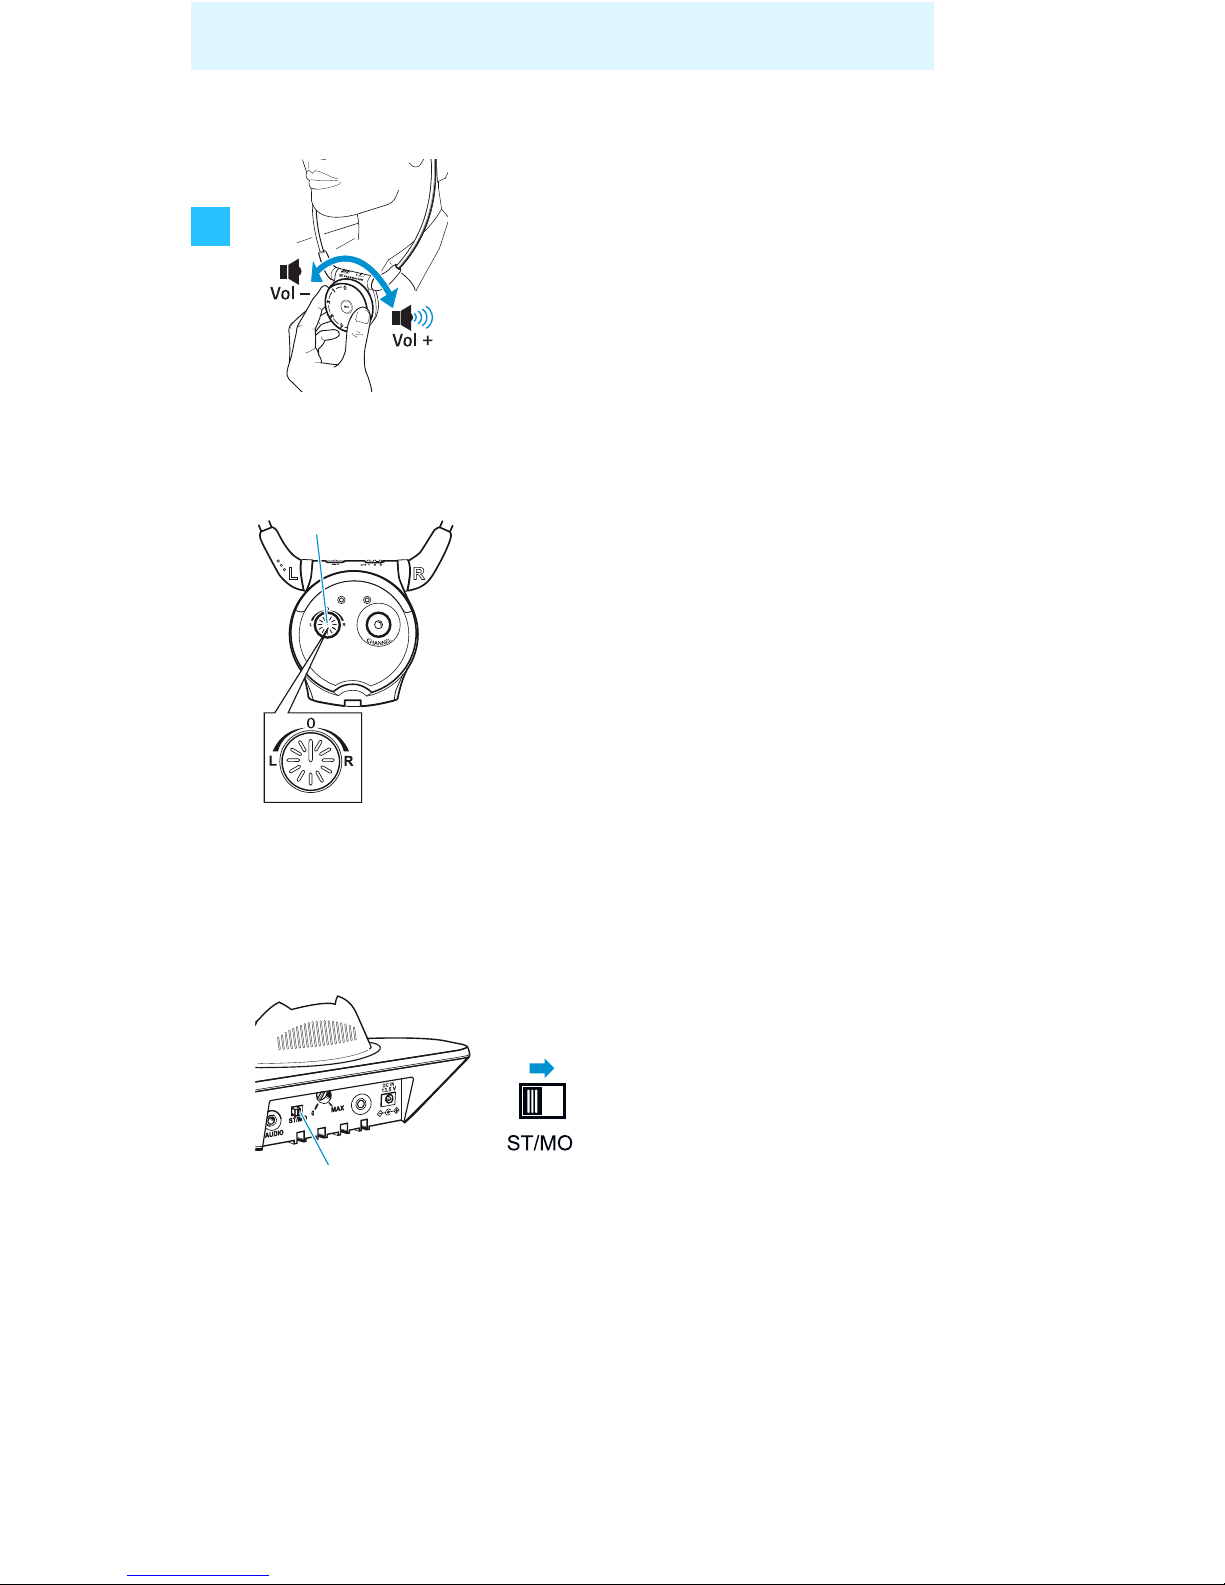
Adjusting the volume
Adjusting the balance
Switching between mono and stereo operation
If, despite a correct balance adjustment, you can hear the
sound only with one ear:
왘 Use the volume control 3 to adjust
the volume to a sufficient and
comfortable level.
The balance control allows for right/left
volume adjustment. Adjust the balance
so that you hear equally well with both
ears.
왘 Turn the balance control 6 to the
left L or right R in order to increase the
volume for the corresponding ear.
왘 Set the ST/MO switch G on the
transmitter to MO (mono).
6
G
Page 19
15
Using the Set 900
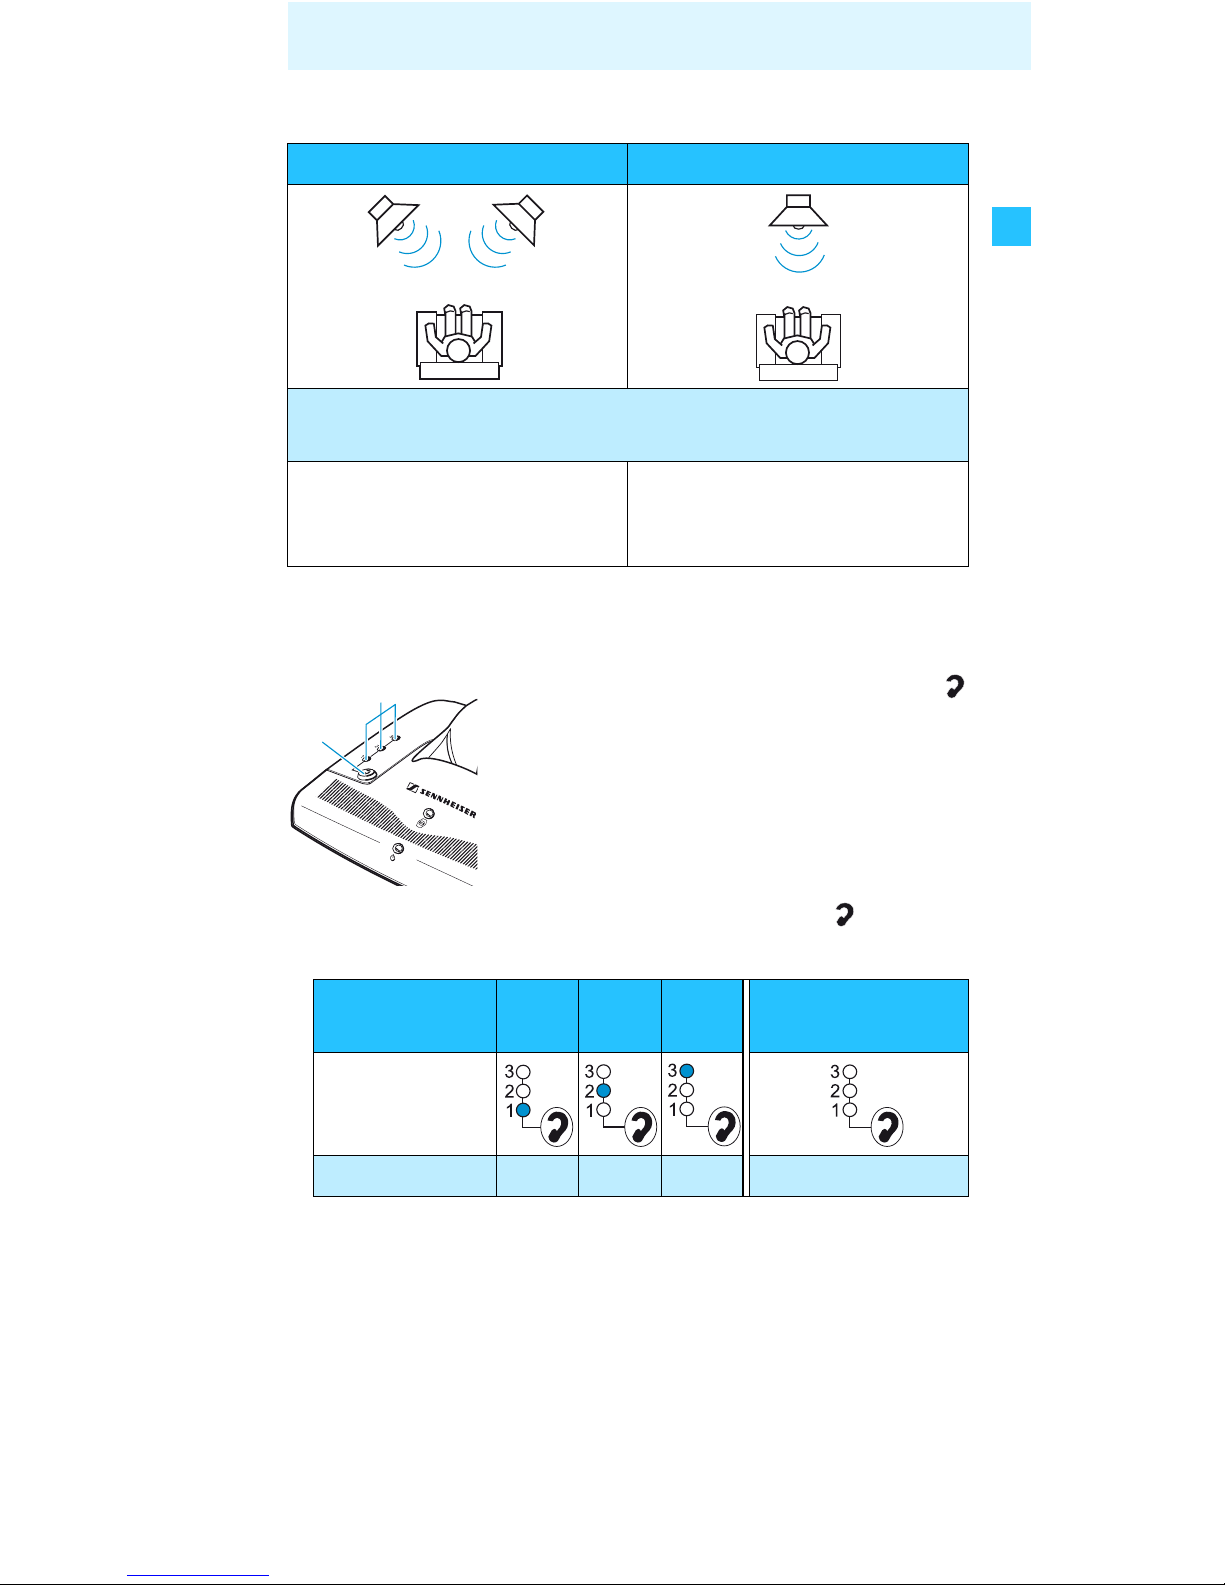
Meaning of the terms “mono” and “stereo”
Individually enhancing the speech intelligibility
왘 Press the “speech intelligibility” button D until the
sound is optimally adjusted to your needs.
If necessary, you can have the speech intelligibility fine
adjusted to your hearing ability (see “Fine adjusting the
speech intelligibility” on page 27).
Stereo (ST) Mono (MO)
Example: L: Speech from the left
R: Music from the right
You hear speech from
the left and music from
the right.
You hear speech and music
coming from the front.
The “speech intelligibility” button D
allows you to adjust the sound to your
individual needs. Try out which setting
works best for you.
Press the
button
1 x 2 x 3 x 4 x
Indicator E lit
yellow
Setting 1 2 3 Default setting
LR
L + R
E
D
Page 20
16
Using the Set 900
Switching the microphones on/off
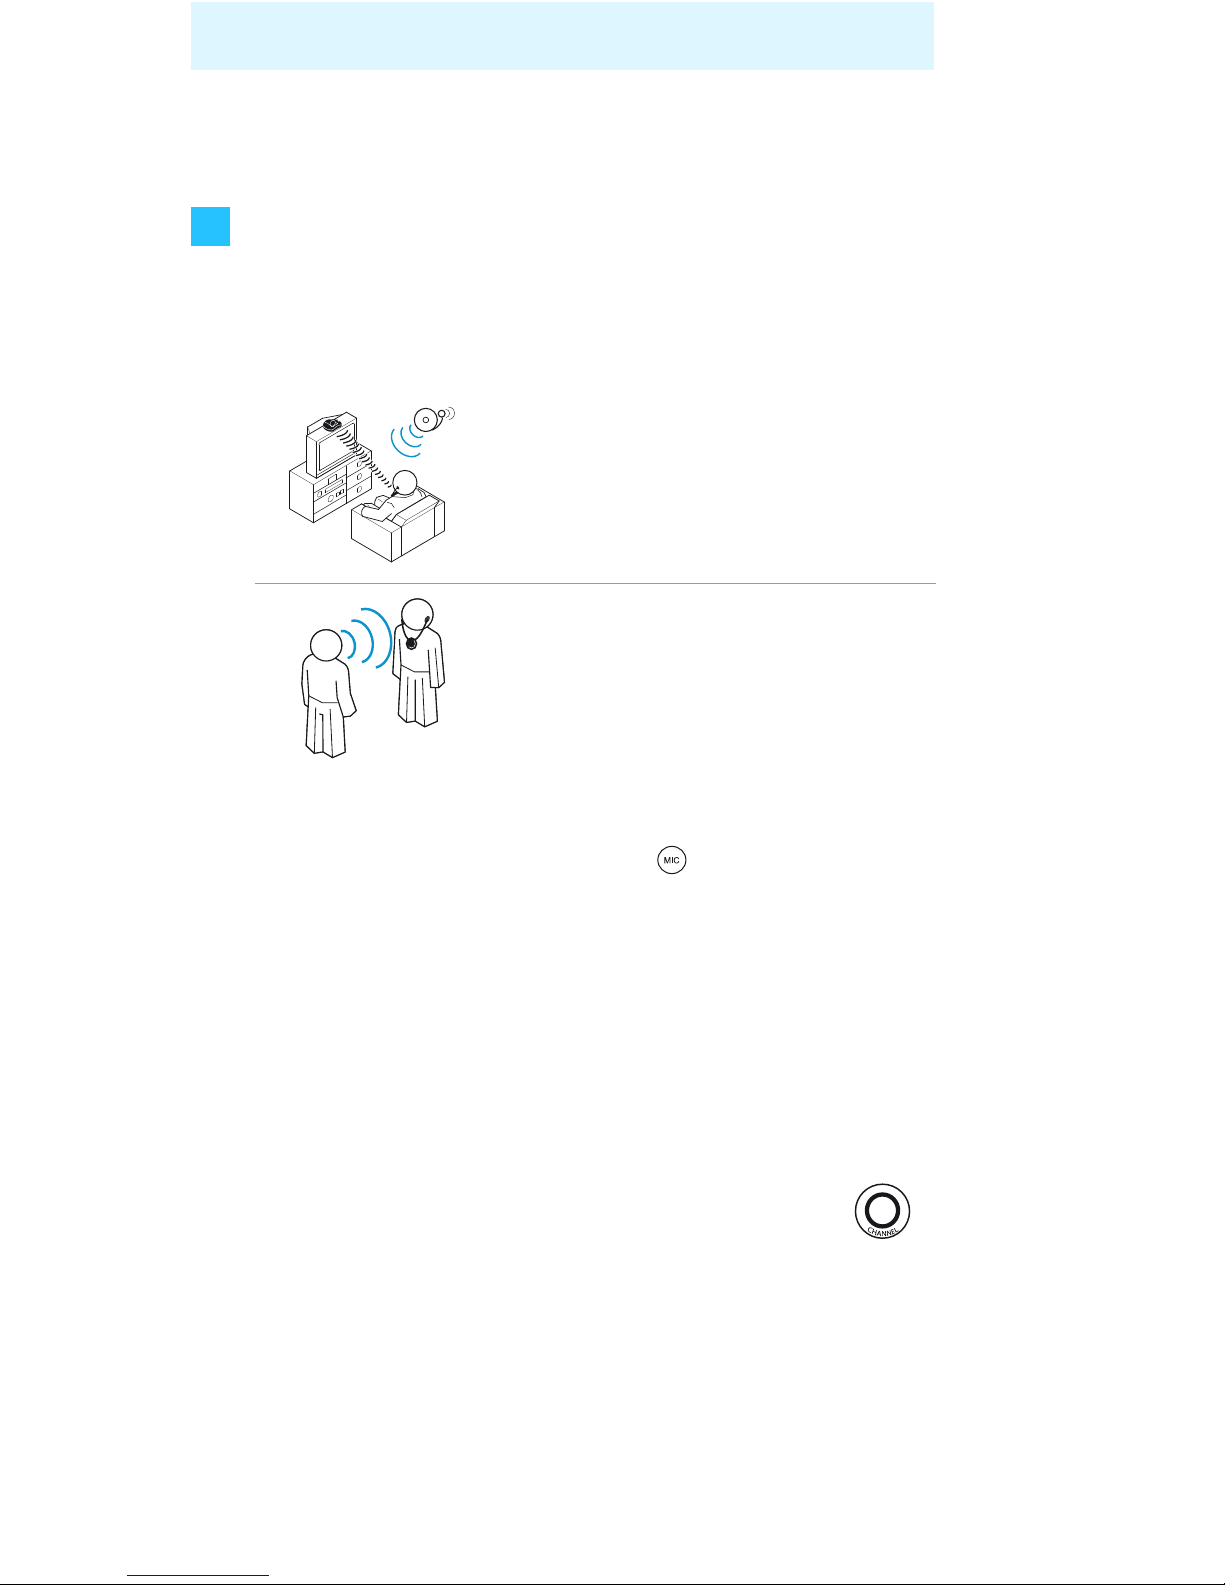
The microphones openings at the sides of the receiver pick
up the sounds of your surroundings. When the microphones are switched on, you will hear your surroundings
louder. You can hear for example your door bell, your telephone or your conversational partner even when you are
wearing the receiver. The microphones can be used in two
different hearing situations:
Switching the microphones on (hearing situation 1 and 2)
왘 Press the microphone button 4 .
The microphone indicator 2 lights up. You hear 2 short,
ascending beeps and then your surroundings.
Make sure that the microphone openings 5 are not
covered!
Hearing situation 2
When you hear a sound source which you do not want to
hear, you can switch off the sound transmission as follows:
왘 Press the channel search button 7.
The channel indicator 1 goes off. You only hear
your surroundings.
왘 Press the channel search button 7 once more to switch
the sound source on again.
Hearing situation 1:
You want to hear the sound of your
sound source and your surroundings.
Hearing situation 2:
You only want to hear your surroundings and you use the receiver as an
assistive listening device which helps
you to better hear other people.
Page 21
17
Using the Set 900
Switching the microphones off
왘 Press the microphone button 4 once more.
The microphone indicator 2 goes off. You hear 2 short,
descending beeps and then only your sound source.
Storing and charging the receiver
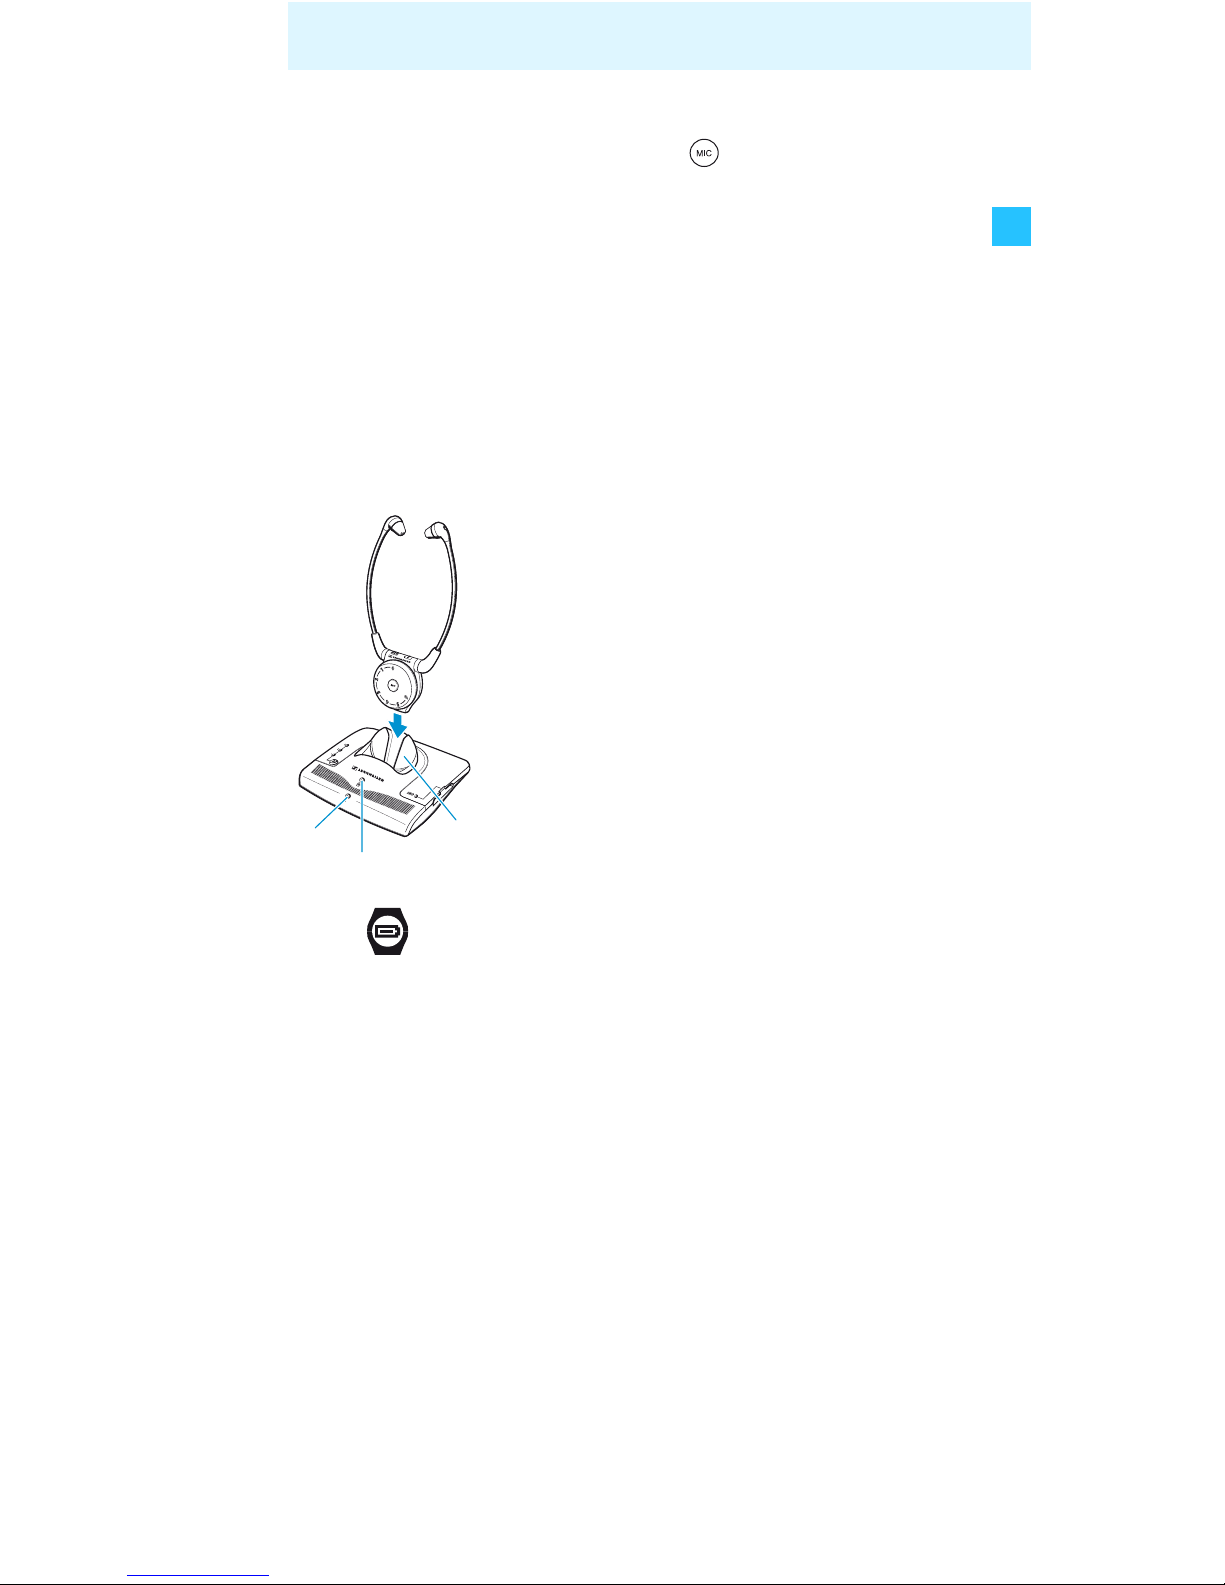
Do not store the receiver on a glass dummy head, chair
armrest, or similar for long periods of time as this can
reduce the contact pressure of the earbows. Furthermore,
with the earbows pulled apart, the receiver remains
switched on.
Notes:
– With a fully charged battery, the operating time is up
to 12 hours.
– If you have several receivers, they can be used during
charging.
– Always store the receiver in the transmitter’s charging
compartment
9 to ensure that it is fully charged. The
intelligent battery charging technology prevents overcharging.
왘 After use, place the receiver into the
transmitter’s charging compartment 9
without exerting too much pressure.
When the receiver is placed correctly
into the charging compartment, the
indicator B lights up:
red: The battery is being charged.
green: The battery is fully charged.
9
C
B
Page 22
18
Using the Set 900
Charging a rechargeable battery in the
transmitter’s charging compartment
You can charge the receiver’s rechargeable battery or a
spare BA 300 rechargeable battery (not included in the
delivery of the Set 900) in the charging compartment 0 at
the side of the transmitter.
The spare battery offers extended listening time while the
discharged first battery is being recharged.
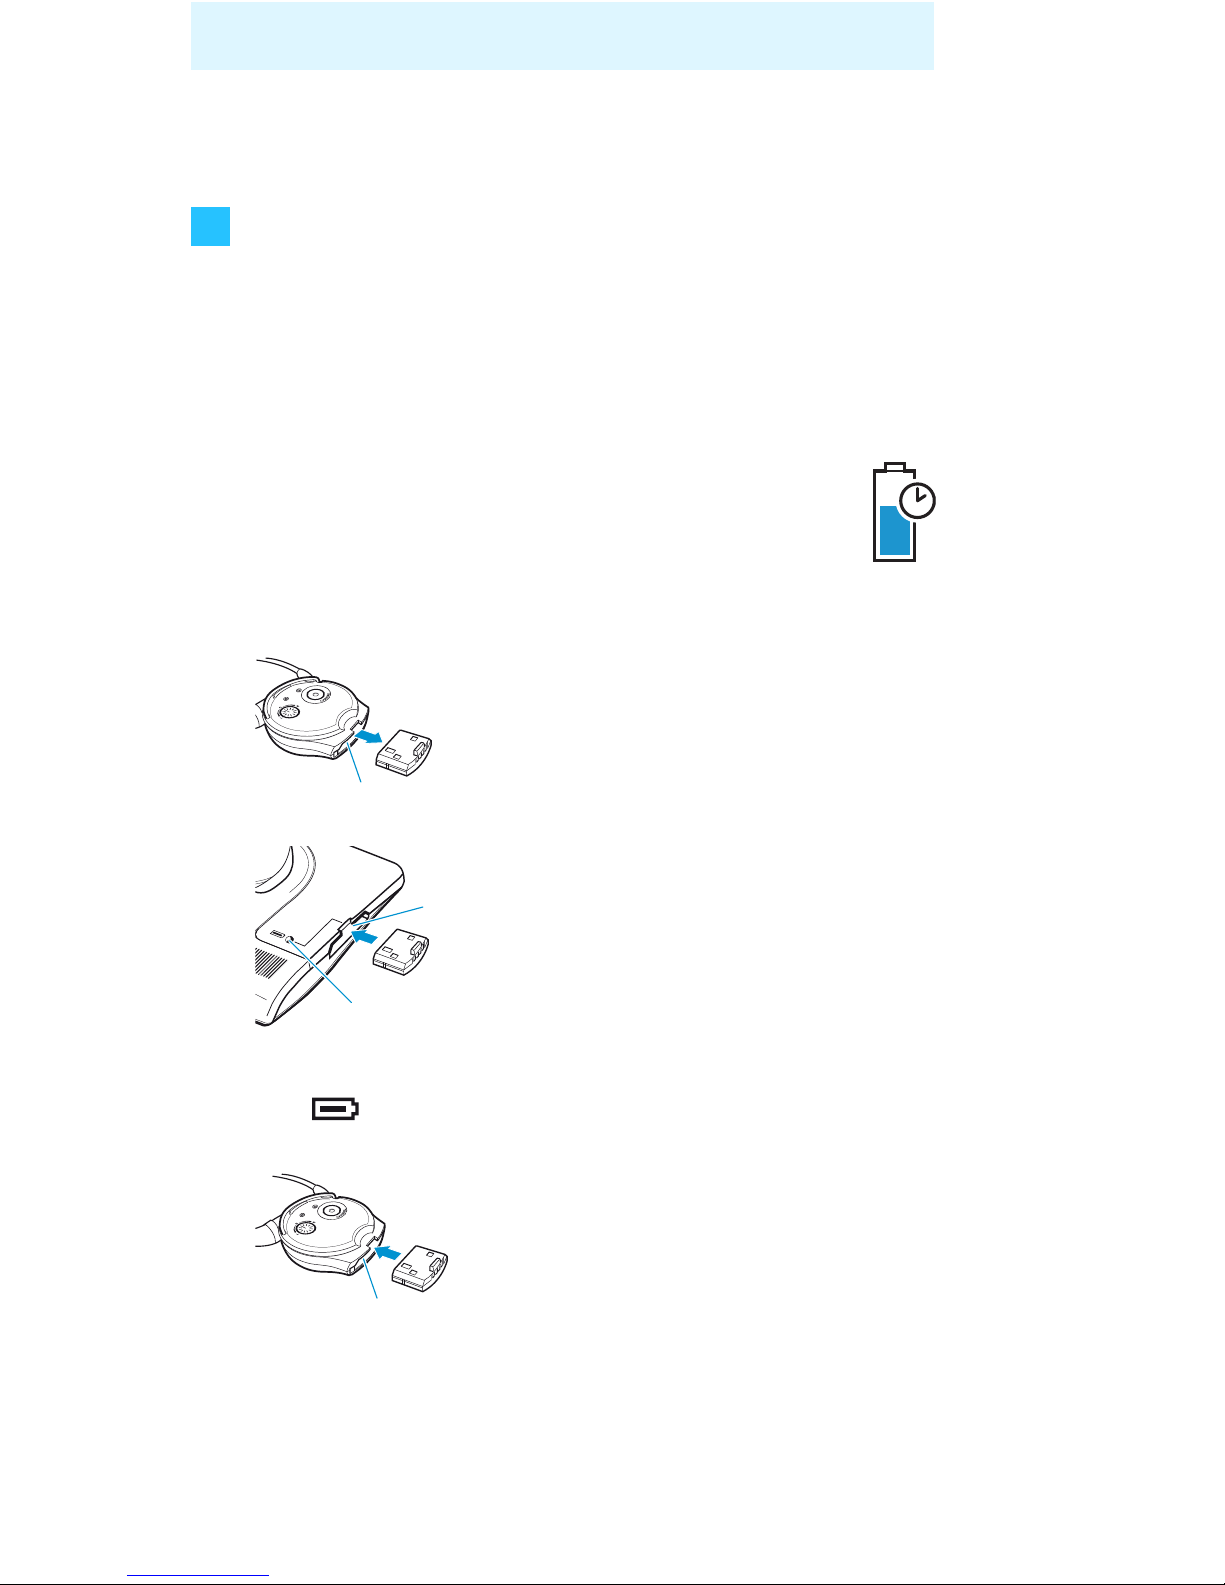
Removing and charging the receiver’s battery
Note:
Before using the spare rechargeable battery for
the first time, charge it for at least 3 hours.
To remove the receiver’s battery:
왘 Pull the battery out of the receiver’s
battery compartment 8.
왘 Insert the receiver’s battery into the
charging compartment 0 at the side
of the transmitter as shown.
When the battery is inserted correctly
into the charging compartment, the
indicator A lights up:
red: The battery is being charged.
green: The battery is fully charged.
왘 Slide the battery into the receiver’s
battery compartment 8 as far as it
will go.
3h
8
0
A
8
Page 23
19
Using the Set 900
Folding up the receiver for transportation
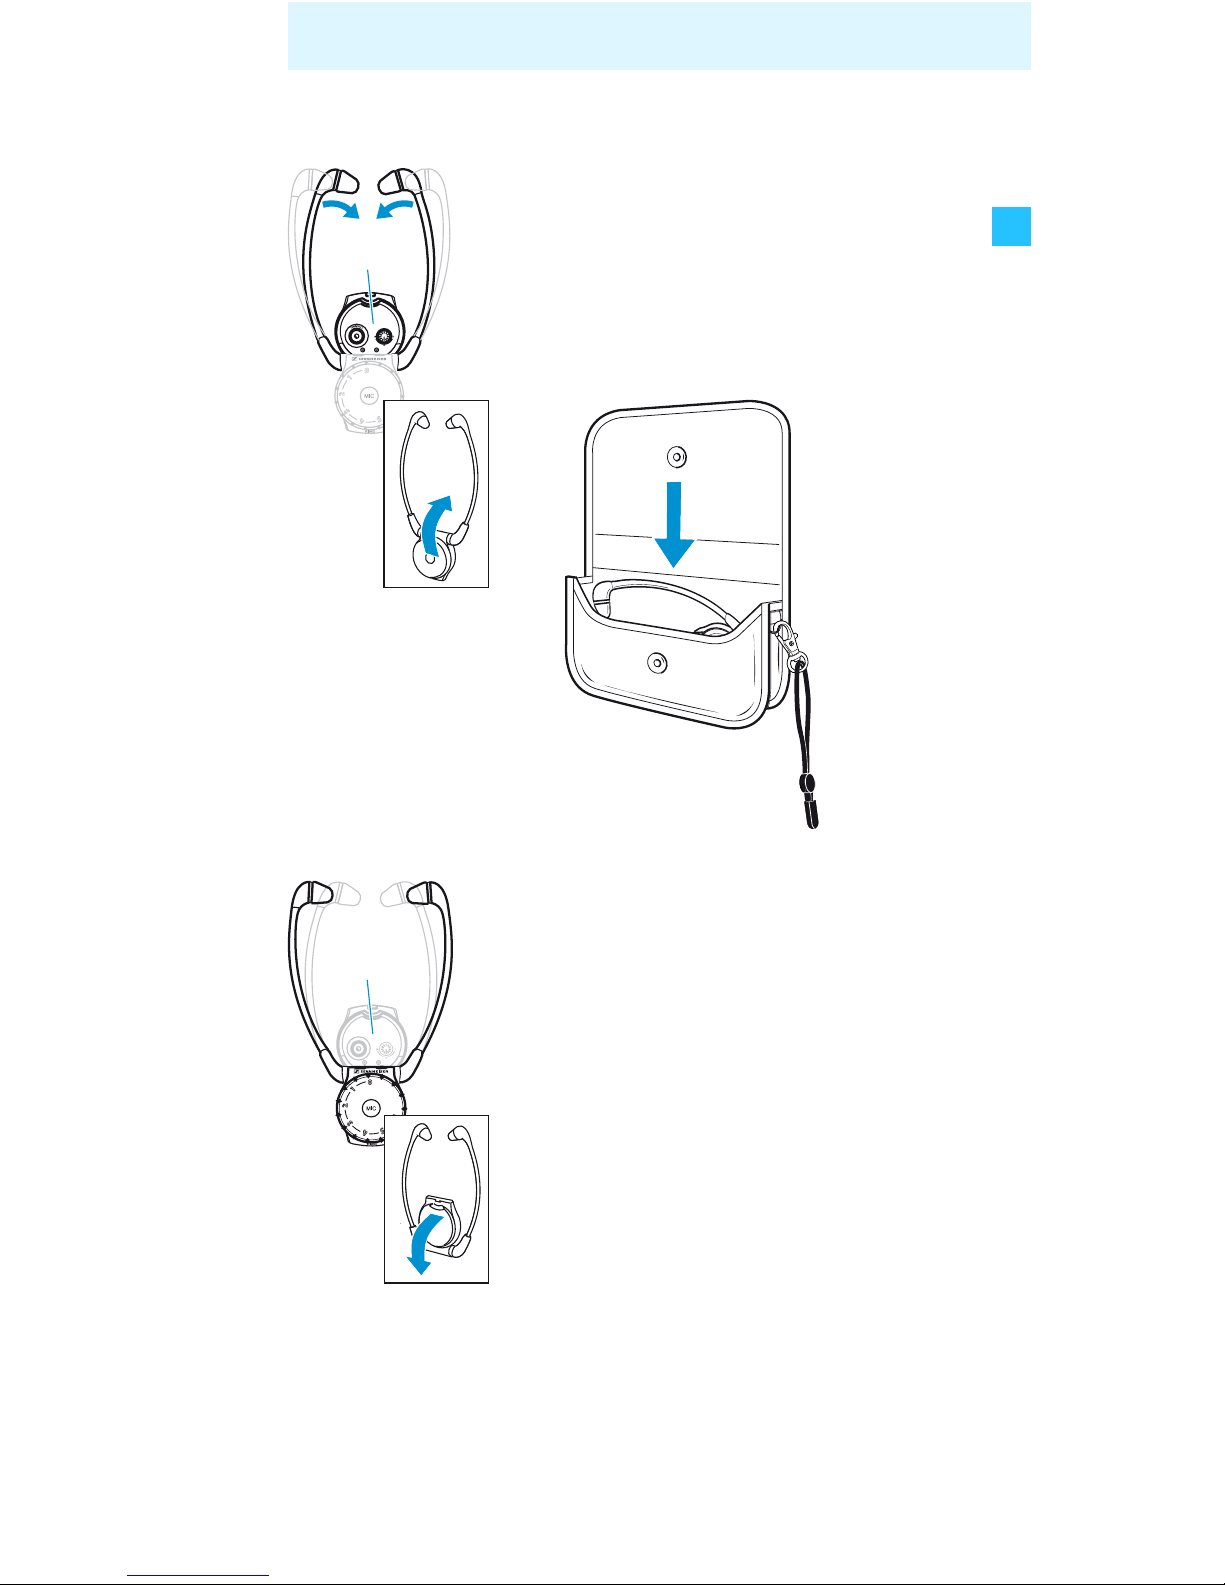
To fold up the receiver:
왘 Carefully turn the operating ele-
ment K upwards.
왘 For safe transportation, place the
receiver into the supplied transport
case as shown.
The transport case has two additional
compartments for storing a spare
rechargeable battery and your spare
earpads.
왘 Attach the hand strap to your trans-
port case.
To unfold the receiver:
왘 Carefully turn the operating ele-
ment K downwards as shown.
K
K
Page 24
20
What if...
What if...
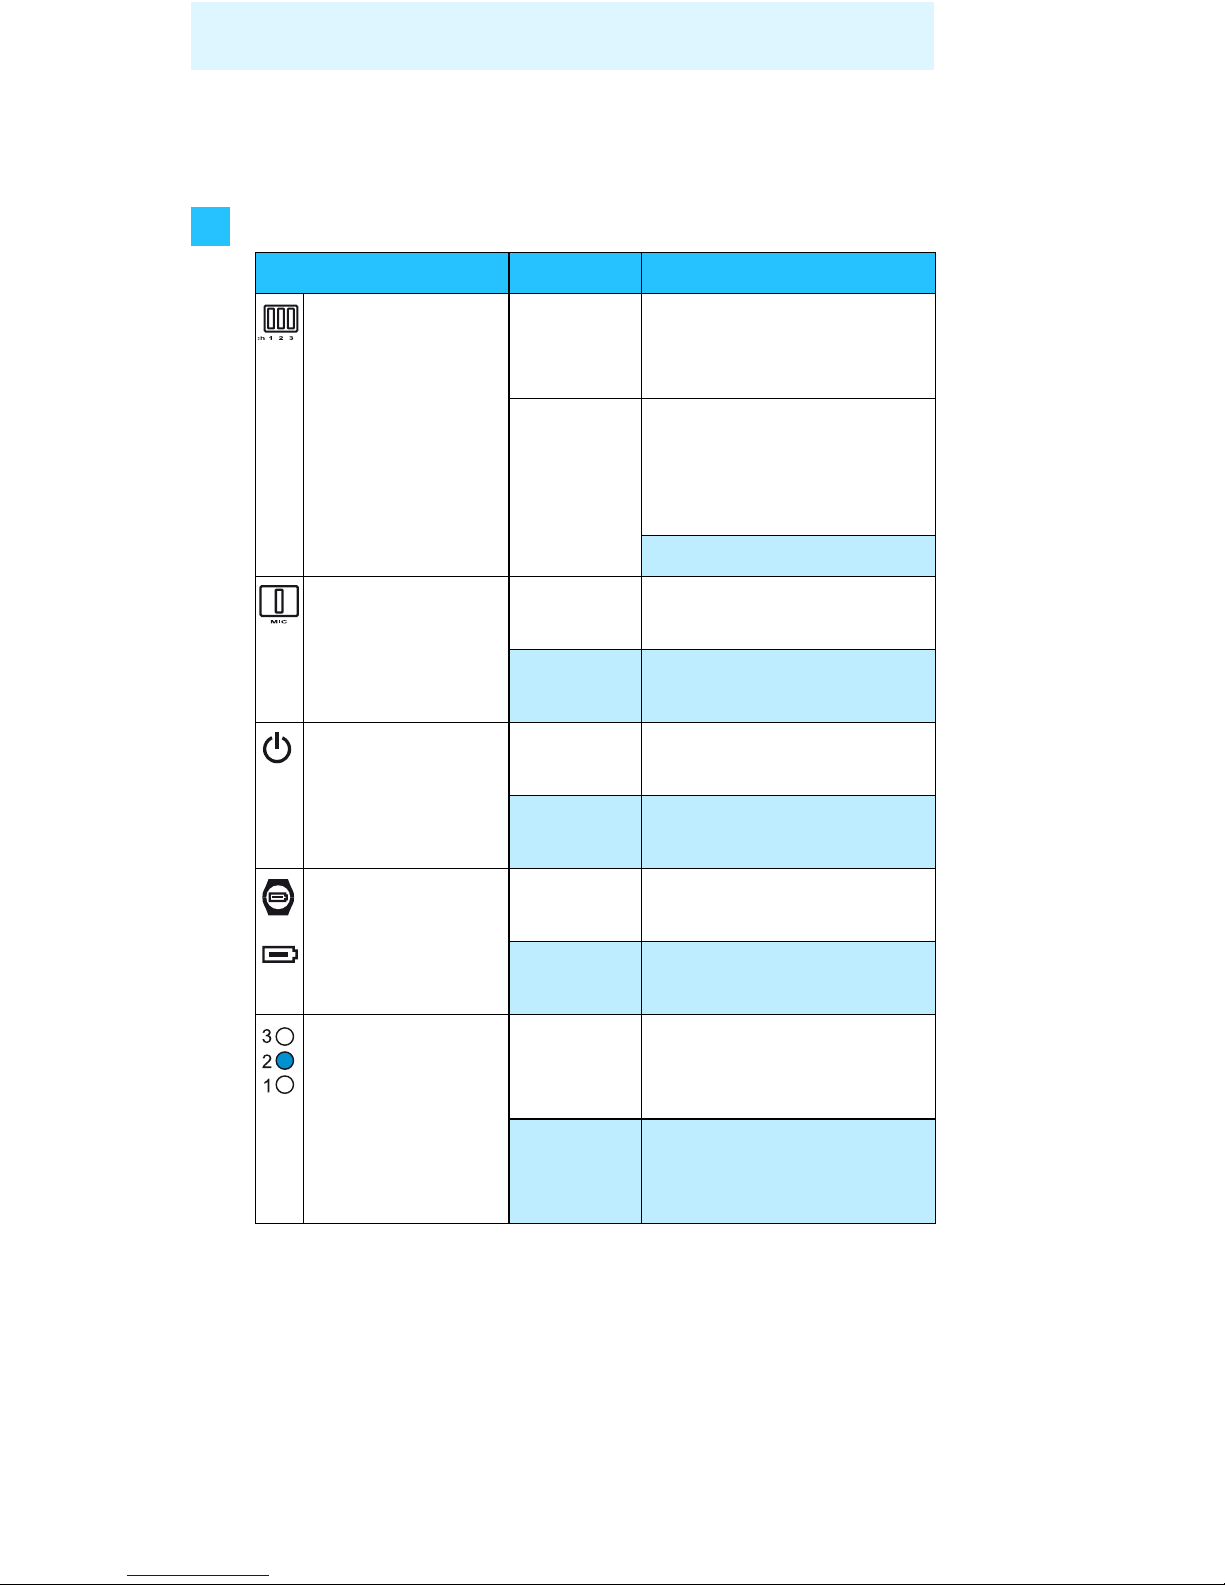
...this indicator lights up?
Indicator Status Meaning
Channel
indicator 1
on the receiver
lit yellow Receiver has just been
switched on or a button
has just been pressed.
off Receiver is switched on
for more than 30 secs.
and no button has been
pressed.
Receiver is switched off.
Microphone
indicator 2
on the receiver
lit red Microphones are
switched on.
off Microphones are
switched off.
Operation
indicator C
on the transmitter
lit green Transmitter is
switched on.
off Transmitter is
switched off.
Charging
indicator B
Charging
indicator A
lit red Rechargeable battery
is being charged.
lit green Rechargeable battery
is fully charged.
“Speech
intelligibility”
indicator E on
the transmitter
lit yellow Speech intelligibility
enhancement is
switched on.
off Speech intelligibility
enhancement is
switched off.
Page 25
21
What if...
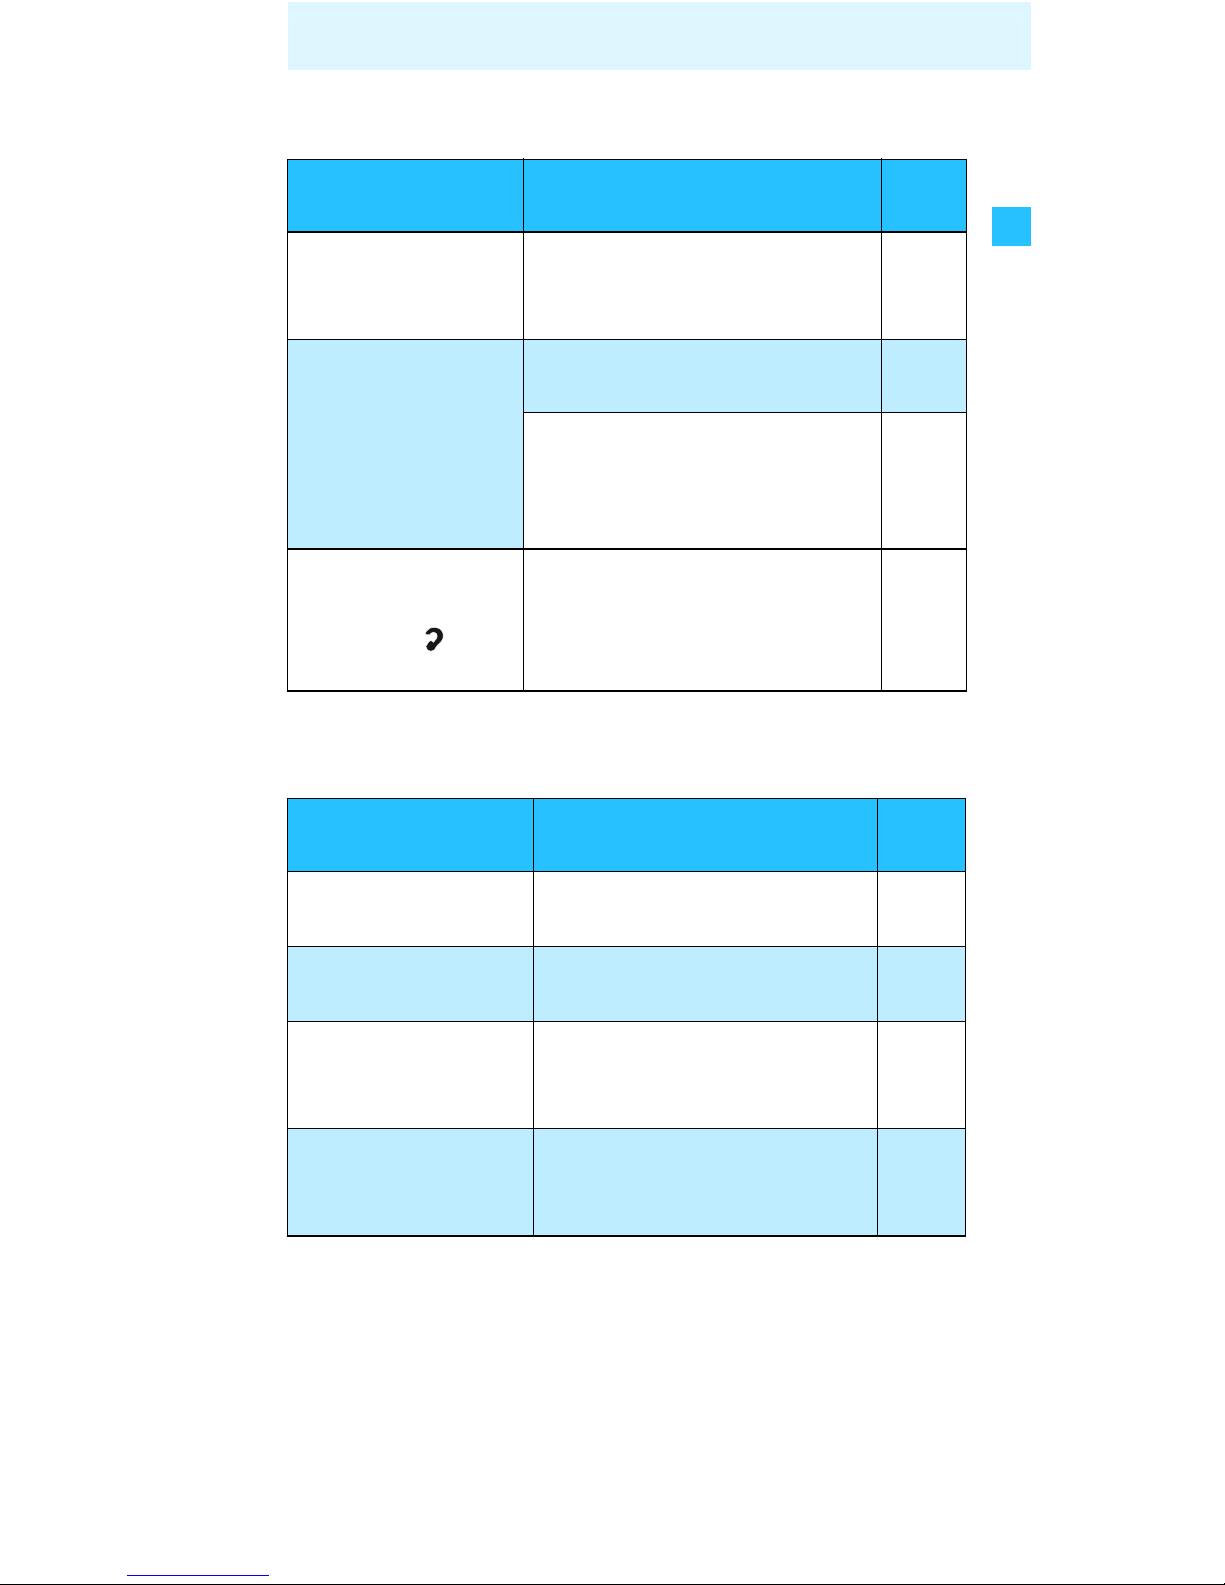
...you press this button?
...you change the position of this control/switch?
Button Function see
page
Microphone
button 4
on the receiver
Switches the microphones
on and off.
16
Channel search
button 7
on the receiver
Searches for the sound
source or a different channel.
12
Switches the sound transmission off (only when the
microphones are switched
on).
16
“Speech
intelligibility”
button D
on the transmitter
Selects one of the possible
settings in order to individually enhance the speech
intelligibility
15
Control/switch Function see
page
Volume control 3
on the receiver
Reduces or increases the
volume of the receiver.
14
Balance control 6
on the receiver
Increases the volume for
the left or the right ear.
14
Mono/stereo slide
switch G on the
transmitter
Sets the transmitter to
mono or stereo operation.
14
Treble adjustment
control
H on the
transmitter
Treble adjustment is only to
be made by a hearing aid
technician / an expert.
27
Page 26
22
What if...
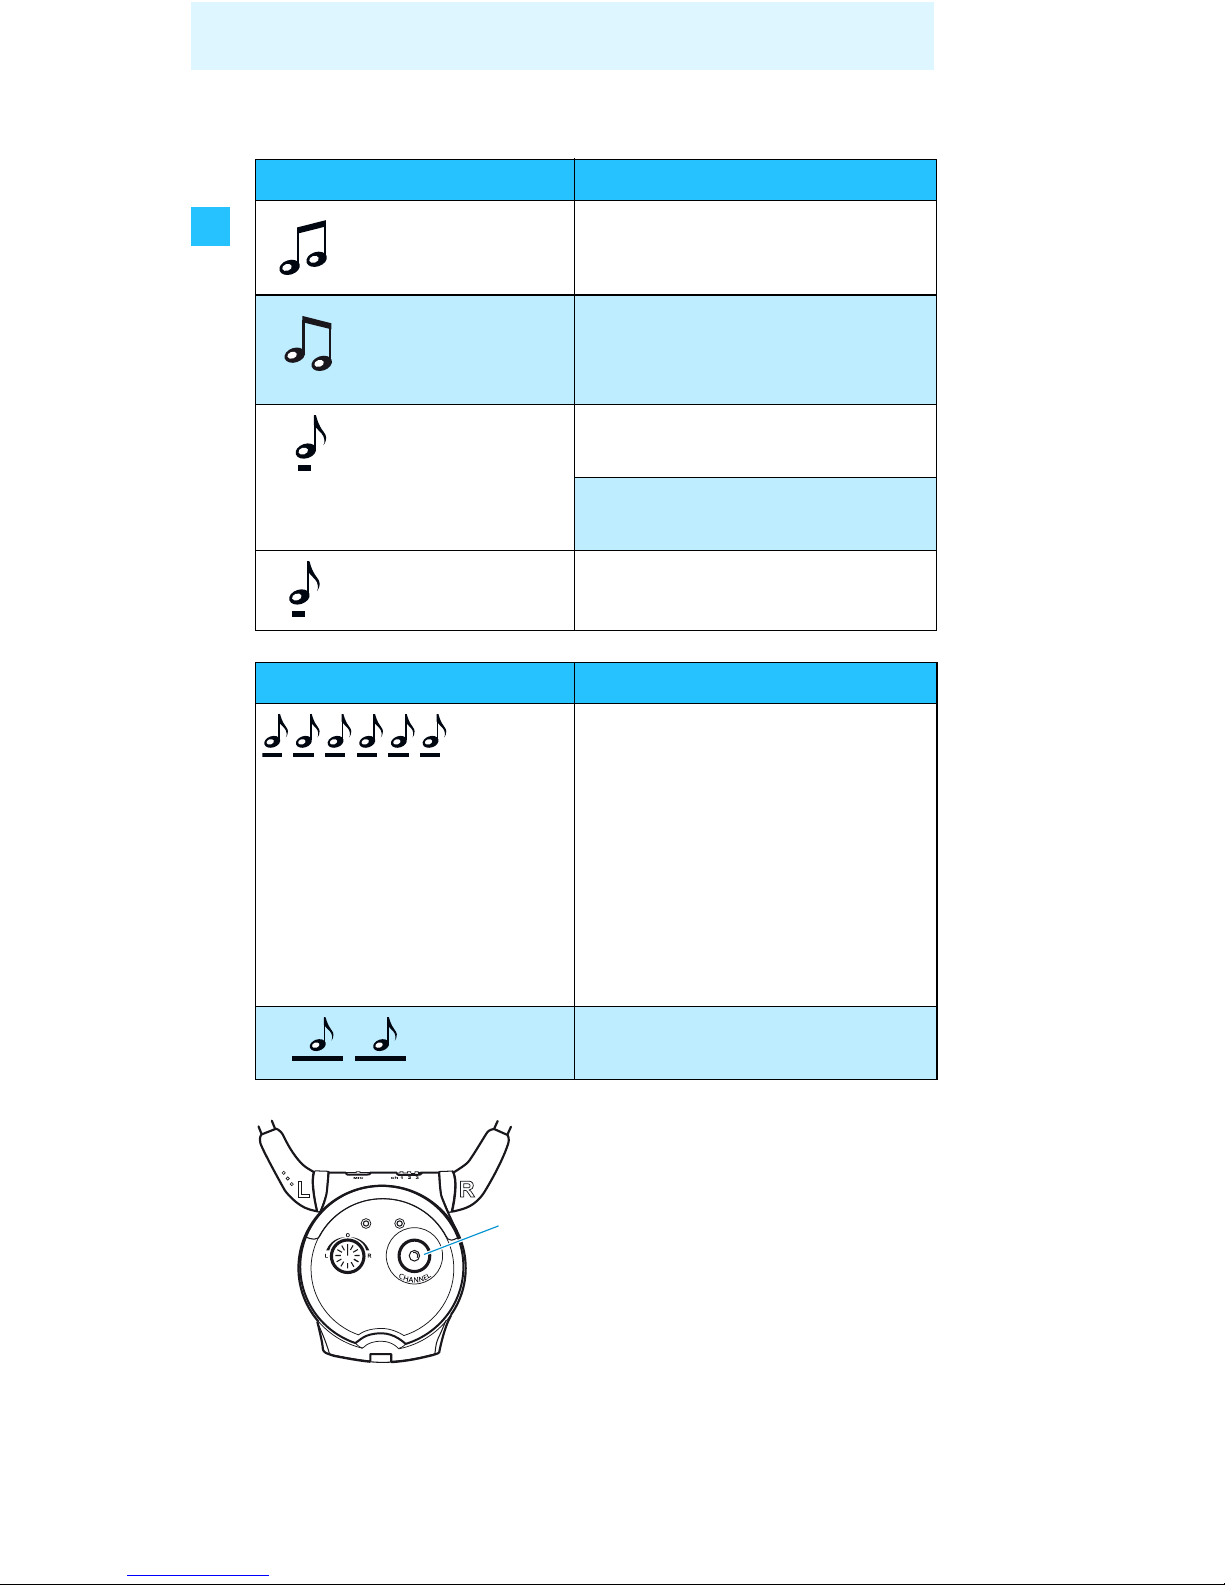
...you hear acoustic signals or warning signals?
Note:
Warning signals cannot be switched off.
Acoustic signal Meaning
2 ascending
beeps
The microphones have just
been switched on.
2 descending
beeps
The microphones have just
been switched off.
1 acknowledgement beep
The channel search button
has been pressed once briefly.
The channel search button
has been pressed for 6 secs.
1–3 short beeps The receiver is set to
channel 1, 2 or 3.
Warning signal Meaning
6 short
beeps
The receiver does not receive
any signal from the transmitter:
y Transmitter and receiver
are too distant.
The receiver switches off
after 3 minutes.
y The transmitter is
switched off.
2 long
beeps
The rechargeable battery is
almost flat.
To switch the acoustic signals on
and off:
왘 Press the channel search
button 7 on the receiver for
approx. 5 seconds.
You hear a short acoustic signal.
7
Page 27
23
Cleaning the Set 900
Cleaning the Set 900
Cleaning the transmitter and the receiver
왘 Before cleaning, disconnect the transmitter from the
mains.
왘 Use only a slightly damp cloth to clean the devices.
Cleaning the earpads
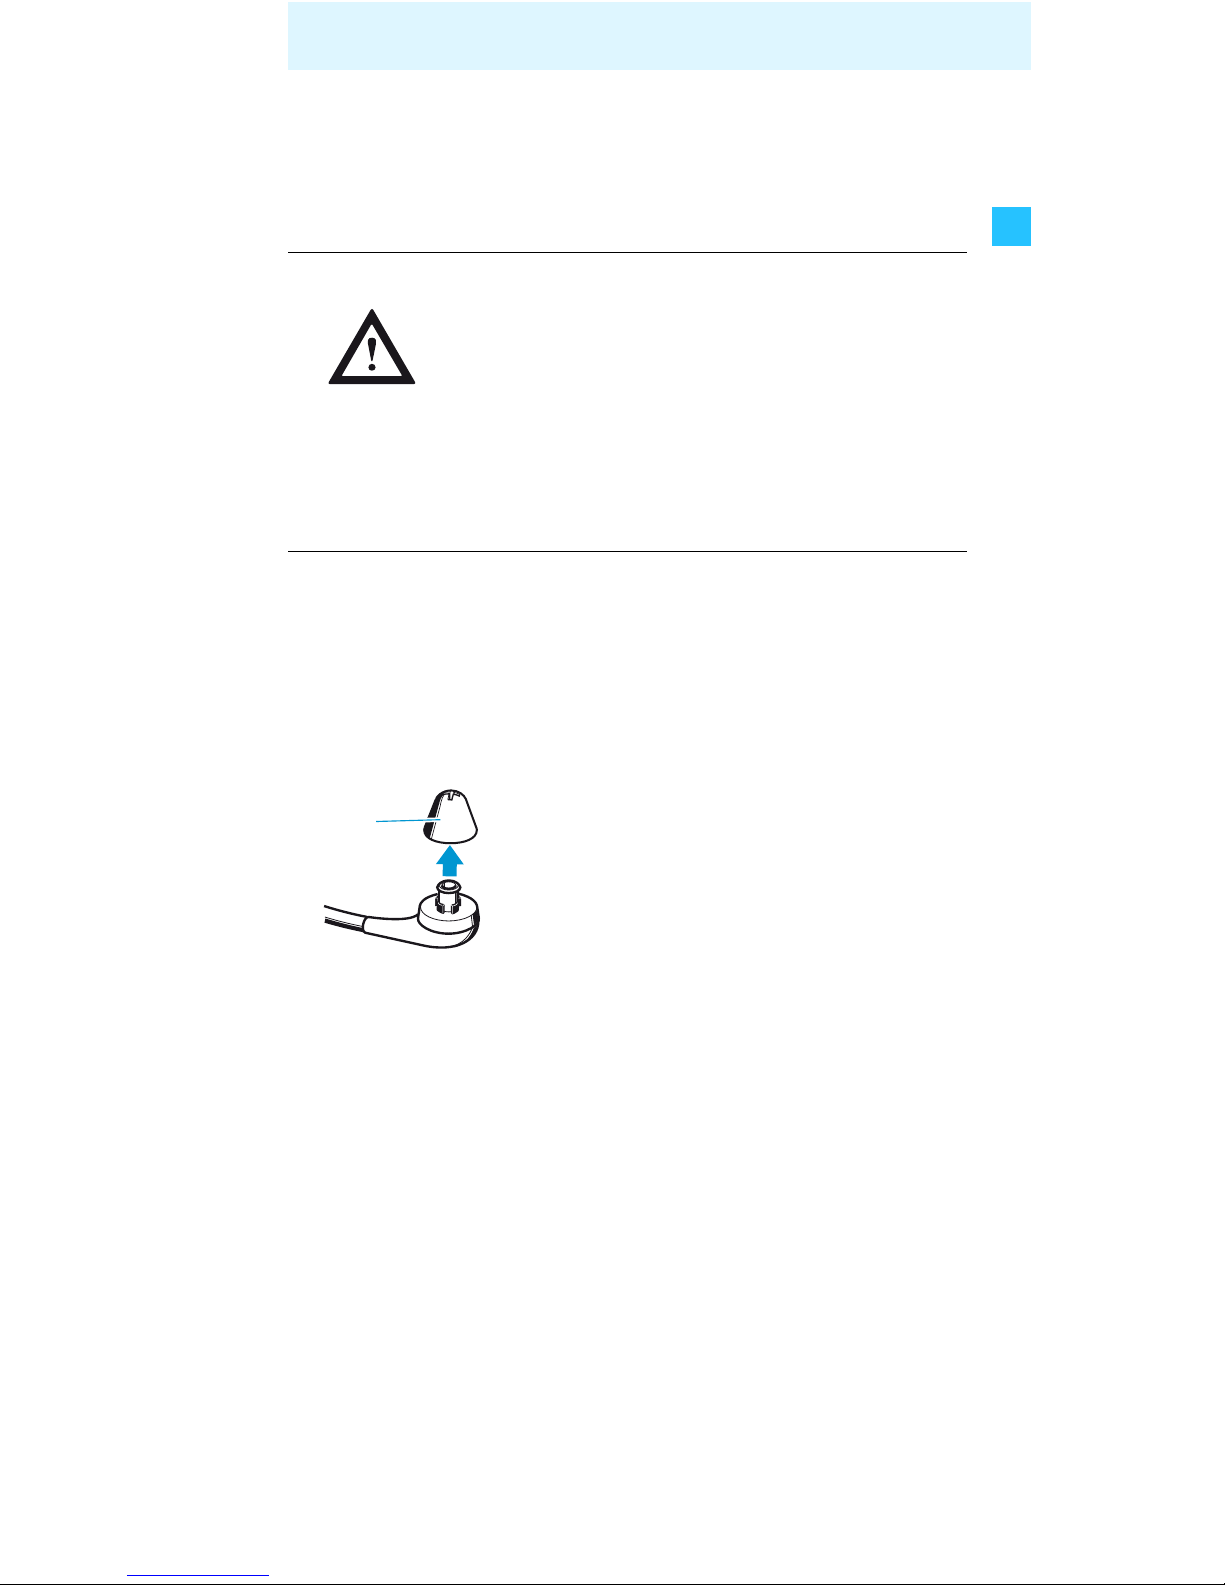
왘 Dry the earpads J.
왘 Put the earpads back on the receiver.
Note:
For reasons of hygiene, you should replace the
earpads
J from time to time. Spare earpads are avail-
able from your Sennheiser dealer (see “Accessories and
spare parts” on page 30).
Liquids can damage the electronics of the
devices!
Liquids entering the housing of the devices
can cause a short-circuit and damage the
electronics.
왘 Keep all liquids far away from the devices.
왘 Do not use any cleansing agents or
solvents.
왘 Carefully remove the earpads J from
the receiver.
왘 Clean the earpads J with warm soapy
water and rinse thoroughly.
CAUTION!
J
Page 28

24
If a problem occurs ...
If a problem occurs ...
The transmitter does not switch on
You cannot hear anything
Possible cause Solution
Is the mains unit
connected correctly?
Check the connection of the mains
unit to the transmitter and to the
mains (see page 10).
Is the sound source
switched on?
Switch your sound source on.
Is the volume of the
sound source sufficient?
Set the volume on your sound
source to a medium value.
Is the transmitter
set to operating
mode 2 (see
page 28)?
Take the receiver out of the
charging compartment.
The transmitter automatically
switches on.
Possible cause Solution
Is there a free line
of sight between
receiver and transmitter?
Remove obstacles in the light path
between receiver and transmitter.
Is the receiver still
within the transmitter’s range?
Move the receiver closer to the
transmitter.
Are transmitter and
receiver exposed to
direct sunlight?
Avoid exposure to direct sunlight.
Are all connectors
connected correctly?
Check the connection between the
transmitter and your sound source
(see page 7).
Is the operation
indicator
C lit?
Check if the transmitter is switched
on (see page 11).
Is the transmitter
set up the wrong
way round?
Set up the transmitter so that the
cables are guided away from the
receiver (see page 6).
Page 29

25
If a problem occurs ...
You hear the sound only with one ear
Does the receiver’s
Sennheiser logo face
the transmitter?
Wear the receiver the right way
round, with the Sennheiser logo
facing the transmitter.
Is the volume of
the sound source
sufficient?
Set the volume on your sound
source to a medium value.
Is the volume of
the receiver
sufficient?
Increase the volume by turning
the volume control 3 on the
receiver (see page 14).
Is the rechargeable
battery inserted
properly into the
receiver and fully
charged?
Check if the channel indicator 1
is lit. If it is not lit: recharge
the rechargeable battery
(see page 17).
Is the sound source
switched off?
Press the channel search button 7
(see “Hearing situation 2” on
page 16).
Possible cause Solution
Is the balance
adjusted correctly?
Turn the balance control 6 to
the left or right (see page 14).
Is the transmitter
set to mono?
Set the mono/stereo switch G
on the transmitter to the left
(see page 14).
Possible cause Solution
Page 30
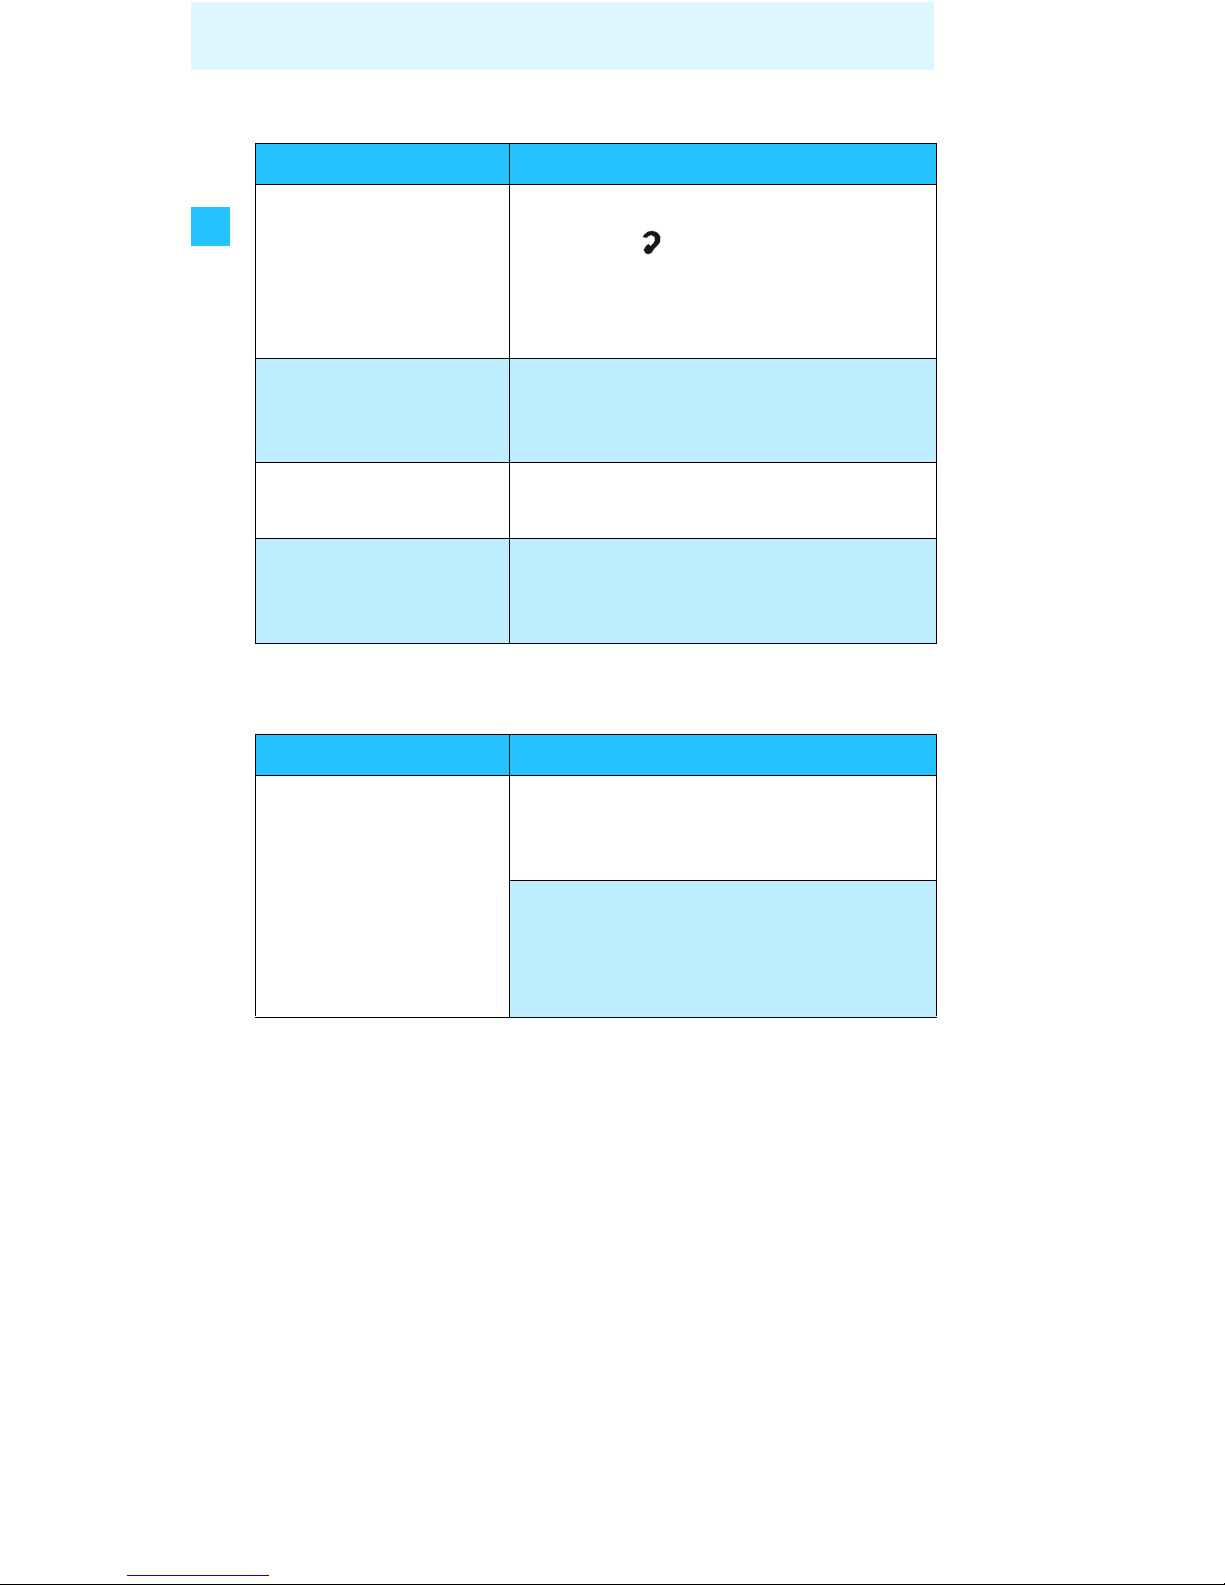
26
If a problem occurs ...
The sound of your sound source is hardly intelligible
The loudspeakers of your TV are muted
If a problem occurs that is not listed in the above tables
or if the problem cannot be solved with the proposed
solutions, please contact your Sennheiser partner for
assistance.
Possible cause Solution
Is the speech
intelligibility
enhancement out
of adjustment?
Press the “speech intelligibility”
button D on the transmitter
until the sound is optimally
adjusted to your needs
(see page 15).
Is the receiver still
within the transmitter’s range?
Move the receiver closer to
the transmitter.
Are the microphones
switched on?
Press the “Microphone” button 4
on the receiver (see page 16).
Do you use a plasma
TV screen?
Make sure that the transmitter is
placed as far as possible from your
plasma TV screen (see page 6).
Possible cause Solution
Some TVs have a
function that mutes
the loudspeakers
when you connect a
transmitter.
Via the operating menu of your TV,
check if and how the muting
function can be deactivated.
Use either a different audio socket
on your TV or use the MKE 800 TV-N
external microphone (see “Accessories and spare parts” on page 30).
Page 31
27
Additional technical information
Additional technical information
Fine adjusting the speech intelligibility
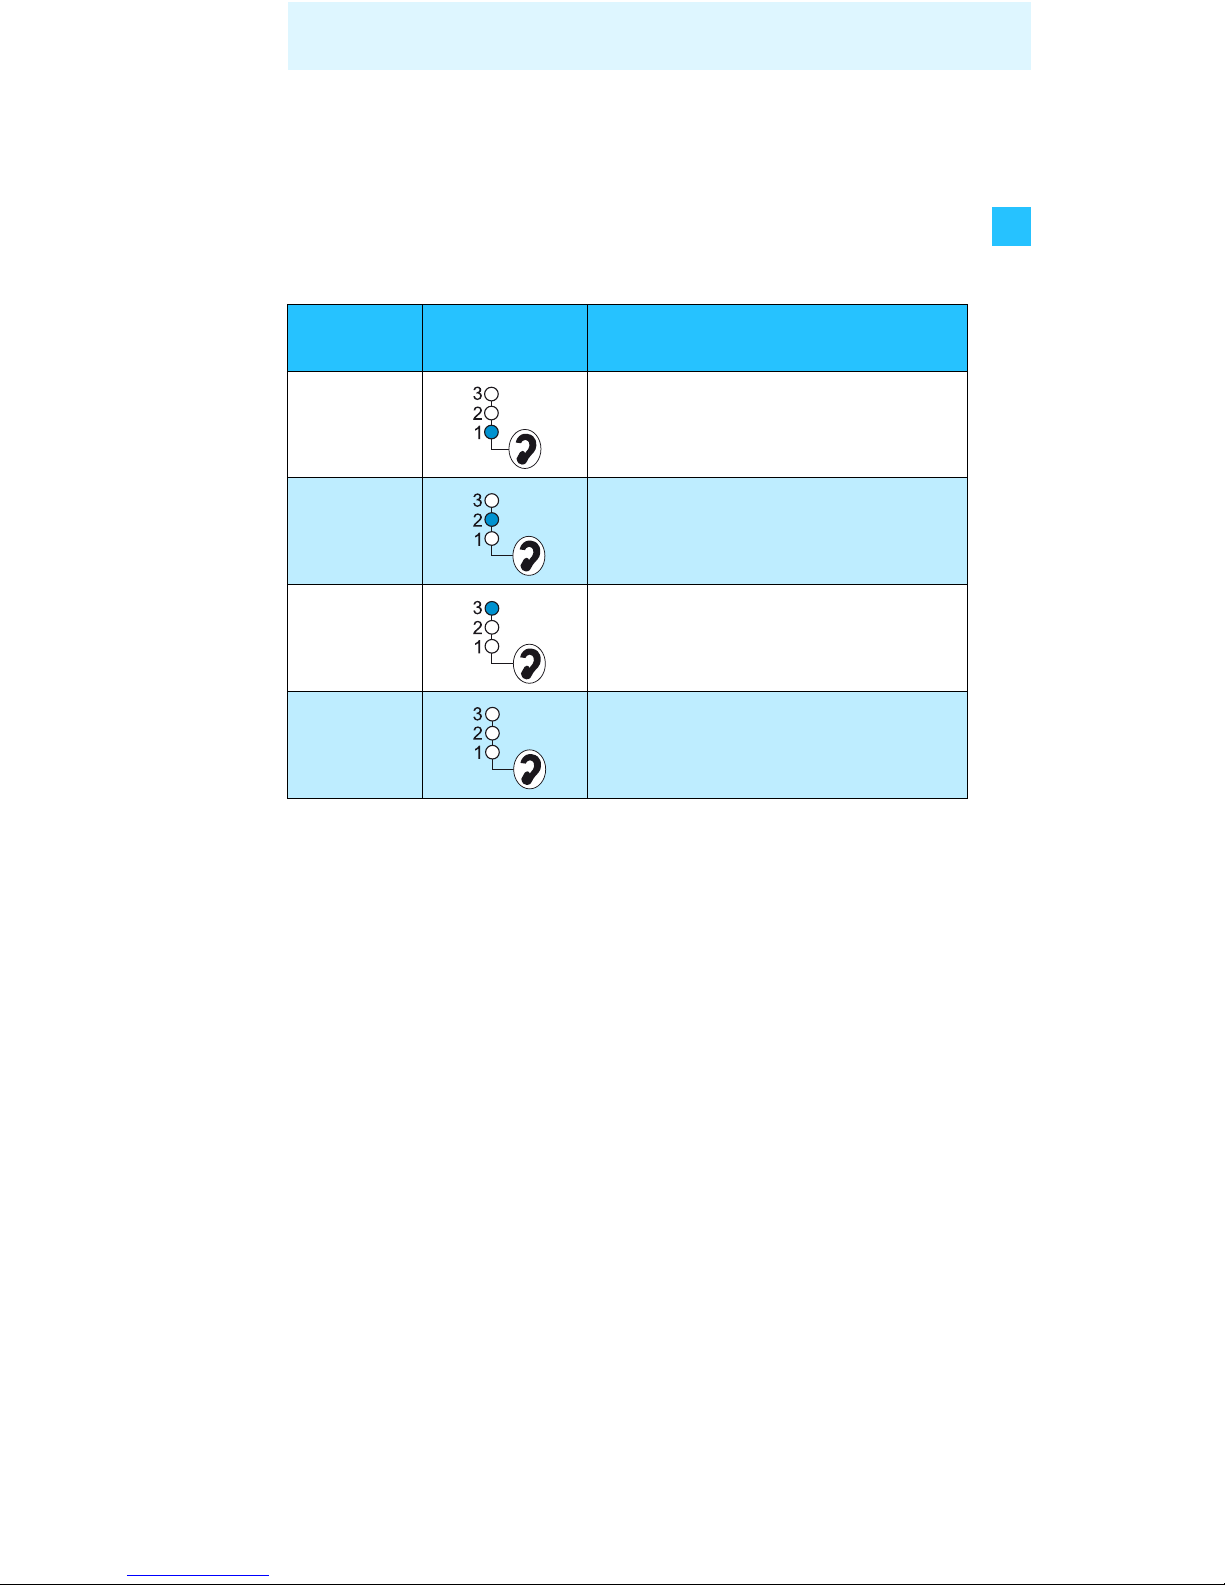
The speech intelligibility can be enhanced individually on the transmitter (see page 15). There are the following settings:
Compression (settings 1 and 3)
Deterioration of the ability to hear quiet sounds as well as loud ones is
a typical symptom of old age. Compression compensates for these
volume differences by boosting the volume of quiet sounds and
reducing the volume of loud sounds if necessary.
Compression seems to put the speech in the foreground, making it
easier to understand.
Compression is self-regulating; once it has been activated, it is not
necessary to make any other settings.
Treble boost (settings 2 and 3)
Another typical age-related phenomenon is the deterioration of the
hearing with regard to high frequencies. However, high frequencies are
important for the intelligibility of speech.
The treble boost makes the speech clearer and easier to understand.
With the treble boost (settings 2 and 3), additional fine adjustment is
possible using the treble boost control
H on the rear of the trans-
mitter.
Setting
Indicator E
lit yellow
Fine adjustment
1 Compression
2 Treble boost
3 Compression and treble boost
Default
setting
No fine adjustment made
Page 32
28
Additional technical information
Function of the treble boost control
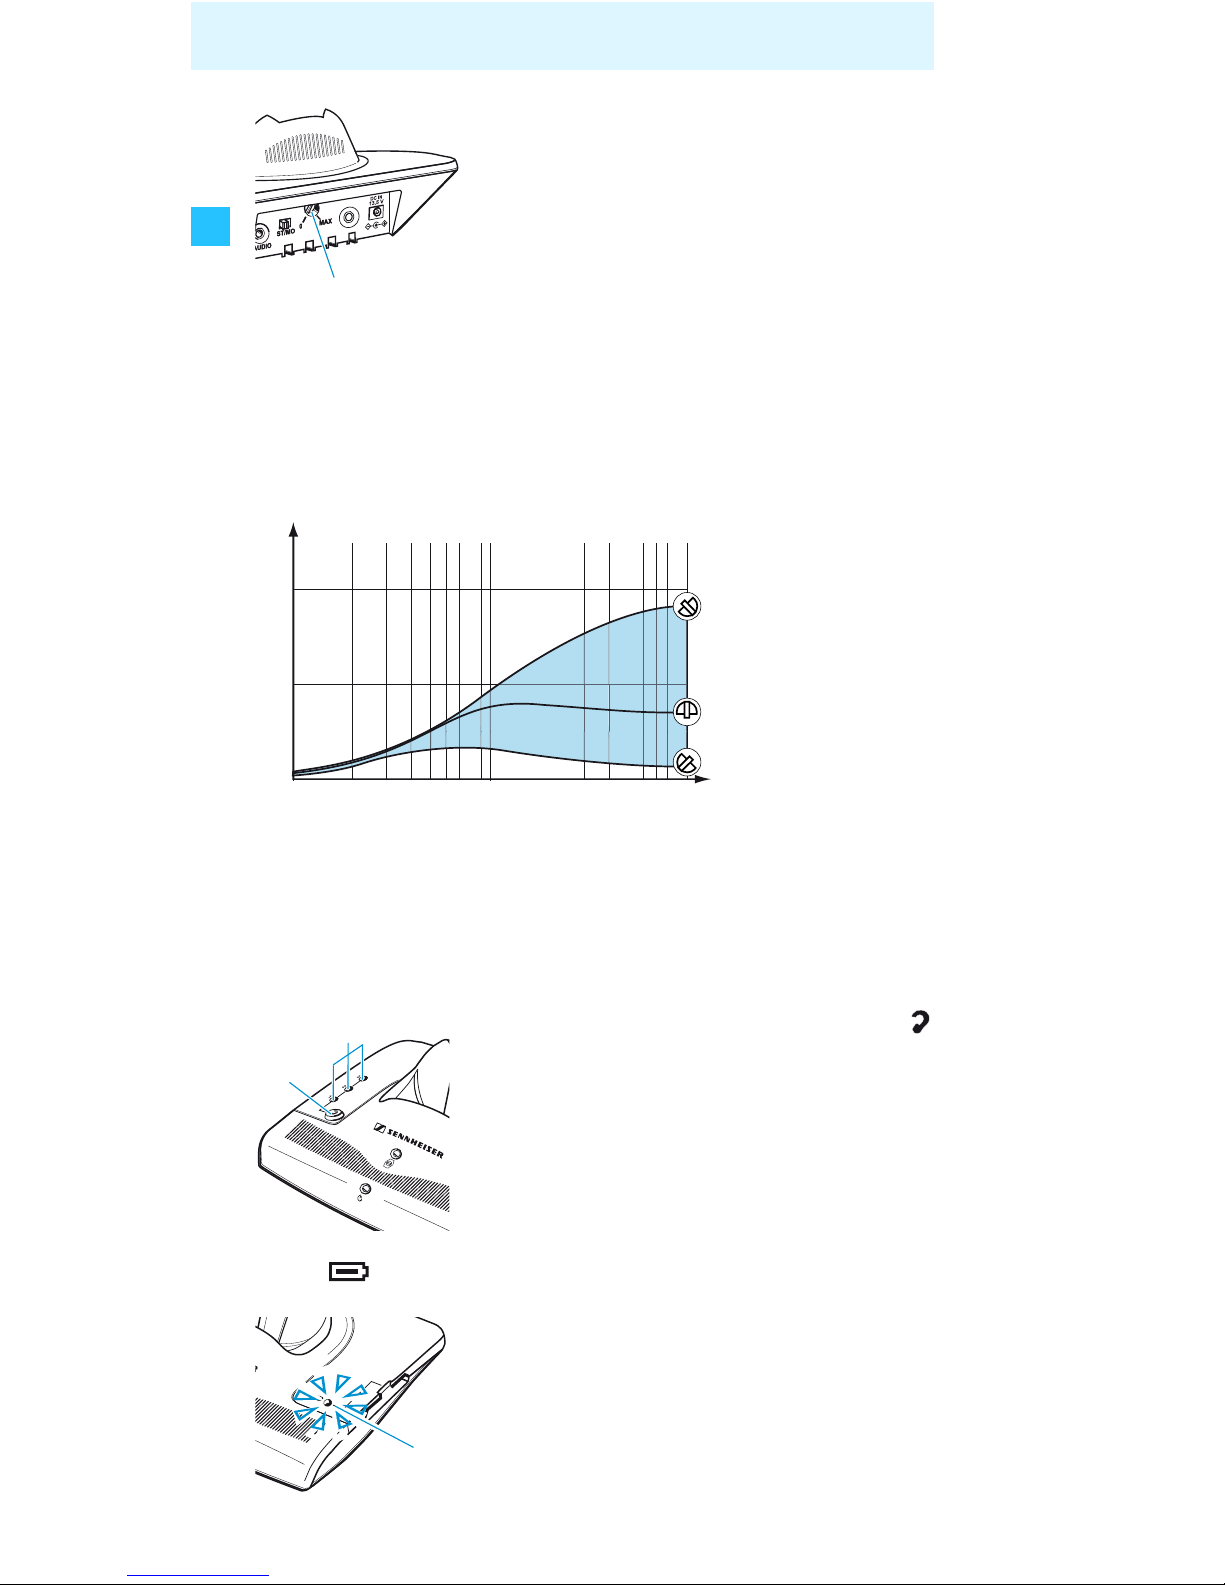
By means of the transmitter’s steplessly adjustable treble boost
control the audio signal is boosted as shown in the diagram.
The treble boost control allows you to select one of the curves shown in
the diagram below.
Changing the operating mode
The transmitter can be set to a different operating mode. This is useful
when the sound of your sound source is very low and the transmitter
therefore does not always switch on automatically.
왘 Use a screwdriver to turn the treble boost
control
H the left or right until the sound can
be heard very well.
The position “0” corresponds to a minimum
boost, the position “MAX” corresponds to a
maximum boost, and the control is factorypreset to the medium position.
왘 Press the “speech intelligibility” button
D
for approx. 5 seconds.
The indicator
E goes off. The charging indi-
cator for the spare rechargeable battery
A
flashes several times:
red: operating mode 2
green: operating mode 1 (factory-preset)
If the operating mode was changed successfully, the charging indicator for the spare
rechargeable
A goes off and the indicator E
lights up again.
H
10
0.1 1 10
20
dB
kHz
“MAX”
“0”
Factory-preset
setting
E
D
A
Page 33
29
Additional technical information
Particularities of operating mode 2:
In operating mode 2, the transmitter is not switched on by the sound
signal from the sound source.
To switch the transmitter on:
왘 Take the receiver out of the charging compartment.
To switch the transmitter off:
왘 Place the receiver into the charging compartment.
If – in operating mode 2 – you want to use a second receiver and charge
its rechargeable battery during operation:
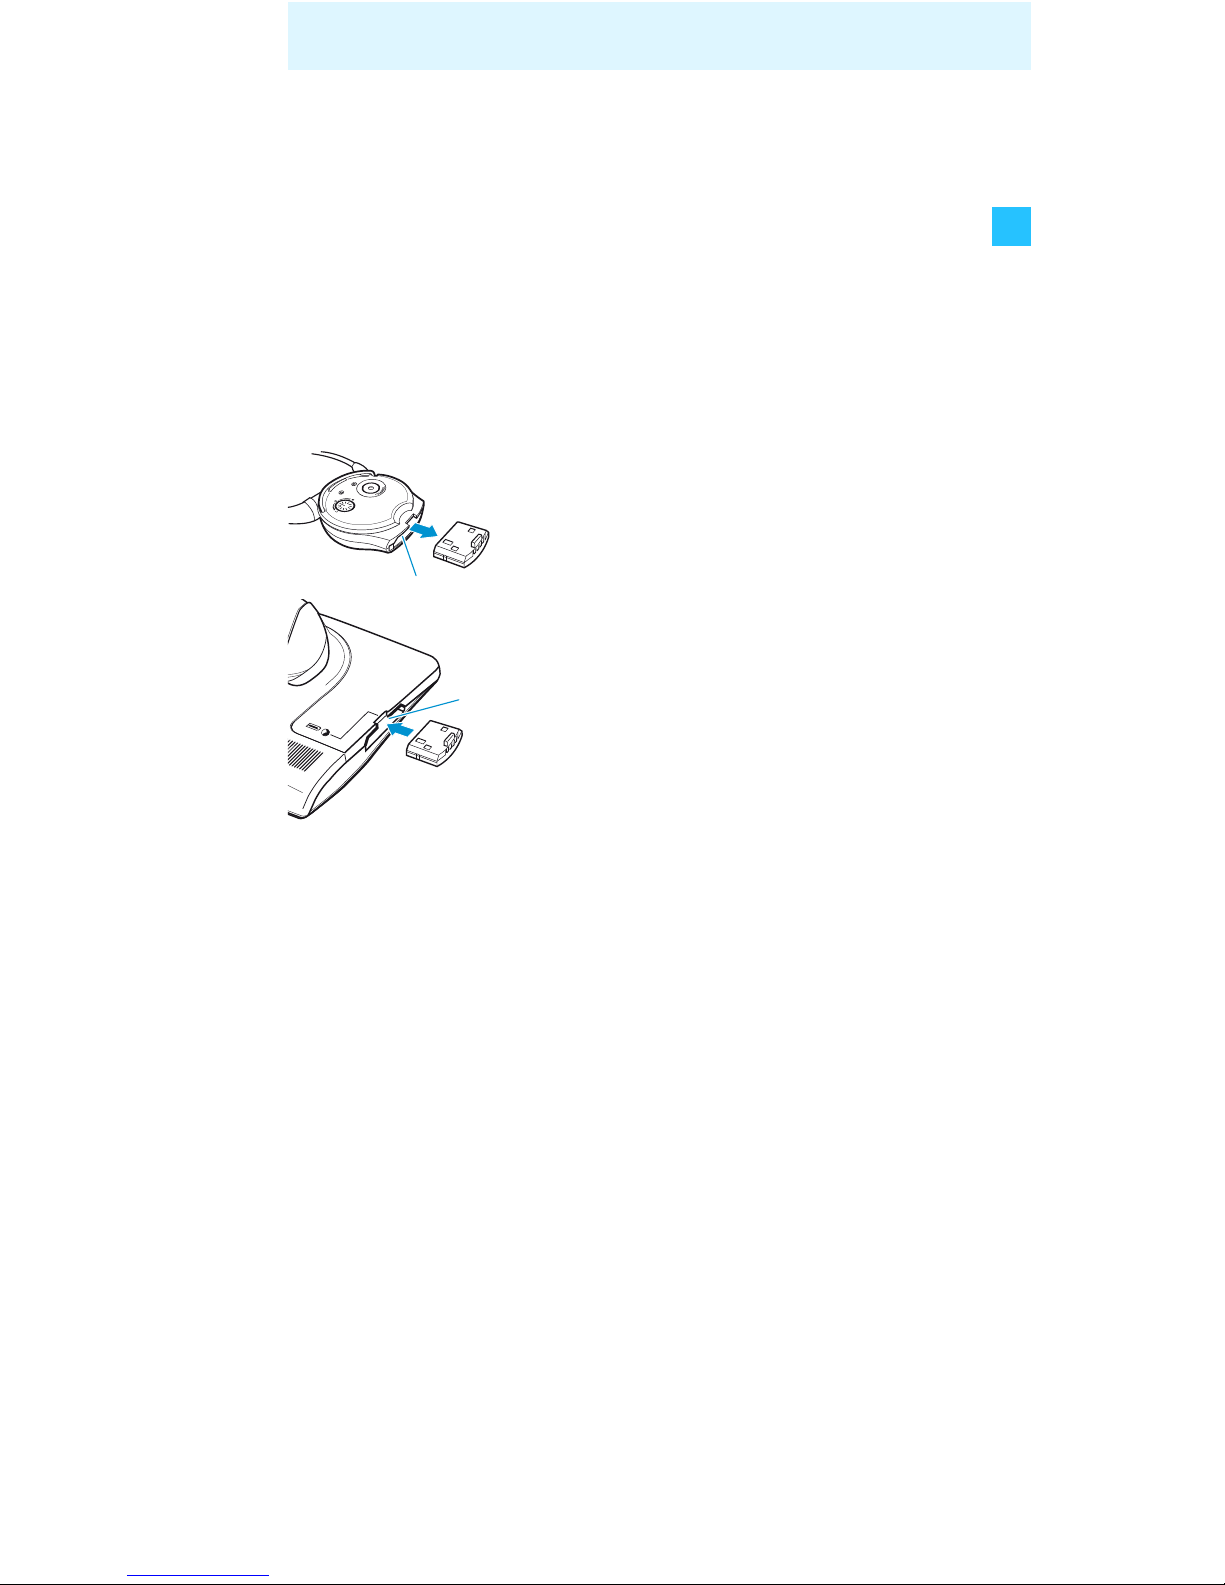
왘 Pull the battery out of the receiver’s battery
compartment
8.
왘 Insert the battery into the charging
compartment
0 at the side of the trans-
mitter (see “Removing and charging the
receiver’s battery” on page 18).
왘 Slide the battery into the transmitter’s
charging compartment
0 as far as it will go.
8
0
Page 34

30
Accessories and spare parts
Accessories and spare parts
Do you wish to use additional receivers?
The following receivers are available from your specialist
dealer:
The following Set 900 accessories are available from your
specialist dealer:
Danger of damage to the device!
Components from other manufacturers (e.g.
for power supply or rechargeable battery)
may cause damage to the device and will
invalidate the warranty!
왘 Use only use original Sennheiser accesso-
ries and spare parts.
Cat. No. Accessory/spare part
502023 RI 900 stethoset receiver
502020 RI 830 stethoset receiver
502021 RI 830 S receiver
Cat. No. Accessory/spare part
500898 BA 300 spare rechargeable battery
528123 Earpads (silicone, black), 5 pairs
528124 Earpads (silicone, transparent), 5 pairs
528125 Earpads (foam, black), 5 pairs
531428 Swivel joint for earpad
528126 RI 900 transport case
500974 MKE 800 TV-N external microphone (mono)
517627 Extension cable, 3 m
(3.5 stereo jack plug)
077798 SCART adapter
CAUTION!
Page 35

31
Specifications
Specifications
System
Modulation FM, stereo
Frequency response 50 Hz–16,000 Hz
THD < 1 %
Charging time for
rechargeable battery approx. 3 hours
Signal-to-noise ratio
(1 mV, peak deviation) typ. 75 dB(A)
Operating temperature 10°C to 40°C
Transmitter
Transmission frequencies 2.3 MHz/2.8 MHz
Range up to 12 m within a room
Audio/microphone
connection 3.5 mm stereo jack socket
Power supply 13.5 V DC/500 mA
via NT 13 mains unit
Weight approx. 260 g
Dimensions approx. 115 x 145 x 40 mm
Receiver
Max. SPL 125 dB (SPL)
Receiving frequencies 2.3 MHz/2.8 MHz/95 kHz
Power supply via BA 300 rechargeable Li-Ion
battery (3.7 V / 150 mAh)
Operating time up to 12 hours
Weight approx. 73 g (incl. BA 300)
Dimensions approx. 240 x 120 x 25 mm
Page 36

32
Specifications
The devices comply with the following standards:
NT 13 mains unit
Nominal input voltage 100 V~ to 240 V~
Mains frequency 50–60 Hz
Max. power consumption 2.4 W (incl. battery charging)
Nominal output voltage 13.5 V DC
Nominal output current 500 mA
Standby consumption approx. 0.9 W
(w/o battery charging)
Ambient temperature +5°C to +40°C
Europe EMC: EN 55013, EN 55020
Safety: EN 60065, EN 61558, EN 60950
USA 47CFR15_B
Canada IC ICES-003
Page 37
33
Manufacturer declarations
Manufacturer declarations
Warranty
Sennheiser electronic GmbH & Co. KG gives a warranty of 24 months on
this product. For the current warranty conditions, please visit our web
site at www.sennheiser.com or contact your Sennheiser partner.
CE Declaration of Conformity
This equipment is in compliance with the essential requirements and other relevant provisions of Directives 2004/108/
EC and 2006/95/EC.
The declaration is available on the internet site at www.sennheiser.com.
Batteries or rechargeable batteries
Please dispose of exhausted batteries and rechargeable
batteries as special waste or return them to your specialist
dealer.
WEEE Declaration
Please dispose of this product at the end of its operational
lifetime by taking it to your local collection point or recycling
centre for such equipment.
Statements regarding FCC and industry Canada
This equipment has been tested and found to comply with the limits for
a Class B digital device, pursuant to Part 15 of the FCC Rules.
These limits are designed to provide reasonable protection against
harmful interference in a residential installation. This equipment generates, uses and can radiate radio frequency energy and, if not installed
and used in accordance with the instructions, may cause harmful interference to radio communications. However, there is no guarantee that
interference will not occur in a particular installation. If this equipment
does cause harmful interference to radio or television reception, which
can be determined by turning the equipment off and on, the user is
encouraged to try to correct the interference by one or more of the
following measures:
y Reorient or relocate the receiving antenna.
y Increase the separation between the equipment and receiver.
y Connect the equipment into an outlet on a circuit different from that
to which the receiver is connected.
y Consult the dealer or an experienced radio/TV technician for help.
This class B digital apparatus complies with the Canadian ICES-003
Changes or modifications made to this equipment not expressly
approved by Sennheiser electronic Corp. may void the FCC authorization to operate this equipment.
Page 38

34
Index
Index
Receiver
Adjusting the balance 14
Adjusting the volume 14
Charging the receiver 17
Cleaning 23
No sound signal 24
Operating time 17
Putting the receiver on/taking the receiver off 12
Searching for a sound source 12
Sound hardly intelligible 26
Sound only audible with one ear 25
Storing the receiver 17
Switching the acoustic signals off 22
Switching the microphones on/off 16
Switching the receiver off 12
Rechargeable battery
Charging in the charging compartment 18
Replacing and charging the rechargeable battery 18
Special functions
Changing the operating mode 28
Fine adjusting the speech intelligibility 27
Treble boost control 28
Terms
Compression/treble boost 27
Mono/stereo 15
Transmitter
Cleaning 23
Connection to a headphone socket 8
Connection to a SCART socket 9
Connection to a sound source 7
Connection to an RCA socket 8
Connection to the mains 10
Enhancing the speech intelligibility 15
Installation 6
Switching between mono and stereo operation 14
Switching the transmitter on/off 11
Treble boost control (function) 28
Troubleshooting 24
Using the MKE 800 TV-N external microphone 9
Page 39

Page 40

Sennheiser electronic GmbH & Co. KG Printed in China
Am Labor 1, 30900 Wedemark, Germany Publ. 07/08
www.sennheiser.com 528247/A01
 Loading...