

Page 1
Instructions for use
IS 410
Page 2

Page 3
A
Page 4

B
Page 5
C
A
B
C
Page 6

Contents
Safety instructions ........................................................................... 2
The IS 410 stethoset receiver system .............................................. 3
Delivery includes .............................................................................. 3
Operating controls ............................................................................ 4
Receiver (see inside cover) ................................................................... 4
Transmitter (see inside cover) ............................................................. 4
LED indications (see inside cover) ....................................................... 4
Connection possibilities (see inside cover) ....................................... 4
Putting the system into operation .................................................. 5
Setting up the transmitter ................................................................... 5
Connecting the transmitter to the sound source ............................. 5
Connecting the transmitter to the mains .......................................... 7
Inserting and removing the receiver’s rechargeable battery ........ 8
Inserting a spare rechargeable battery into the
transmitter’s charging compartment ................................................. 8
Using the system components ........................................................ 9
Switching the transmitter on ............................................................... 9
Switching the stehoset receiver on ..................................................... 9
Adjusting the volume .......................................................................... 10
Adjusting the balance .......................................................................... 10
Enhancing speech intelligibility ......................................................... 10
Storing and charging the receiver ..................................................... 11
Meaning of the LEDs and acoustic signals .................................... 12
LEDs on the transmitter ...................................................................... 12
Acoustic signals of the receiver ......................................................... 12
Care and maintenance .................................................................... 13
Cleaning the system ............................................................................. 13
Cleaning the ear cushions ................................................................... 13
If problems occur... ......................................................................... 14
Accessories ...................................................................................... 15
Connector assignment ................................................................... 15
Specifications .................................................................................. 16
Manufacturer Declarations ............................................................ 17
Thank you for choosing Sennheiser!
We have designed this product to give you reliable operation over
many years. Over 60 years of accumulated expertise in the design and
manufacture of high-quality electro-acoustic equipment have made
Sennheiser a world-leading company in this field.
Please take a few moments to read these instructions carefully, as we
want you to enjoy your new Sennheiser products quickly and to the
fullest.
1
Page 7

Safety instructions
y Please read these instructions carefully and completely
before using the system.
y Make these instructions easily accessible to all users at all
times. Always include these instructions when passing the
system on to third parties.
y Do not wear the headphones in situations which require
special attention (e.g. when performing skilled jobs).
y Always keep the system dry and do not expose it to extreme
temperatures (ideally 10-35°C).
y Use the system with care and set it up in a clean, dust-free
environment.
y Varnish or furniture polish may degrade the feet of the trans-
mitter, which could stain your furniture. You should therefore place the transmitter on a non-slip pad to avoid potential staining of furniture.
y This system allows you to set higher volumes than conventi-
onal stethoset systems. This can cause hearing damage in
persons with healthy hearing and especially in children.
y Please observe the safety instructions for Lithium-Ion
rechargeable batteries on the enclosed leaflet.
Intended use of the system
Intended use includes:
y having read these instructions, especially the chapter
“Safety instructions”.
y using the system within the operating conditions as descri-
bed in these instructions.
Improper use
Improper use means use of the system other than as described
in these instructions or under operating conditions which differ
from those described in these instructions.
2
Page 8

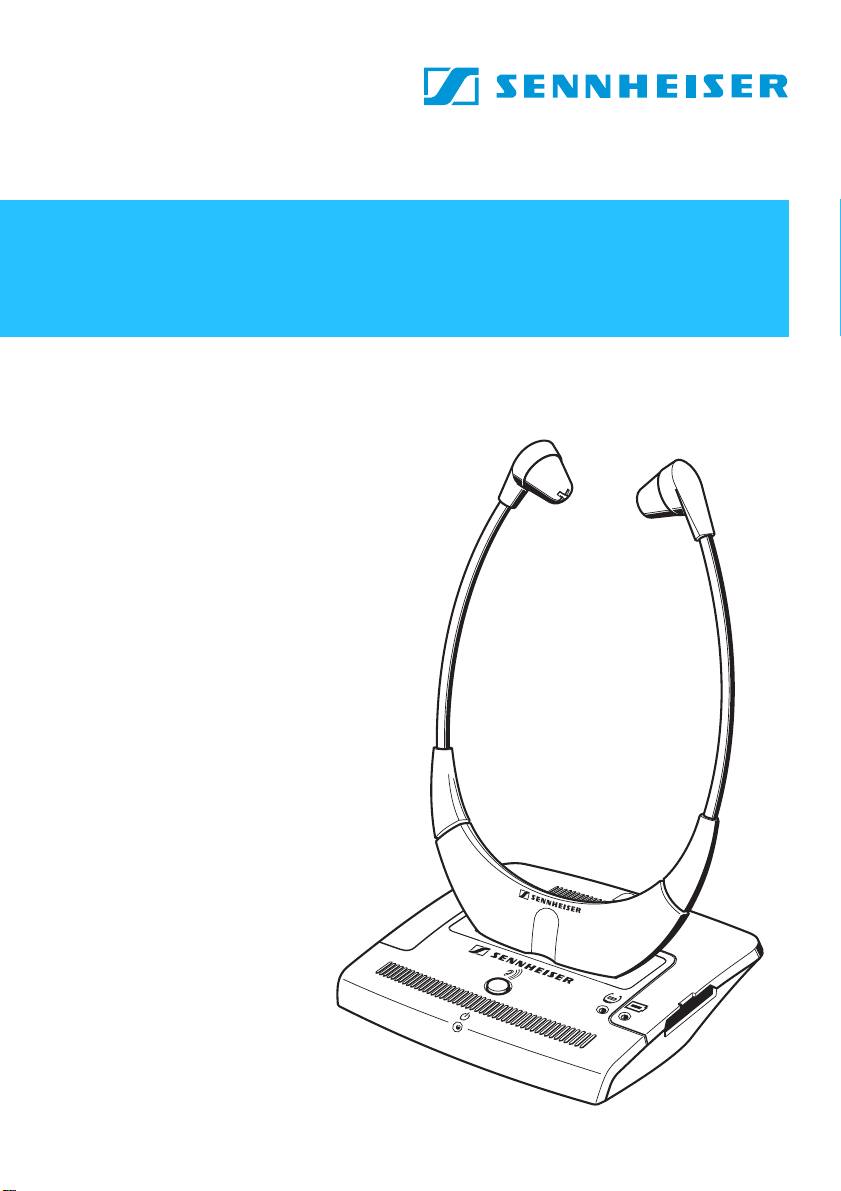
The IS 410 stethoset receiver system
The IS 410 is a cordless infra-red stethoset receiver system with
which you can adjust the volume of your TV, radio, personal
stereo and other hi-fi equipment to suit your individual needs.
In addition, the system allows you to move around freely
without the constrictions of cables within the room where the
transmitter is placed.
The IS 410 is particularly easy and intuitive to operate. The
stethoset receiver automatically switches on when you pull the
earbows apart. The volume can be adjusted directly on the
receiver. The speech intelligibility can be enhanced at the press
of a button on the transmitter.
The transmitter has an integrated charging compartment for
storing the receiver and simultaneously charging the receiver’s
rechargeable battery. In addition, a spare rechargeable battery
can be charged in the small charging compartment at the side
of the transmitter.
Delivery includes
Delivery of the IS 410 stethoset receiver system includes:
y 1 RI 410 stethoset receiver
y 1 TI 410 transmitter with integrated charging compartment
y 1 BA 300 Lithium-Ion rechargeable battery
y 1 mains unit
y 1 connecting cable fitted with two 3.5 mm stereo jack plugs
for connection to headphone socket
(with one adapter to 1/4“ (6.3 mm) jack socket)
y 1 adapter to RCA socket (e.g. TB/Aux-Out)
2 pairs of replacement ear cushions
y
Instructions for use
y
3
Page 9

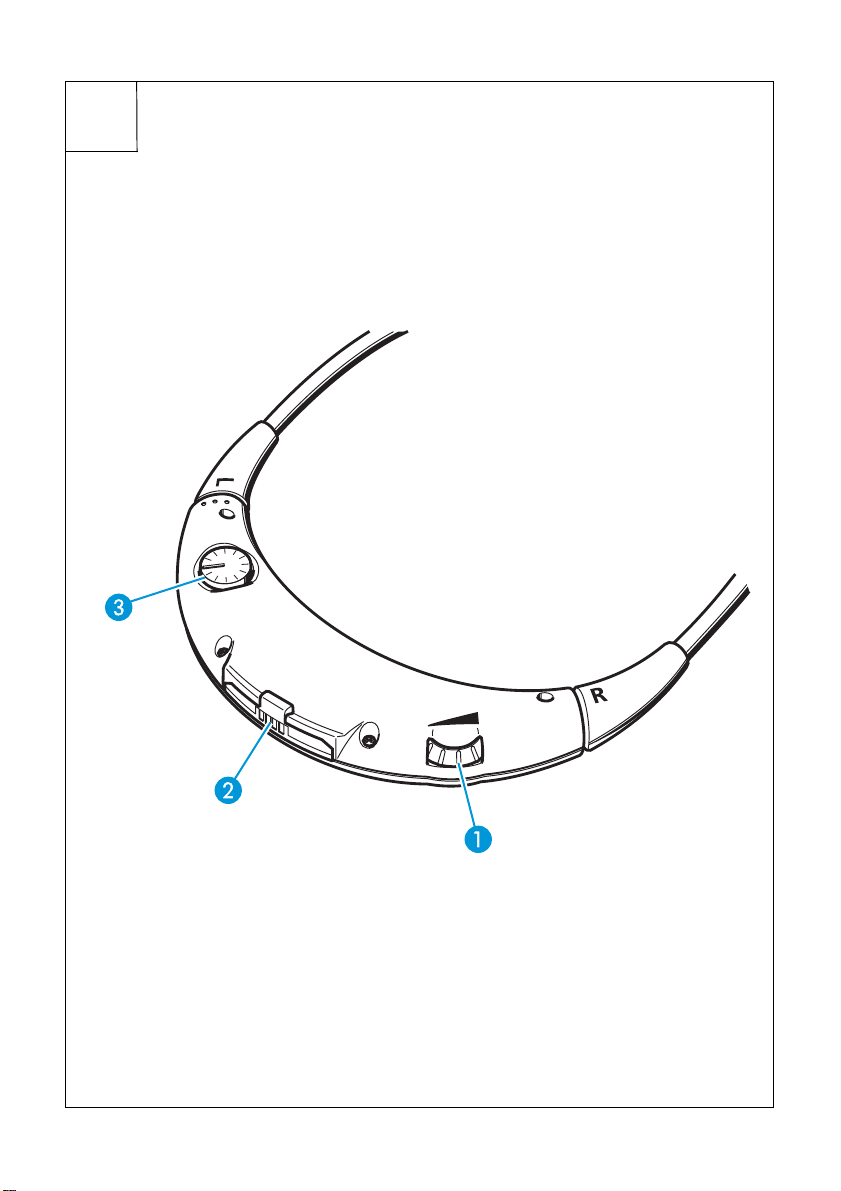
Operating controls
A
Receiver (see inside cover)
Volume control
Compartment for BA 300 rechargeable battery
Balance control
B
Transmitter (see inside cover)
3.5 mm stereo jack socket labeled AUDIO (marked blue)
for connection of sound source
DC socket labeled 12 V (marked yellow) for connection
of mains unit
“Speech intelligibility” button
Charging compartment for receiver
Charging compartment for spare rechargeable battery
B
LED indications (see inside cover)
Charging control LED for spare rechargeable battery
Charging control LED for receiver rechargeable
battery
Operation indication
C
Connection possibilities (see inside cover)
Connecting cable for headphone socket
Adapter to 1/4“ (6.3 mm) jack socket
Adapter to RCA socket
SCART adapter (optional)
Mains unit
4
Page 10

Putting the system into operation
Setting up the transmitter
왘 Place the transmitter so that there are no obstacles in the
light path between transmitter and receiver.
Note:
Avoid exposure to direct sunlight. Direct sunlight may interfere with the reception and may damage the transmitter.
If you use a plasma TV screen, please observe the following to
ensure interference-free reception:
y Make sure that the transmitter’s infrared light beam is
pointed directly at the receiver and that the light path
between transmitter and receiver is not obstructed.
y If necessary, use a standard extension cable (3.5 mm stereo
jack plug) to reduce the distance between transmitter and
receiver. This extension cable is available from your
Sennheiser dealer.
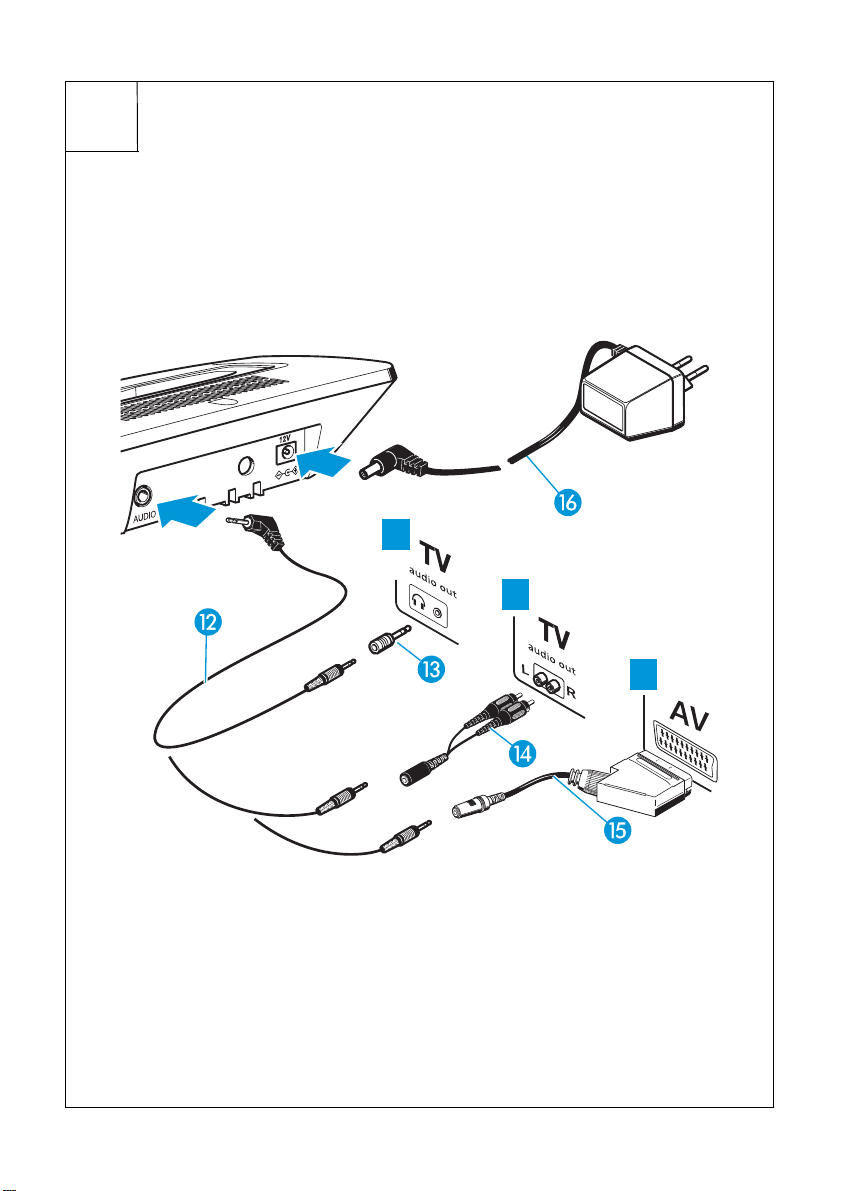
Connecting the transmitter to the sound source
왘 Plug in one end of the connecting cable to the blue AUDIO
socket on the transmitter.
왘 Check the connection possibilities of your sound source (e.g.
TV).
A B C D
TV TV
AV
No socket
LR
Headphone
socket
RCA sockets SCART socket External
microphone
5
Page 11

audio out
headphone sock
Connecting the transmitter via the headphone socket
A
et
왘 Plug in the other end of the connecting cable to the
headphone socket on your sound source.
왘 Adjust the volume of the headphone socket on your sound
source to a medium level. This improves the quality of
cordless sound transmission. If necessary, check the menu
setting of your TV.
Note:
With most TVs, the headphone socket is located at the front
or sides. Depending on the socket, you may have to use the
adapter .
In order to prevent damage to hearing, newer TVs often have a
function that mutes the TV sound as soon as headphones are
connected.
왘 If another person wants to listen to the TV sound via the
loudspeaker, deactivate the muting function via the TV menu
setting.
audio out
RCA socke
L
6
Connecting the transmitter via the RCA sockets
B
t
R
왘 Connect the connecting cable to the adapter .
왘 Connect the red and white RCA connectors of the adapter
to the matching red and white RCA sockets on your sound
source.
Note:
With most TVs, the RCA sockets are located at the rear.
Page 12

Connecting the transmitter via the SCART socket
C
If your sound source has a SCART socket, you can order the
suitable SCART adapter (see “Accessories” on page 15) from
your Sennheiser dealer.
왘 Connect the connecting cable to the SCART adapter .
왘 Plug in the SCART adapter to the SCART socket on your TV.
If your TV has several SCART sockets, select a SCART socket
that is also an output (for details, see operating manual of
your TV).
Using an external microphone
D
If your sound source doesn’t have a headphone or audio output,
SCART or RCA socket, you can use your system together with an
external microphone (see “Accessories” on page 15).
왘 Connect the microphone to the blue socket AUDIO on the
transmitter.
왘 Position the microphone in front of the loudspeaker of your
sound source. You can change the sound by varying the
position of the microphone in front of the loudspeaker.
Connecting the transmitter to the mains
왘 Connect the mains unit to the yellow socket (12 VDC) on
the transmitter.
왘 Plug the mains connector into a wall socket.
The LED lights up green. If the receiver is stored in the
transmitter’s charging compartment , the LED goes off.
Note:
Pull the mains connector out of the wall socket when the
transmitter will not be used for extended periods of time
(e.g. when you are on holiday). In this case, however, the
rechargeable battery will not be recharged.
7
Page 13

Inserting and removing the receiver’s rechargeable battery
왘 Insert the battery into the compartment as shown on the
left. Make sure that the battery is inserted correctly.
왘 To remove the battery, use the finger catch projection to pull
the battery out of the receiver.
Note:
y The receiver is delivered with the battery inserted.
y Before you use the rechargeable battery for the first time,
charge it until the LED lights up green (see “Storing and
charging the receiver” on page 11).
maximum of 3 hours.
This can take a
Inserting a spare rechargeable battery into the transmitter’s charging compartment
You can charge a spare battery (not included) in the charging
compartment at the side of the transmitter. This spare
battery is not required for operating the IS 410 but offers
extended listening time while the discharged first battery is
being recharged.
왘 Insert the spare battery into the charging compartment
as shown on the left.
왘 If the battery is inserted correctly, the LED lights up
red: The rechargeable battery is being charged.
green: The rechargeable battery is fully charged.
8
Page 14

Using the system components
Switching the transmitter on
왘 Take the stethoset receiver out of the transmitter’s charging
compartment . The transmitter automatically switches on.
The LED lights up green.
Note:
If the receiver is placed into the transmitter’s charging
compartment , the transmitter automatically switches off.
The LED goes off.
Switching the stehoset receiver on
ON
OFF
Attention!
The stethoset receiver automatically switches on when you pull
the earbows apart and put the receiver on. When you take the
receiver off, it automatically switches off.
왘 Before putting the receiver on, use the volume control to
adjust the volume to a low level. This protects your hearing
from damage.
왘 Put the receiver on the correct way round, with the
Sennheiser logo at the front.
Volume up? - No!
When people use headphones, they tend to
choose a higher volume than with loudspeakers.
Listening at high volume levels for long periods
can lead to permanent hearing defects. Please
protect your hearing, Sennheiser headphones also
sound exceptionally good at low volumes.
9
Page 15

Adjusting the volume
왘 If the transmitter is connected to a headphones socket of
your sound source:
Adjust the volume of the sound source to a medium level.
This improves the quality of cordless sound transmission.
왘 Use the volume control to adjust the volume to a
sufficient and comfortable level.
Adjusting the balance
The IS 410 features a balance control for right/left volume
adjustment.
왘 Use the balance control to adjust the volume so that you
hear equally well with both ears.
Enhancing speech intelligibility
The button allows you to enhance speech intelligibility.
왘 If the speech is barely intelligible, press the button . The
button is backlit in yellow and speech intelligibility is
enhanced.
10
Note:
If the speech remains barely intelligible, increase the volume
of your sound source.
Page 16

Storing and charging the receiver
Do not store your receiver on a glass dummy head, chair
armrest, or similar for long periods of time as this can reduce
the contact pressure of the earbows. Furthermore, with the
earbows pulled apart, the receiver remains switched on.
왘 After use, place the receiver into the transmitter’s charging
compartment as shown on the left, without exerting too
much pressure. The transmitter automatically switches off.
왘 If the receiver is placed correctly into the charging
compartment, the LED lights up
red: The rechargeable battery is being charged.
왘 Before you use the rechargeable battery for the first time,
green: The rechargeable battery is fully charged.
charge it until the LED lights up green
maximum of 3 hours
operating time is approx. 9 hours.
Note:
Always store the receiver in the transmitter’s charging
y
compartment
ligent battery charging technology prevents over-charging.
y
When not using the receiver for extended periods of time,
charge the battery regularly every three months.
. With a fully charged battery, the
to ensure that it is fully charged. The intel-
. This can take a
11
Page 17

Meaning of the LEDs and acoustic signals
LEDs on the transmitter
LED Status Meaning
Operation indication lit green The transmitter is switched on.
The receiver is not stored in the
charging compartment .
off The transmitter is switched off.
The receiver is stored in the
charging compartment .
Charging control LED of
spare rechargeable
battery
Charging control LED of
receiver rechargeable
battery
“Speech intelligibility”
button
lit red Spare rechargeable battery or
rechargeable battery is being
charged
lit green Spare rechargeable battery or
rechargeable battery is fully
charged
lit yellow Speech enhancement is activated
Acoustic signals of the receiver
Acoustic signal Meaning Commentary
6 short beeps No audio signal
(transmitter is not
activated or out of
range)
2 long beeps Rechargeable battery is
flat
Automatic switch-off after
approx. 3 minutes
Automatic switch-off after
approx. 3 minutes
12
Page 18

Care and maintenance
Cleaning the system
Attention!
왘 Before cleaning, disconnect the transmitter from the mains.
왘 Only use a slightly damp cloth to clean the units. Do not use
any cleansing agents or solvents.
Liquids can damage the electronics of the units!
Liquids entering the housing of the units can
cause a short-circuit and damage the electronics.
왘 Keep all liquids far away from the units.
Cleaning the ear cushions
왘 Carefully remove the ear cushions from the receiver.
왘 Clean the ear cushions with warm soapy water and rinse
thoroughly.
왘 Dry the ear cushions before putting them back on the
receiver.
Note:
For reasons of hygiene, the ear cushions should be
replaced from time to time. Please order the ear cushions
from your Sennheiser dealer.
13
Page 19

If problems occur...
왘 Check if the problem you face is listed in the table below:
Problem Possible cause Page
You cannot
hear anything
The speech
intelligibility
is reduced
You hear the
sound only
with one ear
y Are all jack plugs connected correctly?
y Is the transmitter connected to the
sound source?
y Is the transmitter connected to the
mains?
y Is the volume of the sound source
sufficient?
y Is the green operation indication lit?
y Is the volume of the receiver
sufficient?
y Is the rechargeable battery fully
charged and inserted properly into
the receiver?
y Do you wear the receiver the right
way round, with the Sennheiser logo
at the front?
y Is there a free line of sight between
transmitter and receiver?
y Is the “Speech intelligibility”
button backlit in yellow?
y Is the balance adjusted correctly? 10
5 ff
5 ff
10
10
7
6
7
8
9
5
14
If problems occur that are not listed in the above table or if the
problems cannot besolved with the proposed solutions, please
contact your local Sennheiser agent for assistance.
Page 20

Accessories
Attention!
The following accessories are available from your authorized
Sennheiser dealer:
Ear cushions (lamellar form), 5 pairs Cat. No. 517626
Components from other manufacturers (e.g. for
power supply or rechargeable battery) may cause
damage to the unit and will invalidate the
warranty.
왘 Only use original Sennheiser accessories and
spare parts.
BA 300 spare rechargeable battery Cat. No. 500898
RI 410 receiver Cat. No. 500684
Ear cushions (normal), 5 pairs Cat. No. 517625
SCART adapter Cat. No. 077798
3 m extension cable
(3.5 mm stereo jack plug)
MKE 800 TV-N
external microphone (mono)
Cat. No. 517627
Cat. No. 500974
Connector assignment
The blue socket AUDIO is designed for use with two different
connector types (Line/Mic). The connector type used is identified automatically.
3.5 mm 3-pole jack/standard stereo
L R GND
3.5 mm 4-pole jack/microphone with additional power supply
L R GND8V
1kΩ
15
Page 21

Specifications
System
Modulation FM stereo
Carrier frequencies 2.3 / 2.8 MHz
Range approx 12 m within a room
AF frequency response 50 Hz–16 kHz
THD < 1 %
Transmitter
Audio /microphone connection 3.5 mm stereo jack socket
Charging time of
rechargeable battery
Power supply 12 V
Weight approx. 140 g
Dimensions approx. 115 x 145 x 40 mm
approx. 3 hrs
/50 mA
DC
via NT 410 mains unit
16
Receiver
Max. SPL 125 dB (SPL)
Power supply via BA 300 Li-Ion rechargeable
battery (3.7 V / 150 mAh)
Operating time approx. 16 hrs
Weight approx. 50 g
Dimensions approx. 230 x 135 x 20 mm
Page 22

Manufacturer Declarations
Warranty regulations
The guarantee period for this Sennheiser product is 24 months from the date of
purchase. Excluded are accessory items, rechargeable or disposable batteries
that are delivered with the product; due to their characteristics these products
have a shorter service life that is principally dependent on the individual
frequency of use.
The guarantee period starts from the date of original purchase. For this reason,
we recommend that the sales receipt be retained as proof of purchase. Without
this proof (which is checked by the responsible Sennheiser service partner) you
will not be reimbursed for any repairs that are carried out.
Depending on our choice, guarantee service comprises, free of charge, the
removal of material and manufacturing defects through repair or replacement
of either individual parts or the entire device. Inappropriate usage (e.g.
operating faults, mechanical damages, incorrect operating voltage), wear and
tear, force majeure and defects which were known at the time of purchase are
excluded from guarantee claims. The guarantee is void if the product is
manipulated by non-authorised persons or repair stations.
In the case of a claim under the terms of this guarantee, send the device,
including accessories and sales receipt, to the responsible service partner. To
minimise the risk of transport damage, we recommend that the original
packaging is used.
Your legal rights against the seller, resulting from the contract of sale, are not
affected by this guarantee. The guarantee can be claimed in all countries
outside the U.S. provided that no national law limits our terms of guarantee.
CE Declaration of Conformity
This equipment is in compliance with the essential requirements and other
relevant provisions of Directive 89/336/EC. The declaration is available on the
internet site at www.sennheiser.com.
Before putting the device into operation, please observe the respective countryspecific regulations!
Batteries or rechargeable batteries
The supplied batteries or rechargeable batteries can be recycled.
Please dispose of them as special waste or return them to your
specialist dealer. In order to protect the environment, only dispose of
exhausted batteries.
WEEE Declaration
Your Sennheiser product was developed and manufactured with
high-quality materials and components which can be recycled and/or
reused. This symbol indicates that electrical and electronic equipment
must be disposed of separately from normal waste at the end of its
operational lifetime.
Please dispose of this product by bringing it to your local collection point or
recycling centre for such equipment. This will help to protect the environment
in which we all live.
17
Page 23

Page 24

Sennheiser electronic GmbH & Co. KG
30900 Wedemark, Germany
Phone +49 (5130) 600 0
Fax +49 (5130) 600 300
www.sennheiser.com
Printed in China Publ.
10/06 517637 / A02
 Loading...