


Bedienungsanleitung
HMEC
HMDC
300/302/305
305-C/306/322/400
322

Inhalt
2
Ein Wort zu Ihrer Sicherheit
Leistungsmerkmale der Headsets
Produktvarianten
Lieferumfang
....................................................................................................................................... 5
................................................................................................................................................ 8
Empfohlenes Zubehör
Head sets a nschließen
Die Anschlusskabel der Headsets .................. ....................... ........................ ....................... ............... 10
Pinbelegung der Stecker ......... ........................ ....................... ........................ ....................... ............... 12
Anschlussmöglichkeiten ...................................................................................................................... 13
Headset für den Gebrauch vorbereiten
Kopfhörerbügel einstellen ...... ............ ............ ............ ......................................................................... 19
Mikrofon positioni eren ............ ........................ ....................... ........................ ....................... ............... 20
Zusatzinformation für den Helikopterbetrieb des He adsets HME C 322 .................................... 22
Der tägliche Betrieb
NoiseGard™ ein- und ausschalten ................. ............ ........... ............ ............ ............ ....................... ... 23
Mono-/Stereo-Umschaltung (außer HMEC 305, HMEC 305-C, HMEC 322 und HMDC 322) . ... 23
Lautstärke einstellen ............................................................................................................. ............ ... 23
Kabelklammer anbringen ................................................................................................................. ... 24
Kopfhörer zusammenklappen .............................................. ............ ............ ............ ........... ............ ... 24
Ersatzteile
.................................................................................................................................................... 25
................................................................................................................................. 23
Wissenswertes zum Nachlesen
Wenn Störu ngen auftr eten
Tec hn isch e Da ten
...................................................................................................................................... 32
.................................................................................................................... 3
........................................................................................................ 4
............................................................................................................................... 9
............................................................................................................................. 10
........................................................................................... 19
........................................................................................................... 27
................................................................................................................... 30

Die Headsets NoiseGard™ HMEC 300, HMEC 302, HMEC 305, HMEC 305-C, HMEC 306,
HMEC 322, HMEC 400 u nd HMDC 322 s ind Pilotenheadsets mit aktiver Lärmkompensation
in geschlossener Bau form zum Einsatz i n Helikoptern, Propeller- und Turboprop-Flugzeugen.
Ein Wort zu Ihrer Sicherheit
• Mit eingeschalteter Lärmkompensation NoiseGard™ können sich für Ihr Flugzeug
oder Ihren Helikopter typische Geräusche (z. B. Motoren-, Propellerklang, Warnsignale usw.) anders anhören. Machen Sie sich daher vor dem Start bei eingeschalteter
Lärmkompensation mit allen wichtigen Geräuschen vertraut. Stellen Sie die Lautstärke so ein, dass Sie alle wichtigen Geräusche, Alarme oder Geräusche, die durch
Fehlfunktionen entstehen, hören können.
• Versuchen Sie nicht, das Headset selbst zu reparieren, sondern wenden Sie sich bei
Problemen an Ihren Sennheiser-Vertriebspartner.
• Wechseln Sie nur die Teile aus, deren Austausch in dieser Bedienungsanleitung
beschrieben ist. Alle anderen Teile tauscht Ihnen Ihr Sennheiser-Vertriebspartner
aus.
• Tauc hen Sie das Headset zum Reinigen nicht in Wasser. Fragen zur Reinigung des
Headsets besprechen Sie mit Ihrem Sennheiser-Vertriebspartner.
3

Leistungsmerkmale der Headsets
Headset NoiseGard™ HMEC 300
• Neu es, aktives Headset mit guter Dämpfung des Außenlärms über den gesamten
Freq uenzbereich du rch aktive Lär mko mpensation N ois eGard™
• Aktive Lärmkompensation NoiseGard™ ermöglicht klare Kommunikation auch in lautester Umgebung
• Hervorragende Trageeigenschaften mit viel Bewegungsfreiheit durch geringes
Gewicht, angenehme Ohrpolster, gepolsterten Kopfhörerbügel und einseitig geführtes Kabel
• Kopfhörerbügel mit Klappmechanismus ermöglicht platzsparendenTransport
• Klar e Kommunikation über das Elektret-Mikrofon MKE 45 mit einstellbarer Em pfindlichkeit
• Mikrofon durch flexiblen Mikrofonarm mit Schnellarretierung optimal positionierbar
und beids eitig zu tragen
• Optimale Verständigung durch breitbandiges Hörersystem
• Integrierter Lautstärkesteller für gute Lautstärkeanpassu ng
• A npassu ng an das Interco m-Sy stem d urch Mono-/Stereo-U msch alter
• Lärmkompensation NoiseGard™ für den Gebrauch als herkömmliches Headset
abschaltbar
4

• Spann ungs versorgung des N oiseGard™-System s über B ordnetz, Zigarettenanzünder
oder Batteriepack
• F ail-Safe-Operatio n bei Au sfall der Stromvers orgung
• A npassu ng der Spannung für das Noi seGard™-Sy stem über die In -L ine-Elektr onik im
Anschlusskabel
• Mad e in Germany mit 5 Jahren Gara ntie (H MEC 400: 10 Jah re Gar anti e)
Produktvarianten
Headset Nois eGard™ HMEC 302
Das Headset HMEC 302 unterscheidet sich vom HMEC 300 in folgenden Merkmalen :
• Anschluss von Mikrofon und Spannungsversorgung der NoiseGard™-Elektronik über
Klinkenstecker PJ-068
Headset Nois eGard™ HMEC 305
Das Headset HMEC 305 unterscheidet sich vom HMEC 300 in folgenden Merkmalen :
• Kein Mono-/Stereo-Umschalter
• A nschlu ss v on Kopfhör er, Mik rofon u nd Span nung sversorgung der NoiseGard™- Elek-
tronik an das Bordnetz (12–35 V DC) über XLR-5-Stecker
5

Headset NoiseGard™ HMEC 305-C
Das Headset HMEC 305-C unterscheidet sich vom HMEC 300 in folgenden Merkmalen:
• K ein Mono- /Stereo-Umschalter
• Anschluss von Kopfhörer und Mikrofon über XLR-5-Stecker
• A nschlu ss der S pan nungsverso rgun g der No iseGard™-Elektronik üb er XLR-3 -Stecker
Headset NoiseGard™ HMEC 306
Das Headset HMEC 306 unterscheidet sich vom HMEC 300 in folgenden Merkmalen:
• A nschlu ss vo n Kopfhörer, Mikr ofon und Spannungsvers orgung der NoiseGard™-Elektronik an das Bordnetz (12–35 V DC) über einen 6-PIN-Redel-Stecker
Headset NoiseGard™ HMEC 322
Das Headset HMEC 322 unterscheidet sich vom HMEC 300 in folgenden Merkmalen:
• K ein Mono- /Stereo-Umschalter
•Spiralkabel
• Anschluss von Kopfhörer und Mikrofon über Klinkenstecker U-174/U an eine hochoh mi ge Sc hni tts tel le im H eliko pter
6

Headset Nois eGard™ HMEC 400
Das Headset HMEC 400 unterscheidet sich vom HMEC 300 in folgenden Merkmalen :
• Silberne Ohrmuscheln
• Leder-Ohrpolster
• Kopfbügelband zum Knöpfen
Headset Nois eGard™ HMDC 322
Das Headset HMDC 322 unterscheidet si ch vom HMEC 300 in folgen den Merkmalen:
• Kein Mono-/Stereo-Umschalter
•Spiralkabel
• Dynamisches Mikrofon M-87/AIC und niederohmiger Hörer
• Anschluss von Kopfhörer und Mikrofon über Klinkenstecker U-174/U an eine nieder-
ohmige Schnittstelle im Heli kopter
7

Lieferumfang
Headset HMEC 300, HMEC 305-C, HMEC 322, HMEC 400 und HMDC 322
• Headset
• Dr eipoli ge XLR-Einbaubuchs e zum Anschluss an das Bordnetz
• Gepolsterte Trage- und Aufbewahrungstasche mit Schulterriemen für Headset und
Zubehör
• Windschutz für das Mikrofon (nicht bei HMDC 322)
• Kabelkl ammer MZQ 20 02 - 1 (Art . -Nr . 44740)
Headset HMEC 302, HMEC 305 und HMEC 306
• Headset
• Gepolsterte Trage- und Aufbewahrungstasche mit Schulterriemen für Headset und
Zubehör
•Windschutz für das Mikrofon
• Kabelkl ammer MZQ 20 02 - 1 (Art . -Nr . 44740)
8

ACX -1
ACX -11 AC X-22
ACX- 2
Empfohlenes Zubehör
Austau schbare Gel-Ohrpol ster (Art.-Nr . 83140)
Batteriepack BP-03 (nicht für HMEC 302, HMEC 305 und HMEC 306)
Batteriepack mit XLR-3-Kupplung zur Spannungsversorgung der NoiseGard™-Elektronik
der Headsets HMEC 300, HMEC 305-C, HMEC 322, HMEC 400 und HMDC 322. Vier 1,5-VMignon-Batterien (Typ LR 6, Alkali-Mangan, nicht im Lieferumfang enthalten) sorgen für
eine Betriebszeit von ca. 15 Stunden. Länge des Anschlusskabels: 0,9 m.
Adapterkabel (nicht für HMEC 302, HMEC 305 und HMEC 306)
Für die Headsets HMEC 300, HMEC 305-C, HMEC 322, HMEC 400 und HMDC 322 gibt es spezielle Adapterkabel, mit denen Sie die NoiseGard™-Elektronik über den Zigarettenanzünder an das Bordnetz anschließen können:
• ACX-1 Adapterkabel zur Spannungsversorgung eines Headsets
• ACX-2 Adapterkabel zur Spannungsversorgung von zwei Headsets
Die Adapterkabel werden auch mit einem komfortablen Winkelstecker angeboten, der mit
einer 7,5-A-Flachsicherun g und einer grünen Kontroll-LED ausgerüstet ist:
• ACX-11 Adapterkabel zur Spannungsversorgung eines Hea dsets
• ACX-22 Adapterkabel zur Spannungsversorgung von zwei Headsets
9

10
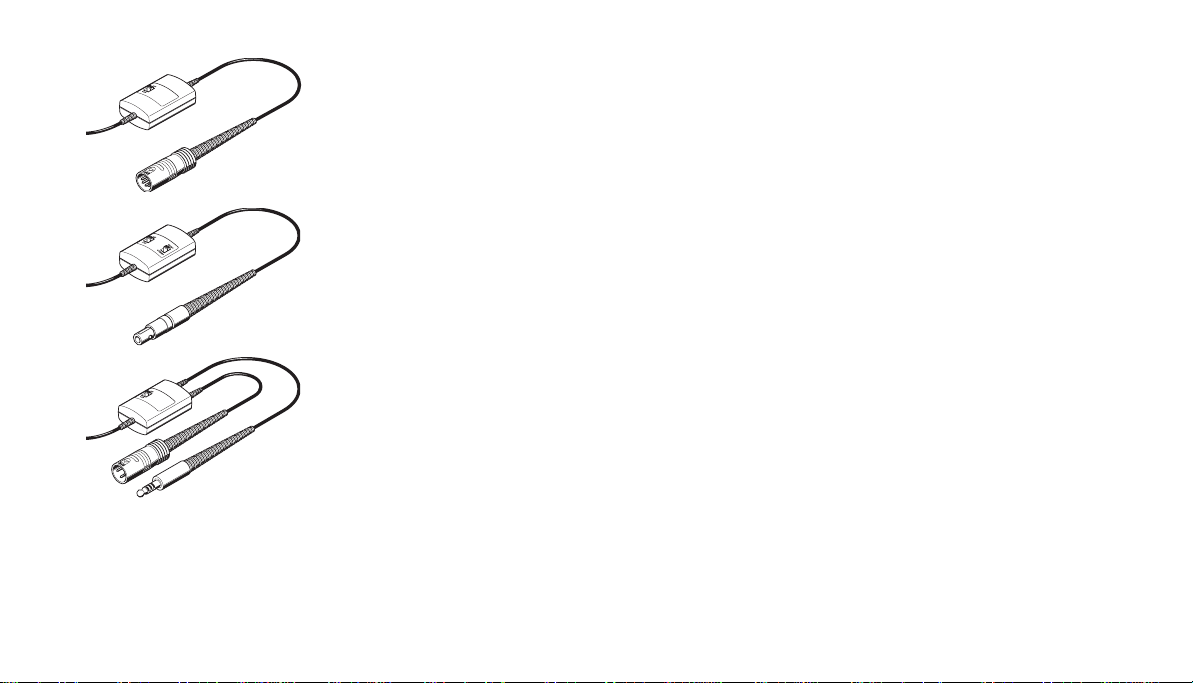
Headsets anschließen
Die A ns chlussk abel d er Headsets
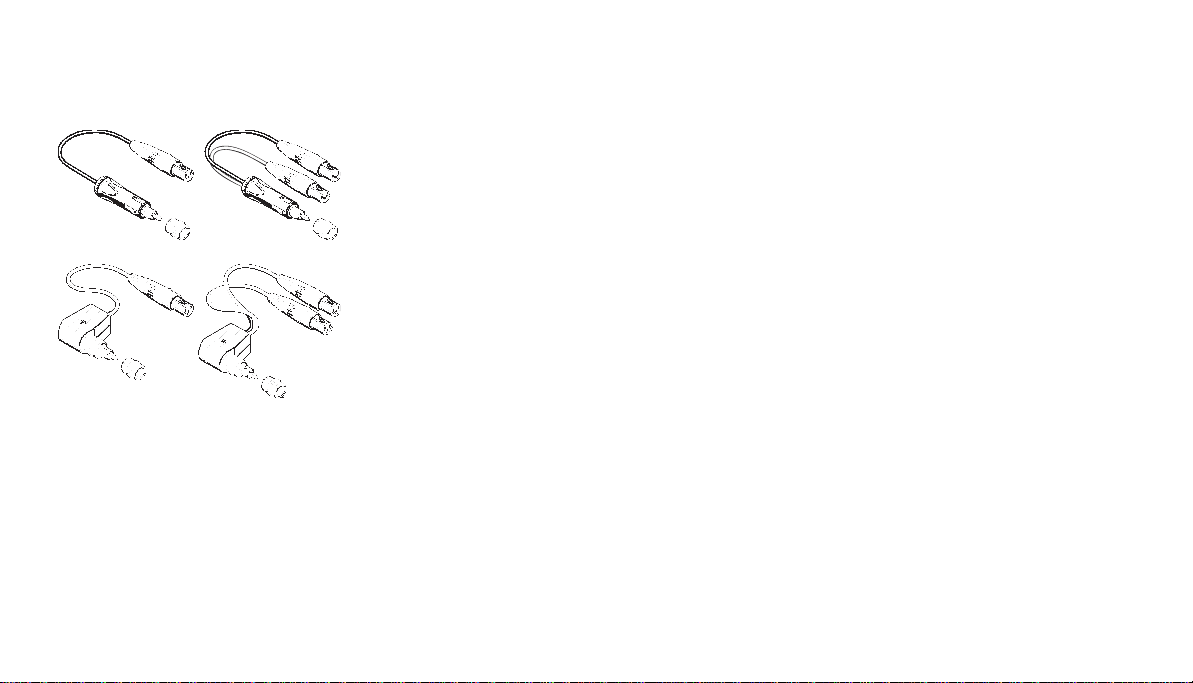
Headset HMEC 300 und HMEC 400:
1 6,35-mm-Stereo-Klinkenstecker zum Anschluss des Kopfhörers
1 Klinkenstecker PJ-068 zum Anschluss des Mikrofo ns
1 XLR-3-Stecker zum Anschluss der Stromversorgung für die NoiseGard™-Elektronik
Anschlusskabel
HMEC 300 und HMEC 400
Headset HMEC 302:
1 6,35-mm-Stereo-Klinkenstecker zum Anschluss des Kopfhörers
1 Klinkenstecker PJ-068 zum Anschluss von Mikro fon u nd Stromversorgung für die
NoiseGard™-Elektronik
Anschlusskabel
HMEC 302
Headset HMEC 305:
1 XLR-5-Stecker zum Anschluss von Kopfhö rer, Mikrofon und Stromv ersorgung für die
NoiseGard™-Elektronik
Anschlusskabel
HMEC 305
Anschlusskabel
HMEC 305-C
Anschlusskabel
HMEC 306
Anschlusskabel
HMEC 322 und HMDC 322
Headset HMEC 305-C:
1 XLR-5-Stecker zum An schlus s vo n Kopfhö rer und Mikr ofon
1 XLR-3-Stecker zum Anschluss der Stromversorgung für die NoiseGard™-Elektronik
Headset HMEC 306:
1 6-PIN-Redel-Stecker zum Anschluss von Kopfhörer, Mikrofon und Stromversorgung
für die NoiseGard™-Elektronik
Headset HMEC 322 und HMDC 322:
1 Klinkenstecker U-174/U zum Anschluss von Kopfhörer und Mikrofon
1 XLR-3-Stecker zum Anschluss der Stromversorgung für die NoiseGard™-Elektronik
11
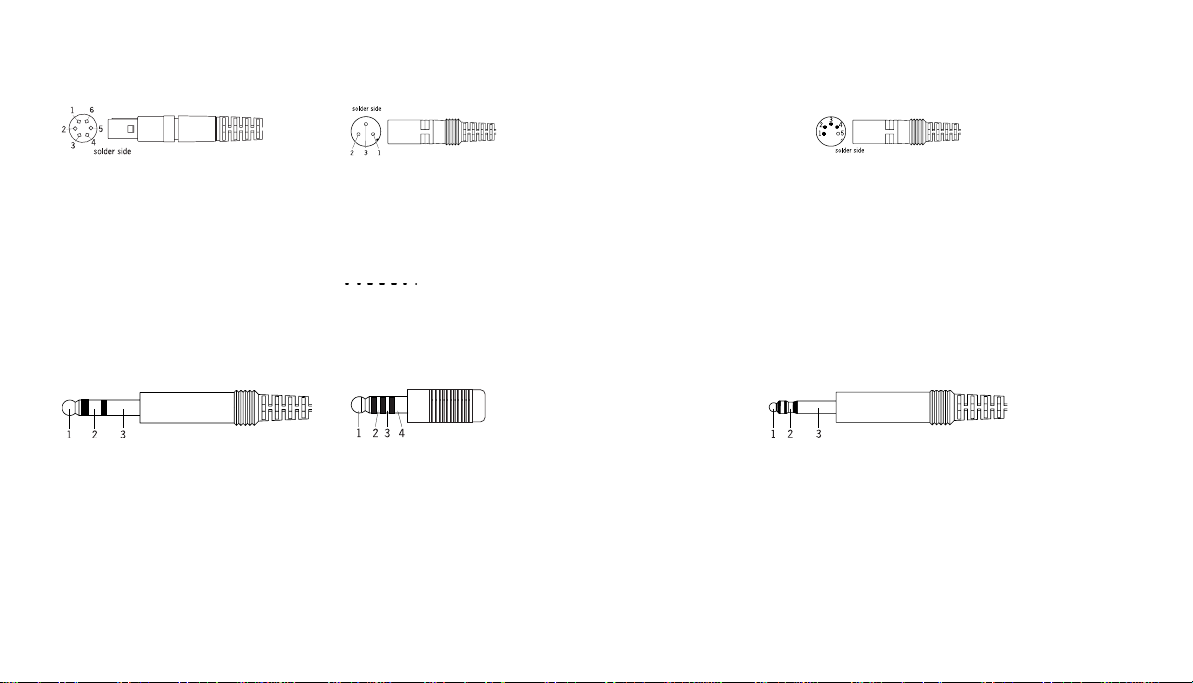
Pinbelegung der Stecker
Redel-Stecker (NoiseGard™) XLR-3-Stecker (NoiseGard™) XLR-5-Stecker
1 Stromvers. NoiseGard™ (DC+) 1 Stromvers. NoiseGard™ (DC+) HMEC 305 HMEC 305-C
2Audio Lo / DC – 2Masse 1Audio Hi 1Audio Hi
3 Audio Hi links 3 Nicht anschließen! 2 Audio Lo / DC – 2 Audio Lo
4Audio Hi rechts 3Mikrofon Hi 3Mikrofon Hi
5 Mikrofon Hi 2 Nich t anschließen! (HMEC 305-C) 4 Mikrofon Lo 4 Mikrofon Lo
6Mikrofon Lo 3Masse (HMEC 305-C) 5Stromvers. NoiseGard™ (DC+)5Nicht belegt!
6,35-mm-Stereo-Klinkenstecker Klinkenstecker U174/U Klinkenstecker PJ-068
1 Audio Hi links 1 Mikrofon Lo HMEC 302 HMEC 300
2Audio Hi rechts 2Audio Hi 1Stromvers. NoiseGard™ (DC+)1Nicht belegt!
3Audio Lo 3Mikrofon Hi 2Mikrofon Hi 2Mikrofon Hi
4Audio Lo 3Mikrofon Lo / DC – 3Mikrofon Lo
12

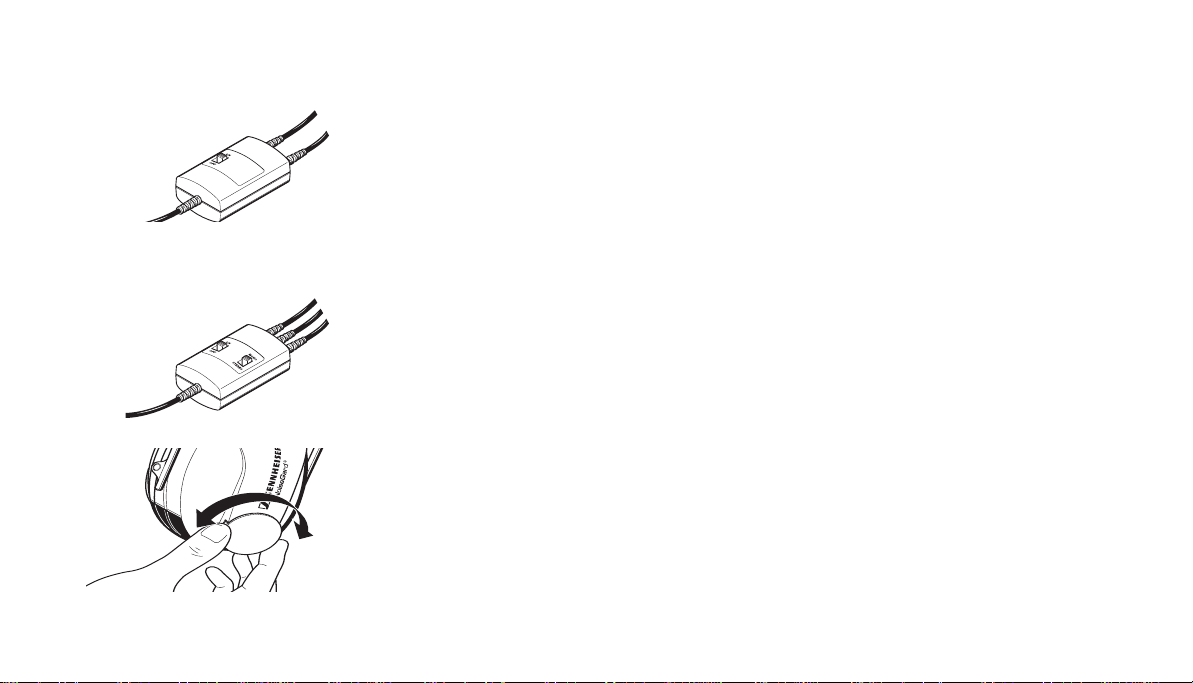
Ans chlussmöglichkeiten
Um di e Lärmkompensation Nois eGard™ mit Span nun g zu versorgen, haben Sie drei Möglichkeiten:
1. Anschluss an das Bordnetz (12–35 V DC)
2. Anschluss an das Batteriepack BP-03
(Zubehör, außer für HMEC 302, HMEC 305 und HMEC 306)
3. Anschluss an den Zigarettenanzünder (12–35 V DC) über Adapterkabel
(Zubehör, außer für HMEC 302, HMEC 305 und HMEC 306)
Die In-Line-Elektronik im Anschlusskabel bereitet die ankommende Spannung für das
NoiseGard™-System auf.
Kurzschlussgefahr!
Stellen Sie vor Inbetriebnahme sicher, dass die Stromversorgung für die NoiseGard™Elektronik aus dem Bordnetz mit einer 1-A-Sicherung abgesichert ist.
13
14
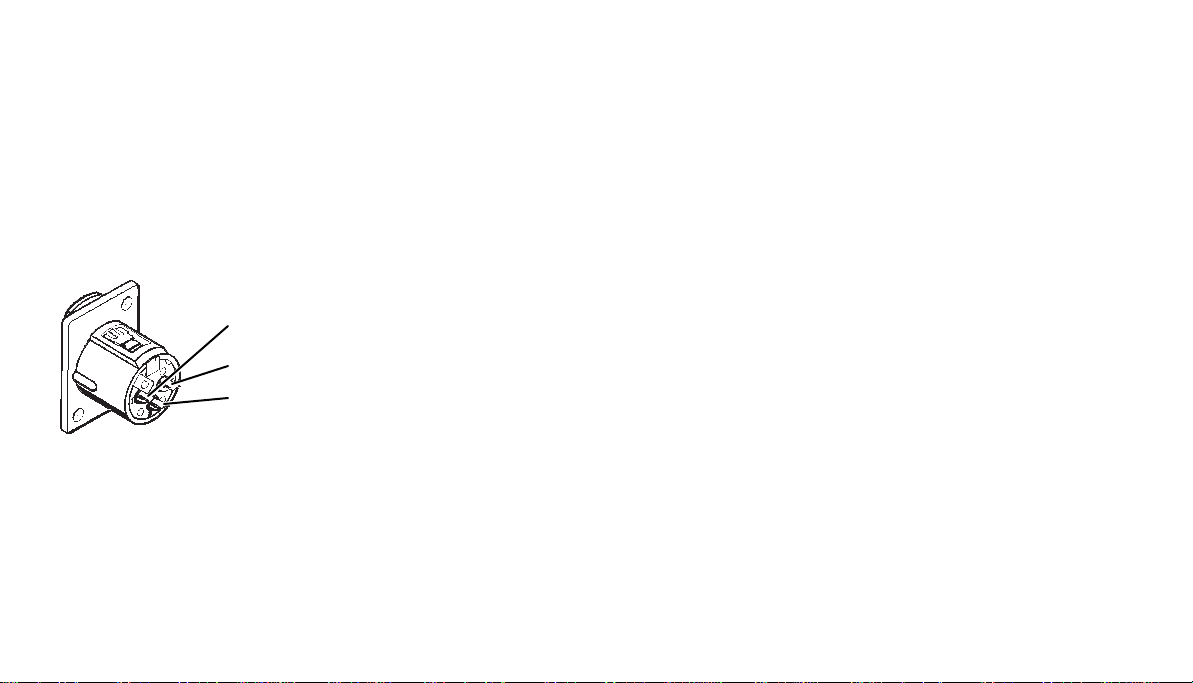
St rom ve rso rgu ng
No is eG ard ™
Masse
Ni ch t
an sc hl i eß e n !
XL R- 3-Einbaubuchse
1. H eads et an das Bordnetz anschließen
Sie können die NoiseGard™-Elektronik an Bordnetze mit einer Spannung zwischen 12 V DC
und 35 V DC anschließen.
Kurzschlussgefahr!
Stellen Sie vor Inbetriebnahme sicher, dass die Stromversorgung für die NoiseGard™Elektronik aus dem Bordnetz mit einer 1-A-Sicherung abgesichert ist.
Zusammen mit den Headsets HMEC 300, HMEC 305-C, HMEC 322, HMEC 400 und
HMDC 322 erhalten Sie eine XLR-3-Einbaubuchse. Lassen Sie die Buchse von Ihrer Werkstatt einbauen.
Headset HMEC 300 und HMEC 400:
왘 Stecken Sie den 6,35-mm-Stereo-Klinkenstecker für den Kopfhörer und den
Klinkenstecker PJ-068 für das Mikrofon in die entsprechenden Klinkenbuchsen Ihres
Intercoms.
왘 Stecken Sie den XLR-3-Stecker in die eingebaute XLR-3-Buchse.

Headset HMEC 302:
왘 Stecken Sie den 6,35-mm-Stereo-Klinkenstecker für den Kopfhörer und den
Klinkenstecker PJ-068 für das Mikrofon in die entsprechenden Klinkenbuchsen Ihres
Intercoms.
Headset HMEC 305:
왘 Stecken Sie den XLR-5-Stecker in die XLR-5-Buchse Ihres Flugzeuges.
Headset HMEC 305-C:
왘 Stecken Sie den XLR-5-Stecker für den Kopfhörer und das Mikrofon in die XLR-5-
Buchse Ihres Flugzeuges.
왘 Stecken Sie den XLR-3-Stecker in die eingebaute XLR-3-Buchse.
Headset HMEC 306:
왘 Stecken Sie den 6-PIN-Redel-Stecker in die 6-PIN-Buchse Ihres Flugzeuges.
Headset HMEC 322 und HMDC 322:
왘 Stecken Sie den Klinkenstecker U-174/U für den Kopfhörer und das Mik rofon in die
U-174/U-Buch se Ihres I nter coms.
왘 Stecken Sie den XLR-3-Stecker in die eingebaute XLR-3-Buchse.
15

16
2. H eads et an das Batteriepack anschließen (außer HMEC 302, HMEC 305 und HMEC 306)
Die N oiseGard™-Elektroni k der Headsets HMEC 300, HMEC 305-C, HME C 322, HMEC 40 0
und HMDC 322 können auch über das Batteriepack BP-03 mit Strom versorgt werden
(siehe „Empfohlenes Zubehör“ auf Seite 9). Das Batteriepack eignet sich für Batterie- und
Akkubetrieb (Batterien bzw. Akkus sind nicht im Lieferumfang enthalten). Für eine
Betri ebszeit von ca. 15 Stunden empfeh len wir den Betrieb mit Batterien (Typ LR 6, 1 ,5 V,
Alkali-Mangan) od er NiMH-Akkus.
Batterien in Batteriepack einsetzen / auswechseln
왘 Öffnen Sie die Abdeckung des Batteriefachs.
왘 Setzen Sie die vier Batterien (Typ LR 6, 1,5 V, Alkali-Mangan) ein. Achten Sie dabei
auf die Polarität.
왘 Schließen Sie das Batteriefach.
Betriebs- und Batterieanzeige des Batteriepacks
Das B atteriepack h at zwei Kontrolleuc hten (LED).
Grüne LED leuchtet: Das Batteriepack ist eingeschaltet, die LED zeigt den Betrieb an.
Rote LED leuchtet: Die Leistung d er Batterien reicht nur n och für ku rze Zeit. Wechseln Sie
die Batterien aus.

Headset anschließen, Batteriepack einschalten
왘 Stecken Sie den XLR-3-Stecker am Anschlusskabel des Headsets in die XLR-3-
Kupplung d es Batteriepa cks.
왘 Headset HMEC 30 0 un d HM EC 400 : Stecken Sie den 6,35-mm-Stereo-Klinkenstecker
für den Kopfhörer und den Klinkenstecker PJ-068 für das Mikrofon in die
entsprechenden Klinkenbuchsen Ihres Intercoms.
Headset HMEC 305-C: Stecken Sie den XLR-5-Stecker für den Kopfhörer und das
Mikrofon in die XLR-5-Buchse Ihres Flugzeuges.
Head set HMEC 32 2 un d HM DC 32 2: Stecken Sie den Klinkenstecker U-174/U für den
Kopf hörer und das Mikrofo n in die U-174 /U-Buchs e Ihres Interco ms.
왘 Schalten Sie das Batteriepack ein, indem Sie den ON/OFF-Schalter in die Postion „ON“
schieben. Die grüne Betriebs-LED leuchtet.
Hinweis:
Der ON/OFF-Schalter in der Zuleitung zum Headset ist bei der Verwendung des
Batteriepacks außer Funktion.
Batteriepack an der Kleidung befestigen
Mit dem Befestigungscl ip läßt sich das Bat teriepack an der Kleid ung befestigen, Klet tband
ist zusätzli ch b eigelegt.
17

ACX -1
ACX -11 AC X-22
ACX- 2
18
3. H eads et über Adapterkabel a nschließen (außer HMEC 302, HMEC 305 und HMEC 306)
Für die Headsets HM EC 300, HMEC 30 5-C, HMEC 322 , HM EC 400 u nd H MDC 322 gibt es spezielle Adapterkabel mit XLR-3-Kupplung, mit denen Sie die NoiseGard™-Elektronik über
den Zigarettenanzünder an das Bordnetz anschließen können:
• ACX-1 Adapterkabel zur Spannungsversorgung eines Headsets
• ACX-2 Adapterkabel zur Spannungsversorgung von zwei Headsets
Die Adapterkabel werden auch mit einem komfortablen Winkelstecker angeboten, der mit
einer 7,5-A-Flachsicherung und einer grünen Kontroll-LED ausgerüstet ist:
• ACX-11 Adapterkabel zur Spannungsversorgung eines Headsets
• ACX-22 Adapterkabel zur Spannungsversorgung von zwei Headsets
Headset anschließen
왘 Stecken Sie den XLR-3-Stecker am Anschlusskabel des Headsets in die XLR-3-
Kupplung des Adapterkabels.
왘 Stecken Sie den Stecker bzw. Winkelstec ker des Adapterkabels in den
Zigarettenanzünder.

Headset für den Gebrauch vorbereiten
Kopfhörerbügel eins tellen
Um eine gute Lärmdämpfung und den bestmöglichen Tragekomfort zu erzielen, müssen
Sie das Headset Ihrem Kopf richtig anpassen. Dazu können Sie den Kopfhörerbügel verstellen:
왘 Setzen Sie den Kopfhörer so auf, dass der Kopfhörerbügel über die Kopfmitte verläuft.
왘 Stellen Sie die Länge des Kopfhörers so ein, dass
• die Ohrposter die Ohren ganz umschl ießen,
• Sie einen leichten Druck um Ihre Ohren herum spüren,
• der Kopfhörerbügel eng am Kopf anliegt.
Hinweis:
Achten Sie darauf, dass Sie beim Einstellen des Kopfhörerbügels die
Verbindungskabel nicht einklemmen, da sie dadurch beschädigt werden können.
왘 Schalten Sie die Lärmkompensation NoiseGard™ ein, indem Sie den ON/OFF-Schalter
in die Position „ON“ schieben (siehe „NoiseGard™ ein- und ausschalten“ auf
Seite 23).
왘 Überprüfen Sie in lauter Umgebung, ob die Ohrposter optimal sitzen.
19

20
Mikrofon positionieren
Mikrofonarm drehen
Sie können das Mikrofon sowohl am rechten als auch am linken Mundwinkel platzieren.
왘 Lösen Sie die Schnellarretierungsschraube.
왘 Drehen Sie das Mikrofon um 180°.
왘 Schrauben Sie die Schnellarretierungsschraube wieder fest.
Mikrofon zum Mundwinkel hin ausrichten
Die Headsets HMEC 300, HMEC 302, HMEC 305, HMEC 305-C, HMEC 306, HMEC 322 und
HMEC 400 haben einen flexiblen Mikrofonarm. Biegen Sie ihn so, dass das Mikrofon am
Mundwinkel, etwa 2 cm vom Mund entfernt, sitzt.
Richten Sie beim Headset HMDC 322 das Mikrofon wie folgt aus:
왘 Stellen Sie die Länge des Mikrofonarms so ein, dass das Mikrofon im Mundwinkel
sitzt. Lösen Sie dazu die Schnellarretierung und verschieben Sie den Mik rofonarm.
왘 Ziehen Sie den mittleren Teil des Mikrofonarms so weit an den Mund heran, dass das
Mikrofon etwa 2 cm vom Mund entfernt ist.
왘 Zur Feinausrichtung können Sie das Mikrofon kippen.
21
22
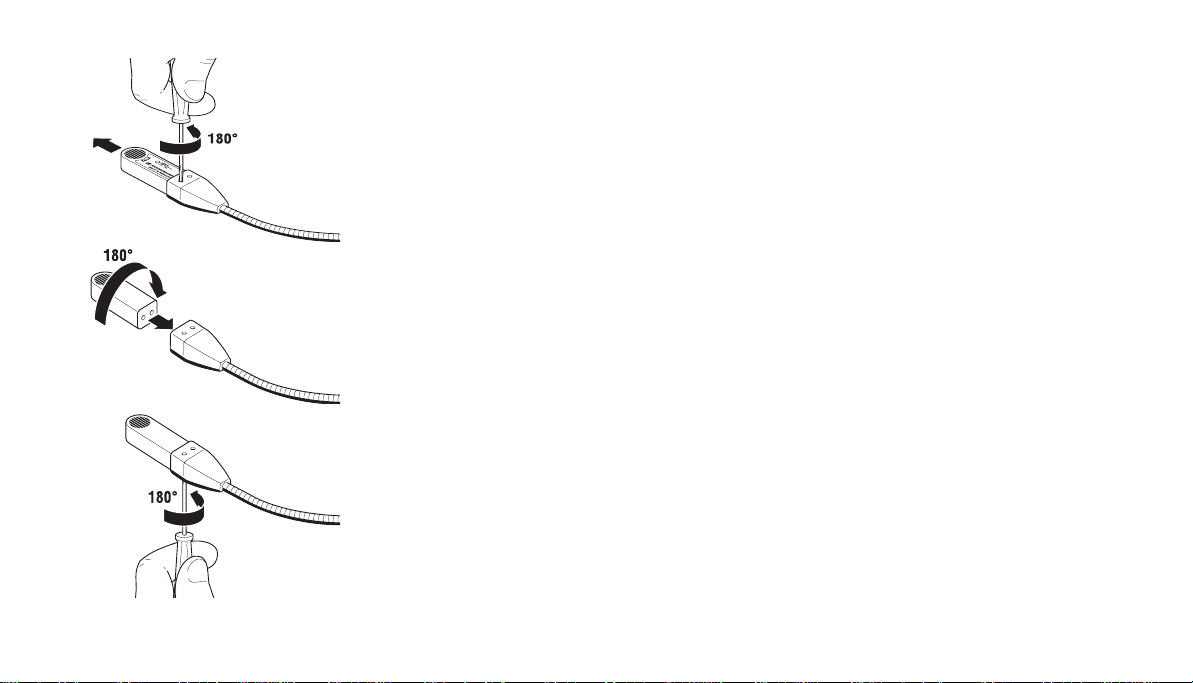
Zusatzinformation für den Helikopterbetrieb des Headsets HMEC 322
Die Beschaltung (Polu ng) des Mikrofon anschlusses in Helikoptern ist weltweit nicht
genormt. Sollte das Mikrofon Ihres Headsetes mit der vorhandenen Beschaltung nicht
funktion ieren, können Sie dur ch einf aches Umdr eh en des Mikrofon moduls die Polun g am
Headset tauschen. In diesem Fall gehen Sie bitte nach folgender Anleitung vor:
1. Ent fernen Sie den Popps chutz.
2. Lösen Sie die Schrauben mit ca. 1/2 Umdrehung.
3. Ziehen Sie das Mikrofonmodu l aus d er Halterung.
4. Drehen Sie das Mikrofonmodul um 180°.
5. Stecken Sie das gedrehte Mikrofonmodul wieder in die Halterung.
6. Ziehen Sie die Schrauben nun von der anderen Seite wieder an.
7. Setzen Sie den Poppschutz wieder auf.
Die akustischen Eigenschaften des Mikrofonmoduls ändern sich durch das Umdrehen des
Moduls nicht, da das Mikrofon durch die geräuschdämpfende Charakteristik von beiden
Seiten b es prechbar ist.
Der tägliche Betrieb
Nois eGard™ ein- und ausschalten
Ist die aktive Lärmkompensation NoiseGard™ ausgeschaltet, können Sie das Headset wie
ein ganz gewöhnliches Headset einsetzen.
Schalten Sie das NoiseGard™-System ein, indem Sie den ON/OFF-Schalter in die Position
„ON“ schieben. Beim Betrieb mit dem Batteriepack BP-03 stellen Sie den Schalter auf „ON“
und nutzen den ON/OFF-Schalter am BP-03.
Mon o-/Ster eo-Umschaltung (au ßer HMEC 305, HMEC 3 05-C, HMEC 322 und HMDC 322)
Üblicherweise empfangen Sie Ihre Tonquelle in Mono und können den Mono-/StereoUmschalter in der Position „Mono“ belassen. Schalten Sie an einem Stereo-Intercom-System den Kop fhörer auf „Stereo“ um.
Lautstärke einstellen
Zu hohe Lautstärke schädigt Ihr Gehör!
Stellen Sie mit dem Lautstärkesteller eine mittlere Lautstärke ein. Sie müssen sicherstellen, dass Sie alle wichtigen Ger äusche wie z. B. Warnsignale hör en kön nen.
23
24
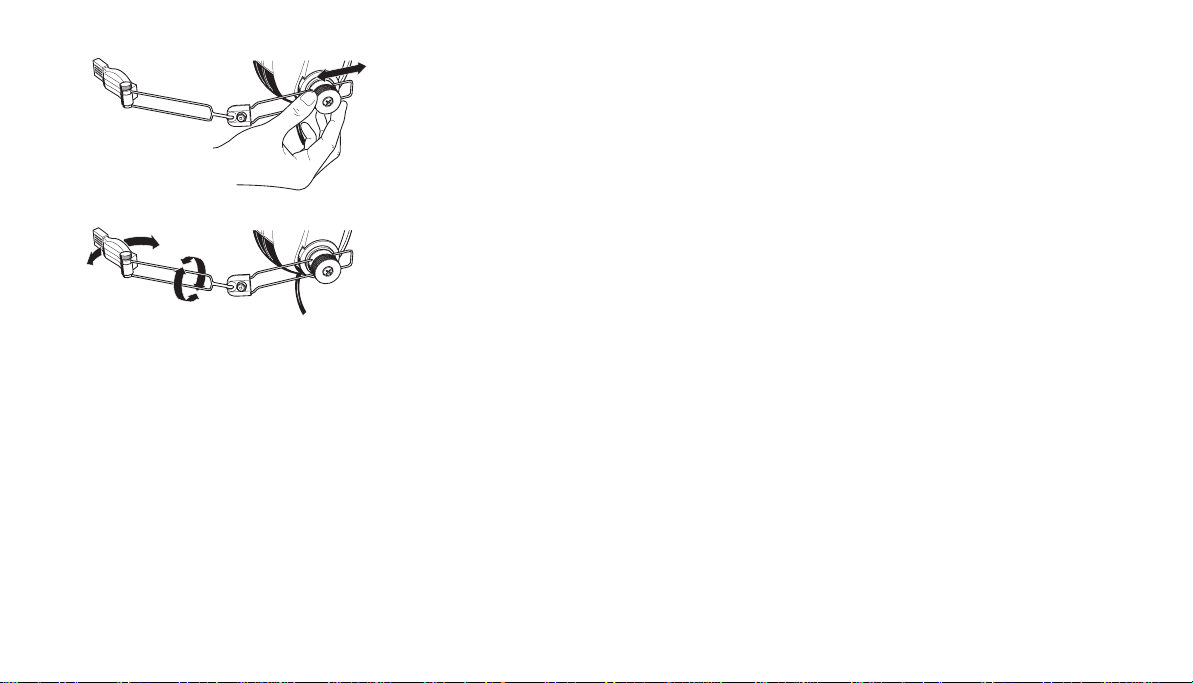
Kabelklammer anbringen
Sie können das Kopfhörerkabel zu Ihrer Bequemlichkeit mit der Kabelklammer fixieren.
Führen Sie das Kopfhörerkabel so durch die Kabelklammer, wie nebenstehend abgebildet.
Klemmen Sie die Kabelklammer an die Kleidung und ziehen Sie die Kabelschlaufe soweit
durch die Kabelklammer, dass Sie das Kopfhörerkabel nicht stört.
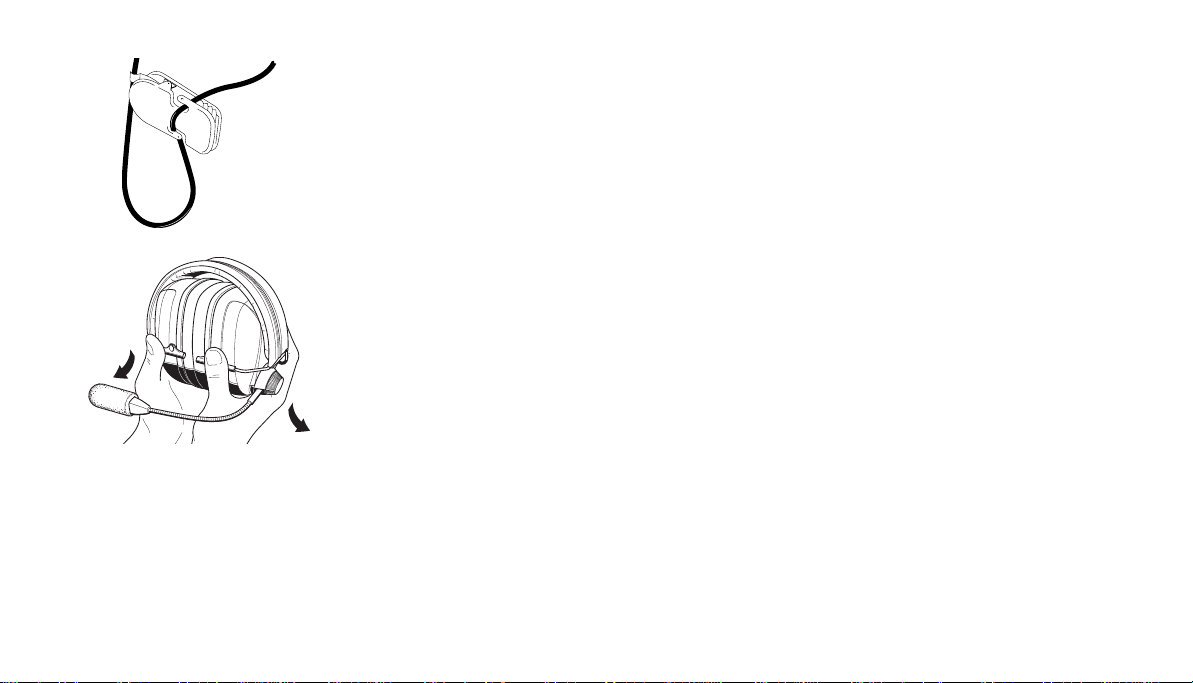
Kopfhörer zusammenklappen
Um den Kopfhörer platzsparend zu transportieren, können Sie die Hörerkappen zwischen
den Kopfhör erbügel schi eb en.
Klappen Sie den Kopfhörer wieder auseinander, indem Sie die beiden Hörerkappen fassen
und nach unten aus dem Kopfhörerbügel herausziehen.

Ersatzteile
Bei Ihrem Sennheiser-Vertriebspartner erhalten Sie folgende Ersatzteile:
• Windschutz für Elektretmikrofon MKE 45
•Ohrpolster
• Kopfbügelband
• Kabelklammer
• Trage- und Aufbewahrungstasche mit Schulterriemen
Windschutz austau schen
Tauschen Sie bei dem Elektretmikrofon den Windschutz aus, wenn er Verschleißerscheinungen wie Risse oder Löcher zeigt. Ziehen Sie den Windschutz vom Mikrofon ab. Schieben Sie vorsichtig den neuen Windschutz auf das Mikrofon. Der Windschutz muss das
ges amte Mikrofon umschließen.
Ohrpolster au stauschen
Tauschen Sie die Ohrpolster aus, wenn sie besc hädigt sind. Fassen Sie hinter die Ohrpolster
und ziehen Sie sie von den Hörerkappen ab. Schieben Sie die neuen Ohrpolster auf die
Hörerkappen.
25
26
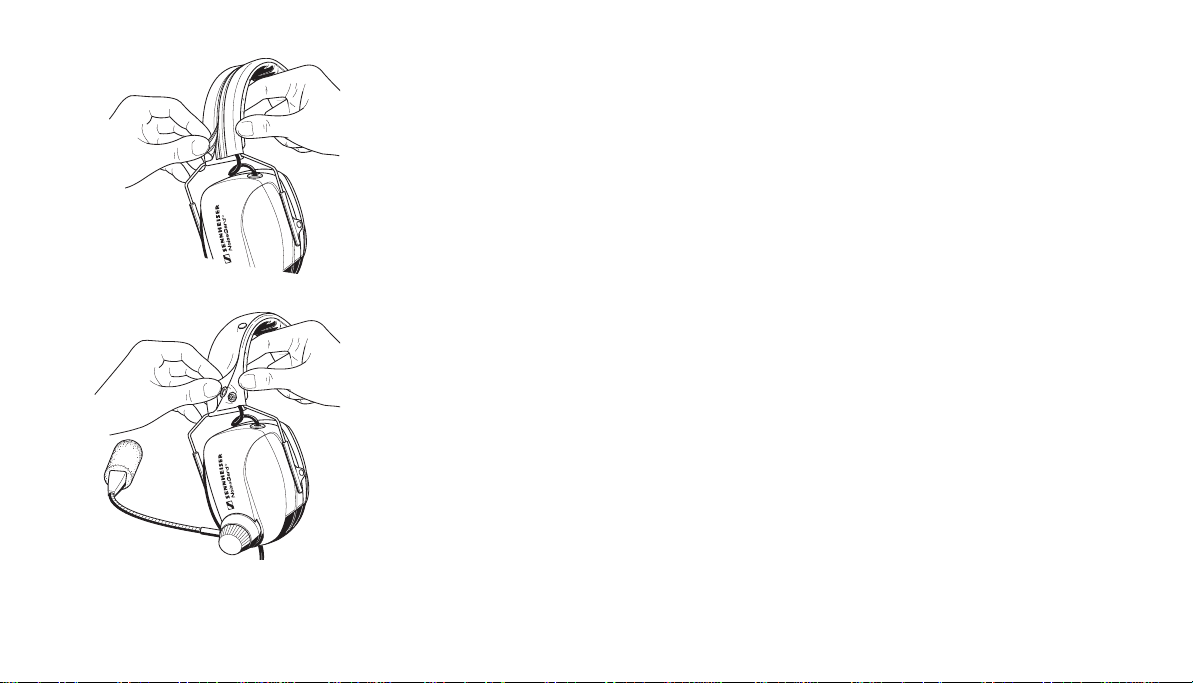
Kopfbügelband austauschen
Tauschen Sie das Kopfbügelband aus, wenn es beschädigt ist.
왘 Ziehen Sie den Verschlu ss des Ko pfb üg elband es auseinander und neh men Sie das
verschlissene Kopfbügelband ab.
왘 Legen Sie das neue Kopfbügelband um den Kopfhörer bügel.
왘 Ziehen Sie die beiden Verschlussseiten des Kopfbügelbandes zusammen, bis sie
leicht überlappen.
왘 Drücken Sie den Verschluss zusammen.
Kopfbügelband des H eads ets HMEC 400 austauschen
Tauschen Sie das Kopfbügelband aus, wenn es beschädigt ist.
왘 Öffnen Sie die Druckknöpfe und nehmen Sie das verschlissene Kopfbügelband ab.
왘 Legen Sie das neue Kopfbügelband um den Kopfhörer bügel.
왘 Ziehen Sie die beiden Verschlussseiten des Kopfbügelbandes zusammen und
schließen Sie die Druckknöpfe.

Wissenswertes zum Nachlesen
Das NoiseGard™-Prinzip
Lärm ist eine der schlimmsten Umweltbelas tungen und ein erns tzun ehmender Streßfaktor. Untersuchungen haben gezeigt, dass Lärm auf das vegetative Nervensystem wirkt.
Müdigkeit, Konzentrationsmangel, Nervosität und Gereiztheit sind die Folge. Darüber hinaus führt ständige Lärmeinwirkung zu Dauerschäden des Gehörs.
Von d iesem Problem betroffen sind insbes ondere Piloten. Der Schalldruckp egel im Cockpit
beträgt etwa 8 0 dB(A) in Jets und zwischen 90 und 97 dB(A) in Pro peller-Flugzeug en. Bei
Start und Landung steigt der Lärm noch wesentlich an. Dami t der Funksprechverkehr
jedoch gut verstanden w erden kann, mu ss die Lautstärke in den Kopfh örern auf weni gstens 95 dB(A) eingestellt wer den. Bei so manch em Piloten wurden deshalb Gehörs chäden
festgestellt, die eine vor zeitige Berufsu nfähigkeit bedin gten bzw. dazu führten, dass Piloten i hre Flugli zenz verloren.
Herkömmliche Gehörschutz-Headsets bieten einen guten Schutz im oberen und mittleren
Audiobereich. Cockpitlärm besteht jedoch hauptsächlich aus mittleren bis tiefen Frequenzen, b ei denen h erkömml iche Gehörsch utz-Headsets n ur noch unzureichend s chützen.
27

28
Durch die von Sennheiser entwickelte aktive Lärmkompensation, System NoiseGard™,
kombiniert mit einem hoch wertigen passiven Gehör schützer, konnte eine sehr hohe,
gleichmäßig e Lärmdämpfung i m gesamten Audiobereich realisiert werden. Der Lärmpegel
im Cockpit wird drastisch gesenkt, der Pilot hört nur noch ein natürliches Motoren-Restgeräusch. Das Funksignal kann er entsprechend leiser stellen.
Die aktive Lärmkompensation NoiseGard™ basiert auf dem Prinzip des phaseninversen
Schalls. Dazu wird eine Schallwell e erzeugt, die zum Störschall u m 180° phasenversch oben
ist, mit dem Er gebnis, dass sich beide Schallwellen gegenseitig annähernd aufheben.
In beide Hörersysteme des Headsets ist eine Elektret-Mikrofonkapsel, ein Rückkopplungskreis und ein Wandlersystem eingebaut. Der von den Mikrofonen aufgenommene Schall,
bestehend aus Störsignalen und Funks ignal, wird verstärkt un d das Funksi gnal herausgefiltert. Der Störsc hall wird nun von einer elektronischen Schaltung aufbereitet u nd um
180° phasen versch oben. Dann wird das Funksi gnal dem Störsc hall wieder beaufschlagt
und als Summensignal verstärkt auf die Wandlersysteme geg eben. Der Störschall wird
durch die Überlagerung mit gegenphasigem Schal l deutli ch reduziert. Das Fun ksignal wird
jedoch unverändert wiedergegeben, da es die Kompensationsschaltung nicht durchlaufen
hat.
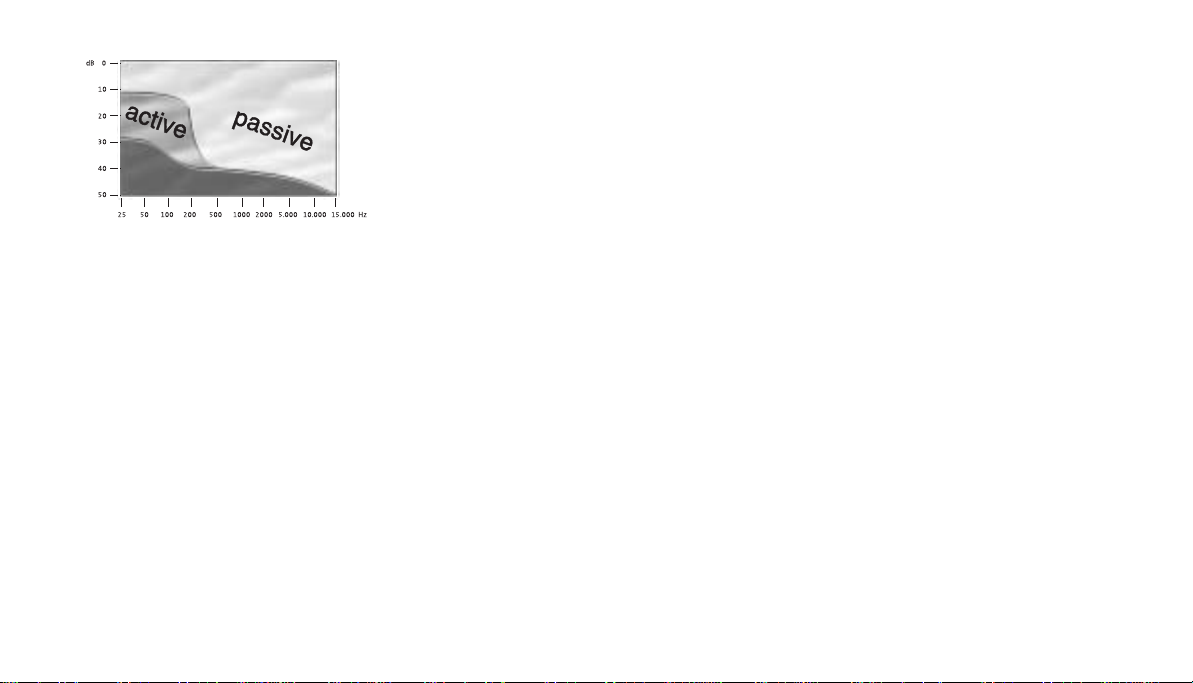
Die Abbildung zeigt die Lärmkompensation mit NoiseGard™: Passive Gehörschützer
dämpfen den Lärm vor allem im mittleren und oberen Frequenzbereich. Bei Frequenzen
unterhalb 500 Hz schützen sie allerdings nur noch unzureichend. Durch die aktive Lärmkompensation wird jedoch auch der Lärm im Frequenzbereich von 25–500 H z um ca.
25 dB reduziert. Die Summendämpfung aus aktiver und passiver Lärmkompensation liegt
bei etwa 30 dB über den gesamten Audiobereich.
Eine Lärmreduzierung um 10 dB wird subjektiv als H albierung der Lautstärke wahrgenommen. Wird der Lärm um weitere 10 dB reduziert, wird dies wiederum als eine Halbierung
der Lautstär ke empfunden u sw.
29

Wenn Störun gen au ftrete n
Setzen Sie sich bitte mit Ihrem Sennheiser-Vertriebspartner in Verbindung, wenn Störungen auftreten, die ni cht in der nachfol genden Tabelle enthalten sind.
Fehler Mögliche Ursachen und Abhilfe
Klare Kommunikation aber keine
aktive Lärmkompensation
30
Die NoiseGard™-Elektronik ist ausgeschaltet.
왘 Überprüfen Sie, ob der Schalter ON/OFF in der Position „ON“ steht.
Der XLR- 3- Stecker ist aus der St romversorg ung herau sgezogen.
왘 Überprüfen Sie, ob der XLR-3-Stecker richtig an die Stromversorgung angeschlossen
ist.
Beim Anschluss an das Bordnetz: Die Sich erung des Bordnetzes ist defekt.
왘 Überprüfen Sie die Sicherung des Bordnetzes.
Beim Anschluss an das Batteriepack (nicht bei HMEC 302, HMEC 305 und HMEC 306):
Die Batterien sind leer.
왘 Überprüfen Sie, ob die grüne Kontrolleuchte am Batteriepack leuchtet.
Leuchtet die rote Kontrolleuchte, müssen Sie die Batterien austauschen.

Fehl er Möglic he Ur sac hen und Abhilfe
Aktive Lärmkompensation, aber
nur seh r leise Kommunikation
Aktive Lärmkompensation, aber
Sie werden schlecht verstanden
Kommunikation nur auf einem Ohr
(nur bei HMEC 300, HMEC 302,
HMEC 306 und HMEC 400)
Die Lautstärke ist zu niedrig eingestellt.
왘 Überprüfen Sie die Lautstärkeeinstellung Ihres Headsets.
Der K opfhör eranschluss ist hera usgezogen (außer HMEC 305, HMEC 305-C u nd
HMEC 306).
왘 Überprüfen Sie, ob der Klinkenstecker des Kopfhörers richtig angeschlossen ist.
Der Mikrofonanschluss ist herausgezogen (außer HMEC 305, HMEC 305-C und
HMEC 306).
왘 Überprüfen Sie, ob der Klinkenstecker des Mikrofons richtig angeschlossen ist.
Sie benutzen ein Stereo-Intercom-System, ha ben das Headset auf Mono-Betrieb
eingestellt.
왘 Stellen Sie den Mono-/Stereo-Umschalter auf die Position „Stereo“.
Sie empfangen eine Monoquelle, haben aber das Headset auf Stereo-Betrieb
eingestellt.
왘 Stellen Sie den Mono-/Stereo-Umschalter auf die Position „Mono“.
31

Techn ische Daten
HMEC 300 HMEC 302 HMEC 306 HMEC 400
Ko pfhörer
Wand le rprinzip dy nam isch
Ankopplung an das Ohr circumaural, geschlossen
Übertragu ngsbereich 45–15.000 Hz
Nennimpedanz aktiv/passiv 300/150 Ω, mono
60 0/3 00 Ω, stereo
Lärmdämpfung (aktiv und passiv) > 25–40 dB
Max. Schalldruckpegel 120 dB (±5 %)
Andruck kraft ca. 10 N
Mikrofon inkl. Vorverstä rker
Wandlerprinzip Elektret-Kapsel, geräuschkomp ensiert, MKE 45
Übertragu ngsbereich 300–5.000 Hz
Empfindlic hkeit –
Max. Schalldruckpegel 120 dB
Anschlusswiderstand 150 Ω
Au sgan gs span nu ng 40 0 mV ± 3 dB b ei 114 dB (nach RTC A/ DO 214)
Versorgungsspannung typ. 16 V DC (8–16 V DC, ca. 8–25 mA, nach RTCA/DO 214)
32

HMEC 300 HMEC 302 HMEC 306 HMEC 400
Allgemeine Daten
Anschlusskabel 1,5 m, einseitig geführt
Gewicht o hne Kabel 370 g
Betriebsspannung NoiseGard™ 12–35 V DC
Stromaufnahme 27 mA (Ruhestrom), max. 80 mA
Sicherung 500 mA Thermo-Sich erung
Stecker 6 ,35-mm-Stereo-Klinken- 6, 35-mm-Stereo-K linken - 6-PIN-Redel-Stecker für 6,35-mm-Stereo-Klinken-
stecker für Kopfhörer, steck er f ür Kop fhöre r , Kopfhörer, Mikrofon stecker für Kopfhörer,
PJ-068 für Mik rofon, PJ-068 für Mikrofon und NoiseGard™ PJ-068 für Mikrofon,
XLR-3-Stecker für und NoiseGard™ XLR-3 -Ste ck er für
NoiseGard™ NoiseGard™
Ausstattung Mono-/Stereo-Umschalter
Ein-/Aussch alter für NoiseGard™
L a ut s t ä r k e st e ll e r f ü r K o p f hö re r
Temperaturbereich Betrieb –15 °C ... +55 °C
Aufbewahrung –55 °C ... +55 °C
Betriebszeit Batterieteil mit Batterien (4 x Mignon, 1,5 V, Alkali-M angan): ca. 15 Stunden
mit NiMH-Akkus: c a. 1 5 Stunden
33

Techn ische Daten
HMEC 305 HMEC 305-C HMEC 322 HMDC 322
Ko pfhörer
Wand le rprinzip dy nam isch
Ankopplung an das Ohr circumaural, geschlossen
Übertragu ngsbereich 45–15.000 Hz
Nennimpedanz aktiv/passiv 300/150 Ω, mono 50/35 Ω, mon o
Lärmdämpfung (aktiv und passiv) > 25–40 dB
Max. Schalldruckpegel 120 dB (±5 %)
Andruck kraft ca. 10 N
Mikrofon inkl. Vorverstä rker
Wandlerprinzip Elektret-Kapsel, dynamis ch,
geräusch kompensiert, geräuschkompensiert,
MK E 4 5 M-87/AIC
Übertragu ngsbereich 300–5.000 Hz 500–4.00 0 Hz
Empfindlic hkeit – 1,8– 4 µV / 74 d B an 5 Ω
Max. Schalldruckpegel 120 dB –
Anschlusswiderstand 150 Ω –
Au sgan gs span nu ng 40 0 mV ± 3 dB b ei 114 dB (nach RTC A/ DO 214) –
Versorgungsspannung typ. 16 V DC (8–16 V DC, ca. 8–25 mA, nach RTCA/DO 214) –
34

HMEC 305 HMEC 305-C HMEC 322 HMDC 322
Allgemeine Daten
Anschlusskabel 1,5 m, einseitig geführt Spiralkabel, einseitig geführt
Gewicht o hne Kabel 370 g
Betriebsspannung NoiseGard™ 12–35 V DC
Stromaufnahme 27 mA (Ruhestrom), max. 80 mA
Sicherung 500 mA Thermo-Sich erung
Stecker XLR-5-Stecker für XLR-5-Stecker für U-174/U-Stecker für Kopfhörer und Mikrofon,
Kopfhörer, Mikrofon und Kopfhörer und Mikrofon, XL R-3 -S tecker f ür No iseGard™
NoiseGard™ XLR-3-Stecker für
NoiseGard™
Ausstattung Ein-/Aussch alter für NoiseGard™
L a ut s t ä r k e st e ll e r f ü r K o p f hö re r
Temperaturbereich Betrieb –15 °C ... +55 °C
Aufbewahrung –55 °C ... +55 °C
Betriebszeit Batterieteil mit Batterien (4 x Mignon, 1,5 V, Alkali-M angan): ca. 15 Stunden
mit NiMH-Akkus: c a. 1 5 Stunden
35

Konformitätserklärung
Sennheiser electronic GmbH & Co. KG erklären, dass dieses Gerät die anwendbaren CE-Normen und Vorschriften
erfüllt.
Garantie-Urkunde
Wir üb erneh men für das von Ihnen gekaufte Produkt eine Gar antie von 5 Jahren. Ausgenommen hiervon sind dem P rodukt
bei gefügte Zubehörartikel, Akku s und Batterien; denn di ese Produkt e hab en wegen i hrer Beschaff enheit eine kürzer e
Lebensdauer, di e zudem i m Einzelfal l konkr et von Ih rer Nutzungsi ntensität abhängt. Wir stellen hiermit ebenso klar, dass wir
keine sogen annte Beschaffenheitsgarantie im Sinne von §§ 443 und §§ 444 BGB abgeb en wollen.
Die Garantie-Zeit beginnt ab Kaufdatum. Zum Nachweis heben Sie bitte unbedingt den Kaufbeleg auf. Ohne diese Nachweise, die
der zuständige Sennheiser-Service-Partner prüft, werden Reparaturen grundsätzlich ko stenpflichtig ausgeführt.
Die Garantieleistungen bestehen nach unserer Wahl in der unentgeltlichen Beseitigung von Material- oder Herstellungsfehlern
durch Reparatur , Tausch von Teilen od er des kompletten Geräts. Vo n d er Garantie au sgenom men sind Mängel durch
unsachgemäßen Gebrauch (z. B. Bedienungsfehler, mechanische Beschädigungen, fals che Betriebsspannung), Verschleiß,
auf gr und höherer Gewalt und solche Mängel, die Ih nen beim Kauf b ereits bekannt sind. Der Gar antieanspruch erlischt bei
Eingriffen in das Produkt durch nicht autorisierte Personen oder Werkstätten.
Im Gar antiefall s enden Sie das Gerät inkl usive Zubehör u nd Kaufbeleg an den für Sie zuständigen Servi ce-Partner. Zur
Vermeidung von Transportschäden sollte möglichst die Original-Verpackung verwendet werden.
Ihre gesetzlichen Mäng elans prüche aus d em K aufvertrag gegen den Verkäufer wer den durch d iese Garantie nicht eingeschrän kt.
Die Garan ti e kann weltweit in allen Ländern – außer in den USA – in Anspruch genommen werden , in denen das jeweils nationale
Recht un seren Garantiebestimm ungen ni cht entgeg en steht.
36


Instructions for use
HMEC
HMDC
300/302/305
305-C/306/322/400
322

Contents
2
Safety tips
Headset features
Product variants
Delivery includes
Recommended accessories
Connecting the headsets
Connecting cables for headsets .......................................................................................................... 10
Connector assignment ............. ........................ ....................... ........................ ....................... ............... 12
Powering options .......... ....................... ........................ ....................... ........................ .......................... 13
Preparing the headsets for use
Adjusting the headband ......... ........................ ....................... ........................ ....................... ............... 19
Positioning the microphone ... ............ ............ ............ ........... ............ ........................ ....................... ... 20
Additional informati on f or helicopter use of the HMEC 322 headset ............... ....................... ... 22
Using the headsets
Turning NoiseGard™ on/off ................................................................................................................. 23
Mono/Stereo selection (except HMEC 305, HME C 305-C, HMEC 322 and HMDC 322) ............ 23
Adjusting the vol ume ... ....................... ........................ ....................... ........................ .......................... 23
Attaching the cable clip ....................................................................................................................... 24
Folding up the headphones .... ............ ............ ............ ....................... ........................ ....................... ... 24
Spare parts
Valuable information o n NoiseGard™
In case of diffi culty
Tec hn ic al da ta
................................................................................................................................................ ..... 3
........................................................................................................................................ 4
.......................................................................................................................................... 5
......................................................................................................................................... 8
..................................................................................................................... 9
....................................................................................................................... 10
........................................................................................................... 19
.................................................................................................................................. 23
.................................................................................................................................................. 25
............................................................................................... 27
................................................................................................................................... 30
............................................................................................................................................ 32

The HMEC 300, HMEC 302, HMEC 305, HMEC 305-C, HMEC 306, HMEC 322, HMEC 400 and
HMDC 322 are pilot headsets with closed ear protector headphones and NoiseGard™
active noise compensation for use in helicopters, propeller and turboprop aircraft.
Safety tips
• With the NoiseGard™ active noise compensation turned on, typical aircraft sounds
(for example, those from engines, propellers, warning alarms, etc.) may sound
different to you. Before operating any aircraft, make sure that, with NoiseGard™
turned on, you can hear and recognize these sounds. Set the volume to safe levels
that do not interfere with your ability to hear informational sounds and warning
alarms.
• Do not attempt to repair the headset yourself. If problems occur, contact your
Sennheiser agent for assistance.
• Only replace parts of the headset whose replacement is described in this manual. All
other parts of the headset must be replaced by your Sennheiser agent.
• Do not immerse the headset in water! For information on how to clean the headset,
contact yo ur Sennheiser agent.
3

Headset features
HMEC 300 NoiseGard™ headset
• New active headset with effective attenuation of external noise across the entire
frequenc y spectrum due to NoiseGard™ active noise compensation
• NoiseGard™ active noise compensation provides clear communica tions even in the
noisiest envir onment
• Excellent com fort due to very low weight, soft ear cushions and padded headband as
well as best possible freedom of movement due to unilateral connecting cable
• Foldable headband for ea sy and space-saving storage
• Clear communications due to MKE 45 electret microphone with adjustable sensitivity
• Microphone can be easily positioned and worn on either left or right side due to
flexible microphone boom with quick-fi xing devic e
• Optimum radio reception due to headphone system s with wide frequency response
• I ntegrated volume control
• Adaption to the aircraft intercom system via Mono/Stereo switch
• With the NoiseGard™ a ctive noise compensation turned off, the headset can be used
as a conventional headset
4

• Power supply for NoiseGard™ is provided via on-board power s upply system,
cigarette lighter socket or battery pack
• Fail safe op erati on in case of po wer failure
• Supply voltage for the NoiseGard™ system is processed by the in-line electronics in
the connecting cable
• Made in Germany, 5-year warranty (HMEC 400: 10-year warranty)
Product variants
HMEC 302 NoiseGard™ headset
The HMEC 302 d iffer s from the HMEC 300 in the following features:
• Connec tion of microphone and NoiseGard™ el ectronics via PJ-068 plug
HMEC 305 NoiseGard™ headset
The HMEC 305 dif fers from the HMEC 300 in the fo llowin g featur es:
• No Mono/Stereo switch
• Connection of headphones, microphone and NoiseGard™ electronics to the on-board
power supply system (12–35 V DC) via XLR-5 plug
5

HMEC 305-C NoiseGard™ headset
The HMEC 305-C differs from the HMEC 300 in the following features:
• No Mono/Stereo switch
• Con nection of headphones and microphon e via XLR-5 plug
• Connection of NoiseGard™ electronics via XLR-3 plug
HMEC 306 NoiseGard™ headset
The HMEC 306 differs from the HMEC 300 in the following features:
• Connection of headphones, microphone and NoiseGard™ electronics to the on-board
power supply system (12–35 V DC) via 6-pin Redel plug
HMEC 322 NoiseGard™ headset
The HMEC 322 differs from the HMEC 300 in the following features:
• No Mono/Stereo switch
• Coiled cable
• Connection of headphones and microphone via U-174/U jack plug to a high impedance
interface in the helicopter
6

HMEC 400 NoiseGard™ headset
The HMEC 400 d iffer s from the HMEC 300 in the following features:
• Styl ish s ilver desig n
• Leatherette ear cushions
• Headband padding can be buttoned
HMDC 32 2 Noi seGard™ heads et
The HMDC 322 differs from the HMEC 300 in the following features:
• No Mono/Stereo switch
• Coiled cable
• M-87/AIC d ynamic microphone and low impedance headphones
• Connection of headphones and m icrophone via U-174/U jack plug to a low impedance
interface in the helicopter
7

Delivery includes
HMEC 300, HMEC 305-C, HMEC 322, HMEC 400 and HMDC 322 headsets
• Headset
• 3-pin XLR socket for aircraft panel m ounting (pow er su pply via the on-boar d system)
• Padded carry and sto rage bag with shoulder strap for headset and accessories
• Wind screen for microphone (except HMDC 322)
• MZQ 2002-1 cable clip (Cat. No. 44740)
HMEC 302, HMEC 305 and HMEC 306 headsets
• Headset
• Padded carry and sto rage bag with shoulder strap for headset and accessories
• Wind screen for mi crophone
• MZQ 2002-1 cable clip (Cat. No. 44740)
8

ACX -1
ACX -11 AC X-22
ACX- 2
Recommended accessories
Replaceable gel ear cushions (Cat. No. 83140)
BP-03 battery pack (except for HMEC 302, HMEC 305 and HMEC 306)
Battery pack with XLR-3 socket for powering the NoiseGard™ electronics of the
HMEC 300, HMEC 305-C, HMEC 322, HMEC 400 and HMDC 322 headsets. Four 1.5 V AA
size alkaline manganese batteries (IEC LR 6) ensure approx. 15 hours of reliable
operation (batteries are not included in the delivery). Length of connecting cable: 0.9 m.
Adapter cables (except for HMEC 302, HMEC 305 and HMEC 306)
Sennheiser offers special adapter cables for connecting the NoiseGard™ electronics of
the HMEC 300, HMEC 305-C, HMEC 322, HMEC 400 and HMDC 322 headsets to the onboard power supply via the cigarette lighter socket:
• ACX-1 adapter cable for powering one headset via the cigarette lighter socket
• ACX-2 adapter cable for powering two headsets via the cigarette lighter socket
The adapter cables are also available with a right-angled jack plug featuring a 7.5 A fuse
and a green LED operation indicator:
• ACX-11 adapter cable for powering one headset via the cigarette lighter socket
• ACX-22 adapter cable for powering two headsets via the cigarette lighter socket
9

10
Connecting the headsets
Connecting cables for heads ets
HMEC 300 and HMEC 400 headsets:
1 ¼” (6.35 mm) stereo jack plug for connecting the headphones
1 PJ-068 jack plug for connecting the microphone
1 XLR-3 plug for connecting the power supply for the NoiseGard™ electronics
Connecting cable for
HMEC 300 and HMEC 400
HMEC 302 headset:
1 ¼” (6.35 mm) stereo jack plug for connecting the headphones
1 PJ-068 jack plug for co nnec ting the microphone and the power supply for the
NoiseGard™ electronics
Conne cti ng cable fo r
HMEC 302
HMEC 305 headset:
1 XLR-5 plug for connecting the headphones, the microphone and the power supply for
the NoiseGard™ electronics
Connecting cable for
HMEC 305

Connecting cable for
HMEC 305-C
Connecting cable for
HMEC 306
Connecting cable for
HMEC 322 and HMDC 322
HMEC 305-C headset:
1 XLR-5 plug for connecting the headphones and the microphone
1 XLR-3 plug for connecting the power supply for the NoiseGard™ electronics
HMEC 306 headset:
1 6-pin Redel plug for connecting the headphones, the microphone and the power
supply for the NoiseGard™ electronics
HMEC 322 and HMDC 322 headsets:
1 U-174/U jack plug for connecting the headphones and the microphone
1 XLR-3 plug for connecting the power supply for the NoiseGard™ electronics
11

Connector assignment
Redel connector (NoiseGard™) XLR-3 connector (NoiseGard™) XLR-5 connector
1 Power supply NoiseGard™ (DC+) 1 Power supply NoiseGard™ (DC+) HMEC 305 HMEC 305-C
2Audio Lo / DC – 2Ground 1Audio Hi 1Audio Hi
3 Audio Hi left 3 Do not connect! 2 Audio Lo / DC – 2 Audio Lo
4 Audio Hi right 3 Microphone Hi 3 Microphone Hi
5Microphone Hi 2Do not connect! (HMEC 305-C) 4Microphone Lo 4Microphone Lo
6 Microphone Lo 3 Ground (HMEC 305-C) 5 Power supply NoiseGard™ (DC+) 5 Not assigned!
¼” (6.35 mm) stereo jack plug U174/U jack plug PJ-068 jack plug
1Audio Hi left 1Microphone Lo HMEC 302 HMEC 300
2 Audio Hi right 2 Audio Hi 1 Power supply NoiseGard™ (DC+) 1 Not assigned!
3Audio Lo 3Microphone Hi 2Microphone Hi 2Microphone Hi
4Audio Lo 3Microphone Lo / DC – 3Microphone Lo
12

Powering options
There are three options for powering the NoiseGard™ active noise compensation:
1. Connection to the on-board system (12–35 V DC)
2. Connection to the BP-03 battery pack
(accessory, except for HMEC 302, HMEC 305 and HMEC 306)
3. Connection to the cigarette ligther socket (12–35 V DC) via adapter cable
(accessory, except for HMEC 302, HMEC 305 and HMEC 306)
The supply voltage for the NoiseGard™ system is processed by the in-line electronics in
the connecting cable.
Danger of short circuit!
Before turning on NoiseGard™, ensure that the on-board power supply system is
protected by a 1 A fuse.
13

14
XLR- 3 socket
Power supply for
No is eG ard ™
Ground
Do not connect !
1. Connecting the headset to the on-board system
The NoiseGard™ electronics can be connected to on-board power supply systems with
operating voltages between 12–35 V DC.
Danger of s hort circuit!
Before turning on NoiseGard™, ensure that the on-board power supply system is
protected by a 1 A fuse.
The HMEC 300, HMEC 305-C, HMEC 322, HMEC 400 and HMDC 322 headsets are supplied
with an XLR-3 socket for panel mounting in the aircraft. The XLR-3 socket must be
mounted by a technician qualified to perform this type of installation.
HMEC 300 and HMEC 400 headsets:
왘 Connect the ¼” (6.35 mm) stereo jack plug for the headphones and the PJ-068 jack
plug for the microphone to the corresponding jack sockets of your intercom.
왘 Connect the XLR-3 plug to the XLR-3 socket.

HMEC 302 headset:
왘 Connect the ¼” (6.35 mm) stereo jack plug for the headphones and the PJ-068 jack
plug for the microphone to the corresponding jack sockets of your intercom.
HMEC 305 headset:
왘 Connect the XLR-5 plug to the aircraft’s XLR-5 socket.
HMEC 305-C headset:
왘 Connect the XLR-5 plug for the headphones and the microphone to the aircraft’s XLR-5
socket.
왘 Connect the XLR-3 plug to the XLR-3 socket.
HMEC 306 headset:
왘 Connect the 6-pin Redel plug to the corresponding socket in the aircraft.
HMEC 322 and HMDC 322 headsets:
왘 Connect the U-174/U jack plug for the headphones and the microphone to the U-174/U
socket of your intercom.
왘 Connect the XLR-3 plug to the XLR-3 socket.
15

16
2. Connecting the headset to the battery pack (except HMEC 302, HMEC 305 and HMEC 306)
The NoiseGard™ electronics of the HMEC 300, HMEC 305-C, HMEC 322, HMEC 400 and
HMDC 322 headsets can also be powered via the BP-03 battery pack (see
“Recommended accessories” on page 9). The battery pack can be operated either on
standard or rechar geable batter ies (not included in the delivery). However, to ensure a
longer operatin g time, we would recommend usi ng standard AA size alkaline
manganese batteries (IEC LR 6) or NiMH rechargeable batteries.
Inserting / replacing the the batteries
왘 Open the cover of the battery compartment.
왘 Insert four AA size alkali ne-mang anese batteries (IEC LR 6). Observe correct pol arity
when inserting the batteries.
왘 Close the cover of the battery compartment.
LED operation and battery status indication
The battery pack has two control LEDs.
Green LED: The battery pack is turned on and the battery capacity is sufficient.
Red LED: The batteries are low. Replace the batteries.

Connecting the headset, turning on the battery pack
왘 Connect the XLR-3 plug of the headset connecting cable to the XLR-3 socket on the
connecting cable of the battery pack.
왘 HMEC 300 and HMEC 400 headsets: Connect the ¼” (6.35 mm) stereo jack plug for
the headphones and the PJ-068 jack plug for the microphone to the corresponding
jack sockets of your intercom.
HMEC 30 5- C heads et: Connect the XLR-5 plug for the headphones and the
microphone to the aircraft’s XLR-5 socket.
HMEC 322 and HMDC 322 headsets: Connect the U-174/U jack plug for the
headphones and the microphone to the U-174/U socket of your intercom.
왘 Turn on the battery pack by setting the ON/OFF switch to ON. The green LED power
indicator lights up.
Note:
Wh en using the batter y pack, the ON/OFF switch integ rated into the headset
connecting cable is out of operation.
Attaching the battery pack to clothing
The battery pack can be attached to clothing by means of the supplied attachment clip,
Velcro tape is als o supplied.
17
ACX -1
ACX -11 AC X-22
ACX- 2
18
3. Connecting the headset via a cig arette lighter adapter cable
(except HMEC 302, HMEC 305 and HMEC 306)
Sennheiser offers special adapter cables with XLR-3 socket for connecting the NoiseGard™
electronics of the HMEC 300, HMEC 305-C, HMEC 322, HMEC 400 and HMDC 322 headsets
to the on-board power supply via the cigarette lighter socket:
• ACX-1 adapter cable for powering one headset via the cigarette lighter socket
• ACX-2 adapter cable for powering two headsets via the cigarette lighter socket
The adapter cables are a lso available with a right-angled jack plug featuring a 7.5 A fuse
and a green LED operation indicator:
• ACX-11 adapter cable for powering one headset via the cigarette lighter socket
• ACX-22 adapter cabl e fo r powering two headsets via the cigarette lighter socket
Connecting the headset
왘 Connect the XLR-3 plug of the headset connecting cable to the XLR-3 socket of the
adapter cable.
왘 Connect the plug or right-angled jack plug of the adapter cable to the cigarette
lighter socket.

Preparing the headsets for use
Adjusting the headband
For good noise attenuation and best possible comfort, the headband has to be adjusted
to properly fit your head:
왘 Wear the headset so that the headband runs over the top of your head.
왘 Adjust the length of the headband so that
• you r ea rs are comp letely inside the ea r c ush ions,
• you feel even, gentle pressure around your ears,
• a snug fit is en sured.
Note:
Make sure not to squeeze any connecting cable when adjusting the headband.
Squeezing can damage the connecting cables.
왘 Turn on the NoiseGard™ active noise compensation by setting the ON/OFF switch to
“ON” (see “Turning NoiseGard™ on/off” on page 23).
왘 Final adjustment i s best made in a noisy environment.
19

20
Positioning the microphone
Relocating the microphone boom
The microphone boom can be worn on either side of the mouth.
왘 Loosen the quick-fixing device.
왘 Rotate the microphone boom by 180°.
왘 Ti ghten the quick-fixing device.
Positioning the microphone towards the corner of the mouth
The HMEC 300, HMEC 302, HMEC 305, HMEC 305-C, HMEC 306, HMEC 322 and HMEC 400
headsets feature a flexible microphone boom. Bend the microphone boom so that the
microphone is placed at the corner of the mouth. Maintain a distance of approx. 2 cm
betw een microphone and mouth.

For positioning the microphone of the HMDC 322 headset, proceed as follows:
왘 Adjust the length of the microphone boom so that the microphone is placed at the
corner of the mouth. To do so, loosen the quick-fixing device and adjust the
microphone bo om in length.
왘 Pull the middle par t of the mi crophone boom towards the mou th so that the distance
between microphone and mouth is approx. 2 cm.
왘 Tilt the microphone f or final positioning.
21

22
Additional information for helicopter use of the HMEC 322 headset
The polarity of the microphone connection in helicopters is not standardized. If the
microphone of your headset does not work with the existing polarity, you can reverse
the polarity on the headset by simply rotating the microphone module. To do so, please
proceed as follo ws:
1. Pull the wind screen from the microp ho ne.
2. Loosen the screws by approx. half a turn.
3. Pull the microphone mo dule from the boom-arm.
4. Rotate the microphone module by 180°.
5. Put the rotated microphone module back into the boom-arm.
6. Now tigh ten the screws from the other side
7. Slide the windscreen over the microphone.
Rotating the microphone module does not change its acoustic properties. Due to its
noise-compensating pick-up pattern, the microphone can be used from either side.

Using the headsets
Tur n in g No is eG ard ™ o n/ off
With the NoiseGard™ active noise compensation turned off, the headset can be used as
a conventional headset.
Turn on the NoiseGard™ active noise compensation by setting the ON/OFF switch to
“ON”. When using the BP-03 battery pack, set the NoiseGard™ ON/OFF switch to “ON”
and use the ON/OFF switc h on the battery pack.
Mono/Stereo selection (except HMEC 305, HMEC 305-C, HMEC 322 and HMDC 322)
In general, you’ll receive a mono sound source so that the Mono/Stereo switch can
remain set to “Mono”. When using a stereo intercom system, set the Mono/Stereo
switch to “Stereo”.
Adjusting the volume
Exposure to loud sounds ca n cause hearing damage!
Set the volume control to a medium value. Make sure that you can hear critical sounds
such as warning alarms.
23

24
Attaching the cable clip
The headphone cable can be fixed by means of the cable clip. Guide the headphone cable
through the metal cable clip as shown in the illustration on the left. Attach the cable clip
to your clothing and then loop the cable through the clip so that the headphone cable
doesn‘t disturb you .
Folding up the headphones
For easy and space-saving transportation, the earcups can be folded up and tucked
between the headband.
Unfold the hea dphon es by grasping both earcu ps a nd pul ling them down and away from
the headband.

Spare parts
The following spare parts are available from your Sennheiser a gent:
• Wind screen for MKE 45 electret microphone
•Ear cushions
• H eadband pa dding
• Cable c lip
• Carry and s torage bag with shoulder strap
Replacing the wind screen
If the wind screen fo r the electret mi croph one shows signs o f wear suc h as tears or holes,
replace the wind screen. Pull the wind screen from the microphone. Gently slide-on the
new wind screen and ensure that it fits securely over the microphone.
Rep lacing the ear cushions
Replace the ear cushions if they are damaged. Grasp behind the ear cushions and pull
them up and away from the earcups. Slide the new ear cushions onto the earcups.
For best resu lts rep lace the ear cushions after 100 h ours o f u se or tw o y ea rs.
25

26
Replacing the headband p adding
Replace the headb and p adding if it i s damag ed.
왘 Pull the Ziploc type fastening strips of the headband padding apart and remove the
worn headband padding.
왘 Put the new headband padding around the headband.
왘 Pull the two edges of the headband padding together so that the fastening strips
slightly overlap.
왘 Join the fastening strips.
Replacing the headband p adding of the HMEC 400 headset
Replace the headb and p adding if it i s damag ed.
왘 Open the snaps on the headband padding and remove the worn headband padding.
왘 Put the new headband padding around the headband.
왘 Pull the two edges of the headband padding together and close the snaps.

Valuable information on NoiseGard™
The NoiseGard™ principle
One of the greatest stress factors today is noise. Research has shown that noise affects
the nervous system, and can cause tiredness, poor concentration, irritability and tension.
Of even greater concern is the permanent damage to hearing that can result from noise
at high levels.
This prob lem con cerns pilots in particular. Cockpit noise am oun ts to ab out 80 dB(A) in
jets and to 90 up to 97 d B(A) in turbo props . During takeoff and landing, the noise level
is even higher. To be a ble to understand radio traffic in spite of the noisy environment,
the ATC signal level must be set to at l east 95 dB(A ). Perman ent h earing loss caused by
the continuous noise in aircrafts is the reason why many pilots became prematurely
disabled or lost thei r pilot´s l icense.
Circumaural communication headsets provide noise attenuating properties and are
commonly used to address this problem. However, the noise attenuation of these
headsets is uneven. High frequencies are reduced considerably, but low frequency wind
and engine noise, the most prominent noise in many of today's aircrafts, is attenuated
very little.
27

28
In response to these problems, Sennheiser has developed an active noise compensation
sys tem – NoiseGard™ – which, com bined with a high-quality passi ve hearing pr otector,
provides consistent noise attenuation over the entire audio range. The overall noise
level i s reduced so th at the rad io vol ume can be turn ed do wn bu t enoug h noise still
remains for the pilot to safely monitor the aircraft engines.
NoiseGard™ active noise compensation is a chieved by generating a signal identical in
sound pressure level but exactly reversed in phase to the noise signal, the effect being
that the out-of-phase signal cancels most of the noise signal.
Active noise compensation is accomplished in the following manner: Each earcup
includes a microphone, a feedback control circuit, and a transducer to reproduce both
the communication and the noise cancelling signal. The feedback control microphones
sense the total sound pressure within each earcup resulting from both the desired radio
signal fro m the receiver and the undesired noise tha t has come through the earcup. The
micropho ne signal is amplified and the radio signal is subtracted from it. The remaining
signal (noise) is then filtered and inverted and the radio signal is added back in.
Eventually, the entire signal is amplified and fed back to the transducer in each earcup.
Since the noise component of the signal is inverted, it cancels the noise signal coming
through the earcup. The radio signal remains unaffected, as it was not processed
through the cancellation circuits.

The diagram on the left shows noise compensation with NoiseGard™: Passive hearing
protectors effectively attenuate noise from the middle and upper frequency range, the
effect d ecreasing sharply in the lower range. H owever, ac ti ve noise compen satio n with
NoiseGard™ combined with pas siv e hearing protec tors results in a reduction of noise of
approx. 25 dB in the 25–500 Hz frequency range. The total attenuation resulting from
active and passive noise compensation is about 30 dB over the entire audio range.
A 10 dB reduction in noise is perceived subjectively as a halving in volume. A further
reduction in noise of 10 dB again results in a decrease in unwanted noise by 50 %.
29

In case of difficulty
If problems occur that are not listed in the below table, please contact your Sennheiser
agent.
Prob lem Possible cause and what to do
Clear co mmunication but no
active noise compensation
30
The NoiseGard™ electronics are turned off.
왘 Check to see if the ON/OFF switch is set to “ON”.
The XLR-3 plug has been pulled out of the power source.
왘 Check to see if the XLR-3 plug is correctly connected to the power source.
If ai rcraft pow ered: Th e ai rcraft fus e is defective.
왘 Check the aircraft fuse.
If battery powered (except HMEC 302 , HMEC 305 and HMEC 306): The batteries are l ow.
왘 Check to see if the green LED on the battery pack is lit. If the red LED is lit, replace
the batteries.

Prob lem Po ssi ble cau se and what to do
Active noise compensation but
very low volu me co mmunic ation
Active noise compensation but
reduced intelligibility
Communicati ons in o ne ear only
(only HMEC 300, HMEC 302,
HMEC 306 and HMEC 306)
The volume control is set too low.
왘 Check the volume setting of the headset.
The headphone connection has been pulled out (except HMEC 305, HMEC 305-C and
HMEC 306).
왘 Check to see if the headphone jack plug is correctly connected.
The microphone connection has been pulled out (except HMEC 305, HMEC 305-C and
HMEC 306).
왘 Check to see if the microphone jack plug is correctly connected.
You are using a stereo intercom system but the headset is set to mono operation.
왘 Set the Mono/Stereo switch to “Stereo”.
You are receiving a mono source but the headset is set to stereo operation.
왘 Set the Mono/Stereo switch to “Mono”.
31

Technical data
HMEC 300 HMEC 302 HMEC 306 HMEC 400
Headphones
Transducer p rinciple dynamic
Ear coupling circumaural, closed
Frequen cy re spo nse 45–1 5,0 00 Hz
Nominal impedan ce active/passive 300/150 Ω, mono
60 0/3 00 Ω, stereo
Attenuation ( active and passive) > 25–40 dB
Max. sound pressure level 120 dB (±5 %)
Contact pressure approx. 10 N
Microphone incl. preamplifier
Transducer p rinciple electret mic capsule, noise-comp ensated, M KE 45
Frequency r espo nse 300–5,000 Hz
Sensitivity –
Max. sound pressure level 120 dB
Min. terminating impedance 150 Ω
Outp ut voltage 400 mV ± 3 dB at 1 14 dB ( as per R TCA /DO 21 4)
Sup ply voltag e t yp. 1 6 V DC (8–16 V D C, ap prox. 8– 25 mA, as per R TC A/D O 214)
32

HMEC 300 HMEC 302 HMEC 306 HMEC 400
General data
Connecting cable 1.5 m, unilateral
Weight without cable 370 g
Power supp ly fo r NoiseGard™ 12–35 V DC
Current consumption 27 mA (zero sign al current), ma x. 80 mA
Fuse 500 mA thermo fuse
Connectors 6.35 m m stereo jack plu g 6.35 mm stereo jack plug 6 -pin Redel plug fo r 6.35 mm stereo jack pl ug
for headphones, for headphones, headphones , microphon e for headphones,
PJ-068 jack p lug for PJ-068 jack plug for and NoiseGard™ PJ-068 jack plug for
mirophone, mi c ropho ne a nd microphone,
XLR-3 for NoiseGard ™ NoiseGard™ XLR-3 for NoiseGard™
Controls Mono/Stereo switch
On/off switch for NoiseGa rd™
Volume control for headphones
Temperature range Operation –15 °C ... +55 ° C
Storag e –55 °C ... +55 °C
Operatin g time Battery pack with batteries (four 1.5 V AA size alkaline-manganese batteries): approx. 15 hours
with NiMH rechargeable batteries: approx. 15 hours
33

Technical data
HMEC 305 HMEC 305-C HMEC 322 HMDC 322
Headphones
Transducer p rinciple dynamic
Ear coupling circumaural, closed
Frequen cy re spo nse 45 –15,000 Hz
Nominal impedan ce active/passive 300/150 Ω, mono 50/35 Ω, mon o
Attenuation ( active and passive) > 25–40 dB
Max. sound pressure level 120 dB (±5 %)
Contact pressure approx. 10 N
Microphone incl. preamplifier
Transducer p rinciple electret mic capsule, dynamic mic capsule,
noise-compensated, noise-compens ated,
MK E 4 5 M-87/AIC
Frequency r espo nse 30 0–5, 000 Hz 500–4,000 Hz
Sensitivity – 1.8 –4 µV / 74 dB at 5 Ω
Max. sound pressure level 120 dB –
Min. terminating impedance 150 Ω –
Outp ut voltage 400 mV ± 3 dB at 1 14 dB ( as per R TCA /DO 21 4) –
Sup ply voltag e t yp. 1 6 V DC (8–16 V D C, ap prox. 8– 25 mA, as per R TC A/D O 214) –
34

HMEC 305 HMEC 305-C HMEC 322 HMDC 322
General data
Connecting cable 1.5 m, unilateral coiled cable, unilateral
Weight without cable 370 g
Power supp ly fo r NoiseGard™ 12–35 V DC
Current consumption 27 mA (zero sign al current), ma x. 80 mA
Fuse 500 mA thermo fuse
Connectors XLR-5 for headphones, XLR-5 for headphones U-174/U jack plug for headphones and microphone,
microphone and and microphone, XLR-3 for NoiseGa rd™
NoiseGard™ XLR-3 for NoiseGard™
Controls On/off switch for NoiseGa rd™
Volume control for headphones
Temperature range Operation –15 °C ... +55 ° C
Storag e –55 °C ... +55 °C
Operatin g time Battery pack with batteries (four 1.5 V AA size alkaline-manganese batteries): approx. 15 hours
with NiMH rechargeable batteries: approx. 15 hours
35

Certif icate of Confo rmity
Sennheiser electronic GmbH & Co . KG declare that this device conforms to the applicable CE standards and
regu lat ions.
Gua ran tee Certificate
The guarantee period for this Sennheiser product is 5 years from the date of purchase. Excluded are accessory items,
rechargeable or disposable ba tteries that are delivered with the product; due to their characteristics these products have a
shorter servic e life th at is prin cipally d epend ent o n the individual frequency of use.
The guarantee period starts from the date of original purchase. For this reason, we recommend that the sales receipt be
retained as proof of purchase. Without this proof (which is checked by the responsible Sennheiser service partner) you will
not be reimbursed for any repairs that are carried out.
Depending on our choice, guarantee service comprises, free of charge, the removal of material and manufacturing defects
through repair or replacement of either individual parts or the entire device. Inappropriate usage (e.g. operating faults,
mechanical damages, incorrect operating voltage), wear and tear, force majeure and defects which were known at the time
of purchase are excluded from guarantee claims. The guarantee is void if the product is manipulated by non-authorised
persons or repair stations.
In the case of a claim under the terms of this guarantee, send the device, including accessories and sales receipt, to the
responsible service partner. To minimise the risk of transport da mage, we recommend that the original packaging is used.
Your legal ri ghts aga inst the seller, resul ting from the contract of sale, are not affected by this guar antee.
The guarantee can be claimed in all countries outside the U.S. provided that no national law limits our terms of guarantee.
36


Notice d’emploi
HMEC
HMDC
300/302/305
305-C/306/322/400
322

Sommaire
2
Conseils et précautions
Points forts
Va ri a nt es
Contenu
............................................................................................................................................... ..... 4
................................................................................................................................................... ..... 5
..................................................................................................................................................... ..... 8
Accessoires recommandés
Raccordement des casques micros
Câbles de raccordement pour casques micros ................................................................................. 10
Câblage des connecteurs ..................................................................................................................... 12
Possi bi lités d’alimentation ................. ........................ ....................... ........................ ....................... ... 13
Préparation des casques micros à l’utilisation
Réglage du serre-tête .............. ........................ ....................... ........................ ....................... ............... 19
Position du microphone .......... ........................ ....................... ........................ ....................... ............... 20
Information compl émentaire pour l’utilisation du HMEC 322 dans un hélicoptère .. ............... 23
Utilisa ti on des casques micros
Commutation Marche/Arrêt du Noi seGard™ ................................................................................... 24
Commutation Mono/St éréo (sauf HMEC 305, HMEC 305-C, HMEC 322 et HMDC 322) ........... 24
Réglage de volume ................... ........................ ....................... ........................ ....................... ............... 24
Fixation du clip de câble ....................................................................................................................... 25
Pliage du casque ............ ....................... ........................ ....................... ........................ ...................... .... 25
Pièces de remplacement
Informa tions utiles sur l e No iseGard™
En cas de difficulté
Caractéristiques techniques
............................................................................................................................. 3
...................................................................................................................... 9
.................................................................................................... 10
.............................................................................. 19
............................................................................................................ 24
........................................................................................................................ 26
............................................................................................. 28
................................................................................................................................... 31
................................................................................................................. 33

Les HMEC 300, HMEC 302, HMEC 305, HMEC 305-C, HMEC 306, HMEC 322, HMEC 400 et
HMDC 322 so nt des casques mic ros pour p ilote. De type clos, ils sont dotés de la
compensation ac tive de bruit N ois eGard™. Ils sont particulièrement recommandés pour
les h élicoptères et tous les avi ons à hélices ou turbopr opuls eurs.
Conseils et préc autions
• Avec le système de compensation actif de bruit NoiseGard™ en fonction, vous
percevez l’environnement sonore d’une façon différente (moteurs, hélices, alarmes,
etc.). Avant d’utiliser votre appareil, assurez-vous qu’avec le système NoiseGard™
actif, vous pouvez identifier ces sons. Le réglage du volume doit être fait de telle
façon qu’il vous permette une bonne perception des signaux d’alarme.
• Ne tentez pas de réparer vous-même votre casque micro. En cas de problème,
contactez votre distributeur Sennheiser pour qu’il puisse vous porter a ssistance.
• Les seules pièces que vous pouvez remplacer vous-même sont celles décrites plus
loin dans ce manuel. Toutes les autres pièces de votre casque micro ne peuvent être
remplacées que par votre distributeur Sennheiser.
• Ne pas i mmerger le casque micro dans l’eau ! Pour savoir comment le nettoyer,
veuillez contacter votre distributeur Sennheiser.
3

Points forts
Casque micro N oiseGard™ HMEC 3 00
• Nouveau casque mic ro actif avec atténuation efficace des bruits environnants sur la
totalité du spectre grâce au système de compensation de bruit NoiseGard™
• Le système de compensation actif de bruit NoiseGard™ assure des communications
cl aires m ême dans des envi ronnements bruyants
• Excellent c onfort grâce à un poids réduit, des oreillettes offrant un contact agréable
et un serre-tête réglable. Votre liberté de mouvement est maximum grâce à un câble
de raccordement unilatéral
• Casque repliable pour une facilité de rangement optimale et un transport facilité
• Des communications claires grâce au micro à électret MKE 45 avec sensibilité réglable
• Le micro peut être aisément positionné d’un côté ou de l’autre de la bouche grâce à
un système de fixation rapide du flexible
• Réception radio optimale grâce à une réponse en fréquence étendue
• Con trôle de volume intégré
• A daptation au système d’intercom du bo rd via un commu tateur mono/stér éo
• Avec le système NoiseGard™ désactivé, le casque micro peut être utilisé comme un
modèle conventionnel
4

• L’alimentation du système NoiseGard™ peut être réalisée via l’alimentation du
tableau de bord, une prise allume-cigare, ou un pack de piles
• Sécurité d’utilisation assurée en cas de défaut d’alimentation
• Tension d’alimentation du NoiseGard™ adaptée par l’électronique intégrée au câble
d’alimentation
• Fabriqué en Allemagne, 5 ans de garantie (HMEC 400 : 10 ans de garantie)
Variantes
Casque micro NoiseGard™ HMEC 302
Le HMEC 302 diffère du HMEC 300 par les caractéristiques suivantes :
• Raccordement microphone et de l’électronique NoiseGard™ via un connecteur jack
PJ-068
Casque micro NoiseGard™ HMEC 305
Le HMEC 305 diffère du HMEC 300 par les caractéristiques suivantes :
•Pas de commutateur mono/stéréo
• Raccordement casque, microphone et de l’électronique NoiseGard™ à l’alimentation
du tableau de bord (12–35 V CC) via un connecteur XLR-5
5

Casque micro NoiseGard™ HMEC 305-C
Le HMEC 305-C diffère du HMEC 300 par les caractéristiques suivantes :
• Pas de commutateur Mono/Stéréo
• Raccordement casque et micropho ne via un connecteur XLR-5
• Raccordement de l’électronique NoiseGard™ via un connecteur XLR-3
Casque micro NoiseGard™ HMEC 306
Le HMEC 306 diffère du HMEC 300 par les caractéristiques suivantes :
• Raccordement casque, microphone et de l’électronique NoiseGard™ à l’alimentation
du tableau de bord (12–35 V CC) via un con necteur Redel à 6 bro ches
Casque micro NoiseGard™ HMEC 322
Le HMEC 322 diffère du HMEC 300 par les caractéristiques suivantes :
• Pas de commutateur Mono/Stéréo
• Câble spiralé
• Raccordement casque et microphone via un connecteur jack U-174/U à une interface
haute impédance dans un hélicoptère
6

Casque micro NoiseGard™ HMEC 400
Le HMEC 400 diffère du HMEC 300 par les caractéristiques suivantes :
• Elégant desi gn argen t
• Oreillettes simili cui r
• Le rembourrage de l’arceau s e bo utonne
Casque micro NoiseGard™ HMDC 322
Le HMDC 322 diffère du HMEC 300 par les caractéristiques suivantes:
• Pas de commutateur Mono/Stéréo
• Câble spiralé
• Micro dynamique M-87/AIC et casque basse impédance
• Raccordement casque et microphone via un connecteur jac k U-174/U à une interface
basse impédance dans un hélicoptère
7

Con tenu
HMEC 300, HMEC 305-C, HMEC 322, HMEC 400 et HMDC 322
•Casque micro
• Prise XLR-3 pour tableau de bord d’avion (alimentation par système de bord)
• Sac de rangement et de transport avec courroie d’épaule pour casque micro et
accessoires
• Protection anti vent pour micro (sauf HMDC 322)
• Clip de câble MZQ 2002-1 (N° Réf. 44740)
HMEC 302, HMEC 305 et HMEC 306
•Casque micro
• Sac de rangement et de transport avec courroie d’épaule pour casque micro et
accessoires
• Protection anti vent
• Clip de câble MZQ 2002-1 (N° Réf. 44740)
8

ACX -1
ACX -11 AC X-22
ACX- 2
Accessoires recommandés
Oreillettes gel, remplaçables (N° Réf. 83140)
Pack de piles BP-03 (sauf HMEC 302, HMEC 305 et HMEC 306)
Pack de piles avec prise XLR-3 pour alimenter l‘élec tronique NoiseGard™ des casques
micros HMEC 300, HMEC 305-C, HMEC 322, HMEC 400 et HMDC 322. Quatre piles alcalines
1,5 V (IEC LR 6) assurent plus de 15 heures d‘utilisation (les piles ne sont pas inclus).
Longueur du câble de raccordement: 0,9 m.
Câbles adaptateurs (sauf HMEC 302, HMEC 305 et HMEC 306)
Sennheiser propose des câbles adaptateurs spéciaux pour raccorder l‘électronique
NoiseGard™ des HMEC 300, HMEC 305-C, HMEC 322, HMEC 400 et HMDC 322 à
l’alimentation du bord via une prise allum e-cigare :
• ACX-1 – Câble adaptateur pour alimenter un casque micro
• ACX-2 – Câb le adaptat eur pour al imenter deux casques micros
Les câbles adaptateurs sont également disponibles avec un jack co udé doté d’un fusible
7,5 A et d‘un témoin de fonctionnement LED (vert) :
• ACX-11 – Câble adaptateur pour alimenter un casque micro
• ACX-22 – Câble adaptateur pour alimenter deux casques micros
9

10
p
Raccordement des casques micros
Câbles de raccordement p our casques micros
HMEC 300 et HMEC 400 :
1 jack stéréo 6,35 mm pour le raccordement du casque
1 jack PJ-068 pour le raccordement du microphone
1 connecteur XLR-3 pour l’alimentation de l’électronique NoiseGard™
C âbl e de racc ordem ent
pour HME C 300 / HMEC 400
HMEC 302 :
1 jack stéréo 6,35 mm pour le raccordement du casque
1 jack PJ-068 pour le raccordement de l’alimentation de l’électronique NoiseGard™ et
du microphone
Câble de raccordement
our HMEC 302
HMEC 305 :
1 connecteur XLR-5 pou r le raccordement du ca sque, de l’alim entation de l’él ectronique
NoiseGard™ et du microphone
C âbl e de racc ordem ent
pour HME C 305

Câ ble de ra cco rde m ent
pou
pour HMEC 305- C
Câ ble de ra cco rde m ent
pour HMEC 306
C âbl e de racc ordem ent
r HM EC 322 / HMDC 322
HMEC 305-C :
1 jack stéréo 6,35 mm pour le raccordement du casque et du microphone
1 connecteur XLR-3 pour l’alimentation de l’électronique NoiseGard™
HMEC 306 :
1 connecteur Redel à 6 broches pour le raccordement du casque, de l ’alimentation de
l’électronique NoiseGard™ et du microphone
HMEC 322 et HMDC 322 :
1 jack U-174/U pour le raccordement casque et micro
1 connecteur XLR-3 pour l’alimentation de l’électronique NoiseGard™
11

Câblage des connecteurs
Connecteur Redel (NoiseGard™) Connecteur XLR-3 (NoiseGard™) Connecteur XLR-5
1 Alim. Nois eGar d™ (CC+) 1 Ali m. NoiseGard™ (CC+) HMEC 305 HMEC 305-C
2 Audio point froid CC – 2 Masse 1 Audio point chaud 1 Audio point chaud
3 Audio poi nt chaud g auche 3 Ne pas raccorder ! 2 Audio poi nt froid / CC – 2 Au dio point froid
4 Audio poi nt chaud droit 3 Micro point chaud 3 Micro point chaud
5 Micro po int chaud 2 Ne pas raccorder ! (HMEC 305-C) 4 Micro po int froid 4 Micro point froid
6 Micro point froid 3 Masse (HMEC 305-C) 5 Alim. NoiseGard™ (CC+) 5 Non assigné !
Jack stéréo 6,35 mm Jack U174/U Jack PJ-068
1 Audio point chaud gauche 1 Micro point froid HMEC 302 HMEC 300
2 Audio poi nt ch aud droit 2 Audio point chaud 1 Alim. NoiseGard™ (CC+) 1 Non assigné !
3 Audio poi nt froid 3 Micro point chaud 2 Micro point chaud 2 Micro point chaud
4 Audio point froid 3 Micro point froid / CC – 3 Micro pont froid
12

Poss ibil ités d’a li mentation
Il existe trois possibilités d’alimentation du système de compensation active NoiseGard™ :
1. Raccordement au système de bord (12–35 V CC)
2. Raccordement à un pack de piles BP-03
(accessoire, sauf HMEC 302, HMEC 305 et HMEC 306)
3. Raccordement à une prise allume-cigare (12–35 V CC) via un câble adaptateur
(accessoire, sauf HMEC 302, HMEC 305 et HMEC 306)
La tension d’alimentation pour le système NoiseGard™ est adaptée par l’électronique
intégrée au câble de raccordement.
Danger de court-circuit !
Avant de mettre en fonction le NoiseGard™, assurez-vous que le système
d’alimentation du bord est protégé par un fusible de 1 A.
13

14
Prise XLR-3
Al im e n ta ti on
No is eG ard ™
Masse
Ne pa s
ra cc o rder !
1. Raccorder un casque micro au système de bord
L’électronique NoiseGard™ peut être raccordée à l’alimentation du bord pour des
tensions comprises entre 12 et 35 V CC.
Danger de court-circuit !
Avant de mettre en fonction le NoiseGard™, assurez-vous que le système
d’alimentation du bord est protégé par un fusible de 1 A.
Les casques micros HMEC 300, HMEC 305-C, HMEC 322, HMEC 400 et HMDC 322 sont
fournis avec une prise XLR-3 destinée à être montée dans le tableau de bord d’un avion.
Ce montage doit être ef fectué par un tech ni cien qualifié p our ce type d’installation.
HMEC 300 et HMEC 400 :
왘 Raccorder le jack 6,35 mm pour le casque et le jack PJ-068 pour le micro aux prises
correspondantes de votre système intercom.
왘 Raccor der le connecteur XLR-3 à la prise XLR-3 du bord.

HMEC 302 :
왘 Raccorder le jack 6,35 mm pour le casque et le jack PJ-068 pour le micro aux prises
correspondantes de votre système intercom.
HMEC 305 :
왘 Raccorder le connecteur XLR-5 à la prise XLR-5 de votre avion.
HMEC 305-C :
왘 Raccorder le connecteur XLR-5 pour le casque et le micro à la prise XLR-5 de votre
avion.
왘 Raccorder le connecteur XLR-3 à la prise XLR-3 du bord.
HMEC 306 :
왘 Raccorder le connecteur Redel à 6 broches à la prise 6 broches de votre avion.
HMEC 322 et HMDC 322 :
왘 Raccorder le jack U-174/U pour le casque et le micro à la prise U-174/U de votre
intercom.
왘 Raccorder le connecteur XLR-3 à la prise XLR-3 du bord.
15

16
2. Raccorder un casque micro au pack de piles (sauf HMEC 302, HMEC 305 et HMEC 306)
L’électronique NoiseGard™ des HMEC 300, HMEC 305-C, HMEC 322, HMEC 400 et
HMDC 322 peut aussi être alimentée via le pack de piles BP-03 (voir “Accessoires
recommandés” à la page 9). Le pack de piles peut être utilisé avec des piles ou des accus
(les piles/accus ne sont pas inclus). Pour profiter d’une autonomie d’env. 15 heures nous
vous recommandons d’utiliser des piles alcalines 1,5 V (IEC LR 6) ou des accus NiMH.
Insertion / remplac em ent des piles
왘 Ouvrir le couvercle du compartiment des piles.
왘 Insérer quatre piles alcalines de type AA (IEC LR 6). Respecter la polarité lors de la
mise en p lace des pil es.
왘 Refermer le couvercle du compartiment des piles.
LED de fonctionnement et d ’état des piles
Le pac k de piles dispose de deux LEDs de contrôl e.
LED verte allu mée : Le pack de pi les es t en fonctio n et la capacité des p iles et suffisante.
LED rouge allumée : Les piles sont faibles. Remplacez-les.

Raccor dem ent d u c asque mi cro, mise en fonction du pack de piles
왘 Raccorder le connecteur XLR-3 du câble de raccordement à la prise XLR-3 du câble de
raccordem ent du pack de piles.
왘 HMEC 300 et HMEC 400 : Raccorder le jack stéréo 6,35 mm pour le casque et le jack
PJ-068 pour le mi cro aux prises corres pondantes de votre inter com.
HMEC 305-C : Rac cord er le connecteur XLR-5 pour le casque et le micro à la pris e
XLR-5 de votre avion.
HMEC 322 et HMDC 322 : Raccorder le jack U-174/U pour le casque et le micro à la
prise U-174/U de votre intercom.
왘 Mettre en fonction le pack de piles à l’ aide du com mutateur ON/ OFF (position “ON ”).
La LED verte doit s’allumer.
Note :
En utilisant le pack de piles, le commuteur ON/OFF intégré au câble de raccordement
du casque micro est hors service.
Fixer le pack de piles à un vêtement
Le pack de pil es peut être fixé à un vêtement à l’aide du clip de f ixation, une bande Velcro
est également fournie.
17

ACX -1
ACX -11 AC X-22
ACX- 2
18
3. Raccorder un casque micro via un câble adaptateur (sauf HMEC 302, HMEC 305 et HMEC 306)
Sennheiser propose des câbles adaptateurs spéciaux avec prise XLR-3 pour raccorder
l’ él ectroni que Noi seGard™ d es HMEC 30 0, HMEC 305-C, H MEC 322, HME C 400 et HMDC 322
à l’alimentation du bord via une prise allume-cigare :
• ACX-1 – Câble adaptateur pour al imenter un casque micro
• ACX-2 – Câble adaptateur pour al imenter deux casques micros
Les câbles a daptateurs sont également disponibles avec un jack coudé doté d’un fusible
7,5 A et d’un témoin de fo ncti onnement LED (ver t) :
• ACX-11 – Câble adaptateur pour alimenter un casque micro
• ACX-22 – Câble adaptateur pour alimenter deux casques micros
Raccordement du ca sque micro
왘 Raccorder le connecteur XLR-3 du câble de raccordement à la prise XLR-3 du câble
adaptateur.
왘 Raccor der le jack ou le jac k coudé du câble adaptateur à la prise allume-cig are.

Préparation des casques micros à l’utilisation
Réglage du serre-tête
Po ur une bonne atténuatio n d es bruits et u n c onf ort optim um, le serre- tête doi t êtr e
aj us té en f oncti on de votre tête :
왘 Placer le casque micro, la bande du serre-tête sur le dessu s de vo tre tête.
왘 Ajuster la longueur du serre-tête :
• Vos oreilles doivent être complètement à l’intérieur des oreillettes.
• Vous ne devez ressentir qu’une lég ère pression sur vos oreil les.
• Un confort optimum est assuré.
Note :
Assurez-vous qu’aucun câble ne vient se prendre dans le serre-tête lorsque vous
l’ajustez. Dans le cas contraire il y a un risque d’endomm ager le câble.
왘 Mettre en fonction la compensation active NoiseGard™ en plaçant le commutateur
ON /OFF sur “ON” (vo ir “Commu ta tion Marche/Arrêt du NoiseGar d™” à la p age 24).
왘 Parfaire le réglage pour une efficac ité optimum, surtout en environnement bruyant.
19

20
Position du micr ophone
Déplacement du flexible de micro
Le flexible de micro peu t être placé d’un côté ou de l’au tre de la bouche.
왘 Desserrer le système de fixation rapide.
왘 Tourner le flexible de 180°.
왘 Resserrer le système de fixation rapide.
Positionner le micro devant le coin de votre bouche
Les HMEC 300, HMEC 302, HMEC 305, HMEC 305-C, HMEC 306, HMEC 322 et HMEC 400
sont dotés d’un flexible micro. Po ur un rendement optimum, le micro doit être
positionné au co in de la bouche. Main tenir une distanc e d’env. 2 cm entre le mi cro et la
bo uche.

Pour positionner le mi cro d u HMD C 322, procéder de la façon suivante :
왘 Ajuster la longueur du support micro de façon à ce que le micro soit placé au coin de
votre bouche. Pour ce faire, desserrer la fixation rapide et ajuster la longueur du
support micro.
왘 Tirer la partie médiane du support micro vers la bouche jusqu’à ce que la distance
micro/bouche soit d’env. 2 cm.
왘 Orien ter l e micro po ur par faire le réglage.
21

22
Information co mplémentaire pour l’utilisation du HMEC 322 dans un hélicoptère
La polarité de branchement d’un microphone dans les hélicoptères n’est pas
standardisée. Si le microphone de votre casque n’est pas conforme avec la polarité
existante, vous pouvez changer la polarité sur le casque en faisant simplement tourner
le module de microp hone. Pour ce faire, procédez comme suit :
1. Retirer la protection antivent du microphone.
2. Déserrer l es vis d’environ un demi to ur.
3. Opérer une tr action sur le module m icro p ar rapport à son bras support.
4. Faire tourner le module micro de 180°.
5. Repousser le module micro en pl ace sur son bras support.
6. Reser rer les vis de l’autre côté.
7. Repl acer la pro tection antivent su r le m icrophone.
La rotation du modu le microphone n e change p as ses propriétés acoustiques. En r aison
de son système de compensation de bruit, le microphone peut être utilisé de l’un ou
l’autre côté.
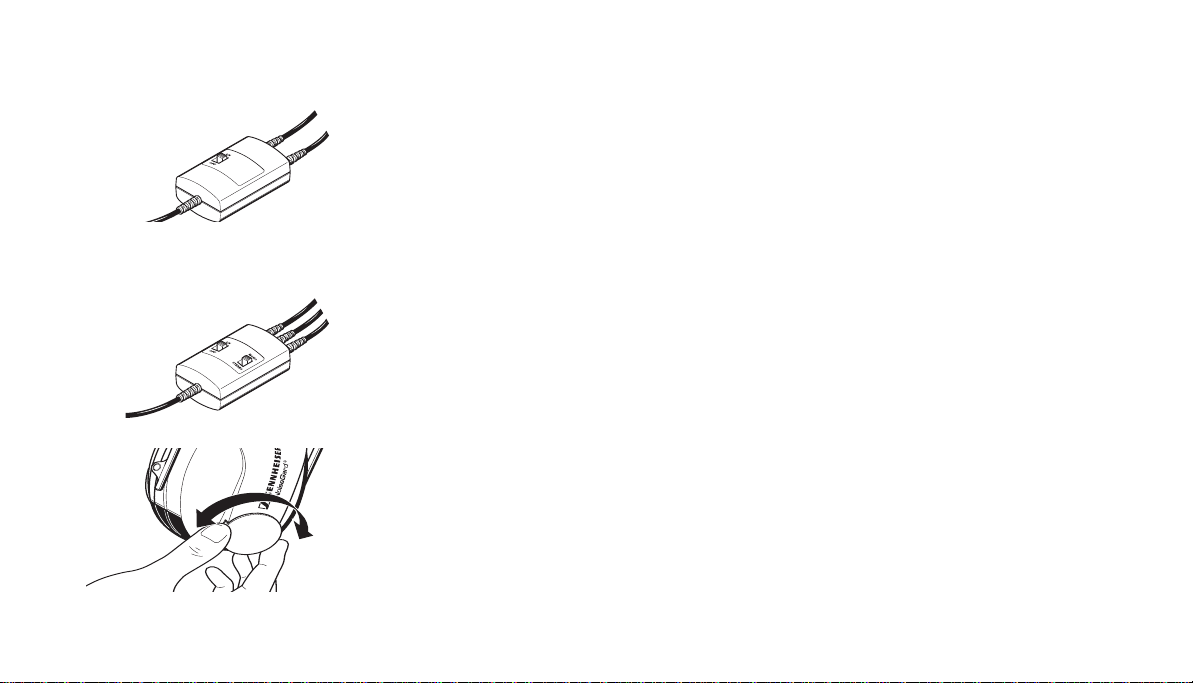
Utilisation des casques micros
Commutation Marche/Arrêt du N oiseGard™
Avec le système de compensation de bruit NoiseGard™ hors fonction, le casque micro
peut être utilisé comme un mo dèle conv entionnel .
Pour m ettre en marche le systèm e Nois eGa rd™, p lacez le commutateur ON/OFF sur “ON”.
Quand le pack de piles BP-03 es t util isé, placez le commutateur ON /OFF du NoiseGard ™
sur “ON” et util is ez le commutateur ON/OFF du pack de piles .
Commutation Mono/Stéréo (sauf HMEC 305, HMEC 305-C, HMEC 322 et HMDC 322)
En général, vo us rec ev ez un son mon o. Le commutateur Mono/Stéréo doit alors être
placé sur “Mono”. Lors de l’utilisation d’un système intercom stéréo, placez le
commutateur Mono/Stéréo sur “Stéréo”.
Réglage de volume
L’exposition à des sons de très fort niveau peut être la cause de dommages
irréversibles de l’audition !
Régler le contrôle de volume sur une valeur moyenne. Assurez-vous que vous pouvez
entendre les sons importants comme les signaux d’alarme.
23

24
Fixa tion du clip de câble
Le câble du c asque peut être fixé au moyen d’un clip. Guidez le câble sur le clip comme
indiqu é sur l'illustration ci-contre. Fixez le clip sur les vêtements et ajustez le câble de
fa çon à ce qu'il ne vo us dérange pa s.
Pliage du casque
Pour faciliter le rangement et le transport, les oreillettes du c asque peuv ent être repliées
à l’intérieur du serre-tête.
Pour déplier le casq ue, saisir les oreillettes et les tirer vers le bas à l’extérieur du serretête.

Pi èc es de remplacement
Les pièces suivantes sont disponibles chez votre distributeur Sennheiser :
• Protection antivent pour microphone électret MKE 45
• Cou ssins d’oreillettes
• Rembourrage de l’arceau
• Clip pour câble
• Sac de rangement et de transport avec courroie d’épaule
Remplacement de la protection antivent
Si la protec tion antivent du micro électret est endommagée ou présente des trous, vous
devez la remplacer. Retirer la protection antivent du micro. Faites glisser doucement la
nouvelle protection et assurez-vous qu’elle est conv enablement mise en place.
Remplacement des coussins d’oreillettes
Remplacer les coussins d’oreillettes dès qu’ils sont endommagés. Saisir l’arrière du
coussin et tirer vers vous de façon à le désolidariser de l’oreillette. Mettre en place un
nouveau coussin sur l’oreillette.
25

26
Remplacement du rembourrage de l’arceau
Remplacer le rembourrage de l’arceau dès qu’il est endommagé.
왘 Tirer sur la fixation ressemblant à une fermeture Éclair se trouvant sur le
rembourrage, puis enlever le rembourrage usé.
왘 Mettre en place le nouveau rembourrage, tout autour de l’arceau.
왘 Tirer sur les bords du nouveau rembourrage, de façon à ce que les dispositifs de
fixation se retr ouvent face à face et débordent légèremen t l’un sur l’autre.
왘 Faire se rejoindre les deux bords de cette fermeture Éclair.
Remplacement du rembourrage de l’arceau du HMEC 400
Remplacer le rembourrage de l’arceau dès qu’il est endommagé.
왘 Ouvrir les bouton-pressions du rembourrage et enlever le rembourrage.
왘 Mettre en place le nouveau rembourrage, tout autour de l’arceau.
왘 Ti rer su r les deux côtés du rembourrage et refermer les bouton-press ions.
 Loading...