

Page 1
™
Bedienungsanleitung
Headset
HMEC 300
HMEC 302
HMEC 305
HMEC 305-C
HMEC 306
HMEC 322
HMEC 400
HMDC 322
3
Page 2

Inhalt
Ein Wort zu Ihrer Sicherheit..................................................................................5
Leistungsmerkmale der Headsets .........................................................................6
Produktvarianten .......................................................................................................................... 7
Lieferumfang......................................................................................................10
Empfohlenes Zubehör ........................................................................................11
Headset anschließen ..........................................................................................12
Die Anschlußkabel der Headsets ................................................................................................ 12
Anschlußmöglichkeiten .............................................................................................................. 14
Headset für den Gebrauch vorbereiten...............................................................20
Kopfhörerbügel einstellen .......................................................................................................... 20
Mikrofon positionieren ............................................................................................................... 21
Zusatzinformation für den Helikopterbetrieb des Headsets HMEC 322 ...................................... 23
Der tägliche Betrieb............................................................................................24
NoiseGard™ ein- und ausschalten.............................................................................................. 24
Mono-/Stereo-Umschaltung (außer HMEC 305, HMEC 305-C, HMEC 322 und HMDC 322) ..... 24
Lautstärke einstellen................................................................................................................... 24
Mic-Gain-Einstellung .................................................................................................................. 25
Kabelklammer anbringen ........................................................................................................... 25
Kopfhörer zusammenklappen..................................................................................................... 25
Ersatzteile...........................................................................................................26
Wenn Störungen auftreten ................................................................................28
Wissenswertes zum Nachlesen ...........................................................................30
Das NoiseGard™-Prinzip ............................................................................................................ 30
Pinbelegung der Stecker............................................................................................................. 33
Technische Daten ...............................................................................................34
4
Page 3

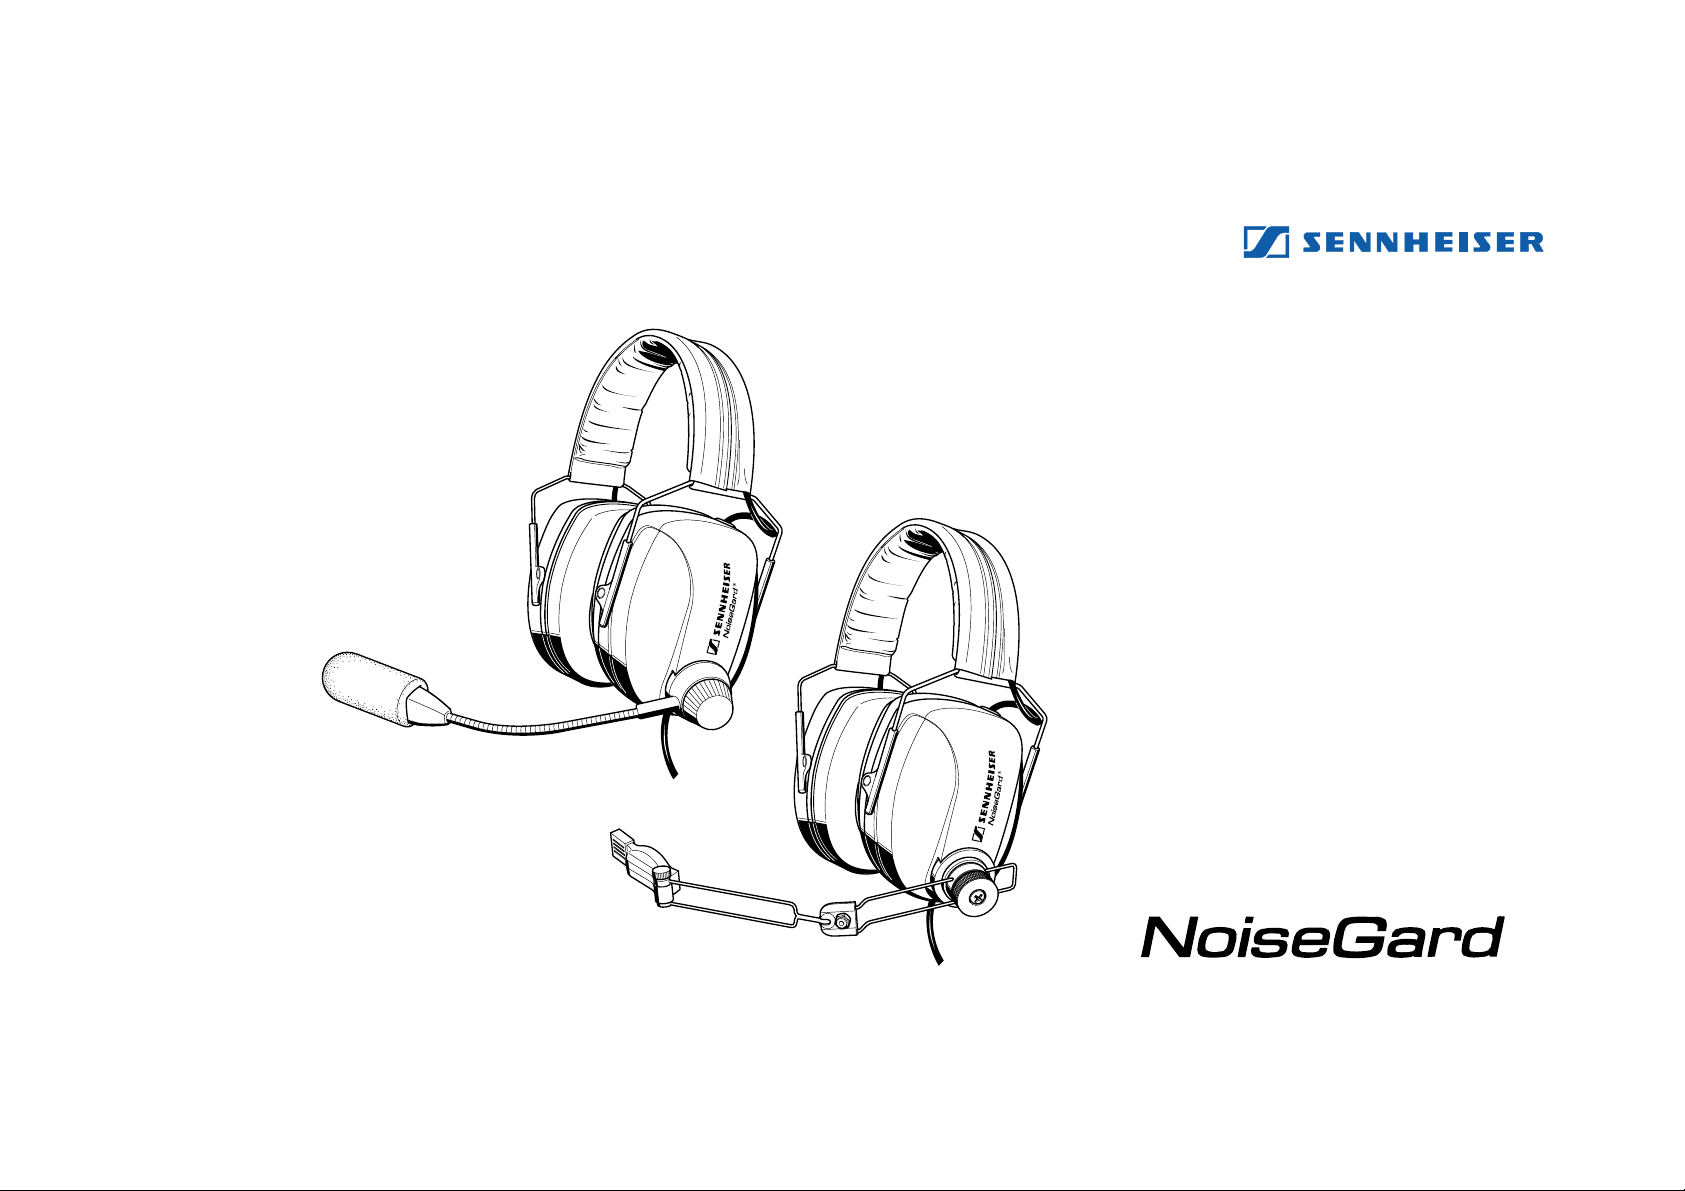
Die Headsets NoiseGard
HMEC 322, HMEC 400 und HMDC 322 sind Pilotenheadsets mit aktiver Lärmkompensation
in geschlossener Bauform zum Einsatz in Helikoptern, Propeller- und TurbopropFlugzeugen.
™
HMEC 300, HMEC 302, HMEC 305, HMEC 305-C, HMEC 306,
Ein Wort zu Ihrer Sicherheit
• Mit eingeschalteter Lärmkompensation NoiseGard
oder Ihren Helikopter typische Geräusche (z. B. Motoren-, Propellerklang, Warnsignale usw.) anders anhören. Machen Sie sich daher vor dem Start bei eingeschalteter
Lärmkompensation mit allen wichtigen Geräuschen vertraut. Stellen Sie die Lautstärke
so ein, daß Sie alle wichtigen Geräusche, Alarme oder Geräusche, die durch
Fehlfunktionen entstehen, hören können.
™
können sich für Ihr Flugzeug
• Versuchen Sie nicht, das Headset selbst zu reparieren, sondern wenden Sie sich bei
Problemen an Ihren Sennheiser-Vertriebspartner.
• Wechseln Sie nur die Teile aus, deren Austausch in dieser Gebrauchsanleitung
beschrieben ist. Alle anderen Teile tauscht Ihnen Ihr Sennheiser-Vertriebspartner
aus.
• Tauchen Sie das Headset zum Reinigen nicht in Wasser. Fragen zur Reinigung des
Headsets besprechen Sie mit Ihrem Sennheiser-Vertriebspartner.
5
Page 4

Leistungsmerkmale der Headsets
Headset NoiseGard™ HMEC 300
• Neues, aktives Headset mit guter Dämpfung des Außenlärms über den gesamten
Frequenzbereich durch aktive Lärmkompensation NoiseGard™
• Aktive Lärmkompensation NoiseGard™ ermöglicht klare Kommunikation auch in
lautester Umgebung
• Hervorragende Trageeigenschaften mit viel Bewegungsfreiheit durch geringes
Gewicht, angenehme Ohrpolster, gepolsterten Kopfhörerbügel und einseitig geführtes Kabel
• Kopfhörerbügel mit Klappmechanismus ermöglicht platzsparendenTransport
• Klare Kommunikation über das Elektret-Mikrofon MKE 45-1 mit einstellbarer Empfindlichkeit
• Mikrofon durch flexiblen Mikrofonarm mit Schnellarretierung optimal positionierbar
und beidseitig zu tragen
• Optimale Verständigung durch breitbandiges Hörersystem
• Integrierter Lautstärkesteller für gute Lautstärkeanpassung
• Anpassung an das Intercom-System durch Mono-/Stereo-Umschalter
• Lärmkompensation NoiseGard™ für den Gebrauch als herkömmliches Headset
abschaltbar
6
Page 5

• Spannungsversorgung des NoiseGard™-Systems über Bordnetz, Zigarettenanzünder oder Batteriepack
• Fail-Safe-Operation bei Ausfall der Stromversorgung
• Anpassung der Spannung für das NoiseGard™-System über die In-Line-Elektronik
im Anschlußkabel
• Made in Germany mit 2 Jahren Garantie
Produktvarianten
Headset NoiseGard™ HMEC 302
Das Headset HMEC 302 unterscheidet sich vom HMEC 300 in folgenden Merkmalen:
• Anschluß von Mikrofon und Spannungsversorgung der NoiseGard™-Elektronik
über Klinkenstecker PJ-068.
Headset NoiseGard™ HMEC 305
Das Headset HMEC 305 unterscheidet sich vom HMEC 300 in folgenden Merkmalen:
• kein Mono-/Stereo-Umschalter,
• Anschluß von Kopfhörer, Mikrofon und Spannungsversorgung der NoiseGard™Elektronik an das Bordnetz (12 bis 35VDC) über XLR-5-Stecker.
7
Page 6

Headset NoiseGard™ HMEC 305-C
Das Headset HMEC 305-C unterscheidet sich vom HMEC 300 in folgenden Merkmalen:
• kein Mono-/Stereo-Umschalter,
• Anschluß von Kopfhörer und Mikrofon über XLR-5-Stecker.
Headset NoiseGard™ HMEC 306
Das Headset HMEC 306 unterscheidet sich vom HMEC 300 in folgenden Merkmalen:
• Anschluß von Kopfhörer, Mikrofon und Spannungsversorgung der NoiseGard™Elektronik an das Bordnetz (12 bis 35VDC) über einen 6-PIN-Redel-Stecker.
Headset NoiseGard™ HMEC 322
Das Headset HMEC 322 unterscheidet sich vom HMEC 300 in folgenden Merkmalen:
• kein Mono-/Stereo-Umschalter,
• Spiralkabel,
• Anschluß von Kopfhörer und Mikrofon über Klinkenstecker U-174/U an eine hochohmige Schnittstelle im Helikopter.
8
Page 7

Headset NoiseGard™ HMEC 400
Das Headset HMEC 400 unterscheidet sich vom HMEC 300 in folgenden Merkmalen:
• silberne Ohrmuscheln,
• Leder-Ohrpolster,
• Kopfbügelband zum Knöpfen.
Headset NoiseGard™ HMDC 322
Das Headset HMDC 322 unterscheidet sich vom HMEC 300 in folgenden Merkmalen:
• kein Mono-/Stereo-Umschalter,
• Spiralkabel,
• dynamisches Mikrofon M-87/AIC und niederohmiger Hörer,
• Anschluß von Kopfhörer und Mikrofon über Klinkenstecker U-174/U an eine niederohmige Schnittstelle im Helikopter.
9
Page 8

Lieferumfang
Headset HMEC 300, HMEC 305-C, HMEC 322, HMEC 400 und HMDC 322
• Headset
• dreipolige XLR-Einbaubuchse zum Anschluß an das Bordnetz
• gepolsterte Trage- und Aufbewahrungstasche mit Schulterriemen für Headset und
Zubehör
• Windschutz für das Mikrofon (nicht bei HMDC 322)
• Kabelklammer MZQ 2002-1 (Art.-Nr. 44740)
Headset HMEC 302, HMEC 305 und HMEC 306
• Headset
• gepolsterte Trage- und Aufbewahrungstasche mit Schulterriemen für Headset und
Zubehör
• Windschutz für das Mikrofon
10
• Kabelklammer MZQ 2002-1 (Art.-Nr. 44740)
Page 9
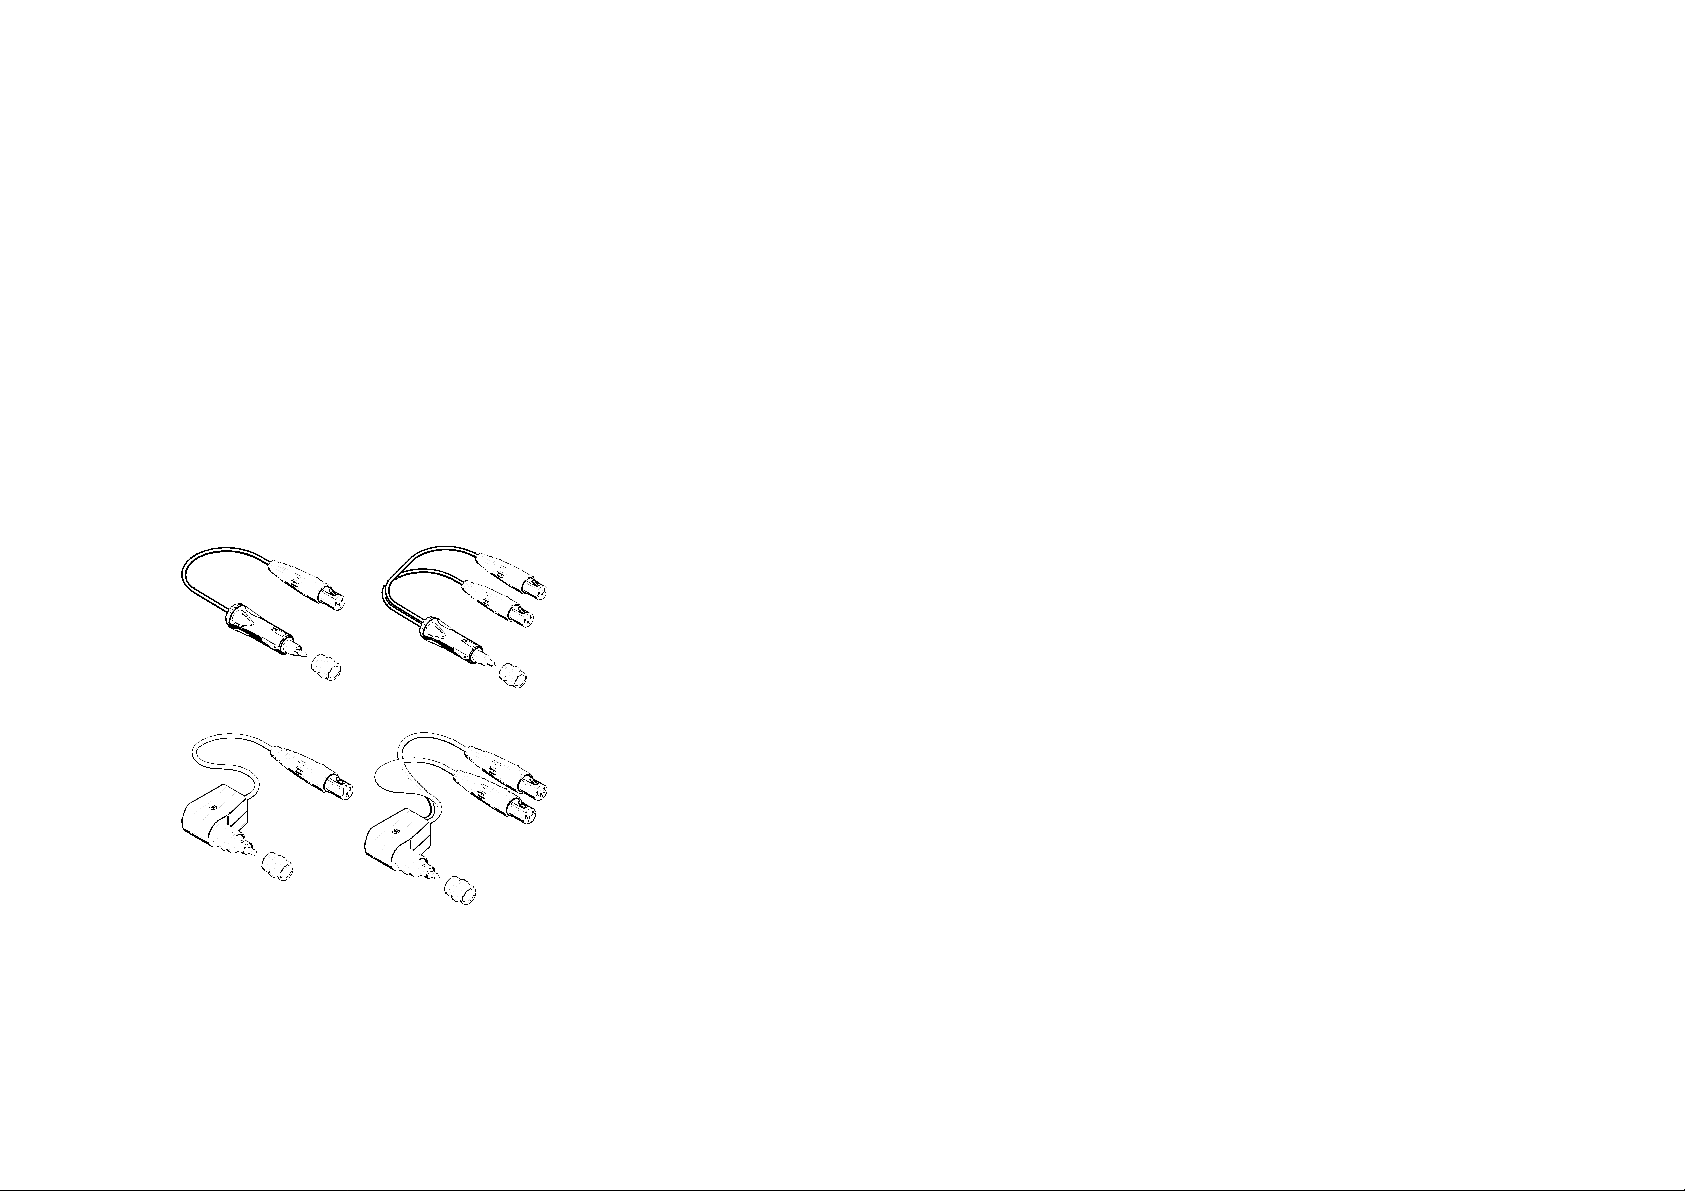
ACX-1 ACX-2
Empfohlenes Zubehör
Austauschbare Gel-Ohrpolster (Art.-Nr. 83140)
Batteriepack BP-03 (nicht für HMEC 302, HMEC 305 und HMEC 306)
Batteriepack mit XLR-3-Kupplung zur Spannungsversorgung der NoiseGard™-Elektronik
der Headsets HMEC 300, HMEC 305-C, HMEC 322, HMEC 400 und HMDC 322. Vier
1,5-V-Mignon-Batterien (Typ LR6, Alkali-Mangan, nicht im Lieferumfang enthalten)
sorgen für eine Betriebszeit von ca. 15 Stunden. Länge des Anschlußkabels: 0,9 m.
Adapterkabel (nicht für HMEC 302, HMEC 305 und HMEC 306)
Für die Headsets HMEC 300, HMEC 305-C, HMEC 322, HMEC 400 und HMDC 322 gibt
es spezielle Adapterkabel, mit denen Sie die NoiseGard™-Elektronik über den Zigarettenanzünder an das Bordnetz anschließen können:
• ACX-1 Adapterkabel zur Spannungsversorgung eines Headsets
• ACX-2 Adapterkabel zur Spannungsversorgung von zwei Headsets
Die Adapterkabel werden auch mit einem komfortablen Winkelstecker angeboten, der
mit einer 7,5-A-Flachsicherung und einer grünen Kontroll-LED ausgerüstet ist:
ACX-11 ACX-22
• ACX-11 Adapterkabel zur Spannungsversorgung eines Headsets
• ACX-22 Adapterkabel zur Spannungsversorgung von zwei Headsets
11
Page 10
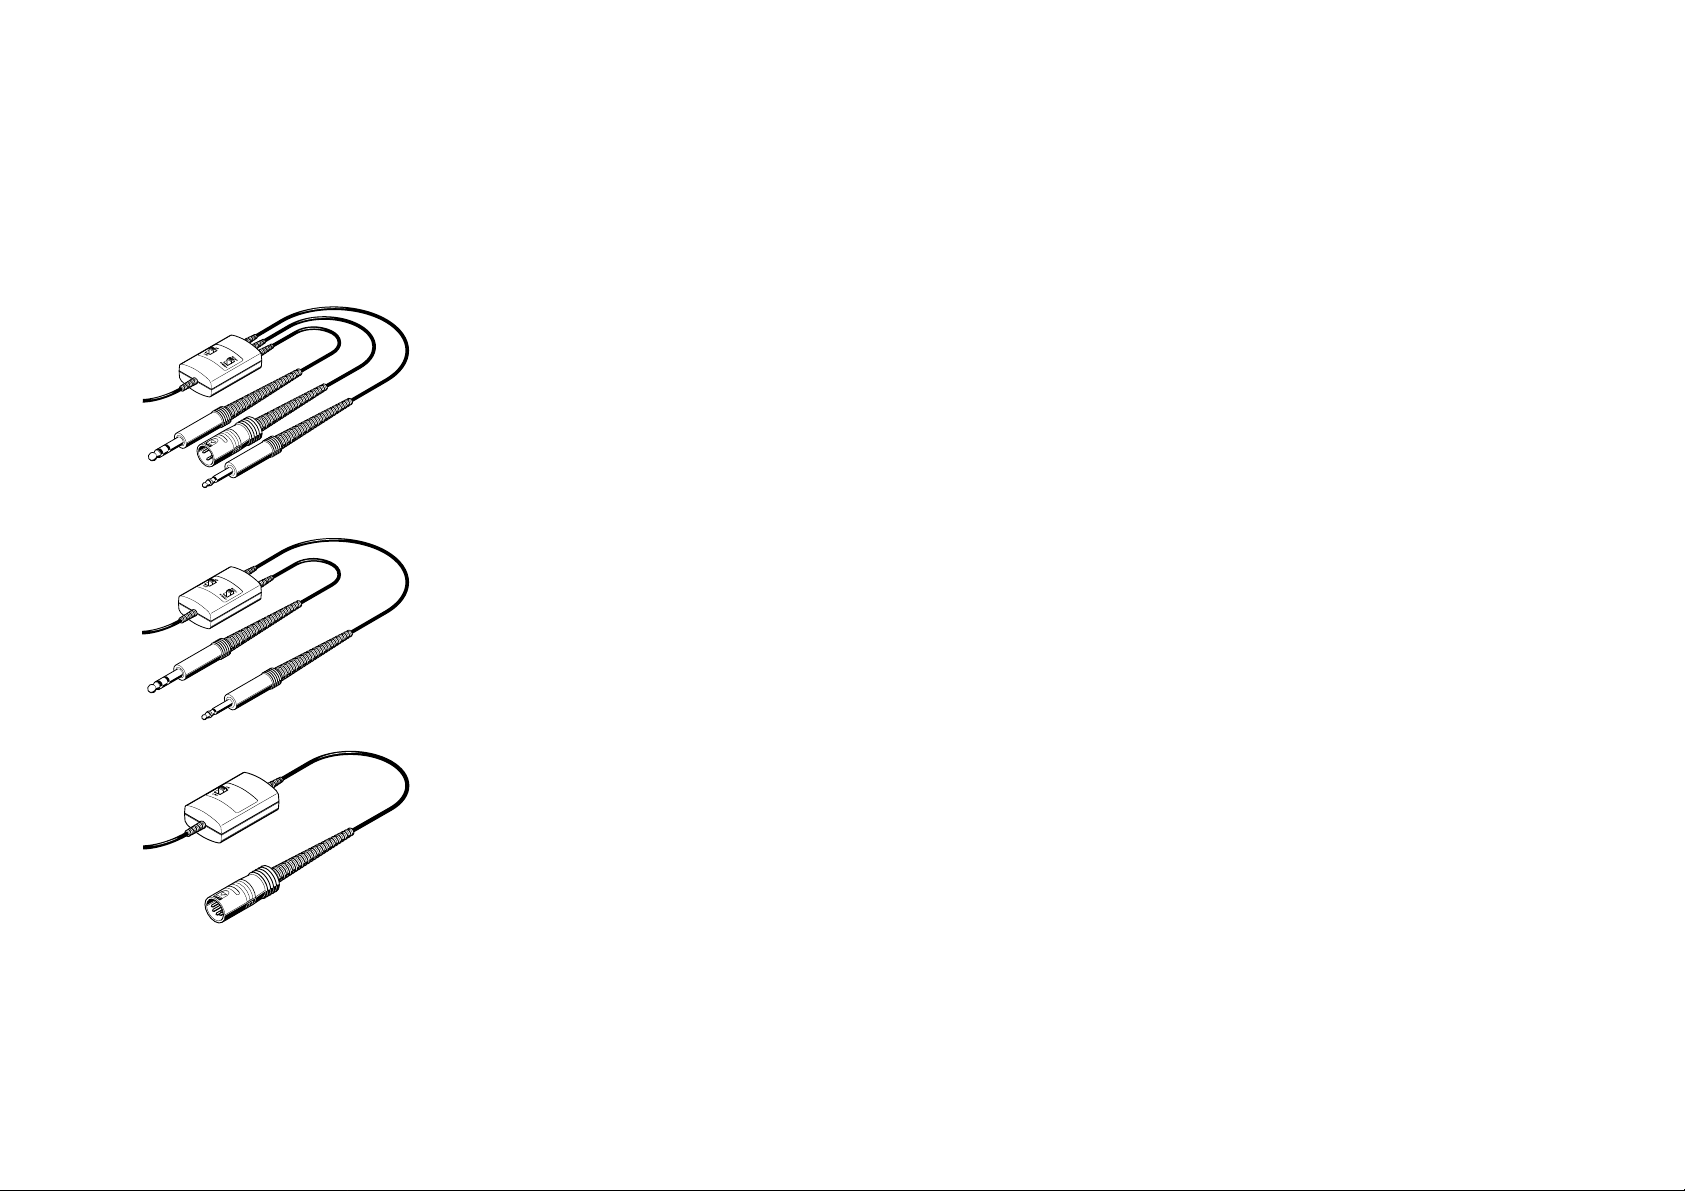
Anschlußkabel HMEC 300
und HMEC 400
Anschlußkabel HMEC 302
Headsets anschließen
Die Anschlußkabel der Headsets
Headset HMEC 300 und HMEC 400:
1 6,35-mm-Stereo-Klinkenstecker zum Anschluß des Kopfhörers
1 Klinkenstecker PJ-068 zum Anschluß des Mikrofons
1 XLR-3-Stecker zum Anschluß der Stromversorgung für die NoiseGard™-Elektronik
Headset HMEC 302:
1 6,35-mm-Stereo-Klinkenstecker zum Anschluß des Kopfhörers
1 Klinkenstecker PJ-068 zum Anschluß von Mikrofon und Stromversorgung für die
NoiseGard™-Elektronik
Headset HMEC 305:
12
1 XLR-5-Stecker zum Anschluß von Kopfhörer, Mikrofon und Stromversorgung für die
NoiseGard™-Elektronik
Anschlußkabel HMEC 305
Page 11
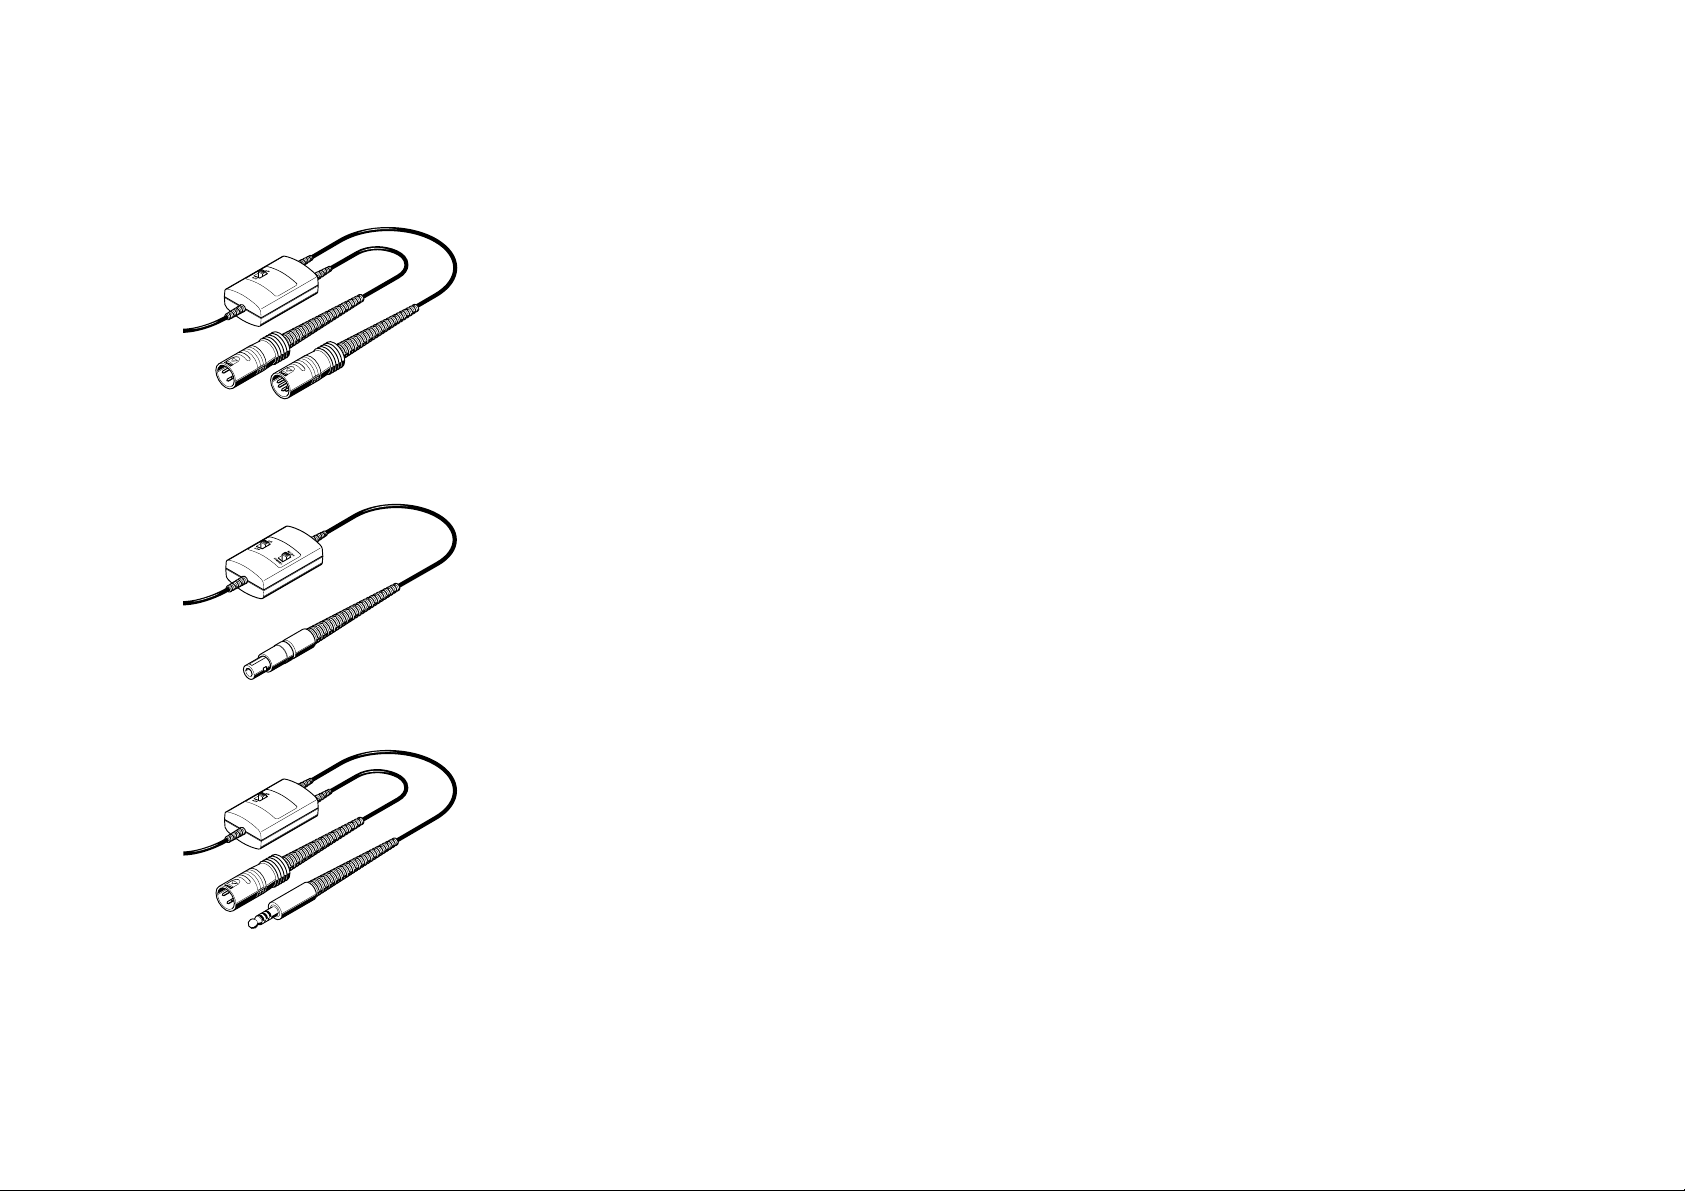
Anschlußkabel HMEC 305-C
Anschlußkabel HMEC 306
Headset HMEC 305-C:
1 XLR-5-Stecker zum Anschluß von Kopfhörer und Mikrofon
1 XLR-3-Stecker zum Anschluß der Stromversorgung für die NoiseGard™-Elektronik
Headset HMEC 306:
1 6-PIN-Redel-Stecker zum Anschluß von Kopfhörer, Mikrofon und Stromversorgung
für die NoiseGard™-Elektronik
Headset HMEC 322 und HMDC 322:
1 Klinkenstecker U-174/U zum Anschluß von Kopfhörer und Mikrofon
1 XLR-3-Stecker zum Anschluß der Stromversorgung für die NoiseGard™-Elektronik
Anschlußkabel HMEC 322
und HMDC 322
13
Page 12

Anschlußmöglichkeiten
Um die Lärmkompensation NoiseGard™ mit Spannung zu versorgen, haben Sie drei
Möglichkeiten:
1. Anschluß an das Bordnetz (12 bis 35 VDC)
2. Anschluß an das Batteriepack BP-03
(Zubehör, außer für HMEC 302, HMEC 305 und HMEC 306)
3. Anschluß an den Zigarettenanzünder (12 bis 35 VDC) über Adapterkabel
(Zubehör, außer für HMEC 302, HMEC 305 und HMEC 306)
Die In-Line-Elektronik im Anschlußkabel bereitet die ankommende Spannung für das
NoiseGard™-System auf.
14
Page 13

1. Headset an das Bordnetz anschließen
Sie können die NoiseGard™-Elektronik an Bordnetze mit einer Spannung zwischen 12 und
35 VDC anschließen.
Kurzschlußgefahr!
Stellen Sie vor Inbetriebnahme sicher, daß die Stromversorgung für die NoiseGard™Elektronik aus dem Bordnetz mit einer 1-A-Sicherung abgesichert ist.
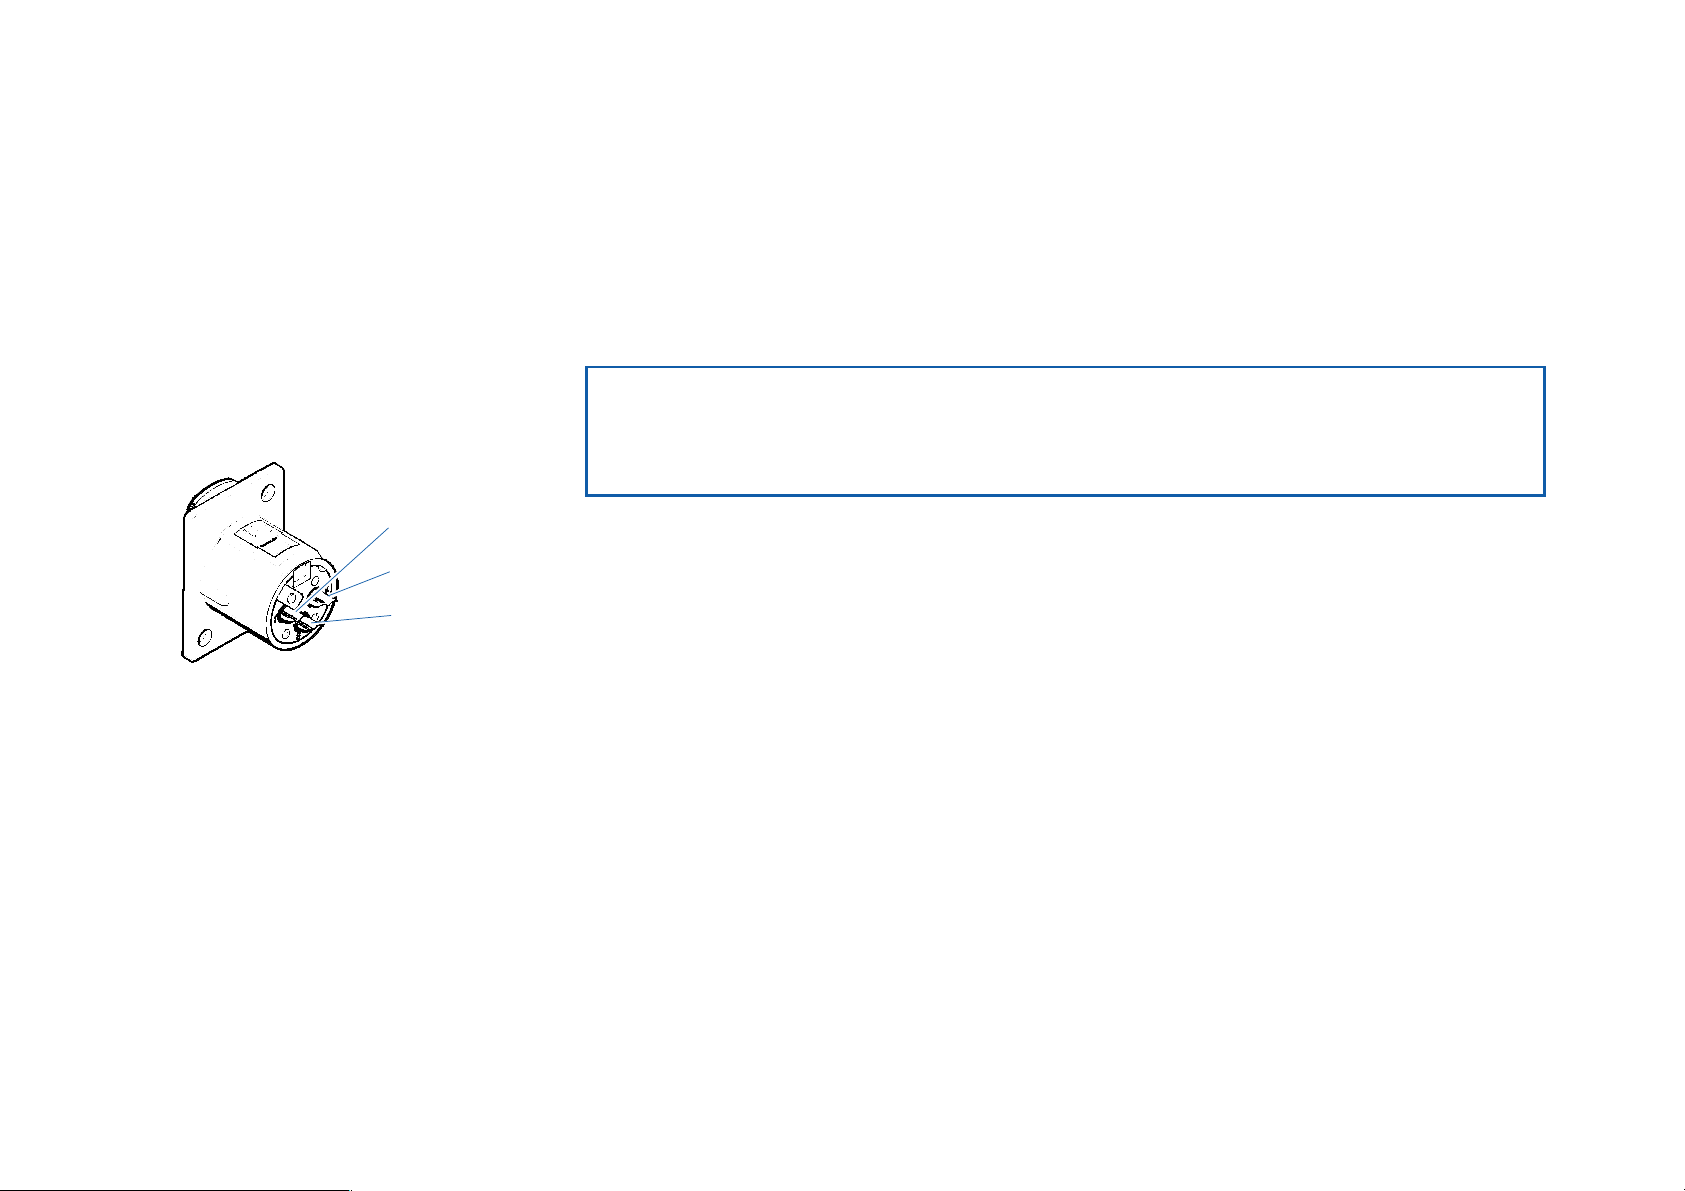
Stromversorgung
NoiseGard
Masse
muß frei bleiben
XLR-3-Einbaubuchse für die Headsets
HMEC 300, HMEC 305-C, HMEC 322,
HMEC 400 und HMDC 322
™
Zusammen mit den Headsets HMEC 300, HMEC 305-C, HMEC 322, HMEC 400 und
HMDC 322 erhalten Sie eine XLR-3-Einbaubuchse. Lassen Sie die Buchse von Ihrer
Werkstatt einbauen.
Headset HMEC 300 und HMEC 400:
Stecken Sie den 6,35-mm-Stereo-Klinkenstecker für den Kopfhörer und den
Klinkenstecker PJ-068 für das Mikrofon in die entsprechenden Klinkenbuchsen Ihres
Intercoms.
Stecken Sie den XLR-3-Stecker in die eingebaute XLR-3-Buchse.
15
Page 14

Headset HMEC 302:
Stecken Sie den 6,35-mm-Stereo-Klinkenstecker für den Kopfhörer und den
Klinkenstecker PJ-068 für das Mikrofon in die entsprechenden Klinkenbuchsen Ihres
Intercoms.
Headset HMEC 305:
Stecken Sie den XLR-5-Stecker in die XLR-5-Buchse Ihres Flugzeuges.
Headset HMEC 305-C:
Stecken Sie den XLR-5-Stecker für den Kopfhörer und das Mikrofon in die XLR-5-
Buchse Ihres Flugzeuges.
Stecken Sie den XLR-3-Stecker in die eingebaute XLR-3-Buchse.
Headset HMEC 306:
Stecken Sie den 6-PIN-Redel-Stecker in die 6-PIN-Buchse Ihres Flugzeuges.
Headset HMEC 322 und HMDC 322:
Stecken Sie den Klinkenstecker U-174/U für den Kopfhörer und das Mikrofon in die
U-174/U-Buchse Ihres Intercoms.
16
Stecken Sie den XLR-3-Stecker in die eingebaute XLR-3-Buchse.
Page 15

2. Headset an das Batteriepack anschließen
(außer HMEC 302, HMEC 305 und HMEC 306)
Die NoiseGard™-Elektronik der Headsets HMEC 300, HMEC 305-C, HMEC 322, HMEC 400
und HMDC 322 können auch über das Batteriepack BP-03 mit Strom versorgt werden
( „Empfohlenes Zubehör“). Das Batteriepack eignet sich für Batterie- und Akkubetrieb
(Batterien bzw. Akkus sind nicht im Lieferumfang enthalten). Wir empfehlen jedoch den
Betrieb mit Batterien (Typ LR6, 1,5 V, Alkali-Mangan), da sich mit Akkus die Betriebszeit von
ca. 15Stunden auf etwa 3Stunden reduziert.
Batterien in Batteriepack einsetzen / auswechseln
Öffnen Sie die Abdeckung des Batteriefachs.
Setzen Sie die vier Batterien (Typ LR6, 1,5 V, Alkali-Mangan) ein. Achten Sie dabei
auf die Polarität.
Schließen Sie das Batteriefach.
Betriebs- und Batterieanzeige des Batteriepacks
Das Batteriepack hat zwei Kontrolleuchten (LED).
grüne LED leuchtet: Das Batteriepack ist eingeschaltet, die LED zeigt den Betrieb an.
rote LED leuchtet: Die Leistung der Batterien reicht nur noch für kurze Zeit. Wechseln
Sie die Batterien aus.
17
Page 16

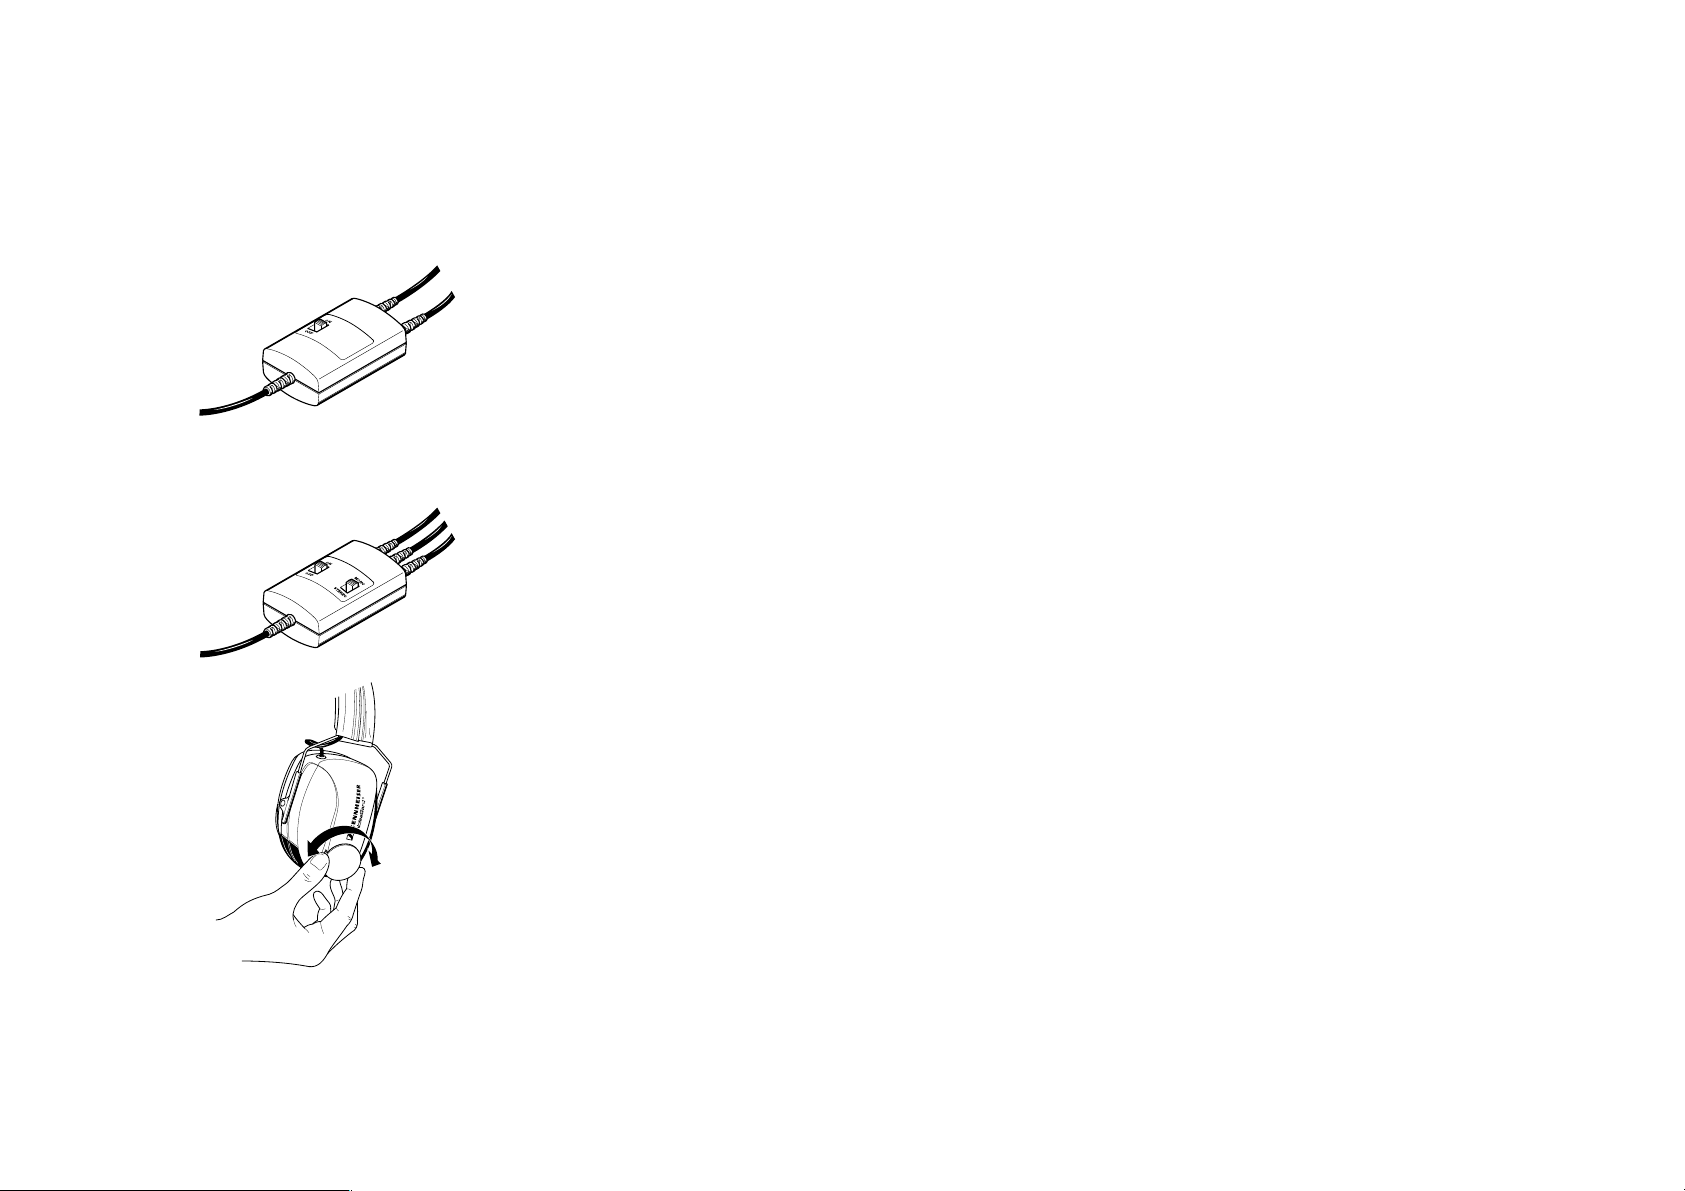
Headset anschließen, Batteriepack einschalten
Stecken Sie den XLR-3-Stecker am Anschlußkabel des Headsets in die XLR-3-
Kupplung des Batteriepacks.
Headset HMEC 300 und HMEC 400: Stecken Sie den 6,35-mm-Stereo-Klinken-
stecker für den Kopfhörer und den Klinkenstecker PJ-068 für das Mikrofon in die
entsprechenden Klinkenbuchsen Ihres Intercoms.
Headset HMEC 305-C: Stecken Sie den XLR-5-Stecker für den Kopfhörer und d as
Mikrofon in die XLR-5-Buchse Ihres Flugzeuges.
Headset HMEC 322 und HMDC 322: Stecken Sie den Klinkenstecker U-174/U für
den Kopfhörer und das Mikrofon in die U-174/U-Buchse Ihres Intercoms.
Schalten Sie das Batteriepack ein, indem Sie den ON/OFF-Schalter in die Postion ‚ON‘
schieben. Die grüne Betriebs-LED leuchtet.
Hinweis
Der ON/OFF-Schalter in der Zuleitung zum Headset ist bei der Verwendung des
Batteriepacks außer Funktion.
18
Batteriepack an der Kleidung befestigen
Mit dem Befestigungsclip läßt sich das Batteriepack an der Kleidung befestigen, Klettband
ist zusätzlich beigelegt.
Page 17

ACX-1 ACX-2
3. Headset über Adapterkabel anschließen
(außer HMEC 302, HMEC 305 und HMEC 306)
Für die Headsets HMEC 300, HMEC 305-C, HMEC 322, HMEC 400 und HMDC 322 gibt
es spezielle Adapterkabel mit XLR-3-Kupplung, mit denen Sie die NoiseGard™-Elektronik
über den Zigarettenanzünder an das Bordnetz anschließen können:
• ACX-1 Adapterkabel zur Spannungsversorgung eines Headsets
• ACX-2 Adapterkabel zur Spannungsversorgung von zwei Headsets
Die Adapterkabel werden auch mit einem komfortablen Winkelstecker angeboten, der
mit einer 7,5-A-Flachsicherung und einer grünen Kontroll-LED ausgerüstet ist:
• ACX-11 Adapterkabel zur Spannungsversorgung eines Headsets
• ACX-22 Adapterkabel zur Spannungsversorgung von zwei Headsets
ACX-11 ACX-22
Headset anschließen
Stecken Sie den XLR-3-Stecker am Anschlußkabel des Headsets in die XLR-3-
Kupplung des Adapterkabels.
Stecken Sie den Stecker bzw. Winkelstecker des Adapterkabels in den Zigaretten-
anzünder.
19
Page 18
Headset für den Gebrauch vorbereiten
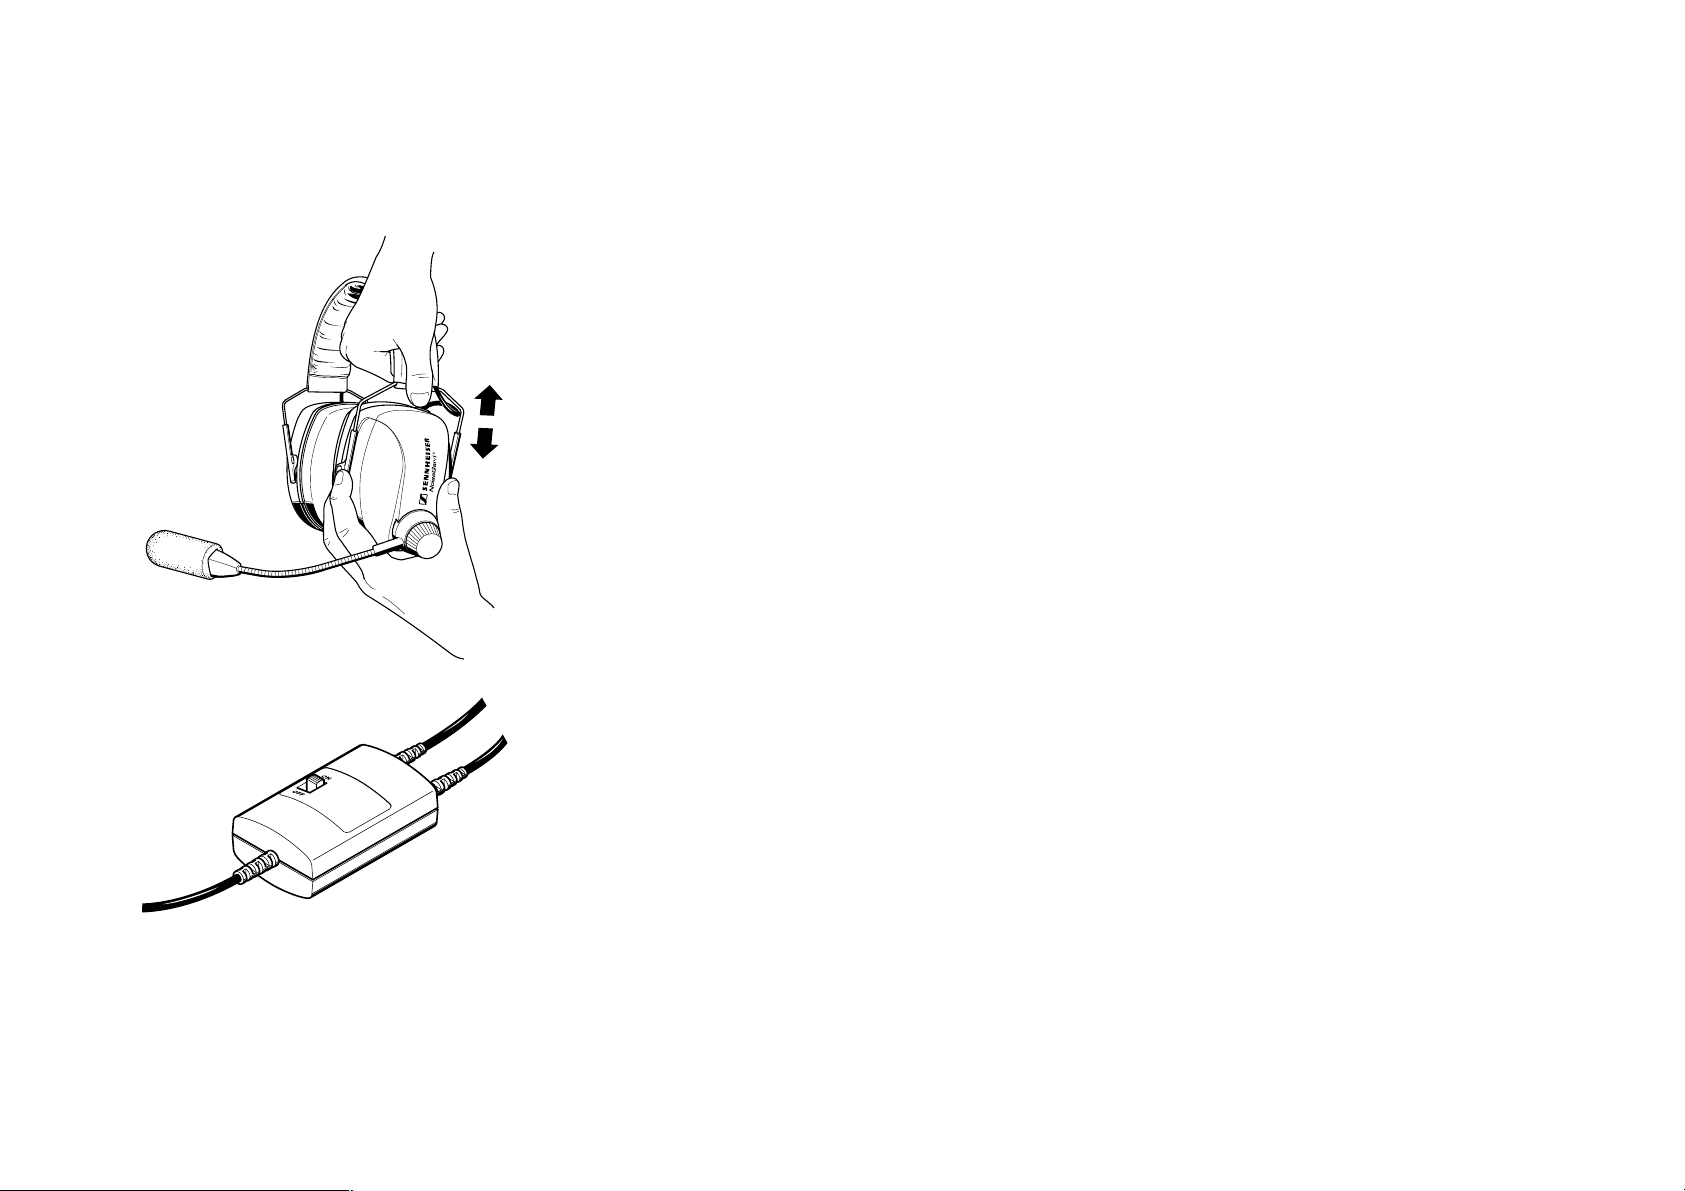
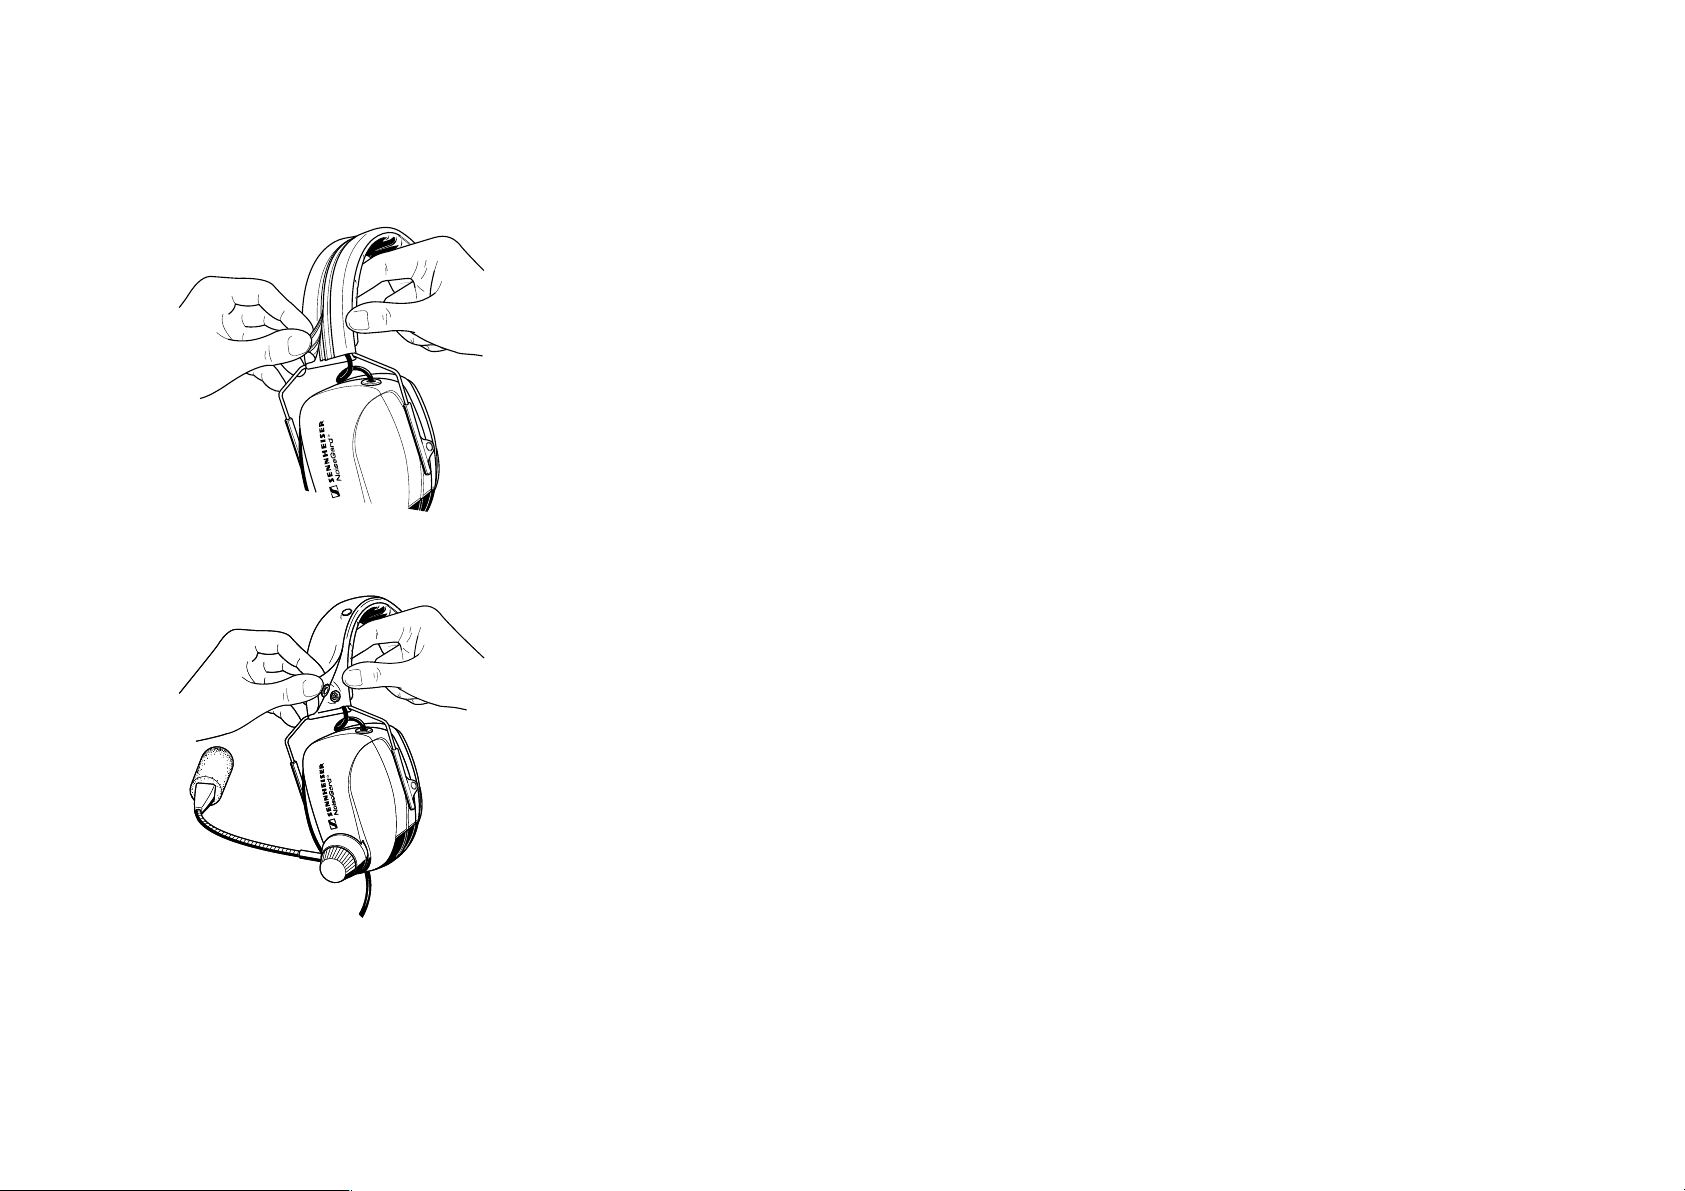
Kopfhörerbügel einstellen
Um eine gute Lärmdämpfung und den bestmöglichen Tragekomfort zu erzielen, müssen
Sie das Headset Ihrem Kopf richtig anpassen. Dazu können Sie den Kopfhörerbügel
verstellen:
Setzen Sie den Kopfhörer so auf, daß der Kopfhörerbügel über die Kopfmitte
verläuft.
Stellen Sie die Länge des Kopfhörers so ein, daß
• die Ohrposter die Ohren ganz umschließen,
• Sie einen leichten Druck um Ihre Ohren herum spüren,
• der Kopfhörerbügel eng am Kopf anliegt.
Hinweis:
Achten Sie darauf, daß Sie beim Einstellen des Kopfhörerbügels die Verbindungskabel nicht einklemmen, da sie dadurch beschädigt werden können.
Schalten Sie die Lärmkompensation NoiseGard™ ein, indem Sie den ON/OFF-
Schalter in die Position ‚ON‘ schieben. ( „NoiseGard™ ein- und ausschalten“)
20
Überprüfen Sie in lauter Umgebung, ob die Ohrposter optimal sitzen.
Page 19
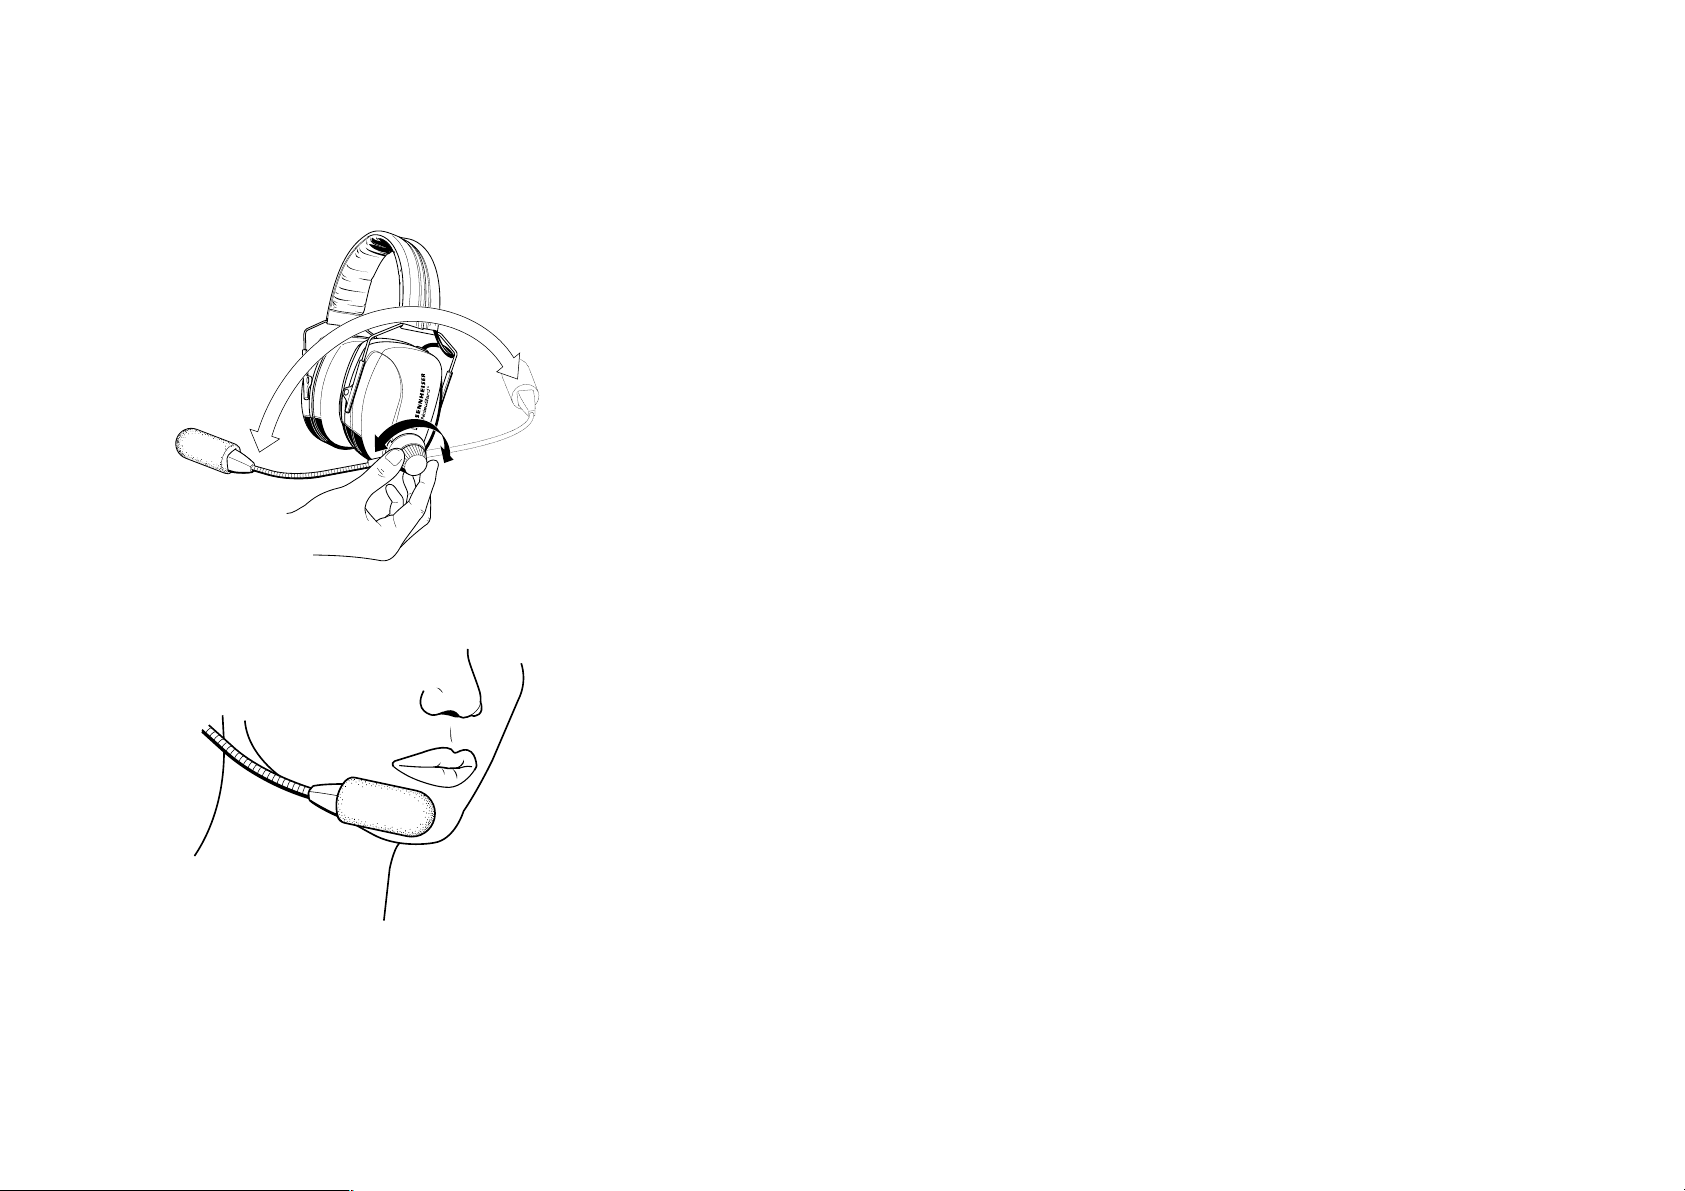
Mikrofon positionieren
Mikrofonarm drehen
Sie können das Mikrofon sowohl am rechten als auch am linken Mundwinkel plazieren.
Lösen Sie dazu die Schnellarretierungsschraube.
Drehen Sie dazu das Mikrofon um 180°.
Schrauben Sie die Schnellarretierungsschraube wieder fest.
Mikrofon zum Mundwinkel hin ausrichten
Die Headsets HMEC 300, HMEC 302, HMEC 305, HMEC 305-C, HMEC 306, HMEC 322
und HMEC 400 haben einen flexiblen Mikrofonarm. Biegen Sie ihn so, daß das Mikrofon
im Mundwinkel, etwa 2 cm vom Mund entfernt, sitzt.
21
Page 20
Richten Sie beim Headset HMDC 322 das Mikrofon wie folgt aus:
Stellen Sie die Länge des Mikrofonarms so ein, daß das Mikrofon im Mundwinkel
sitzt. Lösen Sie dazu die Schnellarretierung und verschieben Sie den Mikrofonarm.
Ziehen Sie den mittleren Teil des Mikrofonarms so weit an den Mund heran, daß das
Mikrofon etwa 2 cm vom Mund entfernt ist.
Zur Feinausrichtung können Sie das Mikrofon kippen.
22
Page 21

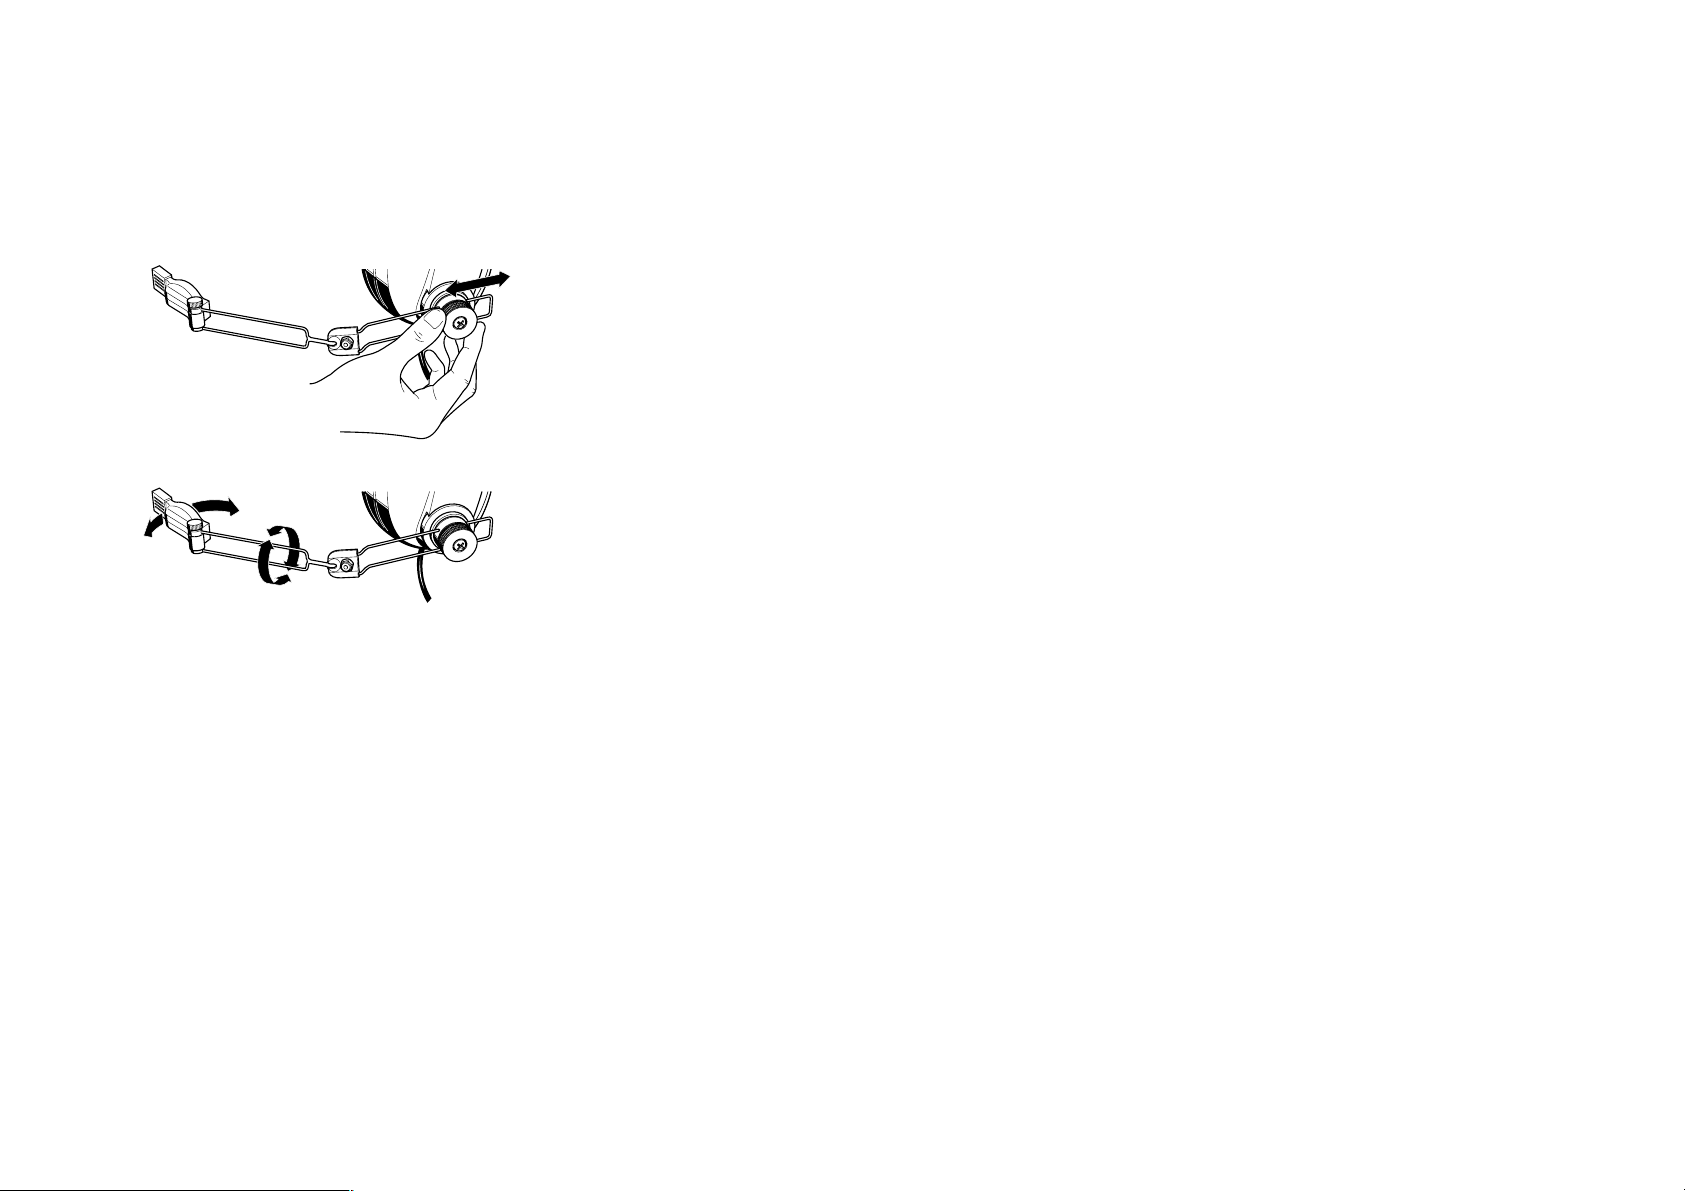
Zusatzinformation für den Helikopterbetrieb des Headsets HMEC 322
Die Beschaltung (Polung) des Mikrofonanschlusses in Helikoptern ist weltweit nicht
genormt. Sollte das Mikrofon Ihres Headsetes mit der vorhandenen Beschaltung nicht
funktionieren, können Sie durch einfaches Umdrehen des Mikrofonmoduls die Polung am
Headset tauschen. In diesem Fall gehen Sie bitte nach folgender Anleitung vor:
1. Entfernen Sie den Poppschutz.
2. Lösen Sie die Schrauben mit ca. 1/2 Umdrehung.
3. Ziehen Sie das Mikrofonmodul aus der Halterung.
4. Drehen Sie das Mikrofonmodul um 180°.
5. Stecken Sie das gedrehte Mikrofonmodul wieder in die Halterung.
6. Ziehen Sie die Schrauben nun von der anderen Seite wieder an.
7. Setzen Sie den Poppschutz wieder auf.
Die akustischen Eigenschaften des Mikrofonmoduls ändern sich durch das Umdrehen des
Moduls nicht, da das Mikrofon durch die geräuschdämpfende Charakteristik von beiden
Seiten besprechbar ist.
23
Page 22

Der tägliche Betrieb
NoiseGard™ ein- und ausschalten
Ist die aktive Lärmkompensation NoiseGard™ ausgeschaltet, können Sie das Headset wie
ein ganz gewöhnliches Headset einsetzen.
Schalten Sie das NoiseGard™-System ein, indem Sie den ON/OFF-Schalter in die Position
‚ON’ schieben. Beim Betrieb mit dem Batteriepack BP-03 stellen Sie den Schalter auf ‚ON’
und nutzen den ON/OFF-Schalter am BP-03.
Mono-/Stereo-Umschaltung (außer HMEC 305, HMEC 305-C, HMEC 322
und HMDC 322)
Üblicherweise empfangen Sie Ihre Tonquelle in Mono und können den Mono-/StereoUmschalter in der Position ‚Mono’ belassen. Schalten Sie an einem Stereo-IntercomSystem den Kopfhörer auf ‚Stereo’ um.
24
Lautstärke einstellen
Zu hohe Lautstärke schädigt Ihr Gehör!
Stellen Sie mit dem Lautstärkesteller eine mittlere Lautstärke ein. Sie müssen sicherstellen,
daß Sie alle wichtigen Geräusche wie z.B. Warnsignale hören können.
Page 23
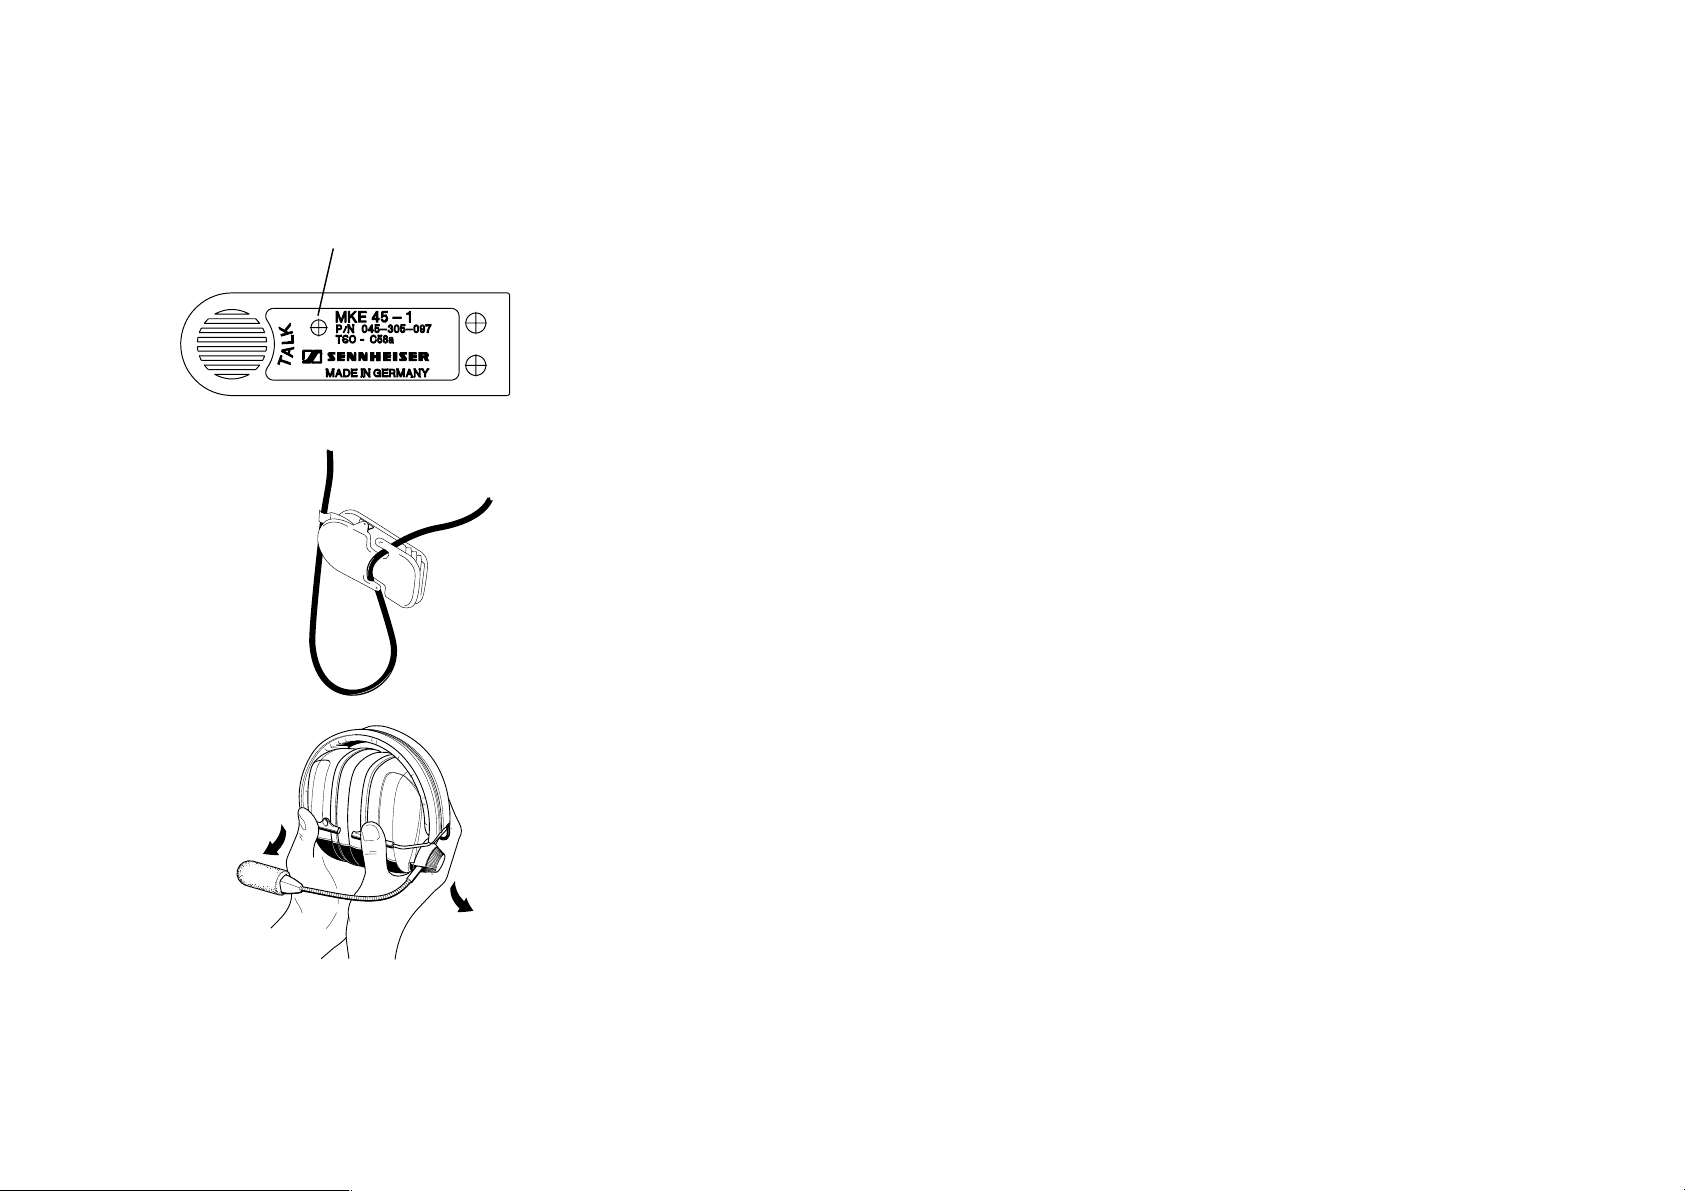
Mic Gain Adjustment
Mic-Gain-Einstellung
Gemäß JTSO-Zulassung C58a ist die Ausgangsspannung des zugehörigen Mikrofons ab
Werk auf 400 mV eingestellt. Falls die Ausgangsspannung Ihres Mikrofons für Ihr
Intercom-System zu hoch oder zu niedrig ist, können Sie diese am Mikrofon nachstellen.
Nehmen Sie dazu einen kleinen Schlitzschraubendreher und drehen Sie die Mic-GainAdjustment-Einstellschraube (siehe Abbildung), bis Ihnen die Einstellung zusagt.
Kabelklammer anbringen
Sie können das Kopfhörerkabel zu Ihrer Bequemlichkeit mit der Kabelklammer fixieren.
Führen Sie das Kopfhörerkabel so durch die Kabelklammer, wie nebenstehend abgebildet.
Klemmen Sie die Kabelklammer an die Kleidung und ziehen Sie die Kabelschlaufe soweit
durch die Kabelklammer, daß Sie das Kopfhörerkabel nicht stört.
Kopfhörer zusammenklappen
Um den Kopfhörer platzsparend zu transportieren, können Sie die Hörerkappen zwischen
den Kopfhörerbügel schieben.
Klappen Sie den Kopfhörer wieder auseinander, indem Sie die beiden Hörerkappen fassen
und nach unten aus dem Kopfhörerbügel herausziehen.
25
Page 24

Ersatzteile
Bei Ihrem Sennheiser-Vertriebspartner erhalten Sie folgende Ersatzteile:
• Windschutz für Elektretmikrofon MKE 45-1
• Ohrpolster
• Kopfbügelband
• Kabelklammer
• Trage- und Aufbewahrungstasche mit Schulterriemen
Windschutz austauschen
Tauschen Sie bei dem Elektretmikrofon den Windschutz aus, wenn er Verschleißerscheinungen wie Risse oder Löcher zeigt. Ziehen Sie den Windschutz vom Mikrofon ab.
Schieben Sie vorsichtig den neuen Windschutz auf das Mikrofon. Der Windschutz muß
das gesamte Mikrofon umschließen.
Ohrpolster austauschen
26
Tauschen Sie die Ohrpolster aus, wenn sie beschädigt sind. Fassen Sie hinter die
Ohrpolster und ziehen Sie sie von den Hörerkappen ab. Schieben Sie die neuen Ohrpolster
auf die Hörerkappen.
Page 25

Kopfbügelband austauschen
Tauschen Sie das Kopfbügelband aus, wenn es beschädigt ist.
Ziehen Sie den Verschluß des Kopfbügelbandes auseinander und nehmen Sie das
verschlissene Kopfbügelband ab.
Legen Sie das neue Kopfbügelband um den Kopfhörerbügel.
Ziehen Sie die beiden Verschlußseiten des Kopfbügelbandes zusammen, bis sie
leicht überlappen.
Drücken Sie den Verschluß zusammen.
27
Page 26

Wenn Störungen auftr eten
Setzen Sie sich bitte mit Ihrem Sennheiser-Vertriebspartner in Verbindung, wenn Störungen auftreten, die nicht in der nachfolgenden Tabelle enthalten sind.
Fehler
Klare Kommunikation aber keine
aktive Lärmkompensation
Mögliche Ursachen und Abhilfe
Die NoiseGard™-Elektronik ist ausgeschaltet.
Überprüfen Sie, ob der Schalter ON/OFF in der Position ‚ON‘ steht.
Der XLR-3-Stecker ist aus der Stromversorgung herausgezogen.
Überprüfen Sie, ob der XLR-3-Stecker richtig an die Stromversorgung angeschlossen
ist.
Beim Anschluß an das Bordnetz: Die Sicherung des Bordnetzes ist defekt.
Überprüfen Sie die Sicherung des Bordnetzes.
Beim Anschluß an das Batteriepack (nicht bei HMEC 302, HMEC 305 und HMEC 306):
Die Batterien sind leer.
Überprüfen Sie, ob die grüne Kontrolleuchte am Batteriepack leuchtet. Leuchtet die
rote Kontrolleuchte, müssen Sie die Batterien austauschen.
28
Page 27

Fehler
Mögliche Ursachen und Abhilfe
aktive Lärmkompensation, aber
nur sehr leise Kommunikation
aktive Lärmkompensation, aber Sie
werden schlecht verstanden
Kommunikation nur auf einem Ohr
(nur bei HMEC 300, HMEC 302,
HMEC 306 und HMEC 400)
Mikrofonausgangsspannung
zu hoch oder zu niedrig
Die Lautstärke ist zu niedrig eingestellt.
Überprüfen Sie die Lautstärkeeinstellung Ihres Headsets.
Der Kopfhöreranschluß ist herausgezogen (außer HMEC 305, HMEC 305-C und HMEC 306).
Überprüfen Sie, ob der Klinkenstecker des Kopfhörers richtig angeschlossen ist.
Der Mikrofonanschluß ist herausgezogen (außer HMEC 305, HMEC 305-C und HMEC 306).
Überprüfen Sie, ob der Klinkenstecker des Mikrofons richtig angeschlossen ist.
Sie benutzen ein Stereo-Intercom-System, haben das Headset auf Mono-Betrieb eingestellt.
Stellen Sie den Mono-/Stereo-Umschalter auf die Position ‚Stereo‘.
Sie empfangen eine Monoquelle, haben aber das Headset auf Stereo-Betrieb eingestellt.
Stellen Sie den Mono-/Stereo-Umschalter auf die Position ‚Mono‘.
Die Ausgangsspannung am Mikrofon muß angepaßt werden.
Nehmen Sie dazu einen kleinen Schlitzschraubendreher und drehen Sie die Mic-Gain-
Adjustment-Einstellschraube (siehe Abbildung S. 25), bis Ihnen die Einstellung
zusagt.
29
Page 28

Wissenswertes zum Nachlesen
Das NoiseGard™-Prinzip
Lärm ist eine der schlimmsten Umweltbelastungen und ein ernstzunehmender Streßfaktor. Untersuchungen haben gezeigt, daß Lärm auf das vegetative Nervensystem wirkt.
Müdigkeit, Konzentrationsmangel, Nervosität und Gereiztheit sind die Folge. Darüber
hinaus führt ständige Lärmeinwirkung zu Dauerschäden des Gehörs.
Von diesem Problem betroffen sind insbesondere Piloten. Der Schalldruckpegel im Cockpit beträgt etwa 80 dB (A) in Jets und zwischen 90 und 97 dB (A) in Propeller-Flugzeugen.
Bei Start und Landung steigt der Lärm noch wesentlich an. Damit der Funksprechverkehr
jedoch gut verstanden werden kann, muß die Lautstärke in den Kopfhörern auf wenigstens
95 dB (A) eingestellt werden. Bei so manchem Piloten wurden deshalb Gehörschäden
festgestellt, die eine vorzeitige Berufsunfähigkeit bedingten bzw. dazu führten, daß
Piloten ihre Fluglizenz verloren.
Herkömmliche Gehörschutz-Headsets bieten einen guten Schutz im oberen und mittleren Audiobereich. Cockpitlärm besteht jedoch hauptsächlich aus mittleren bis tiefen
Frequenzen, bei denen herkömmliche Gehörschutz-Headsets nur noch unzureichend
schützen.
30
Page 29

Durch die von Sennheiser entwickelte aktive Lärmkompensation, System NoiseGard™,
kombiniert mit einem hochwertigen passiven Gehörschützer, konnte eine sehr hohe,
gleichmäßige Lärmdämpfung im gesamten Audiobereich realisiert werden. Der Lärmpegel im Cockpit wird drastisch gesenkt, der Pilot hört nur noch ein natürliches MotorenRestgeräusch. Das Funksignal kann er entsprechend leiser stellen.
A
Die aktive Lärmkompensation NoiseGard™ basiert auf dem Prinzip des phaseninversen
Schalls. Dazu wird eine Schallwelle erzeugt, die zum Störschall um 180° phasenverschoben ist, mit dem Ergebnis, daß sich beide Schallwellen gegenseitig annähernd
aufheben.
In beide Hörersysteme des Headsets ist eine Elektret-Mikrofonkapsel, ein Rückkopplungskreis und ein Wandlersystem eingebaut. Der von den Mikrofonen aufgenommene Schall,
bestehend aus Störsignalen und Funksignal, wird verstärkt und das Funksignal herausgefiltert. Der Störschall wird nun von einer elektronischen Schaltung aufbereitet und um
180º phasenverschoben. Dann wird das Funksignal dem Störschall wieder beaufschlagt
und als Summensignal verstärkt auf die Wandlersysteme gegeben. Der Störschall wird
durch die Überlagerung mit gegenphasigem Schall deutlich reduziert. Das Funksignal
wird jedoch unverändert wiedergegeben, da es die Kompensationsschaltung nicht durchlaufen hat.
31
Page 30
32
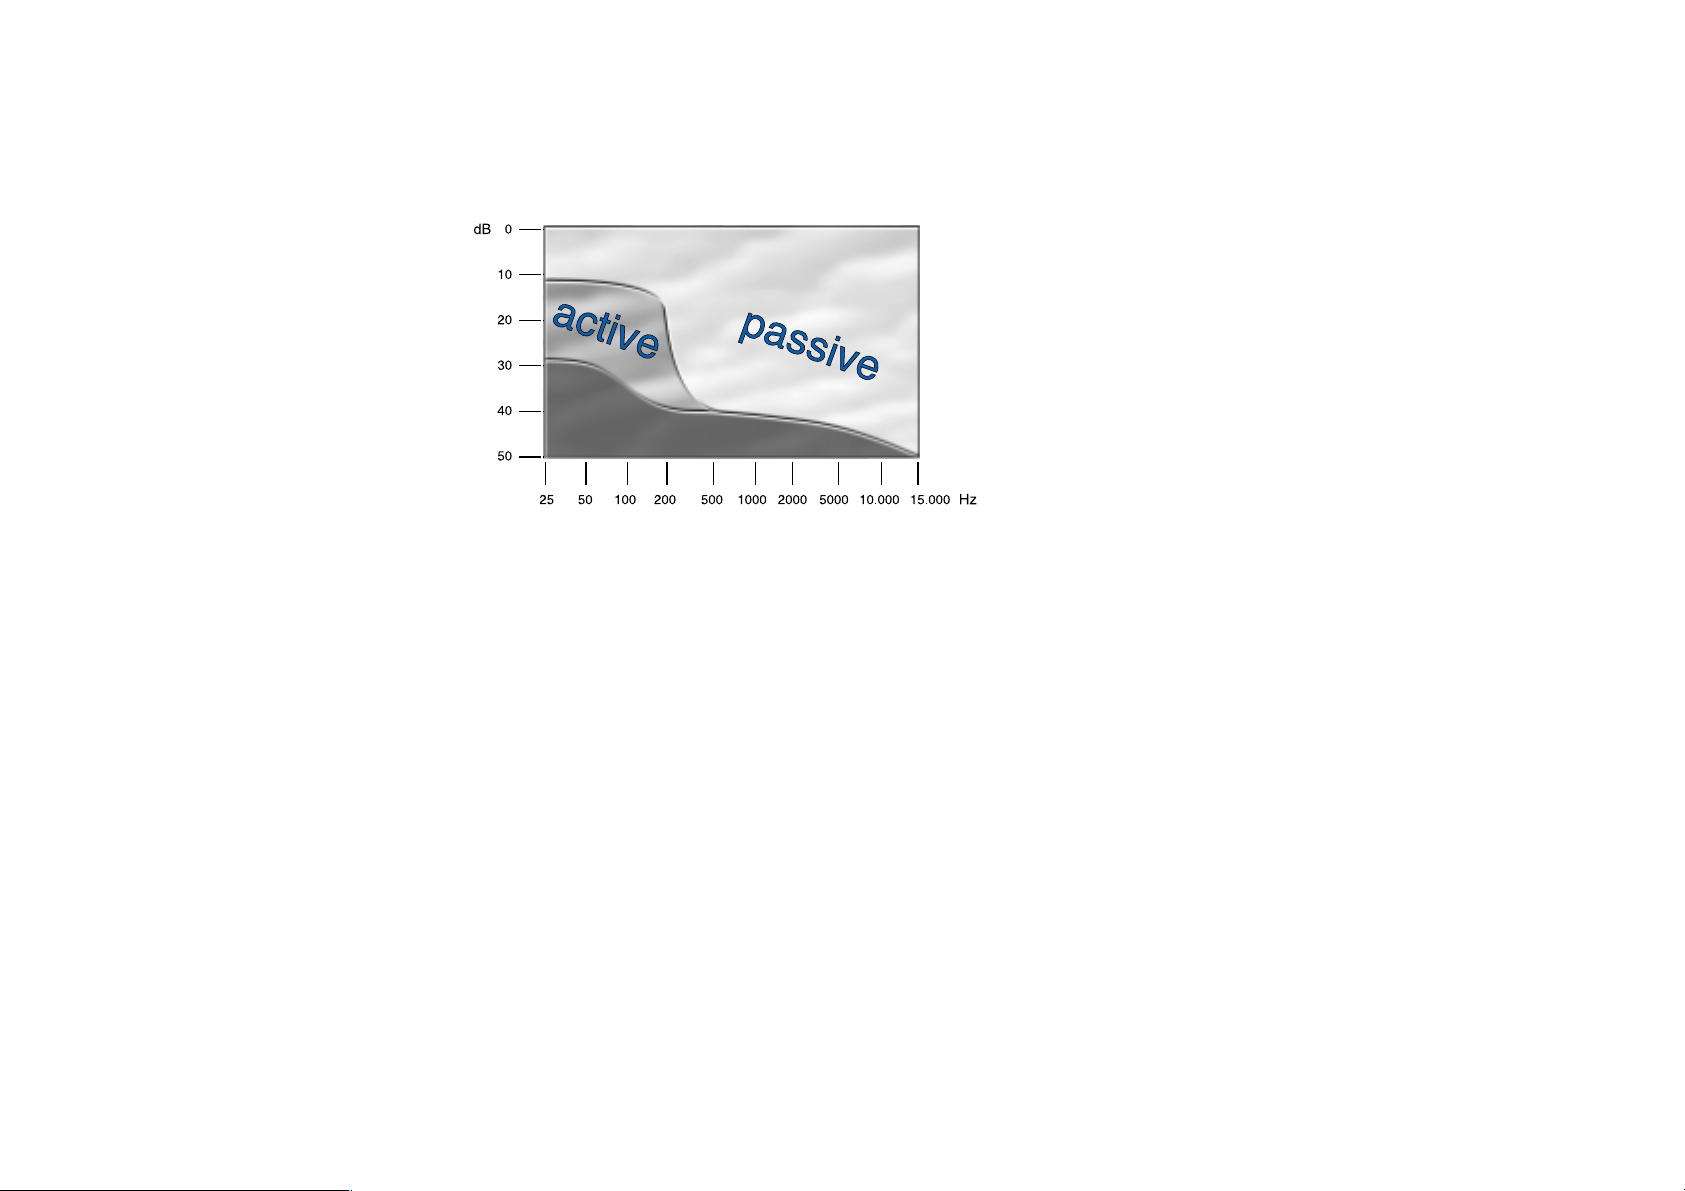
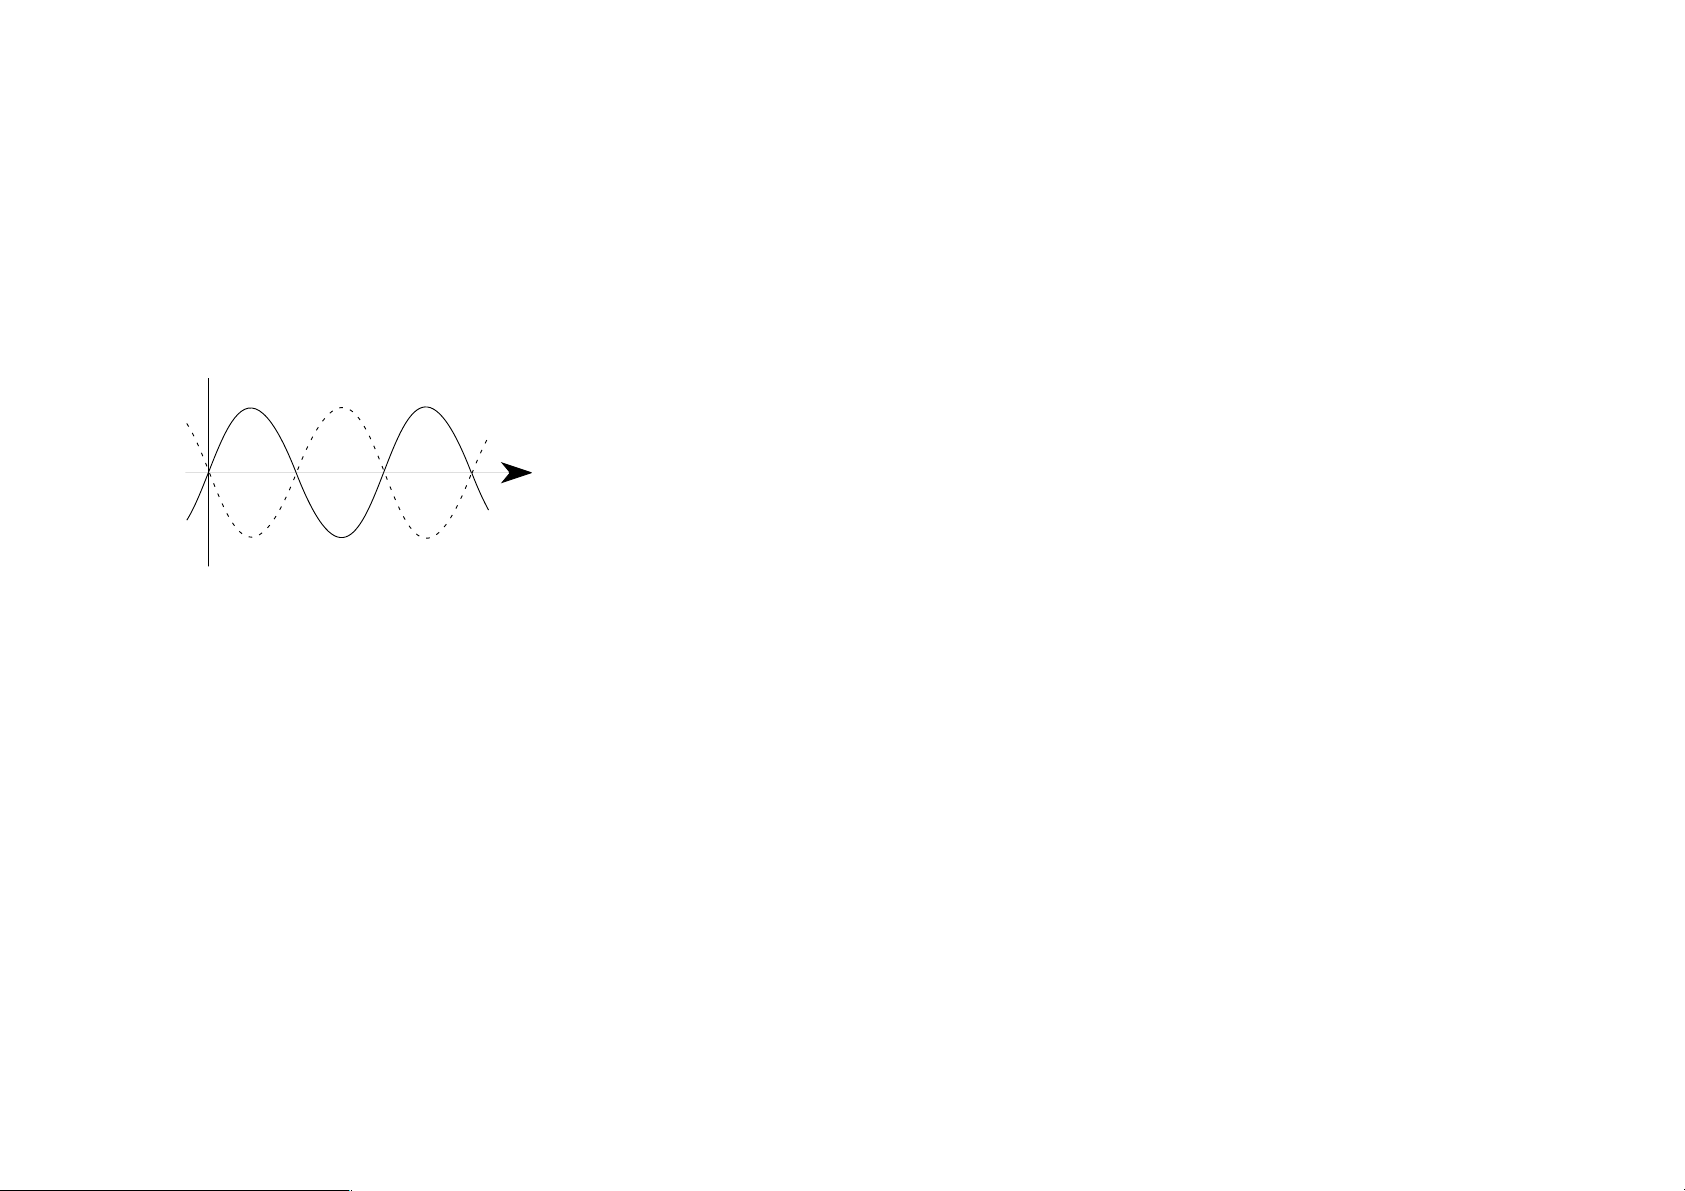
Die Abbildung zeigt die Lärmkompensation mit NoiseGard™: Passive Gehörschützer
dämpfen den Lärm vor allem im mittleren und oberen Frequenzbereich. Bei Frequenzen
unterhalb 500 Hz schützen sie allerdings nur noch unzureichend. Durch die aktive
Lärmkompensation wird jedoch auch der Lärm im Frequenzbereich von 25 bis 500 Hz um
ca. 25 dB reduziert. Die Summendämpfung aus aktiver und passiver Lärmkompensation
liegt bei etwa 30 dB über den gesamten Audiobereich.
Eine Lärmreduzierung um 10 dB wird subjektiv als Halbierung der Lautstärke wahrgenommen. Wird der Lärm um weitere 10 dB reduziert, wird dies wiederum als eine Halbierung
der Lautstärke empfunden usw.
Page 31
4
2
1
3
solder side
5
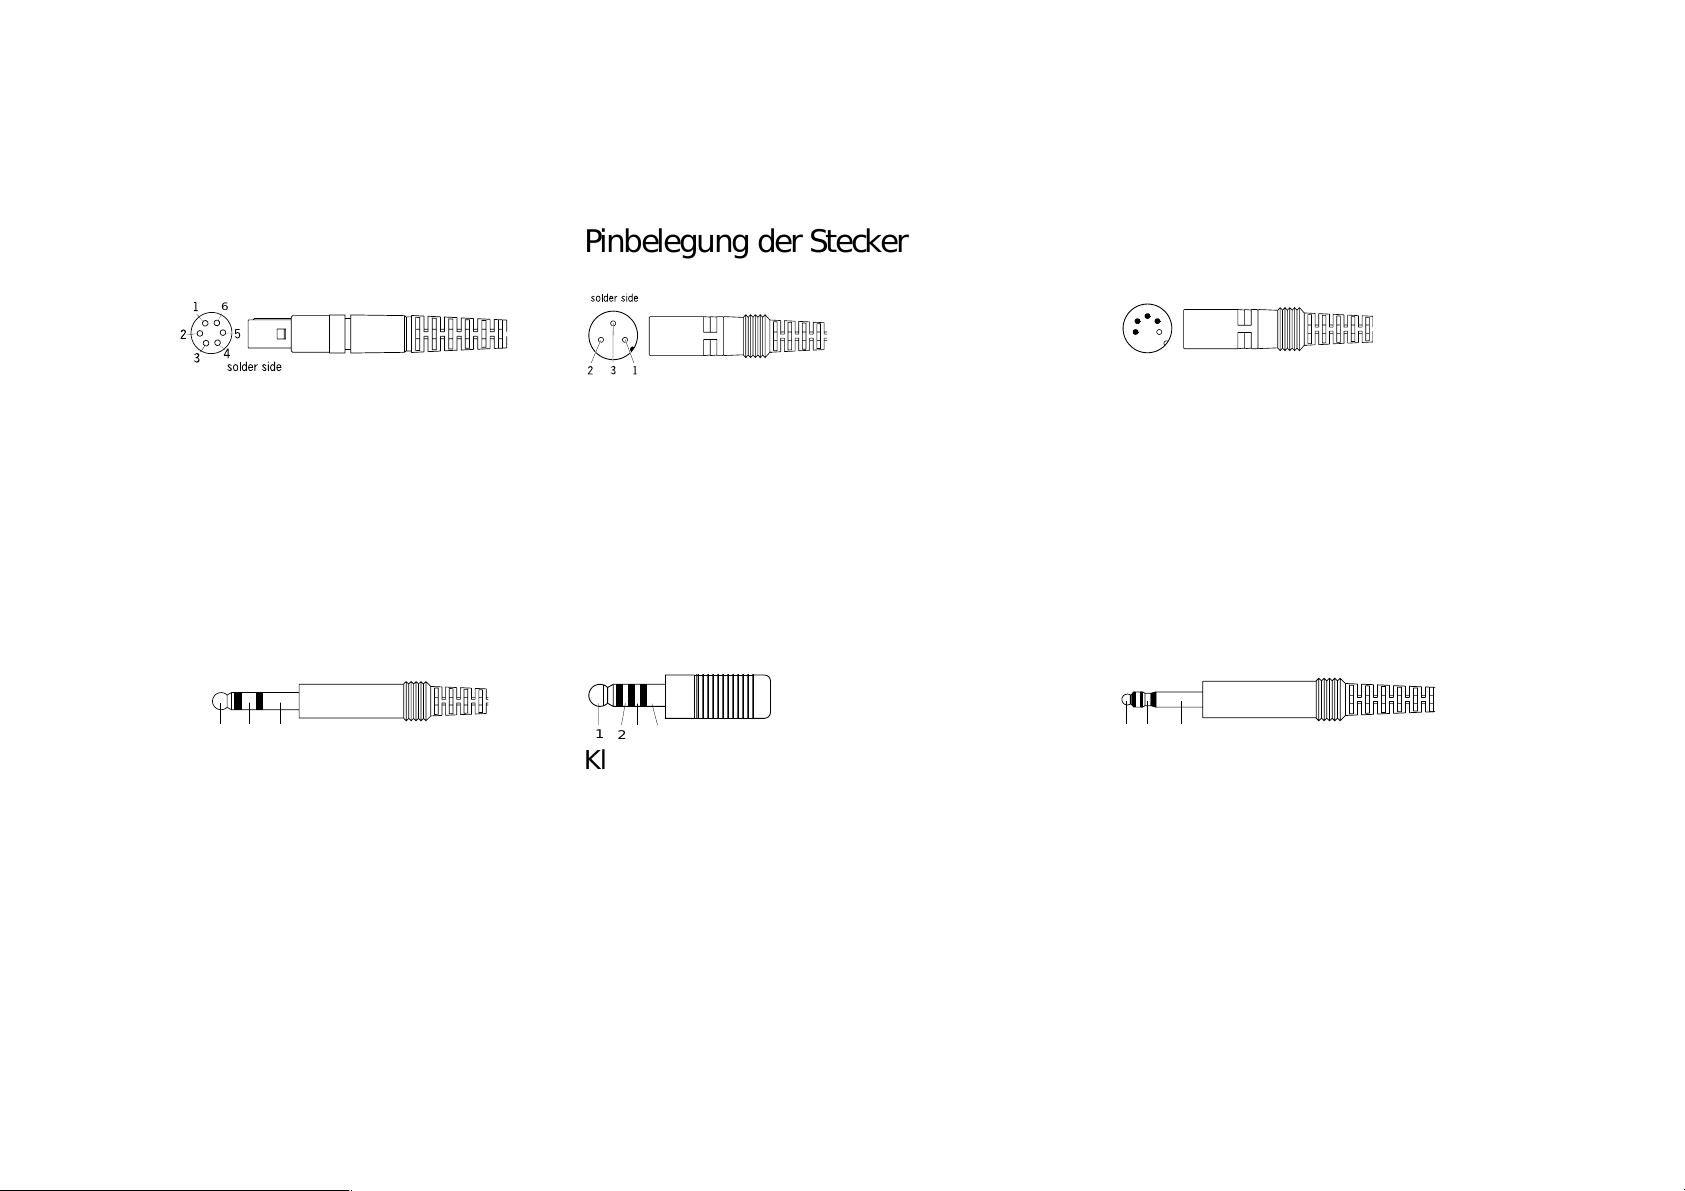
Pinbelegung der Stecker
6
XLR-5-Stecker
Redel-Stecker (NoiseGard™)
1 Stromvers. NoiseGard™
(DC +)
2 Audio Lo / DC –
3 Audio Hi links
4 Audio Hi rechts
5 Mikrofon Hi
6 Mikrofon Lo
31 2
6,35-mm-Stereo-Klinkenstecker
1 Audio Hi links
2 Audio Hi rechts
3 Audio Lo
XLR-3-Stecker (NoiseGard™)
1 Stromvers. NoiseGard™ (DC +)
2 Masse
3 nicht anschließen!
1
2
3 4
Klinkenstecker U174/U
1 Mikrofon Lo
2 Audio Hi
3 Mikrofon Hi
4 Audio Lo
HMEC 305
1 Audio Hi
2 Audio Lo / DC –
3 Mikrofon Hi
4 Mikrofon Lo
5 Stromvers. NoiseGard™ (DC +)
23
1
Klinkenstecker PJ-068
HMEC 302
1 Stromvers. NoiseGard™ (DC +)
2 Mikrofon Hi
3 Mikrofon Lo / DC –
HMEC 305-C
1 Audio Hi
2 Audio Lo
3 Mikrofon Hi
4 Mikrofon Lo
5 nicht belegt!
HMEC 300
1 nicht belegt!
2 Mikrofon Hi
3 Mikrofon Lo
33
Page 32

Technische Daten
HMEC 300 HMEC 302 HMEC 306 HMEC 400
Kopfhörer
Wandlerprinzip dynamisch
Ankopplung ans Ohr circumaural, geschlossen
Übertragungsbereich 45 – 15000 Hz
Nennimpedanz aktiv/passiv 300/150 Ω, mono
600/300 Ω, stereo
Lärmdämpfung aktiv und passiv > 25 – 40 dB
Max. Schalldruckpegel 120 dB (± 5%)
Andruckkraft ca. 10 N
Mikrofon inkl. Vorverstärker
Wandlerprinzip Elektret-Kapsel, geräuschkompensiert, MKE 45-1
Übertragungsbereich 300 – 5000 Hz
Empfindlichkeit –
Max. Schalldruckpegel 120 dB
Anschlußwiderstand 150 Ω
Ausgangspannung 400 mV ± 3dB bei 114 dB (nach RTCA/DO 214)
Versorgungsspannung typ. 16 V DC (8 – 16 V DC, ca. 8 – 25 mA, nach RTCA/DO 214)
34
Page 33

HMEC 300 HMEC 302 HMEC 306 HMEC 400
Allgemeine Daten
Anschlußkabel 1,5 m, einseitig geführt
Gewicht ohne Kabel 370 g
Betriebsspannung NoiseGard™ 12 – 35 V DC
Stromaufnahme 27 mA (Ruhestrom), max. 80 mA
Sicherung 500 mA Thermo-Sicherung
Stecker 6,35-mm-Stereo-Klinken- 6,35-mm-Stereo-Klinken- 6-PIN-Redel-Stecker 6,35-mm-Stereo-Klinken-
stecker für Kopfhörer. stecker für Kopfhörer. für Kopfhörer, Mikrofon stecker für Kopfhörer.
PJ-068 für Mikrofon, PJ-068 für Mikrofon, und NoiseGard™ PJ-068 für Mikrofon,
XLR-3-Stecker für und NoiseGard™ XLR-3-Stecker für
NoiseGard™ NoiseGard™
Ausstattung Mono-/Stereo-Umschalter
Ein-/Ausschalter für NoiseGard™
Lautstärkesteller für Kopfhörer
Temperaturbereich Betrieb –15°C bis 55°C
Aufbewahrung –55°C bis 55°C
Betriebszeit Batterieteil mit Batterien (4 x Mignon, 1,5 V, Alkali-Mangan): ca. 15 Stunden
mit Akkus: ca. 3 Stunden
35
Page 34

Technische Daten
HMEC 305 HMEC 305-C HMEC 322 HMDC 322
Kopfhörer
Wandlerprinzip dynamisch
Ankopplung ans Ohr circumaural, geschlossen
Übertragungsbereich 45 – 15000 Hz
Nennimpedanz aktiv/passiv 300/150 Ω, mono 50/35 Ω, mono
Lärmdämpfung aktiv und passiv > 25 – 40 dB
Max. Schalldruckpegel 120 dB (± 5%)
Andruckkraft ca. 10 N
Mikrofon inkl. Vorverstärker
Wandlerprinzip Elektret-Kapsel, dynamisch,
geräuschkompensiert, geräuschkompensiert,
MKE 45-1 M-87/AIC
Übertragungsbereich 300 – 5000 Hz 500 – 4000 Hz
Empfindlichkeit – 1,8 – 4 µV / 74 dB an 5 Ω
Max. Schalldruckpegel 120 dB –
Anschlußwiderstand 150 Ω –
Ausgangspannung 400 mV ± 3 dB bei 114 dB (nach RTCA/DO 214) –
Versorgungsspannung typ. 16 V DC (8 – 16 V DC, ca. 8 – 25 mA, nach RTCA/DO 214) –
36
Page 35

HMEC 305 HMEC 305-C HMEC 322 HMDC 322
Allgemeine Daten
Anschlußkabel 1,5 m, einseitig geführt Spiralkabel, einseitig geführt
Gewicht ohne Kabel 370 g
Betriebsspannung NoiseGard™ 12 – 35 V DC
Stromaufnahme 27 mA (Ruhestrom), max. 80 mA
Sicherung 500 mA Thermo-Sicherung
Stecker XLR-5-Stecker für XLR-5-Stecker für U-174/U-Stecker für Kopfhörer und Mikrofon,
Kopfhörer. Mikrofon und Kopfhörer und Mikrofon, XLR-3-Stecker für NoiseGard™
NoiseGard™ XLR-3-Stecker für
NoiseGard™
Ausstattung Ein-/Ausschalter für NoiseGard™
Lautstärkesteller für Kopfhörer
Temperaturbereich Betrieb –15°C bis 55°C
Aufbewahrung –55°C bis 55°C
Betriebszeit Batterieteil mit Batterien (4 x Mignon, 1,5 V, Alkali-Mangan): ca. 15 Stunden
mit Akkus: ca. 3 Stunden
37
Page 36

Konformitätserklärung
Sennheiser electronic GmbH & Co. KG erklären, daß dieses Gerät die anwendbaren CE-Normen und Vorschriften erfüllt.
Aktuelle Informationen zu Sennheiser-Produkten erhalten Sie auch im Internet unter „http://www.sennheiser.com”.
38
Page 37

™
Instructions for use
Headset
HMEC 300
HMEC 302
HMEC 305
HMEC 305-C
HMEC 306
HMEC 322
HMEC 400
HMDC 322
111
Page 38

Contents
Safety tips ....................................................................................................113
Headset features ..............................................................................................114
Product variants........................................................................................................................ 115
Delivery includes ..............................................................................................118
Recommended accessories ...............................................................................119
Connecting the headsets..................................................................................120
Connecting cables for headsets................................................................................................ 120
Powering options ..................................................................................................................... 122
Preparing the headsets for use .........................................................................128
Adjusting the headband ........................................................................................................... 128
Positioning the microphone...................................................................................................... 129
Additional information for helicopter use of the HMEC 322 headset....................................... 131
Using the headsets...........................................................................................132
Tur ning NoiseGard™ on/off ..................................................................................................... 132
Mono/Stereo selection (except HMEC 305, HMEC 305-C, HMEC 322 and HMDC 322)........... 132
Adjusting the volume ............................................................................................................... 132
Adjusting the microphone gain ................................................................................................ 133
Attaching the cable clip............................................................................................................ 133
Folding up the headphones...................................................................................................... 133
Spare parts.......................................................................................................134
In case of difficulty ...........................................................................................136
Valuable information on NoiseGard™ ..............................................................138
The NoiseGard™ principle........................................................................................................ 138
Connector assignment ............................................................................................................. 141
Technical data ..................................................................................................142
112
Page 39

The HMEC 300, HMEC 302, HMEC 305,HMEC 305-C, HMEC 306, HMEC 322, HMEC 400
and HMDC 322 are pilot headsets with closed ear protector headphones and NoiseGard™
active noise compensation for use in helicopters, propeller and turboprop aircraft.
Safety tips
• With the NoiseGard™ active noise compensation turned on, typical aircraft sounds
(for example, those from engines, propellers, warning alarms, etc.) may sound
different to you. Before operating any aircraft, make sure that, with NoiseGard™
turned on, you can hear and recognize these sounds. Set the volume to safe levels
that do not interfere with your ability to hear informational sounds and warning
alarms.
• Do not attempt to repair the headset yourself. If problems occur, contact your
Sennheiser agent for assistance.
• Only replace parts of the headset whose replacement is described in this manual.
All other parts of the headset must be replaced by your Sennheiser agent.
• Do not immerse the headset in water! For information on how to clean the headset,
contact your Sennheiser agent.
113
Page 40

Headset features
HMEC 300 NoiseGard™ headset
• New active headset with effective attenuation of external noise across the entire
frequency spectrum due to NoiseGard™
• NoiseGard™ active noise compensation provides clear communications even in the
noisiest environment
• Excellent comfort due to very low weight, soft ear cushions and padded headband
as well as best possible freedom of movement due to unilateral connecting cable
• Foldable headband for easy and space-saving storage
• Clear communications due to MKE 45-1 electret microphone with adjustable sensitivity
• Microphone can be easily positioned and worn on either left or right side due to
flexible microphone boom with quick-fixing device
• Optimum radio reception due to headphone systems with wide frequency response
• Integrated volume control
• Adaption to the aircraft intercom system via Mono/Stereo switch
active noise compensation
114
• With the NoiseGard™ active noise compensation turned off, the headset can be
used as a conventional headset
Page 41

• Power supply for NoiseGard™ is provided via on-board power supply system,
cigarette lighter socket or battery pack
• Fail safe operation in case of power failure
• Supply voltage for the NoiseGard™ system is processed by the in-line electronics in
the connecting cable
• Made in Germany, two-year warranty
Product variants
HMEC 302 NoiseGard™ headset
The HMEC 302 differs from the HMEC 300 in the following features:
• Connection of microphone and NoiseGard™ electronics via PJ-068 plug
HMEC 305 NoiseGard™ headset
The HMEC 305 differs from the HMEC 300 in the following features:
• No Mono/Stereo switch
• Connection of headphones, microphone and NoiseGard™ electronics to the on-board
power supply system (12–35 V DC) via XLR-5 plug
115
Page 42

HMEC 305-C NoiseGard™ headset
The HMEC 305-C differs from the HMEC 300 in the following features:
• No Mono/Stereo switch
• Connection of headphones and microphone via XLR-5 plug
HMEC 306 NoiseGard™ headset
The HMEC 306 differs from the HMEC 300 in the following features:
• Connection of headphones, microphone and NoiseGard™ electronics to the on-board
power supply system (12–35V DC) via 6-pin Redel plug
HMEC 322 NoiseGard™ headset
The HMEC 322 differs from the HMEC 300 in the following features:
• No Mono/Stereo switch
• Coiled cable
• Connection of headphones and microphone via U-174/U jack plug to a high impedance
interface in the helicopter
116
Page 43

HMEC 400 NoiseGard™ headset
The HMEC 400 differs from the HMEC 300 in the following features:
• Stylish silver design
• Leatherette ear cushions
• Headband padding can be buttoned
HMDC 322 NoiseGard™ headset
The HMDC 322 differs from the HMEC 300 in the following features:
• No Mono/Stereo switch
• Coiled cable
• M-87/AIC dynamic microphone and low impedance headphones
• Connection of headphones and microphone via U-174/U jack plug to a low impedance
interface in the helicopter
117
Page 44

Delivery includes
HMEC 300, HMEC 305-C, HMEC 322, HMEC 400 and HMDC 322 headsets
• Headset
• 3-pin XLR socket for aircraft panel mounting (power supply via the on-board system)
• Padded carry and storage bag with shoulder strap for headset and accessories
• Wind screen for microphone (except HMDC 322)
• MZQ 2002-1 Cable clip (Cat. No. 44740)
HMEC 302, HMEC 305 and HMEC 306 headsets
• Headset
• Padded carry and storage bag with shoulder strap for headset and accessories
• Wind screen for microphone
• MZQ 2002-1 Cable clip (Cat. No. 44740)
118
Page 45

ACX-1 ACX-2
Recommended accessories
Replaceable gel ear cushions (Cat. No. 83140)
BP-03 battery pack (except for HMEC 302, HMEC 305 and HMEC 306)
Battery pack with XLR-3 socket for powering the NoiseGard™ electronics of the HMEC 300,
HMEC 305-C, HMEC 322, HMEC 400 and HMDC 322 headsets. Four 1.5 V AA size
alkaline manganese batteries (IEC LR 6) ensure approx. 15 hours of reliable operation
(batteries are not included in the delivery). Length of connecting cable: 0.9 m.
Adapter cables (except for HMEC 302, HMEC 305 and HMEC 306)
Sennheiser offers special adapter cables for connecting the NoiseGard™ electronics of the
HMEC 300, HMEC 305-C, HMEC 322, HMEC 400 and HMDC 322 headsets to the onboard power supply via the cigarette lighter socket:
• ACX-1 adapter cable for powering one headset via the cigarette lighter socket
• ACX-2 adapter cable for powering two headsets via the cigarette lighter socket
The adapter cables are also available with a right-angled jack plug featuring a 7.5 A fuse
and a green LED operation indicator:
ACX-11 ACX-22
• ACX-11 adapter cable for powering one headset via the cigarette lighter socket
• ACX-22 adapter cable for powering two headsets via the cigarette lighter socket
119
Page 46

Connecting cable for
HMEC 300 and HMEC 400
Connecting cable for
HMEC 302
Connecting the headsets
Connecting cables for headsets
HMEC 300 and HMEC 400 headsets:
1
/4” (6.35 mm) stereo jack plug for connecting the headphones
1
1 PJ-068 jack plug for connecting the microphone
1 XLR-3 plug for connecting the power supply for the NoiseGard™ electronics
HMEC 302 headset:
1/
” (6.35 mm) stereo jack plug for connecting the headphones
4
1 PJ-068 jack plug for connecting the microphone and the power supply for the
NoiseGard™ electronics
HMEC 305 headset:
120
Connecting cable for
HMEC 305
1 XLR-5 plug for connecting the headphones, the microphone and the power supply for
the NoiseGard™
electronics
Page 47

Connecting cable for
HMEC 305-C
Connecting cable for
HMEC 306
HMEC 305-C headset:
1 XLR-5 plug for connecting the headphones and the microphone
1 XLR-3 plug for connecting the power supply for the NoiseGard™
electronics
HMEC 306 headset:
1 6-pin Redel plug for connecting the headphones, the microphone and the power
supply for the NoiseGard™ electronics
HMEC 322 and HMDC 322 headsets:
1 U-174/U jack plug for connecting the headphones and the microphone
1 XLR-3 plug for connecting the power supply for the NoiseGard™
electronics
Connecting cable for
HMEC 322 and HMDC 322
121
Page 48

Powering options
There are three options for powering the NoiseGard™ active noise compensation:
1. Connection to the on-board system (12–35 V DC)
2. Connection to the BP-03 battery pack
(accessory, except for HMEC 302, HMEC 305 and HMEC 306)
3. Connection to the cigarette ligther socket (12–35 V DC) via adapter cable
(accessory, except for HMEC 302, HMEC 305 and HMEC 306)
The supply voltage for the NoiseGard™ system is processed by the in-line electronics in
the connecting cable.
122
Page 49
Power supply for
NoiseGard™
Ground
Do not connect!
XLR-3 socket for HMEC 300, HMEC 305-C,
HMEC 322, HMEC 400 and HMDC 322
headsets
1. Connecting the headset to the on-board system
The NoiseGard™ electronics can be connected to on-board power supply systems with
operating voltages between 12–35 V DC.
Danger of short circuit!
Before turning on NoiseGard™, ensure that the on-board power supply system is
protected by a 1 A fuse.
The HMEC 300, HMEC 305-C, HMEC 322, HMEC 400 and HMDC 322 headsets are
supplied with an XLR-3 socket for panel mounting in the aircraft. The XLR-3 socket must
be mounted by a technician qualified to perform this type of installation.
HMEC 300 and HMEC 400 headsets:
씰 Connect the
plug for the microphone to the corresponding jack sockets of your intercom.
씰 Connect the XLR-3 plug to the XLR-3 socket.
1
/4” (6.35 mm) stereo jack plug for the headphones and the PJ-068 jack
123
Page 50

Headset HMEC 302:
씰 Connect the
1
/4” (6.35 mm) stereo jack plug for the headphones and the PJ-068 jack
plug for the microphone to the corresponding jack sockets of your intercom.
HMEC 305 headset:
씰 Connect the XLR-5 plug to the aircraft’s XLR-5 socket.
Headset HMEC 305-C:
씰 Connect the XLR-5 plug for the headphones and the microphone to the aircraft’s
XLR-5 socket.
씰 Connect the XLR-3 plug to the XLR-3 socket.
HMEC 306 headset:
씰 Connect the 6-pin Redel plug to the corresponding socket in the aircraft.
HMEC 322 and HMDC 322 headsets:
124
씰 Connect the U-174/U jack plug for the headphones and the microphone to the
U-174/U socket of your intercom.
씰 Connect the XLR-3 plug to the XLR-3 socket.
Page 51

2. Connecting the headset to the battery pack
(except HMEC 302, HMEC 305 and HMEC 306)
The NoiseGard™ electronics of the HMEC 300, HMEC 305-C, HMEC 322, HMEC 400 and
HMDC 322 headsets can also be powered via the BP-03 battery pack ( ‘Recommended
accessories’). The battery pack can be operated either on standard or rechargeable
batteries (not included in the delivery). However, to ensure a longer operating time, we
would recommend using standard AA size alkaline manganese batteries (IEC LR6). If
operated on rechargeable batteries, the operating time will be reduced to approx. 3
hours.
Inserting / replacing the the batteries
씰 Open the cover of the battery compartment.
씰 Insert four AA size alkaline-manganese batteries (IEC LR6). Observe correct polarity
when inserting the batteries.
씰 Close the cover of the battery compartment.
LED operation and battery status indication
The battery pack has two control LEDs.
Green LED: The battery pack is turned on and the battery capacity is sufficient.
Red LED: The batteries are low. Replace the batteries.
125
Page 52

Connecting the headset, turning on the battery pack
씰 Connect the XLR-3 plug of the headset connecting cable to the XLR-3 socket on the
connecting cable of the battery pack.
씰 HMEC 300 and HMEC 400 headsets: Connect the
1
/4” (6.35 mm) stereo jack plug
for the headphones and the PJ-068 jack plug for the microphone to the corresponding
jack sockets of your intercom.
HMEC 305-C headset: Connect the XLR-5 plug for the headphones and the
microphone to the aircraft’s XLR-5 socket.
HMEC 322 and HMDC 322 headsets: Connect the U-174/U jack plug for the
headphones and the microphone to the U-174/U socket of your intercom.
씰 Turn on the battery pack by setting the ON/OFF switch to ON. The green LED power
indicator lights up.
Note:
When using the battery pack, the ON/OFF switch integrated into the headset
connecting cable is out of operation.
126
Attaching the battery pack to clothing
The battery pack can be attached to clothing by means of the supplied attachment clip,
Velcro tape is also supplied.
Page 53

ACX-1 ACX-2
3. Connecting the headset via a cigarette lighter adapter cable
(except HMEC 302, HMEC 305 and HMEC 306)
Sennheiser offers special adapter cables with XLR-3 socket for connecting the NoiseGard™
electronics of the HMEC 300, HMEC 305-C, HMEC 322, HMEC 400 and HMDC 322
headsets to the on-board power supply via the cigarette lighter socket:
• ACX-1 adapter cable for powering one headset via the cigarette lighter socket
• ACX-2 adapter cable for powering two headsets via the cigarette lighter socket
The adapter cables are also available with a right-angled jack plug featuring a 7.5 A fuse
and a green LED operation indicator:
• ACX-11 adapter cable for powering one headset via the cigarette lighter socket
• ACX-22 adapter cable for powering two headsets via the cigarette lighter socket
ACX-11 ACX-22
Connecting the headset
씰 Connect the XLR-3 plug of the headset connecting cable to the XLR-3 socket of t he
adapter cable.
씰 Connect the plug or right-angled jack plug of the adapter cable to the cigarette lighter
socket.
127
Page 54

Preparing the headsets for use
Adjusting the headband
For good noise attenuation and best possible comfort, the headband has to be adjusted
to properly fit your head:
씰 Wear the headset so that the headband runs over the top of your head.
씰 Adjust the length of the headband so that
• your ears are completely inside the ear cushions,
• you feel even, gentle pressure around your ears,
• a snug fit is ensured.
Note:
Make sure not to squeeze any connecting cable when adjusting the headband.
Squeezing can damage the connecting cables.
씰 Turn on the NoiseGard™ active noise compensation by setting the ON/OFF switch
to ON ( “Turning NoiseGard™ on/off”).
씰 Final adjustment is best made in a noisy environment.
128
Page 55

Positioning the microphone
Relocating the microphone boom
The microphone boom can be worn on either side of the mouth.
씰 Loosen the quick-fixing device.
씰 Rotate the microphone boom by 180°.
씰 Tighten the quick-fixing device.
Positioning the microphone towards the corner of the mouth
The HMEC 300, HMEC 302, HMEC 305, HMEC 305-C, HMEC 306, HMEC 322 and
HMEC 400 headsets feature a flexible microphone boom. Bend the microphone boom so
that the microphone is placed at the corner of the mouth. Maintain a distance of approx.
2 cm between microphone and mouth.
129
Page 56

For positioning the microphone of the HMDC 322 headset, proceed as follows:
씰 Adjust the length of the microphone boom so that the microphone is placed at the
corner of the mouth. To do so, loosen the quick-fixing device and adjust the
microphone boom in length.
씰 Pull the middle part of the microphone boom towards the mouth so that the
distance between microphone and mouth is approx. 2 cm.
씰 Tilt the microphone for final positioning.
130
Page 57

Additional information for helicopter use of the HMEC 322 headset
The polarity of the microphone connection in helicopters is not standardized. If the
microphone of your headset does not work with the existing polarity, you can reverse the
polarity on the headset by simply rotating the microphone module. To do so, please
proceed as follows:
1. Pull the wind screen from the microphone.
2. Loosen the screws by approx. half a turn.
3. Pull the microphone module from the boom-arm.
4. Rotate the microphone module by 180°.
5. Put the rotated microphone module back into the boom-arm.
6. Now tighten the screws from the other side.
7. Slide the windscreen over the microphone.
Rotating the microphone module does not change its acoustic properties. Due to its noisecompensating pick-up pattern, the microphone can be used from either side.
131
Page 58
Using the headsets
Turning NoiseGard™ on/off
With the NoiseGard™ active noise compensation turned off, the headset can be used as
a conventional headset.
Turn on the NoiseGard™ active noise compensation by setting the ON/OFF switch to ON.
When using the BP-03 battery pack, set the NoiseGard™ ON/OFF switch to ON and use
the ON/OFF switch on the battery pack.
Mono/Stereo selection (except HMEC 305, HMEC 305-C, HMEC 322 and
HMDC 322)
In general, you’ll receive a mono sound source so that the Mono/Stereo switch can remain
set to “Mono”. When using a stereo intercom system, set the Mono/Stereo switch to
“Stereo”.
132
Adjusting the volume
Exposure to loud sounds can cause hearing damage!
Set the volume control to a medium value. Make sure that you can hear critical sounds
such as warning alarms.
Page 59

Mic Gain Adjustment
Adjusting the microphone gain
According to JTSO approval C58a, the microphone output voltage has to be factorypreset to 400 mV. If this output voltage is too high or too low for your intercom system,
it can easily be re-adjusted on the microphone. To do so, use a small slotted screwdriver
and turn the ”Mic Gain Adjustment” screw (see illustration on the left) until you reach the
desired setting.
Attaching the cable clip
The headphone cable can be fixed by means of the cable clip. Guide the headphone cable
through the metal cable clip as shown in the illustration on the left. Attach the cable clip
to your clothing and then loop the cable through the clip so that the headphone cable
doesn‘t disturb you.
Folding up the headphones
For easy and space-saving transportation, the earcups can be folded up and tucked
between the headband.
Unfold the headphones by grasping both earcups and pulling them down and away from
the headband.
133
Page 60

Spare parts
The following spare parts are available from your Sennheiser agent:
• Wind screen for MKE 45-1 electret microphone
• Ear cushions
• Headband padding
• Cable clip
• Carry and storage bag with shoulder strap
Replacing the wind screen
If the wind screen for the electret microphone shows signs of wear such as tears or holes,
replace the wind screen. Pull the wind screen from the microphone. Gently slide-on the
new wind screen and ensure that it fits securely over the microphone.
Replacing the ear cushions
134
Replace the ear cushions if they are damaged. Grasp behind the ear cushions and pull
them up and away from the earcups. Slide the new ear cushions onto the earcups.
For best results replace the ear cushions after 100 hours of use or two years.
Page 61
Replacing the headband padding
Replace the headband padding if it is damaged.
씰 Pull the Ziploc type fastening strips of the headband padding apart and remove the
worn headband padding.
씰 Put the new headband padding around the headband.
씰 Pull the two edges of the headband padding together so that the fastening strips
slightly overlap.
씰 Join the fastening strips.
135
Page 62

In case of difficulty
If problems occur that are not listed in the below table, please contact your Sennheiser
agent.
Problem
Clear communication but no
active noise compensation
Possible cause and what to do
The NoiseGard™ electronics are turned off.
씰 Check to see if the ON/OFF switch is set to ON.
The XLR-3 plug has been pulled out of the power source.
씰 Check to see if the XLR-3 plug is correctly connected to the power source.
If aircraft powered: The aircraft fuse is defective.
씰 Check the aircraft fuse.
If battery powered (except HMEC 302, HMEC 305 and HMEC 306): The batteries are low.
씰 Check to see if the green LED on the battery pack is lit. If the red LED is lit, replace
the batteries.
136
Page 63

Problem
Possible cause and what to do
Active noise compensation but
very low volume communication
Active noise compensation but
reduced intelligibility
Communications in one ear only
(only HMEC 300, HMEC 302,
HMEC 306 and HMEC 306)
Microphone output voltage set
too high or too low
The volume control is set too low.
씰 Check the volume setting of the headset.
The headphone connection has been pulled out (except HMEC 305, HMEC 305-C and
HMEC 306).
씰 Check to see if the headphone jack plug is correctly connected.
The microphone connection has been pulled out (except HMEC 305, HMEC 305-C and
HMEC 306).
씰 Check to see if the microphone jack plug is correctly connected.
You are using a stereo intercom system but the headset is set to mono operation.
씰 Set the Mono/Stereo switch to ‘Stereo’.
You are receiving a mono source but the headset is set to stereo operation.
씰 Set the Mono/Stereo switch to ‘Mono’.
Re-adjust the output voltage on the microphone.
씰 To do so, use a small slotted screwdriver and turn the “Mic Gain Adjustment” screw
(see illustration on page 133) until you reach the desired setting.
137
Page 64

Valuable information on NoiseGard™
The NoiseGard™ principle
One of the greatest stress factors today is noise. Research has shown that noise affects
the nervous system, and can cause tiredness, poor concentration, irritability and tension.
Of even greater concern is the permanent damage to hearing that can result from noise
at high levels.
This problem concerns pilots in particular. Cockpit noise amounts to about 80 dB(A) in jets
and to 90 up to 97 dB(A) in turboprops. During takeoff and landing, the noise level is even
higher. To be able to understand radio traffic in spite of the noisy environment, the ATC
signal level must be set to at least 95 dB(A). Permanent hearing loss caused by the
continuous noise in aircrafts is the reason why many pilots became prematurely disabled
or lost their pilot´s license.
Circumaural communication headsets provide noise attenuating properties and are
commonly used to address this problem. However, the noise attenuation of these
headsets is uneven. High frequencies are reduced considerably, but low frequency wind
and engine noise, the most prominent noise in many of today's aircrafts, is attenuated very
little.
138
Page 65
In response to these problems, Sennheiser has developed an active noise compensation
system – NoiseGard™ – which, combined with a high-quality passive hearing protector,
provides consistent noise attenuation over the entire audio range. The overall noise level
is reduced so that the radio volume can be turned down but enough noise still remains
for the pilot to safely monitor the aircraft engines.
A
NoiseGard™ active noise compensation is achieved by generating a signal identical in
sound pressure level but exactly reversed in phase to the noise signal, the effect being that
the out-of-phase signal cancels most of the noise signal.
Active noise compensation is accomplished in the following manner: Each earcup includes
a microphone, a feedback control circuit, and a transducer to reproduce both the
communication and the noise cancelling signal. The feedback control microphones sense
the total sound pressure within each earcup resulting from both the desired radio signal
from the receiver and the undesired noise that has come through the earcup. The
microphone signal is amplified and the radio signal is subtracted from it. The remaining
signal (noise) is then filtered and inverted and the radio signal is added back in. Eventually,
the entire signal is amplified and fed back to the transducer in each earcup. Since the noise
component of the signal is inverted, it cancels the noise signal coming through the earcup.
The radio signal remains unaffected, as it was not processed through the cancellation
circuits.
139
Page 66

140
The above diagram shows noise compensation with NoiseGard™: Passive hearing
protectors effectively attenuate noise from the middle and upper frequency range, the
effect decreasing sharply in the lower range. However, active noise compensation with
NoiseGard™ combined with passive hearing protectors results in a reduction of noise of
approx. 25 dB in the 25–500 Hz frequency range. The total attenuation resulting from
active and passive noise compensation is about 30 dB over the entire audio range.
A 10 dB reduction in noise is perceived subjectively as a halving in volume. A further
reduction in noise of 10 dB again results in a decrease in unwanted noise by 50 %.
Page 67

4
2
1
3
solder side
5
Connector assignment
6
XLR-5 connector
Redel connector (NoiseGard™)
1 Power supply NoiseGard™ (DC+)
2 Audio Lo / DC –
3 Audio Hi left
4 Audio Hi right
5 Microphone Hi
6 Microphone Lo
31 2
1
/4” (6.35 mm) stereo jack plug
1 Audio Hi left
2 Audio Hi right
3 Audio Lo
XLR-3 connector (NoiseGard™)
1 Power supply NoiseGard™ (DC+)
2 Ground
3 Do not connect!
1
2
3 4
U174/U jack plug
1 Microphone Lo
2 Audio Hi
3 Microphone Hi
4 Audio Lo
HMEC 305
1 Audio Hi
2 Audio Lo / DC –
3 Microphone Hi
4 Microphone Lo
5 Power supply NoiseGard™ (DC+)
23
1
PJ-068 jack plug
HMEC 302
1 Power supply NoiseGard™ (DC+)
2 Microphone Hi
3 Microphone Lo / DC –
HMEC 305-C
1 Audio Hi
2 Audio Lo
3 Microphone Hi
4 Microphone Lo
5 Not assigned!
HMEC 300
1 Not assigned!
2 Microphone Hi
3 Microphone Lo
141
Page 68

Technical data
HMEC 300 HMEC 302 HMEC 306 HMEC 400
Headphones
Transducer principle dynamic
Ear coupling circumaural, closed
Frequency response 45–15,000 Hz
Nominal impedance active/passive 300/150 Ω, mono
600/300 Ω, stereo
Attenuation (active and passive) > 25 – 40 dB
Max. sound pressure level 120 dB (± 5%)
Contact pressure approx. 10 N
Microphone incl. preamplifier
Transducer principle electret mic capsule, noise-compensated, MKE 45-1
Frequency response 300–5,000 Hz
Sensitivity –
Max. sound pressure level 120 dB
Min. terminating impedance 150 Ω
Output voltage 400 mV ± 3 dB at 114 dB (as per RTCA/DO 214)
Supply voltage typ. 16 V DC (8 – 16 V DC, approx. 8 – 25 mA, as per RTCA/DO 214)
142
Page 69

HMEC 300 HMEC 302 HMEC 306 HMEC 400
General data
Connecting cable 1.5 m, unilateral
Weight without cable 370 g
Power supply for NoiseGard™ 12–35 V DC
Current consumption 27 mA (zero signal current), max. 80 mA
Fuse 500 mA thermo fuse
Connectors 6.35 mm stereo jack plug 6.35 mm stereo jack plug 6-pin Redel plug for 6.35 mm stereo jack plug
for headphones, for headphones, headphones, microphone for headphones,
PJ-068 jack plug for PJ-068 jack plug for and NoiseGard™ PJ-068 jack plug for
mirophone, microphone and mirophone,
XLR-3 for NoiseGard™ NoiseGard™ XLR-3 for NoiseGard™
Controls Mono/Stereo switch
On/off switch for NoiseGard™
Volume control for headphones
Temperature range Operation –15°C ... + 55°C
Storage –55°C ... + 55°C
Operating time Battery pack with batteries (four 1.5 V AA size alkaline-manganese batteries): approx. 15 hours
with rechargeable batteries: approx. 3 hours
143
Page 70

Technical data
HMEC 305 앚HMEC 305-C 앚HMEC 322 앚HMDC 322
Headphones
Transducer principle dynamic
Ear coupling circumaural, closed
Frequency response 45–15,000 Hz
Nominal impedance active/passive 300/150 Ω, mono 앚 50/35 Ω, mono
Attenuation (active and passive) > 25 – 40 dB
Max. sound pressure level 120 dB (± 5%)
Contact pressure approx. 10 N
Microphone incl. preamplifier
Transducer principle electret mic capsule, 앚 dynamic mic capsule,
noise-compensated, 앚 noise-compensated,
MKE 45-1 앚 M-87/AIC
Frequency response 300–5,000 Hz 앚 500–4,000 Hz
Sensitivity – 앚 1.8–4 µV / 74 dB at 5 Ω
Max. sound pressure level 120 dB 앚 –
Min. terminating impedance 150 Ω 앚 –
Output voltage 400 mV ± 3 dB at 114 dB (as per RTCA/DO 214) 앚 –
Supply voltage typ. 16 V DC (8 – 16 V DC, approx. 8 – 25 mA, as per RTCA/DO 214) 앚 –
144
Page 71

HMEC 305 앚HMEC 305-C 앚HMEC 322 앚HMDC 322
General data
Connecting cable 1.5 m, unilateral 앚 coiled cable, unilateral
Weight without cable 370 g
Power supply for NoiseGard™ 12–35 V DC
Current consumption 27 mA (zero signal current), max. 80 mA
Fuse 500 mA thermo fuse
Connectors XLR-5 for headphones, 앚 XLR-5 for headphones 앚 U-174/U jack plug for headphones and microphone,
microphone and 앚 and microphone. 앚 XLR-3 for NoiseGard™
NoiseGard™ 앚 XLR-3 for NoiseGard™ 앚
Controls On/off switch for NoiseGard™
Volume control for headphones
Temperature range Operation –15°C ... + 55°C
Storage –55°C ... + 55°C
Operating time Battery pack with batteries (four 1.5 V AA size alkaline-manganese batteries): approx. 15 hours
with rechargeable batteries: approx. 3 hours
145
Page 72

Certificate of Conformity
Sennheiser electronic GmbH & Co. KG declare that this device conforms to the applicable CE standards and regulations.
For up-to-date information on Sennheiser products, you can also visit the Sennheiser Web site at “http://www.sennheiser.com”.
146
Page 73

™
Notice d’emploi
Headset
HMEC 300
HMEC 302
HMEC 305
HMEC 305-C
HMEC 306
HMEC 322
HMEC 400
HMDC 322
147
Page 74

Sommaire
Conseils et précautions ....................................................................................149
Points forts.......................................................................................................150
Variantes .................................................................................................................................. 151
Contenu...........................................................................................................154
Accessoires recommandés................................................................................155
Raccordement des casques...............................................................................156
Câbles de raccordement pour casques micros.......................................................................... 156
Possibilités d’alimentation ........................................................................................................ 158
Préparation des casques micros à l’utilisation ...................................................164
Ajustement du serre-tête.......................................................................................................... 164
Position du microphone............................................................................................................ 165
Information complémentaire pour l’utilisation du HMEC 322 dans un hélicoptère................... 167
Utilisation des casques micros ..........................................................................168
Commutation Marche/Arrêt (ON/OFF) du système NoiseGard™.............................................. 168
Commutation Mono/Stéréo (excepté HMEC 305, HMEC 305-C, HMEC 322 et HMDC 322) ... 168
Réglage de volume ................................................................................................................... 168
Ajuster le gain du micro ........................................................................................................... 169
Fixation du clip de câble ........................................................................................................... 169
Pliage du casque....................................................................................................................... 169
Pièces de remplacement...................................................................................170
En cas de difficulté ...........................................................................................172
Informations utiles sur le NoiseGard™ .............................................................174
Le principe NoiseGard™.......................................................................................................... 174
Câblage des connecteurs ......................................................................................................... 177
Caractéristiques techniques..............................................................................178
148
Page 75

Les HMEC 300, HMEC 302, HMEC 305, HMEC 305-C, HMEC 306, HMEC 322, HMEC 400
et HMDC 322 sont des casques micros pour pilote. De type clos, ils sont dotés de la
compensation active de bruit NoiseGard™. Ils sont particulièrement recommandés pour
les hélicoptères et tous les avions à hélices ou turbopropulseurs.
Conseils et précautions
• Avec le système de compensation actif de bruit NoiseGard™ en fonction, vous
percevez l’environnement sonore d’une façon différente (moteurs, hélices, alarmes,
etc.). Avant d’utiliser votre appareil, assurez-vous qu’avec le système NoiseGard™
actif, vous pouvez identifier ces sons. Le réglage du volume doit être fait de telle
façon qu’il vous permette une bonne perception des signaux d’alarme.
• Ne tentez pas de réparer vous-même votre casque micro. En cas de problème,
contactez votre distributeur Sennheiser pour qu’il puisse vous porter assistance.
• Les seules pièces que vous pouvez remplacer vous-même sont celles décrites plus
loin dans ce manuel. Toutes les autres pièces de votre casque micro ne peuvent être
remplacées que par votre distributeur Sennheiser.
• Ne pas immerger le casque micro dans l’eau ! Pour savoir comment le nettoyer,
veuillez contacter votre distributeur Sennheiser.
149
Page 76

Points forts
Casque micro NoiseGard™ HMEC 300
• Nouveau casque micro actif avec atténuation efficace des bruits environnants sur la
totalité du spectre grâce au système de compensation de bruit NoiseGard™.
• Le système de compensation actif de bruit NoiseGard™ assure des communications
claires même dans des environnements bruyants.
• Excellent confort grâce à un poids réduit, des oreillettes offrant un contact agréable
et un serre-tête réglable. Votre liberté de mouvement est maximum grâce à un câble
de raccordement unilatéral.
• Casque repliable pour une facilité de rangement optimale et un transport facilité.
• Des communications claires grâce au micro à électret MKE 45-1 avec sensibilité
réglable.
• Le micro peut être aisément positionné d’un côté ou de l’autre de la bouche grâce
à un système de fixation rapide du flexible.
• Réception radio optimale grâce à une réponse en fréquence étendue.
• Contrôle de volume intégré.
150
• Adaptation au système d’intercom du bord via un commutateur mono/stéréo.
• Avec le système NoiseGard™ désactivé, le casque micro peut être utilisé comme un
modèle conventionnel.
Page 77

• L’alimentation du système NoiseGard™ peut être réalisée via l’alimentation du
tableau de bord, une prise allume-cigare, ou un pack de piles.
• Sécurité d’utilisation assurée en cas de défaut d’alimentation.
• Tension d’alimentation du NoiseGard™ adaptée par l’électronique intégrée au
câble d’alimentation.
• Fabriqué en Allemagne. Deux ans de garantie.
Variantes
Casque micro NoiseGard™ HMEC 302
Le HMEC 302 diffère du HMEC 300 par les caractéristiques suivantes :
• Raccordement microphone et de l’électronique NoiseGard™ via un connecteur jack
PJ-068
Casque micro NoiseGard™ HMEC 305
Le HMEC 305 diffère du HMEC 300 par les caractéristiques suivantes :
• Pas de commutateur mono/stéréo
• Raccordement casque, microphone et de l’électronique NoiseGard™ à l’alimentation
du tableau de bord (12–35 V CC) via un connecteur XLR-5
151
Page 78

Casque micro NoiseGard™ HMEC 305-C
Le HMEC 305-C diffère du HMEC 300 par les caractéristiques suivantes :
• Pas de commutateur Mono/Stéréo
• Raccordement casque et microphone via un connecteur XLR-5
Casque micro NoiseGard™ HMEC 306
Le HMEC 306 diffère du HMEC 300 par les caractéristiques suivantes :
• Raccordement casque, microphone et de l’électronique NoiseGard™ à l’alimentation
du tableau de bord (12–35 V CC) via un connecteur Redel à 6 broches
Casque micro NoiseGard™ HMEC 322
Le HMEC 322 diffère du HMEC 300 par les caractéristiques suivantes :
• Pas de commutateur Mono/Stéréo
• Câble spiralé
• Raccordement casque et microphone via un connecteur jack U-174/U à une
interface haute impédance dans un hélicoptère
152
Page 79

Casque micro NoiseGard™ HHMEC 400
Le HMEC 400 diffère du HMEC 300 par les caractéristiques suivantes:
• Elégant design argent
• Oreillettes simili cuir
• Le rembourrage de l’arceau se boutonne
Casque micro NoiseGard™ HMDC 322
Le HMDC 322 diffère du HMEC 300 par les caractéristiques suivantes:
• Pas de commutateur Mono/Stéréo
• Câble spiralé
• Micro dynamique M-87/AIC et casque basse impédance
• Raccordement casque et microphone via un connecteur jack U-174/U à une
interface basse impédance dans un hélicoptère
153
Page 80

Contenu
HMEC 300, HMEC 305-C, HMEC 322, HMEC 400 et HMDC 322
• Casque micro
• Prise XLR-3 pour tableau de bord d’avion (alimentation par système de bord)
• Sac de rangement et de transport avec courroie d’épaule pour casque micro et
accessoires
• Protection anti vent pour micro (excepté HMDC 322)
• Clip de câble MZQ 2002-1 (N° Réf. 44740)
HMEC 302, HMEC 305 et HMEC 306
• Casque micro
• Sac de rangement et de transport avec courroie d’épaule pour casque micro et
accessoires
• Protection anti vent
154
• Clip de câble MZQ 2002-1 (N° Réf. 44740)
Page 81

ACX-1 ACX-2
Accessoires r ecommandés
Oreillettes gel, remplaçables (N° Réf. 83140)
Pack de piles BP-03 (excepté pour HMEC 302, HMEC 305 et HMEC 306)
Pack de piles avec prise XLR-3 pour alimenter l‘électronique NoiseGard™ des casques
micros HMEC 300, HMEC 305-C, HMEC 322, HMEC 400 et HMDC 322. Quatre piles
alcalines 1,5 V (IEC LR 6) assurent plus de 15 heures d‘utilisation (les piles ne sont pas
inclus). Longueur du câble de raccordement: 0,9 m.
Câbles adaptateurs (excepté pour HMEC 302, HMEC 305 et HMEC 306)
Sennheiser propose des câbles adaptateurs spéciaux pour raccorder l‘électronique
NoiseGard™ des HMEC 300, HMEC 305-C, HMEC 322, HMEC 400 et HMDC 322 à
l’alimentation du bord via une prise allume-cigare :
• ACX-1 – Câble adaptateur pour alimenter un casque micro
• ACX-2 – Câble adaptateur pour alimenter deux casques micros
Les câbles adaptateurs sont également disponibles avec un jack coudé doté d’un fusible
7,5 A et d‘un témoin de fonctionnement LED (vert) :
ACX-11 ACX-22
• ACX-11 – Câble adaptateur pour alimenter un casque micro
• ACX-22 –Câble adaptateur pour alimenter deux casques micros
155
Page 82

Câble de raccordement pour
HMEC 300 et HMEC 400
Raccordement des casques micros
Câbles de raccordement pour casques micros
HMEC 300 et HMEC 400 :
1 jack stéréo 6,35 mm pour le raccordement du casque
1 jack PJ-068 pour le raccordement du microphone
1 connecteur XLR-3 pour l’alimentation de l’électronique NoiseGard™
156
Câble de raccordement
pour HMEC 302
Câble de raccordement
pour HMEC 305
HMEC 302
:
1 jack stéréo 6,35 mm pour le raccordement du casque
1 jack PJ-068 pour le raccordement de l’alimentation de l’électronique NoiseGard™ et
du microphone
HMEC 305 :
1 connecteur XLR-5 pour le raccordement du casque, de l’alimentation de l’électronique
NoiseGard™ et du microphone
Page 83

Câble de raccordement
pour HMEC 305-C
Câble de raccordement
pour HMEC 306
HMEC 305-C :
1 jack stéréo 6,35 mm pour le raccordement du casque et du microphone
1 connecteur XLR-3 pour l’alimentation de l’électronique NoiseGard™
HMEC 306 :
1 connecteur Redel à 6 broches pour le raccordement du casque, de l’alimentation de
l’électronique NoiseGard™ et du microphone
Câble de raccordement pour
HMEC 322 et HMDC 322
HMEC 322 et HMDC 322
:
1 jack U-174/U pour le raccordement casque et micro
1 connecteur XLR-3 pour l’alimentation de l’électronique NoiseGard™
157
Page 84

Possibilités d’alimentation
Il existe trois possibilités d’alimentation du système de compensation active NoiseGard™ :
1. Raccordement au système de bord (12–35 V CC)
3. Raccordement à un pack de piles BP-03
(accessoire, excepté pour HMEC 302, HMEC 305 et HMEC 306)
2. Raccordement à une prise allume-cigare (12–35 V CC) via un câble adaptateur
(accessoire, excepté pour HMEC 302, HMEC 305 et HMEC 306)
™
La tension d’alimentation pour le système NoiseGard
intégrée au câble de raccordement.
est adaptée par l’électronique
158
Page 85

Alimentation
NoiseGard™
Masse
Ne pas raccorder !
Prise XLR-3 pour les casques micros
HMEC 300, HMEC 305-C, HMEC 322,
HMEC 400 et HMDC 322
1. Raccorder un casque micro au système de bord
L’électronique NoiseGard™ peut être raccordée à l’alimentation du bord pour des
tensions comprises entre 12 et 35 V CC.
Danger de court-circuit !
Avant de mettre en fonction le NoiseGard™, assurez-vous que le système d’alimentation
du bord est protégé par un fusible de 1 A.
Les casques micros HMEC 300, HMEC 305-C, HMEC 322, HMEC 400 et HMDC 322 sont
fournis avec une prise XLR-3 destinée à être montée dans le tableau de bord d’un avion.
Ce montage doit être effectué par un technicien qualifié pour ce type d’installation.
HMEC 300 et HMEC 400 :
씰 Raccorder le jack 6,35 mm pour le casque et le jack PJ-068 pour le micro aux prises
correspondantes de votre système intercom.
씰 Raccorder le connecteur XLR-3 à la prise XLR-3 du bord.
159
Page 86

HMEC 302 :
씰 Raccorder le jack 6,35 mm pour le casque et le jack PJ-068 pour le micro aux prises
correspondantes de votre système intercom.
HMEC 305 :
씰 Raccorder le connecteur XLR-5 à la prise XLR-5 de votre avion.
HMEC 305-C :
씰 Raccorder le connecteur XLR-5 pour le casque et le micro à la prise XLR-5 de votre
avion.
씰 Raccorder le connecteur XLR-3 à la prise XLR-3 du bord.
HMEC 306 :
씰 Raccorder le connecteur Redel à 6 broches à la prise 6 broches de votre avion.
HMEC 322 et HMDC 322 :
160
씰 Raccorder le jack U-174/U pour le casque et le micro à la prise U-174/U de votre
intercom.
씰 Raccorder le connecteur XLR-3 à la prise XLR-3 du bord.
Page 87

2. Raccorder un casque micro au pack de piles
(excepté pour HMEC 302, HMEC 305 et HMEC 306)
L’électronique NoiseGard™ des HMEC 300, HMEC 305-C, HMEC 322 et HMDC 322 peut
aussi être alimentée via le pack de piles BP-03 (쏅 “Accessoires recommandés”). Le pack
de piles peut être utilisé avec des piles ou des accus (les piles / accus ne sont pas inclus).
Pour profiter d’une autonomie d’environ 15 heures nous vous recommandons d’utiliser
des piles alcalines 1,5 V (IEC LR 6). Si vous utilisez des accus, l’autonomie sera d’environ
trois heures.
Insertion / remplacement des piles
씰 Ouvrir le couvercle du compartiment des piles.
씰 Insérer quatre piles alcalines de type AA (IEC LR 6). Respecter la polarité lors de la
mise en place des piles.
씰 Refermer le couvercle du compartiment des piles.
LED de fonctionnement et d’état des piles
Le pack de piles dispose de deux LEDs de contrôle.
LED verte allumée : Le pack de piles est en fonction et la capacité des piles et suffisante.
LED rouge allumée : Les piles sont faibles. Remplacez-les.
161
Page 88

Raccordement du casque micro, mise en fonction du pack de piles
씰 Raccorder le connecteur XLR-3 du câble de raccordement à la prise XLR-3 du câble
de raccordement du pack de piles.
씰 HMEC 300 et HMEC 400 : Raccorder le jack stéréo 6,35 mm pour le casque et le
jack PJ-068 pour le micro aux prises correspondantes de votre intercom.
HMEC 305-C : Raccorder le connecteur XLR-5 pour le casque et le micro à la prise
XLR-5 de votre avion.
HMEC 322 et HMDC 322 : Raccorder le jack U-174/U pour le casque et le micro à
la prise U-174/U de votre intercom.
씰 Mettre en fonction le pack de piles à l’aide du commutateur ON/OFF (position ON).
La LED verte doit s’allumer.
Note :
En utilisant le pack de piles, le commuteur ON/OFF intégré au câble de raccordement
du casque micro est hors service.
162
Fixer le pack de piles à un vêtement
Le pack de piles peut être fixé à un vêtement à l’aide du clip de fixation, une bande Velcro
est également fournie.
Page 89

ACX-1 ACX-2
ACX-11 ACX-22
3. Raccorder un casque micro via un câble adaptateur
(excepté pour HMEC 302, HMEC 305 et HMEC 306)
Sennheiser propose des câbles adaptateurs spéciaux avec prise XLR-3 pour raccorder
l’électronique NoiseGard™ des HMEC 300, HMEC 305-C, HMEC 322, HMEC 400 et
HMDC 322 à l’alimentation du bord via une prise allume-cigare :
• ACX-1 – Câble adaptateur pour alimenter un casque micro
• ACX-2 – Câble adaptateur pour alimenter deux casques micros
Les câbles adaptateurs sont également disponibles avec un jack coudé doté d’un fusible
7,5 A et d’un témoin de fonctionnement LED (vert) :
• ACX-11 – Câble adaptateur pour alimenter un casque micro
• ACX-22 –Câble adaptateur pour alimenter deux casques micros
Raccordement du casque micro
씰 Raccorder le connecteur XLR-3 du câble de raccordement à la prise XLR-3 du câble
adaptateur.
씰 Raccorder le jack ou le jack coudé du câble adaptateur à la prise allume-cigare.
163
Page 90

Préparation des casques micros à l’utilisation
Réglage du serre-tête
Pour une bonne atténuation des bruits et un confort optimum, le serre-tête doit être ajusté
en fonction de votre tête :
씰 Placer le casque micro, la bande du serre-tête sur le dessus de votre tête.
씰 Ajuster la longueur du serre-tête :
• Vos oreilles doivent être complètement à l’intérieur des oreillettes
• Vous ne devez ressentir qu’une légère pression sur vos oreilles
• Un confort optimum est assuré
Note :
Assurez-vous qu’aucun câble ne vient se prendre dans le serre-tête lorsque vous
l’ajustez. Dans le cas contraire il y a un risque d’endommager le câble.
씰 Mettre en fonction la compensation active NoiseGard™ en plaçant le commutateur
ON/OFF sur ON (쏅 “Mise en fonction du NoiseGard™”).
164
씰 Parfaire le réglage pour une efficacité optimum, surtout en environnement bruyant.
Page 91

Position du microphone
Déplacement du flexible de micro
Le flexible de micro peut être placé d’un côté ou de l’autre de la bouche.
씰 Desserrer le système de fixation rapide.
씰 Tourner le flexible de 180°.
씰 Resserrer le système de fixation rapide.
Positionner le micro devant le coin de votre bouche
Les HMEC 300, HMEC 302, HMEC 305, HMEC 305-C, HMEC 306, HMEC 322 et HMEC 400
sont dotés d’un flexible micro. Pour un rendement optimum, le micro doit être positionné
au coin de la bouche. Maintenir une distance d’environ 2 cm entre le micro et la bouche.
165
Page 92

Pour positionner le micro du HMDC 322, procéder de la façon suivante :
씰 Ajuster la longueur du support micro de façon à ce que le micro soit placé au coin
de votre bouche. Pour ce faire, desserrer la fixation rapide et ajuster la longueur du
support micro.
씰 Tirer la partie médiane du support micro vers la bouche jusqu’à ce que la distance
micro/bouche soit d’environ 2 cm.
씰 Orienter le micro pour parfaire le réglage.
166
Page 93

Information complémentaire pour l’utilisation du HMEC 322 dans un
hélicoptère
La polarité de branchement d’un microphone dans les hélicoptères n’est pas standardisée.
Si le microphone de votre casque n’est pas conforme avec la polarité existante, vous
pouvez changer la polarité sur le casque en faisant simplement tourner le module de
microphone. Pour ce faire, procédez comme suit:
1. Retirer la protection antivent du microphone.
2. Déserrez les vis d’environ un demi tour.
3. Opérez une traction sur le module micro par rapport à son bras support.
4. Faites tourner le module micro de 180°.
5. Repoussez le module micro en place sur son bras support.
6. Reserrez les vis de l’autre côté.
7. Replacez la protection antivent sur le microphone.
La rotation du module microphone ne change pas ses propriétés acoustiques. En raison
de son système de compensation de bruit, le microphone peut être utilisé de l’un ou l’autre
côté.
167
Page 94

Utilisation des casques micros
Commutation Marche/Arrêt du NoiseGard™
Avec le système de compensation de bruit NoiseGard™ hors fonction, le casque micro
peut être utilisé comme un modèle conventionnel.
Pour mettre en marche le système NoiseGard™, placez le commutateur ON/OFF sur ON.
Quand le pack de piles BP-03 est utilisé, placez le commutateur ON/OFF du NoiseGard™
sur ON et utilisez le commutateur ON/OFF du pack de piles.
Commutation Mono/Stéréo (excepté pour HMEC 305, HMEC 305-C,
HMEC 322 et HMDC 322)
En général, vous recevez un son mono. Le commutateur Mono/Stéréo doit alors être placé
sur “Mono”. Lors de l’utilisation d’un système intercom stéréo, placez le commutateur
Mono/Stéréo sur “Stéréo”.
Réglage de volume
168
L’exposition à des sons de très fort niveau peut être la cause de dommages
irréversibles de l’audition !
Régler le contrôle de volume sur une valeur moyenne. Assurez-vous que vous pouvez
entendre les sons importants comme les signaux d’alarme.
Page 95

Mic Gain Adjustment
Ajuster le gain du micro
En conformité avec la norme JTSO C58a, la tension de sortie du microphone est calibrée
en usine à 400 mV. Si le niveau d’entrée micro de votre système d’intercom est plus élévée
ou plus faible, la tension de sortie micro peut être réajustée sur celui-ci. Pour ce faire,
utilisez un petit tournevis et tournez la vis “Mic Gain Adjustment” (voir l’illustration cicontre) jusqu’à la valeur de réglage désirée.
Fixation du clip de câble
Le câble du casque peut être fixé au moyen d’un clip. Guidez le câble sur le clip comme
indiqué sur l'illustration ci-contre. Fixez le clip sur les vêtements et ajustez le câble de façon
à ce qu'il ne vous dérange pas.
Pliage du casque
Pour faciliter le rangement et le transport, les oreillettes du casque peuvent être repliées
à l’intérieur du serre-tête.
Pour déplier le casque, saisir les oreillettes et les tirer vers le bas à l’extérieur du serre-tête.
169
Page 96
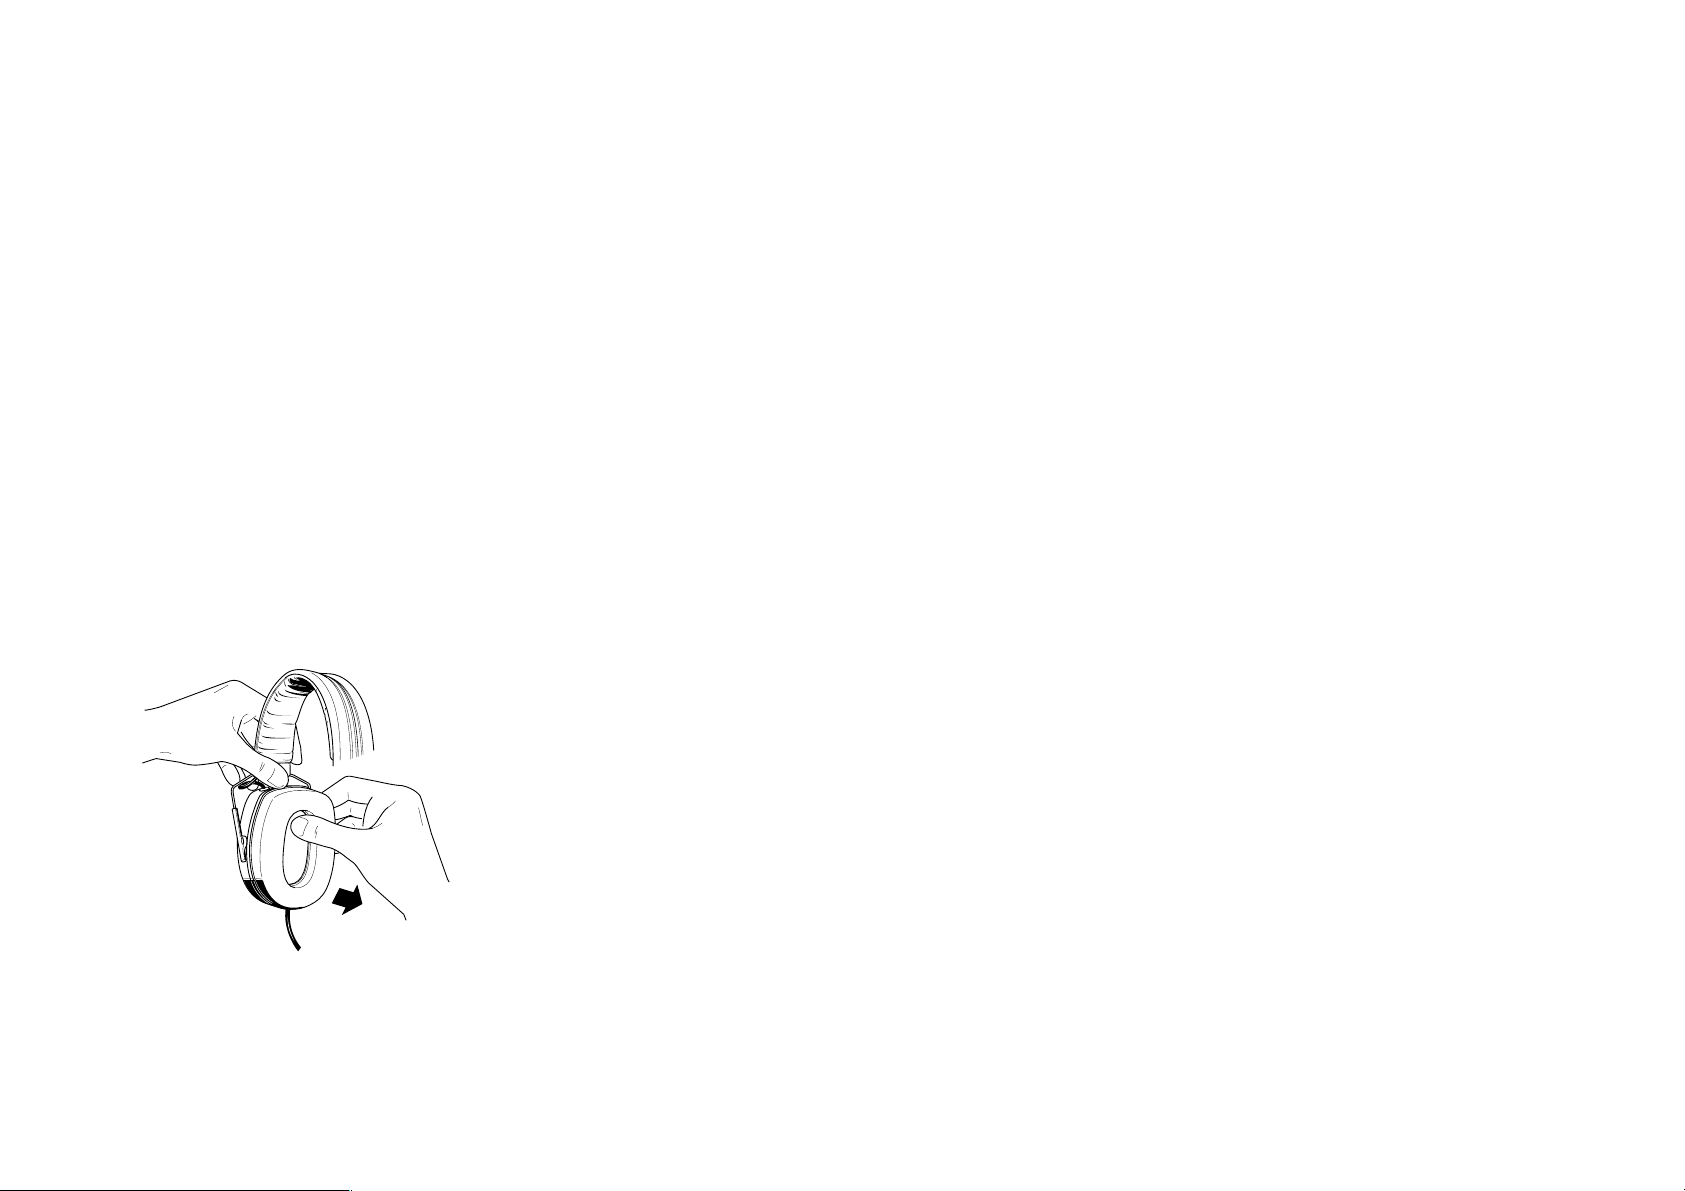
Pièces de remplacement
Les pièces suivantes sont disponibles chez votre distributeur Sennheiser :
• Protection antivent pour microphone électret MKE 45-1
• Coussins d’oreillettes
• Rembourrage de l’arceau
• Clip pour câble
• Sac de rangement et de transport avec courroie d’épaule
Remplacement de la protection antivent
Si la protection antivent du micro électret est endommagée ou présente des trous, vous
devez la remplacer. Retirer la protection antivent du micro. Faites glisser doucement la
nouvelle protection et assurez-vous qu’elle est convenablement mise en place.
Remplacement des coussins d’oreillettes
170
Remplacer les coussins d’oreillettes dès qu’ils sont endommagés. Saisir l’arrière du coussin
et tirer vers vous de façon à le désolidariser de l’oreillette. Mettre en place un nouveau
coussin sur l’oreillette.
Page 97
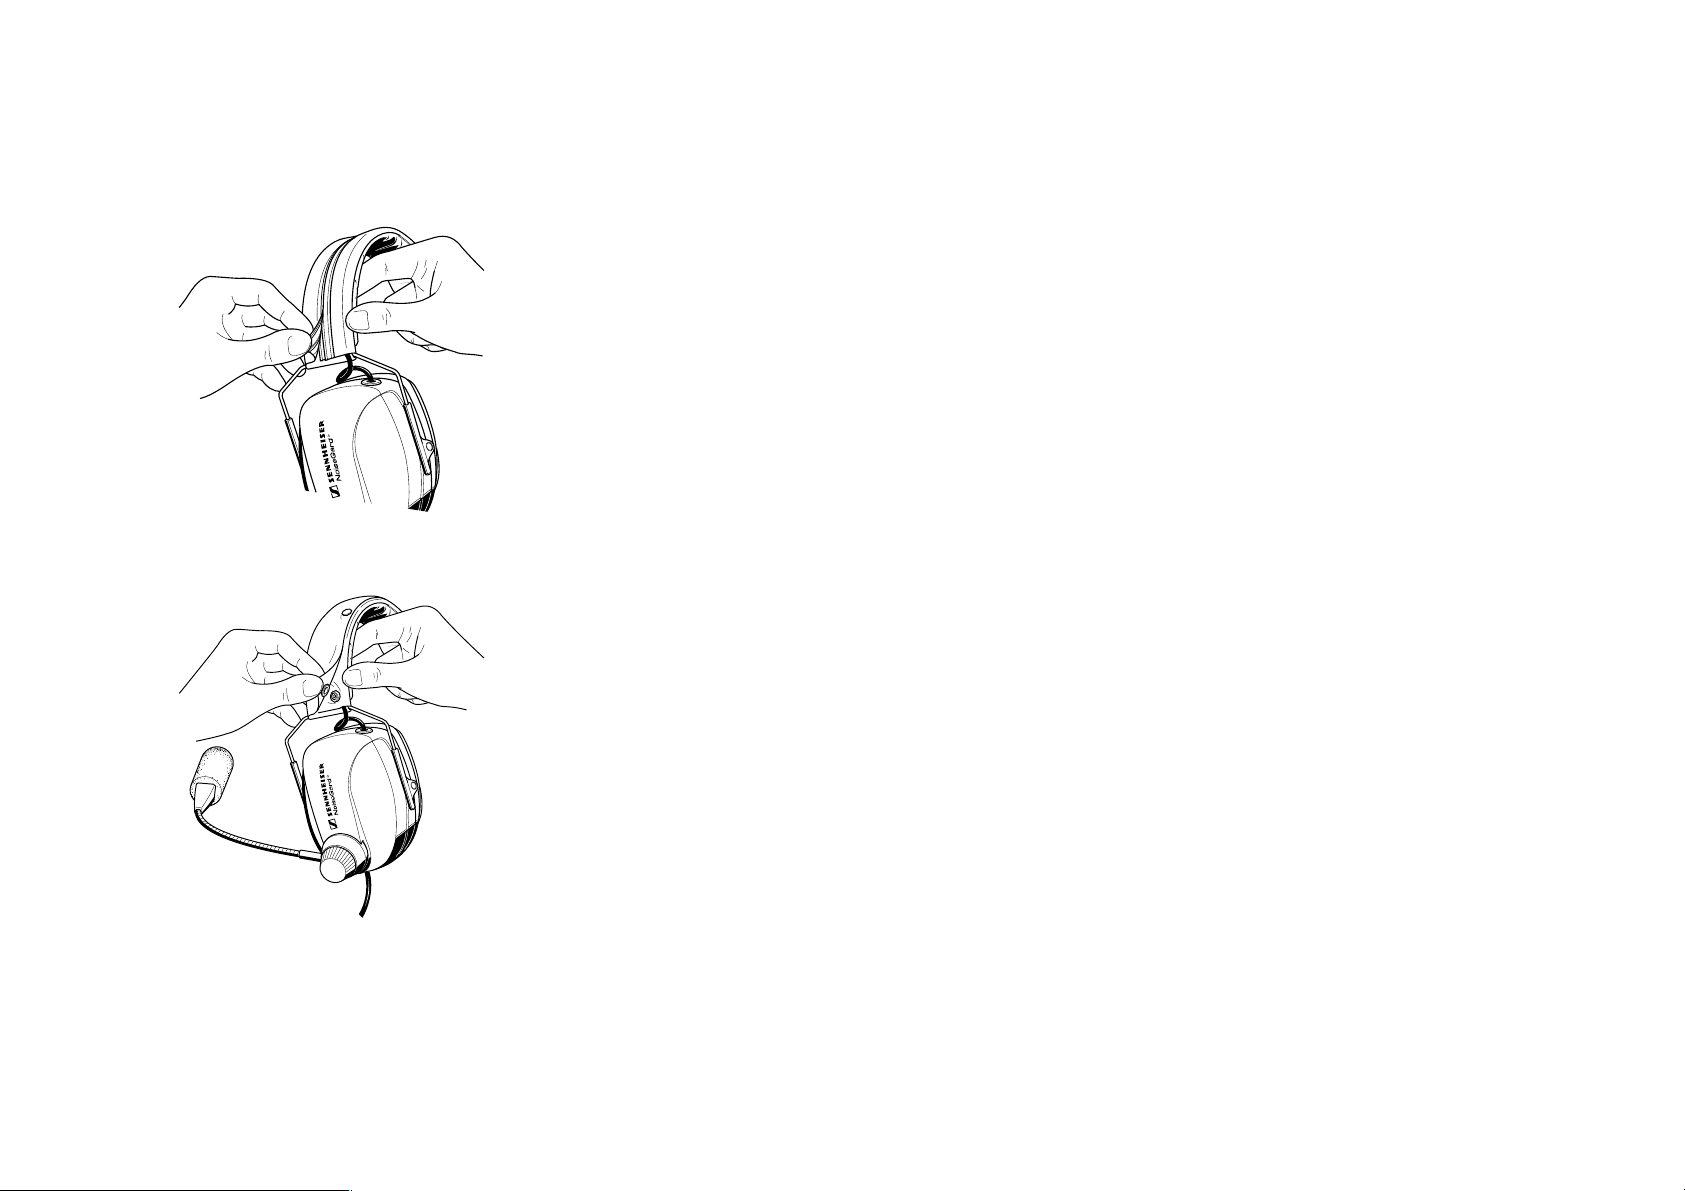
Remplacement du rembourrage de l’arceau
Remplacer le rembourrage de l’arceau dès qu’il est endommagé.
씰 Tirer sur la fixation ressemblant à une fermeture Éclair se trouvant sur le rembourrage,
puis enlever le rembourrage usé.
씰 Mettre en place le nouveau rembourrage, tout autour de l’arceau.
씰 Tirer sur les bords du nouveau rembourrage, de façon à ce que les dispositifs de
fixation se retrouvent face à face et débordent légèrement l’un sur l’autre.
씰 Faire se rejoindre les deux bords de cette fermeture Éclair.
171
Page 98

En cas de difficulté
Si un problème apparaît, et ne fait pas partie de la liste ci-dessous, veuillez contacter votre
distributeur Sennheiser.
Problème
Communications claires, mais
compensation de bruit inactive
Causes possibles / Solutions
L’électronique NoiseGard™ n’est pas en fonction.
씰 Vérifier que le commutateur ON/OFF est positionné sur ON.
Le connecteur XLR-3 est peut-être débranché de sa source d’alimentation.
씰 Vérifier si le connecteur XLR-3 est correctement branché sur sa source d’alimentation.
Alimentation par l’avion : un fusible est défectueux.
씰 Vérifier les fusibles.
Alimentation par piles (excepté HMEC 302, HMEC 305 et HMEC 306) : les piles sont
faibles.
씰 Vérifier que la LED verte du pack de piles est allumée. Si la LED rouge est allumée,
remplacer les piles.
172
Page 99

Problème
Causes possibles / Solutions
Compensation active du bruit en
fonction, mais communications à
un niveau très faible
Compensation active du bruit
mais réduction de l’intelligibilité
Communications perçues
seulement d’une oreille
(uniquement HMEC 300,
HMEC 302, HMEC 306 et
HMEC 306)
Le niveau de sortie micro est trop
élévé ou trop faible
Le contrôle de volume est réglé trop bas.
씰 Vérifier le réglage de volume sur le casque.
La connexion casque est peut-être débranchée (excepté HMEC 305, HMEC 305-C et
HMEC 306).
씰 Vérifier que le jack du casque est correctement raccordé.
La connexion microphone est peut-être débranchée (excepté HMEC 305, HMEC 305-C
et HMEC 306).
씰 Vérifier que le jack du micro est correctement raccordé.
Vous utilisez un système d’intercom stéréo, mais le casque micro est en mode mono.
씰 Vérifiez que le commutateur Mono/Stéréo est bien sur ‘Stéréo’.
Vous recevez une source mono, mais le casque micro est en mode stéréo.
씰 Vérifiez que le commutateur Mono/Stéréo est bien sur ‘Mono’.
La tension de sortie micro peut être réajustée de la façon suivante :
씰 A l’aide d’un petit tournevis tournez la vis “Mic Gain Adjustment” (voir l’illustration
page 169) jusqu’à la valeur de réglage désirée.
173
Page 100

Informations utiles sur le NoiseGard™
Le principe NoiseGard™
Aujourd’hui, le bruit est l’un des principaux facteurs de stress. Des recherches ont montré
que le bruit affecte le système nerveux, pouvant entraîner de la fatigue, une baisse de
concentration, de l’irritabilité et de la tension. Lorsque le niveau sonore est très élevé, il
peut survenir des dommages irréversibles de l’audition.
Ce problème concerne particulièrement les pilotes. Dans le cockpit d’un jet, le niveau de
bruit dépasse souvent 80dB(A) et 90, voir même 97dB(A) dans les appareils à
turbopropulseurs. Durant le décollage et l’atterrissage, le niveau de bruit est encore plus
élevé. Pour comprendre les communications radio dans ces conditions, il faut monter le
niveau du signal à une valeur de l’ordre de 95dB(A). Subir en permanence une telle
agression sonore explique que de nombreux pilotes doivent arrêter prématurément leur
activité professionnelle, se voyant même parfois retirer leur licence.
Les casques micro de type fermé (circumaural) assurent une certaine atténuation du bruit
et sont habituellement utilisés pour apporter une solution à ce problème. Cependant on
constate que l’atténuation passive apportée par ces casques n’est pas suffisante. Les bruits
de hautes fréquences sont considérablement atténués, mais les bruits de basses fréquences
comme les bruits d’air, les moteurs, qui sont les bruits dominants dans les avions actuels,
ne sont que très peu atténués.
174
 Loading...