

Sennheiser HE 1 User Manual

HE 1 MANUAL

HE 1
Instruction manual

Sennheiser electronic GmbH & Co. KG
Am Labor 1, 30900 Wedemark, Germany
www.sennheiser.com
Printed and hand-bound in Germany, Publ. 07/16, 566616/A01 EN
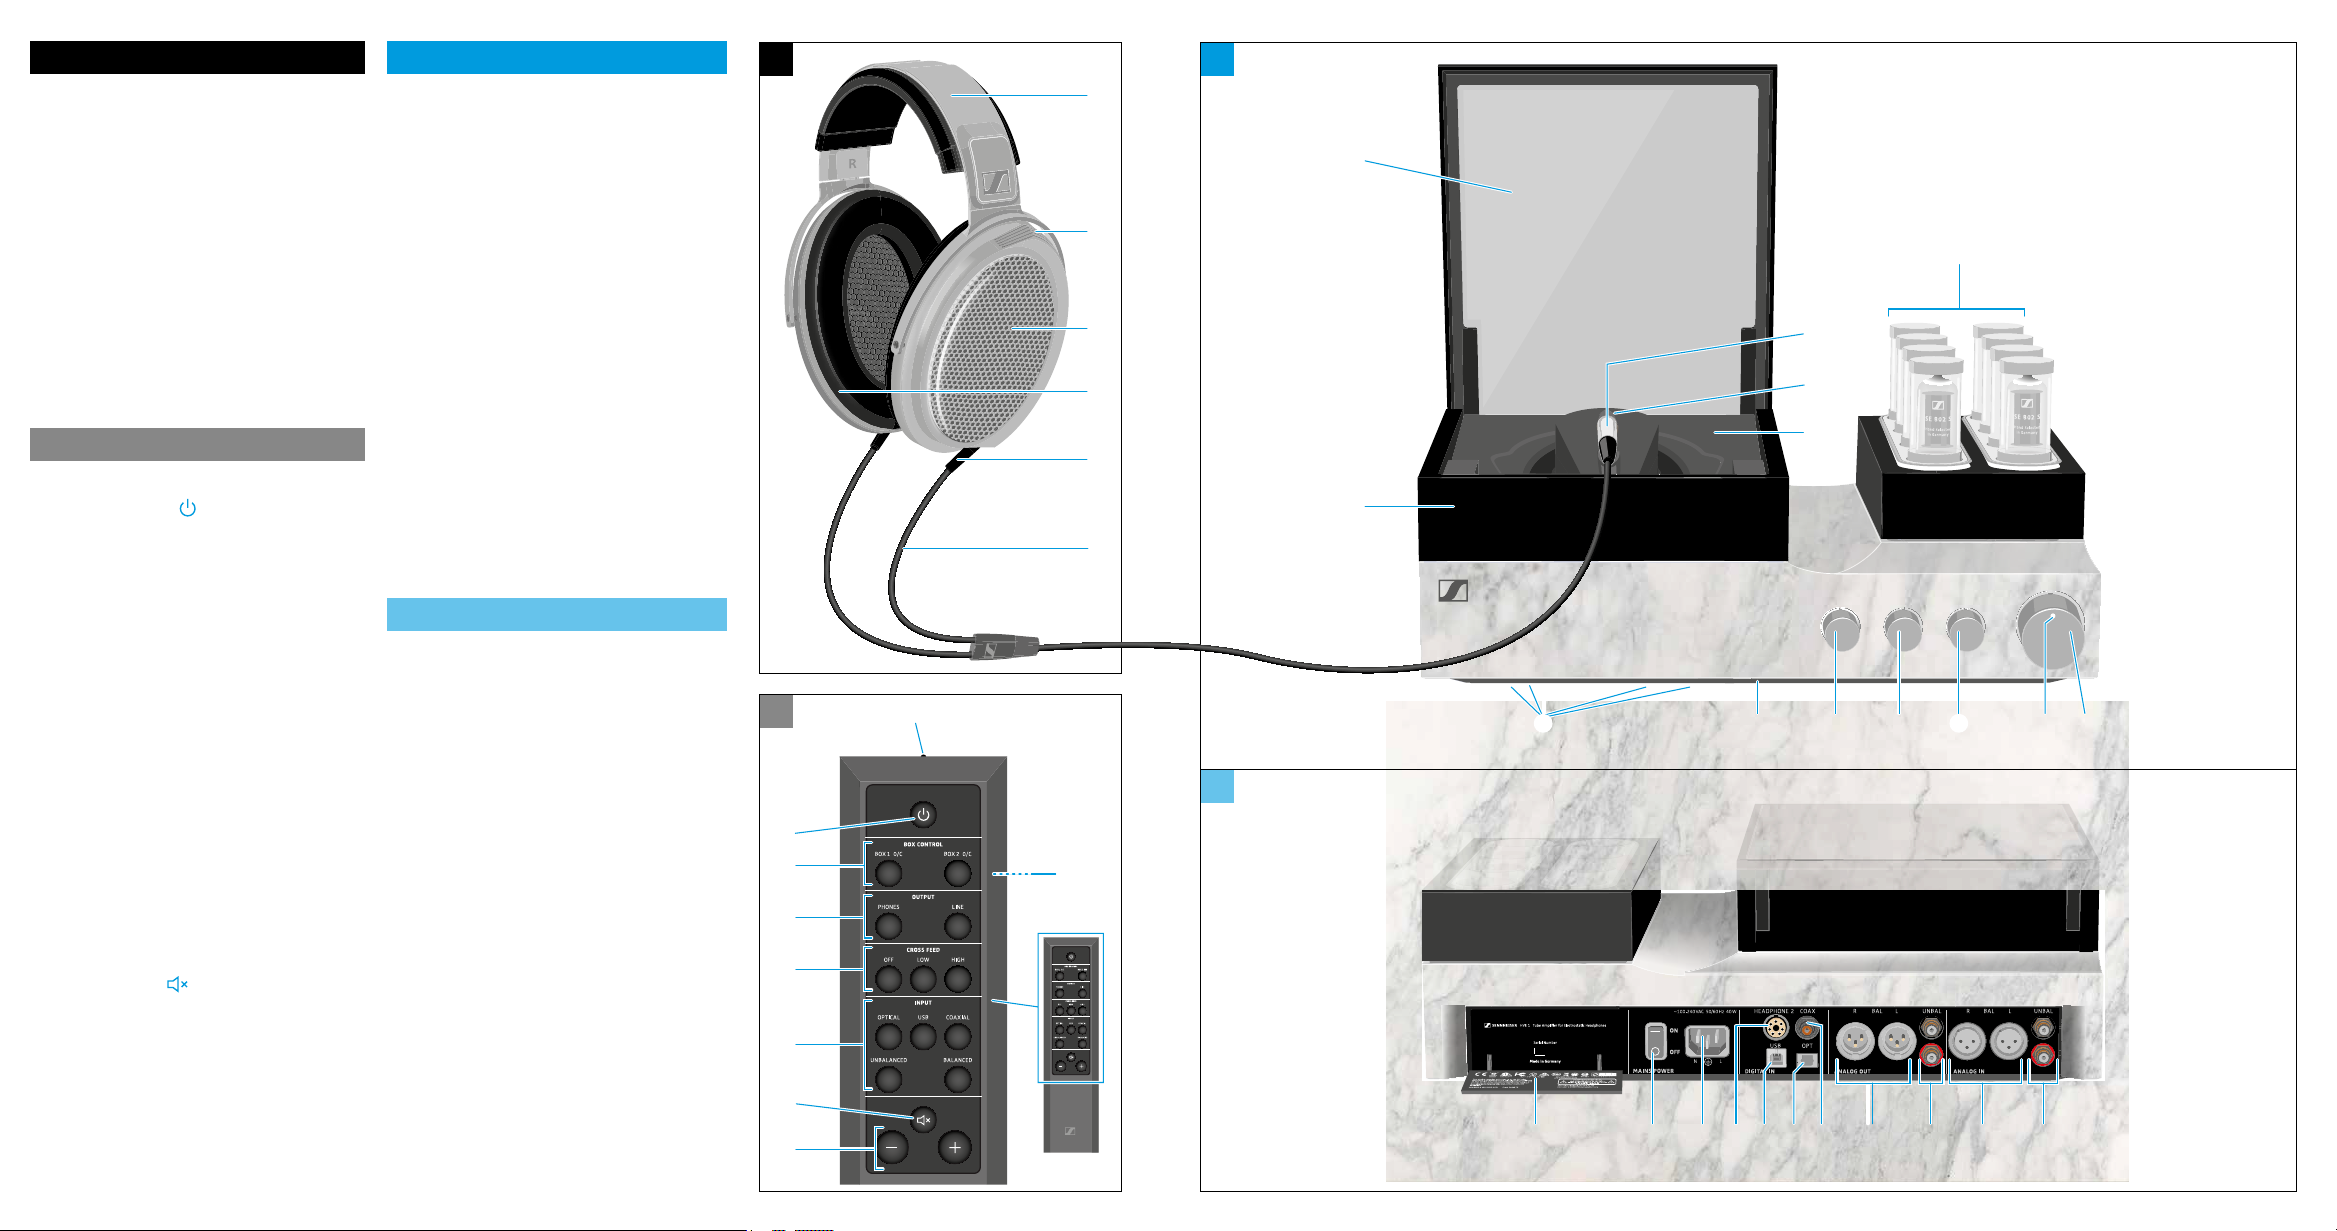
Headphones
1 Headband, adjustable in increments
2 Aluminum heat sink for
high-voltage amplier
3 Electrostatic transducers
4 Ear pads
5 Structure-borne noise reducing cable
connections
6 Highly exible OFC headphone
cable, PTFE insulated, insensitive to
structure-borne noise
Remote control
7 Infra-red transmitter
8 On/off button
9 Control buttons for glass cover
• BOX 1 O/C storage box 1
• BOX 2 O/C storage box 2
0 OUTPUT selection buttons
• PHONES
• LINE
A CROSS FEED selection buttons
• OFF
• LOW
• HIGH
B INPUT selection buttons
• OPTICAL
• USB
• COAXIAL
• UNBALANCED
• BALANCED
C Mute button
D Volume buttons –/+
E Battery compartment for
CR2032 battery, 3 V
(located at the bottom side)
Amplifier (front panel)
F Headphone storage box
G Glass cover
H Headphone plug
I Headphone socket 1 (HEADPHONE 1)
J Headphone compartment with
velvety-soft ocking
K Amplier tubes, housed in protective
cylinders
L On/off button and volume control
M Status LED
N OUTPUT selection rotary switch
O CROSS FEED selection rotary switch
P INPUT selection rotary switch
Q Infra-red remote control sensor
R Vibration absorbing feet
Amplifier (rear panel)
S RCA input sockets, unbalanced
(UNBAL) red R, black L
T XLR-3 input sockets, balanced
(BAL / R / L)
U RCA output sockets, unbalanced
(UNBAL) red R, black L
V XLR-3 output sockets, balanced
(BAL / R / L)
W S/PDIF input, coaxial (COAX)
X S/PDIF input, optical (OPT)
Y USB input (Type B) (USB)
Z Headphone socket 2 (HEADPHONE 2)
[ IEC mains socket
(~100-240 VAC 50/60 Hz 40 W)
\ Power switch (ON/OFF)
] Cover for product information
and approvals
8
9
0
A
B
C
D
7
INPUT
USB COAXIALOPTICAL
BALANCEDUNBALANCED
CROSS FEED
LOW HIGHOFF
OUTPUT
BOX CONTROL
BOX 2 O/CBOX 1 O/C
1
G
2
K
3
4
H
I
J
5
F
6
LPQ O
R
N
M
E
INPUT
USB COAXIALOPTICAL
BALANCEDUNBALANCED
CROSS FEED
LOW HIGHOFF
OUTPUT
LINEPHONES
BOX CONTROL
LINEPHONES
BOX 2 O/CBOX 1 O/C
0123
T SUVWXYZ[] \

Contents
Contents
Contact. . . . . . . . . . . . . . . . . . . . . . . . . . . . . . . . . . . . . . . . . 4
Important safety instructions
Package contents
Product overview
Overview of the LED indicator
Overview of the operating elements
Putting the HE 1 into operation
Setting up the tube headphone amplier
Connecting the tube headphone amplier to audio sources
Using the tube headphone amplier connected to a Mac/PC
Connecting the headphone tube amplier to a power amplier or
to active loudspeakers
Connecting the tube headphone amplier to the power supply system
Using the HE 1
Switching the tube headphone amplier on
Switching the tube headphone amplier off
Connecting headphones
Putting on the headphones
Selecting the INPUT audio inputs
Adjusting the signal levels of the INPUT audio inputs
Using the crossfeed function
Selecting the OUTPUT audio output
Adjusting the signal levels of the OUTPUT audio outputs
Adjusting the volume
Muting the audio
Opening/closing the headphone storage box
. . . . . . . . . . . . . . . . . . . . . . . . . . . . . . . . . . 10
. . . . . . . . . . . . . . . . . . . . . . . . . . . . . . . . . . 11
. . . . . . . . . . . . . . . . . . . . . . . . . . . . . . . . . . . 27
. . . . . . . . . . . . . . . . . . . . . . . . . . . . . . . . 38
. . . . . . . . . . . . . . . . . . . . . . . . . . . . 5
. . . . . . . . . . . . . . . . . . . . . . . . . 11
. . . . . . . . . . . . . . . . . . . . . 12
. . . . . . . . . . . . . . . . . . . . . . . . . 13
. . . . . . . . . . . . . . . . . . 13
. . . . . . . . 14
. . . . . . . 18
. . . . . . . . . . . . . . . . . . . . . . . . . . . . . 24
. . . . . . . . . . . . . . . . . 27
. . . . . . . . . . . . . . . . 29
. . . . . . . . . . . . . . . . . . . . . . . . . . . . 30
. . . . . . . . . . . . . . . . . . . . . . . . . . 31
. . . . . . . . . . . . . . . . . . . . . . . 32
. . . . . . . . . . . 33
. . . . . . . . . . . . . . . . . . . . . . . . . 34
. . . . . . . . . . . . . . . . . . . . . 35
. . . . . . . . . 36
. . . . . . . . . . . . . . . . . . . . . . . . . . . . . 37
. . . . . . . . . . . . . . . . 39
. 26
Cleaning and maintaining the HE 1
Servicing the HE 1
Replacing the ear pads
Replacing the headband padding
Replacing the amplier tubes
Replacing the battery of the BFI 1 remote control
Calibrating the mechanical components
Restoring the factory default settings
Installing rmware updates
. . . . . . . . . . . . . . . . . . . . . . . . . . . . . . . . . 41
. . . . . . . . . . . . . . . . . . . . . . . . . . . . . 41
. . . . . . . . . . . . . . . . . . . . . . . 40
. . . . . . . . . . . . . . . . . . . . . . . 42
. . . . . . . . . . . . . . . . . . . . . . . . . 42
. . . . . . . . . . . . . . . . . . . 44
. . . . . . . . . . . . . . . . . . . . 45
. . . . . . . . . . . . . . . . . . . . . . . . . . 46
. . . . . . . . . . . . . 43
3

Contents
Transporting the HE 1
If a problem occurs .... . . . . . . . . . . . . . . . . . . . . . . . . . . . . . . . 48
Specifications
Reference diffuse-eld frequency response curve
Manufacturer Declarations
. . . . . . . . . . . . . . . . . . . . . . . . . . . . . . . . . . . . 51
. . . . . . . . . . . . . . . . . . . . . . . . . . . . . . . 47
. . . . . . . . . . . . . 54
. . . . . . . . . . . . . . . . . . . . . . . . . . . . 55
Contact
If you have any questions regarding your HE 1 or require any help, please contact your Sennheiser partner:
Hotline: The phone number can be found on the business card issued to you.
Email: HE1@sennheiser.com
Internet: www.sennheiser.com
Sennheiser electronic GmbH & Co. KG
Am Labor 1, 30900 Wedemark, Germany
Phone: +49 (0)5130 600 0
4

Important safety instructions
Important safety instructions
1. Read these safety instructions.
2. Keep these safety instructions. Always include these safety instructions
when passing the product on to third parties.
3. Heed all warnings.
4. Follow all instructions.
5. Do not use the product near water.
6. Only clean the product when it is not connected to the power supply
system. Clean only with a dry cloth.
7. Ensure circulating ventilation. The product generates heat which is dissipated through the housing, especially through the extended tubes. Install
in accordance with the manufacturer’s instructions.
8. Do not install near any heat sources such as radiators, heat registers,
stoves, or other products that produce heat and do not expose to direct
sunlight.
9. Do not defeat the safety purpose of the polarized or grounding-type
plug. A polarized plug has two blades with one wider than the other. A
grounding type plug has two blades and a third grounding prong. The wide
blade or the third prong are provided for your safety. If the provided plug
does not t into your outlet, consult an electrician for replacement of the
obsolete outlet.
10. Protect the power supply cord from being walked on or pinched, particularly at plugs, convenience receptacles, and the point where it exits from
the product.
11. Use only attachments/accessories/spare parts supplied or recommended
by Sennheiser.
12. Use only with shelves, racks, or tables that can safely support the weight
the product (see “Specications” on page 51). Please note that the
installation location and the substructure have effects on the sound quality.
13. Unplug the product during lightning storms or when unused for long periods of time.
5

Important safety instructions
14. Refer all servicing to qualied service personnel. Servicing is required when
the product has been damaged in any way, such as power supply cord or
plug is damaged, liquid has been spilled or objects have fallen into the
product, when the product has been exposed to rain or moisture, does not
operate normally, or has been dropped.
15. WARNING: To reduce the risk of re and electric shock, do not expose the
product to dripping or splashing and ensure that no objects lled with
liquids, such as vases, are placed on the product.
16. To completely disconnect this product from the AC mains, disconnect the
power supply cord plug from the AC receptacle.
17. The plug of the power supply cord shall remain readily accessible.
Hazard warnings on the rear of the product
The label shown on the left can be found at the rear of the amplier behind a
hinged cover.
▷ Lightly press the lower part of the cover to open it.
HVE 1 Tube Amplifier for Electrostatic Headphones
0123
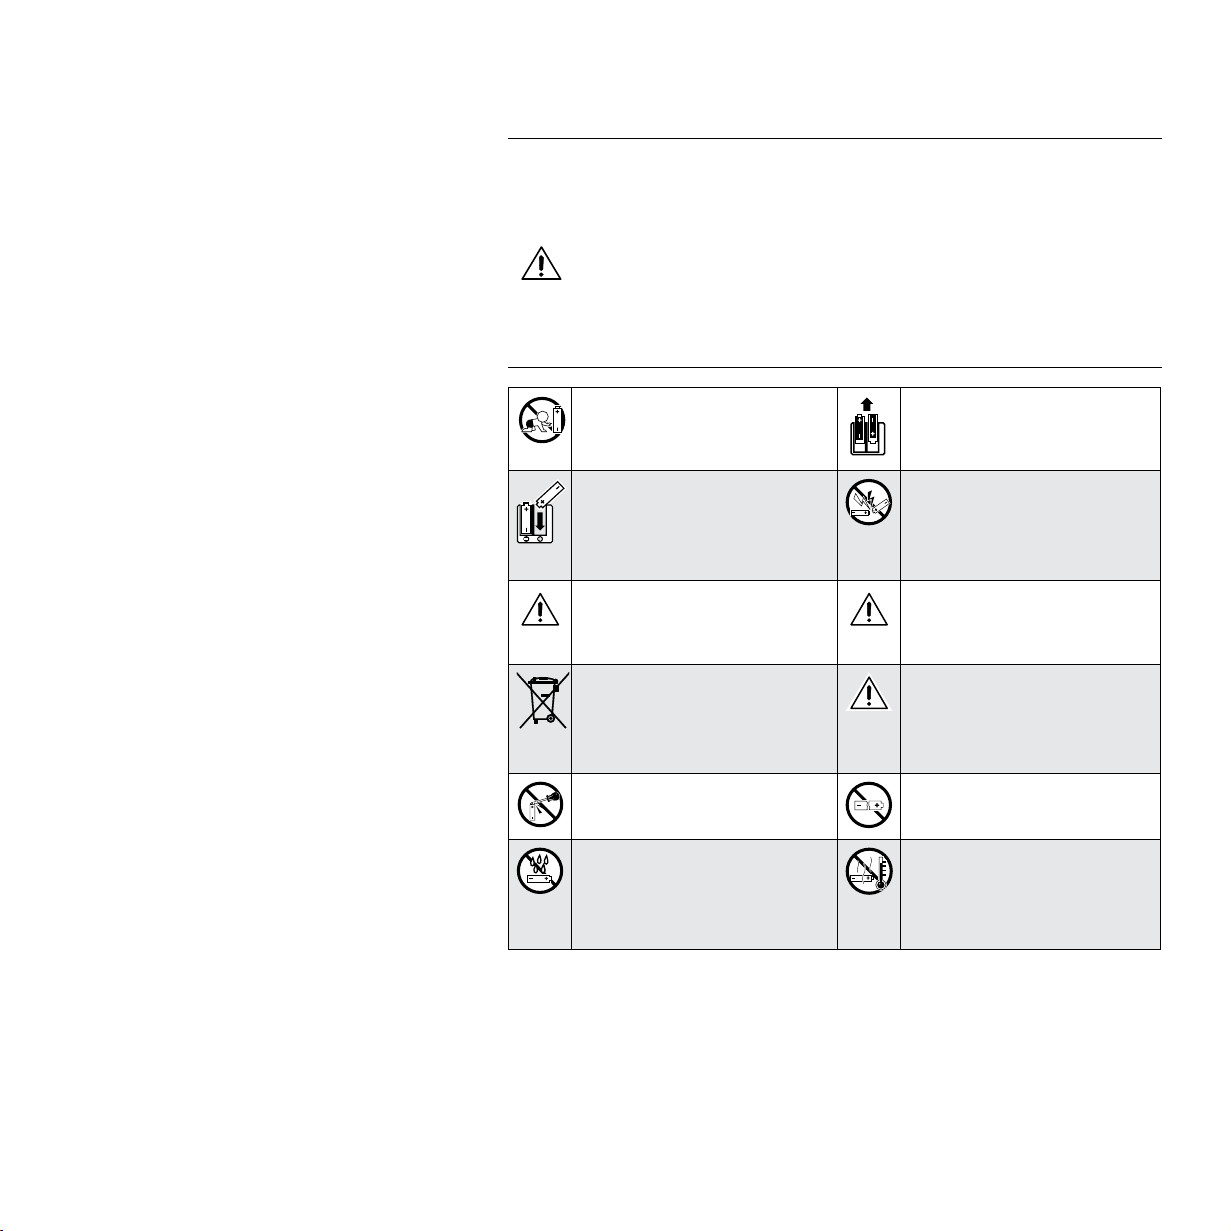
The symbols on this label have the following meaning:
Presence of uninsulated dangerous voltage within
the product’s enclosure that may be of sufcient
magnitude to constitute a risk of re or electric
shock.
Read and follow the safety and operating
instructions contained in this instruction manual.
Never open the product as there is a risk of electric
shock. There are no user serviceable parts inside
the product. Only refer repairs to an authorized
Sennheiser service partner.
6
Important safety instructions
Safety instructions for lithium batteries (BFI 1 remote control)
WARNING
If abused or misused, the batteries may leak. In extreme cases, they may even
present a risk of
• explosion,
• re development,
• heat generation,
• smoke or gas development.
Keep away from children. Remove the batteries if the
product will not be used for
extended periods of time.
Observe correct polarity. Pack/store charged batteries
so that the terminals cannot
contact each other – danger
of shorting out/fire hazard.
Immediately remove the
batteries from an obviously
Only use batteries specified
by Sennheiser.
defective product.
Dispose of batteries at special
collection points or return
them to your specialist dealer.
Store the products in a
cool and dry place at room
temperature (approx.
20 °C/68 °F).
Do not mutilate or dismantle. Do not continue to use
defective batteries.
Do not expose to moisture. Do not heat above
70 °C/158 °F, e.g. do not
expose to sunlight or throw
into a fire.
7

Important safety instructions
Preventing damage to health and accidents
▷ Protect your hearing from high volume levels. Permanent hearing damage
may occur when headphones are used at high volume levels for long
periods of time. Sennheiser headphones sound exceptionally good at low
and medium volume levels.
▷ Do not use the headphones when your hair is damp or wet.
▷ Do not insert pointed objects through the outer and inner covers of the
headphones to avoid contact with live parts or the delicate diaphragms.
▷ Do not use the product when the protective cylinders of the amplier tubes
are removed.
▷ Keep the product, accessories and packaging parts out of reach of children
and pets to prevent accidents and choking hazards.
▷ Do not use the product in an environment that requires your special atten-
tion (e.g. when performing skilled jobs).
Preventing damage to the product and malfunctions
▷ If the product was moved from a cold environment to a warm one, allow
the product to stand for at least 2 hours before putting it into operation.
▷ Do not place your headphones on a dummy head, chair armrest or similar
objects for long periods as this can widen the headband and reduce the
contact pressure of the headphones.
Intended use/Liability
The electrostatic headphones and the tube headphone amplier have been
designed for reproducing music from analog and digital high-end systems.
This product is intended for private domestic use only.
It is considered improper use when the product is used for any application not
named in the corresponding instruction manual.
Sennheiser is not liable for damages to USB devices that are not consistent
with the USB specications.
Sennheiser does not accept liability for damage arising from abuse or misuse
of this product and its attachments/accessories.
8
HE 1
HE 1
UPDATE
HE 1
Important safety instructions
Notes on servicing
We recommend having the product serviced regularly (about every 3 years) to
maintain the perfect sound reproduction of the electrostatic headphones and
the tube headphone amplier. Contact your Sennheiser partner to arrange for
a complete revision and careful refreshment of the product (see “Contact” on
page 4).
The service card inserted in the rear cover of this instruction manual provides
information on the servicing carried out.
Notes on driver and firmware updates
We recommend using the latest DAC (digital-to-analog converter) rmware for
your tube headphone amplier and the latest driver for your operating system
(MacOS), Windows).
DAC rmware and driver updates can be downloaded free of charge from
the Internet at www.sennheiser.com/download or can be obtained from your
Sennheiser partner (see page 18 and 45).
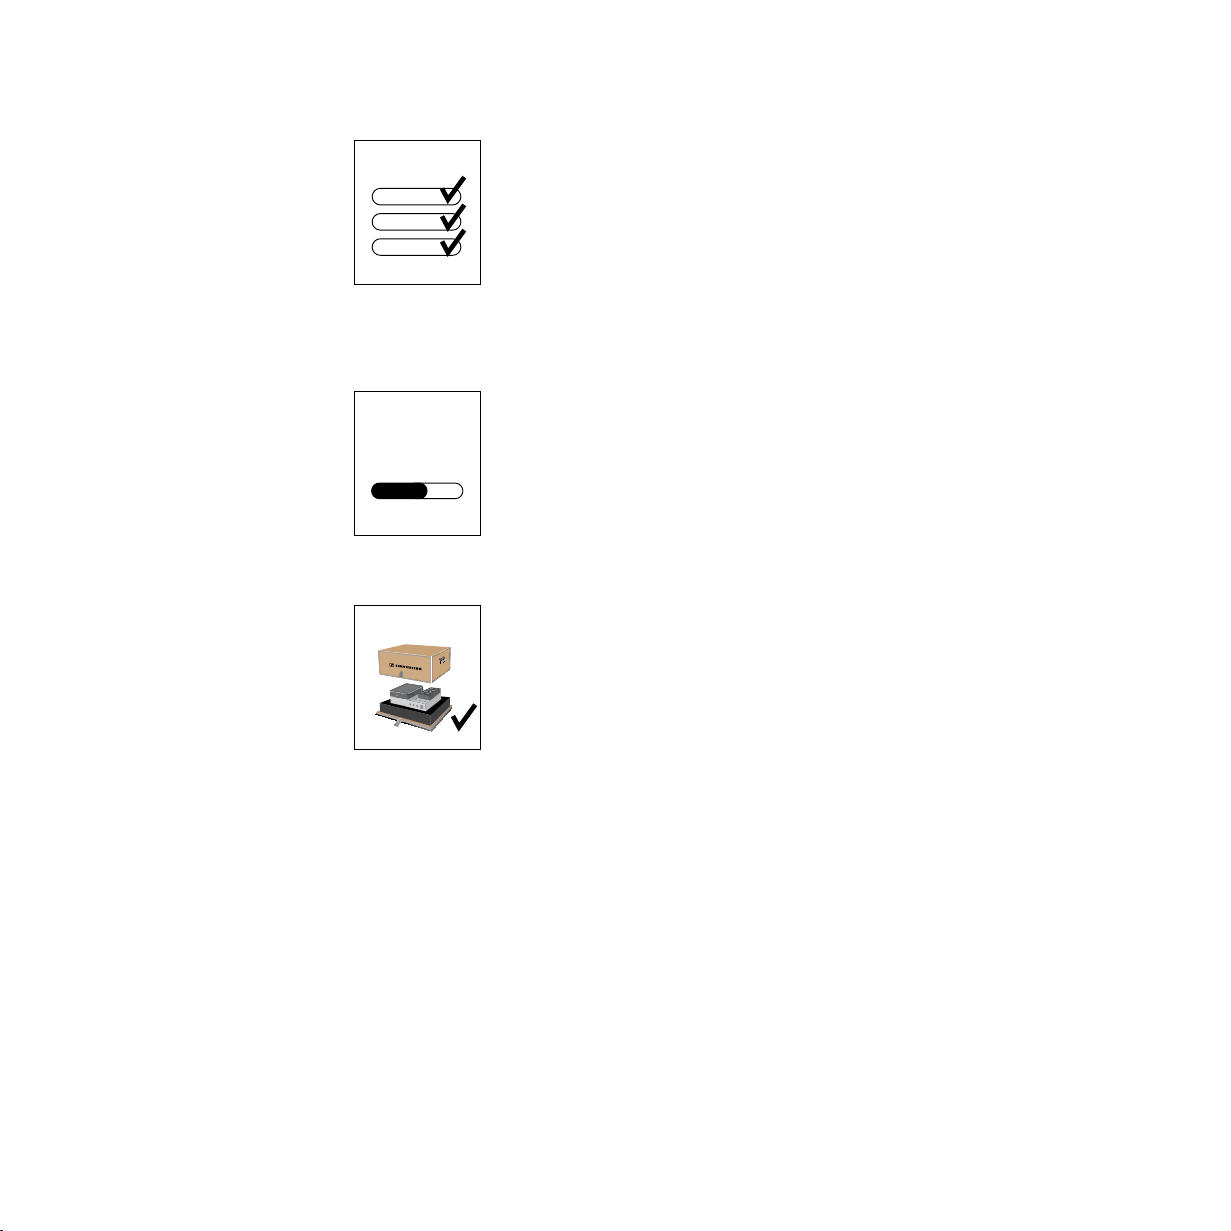
Notes on the packaging
We recommend using the original packaging to ensure safe storage and
transport of the HE 1. Damage during transport is often caused by the use
of unsuitable packaging. The original packaging of the HE 1 provides optimal
protection and minimizes the risk of damage during transport.
Alternatively, you can contact your Sennheiser partner to arrange for the
transport of the HE 1 (see “Contact” on page 4).
9
Package contents
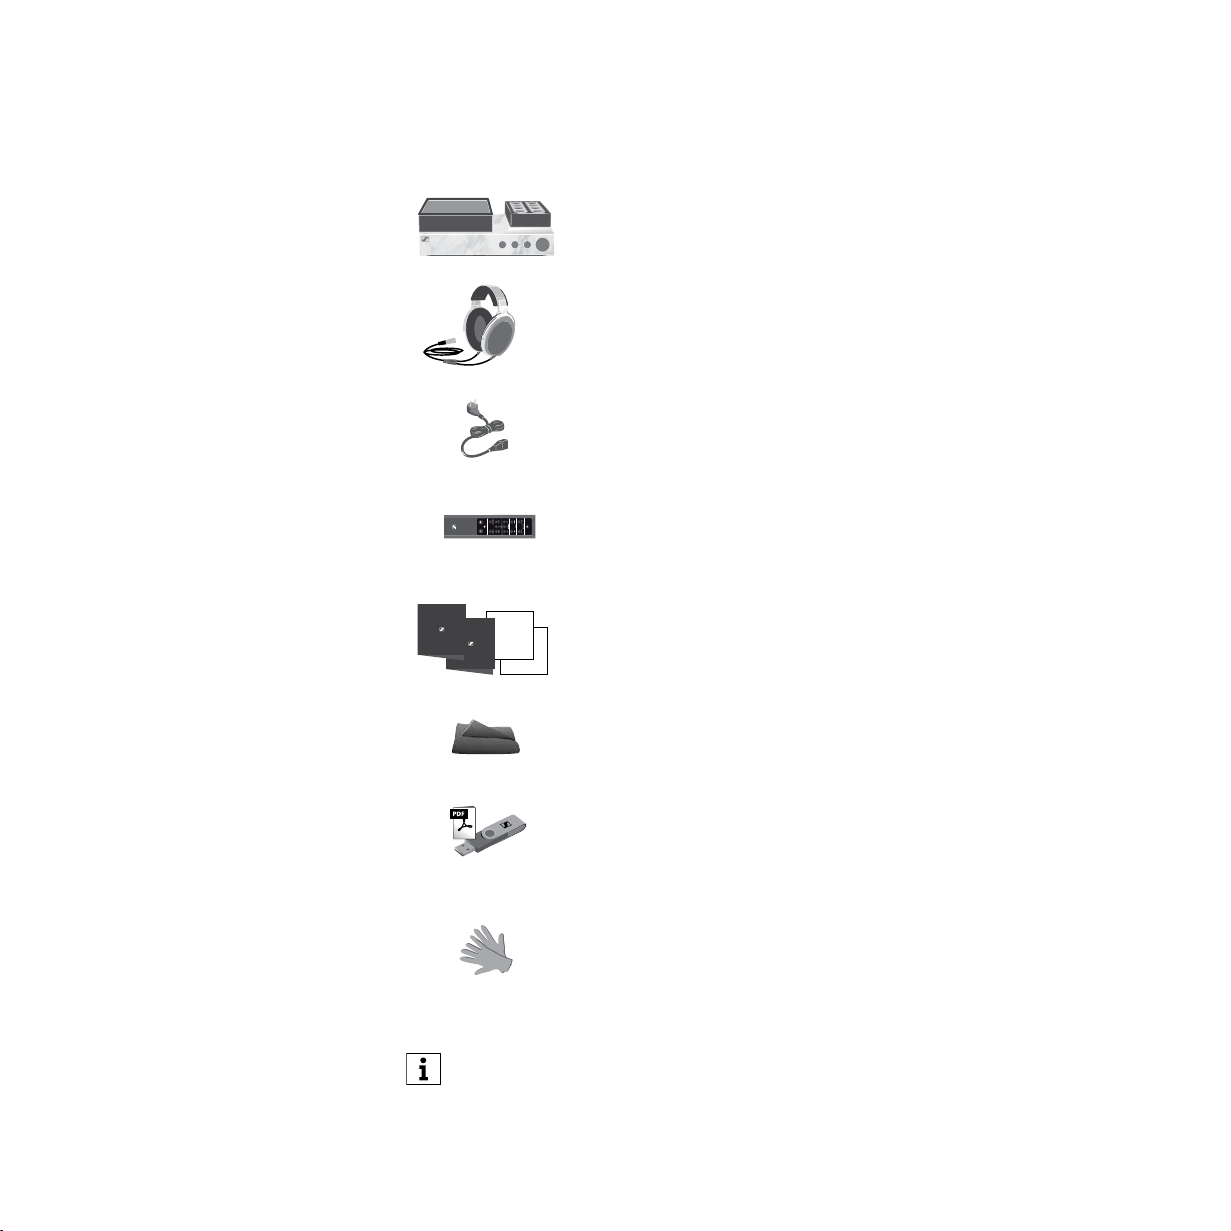
Package contents
HVE 1 tube headphone amplier
HE 1-HP electrostatic headphones
3 power cables (only for regions with EU, UK and US
power plug, length 1.8 m)
BOX CONTROL
CROSS FEED
OUTPUT
LOW HIGHOFF
USB COAXIALOPTICAL
BALANCEDUNBALANCED
BOX 2 O/CBOX 1 O/C
LINEPHONES
BFI 1 remote control
INPUT
incl. CR 2032 battery (3 V)
Brochure, instruction manual, certicate with measurement
result and service card
Microber cloth
USB ash drive (SD-U16L version) with instruction manual
(as PDF le) and driver software for Microsoft Windows
operating systems
Silk gloves for servicing
A list of accessories can be found on the HE 1 product page at
www.sennheiser.com. For information on suppliers, contact your
Sennheiser partner (see “Contact” on page 4).
10
Product overview | Overview of the LED indicator
Product overview
The product overview can be found on the fold-out page at the beginning of
this instruction manual.
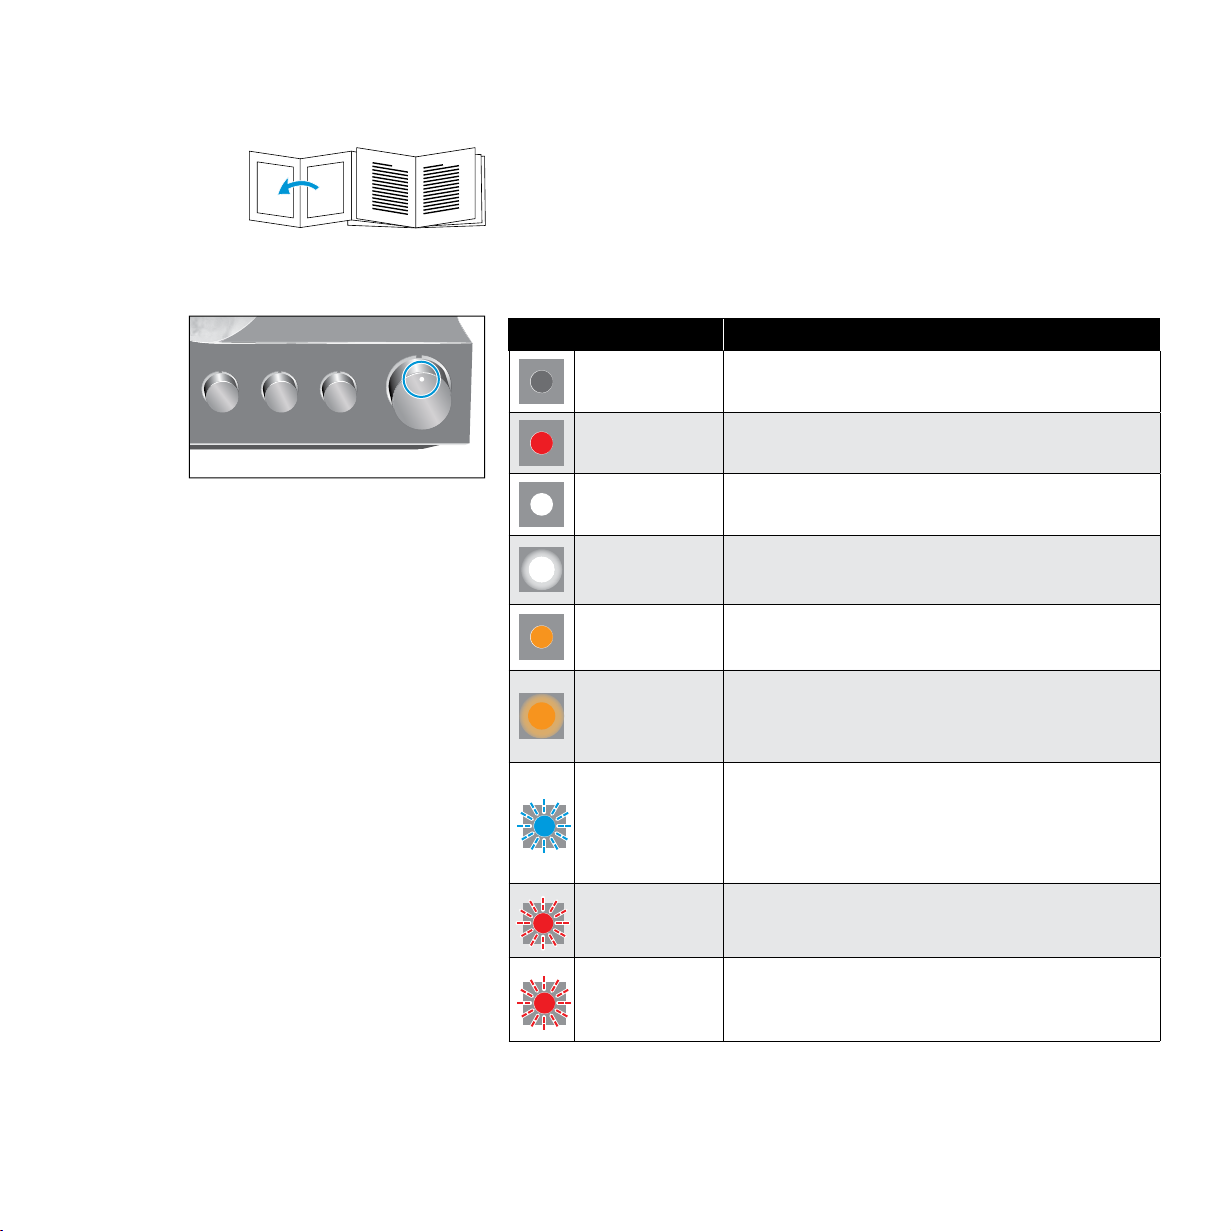
Overview of the LED indicator
Status LED Meaning
– Power switch set to position OFF
lights up red Standby
lights up white Operation
pulses white
lights up
orange
pulses orange
flashes blue
quickly 2 times
flashes red
quickly 2 times
flashes red
quickly 3 times
Headphones are/audio output is muted
(OUTPUT rotary switch in position MUTE)
Operation, a tube replacement is required
(see page 42)
Headphones are/audio output is muted
(OUTPUT rotary switch in position MUTE),
a tube replacement is required (see page 42)
Incompatible digital audio signal; headphones are/
audio output is muted (OUTPUT rotary switch in
position MUTE) (see page 16)
High-voltage protection is activated; device cannot
be operated (see page 50)
Operating elements or amplifier tubes are blocked;
device cannot be operated
(see page 28)
11
Product overview | Overview of the operating elements
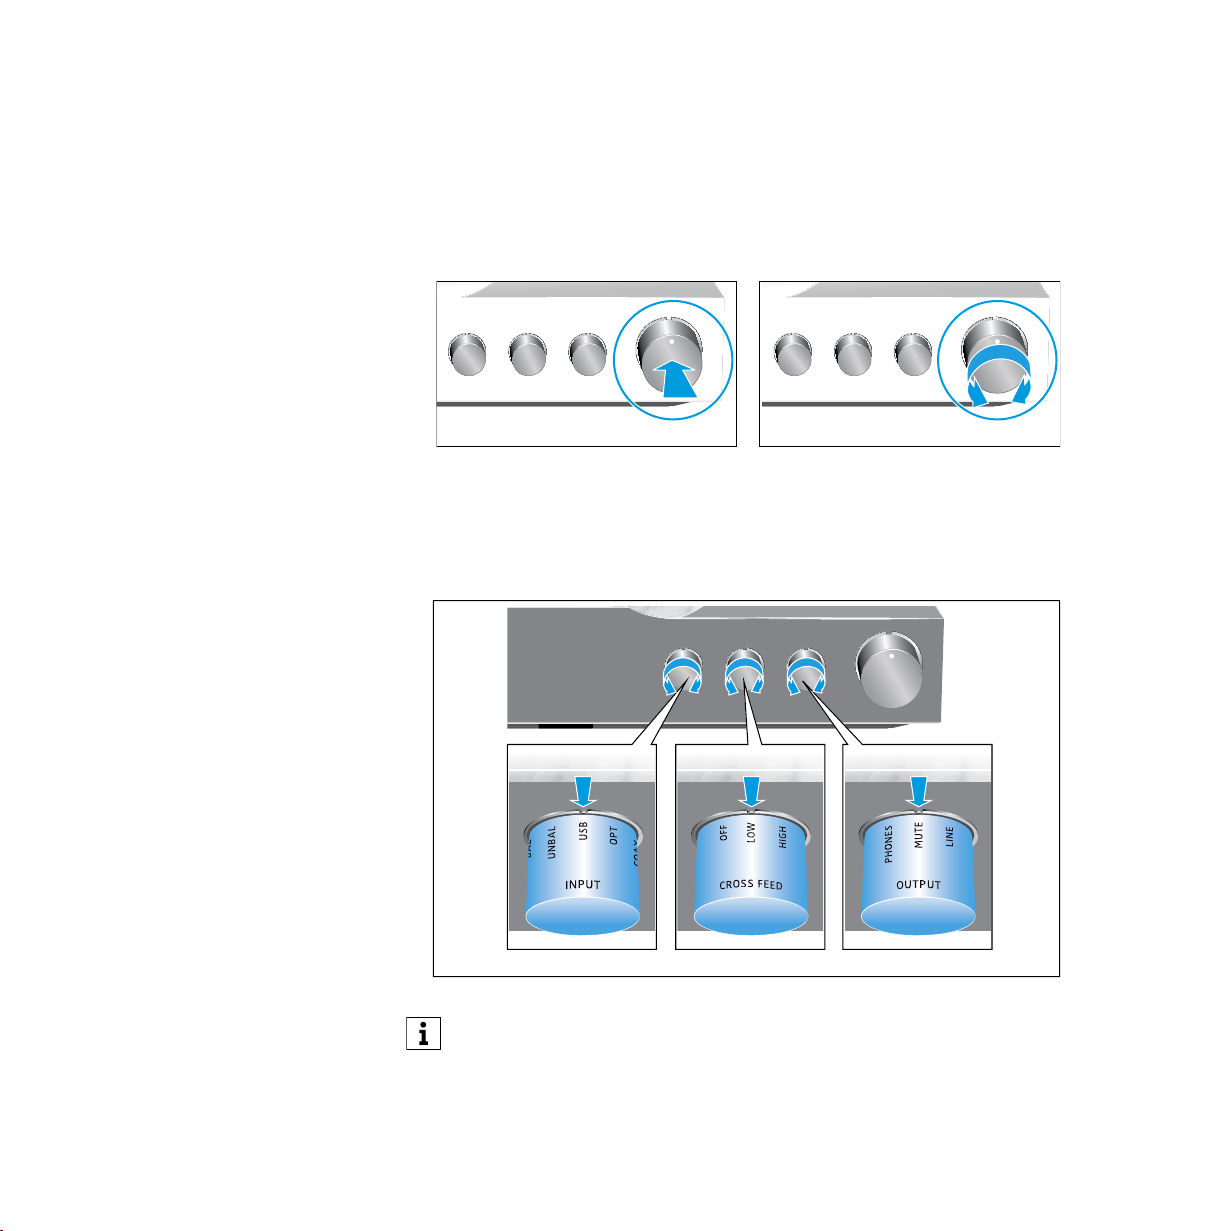
Overview of the operating elements
On/off button and volume control
▷ Press the button to start the switch-on or switch-off process.
▷ Turn the control to steplessly adjust the volume.
ON/OFF
Vol. – Vol. +
Rotary switches
▷ Turn the INPUT, CROSS FEED or OUTPUT rotary switch until the desired
setting points to the marking.
INPUT
CROSS FEED OUTPUT
12
When using the remote control for adjusting a setting or the volume, the
rotary switch or the volume control on the headphone amplier automatically adjusts to the desired position.
Putting the HE 1 into operation | Setting up the tube headphone amplier
Putting the HE 1 into operation
Setting up the tube headphone amplifier
CAUTION
Risk of staining of furniture surfaces!
Varnish or furniture polish may degrade the feet of the product, which could
stain your furniture.
▷ Do not place the product on delicate surfaces; if necessary, use a non-slip
pad under the product.
The installation location and the substructure have effects on the sound
quality. Observe the following notes:
▷ Place the tube headphone amplier on a stable, at, horizontal and low-vi-
bration surface that can safely carry the weight of the amplier.
▷ Ensure circulating ventilation. The amplier generates heat which is dissi-
pated through the housing, especially through the extended tubes. Do not
operate the amplier in closed cabinets.
▷ The power switch at the rear of the amplier must always be easily
accessible.
> 10
cm
21 kg
m
c
5
>
45
6 m
°
<
45
°
13
Putting the HE 1 into operation | Connecting the tube headphone amplier to audio sources
A
B
C
D
E
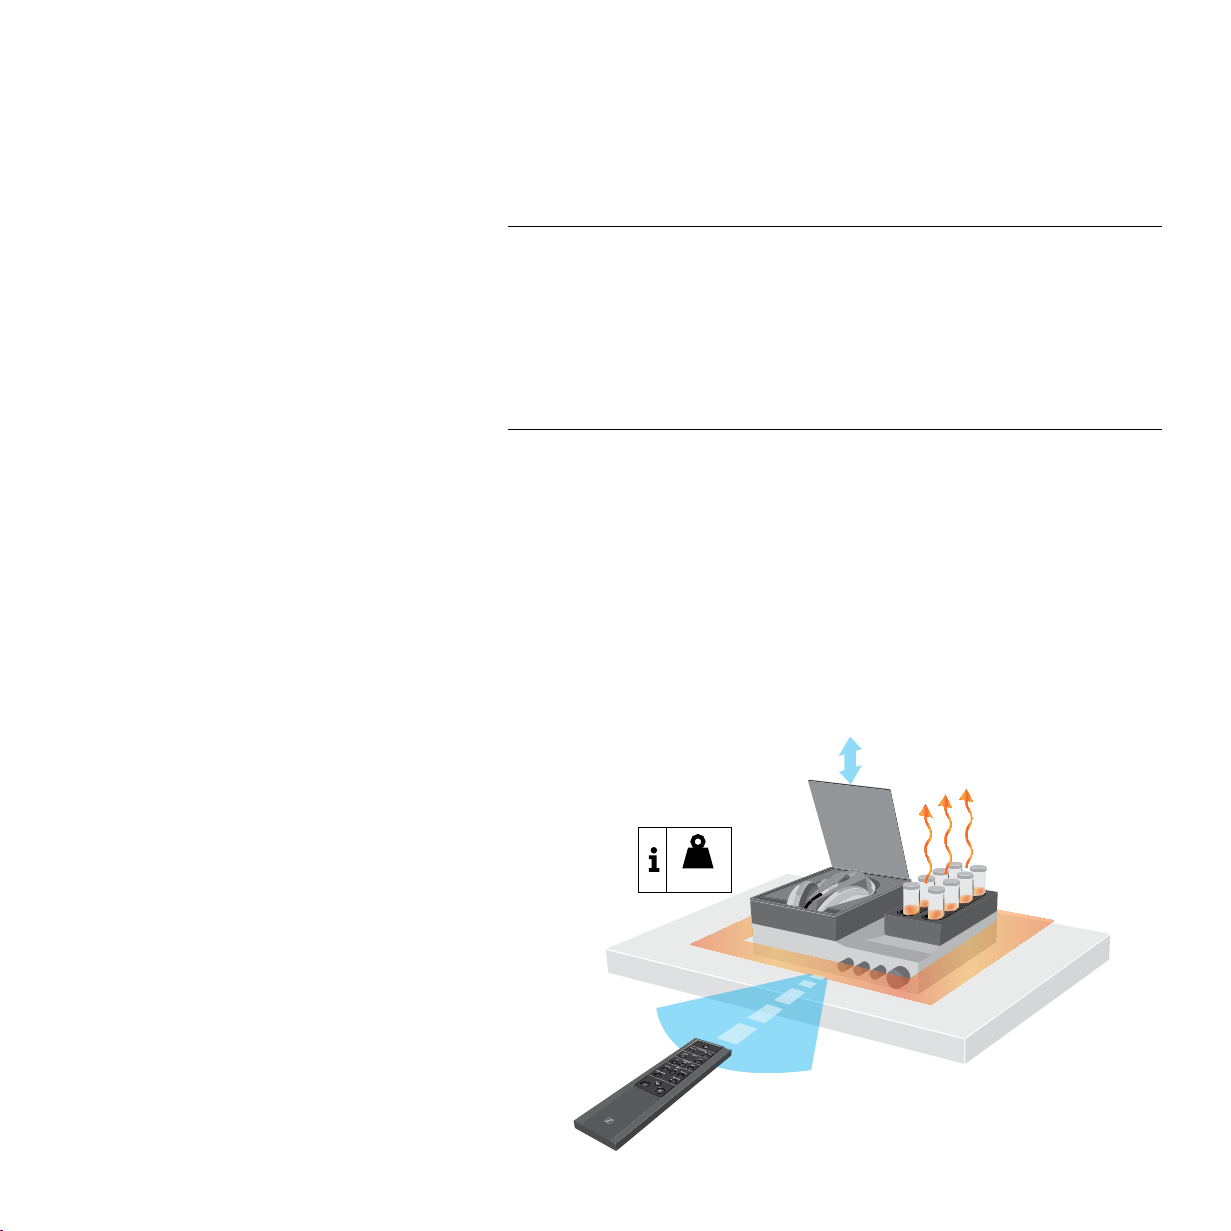
▷ There must be sufcient room in front of and above the amplier as the
operating elements and the amplier tubes extend automatically and the
glass cover opens automatically (see diagram).
▷ Observe the range of the remote control (see diagram).
Connecting the tube headphone amplifier to audio sources
You can connect several audio sources to the tube headphone amplier and
switch between these connected sources using the INPUT rotary switch.
▷ Switch your audio sources off before connecting the tube headphone
amplier.
▷ Select a suitable high-quality connection cable for your audio source. Please
observe the recommended maximum cable length as given in the table.
▷ To connect the tube headphone amplier to your audio source, refer to the
connection diagram suitable for your your audio source (see the following
chapters):
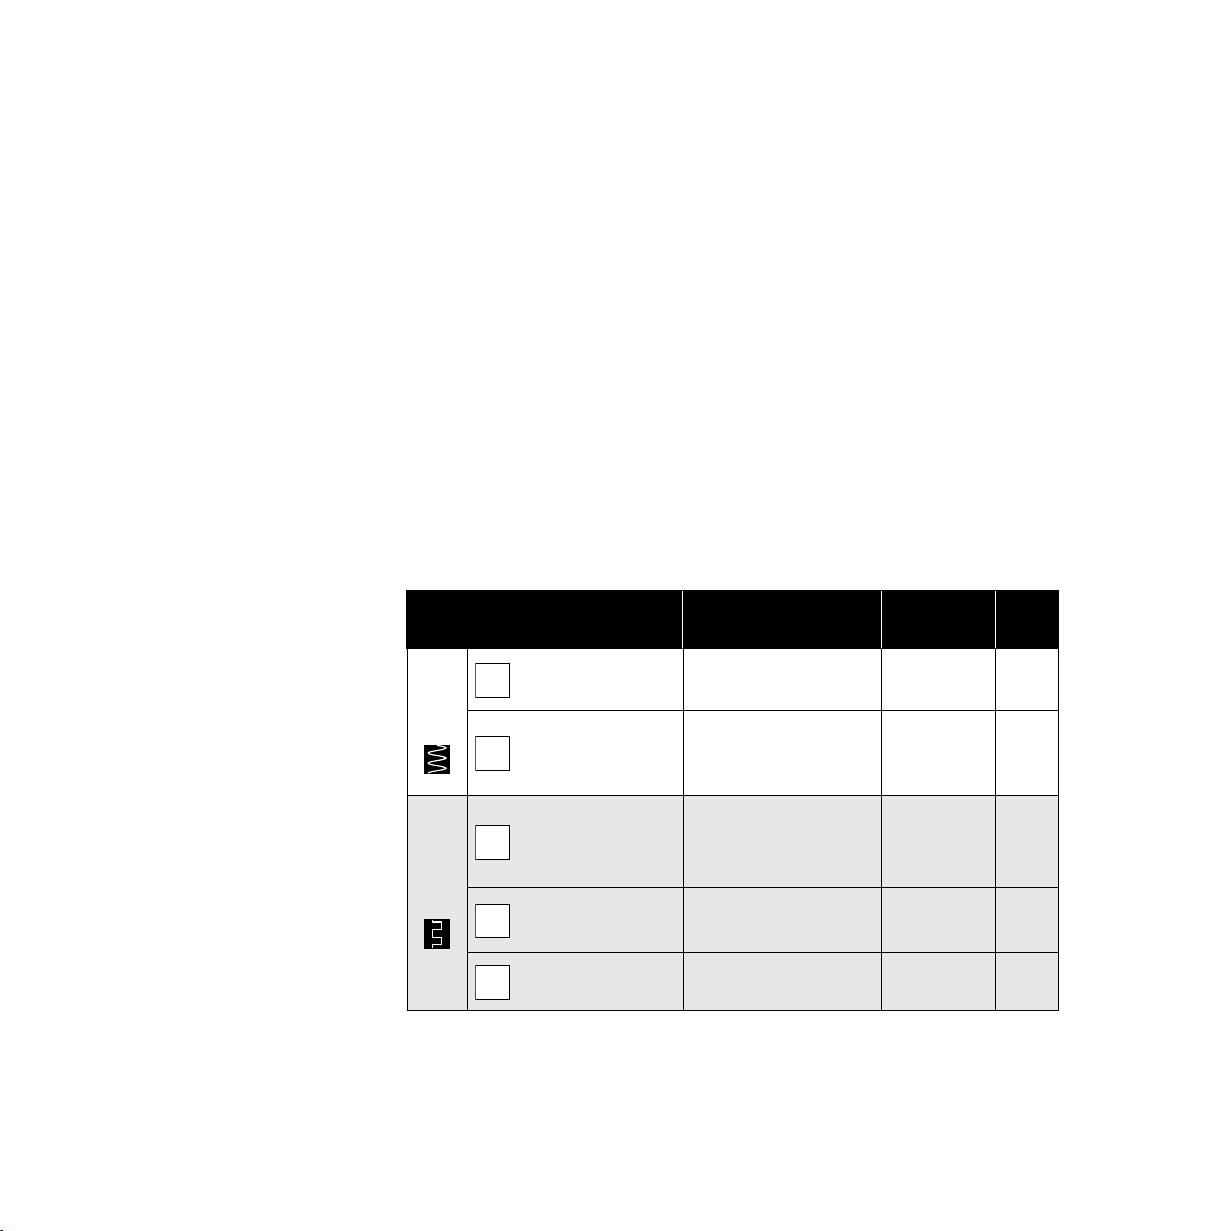
Connection possibilities of the
audio source
XLR-3 (BAL)
ANALOG
RCA (UNBAL)
Connection cable Max. cable
length
2 balanced XLR-3
cables
10 m
Stereo audio cable
with 2 RCA connec-
3 m
Page
15
15
tors at each end
USB 2.0 certified
USB (USB)
cable with Type A and
5 m
16
Type B connector
DIGITAL
Optical (OPT) Optical cable 5 m
16
Coaxial (COAX) Coaxial cable (75 ) 5 m
14
16
Putting the HE 1 into operation | Connecting the tube headphone amplier to audio sources
ORPHEUS
B
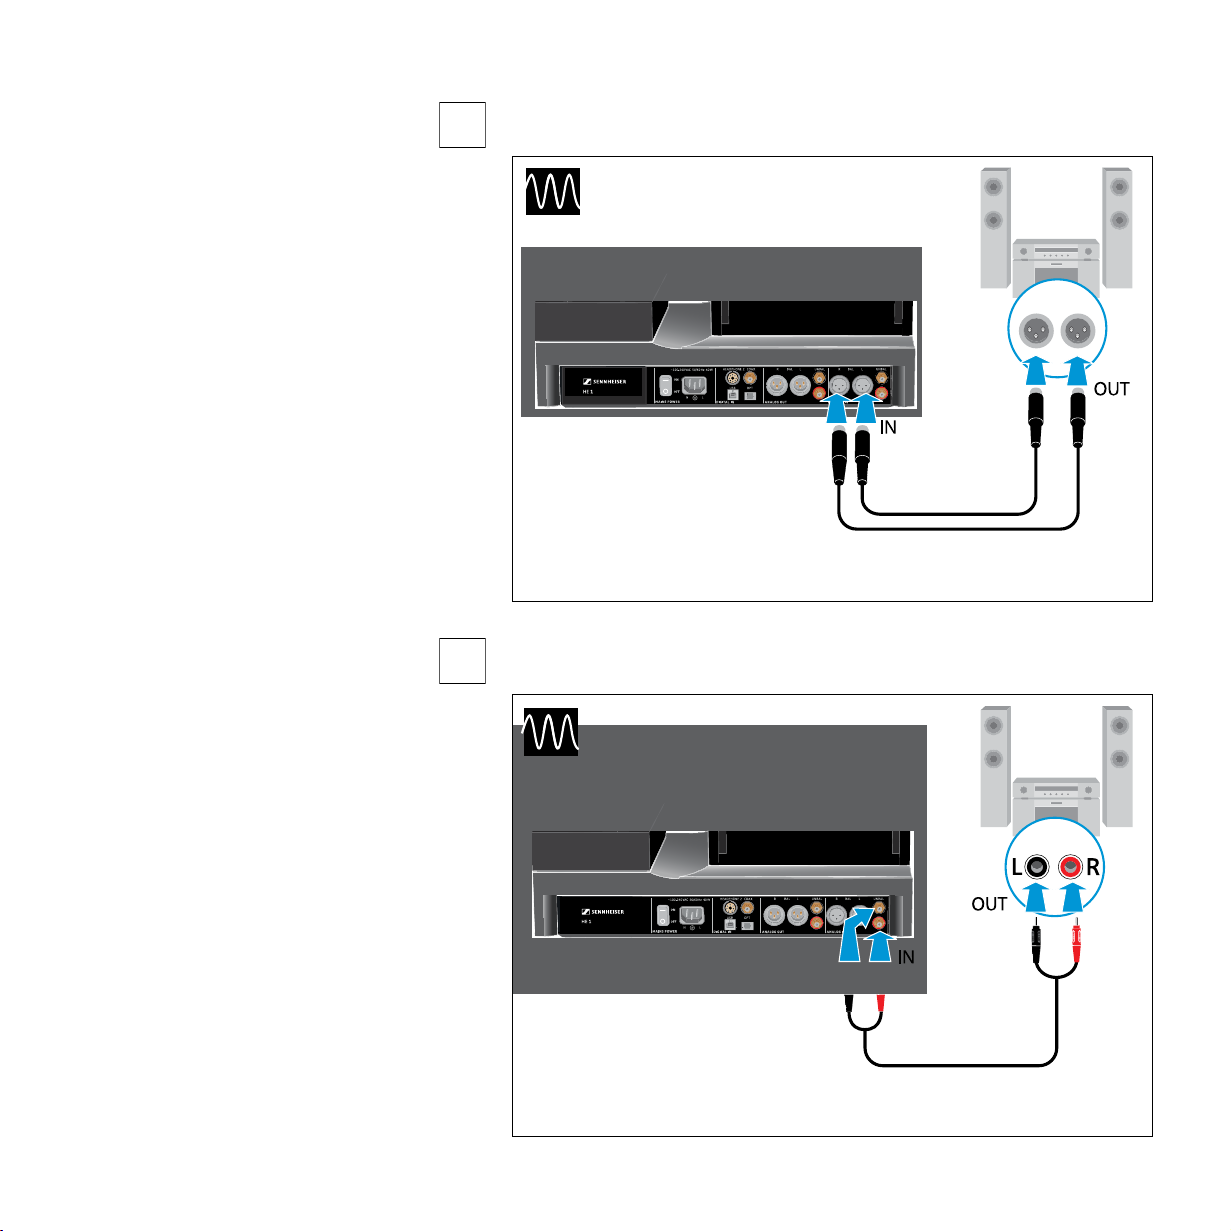
Connection possibility of the audio source: analog, XLR-3, balanced
A
BAL
L R
R L
Connection cable: 2 balanced XLR-3 cables
Connection possibility of the audio source: analog, RCA, unbalanced
UNBAL
ORPHEUS
RL
RL
Connection cable: stereo audio cable with 2 RCA connectors at each end
15

Putting the HE 1 into operation | Connecting the tube headphone amplier to audio sources
D
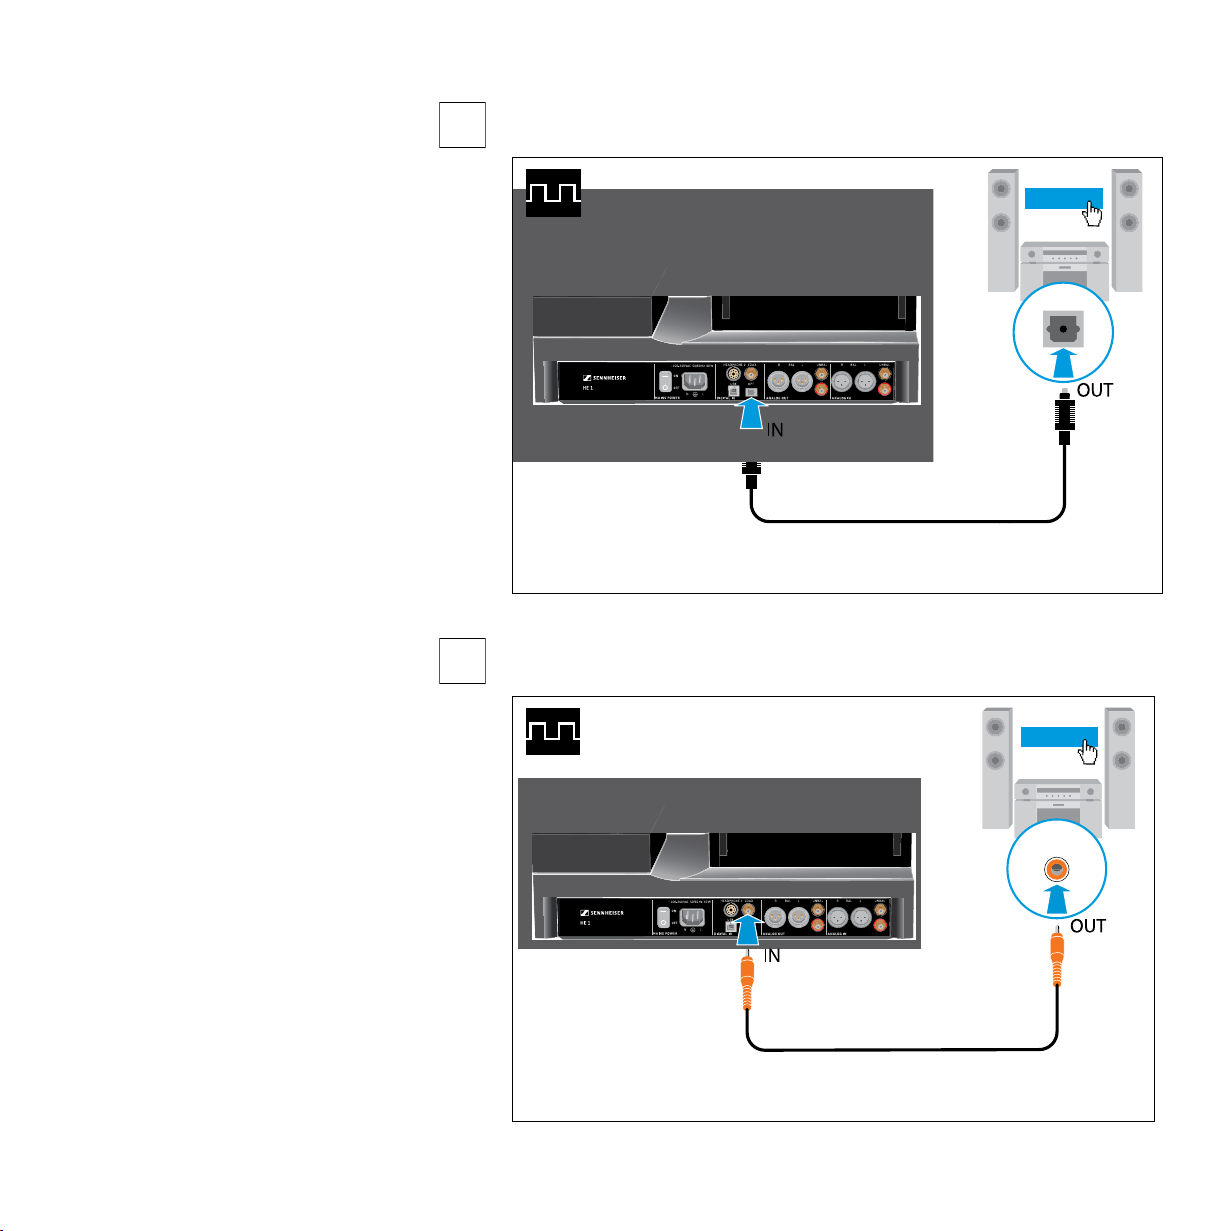
Connection possibility of the audio source: digital, USB connection
C
USB
ORPHEUS
Connection cable: USB 2.0 certied cable with Type B connector for
connection to the headphone amplier
16
Requirements for digital connections
E
The digital audio inputs (DIGITAL IN , OPT or COAX) can receive digital audio
signals in PCM
up to 192 kHz).
Information on how to set the audio signal of the connected device to PCM can
be found in the Sound or Settings menu or in the instruction manual of your
device.
If an incompatible digital audio signal is being received, the status LED of the
HE 1 ashes blue. The headphones are/the audio output is muted (OUTPUT
rotary switch in position MUTE) and music playback is not possible.
format (supported sample rates: optical: up to 96 kHz, coaxial:
Sound menu
Digital sound output
PCM
Bitstream
Putting the HE 1 into operation | Connecting the tube headphone amplier to audio sources
E
Connection possibility of the audio source: digital, optical connection
D
OPT
PCM
ORPHEUS
Connection cable: optical cable
Connection possibility of the audio source: digital, coaxial connection
COAX
PCM
ORPHEUS
Connection cable: coaxial cable (75 )
17
 Loading...