

Sennheiser EK 6042 Users Manual

EK 6042
Instruction manual

Contents
Contents
The EK 6042 portable camera receiver ........................................ 5
Package contents ............................................................................ 5
Product overviews .......................................................................... 6
Top ...................................................................................................... 6
Functions of the buttons ................................................................ 7
Front ................................................................................................... 7
Bottom ............................................................................................... 8
LED indicators ................................................................................... 8
Display panel ..................................................................................... 9
Backpanel adapter ........................................................................ 11
Putting the EK 6042 into operating ........................................... 12
Mounting the EK 6042 into a video camera ............................ 12
Connecting the backpanel adapter ............................................ 13
Connecting the accupack adapter .............................................. 13
Connecting the EK 6042 to a sound recording device
or a mixing console ....................................................................... 14
Connecting headphones .............................................................. 14
Using the EK 6042 ......................................................................... 15
Switching the EK 6042 on or off ................................................ 15
Calling up the standard display, the CH1 display
or the CH2 display ......................................................................... 15
Using the operating menu ........................................................... 15
Performing a synchronization (Sync) ....................................... 17
Performing an automatic configuration (Auto) ..................... 18
Performing a frequency scan ...................................................... 19
Changing scenes ............................................................................ 19
Configuring the EK 6042 using a web browser ....................... 20
Care and maintenance .................................................................. 22
Accessories ..................................................................................... 22
Specifications ................................................................................. 23
Licenses ............................................................................................. 1
eCos ..................................................................................................
Display Font (Palm OS) ................................................................... 1
DHCP Server (dhcps) ......................................................................... 1
The Creative Commons License ..................................................... 2
Pin assignment ................................................................................. 1
... 1
|
EK 6042

The EK 6042 portable camera receiver
The EK 6042 portable camera receiver
The EK 6042 is a miniature two-channel true diversity receiver. It can be
inserted into the receiver slot of professional video cameras or portable
mixing consoles with UniSlot/SuperSlot™ interface (e.g. Panasonic,
Ikegami, ARRI, Sound Devices) or Sony interface. Together with a high-performance Sennheiser bodypack, plug-on or handheld transmitter, a highly
reliable radio link can be set up.
The EK 6042 has the following features:
• Simultaneous reception from two transmitters
• Compatibility with almost all Sennheiser transmitters and microphones
such as e.g.
- digital transmitters of the Digital 9000 series that are operated in LR
mode
- analog transmitters of the 5000, 3000 and 2000 series that are
operated in FM mode and feature the HDX or HiDyn plus companders
• Choice of analog or digital audio output
• Great ease-of-use due to
- quick and easy One Touch Easy Setup
- menu-assisted operation via display panel
- configuration possibility via web browser
• Adapters for professional video cameras with UniSlot/SuperSlot™ interface (e.g. Panasonic, Ikegami, ARRI, Sound Devices) and Sony interface
• Power supply either via the video camera, an external power supply or
the Sennheiser GA 6042 BA accupack adapter
• High operational reliability due to true diversity reception
• Wide range of accessories to suit every application (see “Accessories”
on page 22)
Package contents
1 EK 6042 camera receiver
2 antennas
1USB cable
1 transport case
1 instruction manual
Information on accessories (e.g. power supply, cables and adapters) can
be found on page 22.
EK 6042 | 5
Product overviews
312 4 2 5
8767
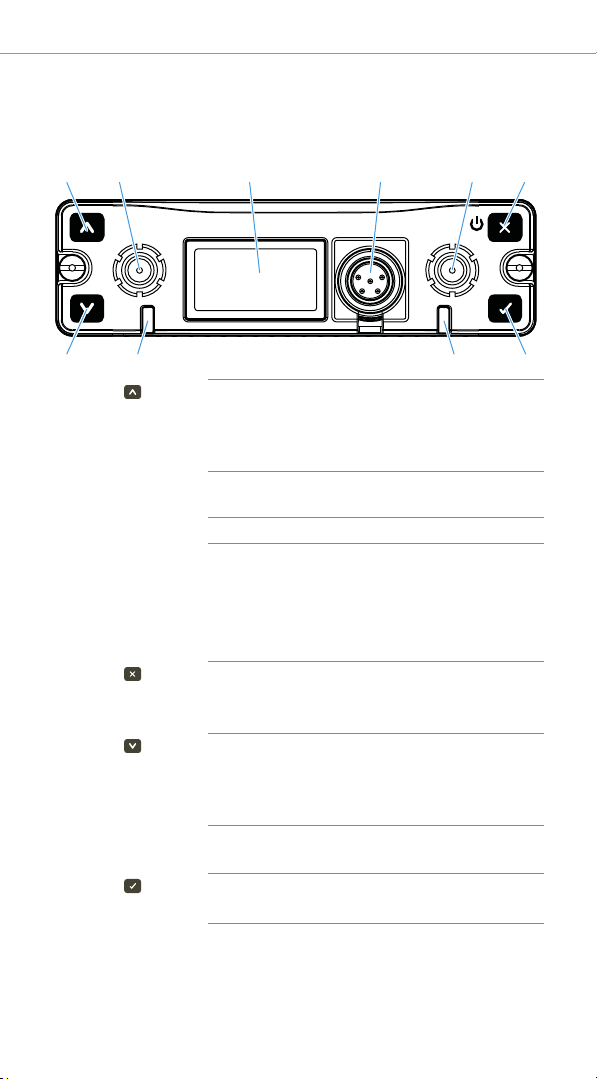
Top
Sync
Auto Scene
Product overviews
1 Button Short-press: Navigates up in the menu or returns
2 SMA sockets for the detachable antennas (diversity section A
3 Display panel For details, see page 9
4 5-pin mini XLR
socket (Top)
AUX 1/2
5 Button Short-press: Exits the menu item
6 Button Short-press: Navigates down in the menu or
7 LED CH1 and CH2 Status LEDs for receiving channel CH1 or CH2
8 Button Short-press: Confirms the selection
you to the standard display
Long-press: See “Performing a synchronization
(Sync)” on page 17
and B)
Audio socket of the secondary audio outputs
AUX 1 and AUX 2 (underneath a cover)
can only output analog audio signals
outputs the same audio signal as the audio socket
AUX 1/2
Long-press: See “Switching the EK 6042 on or off”
on page 15
returns you to the standard display
Long-press: See “Performing a synchronization
(Sync)” on page 17
For details, see page 8
Long-press: See “Changing scenes” on page 19
6 | EK 6042
Product overviews
2
1
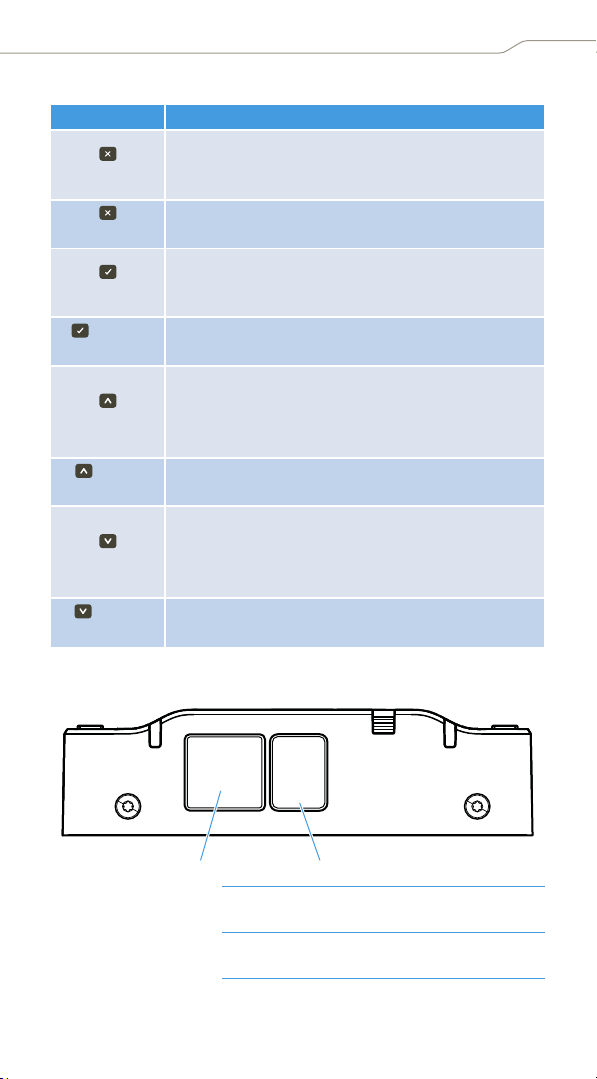
Functions of the buttons
Button Function
• Navigates to the next higher level in the menu
Short-press:
Long-press:
Short-press:
(Scene)
Long-press:
Short-press:
(Sync)
Long-press:
Short-press:
(Auto)
Long-press:
• Exits the menu item without storing changes to the
settings
• Switches the EK 6042 on (see page 15)
• Switches the EK 6042 off
• Changes from the current standard display, the CH1
display or the CH2 display to the operating menu
• Calls up the selected menu item
• Calls up a stored scene (see page 20)
• Switches between the standard display, the CH1
display and the CH2 display
• Returns you to the previous menu item
• Increases the set value
• Synchronizes a transmitter with the EK 6042
(see page 17)
• Switches between the standard display, the CH1
display and the CH2 display
• Changes to the next menu item
• Reduces the set value
• Starts the automatic configuration (see page 17)
Front
CH1 CH2
IR
1 Infra-red interface for synchronization with transmitters (see Sync
on page 17 and Auto on page 18)
2 USB port for connecting a computer for configuration via
a web browser (see page 20)
USB
EK 6042 | 7
Bottom
1
1
2
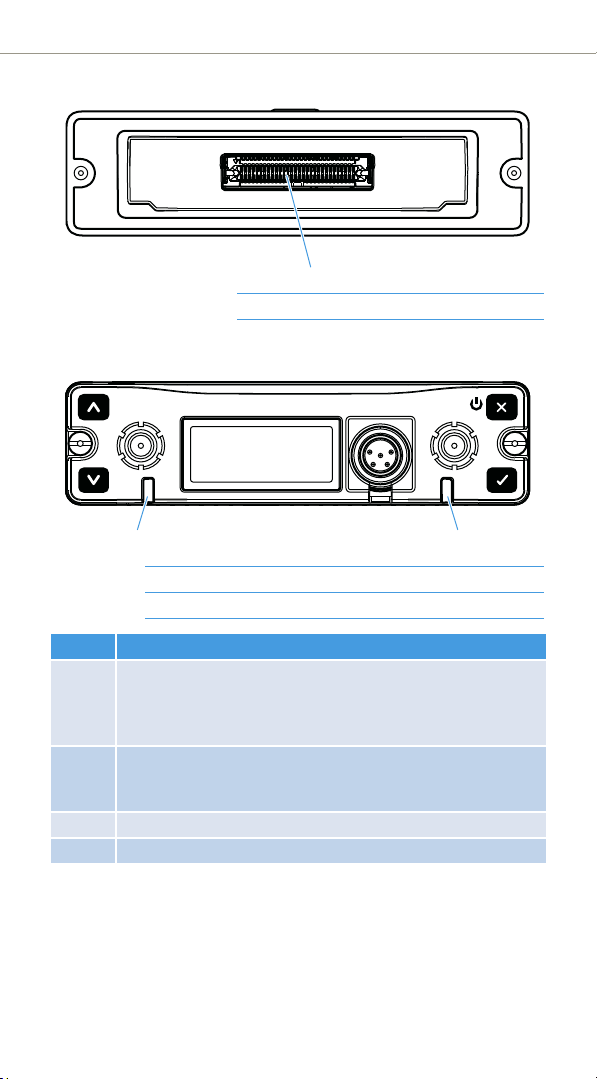
1 Multi-pin interface for connecting accessories
LED indicators
Sync
Auto Scene
1 LED CH1 Status LED for receiving channel CH1
2 LED CH2 Status LED for receiving channel CH2
Product overviews
LED Meaning
off The receiving channel is deactivated, e.g. to safe battery life.
“Inactive” appears on the display panel. For how to activate/
deactivate a receiving channel, refer to “Channel Power” on
page 16.
green The receiving channel is activated and receives a transmitter.
The accupacks of the transmitter and the receiver are suffi-
ciently charged.
yellow A status message is shown on the display panel.
red The receiving channel does not receive a transmitter.
8 | EK 6042
Product overviews
121
3
5635
6
4
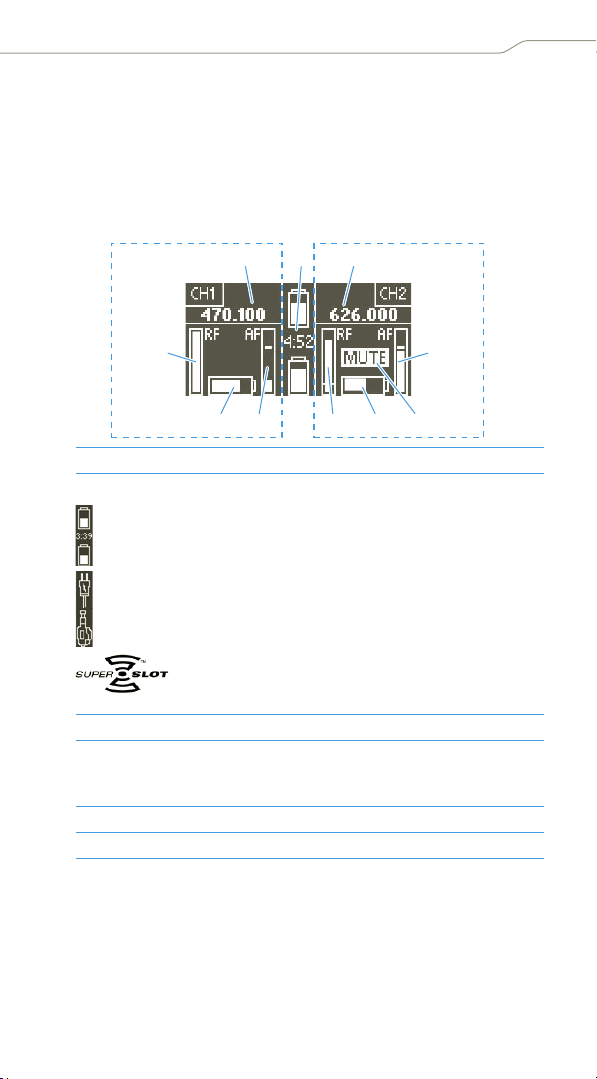
Receiving channel CH1
Receiving channel CH2
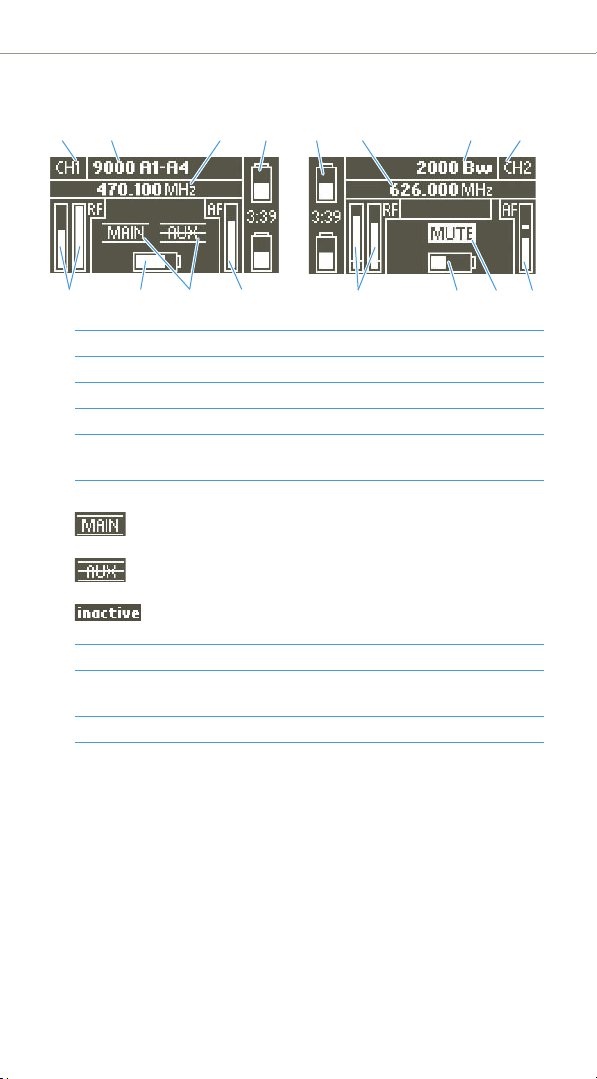
Display panel
The display panel provides various status information and displays the
operating menu. For how to call up the following displays, refer to page 15.
For information on the operating menu, refer to page 15.
Standard display
The standard display is shown after switch-on.
1 Receiving frequency
2 Source and status of the power supply:
If the GA 6042 BA accupack adapter is used, the charge status and
the remaining operating time of the inserted BA 61 accupacks is
displayed.
If an external power supply is connected, a plug icon is displayed.
If the EK 6042 is inserted into the receiver slot of a video camera,
a video camera icon is displayed.
If the EK 6042 is inserted into a SuperSlot™-compatible receiver slot, the logo shown on the left is displayed.
3 Audio level of the transmitter with peak hold function
4 Mute display: Either the EK 6042 has muted the audio output due to
too weak or noisy signal or the received transmitter has been muted
via its MUTE switch.
5 Battery charge status of the received transmitter
6 Signal strength of the received signal on the receiving channel
EK 6042 | 9
Product overviews
12 34
5678
43 2 1
5978
CH1 and CH2 display
Digital reception Analog reception
1 Receiving channel
2 Name of the received transmitter
3 Receiving frequency
4 Source and status of the power supply (see also 2 on page 9)
5 Audio level of the transmitter (deviation/modulation) with peak hold
function
6 Audio output display
If an audio output is active, its icon appears as shown on
the left.
If an audio output is muted via the command function, its
icon is crossed out.
If the receiving channel has been deactivated via the
Channel Power menu, “inactive” is displayed.
7 Battery charge status of the received transmitter
8 Signal strength of the received signal of both diversity sections with
display of the squelch threshold
9 Mute display (see also 4 on page 9)
10 | EK 6042
Product overviews
AES3
MAIN 1/2 AUX 1/2
DC-IN
7-18V
1
4
23
5
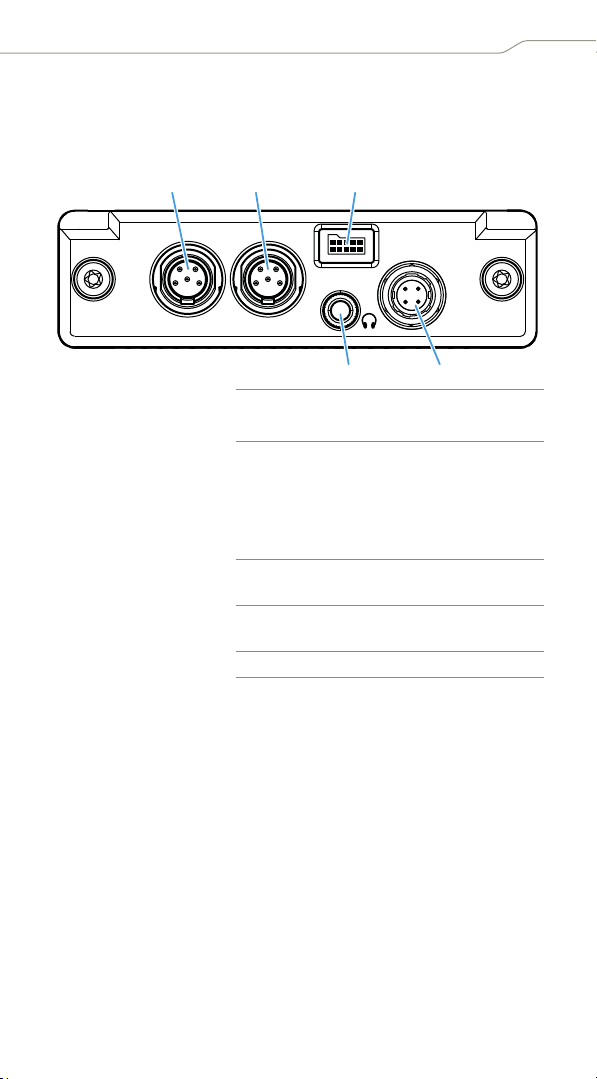
Backpanel adapter
The GA 6042 BP backpanel adapter is available as an accessory. The backpanel adapter is required if you want to use the EK 6042 remotely from
the video camera.
1 5-pin mini XLR socket
AES3 MAIN 1/2
2 5-pin mini XLR socket
AUX 1/2
Audio socket of the primary audio outputs
can output analog or digital audio signal
Audio socket of the secondary audio outputs
AUX 1 and AUX 2
can only output analog audio signals
outputs the same audio signal as the audio
socket (Top) AUX 1/2
3 Socket for accupack for connecting the GA 6042 BA accupack
adapter
4 3,5 mm jack socket
for connecting a pair of headphones
PHONES
5 DC-IN socket for connecting an external power supply
EK 6042 | 11
Putting the EK 6042 into operating
1
2
4
5
6
7
3
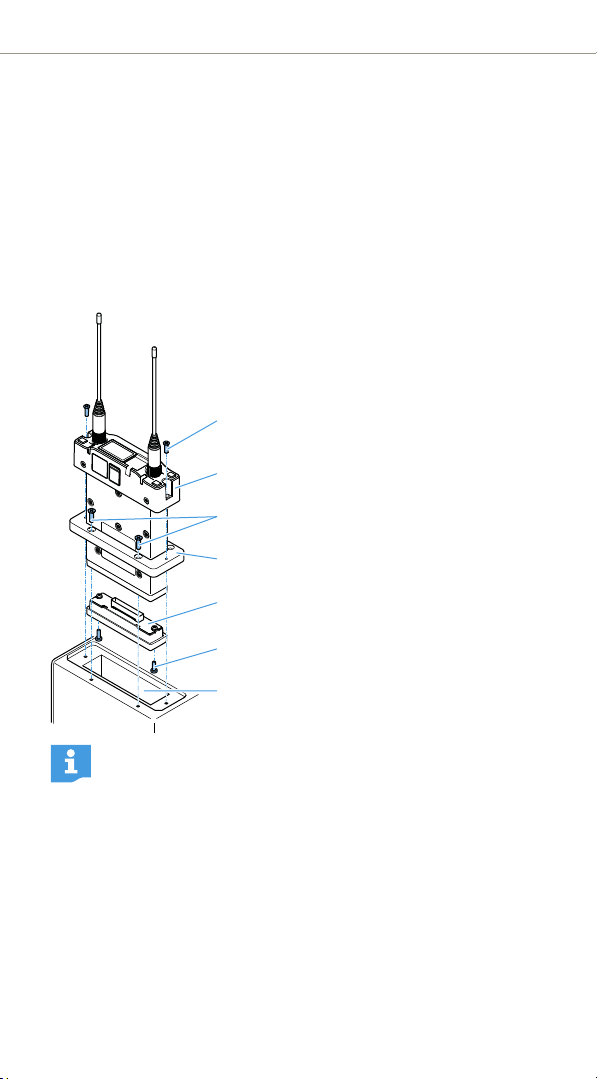
Putting the EK 6042 into operating
Mounting the EK 6042 into a video camera
You can mount the EK 6042 into the receiver slot of a video camera.
In order to mount the EK 6042 into video cameras with
UniSlot/SuperSlot™ interface (e.g. Panasonic, Ikegami, ARRI, Sound
Devices), you require the GA 6042-25 mounting kit. In order to mount the
receiver into Sony video cameras, you require the GA 6042-15 mounting
kit. Each mounting kit consists of an adapter plate 4 and a D-sub
adapter 5.
왘 Secure the adapter plate onto the receiver
slot 7 of your video camera using the four
supplied screws 3.
왘 Carefully connect the D- sub adapter to the
multi-pin interface of the EK 6042 2.
Secure the D-sub adapter to the EK 6042
using the two supplied screws 6.
왘 Slide the EK 6042 with the mounted D-sub
adapter through the adapter plate into the
receiver slot.
왘 Secure the EK 6042 to the video camera
using the two supplied screws 1.
The EK 6042 is connected via its multi-pin
interface to the video camera and is
powered via the video camera’s rechargeable battery.
If you use the EK 6042 in the receiver slot of a video camera with
UniSlot/SuperSlot™ interface (e.g. Panasonic, Ikegami, ARRI), the
audio signals of both receiving channels are transmitted to the
camera via the receiver’s multi-pin interface.
If y ou use the E K 6042 in t he receiver slo t of a Son y video cam era,
it might be that the camera only accepts the audio signal of
receiving channel CH1. If you also want to transmit receiving
channel CH2 to the video camera:
왘 Use the Y-adapter cable to connect the 5-pin mini XLR socket
(Top) AUX 1/2 to a second audio input of your Sony video
camera.
12 | EK 6042
Putting the EK 6042 into operating
1
2
3
4
2
5
6
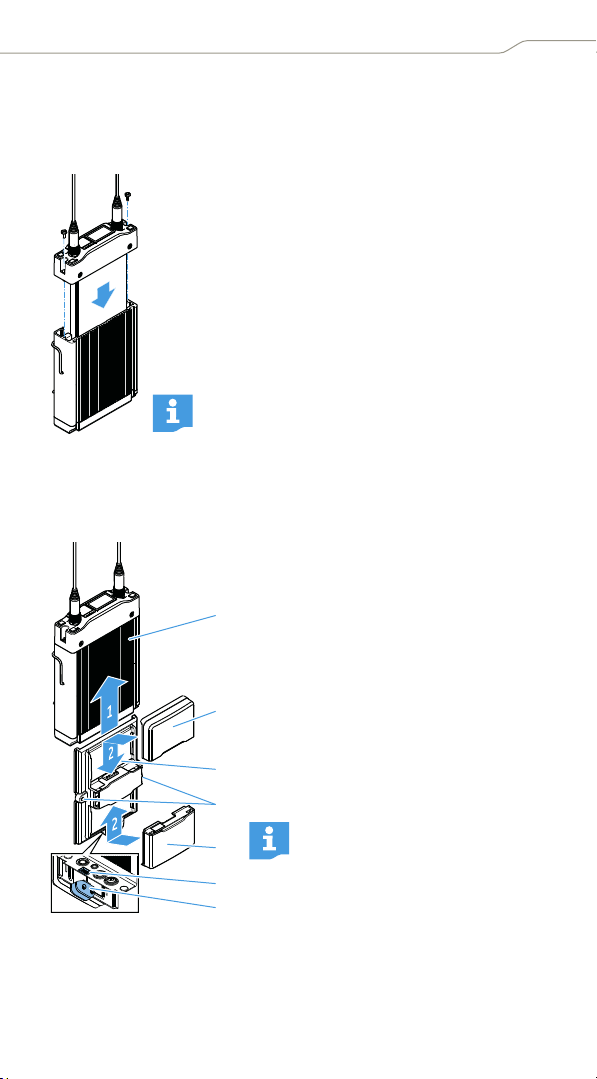
Connecting the backpanel adapter
In order to use the EK 6042 remotely from your video camera (e.g. on a
portable mixing console), you require the GA 6042 BP backpanel adapter
as well as an external power supply.
왘 Carefully slide the EK 6042 completely into the back-
panel adapter.
왘 Secure the EK 6042 to the backpanel adapter using the
two supplied screws.
왘 Use two Y-adapter cables to connect the primary and –
if desired – the secondary audio outputs to your mixing
console (see page 14).
왘 Use the CA 6042 DC DC-IN cable to connect an external
power supply to the DC-IN socket or mount the
GA 6042 BA accupack adapter (see below).
You can remove the belt clip of the backpanel
adapter.
Connecting the accupack adapter
In order to power the EK 6042 with accupacks, you require the GA 6042 BA
accupack adapter, two BA 61 accupacks and the L 60 charger:
왘 Mount the backpanel adapter 1 (see
above).
왘 Slide the accupack adapter 3 to the
correct side of the backpanel adapter so
that the connector of the accupack
adapter 6 connects to the socket for
accupack 5.
왘 Secure the accupack adapter to the back-
panel adapter using the two supplied
screws 4.
왘 Slide the two BA 61 2 onto the accupack
adapter until they lock into place with an
audible click.
You can replace one of the accupacks
at any time, even during operation.
If one accupack is replaced, the
second accupack takes over the
power supply.
EK 6042 | 13
 Loading...