

Page 1
Diversity Receiver
Instructions for use
EK 3041-U
27
Page 2

Thank you for choosing Sennheiser!
We have designed this product to give you reliable operation over many
years.
Please take a few moments to read these instructions carefully, as we want you
to enjoy your new Sennheiser product quickly and to the full.
Chapter Contents ........................................................................................................................................... Page
1 Brief description ............................................................................................................................... .. 29
2 Special features .................................................................................................................................. 29
3 Modes of application ......................................................................................................................... 29
4 Noise reduction with HiDyn
5 Diversity reception ............................................................................................................................. 31
6 Connections and operating elements ............................................................................................ 32
7 Mounting the antennæ ...................................................................................................................... 33
8 Mounting the EK 3041-U into the Philips LDK 120 ........................................................................ 34
9 Mounting the EK 3041-U into the Ikegami HL-V77 ....................................................................... 35
10 Mounting the EK 3041-U into the Sony SX .................................................................................... 36
11 Power supply ....................................................................................................................................... 37
12 Putting the receiver into operation / Switching the receiver on ............................................. 37
13 Switching the receiver off ................................................................................................................ 37
14 Display of receiving frequency or channel number ................................................................... 38
15 Overview of menus ............................................................................................................................. 38
16 „Fast search“ function ...................................................................................................................... 39
17 Adjusting the headphone volume ................................................................................................... 40
18 Adjusting the squelch ........................................................................................................................ 41
19 Changing the receiving frequency .................................................................................................. 42
20 Assigning a channel number ........................................................................................................... 43
21 Limiter .................................................................................................................................................... 44
22 Locking the operating buttons / „Lock mode“ function ............................................................. 4 5
23 Sennheiser transmitters report their battery/accupack status ............................................... 46
24 Suitable Sennheiser transmitters ................................................................................................... 47
25 Safety instructions ............................................................................................................................. 48
26 Error messages ................................................................................................................................... 48
27 Error checklist ..................................................................................................................................... 48
28 Recommended accessories ............................................................................................................. 49
29 Technical data ..................................................................................................................................... 50
®
plus
.................................................................................................. 30
28
Page 3

1 Brief description
The EK 3041-U is a miniature true diversity radiomicrophone receiver
designed for use with the new digital ENG camcorders. It can be inserted in
the slot-in facility of most professional camcorders such as the Philips LDK
120, Ikegami Hl-77 or Sony SX. Together with a suitable Sennheiser UHF
pocket or hand-held transmitter, a highly reliable radio link can be set up.
Annoying noise is effectively suppressed by HiDyn
®
plus
, the Sennheiser noise
reduction system.
Interchangeable mounting kits (for mounting the receiver into camcorders)
ensure suitability for a great variety of applications.
2 Special features
• Compact design
• Robust all-metal housing
• Easy to use due to menu-assisted operation
• Up to 32 pre-programmed receiving frequencies
• High transmission reliability due to true diversity reception
• HiDyn
®
plus
noise reduction system with more than 100 dB signal-to-noise ratio
• Powered via camcorder or GA 3041-B power adaptor
• Indication of transmitter battery status* („Low battery“)
• Mounting kits available for all current professional camcorders
• Weather-proof and therefore suitable for outdoor applications
• Stereo FM working on the „pilot tone“ principle
3 Modes of application
The EK 3041-U can be
• used as a „slot-in“ receiver inserted in the slot-in facility of professional
camcorders
• inserted in a special housing for attachment to camcorders without slot-
in facility
• used as mobile receiver inserted in a belt pouch
• used as a small stationary receiver system mounted into a mini-rack
* only with Sennheiser transmitters transmitting battery status information
29
Page 4
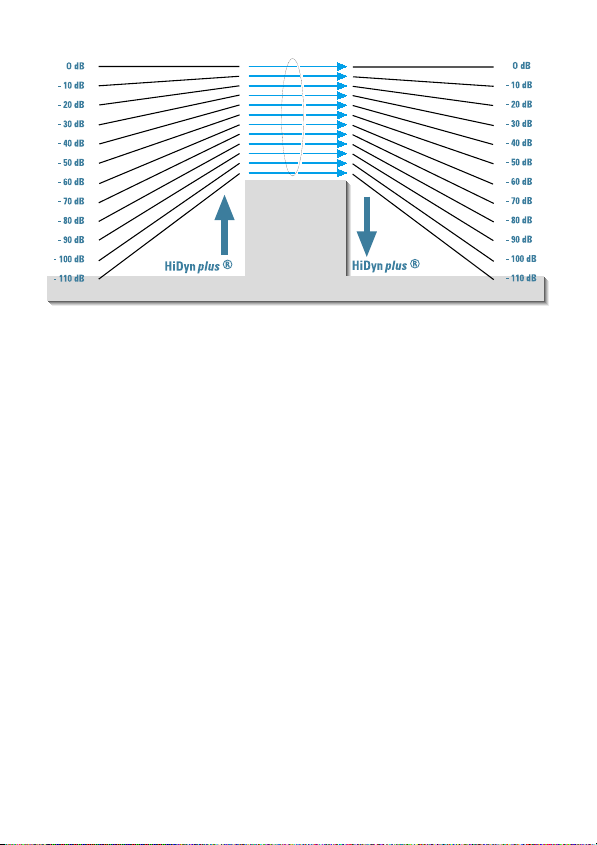
4 Noise reduction with HiDyn
This receiver is equipped with HiDyn
plus
®
®
plus
, the Sennheiser noise reduction
system that reduces RF interference. It increases the signal-to-noise ratio in
wireless audio transmission to more than 100 dB.
HiDyn
®
plus
is a wideband compander system which compresses the AF level
on the transmitter side in a ratio of 2:1 (related to dB), and expands it in an
exactly the same way on the receiver side. The optimisation of the dynamic
range and the supporting effect of the control amplifier in the transmitter
effectively reduce modulation problems.
HiDyn
®
plus
has been specially developed for use in high quality radiomicrophone
systems.
Note
Only transmitters which are also equipped with HiDyn
work correctly in combination with the EK 3041-U receiver. If
this is not the case, the dynamic range is drastically reduced
and the transmission sounds blunt and flat. HiDyn
plus
be switched off on the EK 3041-U receiver.
30
®
plus
®
cannot
can
Page 5
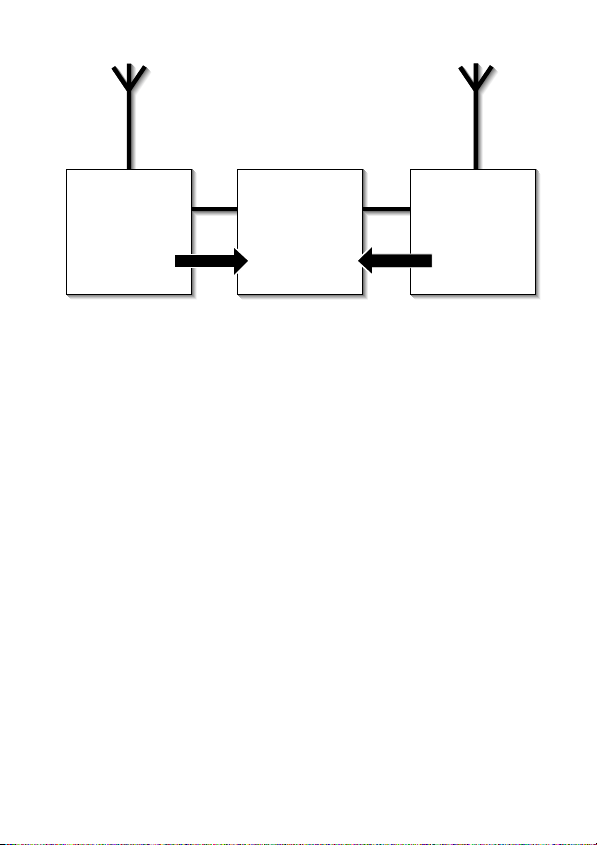
receiver 1
AF-signal
electronic switching
from one signal to another
AF-signal
receiver 2
5 Diversity reception
The EK 3041-U receiver operates on the „true diversity“ principle:
A receiving antenna receives not only the electromagnetic waves which reach
it by a direct path, but also the reflections of these waves which are created in
the room by walls, windows, ceilings and fittings. When these waves are
superimposed, destructive interference occurs, which can also be called „field
strength gaps“. Repositioning the receiving antenna can bring a solution,
provided the transmitter remains in its original position. With mobile
transmitters and receivers, however, the „field strength gap“ will then occur
with a different transmitter or receiver position. These field strength gaps“ can
only be eliminated with true diversity receivers.
In true diversity, instead of one antenna and one receiver there are now two
antenna and two receiver sections. The antenna are spatially separated. By
means of a comparison circuit, the receiver section with the strongest RF
signal is always switched to the common AF output. The switching is
inaudible. True diversity makes sense because, at UHF frequencies, even
antenna placed only a few centimetres apart provide effective protection
against interference caused by „field strength gaps“. The risk of the occurrence
of field strength gaps“ in both antenna at the same time is virtually nonexistant.
31
Page 6
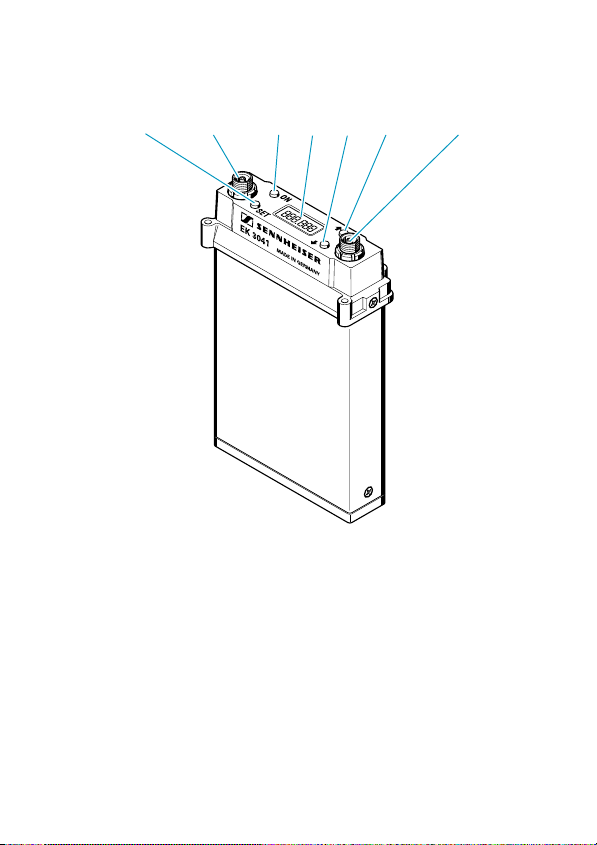
6 Connections and operating elements
햲햳햴햶햷 햸햵
햲 SET button for menu selection and programming
햳 Antenna socket, diversity branch A
햴 ON / OFF switch
햵 Multi-function display panel
햶 Button for adjusting the settings of a selected menu (cycling downwards)
햷 Button for adjusting the settings of a selected menu (cycling upwards)
햸 Antenna socket, diversity branch B
32
Page 7
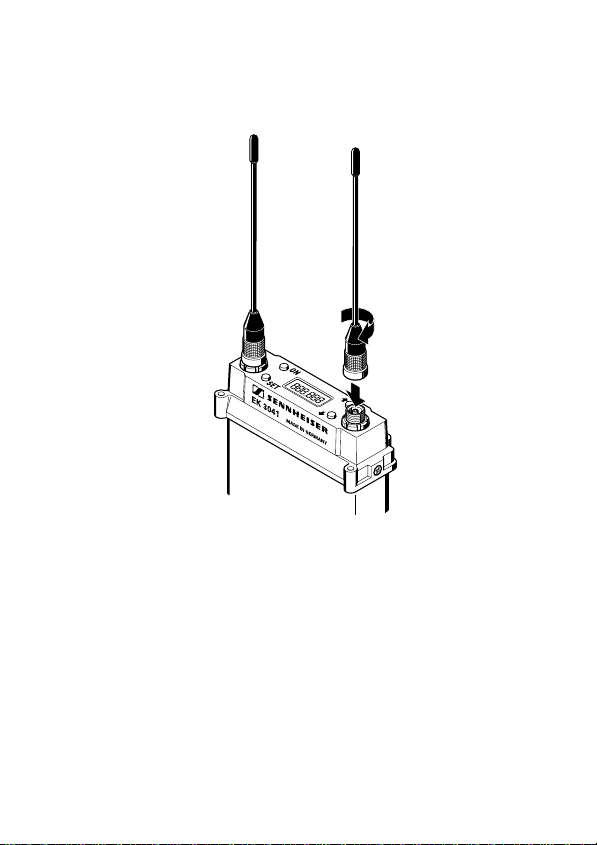
7 Mounting the antennæ
Your EK 3041-U receiver is supplied with two antenna which are necessary
for true diversity operation (see chapter 5). The length of the antenna has been
matched to the frequency range of your EK 3041-U receiver.
Insert the antenna into sockets 햳 and 햸 and screw them tight.
33
Page 8
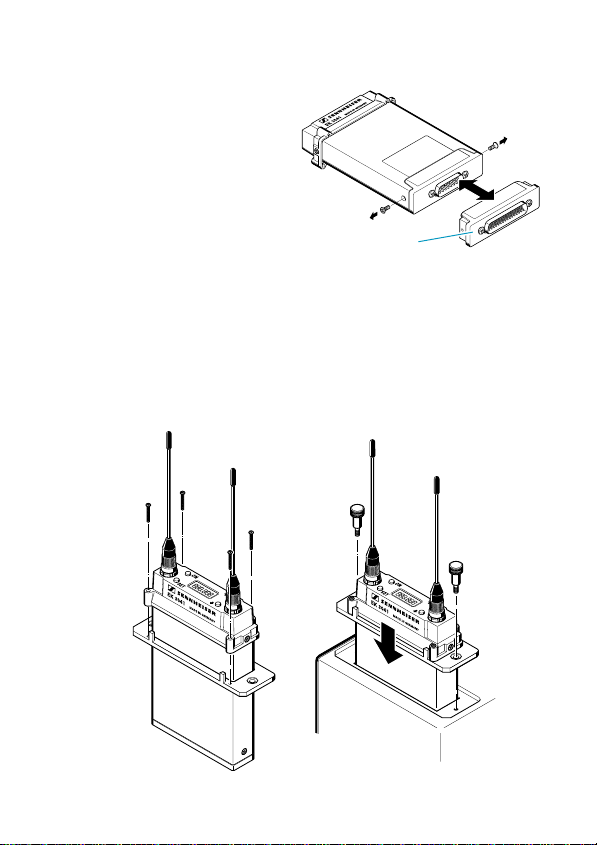
8 Mounting the EK 3041-U into the
Philips LDK 120 camcorder
Preparation:
Mount the base plate
suitable for the Philips
camcorder and fix it
to the left and right of the
receiver by means of two screws.
The Philips adaptor features
a 44-pin connector (accessories).
PHILIPS
Mounting the receiver into the camcorder:
• Fix the receiver (from above) to the mounting frame by means of four
small screws.
• Insert the receiver in the slot-in facility until the 44-pin connector securely
connects.
• Fix the receiver to the slot-in facility by means of the two knurled screws.
34
Page 9

9 Mounting the EK 3041-U into the
Ikegami HL-V77 camcorder
Preparation:
Mount the base plate
suitable for the Ikegami
camcorder and fix it
to the left and right of the
receiver by means of two screws.
The Ikegami adaptor features a
25-pin connector (accessories).
Mounting the receiver
into the camcorder:
• Screw the mounting frame to the Ikegami
camcorder housing.
• Insert the receiver in the slot-in facility until
the 25-pin connector securely connects.
• Fix the receiver (from above) to the
mounting frame by means of four small
screws.
IKEGAMI
35
Page 10

10 Mounting the EK 3041-U
into the Sony SX camcorder
Preparation:
Mount the base plate
suitable for the Sony camcorder
and fix it to the left and right
of the receiver by means
of two screws.
The Sony adaptor features
a 15-pin connector (accessories).
Mounting the receiver into the camcorder:
• Screw the mounting frame to the Sony
camcorder housing.
• Insert the receiver in the slot-in facility until
the 15-pin connector securely connects.
• Fix the receiver (from above) to the
mounting frame by means of four small
screws.
SONY
36
Page 11

11 Power supply
Your EK 3041-U receiver can be powered from different power sources. The
adaption to these power sources is via the plug-in connector at the bottom of
the receiver and the corresponding accessories.
The EK 3041-U can be powered
• directly via the camcorder with 12 V or 5.6 V or
• via the GA 3041-B power adaptor which is attached to the special housing
12 Putting the receiver into operation / Switching the receiver on
If the receiver is inserted in the slot-in facility of a camcorder, the receiver is
switched on as soon as the camcorder is put into operation. The receiver’s
ON/OFF switch 햳 is then locked. If the ON/OFF switch is pressed, „Loc“
appears on the display.
If the receiver is mounted into a special housing for external attachment to
camcorders, press the ON/OFF switch 햳 to switch the receiver on. After
approx. two seconds, the display indicates the receiving frequency or its
respective channel number.
Two bargraphes indicate the received RF signal (upper bargraph: „RF“) and
the deviation (lower bargraph).
13 Switching the receiver off
To switch the receiver off, press the ON/OFF switch 햳 for approx. one
second until „OFF“ briefly appears on the display.
Please wait at least two seconds before switching the receiver on again.
37
Page 12

14 Display of receiving frequency or channel number
You can choose the content of the display i.e. whether the preselected
receiving frequency or its respective channel number is indicated.
To do so, please proceed as follows:
씰 If you press button , the preselected receiving frequency is indicated.
씰 If you press button , the respective channel number is indicated.
Information on how to change the receiving frequency is given in chapter 19,
information on how to assign a channel number can be found in chapter 20.
15 Overview of menus
Despite its small dimensions, the EK 3041-U features an easy-to-use operating
menu comprising six menus with extensive adjustment facilities. The menus
can be selected by means of the SET button.
Detailed information on the menus is given in chapters 17 to
22. The following is just an overview:
씰 Press the SET button once
to adjust the headphone volume. This menu is skipped (= out of
operation) if the receiver is inserted into a camcorder ( see chapter 17).
씰 Press the SET button twice
to adjust the squelch ( see chapter 18).
38
Page 13

씰 Press the SET button three times
to select a receiving frequency ( see chapter 19).
씰 Press the SET button four times
to assign a channel number to a receiving frequency ( see chapter 20).
씰 Press the SET button five times
to adjust the limiter of the headphone output. This menu is skipped (= out
of operation) if the receiver is inserted into a camcorder ( see chapter
21).
씰 Press the SET button six times
to lock the operating buttons! The „lock mode“ function protects your
receiver against operating errors ( see chapter 22).
씰 Press the SET button seven times
to return to normal operation. If desired, you can start to adjust the
settings over again.
Cancellation
After about 15 seconds, the receiver automatically returns to normal
operation if no entry has been made during this period. You can
discontinue your entry at any time by briefly pressing the ON/OFF
switch.
16 „Fast search“ function
The / buttons feature a „fast search“ function. If you hold down a button,
the cycling of the display is continously accelerated. If you release the button
and start over again, the cycling of the display restarts at normal speed.
The „fast search“ function allows you to get fast and easily to your desired
setting.
39
Page 14

17 Adjusting the headphone volume
씰 Briefly press the SET button once.
The display now indicates „PHonE“ in alternation with a three-digit number
indicating the current volume level at the headphone output of your EK 3041U receiver. The adjustment range of the headphone volume is between 0 an
126 (on the display).
씰 The headphone output can only be used if the receiver is not inserted in
the slot-in facility of a camcorder but is operated as a stand-alone receiver,
e.g. inserted into a special housing (accessory). If the receiver is inserted
in the slot-in facility of a camcorder, the headphone volume cannot be
adjusted and the menu is skipped.
씰 With the / buttons you can now select a different volume setting.
Selecting a smaller value reduces the volume, selecting a higher value
increases the volume.
씰 The new setting becomes effective immediately without having to be
stored.
Notes
씰 You can discontinue the programming of this menu at any time. Press the
SET button to change to the next menu or briefly press the ON/OFF
switch to discontinue your entry. The cancellation is briefly confirmed on
the display with „ESC“. The display then switches back to the standard
display (display of receiving frequency or channel number)( see
chapter 16).
씰 After about 15 seconds, the receiver automatically returns to normal
operation if no entry has been made during this period. Here, too, „ESC“
flashes briefly.
40
Page 15

18 Adjusting the squelch
Your EK 3041-U receiver is equipped with an adjustable squelch control
which eliminates annoying noise when the transmitters are switched on and
off. It also suppresses sudden noise when a transmitter leaves the reception
area and there is no longer sufficient transmitter power received by the
receiver.
씰 Briefly press the SET button twice.
The display now indicates „Squelch“ in alternation with one of nine
possible squelch values (adjustable in 5-dB steps from „OFF“ to „40“).
These values are – to some extent – comparable to an input voltage in dB µV.
씰 With the / buttons you can now select a different setting. Selecting a
smaller value reduces the squelch threshold, selecting a higher value
increases the squelch threshold.
씰 The new setting becomes effective immediately without having to be
stored.
Notes
씰 You can discontinue the programming of this menu at any time. Press the
SET button to change to the next menu or briefly press the ON/OFF
switch to discontinue your entry. The cancellation is briefly confirmed on
the display with „ESC“. The display then switches back to the standard
display (display of receiving frequency or channel number)( see
chapter 16).
씰 After about 15 seconds, the receiver automatically returns to normal
operation if no entry has been made during this period. Here, too, „ESC“
flashes briefly.
41
Page 16

19 Changing the receiving frequency
씰 Briefly press the SET button three times.
The display now indicates the preset receiving frequency in alternation
with the channel number assigned. (If no channel number has been
assigned, three „hyphens“ appear on the display):
씰 With the / buttons you can now select a different frequency. The
display always jumps to the next fixed frequency setting in the program.
씰 When you get to the desired frequency, press the SET button for about
1 second. Your entry is confirmed by the fact that „Sto“ briefly appears
on the display.
Only now does the receiver change to the new frequency, any existing
RF link to a transmitter on the previous frequency is interrupted. The
display then switches back to the preset standard display (display of
receiving frequency or channel number)( see chapter 16).
Notes
씰 You can discontinue the programming of this menu at any time. Press the
SET button to change to the next menu or briefly press the ON/OFF
switch to discontinue your entry. The cancellation is briefly confirmed on
the display with „ESC“. The display then switches back to the standard
display ( see chapter 16).
씰 After about 15 seconds, the receiver automatically returns to normal
operation if no entry has been made during this period. Here, too, „ESC“
flashes briefly.
42
Page 17

20 Assigning a channel number
You can assign a channel number (from 001 to 255) to each of the 32 receiving
frequencies. With larger systems, it is recommended to use the same channel
number for both transmitters and receivers in order to provide for simpler
monitoring of the system.
씰 Briefly press the SET button four times.
The display now indicates the assigned channel number in alternation
with „CH SET“. (If no channel number has been assigned, three
„hyphens“ appear on the display):
씰 With the / buttons you can now select the desired channel number.
씰 When you get to the desired channel number, press the SET button for
about 1 second. Your entry is confirmed by the fact that „Sto“ briefly
appears on the display.
The display then switches back to the preset standard display (display of
receiving frequency or channel number)( see chapter 16).
Notes
씰 You can discontinue the programming of this menu at any time. Press the
SET button to change to the next menu or briefly press the ON/OFF
switch to discontinue your entry. The cancellation is briefly confirmed on
the display with „ESC“. The display then switches back to the standard
display ( see chapter 16).
씰 After about 15 seconds, the receiver automatically returns to normal
operation if no entry has been made during this period. Here, too, „ESC“
flashes briefly.
43
Page 18

21 Limiter
Your EK 3041-U receiver is equipped with a switchable limiter which limits
the output voltage of the built-in headphone amplifier. The limiter protects
your hearing and should therefore always be switched on.
Note
The limiter can only be used if the receiver is not inserted in the slot-in
facility of a camcorder but is operated as a stand-alone receiver, e.g.
inserted into a special housing (accessory). If the receiver is inserted in the
slot-in facility of a camcorder, this menu is skipped.
씰 Briefly press the SET button five times.
The display now indicates „—Ltd.—“ in alternation with the current
limiter setting, for example:
•„Ltd.OFF“, if the limiter
is switched off,
•„Ltd.-10“, if the limiter
is set to - 10 dB,
•„Ltd.-20“, if the limiter
is set to - 20 dB.
씰 With the / buttons you can now select the desired limiter setting.
씰 The new setting becomes effective immediately without having to be stored.
Notes
씰 You can discontinue the programming of this menu at any time. Press the
SET button to change to the next menu or briefly press the ON/OFF
switch to discontinue your entry. The cancellation is briefly confirmed on
the display with „ESC“. The display then switches back to the standard
display (display of receiving frequency or channel number)( see
chapter 16).
씰 After about 15 seconds, the receiver automatically returns to normal
operation if no entry has been made during this period. Here, too, „ESC“
flashes briefly.
44
Page 19

22 Locking the operating buttons / „Lock mode“ function
You can lock the operating buttons of your EK 3041-U to prevent accidental
programming or switching off by a user inexperienced in handling the
receiver.
Locking the buttons
씰 Briefly press the SET button six times until „Loc“ begins to flash on the
display.
씰 Now press the SET button for more than one second to store your
setting. „Sto“ briefly appears on the display, indicating that the new
setting has been stored. The display then switches back to the standard
display.
The buttons are now locked. If they are accidentally pressed, the display
briefly indicates „Loc“ and then switches back to the standard display.
With the / buttons, however, you can still choose the content of the
display i.e. whether the transmission frequency or the channel number is
displayed.
Unlocking the buttons
씰 Briefly press the SET once. „Loc“ begins to flash on the display.
씰 Now press the SET button for more than one second.
The display switches back to the standard display and the buttons can
now be operated as usual.
45
Page 20

23 Sennheiser transmitters report their battery/accupack status
Sennheiser supplies hand-held and pocket transmitters ( see chapter 24)
which provide information on the available transmitter battery/accupack
status to the receiver. This information can be evaluated with the EM 3041U receiver.
씰 When the battery or accupack capacity is so low that only a transmission
time of about 20 to 30 minutes remains, the „bat.tr“ display – alternating
with the display of the receiving frequency or channel number – begins
to flash on the display.
You should now immediately replace the transmitter battery or accupack.
Note
씰 The „bat.tr“ display is reset by the mute function ( see chapter 16).
Whenever the squelch is activated in the EK 3041-U receiver, the „bat.tr“
display goes off and the evaluation of the battery status signal from the
transmitter starts over again.
Under normal reception conditions, the evaluation of the battery
information from the transmitter lasts about 10–20 seconds.
46
Page 21

24 Suitable Sennheiser transmitters
For the optimum use of the excellent reception qualities of the EK 3041-U
receiver, Sennheiser offers hand-held and pocket transmitters in a variety of
configurations:
Pocket transmitters:
• SK 1063-U (without display of battery status)
• BF 1083-U (without display of battery status)
• SK 50-U (with display of battery status)
• SK 50-UA (with display of battery status)
• SK 250-U (with display of battery status)
Hand-held transmitters:
• SKM 1072-U (without display of battery status)
• BF 1081-U (without display of battery status)
• SKM 3072-U (with display of battery status)
• SKM 5000-U (with display of battery status)
Information on the many possible combinations of Sennheiser products and
their use in multi-channel systems can be found in the planning brochure
„Practical Applications in RF Technology“ which your Sennheiser distributor
has in stock or will be pleased to order for you from Sennheiser.
For up-to-date information on Sennheiser products, you can also
visit the Sennheiser Web site at „http://www.sennheiser.com“.
47
Page 22

25 Safety instructions
씰 Never open electronic devices! Servicing and programming must only be
done by authorised personnel and is all the more important for currentcarrying units. If devices are opened by customers in breach of this
instruction, the warranty becomes null and void.
씰 Keep the receiver away from central heating radiators and electric
heaters.
씰 Use a damp cloth for cleaning the receiver. Do not use any cleansing
agents or solvents.
26 Error messages
The display of the receiver is also used by the integrated microprocessor to
display error messages for service purposes. If you see error messages such
as „EE_DEF“ or „rS_232“, there is a fault in the receiver unit which can only
be corrected by your local Sennheiser service department.
27 Error checklist
Error Possible cause
Receiver does not work; 씰 Check the camcorder’s power supply;
display panel dark if necessary, switch power supply on
separately
Receiver does not work; 씰 Frequency of transmitter does not agree
display panel lit up with receiving frequency
씰 Squelch threshold adjusted too high
Sound distorted 씰 Transmission microphone over-
modulated; reduce AF level or
transmitter sensitivity
Sound overlaid with 씰 Transmitter not sensitive enough;
background noise where appropriate, increase transmitter
sensitivity
48
Page 23

28 Recommended accessories
• GA 3041-C Base plate with special housing Cat. no. 04642
• GA 3041-B Power adaptor Cat. no. 04643
• GA 3041-15 Sony adaptor Cat. no. 04639
• GA 3041-25 Ikegami adaptor Cat. no. 04640
• GA 3041-44 Philips adaptor Cat. no. 04641
• B 50 Battery box (small) Cat. no. 03545
• B 250 Battery box (large) Cat. no. 03547
• BA 50 Accupack (small) Cat. no. 03546
• BA 250 Accupack (large) Cat. no. 03548
49
Page 24

29 Technical data
Frequency range 450–960 MHz
Receiver frequencies max. 32, pre-programmed to customer
Switching bandwidth 24 MHz
Frequency stability ± 10 ppm (– 10 °C to + 55 °C)
Sensitivity (with HiDyn
®
plus
) typ. 10 µV for 90 dBA rms SNR
Squelch treshold 0 to 100 µV, adjustable in 5-dB steps
Adjacent channel rejection ≥ 70 dB
Intermodulation attenuation > 70 dB (400 kHz/800 kHz)
Antenna inputs / Impedance 2 LEMO sockets / 50 Ω
Compander system Sennheiser HiDyn
De-emphasis 50 µs
Nominal/peak deviation ± 40 kHz/± 56 kHz
AF frequency response 50–20,000 Hz
Signal-to-noise ratio ≥ 100 dB(A) at 1 mV
Outputs / Power supply plug-in connector mounted at the bottom.
씰 via GA 3041-C:
AF output 3-pin XLR + 9 dB (2.2 V rms),
Terminating impedance ≤ 10 kΩ
Power supply via 4-pin „HIROSE“ DC-socket HR 10-7-
씰 via GA 3041-B:
Power supply 1.8–4.8 V (internally DC/DC adjusted to
Suitable accupacks Sennheiser BA 50 and BA 250
Suitable battery boxes Sennheiser B 50 and B250
specifications
®
plus
and peak deviation
RF
The connections depend on
the different mounting adaptors:
electronically balanced, standard wiring
at pin 2 and 3, + at pin 2, 3 screen/ground
R45, pin 1: ground, pin 4 10.5–18 V DC,
approx. 40 mA at 12 V
max. 3.2 V), approx. 150 mA at 2.4 V
Limiter (at headphone output only) switchable: – 10 dB and – 20 dB
THD at 1 kHz and nominal deviation ≤ 1 %, typ. 0.8 % for overall device
Temperature range – 10 °C to + 55 °C
Dimensions / Weight 120 x 74 x 28 mm / approx. 200 g
In compliance with ETS 300422
50
Page 25

Aktuelle Informationen zu Sennheiser-Produkten erhalten Sie auch im Internet
unter „http://www.sennheiser.com“.
Up to date information on Sennheiser products can also be found on the
Internet under “http://www.sennheiser.com”.
Vous trouverez également toutes les informations actuelles relatives aux
produits Sennheiser sur Internet, sous “http://www.sennheiser.com“.
Informazioni attuali sulla gamma di prodotti Sennheiser sono disponibili
anche in Internet al sito „http://www.sennheiser.com“.
También en Internet, bajo „http://www.sennheiser.com“ obtendrá Vd.
informaciones actuales sobre los productos Sennheiser.
Actuele informatie met betrekking tot Sennheiser producten vindt u ook op
Internet onder “http://www.sennheiser.com“.
Änderungen vorbehalten
Subject to alterations
Sous réserve de modification
Con riserva di modifiche
Reservado el derecho a introducir modificaciones
Wijzigingen voorbehouden
Sennheiser electronic GmbH & Co. KG
D-30900 Wedemark
Telefon: +49 (0) 5130 600 0
Telefax: +49 (0) 5130 600 300
Printed in Germany Publ. 04/98 69668 / A 01
148
 Loading...