

Page 1

DECT
Comfort
call
Setup
Guide
DW Series
Setup Guide
Page 2

Contents “Setup Guide”
Contents “Setup Guide”
Important safety information ....................................................................... 2
Scope of delivery and overview of the DW series ...................................... 3
Base stations with components ................................................................... 3
Headsets with components ..........................................................................4
Product overview of the base stations ........................................................ 5
Overview of the front ..................................................................................... 5
Overview of the rear ......................................................................................5
Setting up the base station ........................................................................... 6
Connecting the base station to the mains power supply ....................... 6
Connecting the base station to a fixed line phone .................................. 7
Connecting the base station to an optional
electronic hook switch control (EHS) .......................................................... 9
Connecting the base station to a computer ............................................10
Securing the connected cables ...................................................................10
Charging the headset ...................................................................................11
Testing the headset system and the sound quality ................................ 13
Adjusting the headset system using the DIP switches .........................13
Adjusting the audio signal by means of the dial tone ..........................15
Adjusting the volume ..................................................................................16
Adjusting the automatic audio transmission “Auto Audio” ................16
If a problem occurs ....................................................................................... 17
Specifications ................................................................................................18
DW Series – Setup Guide | 1
Page 3

Important safety information
Important safety information
왘 Please read this instruction manual carefully and completely before
using the product.
왘 Always include this instruction manual when passing the product on to
d parties.
thir
왘 Do not use an obviously defective product.
reventing damage to heal
P
왘 Do not listen at high volume levels for long periods of time to prevent
hearing damage.
왘 Al
ways maintain a distance of at least 3.94” (10 cm) between the ear
and the cardiac pacemaker or implanted defibrillator since the
cups
product generates permanent magnetic fields.
왘 Keep the product, accessories and pac
dren and pets to prevent accidents and choking hazards.
왘 Do not use the product in situations which require special attention.
Preventing damage to the product and malfunctions
왘 Always keep the product dry and do not expo
tures (hairdryer, heater, extended exposure to sunlight, etc.) to avoid
corrosion or deformation.
왘 Only use attachments/accessories supplied or recommended by
n
heiser.
Sen
왘 Only clean the product with a soft, dry cloth.
왘 Unplug the power supply unit from the wa
disconnect the product from the mains power supply.
왘 Do not short-circuit the contacts of th
metal objects (e.g. paper clips, hair pins, earrings) come into contact
with the interfaces and contacts.
th and accidents
k
aging parts out of reach of chil-
se it to extreme tempera-
ll
socket to completely
e product. Make sure that no
왘 Only use the base station for charging DW series headsets.
Intended use/Liability
The headset system can be used for call
(VoIP) and/or a telephone – for audio input/output and is intended for
professional office or call center use.
It is considered improper use when this product is used for any application
not named in this instruction manual.
Sennheiser does not accept liability for damage arising from abuse or
misuse of this product and its attachments/accessories. The risk is to be
borne by the user.
Sennheiser is not liable for damages to USB devices that are not consistent
with the USB specifications.
Sennheiser is not liable for damages resulting from the loss of connection
due to flat or overaged rechargeable batteries or exceeding the DECT
transmission range.
ing and – together with a computer
2 | DW Series – Setup Guide
Page 4
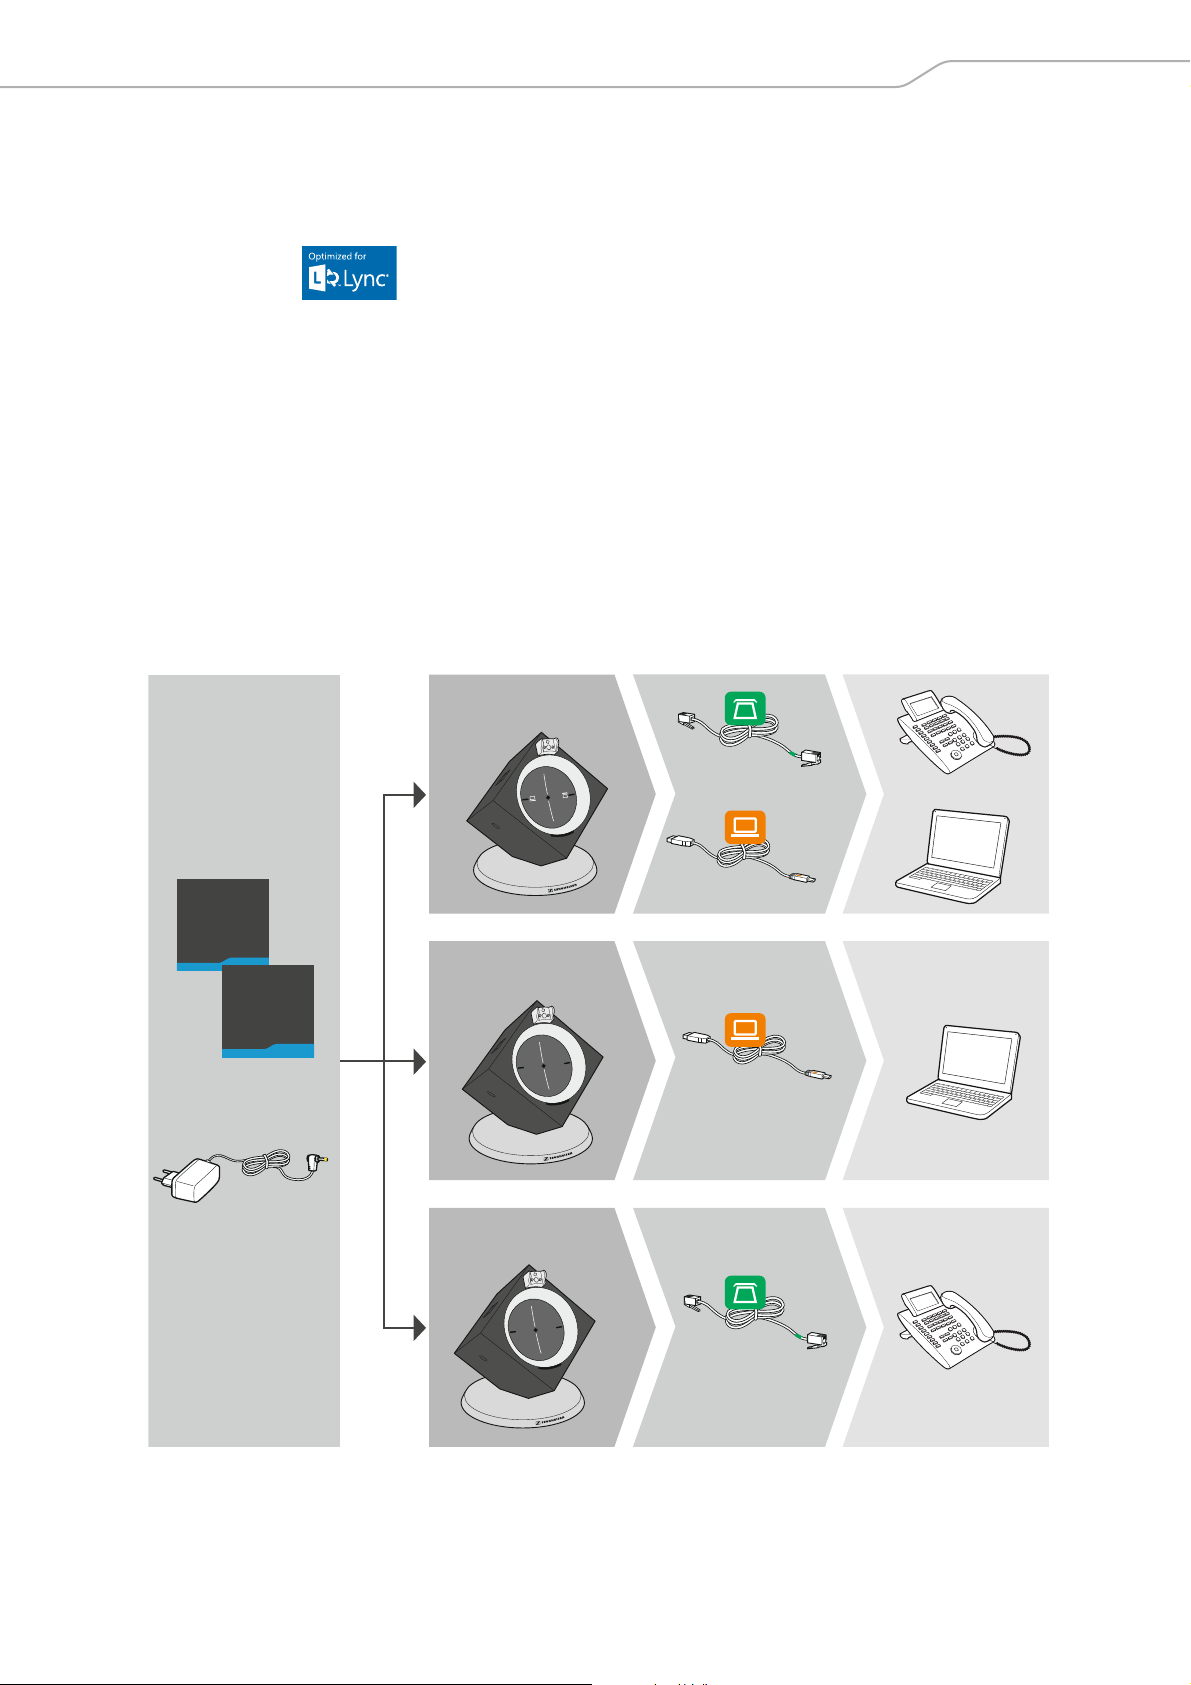
Scope of delivery and overview of the DW series
Phone
USB
DW BS USB
DW BS USB ML
DW BS Phone
DW BS
DW BS ML
Phone
USB
Safety
Guide
Quick
Guide
EU/UK/US/AU
Scope of delivery and overview of the
DW series
The DW series allows you to combine base stations (BS) and headsets (HS)
to meet your needs. The listed headsets and base stations are compatible
wi th each oth er. The DW s eries b ase statio ns marked w ith ML in their name
timized for Microsoft
are op
The scope of delivery includes – depending on the product purchased – a
base station and/or a headset with corresponding components.
Base stations with components
DW BS for fixed line phone and computer
DW BS ML for fixed line phone and computer, opt
DW BS USB for computer
DW BS USB ML for computer, optimized for Microsoft Lync
DW BS Phone for fixed line phone
Lync™.
Microsoft Lync
imized for
DW Series – Setup Guide | 3
Page 5
Scope of delivery and overview of the DW series
DW Pro1 – HS
DW Pro2 – HS
DW Office – HS
Quick
Guide
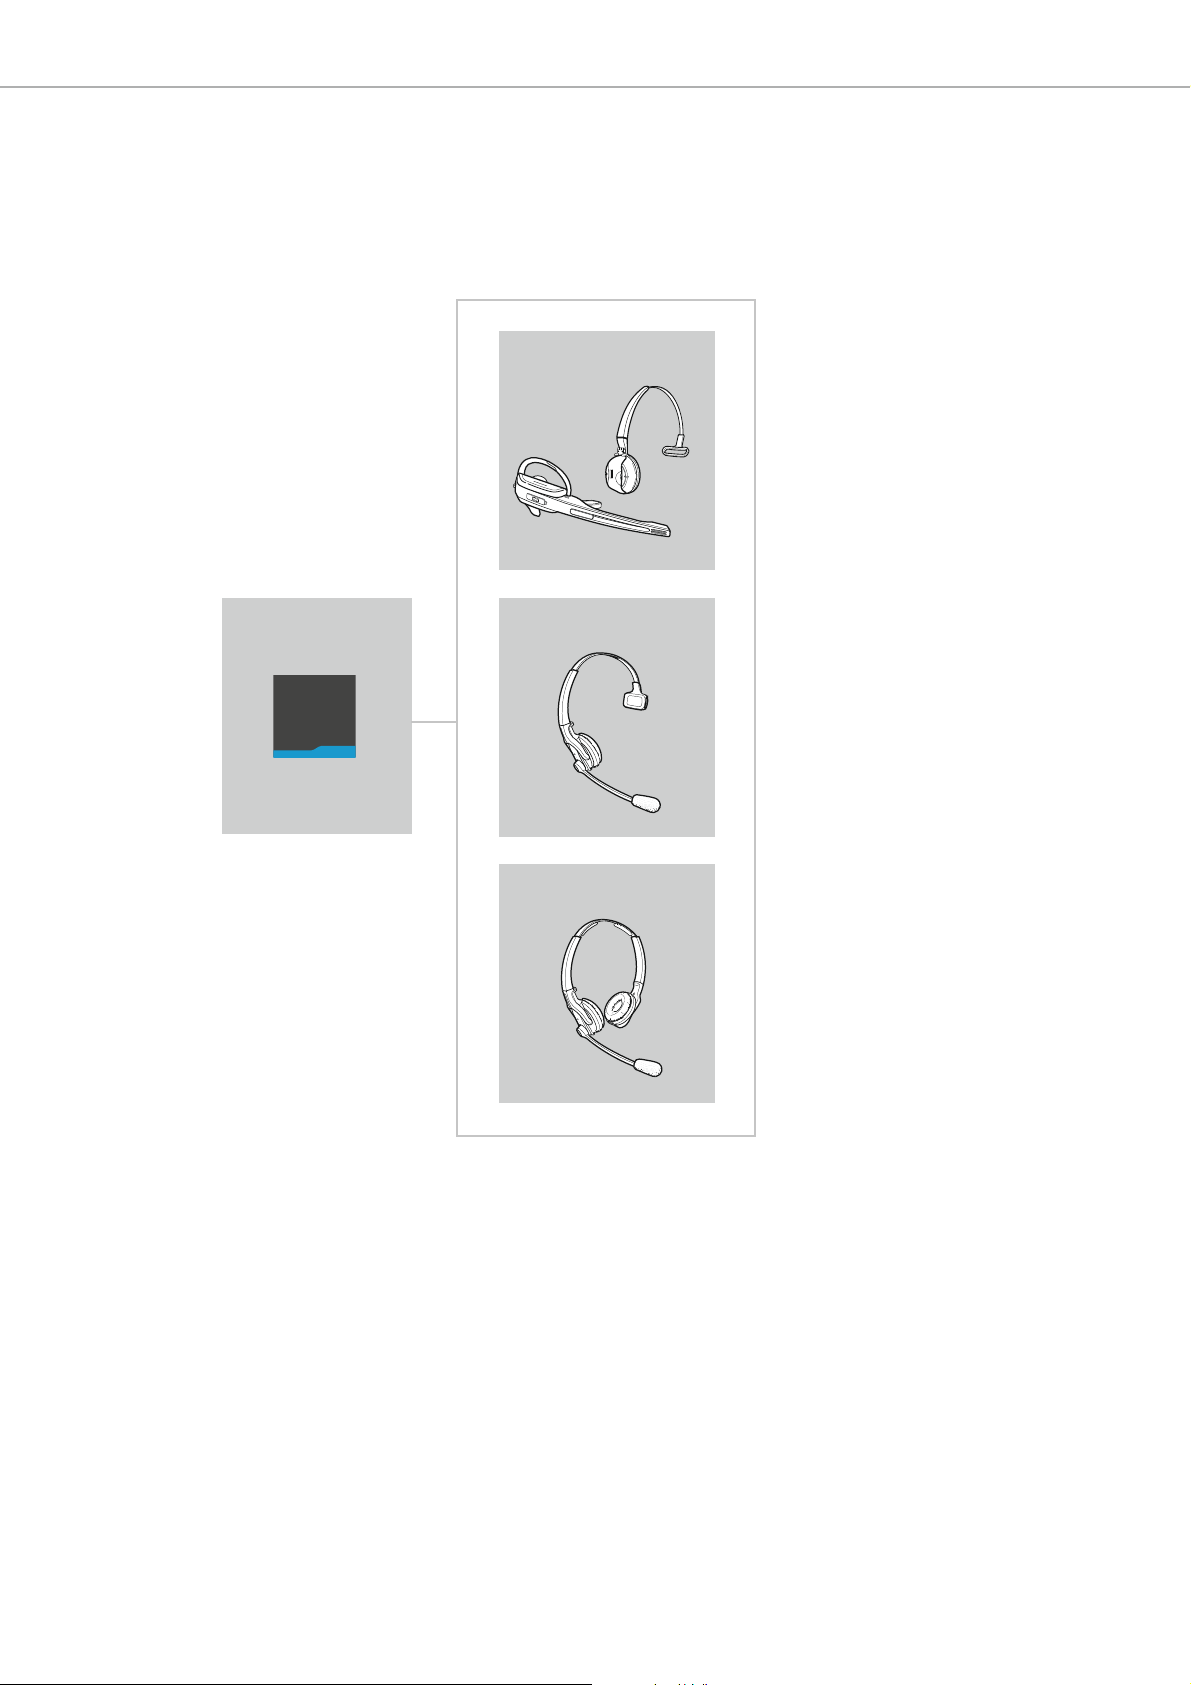
Headsets with components
DW Office – HS monaural, with different wearing styles
DW Pro1 – HS monaural, with headband
DW Pro2 – HS binaural, with headband
4 | DW Series – Setup Guide
Page 6
Product overview of the base stations
DW BS
DW BS ML
DW BS Phone
DW BS USB
DW BS USB ML
쐋
쐇
쐏
쐄
쐃
쐋
쐃
DW BS
DW BS ML
DW BS Phone
DW BS USB
DW BS USB ML
쐆
쐎
쐅
쐂
쐉
씈씉
쐊
쐈
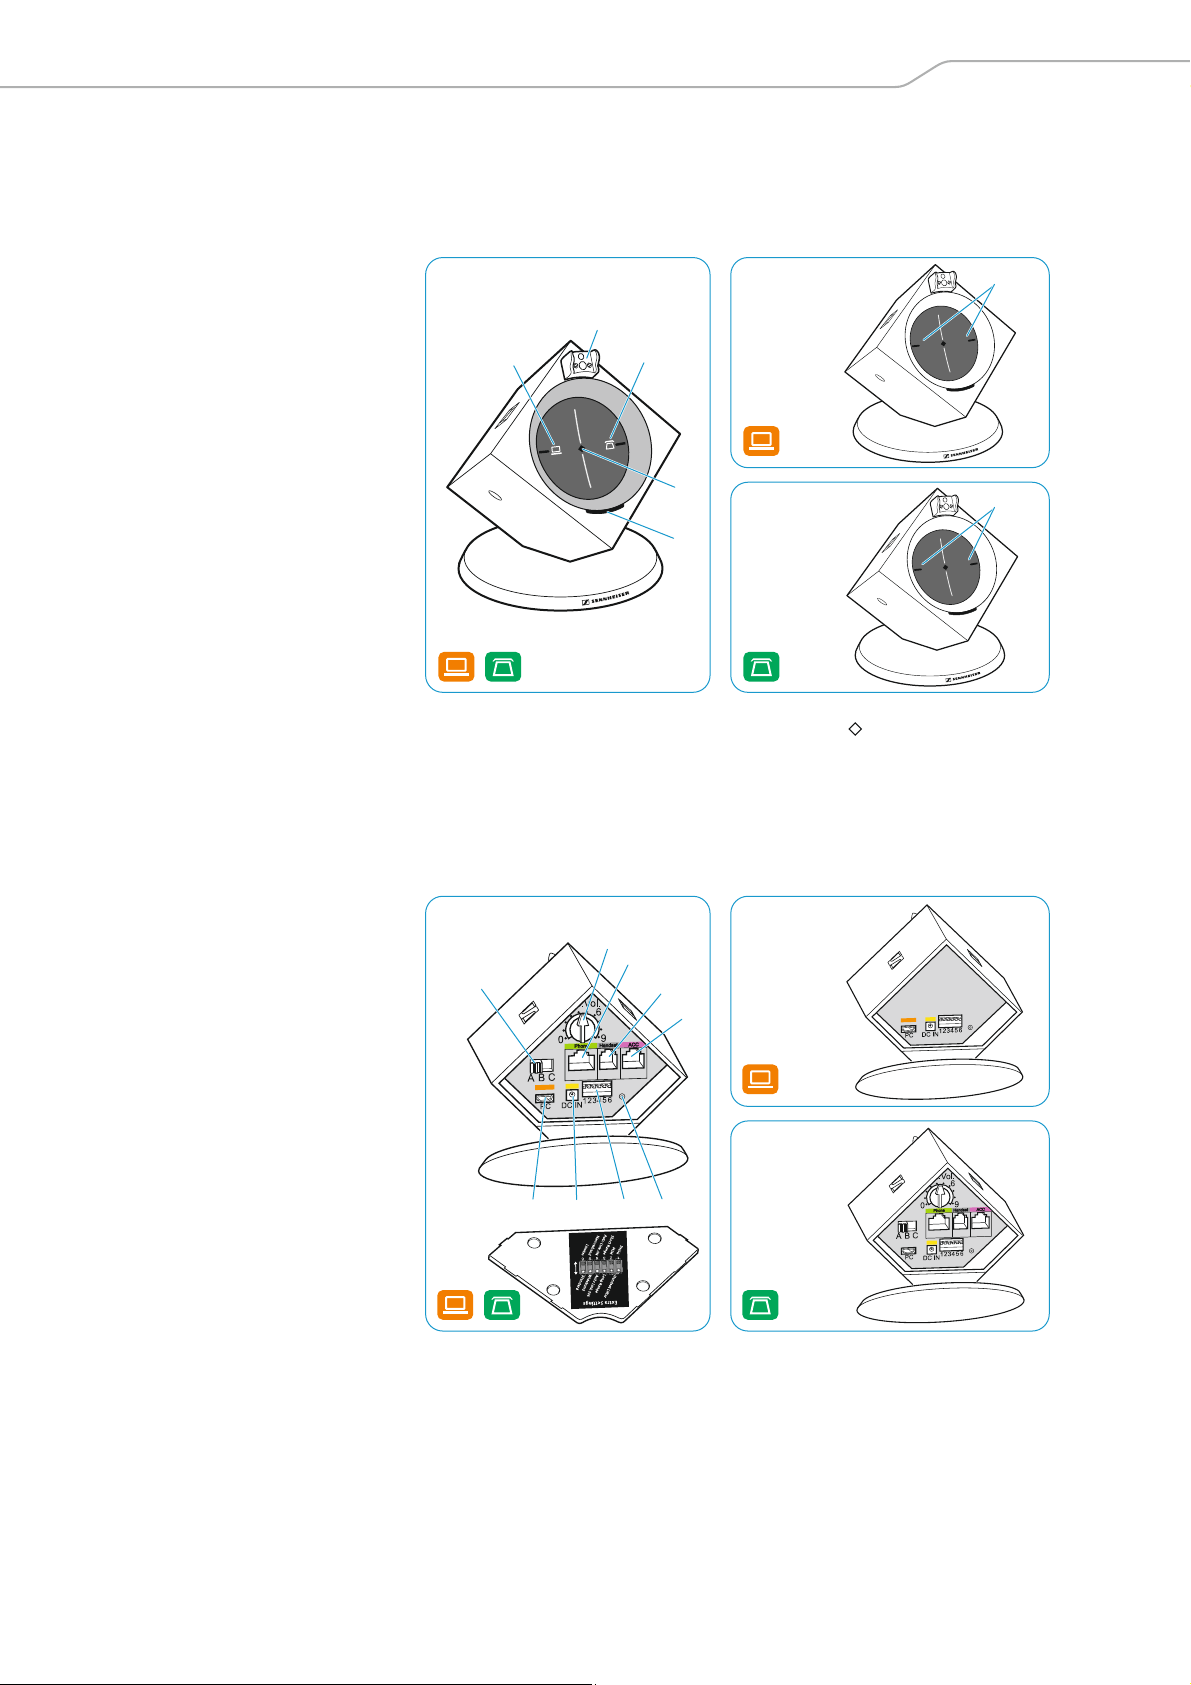
Product overview of the base stations
Overview of the front
쐃 PC button with LED
쐇 Charging contacts
쐋 Phone button with LED
Overview of the rear
쐂 ABC switch
쐏 Link LED
쐄 Charge status LED
쐅 ACC socket
쐆 Microphone volume control
쐊 Phone socket
쐎 Ha
ndset socket
쐈 Set but
쐉 DIP switch row 1 to 6
씈 DC IN socket
씉 PC
ton
socket (USB)
DW Series – Setup Guide | 5
Page 7
Setting up the base station
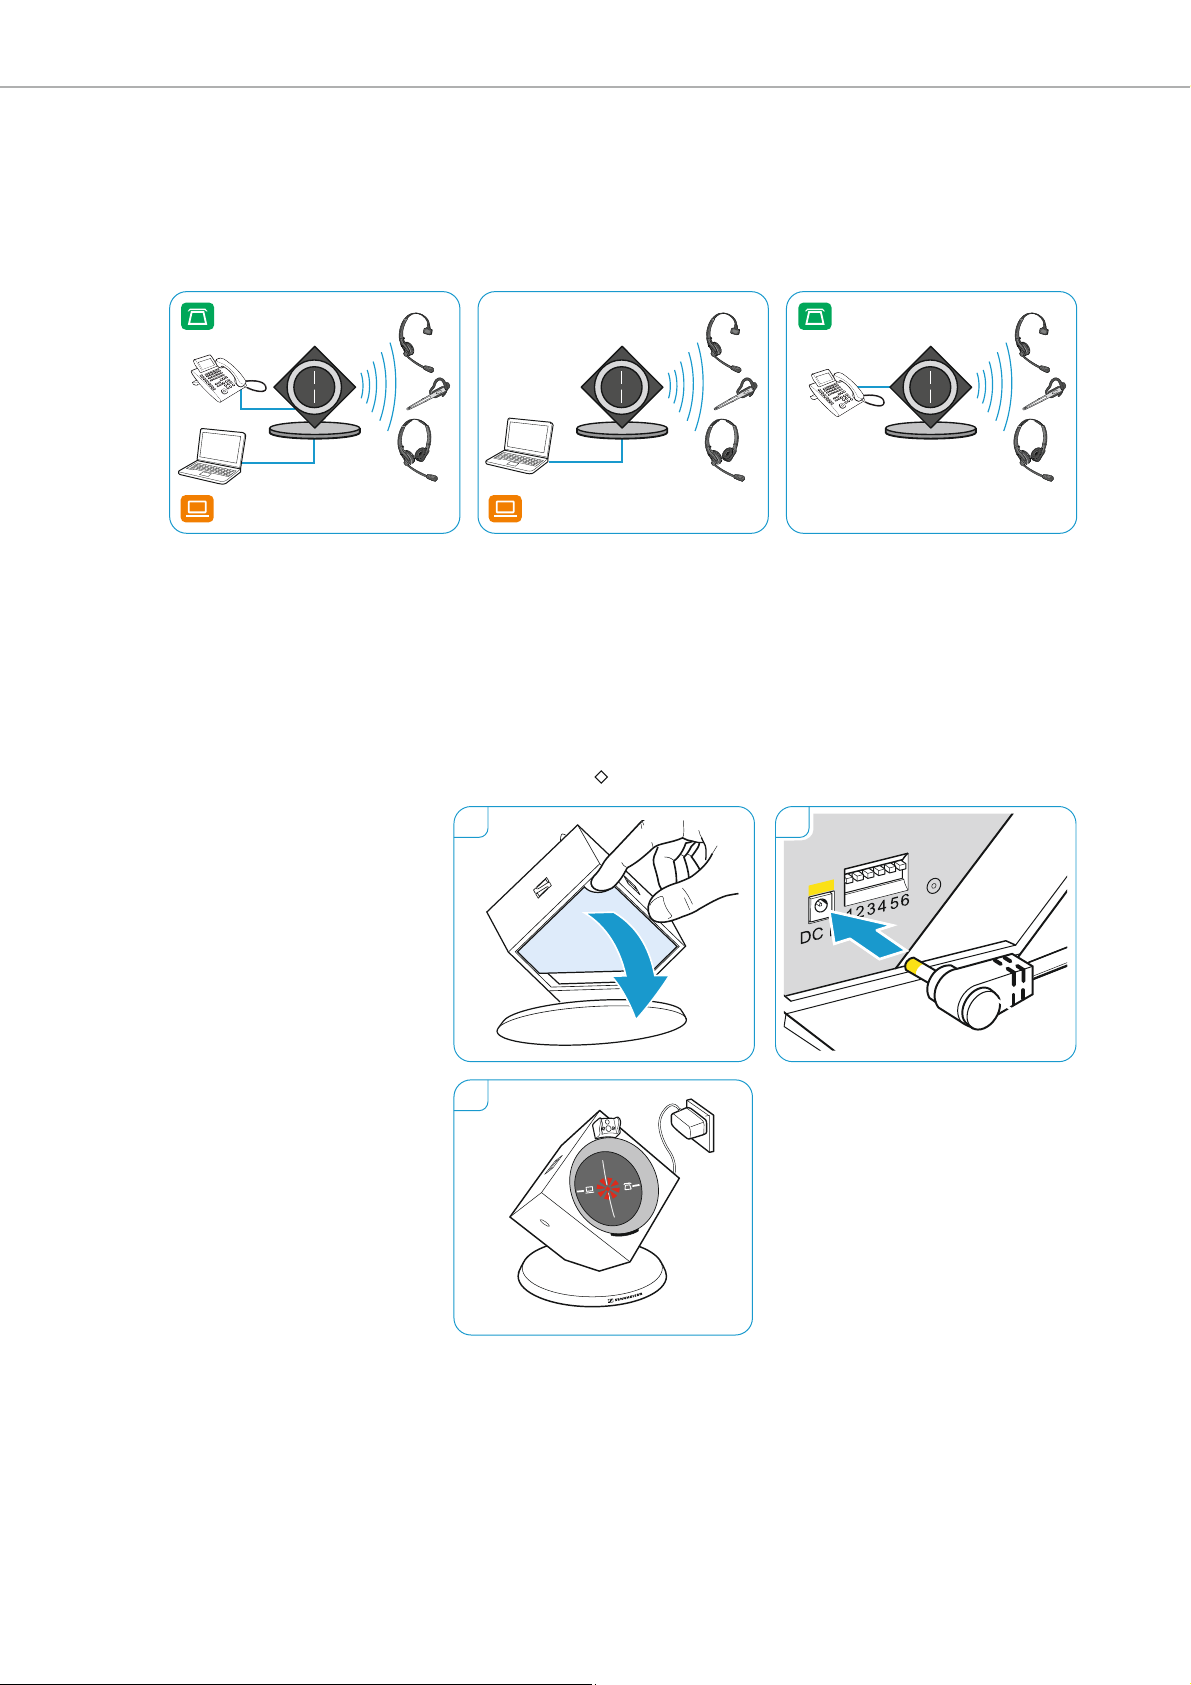
Setting up the base station
You can use the headset system with your fixed line phone and/or your
computer. The base station controls the wireless communication to the
headsets.
왘 Place the base station at a minimum distance of 15
line phone.
cm from the fixed
Connecting the base station to the mains power supply
1 Remove the cover.
2 Connect the connector of the power supply unit to the DC IN socket
ked yellow). Connect the power supply unit to a wall socket.
(mar
3 The Link LED lights up red.
1
3
2
6 | DW Series – Setup Guide
Disconnecting the base station from the mains power supply
왘 If the product is not used for extended periods of time, unplug the
power supply unit fr
om the wall socket.
Page 8
Setting up the base station
A
B
C
A
2
1
3
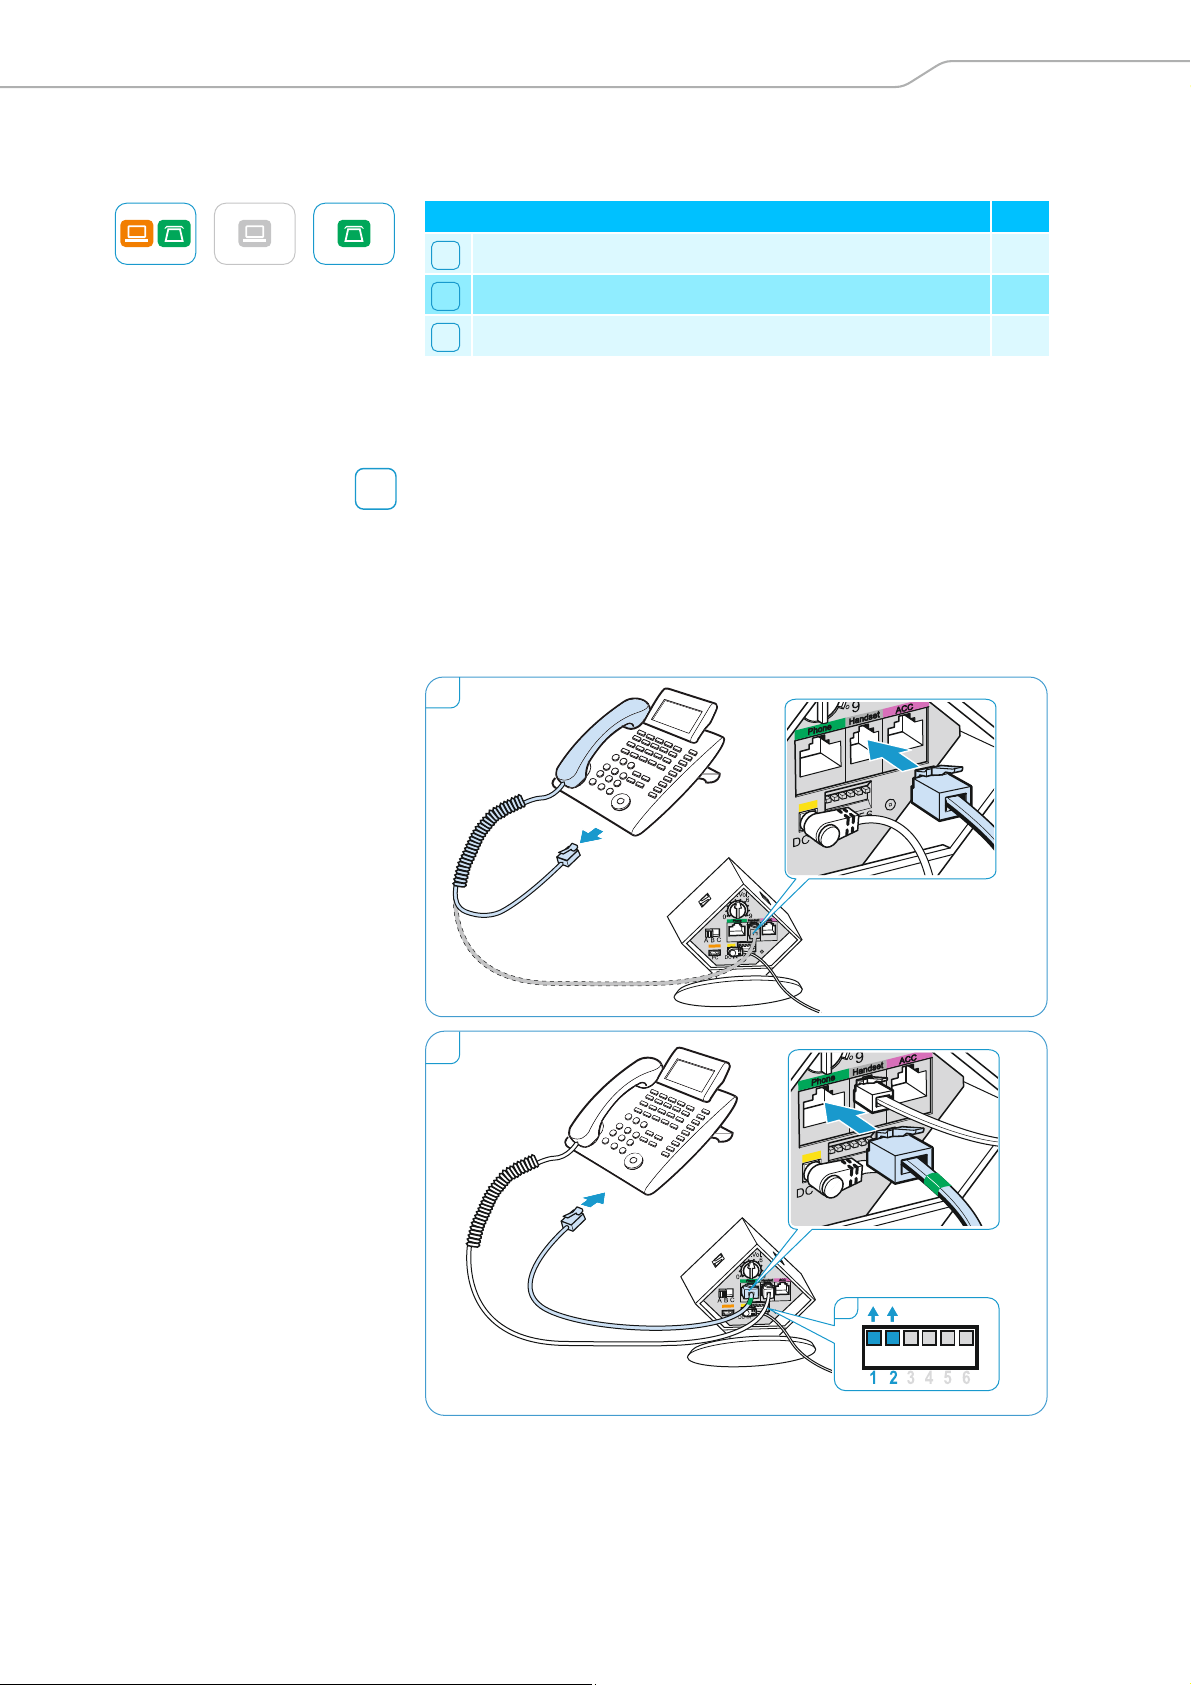
Connecting the base station to a fixed line phone
Connection possibilities Page
Connection to a fixed line phone without headset socket 7
Connection to a fixed line phone with headset socket 8
Connection to an optional mechanical handset lifter 8
왘 Check which connection possibility is best suited for your telephone.
왘 Follow the instructions in the corresponding chapter.
Connecting the base station to a fixed line phone w
1 Disconnect the handset cable from the telephone and connect it to the
Handset socket (marked gray) on the ba
2 Connect the telephone cable to the handset socket on the telephone
the Phone socket (marked green) on the base station.
and to
3 Use a pointed object (e.g. a ball pen) to set the DIP switches 1 and 2 to
the positi
on shown.
se station.
ithout headset socket
DW Series – Setup Guide | 7
Page 9
Setting up the base station
1
2
B
C
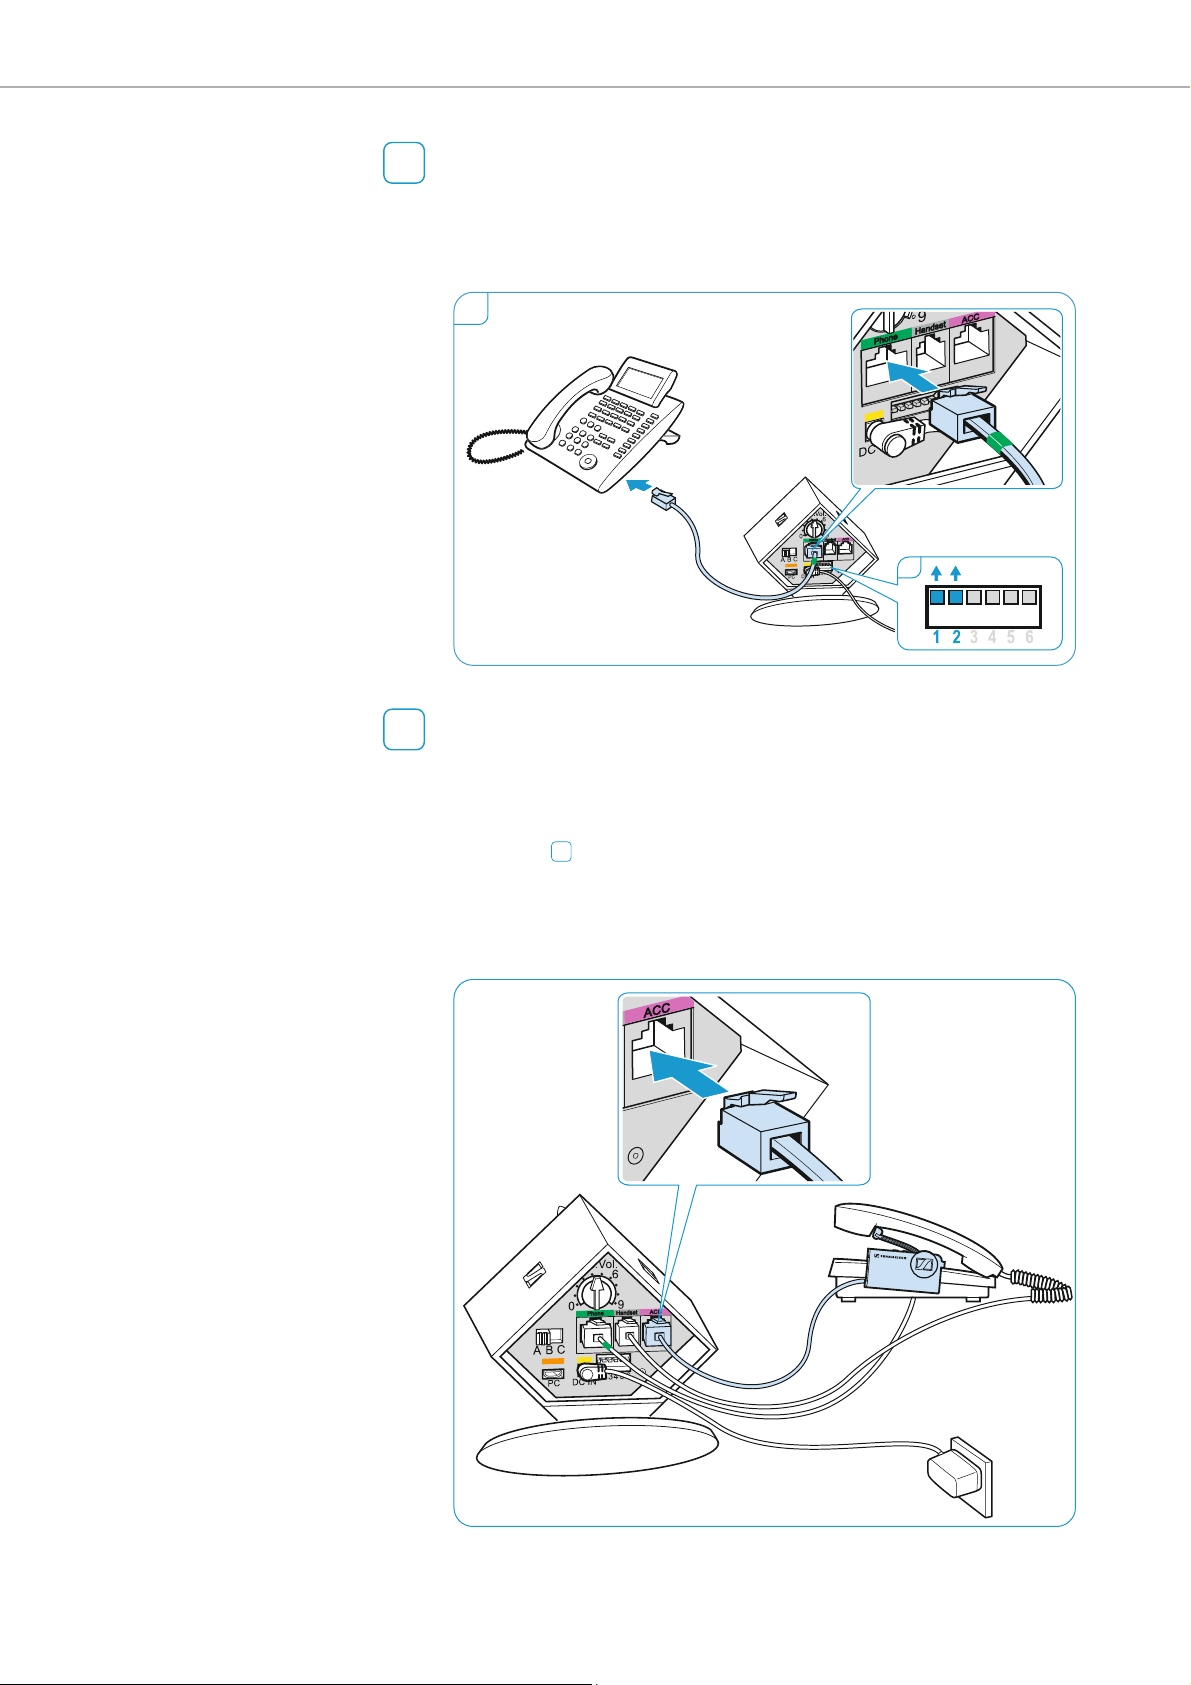
Connecting the base station to a fixed line phone with headset socket
1 Connect the telephone cable to the headset socket on the telephone
and to the Phone socket (marked green) on the base station.
2 Use a pointed object (e.g. a ball pen) to set the DIP switches 1 and 2 to
the position shown.
Connecting the base station to an optional mechanical handset lifter
The Sennheiser H
accessory available from your Sennheiser partner. The handset lifter
allows you to answer calls even when you are away from your desk.
왘 Connect the base station to the fixed line phone as described in
chapter A .
SL 10 II mechanical handset lifter is an optional
왘 Connect the handset lifter to the ACC socket on the base station.
왘 Connect the handset lif
tion, refer to the instruction manual of the HSL 10 II handset lifter.
ter to the fixed line phone. For more informa-
8 | DW Series – Setup Guide
Page 10
Setting up the base station
1
2
1
2
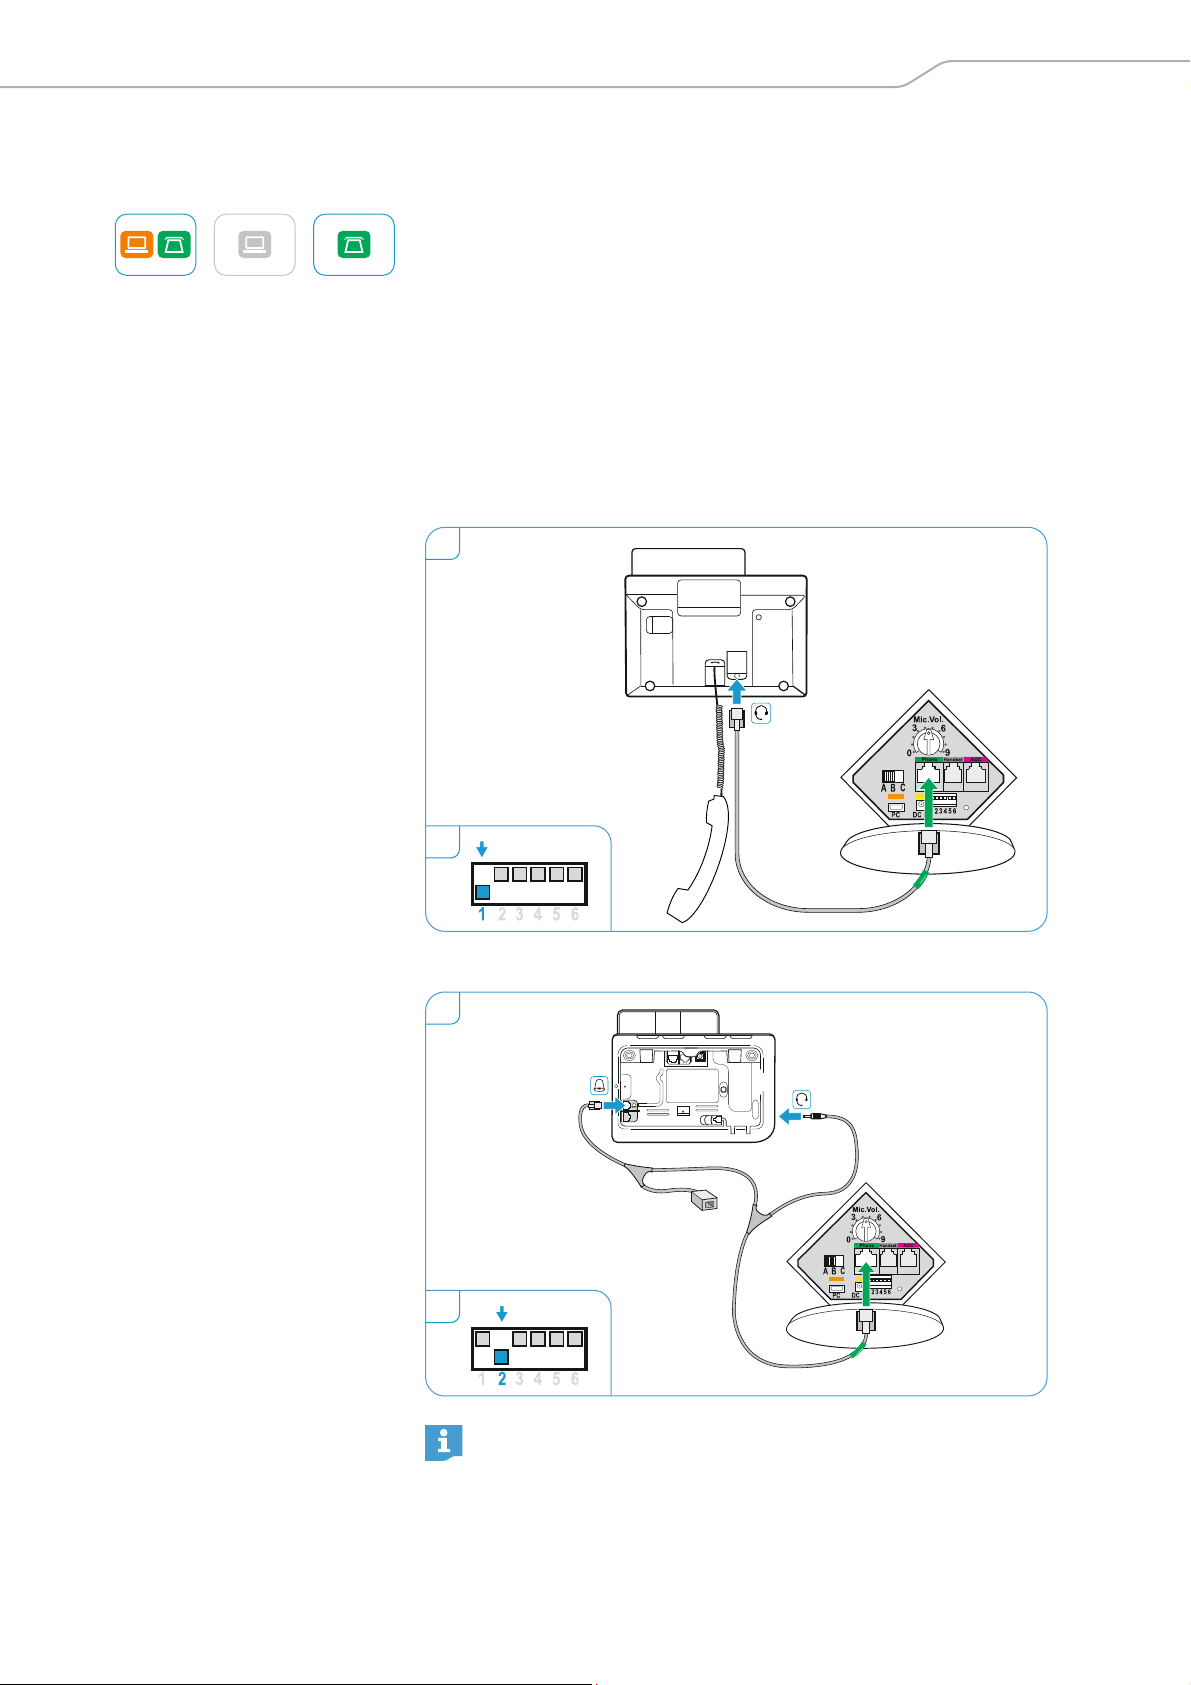
Connecting the base station to an optional electronic hook switch control (EHS)
The necessary EHS connection cables as well as adapter cables for manufacturer specific standards are available as optional accessories from your
Sennheiser partner. The corresponding quick guides are supplied with
the cables or can be found on the product page on our website at
www.sennheiser.com.
By way of example of a Siemens and an Alcatel adapter cable, the following
describes how to connect the base station to an electronic hook switch.
1 Connect the base station to the fixed line phone.
2 Use a pointed object (e.g. a ball pen) to set the DIP switch to the posi-
shown.
on
ti
Siemens, Agfeo, Aastra, Auerswald, etc.
Alcatel
For an overview of the available connection and adapter cables, visit
the DW series product page on our website at www.sennheiser.com
or contact your Sennheiser partner.
DW Series – Setup Guide | 9
Page 11
Setting up the base station
1 2
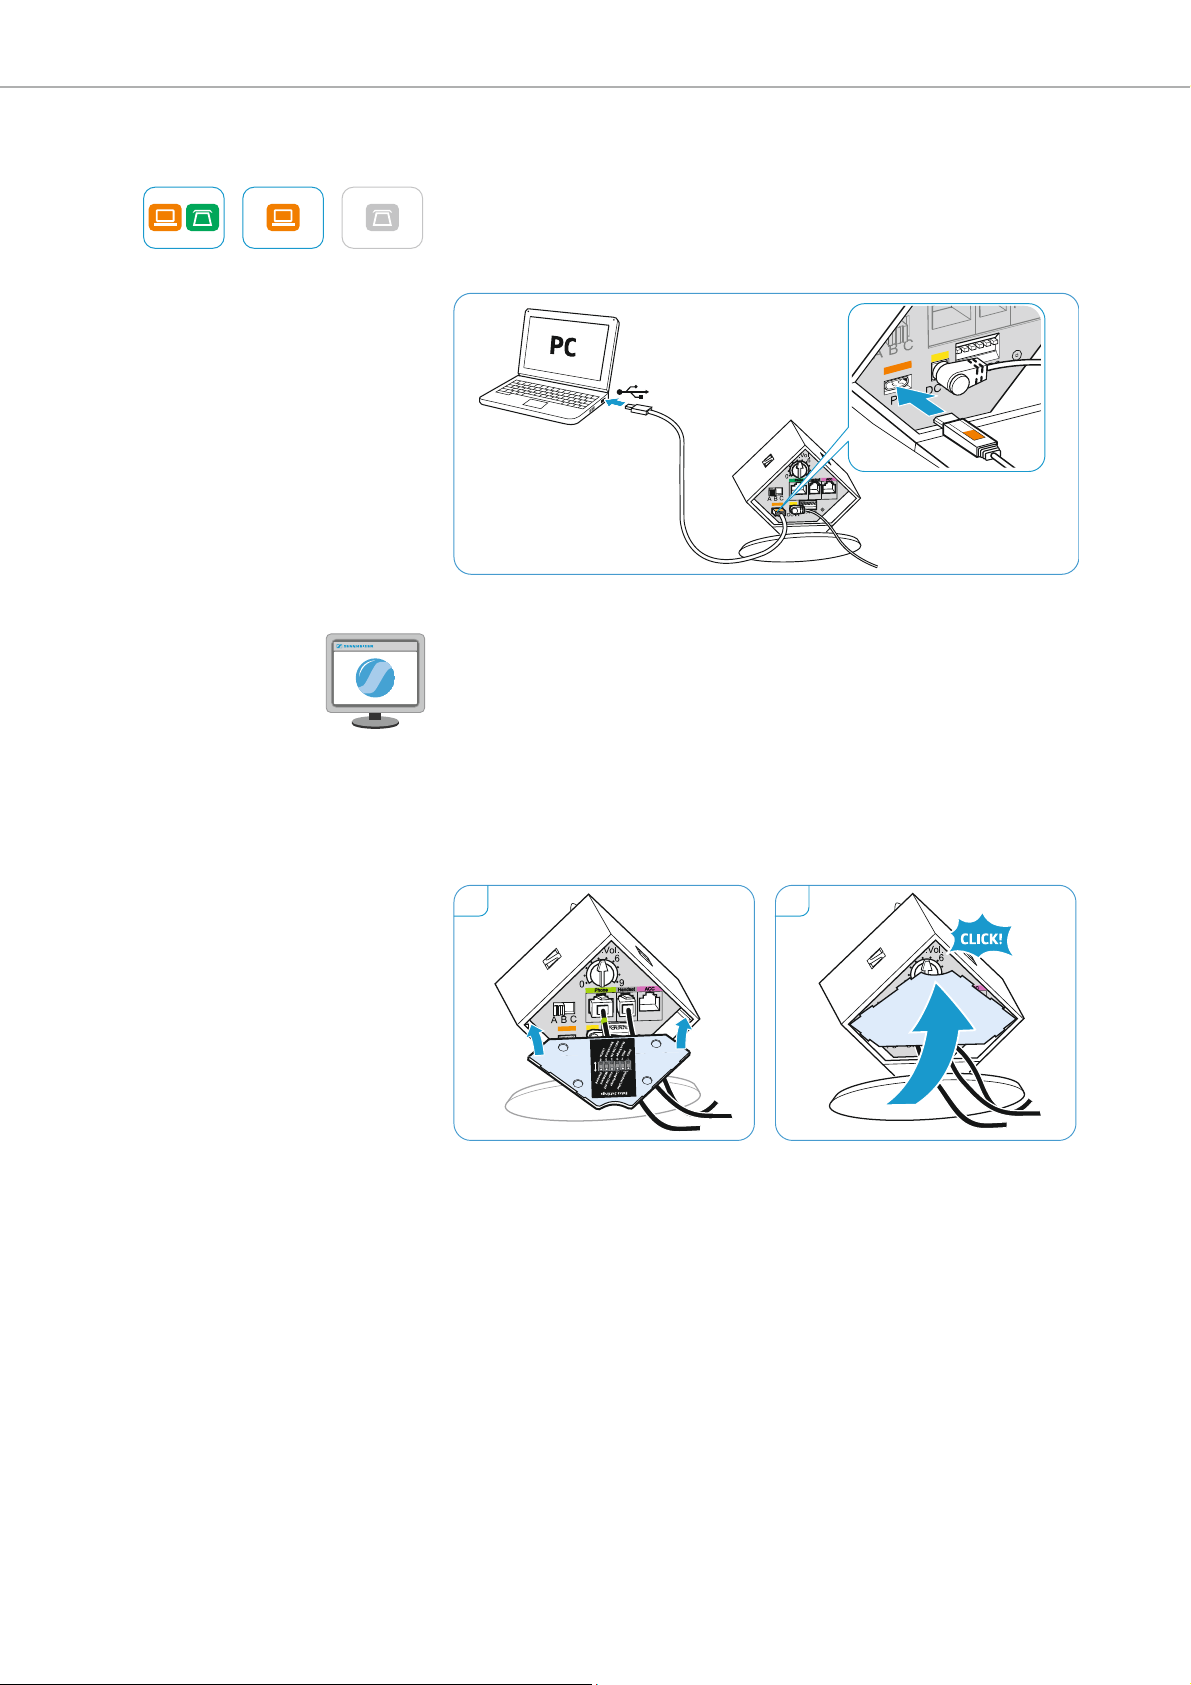
Connecting the base station to a computer
왘 Connect the USB cable to the PC socket (marked orange) on the base
station and to a USB socket of your computer. The operating system
detects the USB audio device ”Sennheiser DECT” and installs the necessary drivers.
Sennheiser PC software
The free Sennheiser PC software allows you to add value to your
Sennheiser products. The Sennheiser Updater, for example, facilitates easy
u
pdating of products with new software. For more information, visit our
website at www.sennheiser.com/cco/software.
Securing the connected cables
1 Replace the cover to the rear of the base station.
2 Tilt the cover upwards until it locks into place with an audible click.
10 | DW Series – Setup Guide
Page 12
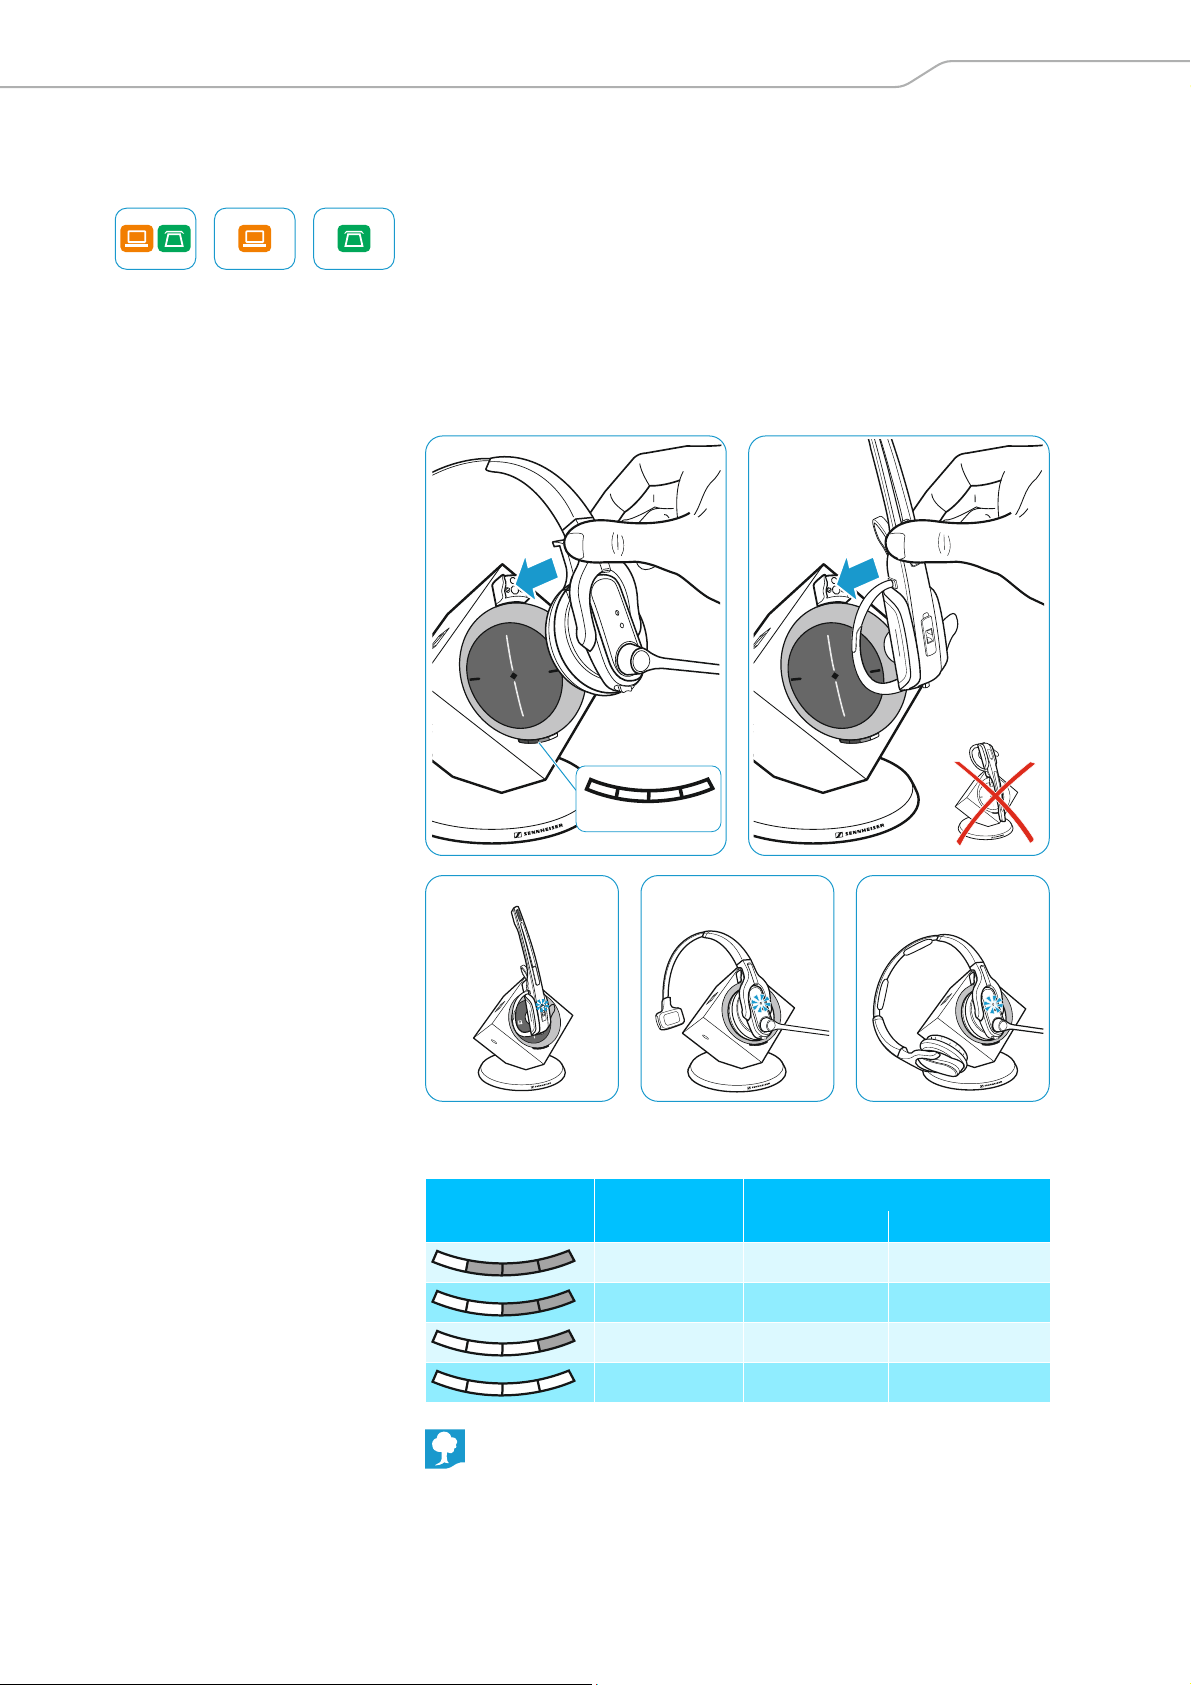
Charging the headset
DW Pro2 – HSDW Office – HS DW Pro1 – HS
25%
50%
75%
100%
Charging the headset
Charge the rechargeable battery for at least 20 minutes without interruption before using it for the first time. A complete charging process takes
about 60 minutes.
Charging the headset in the base station
왘 Place the headset into the magnetic hold
The Headset LED lights up blue and the rechargeable battery is being
charged. The Charge status LED on the base station indicates the
charge status.
er of the base station.
During the first charging process, it may take up to 5 minutes until the
Headset LED lights up blue.
LED segment
(white = lit up)
Required charging time
Corresponds to a talk time of
Wideband Narrowband
approx. 10 min. approx. 2 hrs approx. 3 hrs
approx. 20 min. approx. 4 hrs approx. 6 hrs
approx. 40 min. approx. 6 hrs approx. 9 hrs
approx. 60 min. approx. 8 hrs approx. 12 hrs
If the headset is outside the range of the base station, it will switch
off after 30 minutes in order to conserve battery power.
DW Series – Setup Guide | 11
Page 13
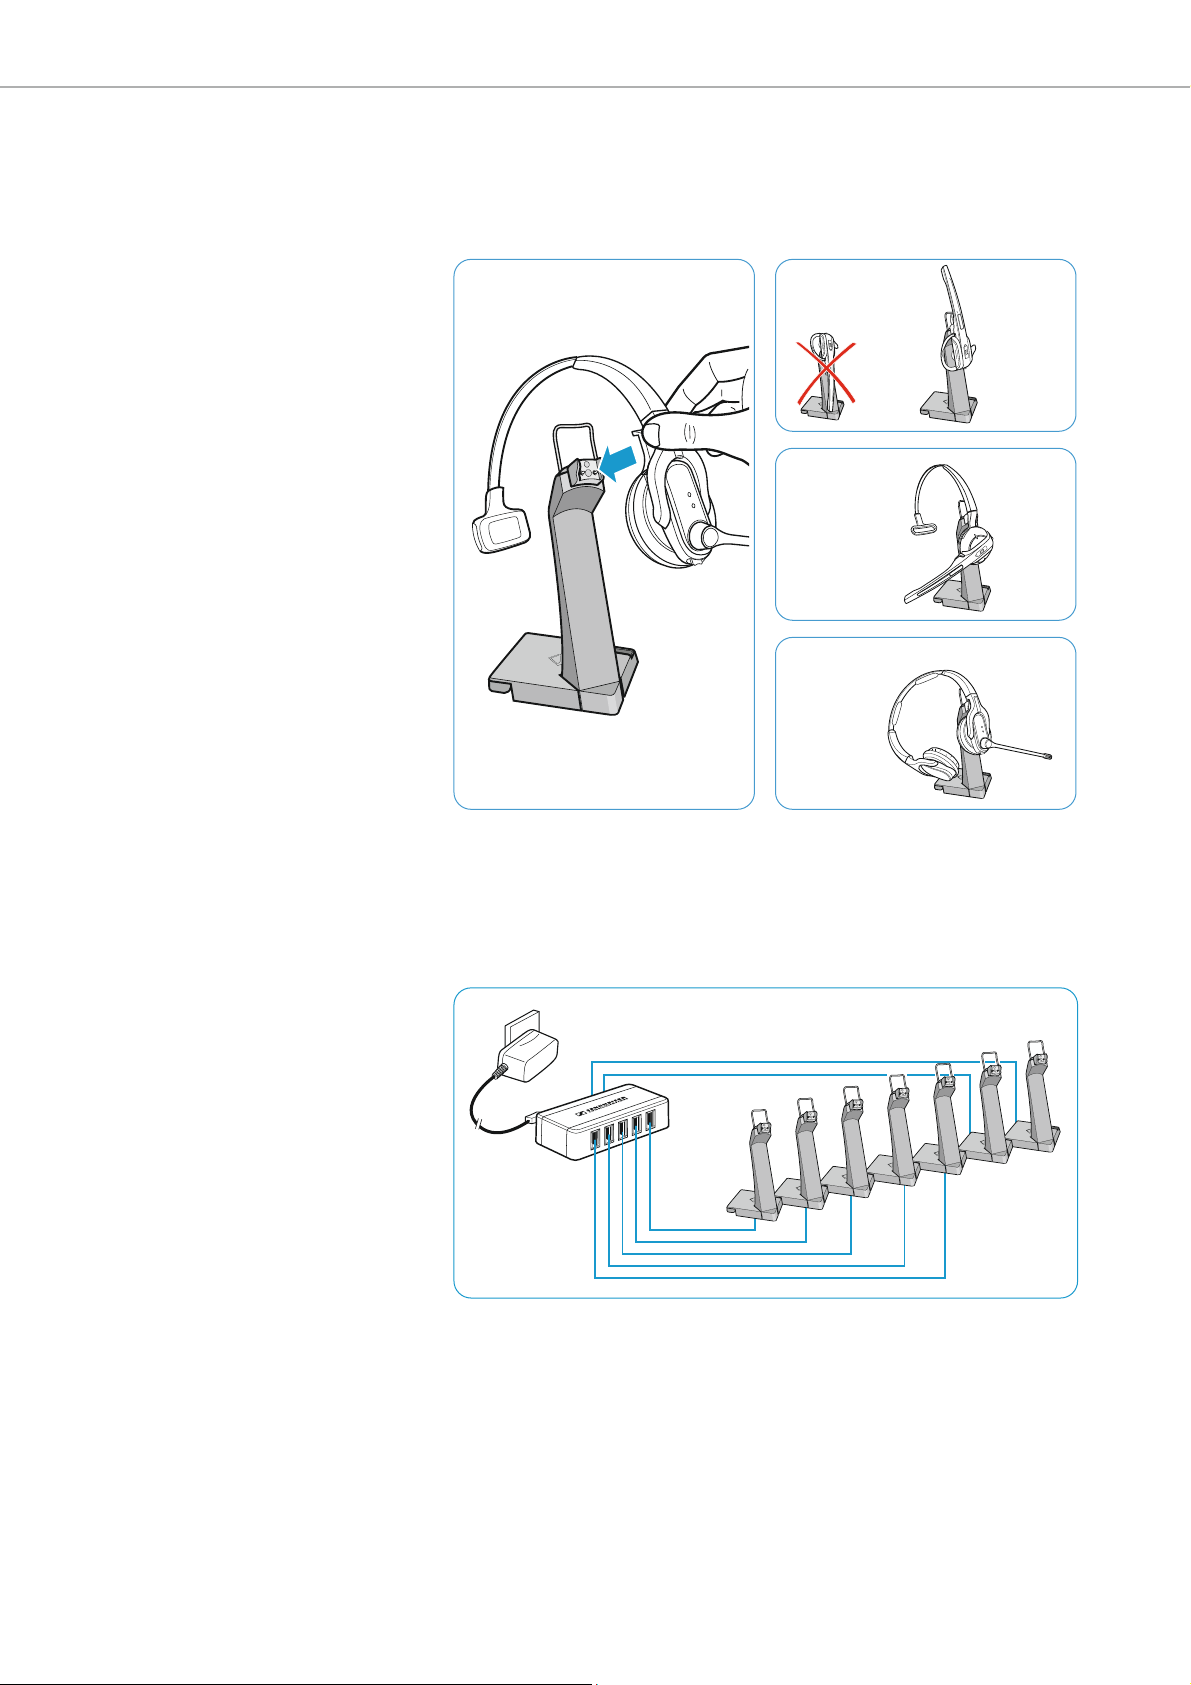
Charging the headset
MCH 7
CH 10 USB
Ch
arging the headset using the optional CH 10 headset charger
The Sennheiser CH 10 headset charger is an optional accessory
available
from your Sennheiser partner. The CH 10 allows you to charge additional
DW series headsets.
DW Office – HS
DW Pro1 – HS
DW Pro2 – HS
왘 Refer to the instruction manual of the CH 10 for more information.
Charging several headsets simultaneously
The MCH 7 multi USB power source is an optional accessory
available from
your Sennheiser partner. Together with the CH 10 USB, the MCH 7 allows
you to charge up to 7 headsets simultaneously.
12 | DW Series – Setup Guide
왘 Refer to the instruction manual of the MC
H 7 for more information.
Page 14
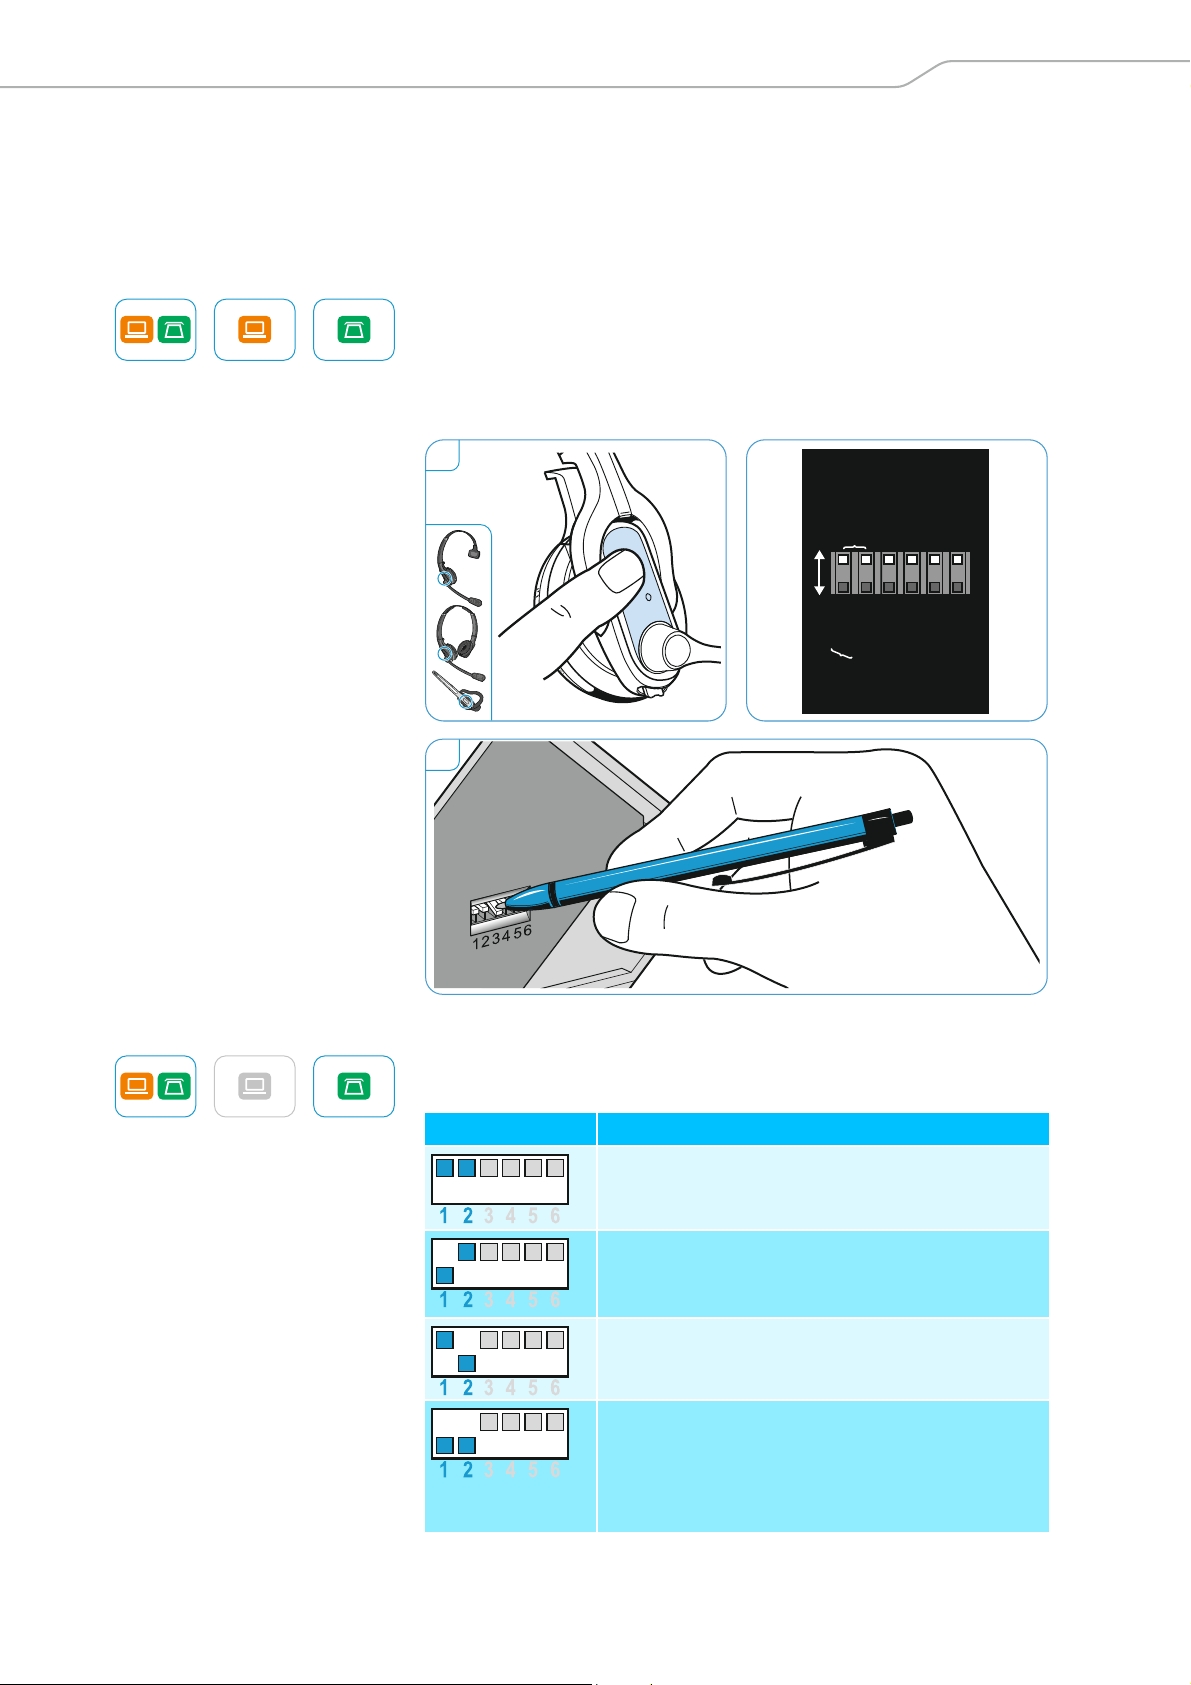
Testing the headset system and the sound quality
2
Testing the headset system and the
sound quality
Adjusting the headset system using the DIP switches
1 Press the Link button on the headset to disconnect an existing wireless
link between base station and headset.
The LEDs on the headset and on the base stat
2 Use a pointed object (e.g. a ball pen) to set the DIP switches to the
desired positi
ion go off.
on.
1
2
Extra
Settings
Handset Lifter
1 2 3 4 5 6
MSH
DHSG
Short Range
Auto Link ON
Fast Link
Auto Link OFF
Long Range
Narrowband
Configuring the handset lifter/hook switch – DIP switches 1
The DIP switches 1 and 2 are only assigned a
function on the DW BS,
DW BS ML and DW BS Phone base stations.
Standard
Wideband
Limiter
and 2
Switch position Function
Manual operation
Lifts/han
gs up the handset manually or using the
handset lifter (Sennheiser HSL 10 II).
Electronic hook switch (DHSG standard)
Call control via the headset system.
For faster link establishment, see Fast Link.
Electronic hook switch (MSH standard)
Call control via the headset system.
Fast Link for DHSG
HSL 10 II handset lifter
Recommended for frequent callers. Shorter battery
standard and
life. Fast link establishment without delay due to
hidden link to the base station.
DW Series – Setup Guide | 13
Page 15
Testing the headset system and the sound quality
DW Office – HS
DW Pro1 – HS
DW Pro2 – HS
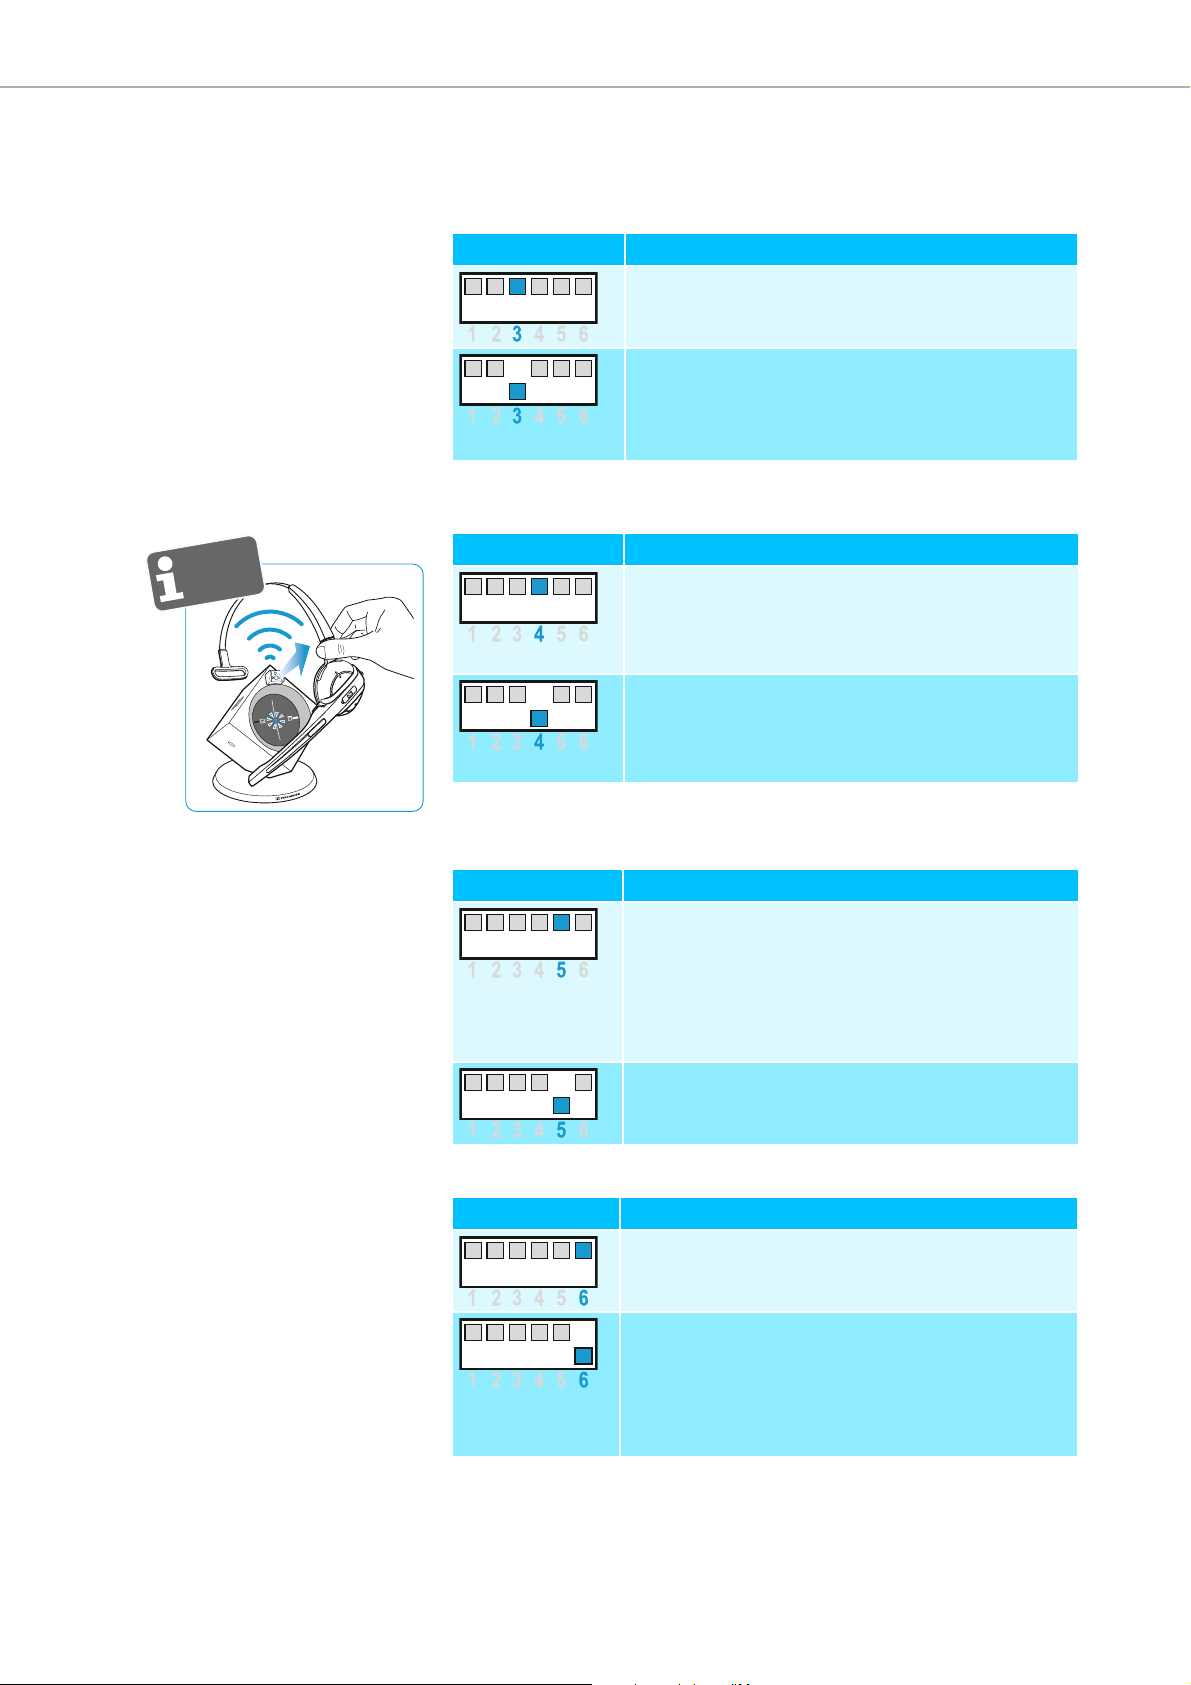
Auto Link
Ad
justing the radio range – DIP switch 3
If many DECT systems are operated in a confined space
occur. In this case, you should change the radio range.
Switch position Function
Automatically establishing the wireless link between headset and
tation (Auto Link) – DIP switch 4
base s
Switch position Function
, interference can
Standard radio range
Reduced radio range
Use this setting in order to avoid interference with
other DECT systems
Range of approx. 10 m indoors
Manual link establishment
When taking the headset out of the base station,
you have to manually establish the wireless link
between headset and base station.
Automatic link establishment – Auto Link
When taking the headset out of the base station, a
wireless link is automatically established between
headset and base station.
Switching between wideband and narrowband audio transmission –
DIP switch 5
Switch position Function
Wideband audio transmission
Automatic frequency adjustment of wideband and
narrowband calls. Wideband audio transmission
is e.g. supported by Skype and gives high speech
quality.
Battery life: 8 hours
Narrowband audio transmission
Battery life: 12 hours
Limiting the volume – DIP switch 6
Switch position Function
Standard limitation
Limited volume (country specific)
•AU version:
in compliance with Directive AS/ACIF G616:2006
• EU and US version:
in compliance with Directive 2003/10/EC
14 | DW Series – Setup Guide
Page 16
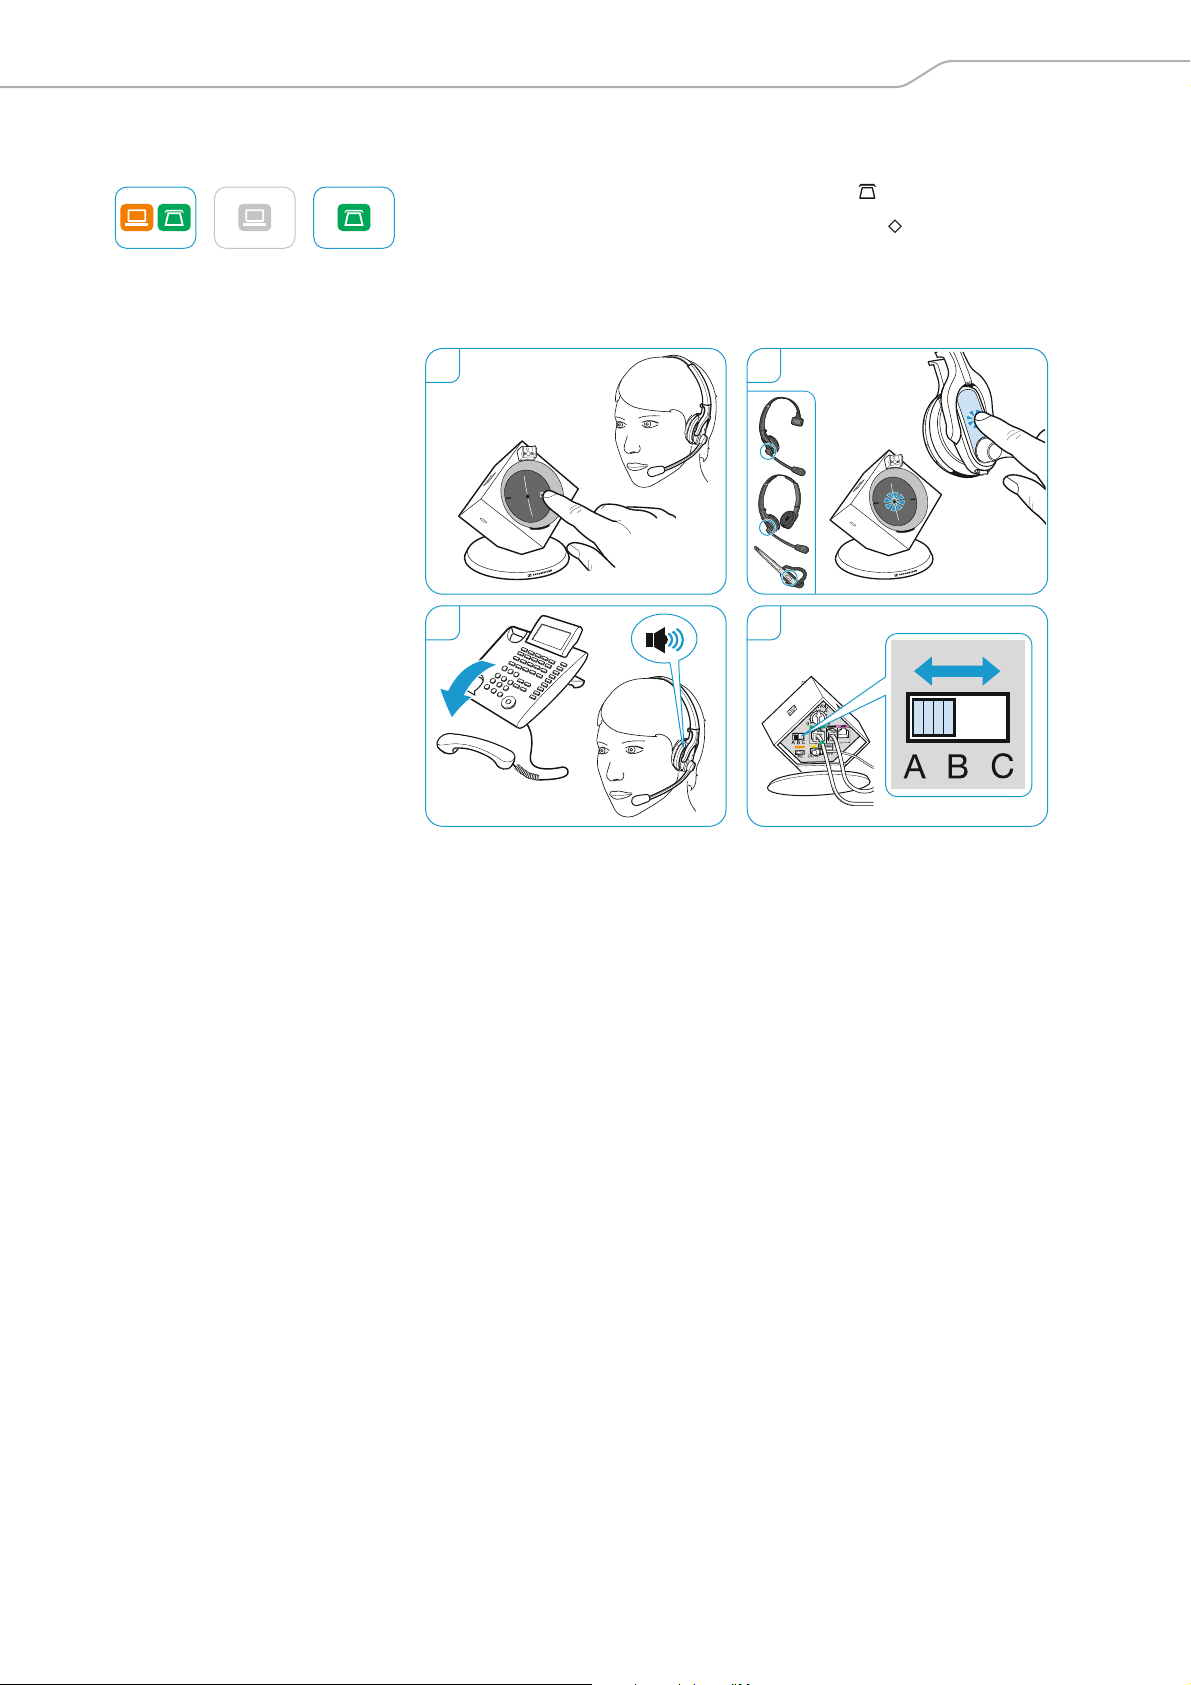
Testing the headset system and the sound quality
Adjusting the audio signal by means of the dial tone
1 Put on the headset and press the Phone button on the base station.
2 Press the Link button on the headset. The Link LED lights up blue.
3 Lift the handset. You hear a dial tone.
4 Set the ABC switch to the position A, B or C so that you can hear a clear
i
al tone in the headset.
d
1 2
3 4
DW Series – Setup Guide | 15
Page 17
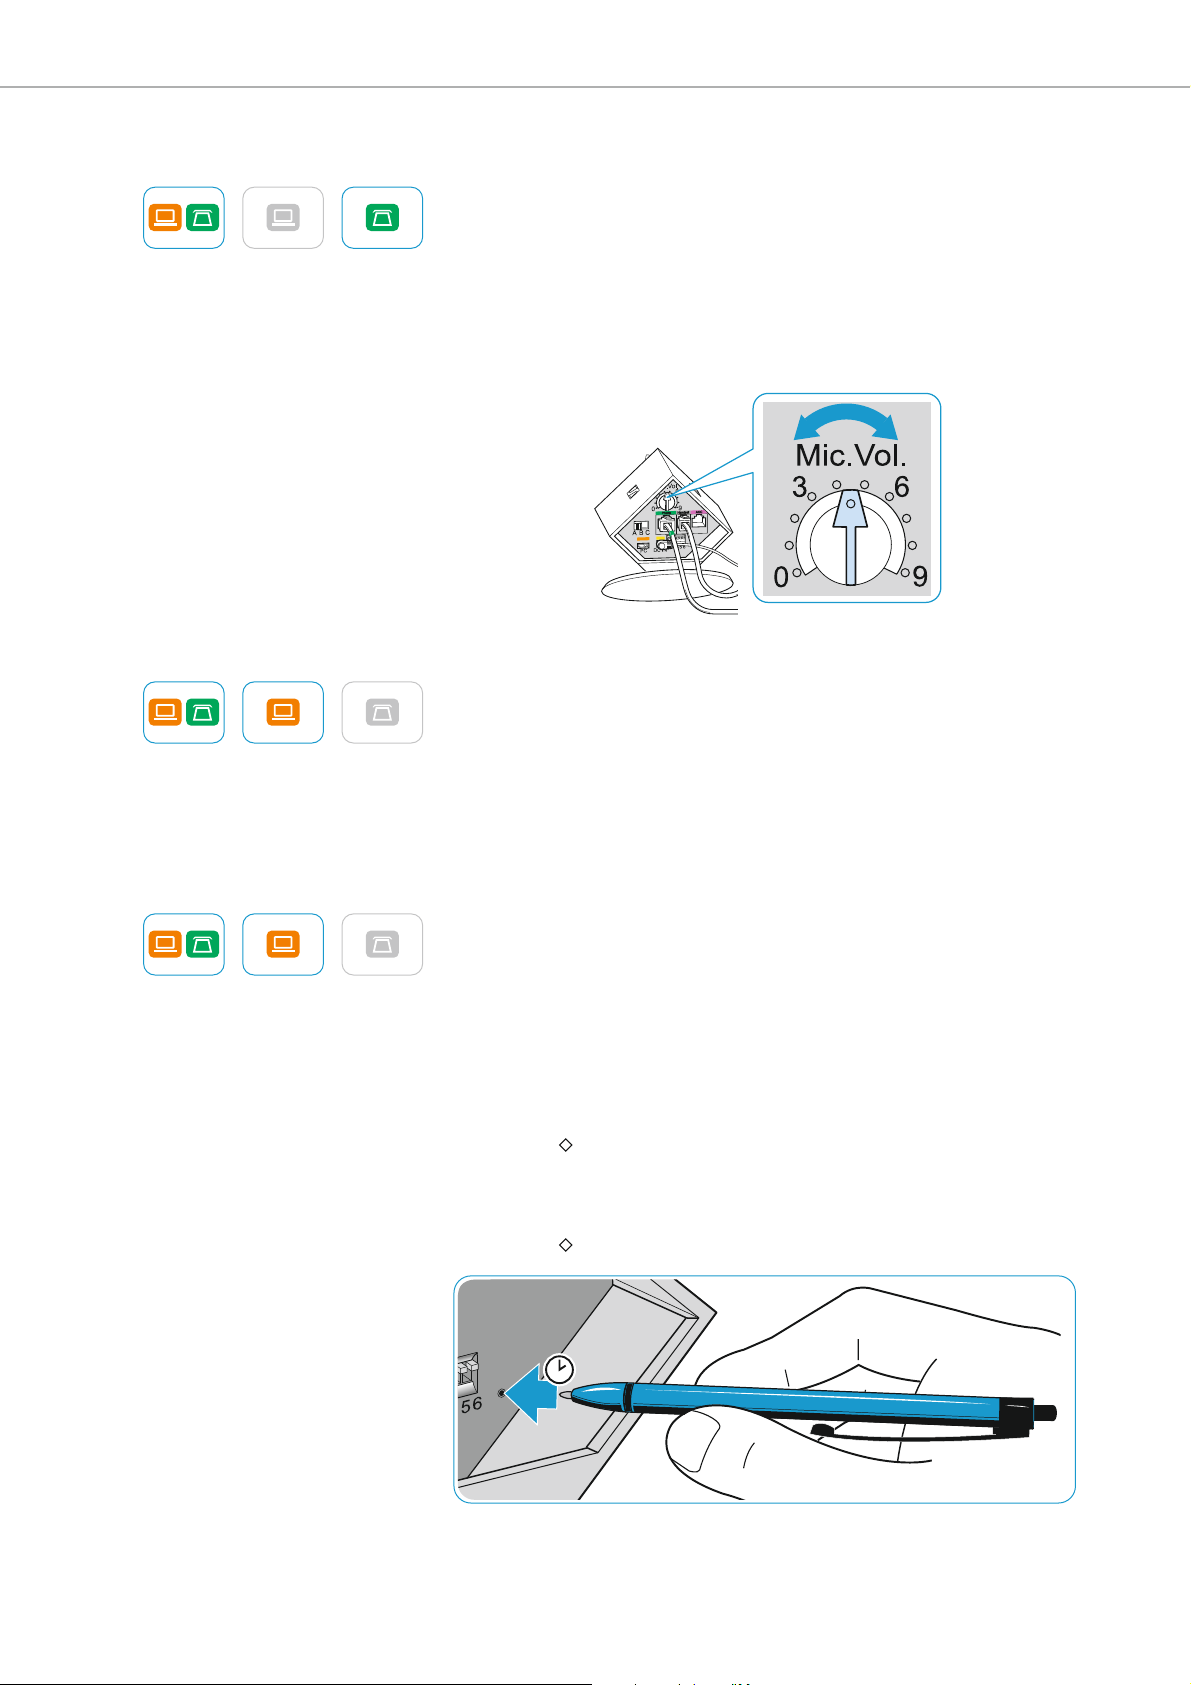
Testing the headset system and the sound quality
5s
Adjusting the volume
Adjusting the microphone volume of the call transmission
By default, the microphone volume control is
is suitable for most telephones.
왘 Make a call to someone who will help you find th
setting for your microphone.
왘 Turn the microphone volume control so that the other party can hear
t a comfortable level.
you a
set to position 4. This setting
e correct sensitivity
Adjusting the microphone volume of the USB transmission
Some softphones adjust the microphone sens
왘 Activate this function in order to be able to optimally use the micro-
phone and, via your
tivity so that the other party can hear you at a comfortable level (see
the Help function of your operating system).
operating system, adjust the microphone sensi-
ivity automatically.
it
Adjusting the automatic audio transmission “Auto Audio”
With the “Auto Audio” function activated and in the case of a USB connection, the audio signals – e.g. from Windows
are automatically transmitted to the headset.
When you receive a call or when a connection to Skype™ is established, the
audio transmission stops and you hear for example the ring tone. The
“Auto Audio” function is activated by default.
Activating the “Auto Audio” function:
왘 Use a pointed object to press the Set button for approx. 5 seconds. The
LED rapidly flashes blue several times.
Link
Deactivating the “Auto Audio” function:
왘 Use a pointed object to press the Set button for approx. 5 seconds. The
Link
LED rapidly flashes red several times.
Media Player or iTunes –
16 | DW Series – Setup Guide
Page 18

If a problem occurs
If a problem occurs
For causes and solutions that are mainly related to the headset, refer to the chapter “If a problem occurs ...” in
the “User Guide”.
Problem Possible cause Possible solution Page
The headset is placed into the
base station but the Charge
status LED if off
Link between headset
and base station
cannot be established
Bad radio link between
headset and base station
Noise interference and connection loss
The rechargeable battery
cannot be charged
Bad audio quality, the other
party sounds too low or too
loud
The sound from the fixed
line phone is distorted and
disturbed
Base station is not connected
to the mains power supply
Rechargeable battery is deep
discharged
Base station is only connected
via the USB cable
Transmission range is exceeded Reduce the distance between
Too many DECT systems within
the radio range
Distance between base station
and fixed line phone is so small
that interference occurs
Headset is not properly placed
into the magnetic holder of the
base station
Microphone sensitivity is not
correctly adjusted
Base station is not adjusted to
the fixed line phone
Connect the base station to the
mains power supply.
Wait several minutes until the
Charge status LED lights up.
For quick-charging the headset:
Briefly press the Set button at the
rear of the base station.
Connect the base station to the
mains power supply.
headset and base station.
Adjust the radio range. 14
Reduce the radio range. 14
Set the base station to narrowband transmission.
Increase the distance between
base station and fixed line phone.
Check if the headset is properly
placed into the magnetic holder.
Adjust the microphone sensitivity. 15
Use the ABC switch to adjust the
base station to your fixed line
phone.
6
11
–
6
–
14
–
11
15
For more information and an FAQ list, please visit our website at www.sennheiser.com.
If a problem occurs that is not listed in the above table or if the problem cannot be solved with the proposed
solutions, please contact your local Sennheiser partner for assistance.
To find a Sennheiser partner in your country, search at www.sennheiser.com under “Service & Support”.
DW Series – Setup Guide | 17
Page 19

Specifications
Specifications
Base station
DW BS/DW BS ML
Dimensions 108 x 116 x 114 mm (W x H x D)
Weight a
Operating temperature range +5°C to +45°C (+41°F to +113°F)
Storage temperature range –20°C to +70°C (–4°F to +158°F)
DW BS USB/DW BS USB ML/DW BS Phone
Dimensions 108 x 116 x 114 mm (W x H x D)
Weight approx. 322 g
Operating temperature range +5°C to +45°C (+41°F to +113°F)
Storage temperature range –20°C to +70°C (–4°F to +158°F)
Headset
pprox. 368 g
DW Office – HS
Dimensions 140 x 24 x 22 mm (W x H x D)
Weight with ear hook: approx. 22 g
with headband: approx. 50 g
Talk time narrowband: up to 12 hours
wideband: up to 8 hours
Charging time 50%: approx. 20 min
100%: approx. 1 hour
Range
(environment dependent)
Speaker type dynamic, neodymium magnet
Microphone type electret microphone, noise canceling
Operating temperature range +5°C to +45°C (+41°F to +113°F)
Storage temperature range –20°C to +70°C (–4°F to +158°F)
DW Pro1/Pro2 – HS (DW 10)
Dimensions 170 x 175 x 55 mm (W x H x D)
Weight Pro1: approx. 65 g
Talk time narrowband: up to 12 hours
Charging time 50%: approx. 20 min
Range
(environment dependent)
Speaker type dynamic, neodymium magnet
Microphone type electret microphone, ultra noise canceling
Operating temperature range +5°C to +45°C (+41°F to +113°F)
Storage temperature range –20°C to +70°C (–4°F to +158°F)
free line of sight: up to 180 m
in office buildings: up to 55 m
Pro2: approx. 85 g
wideband: up to 8 hours
100%: approx. 1 hour
free line of sight: up to 180 m
in office buildings: up to 55 m
18 | DW Series – Setup Guide
Page 20

Specifications
Power supply unit
Nominal input voltage 100 – 240 V~
Nominal input current max. 0.2 A
Mains frequency 50 – 60 Hz
Nominal output voltage 5 V
Nominal output current max. 850 mA
Operating temperature range +5°C to +45°C (+41°F to +113°F)
Storage temperature range –20°C to +70°C (–4°F to +158°F)
Relative humidity operation: 20 to 85%
storage: 20 to 95%
Weight approx. 75 g
DECT
EU, UK, AU:
CAT IQ 1.0
Frequency 1,880 to 1,900 MHz 1,920 to 1,930 MHz
SAR value of DW Office – HS 0.196 W/kg
(max. 10 g SAR)
SAR value of DW Pro1 – HS 0.069 W/kg
(max. 10 g SAR)
SAR value of DW Pro2 – HS 0.058 W/kg
(max. 10 g SAR)
In compliance with
Europe: EMC EN 301489-6
Radio EN 301406
Safety EN 60950-1
SAR EN 50360 ref
Trademarks
Sennheiser is a registered trademark of Sennheiser electronic GmbH & Co. KG.
Other
product and company names mentioned in this instruction manual
may be the trademarks or registered trademarks of their respective
owners.
US version:
DECT 6.0
0.093 W/kg
(max. 1 g SAR)
0.044 W/kg
(max. 1 g SAR)
0.025 W/kg
(max. 1 g SAR)
EN 62209-1
(headset)
DW Series – Setup Guide | 19
Page 21

Sennheiser Communications A/S
Industriparken 27, DK-2750 Ballerup, Denmark
www.sennheiser.com
Printed in China, Publ. 11/18, A06
 Loading...