

Sennheiser Comfort calls,OfficeRunner Instruction Manual

DECT
Comfort
calls
OfficeRunner™
Instruction manual

Contents
Contents
Important safety information ................................................................................... 2
The OfficeRunner™ wireless headset system ..................................................... 4
Delivery includes ............................................................................................................. 5
Product overview ............................................................................................................ 6
Base station ................................................................................................................. 6
Headset ......................................................................................................................... 7
Overview of the buttons .............................................................................................. 8
Overview of the LEDs ..................................................................................................... 9
Putting the headset system into operation ..................................................... 10
Putting the base station into operation ....................................................... 10
Putting the headset into operation ................................................................ 16
Testing the headset system in Phone mode and adjusting it .............. 17
Testing the headset system in PC mode and adjusting it ...................... 19
Adjusting advanced settings ............................................................................. 20
Using the headset system ........................................................................................ 22
Charging the headset’s rechargeable battery ............................................ 22
Switching the headset on/off ........................................................................... 23
Establishing a wireless link between headset and base station ......... 23
Putting the headset on and adjusting it ....................................................... 24
Calling via the fixed line phone using the headset ................................... 25
Calling via the PC using the headset ............................................................... 26
Switching between Phone and PC mode ....................................................... 28
Holding a conference call .................................................................................... 28
Adjusting the volume ........................................................................................... 29
Muting the headset’s microphone .................................................................. 30
Using the advanced functions .......................................................................... 30
If you leave the DECT range ............................................................................... 31
Cleaning and maintaining the headset system .............................................. 32
Replacing the ear pad of the headband ........................................................ 33
Replacing the headset’s rechargeable battery ........................................... 34
If a problem occurs ...................................................................................................... 35
Accessories and spare parts .................................................................................... 36
Specifications ................................................................................................................. 37
Manufacturer Declarations ...................................................................................... 39
Index .................................................................................................................................. 41
1

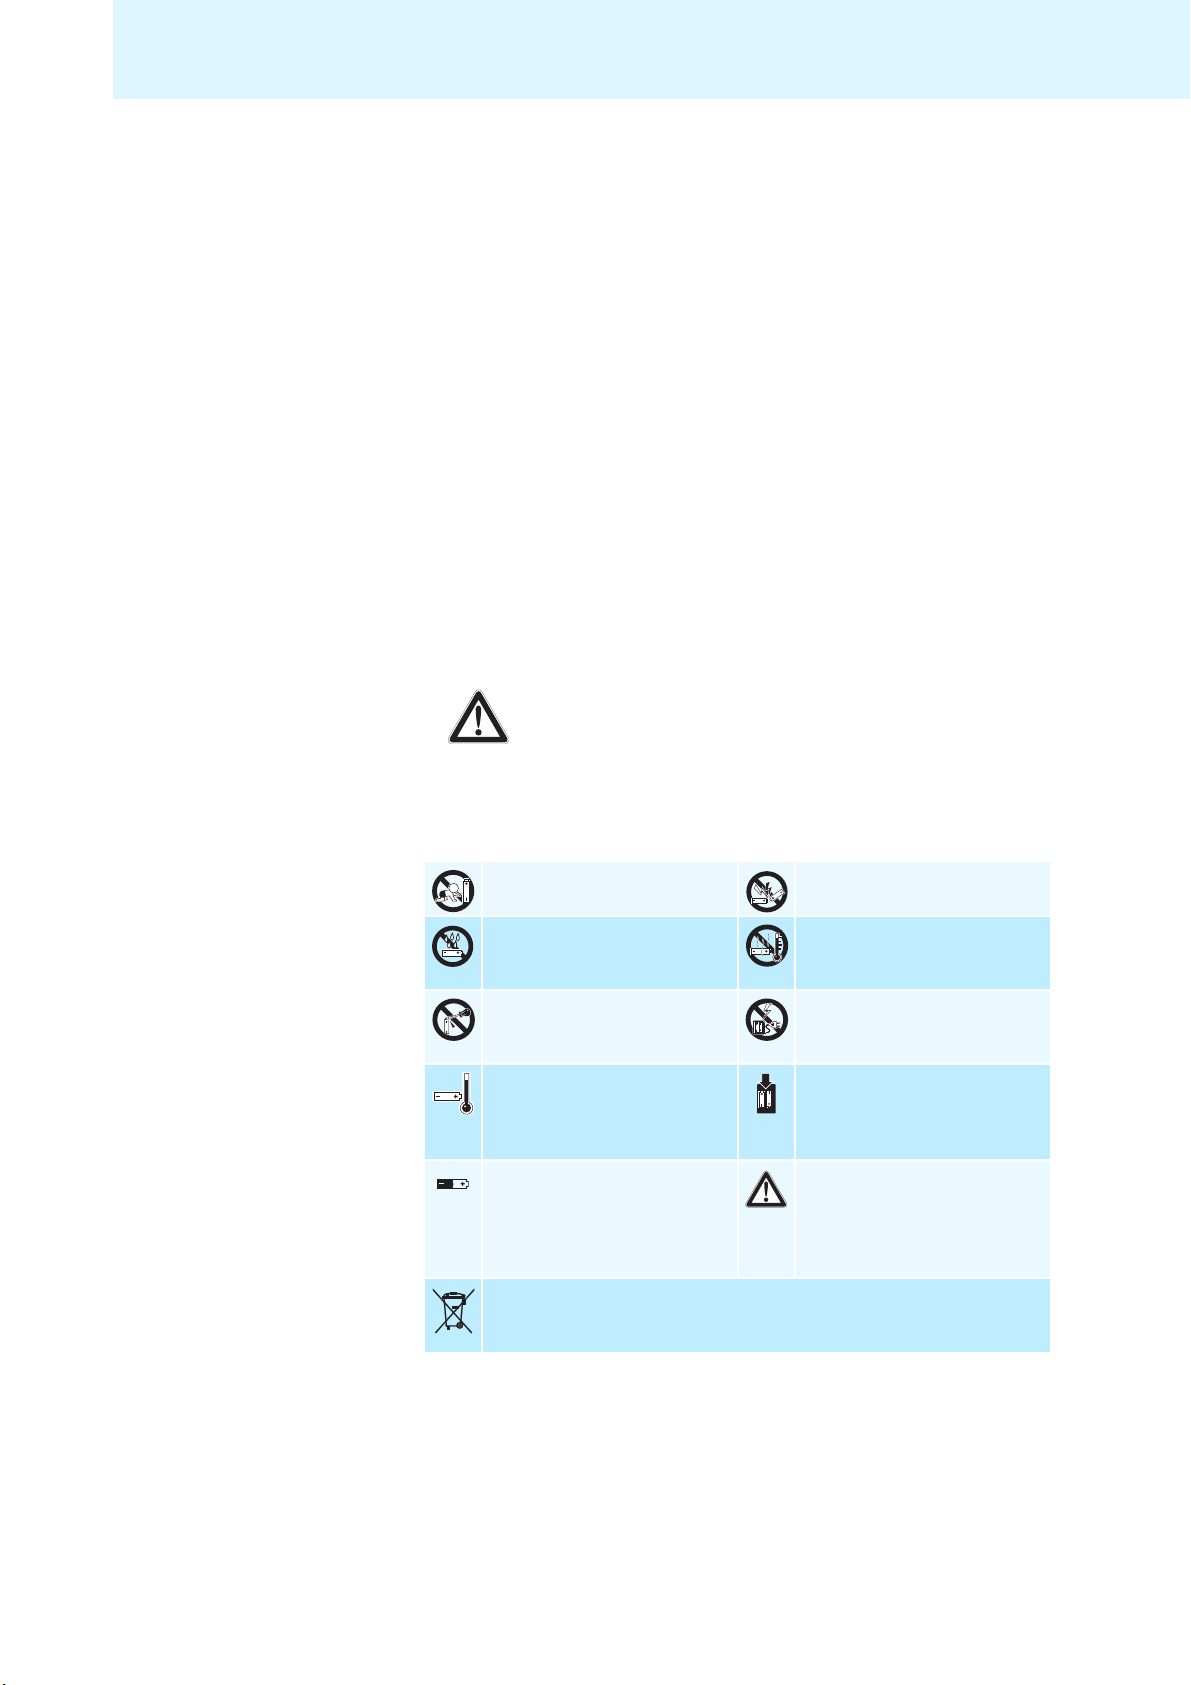
Important safety information
Important safety information
• Please read this instruction manual carefully and completely before
using the product.
• Make the instruction manual easily accessible to all users at all times.
Always include the instruction manual when passing the product on to
third parties.
• Do not use the product in situations which require special attention
(e.g. when performing skilled jobs).
• Always keep the product dry and do not expose it to extreme
temperatures (normal operating temperatures: +5
+45
°C/+113 °F).
• Use the product with care and store it in a clean, dust-free
environment.
• Switch off the headset after use to conserve battery power.
• Only use the OfficeRunner™ base station for charging OfficeRunner™
headsets fitted with the OfficeRunner™ rechargeable battery. Never try
to charge other rechargeable batteries or non-rechargeable batteries in
the
OfficeRunner™ base station.
• Do not short-circuit the contacts of the product. Make sure that no
metal objects (e.g. paper clips, hair pins, earrings) come into contact
with the interfaces and contacts.
• Sennheiser Communications is not liable for damages resulting from
the loss of connection due to a run flat battery, an old battery or
exceeding the DECT transmission range.
• This equipment generates, uses and can radiate radio frequency energy
and, if not used in accordance with the instructions, may cause harmful
interference to radio communications. However, there is no guarantee
that interference will not occur in a particular installation.
•The OfficeRunner™ headsets contain magnets that generate a
magnetic field which could cause interference with cardiac pacemakers
and implanted defibrillators. Keep the
1.2” (3
• Protect your hearing from high volume levels.
• Only use the power supply units supplied by Sennheiser
Communications.
• To reduce the risk of fire or electric shock, do not use the product near
water and do not expose it to rain or moisture.
• Unplug the power supply unit from the wall socket
– to completely disconnect the product from the mains power supply
– during lightning storms or
– when unused for long periods of time.
• Only operate the power supply unit from the type of power source
specified in the chapter “Specifications” (see
• Ensure that the power supply unit is
– in a safe operating condition and easily accessible,
– properly plugged into the wall socket,
– only operated within the permissible temperature range,
– not covered or exposed to direct sunlight for longer periods of time
cm) from cardiac pacemakers or implanted defibrillators!
in order to prevent heat accumulation (see “Specifications” on
page 37).
OfficeRunner™ headsets at least
page 37).
°C/+41 °F to
2
Important safety information
• Do not operate the product near any heat sources.
• Only use attachments/accessories specified by Sennheiser
Communications (see “Accessories and spare parts” on page
36).
• Keep plastic wrap and plastic bags of the packaging out of reach of
children – danger of suffocation!
Intended use
Intended use of the product includes
• having read this instruction manual, especially the chapter “Important
safety instructions” on page
2,
• using the product within the operating conditions and limitations
described in this instruction manual.
“Improper use” means using the product other than as described in this
instruction manual, or under operating conditions which differ from those
described herein.
Safety instructions for the Lithium-Polymer rechargeable batteries
If abused or misused, rechargeable batteries may leak. In extreme cases,
rechargeable batteries may even present
• a heat hazard,
•a fire hazard,
• an explosion hazard,
• a smoke or gas hazard.
Please understand that Sennheiser Communications does not accept
liability for damage arising from abuse or misuse.
Keep away from children. Do not short-circuit.
Do not expose to moisture. Do not heat above +45 °C/
+113 °F, e.g. do not expose to
sunlight or throw into a fire.
Do not mutilate or dismantle. Do not charge the rechargeable
battery if the device is obviously
defective.
Only charge rechargeable
batteries at ambient
temperatures between +5 °C/
+41 °F to +45 °C/+113 °F.
When not using rechargeable
batteries for extended periods
of time, charge them regularly
(every six months for about one
hour).
Return defective devices or devices with defective rechargeable batteries
to your specialist dealer.
Only charge rechargeable
batteries with an appropriate
Sennheiser Communications
charger.
Store in a cool and dry place at
room temperature (approx.
°C/68 °F).
20
3

The OfficeRunner™ wireless headset system
The OfficeRunner™ wireless headset
system
The Sennheiser Communications OfficeRunner™ is a wireless DECT headset
system which is intended for professional office use.
• Can be used with a fixed line phone or PC (VoIP)
• Quick link establishment between headset and base station
• Excellent sound quality in narrowband and wideband mode ensures
• Range of up to 180 m in free line of sight and up to 55 m indoors
• Monaural headset with 2 wearing styles:
• Noise cancelling microphone for optimum speech intelligibility without
• Permits conference calls with up to 4 headsets
• Quick and easy pairing of a new headset
• Long battery operating time:
• Quick and convenient charging of the headset (1 hour)
• HeadSetup software for convenient call control and headset
• Headset can be integrated into existing DECT GAP systems
optimum speech intelligibility
– earloop or
– headband with ear pad
annoying background noise
– up to 12 hours of talk time in narrowband mode
– up to 8 hours of talk time in wideband mode
– up to 4 days of standby time
management via a PC
DECT
The Sennheiser Communications OfficeRunner™ wireless headset system
uses DECT radio technology. Due to a dynamic adjustment of the
transmission power, the DECT technology offers an increased transmission
range, minimized radiation exposure and has a good energy efficiency.
Encrypted radio transmission provides maximum security for wireless
communication.
4

Delivery includes
Delivery includes
1 base station
1 headset with built-in rechargeable battery
1 bendable earloop
2earloops (size S and L)
1 headband
1 name plate with cheek spacer (pre-installed)
1 name plate
1 power supply unit
1 telephone cable
1 USB cable
1 safety guide (booklet with important safety information)
1 quick guide
1 CD ROM (including, among other things, the HeadSetup software and
a
detailed instruction manual as PDF)
5
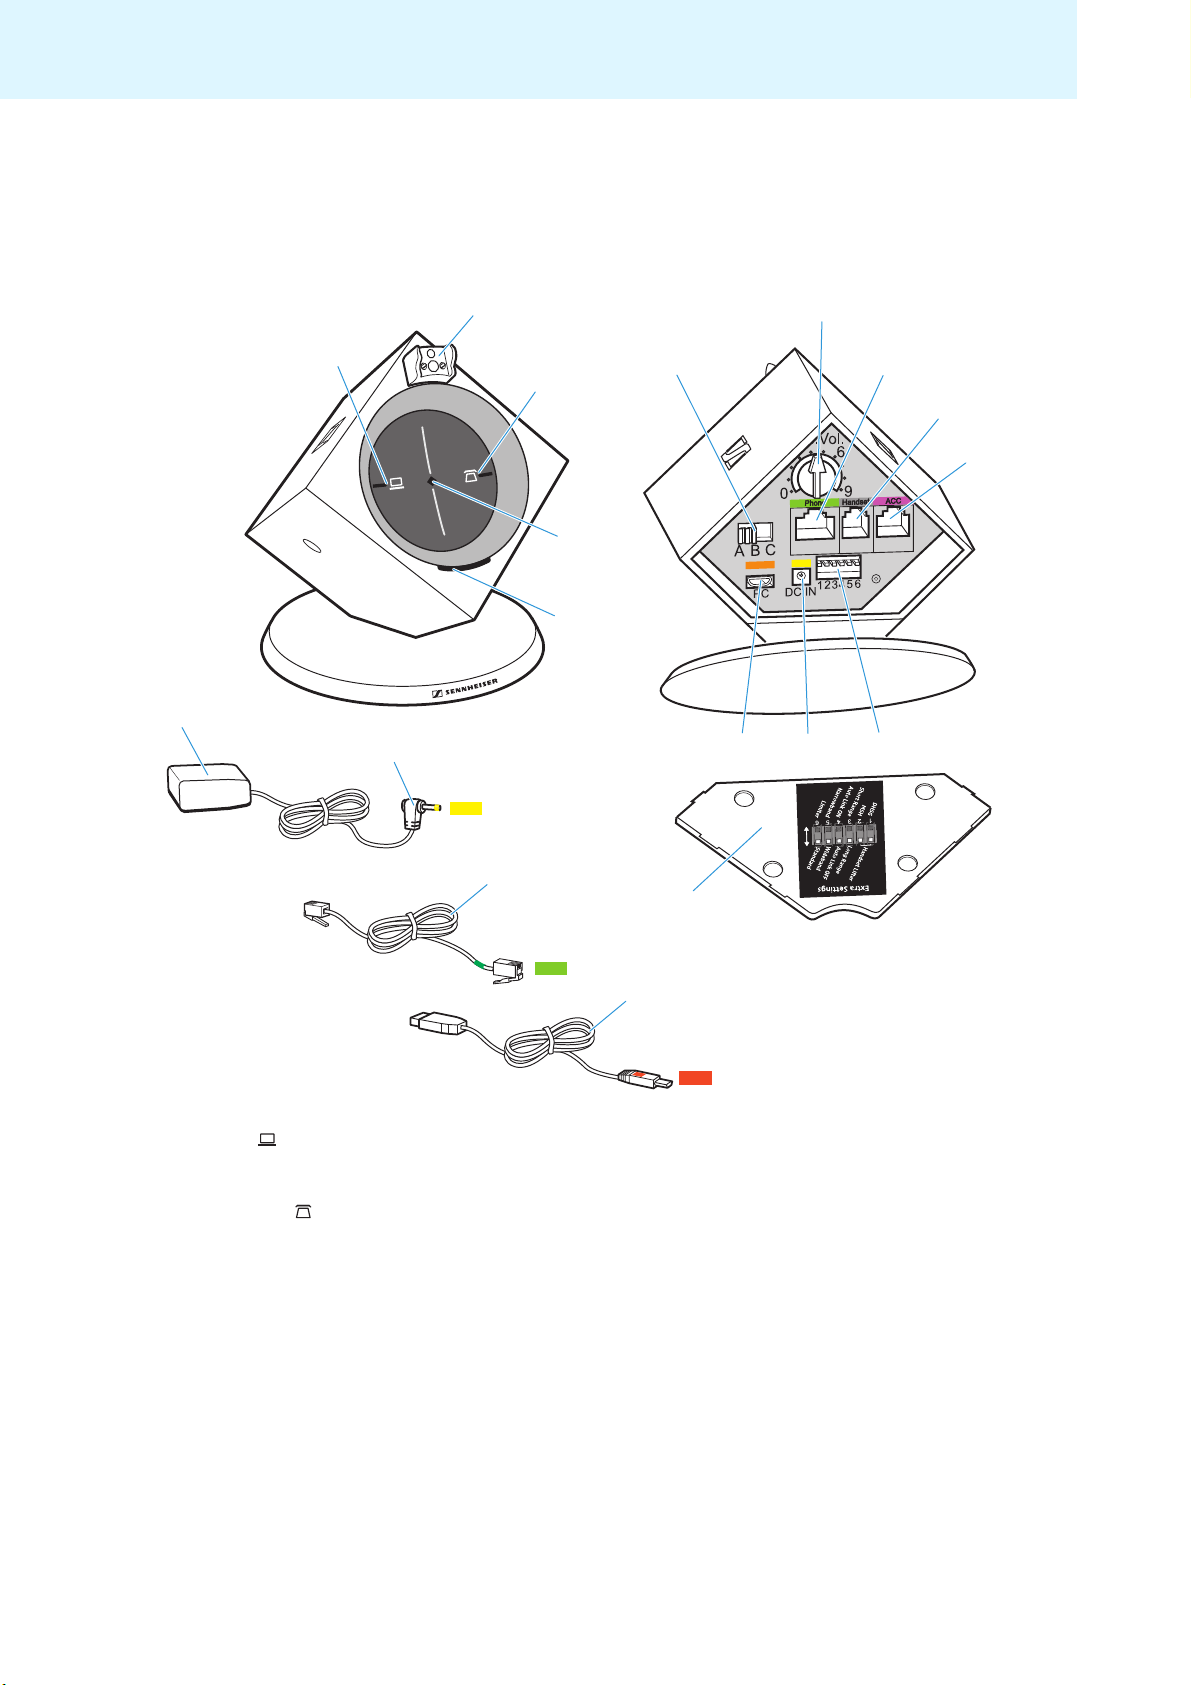
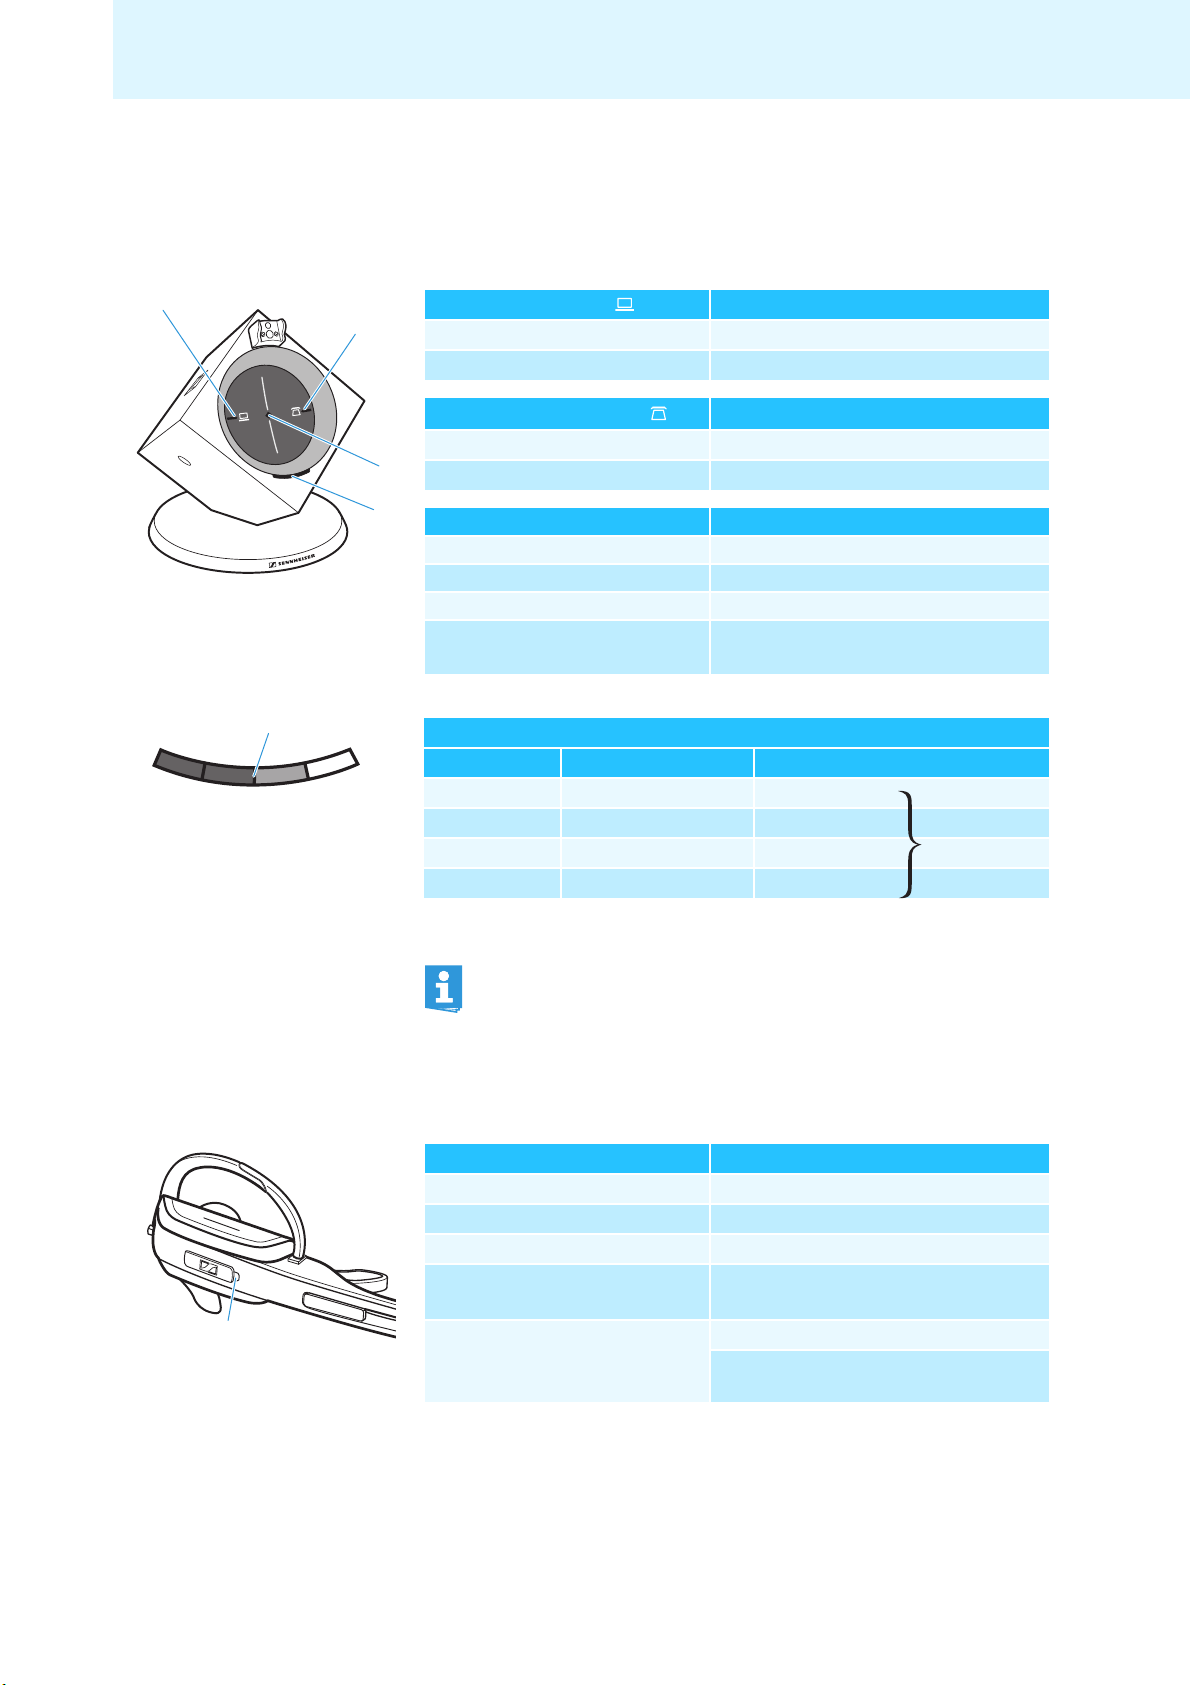
Product overview
Product overview
Base station
PC button with LED
Charging contacts
쐋 PHONE button with LED
LINK LED
CHARGE STATUS LED
ABC switch
Microphone volume control
Phone socket
Handset socket
ACC socket
DIP switch row 1 to 6
DC IN socket
PC socket (USB)
Cover with overview of DIP switch assignment
Power supply unit
DC IN connector
Telephone cable
USB cable
6
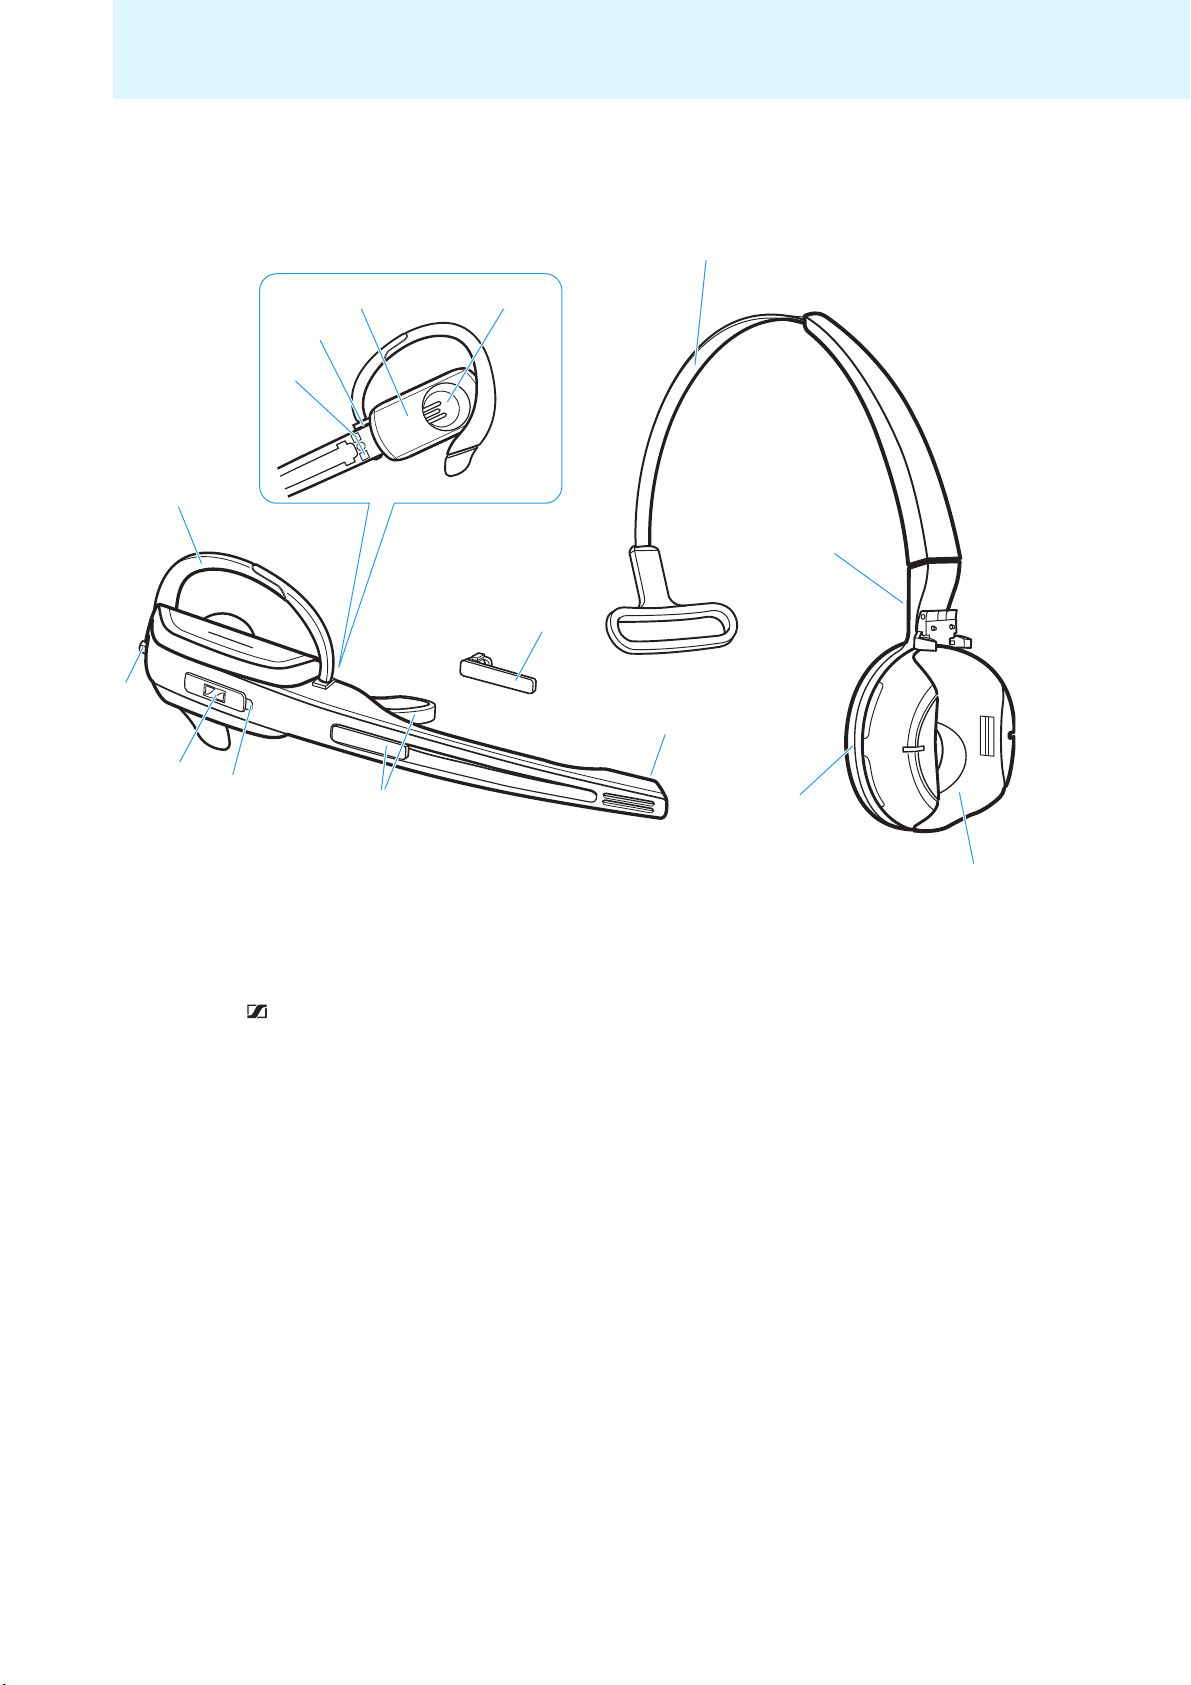
Headset
Product overview
B
6
5
4
3
Microphone
7
8
9
2
0
C
A
1
D
E
Battery compartment cover
Name plate with cheek spacer
HEADSET LED
LINK button
AUDIO button
Earloop
Charging contacts
Earloop slot
Earpiece
Name plate
Headband
Charging contacts
Ear pad
Headset holder
7
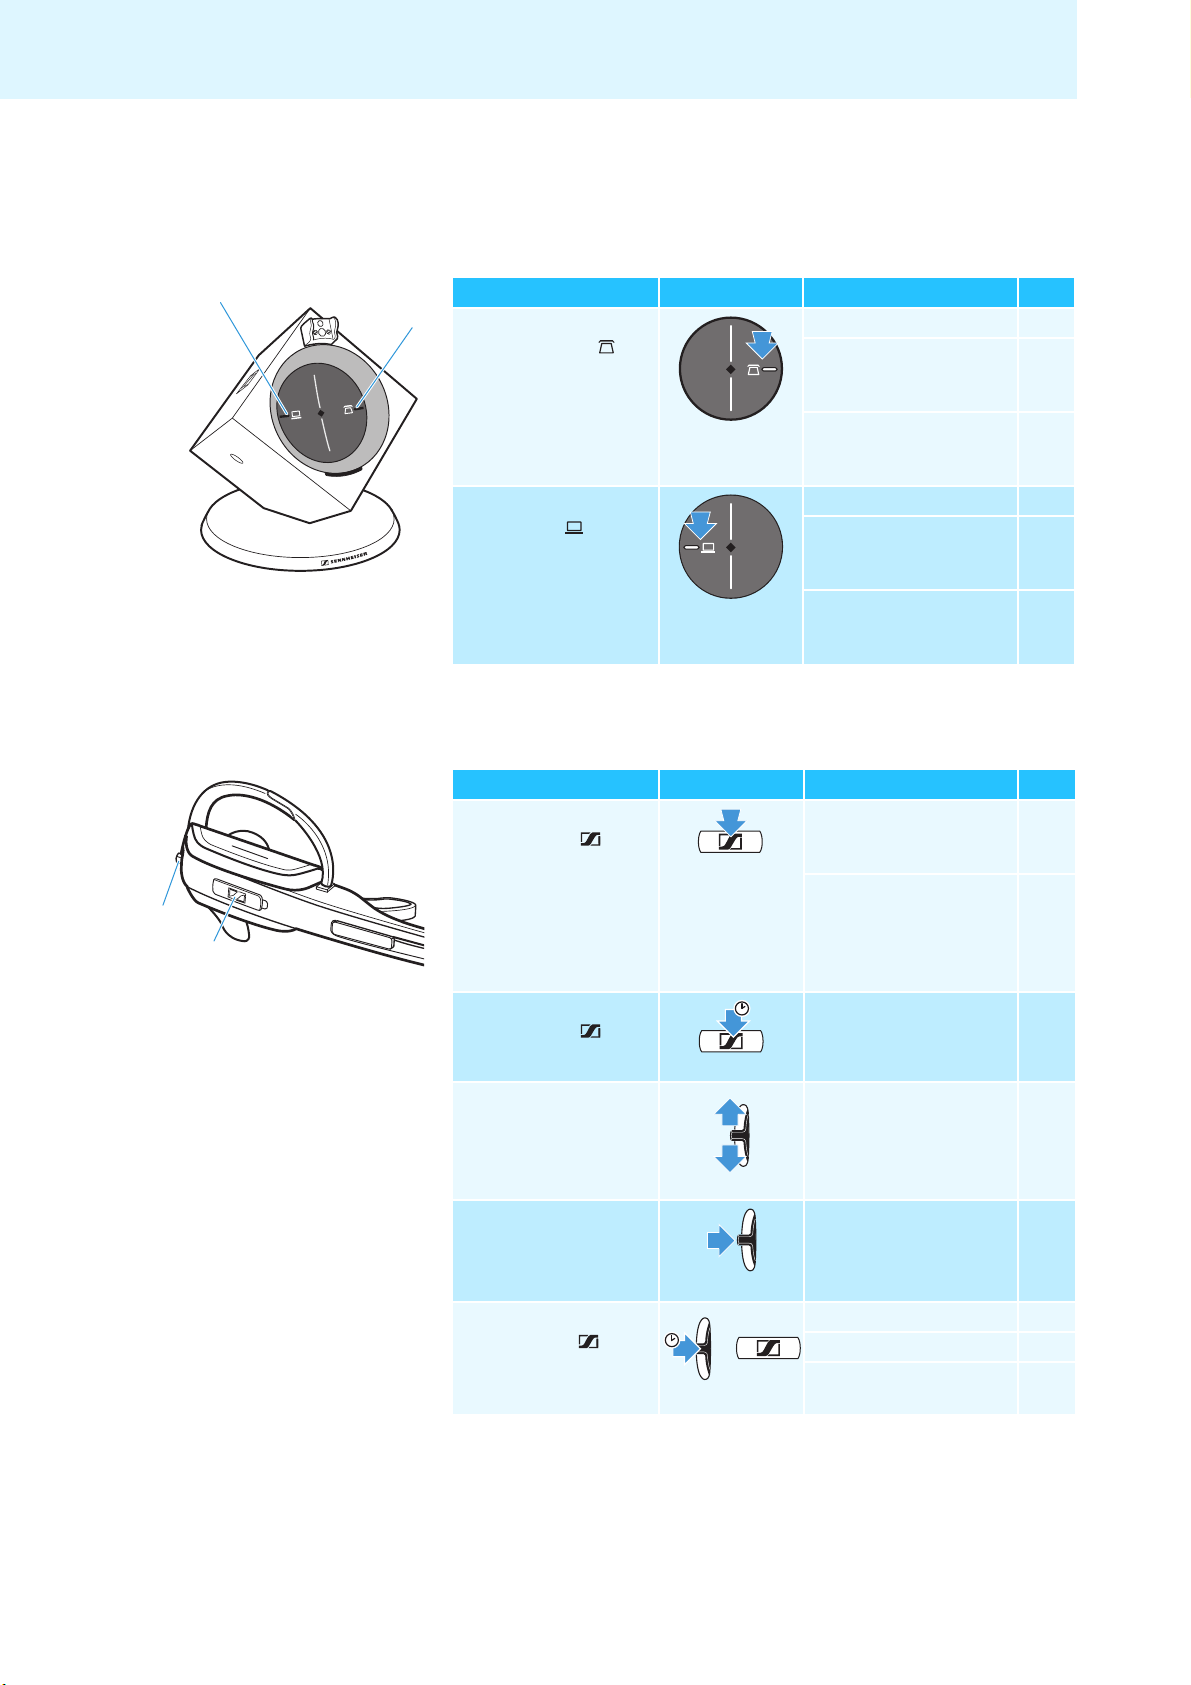
Overview of the buttons
5 s
Overview of the buttons
Base station
Action Button Functions Page
왘 Press the
PHONE
button 쐋
왘 Press the
PC button
Selects the Phone mode 25
Establishes/disconnects
the link between headset
and base station
Accepts/ends a call (with
electronic call control/
handset lifter)
Selects the PC mode 26
Establishes/disconnects
the wireless link between
headset and base station
Accepts/ends a call
(depending on the
softphone used)
23
25
23
26
5
4
Headset
Action Button Functions Page
왘 Press the
LINK button
왘 Press and hold the
LINK button for
5 seconds
왘 Push the
AUDIO button
upwards/downwards
왘 Press the
AUDIO button
Establishes/disconnects
the link between headset
and base station
Accepts/ends a call (with
electronic call control/
handset lifter or
depending on the
softphone used)
Switches the headset
on/off
Increases/reduces the
ring tone volume, the
volume of the acoustic
signals or the audio
volume by 1 step
Mutes the microphone/
unmutes the microphone
23
25/26
23
29
30
왘 Press and hold the
LINK button and
the AUDIO button
for 5 seconds
5 s
+
Setting mode
GAP pairing mode 31
Swaps the assignment of
the AUDIO button
17
8
Overview of the LEDs
3
Base station
LED of the PC button Meaning
lights up PC mode
flashes Incoming PC call
Overview of the LEDs
LED of the PHONE button 쐋
lights up Phone mode
flashes Incoming telephone call
LINK LED Meaning
lights up blue Active link to the headset
lights up red No link to the headset
flashes red Headset is muted
is off Standby mode
CHARGE STATUS LED
LED segment* Battery charge Required charging time
1 0-25 % approx. 10 min
2 25-50 % approx. 10 min
3 50-75 % approx. 20 min
4 75-100 % approx. 20 min
* during charging, each segment gets brighter in 5 steps
Meaning
Base station is switched off (not powered)
When the LED segment 1 lights up weakly or flashes, the battery is
almost flat. You have to recharge the battery within the next few
minutes (see page 22).
total:
approx.
60 min
Headset
HEADSET LED Meaning
lights up blue Charging mode
flashes blue slowly Active link to base station
flashes red Rechargeable battery is almost flat
is off Standby mode
Headset is switched off
flashes blue/red Setting mode/GAP pairing mode
Pairing of an additional headset to the
base station
9

Putting the headset system into operation
Putting the headset system into
operation
Putting the base station into operation
You can use the headset system with your fixed line phone (Phone mode)
and/or your PC (PC mode). The base station controls the wireless
communication between the products.
Removing/attaching the cover
To remove the cover:
왘 Remove the cover by inserting a finger into the recess as shown.
To attach the cover and to secure the connected cables:
왘 Replace the cover to the rear of the base station (see diagram).
왘 Tilt the cover upwards until it locks into place.
10
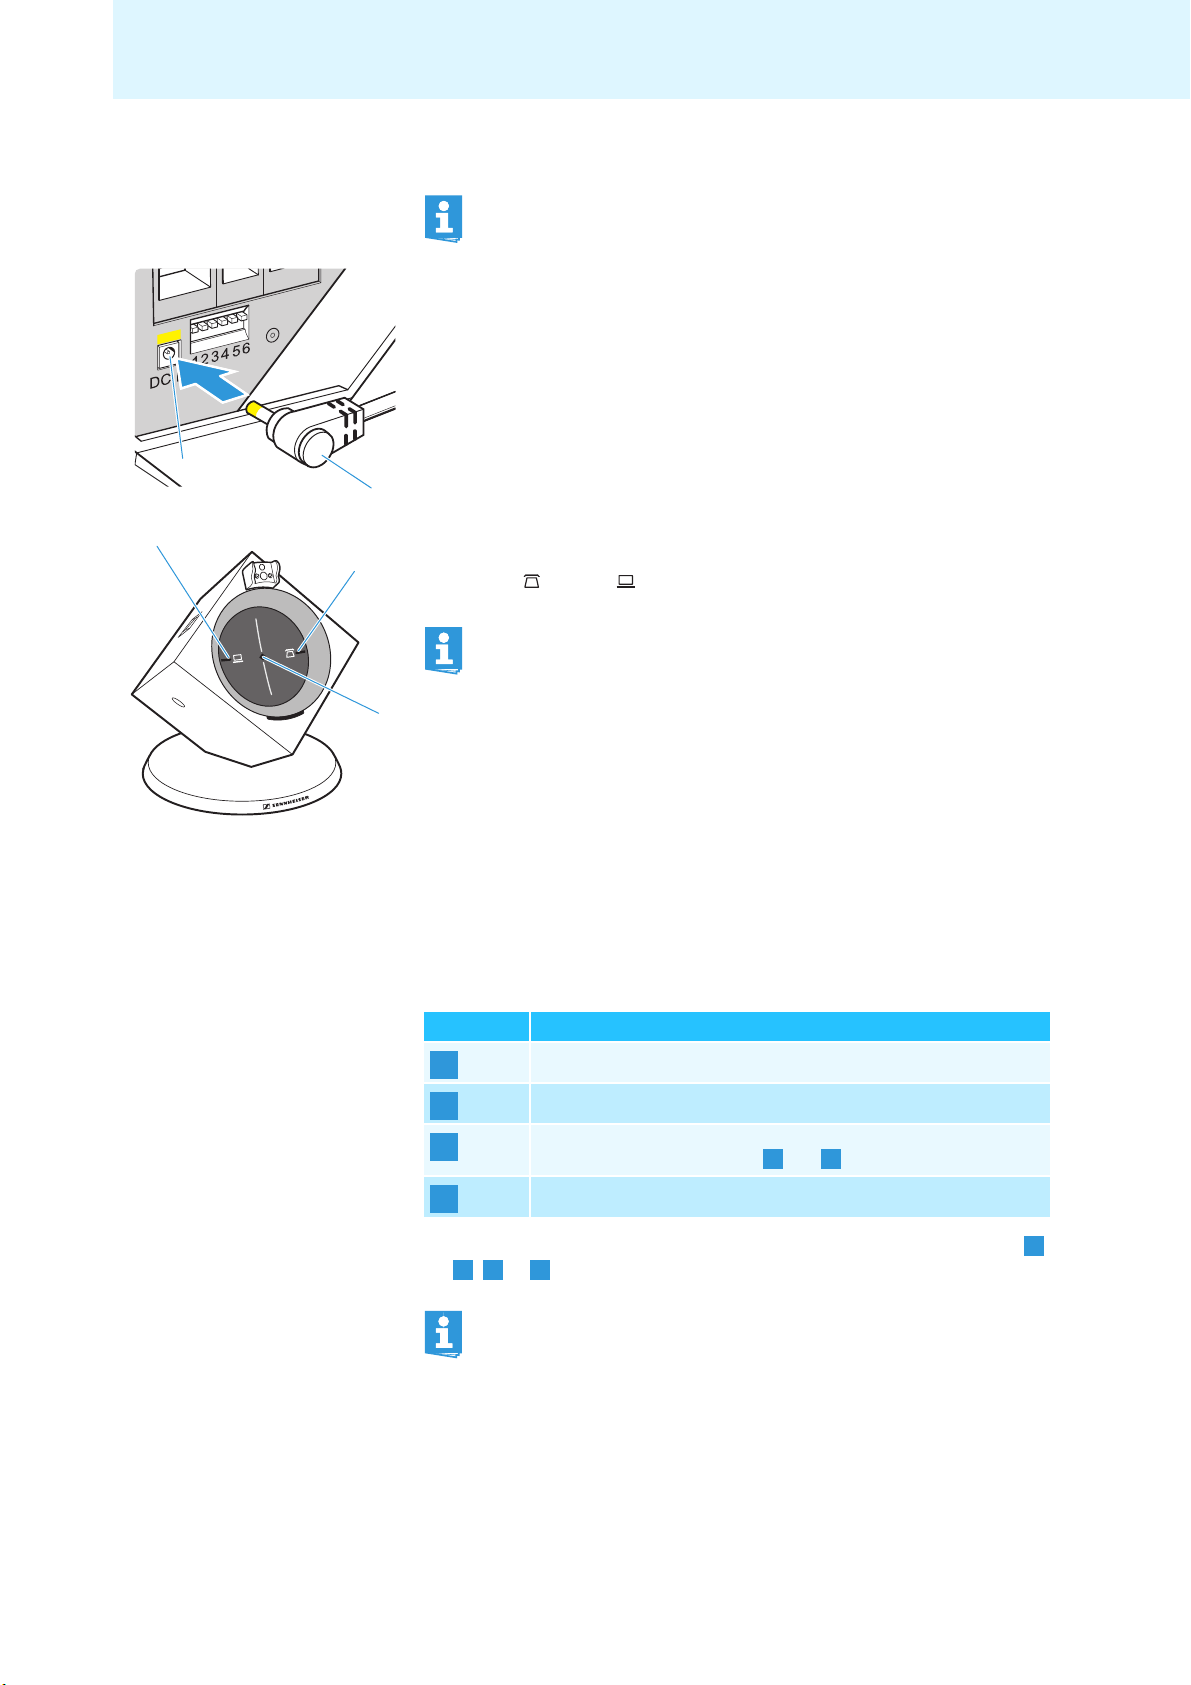
D
Putting the headset system into operation
Connecting the base station to the mains power supply
The base station is ready for operation as soon as it is connected to
the mains power supply.
왘 Connect the DC IN connector of the power supply unit to the DC IN
socket .
왘 Plug the power supply unit into a wall socket.
The LINK LED lights up red. The LED of the last used mode button
(PHONE 쐋 or PC ) lights up white.
When using the headset system only in PC mode, the power from
the PC via the USB cable is sufficient to power the base station. For
charging the rechargeable battery within the specified charging
times (see page
22) and for use in Phone mode, the power supply
unit is required.
Connecting the base station to a fixed line phone
If your telephone features a headset socket for connecting the electronic
call control, please use this socket.
To connect the base station to a fixed line phone, choose one of the follow
options:
Possibility Connection
A
B
C
왘 Choose your connection possibility and proceed as described under ,
B C D
, or on the following pages.
to a fixed line phone without headset socket
to a fixed line phone with headset socket
of an optional mechanical handset lifter
(with connection possibilities and only)
to an optional electronic hook switch control (EHS)
A B
A
For additional information on the individual settings for the
headset system via the DIP switch row
, refer to page 20.
11
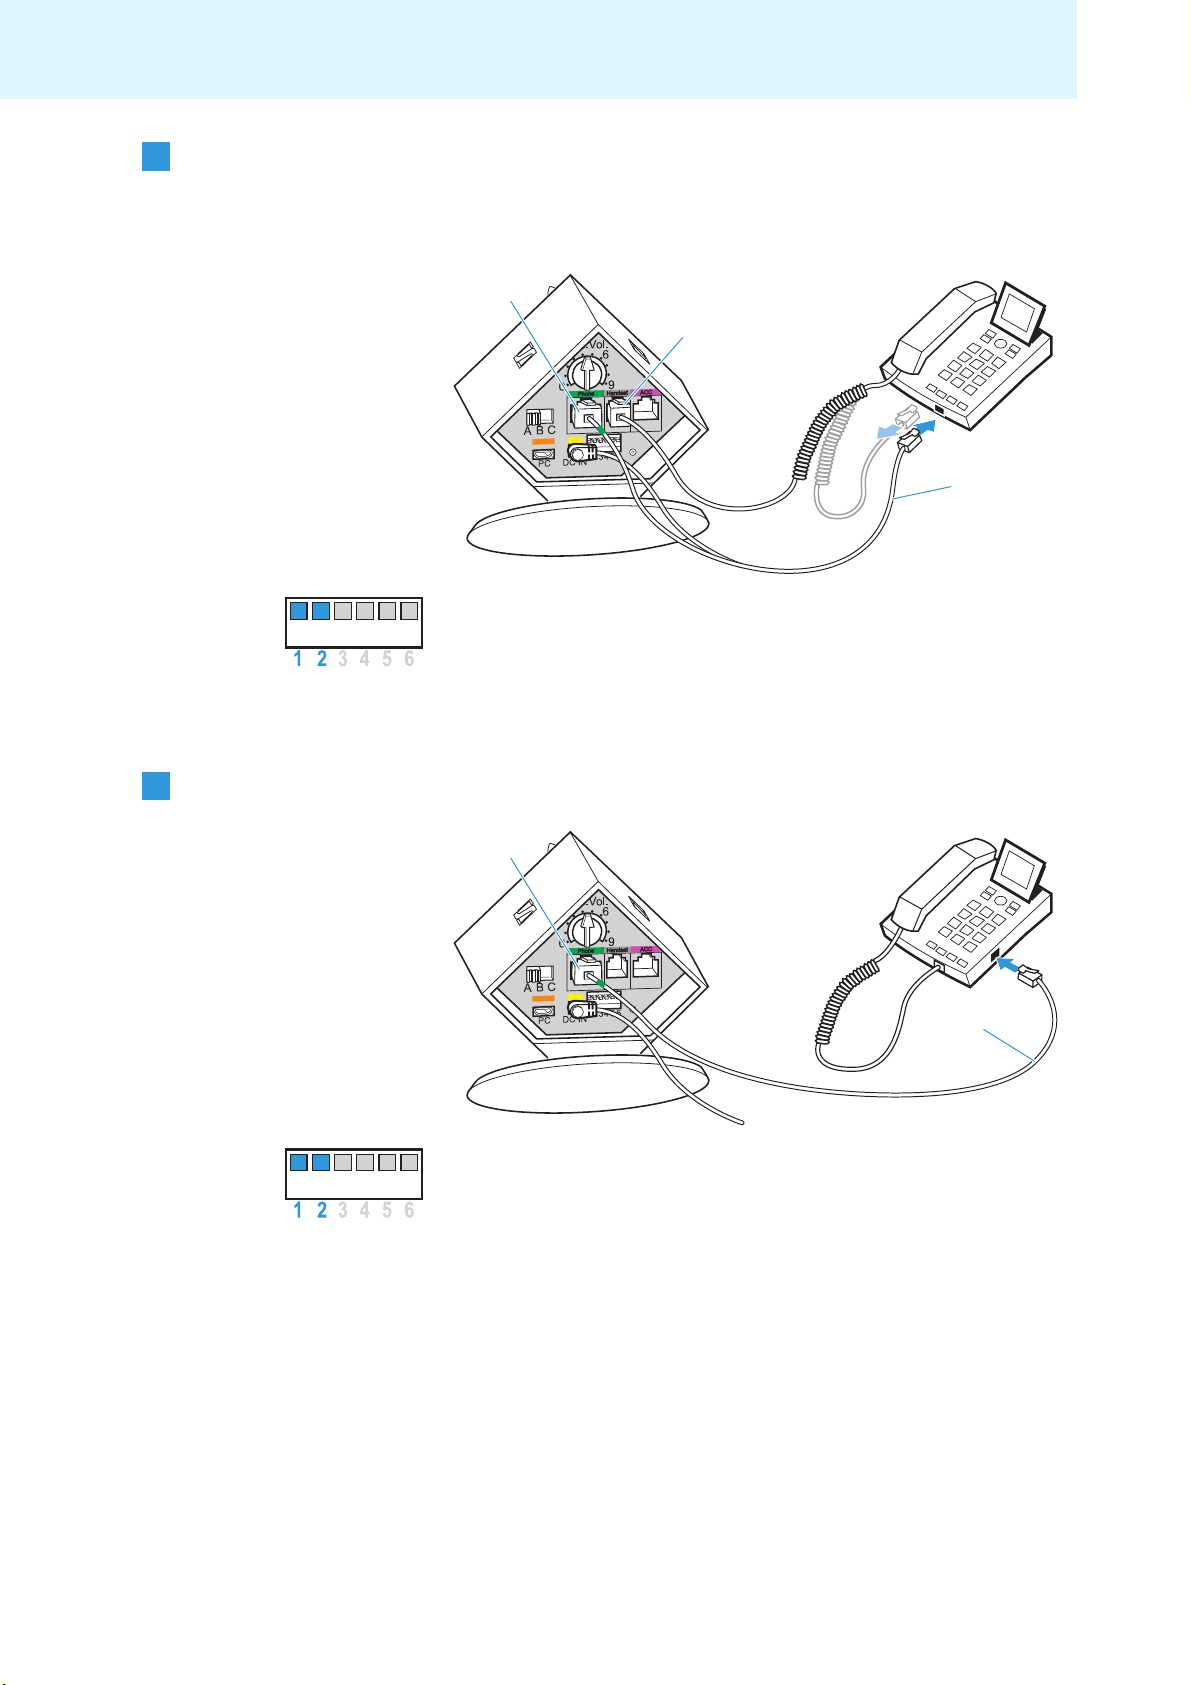
Putting the headset system into operation
Connection to a fixed line
A
phone without headset
socket
왘 Disconnect the handset cable from the telephone.
왘 Connect the handset cable to the Handset socket .
왘 Use the telephone cable to connect the Phone socket to the
handset socket on the telephone.
왘 Set the DIP switch #1 and #2 to the upper position.
Connection to a fixed line
B
phone with headset socket
왘 Use the telephone cable to connect the Phone socket to the
headset socket on the telephone.
왘 Set the DIP switch # 1 and # 2 to the upper position.
12
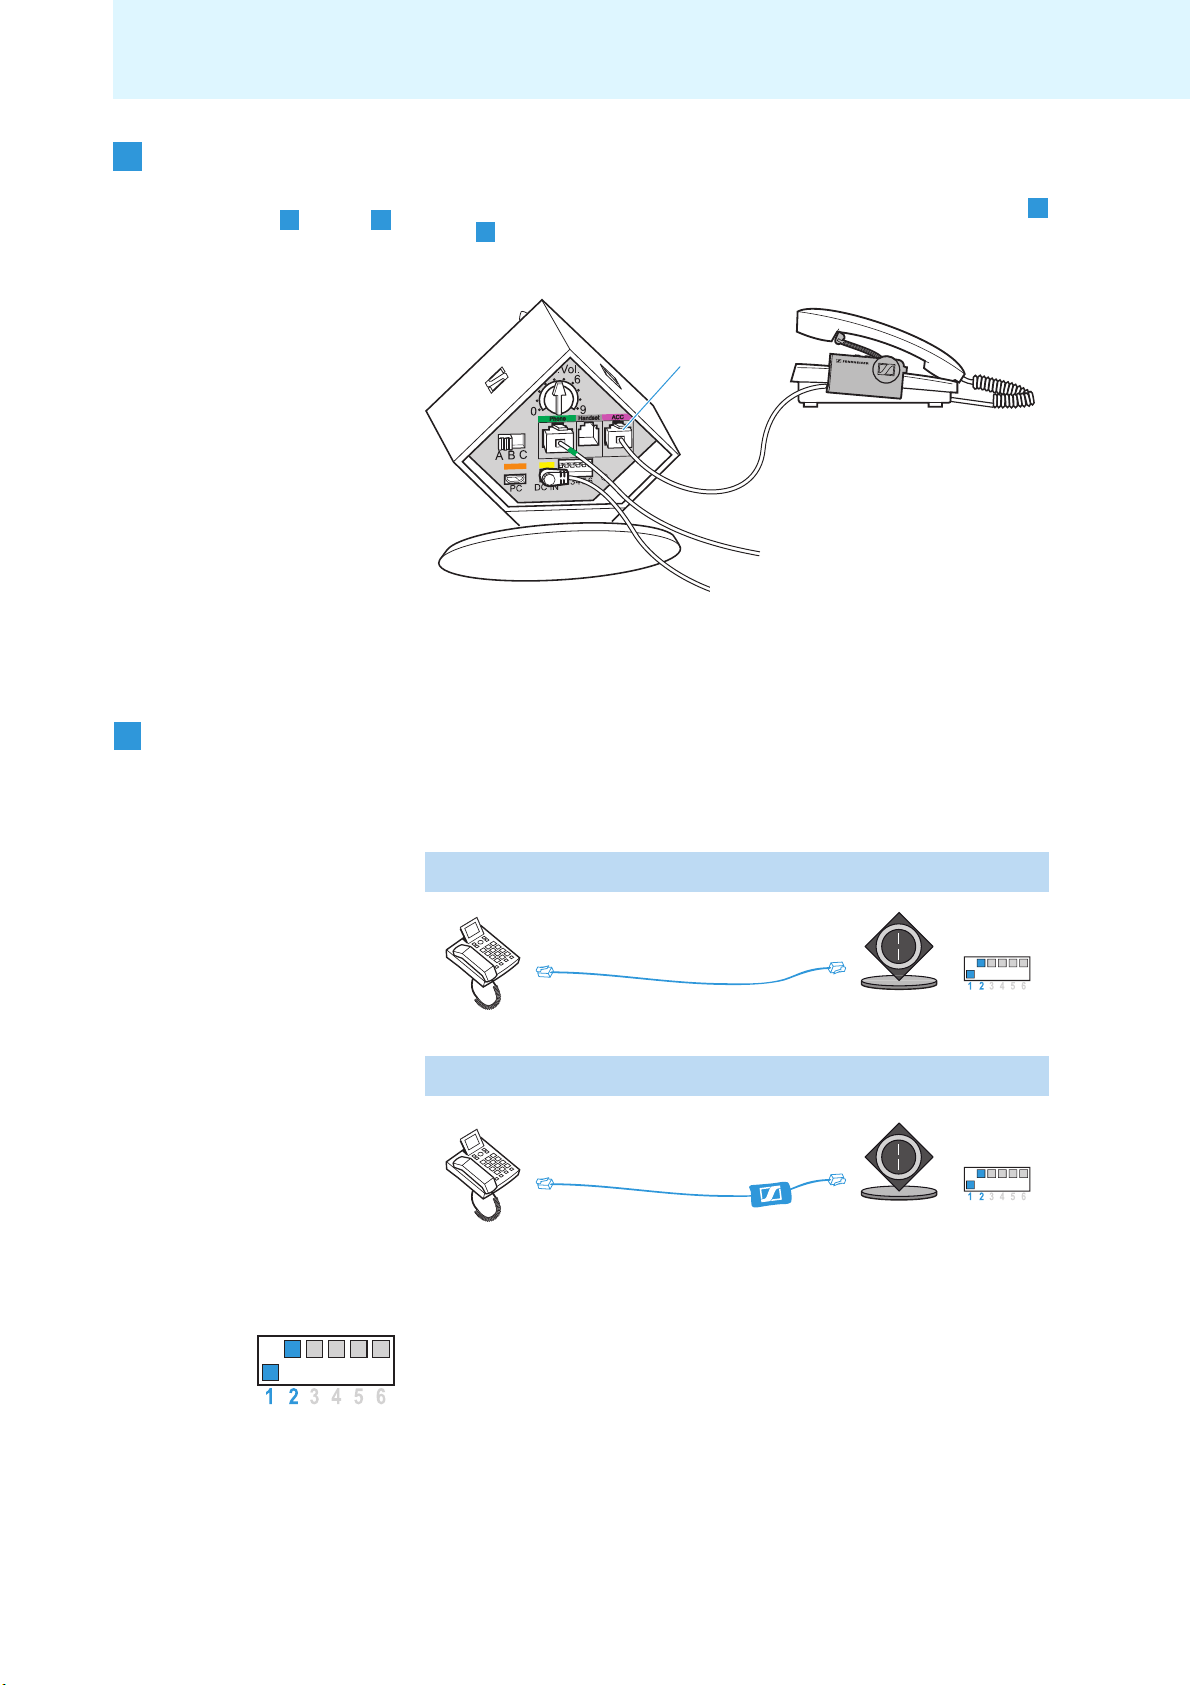
Putting the headset system into operation
D
Connection of an optional
C
mechanical handset lifter
(with connection
possibilities
A B
and
only)
Connection to an optional
electronic hook switch
control (EHS)
You can also connect the HSL 10 mech ani cal hand set lifter from Sennhei ser
Communications (see
왘 Connect the base station to the fixed line phone as described under
B
or .
“Accessories and spare parts” on page 36):
A
왘 Connect the handset lifter to the ACC socket on the base station.
왘 Connect the handset lifter to the fixed line phone as described in the
instruction manual of the handset lifter.
If your telephone has a built-in electronic hook switch, supporting either
the DHSG or the MSH standard, you require the corresponding connection
cables. Other hook switch standards require suitable adapter cables which
convert the control signals to the DHSG standard (see
“Accessories and
spare parts” on page 36).
DHSG standard
DHSG cable
e.g. Siemens, Aastra, Agfeo, etc.
OfficeRunner™ DHSG setting
Other standards
Adapter cable
e.g. Cisco, Avaya, Polycom
OfficeRunner™ DHSG setting
If your telephone has a built-in electronic hook switch supporting the DHSG
or the any other hook switch standard (except for the MSH standard):
왘 Set the DIP switch # 1 to the lower position.
왘 Set the DIP switch # 2 to the upper position.
13
 Loading...