

Sennheiser ClipMic digital Quick Start Manual
3B
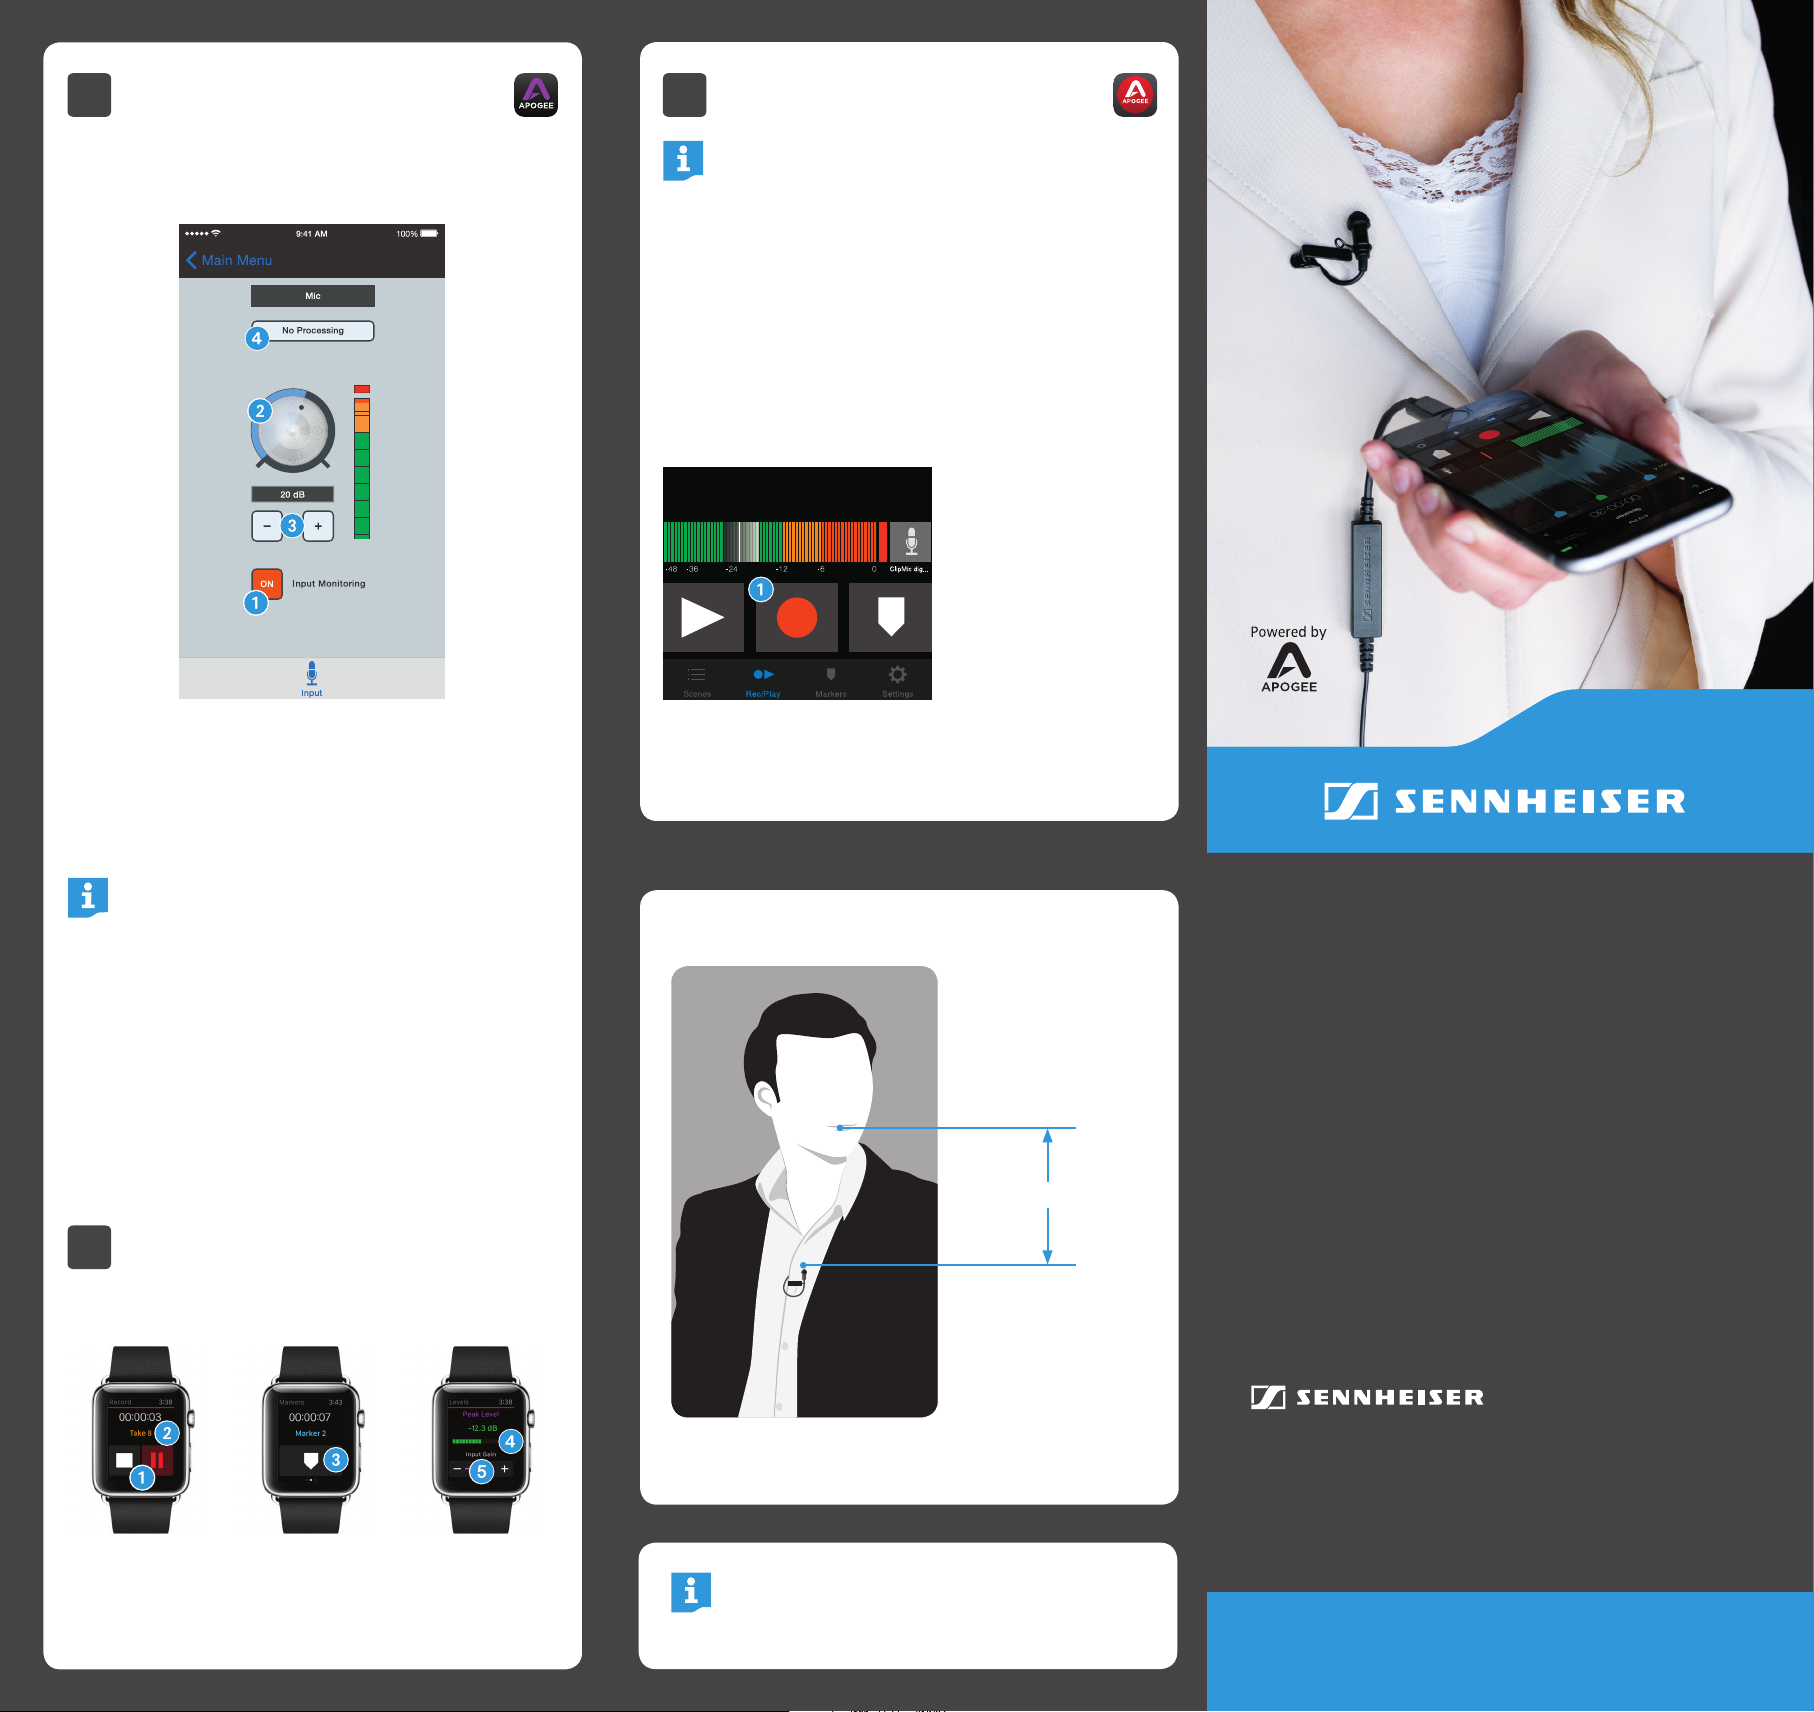
Adjusting Input Level with
4
Recording
Apogee Maestro App
X
Open Apogee Maestro app and choose Sennheiser
ClipMic digital from the main menu.
Note:
It is recommended that you set your iOS device to
airplane mode to prevent any incoming calls from
disrupting your recordings.
X
Open Apogee MetaRecorder or any other Core Audio
compatible recording App.
ClipMic digital should be automatically detected and
selected as the input device.
X
If you haven’t already done so, connect headphones to
the built-in output on your iOS device and enable input
monitoring in the recording App.
X
Tap the Record button 1 in the App to begin.
Quick Start Guide
ClipMic digital
1
Tap the Input Monitoring button to hear your microphone input.
2
Turn the Gain Adjustment knob to increase or decrease the microphone input to the desired level. Small
adjustments can also be made by pressing either the
“–“or “+“ buttons 3.
Tips for Setting Input Level
The best way to do this is to monitor the loudest
sound you will be recording and adjust the input
gain so the input metering remains green, yellow or
orange and not red. If the microphone input meter
becomes red when recording, the input is too high
and the recording will be distorted.
4
Select an Input Processing preset. The presets use
onboard DSP processing to shape the sound with EQ,
compression and limiting to achieve the most natural
or unique result. Select No Processing or leave as is to
bypass this feature.
3C
Apple Watch Remote Control
MetaRecorder offers an Apple Watch App to remotely
operate these controls.
Attachment of the Microphone
25 cm (10 inches)
1
Tap to operate
transport controls.
2
Force tap to toggle
favorite status.
3
Tap to add
a marker.
4
Tap to reset
max. peak display.
5
Tap “+” or “–“
to adjust input
gain.
Sennheiser electronic GmbH & Co. KG
Am Labor 1, 30900 Wedemark, Germany
www.sennheiser.com
Printed in Germany, Publ. 04/15, 560096/A03
For more info on Apogee MetaRecorder
and other compatible apps,
visit www.apogeedigital.com/apps
Overview
In the Box
1 ClipMic digital microphone
1 Clip
1 Metal wind screen
1 Carrying pouch
1 Quick Start Guide
3A
Preparing the Recording
ClipMic digital’s input gain can be controlled from either
of Apogee’s two iOS Apps or from any recording App that
supports Core Audio input control.
1
3
1
Sennheiser ME 2 microphone capsule
2
Apple MFi certified Lightning connector
3
Apogee PureDigital A/D conversion circuitry
2
System Requirements
• iPhone 6, iPhone 6 plus, iPhone 5s, iPhone 5c
iPhone 5
th
• iPad Air 2, iPad Air, iPad (4
• iPad mini 3, iPad mini 2, iPad mini
th
• iPod touch (5
generation)
• iOS version: 8.0 and later
• Apogee MetaRecorder App, Apogee Maestro App or
any Core Audio compatible App on iOS
− Apogee MetaRecorder allows you to record audio
and control your ClipMic digital microphone.
− Apogee Maestro allows you to control your
ClipMic digital microphone.
This is not an App for recording.
generation)
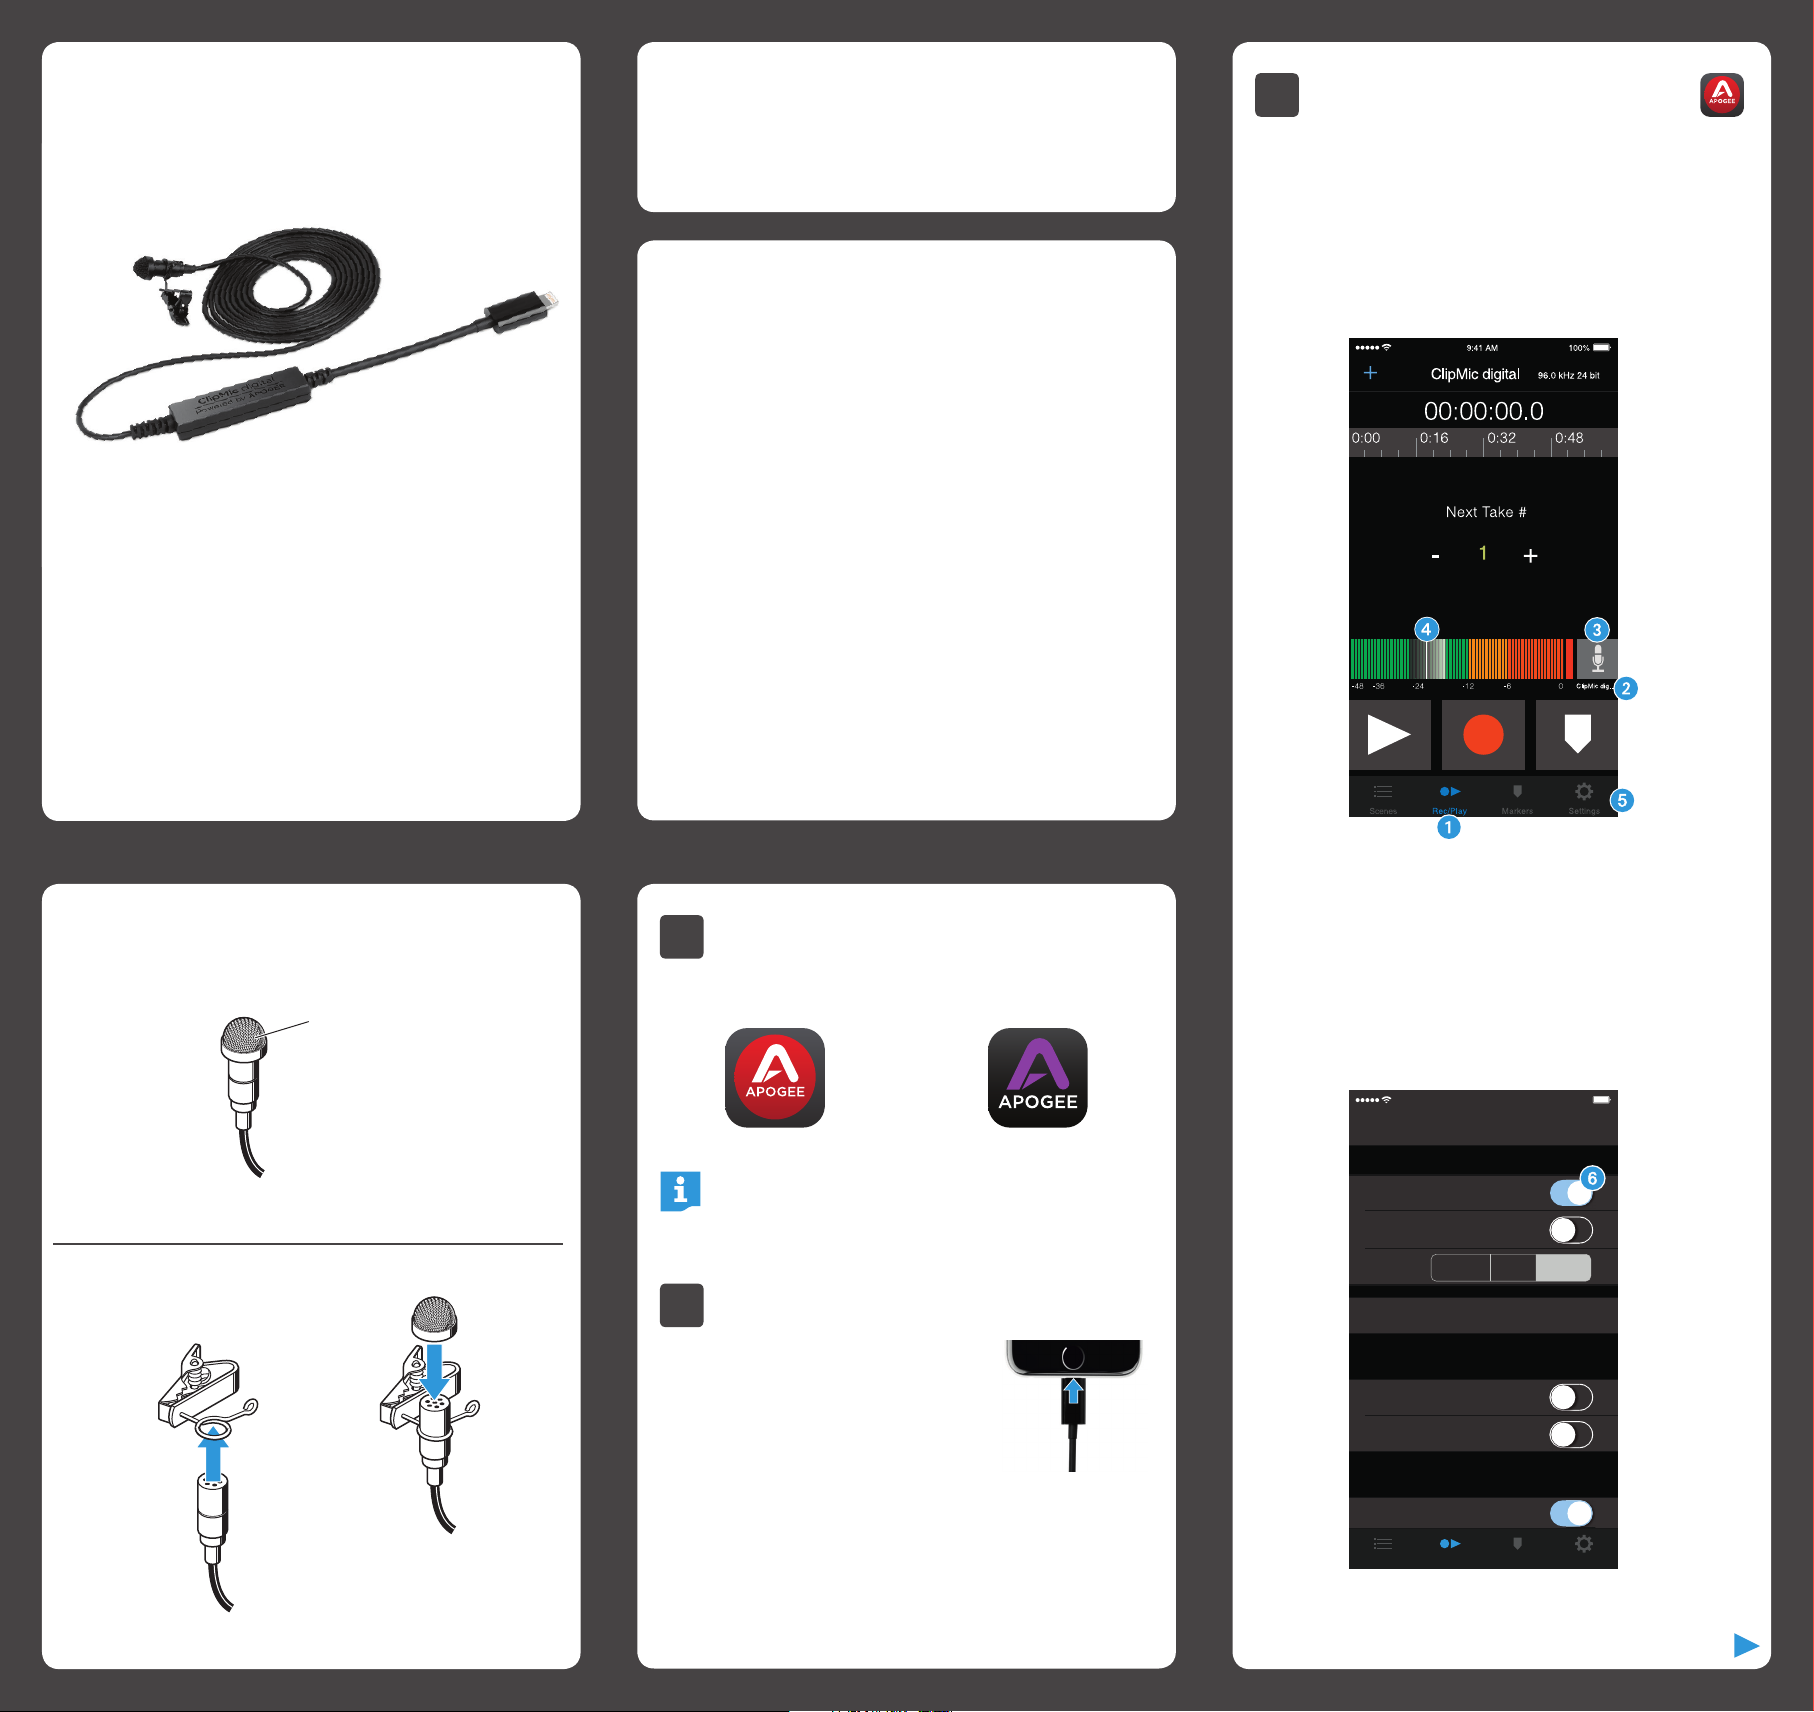
Adjusting Input Level with Apogee
MetaRecorder App
1
Open Apogee MetaRecorder and tap the Rec/Play tab.
Wind Screen
Clip
This metal wind screen
reduces the wind noise by
a maximum of 20 dB.
1
Installing the App
X
Install Apogee MetaRecorder or Apogee Maestro from
Apple’s App Store for iOS.
Apogee MetaRecorder Apogee Maestro
Note:
It is possible to record with ClipMic digital using any
Core Audio compatible App.
2
Connecting to your iOS Device
X
Connect ClipMic digital to the
Lightning port on your iPhone,
iPad or iPod touch.
By default, you will not hear ClipMic
digital until input monitoring is
enabled in an App.
X
Connect headphones to the built-in analog output on
your iPhone, iPad or iPod touch.
This is necessary to avoid feedback when monitoring
your microphone input.
2
Confirm that ClipMic digital appears just below the
microphone icon.
3
Tap the microphone icon to reveal the input
level slider.
4
Drag the input slider with your finger to adjust the
microphone input to the desired level.
5
Tap the Settings tab and enable input monitoring 6.
9:41 AM 100%
Settings
Input Monitor
Measurement Mode
Latency
Sennheiser ClipMic digital Connected >
Configure hardware specific settings of a
connected Apogee product.
Add Marker at Start Record
Long Press to Pause/Stop
When enabled, requires the button to be held
down for 3 seconds to pause or stop recording.
Prevent Screen Lock
Very Low Low
Normal
Markers SettingsScenes Rec/Play
 Loading...