

Page 1
58V MAX LITHIUM ION
HEDGE TRIMMER
Operator’s manual
Model: HTX5-M
For customer support, please call 1-800-261-3981 or send email to:
SAVE THIS MANUAL FOR FUTURE REFERENCE.
Page 2

TECHNICAL DATA
TABLE OF CONTENTS
TECHNICAL DATA ���������������������������������������������������������������������������������������������1
WORK AREA SAFETY ................................................................ 2
ELECTRICAL SAFETY ...............................................................2
PERSONAL SAFETY ����������������������������������������������������������������������������������������2
SPECIFIC RULES FOR HEDGE TRIMMERS ��������������������������������������������������� 3
COMPONENT LOCATION
KNOW YOUR HEDGE TRIMMER ��������������������������������������������������������������������� 4
OPERATION ������������������������������������������������������������������������������������������������������5
ATTACH /REMOVE THE BATTERY ������������������������������������������������������������������5
PREPARING THE HEDGE TRIMMER ��������������������������������������������������������������5
STARTING THE HEDGE TRIMMER ����������������������������������������������������������������� 5
TRIMMING HEDGES ���������������������������������������������������������������������������������������5
MAINTENANCE
CLEANING THE HEDGE TRIMMER ����������������������������������������������������������������� 6
CARBON BRUSHES ����������������������������������������������������������������������������������������� 6
LUBRICATION ���������������������������������������������������������������������������������������������������6
SHARPENING THE BLADES ����������������������������������������������������������������������������6
STORAGE AND TRANSPORTATION ���������������������������������������������������������������6
PARTS
EXPLODED VIEW ��������������������������������������������������������������������������������������������� 7
TECHNICAL DATA
Model Number: HTX5-M
Motor: 40V Motor
Speed: 2800 SPM
Cutting Capacity: 2/3 in.
Weight (w/ Battery): 8.2 lbs
Product Dimensions: 38 x 8.5 x 8.5 in.
Battery/Charger: B25X5/CHX5
Battery: 58V Max Lithium Ion, 2.5 Ah
WARRANTY
LIMITED TWO-YEAR WARRANTY �������������������������������������������������������������������9
1WWW.SENIXTOOLS.COM
Page 3

SAFETY
!
!
SAFETY
Safety is a combination of common sense, staying alert
and knowing how your item works. SAVE THESE
SAFETY INSTRUCTIONS.
WARNING — To reduce the risk of injury, user must
read and understand operator’s manual.
WARNING — To avoid mistakes and serious injury, do
not use this tool until the following steps
have been read and understood.
1. READ and become familiar with this entire instruction
manual. LEARN the tool’s applications, limitations, and
possible hazards.
2. AVOID DANGEROUS CONDITIONS. Do not use in wet
or damp areas or expose them to rain. Keep work areas
well lit.
3. DO NOT use in the presence of ammable liquids
or gases.
4. DO NOT direct the tool at any bystanders.
5. KEEP BYSTANDERS AT A SAFE DISTANCE from the
work area, especially when the tool is operating. NEVER
allow children or pets near the tool.
6. DO NOT FORCE THE TOOL to do a job for which it was
not designed.
7. DRESS FOR SAFETY. Do not wear loose clothing,
gloves, neckties, or jewelry (rings, watches, etc.) when
operating the tool. Inappropriate clothing and items can
get caught in moving parts and draw you in. ALWAYS
wear non-slip footwear and tie back long hair.
13. NEVER STAND ON A TOOL. Serious injury could
result if the tool tips or is accidentally hit. DO NOT store
anything above or near the tool.
14. DO NOT OVERREACH. Keep proper footing and
balance at all times. Wear oil-resistant rubber-soled
footwear. Keep the oor clear of oil, scrap, and
other debris.
15. WEAR NECESSARY hand and hearing protection.
Wear no-slip heavy duty work gloves and hearing
protection to prevent injury.
16. MAINTAIN TOOLS PROPERLY. ALWAYS keep tools
clean and in good working order. Follow instructions for
lubricating and changing accessories.
17. CHECK FOR DAMAGED PARTS. Check for alignment
of moving parts, jamming, breakage, improper
mounting, or any other conditions that may aect the
tool’s operation. Any part that is damaged should be
properly repaired or replaced before use.
18. DO NOT operate the tool if you are under the inuence
of drugs, alcohol, or medication that may aect your
ability to properly use the tool.
19. USE SAFETY GOGGLES AT ALL TIMES that comply
with ANSI Z87.1. Normal safety glasses only have
impact resistant lenses and are not designed for safety.
Wear a face or dust mask when working in a
dusty environment.
20. Use ear protection such as plugs or mus during
extended periods of operation.
8. WEAR A FACE MASK OR DUST MASK if working in
dusty or dirty conditions.
9. ALWAYS remove the battery from the tool when making
adjustments, changing parts, cleaning, or working on
the tool.
10. AVOID ACCIDENTAL START-UPS. Make sure the
power switch is in the OFF position before inserting
the battery.
11. REMOVE ADJUSTMENT TOOLS. Always make sure
all adjustment tools are removed from the tool before
turning it on.
12. NEVER LEAVE A RUNNING TOOL UNATTENDED.
Turn the power switch OFF. Do not leave the tool until it
has come to a complete stop.
2 WWW.SENIXTOOLS.COM
Page 4

SAFETY
!
!
SPECIFIC RULES FOR HEDGE TRIMMERS
WARNING — Do not let comfort or familiarity with
product (gained from repeated use)
replace strict adherence to product
safety rules. If you use this tool
incorrectly, you can suer serious
personal injury!
1. Keep all parts of the body away from the cutter blade.
Do not remove cut material or hold material to be cut
when blades are moving. Make sure the switch is o
when clearing jammed material. Blades coast after turn
o. A moment of inattention while operating the hedge
trimmer may result in serious personal injury.
2. Carry the hedge trimmer by the handle with the cutter
blade stopped. Proper handling of the hedge trimmer will
reduce possible personal injury from the cutter blades.
WARNING — Keep hands away from blade. Use
both hands when operating the hedge
trimmer. Using one hand could cause
loss of control and result in serious
personal injury.
8. Do not use the machine with children or pets in the
vicinity. Do not use if you’ve ingested drugs, alcohol, or
any medications that may slow your reaction time.
9. Do not use the hedge trimmer if the guards or parts have
been damaged.
10. Always wait until the cutting device has come to a
complete stop before removing the battery from the
hedge trimmer.
11. Remove the battery before transporting the unit or
performing any kind of maintenance. Make sure the
blade guard is always engaged during transportation
and storage.
12. Make sure the tool is o before inserting the battery.
13. Check for foreign objects in the hedges such as wire
fences before operation.
3. Hold the hedge trimmer by insulated gripping surfaces
only, because the cutter blade may contact hidden
wiring. Cutter blades contacting a “live” wire may make
exposed metal parts of the power tool “live” and could
give the operator an electric shock.
4. When using the hedge trimmer, always use caution and
stand in a rm, well-balanced position. Avoid working on
wet and slippery ground or uneven terrain.
5. Never run with the hedge trimmer. Keep your eyes open,
paying full attention to your surroundings.
6. Do not use the hedge trimmer if you are unable to hold
it with both hands. Do not overreach in an attempt to
get hard-to-reach branches. Always hold the trimmer
properly with two hands during operation.
7. Never allow children to operate the hedge trimmer. Make
sure anyone that operates the hedge trimmer has fully
read and understood these instructions.
3WWW.SENIXTOOLS.COM
Page 5
COMPONENT LOCATION
6
7
5
COMPONENT LOCATION
KNOW YOUR HEDGE TRIMMER
1
4
3
2
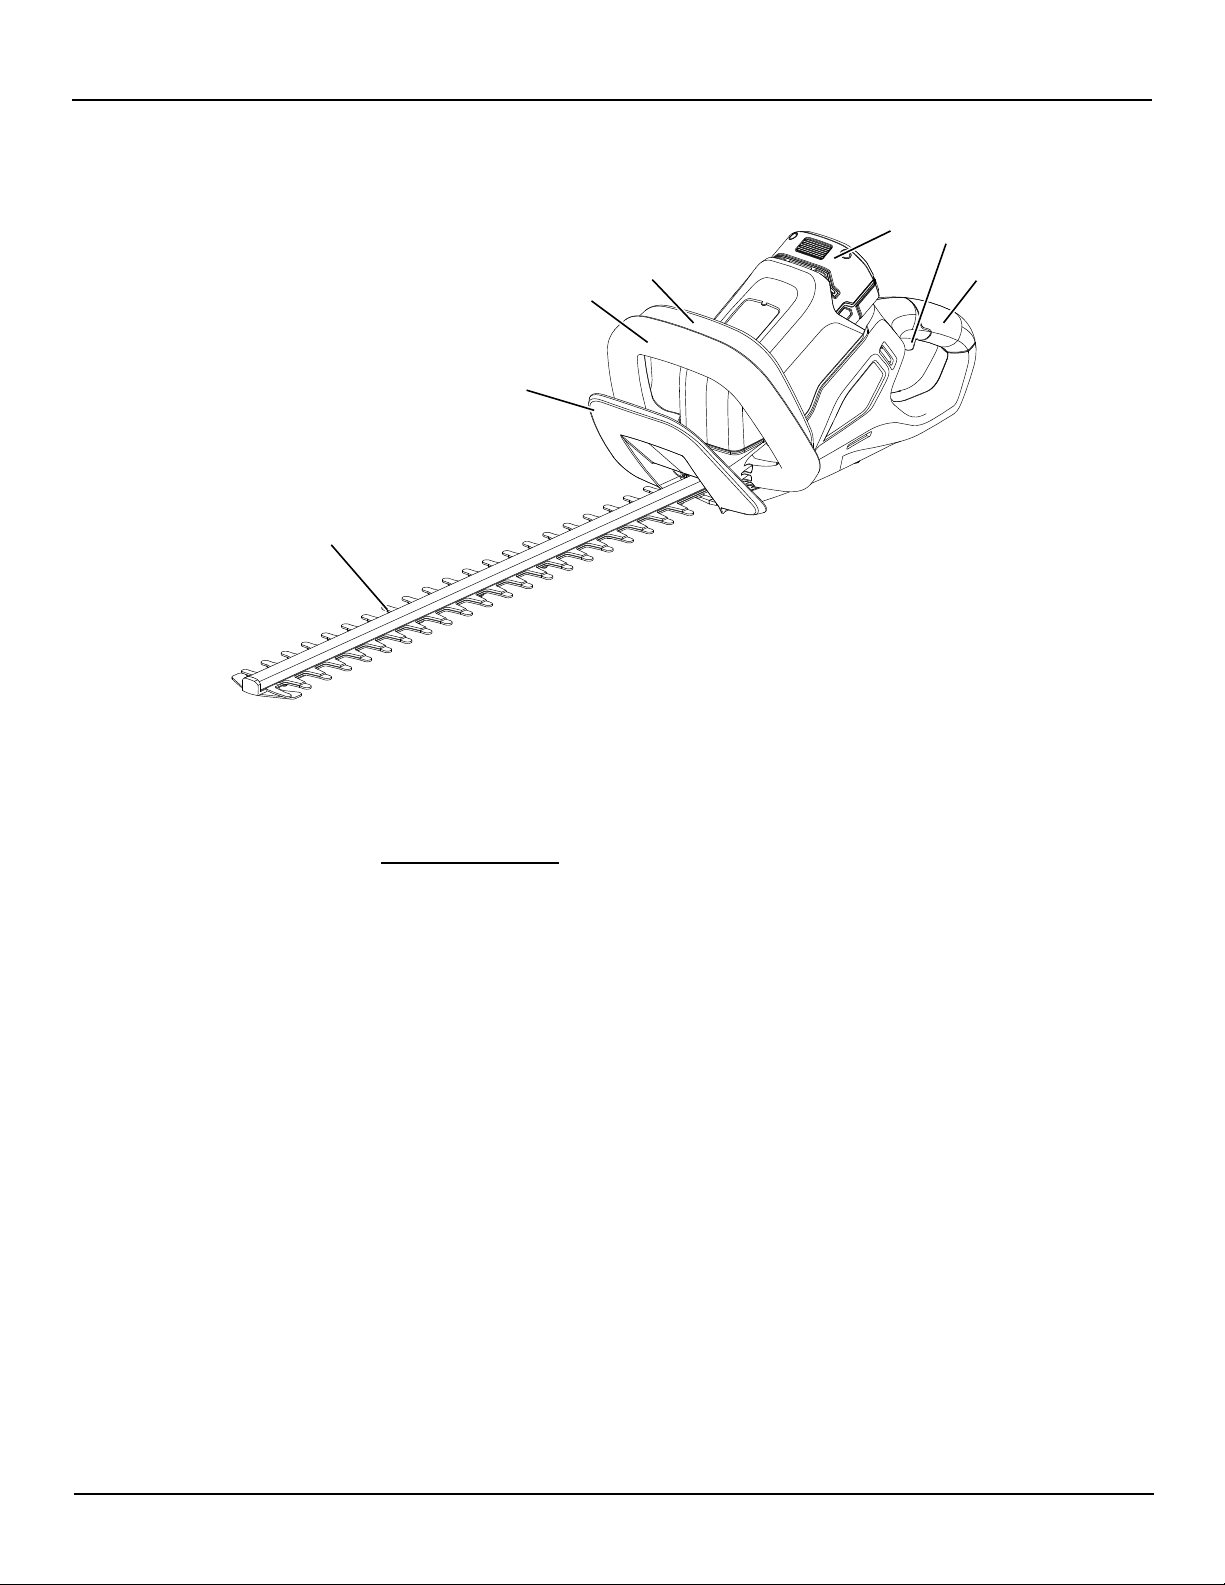
1 — Blade
2 — Front Guard
3 — Front Handle
4 — Safety Switch
1 Battery sold separately
5 — Battery
1
6 — Trigger
7 — Rear Handle
8 — Blade Guard (Not pictured)
4 WWW.SENIXTOOLS.COM
Page 6

OPERATION
!
!
OPERATION
ATTACH /REMOVE THE BATTERY
CAUTION: Only use a Senix-approved battery
and charger.
Note: The battery is not fully charged at the time of
purchase. Charge it fully before using it for the
rst time.
To insert the battery, slide it into the back of the unit until a
“click” is heard. Make sure the battery is fully inserted and
latched into position.
To remove the battery, press the release button and slide
the battery out.
WARNING — Do not insert or remove the battery while
the trigger is pressed or while the unit is
in motion.
PREPARING THE HEDGE TRIMMER
Before starting the hedge trimmer, check that the trigger
switches and safety switches are moving freely, returning
automatically and quickly upon release. Also check that the
cooling air vents are not obstructed and that both the front
and rear handles are clean and dry.
TRIMMING HEDGES
A hedge trimmer is primarily used to cut hedges, but can
also be used on shrubs and bushes as well. For the best
results, angle the blade of the hedge trimmer 15° from the
targeted hedge.
A string or tie can be used as a guideline in order to create
a level hedge. Position the string at the preferred height
and cut everything that protrudes past it.
The unit can be used in either direction. Use a sweeping
motion back and forth for even cuts. Avoid cutting limbs
and branches larger than 2/3 of an inch.
Do not force the hedge trimmer through heavy shrubbery.
If the blades become jammed, immediately release the
trigger and remove the battery pack.
Always be careful of ying debris during operation. Wear
gloves when trimming thorny or prickly foliage.
STARTING THE HEDGE TRIMMER
The hedge trimmer is equipped with a two-handed safety
switch. In order to power the machine on, you must press
both the front handle’s safety switch and the rear handle’s
trigger switch simultaneously. Always hold the hedge
trimmer with both hands during operation.
5WWW.SENIXTOOLS.COM
Page 7

MAINTENANCE
!
!
MAINTENANCE
WARNING — Remove the battery before inspecting,
adjusting, performing maintenance, or
cleaning the unit.
CLEANING
Keep all safety devices, air vents, and motor housing free
of debris and dirt.
Wipe o the housing and the plastic components using a
moist, soft cloth. Do not use strong solvents or detergents
on the plastic housing or plastic components. Certain
household cleaners may cause damage or cause a shock
hazard.
CARBON BRUSHES
The carbon brushes need to be replaced by a
qualied service technician. Do not attempt to replace
them yourself.
LUBRICATION
For a long lifespan, make sure that the cutters are cleaned
and lubricated at regular intervals in order to ensure the
best possible performance. Routinely apply a thin lm of
lubricating oil.
STORAGE
Examine the unit thoroughly for worn, loose or damaged
parts. If you need to repair or replace a part, contact Senix
customer service at 1-800-261-3981.
• Clean the unit before storing or transporting. Be sure to
secure the unit while transporting.
• Remove the battery from before storing.
WARNING — Shorting the battery terminals together
may cause burns or a re.
• When battery pack is not in use, keep it away from other
metal objects like paper clips, coins, keys, nails, screws,
or other small metal objects that can make a connection
from one terminal to another.
• Store the unit in a clean, dry place. Cover it in order to
provide added protection.
SHARPENING THE BLADES
Remove the battery then clamp the blade assembly into
a vise. Make sure the main body of the hedge trimmer is
adequately supported to avoid damage.
File down the exposed cutting surface of each blade with
an 8 inch smooth round le with a diameter of 1/4 to 7/32 of
an inch. Make sure to retain the original angle of the cutter
teeth when ling.
In order to le both sides of each cutter tooth, you may
need to momentarily run the hedge trimmer until the
opposing side of the cutter teeth are exposed.
Do not run the hedge while it is locked into the vise. Make
sure all tools for sharpening have been removed before
installing the battery. Remove the battery pack and repeat
the sharpening process for the newly exposed teeth.
6 WWW.SENIXTOOLS.COM
Page 8
PARTS
EXPLODED VIEW
PARTS
7WWW.SENIXTOOLS.COM
Page 9
PARTS
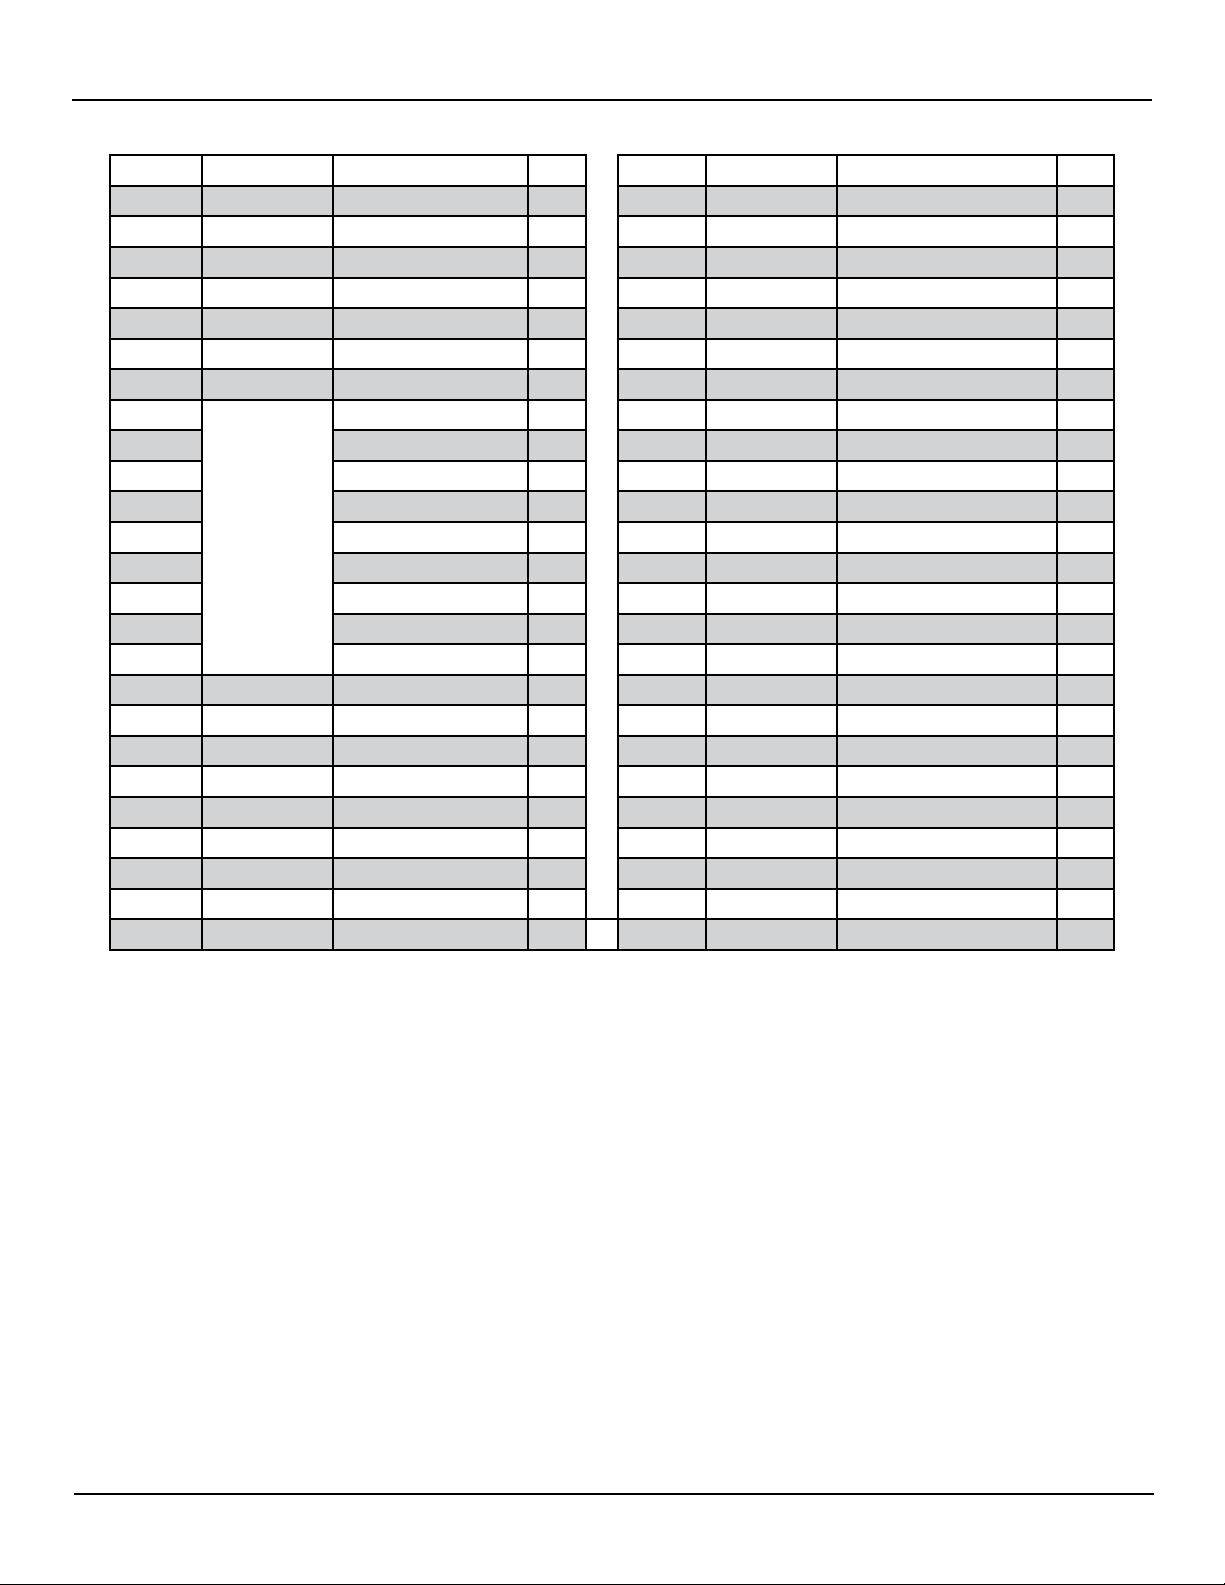
No.
9.1
9.2 Left Plate
9.3 Right Plate
9.4 Front Handle
9.5 Spring
9.6 Handle Support
9.7 Hand Guard
9.8 Screws
10 Switch
11 Insulator
12 Screw
13 Gear Box Assembly
13.1 Motor Assembly
13.1.1 Stator/Rotor
13.1.2 Motor Gear
13.2 Hex Nuts
13.3 Gear Box
Part # Description Qty. No. Part # Description Qty.
1 Battery Housing
2 Switch
3
Switch Spring 2
4 Trigger
5 PCB Board
6 PCB Guard
7 Battery Spring
8 Left Housing
9 Handle Assembly
Countersunk Screws 4
1
1
1
1
1
1
1
1
1
1
1
1
1
1
2
1
2
2
1
1
1
1
2
1
For replacement parts, email: [email protected].
13.4 Screw
13.5 626 Bearing
13.6 Spindle Bushing
13.7 Gear
13.8 Output Shaft
13.9 608Z Bearing
13.10 Output Shaft Assembly
13.10.1 Output Shaft
13.10.2 Drive Gear
13.10.3
Wobbler 2
13.10.4 Blade Assembly
13.10.5 Blade Spacer
13.10.6 Base Plate
13.10.7 Pin
13.11 Bushing
13.12 607 Bearing
13.13 End Cover
13.14 Screw
14 Guide Bar Sheath
15 Battery Latch
16 Insulator
17 Screw
18 Right Housing
19 Screws
20 Battery
21 Charger
2
1
1
1
1
2
1
1
1
1
1
1
2
1
1
1
4
1
1
2
2
1
15
1
1
8 WWW.SENIXTOOLS.COM
Page 10

WARRANTY
LIMITED TWO-YEAR WARRANTY
WARRANTY
9WWW.SENIXTOOLS.COM
 Loading...