

Page 1
VB7880 Advanced Content Extractor
User’s Manual
Form 8124B
Software version 5.2
VB7880 Advanced Content Extractor User’s Manual version 5.2
c
2016
Sencore
3200 W. Sencore Drive - Sioux Falls, SD, 57107
Phone: +1.605.978.4600 - www.sencore.com
Page 2

Copyright
c
2016 Sencore, Inc. All rights reserved.
3200 Sencore Drive, Sioux Falls, SD USA
www.sencore.com
This publication contains confidential, proprietary, and trade secret information. No part of this document
may be copied, photocopied, reproduced, translated, or reduced to any machine-readable or electronic
format without prior written permission from Sencore. Information in this document is subject to change
without notice and Sencore Inc. assumes no responsibility or liability for any errors or inaccuracies.
Sencore, Sencore Inc, and the Sencore logo are trademarks or registered trademarks in the United
States and other countries. All other products or services mentioned in this document are identified by
the trademarks, service marks, or product names as designated by the companies who market those
products. Inquiries should be made directly to those companies. This document may also have links to
third-party web pages that are beyond the control of Sencore. The presence of such links does not imply
that Sencore endorses or recommends the content on those pages. Sencore acknowledges the use of
third-party open source software and licenses in some Sencore products. This freely available source
code can be obtained by contacting Sencore Inc.
About Sencore
Sencore is an engineering leader in the development of high-quality signal transmission solutions for the
broadcast, cable, satellite, IPTV, and telecommunications markets. The company’s world-class portfolio
includes video delivery products, system monitoring and analysis solutions, and test and measurement
equipment, all designed to support system interoperability and backed by best-in-class customer support.
Sencore products meet the rapidly changing needs of modern media by ensuring the efficient delivery
of high-quality video from the source to the home. More information about Sencore is available at the
company’s website, www.sencore.com.
All trademarks and registered trademarks mentioned herein are the property of their respective owners.
2 VB7880 Advanced Content Extractor User’s Manual version 5.2
Page 3

Contents
Contents 3
1 INTRODUCTION 6
1.1 About the VB7880 Advanced Content Extractor . . . . . . . . . . . . . . . . . . . . . . 6
1.2 How to Use This Manual . . . . . . . . . . . . . . . . . . . . . . . . . . . . . . . . . . . 7
2 INSTALLATION AND INITIAL SETUP 8
2.1 System Requirements . . . . . . . . . . . . . . . . . . . . . . . . . . . . . . . . . . . . 8
2.2 First-time Installation . . . . . . . . . . . . . . . . . . . . . . . . . . . . . . . . . . . . . 8
2.3 Deploying in a Virtualized Environment . . . . . . . . . . . . . . . . . . . . . . . . . . . 9
2.4 Verifying Correct Initial Setup and Software Activation . . . . . . . . . . . . . . . . . . . 10
2.5 Initial Setup Troubleshooting . . . . . . . . . . . . . . . . . . . . . . . . . . . . . . . . . 12
2.6 Upgrading From a Previous Version . . . . . . . . . . . . . . . . . . . . . . . . . . . . . 12
2.6.1 Upgrading by Re-Installing the System . . . . . . . . . . . . . . . . . . . . . . . 13
2.6.2 Upgrading From Version 5.0.0 . . . . . . . . . . . . . . . . . . . . . . . . . . . 13
2.6.3 Upgrading From Version 5.1.0 . . . . . . . . . . . . . . . . . . . . . . . . . . . 14
2.7 Upgrading To a Maintenance Release . . . . . . . . . . . . . . . . . . . . . . . . . . . 14
2.8 Accessing the User Interface . . . . . . . . . . . . . . . . . . . . . . . . . . . . . . . . 14
3 QUICK SETUP GUIDE 16
3.1 Basic Setup . . . . . . . . . . . . . . . . . . . . . . . . . . . . . . . . . . . . . . . . . . 16
3.2 Input Signal Definitions . . . . . . . . . . . . . . . . . . . . . . . . . . . . . . . . . . . 16
3.3 Monitoring . . . . . . . . . . . . . . . . . . . . . . . . . . . . . . . . . . . . . . . . . . 16
3.4 Adjusting Alarm Thresholds . . . . . . . . . . . . . . . . . . . . . . . . . . . . . . . . . 17
3.5 License . . . . . . . . . . . . . . . . . . . . . . . . . . . . . . . . . . . . . . . . . . . . 17
4 REMOTE VIDEO WALL 18
4.1 Introduction to the Remote Video Wall . . . . . . . . . . . . . . . . . . . . . . . . . . . 18
4.2 Accessing the Remote Video Wall . . . . . . . . . . . . . . . . . . . . . . . . . . . . . 19
4.3 Remote Video Wall Widgets . . . . . . . . . . . . . . . . . . . . . . . . . . . . . . . . . 19
4.3.1 Alarm View . . . . . . . . . . . . . . . . . . . . . . . . . . . . . . . . . . . . . 20
4.3.2 Clock . . . . . . . . . . . . . . . . . . . . . . . . . . . . . . . . . . . . . . . . . 20
4.3.3 Constellation Diagram (requires VBC integration) . . . . . . . . . . . . . . . . . 20
4.3.4 DataMiner Alarms (requires DataMiner integration) . . . . . . . . . . . . . . . . 20
4.3.5 DataMiner View (requires DataMiner integration) . . . . . . . . . . . . . . . . . 20
VB7880 Advanced Content Extractor User’s Manual version 5.2 3
Page 4

4.3.6 Graphics View (requires VBC integration) . . . . . . . . . . . . . . . . . . . . . 20
4.3.7 Image Viewer . . . . . . . . . . . . . . . . . . . . . . . . . . . . . . . . . . . . 21
4.3.8 Loudness Graph . . . . . . . . . . . . . . . . . . . . . . . . . . . . . . . . . . 21
4.3.9 Media Window (requires VBC integration) . . . . . . . . . . . . . . . . . . . . . 21
4.3.10 RF Graphs (requires VBC integration) . . . . . . . . . . . . . . . . . . . . . . . 21
4.3.11 Stream View (requires VBC integration) . . . . . . . . . . . . . . . . . . . . . . 21
4.3.12 Weather (requires Internet access) . . . . . . . . . . . . . . . . . . . . . . . . . 21
5 THE VB7880 GRAPHICAL USER INTERFACE 22
5.1 Main . . . . . . . . . . . . . . . . . . . . . . . . . . . . . . . . . . . . . . . . . . . . . 24
5.1.1 Main — Summary . . . . . . . . . . . . . . . . . . . . . . . . . . . . . . . . . . 24
5.1.2 Main — Thumb overview . . . . . . . . . . . . . . . . . . . . . . . . . . . . . . 25
5.2 Alarms . . . . . . . . . . . . . . . . . . . . . . . . . . . . . . . . . . . . . . . . . . . . 27
5.2.1 Alarms — All alarms . . . . . . . . . . . . . . . . . . . . . . . . . . . . . . . . 28
5.2.2 Alarms — Alarm setup . . . . . . . . . . . . . . . . . . . . . . . . . . . . . . . 29
5.3 OTT . . . . . . . . . . . . . . . . . . . . . . . . . . . . . . . . . . . . . . . . . . . . . . 33
5.3.1 OTT — Thumbnails (OTT — Active Testing, option) . . . . . . . . . . . . . . . . 33
5.3.2 OTT — Details . . . . . . . . . . . . . . . . . . . . . . . . . . . . . . . . . . . 35
5.3.2.1 OTT — Details — Profiles . . . . . . . . . . . . . . . . . . . . . . . . 35
5.3.2.2 OTT — Details — Manifest (Option) . . . . . . . . . . . . . . . . . . 37
5.3.2.3 OTT — Details — Alarms . . . . . . . . . . . . . . . . . . . . . . . . 39
5.3.2.4 OTT — Details — Thumbnails . . . . . . . . . . . . . . . . . . . . . 40
5.3.2.5 OTT — Details — Alignment . . . . . . . . . . . . . . . . . . . . . . 42
5.3.3 OTT — Channels . . . . . . . . . . . . . . . . . . . . . . . . . . . . . . . . . . 43
5.3.4 OTT — Settings . . . . . . . . . . . . . . . . . . . . . . . . . . . . . . . . . . . 44
5.3.5 OTT — Thresholds . . . . . . . . . . . . . . . . . . . . . . . . . . . . . . . . . 45
5.4 Multicasts . . . . . . . . . . . . . . . . . . . . . . . . . . . . . . . . . . . . . . . . . . . 48
5.4.1 Multicasts — Thumbnails . . . . . . . . . . . . . . . . . . . . . . . . . . . . . . 48
5.4.2 Multicasts — Join . . . . . . . . . . . . . . . . . . . . . . . . . . . . . . . . . . 54
5.4.3 Multicasts — Streams . . . . . . . . . . . . . . . . . . . . . . . . . . . . . . . . 55
5.4.4 Multicasts — Ethernet thresh. . . . . . . . . . . . . . . . . . . . . . . . . . . . 57
5.4.5 Multicasts — Service thresh. . . . . . . . . . . . . . . . . . . . . . . . . . . . . 61
5.5 Captions (Option) . . . . . . . . . . . . . . . . . . . . . . . . . . . . . . . . . . . . . . 65
5.5.1 Captions — Services . . . . . . . . . . . . . . . . . . . . . . . . . . . . . . . . 65
5.5.2 Captions — Caption service . . . . . . . . . . . . . . . . . . . . . . . . . . . . 65
5.5.2.1 Captions — Caption service — Captions . . . . . . . . . . . . . . . . 66
5.5.2.2 Captions — Caption service — Alarms . . . . . . . . . . . . . . . . . 67
5.5.3 Captions — Thresholds . . . . . . . . . . . . . . . . . . . . . . . . . . . . . . . 67
5.6 RVW . . . . . . . . . . . . . . . . . . . . . . . . . . . . . . . . . . . . . . . . . . . . . 69
5.6.1 RVW — Setup . . . . . . . . . . . . . . . . . . . . . . . . . . . . . . . . . . . . 69
5.6.2 RVW — Mosaic A–D . . . . . . . . . . . . . . . . . . . . . . . . . . . . . . . . 70
5.7 Setup . . . . . . . . . . . . . . . . . . . . . . . . . . . . . . . . . . . . . . . . . . . . . 73
5.7.1 Setup — Params . . . . . . . . . . . . . . . . . . . . . . . . . . . . . . . . . . 73
5.7.2 Setup — Colors . . . . . . . . . . . . . . . . . . . . . . . . . . . . . . . . . . . 75
5.7.3 Setup — Ethernet . . . . . . . . . . . . . . . . . . . . . . . . . . . . . . . . . . 76
4 VB7880 Advanced Content Extractor User’s Manual version 5.2
Page 5

5.7.4 Setup — VBC . . . . . . . . . . . . . . . . . . . . . . . . . . . . . . . . . . . . 76
5.7.5 Setup — Login . . . . . . . . . . . . . . . . . . . . . . . . . . . . . . . . . . . 77
5.7.6 Setup — VBC thresh. . . . . . . . . . . . . . . . . . . . . . . . . . . . . . . . . 78
5.7.7 Setup — Scheduling . . . . . . . . . . . . . . . . . . . . . . . . . . . . . . . . 79
5.7.8 Setup — Security . . . . . . . . . . . . . . . . . . . . . . . . . . . . . . . . . . 81
5.8 Data . . . . . . . . . . . . . . . . . . . . . . . . . . . . . . . . . . . . . . . . . . . . . . 82
5.8.1 Data — Configuration . . . . . . . . . . . . . . . . . . . . . . . . . . . . . . . . 82
5.8.2 Data — Software . . . . . . . . . . . . . . . . . . . . . . . . . . . . . . . . . . 83
5.8.3 Data — Eii . . . . . . . . . . . . . . . . . . . . . . . . . . . . . . . . . . . . . . 83
5.9 About . . . . . . . . . . . . . . . . . . . . . . . . . . . . . . . . . . . . . . . . . . . . . 85
5.9.1 About — Release info . . . . . . . . . . . . . . . . . . . . . . . . . . . . . . . . 85
5.9.2 About — License . . . . . . . . . . . . . . . . . . . . . . . . . . . . . . . . . . 85
5.9.3 About — Technologies . . . . . . . . . . . . . . . . . . . . . . . . . . . . . . . 86
5.9.4 About — Credits . . . . . . . . . . . . . . . . . . . . . . . . . . . . . . . . . . . 87
A Appendix: Network configuration 88
B Appendix: OTT Profile Health 89
B.1 OTT Profile Health Bar . . . . . . . . . . . . . . . . . . . . . . . . . . . . . . . . . . . . 89
B.2 OTT Profile Health Timeline . . . . . . . . . . . . . . . . . . . . . . . . . . . . . . . . . 90
Build ID 9345e02e7e51ebaf5e2a0f6e8e545ba6d22f1e1f
Last modified 2016-02-03
VB7880 Advanced Content Extractor User’s Manual version 5.2 5
Page 6
1 INTRODUCTION
1.1 About the VB7880 Advanced Content Extractor
The VB7880 Advanced Content Extractor performs real-time loudness monitoring as well as objective
video and audio monitoring of MPEG-2, H.264/MPEG-4 and H.265/HEVC streams and offers a unique
web browser based Remote Video Wall capability providing full visual status from anywhere. The VB7880
Advanced Content Extractor enables operators to inspect massive amounts of content services beyond
human eyeball capability with dependable alarming on objective parameters having QoE impact.
In addition to providing automated Objective QoE of large amounts of services, the VB7880 offers
thumbnail and metadata extraction for up to 100 streams (TV multicast streams or OTT) concurrently,
depending on the license. The VB7880 with its RVW (Remote Video Wall) capability is ideal for visual
at-a-glance monitoring in the NOC, VOC, head-end or remotely via any standard web browser.
The VB7880 Advanced Content Extractor is typically inserted before scrambling insertion in the head-end
and the extracted metadata and decoded imagery is fed to the VideoBRIDGE Controller. Disruption of
descrambling services is one of the main causes for service production disruptions in the head-end, and
for the first time cost-effective monitoring of scrambling is available.
6 VB7880 Advanced Content Extractor User’s Manual version 5.2
Page 7

Further applications are in middleware scenarios for generating channel mosaics or for extracting channel
metadata such as picture resolution, video bandwidth or wide screen signaling information. Each VB7880
Advanced Content Extractor runs an HTTP server with the client as a web browser, so there is no need
to install custom software on computers needing access to the measurement data.
The VB7880 is designed to raise an alarm for descrambling failures at the head-end, before ingress
into the network. The VB7880 can also detect freeze-frame errors and audio silence. Alarming can be
masked during predefined time periods. The VB7880 enables at-a-glance monitoring remotely via any
standard web browser and it will also work with the VideoBRIDGE Controller.
The VB7880 Advanced Content Extractor is a server appliance, that can be installed onto any
server that meets the minimum requirements specified in chapter 2.
1.2 How to Use This Manual
This User’s Manual is valid for software version 5.2 of the VB7880 Advanced Content Extractor.
Throughout this manual the term stream is often used rather than unicast or multicast. One stream may
consist of one or more services, and refers to one IP uni- or multicast.
Chapter 2 INSTALLATION AND INITIAL SETUP explains how to install the software on a server.
Chapter 3 QUICK SETUP GUIDE contains a quick setup guide; a step-by-step description of how to
setup the VB7880 Advanced Content Extractor once the initial setup has been performed.
Chapter 4 REMOTE VIDEO WALL describes the Remote Video Wall.
Chapter 5 THE VB7880 GRAPHICAL USER INTERFACE describes the graphical user interface (GUI) as
seen when pointing a web browser to the VB7880 Advanced Content Extractor’s IP address.
A Appendix: Network configuration gives a brief introduction to the server OS network configuration.
B Appendix: OTT Profile Health explains the OTT profile health bar and timeline.
Note that current version of the User’s Manual can be obtained from Sencore ProCare support by
emailing procare@sencore.com.
VB7880 Advanced Content Extractor User’s Manual version 5.2 7
Page 8

2 INSTALLATION AND INITIAL SETUP
2.1 System Requirements
The minimum hardware requirements are:
• Dual 6 core Intel E-Series 2.0 GHz CPU
• 32 Gbyte 1600 MHz DDR RAM
• 1 Tbyte HDD
• Dual 10/100/1000T Ethernet Network Interface card with support for Red Hat Enterprise Linux 7
2.2 First-time Installation
Make sure that the server hardware matches the requirements listed above and then follow the procedure
outlined below.
1. Obtain the latest installation kickstart image from Sencore.
2. Insert the installation medium into the server:
•
For CD/DVD-based installations, burn the downloaded ISO image to a CD/DVD and insert
into the server.
•
For USB-based installation, transfer the downloaded image to a USB mass storage device
using a tool such as dd (Mac, Unix, Linux) or USBWriter1(Windows).
•
For installation in a virtualized environment, attach the downloaded ISO image to a virtual
DVD-ROM unit.
It is recommended that you disable any ‘Easy install’ or similarly worded option, and do not
select the operating system type when you initially create the new virtual machine instance
in your virtualization environment. These options may override the installation instructions
included in the provided installation image, causing an incomplete installation.
1
http://sourceforge.net/projects/usbwriter/
8 VB7880 Advanced Content Extractor User’s Manual version 5.2
Page 9

3.
Boot the server and make sure that the primary boot device is set appropriately. If the system fails
to boot from the medium, you may need to configure the boot loader for ‘legacy BIOS mode’.
4.
The installer will run, please follow the on-screen prompts to install the system, taking note of the
following:
• IMPORTANT: Leave ‘Software selection’ at ‘Custom software selected’.
• IMPORTANT:
In the ‘Installation Destination’, the default partitioning will create a large
/home
partition, which is unused. To avoid this, use the ‘I will configure partitioning’ option. Then
use the ‘Click here to create them automatically’ and manually reduce the size of (or remove)
the /home partition, instead giving that space to the / partition.
•
We recommend that you configure network settings (IP address, gateway, DNS) within the
installer. Post-installation network configuration can be performed using the
nmtui
utility,
please refer to A Appendix: Network configuration for details.
•
The default installation does not provide any graphical user interface environment. This can
be installed later if desired, please refer to the Red Hat Enterprise Linux2or CentOS Linux
documentation for more details.
5.
At the end of the installation procedure, the server is rebooted. Remove the installation media and
ensure that the system boots up properly.
6.
Enter the selected IP address in your web browser to access the Software Activation page. If your
host is using dynamic addressing, you can log in to the account created during installation and
issue the command ip addr to display the address assigned to the system.
Continue to chapter 2.4 for details on how to enable the VB7880 Advanced Content Extractor
system.
The kickstart will install Red Hat Enterprise Linux 7 or CentOS 7 on the server. The disks will be
formatted and all contents lost. Make sure that any important data on the server has been backed
up before beginning the procedure.
3
2.3 Deploying in a Virtualized Environment
It is also possible to deploy the software in a virtualized environment. Pre-built images for VMware
(vSphere/Workstation/Player) are provided in
images contains a system already installed according to the steps described in the previous chapter,
with VMware Tools already installed and activated.
To deploy the image, you need to import it to the virtualization host, please refer to the documentation of
your virtualization environment for more details on how to do this.
2
https://access.redhat.com/documentation/en-US/Red_Hat_Enterprise_Linux/7/index.html
3
http://wiki.centos.org/Manuals/ReleaseNotes/CentOS7
VB7880 Advanced Content Extractor User’s Manual version 5.2 9
OVA
(Open Virtualization Format Archive) format. These
Page 10

If installed in a VMware vSphere environment, the machine should report back its network configuration
to the host environment. Please allow some time for it to do so, and then continue with the Software
Activation procedure as described in the next chapter.
If you need to log in to the console of the pre-built images, the default password for the
When installing the software in the virtualized environment yourself, please follow the steps from chapter 2.2. It is recommended that you disable any ‘Easy install’ or similarly worded option, and do not select
the operating system type when you initially create the new virtual machine instance in your virtualization
environment. These options may override the installation instructions included in the provided installation
image, causing an incomplete installation.
root
user is
elvis
2.4 Verifying Correct Initial Setup and Software Activation
Once the software has been installed and restarted all further configuration takes place through HTTP.
1. Launch a web browser application on the management system.
Any web browser with support for JavaScript can be used to access the Software Activation
interface, one of the following are recommended:
• Edge
• Internet Explorer 11.0 or higher
• Firefox 2.0 or higher
.
• Chrome
• Safari
2. Type the IP address of the server in the browser URL field and press Enter .
The network settings should have been set when the operating system was installed. If the web
browser is unable to reach the web server, check the server’s network settings in the operating
system.
3.
The Software Activation view should be displayed inside the browser. Software Activation is
password-protected, the user name is admin and the default password is elvis.
This password can be changed under the More options heading4.
The page displayed should look similar to the following screen shot.
4
If you forget the Software Activation password, you can reset it by logging in as root and issuing the command
/opt/btech/ssg/bin/reset_web_password
10 VB7880 Advanced Content Extractor User’s Manual version 5.2
Page 11

4.
If you already have an XML file with license keys for your system, click on the
heading and upload this file under the
down or in an e-mail, instead use the product page described below.
5.
If this is a new server, and you need to obtain license keys for the purchased products, please
click the link labelled
representative as an e-mail attachment.
6.
The VB7880 Advanced Content Extractor is not enabled by default on the newly installed server.
To enable it, use the link labelled
giving you the details of the installed software, such as the installed version and the hardware key.
If you have a license key that you want to enable and have not yet done so, enter the key in the
field labelled Apply license key and click the Add license button.
7.
Click the button labeled
Advanced Content Extractor should now be activated, and you will be presented with a link to the
user interface. The next time you access the server using a web browser, you should be taken to
the automatically to the enabled software.
export hardware keys as XML
Activate software
Import license keys
Not activated
next to its name. This will take you to a page
and wait for it to finish. If successful, the VB7880
option. If have the license key written
and send the downloaded file to your sales
More options
VB7880 Advanced Content Extractor User’s Manual version 5.2 11
Page 12

Please note that it may take some additional time before the user interface of the activated product
becomes available. If you receive an error trying to access it, please wait for a few minutes before
trying again.
To return to the Software Activation view to make changes, open the
Advanced Content Extractor user interface and click the link labelled Manage installed software.
About — License
tab in the VB7880
2.5 Initial Setup Troubleshooting
If you are having trouble bringing up the Software Activation interface, or the VB7880 Advanced Content
Extractor web based management interface, verify the following:
•
Verify that the client machine and the VB7880 Advanced Content Extractor are configured on the
same subnet and that they have different addresses.
• Make sure that the IP address of the gateway and the network interface are not the same.
•
Verify that the appropriate Ethernet link indicators of the PC and the VB7880 Advanced Content
Extractor are lit.
• Verify that web browser proxy settings are not interfering.
• Verify that local firewall settings on the PC are not interfering.
• Try rebooting the server and make sure all services start as expected.
• Clear the browser’s cache.
Please refer to A Appendix: Network configuration for more information on server network configuration.
2.6 Upgrading From a Previous Version
You can either re-install the system as mentioned below, or by using one of the provided upgrade images.
If you are running on Red Hat Enterprise Linux 7 beta, upgrades are not supported, and you must
re-install the system.
12 VB7880 Advanced Content Extractor User’s Manual version 5.2
Page 13

2.6.1 Upgrading by Re-Installing the System
If you want to re-install the system from scratch, please follow these steps:
1.
Backup the system configuration (
the system as root and copy the file
running a version prior to 5.2, the file is located at
location (off the system).
2.
Export the current license (
nance keys; 5.1.0 or later) or write down the license key (About — License).
3.
Possibly back up the system network configuration by logging in to the machine and copying any
files matching the wildcard
the system).
4.
If you have uploaded custom images for the Remote Video Wall, make sure you have copies of
these available so that you can re-upload those separately.
5. Re-install the system as described above.
6.
Using the Software Activation page import the previous license key (under
re-enter it using the activation page) and activate the software.
About — License — Export current license and software mainte-
/etc/sysconfig/network-scripts/ifcfg-*
Data — Configuration — Full configuration
/opt/btech/extractor/etc/btech.xmlcfg1e
/opt/btech/etc/btech.xmlcfg1e
to a safe location (off
More options
). Log in to
(if you are
) to a safe
); or
7. Import the configuration from Data — Configuration — Import configuration XML.
If importing the old configuration fails with an error, please follow these steps:
1. Log in to the system as root and issue the command
systemctl stop vb288.ewe
2.
Restore the backup of the file
btech.xmlcfg1e
that you made above as
/opt/btech/extractor/
etc/btech.xmlcfg1e
3. Issue the command
systemctl start vb288.ewe
2.6.2 Upgrading From Version 5.0.0
VB7880 Advanced Content Extractor version 5.2 will be able to upgrade VB7880 version 5.1 only. Other
versions of VB7880 will need to first be upgraded to VB7880 version 5.1.
VB7880 Advanced Content Extractor User’s Manual version 5.2 13
Page 14

2.6.3 Upgrading From Version 5.1.0
This release needs some additional software packages to be installed, and must be upgraded using
the upgrade image labeled
necessary. Please refer to chapter 5.8.2 for details on how to install the upgrade image.
The upgrade will also install the Software Activation interface (please see chapter 2.4 for more information),
with the VB7880 Advanced Content Extractor already activated. Open the
the user interface and click the link labeled
Activation, for instance to replace the default password.
upgrade from 5.1.0
Manage installed software
. The upgrade image will install these packages as
About — License
to make changes to Software
tab in
2.7 Upgrading To a Maintenance Release
Please refer to chapter 5.8.2 for details on how to upgrade to maintenance releases. You need to use the
upgrade image labelled upgrade from 5.2.0 when installing a maintenance release.
2.8 Accessing the User Interface
Once the software has been installed and activated all further configuration takes place through HTTP.
The following web browsers are supported for the management interface:
• Internet Explorer 11.0 or higher
• Edge
• Firefox 2.0 or higher
• Chrome
• Safari
Please note that, for optimum results, Chrome is recommended when displaying the Remote Video Wall.
The default management view should look similar to the following screen shot. If you have problems
accessing the user interface, refer to chapter 2.5 for troubleshooting.
14 VB7880 Advanced Content Extractor User’s Manual version 5.2
Page 15

VB7880 Advanced Content Extractor User’s Manual version 5.2 15
Page 16

3 QUICK SETUP GUIDE
This quick setup guide is intended to provide a step-by-step explanation of how to setup the VB7880
once the initial setup has been performed (as described in chapter 2). More detailed instructions are
found in chapter 5 of this manual.
3.1 Basic Setup
1. Set appropriate parameters in the Setup — Params view.
2.
If access control is required, define a password in the
to read the instructions in the associated section of this manual.
3.2 Input Signal Definitions
Multicasts
Setup — Login
view. Note that it is important
1.
Define multicasts, either by defining multicasts from scratch (
importing a multicast list exported from another VB7880 or probe. Note that the sequence of the
multicast definitions will be reflected in monitoring, so order the multicasts correctly if required.
2. Join multicasts in the Multicasts — Join view.
OTT
1. Define OTT channels (OTT — Channels).
Multicasts — Streams
) or by
3.3 Monitoring
When input signal parameters have been set, the signals may be monitored. For Ethernet multicasts the
relevant monitoring views are: Main, Alarms, Multicasts and RVW. OTT traffic monitoring is displayed
in the OTT — Thumbnails view (OTT — Active testing if the appropriate license is installed).
16 VB7880 Advanced Content Extractor User’s Manual version 5.2
Page 17

3.4 Adjusting Alarm Thresholds
When the VB7880 channels and streams have been defined using default thresholds, the result can
be a number of more or less permanent alarms, some of which may not be relevant under the current
circumstances. In order for the user to get rid of unwanted alarms, the extractor provides alarm filtering
functionality in the form of alarm thresholds and alarm on/off selection.
Multicasts
Creating a new threshold template is done either by copying an existing one and altering the copy, or by
creating a new threshold template from scratch. The Ethernet thresholds are defined in the
— Ethernet thresh.
view. In addition to the miscellaneous thresholds, that affect only the streams with which they are
associated, the Alarm — Alarm setup view allows the user to enable and disable alarms on an overall
basis. It is also possible to define the alarm severity levels for different alarms in this view.
OTT
When a OTT channel is defined the default OTT threshold template is assigned to it. To change threshold
values create one or more new templates in the
channels in the OTT — Channels — Edit view.
View. These thresholds are associated with streams in the
OTT — Thresholds
view and assign them to OTT
Multicasts — Streams
Multicasts
3.5 License
When first activated, the VB7880 comes with a 30-day trial license. To use it beyond this time, a license
key is required. To generate the license code, you will need to provide the hardware key, which can be
found under About — License, or from the Software Activation interface, as described in chapter 2.4.
VB7880 Advanced Content Extractor User’s Manual version 5.2 17
Page 18
4 REMOTE VIDEO WALL
This chapter gives a quick introduction on how to use the Remote Video Wall feature of the VB7880
Advanced Content Extractor.
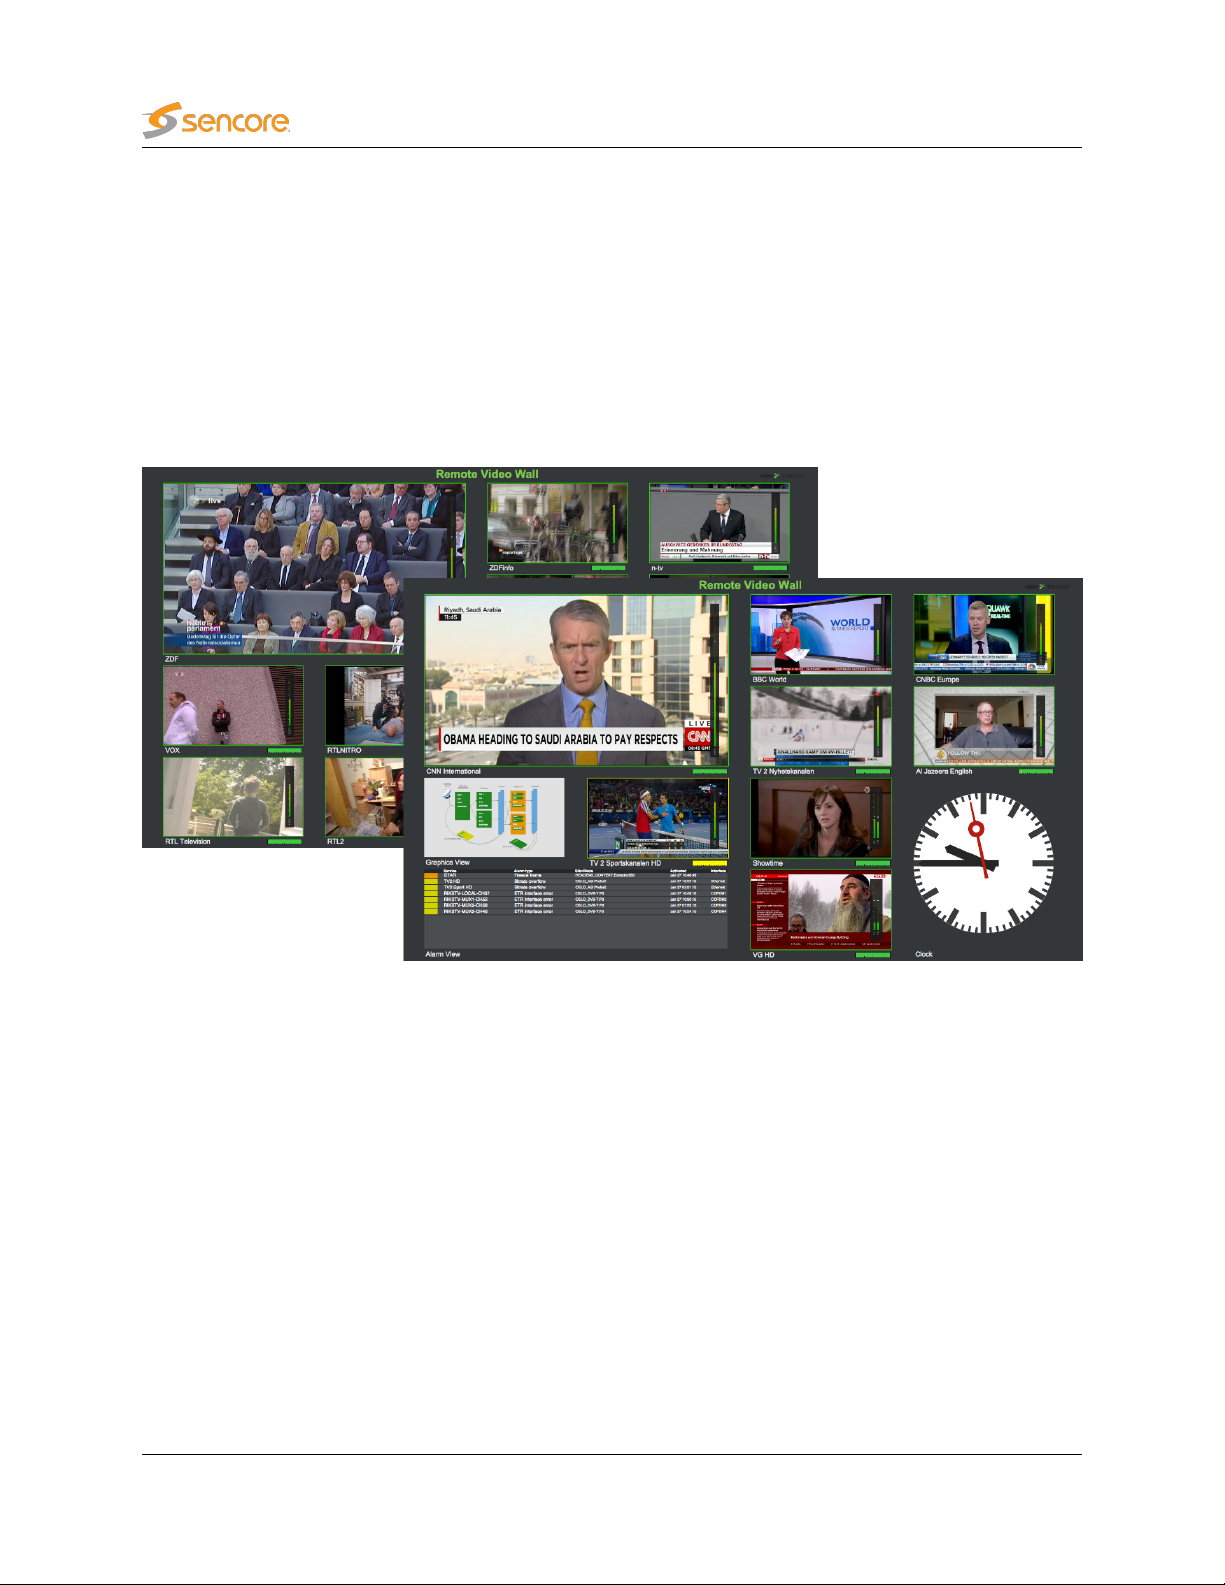
4.1 Introduction to the Remote Video Wall
The VB7880 Advanced Content Extractor gives the opportunity to monitor the content of up to 64
multicast services or live OTT channel profiles spread across four web browser windows. The VB7880
also provides measurements of the audio loudness level according to the ITU-R BS.1770-2 standard.
The measurement used is the EBU R128 momentary (400 ms) value. You can display this data by
selecting LUFS/LKFS in the Remote Video Wall configuration. The raw measurements can be gathered
through the External integration interface (Eii). The specification of the Eii can be obtained from Sencore.
The Remote Video Wall can also be configured to display web-based widgets to convey important
information from within the system. Please see chapter 4.3 below for more information on the available
widgets.
18 VB7880 Advanced Content Extractor User’s Manual version 5.2
Page 19
In addition the VB7880 Advanced Content Extractor can also be integrated with the VideoBRIDGE
Controller enabling Network diagrams and alarm lists right next to crisp mosaics decoded from the
selected streams.
When VBC integration is available, any streams for which the VideoBRIDGE Controller has active alarms
will be shown with a colored border in the RVW. All other streams are displayed with a green border. This
makes it possible to discover stream alarms with just a quick glance. The VBC MicroTimeline is displayed
under all multicast and OTT streams for which the VideoBRIDGE Controller has data. In addition, for
OTT channels, a 24h OTT alarm graph will be displayed, using data from the VideoBRIDGE Controller
connected probes monitoring the same channel (if any).
If VBC integration has not been enabled, the borders will be colorized according to locally generated
alarms, but no MicroTimeline or OTT alarm graph will be displayed.
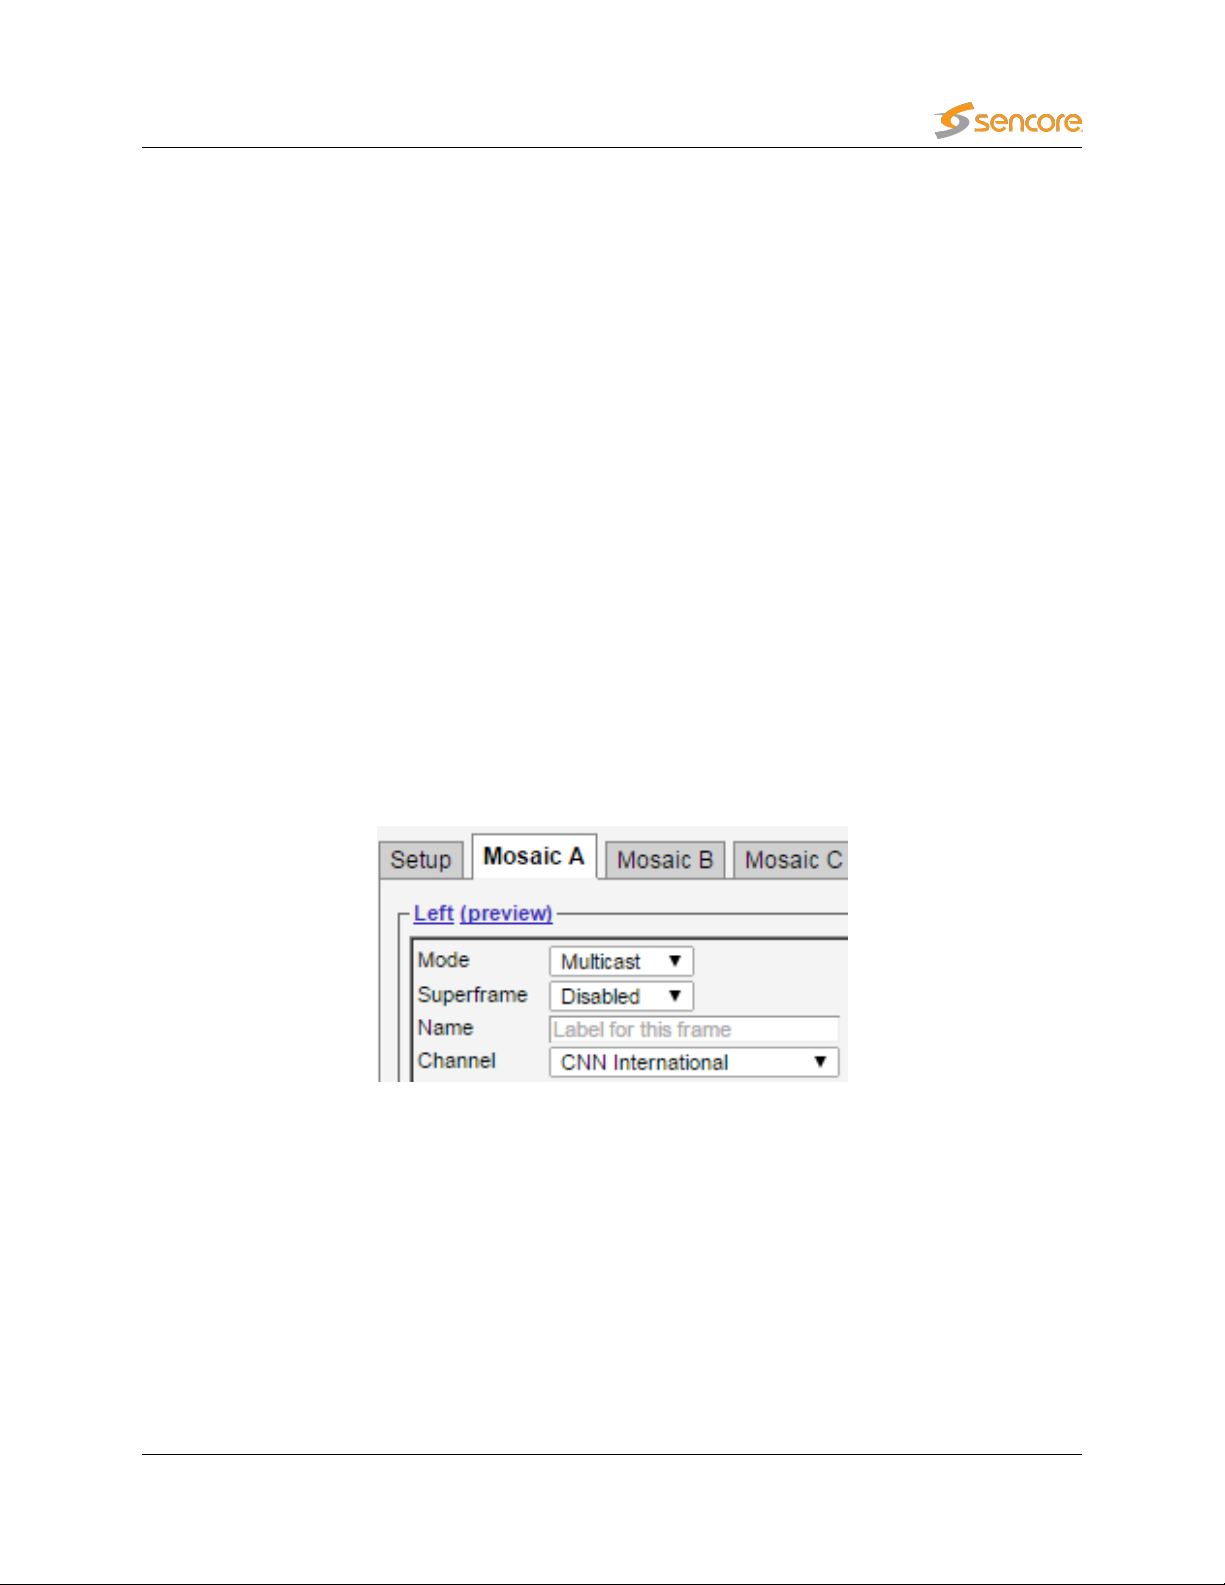
4.2 Accessing the Remote Video Wall
The Remote Video Walls can be reached by entering
m=1,m=2,m=3
described in chapter 5.6.2. The RVWs can also be reached through the management GUI in the section
RVW — Mosaic A–D
renamed Left.
Go to chapter 5.6.2 for details on how to configure the Remote Video Walls.
Google Chrome is recommended for displaying the Remote Video Walls.
and
m=4
selects Mosaic A, B, C and D, respectively, configured under the RVW tab, as
by following the blue link in the upper left corner. In the example below it has been
<IP address>/rvw/?m=1
in a browser’s URL field.
4.3 Remote Video Wall Widgets
In addition to thumbnails, each Remote Video Wall slot can display a web widget. This chapter describes
the Remote Video Wall widgets that are shipped with the VB7880 Advanced Content Extractor.
Some of the widgets requires integration with a VideoBRIDGE Controller server, version 5.1.0 or later.
VB7880 Advanced Content Extractor User’s Manual version 5.2 19
Page 20

4.3.1 Alarm View
This widget makes it possible to display a list of active alarms, either from the VideoBRIDGE Controller
or the VB7880 itself. The alarm source is can be configured for each widget instance. If VBC integration
is disabled, the alarm source is ignored and the local alarms are always displayed.
The Alarm View widget is designed to be two RVW tiles wide and 1–4 tiles tall.
4.3.2 Clock
This widget lets you display the current time on the Remote Video Wall. Several different clock faces are
available, and they can be configured to display either local time (for the system running the browser
displaying the RVW), or a specific time zone.
4.3.3 Constellation Diagram (requires VBC integration)
This widget lets you display the constellation diagram for a specific stream from one of the probes
connected to the VideoBRIDGE Controller. In the configuration you can select any RF interface on
probes available in the VideoBRIDGE Controller.
4.3.4 DataMiner Alarms (requires DataMiner integration)
This widget makes it possible to display the current alarm count from a Skyline DataMiner server. Active
alarms on the server are grouped based on the severity as defined on the DataMiner server and the
numbers are displayed in the RVW.
4.3.5 DataMiner View (requires DataMiner integration)
This widget lets you display a diagram from the Skyline DataMiner inside the RVW. In the configuration
you can select any of the diagrams configured on the DataMiner server that are visible to the user whose
credentials you are logging in with.
4.3.6 Graphics View (requires VBC integration)
This widget lets you display a network diagram from the VBC Graphics View inside the RVW. In the
configuration you can select any of the network diagrams configured in the VBC Graphics View Setup.
20 VB7880 Advanced Content Extractor User’s Manual version 5.2
Page 21

4.3.7 Image Viewer
This widget is a static image viewer, which can be used to easily include external information. In the
configuration, you can select the URL for an image to display and select the update interval.
4.3.8 Loudness Graph
This widget displays a loudness graph for an audio channel of a multicast stream monitored on the
VB7880 Advanced Content Extractor. Real-time audio analysis needs to be enabled for the stream for
the data to be available. Up to two minutes of loudness data is displayed in the graph.
4.3.9 Media Window (requires VBC integration)
This widget lets you display a view of the Media Window for a specific stream from one of the probes
connected to the VideoBRIDGE Controller. In the configuration you can select any multicast stream on
probes available in the VideoBRIDGE Controller.
NOTE: When displaying the media window widget for probes running 5.1.0-5 or earlier, or 5.0.2-4 or
earlier, the threshold colorization does not completely reflect what is seen on the probe.
4.3.10 RF Graphs (requires VBC integration)
This widget displays customizable RF graphs from the VideoBRIDGE Controller. It can be configured to
show RF parameters for any stream that is applicable in the VideoBRIDGE Controller, with a selectable
interval. The parameters that can be displayed are Signal to Noise Ratio (SNR), Modulation Error Ratio
(MER) and Signal Level (SIG).
4.3.11 Stream View (requires VBC integration)
This widget makes it possible to display the VBC MicroTimeline for selected services inside the Remote
Video Wall. The list of streams can be filtered on name and/or current severity level (as defined by the
VideoBRIDGE Controller). The Stream View widget is designed to be one RVW tile wide and 1–4 tiles
tall.
4.3.12 Weather (requires Internet access)
This widget displays a weather forecast for a configurable location for the next 24 hours.
VB7880 Advanced Content Extractor User’s Manual version 5.2 21
Page 22
5 THE VB7880 GRAPHICAL USER INTERFACE
The VB7880 web interface is reached by pointing a web browser to the IP address of the VB7880 as
shown in the screen shot above. Note that different web browsers behave differently with respect to
memory leaking, and if the VB7880 GUI should be available at all times the browser should be selected
22 VB7880 Advanced Content Extractor User’s Manual version 5.2
Page 23

carefully. Memory leak manifests itself as the browser responding more and more slowly, and this is
corrected by closing down the application and restarting.
Web browsers supported are:
• Internet Explorer 9.0 and higher (IE 11 should be run in compatibility mode)
• Firefox 2.0 and higher
• Safari
• Chrome
The interface is easy and intuitive to use. Navigate by clicking on the tabs just below the Content Extractor
logo. Some of the pages have their own tabs for accessing nested pages. The bottom frame of the
interface is always the Alarms & events list, usually referred to as the
displayed or hidden by clicking the Toggle link, which is displayed as an arrow head.
The web interface has been designed to be resizeable in both vertical and horizontal directions with a
minimum screen resolution of 1024×768 pixels.
Tool-tips are available for most buttons and labels. To access tool-tip information simply navigate the
mouse pointer towards a button or a label and leave it hovering for a second or two.
alarm list
. The alarm list can be
In this manual the term stream is generally used instead of the terms multicast and/or a unicast stream.
A stream may thus contain a single service or multiple services.
VB7880 Advanced Content Extractor User’s Manual version 5.2 23
Page 24
5.1 Main
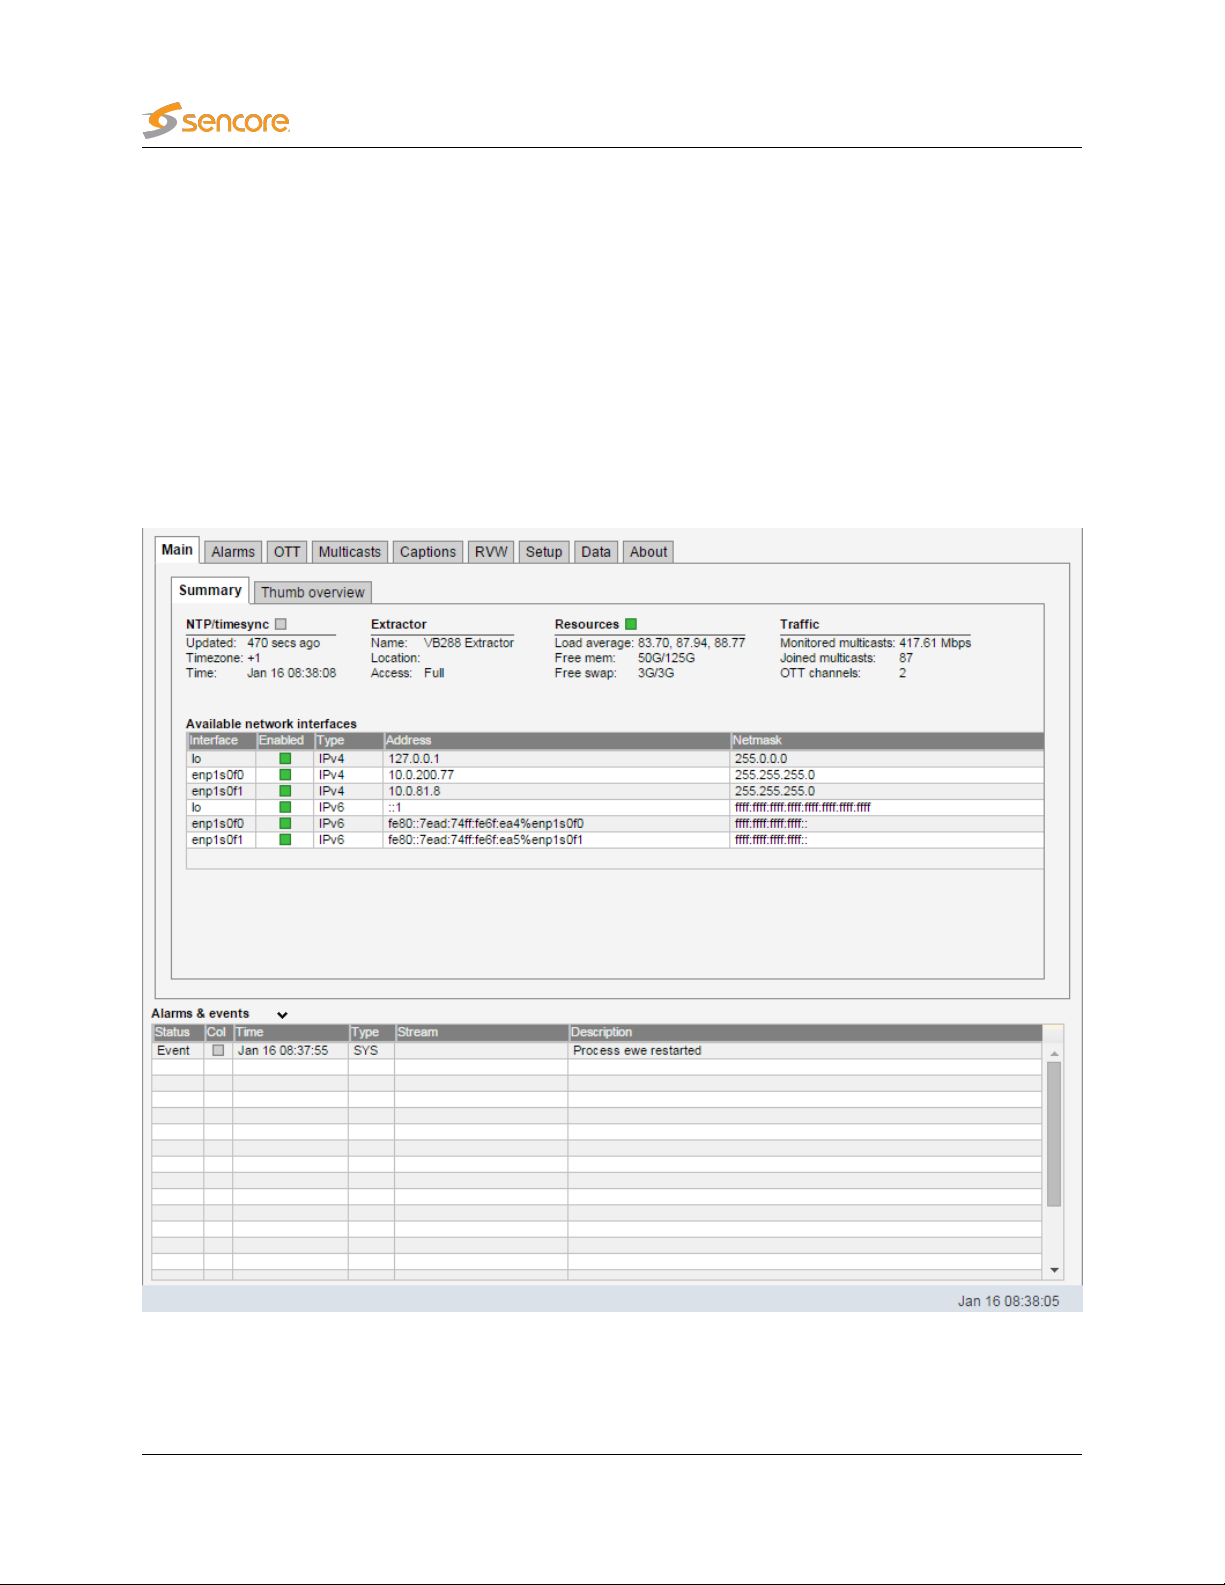
5.1.1 Main — Summary
The intention of this page, together with the
to immediately see if there is anything seriously wrong with one or more input streams.
The following parameters are shown:
(Bulb):
Updated: The time since the last time synchronization update.
Timezone: The time zone relative to UTC. Configured in the OS.
Time: The current local time.
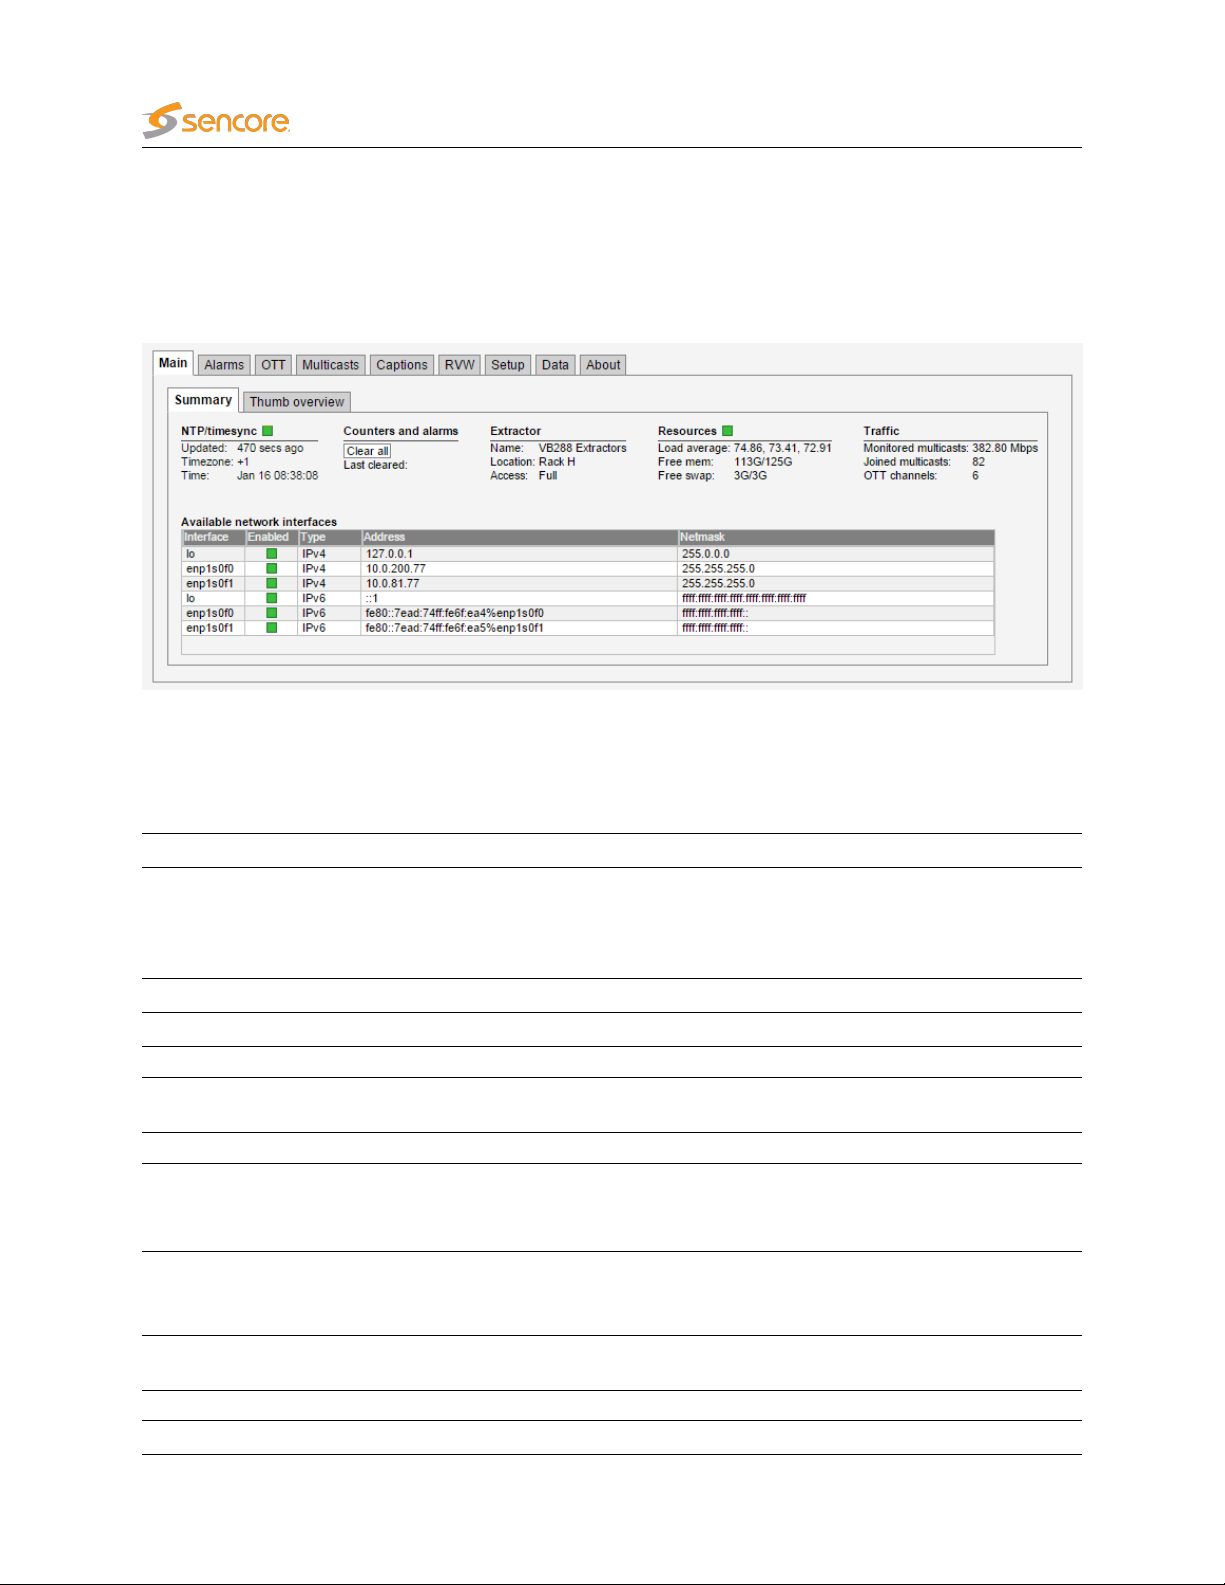
Clear all:
Last cleared:
The NTP/timesync bulb indicates whether the Extractor clock is locked to an
external time reference signal. Green indicates that the Extractor is locked
to an external reference whereas gray indicates that the Extractor runs in
unlocked mode or the status is unknown.
Click the
VB7880measurement and alarm history is cleared. Note that it is not
possible to undo this operation.
The time the
indicated the counters have not been cleared since VB7880startup/reboot
time.
alarm list
NTP/timesync
Counters and alarms
Clear all
Clear all counters
, is to provide enough information for the operator
button to reset all counters, graphs and alarms. All
button was last clicked. If no time is
Extractor
24 VB7880 Advanced Content Extractor User’s Manual version 5.2
Page 25

Name:
Location:
Access:
Load average: The system load of the server.
Free mem: The available free memory.
Free swap: The available free swap memory.
Monitored multicasts: The total bitrate of all monitored multicast streams.
Joined multicasts: The number of joined multicast streams.
OTT channels: The number of enabled OTT channels.
The Extractor name as defined by the operator in the
view.
The Extractor location as defined by the operator in the
view.
The access rights of the current user. Access rights are either full access or
read only access.
Resources
Traffic
Setup — Params
Setup — Params
Available network interfaces
Interface: The id of the selected network interface.
Enabled: Is the selected interface enabled and running.
Type: What type of IP address is set for the selected interface.
Address: The IP address of the selected network interface.
Netmask: The subnet mask of the selected network interface.
5.1.2 Main — Thumb overview
The
Thumb overview
used.
view displays a mosaic of all decoded thumbnails. By default the
Normal
mode is
VB7880 Advanced Content Extractor User’s Manual version 5.2 25
Page 26
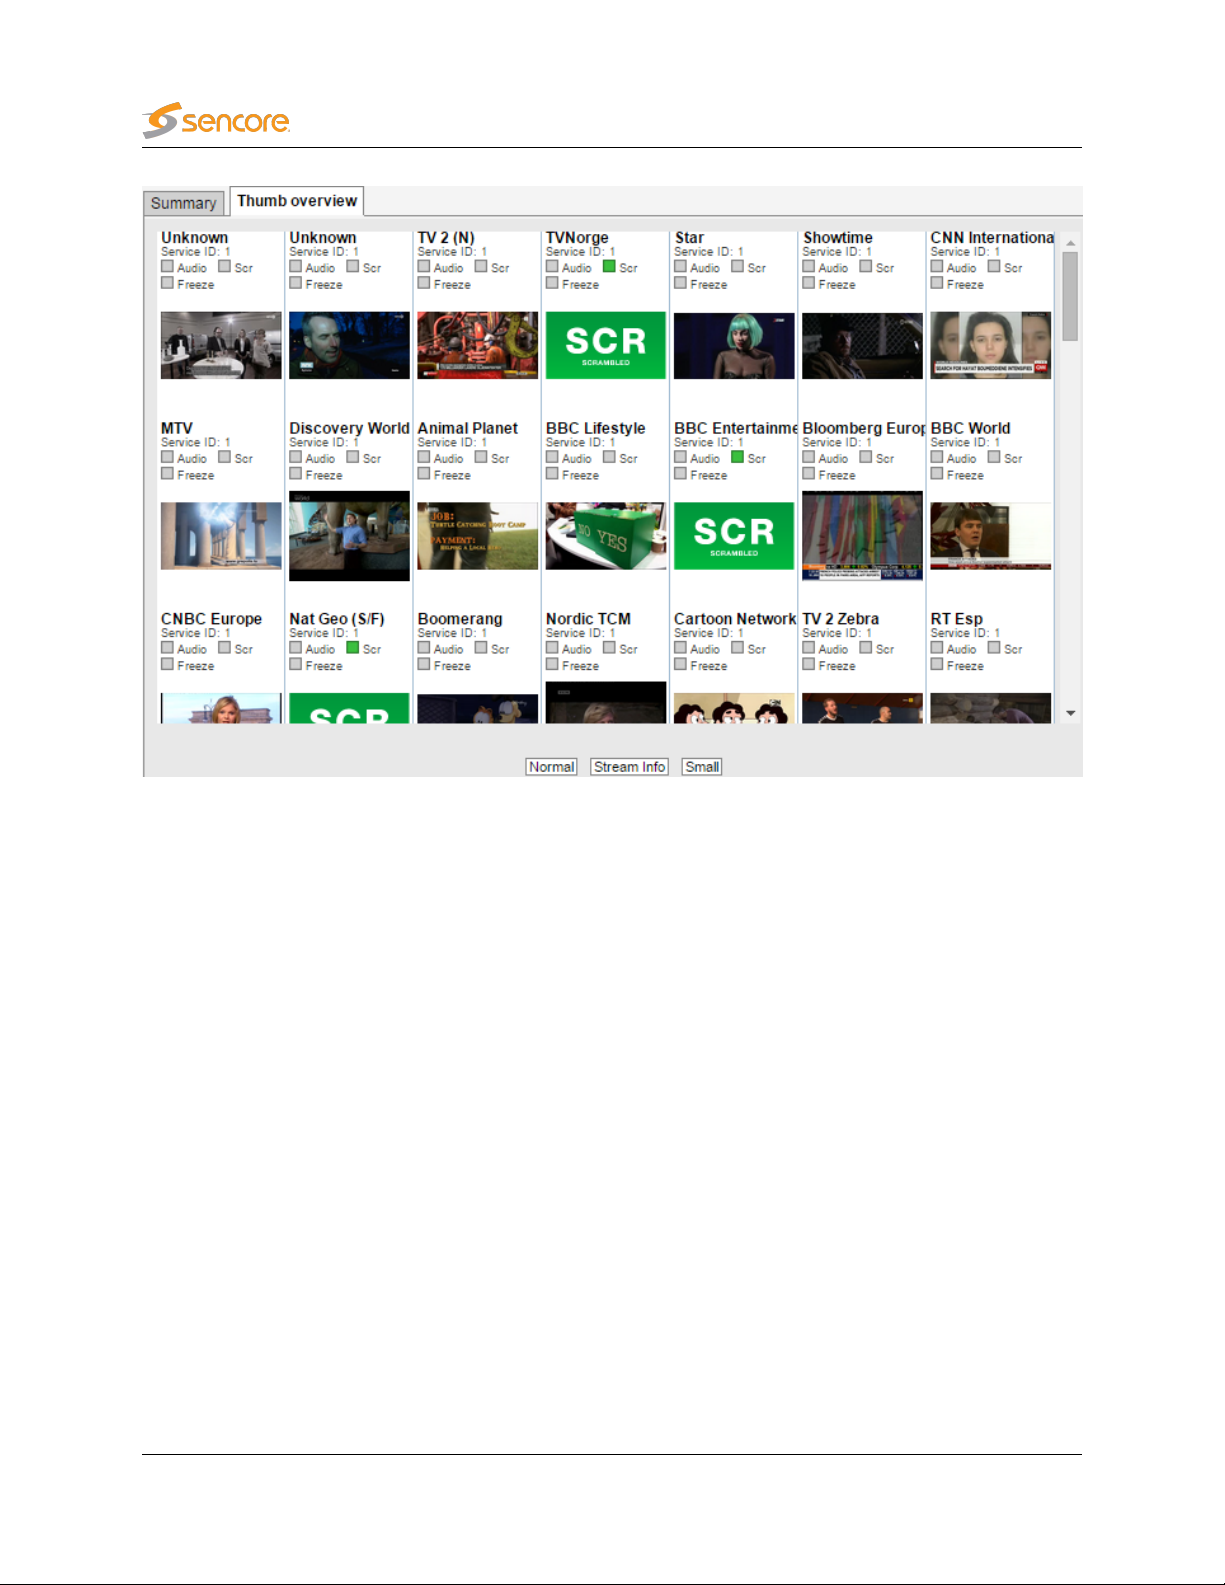
If the
Small
allowing more thumbnails to be displayed in a view. To display the stream address and name (as defined
in the Multicasts — Streams and OTT — Channels views) click the Stream info button.
The
Thumbs Details
more information about the details displayed in the
multicast streams, and chapter 5.3.2 for OTT channels. Clicking the Close button will close the view.
Status bulbs indicates the current content-check status for the streams. The available status bulbs are
Audio silence, scrambling, freeze-frame and color-freeze, and profile alignment (OTT only). A gray bulb
means that the test has not been enabled for the stream. A green bulb indicates that no error has been
detected. A yellow bulb indicates that the extractor is detecting a potential error and a red bulb indicates
that the configured error threshold has been reached.
The Remote Video Wall features offers a better overview of content and alarm status for each stream.
Please refer to chapter 4 for more information on the Remote Video Wall feature.
button is clicked the
pop-up view is accessed by clicking a thumb in the
Thumb overview
view will display service names and thumbs only,
Thumbs Details
Thumb overview
pop-up see chapter 5.4.1 for
view. For
26 VB7880 Advanced Content Extractor User’s Manual version 5.2
Page 27
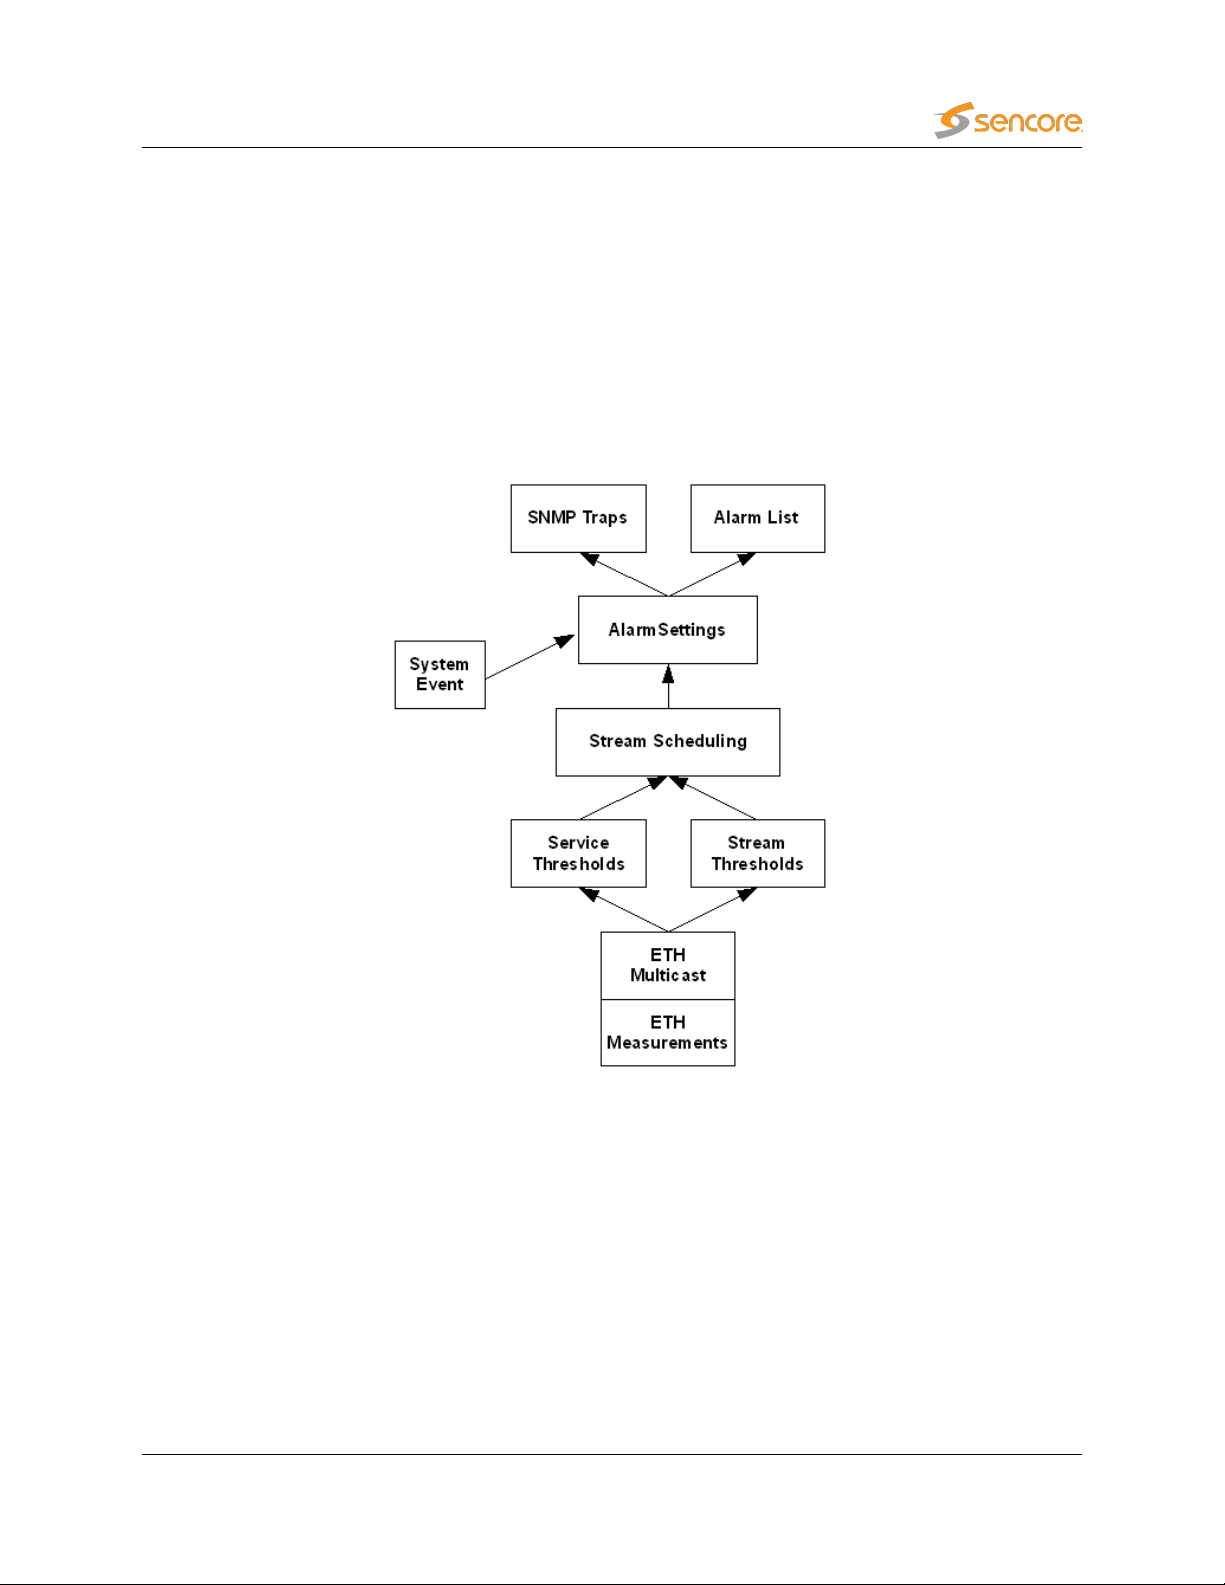
5.2 Alarms
The VB7880 Advanced Content Extractor alarm handling is configured by the user at global level, stream
level or service level. The alarm setup view allows global alarm configuration whereas settings defined
for each multicast and service (in the
simplified diagram of the VB7880 alarm handling is shown below.
The Alarms view gives the user the possibility of viewing alarms according to type or as one complete list.
Multicasts — Streams
views) will also affect VB7880 alarming. A
VB7880 Advanced Content Extractor User’s Manual version 5.2 27
Page 28

5.2.1 Alarms — All alarms
The Ethernet, OTT, Caption and System alarms can also be found in separate tabs next to the All alarms
tab.
If Auto-refresh list is selected, the alarm list will be continuously updated with new alarms.
Clicking the
events list. By clicking an alarm entry in the offline list, a detailed alarm description can be viewed. The
search field in the upper right corner of the view allows the user to type a text string and the alarm list is
updated to display only streams and alarms matching the specified text.
The alarm lists can be deleted by clicking the
action will permanently clear the alarm lists — they cannot be restored.
The
Export
new window.
View list offline
button enables export of the corresponding alarm list as an XML file. This file will open in a
button gives the user the opportunity to view the complete alarms and
Flush alarms
button. However it should be noted that this
28 VB7880 Advanced Content Extractor User’s Manual version 5.2
Page 29

5.2.2 Alarms — Alarm setup
The Alarm setup represents the final filtering stage for VB7880 Advanced Content Extractor alarms.
The user selects whether an alarm should be enabled or ignored, and associates an error severity level
with each alarm. When changes have been made to alarm settings click the
changes to take effect.
Note that the VB7880 Advanced Content Extractor alarm handling will also depend on the threshold
settings assigned to a stream defined by the user (
Service thresh. for multicasts, OTT — Thresholds for OTT and Caption — Thresholds for captions).
Also note that only enabled alarms are shown in the alarm lists and forwarded as SNMP traps. Enabling or
disabling Extractor alarms does however not affect the alarms presented by the VideoBRIDGE Controller.
The following alarm severity levels may be selected:
OK: If enabled, the alarm will be present in the alarm list, color green
Warning: If enabled, the alarm will be present in the alarm list, color yellow
Error: If enabled, the alarm will be present in the alarm list, color orange
Multicasts — Ethernet thresh.
Apply changes
and
Multicasts —
button for
VB7880 Advanced Content Extractor User’s Manual version 5.2 29
Page 30

Major: If enabled, the alarm will be present in the alarm list, color red
Fatal: If enabled, the alarm will be present in the alarm list, color black
The following alarms and events are configured:
ETH (Ethernet) alarms
Scrambling expected:
The service should have been
scrambled but is sent in clear
Default: Enabled, severity ‘Major’
Scrambling not expected:
Freeze-frame detected: The service has frozen frames
Color-freeze detected:
Audio silence detected: The service has silent audio tracks
No data detected:
CC Errors detected:
No signal detected: The stream has no signal
Wrong DAR:
Wrong PAR:
Missing custom video PID:
The service should have been clear
but is scrambled
The service has frozen in one color
The service has no data on video
PID
The service has an excessive
amount of CC errors
The stream has wrong Display Aspect Ratio
The stream has wrong Pixel Aspect
Ratio
A custom video PID has been configured in the service threshold, but
the PID does not appear in the
stream
Default: Enabled, severity ‘Major’
Default: Enabled, severity ‘Major’
Default: Enabled, severity ‘Major’
Default: Enabled, severity ‘Major’
Default: Enabled, severity ‘Major’
Default: Enabled, severity ‘Major’
Default: Enabled, severity ‘Major’
Default: Enabled, severity ‘Major’
Default: Enabled, severity ‘Major’
Default: Enabled, severity ‘Major’
SYS (System) events
[Critical system errors]:
[System errors]:
[System info]:
Enable this to view all critical system errors
Enable this to view all system errors
Enable this to view system information messages
Default: Enabled, severity ‘Fatal’
Default: Enabled, severity ‘Major’
Default: Enabled, severity ‘Ok’
30 VB7880 Advanced Content Extractor User’s Manual version 5.2
Page 31

The number of profiles changed:
OTT Alarms
The number of profiles flagged in
the manifest file changed
Default: Enabled, severity ‘Warning’
Profile stream type changed:
Address resolve error: Unable to resolve address name
Connection failed: Connection failed
Send error: Could not send data to host
Receive error: Could not receive data from host
Empty reply:
HTTP error: Invalid HTTP response
HTTP redirect error: HTTP 3xx redirection error
HTTP client error: HTTP 4xx client error
HTTP server error: HTTP 5xx server error
The streaming format has changed
Response did not contain any data
in body
Default: Enabled, severity ‘Warning’
Default: Enabled, severity ‘Error’
Default: Enabled, severity ‘Error’
Default: Enabled, severity ‘Error’
Default: Enabled, severity ‘Major’
Default: Enabled, severity ‘Major’
Default: Enabled, severity ‘Major’
Default: Enabled, severity ‘Major’
Default: Enabled, severity ‘Major’
Default: Enabled, severity ‘Major’
Freeze-frame detected: The profile has frozen frames
Color-freeze detected: The profile has frozen in one color
Audio silence detected: The profile has a silent audio track
Mis-alignment detected:
Manifest parse error:
Unknown manifest:
One or more profiles are out of visual alignment
Failed to parse manifest file. Invalid
format
Cannot recognize manifest XML format
CAP (Caption) Alarms
Default: Enabled, severity ‘Major’
Default: Enabled, severity ‘Major’
Default: Enabled, severity ‘Major’
Default: Enabled, severity ‘Major’
Default: Enabled, severity ‘Major’
Default: Enabled, severity ‘Fatal’
VB7880 Advanced Content Extractor User’s Manual version 5.2 31
Page 32

Caption service missing:
The service has less caption services than specified in the threshold
Default: Enabled, severity ‘Major’
Bad quality:
Unknown: Unknown error
Some or all caption data was corrupt
Default: Enabled, severity ‘Error’
Default: Enabled, severity ‘Warning’
32 VB7880 Advanced Content Extractor User’s Manual version 5.2
Page 33

5.3 OTT
5.3.1 OTT — Thumbnails (OTT — Active Testing, option)
The OTT support enables monitoring of OTT channels. Up to 100 OTT channels can be monitored
in parallel, up to a total maximum of 100 channels (multicasts and OTT combined), depending on the
license.
VB7880 Advanced Content Extractor User’s Manual version 5.2 33
Page 34

The OTT Active Testing option enables additional monitoring for up to the licensed number of OTT
channels. The Active Testing licenses can be distributed over the monitored OTT channels as desired.
The VB7880 Advanced Content Extractor will parse a channel’s manifest file, and for a live stream one of
the latest chunks in each OTT profile’s chunk sequence will be analyzed.
If manifest file parsing or chunk analysis reveals an error, an alarm will be raised. Note that some alarms
depend on user defined threshold values. Alarms must also be enabled in the
view.
Alarm — Alarm setup
Thumbnail decoding is available for
encrypted HLS streams.
The following OTT information is displayed in the Thumbnails view:
Status bulb: A bulb indicates the current status of the channel, i.e. the most severe profile status.
Thumb:
Channel:
Progress:
Profiles: The number of profiles associated with a channel.
Encryption:
Profile info: The OTT format is displayed (Smoothstream, HLS, MPEG Dash or Adobe HDS).
Additionally, the following OTT information is displayed in the OTT Active Testing view:
If the selected stream is of type HLS or HDS a thumbnail of the content will be decoded
and updated.
The channel name defined by the user and linked to a URL in the
view.
The progress bar shows which channel is currently being monitored and how analysis
is progressing.
Scrambling information is resolved from the profile manifest. If the profile is scrambled
the encryption field will read Yes. If the profile is transmitted in clear the encryption
field will read No.
non-encrypted
HLS and HDS streams, as well as some types of
OTT — Channels
Alarm history:
Current profile status:
A bar graph showing alarm severity history. It can either show the last 120
minutes or the last 24 hours. To switch between them, press the “24h” or
“2h” button on the left under the channel list. Each bar color represents the
alarm severity level as configured under Main — Alarm setup.
The channel health bar displays the current status for individual channel
profiles. Profiles are separated by vertical black lines.
Colors indicate profile alarm status:
• Green: OK
• Yellow: Warning
• Orange: Error
• Red: Major
• Black: Fatal
34 VB7880 Advanced Content Extractor User’s Manual version 5.2
Page 35

5.3.2 OTT — Details
Press the blue information button on a channel to open the details window. This window provides detailed
information about the status and alarms on all the profiles for the selected channel. The same pop-up
can be opened from the Main — Thumb Overview view, see chapter 5.1.2 for more information.
5.3.2.1 OTT — Details — Profiles
The Profiles view in this pop-up consists of two tables detailed below:
The following information relevant for the overall OTT channel is shown in the first part of the Details —
Profiles pop-up window:
Channel:
Progress:
Profiles: The number of profiles associated with a channel.
The channel name defined by the user and linked to a URL in the
view. A bulb indicates the current status of the channel, i.e. the most severe profile
status.
Channels will be analyzed sequentially, and the progress bar shows which channel
is currently being monitored and how analysis is progressing.
OTT — Setup
VB7880 Advanced Content Extractor User’s Manual version 5.2 35
Page 36

Profile status:
(Only displayed if OTT Active Testing is enabled for this channel.) The channel health
bar displays the current status for individual channel profiles. Profiles are separated
by vertical black lines.
Colors indicate profile alarm status:
• Green: OK
• Yellow: Warning
• Orange: Error
• Red: Major
• Black: Fatal
Stream type: The OTT format is displayed (Smoothstream, HLS, Adobe HDS or MPEG Dash).
In the same view below the table for the overall channel a more detailed view per
shown with the following information in it:
Profile: The name of the OTT profile as flagged in the manifest files.
Type: Live
Profile health:
Profile bps:
Download bps:
Chunk length:
Download time:
Download size:
for live content or
done based on the contents of the manifest file.
(Only displayed if OTT Active Testing is enabled for this channel.) A timeline graph
display of a combined bitrate and alarm representation for individual profiles. Refer
to Appendix B for a description of these graphs. The timeline duration is either 2 or
24 hours, and the graph resolution is one minute for the 2 hour graph, and twelve
minutes for the 24 hour graph.
(Only displayed if OTT Active Testing is enabled for this channel.) The profile
nominal bandwidth as flagged in the manifest files.
(Only displayed if OTT Active Testing is enabled for this channel.) The download
bitrate, i.e. the chunk size (megabits) divided by the download time (seconds).
(Only displayed if OTT Active Testing is enabled for this channel.) The profile chunk
length (seconds) specified in the manifest file.
(Only displayed if OTT Active Testing is enabled for this channel.) The actual profile
chunk download time (seconds).
(Only displayed if OTT Active Testing is enabled for this channel.) The actual profile
chunk size (megabytes).
VoD
for stored content. The distinction between the two is
channel profile
is
Encrypt.: Yes or No depending on whether the content for that profile is encrypted or not.
HTTP header:
(Only displayed if OTT Active Testing is enabled for this channel.) The current
HTTP header of the last chunk downloaded for that profile.
36 VB7880 Advanced Content Extractor User’s Manual version 5.2
Page 37

5.3.2.2 OTT — Details — Manifest (Option)
If Active Testing is enabled for the channel, the
manifest file for the channel as well as for the manifest files for the individual profiles.
Channel:
Progress:
Profiles: The number of profiles associated with a channel.
Profile status:
The channel name defined by the user and linked to a URL in the
view. A bulb indicates the current status of the channel, i.e. the most severe profile
status.
Channels will be analyzed sequentially, and the progress bar shows which channel
is currently being monitored and how analysis is progressing.
The channel health bar displays the current status for individual channel profiles.
Profiles are separated by vertical black lines.
Colors indicate profile alarm status:
Manifest
view shows health information on the overall
• Green: OK
• Yellow: Warning
• Orange: Error
• Red: Major
• Black: Fatal
VB7880 Advanced Content Extractor User’s Manual version 5.2 37
OTT — Setup
Page 38

Profile info:
Manifest size: The size in bytes of the main/top manifest file for the overall channel.
Manifest file: Clickable URL for displaying the manifest file as text for the overall channel.
Manifest URL: A clickable link to the current main/top manifest file for the overall channel.
HTTP header: The current HTTP header of the main/top manifest file for the overall channel.
Just below the channel manifest information in the same window is the detailed manifest information per
profile. This view contains the following information:
Profile: The name of the OTT profile as flagged in the manifest files.
Profile bps: The profile nominal bandwidth as flagged in the manifest files.
The type of stream is shown here. Apple
HDS or MPEG Dash.
HLS
, Microsoft
Smoothstream
, Adobe
Type: Live
Seq.age: The profile sequence age.
Manifest size: The size in bytes of the manifest file for a particular profile.
Manifest file: Clickable URL for displaying the manifest file as text for this particular profile.
Manifest URL: Clickable URL to the profile manifest file.
HTTP header: URL to HTTP header in text form for a particular profile manifest file.
for live content or
done based on the contents of the manifest file.
VoD
for stored content. The distinction between the two is
38 VB7880 Advanced Content Extractor User’s Manual version 5.2
Page 39

5.3.2.3 OTT — Details — Alarms
The
Details — Alarms
channel. An alarm log for the selected channel is also provided here.
In the right corner of the pop-up window is a free text search field used to narrow down the entries in the
alarm log.
The alarms are the same ones as explained for the
information.
When the OTT Active Testing option is available, but the currently displayed channel has Active Testing
disabled, the alarms that are not applicable to the channel are shown as black squares in the top half of
the dialog.
view gives an at-a-glance overview of any active OTT alarms for the selected
Alarms Setup
view, see chapter 5.2.2 for more
VB7880 Advanced Content Extractor User’s Manual version 5.2 39
Page 40

5.3.2.4 OTT — Details — Thumbnails
The Thumbnails tab will provide information about the current thumbnails in the stream.
The quality of the content in the selected profile can be viewed in the thumbnail section, and the user
may alter the selected profile in the drop down list.
The section on the right hand side provides specific decoder and chunk information.
By pressing the apply button without selecting a profile from the drop-down list the thumbnail will be
switched to the default selection; Auto Select. Auto select will select the profile with the highest bitrate
and video data.
Click the ‘Play profile audio’ button to play back the last decoded audio chunk for the selected profile in
the browser.
Decoder information
Size: The video picture size of the selected profile
Aspect ratio: The video aspect ratio of the selected profile
Pixel aspect ratio: The video pixel aspect ratio of the selected profile
Codec: The video encoding format of the selected profile
40 VB7880 Advanced Content Extractor User’s Manual version 5.2
Page 41

Quality: The video sampling format of the selected profile
Frame rate: The video frame rate of the selected profile (Hz)
Audio Information
Codec: The audio encoding format
Samplerate: The audio sample rate
Channels: The number of audio channels represented by the audio PID
Layout: The audio channel layout
Format: The binary format of the audio stream
Bitrate: The effective audio bitrate
Loudness: The integrated loudness value for the currently decoded chunk
Peak level: The audio peak level for the currently decoded chunk
Chunk Information
Engine ID: The OTT engine monitoring the selected stream.
Channel ID:
Profile ID: The ID of the selected profile.
Bitrate: Bitrate rate of the a chunk.
Streamtype: The type of the stream detected; live or video on demand.
Sequence Number: The sequence number of a chunk.
The id of selected channel corresponding to the list of streams defined by the
user.
VB7880 Advanced Content Extractor User’s Manual version 5.2 41
Page 42

5.3.2.5 OTT — Details — Alignment
The alignment tab gives the user a view of all the profiles for a selected channel with thumbnails and
corresponding data. Each profile has a profile ID, bitrate, size and Sequence number.
If the sequence numbers are highlighted in yellow, the thumbnails are not generated from the same
chunk for all profiles, and may therefor appear to be out of synchronization.
Click the ‘Play’ button to play back the last decoded audio chunk for the selected profile in the browser.
42 VB7880 Advanced Content Extractor User’s Manual version 5.2
Page 43

5.3.3 OTT — Channels
The OTT Channel Configuration list shows OTT channels configured by the user. To add a channel to the
list click the
define channel parameters. A channel entry can be selected by clicking the channel; the list entry will
be highlighted. Several list entries can be selected by using regular Ctrl + click functionality. Clicking
the
Duplicate selected
channel parameters duplicated, except the channel name. Clicking the
highlighted list entry. Clicking the
the highlighted channel. Batch editing is supported; this is convenient if a new threshold template should
be assigned to a number of channels or if monitoring of several channels should be enabled or disabled.
Select the channels and click the
indicated in the Edit selected pop-up view by an asterisk wildcard symbol.
Add new channel
button will create a new entry and open the
button. This will open the
Edit selected
Edit selected
will open the
button. Parameters differing between channels will be
Edit channel
Edit channel
pop-up view, allowing the user to
Edit channel
Delete selected
pop-up view associated with
pop-up view with all
will delete the
The search field allows searching for one for more list entries containing a user defined text string.
OTT Channel Configuration
Enabled: Check the ‘Enabled’ check box to start monitoring the OTT service.
Threshold:
Active Testing:
VBC thresholds:
Manifest URL: The URL of the OTT channel.
Player URL:
RTMP: Check this check box if the channel is an RTMP channel.
RTMP live: Check this check box if the RTMP channel is a live service.
The OTT threshold that should be assigned to the OTT channel. OTT thresholds
that have been defined in the OTT — Thresholds view are available for selection
from the drop-down menu.
Check this box to enable the ‘Active Testing’ parts of the selected Threshold
settings for this channel. Only available if OTT Active Testing option is enabled.
The alarm threshold template used to configure when alarms are generated
towards VideoBRIDGE Controller template. This setting is applies if Active Testing
is enabled for this channel.
In this field you can enter the URL to a web page which will open the OTT channel
in your browser. If entered, a ‘play’ button will be displayed in the OTT overview
tab, which will open the selected URL in a new browser tab.
VB7880 Advanced Content Extractor User’s Manual version 5.2 43
Page 44

5.3.4 OTT — Settings
In the settings section global round time for all of the OTT engines can be set. The round time setting
does not apply to channels for which real-time audio analysis have been enabled.
44 VB7880 Advanced Content Extractor User’s Manual version 5.2
Page 45

5.3.5 OTT — Thresholds
The OTT
threshold template to the list click the
pop-up view, allowing the user to define threshold parameters. A list threshold template entry can be
selected by clicking the threshold template; the list entry will be highlighted. Several list entries can be
selected by using regular Ctrl + click functionality. Clicking the
Edit threshold
the threshold template name. Clicking the
the
template. Batch editing is supported. Select the threshold templates and click the
Parameters differing between templates will be indicated in the
wildcard symbol.
The search field allows searching for one for more list entries containing a user defined text string.
Threshold presets
pop-up view on a new threshold, with all threshold template parameters duplicated except
Edit selected
list shows OTT threshold templates configured by the user. To add a
will open the
Profile alignment:
Edit channel
Name: The threshold template name defined by the user.
Add new threshold
Delete selected
pop-up view associated with the highlighted threshold
Content-check thresholds
Picture matching in video streams is not an exact science,
as noise can be introduced in many of the stages the stream
goes through. This setting makes it possible to define how
much noise is allowed when performing profile alignment
detection. When set to
of noise is allowed when comparing the frames across profiles
for out-of-alignment conditions.
recommended setting, whereas
a small amount of noise, which may result in too many out-ofalignment alarms.
button. This will open the
Duplicate selected
will delete the highlighted list entry. Clicking
Edit selected
Large difference
pop-up view by an asterisk
Normal difference
Small difference
Edit threshold
button will open the
Edit selected
, a large amount
allows only
button.
is the
Freeze-frame noise floor:
It is possible to define how much noise is allowed when performing freeze-frame detection. When set to Off, the freezeframe detection is disabled. When set to
a small amount of noise is allowed when comparing frames.
Normal change
change
too many freeze-frame alarms.
allows a high amount of noise, which may result in
is the recommended setting, whereas
Small change
VB7880 Advanced Content Extractor User’s Manual version 5.2 45
, only
Large
Page 46

Freeze-frame error timeout:
Color-freeze noise floor:
The time (in minutes) a freeze-frame error should persist
before the VB7880 will raise an alarm.
It is possible to define how much noise is allowed when performing color-freeze detection. When set to Off, the colorfreeze detection is disabled. When set to
a small amount of noise is allowed when comparing to the list
of solid colors.
whereas selection of
noise, which may result in too many color-freeze alarms.
Normal change
Large change
is the recommended setting,
Small change
allows a high amount of
, only
Color-freeze error timeout:
Real-time audio analysis:
Audio silence detection threshold:
Audio silence detection timeout:
If the OTT Active Testing option is available, additional settings are available, which can be enabled on a
channel-by-channel basis by checking the appropriate checkbox in the channel setup. Depending on
the purchased license, there might be an upper limit as to the number of channel the Active Testing
thresholds can be applied to, this limit is described in the Edit Threshold dialog.
To disable a threshold alarm, set the threshold value to -1. This does not apply for Manifest XML size.
Download speed error:
Download speed warn:
The maximum allowed difference between profile bitrate and download
bitrate (%). If the difference exceeds the threshold value a bitrate error
alarm will be raised.
The maximum allowed difference between profile bitrate and download
bitrate (%). If the difference exceeds the threshold value a bitrate error
warning will be raised.
The time (in seconds) a color-freeze error should persist before the VB7880 will raise an alarm.
Enables real-time loudness extraction for the stream. The
loudness data can be retrieved through the Eii.
Set the threshold for silence detection in decibel below 0
LUFS/LKFS (max volume) Use negative values, 0 disables
alarm.
The value in seconds for when to trigger the audio silence
alarm.
Active testing thresholds
Actual bitrate min:
Actual bitrate max:
Sequence age:
Manifest XML size:
The minimum allowed bitrate when measured actual bitrate is compared to
profile bitrate (%). If the actual bitrate goes below the threshold an actual
bitrate alarm will be raised.
The maximum allowed bitrate when measured actual bitrate is compared
to profile bitrate (%). If the actual bitrate exceeds the threshold an actual
bitrate alarm will be raised.
The maximum time a manifest can remain unchanged before a manifest
age alarm is raised.
The maximum detected size of the manifest before a manifest size alarm
is raised.
46 VB7880 Advanced Content Extractor User’s Manual version 5.2
Page 47

Min. Profiles:
Minimum number of profiles in the selected channel before an alarm is
raised.
VB7880 Advanced Content Extractor User’s Manual version 5.2 47
Page 48

5.4 Multicasts
5.4.1 Multicasts — Thumbnails
The
Multicasts — Thumbnails
that the VB7880 Advanced Content Extractor extracts data from are presented in a list of streams, and a
‘bulb’ indicates the current alarm status of the associated stream. In addition, the Remote Video Wall
features offers a better overview of content and alarm status for each stream.
The ‘bulb’ can have the following colors:
Green: stream status: OK.
Yellow:
Red: stream status: alarm.
Gray: stream status: start-up/unknown.
The extractor is observing possible problems but the thresholds have not yet been exceeded.
view gives the user visual feedback of each stream’s status. The streams
48 VB7880 Advanced Content Extractor User’s Manual version 5.2
Page 49

By clicking a stream name a dialog opens displaying an overview of the services available in the stream.
Press the blue information button to display the following information for the service:
Service name:
Service id: The ID of the selected service within a transport stream.
Audio silence detection status:
Freeze-frame detection status:
Shows the name defined for the TV service in the SI service
descriptor. If no SI is present in the stream the service id will be
shown.
A bulb indicating the audio silence detection status. If no audio
silence detection threshold value has been defined, bulb color will
be gray.
When a threshold value has been defined, bulb color is green
for status OK. If the measured audio level goes below the audio
silence detection threshold value, for more than the duration
specified in the threshold settings, an alarm will be raised, and
the bulb turns red.
A bulb indicating the freeze frame detection status for regular and
color freeze. The freeze-frame error timeout value is set as part
of the stream threshold template associated with each multicast
(refer to the
Streams — Edit views). The different bulb colors are:
White:
decode video)
Grey: freeze-frame detection is disabled.
Green:
detected.
Yellow:
frames have been detected, but the freeze-frame error timeout
value has not been exceeded.
Red:
freeze-frame is enabled. freeze-frame has been detected
and the freeze-frame error timeout value has been exceeded,
thus resulting in an alarm.
Multicasts — Stream thresh.
Unknown (typically due to the Extractor being unable to
freeze-frame detection is enabled, no freeze-frame is
freeze-frame detection is enabled. Two consecutive equal
and
Multicasts —
Scrambling status:
The VB7880 Advanced Content Extractor is capable of extracting thumbs from up to 100 streams, up to
a total maximum of 100 channels (multicasts and OTT combined), depending on the license. MPEG-2,
A bulb indicating the scrambling check status. Scrambling check
is defined as part of the stream or service threshold template
associated with each multicast (refer to the
net thresh.,Multicasts — Service thresh.
Streams — Edit views). The different bulb colors are:
Grey: Scrambling check is disabled.
Green:
dance with the user-defined requirement.
Red:
accordance with the user-defined requirement; an alarm is active.
Scrambling check is enabled, and scrambling is in accor-
Scrambling check is enabled, and scrambling is not in
Multicasts — Ether-
and
Multicasts —
VB7880 Advanced Content Extractor User’s Manual version 5.2 49
Page 50

MPEG-4/AVC and HEVC video formats in standard definition, high definition or ultra-high definition are
supported.
The VB7880 Advanced Content Extractor will use a varying amount of time decoding the streams,
depending on how the streams are coded and if they are standard definition, high definition or ultra-high
definition.
In the
video and audio metadata for the stream. The same pop-up can be opened from the
Overview view, see chapter 5.1.2 for more information.
Service Overview
view, clicking the Information icon opens the
Thumb View
which presents
Main — Thumb
Clicking the Close button will close the Thumbs Details view. For multicasts, the following metadata is
displayed in the Thumbs Details view:
Audio fields
PID: The audio PID for which the associated parameters apply
Language: The audio language, as derived from PSI/SI
Average: The average audio level in dB, measured over 0.4 seconds
Peak: The peak audio level in dB, detected during 0.4 seconds
Audio level:
An audio level bar displaying the average audio level as a green bar referenced to the
peak audio level, the peak level being indicated by a white line
50 VB7880 Advanced Content Extractor User’s Manual version 5.2
Page 51

Click the ‘Play’ button to play back the last few seconds of decoded audio for the selected PID in the
browser.
The following stream status information will be displayed (bulbs will be green for status OK, red to indicate
an active alarm and gray if the associated check has been disabled):
Status description
Audio silence:
Scrambling: A bulb indicates the scrambling status with reference to the defined requirement.
Freeze-frame:
Color-freeze:
A bulb indicates the audio silence status with reference to the defined requirement.
Peak level:
silence threshold to determine if an audio silence alarm should be raised.
Threshold:
threshold template associated with the stream.
Expect: ‘Clear’ or ‘Scrambled’
Control bit indicates: ‘Clear’ or ‘Scrambled’
PES status indicates: ‘Clear’ or ‘Scrambled’
A bulb indicating the freeze-frame detection status. The freeze-frame error timeout
value is set as part of the stream threshold group associated with each multicast
(refer to the
views).
Consecutive frozen frames:
been detected
Time since OK:
detected. When a freeze-frame condition occurs, this value indicates for how long
video has been frozen.
A bulb indicating the color-freeze detection status. The freeze-frame error timeout
value is set as part of the stream threshold group associated with each multicast
(refer to the
views).
Consecutive frozen frames:
have been detected
Time since OK:
detected. When a color-freeze condition occurs, this value indicates for how long
video has been frozen.
The measured peak level (dB). This is checked against the audio
The audio silence detection threshold (dB) as defined in the stream
Multicasts — Ethernet thresh.
The number of consecutive equal frames that have
The time (in seconds) since freeze-frame status OK was last
Multicasts — Ethernet thresh.
The number of consecutive single color frames that
The time (in seconds) since color-freeze status OK was last
and
Multicasts — Streams — Edit
and
Multicasts — Streams — Edit
The following metadata information is displayed:
Multicast (Stream Name)
Name:
Type:
Multicast address: The multicast address of the stream containing the selected service
Multicast port: The port number of the multicast containing the selected service
The name of the multicast containing the selected service, as defined
by the user
The type of the stream containing the selected service; multicast or
unicast
VB7880 Advanced Content Extractor User’s Manual version 5.2 51
Page 52

Transport stream ID:
Stream status:
The id of the selected stream as shown in the list of multicasts in the
Ethernet section
The status of the stream containing the selected service, as reported by
the decoding engine
Bitrate:
Stream Threshold: The name of the stream threshold template assigned to the multicast
Service Threshold: The name of the service threshold template assigned to the multicast
Schedule:
Custom Video PID mode: An indication of custom PID mode: ‘Normal’ or ‘Custom PIDs only’.
Service ID: The service ID of the selected service
PSI/SI Name: The name of the selected service, as derived from PSI/SI
Controlbit scramble state: The scramble state as indicated by the MPEG TS control bit
PES sync scramble state: The scramble state as detected from the PES sync state
Number of PIDs: The number of PIDs associated with the selected service
Bitrate: The total bitrate of the selected service (bits/s)
Has PCR: Yes if the selected stream contains PCR, No if not
Bitrate: The video PID bitrate of the selected service
PES sync: The latest PES sync state
The total stream bitrate of the multicast containing the selected service
(bits/s)
The name of the alarm masking schedule template assigned to the
multicast
Service (Service ID)
Video PID (PID Number)
PID: The video PID of the selected service
PES length indicator:
Status: The status of the video PID as reported by the decoding engine
Size: The video picture size of the selected service
Aspect ratio: The video aspect ratio of the selected service
Pixel aspect ratio: The video pixel aspect ratio of the selected service
Codec: The video encoding format of the selected service
Quality: The video sampling format of the selected service
Frame rate: The video frame rate of the selected service (Hz)
If signaled in the PES packet header, the PES packet length is displayed.
Decoder Information
52 VB7880 Advanced Content Extractor User’s Manual version 5.2
Page 53

Audio PID (PID Number)
PID:
Type: The audio encoding standard
Has PCR: Yes if the selected Audio PID contains PCR
Language:
Bitrate: The audio PID bitrate of the selected service
Is scrambled: Yes if the audio PID is scrambled.
Peak level:
Average level:
Codec: The audio encoding format
Samplerate: The audio sample rate
Channels: The number of audio channels represented by the audio PID
Layout: The audio channel layout
The audio PID of the selected service. Note that there may be several
audio PIDs associated with a service.
The language of the audio, as defined in the Program Map Table (PMT)
The peak audio level in dB, detected during a period of approximately
0.4 second
The average audio level in dB, measured over a period of approximately
0.4 second
Audio Information PID (PID Number)
Format: The binary format of the audio stream
Bitrate: The effective audio bitrate
If the Extractor cannot generate a thumbnail from the signal, it will present one of the following icons:
Shown if no data is received for the stream or if no PSI is found. There should be a
match between presenting this icon and a No-signal alarm; however since the alarm and
thumbnail mechanisms work independently of each other they have been given different
names (loss of signal and no signal).
Shown while the thumbnail engine is trying to decode a thumbnail picture and more
precise status information has not yet been obtained. This icon is typically displayed after
extractor reboot or if new streams have recently been joined.
Shown if the service does not carry a video PID — which is the case for radio services.
The stream contains no service, as signaled in PSI/SI.
The signal cannot be decoded due to excessive CC errors.
VB7880 Advanced Content Extractor User’s Manual version 5.2 53
Page 54

The VB7880 does not support thumbnail generation for this protocol mapping.
The signal is recognized as being MPEG-2 encoded but the thumbnail extractor is unable
to correctly decode a thumbnail picture.
The signal is recognized as being MPEG-4 encoded but the thumbnail extractor is unable
to correctly decode a thumbnail picture.
The signal is recognized as being MPEG-H encoded but the thumbnail extractor is unable
to correctly decode a thumbnail picture.
This icon is shown if the VB7880 is unable to receive or analyze the PMT PID. Note that
if a stream is known not to carry PSI, the user may select to manually specify a custom
video PID — refer to the Multicasts — Streams view.
The VB7880 can only generate a thumbnail picture if the video data is not scrambled.
The Extractor will always try to generate a thumbnail picture and will only conclude that it
is scrambled if decode fails and the PID is signaled as being scrambled. If the stream is
configured not to raise an alarm upon scrambling the icon will be colored green.
As above. If the stream is configured to raise an alarm upon scrambling the icon will be
colored red.
5.4.2 Multicasts — Join
A multicast added to the selected Extractor can easily be joined and unjoined by selecting it from one of
the lists and navigate it to the left or right by using the navigation arrows as shown above.
Press Apply changes to save the changes.
54 VB7880 Advanced Content Extractor User’s Manual version 5.2
Page 55

5.4.3 Multicasts — Streams
In this view the operator can define multicasts available to the Extractor and associate a name with each
multicast address. This name will be used by the Extractor when referring to the multicast. If no name
has been defined the Extractor will use the multicast address:port notation.
It is possible to add or delete several entries simultaneously. The current dialogue values will be used as
the template with the values for Name and Address incremented for each.
Note that both multicast and unicast addresses can be entered here.
The search field in the upper right corner of the view allows the user to type a text string, and the multicast
list is updated to display only streams matching the specified text.
Clicking
— Edit
multicasts and enable monitoring. The Extractor will only extract thumbnails from and analyze joined
multicasts. Clicking
channels). Unjoining one or more multicasts is done by selecting multicasts and clicking
or by clicking Unjoin all.
Add new
pop-up menu. When multicasts have been defined, clicking
or selecting one or more multicasts and clicking
Join all
will join all multicasts in the list (up to the licensed maximum number of
Edit selected
Join selected
will open the
will join the selected
Unjoin selected
Multicast
VB7880 Advanced Content Extractor User’s Manual version 5.2 55
Page 56

Multicasts parameters
Name:
Address: The IP address of the unicast or multicast.
Port: The port number of the unicast or multicast.
A name should be assigned to each unicast/multicast. The name will be used
throughout the Extractor’s user interface when referring to this stream.
SSM source 1:
Ethernet thresholds:
Caption thresholds:
Service thresh.:
Schedule:
Custom video PID:
The SSM source value is only needed for IGMP v3 systems. A name may be
associated with a SSM source address.
The stream threshold that should be assigned to the multicast. Stream
thresholds that have been defined in the
view are available for selection from the drop-down menu.
The Caption threshold that should be assigned to the multicast. Caption
thresholds that have been defined in the
available for selection from the drop-down menu.
The service threshold group that should be assigned to the multicast. Service
threshold groups that have been defined in the
view are available for selection from the drop-down menu.
The scheduling scheme that should be assigned to the multicast. Scheduling
schemes that have been defined in the
available for selection from the drop-down menu. Scheduling allows alarm
masking at predefined time periods.
If a stream is known not to contain PSI needed in order to locate the video
component, the user can define a custom video PID to be decoded by the
Extractor. The PID definition is made as part of a service threshold that
should be associated with the stream. If custom video PID is set to ‘Normal’
the Extractor will determine the video PID(s) based on PSI/SI plus custom
video PID definitions made in the service threshold template. If custom video
PID is set to ‘Custom PIDs only’, PSI/SI will not be analyzed.
Multicasts — Ethernet thresh.
Captions — Thresholds
Multicasts — Service thresh.
Setup — Scheduling
view are
view are
Join stream: Check the ‘Join stream’ check box to join a multicast or unicast.
Join interface: Select which interface to join the selected multicast.
Note that no alarms will be raised if the corresponding alarm types are deactivated in the
56 VB7880 Advanced Content Extractor User’s Manual version 5.2
Alarms —
Page 57

Alarm Setup view.
5.4.4 Multicasts — Ethernet thresh.
Thresholds are used to determine when to actually raise an alarm upon detection of an error. The
Multicasts — Ethernet thresh.
level. Thresholds are associated with each stream in the
new threshold setting — click the
threshold.
In the threshold presets list the ‘Refs’ column displays how many streams are associated with each
stream threshold template.
Another way of creating a user-defined thresholds is by highlighting one of the thresholds already defined
and then clicking the Duplicate highlighted button.
Deleting a threshold is done by highlighting the threshold that should be removed and clicking
selected. Note that the predefined ‘Default’ threshold template cannot be deleted or changed.
view makes it possible to define threshold values that operate at stream
Add new threshold
Multicasts — Streams — Edit
button and assign a name and value to the new
view. To add a
Delete
VB7880 Advanced Content Extractor User’s Manual version 5.2 57
Page 58
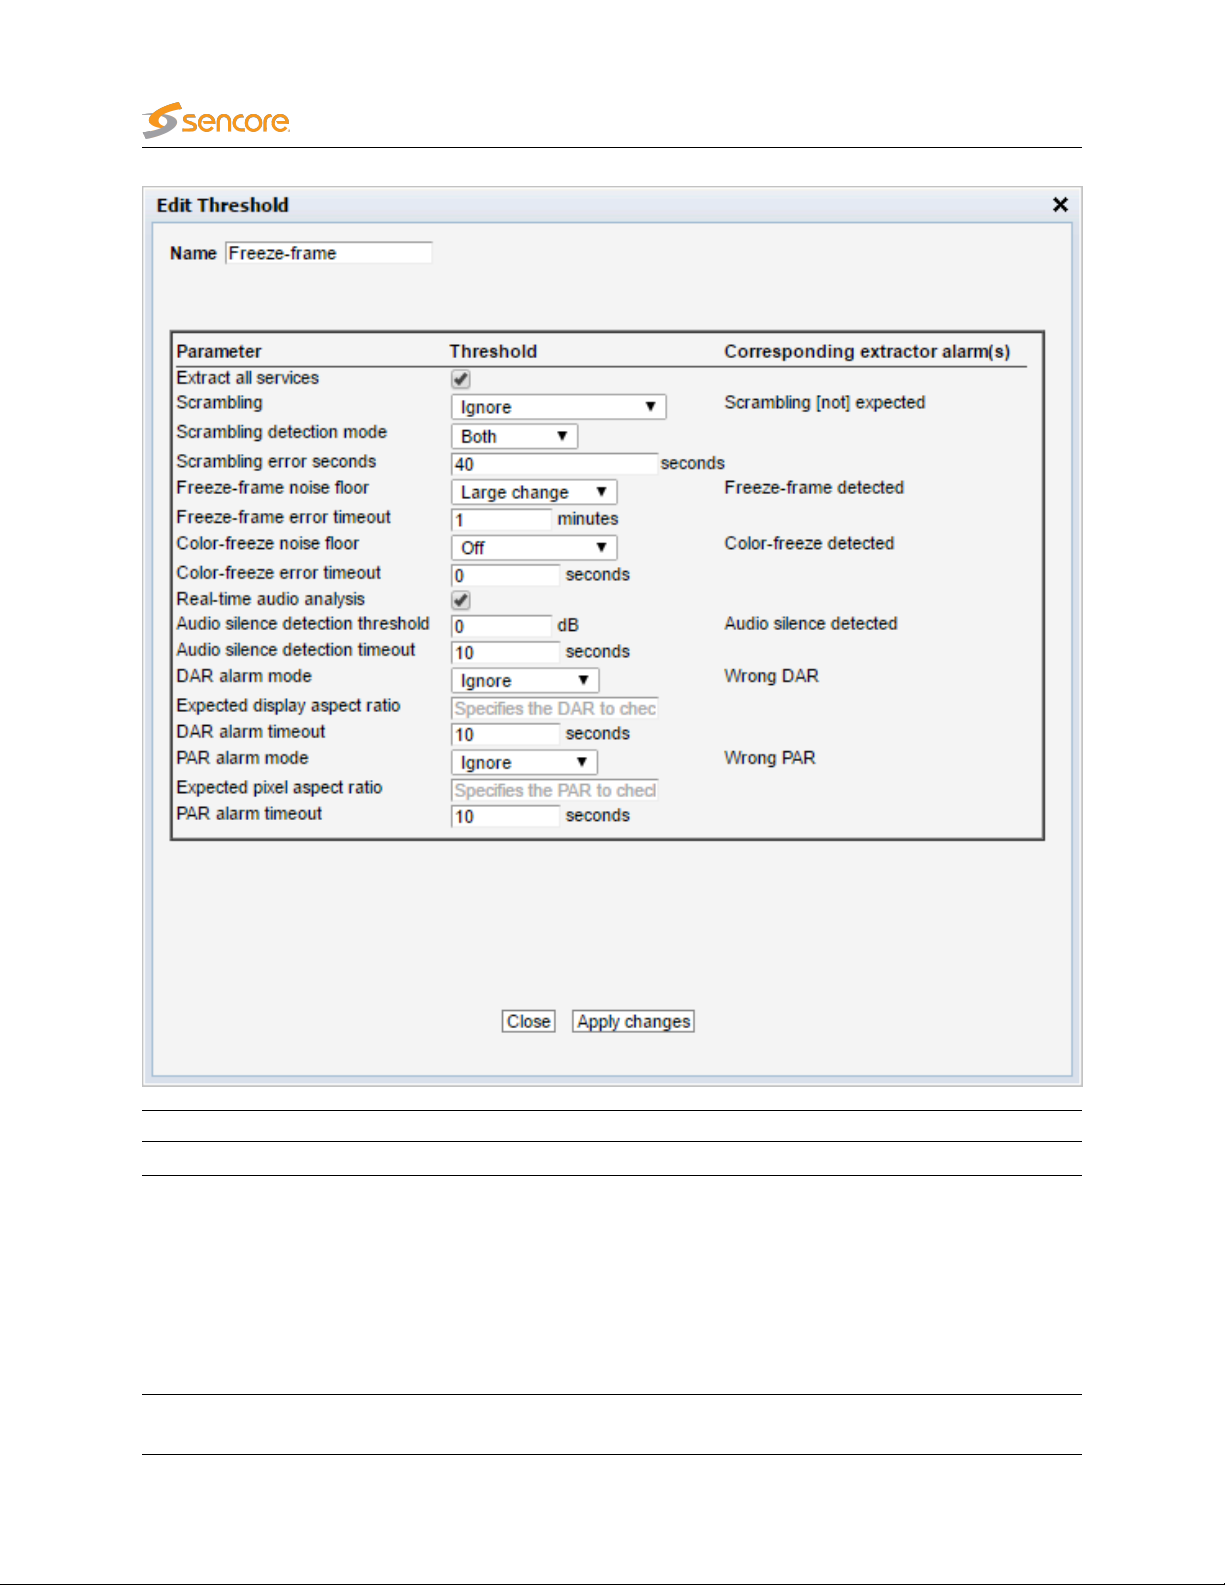
Ethernet thresholds
Name: A text string that identifies the Ethernet threshold
Extract all services:
When enabled, all services in the multicast this threshold is
applied to will be extracted. For an MPTS, all services in the
stream counts towards the active service limit defined by the
license. If only one or a few services need to be monitored,
disable this setting, in which case services not referenced
by the Service threshold applied to the same stream will be
ignored. Please refer to chapter 5.4.5 for details on Service
thresholds.
58 VB7880 Advanced Content Extractor User’s Manual version 5.2
Page 59

Scrambling:
Each stream can be configured to raise an alarm when that
stream’s scrambling status changes. The default behavior
is to ignore whether a stream is scrambled or not. In order
to trigger an alarm if a clear service is received when it is
supposed to be scrambled, select Error if not scrambled in the
Scrambling pull-down menu. For a multicast each individual
service will be checked for violation of this setting — i.e. each
service may trigger an alarm.
As a general rule the value of the Scrambling pull-down
should be set to Ignore when individual service scrambling
alarm handling is defined.
Scrambling detection mode:
Scrambling error seconds:
Freeze-frame noise floor:
When scrambling detection mode is set to ‘Both’, scrambling
of a stream is detected by checking the control bit of the
MPEG transport stream packets and checking PES sync. If
one or both checks indicate that the scrambling requirement
is not fulfilled, an alarm will be raised. When ‘Control bit’ or
‘PES sync’ is selected, scrambling detection will rely on the
selected parameter only.
The number of seconds a scrambling error should persist
before an alarm is raised. The default setting is to wait until
the error has lasted for 40 seconds. This is useful when
scrambling alternates between scrambled and unscrambled
and you don’t want to raise an alarm every time the stream is
not scrambled but only when there is a real error.
Picture matching in video streams is not an exact science,
as noise can be introduced in many of the stages the stream
goes through. This setting makes it possible to define how
much noise is allowed when performing freeze-frame detection.
When set to Off, the freeze-frame detection is disabled. When
set to Small change, only a small amount of noise is allowed when comparing frames. Normal change is the recommended setting, whereas Large change allows a high amount
of noise, which may result in too many freeze-frame alarms.
Freeze-frame error timeout:
Color-freeze noise floor:
The time (in minutes) a freeze-frame error should persist
before the Extractor will raise an alarm
It is possible to define how much noise is allowed when
performing color-freeze detection. When set to Off, the colorfreeze detection is disabled. When set to Small change, only
a small amount of noise is allowed when comparing to the list
of solid colors. Normal change is the recommended setting,
whereas selection of Large change allows a high amount of
noise, which may result in too many color-freeze alarms.
VB7880 Advanced Content Extractor User’s Manual version 5.2 59
Page 60

Color-freeze error timeout:
Real-time audio analysis:
Audio silence detection threshold: The value in dBs when to trigger the audio silence alarm.
The time (in seconds) a color-freeze error should persist
before the Extractor will raise an alarm.
Enables real-time loudness extraction for the stream. The
loudness data can be retrieved through the Eii.
Audio silence detection timeout:
DAR alarm mode:
Expected display aspect ratio:
DAR alarm timeout:
PAR alarm mode:
Expected pixel aspect ratio:
The value in seconds for when to trigger the audio silence
alarm.
The alarm threshold for Display Aspect Ratio can be set to
Ignore, Same or Specific DAR.
• Ignore: No alarming for DAR.
• Same: Alarm if the DAR changes.
•
Specified DAR: The DAR expected for the stream must
be specified in the text field below.
The expected DAR must be given in the text field (i.e: 16:9
or 4:3) if Specified DAR has been selected in the drop-down
menu above.
The number of seconds before an alarm is triggered when
the Expected display ratio is not correct.
The alarm mode of the expected Pixel Aspect Ratio, can be
set to Ignore, same or Specific PAR.
• Ignore: No alarming for PAR.
• Same: Alarm if the PAR changes.
•
Specified PAR: The PAR expected for the stream must
be specified in the text field below.
The expected Pixel Aspect ratio must be given in the text field
(i.e: 1:1 or 2:1) if Specified PAR has been selected in the
drop-down menu above.
PAR alarm timeout:
The number of seconds before an alarm is triggered when
the expected PAR is not correct.
60 VB7880 Advanced Content Extractor User’s Manual version 5.2
Page 61

5.4.5 Multicasts — Service thresh.
Thresholds are used to determine when to actually raise an alarm upon detection of an error. The
Multicasts — Service thresh.
level. This is particularly useful to specify individual alarm handling rules for services in a multi-program
transport stream (MPTS). Note that if there is a stream and service threshold mismatch, the service
threshold will apply. This may be the case if scrambling or scheduling requirements are set differently in
the stream threshold template and service threshold template associated with a stream.
view makes it possible to define threshold values that operate at service
If the
Extract all services
services not referenced by a Service threshold (even if all service-specific settings are disabled or set to
‘Same as stream’) will be ignored by the VB7880.
In the service threshold template list the ‘Refs’ column displays how many streams are associated with
each service threshold template. Thresholds are associated with each stream in the
Streams — Edit
assign a name and value to the new threshold.
Another way of creating a user-defined thresholds is by highlighting one of the thresholds already defined
and then clicking the Duplicate highlighted button.
Deleting a threshold is done by highlighting the threshold that should be removed and clicking
selected. Note that the predefined thresholds cannot be deleted or changed.
view. To add a new threshold setting, click the
setting is disabled in the Ethernet threshold that is applied to a stream, any
Multicasts —
Add new threshold group
button and
Delete
VB7880 Advanced Content Extractor User’s Manual version 5.2 61
Page 62
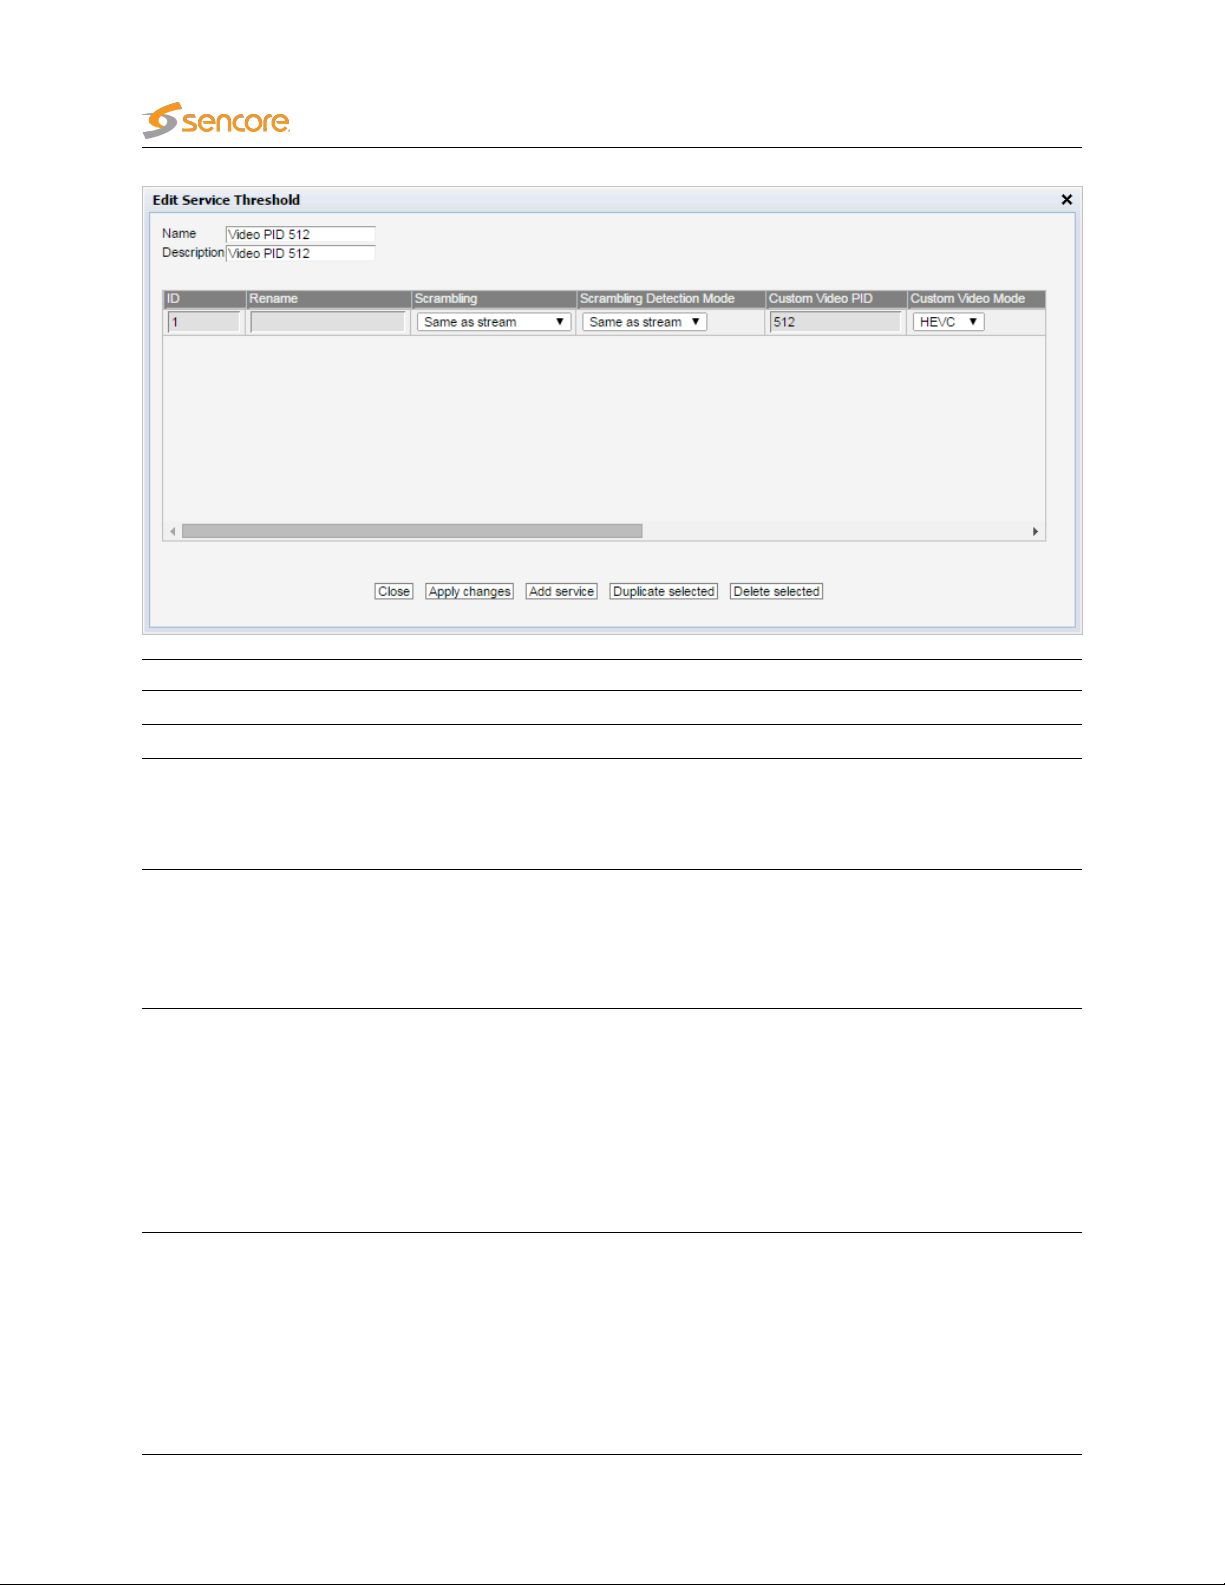
Service thresholds
Name: A text string that identifies the service threshold group
Description: A text string that describes the service threshold group
ID:
The service ID for which the associated thresholds should apply.
For an SPTS the service ID will generally be 1; adding several list
entries with different service IDs allows different thresholds to apply
for different services within an MPTS.
Rename:
Scrambling:
The rename functionality allows a service to be renamed for the
use of the VideoBRIDGE Controller. This is useful when services
within an MPTS are unnamed (no service names in the SDT) or
when services should be recognized by the VideoBRIDGE Controller
under a different name than indicated in the SDT.
Each service can be configured to raise an alarm when that stream’s
scrambling status changes. The default behavior is to ignore whether
a stream is scrambled or not. In order to trigger an alarm if a clear
service is received when it is supposed to be scrambled, select Error
if not scrambled in the Scrambling: pull-down menu. When Error if
scrambled is selected, the Extractor will raise an alarm if it detects
that the stream is clear. When Same as stream is selected, the
requirement defined in the stream threshold will apply.
62 VB7880 Advanced Content Extractor User’s Manual version 5.2
Page 63

Scrambling detection mode:
When scrambling detection mode is set to ‘Both’, scrambling of a
service is detected by checking the control bit of the MPEG transport
stream packets and checking PES sync. If one or both checks
indicate that the scrambling requirement is not fulfilled, an alarm will
be raised. When ‘Control bit’ or ‘PES sync’ is selected, scrambling
detection will rely on the selected parameter only.
When Same as stream is selected, the requirement defined in the
stream threshold will apply.
Custom video PID:
Custom video mode:
DAR Mode:
Expected DAR:
PAR Mode:
If a stream is known not to contain correct PSI needed in order to
locate the video component, the user can define a custom video PID
to be decoded by the Extractor.
Note that for MPTS streams the service IDs for each service should
be unique in the threshold template, even if the stream itself does
not contain PSI.
When a custom video PID has been defined for a service, the user
must specify the video encoding format: MPEG2, H264 or HEVC.
The alarm threshold for Display Aspect Ratio can be set to Ignore,
Same or Specific DAR.
• Ignore: No alarming for DAR.
• Same: Alarm if the DAR changes.
•
Specified DAR: The DAR expected for the stream must be
specified in the text field below.
The expected Pixel Aspect ratio must be given in the text field (i.e:
1:1 or 2:1) if Specified PAR has been selected in the drop-down
menu prior.
The alarm mode of the expected Pixel Aspect Ratio, can be set to
Ignore, same or Specific PAR.
• Ignore: No alarming for PAR.
• Same: Alarm if the PAR changes.
•
Specified PAR: The PAR expected for the stream must be
specified in the text field below.
Expected PAR:
The expected Pixel Aspect ratio must be given in the text field (i.e:
1:1 or 2:1) if Specified PAR has been selected in the drop-down
menu above.
VB7880 Advanced Content Extractor User’s Manual version 5.2 63
Page 64

Schedule:
The Schedule drop-down menu allows the user to associate a
scheduling scheme to a service, in effect masking alarms during
selected intervals. Scheduling templates are defined in the
Scheduling
‘Always’ will always be selectable, and these will result in service
alarms never and always being masked, respectively.
When Same as stream is selected, the requirement defined in the
stream threshold will apply.
Note that alarm masking only affects alarm lists and SNMP traps;
other alarm indications in the GUI will remain visible.
view. The predefined scheduling templates ‘Never’ and
Setup —
64 VB7880 Advanced Content Extractor User’s Manual version 5.2
Page 65

5.5 Captions (Option)
To enable closed caption extraction on a stream, a
be applied to the stream. See chapters 5.4.3 and 5.5.3 for more details.
Captions threshold
with
Enabled
ticked needs to
5.5.1 Captions — Services
The
Captions — Services
service. The services that the VB7880 Advanced Content Extractor extracts captions from are presented
in a list of services, and a ‘bulb’ indicates the current alarm status of the associated service.
view gives the user visual feedback of the closed caption status of each
Thumb: Thumbnail
Name: Service name
Alarm history:
Parent MC stream: Name of the multicast stream this service is extracted from.
#SCTE 20: Number of SCTE 20 caption services detected in this service.
#CEA 608: Number of non-SCTE 20, CEA 608 caption services detected in this service.
#CEA 708: Number of CEA 708 caption services detected in this service.
A bar graph showing alarm severity history for the last 24 hours. Each bar color
represents the alarm severity level as configured under
Main — Alarm setup
.
5.5.2 Captions — Caption service
Press the blue information button on a service to open the caption service window. This window gives
you access to view all closed caption services, and see the alarms for this service.
VB7880 Advanced Content Extractor User’s Manual version 5.2 65
Page 66

5.5.2.1 Captions — Caption service — Captions
The
Captions
display the select captions.
By default, only the closed caption text is shown in the list. If you would like to see all control messages
as well, check the Show control messages checkbox at the bottom left.
view in this pop-up consists of a closed caption service format selector, and the list to
66 VB7880 Advanced Content Extractor User’s Manual version 5.2
Page 67

5.5.2.2 Captions — Caption service — Alarms
The Alarms view gives an at-a-glance overview of any active or cleared alarm for the selected service.
In the right corner of the pop-up window is a free text search field used to narrow down the entries in the
alarm log.
The alarms are the same ones as explained for the
information.
Alarms Setup
view, see chapter 5.2.2 for more
5.5.3 Captions — Thresholds
VB7880 Advanced Content Extractor User’s Manual version 5.2 67
Page 68

Thresholds are used to determine when to actually raise an alarm upon detection of an error. The
Captions — Thresholds
Thresholds are associated with each stream in the
new threshold setting — click the
threshold.
In the threshold presets list the ‘Refs’ column displays how many streams are associated with each
stream threshold template.
Another way of creating a user-defined thresholds is by highlighting one of the thresholds already defined
and then clicking the Duplicate highlighted button.
view makes it possible to define threshold values that operate at stream level.
Add new threshold
Multicasts — Streams — Edit
button and assign a name and value to the new
view. To add a
Deleting a threshold is done by highlighting the threshold that should be removed and clicking
selected. Note that the predefined ‘No Captions’ threshold template cannot be deleted or changed.
Delete
Caption Thresholds
Name: Unique name of these threshold settings
Enabled: Tick this to start closed caption extraction for streams using this threshold
Min. SCTE 20: Minimum number of SCTE 20 caption services expected in services
Min. CEA 608: Minimum number of non-SCTE 20 CEA 608 caption services expected in services
Min. CEA 708: Minimum number of CEA 708 caption services expected in services
68 VB7880 Advanced Content Extractor User’s Manual version 5.2
Page 69

5.6 RVW
5.6.1 RVW — Setup
The
RVW — Setup
chapter 4 for more information on the Remote Video Wall feature.
view configures parameters valid for all the Remote Video Walls. Please refer to
Setup — Branding
Name:
Image:
The name of the selected RVW Mosaic is shown as a label at the top of the
RVW.
A small image/logo that will be visible in the top left corner of the RVW
Mosaic. The file must be selected from the corresponding drop-down menu.
Setup — External system integration
VB7880 Advanced Content Extractor User’s Manual version 5.2 69
Page 70

VBC host name:
The host name or IP address of the VideoBRIDGE Controller used for
integration with the RVW. Leave blank if you do not have a VBC server.
DataMiner host name:
User name:
Password:
The Remote Video Wall allows logos or similar images to be uploaded and set on the each RVW. A
company logo or image can be set as an reference to a selected RVW. To upload an image, use the file
selector under the
from the drop-down menu under Delete image heading and press the Delete button.
The DataMiner user name and password are stored in plain text on the VB7880 server and can
be seen by all logged-in users. If possible, have the VB7880 use a non-privileged account on the
DataMiner server.
Import image
The host name or IP address of the Skyline DataMiner used for integration
with the RVW. Leave blank if you do not have a DataMiner server.
The user name to use when establishing a session towards the DataMiner
server.
The password to use when establishing a session towards the DataMiner
server. The user name and password is sent directly from the VB7880 to
obtain a session key, the RVW widgets do not have access to the password
directly.
heading and press the
Go!
button. To delete an uploaded file, select it
5.6.2 RVW — Mosaic A–D
70 VB7880 Advanced Content Extractor User’s Manual version 5.2
Page 71

The
RVW — Mosaic A–D
RVW and in which frames. A Remote Video Wall can have up to 16 multicast services or OTT channel
profiles depending on the setup.
Follow the link formed by the name of the selected RVW to be re-directed to the URL that hosts the
Remote Video Wall. To display a preview of the RVW inside the configuration UI, use the
Please note that the preview might fail to display properly under some circumstances, and is only meant
as a preview, not a permanent display.
Due to limitations of the VBC server, widget configuration and preview dialogs may not work properly
when opened from inside the VBC interface. If this happens, point the web browser directly to the
VB7880 and perform the configuration there.
Real-time audio analysis is automatically enabled for any multicasts or OTT channels that are set to
display audio bars in the RVW.
Mode: The selected frame can contain these services.
views allows the operator to select which streams to be presented on each
(preview)
RVW — Mosaic A–D
link.
• None: The frame will be empty, this is the default selection.
•
Multicast: When selected from the drop-down menu, a multicast service can
be selected in the Channel drop-down menu below. Make sure that the stream
has been joined in the Multicast section.
•
OTT: When selected, a live OTT profile can be selected in the Channel dropdown menu below. Make sure that the channel has been enabled in the OTT
section.
•
Widget: Embed a web-based widget in this frame. After selecting this type, the
widget to embed can be selected from the ‘Widget’ drop-down menu.
•
Iframe: Embed a web page in this frame. After selecting this type, the address
of the page to embed can be entered in the ‘Address’ field.
Superframe:
Name:
Channel:
Audio: The audio PIDs in a stream to be monitored.
Metering:
Select Superframe to increase the size of a stream thumbnail or widget. When
superframe has been selected, the other frames hidden by this frame will be locked
from editing. A frame can be set up to be displayed in any size from 1x1 to 4x4.
A name to refer to the selected stream in the Remote Video Wall section. If left empty,
the slot will use the name of the service defined by the stream.
In Multicast mode, any service available within a stream may be selected for display. In
OTT mode, any profile available within a live OTT channel may be selected for display.
The specific type of metering for the Audio PIDs. Select either RMS or LUFS/LKFS
metering. RMS metering will display one meter for each audio channel in the stream,
whereas LUFS/LKFS displays one compound meter for the entire audio stream.
Setting metering to None will disable audio bars for this frame.
Note: If the service is scrambled, the VB7880 will not attempt to monitor the audio.
VB7880 Advanced Content Extractor User’s Manual version 5.2 71
Page 72

Widget:
In Widget mode, any installed widget can be selected for display in this frame. Please
refer to chapter 4.3 for descriptions of the available widgets.
Options:
Preview:
If the widget has any configuration options, click the Configure button to set up the
widget. In the configuration dialog, select Apply to apply the changes or Close to close
the dialog without saving changes. Some widgets may also provide a Reset button
that restore the widget’s default setting.
Click the Display button to display a preview of the widget inside the configuration UI.
Please note that not all widget might display correctly in this mode.
72 VB7880 Advanced Content Extractor User’s Manual version 5.2
Page 73

5.7 Setup
5.7.1 Setup — Params
The Setup — Params view enables the following settings:
Various
Extractor name: Each Extractor can be assigned a user defined name.
Extractor location: A text string describing the location of the Extractor.
EBU mode:
Freeze log when full:
Treat events as alarms:
Source specific multicasts: This option should be enable to use Source-specific multicasts.
Selects the unit to use for loudness monitoring. In EBU mode, LUFS is used,
otherwise LKFS is used.
Alarms
When enabled the alarm list will freeze when full (an event will show that it
is full). When the list is full new alarms are ignored until Clear alarms is
pressed. This can sometimes be useful if a unit is placed unattended.
When enabled each event is treated as an alarm that is active for 5
seconds. This may be useful when reporting to external systems that do
not support events but only active or cleared alarms. This setting affects
the local alarm list, SNMP traps and syslog messages.
Network settings
Time synchronization
VB7880 Advanced Content Extractor User’s Manual version 5.2 73
Page 74

Use time server:
If enabled, the Extractor will synchronize with an external NTP time-server. Please
note that if you have configured NTP synchronization in the operating system
(either in the installer or manually), these settings might not be reflected here.
Time server: The IP address or host name of the time server.
Instead of setting up network time synchronization from this tab, we recommend using the standard
operating system tools for configuring the system clock. The settings on this tab are deprecated
and will be removed from a future release of the VB7880 software.
Please refer to the operating system instructions1for further details on how to configure the date and
time.
SNMP
Community string: The Extractor SNMP community string can be changed.
Trap destination 1-3:
SNMP traps will be sent to the specified destinations. Set to 0.0.0.0 to disable
SNMP trap transmission.
1
https://access.redhat.com/documentation/en-US/Red_Hat_Enterprise_Linux/7/html/System_
Administrators_Guide/chap-Configuring_the_Date_and_Time.html
74 VB7880 Advanced Content Extractor User’s Manual version 5.2
Page 75

5.7.2 Setup — Colors
The
Setup — Colors
condition should occur. A mono-colored freeze frame condition may in some cases indicate what
equipment is failing, resulting in the color-freeze.
A freeze color is defined by clicking the
maximum of four colors may be defined. An existing color may be modified by clicking the associated
Edit link.
Name:
Description: A description of the color or an error indication.
Color:
view allows the user to define colors that should be recognized if a color-freeze
Add new color
Edit color
The color name. This name will be part of a color alarm description and the associated
SNMP trap.
The RGB color on the format #XX(Red)XX(Green)XX(Blue) where XX represents a
hexadecimal figure spanning 0-255 in decimal notation. If supported by the browser,
clicking the color should pop up a color selection dialog.
button and assigning an RGB value to a name. A
VB7880 Advanced Content Extractor User’s Manual version 5.2 75
Page 76

5.7.3 Setup — Ethernet
The
Setup — Ethernet
view can be used to verify the server network configuration. A Appendix: Network configuration gives a
brief introduction to the server OS network configuration.
menu displays Ethernet parameters for the available network interfaces. The
Click the
information.
Manage server
button to access the Software Activation interface, see chapter 2.4 for more
5.7.4 Setup — VBC
The VideoBRIDGE Controller can automatically detect the VB7880 Advanced Content Extractor and add
it to the VideoBRIDGE Controller equipment list, provided that the auto-detect functionality is enabled
and the VideoBRIDGE Controller server address is known to the Extractor. Note that the network must
be transparent to traffic between the VideoBRIDGE Controller server and VB7880 Advanced Content
Extractors for auto-detection to work.
The VideoBRIDGE Controller server’s host name may be typed in the VBC server address field. The IP
address associated with the DNS name will be displayed. If host name lookup fails, it is necessary to
type the VideoBRIDGE Controller server’s IP address.
76 VB7880 Advanced Content Extractor User’s Manual version 5.2
Page 77

When changes have been made in the
effect.
Setup — VBC
view, click the
Apply
button for changes to take
5.7.5 Setup — Login
By default, there is no access control and all users have access to all features. Access control can be
enabled for the Extractor, restricting users to read-only access until they log in.
Any user can enable access control, but only users who are logged in can disable it or change the
password.
When access control is activated a
for users that are not logged in. It will be necessary to log-in each time a web browser application is
launched and pointed at the extractor.
Log-in is performed by providing the correct password. The default password is
define a new password that should be easy to remember.
READ-ONLY access
message is displayed under the alarm list
elvis
. The operator may
VB7880 Advanced Content Extractor User’s Manual version 5.2 77
Page 78

Note that when logged in from the VideoBRIDGE Controller, the VideoBRIDGE Controller user’s access
rights apply.
The password defined here controls access to the VB7880 user interface. To change the password
for the Software Activation interface, please refer to chapter 2.4
5.7.6 Setup — VBC thresh.
This tab is only available if the OTT Active Testing option is enabled, and the settings here only apply to
these tests.
The VBC error second thresholds are used by the VideoBRIDGE Controller to issue VBC specific alarms.
The VBC will raise an alarm when the number of error seconds exceeds the error seconds threshold.
The VBC thresholds are only relevant when a VideoBRIDGE Controller is part of the monitoring system.
78 VB7880 Advanced Content Extractor User’s Manual version 5.2
Page 79
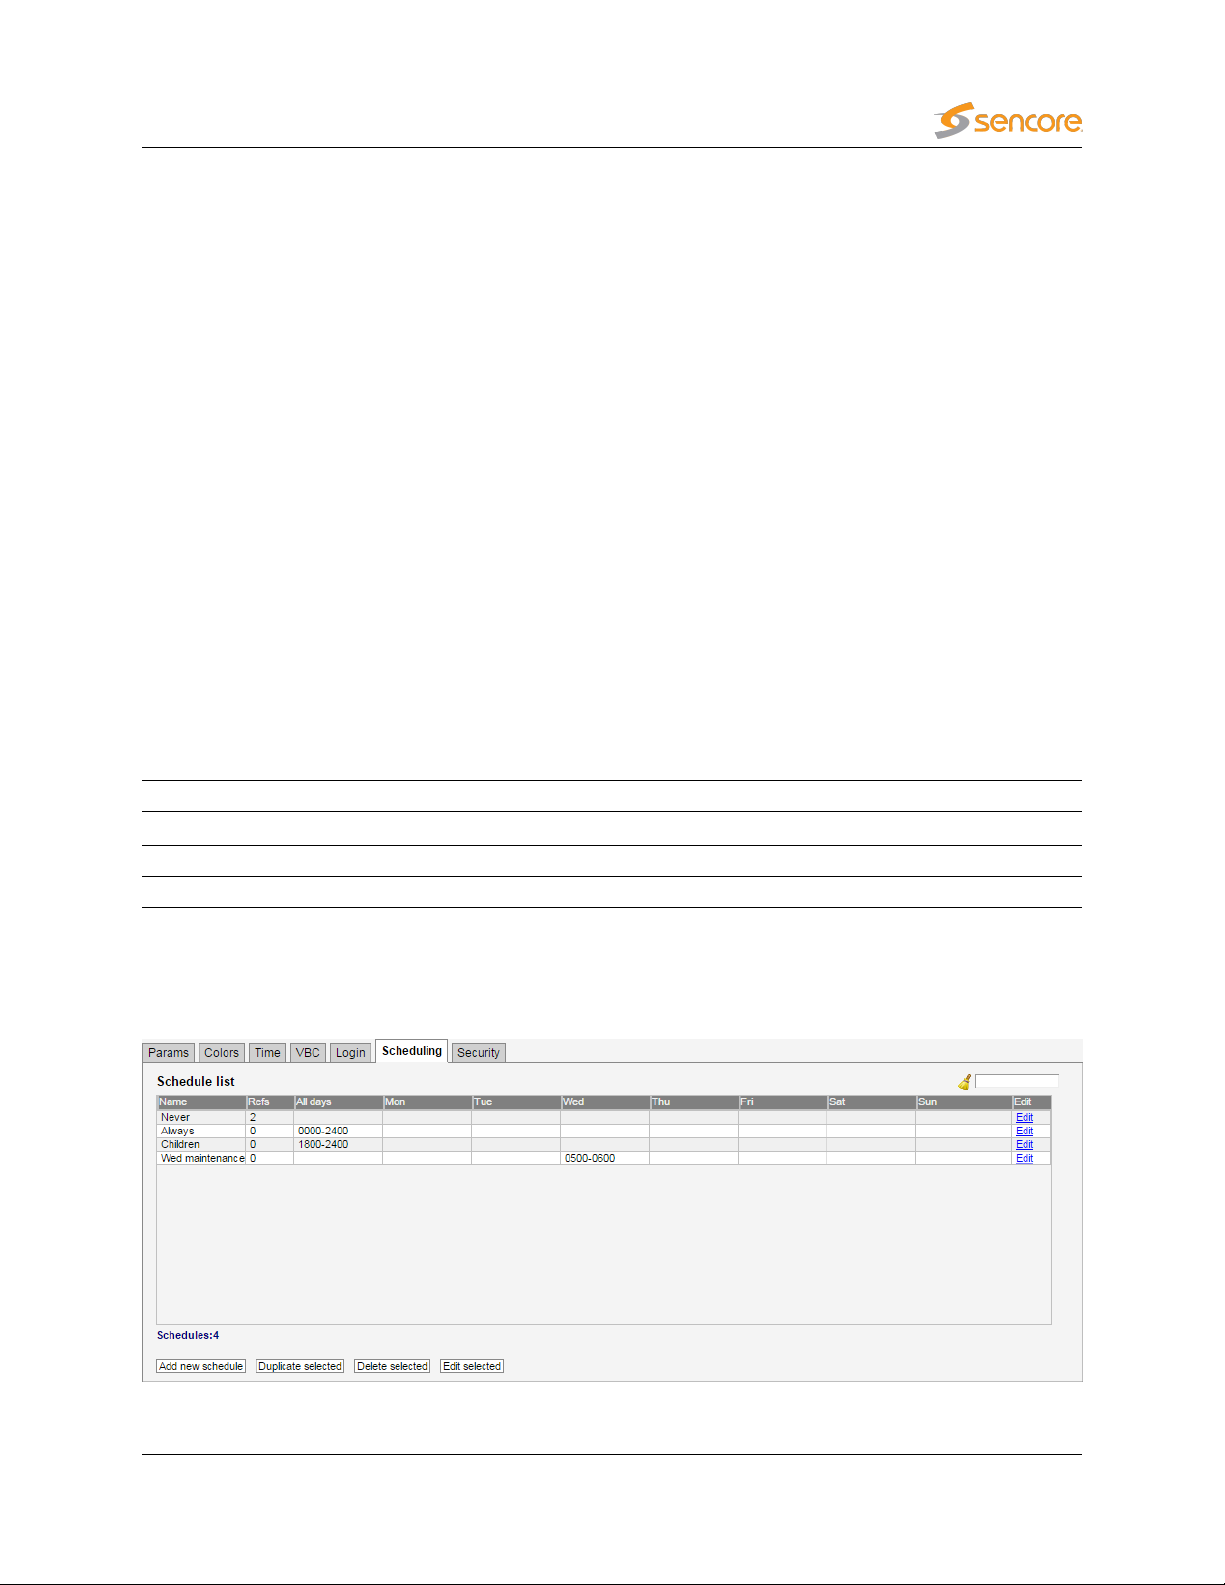
The reason for using error second thresholds is to avoid alarms that toggle on and off, which for a large
monitoring system might otherwise lead to an unintelligible user interface. The VBC thresholds will allow
masking of minor error incidences thus resulting in a control system GUI that presents persistent alarms
only.
The VBC error second thresholds are specified as the number of seconds affected by an error situation.
These thresholds refer to a monitoring window of one hour, meaning that if the number of error seconds
summed over any one-hour period exceeds the associated error second threshold an alarm will be raised
by the VBC.
If a monitoring window different from one hour is selected by the VBC user, the threshold values will be
automatically recalculated to proportional values.
In the ‘VBC threshold presets’ table the ‘Refs’ column shows how many streams are associated with
each VBC threshold template.
By clicking the
definition of a new threshold template. It is possible to copy or delete an existing threshold template by
clicking the
template, the Edit selected button should be clicked.
Multi-edit functionality allows editing several VBC thresholds simultaneously. Highlight the list entries that
should be edited and click the Edit selected button.
OTT transport errors: Number of seconds with OTT transport related alarms
OTT HTTP errors: Number of seconds with OTT HTTP related alarms
OTT XML errors: Number of seconds with OTT XML related alarms.
Add new threshold
Duplicate selectedorDelete selected
button the user will enter a VBC thresholds edit view enabling
VBC thresholds
button respectively. To edit a highlighted threshold
5.7.7 Setup — Scheduling
VB7880 Advanced Content Extractor User’s Manual version 5.2 79
Page 80

The
Setup — Scheduling
PIDs or services using the PID threshold or service threshold template system. This way it is possible to
mask alarms during selected time intervals, e.g. due to maintenance.
In the schedule list the ‘Refs’ column shows how many streams are associated with each schedule
threshold template.
view enables definition of scheduling templates which are associated with
The predefined scheduling templates
respectively. A new scheduling template is created by clicking the
possible to copy an existing scheduling template by highlighting a schedule template and clicking the
Duplicate selected
week days. Intervals are specified on the form hhmm–hhmm, for instance the interval 1200–1400 means
that alarm masking should start at noon and finish at 2 pm. Several alarm masking intervals may be
specified for each day using comma separation. To edit an existing scheduling template, highlight it and
click the Edit selected button. To delete a template, highlight it and click the Delete selected button.
When a scheduling template has been modified, click the
templates become available as selections in the Multicasts — Service thresh. — Edit view.
The search field in the upper right corner of the view allows the user to type a text string, and the schedule
list is updated to display only scheduling templates matching the specified text.
button. The alarm masking intervals are defined for individual week days or for all
Never
and
Always
result in alarms being masked never or always,
Add new schedule
Apply changes
button. Defined scheduling
button. It is also
80 VB7880 Advanced Content Extractor User’s Manual version 5.2
Page 81

5.7.8 Setup — Security
The security section is a restricted section where only the administrator should have access. In this
section the SNMP support may be disabled or enabled (default). For security reasons the login will expire
two minutes after accessing this section.
This page uses the same log-in credentials as the Software Activation interface. Please refer to chapter 2.4
for details on Software Activation.
Enable SNMP:
Security parameters
If SNMP is disabled, no MIB is available on port 161. However
SNMP traps are sent as usual on port 162.
VB7880 Advanced Content Extractor User’s Manual version 5.2 81
Page 82

5.8 Data
5.8.1 Data — Configuration
Full and partial configuration of the Extractor can be exported as XML documents. This is achieved by
clicking one of the links inside the
selected XML document. The browser will allow the contents of the page to be saved to file.
Restoring the Extractor configuration, multicast stream list or OTT channel list is just as simple. Just
click the
and the information in the XML document will be applied. The configuration, stream list, thresholds and
scheduling exports can all be imported by other VB7880s. Multicast stream lists, OTT channel lists and
scheduling information can be exported to and imported from Sencore VideoBRIDGE probes.
You can also import and export license and software maintenance keys in XML format from this page.
It should be possible to import the configuration from a VB280. Go to the Data tab in the VB280 and
select
and the VB7880, some changes may not carry forward correctly.
To import documents that have been manually edited the CRC attribute at the very top of the document
must be deleted (i.e. delete
mechanism.
Under certain circumstances an unmodified configuration file may fail with a CRC error when imported
back. This problem can most often be fixed by opening the exported configuration file in a text editor and
removing the crc attribute as mentioned above.
Browse
Full configuration
button and select the file that contains the XML document. Then click the
under
Export XML
Export XML
crc="..."
frame. A new browser window pops up containing the
Go!
button
. Due to the changes in the architecture between the VB280
from the file). This will bypass the checksum verification
82 VB7880 Advanced Content Extractor User’s Manual version 5.2
Page 83

Note that the Extractor name and location are not part of the XML document. Hence exporting the full
configuration of one Extractor and restoring it on another will make the two Extractors identical except for
the network settings.
Clicking the Debug data export option will generate a document containing debug information that may
be useful if Extractor misbehavior is reported. This file should be sent along with a description of the
misbehavior.
5.8.2 Data — Software
The software section allows the VB7880 Advanced Content Extractor to be upgraded to a newer version
just by pressing the choose file button and selecting the
then pressing Go!.
.tea
file from the directory of the local PC and
5.8.3 Data — Eii
VB7880 Advanced Content Extractor User’s Manual version 5.2 83
Page 84

The
External integration interface
party NMS systems. In order to facilitate integration the
containing the data typically being requested by an NMS system via the regular Eii interface.
Please refer to the document Eii External Integration Interface for detailed information about Eii.
(Eii) allows inclusion of Sencore VideoBRIDGE equipment into 3rd
Data — Eii
view allows export of XML files
84 VB7880 Advanced Content Extractor User’s Manual version 5.2
Page 85

5.9 About
5.9.1 About — Release info
This section shows the version and build date of the installed software and the underlying operating
system.
5.9.2 About — License
VB7880 Advanced Content Extractor User’s Manual version 5.2 85
Page 86

This view shows the available Extractor options and current Extractor license and software maintenance
details. By clicking the blue information icon associated with each option it is possible to view option
details.
It is also possible to export the license and software maintenance keys in XML format from this page.
These keys can be imported using the Data — Configuration tab, or from Software Activation.
Click the
for more information.
To disable the VB7880 Advanced Content Extractor, uncheck the
the
Activation interface (which is done by default the first time you activate the software), you will need to
change the default back to Software Activation before disabling VB7880 Advanced Content Extractor.
Manage installed software
Change
button. You cannot do this if it has been set as the default software through the Software
link to access the Software Activation interface, see chapter 2.4
Activate software
checkbox and click
5.9.3 About — Technologies
This view shows a description of some of the technologies available in the Sencore VideoBRIDGE
product family.
86 VB7880 Advanced Content Extractor User’s Manual version 5.2
Page 87

5.9.4 About — Credits
This view shows information about the software included with the Extractor.
VB7880 Advanced Content Extractor User’s Manual version 5.2 87
Page 88

A Appendix: Network configuration
To change the network configuration, using the
using nmtui can be found in the Networking Guide1.
Some older installation images did not make the
you can install it by issuing the command
nmtui
nmtui
tool is recommended. More documentation on
tool available. If it is not installed on your system,
yum install NetworkManager-tui
It is also possible to use the
modifying network connections using nmcli:
nmcli
command. Here are some example commands for adding and
# Display a list of active connections
nmcli con
# Add a new connection
nmcli con add con-name eno2 ifname eno2 type ethernet ip4 10.100.100.1/24
# Disconnect the eno2 connection
nmcli con down eno2
# Reconfigure the IPv4 address
nmcli con mod eno2 ipv4.addresses 10.100.100.2/24
# Connect the eno2 connection
nmcli con up eno2
More documentation on nmcli is available in the Networking Guide2.
1
https://access.redhat.com/documentation/en-US/Red_Hat_Enterprise_Linux/7/html/
Networking_Guide/sec-Networking_Config_Using_nmtui.html
2
https://access.redhat.com/documentation/en-US/Red_Hat_Enterprise_Linux/7/html/
Networking_Guide/sec-Using_the_NetworkManager_Command_Line_Tool_nmcli.html
88 VB7880 Advanced Content Extractor User’s Manual version 5.2
Page 89

B Appendix: OTT Profile Health
B.1 OTT Profile Health Bar
The profile health bar displayed at channel level shows an overview of current status for individual channel
profiles. Different colors indicate status:
• Green: OK
• Yellow: Warning
• Orange: Error
• Red: Major
• Black: Fatal
All enabled alarms may affect the profile health bar, and alarm severities can be assigned to each alarm
in the Alarms — Alarm setup view.
VB7880 Advanced Content Extractor User’s Manual version 5.2 89
Page 90

B.2 OTT Profile Health Timeline
The OTT profile health timeline shows information about channel bitrate and channel alarm status for the
last two hours, with a time resolution of one minute. Green parts of the timeline indicate profile download
time versus chunk length. The graph is scaled so that 100% indicates a chunk download time identical to
chunk length (in seconds), chunk length being signalled in the profile manifest. Quick chunk download
times therefore result in a ‘low’ green graph, as seen in the left hand part of the graph above. When
download times exceed the user defined profile bitrate warning and error thresholds the graph is colored
yellow and orange respectively.
In addition to profile bitrate indication the graph displays profile status information related to non-bitrate
alarms. Active profile alarms are represented in the graph as 100% bars, the color reflecting the severity
of the alarm. If several alarms are active within a one minute period the graph color will reflect the most
severe alarm. Historical alarms can be examined in more detail by viewing the OTT alarm list.
90 VB7880 Advanced Content Extractor User’s Manual version 5.2
 Loading...