

Page 1

SMR 111
OWNER‘S MANUAL
USER INSTRUCTIONS
NÁVOD K OBSLUZE
UŽIVATELSKÉ POKYNY
NÁVOD NA OBSLUHU
POUŽÍVATEĽSKÉ POK YNY
HASZNÁL ATI ÚTMUTATÓ
HA SZN ÁLAT I UTA SÍTÁ SOK
INSTRUKCJA OBSŁUGI
ZALECENIA DLA UŻYTKOWNIK A
Personal Mobile
Radio
Osobní mobilní
radiostanice
Osobná mobilná
rádiostanica
Személyi mobil
adóvevő
Przenośny
radiotelefon
Page 2

Page 3
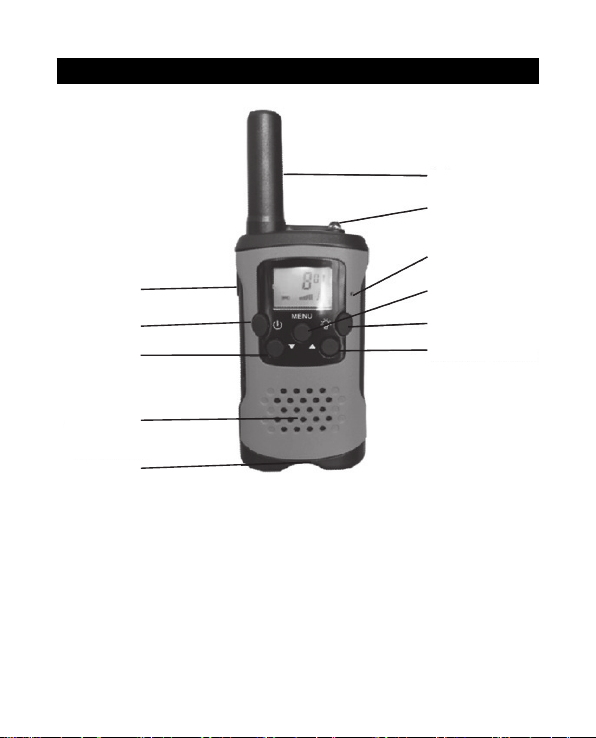
Key Functions
1.
2.
3.
7.
4.
8.
9.
10.
11.
1. Antenna
2. Light
3. Microphone
4. Menu Button
5. Light ON/OFF
6. SCAN/UP Button
5.
6.
7. PTT Button
8. Power ON/OFF Button
9. MONI/DOWN Button
10. Speaker
11. Portable Clip
EN-1
Page 4

Instructions for use
This set included 2 walkie-talkie units: there are communication devices
which operate on mobile radio frequencies. They come with 8 channels
as well as back-lit LCD screen, enabling you to communicate over several
kilometers free-of –charge (up to 5 km in open areas).
Note:
Please read these user instructions carefully before using the
equipment and retain for future consultation!
Specifi c recommendations
If you carry any kind of personal medical device, consult a doctor
before use.
To avoid the risk of burns, do not use the device if the aerial is damage
in any way.
Don not use the device in a potentially explosive setting (e.g. Around
pumps, on the lower deck of a boat or around a fuel-storage
installation or chemical products)
If traveling in a car or by bike, stop before using the device.
Switch off the device if on an airplane or in a hospital,
Never use the device in close proximity to a radio that avoid to
interference.
Remove the batteries if the device is not use for an extended period of
time. Never mix used with new batteries.
Position the transmitter and antenna at least 5cm from your face.
Direct the antenna upwards and speak normally.
Clean the device with a damp cloth. Avoid the use of cleaning agents
and solvents.
Do not modify the device in any way. In the event of damage occurring,
ensure that the device us checked by a qualifi ed professional.
The device cannot be used to contact the emergency services.
EN-2
Page 5
BEFORE USE
To insert batteries into the devices, fi rst remove the belt attachment: Lift the
attachment clip and press the belt attachment upwards. Open the battery
compar tment and inser t 3 AAA batteries (not supplied), ensuring that the
poles are correctly aligned. Then close the lid.
USING
1. Turning the device on/off :
To turn the device on or off , hold down the ON/OFF power button for
3 seconds a BEEP sound will be played to confi rm.
2. Adjusting the volume:
To increase the volume, press the Up ▲ button; to reduce the volume,
press the Down ▼ button.
Note:
The volume level is displayed on the screen.
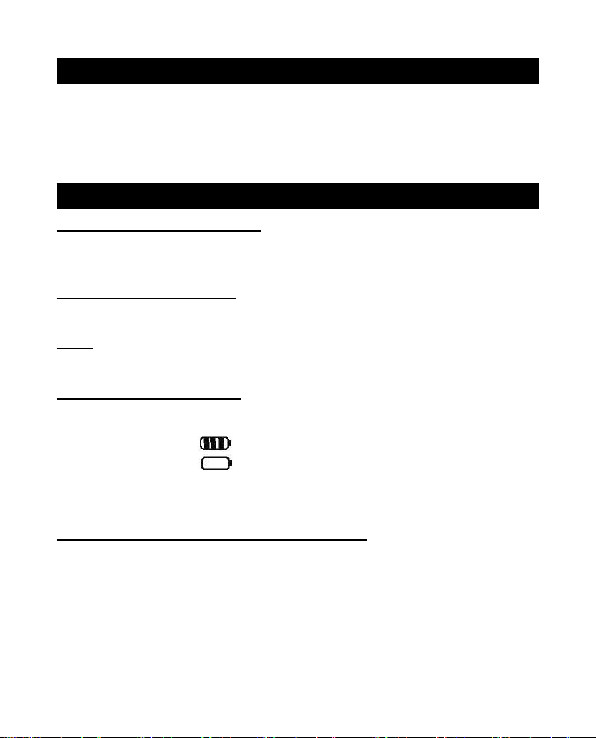
3. Low Battery Indication
The battery is indicated by number of squares present inside the
battery icon on the LCD screen.
Battery Full
Battery empty
When the battery is low, the battery icon will fl ash and a beep will be
heard to indicate that the batteries need to be replaced.
4. Receiving/transmitting communications:
When the display is on, the devices are in “Reception” mode, i.e.
they are ready to accept a call or sound transmitted on the activated
frequency.
When you press the Call/PTT (Call) button, the devices switches to
“Transmit” mode and will send a sound signal to other device.
For a voice transmission, press and hold the Call/PTT (transmit)
button and speak into the microphone. Hold down this button until the
transmission of your message is complete.
EN-3
Page 6

Hold the microphone a minimum of 5 cm from your face.
Note:
- The other device must be set to the same channel and have set the
same CTCSS code (see point 7)
- After completing the transmission and releasing the Call/PTT button,
the other device will make a sound signal (BEEP) to indicate that this
device is ready to transmit.
5. Changing Channels
Press the MENU button once - the number of the current channel will
start fl ashing.
Press the up▲ or the down▼ button to change the channel.
Press the Call/PTT button to confi rm and return to stand-by mode.
Note:
If no button is pressed within 15 seconds during setting, the device will
return to stand-by mode.
6. CTCSS (Continious Tone Coded Squelch System)
License free radio’s operating on the 446 MHz frequency band
have 8 available radio channels. If there are many radio’s users in
your neighborhood, there is a chance that some of these users are
operating on the same radio channel.
To prevent that you receive signals from other users, sub-channels
have been integrated.
Two radio’s will only be able to communicate with each other when they
are operating on the same radio channel and when they have selected
exactly the same sub-channel.
When using CTCSS, a low frequency tone (between 67 and 250 Hz)
will be transmitted along with the voice signal. There are 38 available
tones to choose from. You are free to choose on of these 38 available
tones. Due to fi ltering, these tones will generally not be audible so they
will not disturb the communication.
EN-4
Page 7

7. CT CS S
Press the MENU button twice, the current CTCSS code will fl ash on
the display. Press the up▲ button or the down▼ button to change to
another code.
Press the Call/PTT button to confi rm and return to stand-by mode.
Note:
To turn off CTCSS, select for CTCSS the code “OF” in the menu. When
the entry is confi rmed, “OF” will be displayed.
8. MONITOR
You can use the monitor feature to check for weaker signals in the
current channel.
To monitor a channel, hold down the DOWN▼ button. The monitoring
function will be activated after approximately three seconds.
Release the DOWN▼ button to stop channel monitoring.
Note:
During channel monitoring the receiver circuit in the Radio’s will
not listen to CTCSS codes.
9. VOX (Hands free function)
The Radio’s is capable of voice activated (VOX) transmission. In VOX
mode, the radio will transmit a signal when it is activated by your voice
or other sound around you. VOX opration is not recommended if you
plan to use your radio in a noisy or windy environment.
Note:
VOX mode will be overrided when you press the “Call/PTT button.
Press the MENU button three times, the current VOX setting will
fl ash on the display and the VOX icon will display,
Press UP▲ button to set the VOX sensitivity level between 1 and
3 level (level 3 is the most sensitive level).
Press Down▼ button until “OF” appears on the display to turn VOX
OFF.
Press the Call/PTT button to confi rm and return to stand-by mode.
EN-5
Page 8

10. Scanning for an active radio channel
Press the UP▲ button for 3 seconds: The “SCAN” function indicator
will appear on the display and the channel will scan continuously from
1 to 8 (according to current CTCSS subchannel setting only).
Press the Down▼ button to start scanning channels from 8 to 1.
Once an active channel is found, the scanning will stop and you can
listen to the transmission.
When the transmission is on the found channel stop, the scanning will
resume automatically.
Note:
If you press Call/PTT button while listening to a found channel, the
device will go back to stand-by mode on the found channel.
11. Call tones
A call tone alerts others that you want to start talking.
11.1 Setting the Call Tone
The device has 10 call tones.
Press the MENU button four times, “CA” is displayed and the current
call tone is fl ashing.
Press the UP▲ or the Down▼ button to change another Call Tone.
Press the Call/PTT button to confi rm and return to stand-by mode.
11.2 Sending a call Tone
Press the Call/PTT button briefl y, the call tone will be transmitted on
the set channel.
12. Key-Tone On/Off
When a button is pressed, the unit will beep briefl y.
To set the key-tone.
Press the MENU-button fi ve times “to” will be displayed.
Press the UP▲ button to turn on or the Down▼ button to turn off (OF)
the button tones.
Press the Call/PTT – button to confi rm your selection and return to the
standby mode.
EN-6
Page 9

13. Roger Beep On/Off
After the PTT button us released, the device will send out a roger beep
to confi rm that you have stopped talking.
To set the Roger Beep.
Press the MENU button six times, “ro” will be displayed.
Press the UP▲button to turn on or the Down▼ button to turn off the
Roger Beep function.
Press the Call/PTT button to confi rm your selection and return to the
stand-by mode.
14. Backlit display
To activate the LCD display backlight, press any button with the
exception of the Call/PTT button and the fl ashlight button. The LCD
backlight will light upfor 5 seconds.
15. Battery saving function
When the device has not been used for 6 seconds, the economy
mode is automatically activated. This does not aff ect the reception of
transmission and the standard mode is automatically re-activated as
soon as a signal is detected.
16. Built-in Flash light
Your radio station is equipped with an additional built-in fl ash light
function, which can be used for sending light signals or for lighting
17. Lock & Unlock the device
Press and hold MENU button for 3 seconds to lock the device.
Press and hold MENU button for 3 seconds to unlock the device.
EN-7
Page 10
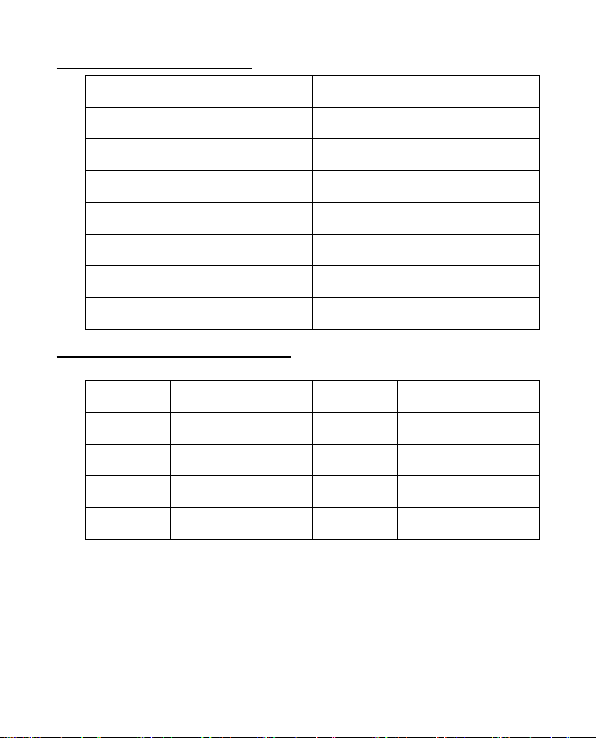
18. Technical specifi cations
Frequency 446 MHZ
Channel number 8 channels
Sub-code CTCSS 38
Transmission Power ≤0.5W
Range Up to 5 Km in open fi eld
Battery type 3* AA A Alkaline batteries
Modulation type FM-F3E
Channel spacing 12.5 KHz (Narrow band)
19. Channel and Frequency (MHz)
Channel Frequency (MHz) Channel Frequency (MHz)
1 446.00625 5 446.05625
2 446.01875 6 446.06875
3 446.03125 7 446.08125
4 446.04375 8 446.09375
EN-8
Page 11
Disposal of Old Electrical & Electronic Equipment
(Applicable in the European Union and other European
countries with separate collection systems) This symbol on
the productor on its packaging indicates that this product
shall not be treated as house hold waste. Instead in shall
Be handed over to the applicable collection point for there
cycling of electrical and electronic equipment. By ensuring
this product is disposed of correctly, you will help prevent
potential negative consequences for the environment
and human health, which could other wise be caused by
inappropriate waste handling of this product. The recycling
of materials will help to conserve natural resources. For
more detailed information about recycling of this product,
please contact your local city offi ce or your household waste
disposal service.
The product meets EU requirements.
Hereby, Fast ČR, a.s. declares that the radio equipment type
SMR 111 is in compliance with Directive 2014/53/EU.
The full text of the EU declaration of conformity is available
at the following internet address: www.sencor.eu
Manufacturer: Fast ČR, a.s., Černokostelecká 1621, CZ 251 01 Říčany
EN-9
Page 12

EN
EN-10
Page 13

Funkce tlačítek
1.
2.
3.
7.
4.
8.
9.
10.
11.
1. Anténa
2. Svítilna
3. Mikrofon
4. Tlačítko Menu
5. Light ON/OFF
(Zapnutí/Vypnutí svítilny)
6. Tlačítko SCAN/UP
(Prohledat/Nahoru)
5.
6.
7. Tlačítko PTT
8. Tlačítko Power ON/OFF
(Zapnutí/Vypnutí napájení)
9. Tlačítko MONI/DOWN
(Monitorovat/Dolů)
10. Reproduktor
11. Přenosná spona
CZ-1
Page 14

Návod k použití
Tato sada obsahuje 2 vysílací jednotky – komunikační zařízení pracující
na mobilních rádiových frekvencích. K dispozici je 8 kanálů, stejně jako
podsvícený LCD displej, pro bezplatnou komunikaci na vzdálenost několika
kilometrů (v otevřeném terénu až 5 km).
Poznámka:
Před použitím tohoto zařízení si prosím pozorně přečtěte tyto
uživatelské pokyny a uschovejte je pro pozdější použití!
Specifi cká doporučení
Pokud používáte jakýkoli typ osobní zdravotní pomůcky, poraďte se před
použitím tohoto zařízení s lékařem.
Aby nehrozilo nebezpečí popálení, v případě jakéhokoli poškození
antény toto zařízení nepoužívejte.
Nepoužívejte toto zařízení v prostředí s nebezpečím výbuchu (např.
v blízkosti čerpacích stanic, na dolní palubě lodi nebo v blízkosti skladišť
paliv nebo chemických produktů)
Pokud jedete autem nebo na kole, před použitím tohoto zařízení
zastavte.
V letadle nebo v nemocnici toto zařízení vypněte.
Nikdy nepoužívejte toto zařízení v těsné blízkosti rádia, aby
nedocházelo k rušení.
Pokud nebudete toto zařízení delší dobu používat, vyjměte z něj baterie.
Nikdy nekombinujte staré a nové baterie.
Umístěte vysílač a anténu do vzdálenosti minimálně 5 cm od vašeho
obličeje. Nasměrujte anténu nahoru a normálně mluvte.
Zařízení čistěte vlhkým hadříkem. Nepoužívejte čisticí prostředky
a rozpouštědla.
Nepokoušejte se zařízení jakkoliv upravovat. V případě poškození
zajistěte, aby bylo zařízení zkontrolováno kvalifi kovaným profesionálem.
Toto zařízení nelze používat pro kontaktování nouzových služeb.
CZ-2
Page 15
PŘED UVEDENÍM DO PROVOZU
Chcete-li vložit do zařízení baterie, nejprve vysuňte sponu na opasek:
Zvedněte západku spony a zatlačte sponu směrem nahoru. Otevřete prostor
pro baterie a vložte 3 baterie AAA (nejsou součástí příslušenství) tak, aby
byla dodržena správná polarita. Potom kryt zavřete.
POUŽITÍ
1. Zapnutí/Vypnutí zařízení:
Pro zapnutí nebo vypnutí zařízení podržte 3 sekundy tlačítko Power
ON/OFF – pro potvrzení se ozve PÍPNUTÍ.
2. Nastavení hlasitosti:
Pro zvýšení hlasitosti stiskněte tlačítko Up ▲; pro snížení hlasitosti
stiskněte tlačítko Down ▼.
Poznámka:
Úroveň hlasitosti se zobrazí na displeji.
3. Indikace vybité baterie
Úroveň nabití baterie je na LCD displeji indikována pomocí políček uvnitř
ikony baterie.
Baterie nabitá
Baterie vybitá
Když je baterie vybitá, ikona baterie bliká a ozve se pípnutí pro indikaci,
že je nutno vyměnit baterie.
4. Příjem/vysílání komunikace:
Když je displej zapnutý, jsou zařízení v režimu „Příjem“, tj. jsou
připravena přijmout hovor nebo zvuk vysílaný na aktivované frekvenci.
Když stisknete tlačítko Call/PTT (Hovor), zařízení se přepne do režimu
„Vysílání“ a odešle do druhého zařízení zvukový signál.
Pro přenos hlasu stiskněte a podržte tlačítko Call/PTT (vysílání) a mluvte
do mikrofonu. Podržte toto tlačítko, dokud není dokončen přenos vaší
zprávy.
CZ-3
Page 16

Držte mikrofon ve vzdálenosti minimálně 5 cm od obličeje.
Poznámka:
- Druhé zařízení musí být nastaveno na stejný kanál a musí mít nastaven
stejný CTCSS kód (viz bod 7)
- Po dokončení přenosu a uvolnění tlačítka Call/PTT vydá druhé zařízení
zvukový signál (PÍPNUTÍ) pro indikaci připravenosti tohoto zařízení
vysílat.
5. Změna kanálů
Stiskněte jednou tlačítko MENU – začne blikat číslo aktuálního kanálu.
Změňte kanál stisknutím tlačítka Up▲ nebo tlačítko Down▼.
Stiskněte tlačítko Call/PTT pro potvrzení a návrat do pohotovostního
režimu.
Poznámka:
Pokud při nastavování během 15 sekund nestisknete žádné tlačítko, vrátí
se zařízení do pohotovostního režimu.
6. CTCSS (Continuous Tone Coded Squelch System)
Radiostanice bez licence používající frekvenční pásmo 446 MHz mají
k dispozici 8 rádiových kanálů. Pokud je ve vašem okolí hodně uživatelů
radiostanic, může se stát, že budou někteří uživatelé používat stejný
rádiový kanál.
Aby nedocházelo k příjmu signálů jiných uživatelů, používají se
subkanály.
Dvě radiostanice budou schopny vzájemné komunikace pouze tehdy,
když používají stejný rádiový kanál a mají nastaven přesně stejný
subkanál.
Při použití systému CTCSS bude společně s hlasovým signálem vysílán
nízkofrekvenční tón (v rozmezí 67 až 250 Hz). Pro výběr je k dispozici
38 tónů. Kterýkoli z těchto 38 tónů si můžete vybrat. Díky fi ltraci nebudou
tyto tóny obecně slyšitelné, takže nebudou rušit komunikaci.
CZ-4
Page 17

7. CTCSS
Stiskněte dvakrát tlačítko MENU – na displeji bude blikat aktuální
CTCSS kód. Nastavte jiný kód stisknutím tlačítka Up▲ nebo tlačítko
Down▼.
Stiskněte tlačítko Call/PTT pro potvrzení a návrat do pohotovostního
režimu.
Poznámka:
Pro vypnutí CTCSS vyberte pro CTCSS v menu kód „OF“. Po potvrzení
této položky se zobrazí „OF“.
8. MONITOROVÁNÍ
Funkci monitorování můžete používat pro kontrolu slabších signálů
na aktuálním kanálu.
Pro monitorování kanálu podržte stisknuté tlačítko DOWN▼. Funkce
monitorování bude aktivována po přibližně třech sekundách.
Pro ukončení monitorování kanálu stiskněte tlačítko DOWN ▼.
Poznámka:
Během monitorování kanálu nebude přijímací obvod v radiostanici
naslouchat CTCSS kódům.
9. VOX (Funkce handsfree)
Tato radiostanice podporuje přenos aktivovaný hlasem (VOX). V režimu
VOX bude radiostanice přenášet signál tehdy, když bude aktivována
vaším hlasem nebo jinými zvuky ve vašem okolí. Funkci VOX
nedoporučujeme používat, pokud budete radiostanici používat v hlučném
nebo větrném prostředí.
Poznámka:
Režim VOX bude po stisknutí tlačítka „Call/PTT“ zrušen.
Stiskněte třikrát tlačítko MENU – na displeji začne blikat aktuální
nastavení VOX a zobrazí se ikona VOX.
Stiskněte tlačítko UP▲ pro nastavení úrovně citlivosti VOX na
hodnotu 1 až 3 (úroveň 3 má nejvyšší citlivost).
Pro vypnutí funkce VOX stiskněte tlačítko Down ▼ a podržte jej,
dokud se na displeji nezobrazí „OF“.
Stiskněte tlačítko Call/PTT pro potvrzení a návrat do pohotovostního
režimu.
CZ-5
Page 18

10. Vyhledávání aktivního rádiového kanálu
Stiskněte na 3 sekundy tlačítko UP▲: Na displeji se zobrazí indikátor
funkce „SCAN“ a začnou se nepřetržitě prohledávat kanály 1 až 8 (pouze
podle aktuálního nastavení subkanálu CTCSS).
Stiskněte tlačítko Down ▼ pro spuštění prohledávání kanálů od 8 do 1.
Po nalezení aktivního kanálu se prohledávání zastaví a můžete
poslouchat vysílání.
Po ukončení vysílání na aktuálním kanálu se automaticky obnoví
prohledávání.
Poznámka:
Pokud stisknete tlačítko Call/PTT během poslechu nalezeného kanálu,
přepne se zařízení zpět do pohotovostního režimu na nalezeném kanálu.
11. Volací tóny
Volací tón upozorňuje ostatní na to, že chcete začít hovořit.
11.1 Nastavení volacího tónu
Toto zařízení má k dispozici 10 volacích tónů.
Stiskněte čtyřikrát tlačítko MENU – zobrazí se „CA“ a začne blikat
aktuální volací tón.
Změňte volací tón stisknutím tlačítka Up▲ nebo tlačítko Down▼.
Stiskněte tlačítko Call/PTT pro potvrzení a návrat do pohotovostního
režimu.
11.2 Odeslání volacího tónu
Stiskněte krátce tlačítko Call/PTT – volací tón bude přenesen na
vybraném kanálu.
12. Zapnutí/vypnutí tónu tlačítek
Po stisknutí tlačítka jednotka krátce pípne.
Nastavení tónu tlačítek.
Stiskněte pětkrát tlačítko MENU pro zobrazení „to“.
Stiskněte tlačítko UP▲ pro zapnutí nebo tlačítko Down▼ pro vypnutí
(OF) tónů tlačítek.
Stiskněte tlačítko Call/PTT pro potvrzení volby a návrat
do pohotovostního režimu.
CZ-6
Page 19

13. Zapnutí/vypnutí funkce Roger Beep
Po uvolnění tlačítka PTT odešle zařízení zvukový signál (pípnutí) pro
potvrzení, že jste přestali mluvit.
Nastavení funkce Roger Beep.
Stiskněte šestkrát tlačítko MENU pro zobrazení „ro“.
Stiskněte tlačítko UP▲ pro zapnutí nebo tlačítko Down▼ pro vypnutí
funkce Roger Beep.
Stiskněte tlačítko Call/PTT pro potvrzení volby a návrat
do pohotovostního režimu.
14. Podsvícení displeje
Pro aktivaci podsvícení LCD displeje stiskněte jakékoli tlačítko
s výjimkou tlačítka Call/PTT a tlačítka svítilny. Podsvícení LCD zůstane
zapnuté po dobu 5 sekund.
15. Funkce šetření baterie
Pokud zařízení během 6 sekund nepoužijete, automaticky se aktivuje
úsporný režim. Tento režim nemá vliv na příjem vysílání a v případě
detekce signálu se znovu automaticky aktivuje standardní režim.
16. Vestavěná svítilna
Vaše radiostanice je vybavena doplňkovou funkcí vestavěné svítilny,
kterou lze používat pro odesílání světelných signálů nebo pro svícení
17. Uzamknutí a odemknutí zařízení
Stiskněte tlačítko MENU a podržte jej 3 sekundy pro uzamknutí zařízení.
Stiskněte tlačítko MENU a podržte jej 3 sekundy pro odemknutí zařízení.
CZ-7
Page 20

18. Technické údaje
Frekvence 446 MHz
Počet kanálů 8 kanálů
Subkód CTCSS 38
Vysílací výkon ≤0,5 W
Dosah Až 5 km v otevřeném prostoru
Typ baterie 3* alkalické baterie AAA
Typ modulace FM-F3E
Rozestup kanálů 12,5 kHz (úzké pásmo)
19. Kanál a frekvence (MHz)
Kanál Frekvence (MHz) Kanál Frekvence (MHz)
1 446,00625 5 446,05625
2 446,01875 6 446,06875
3 446,03125 7 446,08125
4 446,04375 8 446,09375
CZ-8
Page 21

Likvidace vyřazených elektrických a elektronických zařízení
(platí v zemích Evropské unie a dalších evropských zemích
se samostatnými systémy sběru odpadu) Tento symbol na
produktu nebo jeho obalu znamená, že produkt nesmí být
vyhozen do běžného domovního odpadu. Namísto toho jej
musíte odevzdat v příslušném sběrném dvoře určeném pro
recyklaci elektrických a elektronických zařízení. Zajištěním
správné likvidace tohoto produktu pomůžete předejít
potenciálním negativním dopadům na životní prostředí
a lidské zdraví, ke kterým by jinak mohlo dojít v případě
nesprávné likvidace tohoto produktu. Recyklace materiálů
pomáhá chránit přírodní zdroje. Podrobnější informace
o recyklaci tohoto produktu získáte na místním úřadě nebo
u společnosti zajišťující likvidaci vašeho domácího odpadu.
Výrobek splňuje požadavky EU na něj kladené.
Tímto Fast ČR, a.s. prohlašuje, že typ rádiového zařízení
SMR 111 je v souladu se směrnicí 2014/53/EU.
Úplné znění EU prohlášení o shodě je k dispozici na této
internetové adrese: www.sencor.eu
Výrobce: Fast ČR, a.s., Černokostelecká 1621, CZ 251 01 Říčany
CZ-9
Page 22

CZ
Záruční podmínky
Součástí balení tohoto výrobku není záruční list.
Prodávající poskytuje kupujícímu na výrobek záruku vtrvání 24 měsíců od převzetí výrobku kupujícím. Záruka se
poskytuje za dále uvedených podmínek. Záruka se vztahuje pouze na nové spotřební zboží prodané spotřebiteli pro
běžné domácí použití. Práva zodpovědnosti za vady (reklamaci) může kupující uplatnit buď uprodávajícího, ukterého
byl výrobek zakoupen nebo vníže uvedeném autorizovaném servisu. Kupující je povinen reklamaci uplatnit bez
zbytečného odkladu, aby nedocházelo ke zhoršení vady, nejpozději však do konce záruční doby. Kupující je povinen
poskytnout při reklamaci součinnost nutnou pro ověření existence reklamované vady. Do reklamačního řízení se přijímá
pouze kompletní azdůvodů dodržení hygienických předpisů neznečištěný výrobek. Vpřípadě oprávněné reklamace se
záruční doba prodlužuje odobu od okamžiku uplatnění reklamace do okamžiku převzetí opraveného výrobku kupujícím
nebo okamžiku, kdy je kupující po skončení opravy povinen výrobek převzít. Kupující je povinen prokázat svá práva
reklamovat (doklad ozakoupení výrobku, záruční list, doklad ouvedení výrobku do provozu).
Záruka se nevztahuje zejména na:
vady, na které byla poskytnuta sleva;
opotřebení apoškození vzniklé běžným užíváním výrobku;
poškození výrobku vdůsledku neodborné či nesprávné instalace, použití výrobku vrozporu snávodem kpoužití,
platnými právními předpisy aobecně známý mi a obvyklými způsoby používání, v důsledku použití výrobku
kjinému účelu, než ke kterému je určen;
poškození výrobku vdůsledku zanedbané nebo nesprávné údržby;
poškození výrobku způsobené jeho znečištěním, nehodou azásahem vyšší moci (živelná událost, požár, vniknutí
vody);
vady funkčnosti výrobku způsobené nevhodnou kvalitou signálu, rušivým elektromagnetickým polem apod.
mechanické poškození výrobku (např. ulomení knoflíku, pád);
poškození způsobené použitím nevhodných médií, náplní, spotřebního materiálu (baterie) nebo nevhodnými
provozními podmínkami (např. vysoké okolní teploty, vysoká vlhkost prostředí, otřesy);
poškození, úpravu nebo jiný zásah do výrobku provedený neoprávněnou nebo neautorizovanou osobou (servisem);
případy, kdy kupující při reklamaci neprokáže oprávněnost svých práv (kdy akde reklamovaný výrobek zakoupil);
případy, kdy se údaje vpředložených dokladech liší od údajů uvedených na výrobku;
případy, kdy reklamovaný výrobek nelze ztotožnit svýrobkem uvedeným vdokladech, kterými kupující prokazuje
svá práva reklamovat (např. poškození výrobního čísla nebo záruční plomba přístroje, přepisované údaje
vdokladech).
Gestor servisu vČR:
FAST ČR, a.s., Černokostelecká 1621, 251 01 Říčany; tel: 323 204 120
FAST ČR, a.s., Cejl 31, 602 00 Brno; tel: 531 010 295
Více autorizovaných servisních středisek pro ČR naleznete na www.sencor.cz.
CZ-10
Page 23

Funkcie tlačidiel
1.
2.
3.
7.
4.
8.
9.
10.
11.
1. Anténa
2. Svietidlo
3. Mikrofón
4. Tlačidlo Menu
5. Light ON/OFF
(Zapnutie/Vypnutie svietidla)
6. Tlačidlo SCAN/UP
(Prehľadať/Hore)
5.
6.
7. Tlačidlo PTT
8. Tlačidlo Power ON/OFF
(Zapnutie/Vypnutie napájania)
9. Tlačidlo MONI/DOWN
(Monitorovať/Dole)
10. Reproduktor
11. Prenosná spona
SK-1
Page 24

Návod na použitie
Táto súprava obsahuje 2 vysielacie jednotky – komunikačné zariadenie
pracujúce na mobilných rádiových frekvenciách. K dispozícii je 8 kanálov,
rovnako ako podsvietený LCD displej, na bezplatnú komunikáciu
na vzdialenosť niekoľkých kilometrov (v otvorenom teréne až 5 km).
Poznámka:
Pred použitím tohto zariadenia si, prosím, pozorne prečítajte tieto
používateľské pokyny a uschovajte ich na neskoršie použitie!
Špecifi cké odporúčania
Ak používate akýkoľvek typ osobnej zdravotnej pomôcky, poraďte sa
pred použitím tohto zariadenia s lekárom.
Aby nehrozilo nebezpečenstvo popálenia, v prípade akéhokoľvek
poškodenia antény toto zariadenie nepoužívajte.
Nepoužívajte toto zariadenie v prostredí s nebezpečenstvom výbuchu
(napr. v blízkosti čerpacích staníc, na dolnej palube lodi alebo v blízkosti
skladísk palív alebo chemických produktov).
Ak idete autom alebo na bicykli, pred použitím tohto zariadenia zastavte.
V lietadle alebo v nemocnici toto zariadenie vypnite.
Nikdy nepoužívajte toto zariadenie v tesnej blízkosti rádia, aby
nedochádzalo k rušeniu.
Ak nebudete toto zariadenie dlhší čas používať, vyberte z neho batérie.
Nikdy nekombinujte staré a nové batérie.
Umiestnite vysielač a anténu do vzdialenosti minimálne 5 cm od vašej
tváre. Nasmerujte anténu nahor a normálne hovorte.
Zariadenie čistite vlhkou handričkou. Nepoužívajte čistiace prostriedky
a rozpúšťadlá.
Nepokúšajte sa zariadenie akokoľvek upravovať. V prípade
poškodenia zaistite, aby bolo zariadenie skontrolované kvalifi kovaným
profesionálom.
Toto zariadenie nie je možné používať na kontaktovanie núdzových
služieb.
SK-2
Page 25

PRED UVEDENÍM DO PREVÁDZKY
Ak chcete vložiť do zariadenia batérie, najprv vysuňte sponu na opasok:
Zdvihnite západku spony a zatlačte sponu smerom hore. Otvorte priestor
na batérie a vložte 3 batérie AAA (nie sú súčasťou príslušenstva) tak, aby
bola dodržaná správna polarita. Potom kryt zavrite.
POUŽITIE
1. Zapnutie/Vypnutie zariadenia:
Na zapnutie alebo vypnutie zariadenia podržte 3 sekundy tlačidlo Power
ON/OFF – na potvrdenie sa ozve PÍPNUTIE.
2. Nastavenie hlasitosti:
Na zvýšenie hlasitosti stlačte tlačidlo Up ▲; na zníženie hlasitosti stlačte
tlačidlo Down ▼.
Poznámka:
Úroveň hlasitosti sa zobrazí na displeji.
3. Indikácia vybitej batérie
Úroveň nabitia batérie je na LCD displeji indikovaná pomocou políčok
vnútri ikony batérie.
Batéria nabitá
Batéria vybitá
Keď je batéria vybitá, ikona batérie bliká a ozve sa pípnutie na indikáciu,
že je nutné vymeniť batérie.
4. Príjem/vysielanie komunikácie:
Keď je displej zapnutý, zariadenia sú v režime „Príjem“, t. j. sú pripravené
prijať hovor alebo zvuk vysielaný na aktivovanej frekvencii.
Keď stlačíte tlačidlo Call/PTT (Hovor), zariadenie sa prepne do režimu
„Vysielanie“ a odošle do druhého zariadenia zvukový signál.
Na prenos hlasu stlačte a podržte tlačidlo Call/PTT (vysielanie) a hovorte
do mikrofónu. Podržte toto tlačidlo, kým nie je dokončený prenos vašej
správy.
SK-3
Page 26

Držte mikrofón vo vzdialenosti minimálne 5 cm od tváre.
Poznámka:
- Druhé zariadenie musí byť nastavené na rovnaký kanál a musí mať
nastavený rovnaký CTCSS kód (pozrite bod 7)
- Po dokončení prenosu a uvoľnení tlačidla Call/PTT vydá druhé
zariadenie zvukový signál (PÍPNUTIE) na indikáciu pripravenosti tohto
zariadenia vysielať.
5. Zmena kanálov
Stlačte raz tlačidlo MENU – začne blikať číslo aktuálneho kanálu.
Zmeňte kanál stlačením tlačidla Up▲ alebo tlačidla Down▼.
Stlačte tlačidlo Call/PTT na potvrdenie a návrat do pohotovostného
režimu.
Poznámka:
Ak pri nastavovaní počas 15 sekúnd nestlačíte žiadne tlačidlo, vráti sa
zariadenie do pohotovostného režimu.
6. CTCSS (Continuous Tone Coded Squelch System)
Rádiostanice bez licencie používajúce frekvenčné pásmo 446 MHz majú
k dispozícii 8 rádiových kanálov. Ak je vo vašom okolí veľa používateľov
rádiostaníc, môže sa stať, že budú niektorí používatelia používať
rovnaký rádiový kanál.
Aby nedochádzalo k príjmu signálov iných používateľov, používajú sa
subkanály.
Dve rádiostanice budú schopné vzájomnej komunikácie iba vtedy, keď
používajú rovnaký rádiový kanál a majú nastavený presne rovnaký
subkanál.
Pri použití systému CTCSS sa bude spoločne s hlasovým signálom
vysielať nízkofrekvenčný tón (v rozmedzí 67 až 250 Hz). Na výber je
k dispozícii 38 tónov. Ktorýkoľvek z týchto 38 tónov si môžete vybrať.
Vďaka fi ltrácii nebudú tieto tóny všeobecne počuteľné, takže nebudú
rušiť komunikáciu.
SK-4
Page 27

7. CTCSS
Stlačte dvakrát tlačidlo MENU – na displeji bude blikať aktuálny CTCSS
kód. Nastavte iný kód stlačením tlačidla Up▲ alebo tlačidla Down▼.
Stlačte tlačidlo Call/PTT na potvrdenie a návrat do pohotovostného
režimu.
Poznámka:
Na vypnutie CTCSS vyberte pre CTCSS v menu kód „OF“. Po potvrdení
tejto položky sa zobrazí „OF“.
8. MONITOROVANIE
Funkciu monitorovania môžete používať na kontrolu slabších signálov
na aktuálnom kanáli.
Na monitorovanie kanálu podržte stlačené tlačidlo DOWN▼. Funkcia
monitorovania bude aktivovaná po približne troch sekundách.
Na ukončenie monitorovania kanálu stlačte tlačidlo DOWN ▼.
Poznámka:
Počas monitorovania kanálu nebude prijímací obvod v rádiostanici
načúvať CTCSS kódom.
9. VOX (Funkcia handsfree)
Táto rádiostanica podporuje prenos aktivovaný hlasom (VOX). V režime
VOX bude rádiostanica prenášať signál vtedy, keď bude aktivovaná
vaším hlasom alebo inými zvukmi vo vašom okolí. Funkciu VOX
neodporúčame používať, ak budete rádiostanicu používať v hlučnom
alebo veternom prostredí.
Poznámka:
Režim VOX bude po stlačení tlačidla „Call/PTT“ zrušený.
Stlačte trikrát tlačidlo MENU – na displeji začne blikať aktuálne
nastavenie VOX a zobrazí sa ikona VOX.
Stlačte tlačidlo UP▲ na nastavenie úrovne citlivosti VOX na
hodnotu 1 až 3 (úroveň 3 má najvyššiu citlivosť).
Na vypnutie funkcie VOX stlačte tlačidlo Down ▼ a podržte ho, kým
sa na displeji nezobrazí „OF“.
Stlačte tlačidlo Call/PTT na potvrdenie a návrat do pohotovostného
režimu.
SK-5
Page 28

10. Vyhľadávanie aktívneho rádiového kanálu
Stlačte na 3 sekundy tlačidlo UP▲: Na displeji sa zobrazí indikátor
funkcie „SCAN“ a začnú sa nepretržite prehľadávať kanály 1 až 8 (iba
podľa aktuálneho nastavenia subkanálu CTCSS).
Stlačte tlačidlo Down ▼ na spustenie prehľadávania kanálov od 8 do 1.
Po nájdení aktívneho kanálu sa prehľadávanie zastaví a môžete počúvať
vysielanie.
Po ukončení vysielania na aktuálnom kanáli sa automaticky obnoví
prehľadávanie.
Poznámka:
Ak stlačíte tlačidlo Call/PTT počas počúvania nájdeného kanálu, prepne
sa zariadenie späť do pohotovostného režimu na nájdenom kanáli.
11. Volacie tóny
Volací tón upozorňuje ostatných na to, že chcete začať hovoriť.
11.1 Nastavenie volacieho tónu
Toto zariadenie má k dispozícii 10 volacích tónov.
Stlačte štyrikrát tlačidlo MENU – zobrazí sa „CA“ a začne blikať aktuálny
volací tón.
Zmeňte volací tón stlačením tlačidla Up▲ alebo tlačidla Down▼.
Stlačte tlačidlo Call/PTT na potvrdenie a návrat do pohotovostného
režimu.
11.2 Odoslanie volacieho tónu
Stlačte krátko tlačidlo Call/PTT – volací tón bude prenesený na
vybranom kanáli.
12. Zapnutie/vypnutie tónu tlačidiel
Po stlačení tlačidla jednotka krátko pípne.
Nastavenie tónu tlačidiel.
Stlačte päťkrát tlačidlo MENU na zobrazenie „to“.
Stlačte tlačidlo UP▲ na zapnutie alebo tlačidlo Down▼ na vypnutie (OF)
tónov tlačidiel.
Stlačte tlačidlo Call/PTT na potvrdenie voľby a návrat do pohotovostného
režimu.
SK-6
Page 29

13. Zapnutie/vypnutie funkcie Roger Beep
Po uvoľnení tlačidla PTT odošle zariadenie zvukový signál (pípnutie)
na potvrdenie, že ste prestali hovoriť.
Nastavenie funkcie Roger Beep.
Stlačte šesťkrát tlačidlo MENU na zobrazenie „ro“.
Stlačte tlačidlo UP▲ na zapnutie alebo tlačidlo Down▼ na vypnutie
funkcie Roger Beep.
Stlačte tlačidlo Call/PTT na potvrdenie voľby a návrat do pohotovostného
režimu.
14. Podsvietenie displeja
Na aktiváciu podsvietenia LCD displeja stlačte akékoľvek tlačidlo
s výnimkou tlačidla Call/PTT a tlačidla svietidla. Podsvietenie
LCD zostane zapnuté 5 sekúnd.
15. Funkcia šetrenia batérie
Ak zariadenie 6 sekúnd nepoužijete, automaticky sa aktivuje úsporný
režim. Tento režim nemá vplyv na príjem vysielania a v prípade detekcie
signálu sa znovu automaticky aktivuje štandardný režim.
16. Vstavané svietidlo
Vaša rádiostanica je vybavená doplnkovou funkciou vstavaného
svietidla, ktorú je možné používať na odosielanie svetelných signálov
alebo na svietenie
17. Uzamknutie a odomknutie zariadenia
Stlačte tlačidlo MENU a podržte ho 3 sekundy na uzamknutie zariadenia.
Stlačte tlačidlo MENU a podržte ho 3 sekundy na odomknutie zariadenia.
SK-7
Page 30

18. Technické údaje
Frekvencia 446 MHz
Počet kanálov 8 kanálov
Subkód CTCSS 38
Vysielací výkon ≤ 0,5 W
Dosah Až 5 km v otvorenom priestore
Typ batérie 3* alkalické batérie AAA
Typ modulácie FM-F3E
Rozstup kanálov 12,5 kHz (úzke pásmo)
19. Kanál a frekvencia (MHz)
Kanál Frekvencia (MHz) Kanál Frekvencia (MHz)
1 446,00625 5 446,05625
2 446,01875 6 446,06875
3 446,03125 7 446,08125
4 446,04375 8 446,09375
SK-8
Page 31

Likvidácia vyradených elektrických a elektronických zariadení
(platí v krajinách Európskej únie a ďalších európskych
krajinách so samostatnými systémami zberu odpadu).
Tento symbol na produkte alebo jeho obale znamená, že
produkt sa nesmie vyhodiť do bežného domového odpadu.
Namiesto toho ho musíte odovzdať v príslušnom zbernom
dvore určenom na recykláciu elektrických a elektronických
zariadení. Zaistením správnej likvidácie tohto produktu
pomôžete predísť potenciálnym negatívnym dopadom
na životné prostredie a ľudské zdravie, ku ktorým by inak
mohlo dôjsť v prípade nesprávnej likvidácie tohto produktu.
Recyklácia materiálov pomáha chrániť prírodné zdroje.
Podrobnejšie informácie o recyklácii tohto produktu získate
na miestnom úrade alebo v spoločnosti zaisťujúcej likvidáciu
vášho domového odpadu.
Výrobok spĺňa požiadavky EÚ.
Fast ČR, a.s., týmto vyhlasuje, že rádiové zariadenie typu
SMR 111 je v súlade so smernicou 2014/53/EÚ.
Úplné EÚ vyhlásenie o zhode je k dispozícii na tejto
internetovej adrese: www.sencor.eu
Výrobca: Fast ČR, a.s., Černokostelecká 1621, CZ 251 01 Říčany
SK-9
Page 32

SK
Záručné podmienky
Záručný list nie je súčasťou balenia zariadenia.
Predávajúci poskytuje kupujúcemu na výrobok 24 mesiacov záruku od jeho prevzatia kupujúcim. Záruka sa poskytuje
ďalej za nižšie uvedených podmienok. Záruka sa vzťahuje iba na spotrebný tovar predaný spotrebiteľovi na bežné
domáce použitie. Práva zo zodpovednosti za chyby (reklamácie) môže kupujúci uplatniť buď upredávajúceho,
uktorého bol výrobok zakúpený alebo v nižšie uvedenom autorizovanom servise. Kupujúci je povinný reklamáciu
uplatniť bez zbytočného odkladu, aby nedochádzalo ku zhoršeniu chyby, najneskôr však do konca záručnej doby.
Kupujúci je povinný pri reklamácii spolupracovať pri overení existencie reklamovanej chyby. D o reklamačného procesu
sa prijíma iba kompletný azdôvodu dodržania hygienických predpisov neznečistený výrobok. Vprípade oprávnenej
reklamácie sa záručná doba predlžuje odobu od okamžiku uplatnenia reklamácie do okamžiku prevzatia opraveného
výrobku kupujúcim, kedy je kupujúci po skončení opravy povinný výrobok prevziať. Kupujúci je povinný preukázať
svoje práva reklamovať (doklad ozakúpení výrobku, záručný list, doklad ouvedení výrobku do prevádzky).
Záruka sa nevzťahuje na:
chyby, na ktoré boli poskytnuté zľavy;
opotrebenia apoškodenia vzniknuté bežným užívaním výrobku;
poškodenie výrobku vdôsledku neodbornej či nesprávnej inštalácie, použitie výrobku vrozpore snávodom na
použitie splatnými právnymi predpismi a všeobecne známymi a obvyklými spôsobmi používania, vdôsledku
použitia výrobku za iným účelom, než na ktorý je určený;
poškodenie výrobku vdôsledku zanedbanej alebo nesprávnej údržby;
poškodenie výrobku spôsobené jeho znečistením, nehodou azásahom vyššej moci (živelná udalosť, požiar,
vniknutie vody);
chyby funkčnosti výrobku spôsobené nevhodnou kvalitou signálu, rušivým elektromagnetickým poľom apod.;
mechanické poškodenie výrobku (napr. zlomenie gombíka, pád);
poškodenie spôsobené použitím nevhodných médií, náplní, spotrebného materiálu (batérie) alebo nevhodnými
prevádzkovými podmienkami (napr. vysoké teploty vokolí, vysoká vlhkosť prostredia, otrasy);
poškodenie, úpravu alebo iný zásah do výrobku spôsobený neoprávnenou alebo neautorizovanou osobou
(servisom) prípady, keď kupujúci pri reklamácii nepreukáže oprávnenosť svojich práv ( kedy akde reklamovaný
výrobok zakúpil);
prípady, keď sa údaje vpredložených dokladoch líšia od údajov uvedených na výrobku;
prípady, keď reklamovaný výrobok sa nestotožňuje s výrobkom uvedeným v dokladoch, ktorými kupujúci
preukazuje svoje práva reklamovať (napr. poškodenie výrobného čísla alebo záručnej plomby prístroja, prepisované
údaje vdokladoch).
Gestor servisu na SK:
FAST PLUS, Na Pántoch 18, 831 06 Bratislava; teľ: 02 49 1058 53-54
Viac informácií nájdete na www.sencor.sk.
SK-10
Page 33

A gombok funkciója
1.
2.
3.
7.
4.
8.
9.
10.
11.
1. Antenna
2. Lámpa
3. Mikrofon
4. Menü gomb
5. Light ON/OFF
(A lámpa be/kikapcsolása)
6. SCAN/UP gomb
(Keresés/Fel)
5.
6.
7. PTT gomb
8. Power ON/OFF gomb
(A tápellátás be/kikapcsolása)
9. MONI/DOWN gomb
(Monitorozás/Le)
10. Hangszóró
11. Csíptető a hordozáshoz
HU-1
Page 34

Használati útmutató
Ez a csomag 2 adókészüléket – mobil rádiófrekvenciákon működő
kommunikációs eszközt – tartalmaz. Rendelkezésre áll 8 csatorna, valamint
egy háttérvilágítással ellátott LCD-kijelző, amely néhány (nyílt terepen akár 5)
kilométer távolságról történő ingyenes kommunikációt tesz lehetővé.
Megjegyzés:
Kérjük, a készülék használata előtt fi gyelmesen olvassa el ezeket az
utasításokat, és őrizze meg őket a későbbiekre!
Specifi kus ajánlások
Ha bármiféle egészségügyi segédeszközt használ, a készülék
használata előtt konzultáljon orvosával.
Égési sérülés elkerülése érdekében ne használja a készüléket az
antenna bármifajta sérülése esetén.
Ne használja a készüléket robbanásveszélyes környezetben (pl.
benzinkút közelében, hajó alsó fedélzetén, illetve üzemanyag- vagy
vegyianyag-raktár közelében)
Ha autóban utazik vagy kerékpározik, a készülék használata előtt álljon
meg.
Repülőn vagy kórházban kapcsolja ki a készüléket.
Soha ne használja a készüléket rádió közelében, mert zavarják
egymást.
Ha a készüléket hosszabb ideig nem használja, vegye ki belőle az
elemeket. Soha ne használjon együtt használt és új elemeket.
Tartsa az adókészüléket és az antennát legalább 5 cm távolságra az
arcától. Irányítsa az antennát felfelé, és normálisan beszéljen.
A készüléket nedves ronggyal tisztítsa. Ne használjon tisztító- és
oldószert.
Ne próbálja a bármiféleképpen módosítani a készüléket. Meghibásodás
esetén gondoskodjon róla, hogy a készüléket szakképzett szakember
ellenőrizze.
Ez a készülék nem alkalmas segélyhívásra.
HU-2
Page 35

ÜZEMBE HELYEZÉS ELŐTT
Az elemek behelyezése előtt csúsztassa ki az övcsipeszt: Emelje fel
a csipesz reteszét, és nyomja a csipeszt felfelé. Nyissa ki az elemtartó
rekeszt, és tegyen be 3 AAA elemet (nem a csomag része), ügyelve
a megfelelő polaritásra. Aztán csukja vissza a fedelet.
HASZNÁLAT
1. A készülék bekapcsolása/kikapcsolása:
A készülék be- ill. kikapcsolásához nyomja 3 másodpercig a Power
ON/OFF gombot - visszaigazolásképpen megszólal egy SÍPOLÓ hang.
2. A hangerő beállítása:
A hangerő növeléséhez nyomja meg az UP ▲ gombot; a hangerő
csökkentéséhez nyomja meg a Down ▼ gombot.
Megjegyzés:
A hangerő szintje megjelenik a kijelzőn.
3. Lemerült elem jelzése
Az elem töltöttségi szintjét az LCD-kijelzőn az „elem” ikonon belül látható
mezők mutatják.
Feltöltött elem
Lemerült elem
Ha az elem lemerült, az „elem” ikon villog, és sípoló hang fi gyelmeztet,
hogy elemet cserélni kell.
4. Kommunikáció fogadása/adása:
Ha a kijelző be van kapcsolva, a készülék „Vétel” üzemmódban van,
azaz kész az aktív frekvencián beszédet vagy hangot venni.
Ha röviden megnyomja a Call/PTT (Hívás) gombot, a készülék átkapcsol
„Adás” üzemmódba,és hangjelet küld a másik készüléknek.
Hangátvitelhez nyomja meg és tartsa lenyomva a Call/PTT (adás)
gombot, és beszéljen a mikrofonba. Tartsa a gombot mindaddig, amíg be
nem fejezte a hangátvitelt.
HU-3
Page 36

A mikrofont legalább 5 cm távolságra tartsa az arcától.
Megjegyzés:
- A másik készüléket ugyanarra a csatornára kell beállítani, és ugyanazzal
a CTCSS kódnak kell beállítva lennie (ld. 7. pont)
- Az adás befejezése és a Call/PTT gomb felengedése után a másik
készülék hangjelzést (SÍPOLÁS) ad, hogy jelezze, készen áll az adásra.
5. Csatornaváltás
Nyomja meg egyszer a MENU gombot – a képernyőn villogni kezd az
aktuális csatorna száma.
Változtassa meg a csatornát az Up▲ vagy a Down▼ gomb
megnyomásával.
Nyomja meg a Call/PTT gombot a jóváhagyáshoz és a készenléti
üzemmódhoz való visszatéréshez.
Megjegyzés:
Ha beállítás közben 15 másodpercig egyetlen gombot sem nyom meg,
a készülék visszatér készenléti üzemmódba.
6. CTCSS (Continuous Tone Coded Squelch System)
A 446 MHz-es sávot használó, engedély nélküli rádió adóvevőknek
8 rádiócsatorna áll rendelkezésére. Ha a környezetében sokan
használnak rádió adóvevőt, előfordulhat, hogy néhányan azonos
rádiócsatornát használnak.
Annak érdekében, hogy ne vegyék más felhasználók jelét, alcsatornákat
kell használni.
Két rádió adóvevő csak akkor képes egymással kommunikálni, ha
azonos rádiócsatornát használnak, és pontosan ugyanaz az alcsatorna
van beállítva.
CTCSS rendszer használatakor a hangjellel együtt alacsony frekvenciájú
(67 - 250 Hz) hang kerül sugárzásra. 38 hangszín áll rendelkezésre.
Ebből a 38 hangszínből bármelyiket választhatja. A szűrésnek
köszönhetően ezek a hangok általában nem hallhatóak, úgyhogy nem
zavarják a kommunikációt.
HU-4
Page 37

7. CTCSS
Nyomja meg kétszer a MENU gombot – a kijelzőn villogni fog az aktuális
CTCSS kód. Másik kód beállításához nyomja meg az Up▲ vagy
a Down▼ gombot.
Nyomja meg a Call/PTT gombot a jóváhagyáshoz és a készenléti
üzemmódhoz való visszatéréshez.
Megjegyzés:
A CTCSS kikapcsolásához válassza a menüben a CTCSS-re vonatkozó
menüben az "OF" kódot. Jóváhagyásképpen megjelenik az "OF" felirat.
8. MONITOROZÁS
A monitorozás funkciót használhatja a gyengébb jelek ellenőrzésére az
aktuális csatornán.
A csatorna monitorozásához tart a DOWN▼ gombot. A monitorozás
funkció kb. három másodperc után aktiválódik.
A csatorna monitorozásának befejezéséhez nyomja meg a DOWN▼
gombot.
Megjegyzés:
Csatornamonitorozás közben a vevőáramkör nem fi gyeli a CTCSS
kódokat.
9. VOX (Handsfree funkció)
Ez az adóvevő támogatja a hanggal aktivált átvitelt (VOX). VOX
üzemmódban az adóvevő csak akkor sugároz jelet, ha az Ön hangja vagy
a környezetében levő más hang aktiválja. A VOX funkció használatát nem
javasoljuk, ha az adóvevőt zajos vagy szeles környezetben használja.
Megjegyzés:
A VOX üzemmód a Call/PTT gomb megnyomása után szünetel.
Nyomja meg háromszor a MENU gombot – a kijelzőn villogni kezd
a VOX aktuális beállítása, és megjelenik a VOX ikon.
Nyomja meg az UP▲ gombot a VOX érzékenységi fokának
1 és 3 közötti beállításához (a 3 a legmagasabb érzékenység).
A VOX funkció kikapcsolásához nyomja meg a Down▼ gombot, és
tartsa lenyomva, míg a kijelzőn meg nem jelenik az "OF" felirat.
Nyomja meg a Call/PTT gombot a jóváhagyáshoz és a készenléti
üzemmódhoz való visszatéréshez.
HU-5
Page 38

10. Az aktív rádiócsatorna megkeresése
Tartsa lenyomva az UP▲ gombot 3 másodpercig: A kijelzőn megjelenik
a funkció „SCAN” jelzése, és a készülék elkezdi folyamatosan átvizsgálni
az 1 – 8 csatornákat (csak a CTCSS alcsatorna aktuális beállítása
alapján).
Nyomja meg a Down ▼ gombot a 8 – 1-ig történő böngészés
elindításához.
Az aktív csatorna megtalálása után a böngészés megáll, és hallgathatja
az adást.
Miután az adás az aktuális csatornán befejeződik, a böngészés
automatikusan újraindul.
Megjegyzés:
Ha megnyomja a Call/PTT gombot a megtalált csatorna hallgatása
közben, a készülék készenléti üzemmódba kapcsol a megtalált
csatornán.
11. Hívóhangok
A hívóhang jelzi a többieknek, hogy beszélni akar.
11.1 A hívóhang beállítása
A készüléken 10 hívóhang áll rendelkezésre.
Nyomja meg négyszer a MENU gombot – megjelenik a "CA" felirat,
és villogni kezd az aktuális hívóhang.
A hívóhang megváltoztatásához nyomja meg az Up▲ vagy
a Down▼ gombot.
Nyomja meg a Call/PTT gombot a jóváhagyáshoz és a készenléti
üzemmódhoz való visszatéréshez.
11.2 A hívóhang elküldése
Nyomja meg röviden a Call/PTT gombot – a hívóhang a kiválasztott
csatornán átvitelre kerül.
12. A gombok hangjának bekapcsolása/kikapcsolása
Egy gomb megnyomása után az egység egy rövidet sípol.
A gombok hangjának beállítása.
Nyomja meg ötször a MENU gombot – megjelenik a "to" felirat.
HU-6
Page 39

Nyomja meg az UP▲ gombot a gombok hangjának bekapcsolásához,
vagy a Down▼ gombot a kikapcsolásához (OF).
Nyomja meg a Call/PTT gombot a jóváhagyáshoz és a készenléti
üzemmódhoz való visszatéréshez.
13. A Roger Beep funkció bekapcsolása / kikapcsolása
A PTT gomb elengedése után a készülék hangjelzést (sípolást) ad
visszajelzésképpen, hogy abbahagyta a beszélgetést.
A Roger Beep funkció beállítása.
Nyomja meg hatszor a MENU gombot – megjelenik a "ro" felirat.
Nyomja meg az UP▲ gombot a Roger Beep funkció bekapcsolásához,
vagy a Down▼ gombot a kikapcsolásához.
Nyomja meg a Call/PTT gombot a jóváhagyáshoz és a készenléti
üzemmódhoz való visszatéréshez.
14. A kijelző háttérvilágítása
Az LCD-kijelző háttérvilágításának aktiválásához nyomja meg
bármelyik gombot a Call/PTT és a lámpa gombja kivételével.
Az LCD háttérvilágítása 5 másodpercig marad bekapcsolva.
15. Elemtakarékos funkció
Ha a készüléket 6 másodpercig nem használja, automatikusan
aktiválódik az energiatakarékos üzemmód. Ez az üzemmód nem
befolyásolja a hívásfogadást, jel érzékelése esetén újra aktiválódik
a normál üzemmód.
16. Beépített lámpa
Az Ön adóvevője kiegészítő funkcióként beépített lámpával rendelkezik,
amelyet fényjelek adására vagy világításra lehet használni
17. A készülék lezárása és feloldása
Nyomja meg a MENU gombot, és tartsa 3 másodpercig lenyomva
a készülék lezárásához.
Nyomja meg a MENU gombot, és tartsa 3 másodpercig lenyomva
a készülék zárolásának kioldásához.
HU-7
Page 40

18. Műszaki adatok
Frekvencia 446 MHz
Csatornák száma 8 csatorna
Szubkód CTCSS 38
Sugárzási teljesítmény ≤0,5 W
Hatótávolság Akár 5 km nyílt területen
Elem típus 3* AAA alkáli elem
A moduláció típusa FM-F3E
Csatornatávolság 12,5 kHz (keskeny sáv)
19. Csatorna és frekvencia (MHz)
Csatorna Frekvencia (MHz) Csatorna Frekvencia (MHz)
1 446,00625 5 446,05625
2 446,01875 6 446,06875
3 446,03125 7 446,08125
4 446,04375 8 446,09375
HU-8
Page 41

Használaton kívül helyezett elektromos és elektronikus
berendezések megsemmisítése (érvényes az Európai Unió
országaiban és más, önálló szelektív gyűjtési rendszert
alkalmazó európai országokban) Ez a jel a terméken
vagy csomagolásán azt jelenti, hogy ezt a terméket nem
szabad a vegyes háztartási hulladék közé dobni. Ehelyett
le kell adni az elektromos és elektronikus berendezések
újrahasznosítására szolgáló hulladékgyűjtő helyeken.
A termék megfelelő módon történő megsemmisítésének
biztosításával megelőzi a környezetet és az emberi
egészséget veszélyeztető esetleges negatív hatásokat, és
hozzájárul a nem megfelelő hulladék-megsemmisítés által
okozott esetleges negatív környezeti és egészségügyi hatások
megelőzéséhez. Az anyagok újrahasznosítása segít megőrizni
természeti erőforrásainkat. A termék újrahasznosításáról
további információhoz juthat a helyi hivatalban, vagy
a hulladék újrahasznosításával foglalkozó cégtől.
A termék megfelel az EU követelményeinek.
FAST ČR, a.s. igazolja, hogy a SMR 111 típusú
rádióberendezés megfelel a 2014/53/EU irányelvnek.
Az EU-megfelelőségi nyilatkozat teljes szövege elérhető
a következő internetes címen: www.sencor.eu
Gyártó: Fast ČR, a.s., Černokostelecká 1621, CZ 251 01 Říčany
HU-9
Page 42

HU
Jótállási jegy
AFAST Hungary Kft. (2045 Törökbálint, Dulácska u. 1/a) mint atermék magyarországi importőre ajótállási jegyen
feltüntetett típusú és gyártási számú készülékre jótállást biztosít afogyasztók számára az alábbi feltételek szerint:
Atermék gyártója: FAST ČR, a.s. (Černokostelecká1621,Říčany uPrahy 251 01, Csehország, Prága)
AFAST Hungary Kft. atermékre afogyasztó részére történő átadástól (vásárlástól), illetve ha az üzembe helyezést
aforgalmazó vagy annak megbízottja végzi, az üzembe helyezéstől számított 24 hónapig tartó időtartamra vállal
jótállást.
A jótállási igény a jótállási jeggyel, a vásárlástól (üzembe helyezéstől) számított 1 évig a terméket értékesítő
forgalmazónál, illetve ajótállási jegyen feltüntetett hivatalos szerviznél közvetlenül is, míg a13. hónaptól a24. hónapig
kizárólag ahivatalos szerviznél érvényesíthető.
Jótállási jegy hiányában afogyasztói szerződés megkötését bizonyítottnak kell tekinteni, ha afogyasztó bemutatja
a termék ellenértékének megfizetését hitelt érdemlően igazoló bizonylatot. Mindezek érdekében kérjük tisztelt
Vásárlóinkat, hogy őrizzék meg afizetési bizonylatot is. A jótállási időn belüli meghibásodás esetén a fogyasztó
(i) elsősorban - választása szerint - a hibás termék díjmentes kijavítását vagy kicserélését követelheti, kivéve,
ha a választott igény teljesítése lehetetlen, vagy ha az a jótállásra kötelezettnek a másik igény teljesítésével
összehasonlítva aránytalan többletköltséget eredményezne, (ii) ha sem kijavításra, sem kicserélésre nincs joga, vagy
ha a kötelezett akijavítást, illetve kicserélést nem vállalata, vagy e kötelezettségének megfelelő határidőn belül,
a fogyasztónak okozott jelentős kényelmetlenség nélkül nem tud eleget tenni, afogyasztó – választása szerint –
megfelelő árleszállítást igényelhet vagy elállhat aszerződéstől. Jelentéktelen hiba miatt elállásnak nincs helye.
A151/2003. (IX.22.) Kormányrendeletben meghatározott tartós fogyasztási cikk meghibásodása miatt avásárlástól
(üzembe helyezéstől) számított három munkanapon belül érvényesített csereigény esetén a forgalmazó nem
hivatkozhat aránytalan többletköltségre, hanem aforgalmazó köteles atartós fogyasztási cikket kicserélni, feltéve,
hogy a meghibásodás a rendeltetésszerű használatot akadályozza. Kijavítás esetén afogyasztási cikkbe csak új
alkatrész kerülhet beépítésre. Ajótállásra kötelezett törekszik arra, hogy akijavítás vagy kicserélés 15 napon belül
megtörténjen. Arögzített bekötésű, illetve a10kg-nál súlyosabb, vagy tömegközlekedési eszközön kézi csomagként
nem szállítható fogyasztási cikket az üzemeltetés helyén kell megjavítani. Ha ajavítás az üzemeltetés helyén nem
végezhető el, ale- és felszerelésről, valamint az el – és visszaszállításról ajótállás kötelezettje gondoskodik.
Nem számít bele a jótállási időbe a kijavítási időnek az arésze, amely alatt a fogyasztó a terméket nem tudja
rendeltetésszerűen használni. Ajótállási idő aterméknek vagy jelentősebb részének kicserélése (kijavítása) esetén
akicserélt (kijavított) termékre (termékrészre), valamint akijavítás következményeként jelentkező hiba tekintetében
újból kezdődik.
Nem érvényesíthető ajótállási igény, ha jótállásra kötelezett bizonyítja, hogy ahiba oka atermék fogyasztó részére
való átadását követően keletkezett, így például ha ahibát
figyelmen kívül hagyása, helytelen szállítás vagy tárolás, leejtés, rongálás, elemi kár, készüléken kívülálló ok (pl.
hálózati feszültség megengedettnél nagyobb ingadozása)
szerviz által végzett javítás
afogyasztó törvényből eredő jogait nem érinti.
fogyasztó feladatát képező karbantartási munkák elmulasztása okozta. Ajótállás
nem rendeltetésszerű használat, használati útmutató
illetéktelen átalakítás, beavatkozás, nem ahivatalos
HU-10
Page 43

Funkcja przycisków
1.
2.
3.
7.
4.
8.
9.
10.
11.
1. Antena
2. Lampka
3. Mikrofon
4. Przycisk Menu
5. Light ON/OFF
(Włączenie/Wyłączenie lampki)
6. Przycisk SCAN/UP
(Skanować / Do góry)
5.
6.
7. Przycisk PTT
8. Przycisk Power ON/OFF
(Włączenie/Wyłączenie zasilania)
9. Przycisk MONI/DOWN
(Monitoring / W dół)
10. Głośnik
11. Przenośna klamra
PL1
Page 44

Instrukcja obsługi
Niniejszy zestaw zawiera 2 nadajniki – urządzenia komunikacyjne pracujące
na komórkowych częstotliwościach radiowych. Do dyspozycji jest 8 kanałów
oraz podświetlany wyświetlacz LCD do bezpłatnej komunikacji na odległość
kilku kilometrów (w przestrzeni otwartej do 5 km).
Uwaga:
Przed uruchomieniem tego urządzenia prosimy uważnie przeczytać
niniejsze wskazówki użytkowania i zachować je do użytku w przyszłości!
Specyfi czne zalecenia
Jeśli korzystasz z dowolnego typu osobistych pomocy medycznych,
przed użyciem niniejszego urządzenia zasięgnij rady lekarza.
Aby zapobiec ryzyku oparzeń, nie korzystaj z tego urządzenia
w przypadku jakiegokolwiek uszkodzenia anteny.
Nie korzystaj z tego urządzenia w środowisku zagrażającym wybuchem
(np. w pobliżu stacji benzynowych, na dolnym pokładzie statku lub
w pobliżu magazynów paliw lub produktów chemicznych)
Jeśli jedziesz samochodem lub na rowerze, zatrzymaj pojazd przed
użyciem tego urządzenia.
Wyłącz urządzenie w samolocie oraz w szpitalu.
Nigdy nie używaj tego urządzenia bezpośrednio w pobliżu radia, aby nie
dochodziło do zakłóceń.
Jeżeli urządzenie nie będzie używane przez dłuższy czas, wyjmij
z niego baterie. Nigdy nie używaj jednocześnie starych i nowych baterii.
Umieść nadajnik i antenę w odległości co najmniej 5 cm od twarzy.
Skieruj antenę ku górze i mów normalnie.
Czyść urządzenie wilgotną ściereczką. Nie używaj środków
czyszczących i rozpuszczalników.
Nie próbuj w żaden sposób modyfi kować urządzenia. W razie
uszkodzenia zadbaj o to, aby urządzenie zostało skontrolowane przez
wykwalifi kowanego profesjonalistę.
To urządzenie nie może być używane do kontaktu ze służbami
ratunkowymi.
PL2
Page 45

PRZED URUCHOMIENIEM
Chcąc włożyć do urządzenia baterie, najpierw wysuń klamrę na pasek:
Podnieś zapadkę klamry i przyciśnij klamrę ku górze. Otwórz zasobnik na
baterie i włóż 3 baterie AAA (nie wchodzą w skład zestawu) z zachowaniem
prawidłowej biegunowości. Zamknij z powrotem pokrywę.
EKSPLOATACJA
1. Włączanie/Wyłączanie urządzenia:
Aby włączyć lub wyłączyć urządzenie, przytrzymaj przez 3 sekundy
przycisk Power ON/OFF – w celu potwierdzenia zabrzmi SYGNAŁ
DŹWIĘKOWY.
2. Ustawianie głośności:
Aby zwiększyć głośność, wciśnij przycisk Up ▲; aby zmniejszyć
głośność, wciśnij przycisk Down ▼.
Uwaga:
Poziom głośności pojawi się na wyświetlaczu.
3. Wskaźnik rozładowanej baterii
Poziom doładowania baterii jest pokazywany na wyświetlaczu
LCD za pomocą pól wewnątrz ikony baterii.
Bateria jest naładowana
Bateria jest rozładowana
Jeśli bateria jest rozładowana, ikona baterii będzie pulsować i zabrzmi
sygnał dźwiękowy wskazujący na konieczność wymiany baterii.
4. Odbiór/nadawanie komunikatów:
Jeśli wyświetlacz jest włączony, urządzenia są w trybie „Odbiór”, tzn.
są przygotowane do odbioru rozmowy lub dźwięku nadawanego na
aktywowanej częstotliwości.
Po wciśnięciu na krótko przycisku Call/PTT (Połączenie) urządzenie
przełączy się na tryb „Nadawania” i wyśle sygnał dźwiękowy do drugiego
urządzenia.
PL3
Page 46

W celu transmisji głosu wciśnij i przytrzymaj przycisk Call/PTT
(nadawanie) i mów do mikrofonu. Przytrzymaj ten przycisk, dopóki nie
dojdzie do zakończenia transmisji.
Trzymaj mikrofon w odległości przynajmniej 5 cm od twarzy.
Uwaga:
- Drugie urządzenie musi być ustawione na ten sam kanał i musi mieć
ustawiony ten sam kod CTCSS (por. punkt 7)
- Po zakończeniu transmisji i zwolnieniu przycisku Call/PTT drugie
urządzenie wyda (SYGNAŁ DŹWIĘKOWY), aby zasygnalizować
gotowość do nadawania.
5. Zmiana kanałów
Wciśnij jednokrotnie przycisk MENU – zacznie pulsować numer
aktualnego kanału.
Zmień kanał przez wciśnięcie przycisku Up▲ lub przycisku Down▼.
Wciśnij przycisk Call/PTT, aby potwierdzić i powrócić do trybu czuwania.
Uwaga:
Jeśli podczas przeprowadzania ustawień nie wciśniesz w ciągu 15
sekund żadnego przycisku, urządzenie powróci do trybu czuwania.
6. CTCSS (Continuous Tone Coded Squelch System)
Radiotelefony bez licencji korzystające z częstotliwości 446 MHz mają
do dyspozycji 8 kanałów radiowych. Jeśli w Twoim otoczeniu znajduje
się wielu użytkowników radiotelefonów, może się zdarzyć, że niektórzy
użytkownicy będą korzystać z tego samego kanału.
Aby nie dochodziło do odbioru sygnału innych użytkowników,
wykorzystywane są podkanały.
Dwa radiotelefony będą mogły się ze sobą komunikować tylko jeśli
korzystają z tego samego kanału radiowego i mają nastawiony ten sam
podkanał.
Przy korzystaniu z systemu CTCSS wraz z sygnałem głosowym będzie
nadawany ton w niskiej częstotliwości (w zakresie od 67 do 250 Hz).
Do dyspozycji jest 38 tonów. Można wybrać każdy z tych 38 tonów. Na
skutek fi ltrowania tony te nie będą słyszalne, dzięki czemu nie będą
zakłócać komunikacji.
PL4
Page 47

7. CTCSS
Wciśnij dwukrotnie przycisk MENU – na wyświetlaczu będzie pulsować
aktualny kod CTCSS. Ustaw inny kanał przez wciśnięcie przycisku Up▲
lub przycisku Down▼.
Wciśnij przycisk Call/PTT, aby potwierdzić i powrócić do trybu czuwania.
Uwaga:
Aby wyłączyć CTCSS, wybierz w menu kod „OF” dla CTCSS. Po
potwierdzeniu tej opcji wyświetli się „OF”.
8. MONITORING
Funkcję monitoringu możesz wykorzystać do kontroli słabszych
sygnałów na aktualnym kanale.
Aby monitorować kanał, przytrzymaj przycisk DOWN▼. Funkcja
monitoringu zostanie aktywowana po około trzech sekundach.
Aby zakończyć monitoring kanału, wciśnij przycisk DOWN ▼.
Uwaga:
Podczas monitoringu kanału obwód odbioru radiotelefonu nie
będzie wyszukiwać kodów CTCSS.
9. VOX (Funkcja handsfree)
Ten radiotelefon obsługuje transmisję aktywowaną głosem (VOX).
W trybie VOX radiotelefon będzie transmitować sygnał tylko wtedy, gdy
zostanie aktywowany za pomocą głosu lub innych dźwięków z otoczenia.
Nie zaleca się korzystania z funkcji VOX, jeśli radiotelefon jest używany
w głośnych lub wietrznych warunkach.
Uwaga:
Po wciśnięciu przycisku „Call/PTT” tryb VOX zostanie wyłączony.
Wciśnij trzykrotnie przycisk MENU – na wyświetlaczu zaczną
pulsować aktualne ustawienia VOX i pokaże się ikona VOX.
Wciśnij przycisk UP ▲, aby ustawić poziom czułości VOX na
wartość od 1 do 3 (poziom 3 oznacza najwyższą czułość).
Aby wyłączyć funkcję VOX, wciśnij przycisk Down ▼ i przytrzymaj
go, dopóki na wyświetlaczu nie pokaże się komunikat „OF”.
Wciśnij przycisk Call/PTT, aby potwierdzić i powrócić do trybu
czuwania.
PL5
Page 48

10. Wyszukiwanie aktywnego kanału radiowego
Przytrzymaj przez 3 sekundy przycisk UP ▲: Na wyświetlaczu pojawi się
wskaźnik funkcji „SCAN” i a kanały 1 do 8 będą stale skanowane (tylko
według aktualnych ustawień CTCSS).
Wciśnij przycisk Down ▼, aby uruchomić przeszukiwanie kanałów
od 8 do 1.
Po znalezieniu aktywnego kanału wyszukiwanie zostanie zakończone
i można będzie słuchać transmisji.
Po zakończeniu transmisji na aktualnym kanale zostanie automatycznie
wznowione wyszukiwanie.
Uwaga:
Jeśli wciśniesz przycisk Call/PTT w trakcie słuchania znalezionego
kanału, urządzenie przełączy się z powrotem na tryb czuwania na
znalezionym kanale.
11. Tony wywoływania
Ton wywoływanie informuje pozostałe osoby, że chcesz rozpocząć
rozmowę.
11.1 Ustawienia tonu wybierania
Urządzenie dysponuje 10 tonami wybierania.
Wciśnij czterokrotnie przycisk MENU – wyświetli się „CA” i zacznie
pulsować aktualny ton wybierania.
Zmień ton wywoływania przez wciśnięcie przycisku Up▲ lub przycisku
Down▼.
Wciśnij przycisk Call/PTT, aby potwierdzić i powrócić do trybu czuwania.
11.2 Nadawanie tonu wywoływania
Wciśnij krótko przycisk Call/PTT – ton wywoływania zostanie emitowany
na wybranym kanale.
12. Włączanie/wyłączanie tonu przycisków
Po wciśnięciu przycisku jednostka wyda krótki sygnał dźwiękowy.
Ustawienia tonu przycisków.
Aby wyświetlić menu „to”, wciśnij przycisk MENU pięć razy.
Wciśnij przycisk UP ▲, aby włączyć tony przycisków lub przycisk Down
▼, aby je wyłączyć (OF).
PL6
Page 49

Wciśnij przycisk Call/PTT, aby potwierdzić wybór i powrócić na tryb
czuwania.
13. Włączanie/wyłączanie funkcji Roger Beep
Po zwolnieniu przycisku PTT urządzenie wyśle sygnał dźwiękowy, aby
potwierdzić, że przestałeś mówić.
Ustawienia funkcji Roger Beep.
Aby wyświetlić menu „ro”, wciśnij przycisk MENU sześć razy.
Wciśnij przycisk UP ▲, aby włączyć funkcję Roger Beep lub przycisk
Down ▼, aby ją wyłączyć.
Wciśnij przycisk Call/PTT, aby potwierdzić wybór i powrócić na tryb
czuwania.
14. Podświetlanie wyświetlacza
Aby uruchomić podświetlanie wyświetlacza LCD wciśnij dowolny przycisk
z wyjątkiem przycisku Call/PTT i przycisku lampki. Podświetlenie LCD
zostanie włączone na około 5 sekund.
15. Funkcja oszczędzania baterii
Jeśli nie skorzystasz z urządzenia w ciągu 6 sekund, automatycznie
zostanie uruchomiony tryb oszczędny. Tryb ten nie ma żadnego wpływu
na odbiór transmisji i w razie wykrycia sygnału zostanie ponownie
automatycznie uruchomiony tryb standardowy.
16. Wbudowana lampka
Ten radiotelefon dysponuje dodatkową funkcją wbudowanej lampki,
którą można wykorzystać w celu wysłania sygnałów świetlnych lub do
oświetlenia
17. Zablokowanie i odblokowanie urządzenia
Wciśnij przycisk MENU i przytrzymaj go przez 3 sekundy, aby
zablokować urządzenie.
Wciśnij przycisk MENU i przytrzymaj go przez 3 sekundy, aby
odblokować urządzenie.
PL7
Page 50

18. Dane techniczne
Częstotliwość 446 MHz
Liczba kanałów 8 kanałów
Subkod CTCSS 38
Moc transmisji ≤ 0,5 W
Zasięg Do 5 km w otwartej przestrzeni
Typ akumulatora 3* baterie alkaiczne AAA
Typ modulacji FM-F3E
Odstępy kanałów 12,5 kHz (wąskie pasmo)
19. Kanał i częstotliwość (MHz)
Kanał
1 446,00625 5 446,05625
2 446,01875 6 446,06875
3 446,03125 7 446,08125
4 446,04375 8 446,09375
Częstotliwość
(MHz)
Kanał
Częstotliwość
(MHz)
PL8
Page 51

Likwidacja zużytych urządzeń elektrycznych i elektronicznych
(obowiązuje w krajach Unii Europejskiej i innych państwach
europejskich posiadających niezależne systemy gromadzenia
odpadów) Ten symbol umieszczony na produkcie lub jego
opakowaniu oznacza, że produktu nie należy wyrzucać
do zwykłego odpadu domowego. Zamiast tego należy
go oddać do odpowiedniego punktu recyklingu urządzeń
elektrycznych i elektronicznych. Poprzez zapewnienie
prawidłowej likwidacji tego produktu przyczyniasz się do
zapobiegania jego ewentualnemu negatywnemu wpływowi
na środowisko naturalne i zdrowie ludzkie, do czego mogłoby
dojść w przypadku niewłaściwej likwidacji tego produktu.
Recykling materiałów pomaga w ochronie źródeł naturalnych.
Szczegółowe informacje o recyklingu tego produktu uzyskasz
w lokalnym urzędzie lub w spółce zajmującej się likwidacją
Twojego odpadu domowego.
Produkt spełnia wymagania UE.
FAST ČR, a.s. niniejszym oświadcza, że typ urządzenia
radiowego SMR 111 jest zgodny z dyrektywą 2014/53/UE.
Pełny tekst deklaracji zgodności UE jest dostępny pod
następującym adresem internetowym: www.sencor.eu
Producent: Fast ČR, a.s., Černokostelecká 1621, CZ 251 01 Říčany
PL9
Page 52

PL
Warunki gwarancji
Karta gwarancyjna nie jest częścią pakietu urządzenia.
Produkt objęty jest 24 – miesięczną gwarancją, począwszy od daty zakupu przez klienta. Gwarancja jest ograniczona
tylko do przedstawionych dalej warunków. Gwarancja obejmuje tylko produkty zakupione wPolsce ijest ważna tylko
na terytorium Rzeczpospolitej Polskiej. Gwarancja obejmuje tylko produkty funkcjonujące wwarunkach gospodarstwa
domowego (nie dotyczy produktów oznaczonych jako „Professional“). Zgłoszenia gwarancyjnego można dokonać
wautoryzowanej sieci serwisowej lub wsklepie, gdzie produkt został nabyty. Użytkownik jest zobowiązany zgłosić
usterkę niezwłocznie po jej wykryciu, anajpóźniej wostatnim dniu obowiązywania okresu gwarancyjnego. Użytkownik
jest zobowiązany do przedstawienia iudokumentowania usterki. Tylko kompletne iczyste produkty (zgodnie ze
standardami higienicznymi) będą przyjmowane do naprawy. Usterki będą usuwane przez autoryzowany punkt
serwisowy wmożliwie krótkim terminie, nieprzekraczającym 14 dni roboczych. Okres gwarancji przedłuża się oczas
pobytu sprzętu wserwisie. Klient może ubiegać się o wymianę sprzętu na wolny od wad, jeżeli punkt serwisowy
stwierdzi na piśmie, że usunięcie wady jest niemożliwe. Aby produkt mógł być przyjęty przez serwis, użytkownik jest
zobowiązany dostarczyć oryginały: dowodu zakupu (paragon lub faktura), podbitej iwypełnionej karty gwarancyjnej,
certyfikatu instalacji (niektóre produkty).
Gwarancja zostaje unieważniona, jeśli:
usterka była widoczna wchwili zakupu;
usterka wynika ze zwykłego użytkowania izużycia;
produkt został uszkodzony zpowodu złej instalacji, niezastosowania się do instrukcji obsługi lub użytkowania
niezgodnego zprzeznaczeniem;
produkt został uszkodzony zpowodu złej konserwacji lub jej braku;
produkt został uszkodzony zpowodu zanieczyszczenia, wypadku lub okoliczności ocharakterze sił wyższych
(powódź, pożar, wojny, zamieszki itp.);
produkt wykazuje złe działanie zpowodu słabego sygnału, zakłóceń elektromagnetycznych itp.;
produkt został uszkodzony mechanicznie (np. Wyłamany przycisk, upadek, itp.);
produkt został uszkodzony zpowodu użycia niewłaściwych materiałów eksploatacyjnych, nośników, akcesoriów,
baterii, akumulatorków itp. lub zpowodu użytkowania wzłych warunkach (temperatura, wilgotność, wstrząsy itp.);
produkt był naprawiany lub modyfikowany przez nieautoryzowany personel;
użytkownik nie jest wstanie udowodnić zakupu (nieczytelny paragon lub faktura), dane na przedstawionych
dokumentach są inne niż na urządzeniu;
produkt nie może być zidentyfikowany ze względu na uszkodzenie numeru seryjnego lub plomby gwarancyjnej.
Sprzęt marki Sencor serwisuje ogólnopolska sieć serwisowa ARCONET. Okres gwarancji wynosi 24 miesiące od daty
zakupu. Wrazie problemów ze znalezieniem najbliższego punktu serwisowego, prosimy osprawdzenie na stronie
internetowej lub kontakt telefoniczny.
www.arconet.pl tel. kontaktowy (061) 879 89 93
Więcej informacji na www.sencor.pl.
© 2017, 07/2017
PL10
 Loading...