

Page 1
SLE 40FS602TCS
SLE 32S602TCS
EN USER MANUAL LED TV
Page 2
EN
PLEASE, READ THESE INSTRUCTIONS BEFORE STARTING TO OPERATE THE
TELEVISION. STORE IT FOR LATER REFERENCE. NOTE DOWN THE MODEL NUMBER
AND THE SERIAL NUMBER OF THE TV SET. LOOK AT THE LABEL ON THE BACK
COVER AND PASS THE INFORMATION PROVIDED THERE TO YOUR DEALER IN CASE
THAT YOU WOULD NEED SERVICING.
Contents
1. Important safety instructions ..................................................................................................................3
2. Assembling the stand .............................................................................................................................10
3. Device .......................................................................................................................................................... 11
3.1. Control buttons on the TV ........................................................................................................................11
3.2. Connecting the TV connectors ................................................................................................................11
4. Remote controller .................................................................................................................................... 12
5. Basic controls ...........................................................................................................................................14
5.1. First start ......................................................................................................................................................14
5.2. Source selection (SOURCE), movement and menu options ..........................................................14
5.3. Quick options
5.4. Smart ............................................................................................................................................................14
5.5. Channel List ............................................................................................................................................... 15
6. Other menus .............................................................................................................................................16
6.1. Picture .........................................................................................................................................................16
6.2. Aspect Ratio (Aspect Ratio) ...................................................................................................................16
6.3. Network ....................................................................................................................................................... 16
6.4. Advanced Settings ....................................................................................................................................17
6.5. Sound ...........................................................................................................................................................17
6.6. More settings .............................................................................................................................................. 17
6.7. About TV......................................................................................................................................................21
7. Media ......................................................................................................................................................... 23
7.1. USB ............................................................................................................................................................ 23
8. EPG ............................................................................................................................................................ 24
9. REC ............................................................................................................................................................25
10. Troubleshooting ....................................................................................................................................... 26
11. Technical specifications .........................................................................................................................29
11.1. Product Information Sheet .................................................................................................................... 32
........................................................................................................................................14
Contents
2 EN
Revision 09/2021Copyright © 2021, Fast ČR, a. s.
Page 3
Important safety instructions
1. Important safety instructions
To be able to use this product properly, read this user's manual carefully and keep it
for future reference. If you plan to give (sell) this device to a third person, include all
documentation, including this manual, with the transaction.
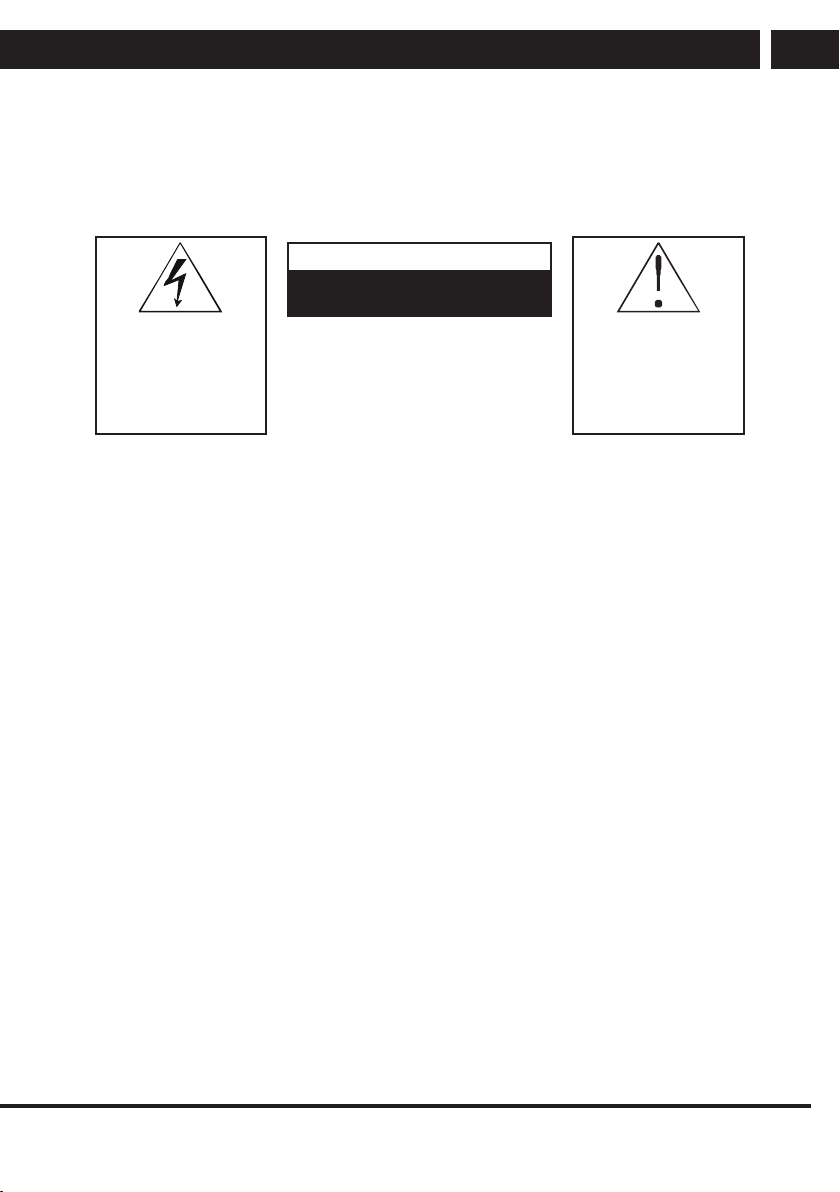
CAUTION
RISK OF ELECTRIC SHOCK – DO
The lightning symbol inside
a triangle indicates the
device has dangerous
voltage that may cause
electric shock.
TO REDUCE THE RISK OF ELECTRIC SHOCK,
DO NOT REMOVE THE COVER (OR BACK SIDE).
THERE ARE NO PARTS INSIDE WHICH COULD
BE REPAIRED BY THE USER. FOR REPAIRS AND
SERVICE, CONTACT AN AUTHORIZED SERVICE
General safety instructions
• Please read this manual carefully before using the device. Follow this manual and
the instructions inside.
• Heed all warnings.
• Follow all instructions.
• Use only the attachments and accessories specified by the manufacturer.
• OPEN FLAMES, FOR EXAMPLE A BURNING CANDLE, SHALL NOT BE PLACED
ON THE DEVICE. DO NOT PLACE HOT OBJECTS OR OBJECTS WITH AN OPEN
FIRE ON THE DEVICE, FOR EXAMPLE CANDLES OR NIGHT LAMPS. HIGH
TEMPERATURES MAY MELT PLASTIC COMPONENTS AND CAUSE FIRE.
• Use the device in temperate climate.
• The manufacturer and vendor of the device are in not in any way liable for any direct
or indirect damages caused by not following the instructions for installation, setup,
operation, maintenance and cleaning of the device mentioned in this manual.
• Protect the device against impacts, falls, blows, shocks, vibration, moisture and dust.
• Prior to granting children consent to use the device, they shall become familiar with
the proper and safe use of the player, corresponding to their age. If the device has
a headphone jack, do not use headphones set to maximum volume. Risk of hearing
damage or loss.
Installation, control
• Install the device according to the instructions in the manual.
• Leave free space around the device, it is necessary for proper air circulation. It helps
to dissipate the heat generated by the operation of the device. By covering the air
vents of the cabinet, you risk overheating and damage of the device. You must
ensure that the air circulation will not be prevented by covering the air vents with e.g.
newspaper, tablecloth, curtain, etc. Follow the installation instructions in the manual.
NOT OPEN!
CENTRE.
The exclamation point
symbol inside an isosceles
triangle indicates important
operation and repair
instructions in the included
device documentation.
EN
EN 3
Revision 09/2021Copyright © 2021, Fast ČR, a. s.
Page 4

Important safety instructions
EN
• This device shall not be kept in a closed area, such as a library or shelf, provided
sufficient ventilation cannot be provided or the manufacturer's instructions cannot be
followed.
• Do not place any objects into the air vents or any other holes. Risk of touching
components with dangerous voltage or shorting parts that could cause fire or electric
shock. Do not pour any liquids into the device. Do not install the device in direct
sunlight, or close to heat sources, like radiators, heat exchangers, stoves or other
appliances (including amplifiers) producing heat. High temperatures shorten the life of
the electronic components of the device significantly. Do not use and do not leave the
device near an open fire.
• The device must not be exposed to dripping or running water and you must not place
upon it objects filled with liquid, e.g. vases. Protect the device against becoming wet,
sprayed on or poured on by any liquid, do not leave or install the device outdoors. Do
not use the device outdoors. You risk electric shock or fire by not adhering to these
instructions.
• Do not use the device close to water.
• Handle the glass panels and cover of the device with care. The glass screen can
break on impact and cause serious injury.
• Make sure the power cord is not stepped on or compressed, especially near the plug
and point leading from the device or adapter. The power plug (adapter) is used to
disconnect the system and must be easy to access.
• Do not use a device with a damaged power cord or plug. If the power cord or plug is
damaged, turn off the device, disconnect it from the power supply and contact your
authorized repair shop. Only a professional can replace a damaged power cord or
plug. Under no circumstances should you attempt to replace the power cord or plug
yourself.
• Do not attempt to bypass the safety function of the polarized plug. If the plug cannot
be plugged into your socket, refer to an electrician to replace your obsolete socket.
Before plugging the device into the socket make sure the voltage in your socket
corresponds with the voltage on the label of the device or power adapter. If you are
not sure of the type of power source you have in your home, refer to your vendor or
local power company.
• Before switching, make sure that all network connections are made properly and in
accordance with the manufacturer's instructions. Switch the device off and unplug it
from the socket before plugging in or changing the connection of the device.
• Remember to always unplug the plug (adapter) from the socket before unplugging
the power cord.
• Plug the power cord into an independent socket. Do not overload wall sockets using
extension cords or unified sockets. Risk of electric shock.
• Hold the power cord by the plug and not by the cable when pulling out from the
socket.
4 EN
Revision 09/2021Copyright © 2021, Fast ČR, a. s.
Page 5
Important safety instructions
• Disconnect the power cord from the power outlet during thunderstorms, or when not
in use for a longer period of time. Avoid carrying the device from a cool environment
into a warm environment or vice versa, or operating the device in a very moist
environment. Air moisture may condense in some areas within the device case and
may cause the device to become temporarily inoperable.
• In this case, leave the device in a warm and well-ventilated area and leave for 1–2
hours until the moisture evaporates. The device can be normally used again. Be
especially cautious when using the device for the first time during a cool season
immediately after purchasing. Do not place the device on an unstable cart, stand,
console or table. The device can fall and cause serious injury to children or adults or
seriously damage the device and other objects. Only carts, stands or tables defined
by the manufacturer or sold with the device shall be used. Any assembly work with
the device shall be carried out according to the manufacturer's instructions and shall
use assembly accessories recommended by the manufacturer.
• Do not lean against the device, do not lean over or use the device as a step. Avoid
quick movements. Make sure children do not play with the machine.
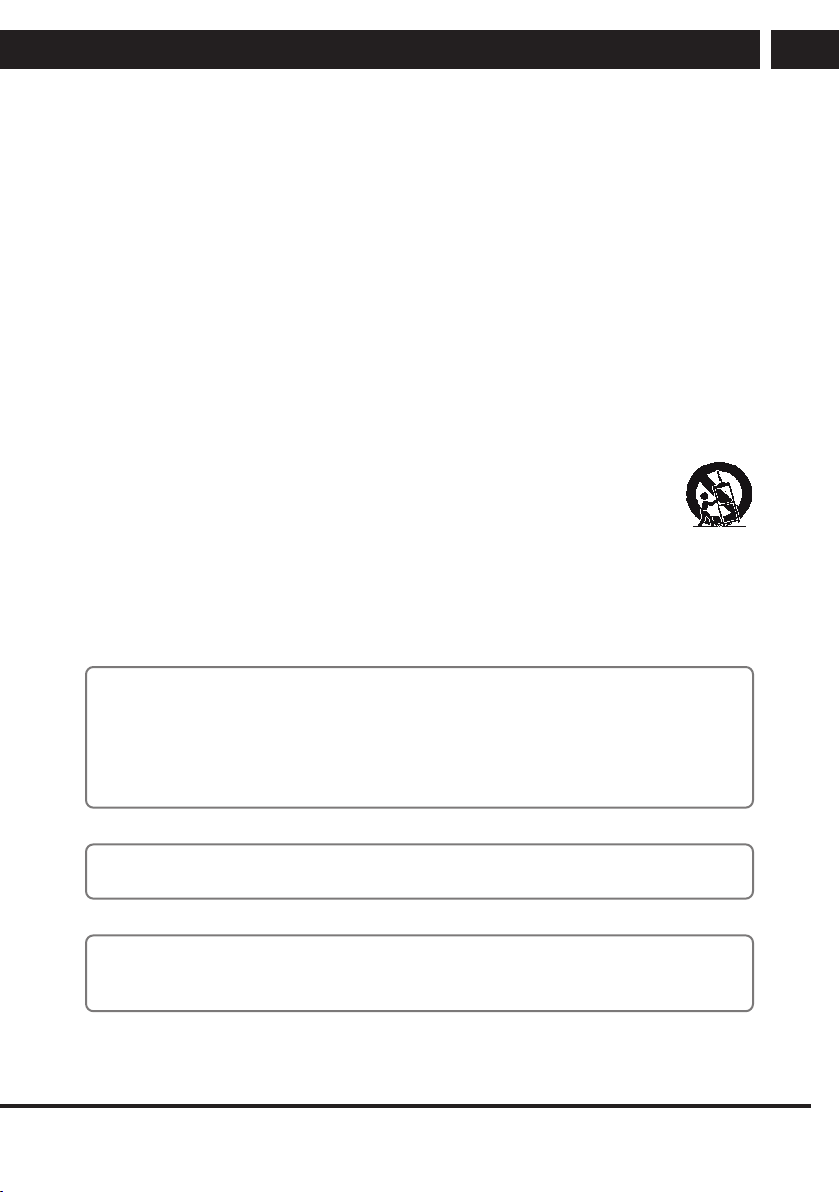
• Be careful when moving the device when placed on a cart. Suddenly
stopping, using excessive force and uneven surfaces may cause the cart
holding the device to tip over.
• The manufacturer and vendor of the device are in not in any way liable
for any direct or indirect damages caused by not following the instructions for
installation, setup, operation, maintenance and cleaning of the device mentioned in
this manual.
• Protect the device against impacts, falls, blows, shocks, vibration, moisture and dust.
Do not expose the device to extreme temperatures or humidity.
EN
Note:
If the device is powered by an adapter, only use the AC adapter and power cord
included with the device. Do not use defective sockets. Make sure the cord is properly
plugged into the socket. If the cord is loose, an electric arc can cause fire. Refer to a
qualified electrician to replace sockets.
Note:
Plug the device into a properly grounded socket with protective grounding pin only.
Note:
If you plan to mount the device to a wall or ceiling, follow the instructions of the
manufacturer and the user's manual for the given system.
EN 5
Revision 09/2021Copyright © 2021, Fast ČR, a. s.
Page 6
Important safety instructions
EN
Repairs and maintenance
• To avoid risks of electric shock or fire, do not remove the device from the case – the
case does not contain components that the user could repair or adjust without the
necessary equipment and qualification. Refer to a professional service centre if your
device requires service.
• In the event of any unusual occurrences during the use of the device, e.g. smelling
the characteristic smell of burning insulation or even seeing a smoke, turn the device
off immediately, disconnect the power supply and wait with continuing use of the
device until you learn the result of its inspection by the service personnel.
• Leave all service to qualified service personnel. Service is necessary when the device
is damaged in any way, for example in case of damage to the power cord, spilling
liquid on the device, intrusion of foreign objects into the device, when the device is
exposed to rain or moisture, if the device does not function in the usual manner or if
it fell.
• When repairing or replacing a component of the device, make sure the repair
technician used spare parts defined by the manufacturer to ensure the replaced
components have the same features as the original. Unauthorized replacements can
cause fire, electric shock or other risks.
• Prior to cleaning, moving or other maintenance work, unplug the cord (adapter) from
the socket.
• Clean the device with a dry cloth only.
• Do not use gasoline, thinner or other solvents or abrasives, scouring pads, or sponges
with scouring pads to clean the device.
Note:
Do not throw the device into your common household waste. Respect laws and
regulations when disposing of the machine.
Remote controller and battery
• Do not expose the remote controller or battery to direct sunlight, or close to heat
sources, like radiators, heat exchangers, stoves or other appliances (including
amplifiers) producing heat. Do not use and do not leave the device near an open fire.
Make sure the sensor is not exposed to intense light (e.g. sunlight) or fluorescent tube
light, which could lower the efficiency and reliability of the remote controller.
• The remote controller or battery must not be exposed to dripping or running water
and objects filled with liquid, e.g. vases, shall not be placed on the device. Protect the
remote controller against becoming wet, sprayed or poured on by any liquid. Do not
use outdoors. Failure to respect these instructions can lead to the remote controller or
battery becoming damaged.
• Do not use the device close to water.
• The impact the battery disposal has on the environment shall be monitored carefully.
• Using the batteries incorrectly can result in leakage and corrosion. Follow the
following instructions to ensure proper remote control operation:
– Do not insert the batteries in the wrong direction.
6 EN
Revision 09/2021Copyright © 2021, Fast ČR, a. s.
Page 7
Important safety instructions
– Do not charge, heat, open or short the batteries.
– Do not throw batteries into a fire.
– Do not leave dead batteries in the remote controller.
– Do not combine various types of batteries or old and new batteries.
– If you do not use the remote controller for a longer period of time, remove the
batteries to prevent damaging the remote controller by the batteries leaking out.
– If the remote controller does not work correctly or its range decreases, replace all
batteries with new ones.
– If there is an electrolyte leakage from the batteries, have the remote control
serviced by an authorized technician.
Notice:
To prevent risk of fire or electric shock, do not expose the device to rain or
moisture.
NOTICE:
The batteries must not be exposed to excessive heat, for example sunlight, fire,
etc.
This symbol indicates the device has double insulation between dangerous
voltage from the network and user-accessible parts. Replace parts with identical
spare parts only.
EN
EN 7
Revision 09/2021Copyright © 2021, Fast ČR, a. s.
Page 8
Important safety instructions
EN
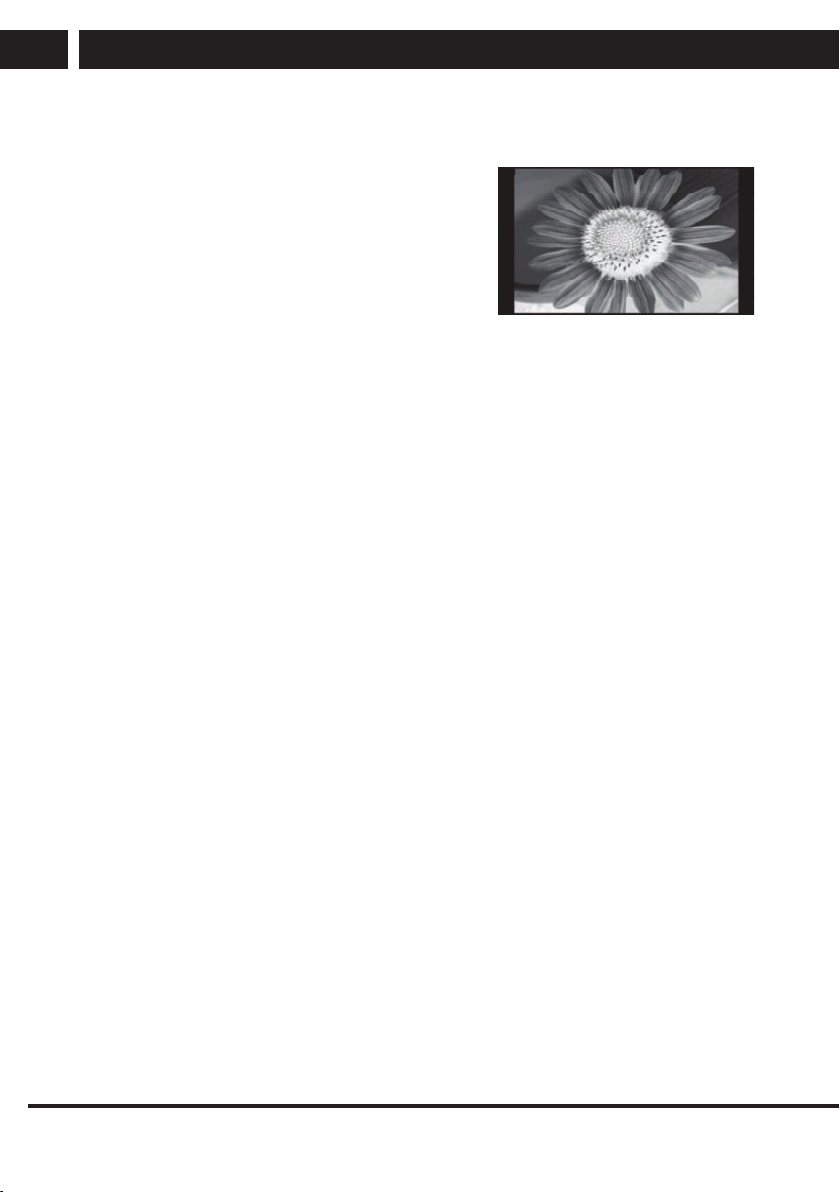
• Do not leave a still image on the LCD panel for
more than 2 hours, as this may damage the
panel.
• This is a characteristic of liquid crystal displays
and does not indicate a problem. LCD screens are
made using precision technology to provide even
the finest image details. Several defective pixels
can appear on the screen from time to time, indicated as red, blue, green or black
dots (up to 0.001% of the total pixel count of the screen). This does not affect the
characteristics and the effectiveness of your TV set.
Notes on the USB connector:
• USB memory devices require being connected directly into the device. To prevent
a failing or interrupting data transfer, do not use USB extension cable. Electrostatic
discharge can cause the device to not function. In this case, the user must restart the
device.
• Before using a USB memory device, test that it communicates with the device and
its read and write speed.
• For maximum reading speed, we recommend to keep the disc space defragmented.
Use file system FAT32, single partition, no protection.
• If the reading/writing of the memory device is not smooth, it can lead to undesirable
effects, such as interruption of the image (blocky image) or failure of whole frames,
audio malfunctions, and in extreme cases, stopping of the operation. Unexpected
behaviour of the connected storage device, or the presence of viruses and other
malicious software can cause the device to stop the functioning with the need to
restart it.
• The USB connector is of standard type and cannot supply power to highly powered
USB devices (e. g. hard discs HDD). Use a device with its own power and power
them with their own power supply.
• The device was designed with respect to maximum compatibility with memory
devices. Considering the variety of devices on the market, we cannot guarantee
compatibility with every USB device available. Should you run into any issues, try
formatting the memory device directly in the device. Should problems persist, use
another memory device.
Due to wide range of the USB devices on the market, it is not possible to ensure
compatibility of the device with all types of USB devices.
8 EN
Revision 09/2021Copyright © 2021, Fast ČR, a. s.
Page 9
Important safety instructions
Serial number
The device's serial number is a unique number that unambiguously identifies your device.
Mark down the serial number of your device below along with additional information
important for the unambiguous identification of your device.
Production number: _________________________________________________________
Date of purchase: ___________________________________________________________
Notes:
1. The graphics in this manual is informative.
2. The menu on your TV screen may be slightly different from the illustrations in this
manual.
3. The information in the document are subject to change without notice. The
manufacturer accepts no liability for damages incurred directly or indirectly from
errors, incompleteness or discrepancies between the instruction manual and the
product described.
EN
EN 9
Revision 09/2021Copyright © 2021, Fast ČR, a. s.
Page 10
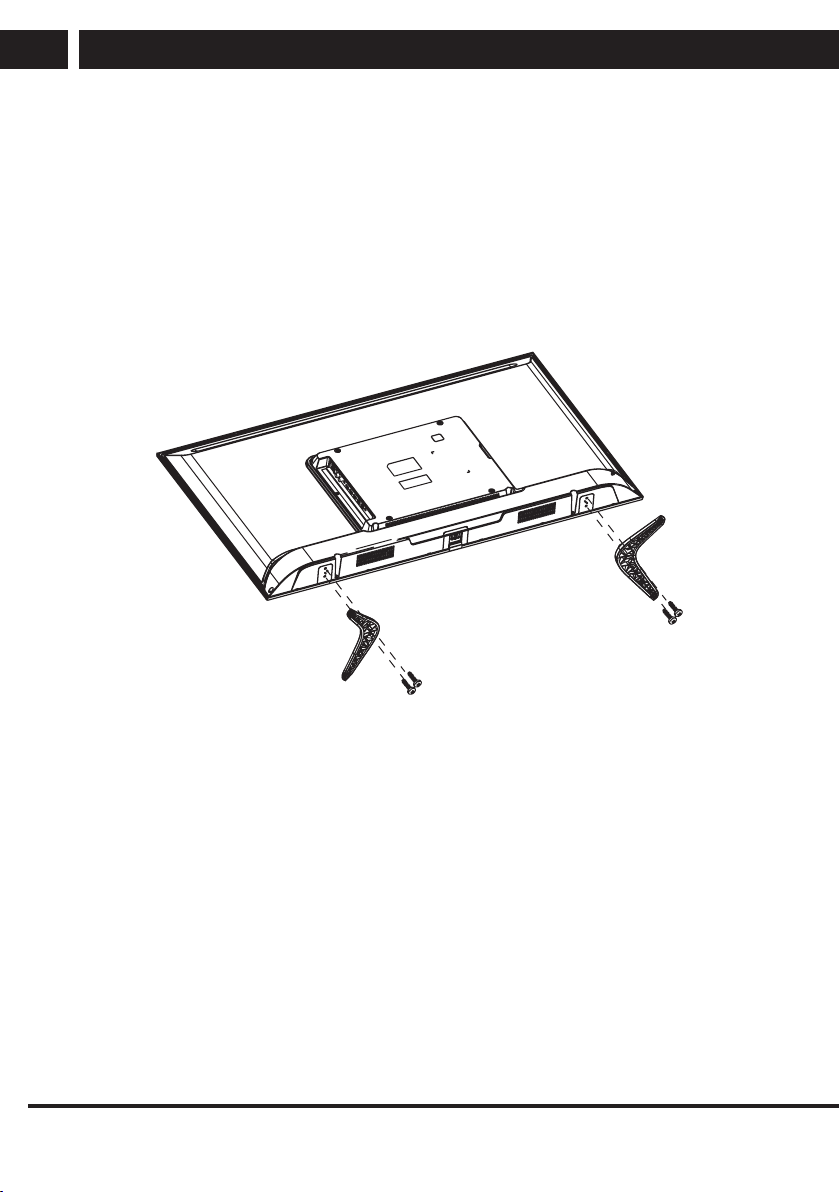
Assembling the stand
EN
2. Assembling the stand
Before attaching /removing the stand, make sure the TV is turned off and plug is
disconnected from the wall outlet.
Before performing the work, put underneath the LED TV set some soft material (e.g.
blanket). This will prevent damage to it. Ensure a proper attachment of the supports so
that the TV set is stable.
Place the assembled TV set on a firm and flat surface.
Instruction for assembling the stand
10 EN
Revision 09/2021Copyright © 2021, Fast ČR, a. s.
Page 11
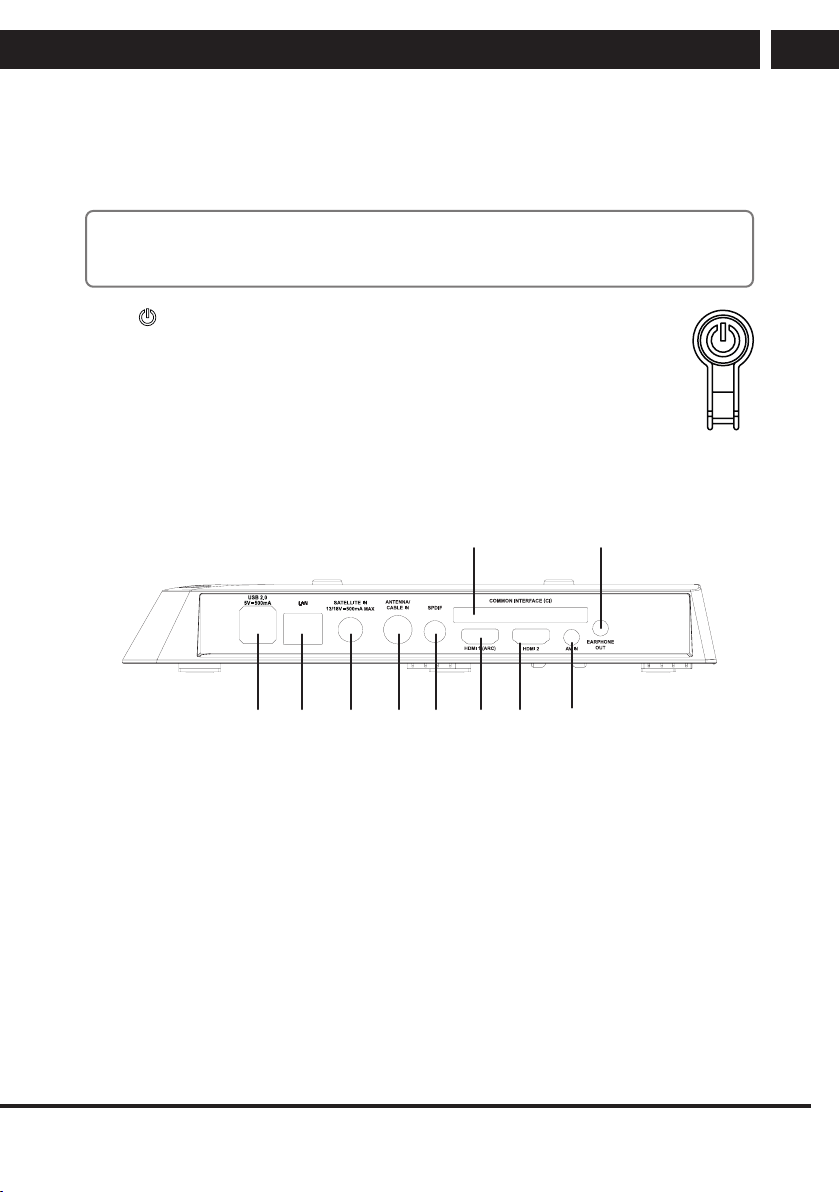
3. Device
1 2
3 4
567
8
9
3.1. Control buttons on the TV
Note:
The location and names of the function and power buttons on your TV may vary
depending on the model.
Button
Press to switch the TV on or switch to standby mode.
3.2. Connecting the TV connectors
0
Device
EN
1. USB 1.2: connect a USB flash drive to play supported multimedia content
2. RJ45: connect to the internet
3. RF IN: connection to the antenna or cable television system
4. RF IN: connection to the antenna or cable television system
5. SPDFI: connect optical output
6. Cl: Cl input
7. HDMI1 ARC: connect a device with HDMI output to the HDMI1 connector
8. HDMI2: connection of device with a HDMI output to the HDMI2 connector
9. AV IN: AV input
10. EARPHONE OUT: earphone output
EN 11
Revision 09/2021Copyright © 2021, Fast ČR, a. s.
Page 12
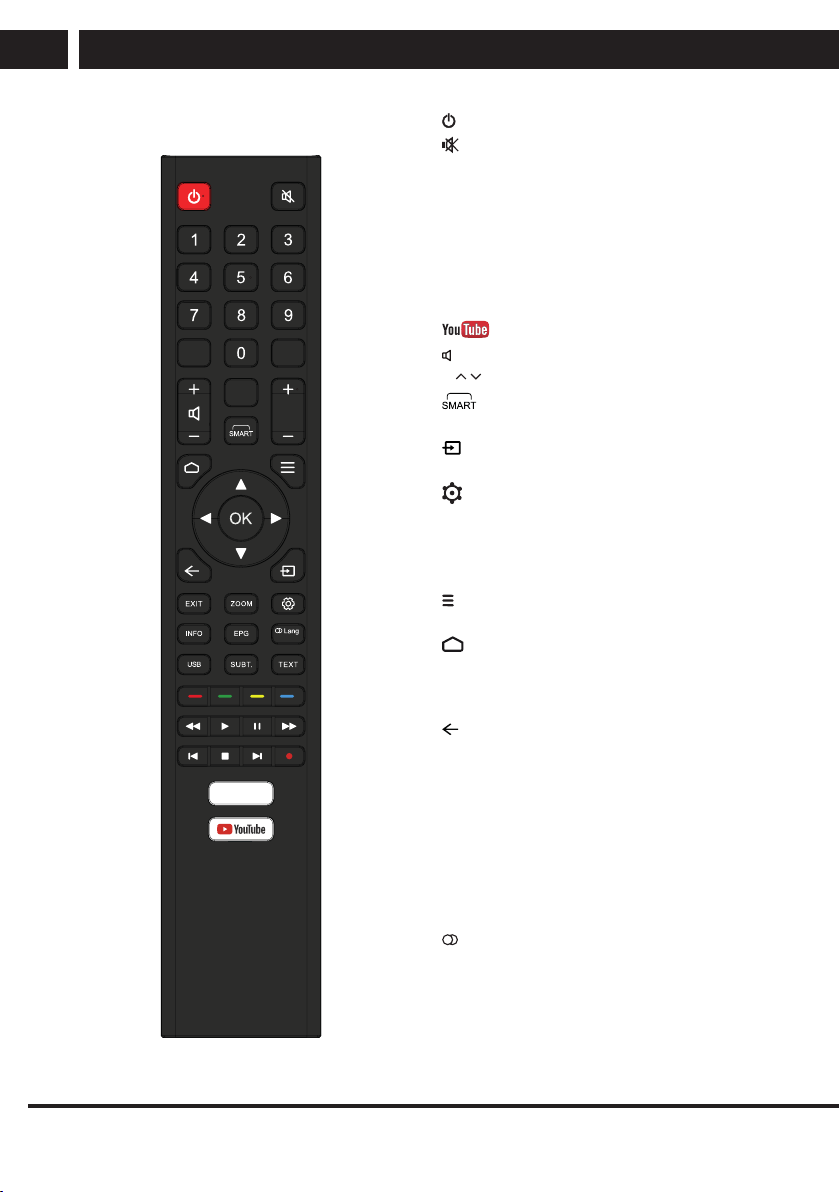
Remote controller
+/-
EN
4. Remote controller
LISTFAV
TV
P
/
AD
: Turns the TV on/off the standby mode.
: Press to mute the sound. Resume it by
pressing again or by pressing the VOL +
button.
Number pad 0-9: Press button 0-9 directly to
select a TV channel when watching television.
Select the page number in the teletext mode,
etc.
FAV: In the TV mode you enter the Favourites
menu or you exit it.
: Access YouTube.
: Press to increase or lower the volume.
P / : Press to switch to individual channels.
: Access to SMART interface.
TV: Direct input selection of digital TV.
: Press to select the desired input.
USB: Press to enter USB mode.
: Displays the TV’s main menu in the TV
mode.
INFO: Button to display information.
EPG: Press to display the electronic
programme guide.
: Displays the options menu of selected
functions (OPTIONS).
: TV Home Page.
v/V/b/B/OK: Used for navigation in the
menu on the screen and set the TV set
according to your preferences.
: Return one step back.
EXIT: Function to exit menu or the screen.
NETFLIX: Enter the NETFLIX page.
Colour buttons: Match various functions in the
menu or in the teletext.
TEXT: Turn teletext on or off.
Note: the teletext function is optional and
the availability of buttons depends on the
model. Teletext information depends fully
on the channel provider.
LANG:
Selection of the accompanying audio, if
available.
Sound mode selection.
12 EN
Revision 09/2021Copyright © 2021, Fast ČR, a. s.
Page 13
Remote controller
SUBT.: Button to display/hide subtitles on the bottom part of the screen if available.
LIST: View the list of programs according to the set options.
ZOOM: Press to change the display size.
m: Fast rewinding.
M: Fast forwarding.
?b: Jump to previous track.
B?: Skip to next track.
: Press to record (only in the DTV mode).
•
B / X: Play/Pause or start recording with time shift in media mode.
x: Stop recording/play.
Note:
Remove the battery during storage or if you do not use the device for a long time.
To control your device with a remote controller, point it at the device and then press
the desired function. The maximum range of the remote control is about 5 meters with
a deviation of up to +/- 30 degrees from the perpendicular direction to the receiving
remote sensor on the front of the device. The falling battery capacity decreases
gradually the range of the remote controller. When you use the remote controller,
there can not be any fixed obstacles between the remote controller and the device.
During a standard use, the battery life in the remote controller is about 1 year. If there
is a significant reduction in the effective range of the remote controller, replace both
batteries in the controller. If you are not going to use the controller for a long time, take
out both batteries – thus preventing a possible damage from battery leakage.
Prevent entry of strong light (e.g. sunlight or strong light from fluorescent or energysaving sources) that may limit the efficiency and reliability of infrared remote controller.
EN
Other selections
Selection NETFLIX/YouTube offers an access to installed apps. To use the YouTube
service it is advisable to log in, to use the NETFLIX service it is necessary to log in. You
can find the terms of use, account management and prices at the websites of these
services.
EN 13
Revision 09/2021Copyright © 2021, Fast ČR, a. s.
Page 14
Basic controls
EN
5. Basic controls
5.1. First start
Guide
The first time you turn on the TV, the guide helps you with the setup.
With the guide, select the appropriate menu language, country, Internet connection, home
use (recommended) or demo mode and source selection. When you finish the guide and
select a broadcast source, you need to search the source for the available channels.
5.2. Source selection (SOURCE), movement and menu options
Press SMART,
and press OK to select it.
Move within the item using the buttons v/V and confirm by pressing OK.
To return to the previous entry, press the
To finish the setting press EXIT. Important items can be accessed directly, while advanced
and more detailed settings can be accessed in the item on the far right - More Settings .
Note:
Depending on the current broadcast situation, on the connected devices and on the
selected source, some options may be inactive or not appearing at all.
or to select the desired source or setting using the v/V/b/Bbuttons
.
5.3. Quick options
After pressing the button button, some useful options are available (may vary
depending on the software used):
Tuner mode (selection between terrestrial, cable and satellite reception), Programme
information, Subtitles (On/Off), Subtitle language (by broadcast), Audio language (by
broadcast), General interface (menu of the inserted CAM module), Channel information
(strength, quality, etc.), Channel installation (new tuning).
5.4. Smart
Wireless display
When you choose Wireless display you switch the TV to reception from a mobile
phone or a tablet. Check, if your phone is equipped with remote screen technology or a
compatible one (e.g. Miracast). You can view the connection data directly on the main
TV screen. On your mobile phone, select the TV where your mobile phone will send the
broadcast. To end the connection press the button EXIT on your remote controller.
Wireless display – wireless display when connected to a mobile device.
Music (Enjoy music) – turning off the screen for just listening to the audio
Sleep (Sleep timer) – TV sleep timer
14 EN
Revision 09/2021Copyright © 2021, Fast ČR, a. s.
Page 15
Basic controls
FastCast - sharing other devices (mobile phone) to the TV. The device must support
FastCast technology or install the app as shown in the QR code.
Soundbar - adjusting the sound for richer delivery through the soundbar
Sport – sports picture and sound mode for better experience
5.5. Channel List
Press LIST to view the list of channels, which you previously saved. Move within the list
using the ▲/▼ buttons and press OK to select a new channel. Other important options
are available in the program list:
Red/Green button - quickly add the currently highlighted program to the Favorites 1-4 list
(red) or remove it from the list (green). The status is shown by the red symbol.
Note:
The last used list will always be displayed after pressing LIST until the FAV button
is pressed again to change it. Likewise, the FAV button on the remote control can be
used as a shortcut to quickly restrict the list to favourite programs only. If you have
not selected any favourite programs and you have selected the Favourites list that is
empty, change the list display to e.g. All using the red button.
EN
EN 15
Revision 09/2021Copyright © 2021, Fast ČR, a. s.
Page 16

Other menus
EN
6. Other menus
Operating the TV is simple and intuitive. There are shortcut options from the remote
control for important or frequently used items.
The main items are SMART (SMART button), Quick Setup (Settings button), Source
(Sources button), Watch TV. You can also move Left/Right (left/right direction) between
the options. You can enter the content of each item by pressing Down and then selecting
an option and pressing OK.
6.1. Picture
Select settings according to your taste, source, scene, ambient conditions.
Picture Mode
Select from available settings Dynamic/Standard/Movie/Natural/Personal.
Personal mode allows to set customized values for Brightness, Contrast, Colour, Tint,
Sharpness, Backlight.
6.2. Aspect Ratio (Aspect Ratio)
Choose between Auto (depends on the video), 16:9, 4:3, Zoom1, Zoom2, FitScreen,
FillScreen, Other.
If the selected aspect ratio differs from that originally recorded in the image, it will distort
the ratios of objects, such as faces. The correct Auto mode function depends on the
correct information provided by the author. The availability of modes depends on the
signal source, e.g. DVB-T2 with a mandatory ratio will not allow a change at all.
6.3. Network
Internet connection (On/Off)
Use smart apps and HbbTV to connect your TV to the internet. Below are summaries of
information for wireless and wired connections, depending on which is active and you
have selected. At the bottom are More settings for specific network settings for experts,
according to their requirements.
Wired
Next select IP setting if your cable connection has automatic connecting available. In this
case keep the following selection DHCP to ON. Or you can set the connection method
manually for a fixed address, in which case select DHCP to OFF. Next, you have to
enter the IP address, Netmask, Gateway and DNS according to your network operator
information.
Wireless
TV searches wireless networks (option Scan). If your network is not listed (for example,
it is set as hidden), you must add it manually by selecting Manual. For this you will
need its SSID name and security. After selecting your network, enter the correct access
16 EN
Revision 09/2021Copyright © 2021, Fast ČR, a. s.
Page 17

Other menus
information, e.g. your password, according to the security method. IP Setting you can
perform the same way as with the cable connection (see above), automatically DHPC or
manually.
6.4. Advanced Settings
Color Enhancement - according to natural color curves
ECO (On/Off) – setting variable picture parameters for agreeable viewing in power saving
mode.
Colour Temp – select Normal, Cool or War m colour presentation.
Dynamic Contrast – advanced evaluation of the displayed scene and adjustment of
contrast.
Noise Reduction - Select the image noise reduction between Off/Low/Medium/High/Auto
.
6.5. Sound
Choose according to your taste, sources, played sound, or ambient conditions of a
particular setting.
Sound mode
Select from available modes: Standard/Music/Theatre/Sports/News/Personal
Advanced Settings
Audio Output - select from available outputs: speaker, headphone, HDMI
SPDIF Type – you can switch between linear PCM or Auto output when your connected
device has a decoder for the accompanying soundtrack.
SPDIF Delay – set in case of broken synchronization in SPDIF.
Audio Delay – fine tuning of audio and picture time synchronization.
Auto Volume Control
Select On or Off – electronic equalization of different volume according to the program.
Equaliser – adjusting the sound in several frequency bands. Only for user audio mode.
Audio Description – When a sound track with an audio description is broadcast in the
currently running program, you can turn it on or off to add it to normal sound.
AD Volume – when audio description is enabled, the volume of the description can be
adjusted against the normal sound.
EN
6.6. More settings
In addition to the important items described above, there are a number of other items
available for more precise adjustment to your needs.
6.6.1. Channel
This selection is used to set up the received channels, to scan the broadcasting bands,
and to save broadcast programs. Depending on the type of broadcast (air, cable, or
satellite), the content of the selection varies.
EN 17
Revision 09/2021Copyright © 2021, Fast ČR, a. s.
Page 18
Other menus
EN
To receive broadcasts, you need to set each broadcast mode you want separately and
save its programs. Before setting each method it is important to select the correct source
SOURCE (DTV for digital DVB-T, ATV for analogue broadcasting).
Tip:
We recommend checking the antenna and its quality, including the quality of the
power cable before starting the tuning. This is especially true for satellite dishes, where
we recommend that they be installed and inspected by an expert, e.a. for safety
reasons.
Note:
Find out the type and parameters of your antenna installation, what signals are present
in your subscriber drawer before setup and tuning.
Tuning may be factory conditional on the specification of a child fuse, depending on
the design and country. Enter factory default 1234 or disable the child lock completely
if you do not need it.
Country – select from the available countries the one which best suits your location.
Tuner Mode – select terrestrial (Antenna) or cable (Cable) or satellite (Satellite) according
to your reception.
• Antenna/Cable
Automatic Search – select if should be tuned digital DTV, analogue ATV or both. OK
– starts searching the whole bandwidth and informs you of the found channels and
programs.
• Other selections are applicable only for cable reception:
Frequency Scan - select Quick, Advanced or Full according to operator information
Network frequency - set according to operator information
Network ID - entered according to operator information
Manual, Analogue, Digital
Use buttons ◄/► Channel intended to search for a program. The demodulation stripe
indicator will let you know about the presence of a broadcast on this channel and how
to find programs on it. Press ▼ to go to Search and press OK. The found programs are
saved in your list, or the new search will overwrite those already present in your list.
Satellite reception (DVB-S/S2)
Make sure you have an antenna ready to receive DVB-S.
18 EN
Revision 09/2021Copyright © 2021, Fast ČR, a. s.
Page 19
Other menus
Satellite setting
ALERT:
Have a professional install your satellite antenna to ensure you get quality and
uninterrupted reception. The professional will inform you about the technical
parameters (in particular DiSEqC), which he used during the installation process
and which shall be entered into the TV receiver for a successful tuning process.
• Search for Satellites
Depending on the M7 FastScan search parameters set for certain countries or Others ,
press OKto perform the search.
• Manual satellite tuning
Correctly determine the received satellites and assign them to DiSEqC. You can select a
transponder to control the received signal (e.g. Astra 3/23,5° E, 12070 GHz, horizontal,
27500 kSym/s). Also set the other satellite reception-specific parameters according to the
installation that the antenna installer tells you.
• Scan Mode
For searching, select a mode between Default/Network Scan/Blind Scan.
Note:
Depending on the model, design, and region, all options may not be available.
EN
Automatic Channel Update
Select On if you want the TV to search the channels itself for changes as instructed by
the operators.
LCN
Turn On if LCN is used in your country, otherwise leave it Off.
HbbTV
Turn on if you want to receive additional information via an Internet connection for some
programs. TV stations that broadcast this data will display their own reception alert in the
picture. Switch to this data using the Red button on the remote controller and continue
according to the instructions of that TV station.
Common interface
If you have inserted a conditional reception module (CAM), you can enter its menu and
set it up in the Quick Options, described above. Some operators require their profile to be
enabled. Follow the module instructions and operator information.
Revision 09/2021Copyright © 2021, Fast ČR, a. s.
EN 19
Page 20

Other menus
EN
6.6.2. System
Language
Set the Language Menu for the TV to communicate with you.
Select your preferred language for audio and subtitles from the available languages. In
case of dual selection, the first search is performed for the language which you enter
as your main language – Primary, if not found, the searching is for the – Secondary
language. If it is not found, the language that is selected as the first to be broadcast is
selected. The recognition function depends on the number of broadcast languages and
their exact identification in the broadcast.
Teletext
Choose Teletext encoding for correct viewing – East, West, Russian, and so on.
CAM PIN - if you have a module that requires a PIN, enter it here.
Clock
• Auto sync Auto Sync – turns on or off time synchronization according to digital
broadcast. We strongly recommend that you keep sync on, because many other
advanced digital broadcasting features synchronize with time.
• Date&Time – only in case the auto sync is off. Set correct date and time.
• Daylight savings – on/off. If it is not broadcast, set it correctly to preserve other time
functions.
Sleep Timer
Set the time after which the TV turns off to Off (timer is not active) / 15 min / 30 min / 45
min / 60 min / 90 min / 120 min.
Auto Standby
You can set the time after which the TV turns off, unless you press any button. The
options are: Off (TV will never turn off with this timer option) / 4 hrs / 6 hrs / 8 hrs.
Screen Saver - replaces the active image with variable images after a set period of time.
Location – Home for normal use, Shop without or including (Demo) function symbols.
Shop Mode - This mode sets the picture for in-store demonstration and displays a
description of the TV's functions. This mode is not energy efficient and is not suitable for
home viewing.
Instant Power-On - shortens the TV start-up time to the previous values.
Child Code
You can limit some TV function and request a password entry. To first activate the lock,
enter the factory password “1234”.
Activate the lock, position On, to display next settings.
Now you can change the factory password to your own in the item Set Password, where
you enter first the current password and then the new one, which you have to repeat to
exclude an error. Remember your new password!
20 EN
Revision 09/2021Copyright © 2021, Fast ČR, a. s.
Page 21
Other menus
Parental Lock - if the digital programme is equipped with information about the required
age for viewing (e.g. 9, 12, 15 or 18 years), you can condition its viewing by entering the
correct password. The function depends on the broadcasted information about age. If
broadcast, the information about age is displayed with the description of the program,
which you can display by pressing
. To activate, select the minimum age numerically.
Note:
If watching is conditional upon entering a password, you can enter it after pressing the
button OK.
Connectivity
Allows you to enable and configure connection devices such as HDMI CEC (T-link)
including its control (T-link Remote Control), format a USB drive for use in this TV (see
chapter on PVR) and a USB keyboard.
Universal Access
Allows you to set advanced options for using special broadcast services. To take
advantage of them, check with specific broadcasters to find out which services their
broadcasts or specific programmes include. For example Audio Description, including
setting the ratio of the original sound to the accompanying description.
Help
Includes a brief description of how to set up and operate the TV
HDMI CEC, T-LINK
When you turn on the HDMI CEC function, only these HDMI and CEC devices will
communicate with each other when they are connected by HDMI cable if they are
equipped with HDMI CEC function.
EN
ALERT:
HDMI CEC is a digital function. The number of available functions depends on
your connected device or the type of its input. The reliability of their application
can also be affected by poor quality or too long HDMI cable or proximity to the
sources of interference.
6.7. About TV
Software upgrade (USB/Network)
If the manufacturer releases new software for this TV in the future, it can be updated with
this option. When new software is released, a description of the new features and how to
update will be released.
Product Information
You can view the basic information about the device and its software again.
Revision 09/2021Copyright © 2021, Fast ČR, a. s.
EN 21
Page 22
Other menus
EN
ALERT:
Compare the version when upgrading over the network. Use only the software
released by the manufacturer for the USB upgrade and designed exclusively
for your TV model. An attempt to update to unauthorized software may cause
irreparable damage to the TV that the warranty does not cover.
Restore to Default
If the TV settings have been changed in many places and it is difficult to find them all,
you can restore the TV to the way it came from the factory by selecting Restore Factory
Settings. All your personal settings are deleted, including the tuned channels, by selecting
Reinstall TV. You will be warned before doing this.
22 EN
Revision 09/2021Copyright © 2021, Fast ČR, a. s.
Page 23

Media
7. Media
7.1. USB
Press USB/OKto open the memory previously inserted into the USB port of the TV.
Moving and selection in the Menu
Move among the items in the memory using the buttons ▲/▼/◄/► and continue to
confirm by pressing OK.
To return to the list above use the item Return. Play the required file by selecting it and
pressing OK.
Press ◄ repeatedly to reach the display filter setting on the left side of the screen. You
can limit the viewing of either all items, or only movies, music, or photos specified by file
extensions using the filter.
Movies
Use for playback controls the usual buttons on the remote controller for fast forward
m
and reverse
Similar buttons appear also when pressing the button OK.
You can also set a different aspect ratio, set the repeat of one, all or no file, view your
playlist, and view the available file information.
Music
To control the playback use the usual buttons on the remote controller for fast forward M
and reverse
You can also set repeat of one or all files, random play.
Photos
Use for playback controls the usual buttons on the remote controller for skipping to the
next B? and previous ?b item of the list, pause X and start B of playback. Similar buttons
will appear when you press the OK button.
You can also set repeat of one or all files, random play. Photos can be rotated left and
right.
, skip to previous . and next > item of the list, pause X and start B.
m
, pause X and start B.
M
EN
EN 23
Revision 09/2021Copyright © 2021, Fast ČR, a. s.
Page 24
EPG
EN
8. EPG
EPG is a digital service that is delivered (exclusively) in the digital broadcasting by the
program provider and offers information about the programs up to seven days in advance.
The program provider is responsible for the amount and accuracy of the information. Time
information about programs refers to a single time, so it is necessary for the TV to set the
correct time incl. of the time zone, whether synchronized from the broadcast or manually
set.
EPG information is of two types. Press INFO to call up information about the currently
running programme and the next programme. This information disappears in a while
or you can suppress it by pressing again INFO. Another type of EPG is the table of
programs, which you call up by pressing EPG on the remote control.
Note:
The program data is broadcast for the entire multiplex (a set of programs broadcast at
the same frequency, e.g. 4–10 programs), cyclically, at several-minute intervals. TV
reads the data and continuously displays.them as soon as they are supplied. If the data
is not complete, select the program and then wait a while until the data is fully loaded.
It depends on the provider how fast the data is broadcast, how detailed and how
accurate it is. Usually, it takes longer to transmit to you multiple data (longer texts).
Tip:
TV's internal clock synchronizes from the broadcast quite accurately. If the TV does
not receive for a long time a broadcast with time, the internal clock can differ from real
time and affect the accuracy of long-term scheduled events. To synchronize the TV
clock switch on the TV set and wait a while.
You can select from other options
Record – select to set the time for recording a program (Red button)
Remind - select to set a reminder time for the show(Green button).
These options are also available from the remote control using the buttons listed in the
brackets above.
Each time function must be edited (set times and repeats) and then it is necessary to save
it to the schedule by confirming OK. In case of a time conflict between two events the TV
will alert you when saving it. A saved event carries a small alarm icon (for reminders) or a
red dot (for entries) next to its name in the EPG list, if there is space to display the icon in
the list.
You can view the list of recordings made (and delete some if necessary) by selecting
EPG/Recordings (Yellow button).
24 EN
Revision 09/2021Copyright © 2021, Fast ČR, a. s.
Page 25
REC
9. REC
ALERT:
To use the PVR functions, the connected disc must be formatted to the TV
system. Formatting will irreversibly delete previous data, back it up beforehand!
This formatted disc can only be used in this TV.
During reception of digital broadcast, part of the broadcast can be recorded for later use.
Records already made are available in MENU/Channel/Playlist.
Recording - press the REC button to start recording and confirm with Applyafter selecting
the scheduled end (if EPG information is available). Press the button STOP, the system
will notify you about full stop of the recording. Confirm this by selecting DONE and
pressing OK to end the recording.
Timeshift – it is the option to stop the current broadcast which is recorded in the
meantime on the connected memory device. After a while, you can start the broadcast
again and move it back and forth. This way, only a small portion of the broadcast can be
stored depending on your PVR settings.
Press PAUSE to pause. For fast forward or reverse through the recording press the
corresponding buttons
Recording, PVR
To ensure successful use of the PVR function, it is important for the combination of
read and write speed to be compatible with the current type of digital broadcasting and
its speed multiples. For maximum performance of the USB memory, it is necessary to
format it in the TV. For example, if your disk speed is not sufficient and you try to record a
demanding program, the TV will either display a note about insufficient disk speed (later
playback problems) or a complete failure/stop of the recording, depending on the current
broadcast speed. The speed of the broadcast and of the disc is evaluated continually and
a message about the speed can appear at any time (repeatedly) during recording. If the
speed is insufficient, use a faster disk.
m/M
.
EN
ALERT:
When recording or timeshift viewing channels protected by conditional access,
your conditional access system can restrict processing according to your
conditional access rules. For example, recording programs to be viewed later is
different from viewing programs in real time and the stored time code can limit
or prohibit your actions. Do not violate copyright laws. The system can refuse
to record programs even considering the parameters of connected memory
or special protective broadcasting functions of both the entire program and
individual programs or program segments (for example due to age or regional
restrictions). Please contact your conditional access system provider for more
information.
EN 25
Revision 09/2021Copyright © 2021, Fast ČR, a. s.
Page 26
Troubleshooting
EN
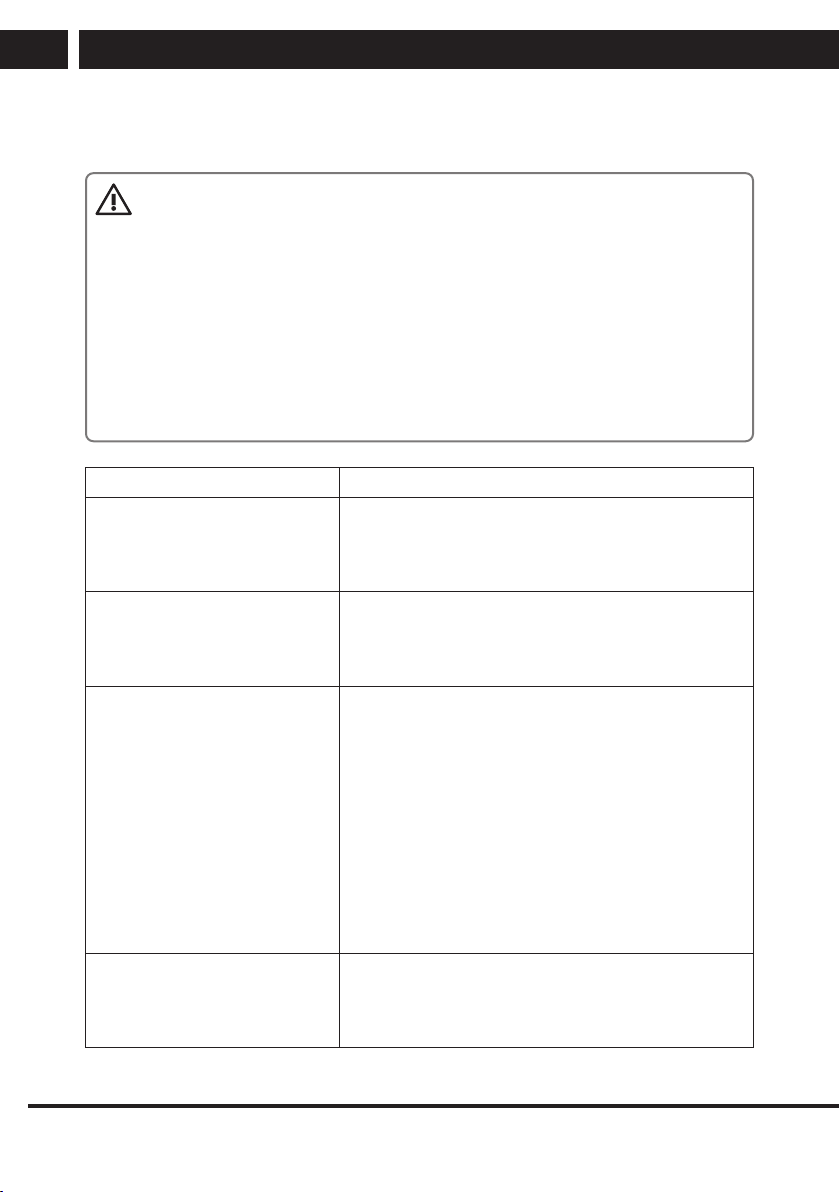
10. Troubleshooting
NOTICE:
Under no circumstances should you try to repair the appliance yourself, the
device does not contain parts that could be repaired by the user. Always take the
device to an authorized service center if a repair or adjustment are necessary
other than regular maintenance. Unauthorized interference with the device
is considered a breach and the loss of warranty claim. The importer, supplier,
distributor or vendor shall not be liable for any losses caused by a violation of
regulations listed in this manual. Do not open the device, there is the danger
of electric shock. In the case of device failure, first check the following list of
problems and their solutions. If you fail to remove the defect according to the
following tips, contact your vendor.
Problems Possible solutions
The TV set has no power. Check the attached power cord and the functioning of
the electrical outlet.
Unplug the power cord, plug it in after 60 seconds
and turn the TV set on again.
No picture. Check the antenna connection.
There could have been problems at the broadcasting
station, try another station.
Adjust contrast and brightness.
Good picture, but no sound. Raise volume.
Check that the sound is not muted (Mute function).
Press MUTE on the remote controller. Check audio
settings.
If you use an external device, make sure that
itsvolume is not muted or the sound is not switched
off.
If you use the A/V or a component input, make sure
that the cables are correctly connected and are not
loose. If you use a cable with DVI reduction on HDMI,
you need a separate audio cable.
Make sure that the headphones jack is not occupied.
Good sound, but an unusually
colored picture or no picture.
Check the connection and the state of the antenna.
If you use a component input, check the connection.
Incorrect or loose connection can cause problems
with colors or empty screen.
26 EN
Revision 09/2021Copyright © 2021, Fast ČR, a. s.
Page 27
Troubleshooting
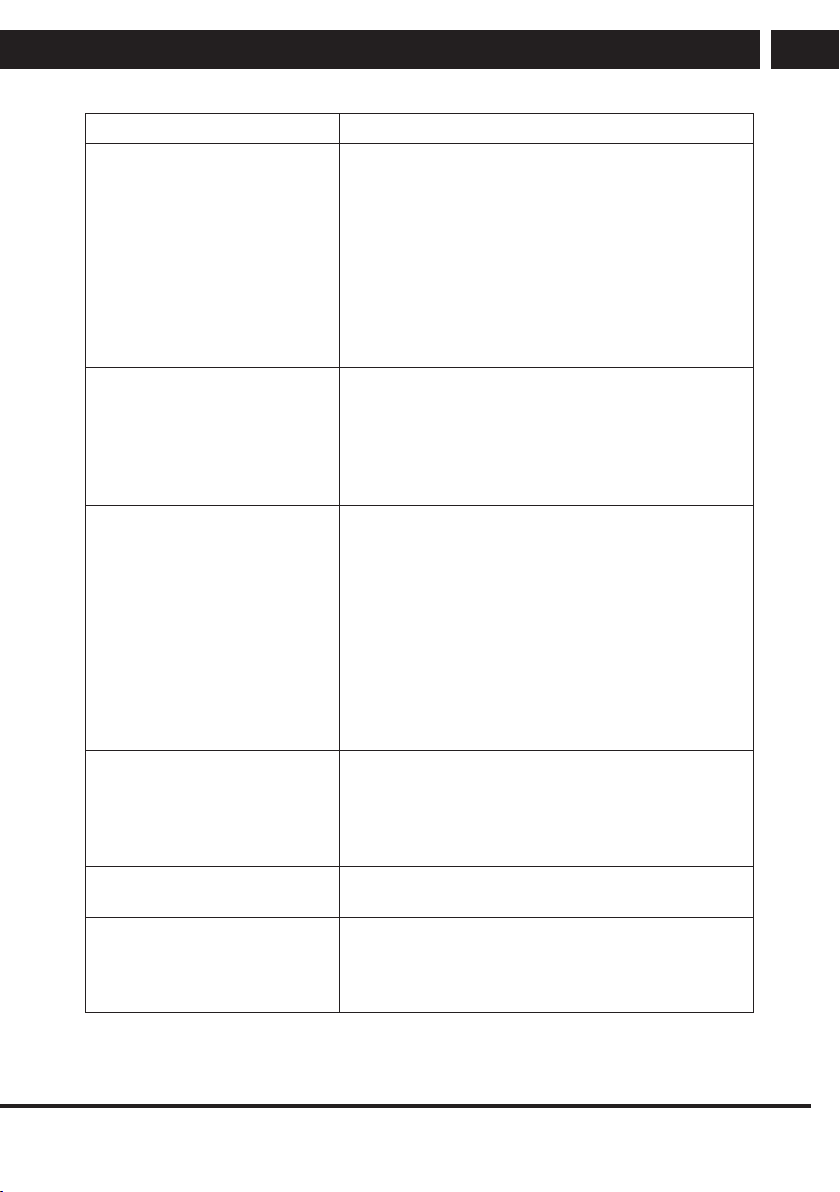
Problems Possible solutions
The TV set does not respond to
the remote controller.
The batteries in the remote controller might be
empty.
If it is necessary, replace them with new ones.
Clean the lens of the remote controller. The distance
between the LED TV set and the remote controller
should be no more than 8 m, in the recommended
operating angle and with no obstacles in the path
of the beam. Prevent the impact of strong light
(daylight, sunlight or fluorescent light lamps and
fluorescent tubes) on the TV and remote controller.
There are color points on the
screen.
Although the LED screen is made with high-precision
technology and 99.99% or more of the pixels are
operational, the screen can display permanently
unlit or lit points of light (red, blue or green). This is
a construction feature of the LED screen and is not a
malfunction.
The picture falls apart. Keep the TV set away from interfering sources of
electricity, such as cars, hair-dryers, welders and any
optional equipment.
The disintegration of image may be caused by
atmospheric phenomena, such as a local or distant
thunderstorm.
When installing optional equipment, leave a space
between the optional equipment and the TV set.
Check the antenna and the connection.
Keep the antenna away from the power or input/
output cables.
After automatic tuning only
some channels are available.
Check if your area is covered by digital TV
broadcasting. Try to retune or manually tune the
missing channels.
Check if you use the correct antenna type – see page
14 “Connecting the antenna”.
Cannot select a channel. Check if the channel is not blocked in the main menu
settings.
Cannot play from the USB
device.
Check the connecting channel between the USB and
power connection. The hard disc was not formatted.
Make sure that the USB flash unit is compatible and
contains supported formats of multimedia data.
EN
EN 27
Revision 09/2021Copyright © 2021, Fast ČR, a. s.
Page 28
Troubleshooting
EN
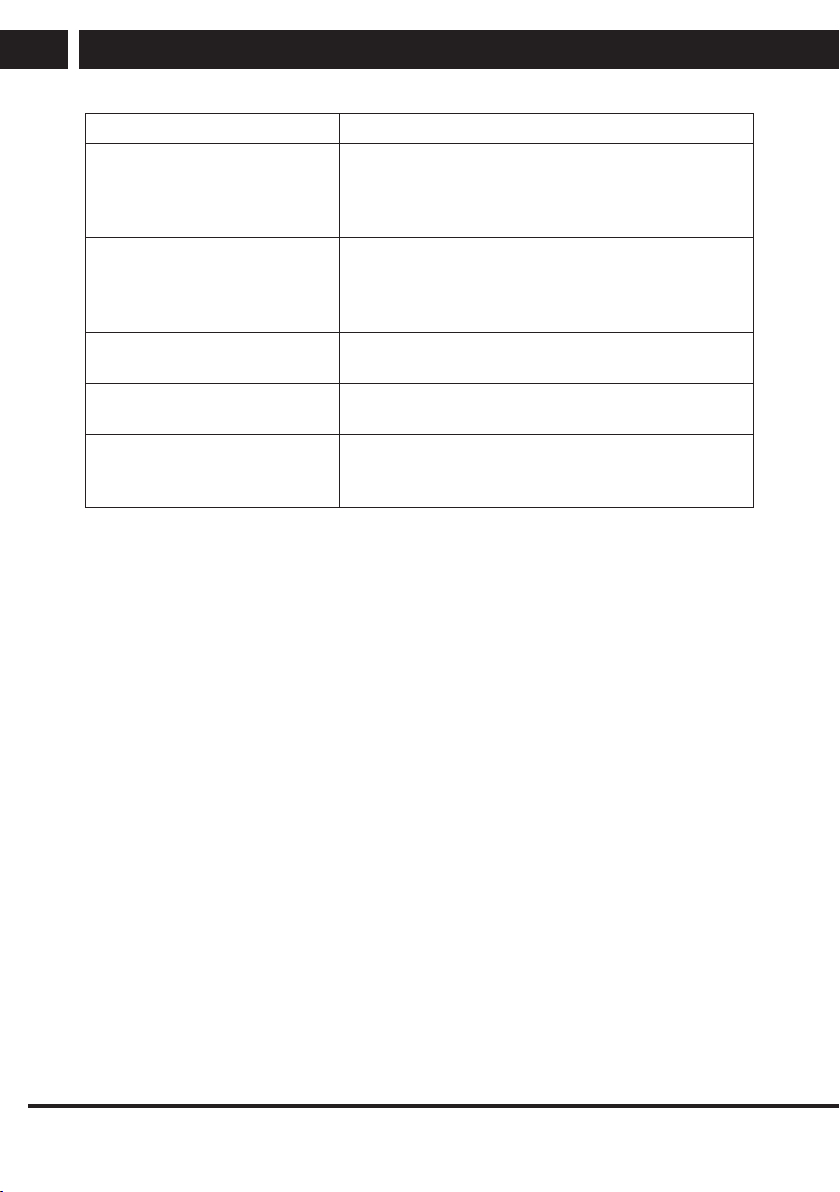
Problems Possible solutions
The picture is distorted,
contains macroblocks,
microblocks, points, large pixels,
Video compression can cause disruption, especially
during rapid movement, e.g. In sports programs and
action movies.
etc.
Speaker noise Check the cable connections, make sure that the
video cable is not connected to video input.
Sound distortion can be caused by a low level of the
signal.
The TV set turns off
automatically.
The TV set turns on
automatically.
The picture is not displayed on
the whole screen.
Make sure that the sleep timer or power save mode
timer are not on.
Make sure that the timer to turn on is not on in the
settings menu (Settings).
First make sure that the problem is not caused by the
input signal. Then try to adjust the item Zoom in the
Functions menu.
Picture defects and their causes
Snowy screen
Snowy screen is usually caused by a weak signal. Change the antenna setting or install
an antenna booster.
Double images or ghosting
Double image is usually caused by reflection from tall buildings. Adjust the antenna
orientation or place it higher.
Radio frequency interference
Waves are moving on the screen, which is usually caused by neighbouring radio
transmitters or shortwave receiver.
Interference by electrothermal devices with high temperature
Inclined or arrow shaped patterns appear on the screen or a part of the picture is missing.
This is probably caused by electrothermic devices with high temperatures in a nearby
hospital.
28 EN
Revision 09/2021Copyright © 2021, Fast ČR, a. s.
Page 29
Technical specifications
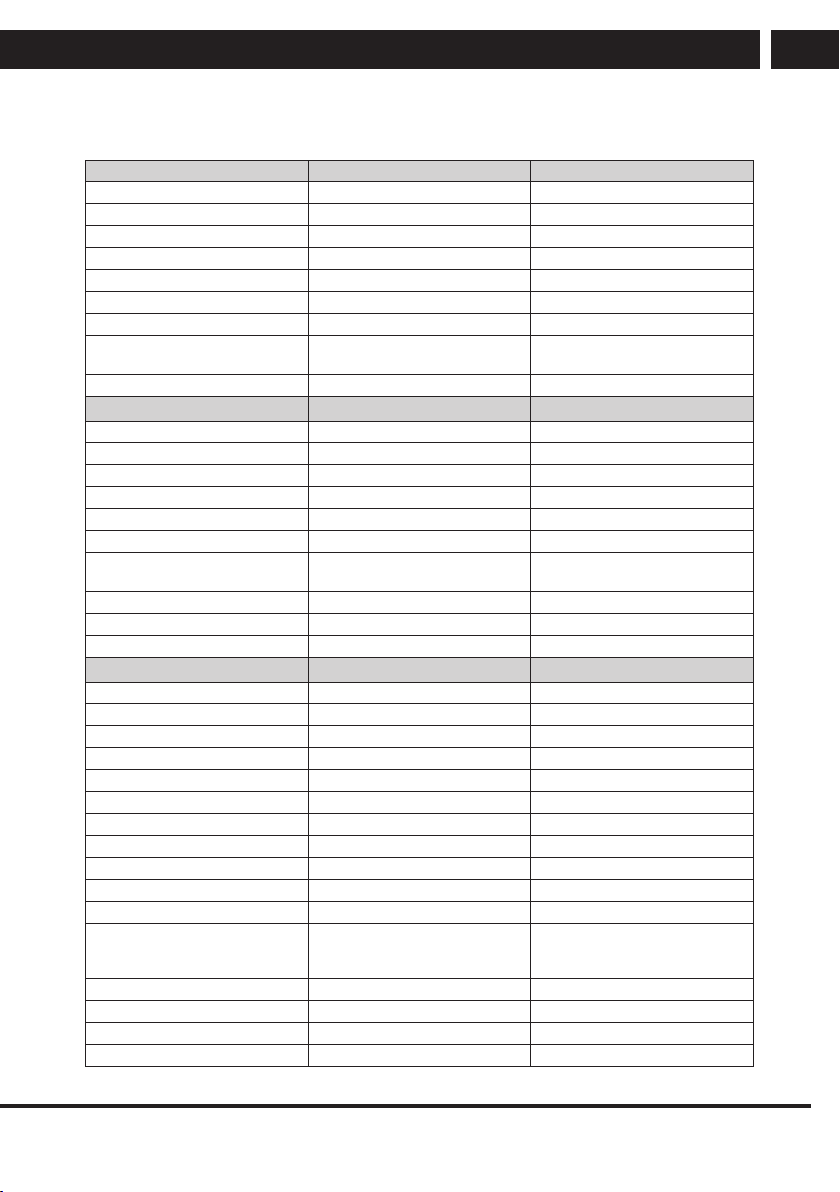
11. Technical specifications
Model SLE 40FS602TCS SLE 32S602TCS
Panel size 40" (102 cm) 32" (80 cm)
Electricity consumption 75 W 55 W
Standby consumption < 0.5W < 0.5W
Rated voltage AC 180–240 V ~ 50/60 Hz AC 180–240 V ~ 50/60 Hz
Remote controller Yes Yes
VESA wall mount 200 × 100 100 × 100
Dimensions with stand (w × h × d) 904 × 571 × 219 mm 726 × 480 × 179 mm
Dimensions without stand (w × h
× d)
Net weight with stand 5.9 kg 3.6 kg
Connectors
RF IN 1 1
AV IN mini 1 1
HDMI 2 (1× ARC) 2 (1× ARC)
Optical/coaxial output 1 1
USB 2 2
RJ45 (LAN) 1 1
Supported USB formats HEVC, MKV, AVI, MP4, MPEG, FLV,
CI slot 1 1
Headphones output 1 1
Wi-Fi Yes (2.4 GHz) Yes (2.4 GHz)
Other functions
Resolution 1920 × 1080 1366 × 768
Brightness (cd/m2) 240 220
Response time (ms) 9.5 6.5
Viewing angle H: 178°, V: 178° H: 178°, V: 178°
Embedded tuner DVB-T/T2, DVB-C, DVB-S2 DVB-T/T2, DVB-C, DVB-S2
Video system PAL/SECAM BG/DK/I PAL/SECAM BG/DK/I
PVR recording to USB Yes Yes
Progressive scan Yes Yes
Timeshift Yes Yes
EPG Yes Yes
Comb filter Digital Digital
OSD menu EN, CZE, POL, HUN, SVK, GER,
Zoom Yes Yes
Noise reduction Yes Yes
Timer OFF / ON / SLEEP Yes Yes
Subtitles Yes Yes
904 × 517 × 86 mm 726 × 428 × 82 mm
MP3, WMA, JPEG, JPG, PNG, BMP
FRE, ITA, SPA, GRC, HRV, SRP, BUL,
SLV, LIT, RUS, ROM
HEVC, MKV, AVI, MP4, MPEG, FLV,
MP3, WMA, JPEG, JPG, PNG, BMP
EN, CZE, POL, HUN, SVK, GER,
FRE, ITA, SPA, GRC, HRV, SRP, BUL,
SLV, LIT, RUS, ROM
EN
EN 29
Revision 09/2021Copyright © 2021, Fast ČR, a. s.
Page 30
Technical specifications
EN
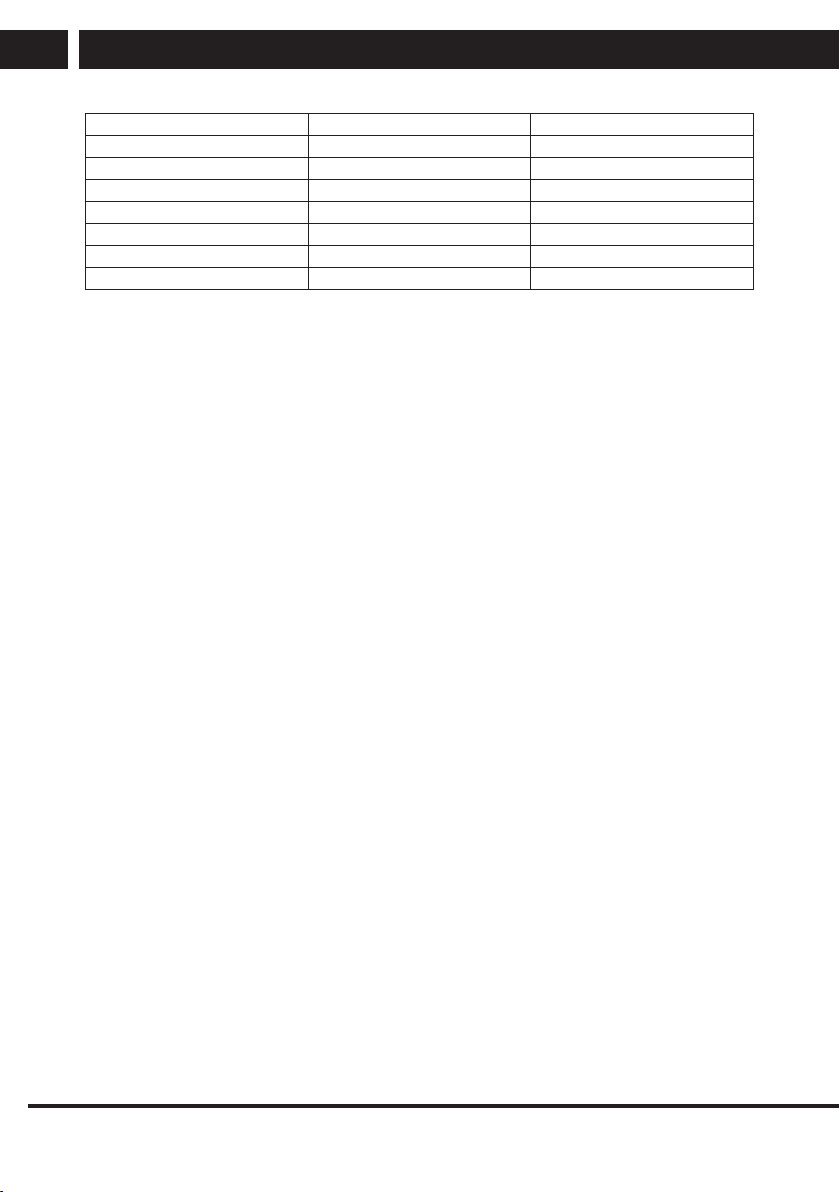
Audio language Yes Yes
Channel list Yes Yes
Favourites list Yes Yes
Image freeze Yes Yes
Radio Yes Yes
Lock Yes Yes
Parent lock Yes Yes
Hotel mode Yes Yes
Note:
Technical specifications may change without prior notice.
The original version is in Czech.
Manufacturer address: FAST ČR, a.s, U Sanitasu 1621, 251 01 Říčany, Czech Republic
Product Information Sheet according to Directive (EU) 2019/2013
The information sheet is located at the end of this manual.
30 EN
Revision 09/2021Copyright © 2021, Fast ČR, a. s.
Page 31
Technical specifications
INSTRUCTIONS AND INFORMATION REGARDING THE DISPOSAL OF USED PACKAGING
Dispose of used packaging material at a place designated by the municipality for waste
disposal.
DISPOSAL OF USED ELECTRICAL AND ELECTRONIC EQUIPMENT
This symbol on the products and / or accompanying documents means that
used electrical and electronic products must not be disposed of with normal
household waste For proper disposal, recovery and recycling, please take these
products to designated collection points. Alternatively, in some European Union
countries or other European countries, you may return your products to your
local retailer when buying an equivalent new product. The correct disposal of
this product will help save valuable natural resources and help prevent potential
negative consequences for the environment and human health, which could be
caused by inappropriate waste handling. For more details, please contact your
local authorities or the nearest collection site. Penalties may be imposed for
incorrect disposal of this type of waste, in accordance with national regulations.
For business entities in European Union countries
To dispose of electrical and electronic equipment, request the necessary
information from your dealer or supplier.
Disposal in other countries outside the European Union
This symbol is valid in the European Union. To dispose of this product, request
the necessary information about the correct disposal method from your local
authorities or from your vendor.
EN
FAST ČR a.s. hereby declares that the SLE 32S602/40FS602 type of radio
equipment complies with the Directive 2014/53/EU.
The full text of the EU Declaration of Conformity is available at the following
website: www.sencor.eu
Changes in text, design and technical specifications are subject to change without notice
and we reserve the right to make changes.
Revision 09/2021Copyright © 2021, Fast ČR, a. s.
EN 31
Page 32
Technical specifications
EN
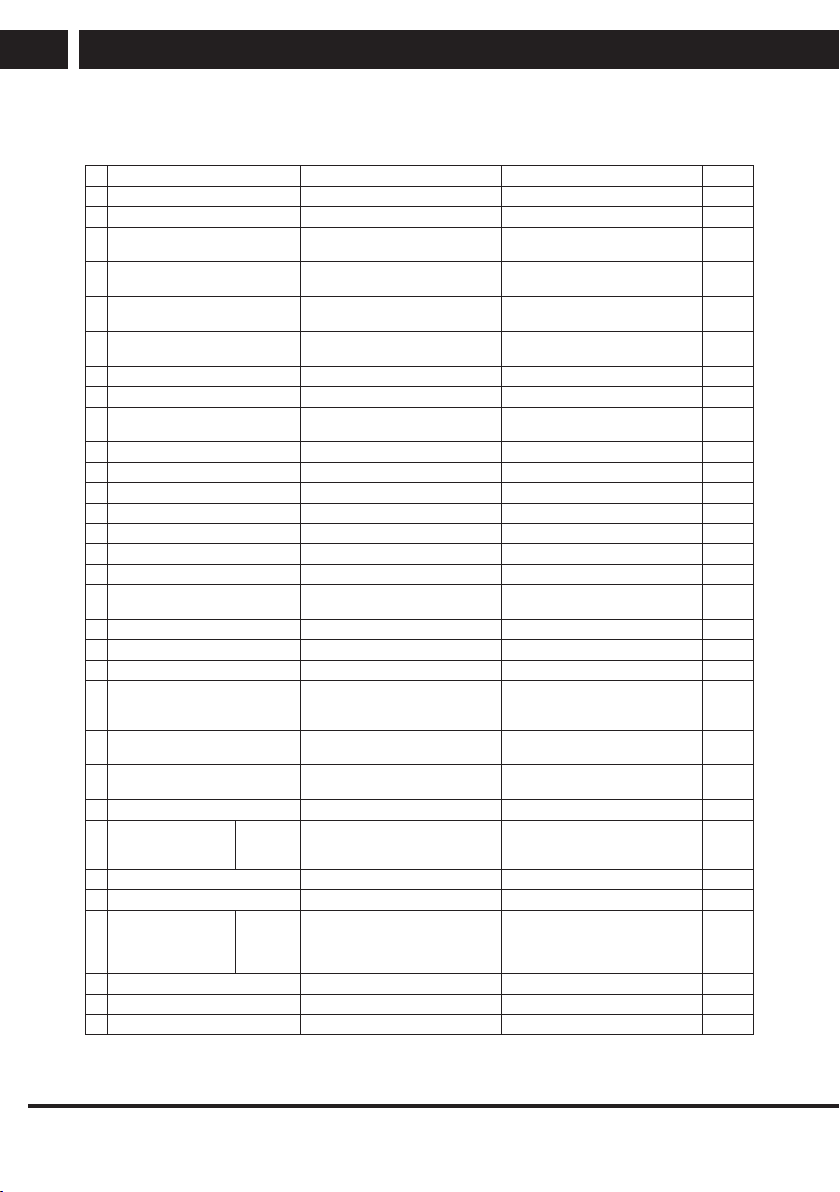
Product Information Sheet
COMMISSION DELEGATED REGULATION (EU) 2019/2013
# INFORMATION Value Value Unit
1 Supplier name or trademark SENCOR SENCOR
2 Model identifier SLE 40FS602TCS SLE 32S602TCS
Energy Efficiency Class for standard
3
Dynamic Range (SDR)
On mode power demand for
4
Standard Dynamic Range (SDR)
Energy Efficiency Class for standard
5
Dynamic Range (HDR)
On mode power demand in High
6
Dynamic Range (HDR) mode
7 Off mode, power demand 0 0 W
8 Standby mode power demand 0.5 0.5 W
Networked standby mode power
9
demand
10 Electronic display category Television Television
11 Size ratio 16 : 9 16 : 9
12 Screen resolution (pixels) 1920 x 1080 1366 x 768 pixels
13 Screen diagonal 102 80 cm
14 Screen diagonal 40 32
15 Visible screen area 46,2 27,4 dm
16 Panel technology used LED LCD LED LCD cm
Automatic Brightness Control (ABC)
17
available
18 Voice recognition sensor available No No
19 Room presence sensor available No No
20 Image refresh frequency rate 60 60 Hz
Minimum guaranteed availability
21
of software and firmware updates
(until):
Minimum guaranteed availability of
22
spare parts (until)
Minimum guaranteed product
23
support (until)
24 Power supply type: Internal Internal
External standardised
i.
power supply (included
in the product box)
External standardised
suitable power supply
ii.
(if not included in the
product box)
Required delivered current N/A N/A A
Required current frequency N/A N/A Hz
Required output voltage N/A N/A V
Standard
name N/A N/A
Input voltage N/A N/A V
Output voltage N/A N/A V
Standard
name
E F
36 32 W
- -
N/A N/A W
N/A N/A W
No No
31.8.2029 31.8.2029
31.8.2029 31.8.2029
31.8.2029 31.8.2029
N/A N/A
inches
2
32 EN
Revision 09/2021Copyright © 2021, Fast ČR, a. s.
Page 33
Technical specifications
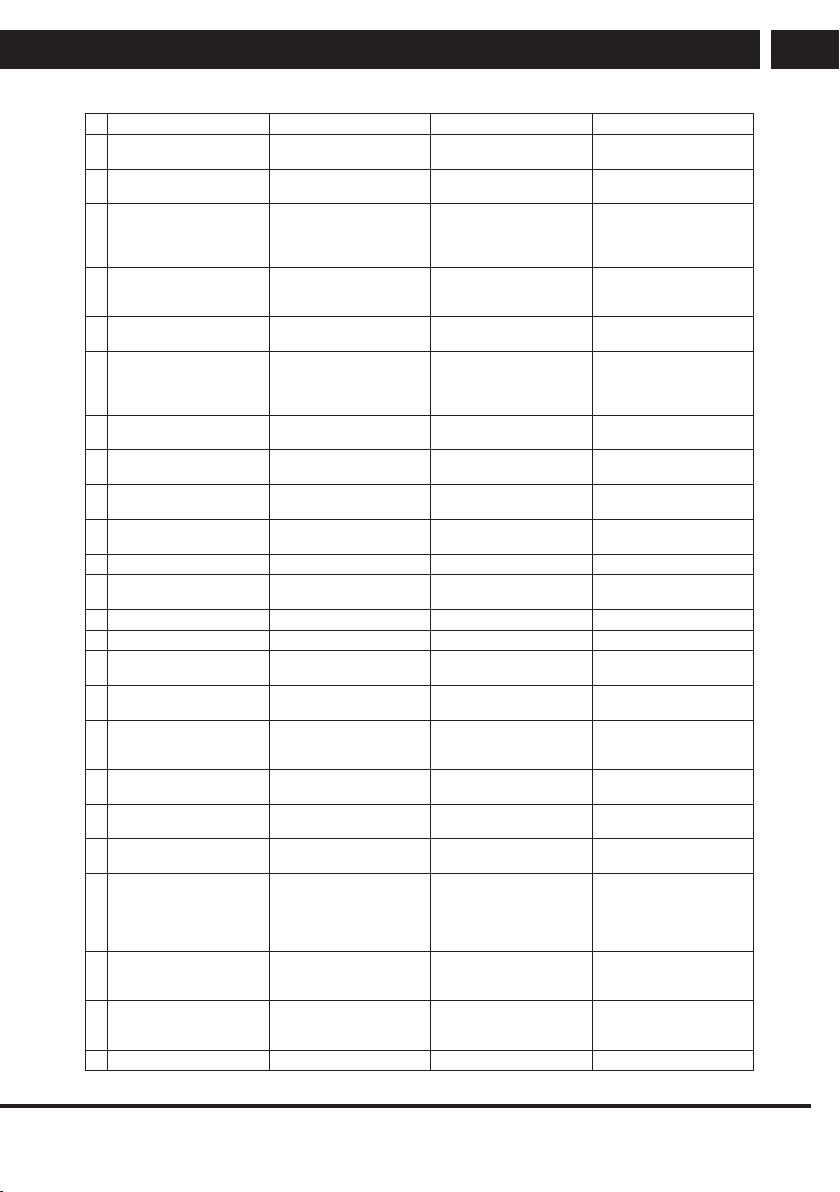
# CZ SK HU PL
Název nebo ochranná známka
1
dodavatele
Identifikační značka modelu
2
dodavatele
Třída energetické účinnosti
u standardního dynamické
3
horozsahu (SDR)
Příkon v zapnutém stavu
4
u standardního dynamické
horozsahu (SDR)
Třída energetické účinnosti
5
(HDR)
Příkon v zapnutém stavu v
režimu vysoce dynamického
6
rozsahu (HDR)
Vypnutý stav, příkon
7
Příkon v pohotovostním
8
režimu
Příkon v síťovém
9
pohotovostním režimu
Kategorie
10
elektronickéhodispleje
11 Poměr stran Pomer strán Oldalarány Format obrazu
Rozlišení obrazovky
12
(vpixelech)
13 Úhlopříčka obrazovky Uhlopriečka zobrazovacej Képátló Przekątna ekranu
14 Úhlopříčka obrazovky Uhlopriečka zobrazovacej Képátló Przekątna ekranu
Viditelná plocha obrazovky
15
Použitá technologie panelů
16
Dostupné automatické
17
ovládání jasu (ABC)
Dostupný snímač pro
18
rozpoznávání hlasu
Dostupný detektor přítomnosti
19
v místnosti
Obnovovací frekvence obrazu Obnovovací kmitočet
20
Minimální zaručenádostupnost
aktualizací softwaru a
21
firmwaru (do):
Minimální zaručená
22
dostupnost náhradních dílů
(do):
Minimální
23
garantovanápodpora výrobku
(do):
24 Typ napájení: Typ zdroja napájania: A tápegység típusa: Typ zasilacza:
Názov dodávateľa alebo jeho
ochranná známka
Identifikačný kód modelu dod
ávateľa
Trieda energetickej účinnosti
pre štan dardný dynamický
rozsah (SDR)
Príkon v režime zapnutia pre š
tandardný dynamický rozsah
(SDR)
Trieda energetickej účinnosti
(HDR)
Príkon v režime zapnutia pre
vysoký dynamický rozsah
(HDR)
Príkon v režime vypnutia
Príkon v režime pohotovosti
Príkon v režime pohotovosti
pri zapojení v sieti
Kategória elektronického
displeja
Rozlíšenie zobrazovacej
jednotky (pixely)
Viditeľná plocha zobrazovacej Látható képernyőterület
Použitá technológia panelu Alkalmazott paneltechnológia
K dispozícii je automatická
regulácia jasu (ABC)
K dispozícii je snímač rozpozn
ávania reči
K dispozícii je snímač prí
tomnosti v miestnosti
obrazovky
Minimálna zaručená
dostupnosť aktualizá cií softv
éru a firmvéru (do):
Minimálna zaručená
dostupnosť náhrad ných
dielov (do):
Minimálna zaručená podpora
výrobkov (do):
A szállító neve vagy védjegye
A szállító által
megadottmodellazonosító
Energiahatékonysági
osztályszabványos
dinamikatartomány (SDR)
esetén
Bekapcsolt üzemmódenergiaigénye szabványosdinamikatartomány (SDR)esetén
Energiahatékonysági
osztály(HDR)
Bekapcsolt
üzemmódenergiaigénye
nagydinamikatartomány
(HDR) esetén
Kikapcsolt
üzemmód,energiaigény
Készenléti
üzemmód,energiaigény
Hálózatvezérelt készenléti
üzemmód, energiaigény
Elektronikus kijelző
kategóriája
Képernyőfelbontás
(képpontok)
Automatikus
fényerőszabályozó (ABC)
rendelkezésre áll
Hangfelismerő
érzékelőrendelkezésre áll
Jelenlétérzékelő
rendelkezésre áll
Képfrissítési frekvencia
A szoftver- és firmwarefrissítések garantált
rendelkezésreállása legalább
eddig (dátum):
A tartalék alkatrészek
garantált rendelkezésre állása
legalább eddig (dátum):
Garantált
terméktámogatáslegalább
eddig (dátum):
Nazwa dostawcy lub
znaktowarowy:
Identyfikator modelu
udostawcy
Klasa efektywności
energetycznej dla
standardowego zakresu
dynamicznego (SDR)
Pobór mocy w trybie
włączenia dla standardowego
zakresu dynamicznego (SDR)
Klasa efektywności
energetycznej (HDR)
Pobór mocy w
trybie włączenia dla
szerokiegozakresu
dynamicznego (HDR)
Pobór mocy w trybie
wyłączenia
Pobór mocy w trybieczuwania
Pobór mocy w trybieczuwania
przy podłączeniudo sieci
Kategoria wyświetlacz elektronicznego
Rozdzielczość ekranu (piksele)
Widoczna powierzchnia
ekranu
Zastosowana technologia
panelu
Dostępność funkcji
automatycznej regulacji
jasności (ABC)
Dostępność czujnika
rozpoznawania mowy
Dostępność czujników
obecności w pomieszczeniu
Częstotliwość odświeżania
obrazu
Minimalna gwarantowana
dostępność aktualizacjio
programowania i
oprogramowania układowego
(do):
Minimalna gwarantowana
dostępność części
zamiennych (do):
Minimalne gwarantowane
wsparcie produktu (do):
EN
EN 33
Revision 09/2021Copyright © 2021, Fast ČR, a. s.
Page 34
Technical specifications
EN
# CZ SK HU PL
Normalizovaný vnější napájecí
zdroj (jako součást balení
i.
výrobku)
Standardní název
Vstupní napětí Vstupné napätie Bemeneti feszültség Napięcie wejściowe
Výstupní napětí Výstupné napätie Kimeneti feszültség Napięcie wyjściowe
Vhodný normalizovaný vnější
napájecí zdroj (pokud není
součástí balení výrobku)
ii.
Standardní název
Požadované výstupní napětí
Požadovaný dodávaný proud Požadovaný prúd Előírt szállítottáram Wymagane natężenie prądu
Požadovaný kmitočet proudu
Externý normalizovaný zdroj
napá jania (ktorý je súčasťou
balenia výrobku)
Štandardný názov
Externý normalizovaný vhodný zdroj napájania (ak nie
jesúčasťou balenia výrobku)
Štandardný názov
Požadované výstupné napätie Előírtkimeneti feszültség
Požadovanáfrekvencia prúdu Előírt áramfrekvencia
Szabványos külső
áramforrás(a termékdobozban)
Szabvány neve
Külső, szabványos
megfelelő áramforrás (haa
termékdoboznaknem része)
Szabvány neve
Znormalizowany zasilacz
zewnętrzny (dostarczonyw
opakowaniuz produktem)
Tytuł normy
Odpowiedni
znormalizowanyzasilacz
zewnętrzny (jeżeli nie jest
dostarczonyw opakowaniu z
produktem)
Tytuł normy
Wymagane napięcie
wyjściowe
Wymagana częstotliwość
prądu
34 EN
Revision 09/2021Copyright © 2021, Fast ČR, a. s.
Page 35

Technical specifications
EN
EN 35
Revision 09/2021Copyright © 2021, Fast ČR, a. s.
Page 36

www.sencor.cz
Designed in Europe by Sencor®, Made in China
 Loading...