

Page 1
SLE 3219
operation. Keep it for future use. Record the model number and
the serial number of the television. See the label on the rear cover
and provide this information to your vendor in the event that you
require repairs.
LED Television
Page 2

EN
Important safety measures . . . . . . . . . . . . . . . . . . . . . . . . . . . . . . . . . . . . . . . . . . . . . . . .3
1. Description of the appliance . . . . . . . . . . . . . . . . . . . . . . . . . . . . . . . . . . . . . . . . . . . .8
2. Remote control. . . . . . . . . . . . . . . . . . . . . . . . . . . . . . . . . . . . . . . . . . . . . . . . . . . . . . . . .9
3. Connecting and setting up . . . . . . . . . . . . . . . . . . . . . . . . . . . . . . . . . . . . . . . . . . . . 11
4. Selecting an input source . . . . . . . . . . . . . . . . . . . . . . . . . . . . . . . . . . . . . . . . . . . . . 13
5. Initial setup . . . . . . . . . . . . . . . . . . . . . . . . . . . . . . . . . . . . . . . . . . . . . . . . . . . . . . . . . . 14
6. Using the menus . . . . . . . . . . . . . . . . . . . . . . . . . . . . . . . . . . . . . . . . . . . . . . . . . . . . . 15
6.1 Picture (Picture) menu . . . . . . . . . . . . . . . . . . . . . . . . . . . . . . . . . . . . . . . . . . . . 15
6.2 Sound (Sound) menu . . . . . . . . . . . . . . . . . . . . . . . . . . . . . . . . . . . . . . . . . . . . . 17
6.3 Channel (Channel) menu . . . . . . . . . . . . . . . . . . . . . . . . . . . . . . . . . . . . . . . . . . 19
6.4 Lock (Lock) menu . . . . . . . . . . . . . . . . . . . . . . . . . . . . . . . . . . . . . . . . . . . . . . . . . 23
6.5 Setup menu (Setup) . . . . . . . . . . . . . . . . . . . . . . . . . . . . . . . . . . . . . . . . . . . . . . . 24
7. USB control . . . . . . . . . . . . . . . . . . . . . . . . . . . . . . . . . . . . . . . . . . . . . . . . . . . . . . . . . . 30
7.1 Photo (Photos) . . . . . . . . . . . . . . . . . . . . . . . . . . . . . . . . . . . . . . . . . . . . . . . . . . . 30
???Table of Contents
7.2 Music (Music) . . . . . . . . . . . . . . . . . . . . . . . . . . . . . . . . . . . . . . . . . . . . . . . . . . . . . 30
7.3 Movie (Movie) . . . . . . . . . . . . . . . . . . . . . . . . . . . . . . . . . . . . . . . . . . . . . . . . . . . . 31
7.4 Text (Text) . . . . . . . . . . . . . . . . . . . . . . . . . . . . . . . . . . . . . . . . . . . . . . . . . . . . . . . . 31
8. Troubleshooting guide . . . . . . . . . . . . . . . . . . . . . . . . . . . . . . . . . . . . . . . . . . . . . . . 32
9. Technical speci cations . . . . . . . . . . . . . . . . . . . . . . . . . . . . . . . . . . . . . . . . . . . . . . . 34
10. Information sheet . . . . . . . . . . . . . . . . . . . . . . . . . . . . . . . . . . . . . . . . . . . . . . . . . . . 35
2
Page 3
Important safety measures
If you want to use this product correctly, carefully read this user'smanual and store it for future
reference. If you give (sell) the appliance to somebody, please also include all the documentation
together with this appliance, including this user'smanual.
The ash symbol in an equilateral triangle indicates that there is dangerous voltage inside
this appliance, which presents arisk of injury by electrical shock.
The exclamation mark in an equilateral triangle symbol indicates important operating or
servicing instructions in the appliance'sdocumentation.
To reduce the risk of injury by electrical shock do not remove the cover (or the rear side). There are
no components inside which the user can repair. Have all repairs or adjustments performed at an
authorised service centre.
GENERAL SAFETY INSTRUCTIONS
• Carefully read this manual before using the appliance. Follow the instructions contained in this
user'smanual.
• Heed all warnings.
• Adhere to all instructions.
• Use only accessories determined by the manufacturer.
• AN OPEN FLAME MUST NOT BE PLACED ON THE APPLIANCE, E.G. ABURNING CANDLE.
DO NOT PLACE HOT ITEMS OR OBJECTS WITH AN OPEN FLAME E.G. CANDLES OR NIGHT
LAMPS ON OR IN THE VICINITY OF THE APPLIANCE. HIGH TEMPERATURES MAY MELT
PLASTIC PARTS AND CAUSE AFIRE.
• Use the appliance in atemperate climate zone.
• Under no condition does the manufacturer or the vendor of the appliance take responsibility for
any direct or indirect damages caused by not adhering to instructions for installation, setup, use,
service or cleaning of this appliance as described in this user'smanual.
• Protect the appliance against being knocked, dropped, hit and shaken and against vibrations,
humidity and dust.
• Before allowing children to use the appliance, they must be appropriately to their age, informed
about the correct and safe use of the player.
• If the appliance is equipped with aheadphone jack, do not use headphones set to an extreme
volume. There is adanger of hearing damage or loss.
EN
Installation, operation
• Install the appliance according to the instructions in the user'smanual.
• Leave free space on all sides of the appliance necessary for proper air circulation. This removes the
heat created during operation. Covering the ventilation openings of the appliance'scase creates
arisk of overheating or damaging the appliance. It is necessary to ensure that the ventilation
openings are not blocked, e.g. by anewspaper, table cloth, curtain, etc. Follow the installation
instructions in the user'smanual.
• This appliance should not be located in acon ned area such as abookshelf or rack, if su cient
ventilation is not provided for or the instructions of the manufacturer are not followed.
• Never insert any items into any ventilation or other openings because they could come into
contact with points with dangerous voltage levels or cause ashort circuit of parts, which could
cause a re or injury by electric shock. Never pour any liquid into the appliance.
• Do not install the appliance in direct sunlight or near sources of heat, such as heaters, heat
exchangers, stoves or other appliances (including ampli ers) producing heat. High temperatures
signi cantly reduce the lifetime of electronic components in the appliance. Do not use or leave the
appliance in the vicinity of an open re.
3
Page 4

EN
• The appliance must not be exposed to dripping or running water and objects lled with water
must not be placed on it, e.g. vases. Protect the appliance against rain, spray or contact with any
other liquid, do not leave or install the appliance outdoors. Do not use the appliance outdoors. Not
adhering to these instructions creates arisk of electrical shock or re hazard.
• Do not use this appliance near water.
• Treat the glass panel and appliance cover with care. The screen glass can break on impact and
cause serious injuries.
• Make sure that the power cord is not stepped on or compressed, particularly near the power plug,
power socket and at the point where it exits the appliance or the adapter. The power plug (adapter)
is used as adisconnection device and must be easily accessible.
• Never use aappliance with adamaged power cord or plug. If the power cord or plug are damaged,
turn o the appliance, disconnect it from the power source and contact an authorised service
centre. Adamaged power cord or plug may only be replaced by quali ed personnel. Under no
circumstances attempt to replace the power cord or plug yourself.
• Do not attempt to circumvent the polarised power plug safety feature. If the power plug cannot
be inserted into your power socket, contact aquali ed electrician to replace the old type of power
socket.
• Before connecting the appliance into apower socket, check that the voltage in your power socket
corresponds to the voltage on the rating label of the appliance or on its power adapter. If you are
not certain about the type of the power sources in your home, contact your vendor or the local
energy company.
• Before turning on the appliance, check that the electrical connection is performed properly and
in accordance with the instructions of the manufacturer. Before connecting or changing the
connection, turn o the appliance and disconnect it from the mains.
• Remember to always disconnect the power plug (adapter) from the power socket before
disconnecting the power cable from the rear side of the appliance.
• Insert the power plug into aindependent power socket. Do not overload wall sockets with
extension cords or multi-socket adapters. There is arisk of injury by electric shock.
• When disconnecting, hold the power cord by the plug and not by the cord itself.
• Disconnect the appliance from the power socket during storms or if you will not be using it for
alonger time.
• Avoid moving the appliance from acold environment to awarm one or vice versa, or when using
the appliance in avery humid environment. Air humidity may condense on some components
inside the case of the appliance and the appliance may stop working temporarily. If this occurs
leave the appliance in awarm and well ventilated place and wait 1 – 2 hours until the moisture
evaporates and the appliance can once more be used as usual. Take care especially during the rst
use of the player immediately after its purchase during acold season.
• Do not place this appliance on an unstable cart, pedestal, stand, bracket or table. The appliance
could fall and cause serious injuries to children or adults or could be seriously damaged or
damage other items. Only use the appliance with acart, pedestal, stand or table designated by
the manufacturer or sold with the appliance. Any mounting of the appliance should be carried out
according to the manufacturer'sinstructions and the mounting accessories recommended by the
manufacturer should be used.
• Do not lean on the appliance, do not lean over it or use it as astep. Protect it against violent
movements. Ensure that children do not play with the appliance.
Important safety measures
If using the cart, be careful when moving it. Stopping suddenly, excessive force and uneven
surfaces could cause the cart to fall over with the appliance.
• Neither the manufacturer nor the vendor of the appliance under any condition takes responsibility
for any direct or indirect damages caused by not adhering to the instructions for installation, setup,
use, service or cleaning of this appliance as described in this user'smanual.
• Protect the appliance against being knocked, dropped, hit and shaken and against vibrations,
humidity and dust.
• Do not expose the appliance to extreme temperatures or humid conditions.
4
Page 5

Important safety measures
Note:
If the appliance is powered by an adapter, use only the adapter and AC power cord supplied with the
appliance. Do not use faulty power sockets. Check that the power plug is properly inserted into the
power socket. If the power plug is loose, arching could result in a re. Contact aquali ed electrician to
have your socket replaced.
Note:
Only connect the appliance to aproperly grounded socket with aprotective grounding pin.
Note:
If you will be installing the appliance on awall or to the ceiling, follow the manufacturer'sinstruction
found in the user'smanual of the particular appliance.
Repairs and maintenance
• To prevent risk of injury through electric shock or the creation of a re, do not take the appliance
out of the case - there are no parts inside the case repairable or adjustable by the user without
appropriate equipment and quali cations. Should the appliance require adjustment or repair,
contact aprofessional service centre.
• In the case of any unusual events occurring during the use of the appliance, e.g. if there is adistinct
smell of burning insulation or smoke comes out of the appliance, immediately turn o the
appliance, disconnect the appliance from the power source and do not use the appliance until you
have received the results of an inspection by the employees of the professional service centre.
• Have all repairs carried out by quali ed personnel. Repairs are necessary if the appliance has
been damaged in any way, for example if the power cord is damaged, liquid was poured on the
appliance, foreign objects have entered the appliance, the appliance has been exposed to rain or
moisture, if the appliance is not working as usual or if it has fallen.
• In the event of repair or replacement of apart of the appliance, ensure that the service technician
uses components designated by the manufacturer or that these components have the same
speci cations as the original ones. Unauthorised replacements could cause a re, lead to adanger
of injury by electrical shock or other dangers.
• Before cleaning, carrying or other maintenance, disconnect the plug (adapter) from the power
socket.
• Clean the appliance only with adry cloth.
• For cleaning do not use petrol, thinners or any other solvents or use any abrasive cleaning agents,
steel wool or any sponges with steel wool.
EN
Note:
Do not throw the appliance into ordinary household waste. For disposal follow all local laws and
regulations.
Remote control and batteries
• Do not expose the remote control or the batteries to direct sunlight or sources of heat, such as
heaters, heat exchangers, stoves or other appliances (including ampli ers) that produce heat. Do
not use or leave the appliance in the vicinity of an open re.
• Ensure that the sensor is not exposed to astrong light source (e.g. sunlight) or light from
uorescent light tubes, which could reduce the e ectiveness and reliability of the remote control.
• Neither the remote control nor the batteries may be exposed to dripping or running water and
objects lled with water must not be placed on them, e.g. vases. Protect against exposure to rain,
spraying or pouring of any kind of liquid. Do not use outdoors. Not following these instructions
creates adanger of damage to the remote control or to the battery.
• Do not use this appliance near water.
• It is necessary to pay attention to the environmental impact aspects of battery disposal.
5
Page 6
EN
• The incorrect use of batteries may cause the leakage of the electrolyte and corrosion. To ensure
that the remote control works correctly, proceed according to the instructions below:
- Do not insert the batteries in the wrong polarity orientation.
- Do not charge, heat, open or short circuit the batteries.
- Do not throw batteries into a re.
− Do not leave discharged batteries in the remote control.
- Do not combine various types of batteries or new and old batteries.
- If you will not be using the remote control for alonger period of time, remove the batteries to
prevent potential damage caused by asubsequent battery leakage.
- If the remote control is not working correctly or its operational range is reduced, change all
batteries for new ones.
- If electrolyte leaks out from the batteries, have the remote control cleaned by an authorised
service centre.
Attention: To prevent a re hazard or injury by electrical shock, do not expose this appliance to rain or
humidity.
Attention: Batteries must not be exposed to excessive heat, for example sunlight, re, etc.
This symbol indicates that the appliance has double insulation between the dangerous mains
voltage and the parts accessible to the user. In the event of repairs use only identical spare
parts.
Important safety measures
Supplement to the LCD TV user'smanual
Measures to take when astatic image is displayed; red/blue/green pixels on the screen
Astatic image can permanently damage the display part of the television
• Do not leave a static image on an LCD screen for longer than 2
hours, because this could damage the screen. This type of damage
is known as "screen burn-in".
• Similar damage to the LCD screen can be caused by a statically
located TV channel logo.
• Watching television in 4:3, 16:9 formats or similar (formats not
covering the entire area of the screen) for along time may leave marks on the right or left side, or
possibly in the middle of the picture as aresult of the di erences in light emission. Similar damage
may also occur when watching aDVD or playing games.
• The display of a static image from video games or computers for an extended period of time
may cause apartial e ect of a"persistent image". To prevent this e ect from occurring, lower the
brightness and contrast when displaying astatic picture.
Damage to the screen resulting from the above mentioned causes is not covered by the warranty!
Red/blue/green/black pixels may appear on the screen
• This is a characteristic feature of liquid crystal displays and does not represent aproblem. LCD
screens are manufactured using avery precise technology in order to achieve a very ne picture
resolution. From time to time several inactive pixels may appear on the screen as apermanently red,
blue, green or black pixel (up to 0.001% of the total number of pixels on the screen). This does not in
any way a ect the features and performance of your television.
6
Page 7

Important safety measures
Notes on the USB connector:
USB memory devices must be inserted into the appliance directly. To prevent data transmission failure
or its interference, do not use USB extension cables. Electrostatic discharges may cause the appliance to
malfunction. In such an event the user must restart the appliance.
Before using aUSB ash drive test its ability to communicate with the appliance and its data reading
and writing speed.
To achieve maximum reading speed we recommend that you keep disk space defragmented. Use the
FAT32 le system, asingle partition, without protection. If reading and writing on the USB memory
device is not continuous, undesirable e ects may occur such as partial image loss (distortions/
checkering e ects) or complete image loss, audio defects, and in extreme cases the operation will be
stopped. Unexpected behaviour of the connected memory device, or the presence of viruses or other
damaging software may cause the functions of the appliance to stop working, necessitating arestart.
The USB connector is the standard type and is not able to power aUSB device with ahigh power usage
(e.g. hard disk drives HDD). Use devices with independent power supplies and power them from their
own power supplies.
The appliance was designed to achieve maximum compatibility with memory devices. With respect to
the variety of devices on the market it is not possible to guarantee compatibility with every USB device.
In the event of di culties try formatting the ash drive directly in the appliance. If problems persist, use
adi erent ash drive.
EN
Due to the wide range of USB devices available on the market it is not possible to guarantee the
compatibility of the appliance with all USB devices.
Serial number of the appliance
The serial number of the appliance is unique and unequivocally identi es your appliance.
Enter the serial number of your appliance together with other details necessary for the de nite
identi cation of your appliance below.
Serial number: ______________________________________
Date of purchase: ____________________________________
7
Page 8
EN
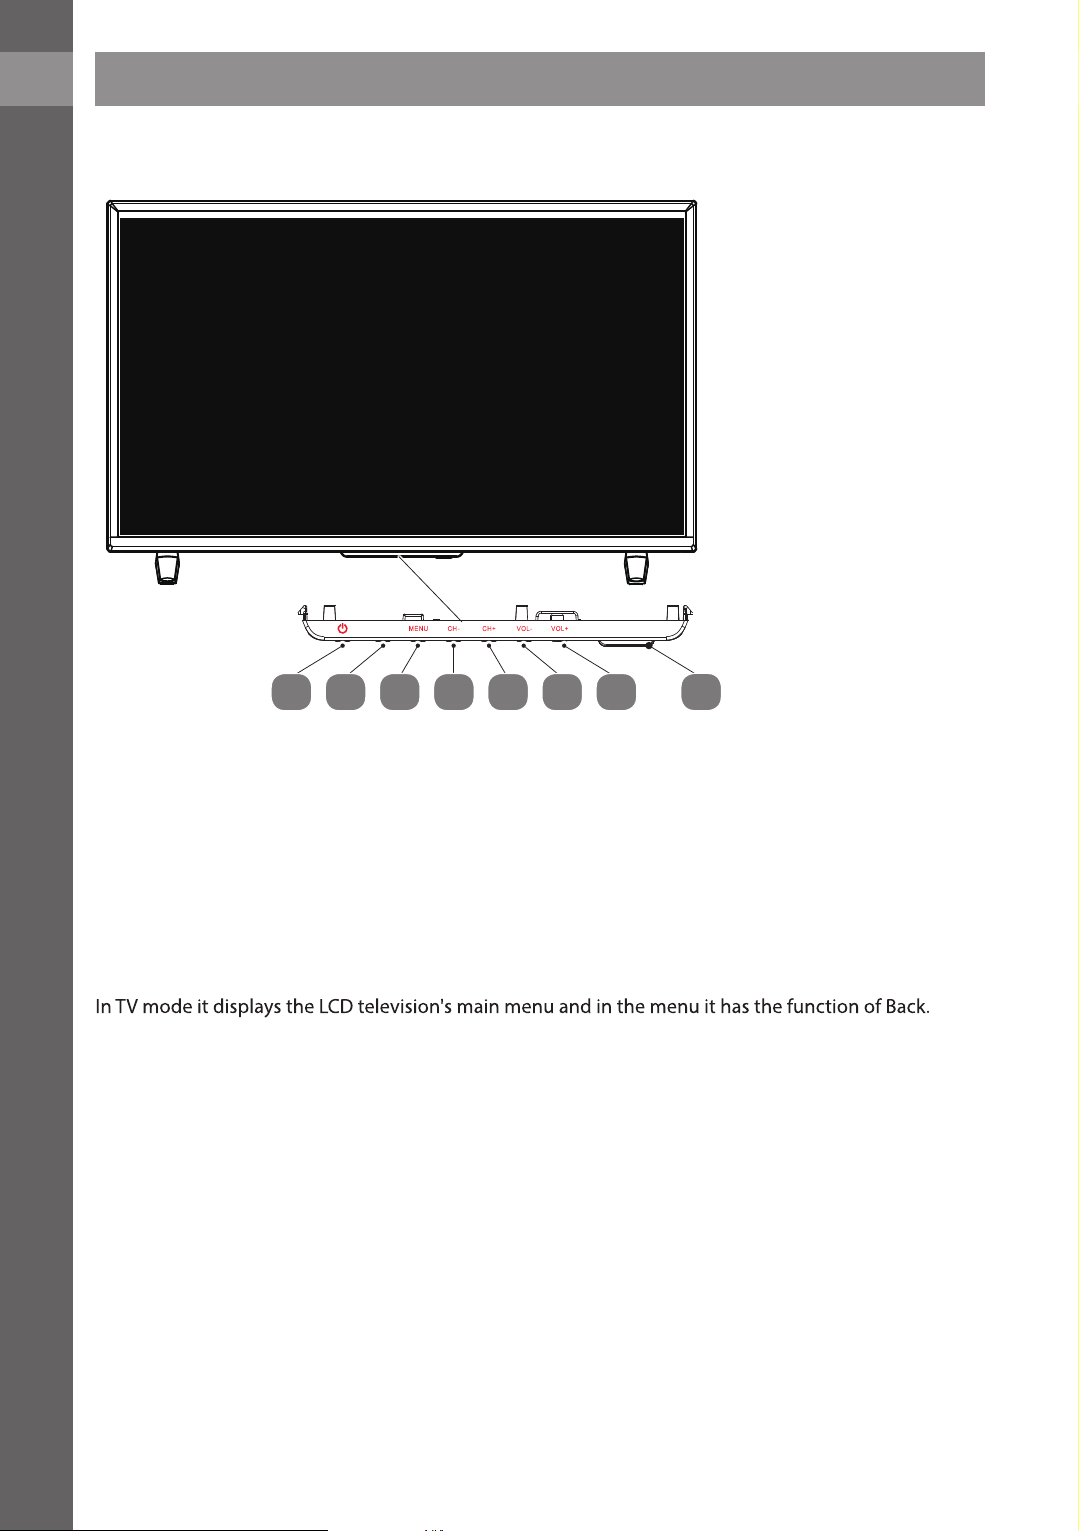
1. Description of the appliance
Description of the appliance
1.STANDBY button
2.SOURCE button
3.MENU button
4.CH +/- button
5.VOL +/- button
6.IR remote control sensor
Power indicator
INPUT
43215
STANDBY button
Turns the television on from the stand-by mode.
VOL +/- button
Press to increase/decrease the volume. In the OSD menu it serves as the left/right arrows.
CH +/- button
Press to switch between individual channels. In the OSD menu it serves as the up/down arrows.
MENU button
SOURCE button
Press and then use CH+/- to select the desired input and select it by pressing VOL+.
IR remote control sensor
Point the remote control at this sensor.
Power indicator
54
6
8
Page 9
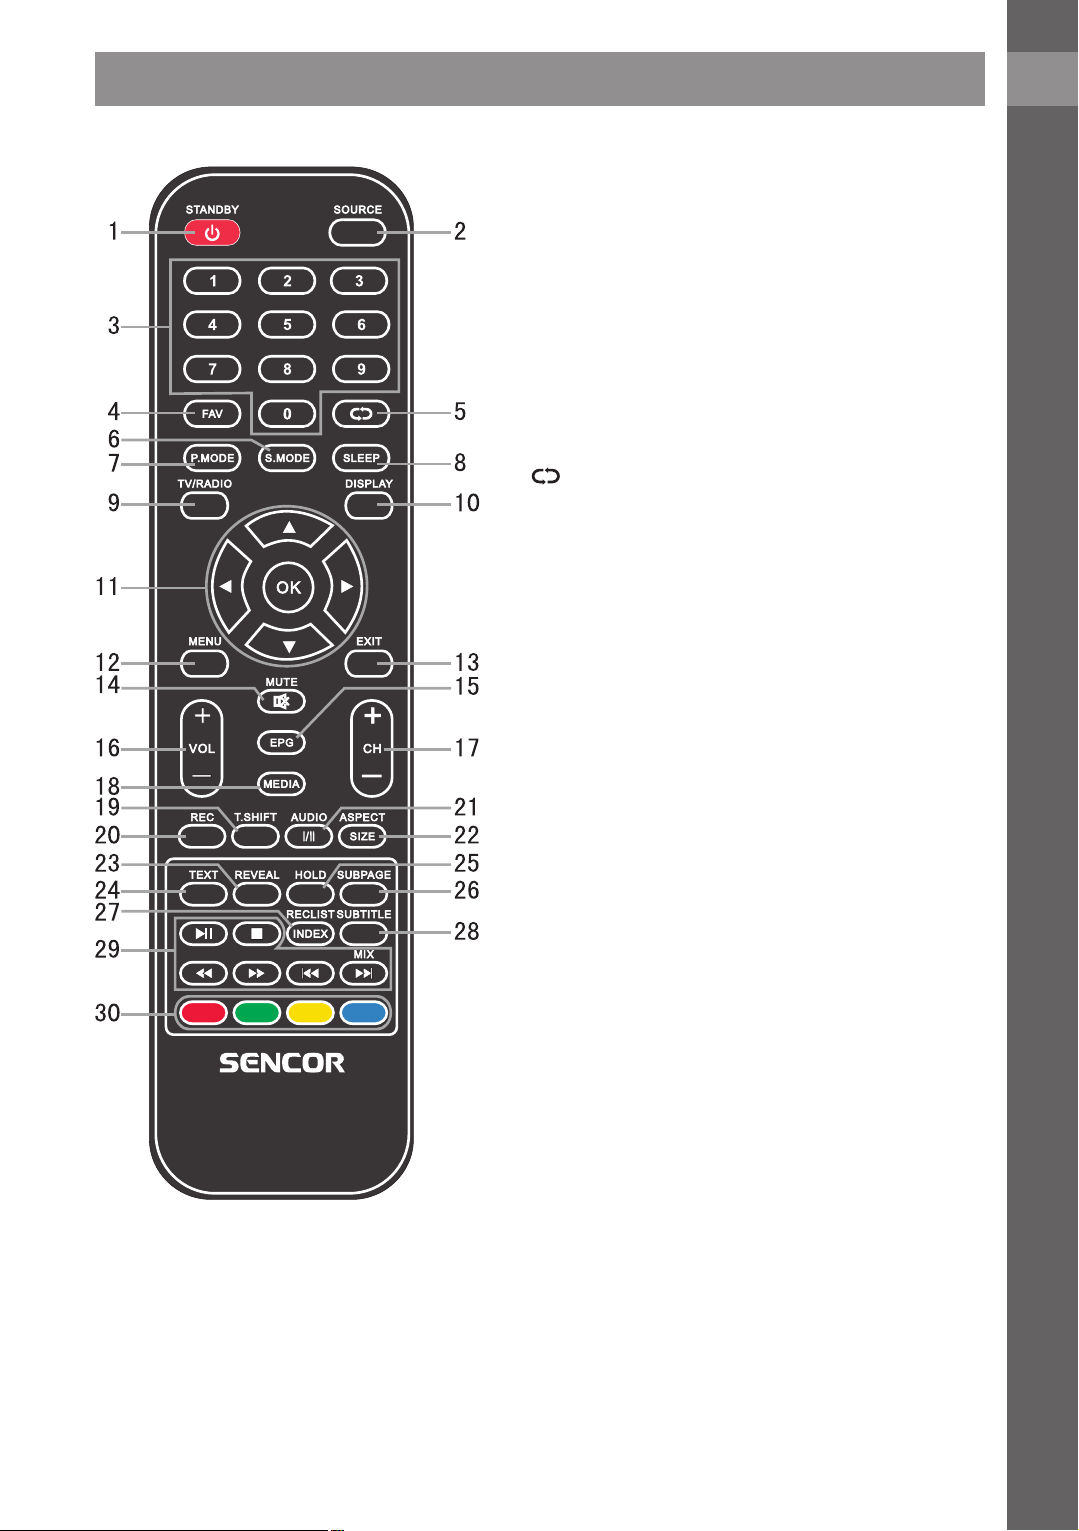
2. Remote control
Remote control
1. STANDBY button
Turns the television on from the stand-by mode.
2. SOURCE button
Press to select the desired input.
3. Numerical buttons 0-9
Press 0-9 to directly select aTV channel while watching
the TV.
In teletext mode enter the page number, etc.
4. FAV button
Press in the TV mode to enter / exitthe favourites
menu.
button
5.
Button for switching to the previously watched
channel.
6. SMODE button
Repeatedly press to select asound mode.
7. PMODE button
Repeatedly press to select apicture mode.
8. SLEEP button
Set the automatic shut o time for the television.
9. TV/RADIO button
Switching between the television and radio modes.
10. DISPLAY button
Button for displaying the source and information about
channels.
11. ////OK buttons
Used for navigating in amenu on the screen and for
setting up the television according to your preferences.
12. MENU button
In TV mode it displays the LCD television'smain menu.
13. EXIT button
Function for exiting amenu or ascreen.
14. MUTE button
Press to mute the sound. Press it again to renew the
sound or press VOL +.
15. EPG button
Press to show/hide the electronic program guide.
16. VOL +/- buttons
Press to increase/decrease the volume.
17. CH +/- buttons
Press to switch between individual channels.
18. MEDIA button
Press to switch to the Media (USB) mode.
19. T.SHIFT button
It is used to start recording with atime shift
(i.e. time shift). Function is only available in the DTV
mode.
EN
9
Page 10

EN
Remote control
20. REC button
Used to start recording (only in DTV mode).
21. AUDIO button
DTV/MEDIA mode: select abackground sound, if
available.
ATV mode: select asound mode: Stereo/Dual I/
II/Mono.
Other sources: select the left / right channel
22. SIZE button
Press SIZE to change the size of the screen in the
MEDIA mode.
23. REVEAL button
Press REVEAL to display or hide hidden teletext
information (depends on the broadcast).
24. TTX button
Turn teletext on or o .
Note: The teletext function is optional and the
availability of buttons depends on the model.
Teletext information fully depends on the
operator of the channel.
25. HOLD button
Freezes the current picture.
26. SUBPAGE button
Press to enter ateletext subpage.
27. RECLIST button
Enter the list of recordings
28. SUBTITLE button
Button for showing / hiding subtitles in the
bottom part of the screen, if they are available.
29. ///////MIX buttons
: start / pause playback, start timeshift
recording function.
: Stop recording / playback.
: Fast rewind
: Fast forward
: Skip to previous track
: Skip to next track
MIX: TV picture and teletext content are
simultaneously displayed on the screen.
30. RED, GREEN, YELLOW, BLUE button:
corresponds to various colour functions in the
menu or teletext.
Note:
Remove the batteries if you will be storing the
appliance or not using it for an extended period
of time.
• To control the appliance using the remote
control, point the remote control at the
appliance and then press the button with
the required function. The e ective range of
the remote control is up to about 5 meters
with amaximum deviation of +/- 30° from
the perpendicular direction to the reception
sensor of the remote control on the front
side of the appliance. The falling capacity of
the batteries gradually reduces the remote
control range. There must be no solid
obstacles in the area between the remote
control and the appliance when the remote
control is being used.
• During standard use the lifetime of batteries
in the remote control is about 1 year. When
the e ective range of the remote control
is substantially reduced or when there are
problems with its use, change both the
batteries in the remote control. If you will
not be using the remote control for alonger
period of time, take out both batteries - in
this way you will prevent potential damage
caused by their leakage.
• Prevent strong light from falling on
the appliance, (e.g. sunlight or strong
uorescent lamps or ecological light bulbs),
which could reduce the e ectiveness and
reliability of the infrared remote control.
10
Page 11

Connecting and setting up
EN
Connecting and setting up
Y Video (yellow AV)
R Audio right (red AV)
W Audio left (white AV)
G Component Y (green)
B Component Pb (blue)
R Component Pr (red)
11
Page 12

EN
Installing cables
Please carefully read the entire user'smanual before installation and operation.
1. Take the TV out of the packaging and place it on an even rigid surface.
Note:
Before connecting or disconnecting aTV, computer or other devices it is necessary to check that the
power cord is disconnected. When disconnecting power or signal cables, hold the cable by the end,
never pull on the cable itself.
2. An IEC antenna connector can be connected with the VF television input connector.
3. The AV output connector DVD can be connected with the television'sAV output using an AV cable.
4. Connect one end of the VGA cable to the VGA port on the computer and the other end of the
VGA cable to the VGA port on the television and on both ends tighten the screws in the clockwise
direction.
Note:
When connecting the 15-pin VGA connector, do not use excessive force so as not to damage the
individual pins.
5. Connect one end of the HDMI cable to the HDMI device and the other end of the HDMI cable to the
TV.
Connecting and setting up
Note:
When connecting HDMI cables ensure that the correct orientation is maintained and do not use
excessive force so as not to damage the individual pins.
6. Check that all AV cables are correctly inserted into the corresponding ports.
7. To these connectors connect the input or output SCART connector of the external device.
8. Connect the power cord to apower socket with avoltage of 110 – 240 V~.
Note:
The permitted power voltage range for this TV is 110 – 240 V~ 50/60 Hz. Do not connect the TV to
apower source outside of this range.
When connecting and disconnecting the power cord, hold the plug by the insulated part and do not
touch the metal parts of the plug.
12
Page 13

Page 14

Page 15

Page 16

Page 17

Page 18

Page 19

Page 20

Page 21

Page 22

Page 23

Page 24

Page 25

Page 26

Page 27

Page 28

Page 29

Page 30

Page 31

Page 32

EN
Troubleshooting guide
8. Troubleshooting guide
Troubleshooting
Before contacting the service centre, please perform the following simple checks. If problems persist,
disconnect the TV and contact aservice centre.
PROBLEM POSSIBLE SOLUTION
No picture and sound - Check that the power cord is connected to the wall power socket.
- Check that you have not pressed the POWER button on the front
panel of the TV receiver.
- Check the brightness and contrast settings.
Normal picture but no
sound.
The remote control does
not work.
The TV suddenly turns o . - Is the time switch set?
The picture appears slowly
after the television is
turned on.
No colours or wrong
colours or poor picture
quality
- Check the volume.
- Is the sound muted? Press the MUTE button.
- Try another channel, the problem may be on the other side of the
broadcast.
- Are the audio cables connected correctly?
- Check that there is no obstacle between the television and the remote
control or whether a uorescent or strong light (e.g. sunlight) is
shining on the sensor on the TV.
- Are the batteries inserted correctly?
- Is the control mode setup correctly? TV, VCR etc.?
- Insert new batteries.
- Check the power supply settings. Power supply interruption.
- The automatic shut o function is set and the tuned station is not
transmitting asignal, or perhaps the remote control has not been used
for alonger period of time.
- This is normal; during the initialisation process of the appliance the
picture is turned o . If the picture does not appear within ve minutes,
please contact your service centre.
- Set the colours in the options menu.
- Maintain asu cient distance between the television and the video
recorder.
- Try another channel, the problem may be on the other side of the
broadcast.
- Are the video cables connected correctly?
- Activate one of the functions for renewing the brightness of the
picture.
32
Horizontal/vertical strip or
broken picture.
Poor reception of certain
channels
Lines or stripes in the
picture
No output from one of the
loudspeakers
- Check that local interference is not occurring, e.g. from other electrical
appliances.
- Problems with the station or cable television. Tune into another
station or frequency of the same station.
- The station signal is weak or is experiencing interference, redirect your
antenna or have it inspected. (Abad antenna is the most frequent
cause of reception problems).
- Identify the source of any interference.
- Check the antenna (change the direction of the antenna).
- Set the balance in the options menu.
Page 33

Troubleshooting guide
Note:
Problem in the VGA mode (only for the VGA mode).
PROBLEM POSSIBLE SOLUTION
The signal is out of range. - Set the resolution, horizontal frequency or vertical frequency.
- Check whether asignal cable has not come loose.
- Check the input source.
EN
Vertical stripe or band
on the background and
horizontal noise and
incorrect position of the
picture.
Inconsistent colours or
single-colour picture.
Maintenance
Appropriate maintenance can prevent premature ageing of the appliance. Regular and thorough
cleaning can prolong the lifetime of your television. Do not forget to turn o the power supply and
disconnect the power cord before cleaning.
Cleaning the screen
1. Dampen asoft wiping cloth into asolution of lukewarm water and dishwashing detergent. Wring
out the cloth until it is almost dry and then use it to carefully wipe the screen.
2. Make sure that no water remains on the screen; allow the appliance to completely dry before
turning it on.
Cleaning the cabinet
Wipe dirt and dust away using asoft dry wiping cloth. Do not use adamp wiping cloth.
In the event of along term absence
If you will not be using the television for alonger period of time (for example during vacation
time), it is advisable to disconnect the power cord and in this way protect the appliance
against possible damage by lightning or overvoltage in the power grid.
- Launch automatic setup or adjust the timing, phase or horizontal/
vertical shift.
- Check the signal cable.
- Reinstall the video card in the PC.
33
Page 34

EN
cations
dnatsehthtiwthgiewteN
Connection
USB 1
MP3, AAC, WAV, JPG, JPEG,TXT
Other functions
Brightness (cd/m
2
t
ruolocelbatsujdA
rutarepme
cations may change without prior notice.
SLE 3219ledoM
81cm)("23lanogaiD
W05noitpmusnocrewoP
W5.0≤edomyb-dnatsnielihwnoitpmusnocrewoP
seYlortnocetomeR
200 x 100 mmtnuomllawASEV
730 x 470 x234mm
730 x 430 x77mm
817 x 515 x133mm
gk9.3
gk8.3dnatsehttuohtiwthgiewteN
1NIFR
)inim(1tupniVA
1TRACS
)inim(1rPbPYtnenopmoC
1)nip51buS-D(AGV
3IMDH
1laixaocFIDPS
,BVMR,9VMW/1-CV,VLF,VKM,ST,4-GEPM,GEPM,IVAstamrofBSUdetroppuS
1tolsIC
1366 x 768noituloserAGXW
180)
9:61oitartcepsA
1:000.000.1tsartnoccimanyD
10 ms)sm(emitesnopseR
lim7.61sruolocforebmuN
mraw,dradnats,looCe
°871:V,°871:HelgnagniweiV
R840renutni-tliuB
LAP/462.H,LH@PM,2-GEPM,LM@PM,2-GEPM/MACES,LAPmetsysoediV
CAA-EH,CAA,+DD,DD,2/1reyal1-GEPM/´L/L,I,KD,GBmetsysoiduA
2A/MACINdnuosoeretS
laixaoclatigid,kcajenohpdaeHtuptuooiduA
seYBSUnognidrocerRVP
oNnoitcerrocdnuoS
seYnacsevissergorP
seY)tfihsemiT(noitcnuftfihsemiT
seYGPE
seYtxeteleT
0001segaptxeteleT
D3retl
seYunemDSO
seYmooZ
seYnoitcuderesioN
seYremitpeels/putrats/
seYseltitbuS
seYegaugnaloiduA
seYtsillennahC
seYsetiruovaffotsiL
seYerutcipezeerF
seYoidaR
oNkcoL
seYecnadiuGlatneraP
seYedomletoH
34
Page 35

Information sheet
10. Information sheet
Manufacturer: FAST ČR, a.s., Černokostelecká 1621, 251 01 Říčany, Česká republika
Brand Sencor
SLE 3219ledoM
A+ssalCygrenE
81cm/32”]"/mc[hcni/mcnilanogaidneercS
30]W[sutatsnoninoitpmusnocrewoP
44]hWk[*noitpmusnocrewoplaunnA
5,0≤]W[edomybdnatsninoitpmusnocrewoP
1366 x 768]slexip[noituloseR
* Power consumption of 44 kWh per year, based on the power consumption of a television, operating
4 hours daily for 365 days. Actual power consumption depends on the television usage.
EN
35
Page 36

EN
INSTRUCTIONS AND INFORMATION REGARDING
THE DISPOSAL OF USED PACKAGING MATERIALS
Dispose of packaging material at a public waste disposal site.
DISPOSAL OF USED ELECTRICAL AND ELECTRONIC
APPLIANCES
disposal of this product will help save valuable natural resources and help in preventing the potential
negative impact on the environment and human health, which could be caused as a result of improper
liquidation of waste. Please ask your local authorities or the nearest waste collection centre for further
details. The improper disposal of this type of waste may fall subject to national regulations for nes.
For business entities in the European Union
If you wish to dispose of an electrical or electronic device, request the necessary information from your
seller or supplier.
Disposal in other countries outside the European Union
If you wish to dispose of this product, request the necessary information about the correct disposal
method from local government departments or from your seller.
Changes to the text, design and technical speci cations may occur without prior notice and we reserve
the right to make these changes.
The meaning of the symbol on the product, its accessory or packaging indicates that this
product shall not be treated as household waste. Please, dispose of this product at your
applicable collection point for the recycling of electrical & electronic equipment waste.
Alternatively in some states of the European Union or other European states you may return
your products to your local retailer when buying an equivalent new product. The correct
This product meets all the basic EU regulation requirements that relate to it.
36
The original version is Czech.
Address of the manufacturer: FAST ČR, a.s., Černokostelecká 1621, 251 01 Říčany, Česká republika
2016
02/2016
Page 37

Page 38

 Loading...