

Page 1

®
Screw Fastening System
SG2500
SG4000
Screwdrivers
Tournesvis
Des Tornilladores
Instruction Manual
Guide d'Utilisation
Manual de Instrucciones
Questions? Comments?
call SENCO’s toll-free Action-line: 1-800-543-4596
or e-mail: toolprof@senco.com Visit our Website www.senco.com
© 2002 by Senco Products, Inc.
NFD179 Issued February 20, 2002
Warnings for the safe use of this tool are included in this manual.
Los avisos para el uso seguro de esta herramienta están incluidos en este manual.
Les consignes pour l’utilisation en toute sécurité de cet outil se trouvent dans ce manuel.
Page 2

English
Espanol Francais
IF YOU HAVE ANY
QUESTIONS OR
COMMENTS ABOUT THIS
OR ANY OTHER SENCO
PRODUCT, CALL US TOLL
FREE AT: 1-800-543-4596.
General
Safety Rules
WARNING! Read and
understand all instructions. Failure to follow all
instructions listed below may
result in electric shock, fire
and/or serious personal
injury.
SAVE THESE
INSTRUCTIONS
Work Area
• Keep your work area clean
and well lit. Cluttered benches
and dark areas invite accidents.
• Do not operate power tools
in explosive atmospheres,
such as in the presence of
flammable liquids, gases, or
dust. Power tools create sparks
which may ignite the dust or
fumes.
• Keep bystanders, children,
and visitors away while
operating a power tool.
Distractions can cause you to
lose control.
EN CASO DE TENER
ALGUNA PREGUNTA O
COMENTARIO ACERCA
DE ESTE O CUALQUIER
OTRO PRODUCTO
SENCO, LLAMENOS SIN
CARGO PARA UD. AL:
1-800-543-4596.
Reglas generales
de seguridad
¡ADVERTENCIA! Lea y
comprenda todas estas
instrucciones.
Si no se siguen todas las
instrucciones presentadas a
continuación puede dar por
resultado un electrochoque,
incendio y/o lesiones
personales graves.
GUARDE ESTASGUARDE ESTAS
GUARDE ESTAS
GUARDE ESTASGUARDE ESTAS
INSTRUCCIONESINSTRUCCIONES
INSTRUCCIONES
INSTRUCCIONESINSTRUCCIONES
Lugar de TrabajoLugar de Trabajo
Lugar de Trabajo
Lugar de TrabajoLugar de Trabajo
• Mantenga su lugar de
trabajo limpio y bien
iluminado. Los bancos de
trabajo desordenados y los
lugares oscuros pueden causar
accidentes.
• No maneje las herramientas
eléctricas en atmósferas
explosivas, por ejemplo, en
presencia de líquidos, gases
o polvos explosivos. Las
herramientas eléctricas crean
chispas que pueden inflamar el
polvo o los vapores.
• No permita que se
acerquen personas, niños o
visitas al lugar mientras está
trabajando con una
herramienta eléctrica. Las
distracciones pueden hacerlo
perder el control.
POUR QUESTIONS OU
COMMENTAIRES SUR
CE PRODUIT SENCO OU
UN AUTRE, APPELEZNOUS SANS FRAIS AU :
1-800-543-4596.
Règles générales
de sécurité
AVERTISSEMENT ! Lisez
et assimilez toutes les
consignes ci-dessous, si
vous ne les respectez pas
vous risquez électrocution,
incendie et/ou blessures
individuelles sérieuses.
CONSERVEZ CESCONSERVEZ CES
CONSERVEZ CES
CONSERVEZ CESCONSERVEZ CES
INSTRUCTIONSINSTRUCTIONS
INSTRUCTIONS
INSTRUCTIONSINSTRUCTIONS
Zone de TravailZone de Travail
Zone de Travail
Zone de TravailZone de Travail
• Gardez votre zone de travail
nette et bien éclairée. Des
plans encombrés et des zones
obscures favorisent les
accidents.
• N’utilisez pas d’outils
électriques en atmosphères
explosives, comme en
présence de liquides, gaz ou
poussières inflammables. Ils
créent des étincelles qui
peuvent allumer la poussière ou
les vapeurs.
• Gardez spectateurs, enfants
et visiteurs à l’écart en
utilisant un outil électrique.
Vous pouvez en perdre le
contrôle si vous êtes distrait.
1
Page 3

English
Electrical
Safety
Espanol Francais
SeguridadSeguridad
Seguridad
SeguridadSeguridad
ElectricaElectrica
Electrica
ElectricaElectrica
SécuritéSécurité
Sécurité
SécuritéSécurité
ÉlectriqueÉlectrique
Électrique
ÉlectriqueÉlectrique
• Double insulated tools are
equipped with a polarized plug
(one blade is wider than the
other.) This plug will fit in a
polarized outlet only one way.
If the plug does not fit fully in
the outlet, reverse the plug. If
it still does not fit, contact a
qualified electrician to install a
polarized outlet. Do not
change the plug in any way.
Double insulation eliminates
the need for the three wire
grounded power cord and
grounded power supply system.
• Las herramientas con
aislante doble cuentan con
un enchufe polarizado (una
clavija es más ancha que la
otra.) Este enchufe se
puede insertar en un
tomacorriente polarizado
de una sola manera. Si el
enchufe no se introduce
totalmente en el
tomacorriente, dé vuelta el
enchufe. Si todavía no
entra, solicite a un perito
electricista que instale un
tomacorriente polarizado.
No le haga ningún tipo de
modificación al enchufe. El
aislante doble elimina la
necesidad de un cordón de
alimentación trifilar conectado
a tierra y de un sistema de
suministro eléctrico
conectado a tierra.
• Les outils à isolation
double ont une fiche
polarisée (une borne est
plus large que l’autre). Elle
ne peut s’enficher dans une
prise polarisée que d’une
façon. Si elle ne s’enfiche
pas, inversez-la. Si le
problème persiste, contactez
un électricien qualifié pour
installer une prise polarisée.
Ne modifiez en aucune façon
la prise existante. Cette
isolation double évite le
besoin d’un cordon secteur 3
fils et de la liaison de terre sur
tout le système d’alimentation
électrique.
2
Page 4

English
Electrical
Safety
Espanol Francais
SeguridadSeguridad
Seguridad
SeguridadSeguridad
ElectricaElectrica
Electrica
ElectricaElectrica
SécuritéSécurité
Sécurité
SécuritéSécurité
ÉlectriqueÉlectrique
Électrique
ÉlectriqueÉlectrique
Applicable only to Class II
(double insulated) tools. The
SG2500 and SG4000 are double
insulated.
• Avoid body contact with
grounded surfaces such as
pipes, radiators, ranges and
refrigerators. There is an
increased risk of electric shock if
your body is grounded.
• Don’t expose power tools to
rain or wet conditions. Water
entering a power tool will
increase the risk of electric
shock.
• Do not abuse the cord.
Never use the cord to carry the
tools or pull the plug from an
outlet. Keep cord away from
heat, oil, sharp edges or
moving parts. Replace
damaged cords immediately.
Damaged cords increase the risk
of electric shock.
• When operating a power tool
outside, use an outdoor
extension cord marked “W-A”
or “W”. These cords are rated
for outdoor use and reduce the
risk of electric shock. When
using an extension cord, be sure
to use one heavy enough to
carry the current your product
will draw. An undersized cord
will cause a drop in line voltage
resulting in loss of power and
overheating. The following table
shows the correct size to use
depending on cord length and
nameplate ampere rating. If in
doubt, use the next heavier
gage. The smaller the gage
number, the heavier the cord.
3
Aplicable solamente a las
herramientas de Clase II (con
aislante doble). Los
destornilladores SG2500 y SG4000
tienen aislante doble.
• Evite el contacto del cuerpo con
las superficies conectadas a
tierra, por ejemplo, tubos,
radiadores, cocinas y
refrigeradores. Existe un riesgo
mayor de sufrir un electrochoque si
su cuerpo está conectado a tierra.
• No exponga las herramientas
eléctricas a la lluvia o
condiciones húmedas. El agua
que entra a una herramienta
eléctrica aumenta el riesgo de
electrochoque.
• No maltrate el cordón eléctrico.
No use el cordón para acarrear
las herramientas o para
desenchufarlas de un
tomacorriente. Mantenga el
cordón lejos del calor, aceite,
borde afilados o piezas en
movimiento. Sustituya
inmediatamente los cordones
dañados. Los cordones dañados
aumentan el riesgo de
electrochoque.
• Cuando trabaje con una
herramienta eléctrica a la
intemperie, use un cordón
alargador de exterior marcado
«W-A» o «W». Estos cordones son
clasificados para uso exterior y
reducen el riesgo de electrochoque.
Cuando utilice un cordón alargador,
asegúrese de que sea lo bastante
grueso para conducir la corriente
que su herramienta va a consumir.
Un cordón de calibre insuficiente
causará una caída en la tensión de
línea dando por resultado la pérdida
de potencia y sobrecalentamiento.
En la tabla siguiente se indican las
medidas correctas a utilizar de
acuerdo a la longitud del cordón y al
amperaje de servicio. Ante cualquier
duda, utilice el próximo calibre más
grueso.
Cuanto menor el número de calibre,
tanto más grueso es el cordón.
Applicable uniquement aux
outils Classe II
(double isolation). Les
SG2500 et SG4000 ont une
double isolation.
• Évitez le contact corporel
avec des surfaces à la terre
comme tuyaux, radiateurs,
cuisinière et réfrigérateur.
Vous avez plus de risques
d’électrocution si votre corps
est mis à la terre.
• N’exposez pas les outils
électriques à la pluie ou à
l’humidité. Une infiltration
d’eau dans l’outil augmente le
risque d’électrocution.
• Ne maltraitez pas le
cordon, pour porter l’outil ou
en le tirant pour le
débrancher. Gardez-le loin
de chaleur, huile, arêtes
tranchantes ou pièces
mobiles. Remplacez-le tout
de suite s’il est abîmé. Un
cordon endommagé crée un
risque d’électrocution.
• En utilisant un outil
électrique dehors, prenez un
cordon rallonge avec label
“W-A” ou “W”. Ce sont des
cordons conçus pour
l’extérieur à risque
d’électrocution réduit.
Choisissez-le bien
dimensionné pour la
puissance qui sera tirée par
votre produit. Un cordon sous
dimensionné provoque une
chute en ligne de la tension
secteur, d’où perte de
puissance en bout et
échauffement. Le tableau qui
suit montre le bon calibre à
utiliser en fonction de la
longueur à prolonger et de la
consommation nominale de
l’appareil à brancher. En cas
de doute, prenez un calibre
supérieur. Plus le numéro de
calibre est petit, plus gros est
le cordon.
Page 5

English
Minimum Gage for Cord Sets
Volts Total Length of Cord in Feet
120V 0-25 26-50 51-100 101-150
240V 0-50 51-100 101-200 201-300
Ampere Rating
More Not More AWG
Than Than
____________________________________________________________________
0 - 6 18 16 16 14
6 - 10 18 16 14 12
10 - 12 16 16 14 12
12 - 16 14 12 Not Recommended
Espanol
Calibre mínimo para cordones de alimentación
Voltios Longitud total del cordón en pies
120V 0-25 26-50 51-100 101-150
240V 0-50 51-100 101-200 201-300
Amperaje
Mayor que No mayor que Calibre (AWG)
____________________________________________________________________
0 - 6 18 1616 14
6 - 10 18 16 14 12
10 - 12 16 16 14 12
12 - 16 14 12 No recomendado
Francais
Calibre minimum du cordon secteur
Volts Longueur totale du cordon en mètres
120 V 0-7,5 7,5-15 15-30 30-45
240 V 0-15 15-30 30-60 60-90
Consommation en A
Plus Moins AWG (calibre de fil)
de de
____________________________________________________________________
0 - 6 18 16 16 14
6 - 10 18 16 14 12
10 - 12 16 16 14 12
12 - 16 14 12 Non recommandé
4
Page 6

English
PersonalPersonal
Personal
PersonalPersonal
SafetySafety
Safety
SafetySafety
Espanol Francais
SeguridadSeguridad
Seguridad
SeguridadSeguridad
Personal
SécuritéSécurité
Sécurité
SécuritéSécurité
IndividuelleIndividuelle
Individuelle
IndividuelleIndividuelle
SPECIFIC SAFETY
RULES AND SYMBOLS
• Stay alert, watch what you
are doing and use common
sense when operating a power
tool. Do not use while tired or
under the influence of drugs,
alcohol, or medication. A
moment of inattention while
operating power tools may result
in serious injury.
• Dress properly. Do not wear
loose clothing or jewelry.
Contain long hair. Keep your
hair, clothing and gloves away
from moving parts. Loose
clothing, jewelry, or long hair can
be caught in moving parts.
• Avoid accidental starting. Be
sure switch is off before
plugging in. Carrying tools with
your finger on the switch or
plugging in tools that have the
switch on invites accidents.
• Remove adjusting wrenches
or switches before turning the
tool on. A wrench or key that is
left attached to a rotating part of
the tool may result in personal
injury.
• Do not overreach. Keep
proper footing and balance at
all times. Proper footing and
balance enables better control of
the tool in unexpected situations.
• Use safety equipment.
Always wear eye protection.
Dust mask, non-skid safety
shoes, hard hat, or hearing
protection must be used for
appropriate conditions.
5
• Manténgase alerta, preste
atención a lo que está
haciendo y use sentido común
cuando maneje una
herramienta eléctrica. No la
utilice si está cansado o se
encuentra en estado de
embriaguez, está drogado o ha
tomado alguna medicina. Un
momento de descuido mientras
maneja una herramienta eléctrica
puede resultar en lesiones
graves.
• Vístase adecuadamente. No
use joyas o vestimentas
sueltas. Cúbrase el cabello
largo. Mantenga el cabello, la
ropa y los guantes lejos de las
piezas en movimiento. La ropa
suelta, las joyas o el cabello largo
pueden enredarse en las piezas
en movimiento.
• Evite el arranque accidental.
Cerciórese que el interruptor
esté apagado antes de
enchufar la herramienta.
El acarrear las herramientas con
el dedo en el interruptor o
enchufarlas con el interruptor
activado puede causar
accidentes.
• Retire las llaves de ajustes o
desconecte los interruptores
antes de encender la
herramienta. Si se deja una llave
conectada a una pieza giratoria
de la herramienta puede resultar
en lesiones personales.
• No trate de alcanzar más lejos
de lo necesario. Mantenga los
pies bien apoyados y
equilibrados en todo momento.
El apoyo y equilibrio adecuados
le permiten tener mejor control de
la herramienta en situaciones
imprevistas.
• Use equipo de seguridad. Use
siempre protección de los ojos.
Se debe usar una mascarilla
contra polvo, calzado
antideslizante, casco o protección
de los oídos según convenga
para las condiciones.
• Restez attentif, regardez ce
que vous faites et gardez
votre bon sens en utilisant
un outil électrique. Ne
travaillez pas avec en étant
fatigué ou sous l’influence
de drogue, alcool ou
médicaments. Un moment
d’inattention en maniant un
outil électrique peut causer de
sévères blessures.
• Habillez-vous de façon
adaptée, sans vêtements
lâches ou bijoux. Gardez
cheveux longs (attachés),
vêtements et gants, à l’écart
des pièces mobiles. Ce sont
tous des éléments qui peuvent
se faire prendre.
• Évitez un démarrage
intempestif, avec
l’interrupteur sur arrêt avant
de brancher. Le transport
d’outils avec doigt sur la
détente et leur branchement
avec leur interrupteur sur
marche sont sources
d’accidents.
• Enlevez clés de réglage ou
de serrage avant de
démarrer l’outil. Elles
peuvent vous blesser en
restant attachées à un outil en
mouvement.
• Ne travaillez pas à bout de
bras, gardez toujours des
bons appui et l’équilibre.
C’est important pour garder un
bon contrôle de l’outil même
dans les situations
inattendues.
• Utilisez un équipement de
sécurité, portez toujours des
lunettes. Un masque anti-
poussières, des chaussures
de sécurité anti-glisse, un
casque ou une protection
acoustique doivent être utilisés
selon les conditions.
Page 7

English
Espanol Francais
Tool UseTool Use
Tool Use
Tool UseTool Use
and Careand Care
and Care
and Careand Care
• Use clamps or other practical
way to secure and support the
workpiece to a stable platform.
Holding the work by hand or
against your body is unstable
and may lead to a loss of control.
• Do not force tool. Use the
correct tool for your application. The correct tool will do the
job better and safer and the rate
for which it is designed.
• Do not use tool if switch
does not turn it on or off. Any
tool that cannot be controlled
with the switch is dangerous and
must be repaired.
• Disconnect the plug from the
power source before making
any adjustments, changing
accessories, or storing the
tool. Such preventive safety
measures reduce the risk of
starting the tool accidentally.
• Store idle tools out of the
reach of children and other
untrained persons. Tools are
dangerous in the hands of
untrained users.
• Maintain tools with care.
Keep cutting tools sharp and
clean. Properly maintained
tools, with sharp cutting edges
are less likely to bind and are
easier to control.
• Check for misalignment or
binding of moving parts,
breakage of parts, and any
other condition that may effect
the tools operation. If
damaged, have the tool
serviced before using. Many
accidents are caused by poorly
maintained tools.
• Use only accessories that are
recommended by the manufacturer for your model.
Accessories that may be suitable
for one tool, may become
hazardous when used on
another tool.
Uso Y Cuidado deUso Y Cuidado de
Uso Y Cuidado de
Uso Y Cuidado deUso Y Cuidado de
las Herramientaslas Herramientas
las Herramientas
las Herramientaslas Herramientas
• Utilice pinzas u otra manera
práctica de sujetar y apoyar la pieza
de trabajo a una plataforma estable.
El sujetar la pieza con la mano o contra
su cuerpo es muy inestable y puede
perder el control de la herramienta.
• No fuerce la herramienta. Utilice la
herramienta correcta para su
aplicación. La herramienta correcta
hará un trabajo mejor y más seguro, y
a la velocidad para la cual está
diseñada.
• No use la herramienta si el
interruptor no la puede encender o
apagar. Toda herramienta que no
puede controlarse con el interruptor es
peligrosa y se debe reparar.
• Desconecte el enchufe de la fuente
de alimentación antes de hacer
ajustes, cambiar los accesorios o
guardar la herramienta. Estas
medidas preventivas reducen el riesgo
de activar la herramienta
accidentalmente.
• Guarde las herramientas que no
están en uso lejos del alcance de los
niños y de otras personas sin
experiencia. Las herramientas son
peligrosas en manos de usuarios
inexpertos.
• Cuide sus herramientas. Mantenga
las herramientas de corte afiladas y
limpias. Las herramientas bien
cuidadas, con los bordes cortantes
bien afilados tienen menos
probabilidades de atascarse y son más
fáciles de controlar.
• Inspeccione para ver si hay
desalineación o atascamiento de las
piezas móviles, rotura de piezas o
cualquier otra condición que pueda
afectar el funcionamiento de las
herramientas. Si la herramienta está
dañada, repárela antes de volverla a
usar.
Muchos accidentes son causados por
herramientas mal cuidadas.
• Use solamente los accesorios
recomendados por el fabricante de
su modelo. Los accesorios que son
adecuados para una herramienta,
pueden ser peligrosos cuando se usan
en una de otro tipo.
Utilisation etUtilisation et
Utilisation et
Utilisation etUtilisation et
Soin de L’outilSoin de L’outil
Soin de L’outil
Soin de L’outilSoin de L’outil
• Utilisez des serre-joints ou
une autre solution pour fixer
la pièce sur un support
stable. Le maintien à la main
ou contre le corps est instable
et peut générer une perte de
contrôle.
• Ne forcez pas sur l’outil,
utilisez-en un approprié pour
l’application. L’outil correct
fera mieux un travail correct et
sûr au rythme pour lequel il a
été conçu.
• N’utilisez pas un outil à
l’interrupteur M/A
défectueux. Tout outil qui ne
peut pas être contrôlé par
l’interrupteur est dangereux et
à réparer.
• Débranchez la fiche secteur
de la prise avant tout
réglage, changement
d’accessoire ou stockage.
Cette mesure de sécurité
préventive élimine le risque de
démarrage intempestif de
l’outil.
• Gardez les outils inactifs
hors de portée des enfants et
personnes sans formation.
Les outils sont dangereux aux
mains des novices.
• Entretenez bien les outils,
gardez-les affûtés et propres.
Des outils entretenus bien
tranchants risquent moins de
plier et sont plus faciles à
manœuvrer.
Vérifiez alignement ou
courbure des pièces mobiles,
cassures, ou tout autre état
pouvant dégrader le
fonctionnement d’outils. En
cas de dommages, faites les
réparer avant usage. Un
mauvais entretien peut etrê la
cause de nombreux incidents.
• N’utilisez que des
accessoires recommandés
par le fabricant de votre
modèle. Des accessoires bons
pour un outil peuvent devenir
dangereux sur un autre.
6
Page 8

English
ServiceService
Service
ServiceService
Espanol Francais
ServicoServico
Servico
ServicoServico
DépannageDépannage
Dépannage
DépannageDépannage
• Tool service must be
performed only by qualified
repair personnel. Service or
maintenance performed by
unqualified personnel could
result in a risk of injury.
• When servicing a tool, use
only identical replacement
parts. Follow instructions in
the Maintenance section of
this manual. Use of authorized
parts or failure to follow
Maintenance Instructions may
create a risk of electric shock or
injury.
• Solamente personal
competente debe reparar
las herramientas. Las tareas
de servicio o de
mantenimiento efectuadas
por personal inexperto
podrían resultar en un riesgo
de lesiones.
• Cuando repare una
herramienta, utilice
solamente piezas de
repuesto idénticas. Siga las
instrucciones que se
encuentran en la sección
Mantenimiento en este
manual.
El uso de piezas no
autorizadas o el
incumplimiento de las
instrucciones de
mantenimiento puede crear
un riesgo de electrochoque o
de lesiones.
• La réparation d’outils ne
doit être confiée qu’à du
personnel qualifié.
Réparation ou maintenance
faites par du personnel non
qualifié sont un risque
potentiel de blessure
ultérieure.
• Pour la réparation,
n’utilisez que des pièces de
rechange identiques. Suivez
les instructions de la section
dépannage de ce manuel. Si
vous ne suivez pas ces
conseils ou utilisez de
mauvaises pièces, vous
pouvez provoquer
électrocution ou blessures.
7
Page 9

English
AdditionalAdditional
Additional
AdditionalAdditional
Safety RulesSafety Rules
Safety Rules
Safety RulesSafety Rules
Espanol Francais
Reglas deReglas de
Reglas de
Reglas deReglas de
SeguridadSeguridad
Seguridad
SeguridadSeguridad
AdicionalesAdicionales
Adicionales
AdicionalesAdicionales
Règles deRègles de
Règles de
Règles deRègles de
SécuritéSécurité
Sécurité
SécuritéSécurité
AdditionnellesAdditionnelles
Additionnelles
AdditionnellesAdditionnelles
• Hold tool by insulated
gripping surfaces when
performing an operation where
the cutting tool may contact
hidden wiring or its own cord.
Contact with a live wire will make
the exposed metal parts of the
tool “live” and shock the
operator.
• Keep handles dry, clean, free
from oil and grease. It is
recommended to use rubber
gloves. This will enable better
control.
• DO NOT TOUCH ANY OF THE
METAL PARTS OF THE TOOL
when drilling or driving into
walls, floors or wherever live
electrical wires may be
encountered. Hold the tool only
by insulated grasping surfaces to
prevent electric shock if you drill
or drive into a live wire.
WARNING: Some dust created
by power sanding, sawing,
grinding, drilling, and other
construction activities contains
chemicals known to cause
cancer, birth defects or other
reproductive harm. Some
examples of these chemicals
are:
• lead from lead-based paints,
• crystalline silica from bricks and
cement and other masonry
products, and arsenic and
chromium from chemically
treated lumber (CCA)
• Cuando esté realizando un
trabajo donde la herramienta
de corte puede tocar algún
cable oculto o su propio
cordón, sujete la herramienta
tomándola de las superficies
de agarre aisladas. El contacto
con un alambre «vivo» dejará las
piezas metálicas expuestas de la
herramienta «con corriente» y
electrocutará al operario.
• Mantenga los mangos secos,
limpios, libres de aceite y
grasa. Se recomienda usar
guantes de goma. Le permitirá
tener mejor control de la
herramienta.
• NO TOQUE NINGUNA DE
LAS PIEZAS METALICAS DE
LA HERRAMIENTA cuando
esté taladrando o atornillando
en paredes, pisos o
dondequiera que puedan
encontrarse cables eléctricos
con corriente. Sujete la
herramienta tomándola
solamente de las superficies de
agarre aisladas para evitar un
electrochoque en caso de
taladrar o atornillar contra un
cable con corriente.
ADVERTENCIA: Algunos
polvos creados al lijar,
aserrar, esmerilar o taladrar
con máquina eléctricas, o por
otras actividades de
construcción contienen
sustancias químicas
causantes de cáncer,
malformaciones congénitas u
otros daños reproductivos.
Algunos ejemplos de estas
sustancias químicas son:
• el plomo de las pinturas a
base de plomo,
• la sílice cristalina de los
ladrillos y el cemento y otros
productos de albañilería, y
• el arsénico y el cromo de la
madera tratada químicamente
(CCA)
• Tenez l’outil par les
surfaces de maintien isolées
en utilisation où l’embout
peut toucher un fil caché ou
le propre cordon de l’outil.
Le contact avec un tel fil peut
amener une tension sur les
parties métalliques exposées
de l’outil et blesser l’opérateur.
• Gardez les poignées
sèches, propres et sans
graisse/huile. Le port de
gants caoutchouc est
recommandé pour un meilleur
contrôle.
• NE TOUCHEZ AUCUNE
PARTIE MÉTALLIQUE DE
L’OUTIL en perçant et
pénétrant dans murs ou
planchers, là où peuvent se
trouver des fils électriques.
Ne tenez l’outil que par ses
surfaces isolées pour éviter
une commotion électrique au
contact de tension.
AVERTISSEMENT : Certaines
poussières créées par
ponçage, meulage, perçage et
autres activités de construction
contiennent des produits
chimiques connus pour
provoquer cancer, anomalies
congénitales ou autres
atteintes à la reproduction. Par
exemple :
• plomb venant de certaines
peintures,
• silice cristallisée de briques
et ciment ou autres matériaux
de maçonnerie, et
• arsenic et chrome des bois
traités chimiquement (CCA)
8
Page 10

English
AdditionalAdditional
Additional
AdditionalAdditional
Safety RulesSafety Rules
Safety Rules
Safety RulesSafety Rules
Espanol Francais
Reglas deReglas de
Reglas de
Reglas deReglas de
SeguridadSeguridad
Seguridad
SeguridadSeguridad
AdicionalesAdicionales
Adicionales
AdicionalesAdicionales
Règles deRègles de
Règles de
Règles deRègles de
SécuritéSécurité
Sécurité
SécuritéSécurité
AdditionnellesAdditionnelles
Additionnelles
AdditionnellesAdditionnelles
Your risk from these exposures
varies, depending on how often
you do this type of work. To
reduce your exposure to these
chemicals: work in a well
ventilated area, and work with
approved safety equipment, such
as those dust masks that are
specially designed to filter out
microscopic particles.
The label on your tool may
include the following symbols.
Su riesgo debido a la
exposición a estas sustancias
varía, dependiendo de cuán
frecuentemente realiza este
tipo de trabajo. Para reducir
su exposición a estas
sustancias químicas: trabaje
en un lugar que tenga buena
ventilación, y trabaje con un
equipo de seguridad
aprobado, por ejemplo, las
mascarillas contra polvo
especialmente diseñadas
para filtrar las partículas
microscópicas.
La etiqueta en su herramienta
puede incluir los símbolos
siguientes:
Vos risques suite à l’exposition
varient suivant la répétitivité de
tels travaux. Pour réduire le
danger chimique : travaillez en
zone bien ventilée, avec un
équipement de sécurité
approuvé, comme les
masques anti poussières
spécialement prévus pour
retenir les microparticules.
L’étiquette sur votre outil peut
comporter ces symboles :
9
Page 11

English
V...........................volts
A...........................amperes
Hz.........................hertz
W..........................watts
min.......................minutes
...................... alternating current
=====..................direct current
n
........................ no load speed
o
........................Class II Construction
…/min...................revolutions or reciprocation per minute
........................earthing terminal
........................safety alert symbol
Espanol
V...........................voltios
A...........................amperios
Hz.........................hertzios
W..........................vatios
min.......................minutos
........................corriente alterna
=====...................corriente continua
n
.........................velocidad sin carga
o
........................Construcción de Clase II
…/min...................revoluciones o vaivén por minuto
........................terminal de puesta a tierra
........................símbolo de alerta de seguridad
Francais
V...........................volts
A...........................ampères
Hz.........................hertz
W..........................watts
min.......................minutes
.......................courant alternatif
=====...................courant continu
n
.........................vitesse sans charge
o
........................construction Classe II
…/min...................tours/minute dans un sens ou l’autre
........................borne de mise à la terre
.........................symbole d’alerte de sécurité
10
Page 12

English
SwitchSwitch
Switch
SwitchSwitch
Espanol Francais
DétenteDétente
Détente
InterruptorInterruptor
Interruptor
InterruptorInterruptor
DétenteDétente
d’interrupteurd’interrupteur
d’interrupteur
d’interrupteurd’interrupteur
FUNCTIONAL
DESCRIPTION
To start tool, depress the trigger
switch, shown in Figure 1. To
stop tool, release the switch.
The variable speed trigger
switch permits speed control.
The farther the trigger switch is
depressed, the higher the speed
of the tool.
To lock the switch in the on
position for continuous operation,
depress the trigger switch and
push in the locking button. The
tool will continue to run. To turn
the tool off, from a locked on
condition, squeeze and release
the trigger once. Before using
the tool (each time), be sure that
the locking button release
mechanism is working freely. Be
sure to release the locking button
release mechanism before
disconnecting the plug from the
power supply. Failure to do so
will cause the tool to start
immediately the next time it is
plugged in. Damage or injury
could result.
The reversing lever is used to
reverse the tool for backing out
screws. It is located above the
trigger, Shown in Figure 1. To
reverse the screwdriver, turn it
off and push the reversing lever
to the right (when viewed from
the back of the tool). Turn the
tool off and push the lever to the
left for forward operation.
11 12
Para activar la herramienta,
oprima el interruptor de
gatillo, ilustrado en la figura 1.
Para apagarla, suelte el
gatillo. El interruptor de
gatillo de velocidad
regulable permite controlar la
velocidad. Cuanto más se
oprime el gatillo, tanto más
rápida es la velocidad de la
herramienta.
Para bloquear el interruptor
en la posición de encendido
para funcionamiento
continuo, oprima el gatillo y
pulse el botón de bloqueo.
La herramienta continuará
funcionando.
Para apagar la herramienta,
desde una condición de
encendido continuo, oprima y
suelte el gatillo una sola vez.
Antes de usar la herramienta
(cada vez), cerciórese de que
el mecanismo soltador del
botón de bloqueo funcione
libremente. Suelte el
mecanismo soltador del botón
de bloqueo antes de
desenchufar la herramienta
de la fuente de alimentación.
Si no lo hace, la herramienta
comenzará a funcionar
inmediatamente la próxima
vez que la enchufe y podría
causar daño o lesiones.
La palanca de inversión se
utiliza para cambiar el sentido
de rotación de la herramienta
para destornillar tornillos. Se
encuentra encima del gatillo,
ilustrado en la figura 1. Para
invertir la rotación del
destornillador, apáguelo y
empuje la palanca de
inversión hacia la derecha
(visto desde la parte trasera
de la herramienta). Apague la
herramienta y empuje la
palanca hacia la izquierda
para que funcione hacia
adelante.
Pour démarrer l’outil, appuyez
sur sa détente (schéma 1).
Relâchez-la pour l’arrêter. La
détente variateur de vitesse
permet de contrôler la rotation.
Plus elle est pressée, plus
l’outil tourne vite.
Pour bloquer la détente en
position pour un
fonctionnement en continu
sans avoir à la maintenir,
appuyez dessus et pressez le
bouton de blocage. L’outil va
continuer à tourner. Pour le
couper à partir de ce mode,
appuyez de nouveau sur la
détente et relâchez-la. Avant
chaque démarrage de l’outil,
vérifiez que le mécanisme de
libération du bouton de
blocage fonctionne bien.
Libérez bien le blocage avant
de débrancher la prise du
secteur, sinon l’outil
démarrerait immédiatement à
sa prochaine mise sous
tension sans même toucher la
détente, entraînant dégâts ou
blessures.
Le levier d’inversion de sens
est prévu pour que l’outil
puisse faire sortir des vis. Il est
situé au dessus de la détente
(schéma 1). Pour inverser le
tournevis, coupez-le et
poussez ce levier vers la droite
(vu de l’arrière de l’outil).
Coupez l’alimentation de l’outil
et repoussez le levier vers la
gauche pour revenir à la
rotation normale dans le sens
des aiguilles d’une montre.
Page 13

English
Figure 1Figure 1
Figure 1
Figure 1Figure 1
Reversing lever
Espanol Francais
Schéma 1Schéma 1
Schéma 1
Figura 1Figura 1
Figura 1
Figura 1Figura 1
Schéma 1Schéma 1
Palanca de inversión
Evier d’inversion de
sens de rotation
Trigger Switch
Interruptor de gatillo
Detente d’interrupteur
Locking Button
Boton de bloqueo
Bouton de blocage
English Specifications
Bit shank size
Frequency
Voltage
Current
Input
No Load Speed
Length
Weight
SG2500
1/4” hex
60 hz
120 V
5.4 A
600 W
0-2500 min
12-1/4”
4.3 lbs.
SG4000
1/4” hex
60 hz
120 V
5.4 A
600 W
0-4000 min
12-1/4”
4.2 lbs.
Espanol Especificaciones
Medida de espiga de punta 1/4” hexagonal 1/4” hexagonal
Hertzios 60 hz 60 hz
Voltios 120 V 120 V
Corriente 5.4 A 5.4 A
Entrada 600 W 600 W
Velocidad sin carga 0-2500 min 0-4000 min
Longitud 12-1/4” 12-1/4”
Peso 4.3 lbs. 4.2 lbs.
SG2500 SG4000
Francais Spécifications
SG2500
Queue d’embout 1/4” 6 pans
Hertz 60 hz
Volts 120 V
Courant 5.4 A
Puissance 600 W
Vitesse à vide 0-2500 min
Longueur 31 cm
Poids 1,96 kg
SG4000
1/4” 6 pans
60 hz
120 V
5.4 A
600 W
0-4000 min
31 cm
1,91 kg
Page 14
English
Figure 2Figure 2
Figure 2
Figure 2Figure 2
Espanol Francais
Schéma 2Schéma 2
Schéma 2
Figura 2Figura 2
Figura 2
Figura 2Figura 2
Schéma 2Schéma 2
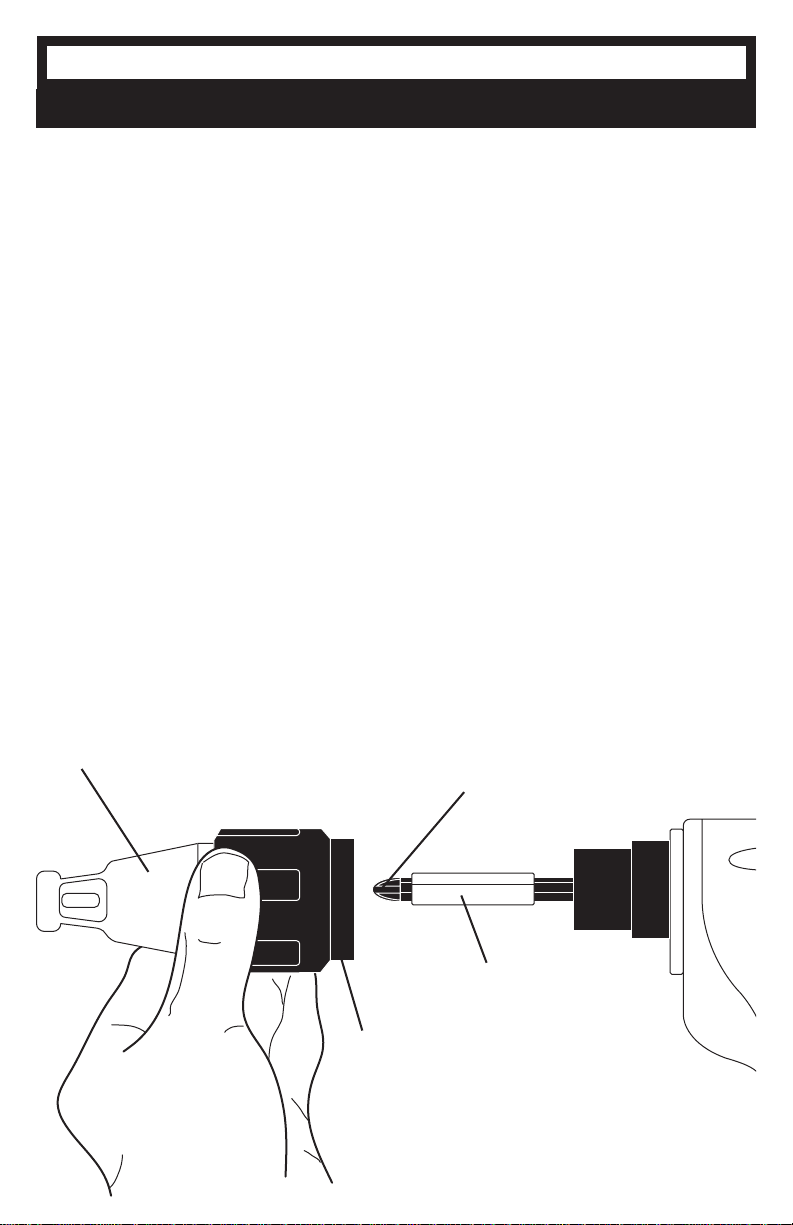
REPLACING THE BIT
HOLDER AND BIT (FIGURE 2)
Pull the locking sleeve. The
locking sleeve and adjusting
sleeve come out of the gear
casing as a set. Pull the bit
holder straight out. If it is difficult
to pull by hand, use pliers. Push
a new bit into the holder. Use a
new bit holder if necessary.
Push the bit holder (with bit) into
the hex hole of the spindle until
the ball lock snaps into the
groove on the bit holder shank.
Attach the locking sleeve (with
adjusting sleeve) to the gear
case. Align the projection inside
the adjusting sleeve with the
groove of the gear case and
push the adjusting sleeve as far
as it will go.
Adjusting Sleeve
Manguito de ajuste
Manchon de réglage
SUSTITUCION DEL
ADAPTADOR Y LA PUNTA
(FIGURA 2)
Tire del manguito de fijación.
El manguito de fijación y el
manguito de ajuste salen de la
caja de engranajes como un
conjunto. Tire del adaptador
recto hacia afuera. Si es difícil
tirarlo con la mano, use los
alicates. Inserte una punta
nueva en el adaptador
(portapunta). Si es necesario,
utilice un adaptador nuevo.
Inserte el adaptador (con la
punta) en el agujero
hexagonal del husillo hasta
que el bloqueo esférico encaje
en la ranura de la espiga del
adaptador. Fije el manguito de
fijación (con el manguito de
ajuste) a la caja de
engranajes. Alinee la
proyección dentro del
manguito de ajuste con la
ranura de la caja de
engranajes y empuje el
manguito de ajuste hasta
donde tope.
Bit
Punta
Embout
REMPLACEMENT DU
PORTE-EMBOUT ET DE
L’EMBOUT (Schéma 2)
Tirez le manchon de blocage. Il
sort du carter d’engrenage avec
le manchon de réglage comme
un ensemble. Tirez le porteembout tout droit, si c’est
difficile utilisez des pinces.
Mettez un nouvel embout dans
le porte-embout. Utilisez un
nouveau porte-embout si
nécessaire. Poussez le porteembout et son embout dans le
trou 6 pans de l’axe jusqu’à ce
que le blocage à bille
s’encastre dans la gorge de la
tige du porte-embout. Fixez le
manchon de blocage (avec le
manchon de réglage) sur le
carter d’engrenages. Alignez la
saillie dans le manchon de
réglage avec la rainure du
carter d’engrenages et
poussez-le à fond.
Bit Holder
Adaptador
Manchon de blocage
Locking Sleeve
Manguito de fijación
Porte-embout
13 14
Page 15
English
Figure 3Figure 3
Figure 3
Figure 3Figure 3
Espanol Francais
Schéma 3Schéma 3
Schéma 3
Figura 3Figura 3
Figura 3
Figura 3Figura 3
Schéma 3Schéma 3
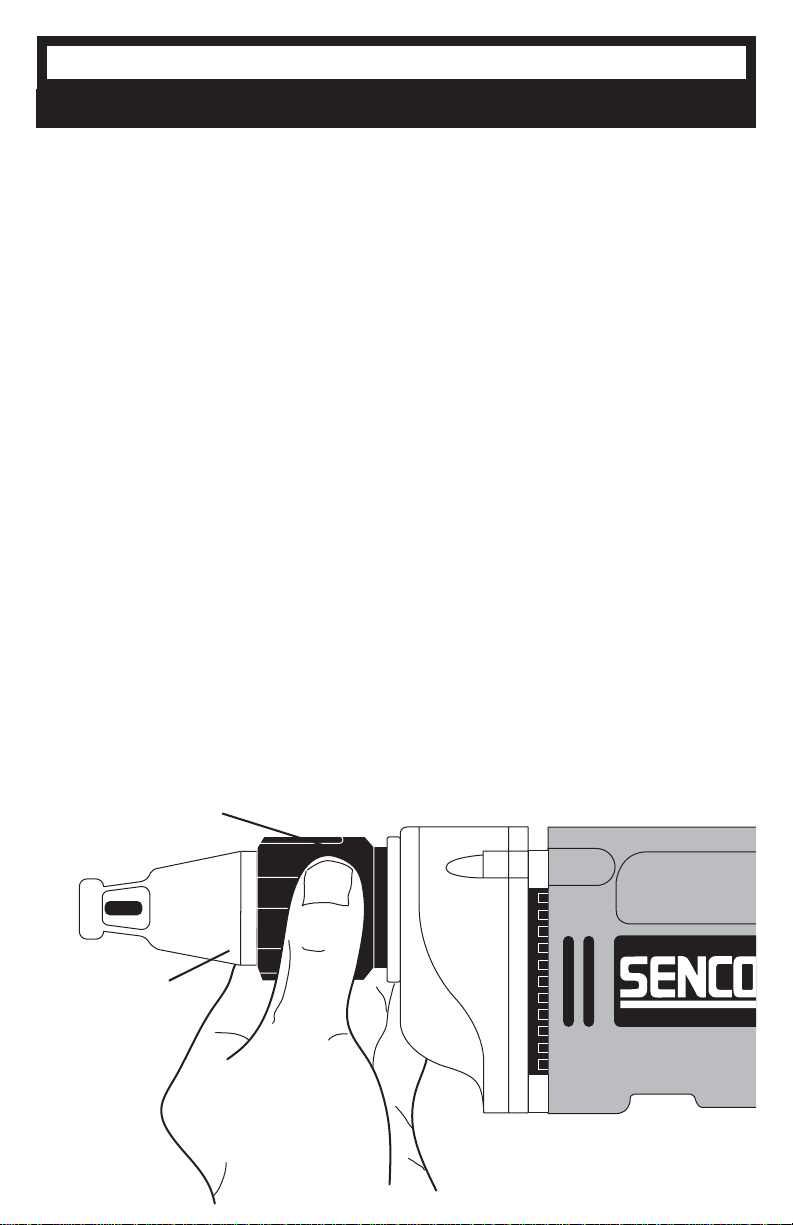
OPERATION
SETTING DEPTH (FIGURE 3)
The adjustable nose piece of
the tool will automatically drive a
screw to a preset depth. To
adjust your screwdriver so it will
drive screws to the desired
depth unlock the locking sleeve,
turn the adjusting sleeve until
depth for bit holders or depth is
obtained. Test drive a fastener
in scrap materials to determine
if fastener is correctly seating.
Further adjustment may be
necessary to increase or
decrease the fastener depth.
DRIVING SCREWS
To engage the clutch to drive
the screw, set the screw in the
bit and align it in the desired
position against the work
surface. Depress the trigger.
With the motor running, push
the tool forward to engage the
clutch. The clutch will disengage when the screw is driven
to the selected depth.
Locking Sleeve
Manguito de fijación
Manchon de blocage
AJUSTE DE LA
PROFUNDIDAD (FIGURA 3)
La nariz ajustable de la
herramienta atornillará
automáticamente un tornillo
hasta una profundidad prefijada.
Para ajustar el destornillador de
manera que atornille los tornillos
hasta la profundidad deseada,
desbloquee el manguito de
fijación, gire el manguito de
ajuste hasta obtener la
profundidad para los adaptadores
(portapuntas) o la profundidad
del tornillo. Pruebe atornillar un
tornillo en material de descarte
para determinar si el tornillo
queda correctamente asentado.
Probablemente será necesario
un ajuste adicional para
aumentar o disminuir la
profundidad del tornillo.
PARA ATORNILLAR
Para engranar el embrague para
atornillar, coloque el tornillo en la
punta y alinéelo en la posición
deseada contra la superficie de
trabajo. Oprima el gatillo. Con el
motor funcionando, empuje la
herramienta hacia adelante para
engranar el embrague. El
embrague se desengranará
cuando el tornillo se inserta a la
profundidad fijada.
RÉGLAGE DE
PROFONDEUR (Schéma 3)
Le nez réglable de l’outil
amènera automatiquement la
vis à la profondeur préréglée.
Pour régler votre tournevis
afin qu’il enfonce les vis d’une
certaine longueur, débloquez
le manchon de blocage,
tournez le manchon de
réglage jusqu’à l’obtention de
la profondeur du porteembout. Testez la mise en
place d’une fixation dans un
matériau d’essai pour
constater si le positionnement
est le bon. Il peut être
nécessaire d’affiner le réglage
pour augmenter ou diminuer la
profondeur d’enfoncement de
l’attache.
VISSAGE DE VIS
Mettez la vis sur l’embout et
alignez-la dans à l’endroit
voulu sur la surface de travail.
Appuyez sur la détente. Avec
le moteur activé, poussez
l’outil vers l’avant pour
engager l’embrayage.
L’embrayage va se
désengager quand la vis aura
été enfoncée de la longueur
prédéterminée.
Adjusting Sleeve
Manguito de ajuste
Manchon de réglage
Page 16

English
MaintenanceMaintenance
Maintenance
MaintenanceMaintenance
Espanol Francais
MantenimientoMantenimiento
Mantenimiento
MantenimientoMantenimiento
Entretien
Cleaning - With the motor
running, blow dirt and dust out
of all air vents with dry air at
least once a week. Wear safety
glasses while performing this
operation. Exterior plastic parts
may be cleaned with a damp
cloth. Never use solvents.
After use, Check the tool to
make sure that it is in top
condition. It is recommended
that you take this tool to a
SENCO Authorized Service
Center for a thorough cleaning
and lubrication at least once a
year.
DO NOT MAKE ANY ADJUSTMENTS WHILE THE MOTOR
IS IN MOTION. ALWAYS
DISCONNECT THE POWER
CORD FROM THE RECEPTACLE BEFORE CHANGING
REMOVEABLE OR EXPENDABLE PARTS, LUBRICATING,
OR WORKING ON THE UNIT.
Limpieza - Con el motor
funcionando, sople la
suciedad y el polvo por todas
las salidas de aire con un
chorro de aire seco por lo
menos una vez a la semana.
Póngase anteojos de
seguridad para hacer este
trabajo. Las piezas exteriores
de plástico pueden limpiarse
con un trapo húmedo. Nunca
use solventes. Después de
usar la herramienta, revísela
para asegurarse que está en
óptimas condiciones. Se
recomienda llevar esta
herramienta a un centro de
servicio autorizado SENCO
para que le hagan una
limpieza a fondo y una
lubricación por lo menos una
vez al año.
NO HAGA NINGUN AJUSTE
MIENTRAS EL MOTOR
ESTA FUNCIONANDO.
DESENCHUFE SIEMPRE EL
CORDON DE
ALIMENTACION DEL
TOMACORRIENTE ANTES
DE CAMBIAR LAS PIEZAS
DESMONTABLES O
FUNGIBLES, DE LUBRICAR
O TRABAJAR EN ESTA
HERRAMIENTA.
Nettoyage – Avec le moteur en
marche, soufflez saletés et
poussière hors de tous les
évents à l’air comprimé sec
une fois par semaine. Portez
des lunettes de sécurité pour
le faire. Les pièces plastiques
externes peuvent se laver
avec un chiffon humide.
N’utilisez jamais de solvants.
Après usage, vérifiez le bon
état de l’outil. Nous vous
recommandons de l’amener à
un centre de réparations agréé
SENCO pour nettoyage et
lubrification au moins une fois
par an.
NE FAITES AUCUN
RÉGLAGE AVEC LE
MOTEUR EN MARCHE.
DÉBRANCHEZ TOUJOURS
LE CORDON SECTEUR
AVANT DE CHANGER DES
PIÈCES DÉTACHABLES OU
EXTENSIBLES, DE
LUBRIFIER OU TRAVAILLER
SUR L’OUTIL.
15 16
Page 17

English
Warning!Warning!
Warning!
Warning!Warning!
Espanol Francais
Avertissement!Avertissement!
Avertissement!
Advertinica!Advertinica!
Advertinica!
Advertinica!Advertinica!
Avertissement!Avertissement!
To ensure the safety and
reliability, all repairs, maintenance and adjustment (including brush inspection and
replacement) should be
performed by an AUTHORIZED
SERVICE CENTER. Always
use identical replacement parts.
SAVE THESE INSTRUCTIONS
FOR FUTURE REFERENCE.
TOOL AND PARTS WARRANTY
The length of this guarantee is
one year from date of purchase
by the original retail purchaser.
SENCO Products Inc. will repair
or replace at Senco’s option,
any original part or parts. This
will be done free of charge,
provided the parts are determined defective in materials or
workmanship. Any replacement
part provided will carry a
warranty for the balance of the
period of warranty applicable to
the part it replaces.
STANDARD ACCESSORIES
1/4” Magnetic Bit Holder,
1/4” #2 Phillips Bit
Para seguridad y
confiabilidad, todas las
reparaciones, las tareas de
mantenimiento y los ajustes
(incluyendo la inspección y la
sustitución de las escobillas)
deben ser efectuadas por un
CENTRO DE SERVICIO
AUTORIZADO. Use siempre
piezas de repuesto idénticas
a las originales.
GUARDE ESTAS
INSTRUCCIONES PARA
REFERENCIA EN EL
FUTURO.
GARANTIA DE LA H
ERRAMIENTA Y PIEZAS
Esta garantía tiene una
duración de un año a partir de
la fecha de compra por el
comprador minorista original.
SENCO Products Inc.
reparará o sustituirá, a opción
de Senco, cualquier pieza o
piezas originales. Esto se
hará sin cargo para el
comprador, siempre que se
determine que las piezas
tienen defectos en el material
o la fabricación.
Toda pieza de repuesto
suministrada estará cubierta
por el resto del período de
garantía aplicable a la pieza
que está sustituyendo.
ACCESORIOS ESTANDAR
Adaptador magnético de 1/4",
punta phillips Nº 2 de 1/4"
Pour assurer sécurité et
fiabilité, toutes réparations,
entretiens et réglages
(incluant inspection et
remplacement des balais)
doivent être réalisés par un
CENTRE DE RÉPARATIONS
AGRÉÉ. Utilisez toujours des
pièces de rechange
identiques.
GARDEZ CES
INSTRUCTIONS POUR
RÉFÉRENCE ULTÉRIEURE.
GARANTIE SUR OUTIL ET
PIÈCES
Cette garantie a une durée
de un an à partir de la date
d’achat par le client d’origine.
SENCO Products Inc. aura le
choix de réparer ou
remplacer toute partie ou
pièces d’origine. L’action sera
gratuite s’il est établi que ces
pièces présentaient un défaut
dû aux matériaux ou à la
main d’oeuvre. Toute pièce
remplacée sera garantie ellemême pour la durée restant à
courir de la garantie initiale
de la pièce qu’elle a
remplacée.
ACCESSOIRES EN
STANDARD
Porte-embout magnétique
1/4”, embout 1/4” pointe
Phillips N°2
Page 18

SG2500 & SG4000
REPLACEMENT PARTS LIST•LISTA DE PARTES DE REPUESTO•ERSATSTEILE-LISTE•LISTE DE PIÈCES DE RECHANGE
PART NO. DESCRIPTION DESCRIPCIÓN BESCHREIBUNG DÉSIGNATION
FA0226 ................... NOSEPIECE ASSY ........ PIEZA DE LA BOCA ....... NASENSTUCK ............. EMBOUT
VA0027 ................... TRIGGER ASSY. ......... ASAMBLE DE GATILLO .. AUSLÖSER ................ ENSEMBLE GÂCHETTE
VB0042 ................... CORD
FA0226
VB0042
1
brush
armature
brush
Blk.
Blk.
2
1
5
8
VA0027
Disconnect
wire leads
7
backside
2
Red
field
motor
field
Yellow
Insert pin,
1
release
yellow wire
White
Unscrew,
release wires
Black
VB0042
AC / 120V
Line In
17
Page 19

SENCO TOOL & PARTS WARRANTY
This tool has been designed and constructed using
the highest standards of material and workmanship.
TOOL AND PARTS WARRANTY:
purchaser. During this period, SENCO Products, Inc., will repair or replace at
Senco’s option, any original part or parts for the original retail purchaser. This will
be done free of charge, provided the parts are determined defective in materials
or workmanship upon examination by a SENCO Authorized Warranty Service Center
(exception: rubber o-rings, seals and bits). Any replacement part provided will
carry a warranty for the balance of the period of warranty applicable to the part it replaces.
This warranty will be honored, only if:
A) No evidence of abuse, or failure to follow recommended operational maintenance, or
B) When repair or replacement of parts or tools is necessary, the original retail purchaser
The length of this guarantee is one year from date of purchase by the original retail
modification of the tool is present (read Operator Manual for use and maintenance instructions);
returns the complete tool or part, with transportation prepaid, to the nearest SENCO
Authorized Warranty Service Center, with purchase receipt or other positive proof that
the part or tool is within the warranty period.
WARRANTIES, WHETHER ORAL, WRITTEN, EXPRESS, OR IMPLIED, INCLUDING, BUT
NOT LIMITED TO, THE IMPLIED WARRANTY OF MERCHANTABILITY OR FITNESS
FOR A P AR TICULAR PURPOSE, ARE EXCLUDED. BUYER’S OR USER’S REMEDIES ARE
SOLELY AND EXCLUSIVELY AS STATED ABOVE. SENCO PRODUCTS, INC. SHALL IN
NO EVENT BE LIABLE FOR INCIDENTAL, CONSEQUENTIAL, INDIRECT, OR SPECIAL
DAMAGES. IN NO EVENT, WHETHER AS A RESULT OF A BREACH OF CONTRACT,
WARRANTY, T ORT (INCLUDING NEGLIGENCE) OR OTHERWISE, SHALL SENCO’S LIABILITY EXCEED THE PRICE OF THE TOOL WHICH HAS GIVEN RISE TO THE CLAIM
OR LIABILITY. ANY LIABILITY CONNECTED WITH THE USE OF THIS TOOL SHALL
TERMINA TE UPON THE EXPIRATION OF THE WARRANTY PERIOD SPECIFIED ABOVE.
THIS W ARRANTY IS THE ONL Y WARRANTY ON THIS T OOL, AND ALL OTHER
Replacement of Tool Due to Natural Disaster
SENCO will also replace any tool destroyed by an Act of God such as flood,
earthquake, hurricane or other disaster resulting only from the forces of nature. Such
a claim will be honored provided that such original retail purchaser had
previously submitted a completed warranty registration card, and then submits proof
of ownership and an acceptable statement describing such Act of God
documented by an insurance carrier, police department, or other official
governmental source. To obtain instructions for filing a claim call 1-800-543-4596.
SENCO PRODUCTS, INC.
CINCINNATI, OHIO 45244-1611 USA
 Loading...