


30K
Motorcycle Bluetooth Communication System with Mesh Intercom™

Menu
TABLE OF CONTENTS
1.About the Motorcycle Bluetooth Communication System with Mesh Intercom™
1.1.Product Details
1.1.1.Headset Main Unit
1.1.2.Universal Clamp Kit
2.Installing the Headset on Your Helmet
2.1.Helmet Installation
2.2.Using the Glued Surface Mounting Plate
2.3.Switching the Microphone
2.3.1.Wired Boom Microphone
2.3.2.Wired Microphone
2.4.Earbuds
2.5.External Mesh Intercom Antenna
3.Getting Started
3.1.Button Functions
3.2.Powering On and Off
3.3.Charging
3.4.Checking the Battery Level
3.5.Volume Adjustment
3.6.Downloadable Sena Software
3.6.1.Sena Device Manager
3.6.2.Sena Smartphone App
3.7.Configuration Menu
3.7.1.Basic Configuration Menu
3.7.2.Advanced Configuration Menu
4.Pairing the Headset with Other Bluetooth Devices
4.1.Mobile Phone
4.2.Additional Mobile Phones, GPS, MP3 Player or Sena SR10 Two-Way Radio Adapter
4.3.Advanced Selective Pairing: Hands-Free or A2DP Stereo
4.3.1.Phone Selective Pairing - Hands-Free Profile
4.3.2.Media Selective Pairing - A2DP Profile
4.4.GPS Pairing
5.Mobile Phone Usage
5.1.Making and Answering Calls
5.2.Speed Dialing
5.2.1.Assigning Speed Dial Presets
5.2.2.Using Speed Dial Presets
5.3.VOX Phone (Default: Enable)
6.Stereo Music
6.1.Playing Music with Bluetooth Devices
6.2.Music Sharing
6.3.Audio Boost (Default: Enable)
6.4.Smart Volume Control (Default: Disable)
7.Bluetooth Intercom Setup
7.1.Bluetooth Intercom Pairing
7.2.Bluetooth Two-Way Intercom
7.3.Bluetooth Multi-Way Intercom
7.3.1.Starting a Bluetooth Three-Way Intercom Conference
7.3.2.Starting a Bluetooth Four-Way Intercom Conference
7.3.3.Ending Bluetooth Multi-Way Intercom
7.4.Three-Way Conference Phone Call with Intercom Users
7.5.Group Intercom
7.6.Universal Intercom
7.7.Audio Multitasking (Default: Enable)
7.8.Intercom-Audio Overlay Sensitivity (Default: 3)
7.9.Audio Overlay Volume Management (Default: Disable)
7.10.VOX Intercom (Default: Disable)
7.11.HD Intercom (Default: Enable)
7.12.Advanced Noise Control™ (Default: Enable)
8.Mesh Intercom
8.1.What is Mesh Intercom?
8.2.Mesh Intercom Mode (Default: Public Mode)
8.2.1.Public Mode
8.2.2.Private Mode
8.2.3.Guest Mode (Default: Disable)
8.3.Using the Mesh
8.3.1.Creating the Mesh
8.3.2.Join an Existing Mesh
8.3.3.Accept/Reject Mesh Invitation Request
8.3.4.Quit the Mesh
8.3.5.Public Mode/Private Mode Toggle
8.3.6.Mic Enable/Disable (Default: Disable)
9.Using the FM Radio
9.1.FM Radio On/Off
9.2.Seek and Save Radio Stations
9.3.Scan and Save Radio Stations
9.4.Temporary Station Preset
9.5.Navigating Preset Stations
9.6.Region Selection (Default: Worldwide)
9.7.Radio Data System (RDS) Alternative Frequency (AF) Setting (Default: Enable)
9.8.FM Station Guide (Default: Enable)
10.Ambient Mode
11.Voice Command
11.1.Voice Command (Default: Enable)
12.General Settings
12.1.Function Priority
12.2.Firmware Upgrades
12.3.Voice Prompts
12.4.Sidetone (Default: Disable)
12.5.Delete All Bluetooth Pairing Information
13.Remote Control
13.1.Pairing with the Remote Control
14.Troubleshooting
14.1.Fault Reset
14.2.Factory Reset

1.About the Motorcycle Bluetooth Communication System with Mesh Intercom™
1.1.Product Details
1.1.1.Headset Main Unit
-Phone Button
-Jog Dial
-Mesh Intercom Button
-Status LED
-Mesh Intercom Antenna
-Bluetooth Antenna
1.1.2.Universal Clamp Kit
-Static Boom Microphone

-Speakers
-MP3 Port
-Ambient Mode Button
-Microphone Port
-Speaker Port
-Earbud Port
-Quick Release Button
2.Installing the Headset on Your Helmet
2.1.Helmet Installation
To securely install the headset on the helmet, please follow this procedure.
1.Insert the back plate of the clamp unit between the internal padding and the external shell of the helmet, and tighten the two screws.
Note:
Depending on the size and shape of your helmet, you may need to change the thickness of the rubber pad between the clamp plates using the two extra rubber pads in the box. To increase the overall thickness, attach the thinner one to the original rubber pad or replace the original rubber pad with the thicker one.

2.Make sure that the microphone is located properly close to your mouth when you wear the helmet. Adjust the direction of the microphone so that the fin side of the microphone is facing outward, away from your lips.
3.Place the helmet speakers along with the hook and loop fasteners, centered to your ear, in the ear pockets of the helmet. If the helmet has deep ear pockets, you can use the speaker pads to place the speakers closer to your ears.
Note:
1.The speaker with the shorter wire is for the left ear and the speaker with the longer one is for the right ear.
2.To enhance the audio quality, you can make use of the foam speaker covers. Cover each speaker with the foam and attach the hook fastener at the back of the speaker. Then place the speakers in the helmet as described above. Foam covered speakers work most effectively when they are slightly touching your ears.

4.Attach the headset main unit to the clamp unit. Slide the main unit down onto the clamp unit until it clicks firmly into the bottom portion of the clamp unit.
5.To remove the main unit from the clamp unit, press the Quick Release Button to slide it off the clamp unit.
2.2.Using the Glued Surface Mounting Adapter
If you have any problem equipping the clamp unit on the helmet for any reason, you may use the glued surface mounting adapter voice command to attach the clamp unit on the external surface of the helmet.
1. Remove the speaker unit.

2. Remove the back plate.
3. Remove the rubber pad and replace it with the thicker rubber pad included in the package.
4. Reconnect the speaker cable to the speaker port.
5.Hook on the adapter to the clamp unit then screw in the glued external adapter to the clamp unit.
6.Locate a proper surface on the helmet to attach the unit then clean the helmet surface location with a moistened towel and allow to dry thoroughly.
7.Peel off the cover of the adhesive tape of the adapter and attach the unit on the proper surface of your helmet.
CAUTION:
Sena recommends using the clamp unit. The glued surface mounting plate is provided for convenience, but is not the recommended mounting method. Sena is not responsible for its use.
2.3.Switching the Microphone
If you want to use a different microphone instead of the static boom microphone, please refer to the following steps.
1.Remove the back plate of the clamp unit.
2.Connect the microphone according to your helmet type.
3.Lock the microphone to the clamp.
4.Reattach the back plate to cover the microphone and the speaker port.
2.3.1.Wired Boom Microphone
When installing the included wired boom microphone, place the hook and loop fastener at the end of the boom microphone between the internal helmet cheek pad and the internal wall of the helmet shell. The boom microphone should be mounted so it is facing close to your mouth when you wear the helmet.

2.3.2.Wired Microphone
In case of the wired microphone, attach the enclosed hook and loop fastener for the wired microphone to the inside of the chin guard for full-face helmets. Place the wired microphone on the hook and loop fastener and connect it to the connector of the clamp unit.
2.4.Earbuds
You can connect your earbuds to the clamp while having the speakers connected to the clamp. The sound of the earbuds will be active while the sound of the outer speakers becomes inactive.
2.5.External Mesh Intercom Antenna
Pull the Mesh Intercom Antenna outwards slightly to unfold it.
3.Getting Started
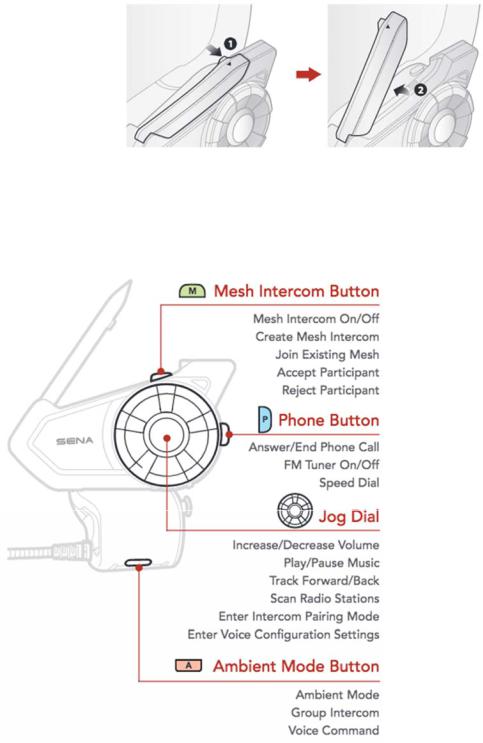
3.1.Button Functions
Phone Button
-Answer/End Phone Call
-FM Tuner On/Off
-Speed Dial
Jog Dial
-Increase/Decrease Volume
-Play/Pause Music
-Track Forward/Back
-Scan Radio Stations
-Enter Intercom Pairing Mode
-Enter Voice Configuration Settings
Mesh Intercom Button
-Mesh Intercom On/Off
-Create Mesh Intercom
-Join Existing Mesh
-Accept Participant
-Reject Participant
Ambient Mode Button
-Ambient Mode
-Group Intercom
-Voice Command
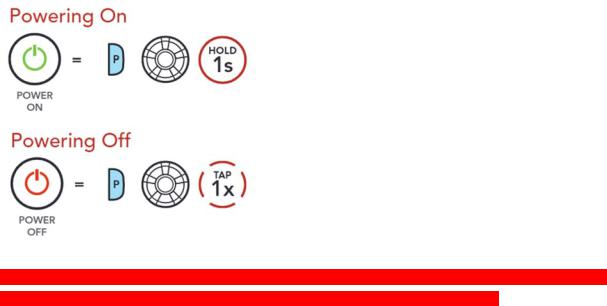
3.2.Powering On and Off
Press and hold the Jog Dial and Phone Button at the same time to turn the headset on or off.
Note: If the Voice Command setting is enabled, it will take more time for the “Hello” voice prompt to be heard in the headset. Please refer to Section 11: “Voice Command” for more details.

3.3.Charging
Charging the Headset
The headset will be fully charged in about 1.5 hours. (The charging time may vary depending on the charging method.) .
Note: The headset includes a Fast Charging feature which allows it to charge quickly over a short period of time. For example, a user can get 5 hours of talk time after charging the headset for 20 minutes.
3.4.Checking the Battery Level
There are two ways to check battery level:
1. Visually, with LEDs when powering on.

Visual Method
VISUAL METHOD [icon] = Phone Button + Jog Dial - Hold 1s [icons]
2.Audible method: press and hold the Phone Button and Jog Dial for more than 3 seconds as the headset powers on. A prompt will announce the remaining battery level.
Audible Method
AUDIBLE METHOD [icon] = Phone Button + Jog Dial - Hold 5s [icons] “Battery level high/medium/low” [Voice Prompt]
Note: Blinking LEDs alternate from blue to red when battery power is low.

3.5.Volume Adjustment
You can raise or lower the volume by rotating the Jog Dial clockwise or counterclockwise. Volume is set and maintained independently at different levels for each audio source (i.e., phone, intercom), even when the headset is rebooted.
Volume Up
VOLUME UP = Jog Dial - Rotate Right [icons]
Volume Down
VOLUME DOWN = Jog Dial - Rotate Left [icons]
3.6.Downloadable Sena Software
3.6.1.Sena Device Manager
The Sena Device Manager allows you to upgrade the firmware and configure its settings directly from your PC or Apple computer. Using this software, you can assign speed dial presets, FM radio station presets and more. For more information on downloading the Sena Device Manager, please visit sena.com.
3.6.2.Sena Smartphone App
The Sena Smartphone App allows you to configure the headset settings, as well as access the User’s Guide and Quick Start Guides. To do so, pair your mobile phone with your headset (please refer to
Section 4: “Pairing the Headset with other Bluetooth Devices” for more details). Run the Sena

Smartphone App and configure the settings directly from your smartphone. You can download the Sena Smartphone App for Android and Apple operating systems.
Sena Software Configuration Menu Chart
Configuration Setting |
Enable/Disable or Execute |
Speed Dial |
Execute |
Intercom-Audio Overlay Sensitivity |
Execute |
Audio Overlay Volume Management |
Enable/Disable |
Audio Boost |
Enable/Disable |
Smart Volume Control |
Execute |
VOX Phone |
Enable/Disable |
VOX Intercom |
Enable/Disable |
HD Intercom |
Enable/Disable |
Guest Mode |
Enable/Disable |
Voice Prompt |
Enable/Disable |
Voice Command |
Enable/Disable |
RDS AF Setting |
Enable/Disable |
FM Station Guide |
Enable/Disable |
Sidetone |
Enable/Disable |
Advanced Noise Control |
Enable/Disable |
3.7.Configuration Menu
The headset can be configured by following a series of voice prompts. Further details about each of these settings will be explained on the following pages.
1.To access the Configuration Menu, press and hold the Jog Dial for 10 seconds until you hear the voice prompt, “Configuration menu.”
 Loading...