

Page 1
A
B
h
w
n
o
r
G
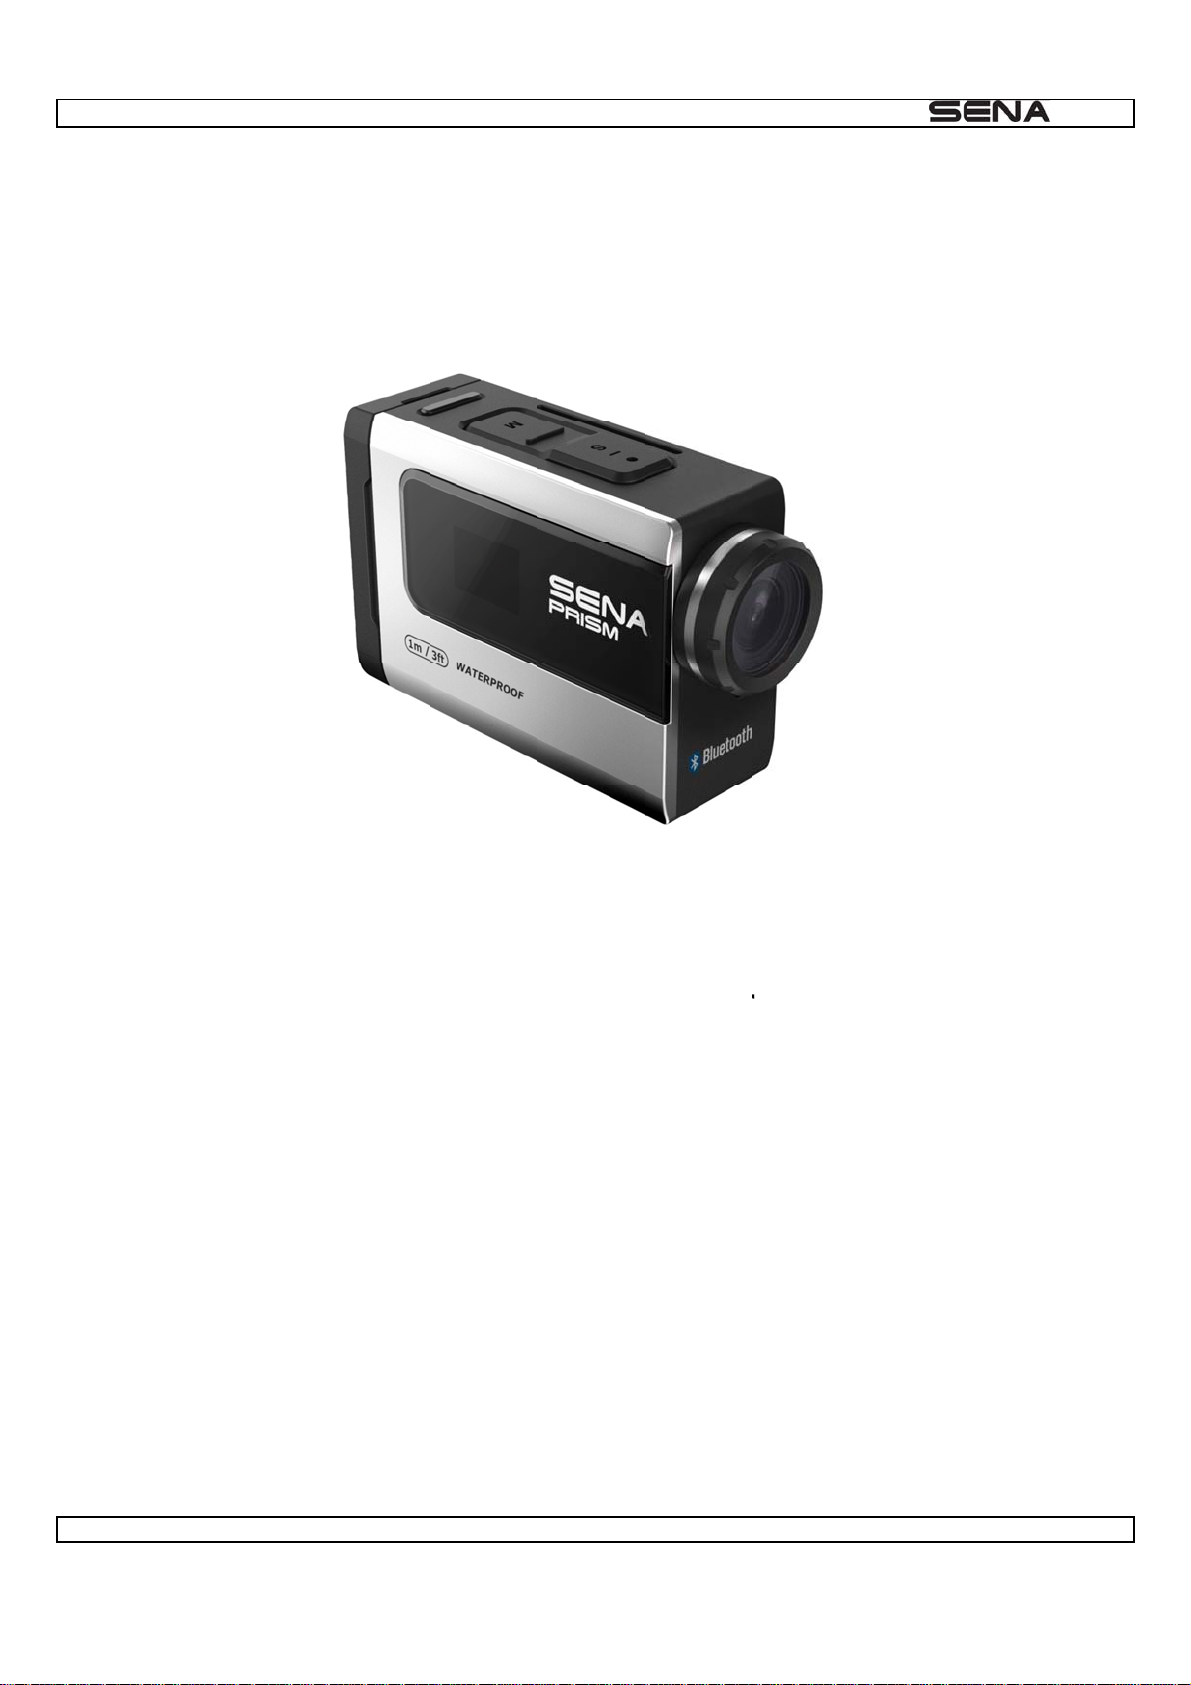
| PRISM
SEN
luetoot
ww
PRISM
®
Actio
.sena.c
Came
m
a
User’s
uide
1
Page 2

N
.2.3.4.5.6.7.
.9.10
S
R
S
n
o
e
e
e
M
e
o
o
o
H
e
e
l
K
o
b
m
o
1
2
3
e
1
2
S
s
o
n
D
s
r
n
T
e
e
O
o
a
*
s
n
i
o
g
k
S
T
O
™
s
e
a
CO
TENT
| PRISM
PACKAGE
1
ACCESSO
GETTING
3.1. Ope
3.2. Mem
3.3. Batte
3.4. Pow
3.5. Cam
3.6. Voic
CAMERA
4.1. Butto
4.2. Cam
VIDEO MO
5.1. Vide
5.2. Vide
5.3. Vide
SINGLE S
CONTENT
IES
TARTED
ing and Clo
ry Card (n
ry
ring On and
ra LCD Me
Prompt
ODES AN
n Operation
ra Modes
DE
Mode Ope
Mode Setti
Recording
OT MODE
ing the Bac
t included in
Off
u Screen
MENU SY
ations
gs
ime
Door
the packag
TEM
)
6.1. Singl
6.2. Singl
BURST SH
7.1. Burst
7.2. Burst
8
TIMELAPS
8.1. Time
PLAYBAC
9.1. Vide
9.2. Play
. CAMERA
10.1. Ca
10.2. Rec
10.2.
10.2.
10.2.
10.3. Blu
Shot Mod
Shot Mod
OT MODE
Shot Mode
Shot Mode
E MODE**
apse Mode
*
s and Phot
ack on Sen
SETTINGS
era Setting
ording Setti
. Internal M
. Upside D
. Date Capt
tooth Settin
Operations
Settings
Operations
Settings
perations
s (TV OUT,
LCD Pack
Operation
gs *
c Gain *
wn *
ion *
s *
HDMI)*
(sold sep
rately)
10.3.
. Bluetooth
10.3.
. Bluetooth
Pairing *
Mic. Gain *
2
Page 3

1
2
314
5
3
4
1
2
3
4
5
6
7
8
O
e
1
2
e
1
2
m
1
2
m
M
e
1
2
M
1
2
M
*
V
e
T
e
o
F
t
n
y
t
C
G
R
u
m
m
c
d
*
R
w
w
a
y
s
o
C
B
u
m
t
u
u
e
n
a
f
e
o
| PRISM
10.3.
10.3.
. Sidetone
. Ultra HD
oice Recor
ing *
10.4. Dev
. BLUETO
1
11.1. Sett
11.2. Blu
11.3. Blu
10.4.
10.4.
10.4.
10.4.
10.4.
10.4.
10.4.
10.4.
11.2.
11.2.
11.3.
11.3.
ice Setting *
. Auto pow
. Beep *
. LED *
. TV out (N
. Time set *
. Factory R
. Device inf
. SD Card
TH AUDIO
ings of Blue
tooth Audio
. Bluetooth
. Bluetooth
tooth Audio
. Bluetooth
. Bluetooth
r off *
SC / PAL)
set *
*
ormatting *
RECORDIN
ooth Audio
Recording
Pairing
Connection
Recording
Pairing
Connection
G
ecording
ith Sena H
ith Non-Se
adsets
a Headsets
1
. Bluetooth
12.1. Re
12.2. Re
1
. CAMERA
13.1. Con
13.2. Con
13.3. Con
. CAMERA
1
. CAMERA
15.1. QR
15.2. Sid
15.3. QR
12.1.
12.1.
15.2.
15.2.
15.3.
Remote Co
ote Control
. Jog Dial T
. Three-but
ote Control
CONNECTI
necting to a
necting to a
necting the
HOUSING
MOUNTIN
™ (Quick
Clamp Mo
. Side Cla
. Side Cla
Top Surfa
. QRM Top
trol
by Sena He
pe Product
on Type Pr
by Non-Sen
ON
Windows P
Mac by US
amera to a
elease Mo
nt
p Mount Co
p Mount Ins
e Mount
Surface Mo
dsets
ducts
a Headsets
by USB C
Cable
TV
nt) System
ponents
allation
nt Compon
ble
or Motorcyc
nts
e
15.3.
. QRM Top
15.4. QR
Dual Sucti
Surface Mo
on Cup Mou
nt Installati
nt
n
3
Page 4

6
7
1
2
M
1
2
S
S
l
l
r
d
d
E
M
A
p
p
n
n
m
t
n
t
| PRISM
15.4.
15.4.
. QRM Dua
. QRM Dua
Suction Cu
Suction Cu
Mount Co
Mount Ins
ponents
allation
15.5. QR
. CAMERA
1
16.1. PRI
16.2. PRI
1
. CAMERA
15.5.
15.5.
Handleba
. QRM Han
. QRM Han
SOFTWAR
M Device
M Smartph
SPECIFIC
Mounting
lebar Mou
lebar Mou
anager
one App
TIONS
ting Compo
ting Installa
ents
ion
4
Page 5

q
t
e
d
n
s
e
e
i
O
e
d
E
N
R
o
e
c
C
e
e
i
O
i
m
e
R
P
O
E
m
m
t
a
q
m
e
5
t
e
u
C
i
n
N
O
N
e
n
c
n
s
n
o
e
h
O
B
D
a
a
e
e
i
u
s
v
m
r
O
A
E
c
r
e
C
h
e
e
h
c
h
H
O
A
R
(
e
q
m
w
r
n
R
F
Y
a
c
u
y
u
o
C
L
a
e
e
f
e
e
e
m
e
e
R
e
u
e
h
y
o
t
l
c
FCC
This e
to par
These
comm
accor
reside
expen
This d
(1) th
undes
Complian
uipment has
15 of the FC
limits are d
rcial environ
ance with th
tial area is l
e.
vice complie
device may
red operation
e Informa
been tested
Rules.
signed to p
ment. This e
instruction
kely to caus
s with Part 1
not cause in
of this devic
ion
nd found to
rovide reaso
uipment gen
anual, may
harmful inte
of FCC Rule
erference, a
.
omply with th
able protect
rates, uses,
cause harmf
rference in w
. Operation i
d (2) the de
e limits for a
on against
and can radi
l interferenc
hich case th
subject to t
ice must ac
lass A digital
armful interf
ate radio fre
to radio co
user will be
e following t
ept any inte
device, purs
rence when
uency energ
munications.
required to c
o conditions:
erence, incl
ant
the equipm
and, if not i
Operation o
orrect the int
ding interfer
| P
nt is operat
nstalled and
this equipm
rference at
nce that ma
ISM
d in a
sed in
nt in a
is own
cause
IMP
FCC
This e
install
locate
NOT
TIO
NCE.
OPE
“This
two c
interf
RTANT N
RF Radiat
quipment co
d and operat
or operating
: THE G
S NOT EX
SUCH M
ATE THE
device co
nditions: (1
rence that
TE:
on Expos
plies with F
d with a min
in conjunctio
ANTEE IS
RESSLY A
DIFICATI
QUIPME
plies with
) this devic
ay cause u
re Statem
C RF radiati
mum distanc
with any ot
OT RESP
PPROVED
NS COUL
T.
Industry C
may not c
desired op
nt:
n exposure l
of 20 centi
er antenna o
NSIBLE F
Y THE P
VOID TH
nada licen
use interfe
ration of th
imits set fort
eters betwee
transmitter.
R ANY C
RTY RESP
USER’S
e-exempt
ence, and
device.”
for an unco
the radiator
ANGES O
NSIBLE
UTHORIT
SS stand
2) this devi
trolled envir
and your bod
MODIFI
OR COMP
TO
rd(s). Oper
e must acc
nment. This
y. This trans
A
IA
tion is subj
ept any int
quipment sh
itter must no
ct to the fo
rference, in
uld be
be co-
lowing
luding
5
Page 6
P
W
L● H● Q● U
G
H
a
m
m
&
d
u
T
t
c
l
o
R
1.
ACKA
Mo
Stat
E CON
Sta
tus LED
e Button
s LCD
ENTS
Shot Button
| P
ISM
●
●
●
aterproof
i-Ion Rech
ousing
rgeable Ba
tery
Microph
ne
elmet Cla
RM Syste
SB Power
p Kit
for Motor
Data Cab
ycles
e
6
Page 7
L
C
C
| PRISM
●
●
●
ens Cap
igar Jack
harger
7
Page 8
A
G
d
S
a
s
c
n
t
h
e
R
e
k
S
e
w
u
K
C
&
d
n
B
n
g
R
2.
CCES
ORIES
| P
ISM
QRM Sy
Motor
Dual Suctio
Composi
Li-Ion Rec
Batt
tem for
ycles
Mount Kit
e Cable
argeable
ry
QRM
Handl
USB Po
urface Mo
bar Mount
Co
mbo Cable
er & Data
nt
it Flat
able Wor
Helmet Cl
Curved A
Micropho
d Wide US
amp Kit
hesive Mou
e Cable
Wall Char
ts
er
3.
3.1.
1. Sli
ETTIN
pening
e the small
G STA
nd Closin
lock near th
TED
g the Bac
bottom of t
Door
he back doo
r to the left.
8
Page 9
d
d
d
e
t
c
d
e
m
d
d
C
y
o
e
r
t
a
h
a
e
c
h
o
w
m
a
a
o
t
e
s
a
D
t
r
c
o
o
h
u
r
l
c
h
k
i
k
r
o
n
y
k
s
2
g
g
c
h
d
C
R
i
r
o
| P
ISM
2. Sli
3. To
4. Sli
5. Sli
3.2.
1. Ins
e the back
close the ba
e the back
e the small
Memory
rt a memor
oor of the c
ck door of t
oor downw
lock near th
ard (not in
card into t
mera upw
e camera, r
rds so that
bottom to t
luded in th
e SD card
rds and unh
tate the ba
he top porti
he right to c
package)
lot and pus
inge the ba
k door so t
n locks into
mplete loc
down until
k door.
at it is firml
place.
ing the bac
t clicks.
against the
door on the
camera.
camera.
2. To
from
Note:
The
recor
3.3.
1. Ins
2. Re
remove the
he slot.
amera is c
ing HD vid
Battery
rt the batte
ove the ba
card, push
mpatible
o and syste
y into the c
ttery lock by
n the SD c
ith Micro S
stability.
mera until i
placing you
rd until yo
, SDHC o
locks into p
thumb in th
hear a clic
SDXC ca
lace then cl
e indentatio
. The card
ds up to 3
se the back
and slidin
lot is sprin
GB. We re
door of the
it to the rig
loaded an
commend
amera.
t. Allow the
the card w
lass 10 ca
battery to p
ll slide
ds for
p out.
9
Page 10
e
c
F
e
e
A
t
s
u
m
V
c
b
D
C
s
m
n
d
f
n
n
e
S
m
h
e
e
s
e
m
d
o
S
n
e
t
u
E
’
a
w
a
e
LOO
e
c
c
u
L
R
c
g
.
| P
ISM
3. Th
when
4. To
charg
Note:
You
3.4.
Pow
Pow
uto
Note:
If you
battery ico
battery rea
charge the
er). The LC
an use all th
Powering
unction
r On
r Off
Power Off
keep the ca
n displayed
hes 0%, the
attery, con
shows soli
e function o
On and O
Shot Butto
Shot Butto
mera not op
in the came
camera will
ect the ca
red while t
the camera
ff
Button
+ Mod
+ Mod
rated or in
a’s LCD wil
save the fil
era to a co
e battery is
while charg
Button
Button
tandby mo
l flash when
and power
puter or U
charging, a
ing the batt
Duration
1 sec
1 sec
e in 5 minu
the battery
ff.
B power s
d it will turn
ry.
L
Last mode
Off
Off
es, it autom
drops belo
pply (such
off when th
D
s color
tically pow
10%. If re
s the wall
battery is f
Camera
ast mode
ff
ff
rs off.
ording is oc
harger or ci
lly charged
CD
urring
arette
3.5.
1. Ba
2. Re
3. Co
4. Ca
5. Blu
6. Me
amera L
tery life
olution / fp
nter
era mode
etooth
mory
D Menu
creen
oice Pro
3.6.
pt
10
Page 11
r
o
C
B
e
t
c
c
e
w
A
p
M
s
i
i
u
i
P
e
o
a
l
E
a
n
d
e
e
P
,
n
o
o
v
A
a
y
e
e
e
App
o
o
p
v
e
M
m
u
s
m
t
h
.
*
u
a
d
o
e
e
g
e
i
a
o
y
m
R
a
e
| P
ISM
If you
unde
how t
4.
4.1.
Mod
Sho
Note:
are paired
stand which
pair the ca
AMER
Button O
utton
Button
Button
ith Blueto
mode you
mera with B
MOD
erations
Change c
during me
Perform vi
item
th headset,
re in and th
uetooth hea
S AND
mera mode
u navigatio
eo or phot
you can be
operation
dset, please
MENU
ress
go to the n
shot or sel
guided by
ou have p
refer to the
SYSTE
xt menu ite
ct the menu
oice promp
rformed w
section, “10
s. The voic
ile operatin
3 Bluetooth
Enter
Exit Q
Take
recor
Quick Settin
ick Setting
photo shot
ing
Press
prompts w
the camer
Settings”.
and hold
g
during vide
ll help you
. For the de
udibly
tails of
* Qui
4.2.
The
by th
k settings is
amera
amera has
LED color.
I
con
a quick and
odes
everal mod
Mode
V
deo
S
ngle Shot
rst Shot
B
T
melapse
*
layback
easy way t
s. To cycle
Record
Capture
Capture
Capture
Playbac
enter the s
through the
ideo
a single ph
up to 10 ph
a series of
video and
ttings men
modes, pre
lication
to
tos in one
hotos at ti
photos.
for each m
ss the Mod
econd
ed intervals
de that you
Button. Th
Red
Blue
Green
Cyan
???
are currentl
Camera
LED Color
in.
odes are id
ntified
ttings
S
djust c
mera settin
gs
Yello
11
Page 12
b
V
V
M
d
i
o
,
R
a
Note:
Play
5.
ack mode a
IDEO
ppears only
ODE
if camera is
connected t
a TV or Sena LCD Pack™ (optional accessory
| P
sold separ
ISM
tely).
5.1.
ideo Mo
e Operat
ons
Note:
12
Page 13

c
d
V
c
n
RFrFie
V
w
B
B
m
c
d
t
4
c
f
09 m18361 h
h
h
p
e
n
s
0
2
4
7
9
m
t
S
g
t
p
)
o
3
m
m
m
m
t
81530
t
e
t
m
o
o
c
R
| P
ISM
The
save
5.2.
You
Whe
amera auto
before the
ideo Mo
an change
you select
esolution
ame Rate
atically sto
amera pow
e Setting
he resolutio
80P (120fp
1080P
720P
480P
30FPS (1
60FPS (7
120FPS (
s recordin
rs off.
s
setting at
) 720P (60f
80P, 720P
0P)
80P)
when the
he video se
s), you can
emory card
ttings, and t
not take a s
is full or th
he frame ra
ill shot durin
battery is
es are fixed
g video rec
ut of power.
along with
rding.
Your video
ertain resol
will be
utions.
ld of View
5.3.
Belo
ideo Re
is a table o
1GB
2GB
4GB
8GB
16G
2
32G
4
Wide (13
Narrow (
ording Ti
approxima
1
80P / 30FP
in
min
min
12 min
24 min
48 min
°)
0°)
e
e video rec
720P /
12 min
24 min
48 min
1 h 36
3 h 12
6 h 24
rding times
0FPS 4
in 2
in 4
in 8
o card size
0P / 120FP
min
min
1
h
h
h
h
in specific
S
ode.
13
Page 14

S
o
O
6.
INGLE
SHOT
| PRISM
MODE
6.1.
ingle Sh
t Mode
perations
14
Page 15

c
u
e
B
o
S
o
r
A
3
41616
M
p
t
x
R
| P
ISM
6.2.
You
resol
R
7.
7.1.
ingle Sh
an change
tions.
solution
3MP
3.2MP
3.5MP
5MP
URST
Burst Sh
t Mode S
the photo
spect
HOT
t Mode O
ettings
esolution a
of Ratio
:2
:3
:9
:9
ODE
erations
the single
shot settings, and the aspect of ratios are fi
ed along w
ith the
15
Page 16

c
M
M
o
h
a
e
s
s
e
s
x
t
R
t
| P
ISM
7.2.
You
3MP
3.2
3.5
Burst Sh
an change t
Resolution
P
P
C
t Mode S
e photo re
3:2
4:3
16:9
pture Rate
10/s
5/s
3/s
ttings
olution at th
A
pect Ratio
burst shot
settings, and the aspect
ratios are fi
ed along wi
h the resolu
ions.
16
Page 17

T
T
A
e
O
p
8.
IMEL
PSE M
| PRISM
DE
8.1.
imelaps
Mode O
erations
17
Page 18

| PRISM
18
Page 19

e
a
u
P
V
o
r
e
d
t
v
A
n
c
a
a
o
g
o
R
병
y
H
y
a
s
g
a
.
a
a
o
r
p
e
a
a
o
c
a
d
a
R
e
)
s
| P
ISM
Tim
Timel
Seq
lapse Mo
pse mode
Type
Video
Photo
ence Inter
e Settin
akes a vide
1080P/
720P/6
720P/3
3.5MP
3.2MP
3MP (1
al
(좌측
1s
3s
5s
s
(or a serie
esolution
30FPS
0FPS
0FPS
(3:2)
(4:3)
6:9)
합)
of photos)
t 1, 3, 5, 10
, 30 or 60 s
cond interv
ls.
9.
Playb
separ
9.1.
To br
1. Plu
2. Tu
LAYB
ck video a
ately). You
ideos an
wse videos
g the camer
n the camer
10s
30s
60s
CK
d photos b
an also pla
d Photos
and photos:
into a TV/
a on
y connectin
back video
(TV OUT,
DTV with a
the camer
nd photos
DMI)
micro HDMI
a to a TV (
n the Sena
cable, com
equires mic
LCD Pack™
osite cable
o HDMI, c
(optional ac
or combo c
mposite or
essory, sol
ble (option
combo cabl
separately
l accessorie
, sold
.
).
3. On
4. Th
your camer
camera sh
, select Pla
ws thumbn
back mode
il previews
of all videos
and photos
19
on the SD c
rd.
Page 20

h
e
h
n
h
m
o
o
e
D
w
e
u
t
i
s
L
s
M
a
g
B
™
o
o
t
t
p
p
r
r
u
e
e
o
m
o
d
s
m
o
B
e
r
h
R
w
e
| P
ISM
5. W
6. Us
7. De
and t
ile in a thu
and
pending on
e Shot Butt
bnail previe
to navigat
whether yo
n to naviga
, use the
backward
are viewin
e.
ode Button
nd forward
videos or
o cycle thro
o see more
photos, diff
gh the thu
media files
rent control
bnails. Pre
n your me
options will
s the Shot
ory card.
appear. Us
utton to vie
the Mode
.
Button
Note:
Burst
Butto
photos and
to select vi
timelapse f
ew and pre
les will disp
s the Shot
lay the first
utton.
photo in th
series. To
view all ph
tos in a se
ies, use th
Mode
9.2.
Playback
n Sena
CD Pack
(sold se
arately)
Playb
See t
ck using th
e Sena LC
Sena LCD
Pack™ U
Pack™ foll
er’s Guide f
ws a simila
r more info
process/pr
mation.
cedure as
escribed wit
h a few slig
t variations.
20
Page 21

c
R
S
n
n
T
O
s
s
b
c
R
a
10.
CAME
A SET
INGS
| P
ISM
10.1
. Camera
ettings
peration
10.2
In re
mode
. Recordi
ording setti
.
g Setting
gs, video,
s
ingle shot,
urst shot a
nd timelapse settings are the same
21
as the qui
k settings
t each
Page 22

| PRISM
22
Page 23

1
c
t
2
g
tED
3
c
a
t
E
D
B
r
S
M
o
f
A
o
o
o
t
o
t
t
f
o
mCam
s
d
c
s
s
a
a
.
a
s
o
s
d
e
d
d
B
t
p
B
a
B
B
o
e
n
o
h
a
n
t
c
d
B
u
a
d
d
o
R
e
n
d
e
s
| P
ISM
10.2.
You
from
10.2.
If you
settin
Fac
. Internal
an adjust th
he microph
Factory De
evel Adjust
pplicati
. Upside D
need to m
eliminates
ory Default
Off
ic Gain
e internal m
ne of the ca
ault
ment
n
wn
unt the cam
the need to
Ca
icrophone g
mera.
Pres
(Auto / l
Pre
era upside
flip your vid
Off
era right si
in of the c
Auto
the Mode
w / middle /
s the Shot
own and sti
o or photos
e up
mera. If th
utton
high / off)
utton
ll wish the fi
during editi
gain is hig
les to appe
g.
, then the
r upright, th
amera will
en you nee
cquire mor
to turn it o
audio
. This
10.2.
You
timel
Fac
10.3
On
nable /
isable
. Date Cap
an record
pse.
ory Default
Off
On
nable /
isable
. Bluetoo
Pre
ion
r hide date
Hi
Re
Pre
h Setting
era upside
s the Shot
caption whil
Off
e date cap
ord date ca
s the Shot
own
utton
e video rec
ion
tion
utton
rding. Date
caption is
ot recorde
during the
video recor
ing of
luetooth se
The
came
a supports
non-
ena Blueto
tings can m
ull control
th headsets
ke the cam
nd setting c
era connect
pability for
your Blueto
Sena Bluet
23
oth headset
oth headse
to overlay
s, while it s
luetooth au
pports rec
io with vid
rding start/
o. The
top for
Page 24

1
E
S
T
2
c
r
h
e
s
h
h
r
n
s
e
e
m
g
e
o
h
o
s
R
| P
ISM
10.3.
1.
2.
3.
10.3.
You
came
. Bluetoot
nter the Blu
et your Blu
he pairing i
. Bluetoot
an adjust t
a will acqui
Pairing
etooth pairi
tooth head
completed.
Mic. Gain
e Bluetooth
e more audi
g in the Blu
et to pairing
microphon
o from the
tooth settin
mode.
gain of th
icrophone
s.
Bluetooth
f the Blueto
24
eadsets or
th headset
microphone. s. If the gai
n is high, th
en the
Page 25

3
n
tED
4
tED
e
m
f
A
o
n
V
s
l
s
s
r
m
D
s
p
s
s
s
B
o
o
B
B
f
B
.
o
y
r
e
a
o
R
| P
ISM
10.3.
Whe
video
Fac
10.3.
Factory De
evel Adjust
pplicati
. Sidetone
using a Se
recording.
ory Default
nable /
isable
. Ultra HD
ault
ment
n
a headset,
Pre
oice Reco
Pres
(midd
Pre
idetone is
On
s the Shot
ding
middle
the Mode
le / high / of
s the Shot
upported; If
utton
utton
/ low)
utton
this feature
is enabled,
ou can hea
r what you
re speaking
during
Fac
Delet
You
ory Default
Off
On
nable /
isable
Pairing Li
ay delete a
Nor
Ultra H
Pre
t
l Bluetooth
On
al voice rec
Voice Rec
s the Shot
airing list of
rding
rding™
utton
the camera
Then you l
st all your p
airing devic
s informati
n.
25
Page 26

R
. Device Setting
10.4
| P
ISM
26
Page 27

1
c
e
2
c
tED
3
c
tED
4
N
C
M
b
n
f
e
A
o
T
A
f
t
A
o
e
s
u
s
T
n
a
n
s
h
B
B
o
A
H
s
(
s
B
f
e
y
B
L
B
d
a
v
i
k
v
g
T
o
m
n
R
| P
ISM
10.4.
The
are b
10.4.
You
Fac
. Auto pow
amera can
ing taken a
Factory De
Idle Tim
pplicati
. Beep
an turn off o
ory Default
nable /
isable
er off
e configur
d no button
ault
n
r on the bee
Pre
d to autom
s have bee
Pre
p sound of t
On
s the Shot
tically powe
pressed). T
On
5 min
s the Shot
e camera d
utton
r off after a
his feature
utton
uring operat
specific per
oes not wor
ions.
od of inacti
while char
ity (when n
ing the ca
videos or
era.
photos
10.4.
You
Fac
10.4.
The
NTS
North
. LED
an turn off o
ory Default
nable /
isable
. TV out (N
TSC and P
when viewi
America) or
Factory De
ode Adjus
pplicati
r on the stat
Pre
SC / PAL)
L settings
ng a TV/HD
if viewing o
ault
ment
n
s LED.
On
s the Shot
govern vide
V in North
a PAL TV/
Pres
Pre
utton
recording
merica. S
DTV in an
NTSC
the Mode
NTSC / PA
s the Shot
frame rate
lect PAL if
region.
utton
)
utton
nd playbac
iewing on a
when view
PAL TV/HD
ing video o
TV (most tel
TV/HDTV.
evisions out
Select
side of
27
Page 28

5
h
h
6
7
c
8
o
o
M
R
f
c
F
r
a
l
a
l
o
a
a
e
c
u
c
w
t
e
c
R
y
m
| P
ISM
10.4.
Set t
Mont
To ch
. Time set
e camera cl
, Hour, and
ange Year/
ock to ensu
Minute,
onth/Day/Ti
e video and
me:
photo files
re saved w
ith the corre
t date and
ime. Time
an be set b
Year,
10.4.
It will
10.4.
You
10.4.
11. F
mem
. Factory
lear all the
. Device in
an see the
. SD Card
rmatting wi
ry card usin
eset
settings to f
o
urrent firmw
ormatting
ll remove a
g the camer
ctory defau
are version
l files from
.
t.
n your cam
memory
era.
ard. When
sing a ne
card for th
e first time,
always for
at the
28
Page 29

t
A
e
r
H
a
c
T
™
s
a
h
e
M
V
e
w
u
A
d
B
h
e
e
l
t
M
d
s
l
-
a
t
f
e
o
s
o
R
s
h
d
g
r
t
n
y
d
r
p
e
t
N
e
n
-
u
e
e
n
o
e
d
c
p
C
h
u
s
n
i
o
e
e
R
u
o
t
t
11.
BLUE
OOTH
UDIO
RECO
DING
| P
ISM
With
udio
exper
11.1
Ther
unde
he use of Bl
Recording
ience but al
. Settings
are sever
standing of
uetooth hea
feature.
o reduces t
of Blueto
l paramet
ow they ar
sets, the c
eing able
e need for
oth Audio
rs that aff
correlated,
mera allow
o narrate t
ollow-up au
Recordin
ct the ove
you need to
users to a
e video du
io editing p
g
rall perform
set up the
d their voic
ring recordi
oviding real
ance of Bl
arameters a
to the vide
g not only
time audio
etooth Au
ccordingly.
on-the-fly
provides u
xperiences.
io Recordi
sing the Bl
ers a whol
g. Based
etooth
e new
n the
Facto
Ultra
is av
mode
appli
ry Default s
Internal
Bluetooth
Ultra HD
D Voice R
ilable only
. When you
ations. If yo
tup is as fol
ic Gain =Au
Mic Gain =
oice Recor
cording™ i
hen a sing
are using a
use a non
ows.
o
iddle
ing =On
provided f
e Sena hea
Sena head
Sena Bluet
r Sena Blue
dset is con
et, you ma
oth headset
ooth heads
ected with
switch to
, Normal Vo
ts ; it enabl
he camera.
ormal Mod
ice Recordi
s you to re
It is not su
pr Noise
g Mode is t
ord your vo
ported in c
ontrol Mod
e only mod
ce in CD-qu
nference in
according
that you m
ality. It
ercom
o your
ay use.
29
Page 30

1
c
p
e
o
m
a
u
단
P
Edh
W
c
2
c
t
h
o
s
r
n
e
r
h
R
c
i
g
e
g
a
n
f
n
n
w
y
s
o
h
a
o
a
h
n
e
→
c
m
t
s
F
d
s
m
B
e
o
d
e
r
e
n
)
e
o
a
u
m
e
e
a
e
a
t
e
m
t
R
e
n
r
r
f
P
t
| P
ISM
11.2
11.2.
To re
micro
the h
the c
Ca
Sen
Stat
(상
1.
2.
. Bluetoo
. Bluetoot
ord your v
hone). Thi
adsets afte
nnection ra
era
Headset
s LED
셀 병합)
erform Blue
nter into th
o not need
h Audio
Pairing
ice to the
pairing ope
the first pa
ge.
Settin
Interco
Camer
Heads
tooth pairin
intercom p
to press a
ecording
amera with
ration is onl
ring proces
s → Blueto
m Pairing (J
a: Bluetooth
t: LED flas
from the c
iring mode
y buttons f
ith Sen
Bluetooth
required o
is complet
th Settings
g Dial 5 se
Pairing Co
es blue.
mera from
of the head
r pairing.
Headset
eadset, you
ce for each
d and auto
Bluetooth
or Center
pleted?
he menu op
et. Then th
or details
should pai
Bluetooth h
atically co
Pairing
utton 5 sec
eration of S
headset is
n intercom
the camer
adset. The
nected to th
ttings → Bl
paired auto
pairing, ref
with a Blu
camera will
e paired he
etooth → B
matically wi
r to the us
tooth head
remain pair
dsets agai
uetooth Pai
h the came
r’s guide o
set (or
d with
within
ing.
a. You
Sena
11.2.
You
3.
eadset.
hen the he
onnected” f
. Bluetoot
an connect
adset LED
om the con
Connectio
the camera
lashes blue,
ected Sena
with Sena h
the pairing
headset.
eadsets an
is complete
transfer th
30
. Then you
conversati
will hear th
ns to the c
voice pro
mera by es
pt saying “
ablishing in
RISM
ercom
Page 31

e
T
c
S
c
o
1
m
-
.
e
p
w
n
n
a
t
h
s
B
m
m
n
o
R
g
a
a
d
e
p
g
l
w
o
a
s
t
o
a
o
o
-
o
n
r
o
o
m
o
s
i
t
S
n
e
e
t
R
e
a
u
| P
ISM
conn
1.
2.
You
interc
ctions at th
urn on the
hannel bet
tart recordi
an record i
m convers
same time.
aired Sena
een the ca
g on the ca
ntercom co
tion, refer t
headset, an
era and th
era by ap
versation a
the user’s
then the c
Sena head
ropriate but
ong two
uide of Sen
camera C
mera is aut
et is open.
on operatio
r three inte
a headset.
nnection f
matically c
.
com friend
r intercom
nnected to
who use
he paired h
ena heads
adsets. Th
ts. For det
audio
ils on
11.3
11.3.
Ca
Non
1
. Bluetoo
. Bluetoot
era
Sena Head
Perform
Pairing.
h Audio
Pairing
Settin
et HFP P
luetooth p
Dua
ecording
s → Blueto
iring
iring from
camera C
ith Non
th → Blueto
the camera
nnection f
Sena Hea
oth Pairing
from the
31
r Sound Sh
dsets
enu operat
aring
on of Setti
gs → Blue
ooth → Bl
etooth
Page 32

.3.
2
c
T
c
S
c
a
c
1
w
w
e
u
u
o
d
n
h
t
w
n
k
o
p
C
T
r
e
n
n
w
S
m
m
u
e
m
e
y
c
hPhJoJoJoJo
m
n
e
e
p
m
m
a
h
l
a
h
t
e
e
e
a
a
w
w
w
n
h
o
n
a
p
n
n
f
o
n
n
n
r
a
o
s
t
o
d
o
g
a
c
i
e
s
m
p
o
h
e
R
e
n
c
R
ISM
| P
Enter int
2
If the pai
Note:
If you
cannot pair
11.3.
. Bluetoot
You
an connect
1.
urn on the
hannel bet
2.
tart recordi
Note:
You
an open or
the c
mera or ma
the handsf
user’s gui
correspo
de of the co
ring is com
ding heads
the non-Se
Connectio
he camera
paired non-
een the ca
g on the ca
close the a
king a phon
ree pairing
responding
pleted, you
t.
a Bluetooth
ith non-Se
ena heads
era and th
era by ap
dio channel
call on the
ode of the
headset.
will hear t
headset, de
a headsets
t, and then
non-Sena
ropriate but
between th
headset. Pl
non-Sena
e voice pr
lete all pairi
and transfer
the camer
eadset is o
on operatio
camera a
ase refer to
eadset. Fo
mpt saying
g list and p
your voice t
is automati
en.
.
d the head
the headse
details on
“PRISM c
ir the one a
the camer
ally conne
et by press
user’s guid
handsfree
nnected” fr
ain.
.
ted to the
ing the Pairi
for more in
airing, refer
m the con
eadset. Th
ng Button o
formation.
to the
nected
audio
ce on
12.
The
helps
Sena’
12.1
12.1.
* Po
* Po
Mod
Bluet
amera can
to use less
s Bluetooth
. Remote
. Jog Dial
Type
er On
er Off
Change
oth Re
be handsfr
energy and
products
ontrol b
ype Produ
P
ote C
e by the re
allows for
Sena He
ts
Button
one Button
one Button
g Dial
ontrol
ote contro
ore versatil
dsets
Triple t
Triple t
Rotate
l capability
control thr
Operation
p
p
hile pressi
rom Blueto
ugh the au
g
th headset
io/video re
. The wirel
ote control
ss remote
profile (AV
ontrol
CP) of
Men
Move
Men
Select
Vide
Start
g Dial
g Dial
g Dial
Rotate
Rotate
Press a
hile pressi
hile pressi
d hold for 1
32
g
g
s
Page 33

e
e
S
b
b
t
b
t
c
2
e
e
e
u
u
e
e
S
b
o
o
m
a
c
f
r
t
o
o
m
a
oJoJo
o
o
h
h
o
o
a
e
r
e
o
t
o
o
o
o
o
o
o
o
o
n
n
n
n
n
n
n
o
h
ePre
ePre
e
e
e
e
e
e
e
e
e
c
o
o
d
d
d
d
d
d
d
d
d
d
d
d
d
n
R
b
| P
ISM
Vide
Sing
Burs
TIm
Tim
Still
Play
Sele
Play
Con
Play
Con
Note:
If you
You
Stop
le Shot
t Shot
lapse (vide
lapse (vide
hot (video
ack - Form
ack - Move
rol Icon
ack - Sele
rol Icon
powered of
annot powe
J
) Start J
) Stop J
ode) P
t P
J
t J
the camer
on or off th
g Dial
g Dial
g Dial
g Dial
g Dial
one Button
one Button
g Dial
g Dial
using cam
camera us
Press a
Press a
Press a
Press a
Press a
Tap
Tap
Press a
Press a
ra button c
ing Bluetoot
d hold for 1
d hold for 1
d hold for 1
d hold for 1
d hold for 1
d hold for 1
d hold for 1
ntrol, you
Remote C
s
s
s
s
s
s
s
an power o
ntrol.
the camera only by us
ng camera
utton.
12.1.
Pow
Pow
Mod
Men
Men
Vide
Vide
Sing
Burs
TIm
Tim
. Three-bu
Type
r On
r Off
Change
Move
Select
Start
Stop
le Shot
t Shot
lapse (vide
lapse (vide
ton Type P
) Start
) Stop
oducts
Butt
(-) Button
(-) Button
(+) & (-) Bu
(+) button
Center Butt
Center Butt
Center Butt
Center Butt
Center Butt
Center Butt
Center Butt
n
tons Pr
n Pr
n Pr
n Pr
n Pr
n Pr
n Pr
n Pr
Pr
ss and hol
ss and hol
ss and hol
ss and hol
ss and hol
ss and hol
ss and hol
ss and hol
ss and hol
ss and hol
ss and hol
Operati
n
for 3 s
for 3 s
for 1 s
for 1 s
for 1 s
for 1 s
for 1 s
for 1 s
for 1 s
for 1 s
for 1 s
Still
hot (video
Play
ack - Form
ode)
t Select
Center Butt
Center Butt
n Pr
n Pr
ss and hol
ss and hol
33
for 3 s
for 3 s
Page 34

b
b
e
e
r
C
Y
o
Y
o
Oce
C
C
v
e
C
o
o
R
a
r
i
c
p
s
o
C
c
s
i
c
y
DED
D
D
E
c
d
W
o
e
z
n
y
o
o
o
n
r
a
l
a
a
a
l
O
d
t
C
g
s
e
e
e
B
e
e
t
D
C
a
e
d
m
0
m
d
d
h
m
c
u
l
s
a
c
r
c
b
w
v
U
o
M
t
o
y
o
e
M
R
t
u
e
m
M
| P
ISM
Play
Icon
Play
Icon
12.2
Vide
Vide
Sing
Burs
TIm
Tim
ack - Mo
ack - Sel
. Remote
Type
Start
Stop
le Shot
t Shot
lapse (vide
lapse (vide
e Control
ct Control
ontrol b
) Start
) Stop
Center Butt
Center Butt
Non-Se
Ope
ial (or redi
nding a cal
ial (or redi
ial (or redi
ial (or redi
nding a cal
n Pr
n Pr
a Headse
ation
l)
l)
l)
l)
ss and hol
ss and hol
s
for 1 s
for 1 s
13.
Reco
an ap
13.1
1.
2.
3.
4.
5.
CAME
ded video
propriate ca
. Connect
onnect the
our PC’s o
perating sy
our PC sh
pen.
pen the D
ard by the
tc).
opy the de
A CON
nd photos
d reader—
ng to a
amera to y
erating syst
tem may be
uld recogni
IM folder, i
amera.! If th
ired files to
NECTI
an be copie
irectly from
indows P
ur PC usin
m may be
setup to op
e the cam
side you wi
ere are a v
our PC.
N
to a comp
he Micro S
by USB
the USB c
etup to op
n connecte
ra as a re
ll find the 1
ry large nu
uter using t
card.
able
ble. The ca
n new devi
devices a
ovable devi
0MEDIA fo
bers of file
e micro-US
era LCD wi
es automati
tomatically,
e—look fo
der, which
, there will
B cable pro
ll display a
ally, if not,
if not, open
PRISM car
ontains all
e multiple f
ided or—if
SB logo.
open My C
My Comput
d in the list
he files sav
lders (100
our compu
mputer. Yo
r.
of all devic
ed on the
EDIA, 101
er has
r PC’s
s and
emory
EDIA,
13.2
. Connect
onnect the
1.
ng to a M
amera to y
ac by US
ur Mac usin
Cable
g the USB c
able. The c
34
mera LCD
ill display a
USB logo.
Page 35

YYw
Y
Oce
C
n
u
i
e
h
e
o
r
m
i
e
h
m
r
o
o
o
C
c
s
i
o
t
R
a
c
e
d
a
c
m
o
s
y
z
e
y
a
U
w
e
w
o
w
e
h
e
e
b
w
a
n
x
e
o
e
x
e
n
u
g
p
o
o
1
m
o
t
t
o
s
t
o
e
s
F
v
c
e
o
s
y
e
o
e
o
s
a
s
P
c
b
h
p
u
u
b
p
o
a
t
o
c
a
t
c
e
o
d
v
M
h
o
R
w
m
M
g
g
s
o
ISM
| P
2.
3.
4.
5.
13.3
1. Co
2. Yo
14.
our Mac’s
our Mac’s
indow.
our Mac sh
pen the D
ard by the
tc).
opy the de
. Connect
nect it to y
need to se
CAME
perating sy
perating s
uld recogni
IM folder—i
amera! If th
ired files to
ng the C
ur TV using
up TV Out
A HO
tem may b
stem may
e the came
nside, you
re are a ve
our Mac.
mera to
a Mini HDM
parameter i
SING
setup to o
e setup to
a as a rem
ill find the
y large nu
TV
I type comb
Device Set
en new de
pen conne
vable devic
00MEDIA f
bers of file
cable (not
ings when
ices autom
ted device
—look for
lder which
, there will
included in t
ou hook it u
tically, if n
automatic
RISM card i
ontains all
e multiple f
e basic pa
with AV ca
t, open a n
lly, if not,
n the list of
the files sa
lders (100
kage).
ble.
w Finder
pen a new
evices and
ed on the
EDIA, 101
indow.
Finder
open.
emory
EDIA,
To se
1. Us
on th
2. Un
3. Ins
4. Cl
(pictu
To re
1. Us
on th
2. Un
3. Re
(pictu
ure camer
ng an index
buckle rele
ook the bu
rt the cam
se the back
es)
ove camer
ng an index
buckle rele
ook the bu
ove the ca
es)
in housing:
finger, pres
ase button
kle from th
ra into the
oor and ho
from housi
finger, pres
ase button
kle from th
mera from t
s down and
ith an inde
case to op
aterproof h
k the buckl
ng:
s down and
ith an inde
case to op
e housing.
slide the bu
finger, use
n the backd
using.
into it. Pre
slide the bu
finger, use
n the backd
ckle releas
he thumb t
or.
s down on t
ckle releas
he thumb t
or.
button to sl
open the b
he latch firm
button to sl
open the b
ide the latch
ckle.
ly until the l
ide the latch
ckle.
forward. W
tch clicks s
forward. W
hile pressin
ut.
hile pressin
down
down
Note:
Before us
●
Do not op
●
any part
ing the wate
en the case
f the case b
rproof housi
where it wo
fore closin
g in a wet
ld be expo
the case.
nvironment,
ed to dust o
ailure to ob
35
ensure that
sand, and
erve these
it is comple
e sure to re
recautions
ely sealed.
move any f
ould result i
reign object
n damage t
from
the
Page 36

Q
e
e
g
R
Q
s
U
e
S
M
a
G
n
d
a
m
s
u
o
b
e
e
a
m
o
c
t
o
R
o
y
b
15.
camera.
CAME
A MO
NTIN
| P
ISM
15.1
The
Ther
up th
chan
. QRM™ (
uick Relea
are three d
system at
ing the cam
uick Rel
e Mount™
ifferent QR
a desired
era angle.
ase Mou
ystem provi
types: Top
ngle, you c
t) Syste
e fast and
Surface Mo
n then mo
for Mot
ecure ways
unt, Handle
nt and rel
rcycle
to switch th
ar Mount,
ase the ca
camera m
nd Dual Su
era withou
unt system
tion Cup M
using any
on the mot
unt. Once
screws or
rcycle.
ou set
olts or
36
Page 37

R
| P
ISM
15.2
. Side Clamp Mount
37
Page 38

S
n
o
1
2
n
B
S
A
M
Q
a
1
M
h
m
o
L
C
m
c
m
e
p
u
e
a
o
o
s
e
r
h
s
M
o
o
r
v
a
d
e
i
t
u
m
o
a
s
a
c
e
e
m
o
t
c
h
c
l
d
e
o
b
o
a
d
n
e
l
m
d
x
e
e
c
m
b
m
o
e
c
y
t
m
c
s
t
w
u
R
n
a
o
| P
ISM
The
rotati
you t
15.2.
15.2.
1. I
2.
3.
ide Clamp
g the joints.
record in t
. Side Cla
Piv
Slide
Helmet
. Side Cla
sert the ba
ring the cla
lide the slid
ount enabl
When you
e driver’s p
p Mount C
t
ock
lamp
p Mount In
kplate of th
ps togethe
lock into t
s you to m
re not reco
int of view.
mponents
The pi
camer
The sli
The h
tallation
clamp unit
and tighten
e clamp unt
unt the cam
ding, you m
ot contain
.
e lock cont
lmet clamp
between th
them using
l you hear a
era at the si
y simply se
the standa
ins a 360’ r
an be insta
internal pa
the two scr
click.
de of your h
parate the s
rd 1/4’’ ca
otating joint.
led at the si
ding and e
ws and the
lmet. You
ide lock fro
era mount
e of the hel
ternal shell
nclosed all
an adjust th
the clamp.
olt on whi
met. It take
f the helme
n wrench.
e camera a
This mount
h you faste
in the slide
.
gle by
allows
n the
lock.
4.
5.
15.3
The
and a
you c
djust the ca
ount the ca
. QRM To
RM Top Su
helmet. Yo
n simply se
mera angle
mera on the
Surface
rface Mount
can adjust
parate the s
of the slide
pivot using
ount
enables yo
the camera
lide lock fro
lock and th
he 1/4’’ ca
to mount y
angle by ro
the flat or
pivot and l
era mount
ur camera
ating the b
urved glue
ck them.
olt.
n a flat or c
ll joint on th
surface mo
rved surfa
QRM Bod
unting adap
e such as
. When yo
er.
indshield, g
are not rec
s tank
rding,
15.3.
. QRM Top
Surface M
QRM
unt Comp
nents
The QRM
fasten the
head contai
amera. Th
38
s the stand
QRM body
rd 1/4’’ ca
combines w
era mount
ith the QRM
olt on whic
head.
h you
Page 39

t
v
Adap
2
C
o
P
S
A
M
Q
a
f
1
L
L
a
u
s
b
e
a
u
d
o
R
l
e
M
t
o
y
o
h
b
M
e
u
hca
a
m
i
a
h
n
e
Y
u
o
a
Q
o
m
a
a
4
o
y
o
c
c
d
y
m
m
r
h
r
h
t
d
d
u
a
r
u
e
b
d
q
w
e
b
h
o
c
R
t
c
e
| P
ISM
Fla
Cur
15.3.
1.
2.
3.
4.
5.
15.4
Slide
Glued Surf
ed Glued S
ter
. QRM Top
hoose the
r curved).
eel off the
lide the slid
djust the ca
ount the ca
. QRM Du
ock for QR
ce Mountin
rface Moun
Surface M
urface that
ack sticker
lock into t
mera angle
mera on the
l Suction
g Adapter
ing
unt Install
ou like to
f the mount
e mounting
y rotating t
QRM head
Cup Mou
The slide l
The mount
The mount
tion
ount the ca
ng adapter
dapter until
e ball joint
sing the 1/
t
ck can take
ing adapter
ing adapter
era on, an
nd carefull
you hear a
nd lock it.
’’ camera
in and lock
an be glue
an be glue
select a s
attach it on
click.
ount bolt.
he rotating
on a flat su
on a curve
itable glued
the surface.
all joint.
rface.
surface.
surface mo
nting adap
er (flat
The
such
the le
head
15.4.
RM Dual S
s windshiel
gs. When y
rom the Q
. QRM Dua
QRM
ocking Scr
ction Cup
d, gas tank,
u are not r
M body.
l Suction C
T
ws
ount enabl
and trunk.
cording, yo
p Mount C
e QRM he
mera. The
s you to m
ou can adju
can simpl
mponents
d contains
RM body c
unt the ca
st the came
separate t
the standa
mbines wit
39
era on surf
a angle by
e suction c
d 1/4’’ cam
the QRM h
ces that re
otating the
ps from th
ra mount
ad.
uire some
heel joints
surface, or
olt on whi
eight for re
r the ball jo
take out th
h you faste
ording
ints on
QRM
n the
Page 40
2
L
h
A
O
P
A
M
3
Lth
D
A
A
P
A
M
Q
o
p
s
g
l
g
s
g
o
g
c
n
e
h
h
h
u
r
,
s
C
e
n
r
s
o
n
u
e
e
w
u
t
g
w
a
t
o
u
s
e
a
o
o
n
4
e
n
l
n
4
t
o
e
f
c
m
f
o
u
m
a
l
e
o
g
d
o
g
s
s
h
e
R
| P
ISM
15.4.
1.
2.
3.
4.
5.
6.
16.4.
Locking Kn
Suction Cu
Long Leg
Short Le
. QRM Dua
ocate a pro
t
oroughly.
djust the le
nce the leg
ull the lever
djust the ca
ount the ca
. QRM Sin
bs
T
ps
T
T
l Suction C
per surface
angles by
angle is set
s on the suc
mera angle
mera on the
le Suction
e suction c
ese legs ar
is leg is us
p Mount In
to attach th
otating the
place the s
tion cups to
by rotating
QRM head
up Mount
ps can be l
used for d
d for single
stallation
e mount, cl
heel joints
ction cups
secure sucti
he barrel a
sing the 1/
Installation
cked into p
al suction.
uction dep
an the sur
nd the ball j
n the surfa
on.
d the ball jo
’’ camera
sition by pu
nding on th
ace location
oints of the l
e.
int on the b
ount bolt.
ling the leve
camera an
with a moi
egs.
dy, and lock
r.
le.
tened towe
them.
l, and allow
to dry
1.
2.
3.
4.
5.
6.
7.
15.5
ocate a pro
oroughly.
etach the b
ttach the sh
djust the le
lace the su
djust the ca
ount the ca
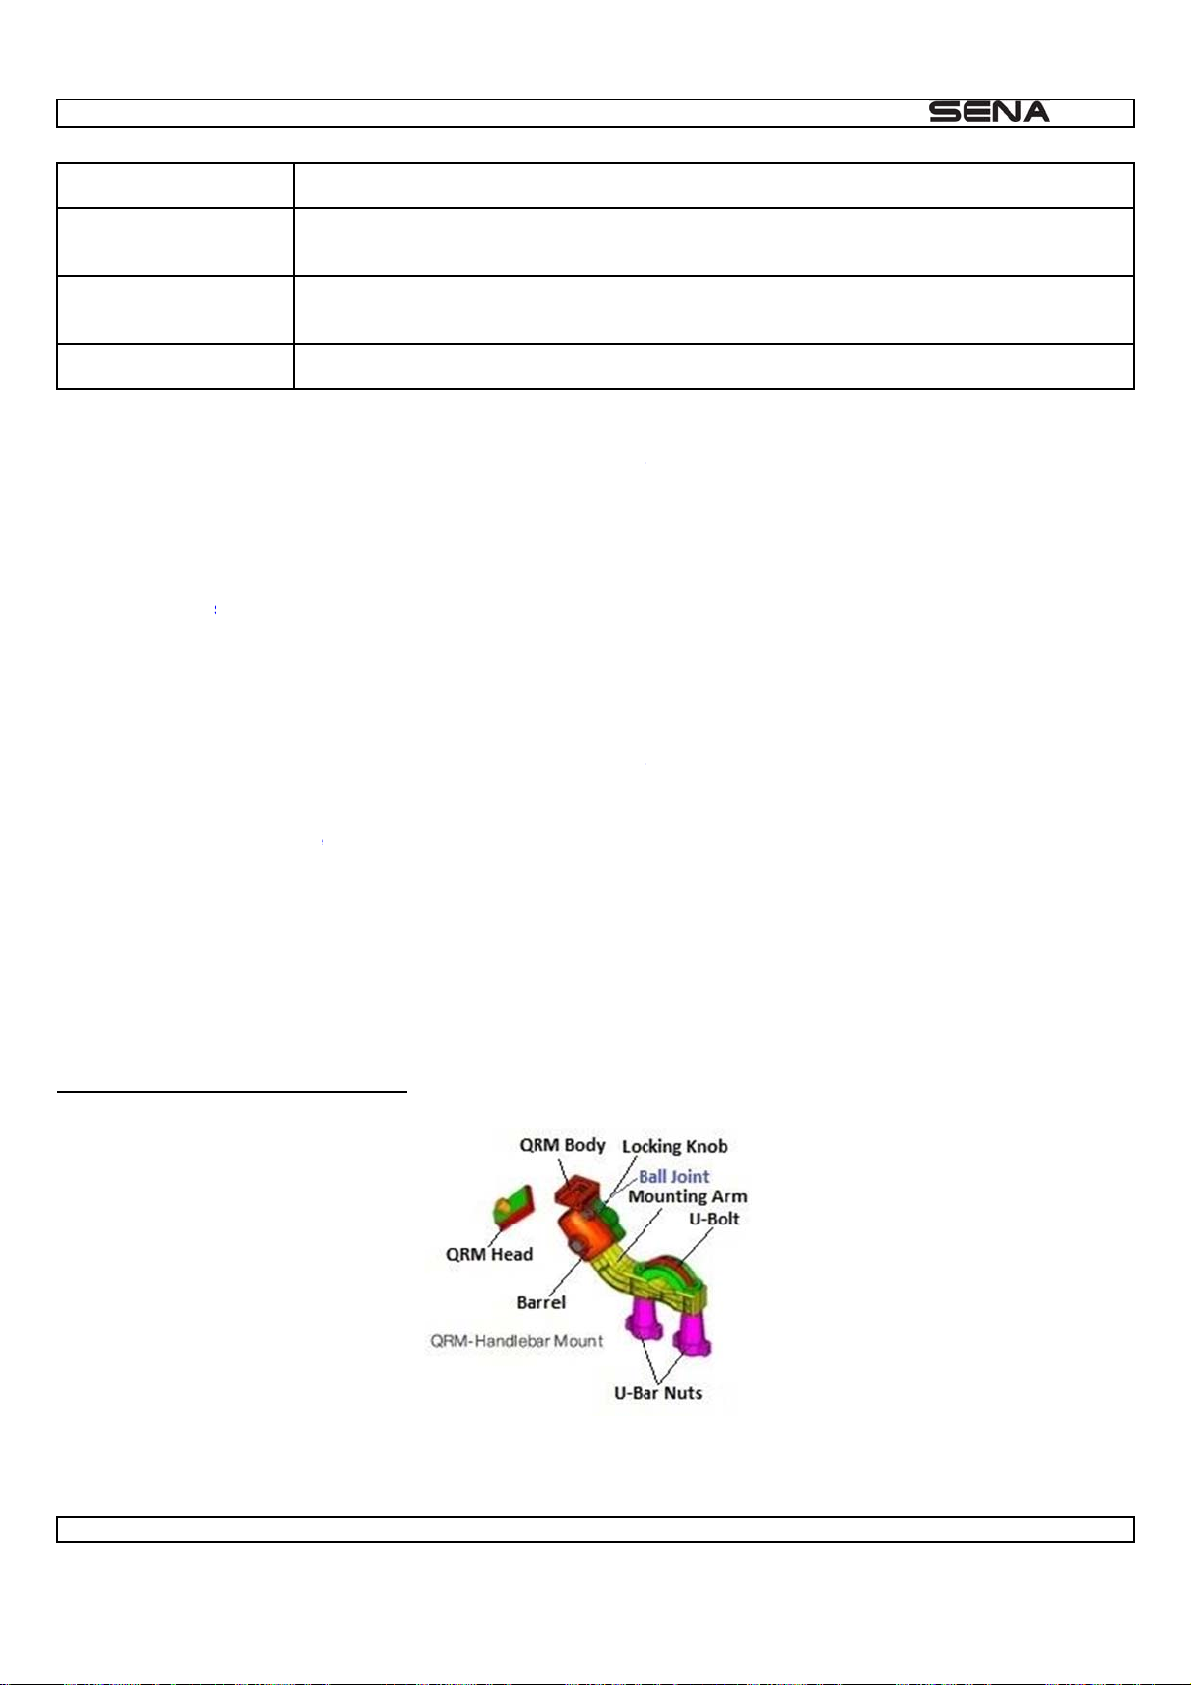
. QRM Ha
per surface
dy from th
ort leg on o
angles by
tion cup on
mera angle
mera on the
dlebar M
to attach th
legs.
e of the lon
otating the
the surface
by rotating
QRM head
unting
e mount, cl
legs.
heel joint a
nd pull the
he barrel a
sing the 1/
an the sur
d the ball j
ever to sec
d the ball jo
’’ camera
ace location
int of the le
re suction.
int of the bo
ount bolt.
with a moi
.
y and lock t
tened towe
hem.
l, and allow
to dry
RM Handl
The
bar Mounti
g enables y
ou to moun
the camer
40
on your m
torcycle’s
andlebar (b
tween 7/8’’
and 1
Page 41

d
n
1
M
2
C
C
P
A
M
M
W
M
e
o
d
s
o
m
d
p
d
R
D
a
d
S
s
s
y
n
M
M
k
k
n
e
h
g
b
T
n
w
m
n
w
o
p
p
t
b
b
t
a
l
d
u
h
E
g
t
o
o
m
t
a
e
m
s
n
b
d
4
a
w
m
a
d
d
m
a
n
m
n
s
e
f
b
Q
u
w
b
d
h
n
.
n
w
w
r
c
w
a
e
C
e
m
R
d
m
a
m
| P
ISM
1/2’’
Whe
15.5.
15.5.
iameter). Y
you are not
. QRM Han
QRM
U-Bolt
U-Bar Nut
Locking Kn
ounting Ar
. QRM Han
u can choo
recording,
lebar Mou
QR
QR
The
The
Loc
b
The
bac
lebar Mou
e the directi
ou can sim
ting Com
head con
body com
U-bolt can
U-bar nuts
s the barrel
mounting
wards.
ting Instal
ons of the
ly separate
onents
ains the st
ines with th
e installed
ighten the
at the adju
rm can be
ation
ounting ar
he QRM he
ndard 1/4’’
e QRM hea
ither upwar
ounting ar
ted angle.
installed ei
and the U-
d from the
camera mo
.
s or down
and the U-
ther upwar
olt to best fi
RM body.
nt bolt on
ards.
olt together
s or down
t the mount
hich you f
.
ards and
on your han
sten the ca
ither forwar
lebar.
era.
ds or
1.
2.
3.
4.
5.
16.
16.1
PRIS
both
16.2
PRIS
hoose the
hoose the
ile them tog
djust the ca
ount the ca
CAME
. PRISM
Device M
indows an
. PRISM
Smartpho
osition of th
irection of t
ether and ti
mera angle
mera on the
A SOF
evice Ma
nager allo
Mac. For
martpho
ne App allo
handlebar
e U-bolt an
hten them
y rotating t
QRM head
WAR
ager
s you to up
ore informa
e App
s you to c
you want to
the mounti
sing the U-
e barrel an
sing the 1/
rade firmw
ion and do
nfigure sett
mount the c
g arm.
olt nuts.
the ball joi
’’ camera
res and co
nload, plea
ings and vi
mera on.
t and lock t
ount bolt.
figure setti
e visit www
w user ma
em.
gs directly f
sena.com.
ual and qui
rom your P
k referenc
. It is avail
directly fro
ble for
your
mobil
phone. It i
available f
r both Andr
id and IOS.
For more in
ormation, pl
ease visit w
w.sena.co
.
41
Page 42

e
u
Au
p
d
h
R
g
s
o
l
o
f
r
t
t
C
s
e
o
f
n
g
s
0
s
T
)
5
e
e
3
x
r
3
e
x
17.
CAME
A SPE
IFICA
| PRISM
IONS
G
neral
●
Record
●
Workin
●
Operati
●
Dimen
time: 2 hour
distance (S
ng temperatu
ions (main m
na headsets
re: -10˚C ~ 5
dule): 59.0m
: up to 100 m
˚C (14°F ~ 1
m x 43.0mm
eters (110 ya
1°F)
21.0mm (2.
ds) in open t
in x 1.75 in
rrain
0.8 in)
etooth
Bl
●
●
Profile:
Blueto
Headset Pro
th 4.0
ile, Hands-Fr
e Profile (HF
P)
dio
●
●
Interna
Wind n
microphone
ise reductio
s
O
tical
●
●
●
Vi
eo mode
●
oto mode
P
●
Field o
3.5M pi
Apertu
Resolu
○
○
○
Resolu
○
view: 137 de
xel CMOS
e f/2.0
ion
1080p 30fp
720p 30 / 6
480p 120fp
ion
3:2 3.5M
rees
fps
42
Page 43

m
V
a
e
h
&
H
n
A
L
c
o
t
6
●
Ti
e lapse mo
●
-out
T
●
○
○
○
Burst s
○
Photo
○
Micro
4:3 5M
4:3 3.2M
16:9 3M
ot
10 / 5 / 3 pi
de
Video
pic per 1 / 3
DMI
per sec
/ 5 / 10 / 30 /
| PRISM
0 sec
B
ttery
●
●
●
C
rtificates
●
Chargi
1100m
Type:
CE, FC
g time: 3.5 h
h
ithium ion ba
C, IC
urs
tery
43
 Loading...